1
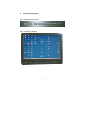
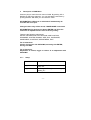
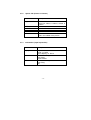
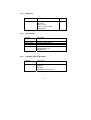
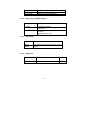
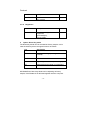
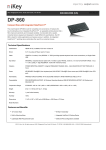
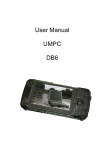
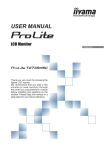
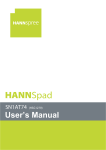
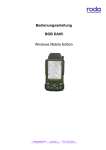
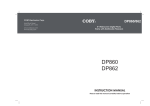
User’s Guide
15“ TFT display
Type: DP860-UX
Art. No.: 141023
roda computer GmbH • Landstraße 6 •
77839 Lichtenau/Baden
Tel.:+49(0)72279579-0 • Fax:+49(0)72279579-20 • www.roda-computer.com
All rights reserved. No part of this publication may be reproduced,
transmitted, transcribed, stored in a system, or translated into any
language, or computer language, in any form, or by any means,
electronic, mechanical, magnetic, optical, chemical, or other, without
the prior written permission of roda Computer GmbH.
roda computer GmbH reserves the right to revise this publication
and to make changes from time to time in the contents hereof
without obligation to notify any person of such revision or changes.
roda computer GmbH grants no warranties, either expressed or
implied, with respect to the contents hereof and specially disclaims
any warranties as to merchantability or fitness for any particular
application.
roda computer GmbH, Landstraße 6, 77839 Lichtenau
Author: Ramona Roth
Creation Date: 25/05/2007
Date of revision: 02/07/2007
TKZ: 146296
-2-
EMC and Safety Notice
Federal Comm. Commission
Radio Frequency Interference Statement
This equipment generates, uses, and can radiate radio frequency
energy and if not installed and used in accordance with the
instructions, may cause interference to radio communications. This
equipment has been tested and found to comply with Class B digital
devices, pursuant to Part 15 of the FCC rules which are designed to
provide reasonable protection against such interference when
operated in a commercial or residential environment.
Countermeasures if interference occurs
You are encouraged to do the following if interference occurs while
you are operating the device:
1. Turn OFF the unit and unplug the AC adapter from the
outlet to see if the interference disappears.
2. Connect the AC adapter to the outlet in another room and
check if the interference still exists.
3. Use an outlet that is far away from the interfered appliance.
4. Re-orient your computer in respect to the interfered
appliance to see if there is improvement.
If all of these failed, please call your dealer for help.
CE
This equipment complies with the requirements set out in the
Council Direction on the Approximation of the laws of the Member
States relating to Electromagnetic Compatibility (89/336/EEC).
Power Conservation
It is recommended that you enable the power saving functions even
not running with battery.
-3-
Recycling
All materials used in the construction of this unit are recyclable or
environmentally friendly. No CFC or related materials were used in
the manufacturing process or inside the product.
Please recycle the packing materials, and at the end of the unit’s
life, all other materials in accordance with the local regulations.
-4-
Content
1
2
2.1.1
2.1.2
2.1.3
2.1.4
2.1.5
2.1.6
3
3.1.1
3.1.2
3.1.3
3.1.4
3.1.5
3.1.6
3.1.7
3.1.8
3.1.9
3.1.10
3.1.11
3.1.12
3.1.13
3.1.14
PREAMBLE .............................................................................6
VARIOUS PHOTOGRAPHS .................................................7
SCOPE OF DELIVERY .............................................................8
I/O PORTS .............................................................................8
OPERATOR KEYBOARD (12 KEYS)........................................8
OSD MENU ...........................................................................9
VOLUME KEYS .......................................................................9
MECHANICAL DIMENSIONS..................................................10
DESCRIPTION OF OSD MENU .........................................11
SETUP .................................................................................11
OPTION: PIP (PICTURE IN PICTURE) ..................................12
INFORMATION (INPUT IMPOSSIBLE) .....................................12
SATURATION........................................................................13
OSD POSITION ...................................................................13
FIRMWARE (INPUT IMPOSSIBLE) .........................................13
OPTION: SYSTEM (ONLY WITH PIP/VIDEO).........................14
GAMMA ................................................................................14
SIZE .....................................................................................14
ADC (ONLY FOR RGB ANALOGUE) ....................................15
SAVE MODE.........................................................................15
SHARPNESS ........................................................................15
CONTRAST...........................................................................16
BRIGHTNESS .......................................................................16
4
OPTION: DIRECT KEY MODE...........................................16
5
TECHNICAL DATA ..............................................................17
6
CLEANING AND MAINTENANCE.....................................19
7. TROUBLESHOOTING.................................................................19
8 REPAIR SERVICE.........................................................................19
-5-
1
Preamble
The roda DP860-UX is a multi-function-display developed for rough
environmental conditions with a screen diagonal of 31.8 cm (15’’).
This screen is able to perform a maximum of physical resolution of
1,280x1,024. 16.7 million colours can be represented.
Caused by its robust metal cabinet it can be used in military vehicles.
It has a resistive USB tochsystem, a USB touchcontroller with 8
function keys (F1-F8) and an integrated 2-port USB 2.0 Hub for
direct connection of two USB periphery devices like keyboard or
mouse.
There is also an integrated stereo amplifier with two speakers which
can be connected to the soundcard.
The roda DP860-UX has signal input devices for DVI and RGB
analogue. The signal sources can be chosen by the On Screen
Display (OSD). Representation can be in 1:1 (scaled) or it can be in
the usual resolutions like 640x480, 800x600, 1024x768. In the case
of 1024x768 electronic will address the passive picture elements in
blue.
OPTION: Picture in Picture (PIP) Functionality
The internalal electronic of DP860-UX is able to work up and show
two signal sources at the same time. The electronic distinguishes
between a primary screen (PS) and a secondary screen (SS). The
secondary screen is usually connected by video signal source and
partially cross-fades the primary screen which shows the DVI or
RGB analogue signal source.
The secondary screen can not be scaled and is able to work out
input timings with max. 755 horizontal pixels. Optionally roda can
deliver it with two changeable video inputs and can be connected
with CCIR or NTSC signal sources. One video input is a CVBS
(FBAS) input, the second one can be realised as CVBS (FBAS) or
as Y/C (SVHS). The recognition of the colour happens
automatically.
INFORMATION: The second screen can show a standard VGA
picture or boot picture, if a video picture is shown on the first screen.
-6-
2
Various photographs
View: keyboard with joystick
View: frontside of display
-7-
2.1.1
Scope of delivery
1 ea.
1 ea.
1 ea.
2.1.2
DP860-UX
Installation CD for touchscreen
User’s guide
I/O Ports
Signal inputs rear side (from the left to the right):
supply voltage input
USB upstream/sound
(optional)
DVI / USB-upstream
RGB analogue
USB1-downstream
USB2-downstream
2.1.3
3-pol VG96912A8-98 PN
connector
9-pol-Sub-D socket
DVI-AD socket
15-Pol Sub-D-HD socket
USB-A socket
USB-A socket
Operator Keyboard (12 keys)
The keyboard can be found on the front side of the display below the
screen. The function of the keys is assured by a USB upstream
connection with the host computer (from the left to the right):
Number of
key
1
2
3
4
5
6
7
key
remark
F1
F2
F3
F4
F5
F6
F7
PC function key (USB)
PC function key (USB)
PC function key (USB)
PC function key (USB)
PC function key (USB)
PC function key (USB)
PC function key (USB)
-8-
8
9
10
F8
backlight off
reduce
brightness
enhance
brightness
display/computer
on/off
11
12
2.1.4
PC function key (USB)
Display internal
display internal
display internal
display internal
OSD Menu
The OSD operator keyboard is located on the top border of the
electronic box (from the left to the right). Controlling happens with
four quadratic keys:
2.1.5
key
1
2
symbol of key
hand symbol
arrow left
3
arrow right
4
rectangle
function
ENTER / Select
menu Navigation leftside/
reduce value
menu Navigation right /
enhance value
ESC/Exit
Volume Keys
The keys for the adjustment of volume are on the right border of the
electronic box. Arrangement on the right side from top to bottom.
key
1
2
symbol of key
speaker ↑
speaker ↓
-9-
function
enhance volume
reduce volume
2.1.6
Mechanical Dimensions
- 10 -
3
Description of OSD Menu
Press any key to reach the main menu of OSD. By pushing UP or
DOWN you reach the submenu. You can activate the submenu by
pushing ENTER. With ESC you can leave the menu.
INFORMATION: OSD menu is switched off automatically 20
seconds after last input.
Changed values only will be saved, if SAVE MODE is executed.
INFORMATION: By pushing the button ENTER and UP at the
same time all adjustments are reset to factory setting.
There are the following submenues:
SETUP, INFORMATION, SATURATION, OSD POSITION,
FIRMWARE, SYSTEM, GAMMA, SIZE, ADC, SAVE MODE,
SHARPNESS, CONTRAST, BRIGHTNESS, EXIT.
For all subemues:
Choice of functions with UP/DOWN; activating with ENTER;
leaving with ESC.
For all functions:
Adjustment of values, toggle or choice of an adjustment with
UP/DOWN.
3.1.1
Setup
function
description
PS_SOURCE
choice of the PS source:
VGA, DVI
all Timings of TimingTable Æ VGA_60,
SVGA_60,...
PS_OUTPUT
- 11 -
3.1.2
Option: PIP (Picture in Picture)
function
description
SS_SOURCE
choice of SS source:
VGA, DVI, Video1, S Video1, Video2, S
Video2
1/1, ½, 1/3, ¼ , bei Video nur ½, 1/3, ¼.
show red frame around PIP
switching on/off PIP
not activated
PIP with UP / DOWN in all four corners
and in the middle of the picture
SIZE
BORDER
SWITCH
LIMIT
PIP AUTO
3.1.3
Information (input impossible)
function
description
display
single / dual
format, i.e. RGB
type of display, i.e. DIS-2
source, i.e. video_1
input timing
output window
Source, i.e. video_1
input timing
size
PS
SS
- 12 -
3.1.4
3.1.5
3.1.6
Saturation
function
description
Default
SATURATION
Adjustment of screen
saturation
from 0 to 255
value 0 = black / white
presentation
64
OSD Position
function
description
OSD H POS
OSD V POS
OSD AUTO
ALPHA
shifting of OSD horizontal
shifting of OSD vertical
centering of OSD
alpha value of OSD
not transparent: 31
transparent: 0
Firmware (Input impossible)
function
description
Deposit of information, for example date of
software.
Not used.
No influence on function.
- 13 -
3.1.7
Option: System (only with PIP/video)
function
description
PS_TRIPIXEL
SS_TRIPIXEL
On/off PS Tripixel
On/off PS Tripixel
(no function when executing without
PIP/video)
On/off film Detection
(no function when executing without
PIP/video)
On/off motion compensation
(no function when executing without
PIP/video)
Adjustment of level for position
recognition
(no function when executing without
PIP/video)
On/off dither function
FILM
MOTION
THRESHOLD
DITHER
3.1.8
3.1.9
Gamma
function
description
default
GAMMA
Adjustment of gamma values.
from 1 to 7
off
Size
function
description
PS_H_SIZE
PS_V_SIZE
PS_H_POS
change of horizontal size PS
change of vertical size PS
change of horizontal position PS
- 14 -
PS_V_POS
PS_H_CAP
PS_V_CAP
change of vertical position PS
change of horizontal capture PS
change of vertical capture PS
3.1.10 ADC (only for RGB analogue)
function
description
PHASE
adjustment of phase,
from 0 to 31
Adjustment of sampling rate in AD
converter,
sampling raite +/- 120
CLOCK
3.1.11 Save Mode
function
description
SAVE
MODE
with ENTER changed adjustments can be
saved
3.1.12 Sharpness
function
description
default
SHARPNESS
on/off sharpness function
off
- 15 -
Contrast
function
description
default
CONTRAST
adjustment of contrast,
from 0 to 255
62
3.1.13 Brightness
4
function
description
default
BRIGHTNESS
adjustment of digital
brightness,
(not backlight !),
from 0 to 255
130
Option: Direct Key mode
The Direct Key Mode can be activated as factory sample. In this
case the OSD keys have changed functions as follows:
key
description
ESC
shading of backlight (as long as button is
pushed)
ENTER
PIP function on/off
DOWN
digital brightness darker (not backlight)
UP
digital brightness brighter (not backlight)
INFORMATION: Direct Key Mode can be adjusting as factory
sample, if the DP860-UX is delivered together with the computer.
- 16 -
5
Technical Data
Optical features
• Light density: 255cd/m² (typ.) with touchscreen
• contrast: 480:1 (typ.)
• Response time ton+toff: 22ms (typ.)
• Angle of view 10:1 r/l: 160° o/u: 160° (typ.)
Resolution (TFT)
1.024x768 pixel (XGA), 16.7 Mio. colours or 256 shades of grey
Display Standards
VGA, SVGA, XGA max. 60 Hz)
Signals
Analogue RGB 0,5 – 1,5Vss by 75 Ohm
Syncronisation (H-Sync, V-Sync): 2,4-3,6Vss by 1K Ohm
DVI 1.0 compatible
USB 2.0, capacity max. 500mA per downstream port
Power Supply
19V DC, <30 W
Environment
Temperature referring MIL-STD-810F method 501.4 and 502.4
operating -32°C to +55°C (no condensation)
storage -40°C to +80°C
Vibration referring MIL-STD-810F method 514.5 procedure 1, cat.
20, Fig. 514.5C-3
Shock referring MIL-STD-810F method 516.5 procedure 1
15g, 3ms 100 vertical shocks,
100g, 0,5ms 3 shocks per axis,
25g, 6ms 3 shocks per axis,
EMV
MIL-STD-461E
Protection Class
IP54 referring EN60529
- 17 -
Weight
Max. 3,5 Kg
Dimensions (without cables)
351mm x 300mm x 57mm (WxHxD)
- 18 -
6
Cleaning and Maintenance
ALWAYS turn OFF power and unplug power cord before cleaning.
The exterior may be wiped with a clean, soft and lint-free cloth (i.e.
Glasses cleaning cloth 3M). If it is difficult removing dirt, apply nonammonia, non-alcohol based glass cleaner to the cloth and wipe.
For salty water please clean with fresh water a lint-free cloth. Please
do not use any sharp-edged objects to clean the device.
7. Troubleshooting
Should the device failed to function properly; you may try the
following to troubleshoot it.
•
Check cable connections.
•
Check AC/ vehicle adapter and the power source.
•
Minimize the configuration, i.e. remove extra peripherals
and devices.
Set factory default.
•
•
Re-install driver and application software related to display
or touch screen.
8 Repair Service
If troubleshooting steps are unsuccessful, consult your dealer for
service. If it is necessary to send in your computer for repairs, you
can download a service waybill on the roda homepage (www.rodacomputer.com), which you have to fill in.
- 19 -
Shipping instructions:
1. Use original shipping container and packing materials, if
possible.
2. If the original packing materials are not available, wrap the
equipment with soft material then put the wrapped
equipment into a hard cardboard shipping box.
3. Include this sheet with the following information:
• Name
• Address
• Serial number, Customer number, Article number
• Place and date of purchase or the original invoice
number
• Date of failure
• A DETAILED description of the problems you have
encountered
• A list of the hardware/ software configuration, if
applicable.
4. Clearly mark the outside of the shipping box with the service
waybill. If service waybill is not present on the shipping box,
delays will be a consequence or even denial of receipt,
because no identification possible and it might be returned.
- 20 -
Service address:
roda Service Center
Bredenhop 20
D – 32609 Hüllhorst
Tel.: +49/ 5744- 944 470
Fax.:+49/ 5744- 944 475
E-Mail: support@rodacomputer com
Business hours:
Monday – Thursday 08.30 –
12.30
& 13.00 –
16.30
Friday
12.30
08.30 –
& 13.00 –
15.00
roda computer GmbH • Landstraße 6 •
77839 Lichtenau/Baden
Tel.:+49(0)72279579-0 • Fax:+49(0)72279579-20 • www.roda-computer.com
- 21 -
- 22 -