1
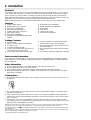
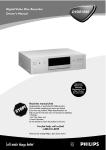
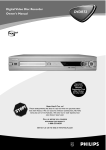
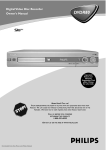
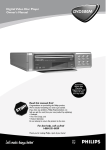
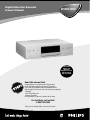
Digital Video Disc Recorder
Owner's Manual
DVDR1000
Important!
Return your
Warranty
Registration Card
within 10 days.
See why inside.
Read this manual first!
Congratulations on purchasing this Philips product.
We’ve included everything you need to get started.
If you have any problems, Philips Representatives can
help you get the most from your new product by explaining:
• Hookups,
• First Time Setup, and
• Feature Operation.
Do not attempt to return this product to the store.
For fast help, call us first!
1-800-531-0039
Thank you for making Philips a part of your home!
Return your Warranty Registration card today to
ensure you receive all the benefits you’re entitled to.
Once your PHILIPS purchase is registered, you’re eligible to receive all the privileges of owning a PHILIPS product.
So complete and return the Warranty Registration Card enclosed with your purchase at once. And take advantage
of these important benefits.
Warranty
Verification
Owner
Confirmation
Model
Registration
Registering your product within 10 days
confirms your right to maximum
protection under the terms and
conditions of your PHILIPS warranty.
Your completed Warranty Registration
Card serves as verification of ownership
in the event of product theft or loss.
Returning your Warranty Registration
Card right away guarantees you’ll
receive all the information and special
offers which you qualify for as the
owner of your model.
!
ry
r
Hu
H
REGIS
IN 1 0 DA
Dear PHILIPS product owner:
Thank you for your confidence in PHILIPS. You’ve selected one of the
best-built, best-backed products available today. We’ll do everything in
our power to keep you happy with your purchase for many years to
come.
As a member of the PHILIPS “family,” you’re entitled to protection by
one of the most comprehensive warranties and outstanding service
networks in the industry. What’s more, your purchase guarantees you’ll
receive all the information and special offers for which you qualify, plus
easy access to accessories from our convenient home shopping
network.
Most importantly, you can count on our uncompromising commitment
to your total satisfaction. All of this is our way of saying welcome - and
thanks for investing in a PHILIPS product.
Sincerely,
Lawrence J. Blanford
President and Chief Executive Officer
P.S. Remember, to get the most from your PHILIPS
product, you must return your Warranty
Registration Card within 10 days. So please mail
it to us right now!
Know these
safetysymbols
T
YS
DE D WI
Congratulations on your purchase,
and welcome to the “family!”
TION N
EE
T
RA
CAUTION
RISK OF ELECTRIC SHOCK
DO NOT OPEN
CAUTION: TO REDUCE THE RISK OF ELECTRIC SHOCK, DO NOT
REMOVE COVER (OR BACK). NO USER-SERVICEABLE PARTS
INSIDE. REFER SERVICING TO QUALIFIED SERVICE PERSONNEL.
This “bolt of lightning” indicates
uninsulated material within your
t
unit may cause an electrical shock. For
the safety of everyone in your household, please do not remove product
covering.
The “exclamation point” calls
attention to features for which
you should read the enclosed
literature closely to prevent operating
and maintenance problems.
WARNING: TO PREVENT FIRE OR
SHOCK HAZARD, DO NOT
EXPOSE THIS EQUIPMENT TO RAIN
OR MOISTURE.
CAUTION: To prevent electric
shock, match wide blade of plug to
wide slot, fully insert.
ATTENTION: Pour éviter les choc
électriques, introduire la lame la plus
large de la fiche dans la borne correspondante de la prise et pousser
jusqu’au fond.
s
For Customer Use
Enter below the Serial No. which is
located on the rear of the cabinet.
Retain this information for future
reference.
Model No. ____________________
Serial No. ____________________
Visit our World Wide Web Site at http://www.philips.com
Contents 3
General Information
Contents . . . . . . . . . . . . . . . . . . . . . . . . . . . . . . . . . . . . . . . . . . . . . . . . . . . . . . . . . . . . . . . . . . . . . . .3
Safety Information . . . . . . . . . . . . . . . . . . . . . . . . . . . . . . . . . . . . . . . . . . . . . . . . . . . . . . . . . . . . . . .4-5
Introduction . . . . . . . . . . . . . . . . . . . . . . . . . . . . . . . . . . . . . . . . . . . . . . . . . . . . . . . . . . . . . . . . . . . . .6
Getting Started
Playable Discs . . . . . . . . . . . . . . . . . . . . . . . . . . . . . . . . . . . . . . . . . . . . . . . . . . . . . . . . . . . . . . . . . . . .7
General Information . . . . . . . . . . . . . . . . . . . . . . . . . . . . . . . . . . . . . . . . . . . . . . . . . . . . . . . . . . . . . . .8
Hookups . . . . . . . . . . . . . . . . . . . . . . . . . . . . . . . . . . . . . . . . . . . . . . . . . . . . . . . . . . . . . . . . . . . . .9-15
Initial Setup . . . . . . . . . . . . . . . . . . . . . . . . . . . . . . . . . . . . . . . . . . . . . . . . . . . . . . . . . . . . . . . . . .16-17
Basic Disc Playback and Features
Quick Disc Playback . . . . . . . . . . . . . . . . . . . . . . . . . . . . . . . . . . . . . . . . . . . . . . . . . . . . . . . . . . . . . .18
Quick Recording . . . . . . . . . . . . . . . . . . . . . . . . . . . . . . . . . . . . . . . . . . . . . . . . . . . . . . . . . . . . . . . .19
DVD Recorder Controls
Remote Control Buttons . . . . . . . . . . . . . . . . . . . . . . . . . . . . . . . . . . . . . . . . . . . . . . . . . . . . . . .20-21
Front Panel . . . . . . . . . . . . . . . . . . . . . . . . . . . . . . . . . . . . . . . . . . . . . . . . . . . . . . . . . . . . . . . . . . . . .22
Display . . . . . . . . . . . . . . . . . . . . . . . . . . . . . . . . . . . . . . . . . . . . . . . . . . . . . . . . . . . . . . . . . . . . . . . .23
Rear Panel . . . . . . . . . . . . . . . . . . . . . . . . . . . . . . . . . . . . . . . . . . . . . . . . . . . . . . . . . . . . . . . . . . . . .24
Menu Bars . . . . . . . . . . . . . . . . . . . . . . . . . . . . . . . . . . . . . . . . . . . . . . . . . . . . . . . . . . . . . . . . . . . . .25
On-screen Symbols, Status Box . . . . . . . . . . . . . . . . . . . . . . . . . . . . . . . . . . . . . . . . . . . . . . . . . . . . .26
Information Boxes . . . . . . . . . . . . . . . . . . . . . . . . . . . . . . . . . . . . . . . . . . . . . . . . . . . . . . . . . . . . . . .27
Advanced Disc Playback and Features
Title/Disc Menus, Chapter/Track Selection . .
Audio Language, Subtitles . . . . . . . . . . . . . . . .
Zoom, Camera Angle . . . . . . . . . . . . . . . . . . .
Sound, Still Picture/Frame-by-Frame Playback .
Slow Motion, Forward and Reverse Searching
Time Search, Scan . . . . . . . . . . . . . . . . . . . . .
Repeat, Repeat A-B . . . . . . . . . . . . . . . . . . . .
Index Picture Screen . . . . . . . . . . . . . . . . . . .
.
.
.
.
.
.
.
.
.
.
.
.
.
.
.
.
.
.
.
.
.
.
.
.
.
.
.
.
.
.
.
.
.
.
.
.
.
.
.
.
.
.
.
.
.
.
.
.
.
.
.
.
.
.
.
.
.
.
.
.
.
.
.
.
.
.
.
.
.
.
.
.
.
.
.
.
.
.
.
.
.
.
.
.
.
.
.
.
.
.
.
.
.
.
.
.
.
.
.
.
.
.
.
.
.
.
.
.
.
.
.
.
.
.
.
.
.
.
.
.
.
.
.
.
.
.
.
.
.
.
.
.
.
.
.
.
.
.
.
.
.
.
.
.
.
.
.
.
.
.
.
.
.
.
.
.
.
.
.
.
.
.
.
.
.
.
.
.
.
.
.
.
.
.
.
.
.
.
.
.
.
.
.
.
.
.
.
.
.
.
.
.
.
.
.
.
.
.
.
.
.
.
.
.
.
.
.
.
.
.
.
.
.
.
.
.
.
.
.
.
.
.
.
.
.
.
.
.
.
.
.
.
.
.
.
.
.
.
.
.
.
.
.
.
.
.
.
.
.
.
.
.
.
.
.
.
.
.
.
.
.
.
.
.
.
.
.
.
.
.
.
.
.
.
.
.
.
.
.
.
.
.
.
.
.
.
.
.
.
.
.
.
.
.
.
.
.
.
.
.
.
.
.
.
.
.
.
.
.
.
.
.
.
.
.
.
.
.
.
.
.
.
.
.
.
.
.
.
.28
.29
.30
.31
.32
.33
.34
.35
Advanced Installation
Installation: Automatic Channel Programming . . . . . . . . . . . . . . . . . . . . . . . . . . . . . . . . . . . . . . . . . .36
Installation: VCR Plus+ Ch. . . . . . . . . . . . . . . . . . . . . . . . . . . . . . . . . . . . . . . . . . . . . . . . . . . . . . . . .37
Installation: Clock Setting . . . . . . . . . . . . . . . . . . . . . . . . . . . . . . . . . . . . . . . . . . . . . . . . . . . . . . .38-39
Recording Options
One-Touch Recording . . . . . . . . . . . . . . . . . .
Timer Recording . . . . . . . . . . . . . . . . . . . . . .
VCR Plus+ Timer Recording . . . . . . . . . . . . .
Erasing Timer Recordings, Error Messages . . .
Title Settings Menu . . . . . . . . . . . . . . . . . . . . .
Manual Recording Volume, Append Recording
Record Settings, Chapter Markers . . . . . . . . .
.
.
.
.
.
.
.
.
.
.
.
.
.
.
.
.
.
.
.
.
.
.
.
.
.
.
.
.
.
.
.
.
.
.
.
.
.
.
.
.
.
.
.
.
.
.
.
.
.
.
.
.
.
.
.
.
.
.
.
.
.
.
.
.
.
.
.
.
.
.
.
.
.
.
.
.
.
.
.
.
.
.
.
.
.
.
.
.
.
.
.
.
.
.
.
.
.
.
.
.
.
.
.
.
.
.
.
.
.
.
.
.
.
.
.
.
.
.
.
.
.
.
.
.
.
.
.
.
.
.
.
.
.
.
.
.
.
.
.
.
.
.
.
.
.
.
.
.
.
.
.
.
.
.
.
.
.
.
.
.
.
.
.
.
.
.
.
.
.
.
.
.
.
.
.
.
.
.
.
.
.
.
.
.
.
.
.
.
.
.
.
.
.
.
.
.
.
.
.
.
.
.
.
.
.
.
.
.
.
.
.
.
.
.
.
.
.
.
.
.
.
.
.
.
.
.
.
.
.
.
.
.
.
.
.
.
.
.
.
.
.
.
.
.
.
.
.
.
.
.
.
.
.
.
.
.
.
.
.
.
.
.
.
.
.
.
.
.
.
.
.
.
.
.
.
.
.
.
.
.
.
.
.
.
.
.
.
.40
.41
.42
.43
.44
.45
.46
Editing
Editing: Disc Information Screen . . . . . . . . . . . . . . . . . . . . . . . . . . . . . . . . . . . . . . . . . . . . . . . . . . . . .47
Editing . . . . . . . . . . . . . . . . . . . . . . . . . . . . . . . . . . . . . . . . . . . . . . . . . . . . . . . . . . . . . . . . . . . . . . . .48
Additional Features and Setup Options
Access Control . . . . . . . . . . . . . . . . . . . . . . . . . . . . . . . . . . . . . . . . . . . . . . . . . . . . . . . . . . . . . . .49-53
User Preference Settings . . . . . . . . . . . . . . . . . . . . . . . . . . . . . . . . . . . . . . . . . . . . . . . . . . . . . . . . . .54
Picture Settings . . . . . . . . . . . . . . . . . . . . . . . . . . . . . . . . . . . . . . . . . . . . . . . . . . . . . . . . . . . . . . . . . .55
Digital Output . . . . . . . . . . . . . . . . . . . . . . . . . . . . . . . . . . . . . . . . . . . . . . . . . . . . . . . . . . . . . . . . . .56
Analog Output . . . . . . . . . . . . . . . . . . . . . . . . . . . . . . . . . . . . . . . . . . . . . . . . . . . . . . . . . . . . . . . . . .57
Language Settings, Recording Audio . . . . . . . . . . . . . . . . . . . . . . . . . . . . . . . . . . . . . . . . . . . . . . . . . .58
Night Mode, Remote Control Settings . . . . . . . . . . . . . . . . . . . . . . . . . . . . . . . . . . . . . . . . . . . . . . . .59
Using Your Recorder’s Remote Control with Your TV . . . . . . . . . . . . . . . . . . . . . . . . . . . . . . . .60-61
Information You May Need
Helpful Hints . . . . . . . . . . . . . . . . . . . . . . . . . . . . . . . . . . . . . . . . . . . . . . . . . . . . . . . . . . . . . . . . .62-63
Glossary . . . . . . . . . . . . . . . . . . . . . . . . . . . . . . . . . . . . . . . . . . . . . . . . . . . . . . . . . . . . . . . . . . . . . . .64
Diagnostic Test . . . . . . . . . . . . . . . . . . . . . . . . . . . . . . . . . . . . . . . . . . . . . . . . . . . . . . . . . . . . . . . . .65
Specifications . . . . . . . . . . . . . . . . . . . . . . . . . . . . . . . . . . . . . . . . . . . . . . . . . . . . . . . . . . . . . . . . . . .66
Limited Warranty . . . . . . . . . . . . . . . . . . . . . . . . . . . . . . . . . . . . . . . . . . . . . . . . . . . . . . . . . . . . . . . .67
Information Index . . . . . . . . . . . . . . . . . . . . . . . . . . . . . . . . . . . . . . . . . . . . . . . . . . . . . . . . . . . . . . . .68
4 Safety Information
Safety Precautions
Warning: To prevent fire or shock hazard, do not expose this equipment to rain or moisture.
Federal Communications Commission (FCC) Warning: Any unauthorized changes or modifications to this equipment void the user’s authority to operate it.
Laser Safety
This unit employs a laser. Only a qualified service person should remove the cover or attempt to service this device, due to possible eye injury.
CAUTION: Use of controls or adjustments or performance of procedures other than those specified
herein may result in hazardous radiation exposure. The set complies with the FCC-Rules, Part 15 and
with 21 CFR 1040.10.
CAUTION: Visible and invisible laser radiation when open and interlock defeated. Do not stare into
the beam. The beam is located inside, near the deck mechanism.
Special Information for Canadian Users
This digital apparatus does not exceed the Class B limits for radio noise emissions from digital apparatus as set out in the Radio Interference Regulations of the Canadian Department of Communications.
CET APPAREIL NUMÉRIQUE N'ÉMET PAS DE BRUITS RADIOÉLECTRIQUES DÉPASSANT LES LIMITES APPLICABLES DANS LA RÈGLEMENT SUR LE BROUILLAGE RADIOÉLECTRIQUES ÉDICTÉ
PAR LE MINISTÈRE DES COMMUNICATIONS DU CANADA.
Radio/TV Interference
This equipment has been tested and found to comply with the limits for a Class B digital device, pursuant to Part 15 of the FCC Rules. These limits are designed to provide reasonable protection against
harmful interference in a residential installation. This equipment generates, uses, and can radiate radio
frequency energy and, if not installed and used in accordance with the instructions, may cause harmful
interference to radio communications. However, there is no guarantee that interference will not occur
in a particular installation. If this equipment does cause harmful interference to radio or television
reception, which can be determined by turning the equipment off and on, try to correct the interference by one or more of the following measures:
1) Reorient or relocate the receiving antenna.
2) Increase the separation between the equipment and the receiver.
3) Connect the equipment into an outlet on a circuit different from that to which the receiver
is connected.
4) Consult the dealer or an experienced radio/TV technician for help.
WARNING:
This device complies with Part 15 of the FCC rules. Operation is subject to the following two conditions:
1) This device may not cause harmful interference.
2) This device must accept any interference received, including interference that may cause
undesired operation.
IMPORTANT:
This product was FCC verified under test conditions that included use of shielded cables and connectors between system components. Use shielded cables to reduce the possibility of causing interference
to radios, televisions, and other electronic devices. If you have any problems, contact your supplier.
Copyright Protection
Unauthorized copying, broadcasting, public performance, and lending of Discs are prohibited. This
product incorporates copyright protection technology that is protected by method claims of certain
U.S. patents and other intellectual property rights owned by Macrovision Corporation and other rights
owners. Use of this copyright protection technology must be authorized by Macrovision Corporation
and is intended for home and other limited viewing uses only unless otherwise authorized by
Macrovision Corporation. Reverse engineering or disassembly is prohibited.
Declaration of Conformity
Model Number:
Trade Name:
Responsible Party:
DVDR1000
Philips
Philips Consumer Electronics
P.O. Box 14810, Knoxville, TN 37914-1810
(865) 521-4316
Safety Information (cont’d) 5
IMPORTANT SAFETY INSTRUCTIONS.
READ BEFORE OPERATING EQUIPMENT.
17. Tilt/Stability - All televisions must comply with
recommended international global safety standards for
tilt and stability properties of cabinet design.
• Do not compromise these design standards by
applying excessive pull force to the front, or top, of the
cabinet, which could ultimately overturn the product.
• Also, do not endanger yourself, or children, by placing
electronic equipment/toys on the top of the cabinet.
Such items could unsuspectingly fall from the top of the
set and cause product damage and/or personal injury.
1.
Read these instructions.
2.
Keep these instructions.
3.
Heed all warnings.
4.
Follow all instructions.
5.
Do not use this apparatus near water.
6.
Clean only with a dry cloth.
7.
Do not block any of the ventilation openings. Install in
accordance with the manufacturer’s instructions.
18. Wall or Ceiling Mounting - The appliance should be
mounted to a wall or ceiling only as recommended by
the manufacturer.
8.
Do not install near any heat sources such as radiators,
heat registers, stoves, or other apparatus (including
amplifiers) that produce heat.
19. Power Lines - An outdoor antenna should be located
away from power lines.
9.
Do not defeat the safety purpose of the polarized or
grounding-type plug. A polarized plug has two blades
with one wider than the other. A grounding type plug
has two blades and a third grounding prong. The wide
blade or third prong are provided for your safety. When
the provided plug does not fit into your outlet, consult
an electrician for replacement of the obsolete outlet.
10. Protect the power cord from being walked on or
pinched, particularly at plugs, convenience receptacles,
and the point where they exit from the apparatus.
11. Only use attachments/accessories specified by the
manufacturer.
12. Use only with a cart, stand, tripod, bracket, or table
specified by the manufacturer or sold with the
apparatus. When a cart is used, use caution
when moving the cart/apparatus combination to
avoid injury from tip-over.
13. Unplug this apparatus during lightning storms or when
unused for long periods of time.
14. Refer all servicing to qualified service personnel.
Servicing is required when the apparatus has been
damaged in any way, such as if the power-supply cord or
plug is damaged, liquid has been spilled or objects have
fallen into the apparatus, or if the apparatus has been
exposed to rain or moisture, does not operate normally,
or has been dropped.
15. This product may contain lead and mercury. Disposal of
these materials may be regulated due to environmental
considerations. For disposal or recycling information,
please contact your local authorities or the Electronic
Industries Alliance: www.eiae.org
16. Damage Requiring Service - The appliance should be
serviced by qualified service personnel when:
A. The power supply cord or the plug has been
damaged; or
B. Objects have fallen, or liquid has been spilled into the
appliance; or
C. The appliance has been exposed to rain; or
D. The appliance does not appear to operate normally
or exhibits a marked change in performance; or
E. The appliance has been dropped, or the enclosure
damaged.
20. Outdoor Antenna Grounding - If an outside
antenna is connected to the receiver, be sure the antenna system is grounded so as to provide some protection
against voltage surges and built up static charges.
Section 810 of the National Electrical Code, ANSI/NFPA
No. 70-1984, provides information with respect to proper grounding of the mast and supporting structure
grounding of the lead-in wire to an antenna discharge
unit, size of grounding connectors, location of antenna
discharge unit, connection to grounding electrodes and
requirements for the grounding electrode. See Figure
below.
21. Object and Liquid Entry - Care should be taken so
that objects do not fall and liquids are not spilled into
the enclosure through openings.
22. Battery usage CAUTION - To prevent battery leakage that may result in bodily injury or damage to the
unit:
• Install all batteries correctly, with + and - aligned as
marked on the unit.
• Do not mix batteries (old and new or carbon and alkaline, etc.).
• Remove batteries when the unit is not used for a long
time.
Example of Antenna Grounding
per National Electrical Code
GROUND CLAMP
ANTENNA LEAD IN WIRE
ANTENNA DISCHARGE UNIT (NEC SECTION 810-20)
GROUNDING CONDUCTORS (NEC SECTION 810-21)
GROUND CLAMPS
ELECTRIC SERVICE EQUIPMENT
POWER SERVICE GROUNDING ELECTRODE SYSTEM (NEC ART 250, PART H)
6 Introduction
Welcome!
Your Philips DVD Recorder both records DVD+RWs and plays prerecorded DVDs. You can record
TV programs, edit camcorder recordings, and quickly access your DVD+RW recordings in the Index
Picture Screen. Plus, the DVD+RW recordings you make on the Recorder will play on some DVD
Players and DVD-ROM drives. You’ll soon appreciate the digital picture and sound quality of DVD and
DVD+RW, which will exceed the quality you have had with video cassette tapes.
Read this manual carefully to understand the latest features, then enjoy your new DVD Recorder.
Features
●
●
●
●
●
●
●
●
Digital Theater System
Dolby Digital Surround Sound
DVD-Video Compatibility
Fast Forward/Reverse Search
i.LINK Digital Video connection
Index Picture Screen
NTSC/PAL compatibility
Paused/Fast/Slow/Step-by-Step/Zoomed
Playback
Package Contents
●
●
●
●
●
●
DVD Recorder
Remote control with two AA batteries
AC power cord
One blank Philips DVD+RW
One RF coaxial cable (black with silver tip,
with single prong in center of tip)
One S-Video cable (black with silver tip)
●
●
●
●
●
●
Progressive Scan compatibility
Repeat and Repeat A-B playback
Screen Saver
Time Search
TruSurround by SRS
VCR Plus+ Programming
●
One three-strand Component Video Cable
(ends have blue, green, and red stripes)
Two two-strand audio cables (ends have red
and white stripes)
One composite video cable (end has a yellow
stripe)
This owner’s manual and registration materials
●
●
●
Environmental Information
Your system has materials that can be recycled and reused if disassembled by a specialized company.
Please observe the local regulations regarding the disposal of packaging materials, exhausted batteries,
and old equipment.
Safety Information
●
●
●
●
Do not expose the system to excessive moisture, rain, sand, or heat sources.
Place the DVD Recorder on a firm, flat surface.
Keep the DVD Recorder away from domestic heating equipment and direct sunlight.
When placing the DVD Recorder in a cabinet, allow about one inch of space all around the DVD
Recorder for ventilation.
Cleaning Discs
●
When a Disc becomes dirty, clean it with a cleaning cloth. Wipe the Disc from the center out, in a
straight line.
●
Do not use solvents such as benzine, thinner, commercially available cleaners, or anti-static spray
intended for analog discs.
If the DVD Recorder cannot read Discs correctly, use a commonly available cleaning CD/DVD to
clean the lens. Other cleaning methods may destroy the lens. Always keep the tray closed to avoid
dust on the lens.
The lens may cloud over if you suddenly move the DVD Recorder from cold to warm surroundings. Playing a Disc is not possible then. Leave the power on for about one hour with no Disc in the
Recorder until normal playback is possible.
●
●
Manufactured under license from Dolby Laboratories. “Dolby,” “Pro Logic,” and the double-D symbol are trademarks of Dolby
Laboratories. “DTS” and “DTS DIGITAL SURROUND” are registered trademarks of Digital Theater Systems, Inc.
TRUSURROUND, SRS, and
are trademarks of SRS Labs, Inc. TRUSURROUND technology is manufactured under license
from SRS Labs, Inc.
VCR Plus+and PlusCode are registered trademarks of the Gemstar Development Corporation. The VCR Plus+ system is manufactured under license from Gemstar Development Corporation.
Copyright 2001 Philips Consumer Electronics.
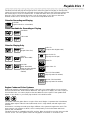
Playable Discs 7
This DVD Recorder will play various types of Discs. Some Disc types will only play on the Recorder;
others will record in the Recorder; some will record and play. There are also a few types of Discs that
will neither play nor record on this Recorder. To determine which Discs you should use with this
Recorder, refer to the following information. Look for these logos on your Discs to determine
whether the Disc will or will not play or record on the Philips DVD Recorder.
Discs for Recording and Playing
DVD+RW
(Digital Video Disc + Rewritable)
Discs Unsuitable for Recording or Playing
DVD-RAM
DVD-Audio
Discs for Playing Only
Audio CD
(Compact Disc Digital Audio)
DVD
(Digital Video Disc)
DVD-R
(DVD-Recordable)
Super Audio CD
(plays only the CD layer)
SUPER AUDIO CD
Video CD
DVD-RW
(DVD-Rewritable)
(plays only when recorded
in video mode and if
finalized)
Super Video CD
CD-R (CD-Recordable)
(plays only Audio CD contents)
Recordable
CD-RW (CD-Rewritable)
(plays only Audio CD contents)
ReWritable
Region Codes and Color Systems
DVDs must meet the requirements for Region Codes and Color Systems before you can use them
with the DVD Recorder. DVDs must be labelled for ALL regions or for Region 1 in order to play on
this DVD Recorder. You cannot play Discs that are labeled for other regions. These symbols must
appear on your DVDs, or you cannot play the DVD in this DVD Recorder.
The number inside the globe refers to a region of the world. Region 1 represents the United States,
Canada, upper regions of North America, Bermuda, the U.S. Virgin Islands, and small regions near
Australia.
Furthermore, recordings are made according to different color systems throughout the world. The
most common color systems are NTSC, which is used primarily in the United States and North
America, PAL, and SECAM.
This DVD Recorder is compatible with NTSC and PAL. Make sure the Discs you play were recorded
in NTSC or PAL. The color system of the DVD may appear on the DVD or on the Disc case.
8 General Information
Battery Installation
1
2
Remove the battery compartment lid on the rear of the
remote control by sliding the lid down, then off.
3
Replace the battery compartment lid.
Place two AA batteries inside the battery compartment
with their + and – ends aligned as indicated. Do not mix old
and new batteries or different types of batteries (standard, alkaline,
etc.).
Using the Remote Control
Unless stated otherwise, the remote control can operate all the features of
the DVD Recorder. Always point the remote control directly at the
remote sensor on the front of the DVD Recorder, not the TV. Details are
on page 22. Make sure there are no barriers between the remote control
and the DVD Recorder.
The remote control also will operate some features of some TVs. Details
are on pages 60-61.
-
+
+
-
When referring to this manual, remember...
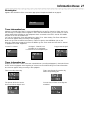
DVD
The feature is available on some Digital Video Discs.
AUDIO CD The feature is available on some Audio Compact Discs.
VIDEO CD
The feature is available on some Video Compact Discs.
DVD+RW
The feature is available on DVD+ReWritable Discs.
DVD Disc Menus...
Some explanations in this manual describe the DVD Disc Menus, which
vary among DVDs. Movie producers set these menus, and not all DVDs
have menus. But, if the DVD has a menu, access the Disc Menu by pressing
the DISC MENU button on the remote control. Details are on page 28.
DVD Recorder Menus...
Some instructions explain how to use the DVD Recorder’s menu (or the
System Menu or Menu Bars) to set up features of the DVD Recorder or
the Disc. You get to the DVD Recorder Menu by pressing SYSTEM MENU
on the remote control. Details are on page 25. Even if a feature is set up in
the DVD Recorder’s menu, it will not be available if the current Disc does
not include that feature.
Available Disc Features...
Features in this manual may not be available on every Disc. If the feature is
not available, you cannot use the DVD Recorder to make the feature available. An “X” will appear in the top left corner of the TV screen if you try
to access a feature that is not available on the current Disc.
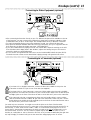
Hookups 9
Determining the best possible connection...
The capabilities of your existing equipment, especially your TV, will determine your connection possibilities.
However, the following guidelines describe which options provide the best picture and sound quality.
Component Video provides the best picture quality. Progressive Scan Component Video has
the highest quality, but use it only if the TV has Progressive Scan. Details are on page 10.
S-Video provides excellent picture quality. Details are on page 11.
Composite Video (a yellow Video jack) provides good picture quality. Details are on page 12.
Your TV may have only an RF-style jack, usually labeled Antenna In or 75 ohm. Connect the
supplied RF coaxial cable to the TV jack on the DVD Recorder and to the Antenna In jack on
your TV. Connect your antenna or Cable TV signal to the ANTENNA jack on the DVD
Recorder as shown on page 10.
You will need an RF modulator in order to view the DVD Recorder at your TV. Set the RF
modulator to channel 3 or 4, then set the TV to the same channel. Ask your dealer for details
on RF modulator availability and compatibility.
Digital audio connections provide the clearest sound. Connect one of the DVD Recorder’s
DIGITAL AUDIO OUT jacks (COAX (coaxial) or OPTICAL) to your Stereo for the best
sound quality. Details are on page 14.
If digital connections are not possible, connect the DVD Recorder’s red and white AUDIO
OUT jacks to the Audio In jacks of your Stereo or TV. Details are on pages 10-13.
Before you begin...
●
●
Refer to the manuals of your TV, Stereo, or other equipment as necessary. Note the style of jacks and
connectors on the other equipment. Determine how to choose different Audio and Video In channels
on your other equipment so you can see and hear the DVD Recorder on the TV, Stereo, etc.
Disconnect all equipment from the power outlets. Connect the equipment to the power outlets only
after you have finished hooking up everything. Never make or change connections with equipment
connected to the power outlet.
Remember...
●
●
●
●
●
Connect the DVD Recorder directly to the TV. For example, do not connect the DVD Recorder to a
VCR, then connect the VCR to a TV. This type of connection may distort the picture and sound. Also,
your VCR might have the copy protection system, which could distort the DVD image.
Set the TV to the correct Video In channel. Such channels may be called AUX or AUXILIARY IN,
AUDIO/VIDEO or A/V IN, EXT1 or EXT2, etc. These channels often are near channel 00. See your
TV manual for details. Or, change TV channels until you see the blue Philips DVD screen saver on the
TV screen.
Set the Stereo to the correct channel or “source” mode.
Do not connect the DVD Recorder’s AUDIO OUT jacks to the PHONO IN jack of your Stereo.
You only need one audio connection and one video connection between the DVD Recorder and your
TV. So, you might not use all the jacks on the Recorder.
Once you determine the best option, find your choice on pages 10-15. Follow the
steps for the hookup you chose.
When you finish your connections and turn on the DVD Recorder for the first time,
you must complete the Initial Setup. Initial Setup helps you set up TV channels,
menu languages, and other features. Go to page 16 to continue.
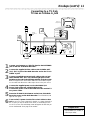
10 Hookups (cont’d)
Connecting to a TV Only
TV has Component Video In Jacks
Back of TV
(example only)
2
Y
Cb/B-Y
RIGHT AUDIO IN
LEFT AUDIO IN
Cr/R-Y
Y
RIGHT AUDIO IN
Pb/Cb
Antenna
or Cable TV
Signal
LEFT AUDIO IN
Pr/Cr
4
EXT 3
COMPONENT VIDEO
Y
Y
3
EXT 3
PROG
SCAN
Y
L
PB
PB
PB
PR
PR
PR
L
L
R
R
R
IN
RC 6
EXT 2
EXT 1
EXT 1/2
1
1
2
Connect your Antenna or Cable TV signal to the ANTENNA jack on the rear of the DVD Recorder.
3
Connect the DVD Recorder’s red and white AUDIO OUT
(Left and Right) (EXT 3) jacks to the left/right AUDIO IN
jacks on the TV. Use one of the supplied two-strand audio cables,
which has ends with red and white stripes. Match the cable stripe
colors to the jack colors.
Connect the DVD Recorder’s COMPONENT VIDEO OUT
Y PB PR jacks (EXT 3) to the corresponding COMPONENT
VIDEO IN jacks on the TV. Use the supplied three-strand component video cable, which has ends with red, blue, and green
stripes. Match the cable stripe colors to the jack colors.
4
Connect the supplied power cord to the MAINS (AC
Power) jack on the rear of the DVD Recorder.
Connect the power cords of the DVD Recorder and the TV
to a power outlet.
5
6
Press the STAND BY/ON button on the front of the DVD
Recorder to turn on the DVD Recorder. The STAND BY/ON
light will turn green.
Turn on the TV power. Set the TV to the correct
Component Video In channel. See your TV owner’s manual for
details. Or, change channels at the TV until you see the DVD screen
saver or Initial Setup screen on the TV screen. The Initial Setup
screen will appear the first time you turn on the Recorder. Go to page 16
to continue.
Helpful Hints
• If your TV has Progressive Scan,
connect the DVD Recorder’s
PROG SCAN OUT Y PB PR jacks
to the TV’s Progressive Scan In
jacks instead. Progressive Scan
produces a clearer picture by
doubling the number of visible
picture lines per field. This provides a jitter-free, sharp, quiet
picture. Only use these connections if your TV has Progressive
Scan. Check your TV manual
for more information.
• On the TV, the component
video in jacks may be labeled
YUV or Pr/Cr Pb/Cb Y and may
be green, blue, and red.
Hookups (cont’d) 11
Connecting to a TV Only
TV has an S-Video In Jack
Back of TV
(example only)
RIGHT AUDIO IN
LEFT AUDIO IN
S-AUDIO IN
2
Antenna
or Cable TV
Signal
RIGHT AUDIO IN
LEFT AUDIO IN
S-VIDEO IN
4
EXT 3
COMPONENT VIDEO
3
EXT 3
PROG
SCAN
Y
Y
Y
PB
PB
PB
PR
PR
PR
L
L
L
R
R
R
IN
RC 6
EXT 2
EXT 1
EXT 1/2
1
1
2
3
Connect your Antenna or Cable TV signal to the ANTENNA
jack on the rear of the DVD Recorder.
4
Connect the supplied power cord to the MAINS (AC
Power) jack on the rear of the DVD Recorder.
Connect the power cords of the DVD Recorder and the TV
to a power outlet.
5
6
Press the STAND BY/ON button on the front of the DVD
Recorder to turn on the DVD Recorder. The STAND BY/ON
light will turn green.
Connect the supplied S-Video cable to the S-VIDEO OUT
(Y/C) (EXT 1) jack of the DVD Recorder and to the TV’s SVIDEO In jack.
Connect a supplied two-strand audio cable to the red and
white AUDIO OUT (EXT 1/2) left and right jacks on the
DVD Recorder and to the left/right AUDIO IN jacks on the
TV. The supplied two-strand audio cable has red and white stripes
on the cable ends. Match the cable stripe colors to the jack colors.
Turn on the TV power. Set the TV to the S-Video In channel. See your TV owner’s manual for details. Or, change channels at
the TV until you see the DVD screen saver or Initial Setup screen
on the TV screen. The Initial Setup screen will appear the first time you
turn on the Recorder. Go to page 16 to continue.
Helpful Hint
• On the TV, the S-Video In jack
may be labeled Y/C, S-Video, or
S-VHS (super video).
12 Hookups (cont’d)
Connecting to a TV Only
TV has a yellow CVBS Video In jack
Back of TV
(example only)
RIGHT AUDIO IN
LEFT AUDIO IN
VIDEO IN
RIGHT AUDIO IN
LEFT AUDIO IN
Antenna
or Cable TV
Signal
VIDEO IN
2
4
EXT 3
COMPONENT VIDEO
3
EXT 3
PROG
SCAN
Y
Y
Y
PB
PB
PB
PR
PR
PR
L
L
R
R
L
R
IN
RC 6
EXT 2
EXT 1
EXT 1/2
1
1
2
Connect your Antenna or Cable TV signal to the ANTENNA
jack on the rear of the DVD Recorder.
3
Connect a supplied two-strand audio cable to the red and
white AUDIO OUT (EXT 1/2) left and right jacks on the
DVD Recorder and to the left/right AUDIO IN jacks on the
TV. The supplied two-strand audio cable has red and white stripes
on the cable ends. Match the cable stripe colors to the jack colors.
4
Connect the supplied power cord to the MAINS (AC
Power) jack on the rear of the DVD Recorder.
Connect the power cords of the DVD Recorder and the TV
to a power outlet.
5
6
Press the STAND BY/ON button on the front of the DVD
Recorder to turn on the DVD Recorder. The STAND BY/ON
light will turn green.
Connect the yellow VIDEO OUT (CVBS) (EXT 2) jack of the
DVD Recorder to the corresponding VIDEO IN jack on your
TV. Use the supplied video cable, which has a yellow stripe on the
cable end.
Turn on the TV power. Set the TV to the correct
Audio/Video In channel. Such channels may be called AUX or
AUXILIARY IN, AUDIO/VIDEO or A/V IN, EXT1 or EXT2, etc.
These channels often are near channel 00. See your TV owner’s
manual for details. Or, change channels at the TV until you see the
DVD screen saver or Initial Setup menu on the TV screen. The
Initial Setup screen will appear the first time you turn on the Recorder. Go
to page 16 to continue.
Helpful Hint
• On the TV, the Video In jack is
usually yellow and might be
labeled video, CVBS, composite,
or baseband.
Hookups (cont’d) 13
Connecting to a TV and a two-channel Stereo
(Stereo has Dolby Pro Logic or right/left Audio In jacks)
Stereo
(example only)
Back of TV
(example only)
S-AUDIO IN
RIGHT AUDIO IN
Antenna
or Cable TV
Signal
4
S-VIDEO IN
LEFT AUDIO IN
2
EXT 3
COMPONENT VIDEO
3
EXT 3
PROG
SCAN
Y
Y
Y
PB
PB
PB
PR
PR
PR
L
L
L
R
R
R
IN
RC 6
EXT 2
EXT 1
EXT 1/2
1
1
2
3
Connect your Antenna or Cable TV signal to the ANTENNA
jack on the rear of the DVD Recorder.
4
Connect the supplied power cord to the MAINS (AC
Power) jack on the rear of the DVD Recorder.
Connect the power cords of the DVD Recorder, Stereo,
and TV to a power outlet.
5
6
7
Turn on the Stereo power and set your Stereo to the correct Audio In channel or sound source. Refer to the Stereo
owner’s manual.
Connect the supplied S-Video cable to the S-VIDEO OUT
(Y/C) (EXT 1) jack of the DVD Recorder and to the TV’s
S-VIDEO IN jack.
Connect a supplied two-strand audio cable to the red and
white AUDIO OUT (EXT 1/2) left and right jacks on the
DVD Recorder and to the left/right AUDIO IN jacks on the
Stereo. The supplied two-strand audio cable has red and white
stripes on the cable ends. Match the cable stripe colors to the jack
colors.
Press the STAND BY/ON button on the front of the DVD
Recorder to turn on the DVD Recorder. The STAND BY/ON
light will turn green.
Helpful Hints
Turn on the TV power. Set the TV to the correct S-Video In
channel. These channels often are near channel 00. See your TV
owner’s manual for details. Or, change channels at the TV until you
see the DVD screen saver or Initial Setup menu on the TV screen.
The Initial Setup screen will appear the first time you turn on the
Recorder. Go to page 16 to continue.
• Set the Analog output accordingly. Details are on page 57.
• If you prefer or need to use the
VIDEO OUT (CVBS) or COMPONENT VIDEO OUT Y PB PR
jacks instead, see pages 10 and
12. You only need one video
connection.
14 Hookups (cont’d)
Connecting to a TV and a Stereo Receiver
(Receiver has Dolby DigitalTM, MPEG2, or Digital Theater System)
Receiver
(example only)
Back of TV
(example only)
S-AUDIO IN
Antenna
or Cable TV
Signal
4
COAXIAL DIGITAL
AUDIO IN
S-VIDEO IN
2
3
EXT 3
COMPONENT VIDEO
EXT 3
PROG
SCAN
Y
Y
Y
PB
PB
PB
PR
PR
PR
L
L
L
R
R
R
IN
RC 6
EXT 2
EXT 1
EXT 1/2
1
1
2
Connect your Antenna or Cable TV signal to the ANTENNA
jack on the rear of the DVD Recorder.
3
4
Connect the supplied S-Video cable to the S-VIDEO OUT
(Y/C) (EXT 1) jack of the DVD Recorder and to the TV’s
S-VIDEO IN jack.
5
6
7
Turn on the Stereo power and set your Stereo to the correct Digital Audio In channel or sound source. Refer to the
Stereo owner’s manual.
Connect one of the DVD Recorder’s DIGITAL AUDIO
OUT jacks (COAX (coaxial) or OPTICAL) to the corresponding DIGITAL AUDIO IN jack on your Stereo. You only
need one connection. Use an appropriate digital audio cable (not
supplied).
Connect the supplied power cord to the MAINS (AC
Power) jack on the rear of the DVD Recorder.
Connect the power cords of the DVD Recorder, Stereo,
and TV to a power outlet.
Press the STAND BY/ON button on the front of the DVD
Recorder to turn on the DVD Recorder. The STAND BY/ON
light will turn green.
Turn on the TV power. Set the TV to the correct S-Video In
channel. These channels often are near channel 00. See your TV
owner’s manual for details. Or, change channels at the TV until you
see the DVD screen saver or Initial Setup menu on the TV screen.
The Initial Setup screen will appear the first time you turn on the
Recorder. Go to page 16 to continue.
Helpful Hints
• Set the Digital output accordingly. Details are on page 56.
• If your Digital Output setting
does not match your Stereo’s
capabilities, the Stereo may
produce a strong, distorted
sound or no sound at all.
• Your Stereo must support
MPEG2, Dolby DigitalTM or
Digital Theater System (DTS).
Check the Stereo’s manual.
• To use the VIDEO OUT (CVBS)
or COMPONENT VIDEO OUT
Y PB PR jacks instead, see pages
10 and 12.
• A small, square, black cap protects the OPTICAL jack when it
is not in use. Remove the cap if
you want to use the jack;
replace the cap when the jack
is not in use.
Hookups (cont’d) 15
Connecting to Other Equipment (optional)
EXT 3
COMPONENT VIDEO
EXT 3
PROG
SCAN
Y
Y
Y
PB
PB
PB
PR
PR
PR
L
L
R
R
L
R
IN
RC 6
EXT 2
EXT 1
VIDEO OUT
EXT 1/2
RIGHT AUDIO OUT
1
LEFT AUDIO OUT
2
24
• After connecting the Recorder directly to your TV, additional IN jacks will be available on the rear
of the Recorder. You may connect other equipment to these jacks, including a Cable Box, Video
Cassette Recorder (VCR) or a DVD Player. The example above shows a Cable Box connection.
• To watch the material playing on the other equipment as usual, turn off the DVD Recorder.
• Most prerecorded video cassettes and DVDs are copy protected. If you try to copy them with the
DVD Recorder, the Recorder display may show ‘COPY PROTECT.’
• If you record material that is playing on a VCR onto a DVD+RW, adjust the tracking on the VCR
first. If the Recorder’s display shows “NO SIGNAL,” adjust the tracking. See your VCR owner’s
manual for details on tracking adjustment.
• Do not connect a Progressive Scan video source to the COMPONENT VIDEO IN jacks (EXT3).
The DVD Recorder cannot record material that is playing through a Progressive Scan source.
Connecting to a Camcorder (optional)
A
D
DV
B
A
B
C
S-VIDEO
VIDEO
Typical
Camcorder
AUDIO
LEFT RIGHT
C
If you have a DV or Digital 8 camcorder, connect the Recorder’s I-LINK DV IN jack to the
Camcorder’s I-LINK OUT jack. Use an i-link cable (not supplied).
If you have a Hi-8 or S-VHS camcorder, connect an S-Video cable to the Recorder’s S-VIDEO
IN jack and to the camcorder’s S-Video Out jack. Connect Audio cables to the AUDIO IN (Left
and Right) jacks on the front of the Recorder and to the AUDIO OUT jacks on the camcorder.
If the camcorder only has a composite-style Video out jack (usually yellow), connect a video
cable to the DVD Recorder’s VIDEO IN jack and to the camcorder’s Video Out jack. Connect
Audio cables to the AUDIO IN (Left and Right) jacks on the front of the DVD Recorder and to
the AUDIO OUT jacks on the Camcorder.
You need only one connection. You might not use all the jacks on the front of the Recorder.
To see the camcorder picture on your TV, select the correct channel at the Recorder and the TV. At
the Recorder, in Tuner mode, choose CAM1, CAM2, or CAM3. Details are on page 22. At the TV,
choose the TV channel that corresponds to the jacks you used on the rear of the Recorder to connect the Recorder to the TV. The TV’s Video In channel may be referred to as Video In, Aux or
Auxiliary In, Audio/Video or A/V In, External or EXT IN, etc. If you have trouble finding the right channel, keep changing TV channels until you see the camcorder image playing on the TV screen.
16 Initial Setup
Initial Setup screens will appear the very first time you turn on the Recorder.
These on-screen messages and menus will help you set up Recorder features
quickly, including TV channels and language options.
Follow the steps below to set up the Recorder as directed on the TV screen.
You can not turn off the Recorder until you finish the Initial Setup.
The only way to quit the Initial Setup is to disconnect the power
cord. If you quit, the Initial Setup screens will appear again the next
time you turn on the Recorder. The screens will not go away until
you finish the Initial Setup.
If the setup screens do not appear, your Recorder has been set up previously.
You can always change setup items later. For details on how to change these
items later, see the pages listed at each step below for each feature.
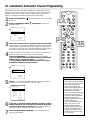
1
2
TUNER
ON/OFF
REC/OTR
STOP
REVERSE
PAUSE
PLAY
SLOW
FORWARD
PREVIOUS
NEXT
2,3
EDIT
Press ON/OFF to turn on the Recorder.
SELECT
CLEAR
TIMER
The Menu Language screen will appear first automatically. Press
98 to choose English, Espanol, or Francais, then press the
OK button.
The DVD Recorder’s menus will be in the language you selected.
To change the Recorder’s Menu Language settings later, see page 58.
~
VOL
CH
2,3
MUTE
Initial Setup
Menu Language
English
Español
Français
K
L
A/CH
T/C
ZOOM
ANGLE
SUBTITLE
AUDIO
DIM
REPEAT
REPEAT
SCAN
Press OK to continue
3
The Audio Language menu appears next. Press 98 to
choose the language you prefer, then press OK.
The Recorder will automatically play Discs in the language you
selected if the language is available on the Disc. The DVD Disc
menu will appear in the same language, if available on the Disc.
Some Discs require you to choose the audio language from the Disc
menu. The Disc preferences or defaults may override your selection
in the Recorder’s Audio Language menu.
To change the Audio Language settings later (as Playback Audio), see
page 58.
~
Initial Setup
Audio Language
English
Español
Français
Português
Italiano
Press OK to continue
Continued on page 17
K
L
1
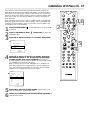
Initial Setup (cont’d) 17
Continued from previous page
4
The Subtitle Language menu appears next. Press 98 to choose
the language you prefer for subtitles, then press OK.
The Recorder will automatically show subtitles in the language you
selected if subtitles are available in that language on the Disc. If your
selected subtitle language is not available, either there will be no
subtitles or subtitles will be in the default language of the Disc.
Some DVDs require you to choose a subtitle language from the
Disc menu. Disc preferences or defaults may override your selection in the Recorder’s Subtitle Language menu.
To change the Subtitle Language settings later, see pages 29 and 58.
~
TUNER
ON/OFF
REC/OTR
STOP
REVERSE
PAUSE
PLAY
SLOW
FORWARD
PREVIOUS
NEXT
4,5
EDIT
Initial Setup
Subtitle Language
English
Español
Français
Português
Italiano
Press OK to continue
K
L
CLEAR
SELECT
TIMER
VOL
CH
4-6
MUTE
5
The TV Shape menu appears next. Press 98 to choose the preferred TV Shape, then press OK.
To change the TV Shape later or for details on TV Shapes, see page 55.
~
Initial Setup
TV Shape
4:3 letterbox
4:3 panscan
16:9
K
L
Press OK to continue
6
“If you have connected the antenna - press OK” appears next. If
you have connected an Antenna or Cable TV signal to the
Recorder’s ANTENNA jack, press OK.
If you have not connected the Antenna or Cable TV signal, take a
moment now to do so. After the Antenna/Cable is connected, press
OK. Details are on pages 10-14.
To reset TV channels later, or to add/delete new channel choices later,
see page 36.
7
“Searching for TV channels” will appear, along with a scale
showing channels are being memorized. The number of channels
found will show on the screen as the searching progresses. This will
take a few minutes, depending on the number of channels available
in your area.
When the channel search finishes, “Auto ch. search complete” will
appear, along with the total number of channels found.
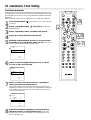
Installation
Auto Ch. Programming
Auto ch. search complete
024 Channels found
To exit press
SYSTEM MENU
8
Press SYSTEM MENU.
The Recorder is ready for use!
A/CH
T/C
ZOOM
ANGLE
SUBTITLE
AUDIO
DIM
REPEAT
REPEAT
SCAN
8
18 Quick Disc Playback
DVD
AUDIO CD
VIDEO CD
DVD+RW
1,2
There are many playback features and options available on Discs. After
familiarizing yourself with the DVD Recorder as described on pages 20-27,
see pages 28 and following to try additional playback features.
1
2
Press OPEN/CLOSE A on the front of the DVD Recorder to
open the disc tray. (You can not open the disc tray using the
remote control.)
Load your Disc in the tray, with the label facing up. If the Disc
(DVD) is two-sided, make sure the side you want to play is facing
up.
3
4
Press OPEN/CLOSE A again to close the tray.
5
REVERSE
PAUSE
PLAY
SLOW
FORWARD
PREVIOUS
NEXT
4,5
EDIT
CLEAR
SELECT
TIMER
VOL
Playback may start automatically. If not:
• If you are playing a DVD, a Disc menu may appear. If the Title or
Chapter selections are numbered, press a Number button to select
an item. Or, press 9 8 ; : to select an item, then press OK.
Playback will begin. Or, follow the on-screen instructions as detailed
in the DVD Disc menu.
• If you are playing an Audio CD, press PLAY : to start playback.
• If you are playing a DVD+RW, the Index Picture Screen will
appear. Press 9 8 to select the Title you want to play, then press
OK. If the Disc is a new blank Disc, the display will show “EMPTY
DISC.” Details are on page 35.
To stop playback at any time, press STOP C.
ON/OFF
REC/OTR
STOP
Press STAND BY / ON to turn on the DVD Recorder. The
STAND BY / ON light will be green when the power is On.
Turn on your TV. Set it to the correct Video In channel.
You should see the blue Philips DVD screen saver on the TV screen
(if no Disc is in the Recorder). Details are on pages 9-14.
5
TUNER
4
CH
MUTE
T/C
ZOOM
A/CH
ANGLE
SUBTITLE
4
AUDIO
Helpful Hints
• If the Disc is Locked by Access
Control, you must enter the fourdigit code or authorize the Disc.
Details are on pages 49-53.
• DVDs have a region code. Your
Recorder will not play Discs that
have a region code different from
the region code of your Recorder.
The Recorder’s region code is 1
(one). Details are on page seven.
• You can not record only Audio
(sound) to a DVD+RW. You
must record both audio and
video (sound and picture).
Quick Recording 19
DVD+RW
1,2
The DVD Recorder can record TV programming onto a DVD+RW.
Before you begin, make sure you have installed the TV channels. Details are
on pages 16-17 and 36. Using an unprotected, recordable DVD+RW, follow the steps below to record TV channels.
For additional recording options, see pages 40-46.
1
2
3
4
5
6
7
Press OPEN/CLOSE A on the front of the DVD Recorder to
open the disc tray. Or, press and hold STOP C on the remote control to open or close the Disc tray.
7
TUNER
REC/OTR
STOP
4
ON/OFF
REVERSE
PAUSE
PLAY
SLOW
FORWARD
PREVIOUS
NEXT
EDIT
Insert a recordable DVD+RW, with the label facing up. Press
OPEN/CLOSE A to close the disc tray. The Index Picture Screen
will appear. Details are on page 35. If the Disc is empty and has no
recordings, “EMPTY DISC” will appear on the Recorder’s display.
3
6
Press 9 to select an empty Title box, which indicates space
available on the Disc for recording. To avoid overwriting previous
recordings, choose the last empty Title box.
CLEAR
SELECT
TIMER
Press TUNER to see TV channels through the DVD Recorder.
VOL
Press CH+/- or the Number buttons to select the channel you
wish to record.
To record material playing on equipment you connected to the
Recorder, select EXT1, EXT2, EXT3, CAM1, CAM2, or CAM3.
Choose the EXT (External) or CAM (Camera) channel that matches
the jack to which you connected the other equipment. For example,
if you connected a camcorder to the S-VIDEO CAM1 jack on the
front of the DVD Recorder, press CH+/- to choose CAM1. CAM1
will appear in the Tuner Information Box. Details are on page 27.
Press REC/OTR to begin recording the selected channel.
RECORD will appear in red on the Recorder’s display panel.
Press STOP C to stop recording. RECORD will flash briefly on
the display panel. The Index Picture Screen will reappear after a few
seconds. To edit your recordings later, see pages 47-48.
CH
MUTE
5
A/CH
T/C
ZOOM
ANGLE
SUBTITLE
AUDIO
DIM
REPEAT
REPEAT
SCAN
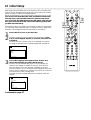
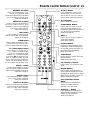
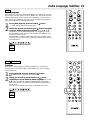
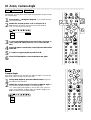
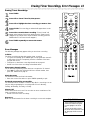
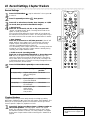
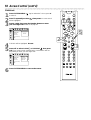
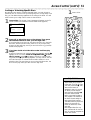
20 Remote Control Buttons
TUNER Button
Press to choose disc mode or tuner
mode. In disc mode, use the Index
Picture Screen, view Disc playback, or
make recordings. In tuner mode, watch
or record TV channels through the
DVD Recorder. Details are on page 19.
TUNER
REC/OTR
STOP
STOP C Button
Press to stop Disc playback or recording.
Press and hold the STOP C button for
three seconds to open or close the
Recorder’s disc tray.
ON/OFF
REVERSE
PAUSE
PLAY
SLOW
FORWARD
PREVIOUS
NEXT
EDIT
DISC MENU Button
Press during playback to access a
DVD’s Title or Disc menu or the
Index Picture Screen of a DVD+RW.
Details are on page 28.
9 8 ; :Buttons
Press to select items.
Details are on pages 25, 28, and 35.
CLEAR
SELECT
TIMER
CH
VOL
RETURN Button
Press to go back to a previous menu.
MUTE
ZOOM a Button
Press to access a (Zoom) in the
Menu Bar and enlarge the video
image during paused or regular playback of a DVD or DVD+RW.
Details are on page 30.
DIM Button
Press repeatedly to adjust the brightness of or to turn off the display on
the front of the DVD Recorder.
REC/OTR Button (Record/OneTouch Recording)
Press to record the current TV
channel as seen in Tuner mode. Or,
press to start recording material that
is playing on equipment connected to
the Recorder (after choosing the
correct EXT or CAM channel).
Details are on page 19. Press repeatedly to set up One-Touch
Recordings. Details are on page 40.
SYSTEM MENU Button
Press to access or remove the Menu
Bars of the DVD Recorder.
Details are on page 25.
OK Button
Press to acknowledge or approve a
menu selection.
VOL (volume) +/- Buttons
Press to increase or decrease the TV
volume. Details are on page 60.
MUTE H Button
Press to silence the TV volume.
Press again to restore the volume.
Details are on page 60.
ON/OFF Button
Press to turn on or off the power of
the DVD Recorder.
The STAND BY/ON light on the
front of the Recorder is green when
the power is on. The light is red
when the power is off.
Details are on page 22.
A/CH
T/C
ZOOM
ANGLE
SUBTITLE
AUDIO
DIM
REPEAT
REPEAT
SCAN
SELECT Button
Press to select an AM or PM Start or
End time for a timer recording.
Details are on page 41.
TV Switch
Press and hold while using buttons
on the remote control that operate
your TV. Details are on page 60.
AUDIO Y Button
Press to select a different audio language or soundtrack during DVD playback. Multiple languages or soundtracks must be available on the DVD.
Details are on page 29.
SCAN Button
Press to play the first 10 seconds of
each Track or Chapter on a Disc.
Details are on page 33.
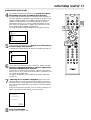
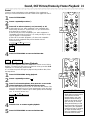
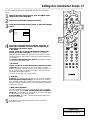
Remote Control Buttons (cont’d) 21
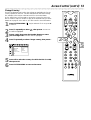
REVERSE ÉE´ Button
Press to search backward, or fast
reverse, during playback. Press
repeatedly to play the Disc backward
at 4 or 32 times the normal speed.
Details are on page 32.
PREVIOUS w Button
Press to return to the beginning of
the current Chapter/Track. Or, press
repeatedly to return to the beginning
of previous Chapters/Tracks.
Details are on page 28.
TUNER
ON/OFF
REC/OTR
STOP
REVERSE
PAUSE
PLAY
SLOW
FORWARD
PREVIOUS
NEXT
EDIT
EDIT Button
Press to display or remove the edit
menu for a DVD+RW during playback.
Details are on page 48.
CLEAR Button
Press to delete the last entry of information into a menu. Press to clear a
timer recording. Details are on page 43.
T/C (Title/Chapter) Button
Press to select “T” (Title/Track) or
“C” (Chapter) in the Menu Bar.
(Press T/C repeatedly to toggle
between T or C in the Menu Bar.)
Then press 98 to select the Title,
Track, or Chapter number you want
to play. The Title/Track/Chapter will
start to play automatically. This button has no effect during Tuner mode.
ANGLE } Button
Press to select a different camera
angle during DVD playback. Multiple
angles must be available on the Disc.
Details are on page 30.
REPEAT Button
Press repeatedly to play a Chapter,
Title, Track, or Disc repeatedly.
Details are on page 34.
REPEAT A-B Button
Press to set up Repeat A-B playback,
in which a certain segment of the
Track or Chapter plays repeatedly.
Details are on page 34.
SLOW H Button
Press repeatedly to select a slow
motion speed. You can choose to
play the Disc at 1/2, 1/4, or 1/8 the
normal speed. Details are on page 32.
PLAY : Button
Press to begin Disc playback.
FORWARD D Button
Press to search forward, or fast forward, during Disc playback. Press
repeatedly to play the Disc forward at
4 or 32 times the normal speed.
Details are on page 32.
NEXT ∑
Press to skip to the next Chapter or
Track during playback.
Details are on page 28.
CLEAR
SELECT
TIMER
CH
VOL
MUTE
PAUSE k Button
Press once to pause playback. Press
repeatedly to advance a paused DVD
or DVD+RW picture one frame at a
time (frame-by-frame playback).
Details are on page 31.
TIMER Button
Press to access or remove the Timer
Recording menu.
Details are on pages 41-43.
A/CH
T/C
ZOOM
ANGLE
SUBTITLE
AUDIO
DIM
REPEAT
REPEAT
SCAN
CH (channel) +/- Buttons
Press to select a TV channel in Tuner
mode.
Number Buttons
Press to select numbered items in a
menu. Details are on page 18. Press during playback to directly select a Chapter
(within the current Title) or Track for
playback. Details are on page 28.
A/CH (Alternate Channel)
Button
Press to return to the previously
selected TV channel while the
Recorder is in Tuner mode.
SUBTITLE Z Button
Press repeatedly during playback to
select a subtitle language from those
available on the current Disc.
Details are on page 29.
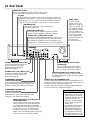
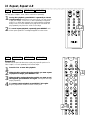
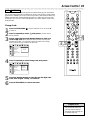
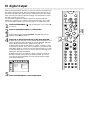
22 Front Panel
STAND BY / ON Button and Light
Press the STAND BY / ON button to turn on or off the power of the DVD
Recorder. The STAND BY / ON light will be red if the DVD Recorder power is
off (standby). The STAND BY / ON light will be green when the power is on.
Remote Sensor
The sensor receives signals from the remote. Point the remote here, not
at your TV, when using the remote control to operate the DVD Recorder.
PANEL button
Press to open or close the panel door so you can
access additional buttons and jacks on the front panel.
Display
Information about the current status of the
Recorder appears here. Details are on page 23.
RECORD I button
Press to begin recording the currently selected
TV channel or source. Details are on page 19.
PLAY : button
Press to begin Disc playback.
STOP C button
Press to stop playback or recording.
OPEN/CLOSE A button
Press to open or close the Disc tray.
CAM3
CAM1 CAM2
CAM1/2
*DV (digital video) iLINK
(CAM3); S-VIDEO In (CAM1);
VIDEO In (CAM2); and
AUDIO In (CAM1/2) jacks
Use these jacks when connecting a
camcorder or other equipment to
the DVD Recorder. Details are on
page 15. When recording material
that is playing on the other equipment, choose the EXT (External)
or CAM (Camera) channel that
corresponds to the jack to which
the equipment is connected.
Details are on page 19.
Disc Tray
Insert a Disc here. Load the Disc
with the label facing up.
Details are on page 18.
* Press the PANEL button to
lower the panel door to
access these buttons or jacks.
*SEARCH E D buttons
Press to begin a reverse or fast forward search during playback. Press
repeatedly to search at either 4 or
32 times the regular playback speed.
Details are on page 32.
*TITLE w ∑ buttons
Press TITLE ∑ to go to the next Title or
Chapter on a Disc. Press TITLE w once to
go to the beginning of the current Title or
Chapter. Press TITLE w repeatedly to go to
previous Titles or Chapters.
*AUTO MAN REC VOLUME button
(Automatic/Manual Recording Volume)
Press to adjust the recording volume automatically or manually. Details are on page 45.
*MANUAL 98 buttons
Press to increase or decrease the volume when manually
adjusting the recording volume. Details are on page 45.
*CHANNEL 98 buttons
Press to change TV channels while in Tuner mode.
Display 23
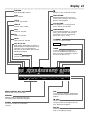
DVD+RW
DVD+Rewritable inserted
D
Remote Control command received
DVD
DVD inserted
TRACK TIME
Elapsed playing time of the current
Track in hours, minutes, and seconds
appears during playback.
TITLE
Current Title number
TOTAL TIME
Total playback or recording time in
hours, minutes, and seconds
TRACK
Current Track number
VCD
Video CD inserted
CD
Audio CD inserted
TIME REMAIN
Total remaining playback or recording
time in hours, minutes, and seconds
according to the current recording
speed ( HQ, SP, LP, or EP)
SVCD
Super Video CD inserted
CHANNEL
Current TV channel number
HQ, SP, LP, EP
High Quality, Standard Play, Long Play, or
Extended Play; Currently selected recording mode, or the recording speed in
which the current Chapter was recorded.
Details are on page 46.
RECORD
Recording in progress
TIMER
A timer recording is scheduled or is
occurring. TIMER flashes just before a
timer recording is scheduled to begin if
the Recorder power is on.
CHAPTER
Current Chapter number
TITLE
CHAPTER
TRACK
TOTAL TRACK TIME
REMAIN
CHANNEL
AM
PM
DVD
S VCD
RW
-40
-30
MPEG
-20
DIGITAL DTS
MPEG, DIGITAL, DTS, PCM
Audio format of the current Disc
MANUAL
Appears when you manually adjust the
recording volume. Details are on page 45.
STEREO
The current channel is broadcasting
in stereo.
04 ,+4)
HQ SP LP EP
-10
PCM
0
TIMER
-40
OVER
MANUAL
-30
-20
RECORD
-10
0
STEREO
OVER
SAP
SAP
The current TV channel is broadcasting
a second Audio Program. Details are on
page 58.
dB scale
Indicates the recording volume when
using the manual recording volume controls. Details are on page 45.
Disc bar
Displays Disc content, recording volume
level, or formatting progress.
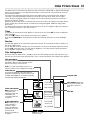
24 Rear Panel
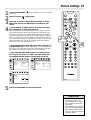
MAINS (AC Power)
Connect the supplied AC power cord here and to a standard AC outlet after completing all other connections.
TV jack
If your television only has a 75 ohm or RF coaxial jack, connect the
supplied RF coaxial cable to the TV jack on the DVD Recorder and to
the RF IN jack on the TV You will need an RF modulator. Details are
on page 9. For more information, refer to your TV owner’s manual.
IN RC 6 jack
Connect a wired
remote control (not
supplied) to the IN RC
6 jack if you prefer. Ask
your dealer for details
on compatible remotes.
The first signals from
the remote control may
be lost. The remote
control supplied with
the DVD Recorder will
operate all the
recorder’s features.
ANTENNA jack
Connect your antenna or Cable TV signal here.
Details are on pages 9-15.
VIDEO IN (CVBS) jack
Use a video cable to connect this jack to the Video
Out jack of other equipment. Details are on page 15.
VIDEO OUT (CVBS) (EXT2) jacks
Connect the supplied yellow-striped video cable to one of
the VIDEO OUT (CVBS) jacks and to the TV’s Video In
jack. Details are on page 12. Use the extra VIDEO OUT
(CVBS) jack to connect the Recorder to other equipment.
EXT 3
COMPONENT VIDEO
EXT 3
PROG
SCAN
Y
Y
Y
PB
PB
PB
PR
PR
PR
L
L
L
R
R
R
IN
RC 6
EXT 2
EXT 1
EXT 1/2
S-VIDEO IN (Y-C) (EXT1) jack
Use an S-video cable to connect this
jack to the S-Video Out jack of
optional additional equipment.
Details are on page 15.
S-VIDEO OUT (Y-C) (EXT1) jack
Connect the supplied S-Video cable
here and to a TV’s S-Video In jack.
Details are on page 11.
COMPONENT VIDEO IN
(Y PB PR) (EXT3) jacks
Connect these jacks to the Component Video Out
jacks of optional additional video equipment (for
example, a DVD Player). Details are on page 15.
COMPONENT VIDEO OUT
(Y PB PR) (EXT3) jacks
Connect the supplied three-strand component
video cable here and to the Component Video
In jacks of a TV. Details are on page 10.
PROG SCAN OUT (Y PB PR) jacks
(Progressive Scan)
Connect these jacks to a TV’s Progressive
Scan In jacks if the TV has Progressive Scan.
Use the supplied three-strand component
video cable. Match the cable stripe colors to
the jack colors. If your TV does not have
Progressive Scan, use the COMPONENT
VIDEO OUT jacks instead. Details are on page
10. Also see your TV manual for details.
DIGITAL AUDIO OUT COAX
(coaxial) jack
Connect a digital audio coaxial cable
here and to the digital audio coaxial In
jack of a Stereo. Details are on page 14.
DIGITAL AUDIO OUT OPTICAL jack
Connect a digital audio optical cable here and to
the digital audio optical In jack of a Stereo. Details
are on page 14.
AUDIO OUT/ IN (Left/Right) jacks
Use the supplied audio cables (with red and white stripes) to connect the Recorder’s AUDIO OUT jacks to the Audio In jacks of a
television or Stereo. Details are on pages 10-13.
Use the AUDIO IN jacks when connecting additional equipment
to the DVD Recorder. Details are on page 15.
Helpful Hints
• Each Audio and Video jack is
labelled EXT1, EXT2, or EXT3.
Use the same EXT (external)
number for the audio and video
connection to the TV. For
example, if you use S-VIDEO,
which is EXT1, use the EXT1
AUDIO jacks.
• Do not touch the inner pins of
the jacks on the rear panel.
Electrostatic discharge may
damage the unit permanently.
• You only need one audio and
one video connection to a TV.
You might not use all the jacks.
Menu Bars 25
In addition to using the shortcut buttons on the remote control to select features, you can use the Menu Bars to operate features. You can not access the
Menu Bars during recording.
When a Menu Bar is on the screen, press the 98 ; : buttons on the remote
control to select an item. The 98; : symbols in the Menu Bar mean more
items are available. Press 98 ; : on the remote control to select these items
or to change the setting of an item.
Menu Bar 1
*Press SYSTEM MENU once to access Menu Bar 1. The following
items are in Menu Bar 1. Depending on the available Disc features, you may
not be able to access each item at all times. Only available features can be
selected.
User Preference Settings Set your preferences for audio and video
quality, depending on the equipment you connected to the DVD
Recorder. Also set up Languages, Access Control, Playback Control,
Remote Control, Settings, Installation features, and other DVD
Recorder features.
W
Title Select to choose an available Title or Track for playback. Use the
Number buttons or the 89 buttons to select the Title you want.
Playback will start automatically.
X
Chapter Select to choose an available Chapter for playback. Use the
Number buttons or the 89 buttons to select the Chapter you want.
Playback will start automatically.
Y
Audio Language If the current DVD has multiple audio soundtracks,
choose one here. For example, some DVDs let you play the movie in
other languages or hear a director’s commentary during playback. Check
the Disc case for details. Details are on page 29.
Subtitle Language If the current DVD has subtitles in multiple lan-
Z guages, select a language here. Details are on page 29.
Angle Select to choose a different camera angle, if available, during
DVD playback. Details are on page 30.
Zoom Select to enlarge the DVD or DVD+RW picture by 1.33, 2, or
a 4 times the normal size during playback. Details are on page 30.
Menu Bar 2
*While in Menu Bar 1, press : repeatedly to move to Menu Bar 2.
The following items are in Menu Bar 2.
d
Sound Mode Select to choose a sound mode: Stereo (st), Dolby
Surround compatible (sur), 3D Sound (3d). Details are on page 31.
Frame-by-frame playback Select for forward or reverse frame-byframe playback of a DVD or DVD+RW. Press 9, then press ; or : to
move the picture backward or forward one frame at a time. Details are
on page 31.
H
E
Slow motion Select to slow the speed of DVD or DVD+RW playback.
Details are on page 32.
Fast motion Select to play a DVD or DVD+RW forward or backward
at four, eight, or 32 times the normal playback speed. Press 9, then
press ; or : to choose a backward (-) or forward speed. Details are on
page 32.
Time Search Select to enter a specific time within the current Track,
Title, or Chapter at which you want playback to begin. Details are on
page 33.
26 On-screen Symbols, Status Box
On-screen Symbols
The following symbols will appear briefly on the TV screen when you activate some Disc features.
scan
repeat
title
chapter
Scan The first 10 seconds of each
Chapter/Track will play.
Details are on page 33.
Repeat All The entire Disc will play
repeatedly.
Details are on page 34.
Repeat Title The current Title will play
repeatedly.
Details are on page 34.
2/2
locked
Locked The current Disc is Locked and
cannot play.
Details are on pages 49-53.
safe
Safe The current Disc is authorized for
playback.
Details are on pages 49-53.
Repeat Chapter The current Chapter
will play repeatedly.
Details are on page 34.
A-
Repeat A Point A for Repeat A-B playback has been entered.
Details are on page 34.
A-B
Repeat A-B A segment of the Disc will
play repeatedly.
Details are on page 34.
Angle Multiple angles are available.
Details are on page 30.
“X” The feature you just attempted is
not available on the current Disc or at the
current time.
Status Box
The Status Box shows the current status of the Recorder and information about the current Disc,
including Disc type, total playing time, and elapsed playing time. Set Status box to On if you want to
see the following icons briefly when you access a feature. Details are on page 54.
Disc status icons
0
rec
9
stop
;
pause
0;
pause
K
x4
J
x4
H
1/4
Disc type icons
recording
DVD+RW
stop
DVD-Video
pause play
pause recording
fast forward at four times
the regular speed
fast reverse at four times
the regular speed
slow motion
SVCD
Super Video-CD
Video-CD
no Disc
Disc error
Information Boxes 27
Warning box
Appears near the bottom of the screen when appropriate. Examples and details are on page 43.
Disc locked
Tuner Information box
Appears on the left side of the TV screen and identifies the current TV channel or Video source you
are watching. For example, if EXT1 appears in the Tuner Information Box, you are viewing or recording the material that is playing on the equipment that is connected to the EXT1 AUDIO and VIDEO
IN jacks on the rear of the Recorder.
You can not remove the Tuner Information box during TV or video viewing. The Tuner Information
box does not appear during recording or Disc playback.
Make sure you have connected an Antenna or Cable TV signal to the ANTENNA jack on the
Recorder. Details are on pages 10-14. Press TUNER to go into Tuner mode and view the TV channel
or playback from other equipment.
Current TV channel
012
No signal - Channel is not
receivable or no equipment
is connected to the designated jack.
Copy-protected signal
012
Timer Information box
Displays the start time or date of the next scheduled timer recording and appears in the Index Picture
Screen. It also may appear at the beginning of a timed One-Touch Recording. The Timer Information
box does not appear during recording or Disc playback.
Timer recording due today
Timer recording set for another day
within the upcoming year
4
The time at which the current
One-Touch Recording will end.
10:15 pm
Current time; no timer recordings are
scheduled.
pm
28 Title/Disc Menus, Chapter/Track Selection
DVD
DVD+RW
Title/Disc menus
1
Press DISC MENU during Disc playback.
For a DVD, if the current Title has a menu, the Title menu will
appear on the screen. Otherwise, the Disc menu will appear. The
menu may list camera angles, spoken language and subtitle options,
and Chapters for the Title.
For a DVD+RW, the Index Picture Screen will appear.
Details are on page 35.
TUNER
ON/OFF
REC/OTR
STOP
REVERSE
PAUSE
PREVIOUS
PLAY
1
SLOW
FORWARD
NEXT
EDIT
2
Press 98 ; : to select items in the menu or Index Picture
Screen, then press OK. Continue until you set up all the features
you want or until playback begins.
2
CLEAR
SELECT
TIMER
CH
VOL
MUTE
DVD
AUDIO CD
VIDEO CD
DVD+RW
TUNER
ON/OFF
Chapter/Track Selection
1
2
Press NEXT ∑ during playback to go to the next
Track/Chapter. Press PREVIOUS w once to return to the
beginning of the current Track/Chapter. Press PREVIOUS w
repeatedly to step back to previous Tracks/Chapters.
1
REC/OTR
STOP
REVERSE
PAUSE
SLOW
PLAY
FORWARD
PREVIOUS
NEXT
EDIT
To go directly to any Track/Chapter during playback, press
the Number buttons to enter the Track/Chapter number.
If you enter an invalid number, an “X” may appear in the top left
corner of the TV screen. The current Track/Chapter will continue
to play. Or, an incorrect Track/Chapter may begin to play. Make
sure the Track/Chapter number you enter is available on the Disc.
Make sure the Chapter is available within the current Title. The
Menu Bar will disappear automatically in a few seconds.
CLEAR
SELECT
TIMER
CH
VOL
MUTE
T/C
2
A/CH
Audio Language, Subtitles 29
DVD
Audio Language
CLEAR
SELECT
TIMER
VOL
CH
Some DVDs are recorded in different languages. For example, you may be
able to watch the same movie in French, Spanish, etc. The movie may have
special audio features, such as a director’s commentary or music soundtrack. If these are available on the DVD, access the different languages or
featured soundtracks by following these steps.
1
2
During DVD playback, press the AUDIO Y button.
Y Audio will be selected in the Menu Bar.
Within five seconds, press the AUDIO Y button repeatedly
to see the different languages available. Or, press 8 or 9
repeatedly to see the different languages. The language you select
will be audible in a few seconds. The Menu Bar will disappear automatically in a few seconds.
The languages or options may be abbreviated. For example, French
may be Fr. See your Disc case for details on available audio features
and explanations.
~
W
1
X
Y
Z
s KB
1
2
1enL
no
MUTE
1,2
A/CH
T/C
ZOOM
ANGLE
SUBTITLE
AUDIO
DIM
REPEAT
REPEAT
SCAN
a
off
L F
DVD play
0:29:40
0:00:07
DVD
DVD+RW
Subtitles
Some DVDs include subtitles in different languages. Or, material you
recorded onto a DVD+RW might include subtitles. To choose subtitles,
follow these steps.
1
2
During playback, press the SUBTITLE Z button.
Z (Subtitle) will be selected in the Menu Bar.
CLEAR
SELECT
TIMER
VOL
CH
Within five seconds, press the SUBTITLE Z button
repeatedly to see the different subtitle languages. Or, press
89 to see the different subtitle languages. Subtitles will appear
after a few seconds. The Menu Bar will disappear automatically in a
few seconds.
You can choose subtitles only if they are available on the Disc.
~
L F
RW play
0:29:40
0:00:07
W
1
X
2
Y
Z
s
B
1en 1en KL no
a
off
MUTE
1,2
A/CH
T/C
ZOOM
ANGLE
SUBTITLE
AUDIO
DIM
REPEAT
REPEAT
SCAN
30 Zoom, Camera Angle
DVD
Zoom
VIDEO CD
DVD+RW
Zooming lets you enlarge the video image during playback and pan through
the enlarged image.
1
2
Press ZOOM a during Disc playback. a Zoom will be selected in the Menu Bar.
Within five seconds, press 8 or 9 to choose 1.33, 2
or 4. Playback will pause, and the still picture will appear at
1.33, 2, or 4 times the normal size.
~
W
1
X
2
Y
1en
L B
RW pause
0:29:40
0:00:07
3
4
5
6
REC/OTR
STOP
Z
1
REVERSE
PAUSE
PLAY
SLOW
FORWARD
PREVIOUS
NEXT
2,3
5
EDIT
6
a
B
1.33KL
s
no
Press OK to pan
CLEAR
SELECT
TIMER
VOL
CH
3,4
MUTE
To move the enlarged picture around on the TV screen, or
“pan,” press OK. Then, press 9 8 ; : to move the picture.
Press OK again to see the still, zoomed picture without the
Menu Bar.
To return to regular playback, press PLAY
1
:.
T/C
Press SYSTEM MENU to remove the Menu Bar again.
A/CH
ZOOM
ANGLE
SUBTITLE
AUDIO
DIM
REPEAT
REPEAT
SCAN
DVD
Camera Angle
Some DVDs include scenes recorded from different angles. To watch segments from a different angle, follow these steps.
1
2
During DVD playback, press the ANGLE button. Angle will
be selected in the Menu Bar.
Within five seconds, press 89 to select a different angle. In
a few seconds, playback changes to the selected angle.
• Or, if the Angle symbol appears in the top left corner of the TV
screen during playback, multiple angles are available. Simply press
89 to switch among the different angles.
2/2
~
L F
DVD play
0:29:40
0:00:07
W
1
X
2
Y
1en
CLEAR
SELECT
TIMER
2
CH
VOL
MUTE
Z
a
s KB
off
1
1/2L
1
A/CH
T/C
ZOOM
ANGLE
SUBTITLE
AUDIO
DIM
REPEAT
REPEAT
SCAN
Sound, Still Picture/Frame-by-Frame Playback 31
Sound
Choose a sound setting based on the capabilities of the equipment to
which you connected the DVD Recorder. Details are on pages 9-14 and 57.
1
2
3
TUNER
ON/OFF
Press SYSTEM MENU.
REC/OTR
STOP
Press : repeatedly to select
d.
1,4
2,3
REVERSE
PAUSE
SLOW
FORWARD
PREVIOUS
Press 89 to select st (stereo), sur (surround), or 3d.
● Select Stereo if your audio equipment is not compatible with
either Dolby Surround or TruSurround, or if you connected the
DVD Recorder to a Stereo TV only.
● Select Dolby Surround compatible if your audio equipment is
compatible with Dolby Surround. If it is, usually a Dolby Pro Logic
logo will appear on the equipment.
● Select 3D if the audio equipment is TruSurround compatible.
Again, the audio equipment likely will be labeled with the
TruSurround logo.
s
d
B
st KL
H
E
NEXT
EDIT
CLEAR
SELECT
TIMER
VOL
CH
L C
RW stop
--:-- --:-- -5
4
PLAY
MUTE
Press SYSTEM MENU to remove the Menu Bar.
DVD
DVD+RW
Still Picture/Frame-by-frame Playback
To quickly pause playback, press PAUSE k on the remote control during
playback. To advance the still picture one frame at a time, press PAUSE k
repeatedly. To resume play, press PLAY :.
Or, to freeze the picture during Disc playback using the Menu Bar, follow
the steps below.
TUNER
STOP
ON/OFF
REC/OTR
1,5
2,3
REVERSE
PAUSE
PREVIOUS
PLAY
SLOW
FORWARD
NEXT
EDIT
1
2
3
Press SYSTEM MENU during playback.
Press : repeatedly to select
Press 9 to freeze the picture, then press ; : to move the
picture backward or forward one frame at a time.
Do not leave a still picture on your TV more than five minutes. This
may etch the image onto your screen permanently. Other still visual
elements, such as TV station logos or video games, also will damage
your TV screen if left too long.
d
st
L B
RW pause
0:29:40
0:00:07
4
5
.
H
E
o
e
Press PLAY : to resume regular playback.
Press SYSTEM MENU to remove the Menu Bar.
4
Helpful Hint
• The Recorder also refers to
Sound settings as Analog Output.
This means the sound the
Recorder sends to your audio
equipment (stereo receiver) is
analog, or two-channel, left and
right. You know you are using
analog sound because you used
the red and white, left and right,
Audio jacks in your connections.
Details are on page 57. Whether
you adjust the sound settings
here or as described on page 57,
the results will be the same.
32 Slow Motion, Forward and Reverse Searching
DVD DVD+RW
Slow Motion
Start slow motion playback simply by pressing the SLOW H button during
playback. Press SLOW H repeatedly to play the Disc at 1/2, 1/4, or 1/8 the
regular speed.
Or, to use the Menu Bar for slow motion, follow the steps below.
TUNER
4
REC/OTR
STOP
REVERSE
1
2
3
ON/OFF
PAUSE
PLAY
SLOW
1,5
FORWARD
During Disc playback, press SYSTEM MENU.
PREVIOUS
Press : repeatedly to select H (Slow motion), then press
9. Playback will pause.
2,3
Press ; : to select the required speed: -1, -1/2, -1/4 or -1/8
(backward), or 1/8, 1/4, 1/2 or 1 (forward). The Disc will start
to play at the speed you selected, for example, one-half as fast as
normal (1/2).
Select 1 to play the Disc at normal speed again. Select 0 or press
PAUSE k on the remote control to pause the picture.
d
st
H
E
NEXT
EDIT
CLEAR
SELECT
TIMER
VOL
CH
K
L F
RW pause
0:00:22
0:00:05
4
5
-1 -1/2 -1/4 -1/8 s 0 B 1/8 1/4 1/2 1
MUTE
To return to normal playback, press PLAY
:.
Press SYSTEM MENU to remove the Menu Bar.
DVD
AUDIO CD
VIDEO CD
DVD+RW
Forward and Reverse Searching
TUNER
1
2
To search a DVD, Video CD, or DVD+RW at four times
the normal speed, press FORWARD ¡ or REVERSE 1
during playback. To search at 32 times the normal speed, press
FORWARD ¡ or REVERSE 1 again. The sound will be mute.
On an Audio CD, to search the Disc at four times the normal speed, press FORWARD ¡ or REVERSE 1 during
playback. Sound will be muted partially. To search at eight times
the normal speed, press FORWARD ¡ or REVERSE 1 again.
The sound will be mute.
Each press of FORWARD ¡ or REVERSE 1 switches between
the slower and faster search speed.
2
ON/OFF
REC/OTR
STOP
REVERSE
PAUSE
PLAY
SLOW
FORWARD
PREVIOUS
NEXT
EDIT
1
Press PLAY : to resume playback or press STOP C to
stop playback.
CLEAR
SELECT
TIMER
VOL
CH
MUTE
Time Search, Scan 33
DVD+RW
DVD
VIDEO CD
Time Search
TUNER
Time Search lets you choose a specific time at which you want to begin
playback.
ON/OFF
REC/OTR
STOP
1,6
REVERSE
1
2
3
Press SYSTEM MENU during Disc playback.
PAUSE
PLAY
SLOW
FORWARD
PREVIOUS
NEXT
2
EDIT
Press : repeatedly to select
.
Press 9. Playback will pause. A time edit box will appear, showing
the elapsed playing time of the current Chapter or Disc.
d
st
H
E
K
L F
DVD pause
0:05:26
0:02:32
s 0:02:32 B
CLEAR
SELECT
TIMER
3
VOL
4
Press the Number buttons to enter the time at which you
want playback to begin. Enter the hour, minutes, and seconds
from left to right in the box. The time must be within the possible
time frame of the current Chapter or Disc. If it is not, play will not
begin after you press OK at step 5. Instead, the first space in the time
edit box will blink. Reenter a correct time.
5
6
Press OK. After a few seconds, playback will resume at the point
you selected.
CH
MUTE
4
T/C
A/CH
Press SYSTEM MENU to remove the Menu Bar.
REC/OTR
STOP
REVERSE
PAUSE
PLAY
SLOW
FORWARD
PREVIOUS
DVD
AUDIO CD
VIDEO CD
NEXT
DVD+RW
EDIT
Scan
Scanning plays the first 10 seconds of each Chapter/Track on the Disc.
1
Press SCAN during playback. Starting at the beginning of the
current Chapter/Track, the first 10 seconds of each Chapter/Track
will play. This will continue until the end of the Disc is reached or
you resume regular playback.
CLEAR
SELECT
TIMER
2
5
To continue regular playback from a Chapter/Track, press
SCAN again or press PLAY :.
VOL
CH
MUTE
1,2
A/CH
T/C
ZOOM
ANGLE
SUBTITLE
AUDIO
DIM
REPEAT
REPEAT
SCAN
2
34 Repeat, Repeat A-B
DVD AUDIO CD
Repeat
VIDEO CD
DVD+RW
MUTE
You may play a Chapter, Track, Title or entire Disc repeatedly.
1
2
During Disc playback, press REPEAT repeatedly to choose
a Repeat option. Depending on the type of Disc, you may choose
to play the Chapter, Track, Title, or Disc repeatedly. During DVD,
Video CD, or DVD+RW playback, the repeat symbols will appear
briefly on the TV screen. Details are on page 26. A DVD+RW will
play repeatedly only if the Disc is full of recordings.
To cancel repeat playback, repeatedly press REPEAT until
all the repeat symbols or messages disappear from the screen.
DVD
AUDIO CD
VIDEO CD
1,2
A/CH
T/C
ZOOM
ANGLE
SUBTITLE
AUDIO
DIM
REPEAT
REPEAT
SCAN
DVD+RW
TUNER
ON/OFF
Repeat A-B
You also may set the DVD Recorder to play only a specific portion of a
Title, Chapter, or Track repeatedly. Follow these steps.
1
2
3
4
Press PLAY : to start Disc playback.
REC/OTR
STOP
REVERSE
PAUSE
PLAY
SLOW
FORWARD
PREVIOUS
NEXT
EDIT
When the Disc reaches the point at which you want repeated playback to begin, press REPEAT A-B.
When the Disc reaches the point at which you want to end
the segment, press REPEAT A-B again. The segment will begin
playing repeatedly.
To resume regular playback, press REPEAT A-B again.
Regular playback will resume from the current point.
CLEAR
SELECT
TIMER
VOL
CH
MUTE
2-4
A/CH
T/C
ZOOM
ANGLE
SUBTITLE
AUDIO
DIM
REPEAT
REPEAT
SCAN
1
Index Picture Screen 35
The Index Picture Screen shows the Titles you have recorded on a DVD+RW. It appears automatically
when you stop playback or recording and a DVD+RW is in the Recorder. (The DVD+RW must contain recorded content.)
An Index Picture represents each Title. Next to the Index Picture is the program name, length of
recording, recording mode/speed, and date of recording. If the Title has no name, the recording
source and time will appear instead (for example, the recorded channel) and the time at which you
started recording the channel.
Empty disc areas (erased Titles or blank space at the end of the Disc) also appear in the Index Picture
Screen. “Empty title” and the amount of remaining recording time appear beside the empty Index
Picture box.
The Index Picture Screen will dim after several minutes of no use. To brighten it again, press any button on the DVD Recorder or its remote control.
Titles
A maximum of three Index Pictures appears on the screen at once. Press 89 to move to additional
Titles if available.
Press STOP C briefly to move directly to the first Title on the Disc.
Press and hold NEXT∑ to move quickly to the last recorded Title on the Disc or to the last Empty
Title.
Disc Bar
The Disc Bar appears at the right of the Index Picture Screen. This overviews all titles on the Disc, as
well as any empty spaces.
On the Disc Bar, an arrow indicates your current position on the Disc. Moving through the Titles by
pressing 89 moves the arrow. You may resume playback or recording from this point by pressing
OK for playback or REC/OTR for recording.
Title Settings Menu
When you select an Index Picture, press : to go to the Title Settings menu for that Title. Here, you
can edit the current Title name, play the entire Title, or erase the selected Title. Details are on page 44.
Title description:
Includes program name, length of recording and
the speed in which it was recorded, and the
date of recording (if clock was set).
Cue: Go to Disc Information Screen or to
Title on previous screen. Details are on page 47.
Index Picture:
An image representing a recorded Title. An
empty box represents an area on the Disc that
is empty and available for recording. To personalize the Index Picture, see page 48.
Current Title
2
Wed 10/02/2002
Disc Pointer: Shows the
current Title number and
its position within the
Disc.
C06 11:20AM
Disc Bar
C10 07:56AM
0100:01:24 . SP
Timer Information
Box: Displays the current time or the
time/date of the next
scheduled timer
recording. Details are
on page 27.
Tuner Information
Box: Displays the currently selected TV
channel or video
source (if additional
equipment is connected to the DVD
Recorder). Details are
on page 27.
K
B 0100:00:22 . SP
X !
Wed 10/24
¡
012
Sun 07/28/2002
L
C10 12:01AM
0100:58:53 . SP
Sun 01/06/2002
4
Cue: Go to Title
on next screen.
36 Installation: Automatic Channel Programming
Although the DVD Recorder selects available TV channels during Initial
Setup, you may want to repeat the process later if more channels become
available in your area. This will erase and replace all previously stored
channels. To update the available channels, follow these steps.
1
2
Press SYSTEM MENU.
to select it.
may be selected. If it is not, press ;
Press 9 repeatedly to select
Installation menu.
TUNER
REC/OTR
STOP
1,4,7
REVERSE
, then press : to enter the
ON/OFF
PAUSE
PLAY
SLOW
FORWARD
PREVIOUS
NEXT
EDIT
Installation
K
u B Auto Ch. Programming
L Add/Delete Channels
VCR Plus+ Ch.
Time/Date
B
2-6
To exit press
SYSTEM MENU
3
Press 89 to select Auto Ch. Programming, then press OK.
“Searching for TV channels” will appear, along with a scale showing
channels that are being memorized. The number of channels found
will show on the screen as the searching progresses. This will take a
few minutes, depending on the number of channels available.
4
When the channel search finishes, “Auto ch. search complete” will
appear, along with the total number of channels found.
Press SYSTEM MENU. The Installation menu will reappear.
If you are satisfied with the channels found, press SYSTEM
MENU again to remove the menu. You are finished.
To add or delete additional channels, press 89 to select
Add/Delete Channels, then go to step 5.
Installation
K Auto Ch. Programming
u B Add/Delete Channels
L VCR Plus+ Ch.
Time/Date
CLEAR
SELECT
TIMER
CH
VOL
MUTE
3,6
A/CH
T/C
ZOOM
ANGLE
SUBTITLE
AUDIO
DIM
REPEAT
REPEAT
SCAN
B
To exit press
SYSTEM MENU
5
Press :. A channel list will appear. Beside each channel number,
you will see “Del” for deleted or “Add” for added.
6
Press 89 to select the channel number you want to add or
delete, then press ; : to choose Add or Del for that channel. Press OK to store your choice. Repeat step 6 as often as
necessary to add or delete all the channels you want.
7
Press SYSTEM MENU repeatedly to remove all the menus
when you are finished.
Installation
Add/Delete Channels
K K...
u Channel 001 s Del
B
L Channel 002
Add
Channel 003
Add
Channel 004
Add
Channel 005
Add
Channel 006
Add
L...
To exit press
SYSTEM MENU
Helpful Hints
• Channels you add will be accessible through the DVD Recorder
when you press the CH +/- buttons on the remote while in
Tuner mode. Channels you
delete will be skipped when you
press the CH +/- buttons. So,
delete channels you rarely
watch. This will quicken channel
changing when you use CH +/-.
You still can select the deleted
channels by pressing the
Number buttons on the remote
while in Tuner mode.
• If new channels become available in your area, or if you
receive a channel that the
Recorder did not program automatically during setup, add the
channel. The channel will be
accessible when you press the
CH +/- buttons.
Installation: VCR Plus+ Ch. 37
If you intend to use the VCR Plus+ programming system, program the
DVD Recorder with your local channel information. This will only take a
few minutes. Since the channel numbers of the stations you receive may
not be the same as the station numbers, and since channel numbers differ
from area to area, you must set up channels in order for the system to
work efficiently.
Before you begin, make sure you have 1) a cable channel list, if applicable
(you can request one from your cable company), and 2) a chart that lists
VCR Plus+ channel numbers, which you can find in your TV guide or the
TV listings of your local newspaper.
1
2
3
Press SYSTEM MENU.
to select it.
may be selected. If it is not, press ;
Press 9 repeatedly to select
Installation menu.
TUNER
ON/OFF
REC/OTR
STOP
REVERSE
PAUSE
PLAY
SLOW
FORWARD
PREVIOUS
NEXT
2-4
EDIT
, then press : to enter the
Press 89 to select VCR Plus+ Ch. (channel), then press :.
CLEAR
SELECT
TIMER
Installation
VOL
Auto Ch. Programming
K Add/Delete Channels
u B VCR Plus+ Ch.
L Time/Date
CH
MUTE
B
4
To exit press
SYSTEM MENU
4
Press 89 to select a VCR Plus+ Ch. number, then press
the Number buttons or ; : to enter the corresponding
Channel number from your TV guide list. If you use the
Number buttons, enter the channel number as a three-digit number.
For example, for channel 18, press 0,1,8.
Refer to the list from your local newspaper or TV guide for the
VCR Plus+ channels and corresponding TV channel numbers for
your area. These are the numbers you will enter as the Channel
number as you complete the chart on the screen.
Installation
VCR Plus+ Ch.
VCR Plus+ Ch.
Channel
K K...
u 001
s 018
L 002
-- -- -003
-- -- -004
-- -- -005
-- -- -L...
To store
Press OK
5
6
1,6
B
Press OK to store the Channel number. Repeat steps 4-5 as
often as necessary to complete the chart.
When you are finished, press SYSTEM MENU repeatedly to
remove all the menus.
A/CH
T/C
ZOOM
ANGLE
SUBTITLE
AUDIO
DIM
REPEAT
REPEAT
SCAN
5
38 Installation: Clock Setting
Time/Date Automatic
The Recorder can set the time and date automatically by referring to your
local PBS station. If the Recorder chooses an incorrect PBS channel or sets
the time/date incorrectly, you can set the information manually. Details are
on page 39.
Before you begin, make sure TV channels are set. Details are on page 36.
TUNER
REC/OTR
STOP
REVERSE
1
2
3
4
5
Press SYSTEM MENU.
to select it.
ON/OFF
PAUSE
PLAY
SLOW
FORWARD
may be selected. If it is not, press ;
Press 9 repeatedly to select
Installation menu.
PREVIOUS
, then press : to enter the
NEXT
2-7
EDIT
Press 9 repeatedly to select Time/Date, then press :.
1,8
Press 89 to choose Automatic, then press :.
CLEAR
With PBS Channel selected, press ; :to choose the channel number of your PBS station, then press OK. If you do not
know your PBS channel number, choose Auto.
SELECT
TIMER
VOL
CH
MUTE
Time/date
Automatic
K
u PBS Channel
L Daylight Saving
Time Zone
s 010
Off
Auto.
B
To store
Press OK
A/CH
T/C
6
Press 9 to choose Daylight Saving. Press ; : to choose
On, Off, or Auto, then press OK.
Time/date
Automatic
K PBS Channel
u Daylight Saving
L Time Zone
010
s Off
Auto.
B
To store
Press OK
7
Press 9 to choose Time Zone. Press ; : repeatedly to
choose your time zone, then press OK.
If you want the Recorder to use the time zone from which your
PBS station broadcasts, choose Auto. If your PBS station broadcasts
from a different time zone than the one in which you live, be sure
to select your time zone.
Time/date
Automatic
PBS Channel
K Daylight Saving
u Time Zone
L
010
Off
s Auto.
B
To store
Press OK
8
8
Press SYSTEM MENU repeatedly to remove the menus,
then press ON/OFF to turn off the Recorder. After a few
minutes, the correct time will appear in the display panel on the
front of the Recorder.
ZOOM
ANGLE
SUBTITLE
AUDIO
DIM
REPEAT
REPEAT
SCAN
5-7
Installation: Clock Setting (cont’d) 39
Time/Date Manual
If the Recorder does not set the time and date correctly using the
Time/Date Automatic feature, set the clock manually by following the steps
below.
TUNER
REC/OTR
STOP
1
2
3
4
Press SYSTEM MENU.
to select it.
ON/OFF
PLAY
may be selected. If it is not, press ;
Press 9 repeatedly to select
Installation menu.
REVERSE
, then press : to enter the
Press 9repeatedly to select Time/Date, then press :.
PAUSE
SLOW
FORWARD
PREVIOUS
NEXT
1,11
EDIT
2-10
Press 9 to choose Manual, then press :.
Time/date
Manual
K
u Time
L AM/PM
Year
Month
Date
Daylight Saving
s 04:24 B
PM
2002
02
14
Auto
CLEAR
SELECT
TIMER
VOL
CH
MUTE
5-10
To exit press
SYSTEM MENU
5
Time will be highlighted. Press ; : to choose the correct time
in hours and minutes, then press OK. Or, press the Number
buttons to quickly enter the time in hours and minutes, then press
OK.
6
7
8
9
10
11
Press 9 to choose AM/PM, then press ; : to choose AM
or PM. Press OK.
A/CH
T/C
ZOOM
ANGLE
SUBTITLE
AUDIO
DIM
REPEAT
REPEAT
SCAN
Press 9 to choose Year, then press ; : to choose the current year. Press OK.
Press 9 to choose Month, then press ; : to choose the
current month. Press OK.
Press 9 to choose Date, then press ; : to choose the current date. Press OK.
Press 9 to choose Daylight Saving, then press ; : to
choose On, Off, or Auto. Press OK.
Press SYSTEM MENU repeatedly to remove all menus.
Helpful Hints
• In order for the clock to
remain set as you specified
manually, set Daylight Saving
to Off.
• To keep the automatic clock
from overriding your manual
clock setting, set PBS Channel
to an incorrect PBS station.
Details are on page 38.
• If you set up channels again
as described on page 36, you
must reset your clock.
• When you set the clock manually, you may see an error
message every time you turn
on the Recorder, indicating
that the clock is not set. If the
time you set appears on the
Recorder’s display, disregard
the error message.
40 One-Touch Recording
1
2
3
4
5
6
Insert a recordable DVD+RW into the Recorder.
Details are on pages 18 and 22.
In the Index Picture Screen, press 89 to select an empty
Title (or empty Index Picture box) on the Disc that has
enough remaining recording time for the recording. Details
are on page 35.
Press TUNER to see TV channels through the DVD Recorder.
Make sure you have programmed channels. Details are on page 36.
6
TUNER
REC/OTR
STOP
3
ON/OFF
REVERSE
PAUSE
PLAY
SLOW
FORWARD
PREVIOUS
NEXT
EDIT
Press CH+, CH- or the Number buttons to select the channel you wish to record.
Press REC/OTR twice to start a 30-minute recording. Press
REC/OTR repeatedly to record longer timed recordings, up
to four hours long in thirty-minute increments.
Press |STOP C if you need to stop the recording before the
designated end time. Otherwise, the Recorder will automatically
stop recording at the designated end time and turn itself off.
SELECT
CLEAR
TIMER
VOL
5
2
CH
MUTE
4
A/CH
T/C
ZOOM
ANGLE
SUBTITLE
AUDIO
DIM
REPEAT
REPEAT
SCAN
Helpful Hints
• You cannot set a timed recording of a length that will exceed
the remaining recording time of
the Disc (at the current speed).
• An ‘X’ will appear in the top left
corner of the screen if a protected DVD+RW is in the Recorder.
• If the power fails during recording, the Index Picture Screen
may not match the actual video
content on the Disc. The last
recorded Title may be lost.
Timer Recording 41
1
2
Press TIMER on the remote control.
Press 89 to select Timer Programming, then press :.
Timer
TUNER
REC/OTR
STOP
REVERSE
K VCR Plus+ programming
uB Timer Programming
L Timer List
ON/OFF
PAUSE
PLAY
SLOW
FORWARD
B
PREVIOUS
11
NEXT
EDIT
To exit
Press TIMER
3
Date will be selected. Press 89 to enter the month and date
you want the recording to start, then press :.
Press SELECT repeatedly to choose: the date (timer recording
will occur once on the day you choose); Mo-Fr (timer recording will
occur every weekday at the same time); or a day of the week (for
example, Mo for Monday; timer recording will occur every Monday at
the same time).
Timer
Timer Programming
4
5
6
7
2-8
CLEAR
SELECT
TIMER
VOL
CH
3,5,6
MUTE
Rec
Date Ch. Start
End
Mode
10/24 122 09:00AM 09:30AM EP
Mo-Fr/Weekly
Press SELECT
9
1,10
To store
Press OK
Ch. (channel) will be selected. Press 89 to enter the channel you
want to record, then press :.
Start will be selected. Press 89 to enter the time at which you
want recording to begin - in hours and minutes. Then, press
SELECT repeatedly to choose AM or PM. When the start
time is correct, press :.
A/CH
T/C
ZOOM
ANGLE
SUBTITLE
AUDIO
DIM
REPEAT
REPEAT
SCAN
End will be selected. Press 89 to enter the time at which you
want recording to stop - in hours and minutes. Then, press
SELECT repeatedly to choose AM or PM. When the End
time is correct, press :.
Rec Mode (Record Mode) will be selected. Press 89 to choose the
speed at which you want recording to occur. Choose HQ, SP,
LP, or EP.
HQ allows one hour of recording per Disc; SP, two hours; LP, three
hours; and EP, four hours. The slower the speed, the more recording
time per Disc. EP is the slowest speed. The faster the speed, the better the picture quality. HQ is the fastest speed. Details are on page 46.
8
9
10
11
Take a minute to check your timer information. If something is incorrect, press ; : to choose the incorrect information. Use 89 to
enter the correct data.
When the information is correct, press OK. Stored will appear
briefly, then the Timer menu will reappear.
Press TIMER to remove the menu.
Put a recordable DVD+RW in the Recorder. Press
ON/OFF to turn off the Recorder a few minutes before the
timer recording is set to begin. The Recorder must be off in
order for the timer recording to begin. For the timer recording, the
DVD Recorder will turn itself on, record, then turn itself off when
finished.
Helpful Hints
• For additional Timer information,
see page 43.
• You can enter the information for
Date, Channel, Start, and End
using the Number buttons. If you
do, the next item will be selected
automatically.
• When using the Number buttons,
enter channel numbers as a three
digit number. For example, for
channel 15, press 0,1,5.
• To stop a timer recording that is
in progress, press ON/OFF on the
remote control to turn off the
Recorder and stop the recording.
• Use HQ when recording from
digital sources, such as a digital
camcorder.
42 VCR Plus+ Timer Recording
A PlusCode is a number of up to eight digits, printed in most TV guides
next to the start time of a TV program. You can program a timer recording quickly by simply entering the code for your program.
Before you begin, complete the VCR Plus+ channel setup. Details are on
page 37.
1
2
Press TIMER on the remote control.
TUNER
ON/OFF
REC/OTR
STOP
REVERSE
PAUSE
PLAY
SLOW
FORWARD
PREVIOUS
6
NEXT
Press 89 to select VCR Plus+ programming, then press :.
EDIT
2
Timer
K
uB VCR Plus+ programming
L Timer Programming
Timer List
B
To exit
Press TIMER
CLEAR
SELECT
TIMER
VOL
3
Press the Number buttons to enter the PlusCode number
from your TV guide, then press OK. Information about the
timer will appear. If information is missing or not available, you may
be asked to enter more information. Follow the instructions given
on the screen.
If you make a mistake, press CLEAR to erase the PlusCode, then
enter it again.
CH
MUTE
1,5
Timer
VCR Plus+ programming
A/CH
T/C
-- -- -- -- -- -- -- --
Mo-Fr/Weekly
Press SELECT
4
To store
Press OK
If the timer recording information seems complete, press
OK. “Stored” will appear on the screen briefly.
Timer
VCR Plus+ programming
Rec
Date Ch. Start
End
Mode
10/24 122 09:00AM 09:30AM SP
AM/PM
Press SELECT
5
6
Press OK
Press TIMER to remove the menu.
Put a recordable DVD+RW in the Recorder. Press ON/OFF
to turn off the Recorder before the timer recording is set
to begin. The Recorder must be off in order for the timer recording to occur.
ZOOM
ANGLE
SUBTITLE
AUDIO
DIM
REPEAT
REPEAT
SCAN
3,4
3
Erasing Timer Recordings, Error Messages 43
Erasing Timer Recordings
1
2
3
4
5
Press TIMER.
6
Press TIMER repeatedly to remove the menus.
TUNER
Press 89 to choose Timer list, then press :.
ON/OFF
REC/OTR
STOP
REVERSE
PAUSE
PLAY
SLOW
FORWARD
Press 89 to highlight the timer recording you want to clear.
PREVIOUS
NEXT
EDIT
Press CLEAR. The recording you selected will appear alone on the
screen.
Press OK to erase the timer recording. “Timer Cleared” will
appear at the bottom of the screen briefly, then the Timer List will
reappear. (If you decide not to erase the timer recording, press the
TIMER button. The Timer List will reappear.)
2,3
4
SELECT
CLEAR
TIMER
CH
VOL
MUTE
Error Messages
The following messages may appear while you set a timer recording.
Collision
The timer recording overlaps with another timer recording.
• To ignore the message, press TIMER again. The program with the earlier start time will record completely, then the remainder of the later
program will record.
• Change one or both timer recordings. Details are on page 41.
• Delete one of the timer recordings as described above.
Please enter channel number
The VCR Plus+programming system does not recognize the TV channel.
• Press ; : to select the required VCR Plus+ channel number, then
press OK. Details are on page 37.
1,6
5
A/CH
T/C
ZOOM
ANGLE
SUBTITLE
AUDIO
DIM
REPEAT
REPEAT
SCAN
PlusCode wrong
You entered an incorrect PlusCode number.
• Enter the correct information or press TIMER repeatedly to quit.
Weekend programming -not possible
You entered an incorrect date or chose a daily (Mo-Fr) recording. You can
only use daily programming for recordings that will occur Monday,
Tuesday, Wednesday, Thursday, or Friday.
Memory full
All the timer blocks are in use. The recorder can store a maximum of six
timer recordings at one time.
• Delete one of the timer recordings.
Data error
Make sure all information for the timer recording is correct and complete.
Helpful Hints
• Timer recordings that overlap or
conflict with another will appear
in a red highlight in the Timer
List.
• You may not be able to access
the Timer menu if the clock is not
set. See pages 38-39 to set the
clock.
44 Title Settings Menu
The Title Settings Menu lets you rename a Title that you have recorded
onto a DVD+RW. From the same menu, you can also play the entire
selected Title or erase the chosen Title from the DVD+RW.
1
When playback is stopped and a DVD+RW is in the DVD
Recorder, the Index Picture Screen will appear automatically.
Details are on page 35.
TUNER
ON/OFF
REC/OTR
STOP
REVERSE
PAUSE
PLAY
SLOW
FORWARD
2
C10 07:56AM
PREVIOUS
0100:01:24 . SP
NEXT
EDIT
Wed 10/02/2002
K
X !
Wed 10/24
¡
012
C06 11:20AM
B 0100:00:22 . SP
4
Sun 07/28/2002
L
C10 12:01AM
0100:58:53 . SP
Sun 01/06/2002
2-5
CLEAR
2
3
4
Press 89 to select the Index Picture of the Title you want
to name, play, or erase, then press :. The Title settings menu
will appear.
CH
VOL
MUTE
Press 89 to select Name, Play full title, or Erase this title,
then continue as directed for each option in step 4.
Name
Press :. The first character of the Title name will be selected.
Press 89 to change the character.
Press SELECT to switch between upper and lower case letters.
Press CLEAR to erase a character. To move to the next or previous
character, press ;:. Repeat this process until you have finished
naming the Title.
When the Title is complete, press OK.
●
Play full title
Press OK. The Title you selected will begin to play from its beginning.
●
Erase this title
Press OK. The DVD Recorder will ask you to confirm that you
really want to erase the entire Title. Press OK again to start
erasing the Title. “Erasing title” will appear during erasure. When
erasing is complete, the Index Picture Screen will reappear.
(If you do not want to erase the Title, press ; to return to the
Title Settings menu.)
●
Settings for title XXXXX
Settings for title XXXXX
Name
Play full title
Erase this title
K
s XXXXX
L
B
Name
K
sL Play full title
XXXXX
Press OK
Erase this title
Settings for title XXXXX
Name
Play full title
K
s Erase this title
5
SELECT
TIMER
XXXXX
Press OK
Press ; to return to the Index Picture Screen if necessary.
A/CH
T/C
ZOOM
ANGLE
SUBTITLE
AUDIO
DIM
REPEAT
REPEAT
SCAN
Manual Recording Volume, Append Recording 45
Manual Recording Volume
You can adjust manually the volume level of your DVD Recorder during
recording.
1
During recording of a TV broadcast, press AUTO/MAN
REC VOLUME on the front of the DVD Recorder. (You may have
to press PANEL first to access the front panel buttons.) The display
will show the current audio level. MANUAL appears on the display.
2
3
Press MANUAL 89 on the front of the DVD Recorder to
adjust the volume level.
To return to automatic audio level control, press
AUTO/MAN REC VOLUME again. MANUAL will disappear
from the display.
2
1,3
Append recording
To add a new video recording to an earlier recorded Title, follow these
steps.
1
2
3
4
5
6
In the Index Picture Screen, press 89 to select the Title to
which you want to add a recording.
Press PLAY :.
When you reach the point at which you want to start the
new recording, press PAUSE k.
Press TUNER, then press CH+/- to select the channel (or
other equipment) you want to record.
Press REC/OTR. The new recording will start at the point you
selected and overwrite the video material beyond this point, including later Titles.
Press STOP C to stop recording.
6
TUNER
REC/OTR
STOP
4
ON/OFF
REVERSE
PAUSE
PLAY
SLOW
FORWARD
PREVIOUS
NEXT
5
EDIT
3
1
2
CLEAR
SELECT
TIMER
CH
VOL
4
MUTE
Helpful Hint
• You can not use Manual Audio
Control when recording from
equipment that is connected to
the DV jack on the front of the
Recorder. Manual Audio Control
is only effective when recording
in Tuner mode.
46 Record Settings, Chapter Markers
Record Settings
1
2
3
4
Press SYSTEM MENU.
to select it.
may be selected. If it is not, press ;
TUNER
REC/OTR
STOP
Press 9 repeatedly to select
ON/OFF
PLAY
, then press :.
REVERSE
Press 89 to select Record mode, Auto chapters, or LP/EP
rec mode, then proceed as described in step 4.
Record mode
Press ; : to choose SP, LP, EP, or HQ, then press OK.
“Stored” will appear briefly. Now, recordings will be made in the
speed, or mode, you selected.
The recording mode defines the picture quality of recordings and
the maximum recording time for a Disc. You can play a Disc only in
the mode in which it was recorded. See the chart below for details.
PAUSE
SLOW
1,5
FORWARD
PREVIOUS
NEXT
EDIT
●
Auto chapters
Press ; : to choose On or Off, then press OK. “Stored” will
appear briefly. If Auto chapters is On, the Recorder will insert a
Chapter marker automatically every five to six minutes during
recording. To disable this feature, select Off.
You can manually insert Chapter markers after recording. Details are
on page 48. You also may insert Chapter markers manually during
recording. See Chapter Markers below.
●
LP/EP rec mode (recording mode)
Press ; : to choose Stndrd (Standard) or Sport, then press
OK. “Stored” will appear briefly. Adjust this setting only if you
chose LP or EP at Record mode as described above. (The setting
has no effect when recording in HQ or SP.) When recording in LP
or EP speed, select Sport to improve recording of images that move
quickly. Otherwise, choose Stndrd.
4
2-4
CLEAR
SELECT
TIMER
VOL
CH
MUTE
●
5
Press SYSTEM MENU repeatedly to remove the menus.
Mode
Picture quality
Recording time
per Disc
HQ (High Quality)
Highest quality; allows
least recording time
per Disc
60 minutes
SP (Standard Play)
Equals quality of
a pre-recorded DVD
120 minutes
LP (Long Play)
Equals quality of
an S-VHS tape
180 minutes
EP (Extended Play)
Exceeds VHS tape
quality; allows
most recording
time per Disc
240 minutes
A/CH
T/C
ZOOM
ANGLE
SUBTITLE
AUDIO
DIM
REPEAT
REPEAT
SCAN
Chapter Markers
Chapter Markers let you move easily through recordings by pressing
NEXT ∑ or PREVIOUS w to select the next marker during playback. This
allows you to access specific points on a DVD+RW much as you would
choose a specific Chapter for playback on a DVD.
1
Press EDIT during recording to insert a Chapter marker at
the current position. “Inserting chapter marker” will appear
briefly. The maximum number of markers varies per Disc. When
the maximum number is reached, “Too many chapters” will appear.
Delete some Chapter markers before inserting more. Details are on
page 48.
Helpful Hint
• Use HQ when recording from digital sources, such as a digital camcorder.
Editing: Disc Information Screen 47
You can change Disc settings for a DVD+RW from the Disc Information
Screen.
1
TUNER
1
2
3
When in the Index Picture Screen, press STOP C to select
the first Title on the DVD+RW.
REC/OTR
STOP
Press 8 to enter the Disc Information Screen.
REVERSE
PAUSE
PLAY
SLOW
FORWARD
2
PREVIOUS
In the Disc Information Screen, press : to enter the Settings
menu.
sL 01Disc name
Protection
NEXT
4
Settings for XXXXXX
ON/OFF
EDIT
B sample
Unprotected
Erase disc
5
4
Press 89 to select Disc name, Protection, Erase Disc, or
Make edits compatible. Proceed as follows, depending on
which feature you want to adjust.
● Disc name
Press :. Press ;: to choose the character position, then
press 89 to enter a character. Press SELECT to alternate
between capital and lower case characters. Press CLEAR to erase a
character (the space will remain). A name may contain a maximum of
64 characters.
To return to the Settings menu, press ;, repeatedly if necessary.
“Storing name” will appear briefly.
Protection
Press :. Press 89 to select Protected or Unprotected, then
press OK. If you protect the Disc, you can not make any further
changes to the Disc, including recording. “Disc locked” will appear on
the TV screen briefly if you attempt recording. Choosing Protected
also disables most editing features.
To edit or record again, select Unprotected.
CLEAR
SELECT
TIMER
VOL
4
CH
MUTE
A/CH
T/C
ZOOM
ANGLE
SUBTITLE
AUDIO
DIM
REPEAT
REPEAT
SCAN
●
● Erase disc
Press OK. “This will erase all titles Press OK to confirm” will appear.
Press OK again to begin erasing. (If you decide not to erase the
Disc, press ;.) “Erasing disc” appears until erasing is complete. When
the Disc is erased, the Index Picture Screen will reappear, showing the
free space on the Disc.
Make edits compatible
This option appears only if the current DVD+RW is not compatible
with other DVD Players. After choosing Make edits compatible,
press OK. “This will take XX” and “Press OK to confirm” will appear
to indicate how long the action will take.
Press OK again. “Working ..” and a progress bar will appear until
the action is complete.
●
5
Press ; when you are finished and want to return to the Disc
Information Screen.
Helpful Hint
• For information on the Index
Picture Screen, see page 35.
3
48 Editing
1
2
On the Index Picture Screen, press 89 to select the Title
you want to edit, then press PLAY : to begin playback.
During DVD+RW playback, press EDIT. The Favorite Scene
Selection menu will overlay the currently playing video image. The
current Title and Chapter numbers will appear at the top of the
screen.
TUNER
ON/OFF
4
REC/OTR
STOP
REVERSE
PAUSE
PLAY
SLOW
FORWARD
PREVIOUS
W
1
L B
RW play
0:01:24
0:00:22
NEXT
X
2
1,3,4
EDIT
Favorite Scene Selection
01Insert chapter marker
K
L Current chapter
Delete chapter marker
B Hidden
Delete all markers
New index picture
1
2,5
Divide title
CLEAR
SELECT
TIMER
3
4
Press 89 to select Insert chapter marker, Current chapter, Delete chapter marker, Delete all markers, New Index
Picture, or Divide title, then proceed as described in step 4.
VOL
CH
4
MUTE
If you select Insert chapter marker, press OK. “Inserting
chapter marker” will appear briefly. This places a Chapter marker at
the point you select. Then, you can move quickly to that point during playback by pressing NEXT ∑ or PREVIOUS w to select the
next Chapter.
●
If you select Current chapter, press : (or SELECT) repeatedly to select Visible or Hidden, then press OK. Initially all
Chapters are visible during playback. By hiding chapters or making
them visible, you determine which chapters you want to view. For
example, if you do not want to watch certain scenes (for example,
commercials), hide that segment by choosing Hidden. Then, watch
your recording without the hidden chapters. The picture may freeze
briefly between scenes, but you will not see the hidden content.
●
A/CH
T/C
ZOOM
ANGLE
SUBTITLE
AUDIO
DIM
REPEAT
REPEAT
SCAN
If you select Delete chapter marker, press OK. This deletes
the Chapter marker at the beginning of the current Chapter. (This
option is not always available.)
●
If you select Delete all markers, press OK. “This will delete
all markers in this title. Press OK to confirm” will appear. Press
OK again. (If you decide not to delete all markers, press ;.)
(This option is not always available.)
●
● If you select New Index Picture, press PAUSE F or
SLOW H to accurately choose a frame of picture during
playback. This frame will become the miniature picture that will
appear in the Index Picture Screen for the current Title.
When you reach the desired picture frame, press OK. “This
will update the index picture Press OK to confirm” will appear.
Press OK again. “Updating menu” will appear, then the Index
Picture Screen will reappear when the action is complete.
(If you decide not to select a new Index Picture, press ;.)
If you select Divide title, press PAUSE F to accurately
choose the point at which you want to start the new Title.
Press OK. “This will divide this title into two separate titles. Press
OK to confirm” will appear. Press OK again. “Dividing title”
appears until the action is completed. The Index Picture Screen will
reappear. (If you decide not to divide the Title, press ;.)
●
5
Press EDIT to remove the Favorite Scene Selection menu if necessary.
Helpful Hints
• The maximum number of
Chapters per Title varies. When
you reach the maximum number, “Too many chapters” will
appear on the screen. Delete
Chapters before making more.
• The Favorite Scene Selection
menu will disappear after about
five minutes if you do not edit
any information.
• You cannot undo a Title division. A new index picture will
appear at the point at which
you divided the Title. The Index
Picture Screen will show two
titles instead of one, but both
will have the same name. You
can change the name in the
Title Settings menu. Details are
on page 44.
Access Control 49
DVD VIDEO CD
Access Control limits viewing of Discs that exceed the limits you set. This feature
will not limit viewing if the Disc manufacturer did not code the Disc. Philips cannot
guarantee the availability of Access Control with all Discs, and therefore denies any
liability associated with unintended watching of Discs. Make sure your Discs play
according to your Access Control settings before you allow children access to the
DVD Recorder.
TUNER
ON/OFF
REC/OTR
STOP
1,6
REVERSE
PAUSE
PLAY
SLOW
FORWARD
PREVIOUS
NEXT
EDIT
Change Code
1
2
3
may be selected. If it is not, press ;
Press SYSTEM MENU.
to select it.
Press 9 repeatedly to select
will be selected.
, then press :. Access control
Press : again, then press the Number buttons to enter your
old four-digit code. When doing this the first time, enter any four
numbers you prefer. You will have to enter the same code, exactly,
twice. This will set your code for the first time.
~
W
1
X
2
Y
1en
Z
off
no
a
off
2-4
CLEAR
SELECT
TIMER
VOL
CH
3,5
MUTE
s
G
r
Access control
Status box
Auto resume
Low power standby
PBC
[] [] [] []
Enter code
A/CH
T/C
4
~
G
r
5
6
ZOOM
ANGLE
SUBTITLE
AUDIO
DIM
REPEAT
REPEAT
SCAN
Press 9 repeatedly to select Change code, then press :.
W
1
X
2
Y
1en
Access control
Status box
Auto resume
Low power standby
PBC
Z
off
no
a
off
s Child lock
[]
Parental level
[]
Change country
[]
Change code KB[ ]
Press four Number buttons to enter the new four-digit code.
Then, enter it again - exactly - to confirm it.
Press SYSTEM MENU to remove the menu.
Helpful Hint
• The code may not go into effect
until you activate Child Lock.
(You may have to keep confirming the code.) See page 50
to activate Child Lock.
50 Access Control (cont’d)
Child Lock
1
2
3
may be selected. If it is not, press ;
Press SYSTEM MENU.
to select it.
TUNER
REC/OTR
STOP
Press 9 repeatedly to select
will be highlighted.
, then press :. Access control
Press : again, then press the Number buttons to enter
your four-digit code. Details are on page 49.
~
W
1
X
2
Y
1en
Z
off
no
ON/OFF
1,6
REVERSE
PAUSE
PLAY
SLOW
FORWARD
PREVIOUS
NEXT
EDIT
a
off
5
s
G
r
Access control
Status box
Auto resume
Low power standby
PBC
[] [] [] []
Enter code
2-5
CLEAR
SELECT
TIMER
VOL
4
5
MUTE
3
Press 89 to select Locked Ç or Unlocked
, then press
OK. If you chose Locked, unauthorized or Locked Discs will not
play unless you enter your four-digit code.
~
G
r
6
CH
Child lock will be highlighted. Press :.
W
1
X
2
Y
1en
Access control
Status box
Auto resume
Low power standby
PBC
Z
off
no
a
off
s Child lock
L B@
Parental level
Change country
Change code
@
Press SYSTEM MENU to remove the menus.
A/CH
T/C
ZOOM
ANGLE
SUBTITLE
AUDIO
DIM
REPEAT
REPEAT
SCAN
Access Control (cont’d) 51
Locking or Unlocking Specific Discs
Not all DVDs are rated or coded by Parental levels. You may choose to
specifically lock or unlock a Disc by choosing Play once or Play always. This
way, you can disable viewing regardless of the rating of the DVD. You will
need to know your 4-digit code in order to view the Disc.
1
Insert a Disc. The Access Control message will appear on the TV
screen. (Child Lock should be Locked. Details are on page 50.)
1
|
Play always
REC/OTR
PAUSE
SLOW
[] [] [] []
FORWARD
PREVIOUS
NEXT
Choose 'Play always' to insert the disc in
the child-safe list
Press 89 to select Play once or Play always. Then, press
the Number buttons to enter your four-digit code.
If you select Play Once, the Disc can play as long as it is in the DVD
Recorder and the DVD Recorder power is On. If you select Play
Always, the Disc will play, even if you set Child Lock to Ç (Locked).
Details are on page 50.
CLEAR
2
SELECT
TIMER
VOL
3
PLAY
[] [] [] []
EDIT
2
ON/OFF
Access Control
REVERSE
p Play once
3
TUNER
STOP
locked
Insert a Disc.
If you later decide to lock the Disc so that it will not play
always:
When you insert the Disc, playback begins automatically and safe {
appears on the TV screen. Press STOP C while safe { is on
the TV screen. Locked | will appear. If the Disc continues playing, press STOP C again to stop playback. You may need to turn off
the DVD Recorder or remove the Disc before the Disc is completely Locked. The next time you turn on the DVD Recorder, the
Disc will not play unless you enter the four-digit code.
CH
2
MUTE
T/C
A/CH
Helpful Hints
• The Access Control screen will
appear when you try to play a
Locked Disc. If you do not know
your code, press STOP çC. Then,
select Access Control as
described in steps 1-3 on page
49. When you are asked to
enter the code, press STOP C
four times. Press SYSTEM
MENU, then press PLAY : to
start playback. This restores all
the Access Control settings to
their original factory settings.
• Two-sided DVDs may have a different ID for each side. To
unlock the entire Disc, unlock
each side.
• Multi-volume Video CDs may
have a different ID for each volume. To unlock the complete set,
unlock each volume.
52 Access Control (cont’d)
Parental Level
DVDs may contain alternative scenes that conform to the Parental Level, or
movie rating, that you select. The Parental Level may apply to the complete
Disc or to certain scenes on the Disc. These scenes are rated from 1 to 8.
Follow the steps below to set the Parental Level at which you want Discs to
play.
TUNER
REC/OTR
STOP
1
2
3
may be selected. If it is not, press ;
Press SYSTEM MENU.
to select it.
1,6
REVERSE
Press 9 repeatedly to select
trol will be highlighted.
, then press :. Access con-
ON/OFF
PAUSE
PLAY
SLOW
FORWARD
PREVIOUS
NEXT
EDIT
Press : again, then press the Number buttons to enter
your four-digit code.
~
W
1
X
2
Y
1en
Z
off
a
off
no
s
G
r
Access control
Status box
Auto resume
Low power standby
PBC
[] [] [] []
Enter code
2-5
SELECT
CLEAR
TIMER
CH
VOL
MUTE
4
5
Press 9 to select Parental level, then press :.
Press 89 or the Number buttons to select a rating, then
press OK.
Select “0” (– –) to deactivate Parental level. The entire Disc will
play.
Choose a rating between 1-8, and scenes with the same rating or
lower will play. Higher rated scenes will not play unless an alternative scene is available on the Disc. The alternative must have the
same rating or a lower one. If no suitable alternative is found, playback will stop. Enter the 4-digit code to play the Disc.
~
G
r
6
W
1
X
2
Y
1en
Access control
Status box
Auto resume
Low power standby
PBC
Z
off
no
Child lock
Parental level
Change country
Change code
5
A/CH
T/C
3,5
ZOOM
ANGLE
SUBTITLE
AUDIO
DIM
REPEAT
REPEAT
SCAN
a
off
2
s KL
Press SYSTEM MENU to remove the menus.
Helpful Hint
• The rating numbers compare to
standard U.S. movie ratings as
follows:
7 - NC-17
6-R
4 - PG-13
3 - PG
1-G
Access Control (cont'd) 53
Change Country
If a Disc has Parental Level coding, the codings are applicable only for the
country specified on the Disc. The Disc manufacturer sets these codings.
For example, a Disc may be coded at Level 3 for the United States.
So, for some Discs, you may need to choose the Country for which the
Disc is coded in order for the Disc to play at the Parental Level you select.
Details are on page 52. Also refer to your Disc case for more information.
1
2
3
4
ON/OFF
REC/OTR
STOP
1,6
REVERSE
PAUSE
PLAY
SLOW
FORWARD
PREVIOUS
NEXT
EDIT
Press 9 repeatedly to select
trol will be highlighted.
, then press :. Access con-
Press : again, then press the Number buttons to enter
your four-digit code. Child lock will be highlighted.
Press 9repeatedly to select Change country, then press :.
2-5
CLEAR
SELECT
TIMER
VOL
~
G
r
5
6
may be selected. If it is not, press ;
Press SYSTEM MENU.
to select it.
TUNER
W
1
X
2
Y
1en
Access control
Status box
Auto resume
Low power standby
PBC
Z
off
no
CH
a
off
5
MUTE
s American Samoa L
Bermuda
Canada
Puerto Rico
Press 89 to select the country for which the Disc is coded,
then press OK.
A/CH
T/C
ZOOM
ANGLE
SUBTITLE
AUDIO
DIM
REPEAT
REPEAT
SCAN
Press SYSTEM MENU to remove the menus.
3
54 User Preference Settings
1
2
3
4
may be selected. If it is not, press ;
Press SYSTEM MENU.
to select it.
TUNER
Press 9 repeatedly to select
ON/OFF
, then press :.
REC/OTR
STOP
Press 98 to select Status box, Auto resume, Low power
standby, or PBC. Then, press : and follow step 4 according
to your choice.
1,5
REVERSE
PAUSE
PLAY
SLOW
FORWARD
PREVIOUS
NEXT
EDIT
If you selected Status box, press 98 to choose On or Off,
then press OK. The status box displays the current Disc type and
status of the Recorder. Select On if you want to see the Status box
with the Menu Bar or briefly when you change playing or recording
status. Choose Off if you do not want to see the Status boxes.
●
If you selected Auto resume, press 98 to choose On or
Off, then press OK. Auto resume affects the last 20 pre-recorded
DVDs and Video CDs you played. When Auto resume is On, play
resumes at the point at which it stopped the last time you played
the Disc. If Auto resume is Off, the Recorder starts playing the Disc
from the beginning of the Disc.
4
●
2-4
CLEAR
SELECT
TIMER
CH
VOL
MUTE
If you selected Low power standby, press 98 to choose
On or Off, then press OK. If Low power standby is On and you
do not use the Recorder for 20 minutes, the image on the TV
screen will dim.
●
If you selected PBC (Playback Control), press 98 to
choose On or Off, then press OK. Playback Control is a feature
available on some Video CDs that allows you to choose playing features from those available on the Disc. The Video CD must be
compatible with Playback Control. Check the Video CD case for
details. The Video CD will show instructions or options on the TV
screen. Use the DVD Recorder’s remote control buttons as directed by the Video CD. Set PBC to On only if you are playing PBCcompatible Video CDs on the DVD Recorder. Otherwise, set PBC
to Off.
●
~
W
1
X
2
Y
1en
Z
off
no
a
off
~
W
1
X
2
Y
1en
Z
off
G
r
~
W
1
X
2
Y
1en
Z
off
L
a
off
G
~
Access control
Status box
Auto resume
s On
Low power standby
Off
PBC
W
1
X
2
Y
1en
Z
off
r
5
Access control
Status box
Auto resume
Low power standby s On
PBC
Off
G
r
L
SUBTITLE
AUDIO
DIM
REPEAT
REPEAT
SCAN
L
Helpful Hints
a
off
no
Features
Features
G
ANGLE
Features
r
no
ZOOM
a
off
no
Features
Access control
Status box
s On
Auto resume
Off
Low power standby
PBC
A/CH
T/C
Access control
Status box
Auto resume
Low power standby
PBC
s On
Off
Press SYSTEM MENU repeatedly to remove the menus.
L
• Adapt Disc Format will appear if
a DVD+RW recorded on a different brand of Recorder is in
the Philips Recorder. The option
only appears when such a Disc
is in the Philips Recorder. If the
Disc is unprotected, you can
adapt the disc format by selecting Adapt Disc Format. This will
enable you to play the Disc and
access its features, such as the
menus or edited versions.
• If resume appears when you
start playback, you can press
PLAY : while resume appears
on the TV screen. This lets you
resume play from the last
played point, even if Auto
resume is Off.
Picture Settings 55
1
2
3
4
may be selected. If it is not, press ;
Press SYSTEM MENU.
to select it.
Press 9 to select
TUNER
, then press :.
REC/OTR
STOP
1,5
REVERSE
Press 89 to select TV Shape, Black level shift, or Video
shift. Then, press : and follow step 4 according to your
choice.
If you selected TV Shape, press 89 to select 4:3 letterbox, 4:3 panscan, or 16:9, then press OK.
Select 4:3 letterbox if you have a regular TV and want to see the
picture with black bars at the top and bottom of the screen. This
looks like the picture you see when watching movies in a theater.
This setting is possible only if the DVD contains letterbox material.
Select 4:3 panscan if you have a regular TV and want both sides of
the picture to be trimmed, or formatted to fit your TV screen. This
setting is possible only if the DVD contains pan & scan material.
Select 16:9 if you have a widescreen TV.
ON/OFF
PAUSE
FORWARD
NEXT
EDIT
●
2-4
CLEAR
SELECT
TIMER
VOL
CH
If you selected Black level shift, press 89 to select On or
Off, then press OK. Set Black level shift to On during playback of
NTSC Discs. This will improve the color contrast during Disc playback. Black level shift has no effect on PAL Disc playback.
Y
Y
SLOW
PREVIOUS
4
MUTE
●
Z
Z
PLAY
d
d
If you selected
Video shift, press ; : to center the picture on your TV screen - or “shift” the video. When you
are satisfied with the position of the picture, press OK.
●
~
G
r
~
W
1
X
2
Y
1en
TV Shape
Black level shift
Video shift
W
1
X
2
Z
off
s 4:3 letterbox
4:3 panscan
16:9
Y
1en
Z
off
a
off
no
~
Picture
L
W
1
X
2
Y
1en
Z
off
no
a
off
A/CH
T/C
Picture
G
r
TV Shape
Black level shift
Video shift
s On
Off
ZOOM
ANGLE
SUBTITLE
AUDIO
DIM
REPEAT
REPEAT
SCAN
L
a
off
no
Picture
G
r
5
TV Shape
Black level shift
Video shift
sB
OK to exit
Press SYSTEM MENU to remove the menus.
Helpful Hints
• The format you select must be
available on the Disc. If it is
not, the settings for TV Shape
will not affect the picture during playback.
• Some widescreen TVs may show
only part of the DVD Recorder’s
menu. Adjust the screen mode
on your TV. See your TV owner’s
manual for details.
56 Digital Output
After connecting the DVD Recorder to your TV and other equipment, you
may need to change the DVD Recorder’s Digital Output setting. Look to
see which DVD Recorder audio jacks you connected to your other equipment, then set your Digital Output accordingly. The information in step 4
will help you make your choice.
You only need to adjust the Digital Output if you used the DIGITAL
AUDIO OUT (OPTICAL or COAX) jacks of the Recorder. (If you used
the red and white AUDIO OUT jacks, see page 57 to adjust the sound.)
TUNER
ON/OFF
REC/OTR
STOP
1,5
REVERSE
PAUSE
PLAY
SLOW
FORWARD
PREVIOUS
1
2
3
4
may be selected. If it is not, press ;
Press SYSTEM MENU.
to select it.
NEXT
EDIT
Press 9 repeatedly to select G, then press :.
4
Digital output will be selected. Press :. If Digital output is not
selected, press 89 to select it.
Press 89 to select Off, PCM only, or All, then press OK.
● Select All if you used the COAX (coaxial) DIGITAL AUDIO OUT
jack to connect the DVD Recorder to a Stereo Receiver that has a
built-in Multi-channel Decoder. Details are on page 14.
● Select Off if you did not use either the COAX (coaxial) or OPTICAL DIGITAL AUDIO OUT jack. For example, if you used the supplied audio cables to connect the red and white AUDIO OUT jacks
of the DVD Recorder to a TV or Stereo, select Off. See page 57 to
adjust your analog sound settings.
● Select PCM only if you used the COAX (coaxial) or OPTICAL
DIGITAL AUDIO OUT jacks of the DVD Recorder for connections, but the audio equipment does not include a built-in digital
multi-channel Decoder.
~
W
1
X
2
Y
1en
Z
off
no
a
off
2-4
CLEAR
SELECT
TIMER
VOL
CH
MUTE
A/CH
T/C
ZOOM
ANGLE
SUBTITLE
AUDIO
DIM
REPEAT
REPEAT
SCAN
Sound
G
r
5
Digital output
Analog output
Night mode
s Off
PCM only
All
K
L
Press SYSTEM MENU to remove the menus.
Analog Output 57
If you connected the DVD Recorder’s red and white AUDIO OUT jacks
to a Stereo (or Stereo TV) as shown on pages 10-13, choose a setting for
Analog Output.
You do not need to adjust this setting if you used the DIGITAL AUDIO
OUT (OPTICAL or COAX) jacks on the DVD Recorder.
Check your Stereo and see if it is compatible with Dolby Surround or
TruSurround. Then follow the steps below to choose the Analog Output
setting that is most compatible with your audio equipment (or TV).
TUNER
ON/OFF
REC/OTR
STOP
1,5
REVERSE
PAUSE
PLAY
SLOW
FORWARD
PREVIOUS
1
2
3
4
may be selected. If it is not, press ;
Press SYSTEM MENU.
to select it.
Press 9 repeatedly to select
NEXT
EDIT
4
G, then press :.
Press 9 to select Analog output, then press :. Analog output
may be selected already. If so, just press : to continue.
2-4
CLEAR
Press 8 or 9 to select Stereo, Surround, or 3D sound, then
press OK.
● Select Stereo if your audio equipment is not compatible with
either Dolby Surround or TruSurround, or if you connected the
DVD Recorder to a Stereo TV only.
● Select Dolby Surround compatible if your audio equipment is
compatible with Dolby Surround. If it is, usually a Dolby Pro Logic
logo will appear on the equipment.
● Select 3D if the audio equipment is TruSurround compatible.
Again, the audio equipment likely will be labeled with the
TruSurround logo as shown below.
~
W
1
X
2
Y
1en
Z
off
no
a
off
SELECT
TIMER
CH
A
MUTE
A/CH
T/C
ZOOM
ANGLE
SUBTITLE
AUDIO
DIM
REPEAT
REPEAT
SCAN
Sound
G
r
5
Digital output
Analog output
Night mode
s Stereo
Surround
3D sound
L
Press SYSTEM MENU to remove the menus.
Helpful Hint
TruSurround and the
symbol are trademarks of SRS Labs, Inc.
TruSurround technology is incorporated under license from SRS Labs, Inc.
• You also can set analog sound
in the Menu Bar. Details are
on page 31.
58 Language Settings, Recording Audio
DVD
Language Settings
TUNER
Select a different language for the Disc Menu, Audio soundtrack, or
Subtitles if multiple languages are available on the Disc.
1
2
3
may be selected. If it is not, press ;
Press SYSTEM MENU.
to select it.
ON/OFF
REC/OTR
STOP
1,5
REVERSE
PAUSE
PLAY
SLOW
FORWARD
PREVIOUS
Press 9 repeatedly to select
r, then press :.
NEXT
EDIT
4
Press 89 to select Playback Audio, Subtitle, or Menu, then
press :.
~
G
r
W
1
X
2
Y
1en
Playback audio
Recording audio
Subtitle
Menu
Z
off
a
off
no
s English
Españo
Français
2-4
Language
L
CLEAR
SELECT
TIMER
CH
A
MUTE
4
Press 89 to select the language you want, then press OK.
The changes will be effective only if the language is available on the
Disc. Some DVDs allow you to change languages in the DVD Disc
Menu only.
5
Press SYSTEM MENU to remove the menus.
T/C
A/CH
TUNER
ON/OFF
DVD+RW
Recording Audio
Some TV programs broadcast in stereo or in a second audio program (SAP).
Usually, second audio means the program has a second language available. For
example, the program might be available in English and Spanish, with Spanish
being the SAP (second audio program) option.
To record the stereo or SAP broadcasts with the DVD Recorder, select
Stereo or SAP as your preferred recording audio as described below.
Your selection will only be active if the program is available in stereo or second audio. When you play the recording, you can play only in the audio you
recorded. For example, if you recorded in SAP, you can play the recording
only in SAP.
1
2
3
4
may be selected. If it is not, press ;
Press SYSTEM MENU.
to select it.
REC/OTR
STOP
1,5
REVERSE
PAUSE
PLAY
SLOW
FORWARD
PREVIOUS
NEXT
EDIT
Press 9 repeatedly to select
r, then press :.
4
Press 89 to select Recording Audio, then press :.
Press 89 to select Stereo or SAP, then press OK.
~
W
1
X
2
Y
1en
Z
off
no
a
off
2-4
SELECT
CLEAR
TIMER
CH
A
MUTE
Language
G
r
5
Playback audio
Recording audio
Subtitle
Menu
s Stereo
SAP
L
Press SYSTEM MENU to remove the menus.
T/C
A/CH
Night Mode, Remote Control Settings 59
Night Mode
Turn on Night Mode to improve the sound during low volume playback.
TUNER
1
2
3
ON/OFF
may be selected. If it is not, press ;
Press SYSTEM MENU.
to select it.
REC/OTR
STOP
Press 9 repeatedly to select
G, then press :.
1,5
REVERSE
PAUSE
PLAY
SLOW
FORWARD
PREVIOUS
Press 9 repeatedly to select Night mode, then press :.
~
W
1
X
2
Y
1en
Z
off
NEXT
EDIT
a
off
no
4
Sound
G
r
Digital output
Analog output
Night mode
s On
Off
L
2-4
CLEAR
SELECT
TIMER
VOL
4
5
CH
Press 8 or 9 to select On or Off, then press OK.
MUTE
Press SYSTEM MENU to remove the menus.
Remote Control Settings
1
2
3
4
may be selected. If it is not, press ;
Press SYSTEM MENU.
to select it.
Press 9 repeatedly to select
TUNER
REC/OTR
STOP
, then press :.
1,5
REVERSE
Press 89 to select Key sound or Remote control used.
Then, press : and follow step 4 according to your choice.
ON/OFF
PAUSE
PLAY
SLOW
FORWARD
PREVIOUS
NEXT
EDIT
If you selected Key sound, press 89 to select On or Off,
then press OK.
Select On if you want the DVD Recorder to beep each time you
press a key on the remote control or the Recorder. The factory
setting is On. Select Off to disable the sound; the Recorder will be
silent when you press buttons on the remote or the Recorder.
●
If you selected Remote Control used, press 89 to select
DVD Player or DVD Recorder, then press OK. The factory
setting is DVD Recorder. By selecting DVD Recorder, you will
operate the DVD Recorder with the remote control supplied with
the DVD Recorder (as shown at right and throughout this book).
However, if you have another Philips DVD Player and want to use
that remote to also control the DVD Recorder, you may do so if
you select DVD Player as the Remote Control used.
●
~
W
1
X
2
Y
1en
Z
off
no
a
off
Remote control settings
Key sound
s On
L
Remote control used
Off
~
W
1
X
2
Y
1en
Z
off
no
4
2-4
CLEAR
SELECT
TIMER
VOL
CH
MUTE
a
off
Remote control settings
Key sound
DVD Player
L
Remote control used s DVD Recorder
A/CH
T/C
5
Press SYSTEM MENU repeatedly to remove the menus.
ZOOM
ANGLE
SUBTITLE
AUDIO
DIM
REPEAT
REPEAT
SCAN
60 Using Your Recorder’s Remote Control with Your TV
The following buttons on your DVD Recorder’s remote control will operate the TV at any time:
• VOL +/- increases/decreases TV volume
• H mutes/activates the TV sound
TV switch
CLEAR
SELECT
TIMER
CH
VOL
The following buttons operate the TV if you press and hold the TV switch
on the right side of the remote while pressing these buttons:
• CH +/- Selects TV channels at the TV (not the Recorder)
• A/CH Selects the TV channel you were viewing just before switching to
the current channel.
• Number buttons 0-9 Press to choose a TV channel quickly.
• 2 Press to turn on or off the TV power.
MUTE
If these buttons already operate your TV, no further action is necessary. If
they do not, follow these steps for either Automatic Remote Setup or
Manual Remote Setup to make the Recorder’s remote control operate
your TV.
A/CH
T/C
ZOOM
ANGLE
SUBTITLE
AUDIO
DIM
REPEAT
REPEAT
SCAN
Automatic Remote Setup
Automatic Remote Setup
1
2
3
4
2
Turn on your television and find the code for your brand of
TV in the list on page 61.
2
Point the remote control at the TV. Press and hold the
RETURN and SELECT buttons simultaneously for at least
three seconds, then release.
CLEAR
SELECT
TIMER
CH
A
Within 30 seconds, press the Number buttons to enter the
correct three-digit code for your brand of TV.
3
MUTE
See if the remote control now works your TV as described
above. If it does, you are finished. If it does not, repeat steps 1-3,
using a different code for your brand, if available.
If the remote still will not operate your TV after repeating steps 1-3
with all the codes for your brand, try the Manual Remote Setup
procedure as described below.
T/C
A/CH
Manual Remote Setup
1
2
3
4
Turn on your television.
Manual Remote Setup
TUNER
Point the remote control at the TV. Press and hold the
RETURN and SELECT buttons simultaneously for at least
three seconds, then release.
REC/OTR
STOP
REVERSE
Within 30 seconds, press and hold the ON/OFF button until
your TV turns off. Your TV will turn off when the remote control
finds the correct code that will allow the remote to work your TV.
When your TV turns off, immediately release the ON/OFF
button. This step may take up to two minutes.
Make sure your remote works your TV as described above.
3
ON/OFF
PAUSE
PLAY
SLOW
FORWARD
PREVIOUS
NEXT
EDIT
2
2
CLEAR
SELECT
TIMER
CH
A
MUTE
Using Your Recorder’s Remote Control with Your TV (cont’d) 61
A
AOC ......................046,057
Acura.............................036
Admiral ................120,490
Adyson ..........................244
Aiko ...............................119
Akai................................057
Akura.....................245,291
Alaron....................206,243
Alba 064,036,245,063,398
Allorgan ........................321
America Action...........207
Amplivision...................244
Amstrad.198,398,036,064
Anam .....................207,036
Anitech..........................036
Arcam....................243,244
Asuka.............................245
Atlantic..........................233
Audiosonic ...........064,136
Audiovox ......119,207,478
Autovox........................233
B
BPL.................................309
BSR.................................321
BTC ...............................245
Bang &Olufsen ...........592
Basic Line..............036,245
Baur................064,037,581
Baysonic........................207
Beaumark......................205
Beko...............................397
Belcor............................046
Bell &Howell................181
Beon ..............................064
Binatone........................244
Blaupunkt......................581
Blue Sky ........................245
Blue Star .......................309
Boots .............................244
Bradford........................207
Brandt............................136
Britannia........................243
Brockwood ..................046
Broksonic..............263,490
Bush.......064,398,245,036,
................063,309,321,401
C
CCE .......................064,244
CS Electronics .............243
CXC ..............................207
Candle ...................057,083
Carnivale.......................057
Carrefour .....................063
Carver ...........................081
Cascade.........................036
Cathay ...........................064
Celebrity.......................027
Centurion.....................064
Cimline..........................036
Cineral...................478,119
Citizen ..................083,057,
........................066,087,119
Clarivox ........................064
Clatronic.......................397
Concerto ......................083
Condor..................347,397
Contec...036,063,207,243
Craig ..............................207
Crosley..........................081
Crown ..........397,036,064,
........................066,207,445
Crystal...........................458
Curtis Mathes.....087,057,
........066,074,078,081,083,
.........120,172,181,193,478
Cybertron ....................245
D
Daewoo .......119,046,401,
................478,036,064,066
Dainichi .........................245
Dansa.............................064
Dayton ..........................036
Daytron.........................046
Decca.....................064,099
Denon ...........................172
Dixi ........................036,064
Dual Tec .......................244
Dumont.........044,046,097
E
Electroband..................027
Elin .................................064
Elite ........................245,347
Elta .................................036
Emerson .......263,207,205,
.206,490,309,066,046,181
Envision.........................057
Erres ......................039,064
Expert............................233
F
Ferguson ...............136,064
Fidelity...........................243
Finlux ............064,132,097,
................................099,206
Firstline.........348,036,243,
................................244,321
Fisher .............244,181,397
Flint ................................482
Formenti ...............347,064
Frontech ...............458,291
Fujitsu ............206,099,233
Funai..............321,198,206,
................................207,291
Futuretech....................207
G
GE...................048,074,078
................205,478,120,309
GEC ...............099,064,244
GPM...............................245
Geloso...........................036
Genexxa .......................245
Gibralter .......044,046,057
GoldStar........064,046,057
................205,244,083,136
Goodmans ...064,099,206,
................398,063,244,401
Gorenje.........................397
Gradiente..............083,080
Granada.........064,099,244
Grandin .........................309
Grundig .........097,581,064
Grunpy ..................206,207
H
HCM ......................036,309
Hallmark .......................205
Hanseatic ..............064,347
Harley Davidson .........206
Harman/Kardon ..........081
Harvard.........................207
Hinari ............036,063,064,
................................245,206
Hisawa...................309,482
Hitachi ..136,071,172,244,
........................063,083,132
Huanyu ..................243,401
Hypson ..........291,064,309
I
ICE..................244,291,398
ICeS ...............................245
ITS ..................................398
Imperial .................445,397
Indiana ...........................064
Infinity............................081
Inno Hit.........................099
Innova............................064
Inteq...............................044
Interfunk .......................064
Intervision............064,129,
................................244,291
Isukai..............................245
J
JBL ..................................081
JCB .................................027
JVC .........080,063,398,680
K
KEC................................207
KTV ........207,244,057,066
Kaisui ....................245,244,
........................036,243,309
Kamp .............................243
Kapsch...........................233
Kawasho .......................243
Kendo............................064
Kenwood ..............057,046
Kingsley.........................243
Korpel ...........................064
Koyoda..........................036
L
LG ..................................083
LXI ..181,074,081,183,205
Leyco......099,064,291,321
Liesenk &Tter..............064
Luma ..............................233
Luxman .........................083
M
M Electronic........132,244,
................036,064,136,401
MGA.......177,046,057,205
MTC087,057,046,083,243
Magnadyne....................129
Magnafon ......................129
Magnavox.............081,057,
................................063,206
Manesth.........347,244,291
Marantz .........064,081,057
Mark...............................064
Matsui ...036,064,244,398,
................062,063,099,321
Matsushita.............277,677
Mediator ...............039,064
Megatron ..............172,205
Memorex .....205,036,083,
................177,181,277,490
Midland ..044,066,074,078
Minerva .................097,581
Minutz ...........................048
Mitsubishi.....063,135,177,
........................205,046,120
Mivar..............................243
Motorola.......................120
Multitech ......036,129,207,
................................243,244
N
NAD ..............183,193,205
NEC057,063,046,083,482
NEI .........................064,458
NTC ..............................119
Neckermann ........064,581
Nesco ............................206
Netsat............................064
Nikkai....064,062,245,099,
................................243,291
Nikko.............205,057,119
Nobliko .........................129
Nordmende .................136
O
Onwa.............................207
Optimus 277,193,181,677
Optonica...............120,192
Orion ....321,490,064,206,
........................263,347,348
Osaki......099,244,245,291
Oso ................................245
Osume...........................099
Otto Versand .....064,037,
................063,244,347,581
P
Palladium...............397,445
Panama ..................244,291
Panasonic ......078,277,677
Pathe Cinema ......347,243
Pausa..............................036
Penney ..074,087,057,048,
205,078,066,046,083,183
Perdio............................347
Philco ....................172,046,
........................057,081,490
Philips....................064,039,
........................081,401,581
Phonola .................064,039
Pilot ................046,057,066
Pioneer..................136,193
Portland.........046,066,119
Prism..............................078
Profex............................036
Proline...........................348
Proscan .........................074
Protech.........064,129,036,
................458,244,291,445
Proton ...........................205
Pulsar .....................044,046
Pye..................................039
Q
Quasar ...078,277,192,677
Quelle ....064,097,037,581
Questa...........................063
R
R-Line ............................064
RBM ...............................097
RCA ......................074,046,
........................078,117,120
Radio Shack.192,207,057,
.......................205,066,181,
........................046,074,083
Radiola...................064,039
Rank Arena ..................063
Realistic ........192,207,181,
.........057,066,205,046,083
Revox ............................064
Rex.........................233,291
Rhapsody ......................243
Roadstar036,291,245,445
Runco ....................044,057
S
SBR.........................039,064
SEG.................244,063,291
SEI...................129,037,321
SKY ................................064
SSS..........................046,207
Saba................................136
Saisho.............036,291,458
Sambers ........................129
Sampo....................057,066
Samsung........064,046,205,
...............244,291,397,036,
.........057,066,083,087,117
Samsux ..........................066
Sandra............................243
Sansei.............................478
Sansui.............................490
Sanyo..............181,063,099
Schneider ......064,245,398
Scimitsu.........................046
Scotch............................205
Scott263,046,205,206,207
Sears......181,083,183,074,
................081,198,205,206
Seleco ............................233
Semivox ........................207
Semp..............................183
Sentra ............................062
Sharp ......120,192,063,066
Shogun...........................046
Shorai ............................321
Siarem ...........................129
Siemens .................581,064
Silver..............................063
Sinudyne........129,037,321
Sonoko ..................036,064
Sontec ...........................064
Sony ...............037,063,027
Soundesign....205,206,207
Soundwave ...........064,445
Squareview ...................198
Standard ........244,245,036
Starlite ...........................207
Stern ..............................233
Sunkai ....................321,348
Supra..............................083
Supreme........................027
Susumu..........................245
Sylvania..................081,057
Symphonic ....................198
Sysline............................064
T
TMK.......................083,205
Tandy .....245,099,244,120
Tashiko..................063,244
Tatung............099,244,064
Tec .................................244
Technema.....................347
Technics ........078,277,677
Technol Ace ................206
Techwood ............078,083
Teknika.081,206,207,046,
.........066,119,083,087,177
Telefunken............136,083
Telemeister..................347
Teletech........................036
Teleton..........233,063,244
Tensai ............245,321,347
Texet .....................243,245
Thomson ......................136
Thorn.............064,062,099
Tomashi ........................309
Toshiba.........062,183,063,
........................097,087,181
Totevision ....................066
U
Uher.......................233,347
Ultravox........................129
Universum ...........132,064,
................................291,397
V
Vector Research.........057
Vestel.............................064
Victor ............................080
Videotechnic ................244
Vidikron ........................081
Vidtech ..........046,063,205
Vision.............................347
W
Waltham .......................244
Wards...081,192,205,046,
................048,057,083,206
Watson .................347,064
Watt Radio ..................129
Wea ...............................063
White Westinghouse .......
................347,064,243,490
Y
Yamaha..................046,057
Yoko.......244,064,291,458
Z
Zanussi ..........................233
Zenith ............044,119,490
62 Helpful Hints
If you are having problems with your product, check this list of problems and possible solutions before
requesting service. You may be able to solve the problem yourself.
If you need to call a customer service representative, please know the model number and serial number of your product before you call. This information is on the rear of the product. Also, please take a
moment to identify the problem you are having, and be prepared to explain this to the representative.
If you believe the representative will need to help you with operations, please stay near the product.
Our representatives will be happy to assist you.
No power
• Press the STAND BY / ON button on the front of the DVD Recorder to turn on the DVD
Recorder.
• Make sure you connected the supplied power cord properly to the MAINS (AC power) jack on the
rear of the DVD Recorder. Connect the power cord firmly to an AC power outlet. Use only the
supplied power cord.
• Make sure the AC outlet has power by trying another appliance in the same outlet.
No picture
• Make sure the TV power is on.
• Check the video cables. Make sure the cable(s) are fastened securely to the DVD Recorder and to
the TV.
• Set your TV to the correct Video In channel. These channels are usually near channel 00. Or, you
may have a button on the TV remote control that selects an Auxiliary or A/V IN channel. See your
TV owner’s manual for details. Or, just change channels at the TV until you see the DVD
Recorder’s screen saver on the TV screen.
• You only need one video connection between the DVD Recorder and the TV. Details are on page 9.
Distorted picture
• Check the Disc for fingerprints. Clean the Disc with a soft cloth, wiping from the center to the
edge in a straight line.
• Sometimes a small amount of picture distortion may appear. This is not a malfunction.
The picture is distorted or the picture is only black and white during DVD or Video CD
playback.
• TVs have a color system standard, usually NTSC in the United States. If the Disc’s or DVD
Recorder’s color system is different than your TV’s color system, the picture may be distorted or
colorless. Details are on page 7.
The sound is distorted during Disc playback through a Stereo.
• Make sure you did not connect any cables from the DVD Recorder to the Stereo’s “PHONO IN”
jack.
• Make sure you did not connect a digital jack on the Recorder (DIGITAL AUDIO OUT - OPTICAL
or COAX) to an analog jack on the Stereo. (Analog audio jacks are usually labeled as such and are
usually red and white.)
No sound
• Check the audio connections. Details are on pages 9-15. Remember, you only need one audio connection. See page 9 to see what connection best suits your situation.
• Make sure cables are connected firmly to all equipment.
• Select another channel, sound source, or Auxiliary station at your Stereo or TV. See your Stereo’s
manual or TV’s manual for details. Or, just continue selecting the different sound sources or modes
on the Stereo or TV until you hear sound from the Disc that is in the DVD Recorder. Details are
on pages 9-15.
• Check your Analog output settings or Digital output settings. Make sure you choose the right setting, based on what equipment you connected to the DVD Recorder. Details are on pages 56-57.
• Make sure your Analog output settings or Digital output settings match the capabilities of your
Stereo Receiver or TV. Details are on pages 56-57.
Helpful Hints (cont'd) 63
Disc will not play.
• Make sure the Disc label is facing up. If you are playing a two-sided Disc, make sure the side you
want to play is facing up. Details are on page 18.
• Check the Access Control settings for the Disc. Details are on pages 49-53.
• Check the Region Code of the DVD. The DVD must be coded for All regions or Region 1 in order
to play on this DVD Recorder. Details are on page 7.
• See if the Disc is defective by trying another Disc. Make sure the Disc is not scratched or warped.
Carefully clean the Disc. Details are on page 6.
• Use a commonly available cleaning CD/DVD to clean the lens of the DVD Recorder.
• A DVD+RW recorded on a different brand of Recorder can play on the Philips DVD Recorder, but
all its features may not be accessible. However, you may be able to adapt the disc format so you
can access the Disc’s original features. Details are on page 54. If the Disc is protected, you can not
adapt the disc format.
The DVD logo does not appear on the TV screen after you remove a Disc.
• Reset the DVD Recorder by switching it off, then on again.
The DVD Recorder does not respond to the remote control.
• Aim the remote control directly at the sensor on the front of the DVD Recorder. Details are on
page 22. Point the remote control toward the DVD Recorder, not your TV.
• Remove any obstacles between the DVD Recorder and the remote control.
• Inspect or replace the batteries in the remote control. Details are on page 8.
• The remote control may have been set to operate another DVD Recorder accidentally. Press and
hold the SELECT and Number 1 buttons on the remote control at the same time to have the
remote control operate the DVD Recorder.
The DVD Recorder will not select some features, such as Angles, Subtitles, or multi-language Audio.
• The feature may not be available on the Disc. If it is not, an “X” will appear on the TV screen.
Check the Disc case to see if the Disc has the feature. If the Disc does not have the feature, the
DVD Recorder cannot create the feature. This is not a malfunction of the DVD Recorder.
You can not record a new Title.
• See if the Disc already has the maximum number of titles. Delete some recordings if necessary.
Details are on page 44.
• You can record only if the Disc is Unprotected. Details are on page 47.
The Index Picture Screen does not appear, but the Disc still plays.
• Clean the Disc. Details are on page 6.
• Adapt the disc format if possible. Details are on page 54.
A DVD player shows the Index Picture Screen but does not react to PLAY :.
• Press STOP C to exit the Index Picture Screen, then press PLAY :.
You need to access system information for service reasons.
• Press SYSTEM MENU.
may be selected. If it is not, press ; to select it. Press 9 repeatedly to
select , then press :. Press 9 repeatedly until the system information appears.
The DVD Recorder does not work.
• Disconnect the power cord from the Recorder and the power outlet for a few minutes. Reconnect
the power cord and try to operate the Recorder again as usual.
If the DVD Recorder still will not operate, disconnect the power cord from the Recorder again.
Then, while pressing and holding the STAND BY/ON button on the front of the Recorder, reconnect the power cord. This resets the DVD Recorder to the factory mode, or to its original settings
as they were when you first received the Recorder. You will have to complete the Initial Setup
again and reset any items you have adjusted during your use of the Recorder.
Strange codes appear on the Recorder’s display.
• Remove and reinsert the Disc.
• Clean the Disc.
• Disconnect the power cord from the power outlet, then reconnect the cord and try playback as
usual.
64 Glossary
AC-3: Audio Coding 3, also known as Dolby Digital; a multi-channel digital audio compression system from
Dolby Labs.
Analog: Sound that has not been turned into numbers. Analog sound varies, while digital sound has specific
numerical values. Analog sound is available when you use the red and white audio jacks on your equipment.
These jacks send audio through two channels, the left and right.
AUDIO OUT Jacks: Jacks on the rear of the DVD Recorder that send audio to another system (TV,
Stereo Receiver, etc.).
A/V: Audio/Video.
CD: Compact Disc.
Chapter: A part of a Title.
COAX (coaxial) jack: Sends digital audio to a Stereo Receiver, allowing you to adjust the volume at the
Receiver. The Receiver must have a coaxial in jack. This connection provides the 5.1 channel surround sound
as heard in movie theaters.
COMPONENT VIDEO Jacks: The OUT jacks on the rear of the DVD Recorder send high-quality video
to a TV that has Component Video In jacks. The IN jacks allow the Recorder to receive high-quality video
from other equipment, such as a DVD Player.
Digital: Sound that has been converted into numerical values. Digital sound is available when you use the
COAX (coaxial) or OPTICAL DIGITAL AUDIO OUT jacks on the Recorder. These jacks send audio through
multiple channels, instead of just two channels as analog does.
Dolby Digital: A surround sound system that provides 5.1 channel sound as used in movie theaters.
DTS: Digital Theater Systems. This is a surround sound system, but it is different from Dolby Digital. The
formats were developed by different companies.
DVD: Digital Video Disc.
DVD+RW: DVD+ReWritable. The disc standard used by the DVD Recorder.
i.LINK: Also known as ‘FireWire ’and ‘IEEE 1394.’ A cable for transfer of high bandwidth digital signals as
used by Digital Video camcorders.
Index Picture Screen: A screen that gives an overview of a DVD+RW. An Index Picture represents each
recording.
Letterbox: Widescreen format; a TV aspect ratio setting (4:3). Displays the video in full-width, with black
bars at the top and bottom of the TV screen. This format is similar to seeing a movie in a theater. If the Disc
does not include a letterbox format, selecting 4:3 letterbox may have no effect. (For example, some DVDs
are two-sided, with one side playing in widescreen format and the other side playing in a normal format.)
MPEG: Motion Picture Experts Group. A collection of compression systems for digital audio and video.
OPTICAL Jack: Converts electrical signals into optical signals before sending the audio to the Stereo
Receiver. Optical audio is not prone to external electrical influences and has less noise, which reduces
adverse effects on external equipment. Be sure to keep the protective cap on the jack when the jack is not in
use. This keeps dust out of the jack.
OTR: One-Touch Recording. Start a timed recording by pushing just one button; select the switch-off time
in intervals of 30 minutes.
Pan & Scan: A TV aspect ratio setting (4:3). Displays the video with full-height picture, with one or both
sides of the picture trimmed to fit on your TV screen. Some movie companies refer to this as “reformatting
the picture to fit your TV screen.”
PBC: Playback Control. A special feature on a Video CD or Super VCD that enables interactive use.
PBS: Public Broadcast System. The channel transmits data for Automatic clock setting.
PCM: Pulse Code Modulation.A digital audio encoding system.
RGB: Red-Green-Blue. A top-quality video connection where red, green and blue components of a video
signal are carried through separate wires. This also is referred to as the component video connection.
S-Video: Produces a clearer picture by sending separate signals for the luminance and the color. If you connect the supplied S-Video cable, you will not need to use the supplied yellow video cable. You can use SVideo only if your TV has an S-Video In jack.
Title: A unit of recording on a Disc. A Title typically represents one recording on a DVD+RW.
TruSurround: A system that simulates multi-channel sound via a two-channel connection (audio left and
right).
TV system: There are various systems for transmitting television signals, for example PAL, SECAM, and
NTSC. NTSC is the most common color system in the United States of America. The TV system is country
dependent. The Recorder automatically selects the right TV system.
VCD: Video Compact Disc
VCR: Video Cassette Recorder
VCR Plus+: Allows you to set a timer recording by entering a code from your TV guide.
VIDEO OUT Jack: Jack on the rear of the DVD Recorder that sends video (picture) to a TV.
Widescreen: A TV aspect ratio setting (16:9). Displays the video appropriately when you connect the DVD
Recorder to a widescreen TV.
Diagnostic Test 65
If you are still having trouble with the Recorder after checking Helpful Hints and other information in
this manual, you may perform a Diagnostic Test on the Recorder. Follow the steps below.
Disconnect the power cord from the Recorder.
1
2
Press and hold the PLAY : button on the front of the Recorder while you reconnect the power cord to the Recorder. “BUSY” will appear on the display panel, along with
a counter number. Continue to hold down PLAY :. The counter will reach zero (0) when
the test is finished. Release PLAY :.
3
Momentarily, “FAIL” or “PASS” will appear on the display panel.
If “FAIL” appears, your Recorder needs repair. Contact the Philips Customer Care Center for
the Authorized Service Center nearest you.
If “PASS” appears, the Recorder apparently has no failure. The problem may be incorrect interpretation of the operating instructions, a wrong Disc in use, or incorrect connections. Contact
the Philips Customer Care Center for further assistance in solving the problem.
4
If there is no failure, disconnect the power cord again, then reconnect it to the Recorder and an
AC power outlet. The DVD Recorder will be ready for regular use.
66 Specifications
DISC FORMATS SUPPORTED
Disc type
Playback
DVD+RW
•
DVD-RW (Video format)
•
DVD-R
•
DVD-Video
•
SVCD
•
Video CD
•
Audio CD
•
CD-R
•
CD-RW
•
Recording
•
—
—
—
—
—
—
—
—
DVD+REWRITABLE DISC FORMAT
Medium
Phase-Change ReWritable
Diameter
12 cm
Capacity (single side)
4.7 Gbyte
Recording time
HQ
60 minutes
SP
120 minutes
LP
180 minutes
EP
240 minutes
TV STANDARD
Scan Frequency
Number of lines
Playback
Recording
Internal tuner
VIDEO FORMAT
Digital Compression
VIDEO RESOLUTION
DVD-Video/
DVD+RW(HQ/SP)
• Horiz.Resolution
• Vertical Resolution
DVD+RW (LP/EP)
• Horiz.Resolution
• Vertical Resolution
VCD
• Horiz.Resolution
• Vertical Resolution
PAL/SECAM
50Hz
625
•
•
—
NTSC
60Hz
525
•
•
•
MPEG2 for DVD
MPEG1 for VCD
50Hz
60Hz
720 pixels1
576 lines
720 pixels1
480 lines
360 pixels2
576 lines
360 pixels2
480 lines
352 pixels
288 lines
352 pixels
240 lines
1 equivalent to 500 lines on your TV
2 equivalent to 250 lines on your TV
VIDEO PERFORMANCE
DA Converter
10-bit
AD Converter
9-bit
Signal handling
Components
Video Output
1 Vpp into 75 Ohm
S-video Output
Y: 1 Vpp into 75 Ohm
C: 0.300 Vpp into 75 Ohm
Component/
Progressive out
Y: 1 Vpp into 75 Ohm
PB: 0.7 Vpp into 75 Ohm
PR: 0.7 Vpp into 75 Ohm
CABINET
Dimensions (w x h x d): 17 x 4.3 x 13 inches
Net weight: 8.8 kg
Front Panel: Aluminum
AUDIO FORMAT
Compressed digital
• Dolby Digital (AC-3)
Playback
Multi-channel
Recording
2-channel
16 bit,
fs 48 kHz
—
—
—
• DTS
Multi-channel
• MPEG1
2-channel
• MPEG2
Multi-channel
Uncompressed digital (SP dif)
• PCM
2-channel
16, 20, 24 bit
fs 48, 96 kHz
AUDIO PERFORMANCE
DA Converter
24 bit
AD Converter
16 bit
DVD
fs 96 kHz
fs 48 kHz
Video CD
fs 44.1 kHz
Audio CD
fs 44.1 kHz
Signal-Noise (1kHz)
105 dB
Dynamic Range (1kHz)
100 dB
Crosstalk (1kHz)
110 dB
Distortion/Noise (1kHz)
90 dB
—
4
4
4
4
Hz
Hz
Hz
Hz
-44
-22
-22
-20
kHz
kHz
kHz
kHz
FRONT CONNECTIONS
i.LINK DV
IEEE 1394 4-pin
S-video Input
Hosiden 4-pin*
Video Input
Cinch (yellow)*
Audio Left/Right Input
Cinch (white/red)*
REAR CONNECTIONS
Component Video In
Component Video Out
Progressive Scan Out
S-video In
S-video Out
Video In
Video Out (2x)
Audio L/R In (2x)
Audio L/R Out (2x)
Digital Audio Out
RF Antenna In
RF TV Out
Power
*
Cinch (green/blue/red)*
Cinch (green/blue/red)*
Cinch (green/blue/red)*
Hosiden 4-pin
Hosiden 4-pin
Cinch (yellow)*
Cinch (yellow)*
Cinch (white/red)*
Cinch (white/red)*
1 coaxial*,1 optical
IEC958 for CDDA /LPCM
IEC1937 for MPEG2,
Dolby Digital
Coaxial 75 ohms
Coaxial 75 ohms
Standard (IEC type)
gold-plated
POWER SUPPLY
AC power:
Power supply
Power consumption
polarized (IEC)
100 -120V AC
50/60 Hz
Operation
36 W
Low-power standby 3 W
Limited Warranty 67
DVD Recorder
Two years Free Labor / Two years Exchange Warranty on Parts
This product must be carried in for repair.
WHO IS COVERED?
You must have proof of purchase to receive warranty service.
A sales receipt or other document showing that you purchased the product is considered proof of purchase.
WHAT IS COVERED?
Warranty coverage begins the day you buy your product. For
two years thereafter, all parts will be repaired or replaced, and
labor is free. After two years from the day of purchase, you pay
for the replacement or repair of all parts, and for all labor
charges.
All parts, including repaired and replaced parts, are covered
only for the original warranty period. When the warranty on
the product expires, the warranty on all replaced and
repaired parts also expires.
WHAT IS EXCLUDED?
Your warranty does not cover:
• labor charges for installation or setup of the product,
adjustment of customer controls on the product, and
installation or repair of antenna systems outside of the
product.
• product repair and/or part replacement because of misuse,
accident, unauthorized repair or other cause not within
the control of Philips Consumer Electronics.
• reception problems caused by signal conditions or cable or
antenna systems outside the unit.
• a product that requires modification or adaptation to
enable it to operate in any country other than the country
for which it was designed, manufactured, approved and/or
authorized, or repair of products damaged by these modifications.
• incidental or consequential damages resulting from the
product. (Some states do not allow the exclusion of incidental or consequential damages, so the above exclusion
may not apply to you. This includes, but is not limited to,
prerecorded material, whether copyrighted or not copyrighted.)
• a product that is used for commercial or institutional purposes (including but not limited to rental purposes).
WHERE IS SERVICE AVAILABLE?
Warranty service is available in all countries where the product is officially distributed by Philips Consumer Electronics. In
countries where Philips Consumer Electronics does not distribute the product, the local Philips service organization will
attempt to provide service (although there may be a delay if
the appropriate spare parts and technical manual(s) are not
readily available).
MAKE SURE YOU KEEP...
Please keep your sales receipt or other document showing
proof of purchase. Attach it to the owner’s manual and keep
both nearby. Also keep the original box and packing material
in case you need to return your product.
BEFORE REQUESTING SERVICE...
Please check your owner’s manual before requesting service.
Adjustments of the controls discussed there may save you a
service call.
TO GET WARRANTY SERVICE IN U.S.A.,
PUERTO RICO OR U.S. VIRGIN ISLANDS...
Take the product to a Philips factory service center (see
enclosed list) or authorized service center for repair. When
the product has been repaired, you must pick up the unit at
the center. Centers may keep defective parts.
(In U.S.A., Puerto Rico and U.S. Virgin Islands, all implied warranties, including implied warranties of merchantability and fitness for a particular purpose, are limited in duration to the
duration of this express warranty. Because some states do
not allow limitations on how long an implied warranty may
last, this limitation may not apply to you.)
TO GET WARRANTY SERVICE IN CANADA...
Please contact Philips at:
1-800-661-6162 (French Speaking)
1-800-363-7278 (English Speaking)
(In Canada, this warranty is given in lieu of all other warranties. No other warranties are expressed or implied,
including any implied warranties of merchantability or fitness
for a particular purpose. Philips is not liable under any circumstances for any direct, indirect, special, incidental or consequential damages, howsoever incurred, even if notified of
the possibility of such damages.)
REMEMBER...
Please record below the model and serial numbers found on
the product. Also, please fill out and mail your warranty registration card promptly. It will be easier for us to notify you if
necessary.
MODEL # ________________________________
SERIAL # ________________________________
This warranty gives you specific legal rights. You may have other rights which vary from state/province to state/province.
Philips Service Solutions Group, P.O. Box 2976, Longview, Texas 75606,
EL6494E001 / 08-01
(903) 242-4800
Information Index
a/ch button ..................................21
ac power cord ..............10-14, 24
access control ......................49-53
adapt disc format.......................54
add/delete channels...................36
analog output.......................31, 57
analog sound........................31, 57
angle .......................................26, 30
angle button .........................21, 30
append recording.......................45
arrow buttons.......18, 20, 25, 28
audio button ........................20, 29
audio in/out jacks..................9-13,
..........................................15, 22, 24
audio language .....................16, 58
auto chapters..............................46
auto man rec volume button .22
auto resume................................54
automatic channel
programming...............................36
edit button...................................21
editing ...........................................48
ep ...................................................46
erase disc .....................................47
erase this title.............................44
error messages...........................43
batteries..........................................8
black level shift ...........................55
index picture screen.................35
information boxes .....................27
initial setup ............................16-17
insert chapter marker ..............48
installation..............................36-39
cam1/cam2/cam3 .......................22
camera angle ........................26, 30
change code ................................49
change country...........................53
channel buttons ...................21-22
channel programming...............36
chapter markers.........................46
chapters..........................28, 46, 48
child lock......................................50
cleaning discs.................................6
clear button.................................21
clock........................................38-39
code (access control)...............49
color systems................................7
component video
in/out jacks .......................9-10, 24
connections .............................9-15
contents of package ....................6
contents, table of .........................3
controls, remote .................20-21
daylight saving.......................38-39
delete all markers......................48
delete chapter marker .............48
diagnastic test .............................65
digital audio .....................9, 14, 56
digital output...............................56
digital sound ................................56
dim button...................................20
disc bar .........................................35
disc information screen ...........47
disc lock .................................49-53
disc menu button ...............20, 28
disc menus...................................28
disc name .....................................47
disc pointer .................................35
disc tray........................................18
display ...........................................23
divide title ....................................48
dolby surround ............13, 31, 57
dts (digital surround)................14
dvd ilink ........................................22
dvd video........................................7
fast forward searching.......25, 32
fast motion ..................................25
favorite scene selection ...........48
forward button ...................21, 32
frame-by-frame playback ..25, 31
front panel ...................................22
glossary.........................................64
helpful hints...........................62-63
hidden chapter ...........................48
hookups....................................9-15
hq ...................................................46
key sound ....................................59
language...........................16-17, 58
letterbox ...............................55, 64
limited warranty.........................67
lock/unlock ..................................50
low power standby ...................54
lp.....................................................46
lp/ep rec mode...........................46
make edits compatible .............47
manual buttons...........................22
manual recording volume........45
menu bars....................................25
menu language.....................16, 58
menus................................8, 25, 28
mute button................................20
name..............................................44
new index picture .....................48
next button .................................21
night mode ..................................59
ntsc...................................................7
number buttons .........................21
ok button.....................................20
on/off button...............................20
on-screen symbols ....................26
one-touch recording.................40
open/close button .....................22
optical (digital audio out)
jack ..................................14, 24, 56
pal.....................................................7
panel button................................22
panscan .........................................55
parental level...............................52
password (access control) ......49
pause button........................21, 31
pbc .................................................54
This owner’s manual is made of recyclable materials.
Remember to recycle!
pbs channel ...........................38-39
pcm only ......................................56
picture settings...........................55
play always...................................51
play button .....................18, 21-22
play full title.................................44
play once......................................51
playable discs.................................7
playback control.........................54
playing a disc ...............................18
pluscode .......................................42
power cord....................10-14, 24
previous button..........................21
prog scan out
(Y, Pb, Pr) jacks...................10, 24
progressive scan.........................10
protection....................................47
3D sound.......................25, 31, 57
time .........................................38-39
time search...........................25, 33
time zone...............................38-39
timer button ..................21, 41-43
timer information box ......27, 35
timer recordings..................41-43
title buttons.................................22
title menus...................................28
title settings menu.....................44
titles...............................................25
tuner button ...............................20
tuner information box ......27, 35
tracks .....................................25, 28
tv shape .................................17, 55
tv switch................................20, 60
tv system ........................................7
rear panel.....................................24
rec/otr button ............................20
record button.............................22
record mode...............................46
record settings ...........................46
recording audio..........................58
region codes..................................7
remote control, buttons ...20-21
remote control, settings..........59
remote control, tv
operation ...............................60-61
remote sensor............................22
repeat a-b .............................26, 34
repeat a-b button ...............21, 34
repeat button ......................21, 34
repeat playback ..........................34
return button..............................20
reverse button ....................21, 32
reverse searching.......................32
user preference settings...25, 54
vcr plus+ programming.....37, 42
video cd ......................................7-8
video (cvbs) in/out jacks...15, 24
video input channel (tv) .............9
video shift ....................................55
visible chapter.............................48
vol(ume) buttons .......................20
warranty.......................................67
widescreen tv .............................55
“x”....................................................8
zoom......................................25, 30
zoom button........................20, 30
safe..........................................26, 51
safety precautions ....................4-6
sap..................................................58
scan ................................20, 26, 33
scan button ..........................20, 33
search buttons............................22
searching ......................................32
select button........................20, 41
slow button..........................21, 32
slow motion.........................25, 32
sound mode..................25, 31, 57
sp....................................................46
specifications...............................66
st (stereo)......................25, 31, 57
stand by /on button ..................22
status box .............................26, 54
stereo .......................25, 31, 57-58
still picture...................................31
stop button ....................18-20, 22
subtitle button.....................21, 29
subtitles...................17, 25, 29, 58
sur (surround)..............25, 31, 57
svcd..................................................7
s-video ................9, 11, 15, 22, 24
s-video in/out jacks ............22, 24
system menu button..........20, 25
T-C button ..................................21
table of contents ..........................3
3104 125 2407.2