1
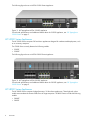
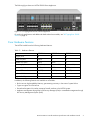
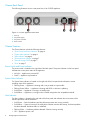
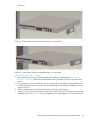
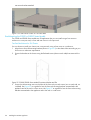
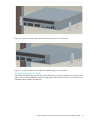
HP TippingPoint
Next Generation Firewall Hardware Specification
and Installation Guide
Abstract
This guide describes the HP TippingPoint Next Generation Firewall Appliance hardware specifications, chassis
components, and installation requirements and instructions. This information is intended for network and security
administrators, or IT specialists responsible for installation and setup of the NGFW Appliance.
*5998-4805*
Part number: 5998-4805
Edition: First Publication (Aug 2013)
Legal and notice information
© Copyright 2013 Hewlett-Packard Development Company, L.P.
Hewlett-Packard Company makes no warranty of any kind with regard to this material, including, but not limited to, the implied warranties of
merchantability and fitness for a particular purpose. Hewlett-Packard shall not be liable for errors contained herein or for incidental or consequential
damages in connection with the furnishing, performance, or use of this material.
This document contains proprietary information, which is protected by copyright. No part of this document may be photocopied, reproduced, or
translated into another language without the prior written consent of Hewlett-Packard. The information is provided “as is” without warranty of any
kind and is subject to change without notice. The only warranties for HP products and services are set forth in the express warranty statements
accompanying such products and services. Nothing herein should be construed as constituting an additional warranty. HP shall not be liable for
technical or editorial errors or omissions contained herein.
TippingPoint®, the TippingPoint logo, and Digital Vaccine® are registered trademarks of Hewlett-Packard All other company and product names
may be trademarks of their respective holders. All rights reserved. No part of this documentation may be reproduced in any form or by any means
or used to make any derivative work (such as translation, transformation, or adaptation) without written permission from Hewlett-Packard or one of its
subsidiaries.
Printed in US.
Next Generation Firewall Hardware Specification and Installation Guide
Publication Part Number: 5998-4805
Table of Contents
About This Guide . . . . . . . . . . . . . . . . . . . . . . . . . . . . . . . . . . . . . . . . . . . . . . . . . . . . . .ix
Target Audience . . . . . . . . . . . . . . . . . . . . . . . . . . . . . . . . . . . . . . . . . . . . . . . . . . . . . . . . . . . . . .
Related Documentation . . . . . . . . . . . . . . . . . . . . . . . . . . . . . . . . . . . . . . . . . . . . . . . . . . . . . . . . .
Document Conventions . . . . . . . . . . . . . . . . . . . . . . . . . . . . . . . . . . . . . . . . . . . . . . . . . . . . . . . . .
Typefaces . . . . . . . . . . . . . . . . . . . . . . . . . . . . . . . . . . . . . . . . . . . . . . . . . . . . . . . . . . . . . . . .
Document Messages . . . . . . . . . . . . . . . . . . . . . . . . . . . . . . . . . . . . . . . . . . . . . . . . . . . . . . . .
Customer Support . . . . . . . . . . . . . . . . . . . . . . . . . . . . . . . . . . . . . . . . . . . . . . . . . . . . . . . . . . . . .
Before Contacting Support . . . . . . . . . . . . . . . . . . . . . . . . . . . . . . . . . . . . . . . . . . . . . . . . . . . .
Contact Information . . . . . . . . . . . . . . . . . . . . . . . . . . . . . . . . . . . . . . . . . . . . . . . . . . . . . . . . .
.
.
.
.
.
.
.
.
..
..
..
..
..
..
..
..
ix
ix
.x
.x
.x
xi
xi
xii
1 Overview . . . . . . . . . . . . . . . . . . . . . . . . . . . . . . . . . . . . . . . . . . . . . . . . . . . . . . . . . 1
NGFW Appliances . . . . . . . . . . .
HP S1000 Series Appliance . .
HP S3000 Series Appliances .
HP S8000 Series Appliances .
Core Hardware Features . . . . . . .
..
..
..
..
..
.
.
.
.
.
..
..
..
..
..
.
.
.
.
.
..
..
..
..
..
..
..
..
..
..
.
.
.
.
.
..
..
..
..
..
..
..
..
..
..
.
.
.
.
.
..
..
..
..
..
.
.
.
.
.
..
..
..
..
..
..
..
..
..
..
.
.
.
.
.
..
..
..
..
..
..
..
..
..
..
.
.
.
.
.
..
..
..
..
..
.
.
.
.
.
..
..
..
..
..
..
..
..
..
..
.
.
.
.
.
..
..
..
..
..
..
..
..
..
..
.
.
.
.
.
..
..
..
..
..
.
.
.
.
.
....
....
....
....
....
.
.
.
.
.
.
.
.
.
.
.
.
.
.
.
1
1
2
2
3
2 HP TippingPoint S1000 Series . . . . . . . . . . . . . . . . . . . . . . . . . . . . . . . . . . . . . . . . . . . 5
S1050F Appliance Overview.
Chassis Front Panel . . . . .
Chassis Back Panel . . . . .
Chassis Features . . . . . . .
Model Requirements . . . . . . .
Power Requirements . . . . .
Cabling Requirements . . .
Technical Specifications. . . . .
Installing the Appliance . . . . .
.
.
.
.
.
.
.
.
.
..
..
..
..
..
..
..
..
..
..
..
..
..
..
..
..
..
..
.
.
.
.
.
.
.
.
.
..
..
..
..
..
..
..
..
..
.
.
.
.
.
.
.
.
.
..
..
..
..
..
..
..
..
..
..
..
..
..
..
..
..
..
..
.
.
.
.
.
.
.
.
.
..
..
..
..
..
..
..
..
..
..
..
..
..
..
..
..
..
..
.
.
.
.
.
.
.
.
.
..
..
..
..
..
..
..
..
..
.
.
.
.
.
.
.
.
.
..
..
..
..
..
..
..
..
..
..
..
..
..
..
..
..
..
..
.
.
.
.
.
.
.
.
.
..
..
..
..
..
..
..
..
..
..
..
..
..
..
..
..
..
..
.
.
.
.
.
.
.
.
.
..
..
..
..
..
..
..
..
..
.
.
.
.
.
.
.
.
.
..
..
..
..
..
..
..
..
..
..
..
..
..
..
..
..
..
..
.
.
.
.
.
.
.
.
.
..
..
..
..
..
..
..
..
..
..
..
..
..
..
..
..
..
..
.
.
.
.
.
.
.
.
.
..
..
..
..
..
..
..
..
..
...
...
...
...
...
...
...
...
...
.
.
.
.
.
.
.
.
.
.
.
.
.
.
.
.
.
.
.
.
.
.
.
.
.
.
.
.
.
.
.
.
.
.
.
.
.
.
.
.
.
.
.
.
.
5
5
6
6
7
7
8
8
8
3 HP TippingPoint S3000 Series . . . . . . . . . . . . . . . . . . . . . . . . . . . . . . . . . . . . . . . . . . . 9
S3000 Series Overview . . . . . . . . . . . .
Chassis Front Panel . . . . . . . . . . . . .
Chassis Back Panel . . . . . . . . . . . . .
Chassis Features . . . . . . . . . . . . . . .
Model Requirements . . . . . . . . . . . . . . .
Power Requirements . . . . . . . . . . . . .
Cabling Requirements . . . . . . . . . . .
Technical Specifications. . . . . . . . . . . . .
Hardware Installation and Configuration .
.
.
.
.
.
.
.
.
.
..
..
..
..
..
..
..
..
..
..
..
..
..
..
..
..
..
..
.
.
.
.
.
.
.
.
.
..
..
..
..
..
..
..
..
..
..
..
..
..
..
..
..
..
..
.
.
.
.
.
.
.
.
.
...............................
...............................
...............................
...............................
...............................
...............................
...............................
...............................
...............................
.
.
.
.
.
.
.
.
.
.
.
.
.
.
.
.
.
.
.
.
.
.
.
.
.
.
.
.
.
.
.
.
.
.
.
.
. 9
. 9
10
10
12
12
12
12
13
4 HP TippingPoint S8000 Series . . . . . . . . . . . . . . . . . . . . . . . . . . . . . . . . . . . . . . . . . . 15
S8000 Series Appliances Overview . . . .
Chassis Front Panel . . . . . . . . . . . . .
Chassis Back Panel . . . . . . . . . . . . .
Chassis Features . . . . . . . . . . . . . . .
Model Requirements . . . . . . . . . . . . . . .
Power Requirements . . . . . . . . . . . . .
Cabling Requirements . . . . . . . . . . .
Technical Specifications. . . . . . . . . . . . .
Hardware Installation and Configuration .
.
.
.
.
.
.
.
.
.
..
..
..
..
..
..
..
..
..
..
..
..
..
..
..
..
..
..
.
.
.
.
.
.
.
.
.
..
..
..
..
..
..
..
..
..
..
..
..
..
..
..
..
..
..
.
.
.
.
.
.
.
.
.
................................
................................
................................
................................
................................
................................
................................
................................
................................
.
.
.
.
.
.
.
.
.
.
.
.
.
.
.
.
.
.
.
.
.
.
.
.
.
.
.
15
15
16
16
18
18
18
19
19
5 Installing the NGFW Appliance . . . . . . . . . . . . . . . . . . . . . . . . . . . . . . . . . . . . . . . . . 21
Install the Chassis . . . . . . . . . . . . . .
Determine Total Rack Space . . . .
Attach the Appliance to the Rack .
Connect the Power Supply . . . . .
.
.
.
.
..
..
..
..
.
.
.
.
..
..
..
..
..
..
..
..
.
.
.
.
..
..
..
..
..
..
..
..
.
.
.
.
..
..
..
..
.
.
.
.
.
.
.
.
.
.
.
.
.
.
.
.
.
.
.
.
.
.
.
.
.
.
.
.
.
.
.
.
.
.
.
.
.
.
.
.
.
.
.
.
.
.
.
.
.
.
.
.
.
.
.
.
.
.
.
.
.
.
.
.
.
.
.
.
.
.
.
.
.
.
.
.
.
.
.
.
.
.
.
.
.
.
.
.
.
.
.
.
.
.
.
.
.......
.......
.......
.......
.
.
.
.
Next Generation Firewall Hardware Specification and Installation Guide
.
.
.
.
21
21
21
26
iii
Attach Cables . . . . . . . . . . . . . . . . . . . . . . . . . . . . . . . . . . . . . . . . . . . . . . . . . . . . . . . . . . . . . . . . . 26
Check LEDs . . . . . . . . . . . . . . . . . . . . . . . . . . . . . . . . . . . . . . . . . . . . . . . . . . . . . . . . . . . . . . . . . . . 27
Setup Wizard . . . . . . . . . . . . . . . . . . . . . . . . . . . . . . . . . . . . . . . . . . . . . . . . . . . . . . . . . . . . . . . . . 27
A Connector and Cable Pinout Specifications . . . . . . . . . . . . . . . . . . . . . . . . . . . . . . . . 29
RJ-45 (COM) Console . . . . . . . . . . . . . . . . . . . . . . . . . . . . . . . . . . . . . . . . . . . . . . . . . . . . . . . . . . . . 29
RJ-45 Ethernet Connectors . . . . . . . . . . . . . . . . . . . . . . . . . . . . . . . . . . . . . . . . . . . . . . . . . . . . . . . . . 29
Pluggable Transceivers . . . . . . . . . . . . . . . . . . . . . . . . . . . . . . . . . . . . . . . . . . . . . . . . . . . . . . . . . . . 30
B Power Supply and Fan Modules . . . . . . . . . . . . . . . . . . . . . . . . . . . . . . . . . . . . . . . . 33
The S3000 or S8000 Series AC Power Supply . . . . . . . . . . . . . . . . . . . . . . . . . . . . . . . . . . . . . . . . . . 33
NGFW Fans . . . . . . . . . . . . . . . . . . . . . . . . . . . . . . . . . . . . . . . . . . . . . . . . . . . . . . . . . . . . . . . . . . 34
C Using the External CFast Storage Card . . . . . . . . . . . . . . . . . . . . . . . . . . . . . . . . . . . 37
About the External CFast Storage Card . . . . . . . . . . . . . . . . . . . . . . . . . . . . . . . . . . . . . . . . . . . . . . . . 37
CFast Card Commands . . . . . . . . . . . . . . . . . . . . . . . . . . . . . . . . . . . . . . . . . . . . . . . . . . . . . . . . . . . 38
Index . . . . . . . . . . . . . . . . . . . . . . . . . . . . . . . . . . . . . . . . . . . . . . . . . . . . . . . . . . . . . 41
iv
List of Figures
Figure
Figure
Figure
Figure
Figure
Figure
Figure
Figure
Figure
Figure
Figure
Figure
Figure
Figure
Figure
Figure
Figure
Figure
Figure
Figure
Figure
Figure
Figure
1-1 - HP TippingPoint NGFW S1050F Appliance . . . . . . . . . . . . . . . . . . . . . . . . . . . . . . . . . . . . . 2
1-2 - HP TippingPoint NGFW S3020F Appliance . . . . . . . . . . . . . . . . . . . . . . . . . . . . . . . . . . . . . 2
1-3 - HP TippingPoint NGFW S8010F Appliance . . . . . . . . . . . . . . . . . . . . . . . . . . . . . . . . . . . . . 3
2-1 - S1050F Appliance Front Panel . . . . . . . . . . . . . . . . . . . . . . . . . . . . . . . . . . . . . . . . . . . . . . . 5
2-2 - S1050F Appliance Back Panel . . . . . . . . . . . . . . . . . . . . . . . . . . . . . . . . . . . . . . . . . . . . . . . 6
2-3 - Management and Console Ports . . . . . . . . . . . . . . . . . . . . . . . . . . . . . . . . . . . . . . . . . . . . . . 7
3-1 - S3000 Series Appliance Front Panel . . . . . . . . . . . . . . . . . . . . . . . . . . . . . . . . . . . . . . . . . . . 9
3-2 - S3000/S8000 Series Appliance Back Panel . . . . . . . . . . . . . . . . . . . . . . . . . . . . . . . . . . . . 10
3-3 - Management and Console Ports . . . . . . . . . . . . . . . . . . . . . . . . . . . . . . . . . . . . . . . . . . . . . 11
4-1 - S8000 Series Appliance Front Panel . . . . . . . . . . . . . . . . . . . . . . . . . . . . . . . . . . . . . . . . . . 15
4-2 - S3000/S8000 Series Appliance Back Panel . . . . . . . . . . . . . . . . . . . . . . . . . . . . . . . . . . . . 16
4-3 - Management and Console Ports . . . . . . . . . . . . . . . . . . . . . . . . . . . . . . . . . . . . . . . . . . . . . 17
5-1 - S1000 Series Model Front-Mount Bracket and Ear . . . . . . . . . . . . . . . . . . . . . . . . . . . . . . . . 22
5-2 - S1000 Series Chassis with Front Mounting in a Two-Post Rack . . . . . . . . . . . . . . . . . . . . . . . . 23
5-3 - S1000 Series Chassis with Mid-Mounting in a Two-Post Rack . . . . . . . . . . . . . . . . . . . . . . . . . 23
5-4 - S1000 Series Chassis in a Four-Post Rack . . . . . . . . . . . . . . . . . . . . . . . . . . . . . . . . . . . . . . 24
5-5 - S3000/S8000 Series Model Front-Mount Bracket and Ear . . . . . . . . . . . . . . . . . . . . . . . . . . 24
5-6 - S3000 or S8000 Series Model with Front Mounting in a Two-Post Rack . . . . . . . . . . . . . . . . . 25
5-7 - S3000 or S8000 Series Model with Mid-Mounting in a Two-Post Rack . . . . . . . . . . . . . . . . . . 25
5-8 - S3000 or S8000 Series Chassis in a Four-Post Rack . . . . . . . . . . . . . . . . . . . . . . . . . . . . . . . 26
A-1 - RJ-45 Connector . . . . . . . . . . . . . . . . . . . . . . . . . . . . . . . . . . . . . . . . . . . . . . . . . . . . . . . . 29
B-1 - S3000/S8000 Series AC Power Supply . . . . . . . . . . . . . . . . . . . . . . . . . . . . . . . . . . . . . . . 33
B-2 - NGFW Fan Unit . . . . . . . . . . . . . . . . . . . . . . . . . . . . . . . . . . . . . . . . . . . . . . . . . . . . . . . . 34
Next Generation Firewall Hardware Specification and Installation Guide
v
vi
List of Tables
Table
Table
Table
Table
Table
Table
Table
Table
Table
Table
Table
Table
Table
1 - Document Typographic conventions . . . . . . . . . . . . . . . . . . . . . . . . . . . . . . . . . . . . . . . . . . . . . x
2 - Customer Support Information . . . . . . . . . . . . . . . . . . . . . . . . . . . . . . . . . . . . . . . . . . . . . . . . .xi
1-1 - Hardware Features . . . . . . . . . . . . . . . . . . . . . . . . . . . . . . . . . . . . . . . . . . . . . . . . . . . . . . . 3
2-1 - Management Port LED Descriptions . . . . . . . . . . . . . . . . . . . . . . . . . . . . . . . . . . . . . . . . . . . . 7
2-2 - S1050F Appliance Hardware Specifications . . . . . . . . . . . . . . . . . . . . . . . . . . . . . . . . . . . . . . 8
3-1 - Management Port LED Descriptions . . . . . . . . . . . . . . . . . . . . . . . . . . . . . . . . . . . . . . . . . . . 11
3-2 - S3000 Series Appliance Hardware Specifications . . . . . . . . . . . . . . . . . . . . . . . . . . . . . . . . . 12
4-1 - Management Port LED Descriptions . . . . . . . . . . . . . . . . . . . . . . . . . . . . . . . . . . . . . . . . . . . 18
4-2 - S8000 Series Appliance Hardware Specifications . . . . . . . . . . . . . . . . . . . . . . . . . . . . . . . . . 18
A-1 - RJ-45 Console Connector Pinouts . . . . . . . . . . . . . . . . . . . . . . . . . . . . . . . . . . . . . . . . . . . . 29
A-2 - RJ-45 Ethernet Connector Pinouts . . . . . . . . . . . . . . . . . . . . . . . . . . . . . . . . . . . . . . . . . . . . . 29
A-3 - RJ-45 Connector Pinouts for 1GbE Mode . . . . . . . . . . . . . . . . . . . . . . . . . . . . . . . . . . . . . . . 30
C-1 - External Storage Card Commands . . . . . . . . . . . . . . . . . . . . . . . . . . . . . . . . . . . . . . . . . . . 38
Next Generation Firewall Hardware Specification and Installation Guide
vii
viii
About This Guide
The HP TippingPoint Next Generation Firewall (NGFW) provides a high performance enterprise-class
application-aware firewall and VPN terminator with HP TippingPoint IPS and other DPI capabilities. This
guide summarizes the features and capabilities provided by the NGFW Appliance.
This section covers the following topics:
• Target Audience, page 1
• Related Documentation, page 1
• Document Conventions, page 2
• Customer Support, page 3
Target Audience
This guide is intended for security network administrators and specialists who have the responsibility of
monitoring, managing, and improving system security.
Related Documentation
Access the documentation at http://www.hp.com/support/manuals . For the most recent updates for your
products, check the HP Networking Support web site at http://www.hp.com/networking/support.
Next Generation Firewall Concepts and Deployment Guide
1
Document Conventions
This guide uses the following document conventions.
• Typefaces, page 2
• Document Messages, page 2
Typefaces
HP TippingPoint publications use the following typographic conventions for structuring information:
Document Typographic Conventions
Convention
Element
Medium blue text: Link
Cross-reference links and e-mail addresses
Blue, underlined text (http://www.hp.com) Web site addresses
Bold font
•
•
Key names
Text typed into a GUI element, such as into a box
• GUI elements that are clicked or selected, such as menu and list
items, buttons, and check boxes. Example: Click OK to accept.
Italics font
Text emphasis, important terms, variables, and publication titles.
Monospace font
•
•
•
•
File and directory names
System output
Code
Text typed at the command-line
Monospace, italic font
•
•
Code variables
Command-line variables
Monospace, bold font
Emphasis of file and directory names, system output, code, and text
typed at the command line
Document Messages
Document messages are special text that is emphasized by font, format, and icons. This concepts and
deployment guide contains the following types of messages:
• Warning
• Caution
• Note
• Tip
WARNING! Warning notes alert you to potential danger of bodily harm or other potential harmful
consequences.
CAUTION: Caution notes provide information to help minimize risk, for example, when a failure to follow
directions could result in damage to equipment or loss of data.
NOTE: Notes provide additional information to explain a concept or complete a task. Notes of specific
importance in clarifying information or instructions are denoted as such.
2
IMPORTANT:
Another type of note that provides clarifying information or specific instructions.
TIP: Tips provide helpful hints and shortcuts, such as suggestions about how you can perform a task more
easily or more efficiently.
Customer Support
HP TippingPoint is committed to providing quality customer support to our customers. Each customer is
provided with a customized support agreement that provides detailed customer and support contact
information. When you need technical support, use the following information to contact Customer Support.
• Before Contacting Support, page 3
• Contact Information, page 3
Before Contacting Support
For the most efficient resolution of your problem, please take a moment to gather some basic information
from your records and from your system before contacting HP TippingPoint customer support.
Customer Support Information
Information
Location
Your customer number
You can find this number on your Customer Support Agreement
and on the shipping invoice that came with your IPS.
Your DV Toolkit version number
You can find this information by clicking Help > About in the
NGFW menu bar.
Your NGFW Appliance serial
number
You can find this number in the LSM in the System Summary
page, or on the shipping invoice that came with your system.
Your TOS version number
You can find this information in the LSM in the System Summary
page, or by using the CLI show version command.
Your SMS server serial number
You can find this number on the bottom of the server chassis.
Also, from the SMS CLI, you can run the key command.
Your SMS version number
You can find this information on the Dashboard in the Updates
area. The Admin > General screen also displays the version
number.
Contact Information
For additional information or assistance, contact the HP Networking Support:
http://www.hp.com/networking/support
Before contacting HP, collect the following information:
• Product model names and numbers
• Technical support registration number (if applicable)
• Product serial numbers
• Error messages
• Operating system type and revision level
• Detailed questions
Next Generation Firewall Concepts and Deployment Guide
3
HP Contact Information
For the name of the nearest HP authorized reseller, see the contact HP worldwide web site:
• http://www.hp.com/country/us/en/wwcontact.html
4
1
Overview
The HP TippingPoint Next Generation Firewall is the latest offering in the comprehensive security suite of
HP TippingPoint products.
The Next Generation Firewall (NGFW) is a high-performance, enterprise-class solution that offers a range
of appliances designed to address the needs of various network topologies. The NGFW Appliances offer
protection for networks ranging from single-point-of-entry networks to complex enterprise networks and
data centers.
The HP TippingPoint line-up of NGFW Appliances offers a sophisticated and comprehensive defense
against network invasion, proliferation of unauthorized application use, and business interruption at critical
access points, including the network perimeter. In addition to providing a robust and scalable solution that
includes auto-updating and policy-based controls, these appliances are designed for easy installation and
maintenance.
For additional information on NGFW features and their implementation, refer to the Concepts and
Deployment Guide.
The following topics are covered:
• ”NGFW Appliances” on page 1
• ”Core Hardware Features” on page 3
NGFW Appliances
HP TippingPoint NGFW Appliances deliver the highest level of defense against network intrusion and
provide application control. Security zones inspect and filter traffic that passes through them.
Application-layer gateway traffic is monitored to identify and classify applications crossing onto the
network. With its ability to identify hundreds of the most common enterprise applications, the NGFW
Application Intelligence System (AIS) enables fine-grained control of those applications and the users
accessing them.
You can install as many HP TippingPoint security appliances as you need to strategically protect your
network enterprise zones. A local client on each appliance monitors and manages activity. Alternatively,
you can manage appliances by using the Security Management System (SMS) console.
The NGFW family includes the S1000 Series, S3000 Series, and the S8000 Series appliances. These
robust, high-performance security appliances offer a scalable solution to support all types of organizations
and network environments.
HP S1000 Series Appliance
The HP S1000 Series comprises a 1U form-factor appliance designed for smaller organizations, such as
corporate branch offices. This appliance provides full next-generation firewall protection designed to meet
the needs and budgets of small- to medium-sized organizations.
The S1000 Series currently features the S1050F model.
Next Generation Firewall Hardware Specification and Installation Guide
1
The following figure shows an NGFW S1000 Series Appliance:
Figure 1-1 HP TippingPoint NGFW S1050F Appliance
For technical specifications and additional details about the S1050F appliance, see ”HP TippingPoint
S1000 Series” on page 5.
HP S3000 Series Appliances
The HP S3000 Series comprises 2U form-factor appliances designed for medium-sized deployments, such
as on university campuses.
The S3000 Series currently features the following models:
• S3010F
• S3020F
The following figure shows an NGFW S3000 Series Appliance:
Figure 1-2 HP TippingPoint NGFW S3020F Appliance
For technical specifications and additional details about the S3020F appliance, see ”HP TippingPoint
S3000 Series” on page 9.
HP S8000 Series Appliances
The HP S8000 Series comprises high-performance, 2U form-factor appliances. These high-end, robust
models accommodate the heavier traffic flows of large enterprises. The 8000 Series includes the following
models:
• S8005F
• S8010F
2
Overview
The following figure shows an NGFW S8000 Series Appliance:
Figure 1-3 HP TippingPoint NGFW S8010F Appliance
For technical specifications and additional details about these models, see ”HP TippingPoint S8000
Series” on page 15.
Core Hardware Features
The NGFW models have the following hardware features:
Table 1-1
Hardware Features
Feature
S1000 Series
S3000 Series
S8000 Series
Copper ports
8
8
8
1GbE SFP ports
None
8
8
10GbE SFP+ ports
None
None
4
Power supply
1 (built-in)
2 (removable)
2 (removable)
System memory
8GB
12GB
32GB
External CFast card
1 (8GB)
1 (8GB)
1 (32GB)
Replaceable fans
No
Yes
Yes
High Availability
Yes
Yes
Yes
In addition, the following features are available on all models:
• Built-in intrinsic high-availability features, guaranteeing continuity in the event of system failure
• Crypto encryption for VPN service
• Streamlined migration from other enterprise firewall products to the NGFW system
• Appliance management through the Local Security Manager (LSM) or centralized management through
the Security Management System (SMS).
Next Generation Firewall Hardware Specification and Installation Guide
3
4
Overview
2
HP TippingPoint S1000 Series
This information describes the components, chassis, requirements, and installation specifics of the HP
TippingPoint S1000 Series Next Generation Firewall Appliances. This series currently features the S1050F
model, described further in the following topics:
• ”S1050F Appliance Overview” on page 5
• ”Model Requirements” on page 7
• ”Technical Specifications” on page 8
• ”Installing the Appliance” on page 8
For more information about installing the S1050F appliance, see ”Installing the NGFW Appliance” on
page 21. Prior to installation, have the CLI Reference available for configuration information. After
installing the components, complete the HP TippingPoint Setup Wizard as part of the installation and
configuration procedures.
S1050F Appliance Overview
The S1050F appliance is a small form-factor devices designed for smaller network environments in which
traffic throughput requirements are 500Mbps or less. This model provides the same high-level security
protection as the higher-capacity models.
Chassis Front Panel
The S1050F appliance is a 1U form-factor device that is rack-mountable in a 19-inch rack (or 23-inch rack,
with appropriate conversion parts available from rack accessory vendors).
The following image is a front panel view of an S1050F appliance:
Figure 2-1 S1050F Appliance Front Panel
1
CFast card
2
1GB copper ports
3
Dedicated HA port
4
Serial console port/Management port
5
Alert indicator
6
Power indicator
7
System status indicator
Next Generation Firewall Hardware Specification and Installation Guide
5
Chassis Back Panel
The following illustration shows a rear-panel view of an S1050F appliance.
Figure 2-2 S1050F Appliance Back Panel
1
Fans (3)
2
AC power supply
3
AC power connector
4
Power switch
Chassis Features
The Chassis features include the following elements:
• ”Power Switch and Power Indicator” on page 6
• ”System Status Indicator” on page 6
• ”Alert Indicator” on page 6
• ”Fans and Power Supplies” on page 7
• ”External Storage Card” on page 7
• ”Ports” on page 7
Power Switch and Power Indicator
The power switch is located on the right side of the back panel. The power indicator on the front panel
indicates the current power status of the appliance.
• No light — Appliance is powered off.
• Green — Appliance is powered on.
System Status Indicator
The System Status indicator is located on the right side of the front panel and indicates the current
operating status of the appliance.
• Flashing Green — Appliance is booting and is not yet ready to inspect traffic.
• Flashing Green/Yellow — Appliance is booting and BIOS or software is updating.
• Solid Green — Appliance is running in a healthy state.
• Solid Yellow — Appliance is running but has a health rating below the acceptable threshold.
Alert Indicator
The Alert indicator is located on the right side of the front panel and indicates the current status of the
software processes and the hardware.
• Solid Green — Both the hardware and the software processes are running normally.
• Solid Yellow — System is booting. If the solid yellow indicator remains after startup, a software problem
has been detected. Hardware status is undefined.
• Flashing Yellow — Hardware problem detected. Software running normally.
• Off — Appliance power is off.
6
HP TippingPoint S1000 Series
Fans and Power Supplies
The S1050F appliance includes one power supply and three cooling fans. These components are not
customer-replaceable. For more information about these components, see ”Power Supply and Fan
Modules” on page 33.
External Storage Card
The S1050F appliance includes a CFast card slot. The external storage card stores system logs, snapshots,
and other system data. The card can be removed and inserted while the appliance is running; however, to
do so, you must issue the appropriate unmounting, mounting, and preparation commands in the command
line interface (CLI). Refer to ”Using the External CFast Storage Card” on page 37 or the CLI Reference for
command syntax.
For more information about the procedure, refer to ”Using the External CFast Storage Card” on page 37.
Ports
All NGFW Appliances, including the S1050F appliance, are equipped with eight copper ports. In
addition, appliances include the console and management ports shown in the following figure:
Figure 2-3 Management and Console Ports
1
1 RJ-45 serial console port
2
1GbE copper management port
3
Link LED
4
Activity LED
The management port LEDs indicate link and activity state, as described in the following table.
Table 2-1
Management Port LED Descriptions
LED Type
Color
Description
Link
Green
Link is active at 1000Mbps.
Off
Link is inactive, or is active at 10Mbps or 100Mbps.
Blinking amber
Data traffic is passing.
Off
No traffic is passing.
Activity
Model Requirements
The following topics describe the power and cabling requirements for the S1050F appliance.
• ”Power Requirements” on page 7
• ”Cabling Requirements” on page 8
Power Requirements
The S1050F appliance requires one input of Alternating Current (AC) that must meet the following
requirements:
• AC: Voltage 100V – 240V; 4 – 2 amp; 50 – 60 Hz
Next Generation Firewall Hardware Specification and Installation Guide
7
WARNING! Do not attempt to install a DC power supply into an NGFW Appliance. The NGFW
Appliance does not contain the grounding capability for safe installation of a DC power supply. Bodily
harm and damage to the system could result.
Cabling Requirements
The S1050F appliance ships with the following cables:
• One AC power cable
• Null modem cable for the serial console management port (DB-9 to RJ-45) shown in Figure 2-3 on
page 7.
Technical Specifications
The S1050F appliance has the following specifications:
Table 2-2
S1050F Appliance Hardware Specifications
Specification
Description
Dimensions
(unpackaged)
1.73 in (H) x 16.78 in (W) x 17.72 in (D)
(4.40 cm x 42.62 cm x 45.00 cm)
Weight
15.28 lbs (6.93 kg)
Power
Requirements
AC: Voltage 100 – 240; Current 4 – 2 A; Frequency 50 – 60 Hz
Service Provider
operating
requirements
Temperature: 32 – 104° F (0 – 40° C) — Operating
The appliance’s maximum power consumption is 142 W.
Temperature: -4 – 158° F (-20 – 80° C) — Storage
Altitude: No degradation up to 10,000 feet (3048 m)
Humidity: 5% to 95% (non-condensing)
External interfaces
• 1 – 1GbE copper management port
• 1 – RJ-45 console port
• 8 – 1GbE copper ports
• 1 external storage card drive
Installing the Appliance
To install and complete installation setup of the appliance, see ”Installing the NGFW Appliance” on
page 21.
8
HP TippingPoint S1000 Series
3
HP TippingPoint S3000 Series
This information describes the components, chassis, requirements, and installation specifics of the HP
TippingPoint S3000 Series Next Generation Firewall Appliances. This series currently features the S3010F
and S3020F models described further in the following topics:
• S3000 Series Overview, page 9
• Model Requirements, page 12
• Technical Specifications, page 12
• Hardware Installation and Configuration, page 13
For more information about installing the S3000 Series appliances, see ”Installing the NGFW Appliance”
on page 21. Prior to installation, have the CLI Reference available for configuration information. After
installing the components, complete the HP TippingPoint Setup Wizard as part of the installation and
configuration procedures.
S3000 Series Overview
The S3010F and S3020F appliances are mid-range systems that have a larger form factor than the S1050F
appliance and are designed for network environments requiring traffic throughput rates of 2Gbps or lower.
These models provide the same high-level of security protection as the highest-capacity models.
Chassis Front Panel
The S3010F and S3020F appliances are 2U form-factor devices that are rack-mountable in a 19-inch rack
(or 23-inch rack, with appropriate conversion parts available from rack accessory vendors). These
appliances support throughput across multiple copper and fiber ports.
The following illustration shows a front panel view of the S3000 Series appliance:
Figure 3-1 S3000 Series Appliance Front Panel
1
1GbE SFP ports
2
1GbE copper ports
3
CFast card
4
Dedicated HA port
5
Console/Management port
6
Power button
7
Alert indicator
8
System status indicator
Next Generation Firewall Hardware Specification and Installation Guide
9
Chassis Back Panel
The following illustration shows the rear-panel view of an S3000 Series appliance.
Figure 3-2 S3000/S8000 Series Appliance Back Panel
1
Fans (3)
2
Power supplies (2)
Chassis Features
The Chassis features include the following elements:
• Power Button, page 10
• System Status Indicator, page 10
• Alert Indicator, page 10
• Fans and Power Supplies, page 11
• External Storage Card, page 11
• Ports, page 11
Power Button
The power button is located on the right side of the console/management ports on the front panel. The
power button light indicates the current status of the appliance.
• No light — Appliance is powered off.
• Green — Appliance is powered on.
System Status Indicator
The System Status indicator is located on the right side of the front panel and indicates the current
operating status of the appliance.
• Flashing Green — Appliance is booting and is not yet ready to inspect traffic.
• Flashing Green/Yellow — Appliance is booting and BIOS or software is updating.
• Solid Green — Appliance is running in a healthy state.
• Solid Yellow — Appliance is running but has a health rating below the acceptable threshold.
Alert Indicator
The Alert indicator is located on the right side of the front panel and indicates the current status of the
software processes and the hardware.
• Solid Green — Both the hardware and the software processes are running normally.
• Solid Yellow — System is booting. If the solid yellow indicator remains after startup, a software problem
has been detected. Hardware status is undefined.
10
HP TippingPoint S3000 Series
• Flashing Yellow — Hardware problem detected. Software running normally.
• Off — Appliance power is off.
Fans and Power Supplies
The S3000 Series appliances include two power supplies and three cooling fans. These components are
hot-pluggable. For more information about these components, see ”Power Supply and Fan Modules” on
page 33.
External Storage Card
The S3000 Series appliances include a CFast card slot. The external storage card stores system logs,
snapshots, and other system data. The card can be removed and inserted while the appliance is running;
however, to do so, you must issue the appropriate unmounting, mounting, and preparation commands in
the command line interface (CLI). Refer to ”Using the External CFast Storage Card” on page 37 or the CLI
Reference for command syntax.
For more information about configuring the external CFast card, refer to ”Using the External CFast Storage
Card” on page 37.
Ports
All NGFW Appliances, including the S3000 Series appliances, are equipped with eight copper ports in
addition to the console and management ports shown in the following figure:
Figure 3-3 Management and Console Ports
1
1 RJ-45 serial console port
2
1GbE copper management port
3
Link LED
4
Activity LED
The management port LEDs indicate link and activity state, as described in the following table.
Table 3-1
Management Port LED Descriptions
LED Type
Color
Description
Link
Green
Link is active at 1000Mbps.
Off
Link is inactive, or is active at 10Mbps or 100Mbps.
Blinking amber
Data traffic is passing.
Off
No traffic is passing.
Activity
Eight 1Gbe SFP fiber ports are also available on the S3000 Series appliances.
Next Generation Firewall Hardware Specification and Installation Guide
11
Model Requirements
The following topics describe the power and cabling requirements for the S3000 Series appliances.
• ”Power Requirements” on page 12
• ”Cabling Requirements” on page 12
Power Requirements
The S3000 Series appliances require one input of Alternating Current (AC) that must meet the following
requirements:
• AC: Voltage 100V – 240V; 12 – 6 amp; 47 – 63 Hz
WARNING! Do not attempt to install a DC power supply into an NGFW Appliance. The NGFW
Appliance does not contain the grounding capability for safe installation of a DC power supply. Bodily
harm and damage to the system could result.
Cabling Requirements
The S3000 Series appliances ship with the following cables:
• Two AC power cables, one for each hot-pluggable power supply
• Null modem cable for the serial console management port (DB-9 to RJ-45) shown in Figure 3-3 on
page 11.
Technical Specifications
The S3000 Series appliances have the following hardware specifications:
Table 3-2
S3000 Series Appliance Hardware Specifications
Specification
Description
Dimensions
(unpackaged)
2U – 3.46 in (H) x 16.77 in (W) x 18.70 in (D)
(8.80 cm x 42.60 cm x 47.50 cm)
Weight
22.66 lbs (10.28 kg)
Power
Requirements
AC: Voltage 100 – 240; Current 12 – 6 A; Frequency 47 – 63 Hz
Service Provider
operating
requirements
Temperature: 32 – 104° F (0 – 40° C) — Operating
The appliance’s maximum power consumption is 493 W.
Temperature: -4 – 158° F (-20 – 80° C) — Storage
Altitude: No degradation up to 10,000 feet (3048 m)
12
HP TippingPoint S3000 Series
Table 3-2
S3000 Series Appliance Hardware Specifications
Specification
Description
Humidity: 5% to 95% (non-condensing)
External interfaces • 1 – 1GbE copper management port
• 1 – 1 RJ-45 console port
• 8 – 1GbE copper ports
• 8 – 1GbE SFP fiber ports
• 1 external storage card drive
Hardware Installation and Configuration
For general instructions on installing the NGFW Appliance, see ”Installing the NGFW Appliance” on
page 21.
Next Generation Firewall Hardware Specification and Installation Guide
13
14
HP TippingPoint S3000 Series
4
HP TippingPoint S8000 Series
This information describes the components, chassis, requirements, and installation specifics of the HP
TippingPoint S8000 Series Next Generation Firewall Appliances. This series currently features the S8005F
and S8010F models described further in the following topics:
• ”S8000 Series Appliances Overview” on page 15
• ”Model Requirements” on page 18
• ”Technical Specifications” on page 19
• ”Hardware Installation and Configuration” on page 19
For more information about installing these appliances, see ”Installing the NGFW Appliance” on page 21.
Prior to installation, have the CLI Reference available for configuration information. After installing the
components, complete the HP TippingPoint Setup Wizard as part of the installation and configuration
procedures.
S8000 Series Appliances Overview
The S8005F and S8010F appliances are high-performance systems that are designed for enterprises with
high traffic volume that require throughput rates of 5Gbps or higher. These top-performing models are
well-suited for larger data center environments.
Chassis Front Panel
The S8005F and S8010F appliances are 2U form-factor devices that are rack-mountable in a 19-inch rack
(or 23-inch rack, with appropriate conversion parts available from rack accessory vendors). These
appliances support throughput across multiple copper and fiber ports.
Following is a front panel view of the appliance.
Figure 4-1 S8000 Series Appliance Front Panel
1
10GbE SFP+ ports
2
1GbE SFP ports
3
1GbE copper ports
4
External CFast card
5
Dedicated HA ports
6
Console/Management port
7
Power button
8
Alert indicator
9
System status indicator
Next Generation Firewall Hardware Specification and Installation Guide
15
NOTE: The S8000 Series appliances have two dedicated high availability (HA) ports. For more
information about HA configurations, refer to the Concepts and Deployment Guide.
Chassis Back Panel
The following illustration shows the rear-panel view of an S8000 Series appliance.
Figure 4-2 S3000/S8000 Series Appliance Back Panel
1
Fans (3)
2
Power Supplies (2)
Chassis Features
The Chassis features include the following elements:
• ”Power Button” on page 16
• ”System Status Indicator” on page 16
• ”Alert Indicator” on page 17
• ”Fans and Power Supplies” on page 17
• ”External Storage Card” on page 17
• ”Ports” on page 17
Power Button
The power button is located on the right side of the console/management ports on the front panel. The
power button light indicates the current status of the appliance.
• No light — Appliance is powered off.
• Green — Appliance is powered on.
System Status Indicator
The System Status indicator is located on the right side of the front panel and indicates the current
operating status of the appliance.
• Flashing Green — Appliance is booting and is not yet ready to inspect traffic.
• Flashing Green/Yellow — Appliance is booting and BIOS or software is updating.
• Solid Green — Appliance is running in a healthy state.
• Solid Yellow — Appliance is running but has a health rating below the acceptable threshold.
16
HP TippingPoint S8000 Series
Alert Indicator
The Alert indicator is located on the right side of the front panel and indicates the current status of the
software processes and the hardware.
• Solid Green — Both the hardware and the software processes are running normally.
• Solid Yellow — System is booting. If the solid yellow indicator remains after startup, a software problem
has been detected. Hardware status is undefined.
• Flashing Yellow — Hardware problem detected. Software running normally.
• Off — Appliance power is off.
Fans and Power Supplies
The S8000 Series appliances include two power supplies and three cooling fans. These components are
hot-pluggable. For more information about these components, see ”Power Supply and Fan Modules” on
page 33.
External Storage Card
The S8000 Series appliances include a CFast card slot. The external storage card stores system logs,
snapshots, and other system data. The card can be removed and inserted while the appliance is running;
however, to do so, you must issue the appropriate mounting and preparation commands in the command
line interface (CLI). Refer to ”Using the External CFast Storage Card” on page 37 or the CLI Reference for
command syntax.
For more information about the procedure, refer to ”Using the External CFast Storage Card” on page 37.
Ports
All NGFW Appliances, including the S8000 Series appliances, are equipped with eight copper ports in
addition to the console and management ports shown in the following figure:
Figure 4-3 Management and Console Ports
1
1 RJ-45 serial console port
2
1GbE copper management port
3
Link LED
4
Activity LED
Next Generation Firewall Hardware Specification and Installation Guide
17
The management port LEDs indicate link and activity state, as described in the following table.
Table 4-1
Management Port LED Descriptions
LED Type
Color
Description
Link
Green
Link is active at 1000Mbps.
Off
Link is inactive, or is active at 10Mbps or 100Mbps.
Blinking amber
Data traffic is passing.
Off
No traffic is passing.
Activity
Eight 1GbE SFP fiber ports and four 10GbE SFP+ ports are also available on the S8000 Series
appliances.
Model Requirements
The following topics describe the power and cabling requirements for the S8000 Series appliances.
• ”Power Requirements” on page 18
• ”Cabling Requirements” on page 18
Power Requirements
The S8000 Series appliances require one input of Alternating Current (AC) that must meet the following
requirements:
• AC: Voltage 100V – 240V; 12 – 6 amp; 47 – 63 Hz
WARNING! Do not attempt to install a DC power supply into an NGFW Appliance. The NGFW
Appliance does not contain the grounding capability for safe installation of a DC power supply. Bodily
harm and damage to the system could result.
Cabling Requirements
The S8000 Series appliances ship with the following cables:
• Two AC power cables, one for each hot-pluggable power supply
• Null modem cable for the serial console management port (DB-9 to RJ-45)
18
HP TippingPoint S8000 Series
Technical Specifications
The S8000 Series appliances have the following hardware specifications:
Table 4-2
S8000 Series Appliance Hardware Specifications
Specification
Description
Dimensions
(unpackaged)
2U – 3.46 in (H) x 16.77 in (W) x 18.70 in (D)
(8.80 cm x 42.60 cm x 47.50 cm)
Weight
26.26 lbs (11.91 kg)
Power
Requirements
AC: Voltage 100 – 240; Current 12 – 6 A; Frequency 47 – 63 Hz
Service Provider
operating
requirements
Temperature: 32 – 104° F (0 – 40° C) — Operating
The appliance’s maximum power consumption is 493 W.
Temperature: -4 – 158° F (-20 to 80° C) — Storage
Altitude: No degradation up to 10,000 feet (3048 m)
Humidity: 5% to 95% (non-condensing)
External interfaces • 1x1GbE copper management port
• 1x1 RJ-45 console port
• 8 – 1GbE copper ports
• 8 – 1GbE SFP fiber ports
• 4 – 10GbE SFP+ fiber ports
• 1 external storage card drive
Hardware Installation and Configuration
For general instructions on installing the NGFW Appliance, see ”Installing the NGFW Appliance” on
page 21.
Next Generation Firewall Hardware Specification and Installation Guide
19
20
HP TippingPoint S8000 Series
5
Installing the NGFW Appliance
After you have completed preparation procedures and unpacked the HP TippingPoint NGFW Appliance,
you are ready to install and configure the components. Have the CLI Reference available for configuration
information reference. After installation of the hardware components, complete the OBE Setup Wizard
requirements as part of the installation and configuration procedures.
NOTE: Before installing your NGFW Appliance, review and adhere to all safety guidelines described the
Hardware Safety and Compliance Guide, which also contains detailed regulatory compliance information
and is included with your product shipment.
This information includes the following procedures:
• ”Install the Chassis” on page 21
• ”Attach Cables” on page 26
• ”Check LEDs” on page 27
• ”Setup Wizard” on page 27
Install the Chassis
Before installing your new NFGFW Appliance, gather any necessary materials and prepare the network
and hardware site. To carefully and correctly install the appliance, read through all preparation instructions
and requirements. This information provides general guideline information for all TippingPoint appliances.
To install the appliance you must do the following:
• ”Determine Total Rack Space” on page 21
• ”Attach the Appliance to the Rack” on page 21
• ”Connect the Power Supply” on page 26
Determine Total Rack Space
Before you install the chassis, determine the total rack space that is required to install your system. The total
required rack space increases if you plan to install multiple systems.
The NGFW Appliance fits in a 19-inch-wide rack (or a 23-inch-wide rack, with appropriate conversion
parts available from rack accessory vendors). For more information about the dimensions of the appliance,
refer to the technical specifications and requirements for your model.
Attach the Appliance to the Rack
The NGFW S1000 Series appliance ships with a four-post rack-mount kit to mount the appliance to a rack.
You can use this kit to install the appliance in a two-post or four-post rack.
The S3000 Series and S8000 Series appliances ship with a slide rail kit to mount these appliances to a
four-post rack and mounting ears for two-post racks. Slide rail kits are also available for order from
TippingPoint. Refer to the instructions in the slide rail kit for information about installing the slide rails.
For two-post racks, use the front mounting ears to install S3000 Series and S8000 Series appliances in
either front-mount or mid-mount positions.
Your NGFW Appliance shipment includes the following mounting hardware:
• Front-mounting brackets for a 19-inch rack. Adapters (available from rack accessory vendors) are
required for posting in a 23-inch rack.
• Rear-mounting brackets for the NGFW S1000 Series appliance in a 19-inch rack. Adapters (not
included) are required for posting in a 23-inch rack.
Next Generation Firewall Hardware Specification and Installation Guide
21
• Bracket screws for attaching the brackets to the chassis.
Your NGFW Appliance can be stored on a desktop, on a shelf, or in a rack. If you are bolting the
appliance to the rack, follow these guidelines.
WARNING! To prevent bodily injury when mounting or servicing this unit in a rack, you must take special
precautions to ensure that the system remains stable.
• If the rack comes with stabilizing devices, install the stabilizers before mounting or servicing the unit in
the rack.
• If the rack is partially filled, load the rack from the bottom to the top with the heaviest component at the
bottom of the rack.
• If you plan to expand your system to include additional TippingPoint systems in the future, allow space
in the rack for additions. During the initial installation, keep in mind the weight distribution and stability
of the rack.
Rack-Mounting the S1000 Series Appliance
The S1000 Series appliance is a 1U appliance that you can install using a front mount or mid-mount in a
two-post rack, or front and rear mount in a four-post rack.
IMPORTANT:
Do not use a two-post mount in a four-post rack. For four-post racks, use a four-post mount.
Two-Post Rack Mount for 1U Chassis
1.
Align the two front rack-mounting brackets (shown in Figure 5-1) with the S1000 Series chassis holes
according to your front mount or mid-mount requirements. Secure the brackets to the chassis using the
flat-head screws (six on each side) that came with the kit.
Figure 5-1 S1000 Series Model Front-Mount Bracket and Ear
2.
22
Secure the rack-mounting brackets into the holes of the front rack post or mid-rack post with three
screws on each side (rack screws not included in the kit). Use Figure 5-2 as a guide for how the front
rack-mounting brackets are attached to the appliance and to the rack in a front-mount. Use Figure 5-3
as a guide for how the front rack-mounting brackets are attached to the appliance and to the rack in a
Installing the NGFW Appliance
mid-mount.
Figure 5-2 S1000 Series Chassis with Front Mounting in a Two-Post Rack
Figure 5-3 S1000 Series Chassis with Mid-Mounting in a Two-Post Rack
Four-Post Rack Mount for 1U Chassis
1.
After attaching the front rack-mounting brackets to the appliance as described in ”Two-Post Rack
Mount for 1U Chassis”, attach the two slide-bracket screws (provided in the kit) on each side of the
chassis.
2.
Using three rack screws (not included in the kit) on each side, attach either the short slide-bracket or
the long slide-bracket to the rear post of the rack, depending on which length is needed to secure the
chassis in the rack.
3.
Slide the slide brackets mounted to the back posts of the rack onto the chassis.
4.
Secure the front rack-mounting brackets into the holes of the front rack post with three rack screws (not
included) on each side. Figure 5-4 shows the appliance as it would appear in the rack with front and
Next Generation Firewall Hardware Specification and Installation Guide
23
rear-mount brackets attached.
Figure 5-4 S1000 Series Chassis in a Four-Post Rack
Rack-Mounting the S3000 or S8000 Series Models
The S3000 and S8000 Series models are 2U appliances that you can install using a front mount or
mid-mount in a two-post rack, or front and rear mount in a four-post rack.
Two-Post Rack Mount for 2U Chassis
You can choose to install your chassis into a two-post rack using a front mount or a mid-mount:
1.
Align the two front rack-mounting brackets (shown in Figure 5-5) to the chassis holes according to your
front mount or mid-mount requirements.
2.
Secure the brackets to the chassis using the flat-head screws (three on each side) that came with the
kit.
Figure 5-5 S3000/S8000 Series Model Front-Mount Bracket and Ear
3.
24
Secure the rack-mounting ears into the holes of the front rack post with screws (two on each side, not
included). Use Figure 5-6 as a guide for how the front rack-mounting brackets are attached to the
appliance and to the rack in a front mount. Use Figure 5-7 as a guide for how the front rack-mounting
brackets are attached to the appliance and to the rack in a mid-mount.
Installing the NGFW Appliance
Figure 5-6 S3000 or S8000 Series Model with Front Mounting in a Two-Post Rack
Figure 5-7 S3000 or S8000 Series Model with Mid-Mounting in a Two-Post Rack
Four-Post Rack Mount for 2U Chassis
The S3000 and S8000 Series models ship with a slide rail kit to mount the appliance to a four-post rack.
Slide rail kits are also available for order from TippingPoint. Refer to the instructions in the slide rail kit for
information about installing the slide rails.
Next Generation Firewall Hardware Specification and Installation Guide
25
Use Figure 5-8 as a reference for how a 2U chassis is installed in a four-post rack with slide rails.
Figure 5-8 S3000 or S8000 Series Chassis in a Four-Post Rack
Connect the Power Supply
After you have bolted the appliance to the rack, attach the power supply AC connections. To turn power on
for the S1050F appliance, flip the power switch on the back panel of the appliance. To turn the power on
for the S3000 or S8000 appliance, use the power button located on the front panel of the appliance.
Attach Cables
During initial setup, use the management processor connection or the console port to access the NGFW
setup wizard.
Attach the Console port connection
1.
Connect the RJ-45 null modem cable to the Console port on the front of the unit.
2.
Connect the other end of your cable (standard-sized female DB-9 connector) to your
VT100-compatible terminal or your computer.
Use the following terminal settings for the Console port:
• Baud rate: 115.2 Kbps
• Character size: 8 bits
• Parity: None
• Stop Bits: One
• Flow Control: None
Attach the Management Processor connection
1.
Connect one end of the Category 5 Ethernet cable to the port labeled MGMT located on the front
panel.
2.
Connect the other end of the Ethernet cable to your network. This enables remote management.
Attach network connections
All ports on the NGFW Appliance are dynamic and do not require fixed cable assignments. When
making your network cable connections, keep track of which ports you select for which purpose.
26
1.
Attach one or more network cables for the internal network. Make note of which front panel ports you
use.
2.
Attach a network cable for the external (WAN) network. Make note of which front panel port you use.
3.
Using the NGFW LSM or the command line interface, configure network interface types appropriate
to the surrounding network using the ports you selected.
Installing the NGFW Appliance
4.
Using the NGFW LSM or the command line interface, configure your firewall rules according to your
traffic flow requirements.
For more information about HP TippingPoint NGFW Appliance network configuration and connections,
refer to the Local Security Manager User Guide and the CLI Reference.
Check LEDs
When you connect power to the appliance, the system completes a series of component checks. It then
displays LEDs to show the status of each component. Refer to the information for your appliance model for
more information about the LEDs.
Setup Wizard
After you have powered on, the NGFW setup wizard is displayed on your COM port terminal. The wizard
prompts you to perform basic configuration tasks and periodically input information. After you run the
setup, you can further configure your system using subsequent setup commands through the Command Line
Interface (CLI). See the CLI Reference for detailed command descriptions.
Next Generation Firewall Hardware Specification and Installation Guide
27
28
Installing the NGFW Appliance
A
Connector and Cable Pinout Specifications
This information provides connector and pinout information for the NGFW Appliance and contains the
following topics:
• ”RJ-45 (COM) Console” on page 29
• ”RJ-45 Ethernet Connectors” on page 29
• ”Pluggable Transceivers” on page 30
RJ-45 (COM) Console
The following figure displays the RJ-45 connector and Table A-1 shows the RJ-45 console connector
pinouts.
Figure A-1 RJ-45 Connector
Table A-1
RJ-45 Console Connector Pinouts
Pin Number
Signal Name
1
Request to Send (RTS)
2
Data Terminal Ready (DTR)
3
Transmit Data (TxD)
4
Ground (GND)
5
Ground (GND)
6
Receive Data (RxD)
7
Data Set Ready (DSR)
8
Clear to Send (CTS)
RJ-45 Ethernet Connectors
Use the following pinout information when your RJ-45 device is operating in 10Mbps/100Mbps mode.
Table A-2
RJ-45 Ethernet Connector Pinouts
Pin Number
Signal Name
1
Transmit positive (Tx+)
2
Transmit negative (Tx-)
3
Receive positive (Rx+)
4
Ground (GND)
5
Ground (GND)
6
Receive negative (Rx-)
Next Generation Firewall Hardware Specification and Installation Guide
29
Table A-2
RJ-45 Ethernet Connector Pinouts
Pin Number
Signal Name
7
Ground (GND)
8
Ground (GND)
NOTE: These ports can auto-negotiate their mode and can automatically detect whether they should
operate in straight-through or cross-over mode.
Use the following pinout information when your RJ-45 device is operating in 1000Mbps (1GbE) mode.
Table A-3
RJ-45 Connector Pinouts for 1GbE Mode
Pin Number
Signal Name
1
Twisted Pair 1 positive (TP1+)
2
Twisted Pair 1 negative (TP1-)
3
Twisted Pair 2 positive (TP2+)
4
Twisted Pair 3 positive (TP3+)
5
Twisted Pair 3 negative (TP3-)
6
Twisted Pair 2 negative (TP2-)
7
Twisted Pair 4 positive (TP4+)
8
Twisted Pair 4 negative (TP4-)
Pluggable Transceivers
The NGFW S3000 Series and S8000 Series Appliances can also have pluggable transceivers. The
following SFP transceivers are supported on both S3000 Series and S8000 Series models. The following
SFP+ transceivers (with HP names) are supported on S8000 Series models:
• HP X126 1G SFP RJ45 T (Copper SFP)
• HP X126 1G SFP LC LX 10km 1310nm XCVR
• HP X126 1G SFP LC SX 550m 850nm XCVR
• HP S136 10G SFP+ LC SR
• HP S136 10G SFP+ LC LR
NOTE: Only optical transceiver modules (including SFP and SFP+) available from HP TippingPoint have
been validated to achieve optimal performance with HP TippingPoint products. Other vendor devices are
not supported. Using other vendor devices could be detrimental to proper operation of the HP TippingPoint
system.
The following table details the information for SFP and SFP+ transceivers.
30
Fiber Input
Signal
Left side
Transmit
Right side
Receive
Connector and Cable Pinout Specifications
Next Generation Firewall Hardware Specification and Installation Guide
31
32
Connector and Cable Pinout Specifications
B
Power Supply and Fan Modules
This appendix provides installation instructions for power supply modules and fans. The following subjects
are discussed.
• ”The S3000 or S8000 Series AC Power Supply” on page 33
• ”NGFW Fans” on page 34
WARNING! This product might have more than one power supply source. All power sources must be
removed to de-energize the unit.
NOTE: The S3000/S8000 Series appliances have hot-swappable fans and power supplies. They have
no other serviceable parts inside. There are no serviceable parts inside the S1050F appliance.
The S3000 or S8000 Series AC Power Supply
The S3000 and S8000 Series appliances include two power supply modules. The modules are
hot-pluggable, redundant, and current-sharing, and the appliance can run with one active module.
Figure B-1 S3000/S8000 Series AC Power Supply
1
Removal Latch
2
Handle
3
Status LED
4
AC male power input
The Status LED is green when the module is powered and running normally.
Next Generation Firewall Hardware Specification and Installation Guide
33
WARNING! Do not attempt to install a DC power supply into an NGFW Appliance. The NGFW
Appliance does not contain the grounding capability for safe installation of a DC power supply. Bodily
harm and damage to the system could result.
When the AC power supply has been securely placed in the appliance, use the following procedure to
connect power to the AC power supply:
1.
Locate the male power input on the back of the chassis.
2.
Plug one end of a standard female power plug into the power input.
3.
Plug the other end into an AC outlet, power strip, or UPS. The power should meet the following
requirements:
• Voltage: 100 – 240 VAC
• Current: 12 – 6 Amps
• Frequency: 47 – 63 Hz
4.
The NGFW Appliance returns to its previous power-on state in the event of a power interruption. If
power was on when the interruption occurred, the appliance automatically powers back on when the
power is reconnected; if power was off, the appliance stays off when the power is reconnected. If
necessary, power on the appliance with the button on the front of the chassis.
Replacement power supplies are shipped with replacement instructions. Refer to that document when
replacing a faulty power supply.
NGFW Fans
The NGFW Appliances include three cooling fans. The fans for the NGFW S3000/S8000 Series
appliances are redundant and hot-pluggable, and can be replaced without powering down the appliance.
34
Power Supply and Fan Modules
The NGFW Spare Fan (5066-3329) is a replacement unit and can only be used with NGFW
S3000/S8000 Series appliances.
Figure B-2 NGFW Fan Unit
1
Attachment Screw Knobs
2
Fan Assembly
Before you begin, determine which fan assembly is faulty and needs to be replaced. When a fan module
fails or its RPM rate falls below a certain threshold, the system generates a warning or critical alarm
message in its logs.
You can check a fan’s performance using:
• The Local Security Manager (LSM) graphical user interface: System Health > Monitor > Fan Speed
• The command line interface (CLI): show health fan
After you have identified the faulty fan assembly, follow this procedure to replace the fan:
1.
Loosen the top two attachment screw knobs. The screw knobs remain attached to the assembly.
2.
Lift the assembly up slightly and pull it from its slot.
3.
Set the faulty fan aside.
4.
Remove the new fan assembly from the packaging.
5.
Align the new fan assembly slightly higher than its open slot and then slide the unit down until it is
seated in the connector.
6.
Tighten the two attachment screw knobs securely.
Next Generation Firewall Hardware Specification and Installation Guide
35
36
Power Supply and Fan Modules
C
Using the External CFast Storage Card
This information describes the external storage card and provides the following topics:
• ”About the External CFast Storage Card” on page 37
• ”CFast Card Commands” on page 38
About the External CFast Storage Card
All NGFW Appliances come with a pre-formatted external CFast storage card.
NOTE: Only CFast cards available from HP TippingPoint have been validated to achieve optimal
performance with HP TippingPoint products. Other vendor cards are not supported. Using other vendor
cards could be detrimental to proper operation of the HP TippingPoint system.
The external CFast card is a 8GB (for the S1000/S3000 Series appliances) or 32GB (for S8000 Series
appliances) storage card used to store system logs, snapshots, and other system data.
CAUTION: Failure to properly remove the HP TippingPoint CFast card can result in disk corruption and a
system error.
You can replace the CFast card when the system is operating. Before you remove the card, use the
command line interface (CLI) to first unmount the card. For the appropriate unmount command, consult
Table C-1.
After you successfully unmount the previous storage card, you can insert a new card into the CFast slot.
Referencing Table C-1, issue the appropriate mounting and preparation commands in the CLI.
When you manually mount and format a CFast card, the card will mount automatically when the appliance
boots.
Next Generation Firewall Hardware Specification and Installation Guide
37
CFast Card Commands
The following table lists the commands used to manage the external storage card in the CLI. Refer to the
CLI Reference for detailed documentation of these commands.
Table C-1
External Storage Card Commands
Command
Description
user-disk format
Formats a card. Any existing data on the card will be
erased.
NOTE: Only cards that are mounted and formatted
manually by the user will be mounted automatically by
the appliance when it boots. However, after the initial
install, any card still present in the appliance during
subsequent installs will also be mounted automatically.
user-disk mount
Manually mounts the inserted card.
NOTE: Only cards that are mounted and formatted
manually by the user will be mounted automatically by
the appliance when it boots. However, after the initial
install, any card still present in the appliance during
subsequent installs will also be mounted automatically.
user-disk unmount
Unmounts the card so that the user can remove it.
user-disk encryption
enable
Encrypts the card if the system master-key has been set.
Changing the encryption status reformats the card and
erases all data on the card.
NOTE: Master-key and encryption controls can also be
configured using System > Settings > Log Configuration
in the NGFW LSM. For more information, refer to the
Local Security Manager User Guide.
user-disk encryption
disable
Disables encryption of the card if the system master-key
has been set. Changing the encryption status reformats
the card and erases all data on the card.
NOTE: Master-key and encryption controls can also be
configured using System > Settings > Log Configuration
in the NGFW LSM. For more information, refer to the
Local Security Manager User Guide.
cleanse
38
Using the External CFast Storage Card
Wipes the CFast card clean.
Table C-1
External Storage Card Commands
Command
Description
show user-disk
Shows the card’s operation status, capacity, used and
free space, and whether it is encrypted.
master-key set
Encrypts the external CFast card and the system keystore
using the system master-key. You are prompted to enter a
master-key that is between 9 and 32 characters in length,
contains a combination of numbers and uppercase and
lowercase letters, and that has at least one special
character (for example, !@#).
NOTE: Master-key and encryption controls can also be
configured using System > Settings > Log Configuration
in the NGFW LSM. For more information, refer to the
Local Security Manager User Guide.
Next Generation Firewall Hardware Specification and Installation Guide
39
40
Using the External CFast Storage Card
Index
A
S
AC power supply 33
S1000 Series
models 1
overview 1
S1050F appliance
back panel 6
cabling requirements 8
external CFast card 7
fans 7
features 6
front panel 5
management port 7
overview 5
ports 7
power indicator 6
power requirements 7
power supply 7
power switch 6
technical specifications 8
S3000 Series
models 2
overview 2
S3010F appliance
back panel 10
cabling requirements 12
external CFast card 11
fans 11
features 10
front panel 9
management port 11
overview 9
ports 11
power button 10
power requirements 12
power supplies 11
technical specifications 12
S3020F appliance
back panel 10
cabling requirements 12
external CFast card 11
fans 11
features 10
front panel 9
management port 11
overview 9
ports 11
power button 10
power requirements 12
power supplies 11
technical specifications 12
S8000 Series
models 2
overview 2
C
cabling 26
CFast card
commands 38
overview 37
connector & pinout specifications 29
core functionality 3
Customer support, contacting xi
F
fans 34
G
guide
document conventions x
related documentation ix
H
hardware features 3
I
installing
overview 21
setup wizard 27
L
LED
component check 27
S1050F appliance management port 7
S3010F appliance management port 11
S3020F appliance management port 11
S8000 Series management port 17
N
network connections 26
P
power supply
AC 33
connecting 26
R
rack installation 21
rack space 21
related documentation ix
RJ-45 (COM) 29
Next Generation Firewall Hardware Specification and Installation Guide
41
S8005F appliance
back panel 16
cabling requirements 18
external CFast card 17
fans 17
features 16
front panel 15
management port 17
overview 15
ports 17
power button 16
power requirements 18
power supplies 17
technical specifications 18
S8010F appliance
back panel 16
cabling requirements 18
external CFast card 17
fans 17
features 16
front panel 15
management port 17
overview 15
ports 17
power button 16
power requirements 18
power supplies 17
technical specifications 18
small form-factor pluggable transceivers (SFPs) 30
T
technical specifications
S1050F appliance 8
S3010F appliance 12
S3020F appliance 12
S8000 Series 18
typeface conventions and symbols x
42