1
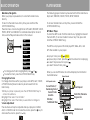
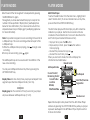
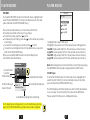
R
U SER'S MANUAL
DIGITAL AUDIO/VIDEO PLAYER
C oby Ele ctronic s Corp.
5 6-65 Ru st Stree t
M aspeth , NY 11 378
w ww.co byusa.c om
w ww.ecoby.com
Please read manual before operation
Techn ical Support Hours
Mond ay-Friday 8:3 0 AM - 8:30 PM EST, 1-8 00-681-2629 or 718-416-3197
Saturd ay-Sunday 9:00 AM - 5:3 0 PM EST, 1 -800-727-35 92
Or Send E-Mail to: techsupport @cobyusa.c om
CONTENTS
FEATURES
F EATURE S
PACKAGE CONTENTS
SAFETY INSTRUCTIONS
CHARGING YOU R PLAYER
U SB DRIVER INSTALLATION
LOCATION OF CONTROL S
Mp3 P LAYER
Display
BASIC O PERATION
Powering You r Player On or Off
Connecting/Disconnecting Your Play er
Transferring Files
Deleting Files
Main Menu/Navigation
Chang ing Directories
Volume Adjustment
PLAYER MODES
Mp3 Music Player
AMV Video Player
RECORD
PHOTO
FM Ra dio
SETUP
E-BOOK
F IRMWARE UPGRADE
SOFTWARE UTILITIES
SPECIFICATION
TROUBLESHOOTING
1
2
3
4
5
6
7
7
8
9
9
9
10
10
11
11
11
12
12
16
17
19
20
21
24
25
26
28
29
512 MB Built-in Flash Memory
65,0 00 Colo r LCD Display
Video Playb ack
Mobile Mus ic, Data , Docum ent, and Pictu re Storage
Mul ti-language Sup port (e.g., English, Spanish, Ch inese,
Japanese, etc.)
Text and Photo Viewer
Voice Reco rding
Buil t-in FM T uner
Plug and Pl ay: Supp orts Windows 9 8 SE (wi th includ ed
Inst allation CD), Windows M E, 2000 , XP, and MAC OS X
Digital Preset Equalizer: Normal, Ba ss, Jazz , Disco,
Rock, and P op
Mini-USB Port for Fast File Tr ansfers
Dua l Headphone Jacks
Buil t-in Stereo Speakers
Buil t-in Rechargeable Lithium-lon B attery
Upg radeab le Firmw are
2
PACKAGE CONTENTS
Mp3 player
SAFETY INSTRUCITONS
User's Man ual
A/C Adapter
Earpho nes w/neck strap
1.Read these instructions carefully.
2.Keep these instructions for future reference.
3.Heed all warnings.
4.Follow all instructions.
5.Do not expose device to wate r or moisture.
6.Clean only with a dry cloth.
7.Do not place device near any heat so urces su ch as st oves,
radiators, amplifiers or any apparatus that produces heat.
8.Do not force t he power plug into the w all outl et. A polarized p lug
has tw o blade s with one wider than th e other ; the wid er blade is
provid ed for y our safety. If the plug provided does not fit into your
outlet , consult an electrician for replacement of the obsolete outlet.
9.Position the power cord so tha t it is protected from being walked
on, pinched b y objects, or tor n and exposed to liquids (espec ially at
plugs, conven ience r eceptacles, and at the point which they exit
from t he product).
10.Only use atta chments/accessories specified by the manufacturer.
Use of attachments/accessories not recommended by the
product manufacturer may b e hazardous.
11.Unpl ug the device during lightning storms or when unused fo r
long periods of time.
12.Do not use this device near water.
13.Refer all servicing to authoriz ed service personnel.
Protect your ears:
Hearing experts advise against the constant u se of personal
stereo equipme nt played at hi gh volumes. Constant h igh-vol ume
use can lead to hearing loss. If you experience ringing in your
ears or hearing loss, dis continu e use an d seek medical advice .
USB Cable
Insta llation C D
3
For recycling or dispos al information a bout this product, plea se
contact your local auth orities or the El ectronic s Industries
Alliance : www.eiae.or g
4
CHARGING YOUR PLAYER
USB DRIVER INSTALLATION(Windows 98 SE only)
You r player operate s on a b uilt-in recharge able lit hium-io n batter y.
Whe n charg ing you r player , make sure tha t the PO WER ON /OFF
switch is set to the ON posit ion and that the autom atic Pow er off
opti on in the Setup menu is set to "0 ". See the Setup section for
instr uctions on how to set the autom atic Po wer off option.
If you ar e using Window s 98 SE, you mu st install the USB driver
and upd ate util ity.
1.Place the Installation CD in yo ur com puter's CD-ROM drive.
2.In My Compu ter, double-click the dis c drive (D:) icon (where
D: is yo ur CD-R OM driv e).
3.Find a nd doub le-click "Win98 Driver.e xe" to st art the installation
proce ss. A set up dialo g windo w will a ppear o n the sc reen.
4.Follow the on-screen instructions. When setup is com plete,
restart your co mputer .
Ther e are tw o ways to char ge your player:
Charge through y our computer's USB por t.
Yo ur playe r will be charge d while it is con nected to a po wered-o n
co mputer regardl ess of w hether y our pla yer itself is powe red on or
off . For ins tructions on how to con nect yo ur playe r to a compute r,
see the se ction Co nnecting/Disconnecti ng Your Player i n
thi s manua l.
Charge through th e provi ded A/C adapt er.
Wh en the A/C ada pter is plugged into an electric al outlet,
the red charge lam p will l ight up t o indica te that power has
been conn ected. Conne ct the a dapter t o your p layer's USB por t.
The green charge lamp w ill light u p to ind icate that your player i s
being cha rged. W hen cha rging is complete, the green c harge
lamp will d im or tu rn off.
USB driv er installation is not necessary i f you are using
Window s Me/2K /XP or M ac OS X version 10.2.6 or abov e. Simp ly
connec t your player to the com puter; the ope rating system w ill
then tak e a moment to set up a nd a removabl e disk ic on will
appear in "My C omputer." (For Mac OS X users, a remo vable
disk icon will ap pear on the "Desktop.")
To an AC O utle t
In sert into the USB port
The charge lamp indicat or
5
6
LOCATION OF CONTROLS
RECORD
butto n
LOCATION OF CONTROLS
LCD
s creen
LCD Displ a y (MP3 Music Player)
Battery level icon
Current track #
Joystick S elect /
Se lect Ke y
Time Elap s ed
File Format
Joy stick UP /
Volume Up Key
ON/OF F
switch
Bit Rate
Equalizer Setting
Joystick RIGHT/
forward key
REPEA T
button
Volume level
Recording Mo de
PLAY/S TOP
button
Stereo
Speake r
Track Title/Filename
Progress bar
Recordin g Indicat or
Joystick LEFT/Re verse Ke y
Mic rophon e
J oystick DOWN/
v olume d own ke y
Fi le name
Bit rate /File typ e
Time Stamp
Recordi ng t ime elapsed
Total : 010
H eadpho ne out 1
Remai ning Time
Hea dphone out 2
7
8
Recordi ng fil e n umber
BASIC OPERATION
BASIC OPERATION
Powe ring You r Player On or O ff
To Po wer On :Set the P OWER ON/OFF switch to the ON position,
then p ress an d hold t he
b utton u ntil your player turns on.
To Po wer Off : Press an d hold t he
bu tton un til your player t urns off.
If you r player 's softwa re freez es, you may set the POWER ON /OFF
switch to the OFF pos ition.
Note: Your player ha s power-saving feature s that w ill turn o ff your
playe r, turn o ff the sc reen, or place i t in slee p mode automa tically
after a period of inac tivity. To wake your pla yer from sleep m ode,
press and hol d the JO YSTICK SELECT key. See the Setup sect ion for
instru ctions o n how to set the power-saving features' option s.
Conn ecting/ Disconn ecting Y our Pla yer
To co nnect y our play er to a c omput er:
1.Plug the larg e end of the USB cable into th e comp uter's USB port.
2.Pow er on your play er.
3.Plug the other end of the U SB cable into yo ur player's mini -USB
port .
To saf ely disconnect your pla yer from a computer:
1.Dou ble-clic k the gr een arrow in the taskba r locat ed at the
bott om-righ t of the compu ter's screen. A " Safely R emove
Hard ware" w indow will app ear.
2.In th e list of hardware devices, dou ble-clic k on "USB Mass Storage
Dev ice" . A " Stop a H ardwar e Devic e" wind ow will a ppear.
3.Click the OK button . You m ay now safely d isconne ct your player
from the co mputer.
9
Transferri ng Files
To transfe r files between your player and a com puter:
1. Connec t your p layer to the computer with the USB cable.
2. Open W indows Explorer on the compu ter.
3. Select t he files you wan t to tran sfer and drag-and-dro p them to
the rem ovable disc ico n (ie, yo ur playe r). You can also transfe r
files from your player to a comp uter. Do not disconnec t your
player w hile it is transfe rring file s. Doing so may corrup t or
damag e the firmware a nd/or f iles on y our play er. If yo ur playe r
is accid entally d isconn ected w hile it is transferring file s and do es
not wor k prope rly, pow er your p layer o ff using the ON/ OFF swi tch
and the n power your pl ayer on again.
De leting F iles
To delete files fro m within your player, enter MP3, AMV, V OICE,
or PHOTO mode ( these m odes m ay be accessed from th e
M ain men u).
W hile you r player is paus ed, press the JO YSTICK SELECT k ey to
access th e subm enu.
1. Highligh t then s elect "Delete".
2. Highligh t then s elect the file yo u want to delet e.
3. Highligh t then s elect "Delete". You may also ch oose to delete
all files l isted by selectin g "Dele te all".
N ote : The files av ailable t o be deleted a re dependent o n the
m ode tha t your p layer is in. Music files m ay be deleted in MP3
m ode, movie file s in AMV mode, etc.
You may also cho ose to delete f iles from your pl ayer thr ough yo ur
compute r while t he two are connected. If you d elete files in this
m anner, make su re you disconne ct your player using th e proce ss
described in the Connec ting/Dis connecting Yo ur Playe r sectio n.
10
BASIC OPERATION
PLAYER MODES
Main Me nu/Nav igation
When yo ur play er is pow ered o n, it will enter th e Main menu
directly.
To return to the Main menu at a ny time, press a nd hold the
JOYSTIC K SELEC T key.
The Mai n menu consists of eight items: MP3, AM V, REC ORD, VO ICE,
PHOTO, SETUP, a nd E-BO OK. Fo r a deta iled des cription of each
item, se e the Player Mo des sec tion in th is manu al.
Mp3
AMV
RECORD
VOICE
FM Radio
PHOTO
SETUP
E-BOOK
To chang e which item is highlighted, pre ss
or
.
To select an item , press the JOYS TICK SEL ECT key .
Cha nging D irectories
To c hange directories within your p layer, e nter MP 3, AMV , VOICE ,
or P HOTO m ode (these mo des may be acc essed f rom the
Main menu ).
1.W hile you r player is pause d, pres s the JO YSTICK S ELECT k ey to
access the subme nu.
2.Hi ghlight then sel ect "Local folde r " .
3.Hi ghlight then sel ect the folder y ou woul d like to change to.
Volu me Ad justmen t
The volume level may be a djusted while yo ur play er is in M USIC,
AM V, or VO ICE mode. To in crease the volu me, pre ss the
key. To
dec rease the volum e, pres s the
key.
11
Th e follow ing play er mod es may be selec ted fro m the M ain menu:
Mp3, AMV , RECOR D, VOICE, PHOTO, SETU P, E-BOOK
To access the Ma in menu at any time, press and hold the
JOYSTICK SELECT key.
MP3 Music Player
To enter th e MP3 mode: From the Main m enu, hig hlight a nd sele ct
th e item M P3. (To access the Mai n menu at any t ime, press and
ho ld the J OYSTICK SELECT key.)
Th e MP3 m usic pla yer will find and play M P3, WM A, AMV , and
MTV files loaded o n your player.
T o play a track, p ress the button.
T o pause /stop a track, p ress the butto n while a track is playin g.
T o select the pre vious tra ck, pre ss
.
T o select the nex t track, press
.
When you are in M P3 mod e, the L CD will display the infor mation
illu strated below:
R epeat m ode
A-B R epeat m ode
Cu rrent Tra ck #/
Re maining Track #
Current Folder
Locatio n
Bit rate/
Total Track Time
Time Ela psed
Track T itle/File name
Prog ress Ba r
V olume L evel
Equa lizer Setting
12
PLAYER MODES
PLAYER MODES
Repeat mode options may be set by pressing the button d uring
playb ack. See Repea t in the MP3 Mu sic Player Optio ns secti on
for mo re information.
A-B Repeat m ode ma y be set by pressing the RECOR D butto n
during playba ck . See Replay in the M P3 Music Playe r Option s
sectio n for more infor mation.
To exit A-B Repeat mo de and return t o normal playb ack, press
the JOYSTICK SELECT key.
MP3 Mus ic Playe r Options
To access the MP3 Music Player Options menu, press the JOYSTICK
S ELECT key durin g playb ack . To return to MP3 M usic Pla yer mode,
press the
button.
Highlight and select one of the f ollowing items to set its options :
R epeat, Equalizer, Tempo rate, Replay, Replay times, o r
R eplay g ap.
Mus ic
Repeat
Equalize r
Te m po rat e
Replay
Replay ti mes
Rep eat
Press
or
to sel ect one of the f ollowing repea t functio ns:
No rmal (p lays all tracks in order o nce)
Re peat O ne (repeats cur rent tra ck)
Fo lder (pl ays all tr acks in the curr ent fold er once )
Re peat Fo lder (re peats tr acks in current folder)
Re peat All (repea ts all tracks)
Ra ndom ( plays tra cks in c urrent f older in random order)
In tro (play s the fir st 10 sec onds of all trac ks in the current folder)
Equ alizer
The equaliz er prese ts allow you to change the wa y music sounds
on y our pla yer. Press
or
to select one of the f ollowing preset
opt ions: Na tural, Ro ck, Pop , Classi c, Soft, J azz, or DBB.
Tem po rate
This setting changes the sp eed at w hich yo ur music plays
(tem po onl y affect s music and voi ce files) . Press
for sl ower
playback o r
for faster p laybac k. A Tem po rate setting of "0"
will play mu sic at normal speed.
Rep lay
This setting will put y our play er in A-B Repeat mode (i.e., repeat a
music track segment). After you have selected "Replay" dur ing
music playback , the A will b e blinking on the A-B Repeat mo de icon.
1.Set the beginning of the track seg ment to be repeated by
pressing the RECOR D button. The B will start to blink on the A-B
Repeat mode icon.
Replay Gap
13
14
PLAYER MODES
PLAYER MODES
2.S et the end of the track segment to be repeated by pres sing
the RECOR D button again.
The segment you have selected will then play in a loop for the
nu mber of times specified in "Replay times" (see Replay times
below for more info rmation). You can also set how much ti me
ela pses be tween loops in "Replay gap" (see Replay gap below
for more informatio n).
No te: It is possible to appe nd a vo ice reco rding t o the end of an
A-B Repea t loop. T his voic e recording wil l becom e part o f the
A-B Repea t loop.
1.W hile the A-B Repeat loo p is pla ying, pr ess
to begin voice
re cordin g.
2.T o stop v oice-recording , press
again .
The A-B Re peat loop will n ow resu me with the addition of the
new voice recording.
Yo u may e xit A-B R epeat m ode at any tim e by pressing th e
JOYSTICK S ELECT k ey.
Re play tim es. Sets how ma ny time s your p layer w ill repea t track
segments specifie d in A-B Repeat mode ( 1x to 10 x).
5
Re play ga p. Sets t he dura tion of t ime (in s econds ) your p layer
wil l pause betwee n A-B Re peat lo ops (1 t o 10).
AMV V ideo Pl ayer
To ent er the AMV mod e: From the Ma in menu, highlig ht and
select the item AMV. (To access the M ain me nu at any time,
press a nd hold the JO YSTICK S ELECT k ey.)
The AM V vide o playe r will find and pl ay any AMV vid eo files
loade d on you r playe r. Use the file-co nversio n softw are
includ ed on the insta llation d isc to co nvert v ideo file s to the
AMV f ormat ( see Inclu ded So ftware s ection) .
To p lay a tra ck, pre ss the
button .
To p ause/st op a tra ck, pres s the
button while a
trac k is play ing.
To se lect the previo us track , press
.
To se lect the next tr ack, pre ss
.
When you are in AMV mode, the LCD will disp lay the
inform ation ill ustrated below :
Repeat mode
A-B Repeat mode
Cu rrent Tr ack #/
Re maining Track #
Current Folder
Locatio n
Bit rate/
Total Trac k Time
Time Ela psed
Track Title/File name
Pro gress Ba r
V olume Level
Repea t mode options may be set from the AM V Video Player
subme nu by pr essing t he JOYS TICK SELECT key while y our player
is paus ed. See Repeat in the M P3 Music Playe r Option s sectio n
for mor e inform ation.
15
16
PLAYER MODES
PLAYER MODES
REC ORD
Record
To enter the RECOR D mode : From the Main menu, highligh t and
selec t the ite m RECO RD. (To access the Ma in menu at any time,
pres s and ho ld the J OYSTICK SELECT key.)
The v oice re corder a llows you to record sou nd from the
micr ophone located on the top of y our pla yer.
To start rec ording , press th e
bu tton.
To pause/ stop rec ording, press th e
bu tton while your player
is r ecordin g.
To save the record ing, pre ss and hold the
but ton.
To save the record ing and return to the M ain men u, pres s and
ho ld the JO YSTICK SELECT key.
Whe n you are in REC ORD m ode, the LCD w ill displa y the
infor mation illustrate d below :
Fin e REC
Long REC
Fin e VO R
Long V OR
1.Highlight the n select "REC ty pe " .
2.Highlight, then selec t one of the fol lowing r ecording options:
Fine REC . High-quality WAV fi le. This will take up more memory;
Long R EC . Low er-quality ACT file. This will take up less memory;
Fine VOR . High-quality WAV file. This w ill take up more memory;
Long V OR . Low er-quality ACT file. This will take up less memory.
Note: Recordi ng may be start ed insta ntly at a ny time by pressing
the RECORD button except during pl ayback in MP3 mode .
Curr ent Fold er
Loca tion
Bitrat e/Filetype
# of R ecordings in
Current Folder
REC type
Filename/Timestamp
Total : 010
Recording Time Elapsed
Remai ning Time
Av ailable Recordi ng Time remain ing
VOICE Player
To ent er the VOICE mode: From the Main menu, highlight and
select the item VOICE . (To access the Main menu at any time,
press a nd hold the JOYSTICK S ELECT k ey.)
The VOICE player will find and play any ACT o r WAV files loaded
on you r player. Its functionali ty is the same as the MP3 Music
Player except that there is no A-B Rep eat mode.
To change the reco rding qu ality (i.e ., bitrat e/filety pe) options,
pres s the JO YSTICK S ELECT k ey while the rec order is stopped .
17
18
PLAYER MODES
PLAYER MODES
PHOTO Viewer
FM Radio
To enter th e PHOTO mode : From th e Main menu, h ighligh t and
select the item PHO TO. (To access the Ma in menu at any time,
pre ss and h old the JOYSTIC K SELEC T key.)
The PHOTO viewer will find and dis play an y JPG, G IF, or BM P files
loa ded on your player. The viewer can dis play photos wit h
ma nual co ntrol or automa tically a s a slide show (a ll photo s in
the current folder are disp layed se quentially).
To display a phot o or start the slid eshow , highlig ht a file and
p ress the
butt on.
To return to the fi le list or stop the slidesh ow, pre ss the
button .
To display the previous photo manua lly, pres s
w hile a photo is
b eing dis played.
while a photo is
To display the next p hoto ma nually, press
b eing dis played
To change betwee n slides how and manu al mode s:
1.P ress the JOYSTIC K SELECT key to access the sub menu
2.H ighlight then se lect "pla y set".
3.Fo r manu al mode : Highli ght then select "Manua l play." M anual
m ode is now set.
Fo r slides how mo de: Hig hlight then select "auto play". C ontinue
to the ne xt step.
4.P ress
or
to set how long ea ch phot o will be display ed for
(i n seconds), the n press t he JOYS TICK SE LECT ke y.
View Photo
1.jpg
2.jpg
To enter the FM Radio mode: From the Main menu, highlight and
select the item FM R adio. (To access the Main menu at any time,
press and hold the JOYSTICK SELECT key.)
Press the
or
key to select your desired station.
Use the
or
key to adjust the volume.
Press the JOYSTICK SELECT key to access the menu shown below:
FM Mode
Save
Dele te
Dele te all
Normal B and
Japan Band
Fine REC
Record the FM voice in WMA fo rmat.
Delete all fa vorite st ations.
Delete current station from the favorit e statio ns.
Save current station to the fa vorite s tations.
3.jpg
19
20
PLAYER MODES
PLAYER MODES
SETU P
To access the SE TUP menu: From the Main menu , highlight and
select the item S ETUP. (To access the Main menu at any time,
press and hold the JOYSTICK SELECT key.)
In the SETUP menu, highlight and select one of the following items
to set its options: Clock, LCD set, Language, Power off,
R eplay mode, Online mode, Memory info, Firmw are version,
or Firmware upgrade.
Sys S etu p
LCD se t
LCD se t allows you to s et the b rightness and b lack lev el of the
LCD sc reen.
To set t he brigh tness:
Highli ght and select " Brightness".
Press
or
to adjus t the br ightness of the screen ( 0 is dimmest,
10 is b rightest ), then press the JOYST ICK SELE CT key.
Sys Set
Sys Set
Br ightness
LCD Set
Clock
Br ight ness
LCD set
9
Bl ack
Language
Ex it
Power off
Replay mode
Onl ine Mode
Clock
Clock set up allows you to set your player's internal clock to the
proper date and time.
When you are in Clock setup mode, the LCD will display the
information illust rated below:
To set t he blac k level:
Highli ght and select " Black".
Press
or
to adju st the bl ack lev el of the screen , (0 is
darke st, 10 is lightest), then p ress the JOYSTICK SELEC T key.
Sy s Setup
Clo ck
Sys Set
month
Sys Set
LCD Set
Yea r
20 06
hour
04
01
50
23
date
31
second
Black
minute
Exit
To change the selected field, press the
key or the
To change the value of a selected field, press
or
To return to the SETUP menu, press the
button.
21
B lack
Brightness
5
key.
.
22
PLAYER MODES
PLAYER MODES
La nguage
Language setup allows you to set the language of your player.
Supported langu ages are Simple Chinese, English, Traditional
Chinese, Korean, Japanese, French, German, Italian, Dutch,
Portuguese, Spanish, Czech, Danish, and Russian.
Power off
Power off setu p allow s you to set the power-s aving fe atures of
your p layer. O ff Time specifie s the am ount of time (in second s)
your p layer ca n be le ft idle before it a utoma tically shuts off.
Sleep Time sp ecifies t he amo unt of time (in se conds) your pl ayer
can b e left idle before your p layer en ters a p ower-sa ving sleep
mode . To wak e your p layer fr om slee p mode, press a nd hold the
JOYSTICK SELE CT key.
Note: A setting of "0" w ill disab le these power -saving feature s.
Replay mode
R eplay mode set up allows you to choose whether your player
inserts a pause between tracks during Manual replay or Auto
replay.
Online mode
Online mode setup allows you to choose between Multi-drive,
Normal Only, and Encrypted Only modes. A partitioning/
encryption software tool(not included) is necessary to use these
features.
Memory info
The memory info screen displays both the total amount of
memory available and the percentage of memory used.
F irmware version
The firmw are version screen displays the current version of the
firmware installed on you r player.
F irmware upgrade
See the Firmware Upgrade sect ion for instructions on how to
u pgrade the firmware of your player.
23
E-B OOK Reade r
To enter th e E-Boo k mode : From the Main menu, highligh t and
select the item E-BOOK. (T o acce ss the M ain menu at any time,
press and hold the JOYSTI CK SELECT key.)
The E-Book reader can read any t ext files in the TXT format
loaded on your player. The E-Boo k reade r's funct ions are :
Dir Selec t: Selects a dire ctory fo r your player to find TXT files
File Select: Selects and l oads a file for y our play er to read. You
must load a f ile here for your player to read
T ext Read: Displays the l oaded TXT file. Press
or
in this
mode to scro ll through the TXT docu ment. Press
the
button to retu rn to the E-Book reader menu
24
FIRMWARE UPGRADE
SOFTWARE UTILITIES
IM PORTANT:
Make sure your player is e ither attached to a power sou rce or
has been fully charged b efore upgrading your f irmware . Do not
disconnect your player from you r PC or o therwis e interru pt the
upgrade process a s doing so could damage your pla yer and
render it inopera ble.
The softw are utilities allo w you to conve rt sound and vid eo files
to format s recog nized by your p layer. In stall the se utilities on
y our computer fr om the Installat ion CD include d with y our play er.
Fi rmware update s may be found at www .cobyu sa.com . Check
th is site periodica lly for new updates. Firmware u pdates may
add new functionality to your player.
S ound Co nverte r Tool
The Soun d Converter Tool allow s you to convert sound f iles from
the ACT f ormat recorded by you r player to the w idely re cogniz ed
S ou nd C onv er ter Tool
W AV form at.
OPEN
Fo llow the se instr uctions to upgrade you r firmwa re.
1. Download the latest firmware u pgrade file from the Coby
website.
2. Connec t your p layer to your co mputer using the USB cable.
3. Run the Mp3 Pla yer Upgrade To ol utility from th e START menu o n
your computer( this utili ty can b e found on the i nstallati on CD).
4. Click "Select ne w Firmware Upgrade file" to select the
downloaded fir mware upgrade file the n click "Start Up grade" .
5. Disconnect you r player from yo ur computer when the
upgrade is complete.
1 .Run the Sound Conver ter Tool utility from the S TART menu on
your co mputer .
2 .Click the OPEN button to selec t an AC T file tha t you w ould lik e
to conv ert.
3 .Click the CONV ERT bu tton to run the conversion proc ess.
M ovie Co nvert Tool
The Movi e Conve rt Tool allows y ou to co nvert video file s to the
M TV or A MV form at reco gnized by your player.
Movie Conv ert Tool
In put
Ou tput
Outp ut Information
Item fil e n ame
Start
End
R un
Total
a ud io fil e
Convert s chedul e
25
26
sta te
time
SOFTWARE UTILITIES
1.R un the M ovie C onvert T ool utili ty from t he STAR T menu on your
c ompute r.
2.F ind and select t he vide o file tha t you w ould lik e to convert in
the INPUT field.
3.F ind and select t he direc tory loc ation that you would li ke to
save the conver ted file t o.
4.C lick the
bu tton to run the c onversion process.
SPECIFICATION
Te chn ical Specifi cations
External size
76×42× 18mm
Weight
28g
Display screen
OLED 65K colo r
Conne ction to PC
USB 1.1
Memory
512M
Power supply
Li-ion B attery
Recording
SP/LP
Au dio form ats
FM rad io
MP3, WMA
87.5MH z-108M Hz
Tempe rature
-5℃-40℃
PR OP. 6 5 WAR N ING :
Ha ndling the cord on the earphones will expose you to lead, a chem ical k nown to the State of
Ca lifornia to ca u s e [ cancer, and] birth cdefects or other reproductive harm.
Wash hands after handling.
27
28
TROUBLESHOOTING
Thi s troublesho oting guide aims to sav e you time in case you
exp erience an y inconveni ence with th is digital a udio player.
If yo u are still h aving difficulty, please contact Co nsumer Serv ice/
Tec hnical Supp ort.
My player doe s not work.
1.Ensure that th e ON/OFF s witch is set to the ON p osition.
2.Ensure that th e battery is charged.
File transfer fai lure.
1.Ensure that th e USB drive r has been i nstalled co rrectly on th e PC.
2.Ensure that th e USB cable is attache d securely t o both the P C
a nd your pla yer.
3.Ensure that y our player's memory ca pacity limit has not bee n
re ached.
4.Ensure that th e battery is charged.
Poo r sound quality or no so und.
1.Ensure that th e volume le vel is not se t to "0".
2.Ensure that y our headph ones are at tached sec urely to the
he adphone j ack.
3.Poor sound q uality may r esult from c orrupt or po orly encode d
m usic files. Try download ing the mus ic file again or encodin g
th e file at a h igher bitrate . The recom mended b itrates for th is
p layer is 128 kbps for Mp 3 files and 64 kbps for W MA files.
Ca n't find any music files.
1.Ensure that a udio files ha ve been tra nsferred to your player.
2.Ensure that th e audio file is of a com patible form at (Mp3 or WMA).
The screen dis plays nothin g.
1.Pleases call T echnical Su pport for a Hot-key reb oot.
Tec hnical Supp ort
Mo nday to Frid ay: 8:00 AM - 11:00 PM ES T
Sat urday and Sunday: 9:00 AM - 11:00 P M EST
Tel ephone: 800 -681-2629 o r 718-416-31 97
You can also re ach us onli ne at www. cobyusa.co m or
by e-mail at te chsupport@ cobyusa.co m.
29