1
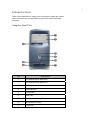
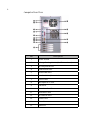
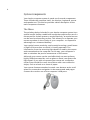
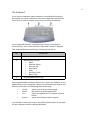
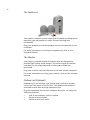
Copyright Notice
© Acer Incorporated 2002. All rights reserved.
Acer Incorporated reserves the right to change product specifications and the
information contained in this user guide without notice.
No part of this document may be copied, reproduced, or transmitted by any means, or
for any purpose, without prior written permission from Acer Incorporated.
Table of Contents
Welcome
v
Before You Start
vi
Important safety instructions
Laser compliance statement
Lithium battery statement
Year 2000 compliance statement
Setting Up The System
Placement Tips
System Overview
Computer Front View
Computer Rear View
System Components
System Components
The Mouse
The Keyboard
The Speaker set
The Monitor
Modem Card (Optional)
Upgrading Your System
Opening The Case
Installing New Components
Questions & Troubleshooting
vi
viii
ix
ix
x
x
1
1
2
3
4
4
5
6
6
6
7
7
7
8
v
Welcome
Congratulations on purchasing your new Aspire computer! You
now have the convenience and flexibility of a full-featured
multimedia PC, offering increased productivity combined with first
class digital entertainment. Incorporating the latest Microsoft®
Windows® operating system, your Aspire offers a host of functions
designed to improve your computing experience.
vi
Before You Start
To ensure that you can use your computer safely and correctly,
please read this user guide carefully before you start. For future
reference, keep this user guide handy at all times.
Important safety instructions
1.
Follow all warnings and instructions marked on the product.
2.
Unplug this product from the wall outlet before cleaning.
Do not use liquid cleaners or aerosol cleaners. Use a damp
cloth for cleaning.
3.
Do not use this product near water.
4.
Do not place this product on an unstable cart, stand, or table.
The product may fall, causing serious damage to the
product.
5.
Slots and openings in the cabinet and the back or bottom
are provided for ventilation; to ensure reliable operation of
the product and to protect it from overheating, these
openings must not be blocked or covered. The openings
should never be blocked by placing the product on a bed,
sofa, rug, or other similar surface. This product should never
be placed near or over a radiator or heat register, or in a
built-in installation unless proper ventilation is provided.
6.
This product should be operated from the type of power
indicated on the marking label. If you are not sure of the
type of power available, consult your dealer or local power
company.
7.
Do not allow anything to rest on the power cord. Do not
locate this product where persons will walk on the cord.
8.
If an extension cord is used with this product, make sure that
the total ampere rating of the equipment plugged into the
extension cord does not exceed the extension cord ampere
rating. Also, make sure that the total rating of all products
plugged into the wall outlet does not exceed the fuse rating.
9.
Never push objects of any kind into this product through
cabinet slots as they may touch dangerous voltage points or
short out parts that could result in a fire or electric shock.
Never spill liquid of any kind on the product.
10.
Do not attempt to service this product yourself, as opening
or removing covers may expose you to dangerous voltage
points or other risks. Refer all servicing to qualified service
personnel.
vii
11.
Unplug this product from the wall outlet and refer servicing to
qualified service personnel under the following conditions:
a.
When the power cord or plug is damaged or frayed
b.
If liquid has been spilled into the product
c.
If the product has been exposed to rain or water
d.
If the product does not operate normally when the
operating instructions are followed. Adjust only those
controls that are covered by the operating instructions
since improper adjustment of other controls may result
in damage and will often require extensive work by a
qualified technician to restore the product to normal
condition.
e.
If the product has been dropped or the cabinet has been
damaged.
f.
If the product exhibits a distinct change in performance,
indicating a need for service.
12.
Replace the battery with the same type as the product's
battery we recommend. Use of another battery may present a
risk of fire or explosion. Refer battery replacement to a
qualified serviceman.
13.
Warning! Batteries may explode if not handled properly. Do
not disassemble or dispose of them in fire. Keep them away
from children and dispose of used batteries promptly.
14.
Use only the proper type of power supply cord set (provided in
your accessories box) for this unit. It should be a detachable
type: UL listed/CSA certified, type SVT, rated 7A 125V minimum,
VDE approved or its equivalent. Maximum length is 15 feet
(4.6 meters).
viii
Laser compliance statement
The CD or DVD drive in this computer is a laser product. The CD or
DVD drive’s classification label (shown below) is located on the
drive.
CLASS 1 LASER PRODUCT
CAUTION: INVISIBLE LASER RADIATION WHEN OPEN. AVOID
EXPOSURE TO BEAM.
APPAREIL A LASER DE CLASSE 1 PRODUIT
LASERATTENTION: RADIATION DU FAISCEAU LASER INVISIBLE EN
CAS D’OUVERTURE. EVITTER TOUTE EXPOSITION AUX RAYONS.
LASER KLASSE 1
VORSICHT: UNSICHTBARE LASERSTRAHLUNG, WENN ABDECKUNG
GEÖFFNET, NICHT DEM STRAHLL AUSSETZEN.
PRODUCTO LÁSER DE LA CLASE I
ADVERTENCIA: RADIACIÓN LÁSER INVISIBLE AL SER ABIERTO.
EVITE EXPONERSE A LOS RAYOS.
ADVARSEL: LASERSTRÅLING VEDÅBNING SE IKKE IND I STRÅLEN
VARO! LAVATTAESSA OLET ALTTINA LASERSÅTEILYLLE.
VARNING: LASERSTRÅLNING NÅR DENNA DEL ÅR ÖPPNAD ÅLÅ
TUIJOTA SÅTEESEENSTIRRA EJ IN I STRÅLEN
VARNING: LASERSTRÅLNING NAR DENNA DEL ÅR ÖPPNADSTIRRA
EJ IN I STRÅLEN
ADVARSEL: LASERSTRÅLING NAR DEKSEL ÅPNESSTIRR IKKE INN I
STRÅLEN
ix
Lithium battery statement
CAUTION
Danger of explosion if battery is incorrectly replaced. Replace only
with the same or equivalent type recommended by the
manufacturer. Discard used batteries according to the
manufacturer’s instructions.
ADVARSEL!
Lithiumbatteri - Eksplosionsfare ved fejlagtig håndtering.
Udskiftning må kun ske med batteri af samme fabrikat og type.
Léver det brugte batteri tilbage til leverandøren.
ADVARSEL
Eksplosjonsfare ved feilaktig skifte av batteri. Benytt same
batteritype eller en tilsvarende type anbefalt av
apparatfabrikanten. Brukte batterier kasseres i henhold til
fabrikantens instruksjoner.
VARNING
Explosionsfara vid felaktigt batteribyte. Anvãnd samma batterityp
eller en ekvivalent typ som rekommenderas av apparattillverkaren.
Kassera anvãnt batteri enligt fabrikantens instruktion.
VAROITUS
Päristo voi räjähtää, jos se on virheellisesti asennettu. Vaihda
paristo ainoastaan laitevalmistajan suosittelemaan tyyppiin. Hävitä
käytetty paristo valmistajan ohjeiden mukaisesti.
VORSICHT!
Explosionsgefahr bei unsachgemäßen Austausch der Batterie
Ersatz nur durch denselben oder einem vom Hersteller
empfohlenem ähnlichen Typ. Entsorgung gebrauchter Batterien
nach Angaben des Herstellers.
Year 2000 compliance statement
The computer carries the "Hardware NSTL Tested Year 2000
Compliant" logo, which certifies that this model has been tested by
NSTL using the YMark2000 test, and has been found to meet
NSTL's standards for Year 2000 hardware compliance.
x
Setting Up The System
It only takes a few minutes to set up your new Aspire system. Start
by preparing your workspace. Make sure that the surface is stable,
level and clean.
Open the box carefully, ensuring that you do not damage the box
or any of the other packing materials. The box will be required if
you ever have to store or ship your computer. Unpack the box and
set out the contents on your work surface.
Placement Tips
For maximum viewing comfort, set up your monitor at arm's
length from your seat, with the top third of the screen at eye
level. Tilt and swivel the display to find the optimum
position.
Place your mouse and keyboard side by side in front of the
monitor. Check that you are able to adopt a comfortable
typing position.
Choose a chair that can be adjusted for maximum comfort.
Make sure your work area is well lit.
1
System Overview
Take a few moments to study your new Aspire computer system.
Learn the locations of the buttons, ports and other hardware
features.
Computer Front View
No.
Description
1
CD-ROM/DVD/CD-RW Drive
2
CD-ROM/DVD/CD-RW Drive
3
FDD Drive
4
Power Button
5
Power LED
6
HDD LED
7
Speaker / Headphone Jack
8
Microphone-in Jack
9
USB Ports
2
Computer Rear View
No.
Description
1
Power Socket
2
Voltage Setting Switch (for Taiwan Area)
3
PS/2 Keyboard Port
4
COM1/Serial Port
5
VGA/COM2 Port
6
Speaker / Headphone Jack
7
Line-in Jack
8
Microphone-in Jack
9
USB Ports
10
Extension Card Slots
11
Ventilation Slot
12
PS/2 Mouse Port
13
Printer Port
14
Game Port
15
LAN Port
3
System Components
Monitor
Keyboard
Mouse
Speaker set
4
System Components
Your Aspire computer system is made up of several components.
These include the computer itself, the monitor, keyboard, mouse
and speaker set. This section provides a brief description of the
main component features.
The Mouse
The pointing device included in your Aspire computer system is an
optical mouse. Unlike a traditional mouse that requires the use of a
mouse pad for its ball system to work effectively, an optical mouse
can be used on almost any surface. This allows you to operate your
mouse anywhere in the vicinity of your computer - an important
advantage on a cluttered desktop.
Your optical mouse works by continuously bouncing a small beam
of light off the surface on which it is being operated. The
information from the returning light beams is read by the mouse
and transmitted to the computer. In this way, your computer is
able to calculate the precise movements of the mouse.
Although your mouse can be used effectively on most surfaces,
highly reflective materials, such as glass or metal, can distort the
light signal. If you wish to operate your mouse on a reflective
surface you should first cover the surface with a non-reflective
object, such as a book or a sheet of paper.
Your mouse features standard controls: two buttons and a scroll
wheel for convenient navigation in documents and web pages.
Connect the cord to one of the computer's USB ports.
5
The Keyboard
Your Aspire computer system features a multimedia keyboard,
providing one-touch control for the most important multimedia
functions, as well as instant access to your favorite websites.
Your keyboard features a standard set of keys, including 12
function keys, four cursor direction keys and a numeric keypad.
The multimedia keys provide the following functions:
No.
Description
1
Suspend
2
Multimedia Control
Mute
Volume Down
Volume Up
Play/Pause
Stop
Previous Track
Next Track
3
Programmable Hot Keys
The programmable hot keys can be set to open any website or any
application on your computer. When you purchase your Aspire, the
hot keys will have the following default settings:
Home Email Go Search -
opens your Internet home page.
launches the email application.
opens an application or website of your
choice.
opens the Internet search engine.
You should connect the cord to the PS/2 keyboard port at the back
of the computer before starting Windows.
6
The Speaker set
Your Aspire computer system comes with a speaker set designed to
maximize your enjoyment of audio CDs and exciting new
multimedia.
Plug your speaker set into the speaker-out port at the back of your
computer.
For more information on using your speaker set, refer to the
included manual.
The Monitor
Your Aspire computer system includes a monitor designed to
provide high quality visual images. The size and type of monitor
included in your system depends on the system model you
purchased.
Plug your monitor into the VGA port at the back of your computer.
For more information on using your monitor, refer to the included
manual.
Modem Card (Optional)
Depending on the models, your Aspire might include a modem
card in the rear panel of the PCI slot. The modem card helps to
send and receive data through telephone line.
Plug the telephone line to Acer computer then you can enjoy the
following features:
Link to the Internet, and surf online.
Send and receive faxes.
Send and receive E-mails.
7
Upgrading Your System
You can quickly and easily expand your Aspire computer system by
adding additional components. Alternatively, you can upgrade
existing components to provide enhanced performance.
Opening The Case
Before you open the case, turn your computer off and unplug the
power cord from the wall outlet.
Remove the retaining screws to release the cover panel.
Slide the cover panel off.
Installing New Components
Make sure you only use components that are compatible with your
Aspire computer. Consult your dealer about the suitability of new
components before you purchase them.
To ensure correct installation, refer to the documentation that
comes with your new components before you start to add or
replace components.
Possible upgrade options include the following:
Replace the HDD with a higher capacity model, or add a
second HDD.
Install additional memory.
Install a graphics card as a substitute for the embedded
graphics subsystem.
Replace the CD drive with a DVD or CD-RW drive.
Install an add-on card, such as a fax/modem card, in one of
the empty PCI slots.
8
Questions & Troubleshooting
This section attempts to answer some frequently asked questions
regarding your Aspire computer system, as well as offering tips for
troubleshooting problems.
Refer to the online help file for additional information about your
Aspire computer system.
Q:
My monitor displays a blank screen, my corded
mouse/keyboard does not function, or my speakers do not
emit sound. How can I make them work?
A:
If a system component does not perform correctly, first check
that it is plugged in and turned on (if necessary) and
connected to the computer correctly.
For specific questions and problems relating to the monitor
and speaker set, refer to the documentation provided with
those components.
Q:
My monitor is turned on and connected correctly but the
screen is still blank. What is the problem?
A:
Check the brightness and contrast controls on the monitor.
Also, move the mouse or tap a key on the keyboard to make
sure that the monitor is not in power-saving mode.
Q:
My mouse cursor movement is erratic. How can I get better
control?
A:
Your Aspire computer system features an optical mouse
providing greater freedom of use. However, highly reflective
surfaces, such as glass or metal, can distort the optical light
signal and cause tracking problems. If you wish to operate
your mouse on a reflective surface you should first cover the
surface with a non-reflective object, such as a book or a sheet
of paper.
Q:
My floppy drive (FDD) is unable to read my diskette?
A:
First, eject the disk, and then reinsert it before trying to read it
again. If you are still unable to read the diskette, check that it
is a disk drive problem by inserting and attempting to read
other diskettes. You might have a defective diskette, or your
diskette might need formatting.
If you believe that there is a problem with the drive, take your
computer in for servicing.
9
Q:
My system freezes. How can I restore normal operation?
A:
Sometimes Windows experiences problems that cause the
operating system to "hang". Usually these problems arise
from conflicts with the application software you are running.
Press the Alt-Ctrl-Del keys simultaneously for on-screen
instructions. If Windows is unable to resolve the problem, you
should press Alt-Ctrl-Del again to reboot. In extreme cases
where the keyboard fails to respond, you might need to press
and hold the power button to perform a "hard" reboot.
If an application continually causes problems, see its online
help file for advice. You might need to uninstall and then
reinstall the software using the program's Uninstall utility or,
if it does not have one, by using the Windows Add/Remove
Programs facility. See the Windows online help file for more
information.
Q:
Windows continually "hangs" or "crashes". How can I use my
computer normally again?
A:
If your operating system has become corrupted you might
need to return your computer to a previous "clean"
configuration. See the Windows online help for advice on
returning your system settings to a previous configuration.
In extreme cases, you might want to return your computer to
the factory default settings. The included recovery CD allows
you to restore the software to the state it was in when you
first purchased your Aspire computer system. However, all
your additional programs, data and settings will be lost when
you use the recovery CD.
To restore the factory defaults, follow the instructions on the
recovery CD. Back up your data on another drive before you
begin this procedure.
Q:
I've tried the suggestions provided in this user guide, but I am
still unable to get my Aspire computer system to work
normally. What can I do now?
A:
If you are unable to solve a problem after reading these
troubleshooting tips, take your computer to qualified
personnel for servicing. Do not attempt to service your
computer yourself.