1
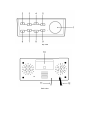
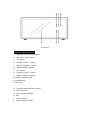
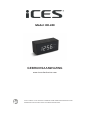
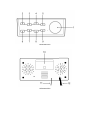
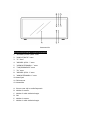
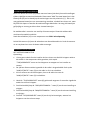
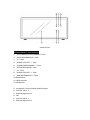
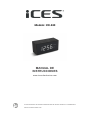
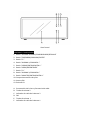
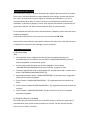
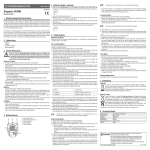
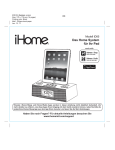
Model: ICR-240 INSTRUCTION MANUAL www.ices-electronics.com READ THIS INSTRUCTION MANUAL BEFORE OPERATING THE APPLIANCE. AND SAVE IT FOR FUTURE REFERENCE. Top view Back view Front view CONTROLS AND INDICATORS 1. “SNOOZE / SLEEP / DIM” button 2. “ON / OFF / NAP” button 3. “P-“ button 4. “ALARM 1 / VOL –“ button 5. “HOUR / TUNING –“ button 6. “TIME / PRESET” button 7. “P+” button 8. “ALARM 2 / VOL +” button 9. “MIN / TUNING +” button 10. Battery compartment 11. FM antenna 12. AC plug A. Time and radio frequency display B. C. D. E. F. Alarm 2 buzzer Alarm 2 radio indicator FM Alarm 1 buzzer Alarm 1 radio indicator PREPARATION FOR USE This clock radio includes a battery backup system that will maintain the time and alarm settings during a temporary power interruption. Insert two ‘AAA’ size batteries correctly by matching the polarity (+/-) markings in the battery compartment (10). If you experience a power failure while batteries are installed, the display will turn ‘off’ but the clock will continue to run and maintain your alarm settings. Please replace all batteries at the same time with only new batteries. The clock radio has slip proof silicon feet. Place the clock radio only on protected furniture. Plug AC plug (12) into 230vac electrical outlet. Unwind the FM antenna (11) on the back of the clock radio. Extend and reposition the antenna for best radio reception. ALARM CLOCK OPERATION SETTING THE TIME Note: You cannot set any function when the clock display is blinking after plug in, press the “TIME/PRESET” to stop blink and start setting. The time can only be set when the radio is turned off. Press the “ON / OFF / NAP” button (2) to turn radio on or off. When the clock display is blinking, you cannot power on radio by the “ON / OFF / NAP” button (2). 1. Press and hold down “TIME / PRESET” button (6) for approximately 3 seconds until the display flashes. 2. Press “HOUR / TUNING –“ button (5) repeatedly to change the hour setting. 3. Press “MIN / TUNING +“ button (9) repeatedly to change the minute setting. 4. Press “TIME / PRESET” button (6) to confirm at the time and the display will stop flashing. SETTING THE ALARM TIME This clock radio has dual alarms that can be set and used independently. The procedure to set both alarms are the same. Both alarms can either sound the buzzer or wake up to radio. Note: The alarm time can only be set when the radio is turned off. Press the “ON / OFF / NAP” button (2) to turn radio on or off. 1. For setting alarm time 1 with buzzer, press “ALARM 1 / VOL –“ button (4) and indicator (E) will flash. For setting alarm time 1 with radio, press “ALARM 1 / VOL –“ button (4) twice and indicator (F) will flash. 2. When the digits are flashing, press “HOUR / TUNING –“ button (5) repeatedly to change the hour setting. Press “MIN / TUNING +“ button (9) repeatedly to change the minute setting. 3. Press “ALARM 1 / VOL –“ button (4) to confirm. 4. To cancel alarm, press “ALARM 1 / VOL –“ button (4) three times when the current time is showing. The alarm indicators will be off. 5. When the alarm sounds, press any button to turn off alarm or press “SNOOZE / SLEEP / DIM” button (1) to enter snooze mode. or will blink during snooze mode. Alarm will sound again after 5 minutes. Alarm buzzer does not cut the radio sound. If alarm waken up by radio, volume control for radio is not available. 6. Follow the same instructions for alarm 2 with “ALARM 2 / VOL +” button (8). Note: You must make the time and alarm time adjustments while the display is flashing. The display will stop flashing after approximately 10 seconds if adjustments are not made. If two alarms are set together, for example alarm1 set to buzzer alarm and alarm2 set to radio alarm, when buzzer is activated by alarm1 and radio is activated by alarm2, the previous alarm does not stop automatically and has both buzzer and radio sound together. RADIO General Operations 1. Press the “ON/OFF/NAP” button (2) to turn radio on and off. 2. For manual tuning, press “HOUR / TUNING –“ button (5) or “MIN / TUNING +“ button (9) for increments of 0.1mHz. 3. For automatic tuning, press and hold down “HOUR / TUNING –“ button (5) or “MIN / TUNING +“ button (9) for approximately 3 seconds. Depress the button and the radio will start to scan for the next available station. 4. Press “ALARM 1 / VOL –“ button (4) or “ALARM 2 / VOL +“button (8) to adjust volume level. The display changes to show the volume level indication (00 to 14) during the volume adjustments, then changes back to the radio station frequency and then the current time. 5. Press “HOUR / TUNING –“ button (5) or “MIN / TUNING +“ button (9) to show the radio station frequency. Pre-set Station Memory 1. The radio can store up to 20 FM stations. 2. To store a station in memory, tune to the desired radio station. Press and hold down “TIME/PRESET” button (6) for approximately 3 seconds and “P01” on the display will flash. Press “P+” button (7) or “P-“ button (3) to the desired station memory (P01 to P20). Press “TIME/PRESET” button (6) once to confirm. 3. Repeat the above steps for up to 20 stations. 4. To recall the station, press “P+” button (7) or “P-“ button (3) until desired station is reached. Sleep mode 1. When the radio is on, press “SNOOZE / SLEEP / DIM” button (1) to enter sleep mode. “OFF” will be displayed. Press “SNOOZE / SLEEP / DIM” button (1) repeatedly for the duration of the “SLEEP” time. The range of “SLEEP” time is 90 minutes to 10 minutes, as displayed on the screen. NAP Set the desired NAP time and the radio will turn on automatically after the preset time. 1. When the radio is off, press and hold “ON / OFF / NAP” button (2) for approximate 4 seconds and the display and FM indicator (D) will flash. 2. 3. Press “P+” button (7) or “P-“ button (3) to set the desired nap time (45, 60, 90 or 120 mins) Press “ON / OFF / NAP” button (2) to confirm. DIMMER When the radio is off and the current time showing, press “SNOOZE / SLEEP / DIM” button (1) to select the brightness of the display for high or low. Service and support For information: http://www.ices-electronics.com/ ICES offers service and warranty in accordance to European law, which means that in case of repair (both during and after the warranty period), you should contact your local dealer. Please note: It is not possible to send products directly to ICES for repair. Important note: If this unit will be opened, or accessed in any way by a non-official service center, the warranty expires immediately. Products with the CE marking comply with the EMC Directive (2004/108/EC) and the Low Voltage Directive (2006/95/EC) issued by the Commission of the European Community. The declaration of conformity may be consulted at www.ices-electronics.com This symbol indicates that the relevant electrical product or battery should not be disposed of as general household waste in Europe. To ensure the correct waste treatment of the product and battery, please dispose them in accordance to any applicable local laws of requirement for disposal of electrical equipment or batteries. In so doing, you will help to conserve natural resources and improve standards of environmental protection in treatment and disposal of electrical waste (Waste Electrical and Electronic Equipment Directive). ®All rights reserved Model: ICR-240 GEBRUIKSAANWIJZING www.ices-electronics.com LEES VOORDAT U HET APPARAAT GEBRUIKT DEZE GEBRUIKSAANWIJZING DOOR. EN BEWAAR HEM OM HEM LATER TE KUNNEN RAADPLEGEN. Bovenaanzicht Achteraanzicht Vooraanzicht BEDIENINGSORGANEN EN INDICATIELAMPJES 1. “SLUIMER-/SLAAP-/DIM”-toets 2. “AAN/UIT/DUTJE”-toets 3. “P-” toets 4. “WEKKER 1/VOL –” toets 5. “UREN/AFSTEMMEN –” toets 6. “TIJD/VOORKEUZE”-toets 7. “P+” toets 8. “WEKKER 2/VOL +” toets 9. “MIN/AFSTEMMEN +” toets 10. batterijvak 11. FM-antenne 12. Netstekker A. Scherm voor tijd en radiofrequentie B. C. D. E. F. Wekker 2 zoemer Wekker 2 radio-indicatielampje FM Wekker 1 zoemer Wekker 1 radio-indicatielampje VOORBEREIDING VOOR GEBRUIK Deze klok bevat een back-upsysteem met een batterij dat de tijd en wekinstellingen tijdens tijdelijke stroomuitval behoudt. Plaats twee “AAA”-formaat batterijen in het batterijvak (10) en let daarbij op de markeringen voor de polariteit (+/-). Als er zich met geplaatste batterijen een stroomstoring voordoet, schakelt het scherm uit, maar blijft de klok lopen en worden de wekinstellingen behouden. Vervang alle batterijen gelijktijdig en vervang ze alleen door nieuwe batterijen. De wekkerradio is voorzien van antislip siliconen voetjes. Plaats de wekkerradio uitsluitend op stabiel meubilair. Steek de netstekker (12) in een stopcontact met 230 V wisselspanning. Rol de FM-antenne (11) aan de achterkant van de wekkerradio uit. Strek de antenne uit en verplaats hem voor de beste radio-ontvangst. BEDIENING VAN DE WEKKER HET INSTELLEN VAN DE TIJD Opmerking: U kunt geen enkele functie instellen als het scherm van de klok knippert nadat u de stekker in het stopcontact hebt gestoken; druk op de “TIJD/VOORKEUZE”-toets om het knipperen te stoppen en het instellen te starten. De tijd kan alleen worden ingesteld als de radio is uitgeschakeld. Druk op de “AAN/UIT/DUTJE”-toets (2) om de radio in of uit te schakelen. Als het scherm van de klok knippert, kunt u de radio niet met de “AAN/UIT/DUTJE”-toets (2) inschakelen. 1. Houd de “TIJD/VOORKEUZE”-toets (6) gedurende ongeveer 3 seconden ingedrukt totdat het scherm knippert. 2. Druk herhaaldelijk op de “UREN/AFSTEMMEN –” toets (5) om de ureninstelling te wijzigen. 3. Druk herhaaldelijk op de “MIN/AFSTEMMEN +” toets (9) om de minuteninstelling te wijzigen. 4. Druk de “TIJD/VOORKEUZE”-toets (6) om de tijd te bevestigen, waarna het knipperen van het scherm stopt. HET INSTELLEN VAN DE WEKTIJD Deze wekkerradio is voorzien van twee wektijden die onafhankelijk kunnen worden ingesteld en gebruikt. De procedure voor het instellen is voor beide wektijden hetzelfde. Voor beide wektijden kan worden gekozen uit de zoemer of wakker worden met de radio. Opmerking: De wektijd kan alleen worden ingesteld als de radio is uitgeschakeld. Druk op de “AAN/UIT/DUTJE”-toets (2) om de radio in of uit te schakelen. 1. Druk voor het instellen van wektijd 1 met zoemer de “WEKKER 1/VOL –” toets (4), waarna het indicatielampje (E) begint te knipperen. Druk voor het instellen van wektijd 1 met radio twee keer op de “WEKKER 1/VOL –” toets (4), waarna het indicatielampje (F) begint te knipperen. 2. Druk als de cijfers knipperen herhaaldelijk op de “UREN/AFSTEMMEN –” toets (5) om de ureninstelling te wijzigen. Druk herhaaldelijk op de “MIN/AFSTEMMEN +” toets (9) om de minuteninstelling te wijzigen. 3. Druk de “WEKKER 1/VOL –” toets (4) om de keuze te bevestigen. 4. Druk om de wektijd te annuleren bij weergave van de huidige tijd drie keer op de “WEKKER 1/VOL –” toets (4). De indicatielampjes voor het wekken zijn uit. 5. Druk als de wekker klinkt op een willekeurige toets om de wekker uit te zetten, of druk de “SLUIMER-/SLAAP-/DIM”-toets (1) om hem in de sluimerstand te zetten. Tijdens de sluimerperiode knippert of . De wekker gaat na 5 minuten weer af. De zoemer breekt het geluid van de radio niet af. Als de wekker met radio wordt gebruikt, is de volumeregeling van de radio niet beschikbaar. 6. Volg dezelfde aanwijzingen voor wektijd 2, maar gebruik hiervoor de “WEKKER 2/VOL +” toets (8). Opmerking: De aanpassingen aan de tijd en de wektijd moeten worden gemaakt terwijl het scherm knippert. Als er geen aanpassingen worden gemaakt, stopt het knipperen van het scherm na ongeveer 10 seconden. Als de twee wektijden op vrijwel dezelfde tijd zijn ingesteld, bijvoorbeeld wektijd 1 is ingesteld op de zoemer en wektijd 2 is ingesteld op de radio, waarbij de zoemer door wektijd 1 en de radio door wektijd 2 wordt geactiveerd, stopt het eerste alarm niet automatisch, dus klinken zowel de zoemer als de radio gelijktijdig. RADIO Algemene Bediening 1. Druk op de “AAN/UIT/DUTJE”-toets (2) om de radio in of uit te schakelen. 2. Druk voor handmatig afstemmen op de “UREN/AFSTEMMEN –” toets (5) of de “MIN/AFSTEMMEN +” toets (9) voor stappen van 0,1 MHz. 3. Houd voor automatisch afstemmen de “UREN/AFSTEMMEN –” toets (5) of de “MIN/AFSTEMMEN +” toets (9) gedurende ongeveer 3 seconden ingedrukt. Laat de toets los en de radio begint naar het volgende beschikbare station te zoeken. 4. Druk de “WEKKER 1/VOL –” toets (4) of de “WEKKER 2/VOL +” toets (8) om het volume aan te passen. Tijdens het regelen van het volume geeft het scherm de aanduiding voor het volume (00 tot 14) weer, wijzigt dan weer naar de frequentie van het radiostation en dan weer naar de huidige tijd. 5. Druk op de “UREN/AFSTEMMEN –” toets (5) of de “MIN/AFSTEMMEN +” toets (9) om de frequentie van het radiostation weer te geven. Geheugen voorkeuzestations 1. De radio kan maximaal 20 FM-stations opslaan. 2. Stem om een station in het geheugen op te slaan eerst af op het gewenste radiostation. Houd de “TIJD/VOORKEUZE”-toets (6) gedurende ongeveer 3 seconden ingedrukt totdat “P01” op het scherm knippert. Druk de “P+” toets (7) of de “P-” toets (3) totdat het gewenste geheugen voor het station (P01 tot P20) wordt weergegeven. Druk eenmaal de “TIJD/VOORKEUZE”-toets (6) om de keuze te bevestigen. 3. Herhaal bovenstaande stappen voor maximaal 20 stations. 4. Druk om het station op te roepen de “P+” toets (7) of de “P-” toets (3) totdat het gewenste station is bereikt. Slaapstand 1. Druk als de radio aan is op de “SLUIMER-/SLAAP-/DIM”-toets (1) om hem in de slaapstand te zetten. Er wordt “OFF” (UIT) weergegeven. Druk herhaaldelijk de “SLUIMER-/SLAAP-/DIM”-toets (1) om de duur van de “SLAAP”-tijd in te stellen. Het bereik voor de “SLAAP”-tijd is van 90 minuten tot 10 minuten, zoals op het scherm wordt weergegeven. DUTJE Stel de gewenste tijd voor het DUTJE in en na de vooraf ingestelde tijd wordt de radio automatisch ingeschakeld. 1. Houd als de radio uit is de “AAN/UIT/DUTJE”-toets (2) gedurende ongeveer 4 seconden ingedrukt totdat het scherm en de het FM-indicatielampje beginnen 2. 3. te knipperen. Druk de “P+” toets (7) of de “P-” toets (3) om de gewenste tijd voor het dutje in te stellen (45, 60, 90 of 120 minuten) Druk de “AAN/UIT/DUTJE”-toets (2) om de keuze te bevestigen. DIMMER Druk als de radio uit is en de huidige tijd wordt weergegeven op de “SLUIMER-/SLAAP-/DIM”-toets (1) om de helderheid van het scherm op hoog of laag in te stellen. Service en ondersteuning Voor informatie: http://www.ices-electronics.com/ ICES biedt service en garantie aan overeenkomstig met de Europese wetgeving. Dit houdt in dat in het geval van reparaties (zowel tijdens en na de garantieperiode), u uw lokale handelaar moet contacteren. Opmerking: Het is niet mogelijk om producten voor reparatie direct naar ICES te sturen. Belangrijke opmerking: Als het apparaat wordt geopend, of er wordt toegang to verkregen door een onbevoegd servicecentrum, dan vervalt de garantie onmiddellijk. Producten met een CE keurmerk houden zich aan de EMC richtlijn (2004/108/EC) en de Richtlijn voor Lage Voltage (2006/95/EC) uitgegeven door de Europese Commissie. De verklaring van overeenstemming kan worden geraadpleegd op www.ices-electronics.com Dit symbool geeft aan dat het betreffende elektrische product of de batterij niet moet worden verwijderd als algemeen huishoudelijk afval in Europa. Zorg voor een juiste afvalverwerking door het product en de batterij in overeenstemming met alle van toepassing zijnde lokale wetten voor het verwijderen van elektrische apparatuur of batterijen te verwijderen. Als u dit doet, helpt u de natuurlijke hulpbronnen te behouden en de standaard van milieubescherming te verbeteren bij de behandeling en verwijdering van elektrisch afval (Afgedankte Elektrische en Elektronische Apparatuur). ®Alle rechten voorbehouden Modell: ICR-240 BEDIENUNGSANLEITUNG www.ices-electronics.com LESEN SIE DIESE BEDIENUNGSANLEITUNG VOR DER BENUTZUNG DES GERÄTES GRÜNDLICH DURCH. UND BEWAHREN SIE SIE FÜR ZUKÜNFTIGE REFERENZ AUF. Ansicht von oben Rückansicht Vorderansicht BEDIENELEMENTE UND ANZEIGEN 1. „SCHLUMMER/SCHLAF/DIMMEN“-Taste 2. „EIN/AUS/KURZSCHLAF“-Taste 3. „P–“-Taste 4. „ALARM 1/LAUTST. –“ Taste 5. „STUNDE/ABSTIMMUNG –“-Taste 6. „ZEIT/SCHNELLWAHL“-Taste 7. „P+“-Taste 8. „ALARM 2/LAUTST. +“ Taste 9. „MIN/ABSTIMMUNG +“-Taste 10. Batteriefach 11. UKW-Antenne 12. Netzstecker A. Anzeige der Uhrzeit und der Radiofrequenz B. C. D. E. F. Summer Alarm 2 Radioanzeige Alarm 2 FM Summer Alarm 1 Radioanzeige Alarm 1 VORBEREITUNG FÜ R DIE ANWENDUNG Dieser Radiowecker umfasst ein Batterie-Sicherungssystem, das während eines vorübergehenden Stromausfalls die Uhrzeit und die Alarmeinstellungen beibehält. Legen Sie zwei „AAA“-Batterien unter Berücksichtigung der korrekten Polaritätsmarkierungen (+/-) in das Batteriefach (10) ein. Wenn bei eingelegten Batterien ein Stromausfall eintritt, wird die Anzeige ausgeschaltet, doch die Uhrzeit läuft weiter und die Alarmeinstellungen werden beibehalten. Ersetzen Sie bei einem Batteriewechsel alle Batterien gleichzeitig durch neue Batterien. Der Radiowecker hat rutschfeste Silikonfüße. Stellen Sie den Radiowecker nur auf geschützten Möbeln auf. Stecken Sie den Netzstecker (12) in eine 230VAC Steckdose. Wickeln Sie die FM-Antenne (11) auf der Rückseite des Radioweckers ab. Strecken Sie die Antenne aus und positionieren Sie sie für den besten Radioempfang. ALARMBETRIEB EINSTELLEN DER UHRZEIT Hinweis: Funktionen können nicht eingerichtet werden, wenn die Anzeige nach dem Einstecken des Steckers blinkt. Drücken Sie die Taste „ZEIT/SCHNELLWAHL“, um das Blinken auszuschalten und mit den Einstellungen zu beginnen. Die Uhrzeit kann nur eingestellt werden, wenn das Radio ausgeschaltet ist. Drücken Sie die Taste „EIN/AUS/KURZSCHLAF“ (2), um das Radio ein- oder auszuschalten. Wenn die Uhranzeige blinkt, können Sie das Radio nicht über die Taste „EIN/AUS/KURZSCHLAF“(2) einschalten. 1. Halten Sie die Taste „ZEIT/SCHNELLWAHL“ (6) ca. 3 Sekunden lang gedrückt, bis die Anzeige blinkt. 2. Drücken Sie wiederholt die Taste „STUNDE/ABSTIMMUNG–“ (5), um die Stunden-Einstellung zu ändern. 3. Drücken Sie wiederholt die Taste „MIN/ABSTIMMUNG+“ (9), um die Minuten-Einstellung zu ändern. 4. Drücken Sie zur Bestätigung der Zeit die Taste „ZEIT/SCHNELLWAHL“ (6) und die Anzeige hört auf zu blinken. EINSTELLEN DER ALARMZEIT Der Radiowecker verfügt über Dual-Alarme, die unabhängig voneinander eingestellt werden können. Das Verfahren zur Einstellung beider Alarmzeiten ist das gleiche. Beide Alarme können eingestellt werden, um entweder mit einem Summer oder mit dem Radio zu wecken. Hinweis: Die Alarmzeit kann nur eingestellt werden, wenn das Radio ausgeschaltet ist. Drücken Sie die Taste „EIN/AUS/KURZSCHLAF“ (2), um das Radio ein- oder auszuschalten. 1. Zur Einstellung der Alarmzeit 1 mit Summer, drücken Sie die Taste „ALARM 1/LAUTST. –“ (4) und die Anzeige (E) blinkt. Zur Einstellung der Alarmzeit 1 mit Radio, drücken Sie die Taste „ALARM 1/LAUTST. –“ (4) zweimal und die Anzeige (F) blinkt. 2. Wenn die Ziffern blinken, drücken Sie wiederholt die Taste „STUNDE/ABSTIMMUNG–“ (5), um die Stunden-Einstellung zu ändern. Drücken Sie wiederholt die Taste „MIN/ABSTIMMUNG+“ (9), um die Minuten-Einstellung zu ändern. 3. Drücken Sie zur Bestätigung die Taste „ALARM 1/LAUTST. –“ (4). 4. Um den Alarm abzubrechen, drücken Sie die Taste „ALARM 1/LAUTST. –“ (4) dreimal, wenn die aktuelle Uhrzeit angezeigt wird. Die Alarmanzeigen werden ausgeschaltet. 5. Wenn der Alarm ertönt, drücken Sie eine beliebige Taste zum Ausschalten des Alarms oder drücken Sie die Taste „SCHLUMMER/SCHLAF/DIMMEN“ (1), um den Schlummermodus einzuschalten. oder blinkt während des Schlummermodus. Der Alarm ertönt erneut nach 5 Minuten. Der Alarmsummer schaltet das Radio nicht ab. Wenn die Weckfunktion per Radio ausgewählt ist, steht die Lautstärkeregelung für das Radio nicht zur Verfügung. 6. Folgen Sie für Alarm 2 den gleichen Schritten wie zuvor, jedoch mit der Taste „ALARM 2/LAUTST. +“ (8). Hinweis: Die Einstellungen für die Uhrzeit und die Alarme müssen vorgenommen werden, während die Anzeige blinkt. Die Anzeige hört nach ca. 10 Sekunden auf zu blinken, wenn keine Änderungen oder Einstellungen vorgenommen werden. Wenn zwei Alarme gleichzeitig eingerichtet werden, zum Beispiel Alarm 1 auf Summeralarm und Alarm 2 auf Radioalarm, wird, wenn der Summer durch Alarm 1 aktiviert ist und das Radio durch Alarm 2, der vorherige Alarm nicht automatisch gestoppt und hat sowohl Summer als auch Radio gleichzeitig. RADIO Allgemeine Bedienung 1. Drücken Sie die Taste „EIN/AUS/KURZSCHLAF“ (2), um das Radio ein- oder auszuschalten. 2. Für die manuelle Abstimmung, drücken Sie die Taste „STUNDE/ABSTIMMUNG – “ (5) oder die Taste „MIN/ABSTIMMUNG +“ (9) für 0,1 mHz Schritte. 3. Für die automatische Abstimmung, halten Sie die Taste „STUNDE/ABSTIMMUNG –“ (5) oder die Taste „MIN/ABSTIMMUNG +“ (9) ca. 3 Sekunden lang gedrückt. Drücken Sie die Taste und das Radio beginnt, nach dem nächsten verfügbaren Sender zu suchen. 4. Zur Anpassung der Lautstärke drücken Sie die Taste „ALARM 1/LAUTST. –“ (4) oder „ALARM 2/LAUTST. +“ (8). Während der Lautstärkeanpassung wechselt die Anzeige auf die Lautstärkeanzeige (00 bis 14), wechselt dann zurück auf die Radiosenderfrequenz und dann zur aktuellen Uhrzeit. 5. Zur Anzeige der Radiosenderfrequenz drücken Sie die Taste „STUNDE/ABSTIMMUNG –“ (5) oder „MIN/ABSTIMMUNG +“ (9). Speicher für voreingestellte Sender 1. Das Radio kann bis zu 20 FM-Sender speichern. 2. Um einen Sender zu speichern, stellen Sie den gewünschten Radiosender ein. Halten Sie die Taste „ZEIT/SCHNELLWAHL“ (6) ca. 3 Sekunden lang gedrückt, bis „P01“ auf der Anzeige blinkt. Drücken Sie die Taste „P+“ (7) oder „P –“ (3), bis die gewünschte Sender-Schnellwahltaste (P01 bis P20) erreicht ist. Drücken Sie zur Bestätigung die Taste „ZEIT/SCHNELLWAHL“ (6). 3. Wiederholen Sie diese Schritte für bis zu 20 Sender. 4. Zum Aufrufen eines Senders drücken Sie die Taste „P+“ (7) oder „P –“ (3), bis der gewünschte Sender erreicht ist. Schlafmodus 1. Wenn das Radio eingeschaltet ist, drücken Sie die Taste „SCHLUMMER/SCHLAF/DIMMEN“ (1), um den Schlafmodus aufzurufen. Es wird „OFF (AUS)“ angezeigt. Drücken Sie wiederholt die Taste „SCHLUMMER/SCHLAF/DIMMEN“ (1) um die Dauer der „SCHLAF“-Zeit einzustellen. Die „SCHLAF“-Zeit kann für 90 bis 10 Minuten eingestellt werden und wird auf der Anzeige angezeigt. KURZSCHLAF Stellen Sie die gewünschte KURZSCHLAF-Zeit ein und das Radio schaltet sich automatisch nach der voreingestellten Zeit ein. 1. Wenn das Radio ausgeschaltet ist, halten Sie die Taste „EIN/AUS/KURZSCHLAF“ (2) ca. 4 Sekunden lang gedrückt und die Anzeige und die FM-Anzeige (D) blinken. 2. Drücken Sie die Taste „P+“ (7) oder „P –“ (3), um die gewünschte Kurzschlafzeit (45, 60, 90 oder 120 Minuten) einzustellen. 3. Drücken Sie zur Bestätigung die Taste „EIN/AUS/KURZSCHLAF“ (2). Helligkeitsregler (Dimmer) Wenn das Radio ausgeschaltet ist und die aktuelle Uhrzeit angezeigt wird, drücken Sie die Taste „SCHLUMMER/SCHLAF/DIMMEN“ (1) zur Auswahl der Helligkeit der Anzeige (hoch oder niedrig). Service und Unterstützung Weitere Informationen: http://www.ices-electronics.com/ ICES bietet Leistungen und Garantien im Einklang mit Europäischem Recht. Im Falle von Reparaturen (sowohl während als auch nach Ablauf der Garantiezeit) sollten Sie deshalb Ihren Händler vor Ort kontaktieren. Bitte beachten Sie: Es besteht keine Möglichkeit, Produkte zur Reparatur direkt an ICES zu senden. Wichtiger Hinweis: Im Falle des Ö ffnens oder jeglichen anderweitigen Eingriff durch ein unautorisiertes Servicecenter erlischt jeglicher Garantieanspruch. Produkte mit der CE Kennzeichnung entsprechen der EMC-Richtlinie (2004/108/EC) und der Niederspannungsrichtlinie (2006/95/EC), herausgegeben von der Kommission der Europäischen Gemeinschaft. Die Konformitätserklärung kann unter folgendem Link abgerufen werden: www.ices-electronics.com Dieses Symbol zeigt an, dass das entsprechende Produkt oder dessen Batterie in Europa nicht mit dem normalen Hausmüll entsorgt werden darf. Um die ordnungsgemäße Abfallbehandlung des Produkts und dessen Batterie zu gewährleisten, müssen diese im Einklang mit allen anwendbaren örtlichen Vorschriften zur Entsorgung von Elektrogeräten und Batterien entsorgt werden. Dabei helfen Sie natürliche Ressourcen zu schonen und Umweltschutzstandards zur Verwertung und Entsorgung von Altgeräten aufrechtzuerhalten (Waste Electrical and Electronic Equipment Directive). ®Alle Rechte vorbehalten Modèle : ICR-240 MODE D’EMPLOI www.ices-electronics.com LISEZ CE MODE D’EMPLOI AVANT D’UTILISER L’APPAREIL. CONSERVEZ-LE POUR LE CONSULTER ULTÉRIEUREMENT. Vue du dessus Vue arrière Vue avant COMMANDES ET INDICATEURS 1. Bouton « RAPPEL D’ALARME/MISE EN VEILLE/VARIATEUR » 2. Bouton « MARCHE/ARRÊT/SIESTE » 3. Bouton « P - » 4. Bouton « ALARME 1/VOL - » 5. Bouton « HEURES/RÉGLAGE - » 6. Bouton « HEURE/PRÉSÉL. » 7. Bouton « P + » 8. Bouton « ALARME 2/VOL + » 9. Bouton « MINUTES/RÉGLAGE + » 10. Compartiment à piles 11. Antenne FM 12. Prise secteur A. Affichage de l’heure et de la fréquence radio B. C. D. E. F. Avertisseur sonore de l’alarme 2 Indicateur de radio de l’alarme 2 FM Avertisseur sonore de l’alarme 1 Indicateur de radio de l’alarme 1 PRÉPARATION AVANT UTILISATION Ce radio-réveil inclut une pile de secours qui maintiendra les réglages d’horloge et d’alarme lors d’une coupure de courant. Installez correctement deux piles de type « AAA » en respectant les polarités (+/-) indiquées à l’intérieur du compartiment à piles (10). En cas de coupure de courant avec les piles installées, l’afficheur s’éteindra mais l’horloge continuera de fonctionner et gardera vos réglages d’alarme. Remplacez toujours toutes les piles en même temps par des neuves. Ce radio-réveil est muni de pieds en silicone antidérapant. Posez le radio-réveil uniquement sur un meuble protégé. Branchez la fiche secteur (12) dans une prise électrique de 230 V CA. Déployez l’antenne FM (11) à l’arrière du radio-réveil. Déployez et déplacez l’antenne pour améliorer la réception radio. UTILISATION DE L’HORLOGE D’ALARME RÉGLAGE DE L’HEURE Remarque : Vous ne pouvez régler aucune fonction lorsque l’affichage de l’horloge clignote après branchement à l’alimentation électrique. Appuyez sur « HEURE/PRÉSÉL. » pour que l’heure cesse de clignoter et pour commencer le réglage. Vous ne pouvez régler l’heure que quand la radio est désactivée. Appuyez sur le bouton « MARCHE/ARRÊT/SIESTE » (2) pour activer ou désactiver la radio. Lorsque l’heure clignote sur l’afficheur, vous ne pouvez pas activer la radio avec le bouton « MARCHE/ARRÊT/SIESTE » (2). 1. Maintenez enfoncé le bouton « HEURE/PRÉSÉL. » (6) pendant environ 3 secondes jusqu’à ce que l’affichage clignote. 2. Appuyez plusieurs fois sur le bouton « HEURES/RÉGLAGE - » (5) pour changer le réglage des heures. 3. Appuyez plusieurs fois sur le bouton « MINUTES/RÉGLAGE + » (9) pour changer le réglage des minutes. 4. Appuyez sur le bouton « HEURE/PRÉSÉL. » (6) pour confirmer l’heure et l’horloge cessera de clignoter. RÉGLAGE DE L’HEURE DE L’ALARME Ce radio-réveil permet de régler deux alarmes utilisables indépendamment. La procédure est identique pour régler les deux alarmes. Les deux alarmes peuvent déclencher l’avertisseur sonore ou la radio. Remarque : Vous ne pouvez régler l’heure d’alarme que quand la radio est désactivée. Appuyez sur le bouton « MARCHE/ARRÊT/SIESTE » (2) pour activer ou désactiver la radio. 1. Pour régler l’heure de l’alarme 1 avec avertisseur sonore, appuyez sur le bouton « ALARME 1/VOL - » (4) et l’indicateur (E) clignotera. Pour régler l’heure de l’alarme 1 avec la radio, appuyez deux fois sur le bouton « ALARME 1/VOL - » (4) et l’indicateur (F) clignotera. 2. Lorsque les chiffres clignotent, appuyez plusieurs fois sur le bouton « HEURES/RÉGLAGE - » (5) pour changer le réglage des heures. Appuyez plusieurs fois sur le bouton « MINUTES/RÉGLAGE + » (9) pour changer le réglage des minutes. 3. Appuyez sur le bouton « ALARME 1/VOL - » (4) pour confirmer. 4. Pour annuler l’alarme, appuyez trois fois sur le bouton « ALARME 1/VOL - » (4) lorsque l’heure s’affiche. Les indicateurs d’alarme s’éteindront. 5. Lorsque l’alarme sonne, appuyez sur n’importe quel bouton pour éteindre l’alarme ou appuyez sur le bouton « RAPPEL D’ALARME/MISE EN VEILLE/VARIATEUR » (1) pour passer au mode de rappel d’alarme. ou clignotera en mode de rappel d’alarme. L’alarme se déclenchera à nouveau 5 minutes plus tard. L’avertisseur sonore d’alarme ne coupe pas le son de la radio. Si l’alarme est réglée avec la radio, alors le réglage du volume pour la radio n’est pas disponible. 6. Suivez les mêmes instructions pour l’alarme 2 avec le bouton « ALARME 2/VOL + » (8). Remarque : Vous devez effectuer le réglage de l’heure et de l’alarme lorsque l’affichage clignote. L’affichage cessera de clignoter au bout d’environ 10 secondes si ces réglages ne sont pas faits. Si les deux alarmes sont réglées ensemble, par exemple alarme 1 réglée sur avertisseur sonore et alarme 2 réglée sur radio, alors l’avertisseur sonore est activé par l’alarme 1 et la radio est activé par l’alarme 2, l’alarme précédente ne s’arrête pas automatiquement et déclenche l’avertisseur sonore et la radio ensemble. RADIO Fonctionnement Général 1. Appuyez sur le bouton « MARCHE/ARRÊT/SIESTE » (2) pour activer et désactiver la radio. 2. Pour un réglage manuel, appuyez sur le bouton « HEURES/RÉGLAGE - » (5) ou « MINUTES/RÉGLAGE + » (9) pour changer la fréquence par paliers de 0,1 MHz. 3. Pour un réglage automatique, maintenez enfoncé le bouton « HEURES/RÉGLAGE - » (5) ou « MINUTES/RÉGLAGE + » (9) pendant environ 3 secondes. Relâchez le bouton et la radio commencera à rechercher la prochaine station disponible. 4. Appuyez sur le bouton « ALARME 1/VOL - » (4) ou « ALARME 2/VOL + » (8) pour régler le niveau du volume. L’affichage change pour indiquer le niveau du volume (de 00 à 14) lors du réglage du volume, puis affiche à nouveau la fréquence de la station de radio et l’heure actuelle. 5. Appuyez sur le bouton « HEURES/RÉGLAGE - » (5) ou « MINUTES/RÉGLAGE + » (9) pour afficher la fréquence de la station de radio. Stations mémorisées 1. La radio peut mémoriser au maximum de 20 stations FM. 2. Pour enregistrer une station dans un emplacement de mémoire, réglez la fréquence sur la station de radio voulue. Maintenez enfoncé le bouton « HEURE/PRÉSÉL. » (6) pendant environ 3 secondes et « P01 » clignote sur l’affichage. Appuyez sur le bouton « P+ » (7) ou « P- » (3) jusqu’à atteindre l’emplacement de mémoire voulu (P01 à P20). Appuyez une fois sur le bouton « HEURE/PRÉSÉL. » (6) pour confirmer. 3. Recommencez la procédure ci-dessus si vous souhaitez enregistrer d’autres stations (20 au maximum). 4. Pour charger une station, appuyez sur le bouton « P+ » (7) ou « P- » (3) jusqu’à atteindre la station de radio voulue. Mode veille 1. Lorsque la radio est activée, appuyez sur le bouton « RAPPEL D’ALARME/MISE EN VEILLE/VARIATEUR » (1) pour passer en mode veille. « OFF » (ARRÊT) s’affichera. Appuyez plusieurs fois sur le bouton « RAPPEL D’ALARME/MISE EN VEILLE/VARIATEUR » (1) pendant la durée du temps de « VEILLE ». La plage de temps de « VEILLE » va de 90 minutes à 10 minutes, comme affiché sur l’afficheur. SIESTE Réglez l’heure de SIESTE et la radio s’activera automatiquement après la durée préréglée. 1. 2. 3. Lorsque la radio est désactivée, maintenez enfoncé le bouton « MARCHE/ARRÊT/SIESTE » (2) pendant environ 4 secondes et l’affichage et l’indicateur FM (D) clignoteront. Appuyez sur le bouton « P+ » (7) ou « P- » (3) jusqu’à atteindre la durée de sieste voulue (45, 60, 90 ou 120 minutes). Appuyez sur le bouton « MARCHE/ARRÊT/SIESTE » (2) pour confirmer. VARIATEUR Lorsque la radio est désactivée et l’heure actuelle s’affiche, appuyez sur le bouton « RAPPEL D’ALARME/MISE EN VEILLE/VARIATEUR » (1) pour augmenter ou diminuer la luminosité de l’afficheur. Service et assistance Pour obtenir des informations : http://www.ices-electronics.com/ ICES propose un service et une garantie conformément aux lois européenne, ce qui signifie qu’en cas de besoin de réparation (aussi bien pendant et après la période de garantie), vous pouvez contacter votre revendeur le plus proche. Veuillez noter : Il n’est pas possible d’envoyer des produits directement à ICES pour réparation. Remarque importante : Si cet appareil est ouvert ou démonté de quelque manière que ce soit par un réparateur non agréé, la garantie sera caduque immédiatement. Les produits avec la marque CE sont conformes à la directive CEM (2004/108/CE) et à la directive basse tension (2006/95/CE) émises par la commission de la communauté européenne. La déclaration de conformité peut être consultée via le lien suivant www.ices-electronics.com Ce symbole indique que le produit électrique concerné ou la batterie ne doivent pas être jetés parmi les autres déchets ménagers en Europe. Pour garantir un traitement correct du déchet de la batterie ou de l'appareil, veuillez les mettre au rebut conformément aux règlements locaux en vigueur relatifs aux appareils électriques et autres batteries. En agissant de la sorte, vous contribuerez à la préservation des ressources naturelles et à l'amélioration des niveaux de protection environnementale concernant le traitement et la destruction des déchets électriques (Directive sur les déchets des équipements électriques et électroniques). ®Tous droits réservés Modelo: ICR-240 MANUAL DE INSTRUCCIONES www.ices-electronics.com LEA ESTE MANUAL DE INSTRUCCIONES ANTES DE USAR EL APARATO.Y CONSÉRVELO PARA FUTURAS CONSULTAS Vista superior Vista posterior Vista frontal CONTROLES E INDICADORES 1. Botón “APLAZAR ALARMA/TEMPORIZADOR/ATENUAR” 2. Botón “ENCENDIDO/APAGADO/SIESTA” 3. Botón “P–” 4. Botón “ALARMA 1/VOLUMEN –” 5. Botón “HORAS/SINTONIZACIÓN –” 6. Botón “HORA/PRESINTONÍA” 7. Botón “P+” 8. Botón “ALARMA 2/VOLUMEN +” 9. Botón “MINUTOS/SINTONIZACIÓN +” 10. Compartimento Para las pilas 11. Antena FM 12. Enchufe CA A. Presentación de la hora y frecuencia de radio B. C. D. E. F. Timbre de alarma 2 Indicador de radio de la alarma 2 FM Timbre de alarma 1 Indicador de radio de la alarma 1 PREPARACIÓ N PARA EL USO Este radio-reloj incluye un sistema de batería de respaldo que conservará los ajustes de la hora y la alarma durante un corte temporal de la energía. Inserte dos pilas de tipo “AAA” en la posición correcta según los símbolos de polaridad (+) y (-) en el compartimento de las pilas. Si ocurre un fallo en la red eléctrica estando las pilas instaladas, la pantalla se apagará, pero el reloj seguirá funcionando y conservará sus ajustes de la alarma. Por favor, cambie todas las pilas al mismo tiempo. El reloj dispone de patas de silicona antideslizantes. Coloque el radio-reloj sólo sobre muebles protegidos. Conecte el enchufe de CA (12) a una toma de corriente de 230 V CA Desenrolle la antena FM (11) de la parte posterior del radio-reloj. Extienda la antena y colóquela en la posición que obtenga la mejor recepción. USO DEL DESPERTADOR AJUSTAR LA HORA Nota: No es posible ajustar ninguna función mientras la pantalla del reloj esté parpadeando tras encenderlo. Pulse el botón “HORA/PRESINTONÍA” para que deje de parpadear y comenzar el ajuste. La hora sólo puede ajustarse con la radio apagada. Pulse el botón “ENCENDIDO/APAGADO/SIESTA”(2) para encender y apagar la radio. Cuando la pantalla del reloj esté parpadeando, no podrá encender la radio con el botón “ENCENDIDO/APAGADO/SIESTA”(2). 1. Mantenga pulsado el botón “HORA/PRESINTONÍA” (6) durante unos 3 segundos hasta que la pantalla parpadee. 2. Pulse el botón “HORAS/SINTONIZACIÓN -” (5) repetidamente para cambiar las horas. 3. Pulse el botón “MINUTOS/SINTONIZACIÓN +” (9) repetidamente para cambiar los minutos. 4. Pulse el botón “HORA/PRESINTONÍA” (6) para confirmar la hora y la pantalla dejará de parpadear. AJUSTAR LA HORA DE LA ALARMA Este radio-reloj tiene dos alarmas que se pueden ajustar y utilizar por separado. El procedimiento para ajustar ambas alarmas es el mismo. Las dos alarmas pueden hacer sonar el timbre o la radio. Nota: La hora de la alarma sólo puede ajustarse con la radio apagada. Pulse el botón “ENCENDIDO/APAGADO/SIESTA”(2) para encender y apagar la radio. 1. Para ajustar la hora de la alarma 1 con el timbre, pulse el botón “ALARMA1/VOLUMEN-” (4) y el indicador (E) parpadeará. Para ajustar la hora de la alarma 1 con la radio, pulse dos veces el botón “ALARMA1/VOLUMEN-” (4) y el indicador (F) parpadeará. 2. Cuando los dígitos estén parpadeando, pulse el botón “HORAS/SINTONIZACIÓN -” (5) repetidamente para cambiar la hora. Pulse el botón “MINUTOS/SINTONIZACIÓN +” (9) repetidamente para cambiar los minutos. 3. Pulse el botón “ALARMA 1/VOLUMEN –” (4) para confirmar. 4. Para cancelar la alarma, pulse tres veces el botón ALARMA 1/VOLUMEN –” (4) cuando se visualice la hora actual. Los indicadores de la alarma desaparecerán. 5. Cuando suene la alarma, pulse cualquier botón para apagarla o pulse el botón “APLAZAR ALARMA/TEMPORIZADOR/ATENUAR” (1) para activar el modo de aplazamiento de la alarma (snooze). o parpadeará durante el modo de aplazamiento de la alarma. La alarma volverá a sonar transcurridos 5 minutos. El timbre de la alarma no interrumpe el sonido de la radio. Si la alarma hace sonar la radio, el control de volumen de la radio no estará disponible. 6. Siga la mismas instrucciones para la alarma 2, pero con el botón “ALARMA 2/VOLUMEN+”(8). Nota: Debe realizar los ajustes de la hora y de la alarma con la pantalla parpadeando. La pantalla dejará de parpadear tras unos 10 segundos si no se realiza ningún ajuste. Si las dos alarmas están configuradas a la misma hora, por ejemplo la alarma 1 con el timbre y la alarma 2 con la radio, cuando la alarma 1 active el timbre y la alarma 2 active la radio, la alarma anterior no se detendrá automáticamente y ambas sonarán al mismo tiempo. RADIO Funcionamiento general 1. Pulse el botón “ENCENDIDO/APAGADO/SIESTA” (2) para encender y apagar la radio. 2. Para la sintonización manual, pulse el botón “HORAS/SINTONIZACIÓN –”(5) o el botón “MINUTOS/SINTONIZACIÓN +” (9) para cambiar la frecuencia en incrementos de 0,1mHz. 3. Para la sintonización automática, mantenga pulsado el botón “HORAS/SINTONIZACIÓN –”(5) o el botón “MINUTOS/SINTONIZACIÓN +” (9) durante unos 3 segundos. Suelte el botón y la radio comenzará a buscar la siguiente emisora disponible. 4. Pulse el botón “ALARMA 1/VOLUMEN – ” (4) o el botón ALARMA 2/VOLUMEN” (8) para ajustar el nivel de volumen. La pantalla cambia para mostrar la indicación del nivel de volumen (de 00 a 14) durante el ajuste del volumen y después volverá a mostrar la frecuencia de la emisora de radio y la hora actual. 5. Pulse el botón “HORAS/SINTONIZACIÓN –” (5) o “MINUTOS/SINTONIZACIÓN –” (9) para visualizar la frecuencia de la emisora de radio. Memorizar presintonías 1. La radio puede almacenar hasta 20 emisoras de FM. 2. Para almacenar una emisora en la memoria, sintonice la emisora de radio deseada. Mantenga pulsado el botón “HORA/PRESINTONÍA” (6) durante unos 3 segundos y en la pantalla parpadeará “P01”. Pulse el botón “P+” (7) o “P-” (3) para seleccionar el número de presintonía deseado (de P01 a P20). Pulse el botón “HORA/PRESINTONÍA” (6) para confirmar. 3. Repita los pasos anteriores para presintonizar hasta 20 emisoras. 4. Para escuchar la emisora, pulse el botón “P+” (7) o “P-” (3) hasta llegar a la emisora deseada. Modo de temporizador 1. Cuando esté escuchando la radio, pulse el botón “APLAZAR ALARMA/TEMPORIZADOR/ATENUAR” (1) para entrar en el modo de temporizador. En la pantalla aparecerá “OFF”(APAGADO). Pulse el botón “APLAZAR ALARMA/TEMPORIZADOR/ATENUAR” (1) repetidamente para seleccionar el tiempo del “TEMPORIZADOR DE APAGADO”. El rango del tiempo del “TEMPORIZADOR” es de 90 a 10 minutos, como va apareciendo en la pantalla. SIESTA Establezca el tiempo de SIESTA deseado y la radio se encenderá automáticamente tras el período establecido. 1. Cuando la radio esté apagada, mantenga pulsado el botón “ENCENDIDO/APAGADO/SIESTA” (2) durante unos 4 segundos y la pantalla y el indicador FM (D) parpadearán. 2. Pulse el botón “P+” (7) o “P-” (3) para establecer la duración de siesta deseada (45, 60, 90 o 120 minutos). 3. Pulse el botón “ENCENDIDO/APAGADO/SIESTA” (2) para confirmar. Atenuador Cuando la radio esté apagada y se visualice la hora actual, pulse el botón “APLAZAR ALARMA/TEMPORIZADOR/ATENUAR” (1) para seleccionar el brillo de la pantalla entre alto y bajo. Servicio y asistencia Para más información: http://www.ices-electronics.com/ ICES ofrece servicio y garantía en cumplimiento de la ley de la Unión Europea, lo cual implica que, en caso de que su producto precise ser reparado (tanto durante como después del periodo de garantía), deberá contactar directamente con su distribuidor. Tenga en cuenta: No es posible enviar los productos directamente a ICES para su reparación. Nota importante: La garantía dejará inmediatamente de tener efecto en el caso de que esta unidad sea abierta o reparada por un centro de servicios de reparaciones no autorizado. Los productos con la marca CE cumplen con la Directiva EMC (2004/108/EC) y con la Directiva de Bajas Tensiones (2006/95/EC) emitida por la Comisión de la Unión Europea. La declaración de conformidad puede ser consultada enwww.ices-electronics.com Este símbolo indica que no deberá deshacerse del producto eléctrico o batería en cuestión junto con los residuos domésticos, en el ámbito de la UE. Para garantizar un tratamiento residual correcto del producto y su batería, por favor, elimínelos cumpliendo con las leyes locales aplicables sobre requisitos para el desechado de equipos eléctricos y baterías. De hacerlo, ayudará a conservar recursos naturales y mejorar los estándares de protección medioambiental en el tratamiento y eliminación de residuos eléctricos (Directiva sobre la Eliminación de Equipos Eléctricos y Electrónicos). ®Reservados todos los derechos