1
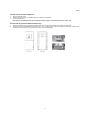
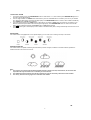
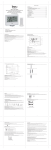
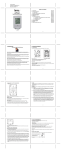
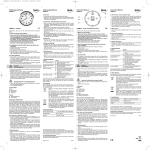
(ENG)
EBR505
INSTRUCTION MANUAL
FUNCTIONS OF THE WEATHER STATION
This weather station measures the environment of its surrounding area and may receive the measured temperature and relative
humidity of up to three (868MHz) remote thermo/hygrometers. The information is displayed by LCD.
FEATURES
•
Weather forecast based on barometric pressure changes
•
Radio controlled t im e (DCF77)
•
Displays indoor/outdoor minimum and maximum temperature/humidity
•
Low battery indication for main unit and wireless sensors
•
Two Daily alarms (wake-up alarm) with SNOOZE function
•
1 2 or 24 h our tim e form a t
•
Moo n P h a s e
•
L C D Back li g ht
•
Wall mount or free standing
-1-
(ENG)
DISPLAY AND FUNCTIONS ON THE MAIN UNIT
A. Air pressure trend arrows
Indicates the trend of air pressure changes.
B. Low battery indicator of outdoor sensor
Appears when the batteries of the remote sensor are running dry and the temperature measured by this sensor is no longer
reliable. The user must change the batteries at once.
C. Weather forecast window
Shows weather forecast by using icons.
D. Moon phase
Shows current moon phase.
E. Outdoor remote sensor indicator
Indicates the current outdoor remote sensor signal received. It can display up to 3 different remote sensors which are placed in
3 different places and within 75 meter distance from the main unit.
Note: Many factors may affect the actual distance (walls, metal parts, electrical appliances, etc.).
F. Auto scroll indicator
The rotating arrow icon is shown to indicate the auto scroll of the 3 different remote channels.
G. Outdoor maximum/minimum indicator
Indicates the maximum/minimum outdoor temperature and humidity are displayed.
H. Low battery indicator of main unit
Shown to indicate the battery in the main unit is low and all displayed information on the LCD is no longer reliable. The user
needs to change the batteries at once.
I.
Indoor indicator
Indicates the indoor temperature and humidity are displayed.
J. Indoor maximum/minimum indicator
Indicates the maximum/minimum indoor temperature and humidity are displayed.
K. Clock window
Display current time, current time and weekday, calendar or alarm time.
L. Radio reception signal
Indicates the condition of DCF77 radio controlled time reception.
M. Alarm on icon
Appears when alarm is activated
-2-
(ENG)
DESCRIPTION OF BUTTONS
The EBR505 has 6 function buttons on the front.
1. SNOOZE/LIGHT Button
Press once to activate the LCD backlight for 5 seconds or SNOOZE function.
2. ▼/UNIT Button
Press once to decrease the setting in clock, calendar or alarm setting mode.
While in clock display mode, press once to toggle between ˚C and ˚F
3. ▲/CH Button
Press once to increase the setting in clock, calendar or alarm setting mode.
Select among channel 1, 2, 3 or to enter auto scroll mode.
Press and hold 2 seconds to activate or deactivate the sensor searching mode.
4. MAX/MIN Button
Toggle to view the MAX/MIN reading of the indoor and remote temperature/humidity.
Press and hold 2 seconds to clear indoor and current channel remote temperature/humidity memories.
5.
Button
While in alarm display mode, press once to toggle between enable or disable the daily alarm.
Press and hold 3 seconds to manually activate the radio controlled function and press, during reception, once to deactivate.
Note: The radio controlled time signal reception automatically activates itself again within 24 hours.
6. MODE/ENTER Button
Toggle amongst display for clock (HR-MIN-SEC), clock-day (HR-MIN-Weekday), alarm 1, alarm 2, calendar (Date-Month).
Press and hold 2 seconds to access setting mode of clock or alarm (while in corresponding display mode).
GETTING STARTED
This Weather Station was designed for easy set up. For best operation, the following steps are required to be done in the proper
sequence.
1. Insert batteries for main unit before doing so for the sensor units.
2. The main unit cannot be programmed manually until the wireless remote sensor unit registration procedure has been
completed.
3. Position the remote unit and main unit within effective transmission range, which, in usual circumstance, is within 75 meters.
Although the remote unit is weather resistant, it should be placed away from direct sunlight, rain or snow.
-3-
(ENG)
BATTERY INSTALLATION FOR MAIN UNIT
1. Remove the battery door.
2. Insert 3 pieces of AA size 1.5V alkaline battery as indicate by the polarity.
3. Close the battery door.
Note: Replace the batteries when the low battery indicator appears on the bottom-left corner of the LCD.
BATTERY INSTALLATION FOR REMOTE SENSOR UNIT
1. Remove the battery cover by grabbing its bottom edge (near the two recess location) from bottom of sensor unit.
2. Insert 2 pieces of AA size batteries according to the “+” and “-” polarity marks shown in the battery compartment and then close
the battery door with the clip on (press down the snap on both sides slightly).
-4-
(ENG)
WIRELESS REMOTE SENSOR REGISTRATION PROCEDURE
1. Insert 3 pieces of AA batteries first to the main unit. The temperature display shows - - - - while the wave icon will keep blinking
for 2 minutes indicate the main unit is in sensor searching mode.
2. In a second step, insert the 2 pieces of AA batteries into the sensor unit. The red LED on the front will start flashing at a rate of
one time per 2 seconds indicates channel-1 is in use.
3. While the red LED is flashing, press once the ▲/CH button (located in the battery compartment) will change the sensor channel
setting to 2. Keep toggle on ▲/CH button can change channel setting up to 3. The LCD is blinking at a frequency to indicate the
channel setting, i.e. continuous blinks 2 times indicate channel-2 is selected.
Note: If user does not press any key for 10 seconds, it will exit the channel setting mode and transmit the RF signal.
The main unit will register the temperature reading.
For later sensor search and registration:
Start the sending mode on the main unit by pressing the ▲/CH button for 2 seconds.
On the sensor unit do as described in step 2 and 3 above.
REMOTE CHANNEL AUTO-SCROLLING
This device is equipped with an auto-scroll function. While the auto-scroll function is set, the unit will automatically cycle to display
the temperature and humidity of each remote sensor for 6 seconds.
1. To retrieve manually the specific sensor temperature and humidity reading, press ▲/CH button until desired channel number is
displayed.
2. To enable auto-scroll function, use ▲/CH button to toggle channel 1, 2 or 3 until auto scroll icon appears on the left hand side of
the second line display.
DCF 77 RADIO CONTROLLED CLOCK
The time signal DCF 77 is transmitted by the atomic clock in Mainflingen near Frankfurt/Main. The long-wave transmitter has a range
of up to 1500km.
If the time icon is displayed without waves you have reception problems. Please observe following points:
- There are fewer disturbances in the atmosphere during the night which increases the likeliness of reception. One reception per day
is completely sufficient to ensure the preciseness of the clock by +/- 1 second
- Make sure that the device is at least 2 meters (8 feet) away from possible sources of disturbance such as TV, computer, monitor,
microwave etc.
- In rooms with concrete or metal walls (e.g. cellar rooms, modern office buildings etc.) the receipt of the signal may be more difficult
due to the shielding. In such cases find a better location for the device near a window. Sometimes it also helps to simply turn the
device by 90°, thereby improving the alignment of the receiving antenna.
Once the time signal is received, the wave icon will stay on the LCD, and time and calendar will automatically be updated.
Note: During the 10-minute time signal reception, all manual settings will be suspended. If setting is desired, press once
button key to deactivate the reception. You can also press and hold the same key for 3 seconds to manually
activate the reception in normal mode.
Attention: The radio controlled time signal reception automatically activates itself again within 24 hours.
-5-
(ENG)
SET THE CLOCK, CALENDAR & LANGUAGE
1. Press & hold MODE/ENTER button for 2 seconds to enter clock setting mode. Flashing 12/24 hours will appear.
2. Press▼/UNIT button or▲/CH button to switch between 24 hours and 12 hours format, and then press MODE/ENTER button to
confirm.
3. The hour digits will flash. Use the▼/UNIT button to decrease by one hour or▲/CH button to increase by one hour to your
desired hour. Hold press either button will change the digit rapidly. Press MODE/ENTER button to confirm.
4. The minute digits will flash. Use the▼/UNIT button or▲/CH button to set your desired minute. Hold press either button will
change the digit rapidly. Press MODE/ENTER button to confirm.
Note: Every change of minute digit will automatically reset the seconds to zero.
5. The year digit will flash and Yr icon appears. Press ▼/UNIT button or▲/CH button to set your desired year. Press
MODE/ENTER button to confirm.
6. D and M icons will flash. Press▼/UNIT button or▲/CH button to select D and M (Date and Month) or M and D (Month and
Date) format.
Press MODE/ENTER button to confirm.
7. Month digits will flash. Press▼/UNIT button or▲/CH button to set your desired month. Press MODE/ENTER button to confirm.
Do the same to set Date.
Note: The moon phase and the weekday will be automatically calculated and displayed according to the date set as
above.
8. E digit will flash. Press [▼/UNIT button or▲/CH button to switch 5 languages display of weekday
(English/German/French/Spanish/Italian. See table 1). Press MODE/ENTER button to confirm and exit setting mode.
Note: If no key press during setting mode for 10 seconds, it will automatically keep the setting and exit to normal display
-6-
(ENG)
TO SET DAILY ALARM
1. In clock time display mode, press MODE/ENTER button to select alarm 1 or 2, then hold and press MODE/ENTER again for 2
seconds to access alarm setting.
2. The hour digits will flash use▼/UNIT button to decrease by one hour or ▲/CH button to increase by one hour to your desired
hour. Hold press either button will change the digit rapidly. Press MODE/ENTER button to confirm, alarm enable automatically
when▼/UNIT button or▲/CH button pressed.
3. The minute digits will flash. Use▼/UNIT button to decrease by one minute or▲/CH button to increase by one minute to your
desired minute. Hold press either button will change the digit rapidly. Press MODE/ENTER button to confirm and finish the
setting, alarm enable automatically when▼/UNIT button or▲/CH button pressed.
4. Press
button again in alarm display mode to enable or disable the daily alarm, setting automatically save when time out in
10 seconds.
MOON PHASE
Our weather station is equipped with 8 moon phases display (i.e. from new moon to waning crescent) on the screen.
WEATHER FORECAST
Our weather station is capable of detecting local barometric pressure changes, and based on the data collected, predicts the
weather forecast for the next 12 to 24 hours.
Note:
1. The accuracy of a general pressure-based weather forecast is about 70 to 75%, and therefore, we cannot be held
responsible for any inconveniences so caused by an inaccurate one.
2. The weather forecast is meant for the next 12 to 24 hours. It may not necessarily reflect the current situation.
3. The ‘Sunny’ forecast covering night hours indicates clear weather.
CE.
-7-
(ENG)
SPECIFICATIONS
Main Unit
Proposed operating range and measuring range
Temperature resolution
: 0.0°C to +50.0°C (32.0°F to 122.0°F)
: 0.1°C (0.2°F)
Displayed OUT temperature range
Temperature resolution
: -10.0°C to +60.0°C (-14.0°F to 140.0°F)
: 0.1°C (0.2°F)
Indoor/Remote relative humidity measurement
Displayed relative humidity range
Batteries
: 20%RH to 99%RH
: 3 pieces of AA size 1.5V alkaline battery
Remote Unit
Proposed operating range
Displayed relative humidity range
Displayed temperature range
: -10.0°C to +50.0°C (14.0°F to 122.0°F)
: 20%RH to 99%RH
: -10.0°C to +50.0°C (14.0°F to 122.0°F)
RF Transmission Frequency
Open Field RF Transmission Range
Temperature transmission cycle time
Batteries
: 868 MHz
: max. 75 meters
: 120 seconds
: 2 pieces of AA size 1.5V alkaline battery
Please also remember that used batteries should not be thrown in the household rubbish bin but handed in at the
designated collection points. The environment will thank you for it!
CARE INSTRUCTIONS
•
Do not expose the device to extreme temperatures or direct sunlight over longer periods.
•
Avoid blows and shocks of any kind to the device.
•
For cleaning use a dry soft cloth that you have moistened with water and a mild cleaning agent. Never use volatile
substances such as benzene, thinner, cleansing agents in spray cans etc.
•
When the device is not being used store it in a dry area and out of the reach of small children.
•
If the device is activated under extreme coldness it may occur that the display becomes illegible. As soon as it is returned
to a warm environment the device will function normally.
•
Please keep the user’s manual and other documents delivered with the device stored carefully so that you can reference
them at a later point if necessary.
•
Please use only new batteries and never mix old and new batteries.
•
Please also remember that old batteries should not be disposed of with household waste but should be handed in at the
designated collection centres.
•
Important: With all Irox appliances, all disposal fees in Switzerland (vRG; advance recycling fee) and in the EU (WEEE)
have been paid.
SUPPORT
This device is a new development of Irox Development Technology. All information was made and checked by means of a
functioning instrument. It may occur that adjustments and improvements of the device will take place that due to typographical
procedures were not able to be listed in this manual. Should you notice deviations which make it difficult for you to operate and use
the instrument you may at any time download the latest manual onto your PC free of charge at www.irox.com.
© Irox Development Technology www.irox.com
-8-