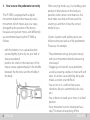
1
USER MANUAL
PE108N
ENGLISH | Table of contents
1. Ready in just 3 steps !
1. Ready in just 3 steps !3
2. Introduction 4
3. How to wear the pedometer correctly 6
4. Select a function (MODE) 9
4.1 The function TIME (Time Mode)
10
4.2 The function STEP COUNTER
( Walk / Run Mode)
11
4.3.The function MEMORY (Memory Mode)
14
4.4.The function PERSONAL DATA
(User Data Mode)
15
4.5. The function PACE MAKER (Pace Mode)
18
4.6. The function ALARM CLOCK (Alarm Mode) 19
4.7. The function STOPWATCH (Stopwatch Mode)
20
5. Battery replacement 21
6. Pedometer care 22
7. Support 23
| ENGLISH
1) Attach the PE108N with the clip to your
belt or trouser waistband, hip high at the
front of your body.
2) Press the “MODE” button until “WALK”
appears on the display.
3) Press and hold the “NEXT” button until
the display is at zero.
-> and off you go
The middle row on the display indicates
how many steps have been taken and the
bottom row shows the time required.
For further information about the device
please read the operating manual
completely.
ENGLISH | 2. Introduction The digital pedometer PE108N is a highly
accurate step counter for your personal step
monitoring when walking or running. It offers
additional features that are free for you to use,
but are not mandatory.
The main idea behind a pedometer is to make
you aware of how many steps you make a day
and to motivate you into additional healthy
movement behaviour.
Common speech in Asia says: “He who walks
1000 steps a day will live to be 100 years old”.
It is not quite that easy but you should try to
add an additional 3000 steps every day to
your daily routine, for example with a
deliberate and vigorous evening walk. You
will find that the daily repetition will greatly
increase your health and actually be fun.
The pedometer could be a device to monitor
your training. Another option is to include
your pulse. For this Irox offers you a selection
of watches with pulse monitoring
(www.irox.com), e.g. the Irox Phan X2.
| ENGLISH
The main features of the PE108N are listed
here and their functions will be explained in
detail on the following pages:
- Time and date
- Step counter for walking and running
(with distance, kcal consumption and
walking speed)
- Save mode for step counting record
keeping for a period of 7 days
- Enter your personal data (age, weight,
step length, targeted number of steps
per day)
- Acoustic pace setter
- Alarm function
- Stopwatch
The PE108N has 4 buttons:
MODE – Mode of operation selection
ADJUST– Necessary for adjustments
NEXT – Diverse functions
(see details under functions)
EL – Activates the display illumination for approx. 3 seconds
ENGLISH | 3. How to wear the pedometer correctly The PE108N is equipped with a digital
movement detector that measures every
movement, which means also your steps,
disregarding the position of the device.
Because every person moves a bit differently
we recommend wearing the PE108N as
follows:
- with the buttons in an upward position
- secured tightly by the clip on your belt or
trouser waistband
- position on a belt: In the extension of the
trouser crease, approximately in the middle between the hip bone and the middle of the body.
| ENGLISH
Other carrying modes e.g. in a handbag, coat
pocket or other places on the body are
possible under certain circumstances. You
must make sure that and how exact the
counting is and then chose the correct
mode for you.
Certain situations and walking styles can
influence the preciseness of the pedometer.
These are, for example:
-The pedometer swings along too loosely
with your movements thereby measuring “extra steps”
-Dragging your feet will cause problems,
as well as wearing sandals or shoes with soft
soles. An all too casual ambling along also makes a correct count difficult.
-You are on or in a vehicle that causes
vibrations (bicycle, automobile, train, bus,
etc.).
-You sit down or stand up or move in a fixed position.
-Every movement can be interpreted as a step. This means that pulling off the
ENGLISH | pedometer also counts steps. Therefore
always put it on first and then adjust the setting to 0.
- Your movements will be counted. They
are perhaps not always consistent that is
why there may be some deviations to the
number of steps you have perhaps counted
by yourself at one time. Don’t allow this to
confuse you. A certain counting tolerance
(+/- 10%) is normal and will often balance
itself out over the day.
What is important though: Even with the
error, your own walking performance can
still be monitored and documented.
Whether it’s 5000 or 5300 steps is not as
important as that you consciously,
sufficiently and in a healthy manner moved
your body!
4. Select a function (MODE)
Repeatedly press the large “MODE” button
until you have reached the desired function.
You may choose between following 7
functions:
- Time mode
- Walk / Run mode
- Memory mode
- User Data mode
- Pacer mode
- Alarm mode
- Stopwatch mode
After the stopwatch (STW) the first function is
displayed again (time).
As soon as you have reached the desired
function you can make your adjustments with
the “ADJUST” button. Please read the
corresponding instructions on how to
proceed.
The device automatically returns to the time
mode if the selected mode is not operated
within a 5 minute time frame.
| ENGLISH
ENGLISH | 4.1The function TIME (Time Mode)
The PE108N also serves as a watch by
displaying the time and date. In the lower line
you can display the following information by
repeatedly pressing the NEXT button:
Number of steps >> Calories >> Distance
>> Speed >> Percentage of set target >>
Movement timer.
The step information indicated here can not
be reset manually.
Please note that:
- The correct setting of time is important in
order to properly use the memory function.
At midnight your step information from that
day will automatically be stored and
recording will begin again at zero for the
new day.
- Some information (distance, kcal, set target)
requires the input of your personal data.
Please read the chapter below, “User Data
mode“.
10 | ENGLISH
- Settings
To set the time, the date and the 12/24 hr.
display format, please press and hold the
ADJUST button for approximately 2 seconds
or until the words “HOLD ADJ” appear.
As soon as the hour display blinks you can
forward adjust this with the NEXT button (to
fast forward: Keep NEXT button pressed).
With the MODE button you can move from
setting to setting and the procedure always
remains the same as described above.
After the last setting, the selection of time
indication either the 12 or 24 display format,
setting is complete and you will be returned
to the time display.
4.2. The function
STEP COUNTER ( Walk / Run Mode)
In this mode you can enlarge your step data
on the display.
Basically you set your mode of movement
here too:
- Walking ---> WALK
- Jogging ---> RUN
ENGLISH | 11
The switch-over is conducted by repeatedly
pressing the NEXT button until WALK or RUN
appears in the upper part of the display. The
switch-over from WALK to RUN and vice versa
takes place in this display by pressing and
holding the NEXT button (approx. 3 seconds)
until the corresponding text appears.
Independent of the indication WALK or RUN
you can acquire following information on
the display by repeatedly pressing the NEXT
button:
Steps + Movement timer >> Distance +
Steps >> Calories + Steps >> Speed + Steps
To delete accumulated daily data, press and
hold the ADJUST button in this function for
approx. 2 seconds or as long as the words
“HOLD CLEAR” are displayed.
Hereby all current day records will be deleted,
but not the records that have already been
stored in the memory from the previous day.
12 | ENGLISH
Please note that:
- Some information (distance, kcal, speed)
requires the input of your personal data. Please read the chapter below, “User Data mode”
Movement timer
This timer shows you how long you have
been in motion. That means as soon as the
pedometer indicates a movement, the timer
starts running. This allows you to see how
long it took you to make how many steps. The
resetting of this time is conducted together
with the pedometer.
First steps
The pedometer does not start counting until
the fifth step. This means if you take two steps
and then sit again for a while it won’t count
anything. But if you stand up and walk for
more than five steps it will begin counting
which means it begins at 6. So basically no
steps are lost.
ENGLISH | 13
4.3. The function
MEMORY (Memory Mode)
4.4. The function
PERSONAL DATA (User Data Mode)
At midnight the PE108N always automatically
stores, under that date (day and month), the
following accumulated daily information for
the last 7 days:
In order to use additional features of the
PE108N you must enter your personal data.
Following information is then calculated from
this data:
- Calorie consumption
- Distance
- Speed
- Percentage of steps made compared to your day’s targeted number of steps
- large display: Number of steps
- small display (alternating): Percentage of
days target, kcal, distance
If the memory is empty “NO INFO” is displayed.
As soon as data is available it will be stored
under the corresponding date. If there is
daily data from more than one day, you can
use the NEXT button to “scroll” through the
stored days.
Days without movement are also recorded.
The content is then just “zero”.
You can delete recorded information by
pressing and holding the ADJUST button for
approx. 2 seconds or as long as the words
“HOLD CLEAR” are displayed. Please note: You
can only delete all days together, not select
single days.
14 | ENGLISH
By repeatedly pressing the NEXT button you
can “scroll” through the current data. The
sequence on the display is as follows:
AGE >> Weight (in KG or LB) >> Stride “WALK”
>> Stride “RUN” >> Day’s targeted number of
steps (GOAL)
Settings:
- Press NEXT, until you have reached “AGE”
on the display
- Now press and hold the ADJUST button for approx. 2 seconds or as long as the words
“HOLD ADJ” are displayed. As soon as the ENGLISH | 15
next element to be set blinks (in this case the age display) you can adjust this setting forwards with the NEXT button (Fast forward: Press and hold the NEXT button).
Age setting from 5 to 99 years old.
- With the MODE button you can move from
setting to setting and the procedure stays the same as described above.
Following settings are adjustable after
setting the age:
kg <--> LB
Weight (20kg-150kg resp. 44LB – 331LB)
cm <--> INCH
Stride “WALK” (30- 180cm resp. 12 -71 inch)
Stride “RUN” (30- 180cm resp. 12 -71 inch)
Day’s targeted number of steps
(100-999900)
After the last setting in the procedure, the
targeted number of steps, the setting has to
be completed by once again pressing the
MODE button and you will be returned to the
age display.
16 | ENGLISH
Changing the display unit
The weight unit and stride can, as soon as the
corresponding value appears on the display
when scrolling, be changed by pressing the
ADJUST button.
Measuring stride
To measure your stride, proceed as follows:
- WALK
First you take ten steps like you normally walk measure the distance you walked and divide this by ten.
Example:
You measure 6.2 metres. 6.2m / 10 (number of steps) = 0.62m (Enter stride WALK: 62 cm).
- RUN
For this we recommend at least running 50 steps and then use the distance you ran in the calculation.
ENGLISH | 17
4.5. The function
PACE MAKER (Pace Mode)
4.6. The function
ALARM CLOCK (Alarm Mode)
With this function you can set yourself a
specific step rhythm via an acoustic signal.
With the NEXT button you can easily activate
(ON) and deactivate (OFF) the pacer.
When it is activated a “Beep” will sound in the
frequency indicated.
With this function you can be awakened at
a specific time or otherwise reminded of an
appointment.
Settings:
Press and hold the ADJUST button for 2
seconds or as long as the words “HOLD ADJ”
are displayed. As soon as the pacer value
blinks you can adjust this setting forwards
with the NEXT button (Fast forward: press and
hold NEXT button).
Setting range: 30 / 50 / 60 / 70 / 80 / 90 / 100
/110 / 120 / 130 / 140 / 160 / 180 bpm
(beats per minute).
With the ADJUST button you can confirm the
setting and return to the PACE display.
18 | ENGLISH
With the NEXT button you can easily activate
(ON) and deactivate (OFF) the alarm.
When it is activated an alarm ring will sound
for approx. one minute at the wake-up time
indicated. The alarm ring can be manually
disengaged by pressing one of the following
buttons: MODE, ADJUST, NEXT.
As long as the alarm is ON it will repeat itself
daily at the set time.
Settings:
Press and hold the ADJUST button for approx.
2 seconds or as long as the words “HOLD ADJ”
are displayed.
As soon as the hour display blinks you can
adjust this setting forwards with the NEXT
button (Fast forward: press and hold NEXT
button). With the MODE button you can move
to the minute setting.
Complete the setting with the MODE button.
ENGLISH | 19
With this setting the alarm has automatically
been set to ON.
4.7. The function
STOPWATCH (Stopwatch Mode)
The stopwatch measures your time for a
maximum of 23 hours and 59 minutes.
The resolution is 1/100 seconds.
The button functions are:
ADJUST: Start/Stop
NEXT : Reset to zero (only functions when the stopwatch is stopped)
MODE : Move on to another function (the stopwatch can continue running in the background)
20 | ENGLISH
5. Battery replacement - The lid of the battery compartment is
found under the clip on the back side of
the instrument. Lift the clip and unscrew
the screw that is attached to the battery
compartment.
- Replace the old batteries with new Typ
CR2032 batteries (3V). Please note the
polarity (the positive pole against the top
so that it is visible to you when replacing)!
- Close the battery compartment again and
attach the screw.
ENGLISH | 21
6. Pedometer care 7. Support
- Do not expose the device to extreme
temperatures or direct sunlight over
longer periods.
- Avoid blows and shocks of any kind to
the device.
- For cleaning use a dry soft cloth that you
have moistened with water and a mild
cleaning agent. Never use volatile
substances such as benzene, thinner,
cleansing agents in spray cans etc..
- When your pedometer is not being used
store it in a dry area and out of the reach
of small children.
- If the device is activated under extreme
coldness it may occur that the display
becomes illegible. As soon as the
pedometer is returned to a warm
environment the device will function
normally.
- Please keep the user’s manual and other
documents delivered with the device
stored carefully so that you can reference
them at a later point if necessary.
This device is a new development of Irox
Development Technology. All information
was made and checked by means of a
functioning instrument. It may occur
that adjustments and improvements of
the device will take place that due to
typographical procedures were not able to
be listed in this manual. Should you notice
deviations which make it difficult for you to
operate and use the instrument you may at
any time download the latest manual onto
your PC free of charge at www.irox.com.
22 | ENGLISH
© Irox Development Technology
ENGLISH | 23
24 | ENGLISH
UK-