1
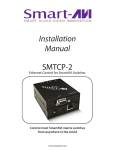
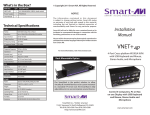
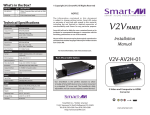
1
HDR-ULTRA
HDMI 16x16 Matrix over Cat 5e/6
QUICK INSTALLATION GUIDE
www.smartavi.com
2
INTRODUCTION
The HDR-ULTRA is a High Definition video router that enables users to route HD signals up to 425 feet over
CAT 5e/6 cables, providing the ultimate solution to create clean and efficient video and digital signage
systems in configurations up to 16x16.
Pristine high definition video has become the standard for entertainment, video systems and digital
signage, but HD video routing has been confined by the necessity of short, bulky and unsightly cables. The
HDR-ULTRA, utilizing HDBaseT technology, breaks the distance limits that have tethered users as it
facilitates the routing of crystal clear 1080p HD video, multi-channel audio, Ethernet, IR and power up to
an incredible 425 feet through the use of inexpensive CAT 5e/6 cables. With unprecedented flexibility and
convenience, the HDR-ULTRA is overhauling the old challenges of HD Matrix routers with an elegant and
easy-to-install solution.
The HDR-ULTRA can direct as many as 16 HD inputs and 16 HD outputs effortlessly. Routing HD signals
across long distances from the user-friendly HDR-ULTRA exponentially increases users’ ability to create the
ideal digital video and audio experience in any environment.
APPLICATION DIAGRAM
www.smartavi.com
3
INSTALLATION
1.
2.
3.
4.
Turn off all input devices and displays.
Connect the HDMI cables from the input devices and to the “IN” ports on the HDR-ULTRA matrix.
Connect the HDMI cables from the HDMI port of the HDX-Ultra Receivers to the HDMI displays.
Connect the RJ-45 port of each HDX-Ultra Receivers to the respective “OUT” ports on the HDR-ULTRA
using CAT5e/6 cables.
5. Power on the HDX-Ultra Receivers by plugging in their power adapters (5VDC2A).
6. Connect the power cord and power-on the HDR-ULTRA.
7. Power on the input devices and the displays.
CONTROLLING THE HDR-ULTRA
There are multiple ways to control the HDR8X8/HDR16X16:
• Front panel
• SmartControl software
• RS-232 commands
• TCP-IP module (NET-IP-Pro)
Front Panel
The HDR ULTRA front panel enables one to switch directly from the Matrix without the use of any software.
Its LCD (40x4) offers detailed information about the status of the switch at any given moment.
SmartControlPro Software
SmartConrolPro is the Windows® GUI application that enables users to control SmartAVI matrixes using
graphic user interface without having to write the codes and send serial commands to the devices. The
software enables configuration of the size and type of the Matrix, including a preset defined at macro. The
software also enables identification by name for each source and display.
RS-232 Commands
There are two primary modes of operation for the RS-232 control of the HDR-ULTRA: Command Mode and
Debug Mode. When connecting to the HDR-ULTRA via RS-232, it will start in Command Mode, in which raw
commands are allowed to be sent matrix to control its various functions without the use of a menu or
prompt. This mode is intended for advanced Debug mode is a more user-friendly way of operating the
HDR-ULTRA and it also includes instructional menus.
www.smartavi.com
4
TCP/IP Control (NET-IP-Pro)
Net-IP-Pro gives the user full control of the matrixes from anywhere in the world through this advanced new
web browser software. It enables multiple users to control and configure the Matrix, including names of
sources, names of displays, IP address and low level features of the Matrix. The Net-IP-Pro enables the
support of telnet for easy integration with other control systems.
LEARNING THE EDID OF THE MONITOR
1. Power on the HDR-ULTRA.
2. Connect CAT5e/6 cable from one of the HDX-Ultra Receivers to the OUT1 of the HDR-ULTRA.
3. Connect a straight-through male-to-female RS-232 cable from the computer to the RS-232 port of the HDRULTRA.
4. Run HyperTerminal on your PC (or use the terminal client of your choice).
5. Choose the correct COM port and use the following parameters:
6. Cycle the power of the HDMI (reset) and you should see the following on the screen:
SmartAVI HDMI 16X16 ver 12.06.11#1
7. To enter the Debug Mode type “d on” and hit ENTER. You will see the following prompt:
DBG>
8. Type in “edid” and hit ENTER to go to Manage EDID:
EDID
EDID>
9. Type in “learn” and hit ENTER to learn the monitor plugged in port 1:
1
EDID> learn
Successfully learned EDID!
www.smartavi.com