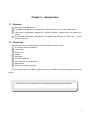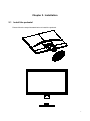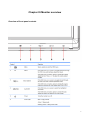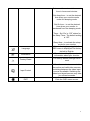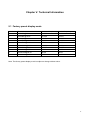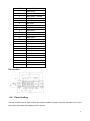
1
HP 24wd LED Backlit Monitor User Guide © 2012 Hewlett-Packard Development Company, L.P. Microsoft, Windows, and Windows Vista are either trademarks or registered trademarks of Microsoft Corporation in the United States and/or other countries. The only warranties for HP products and services are set forth in the express warranty statements accompanying such products and services. Nothing herein should be construed as constituting an additional warranty. HP shall not be liable for technical or editorial errors or omissions contained herein. This document contains proprietary information that is protected by copyright. No part of this document may be photocopied, reproduced, or translated to another language without the prior written consent of Hewlett-Packard Company. First Edition (October 2012) Document Part Number: 715991-001 1 Chapter I. Introduction 1.1 Features Multilingual OSD adjustment Compatible with IBM VGA, extended VGA, VESA VGA, SVGA, XGA, and SXGA modes Wide range of applicable voltages (AC 100-240V 50/60Hz ) enables direct use without any setting. Plug-and-play VESA DDC1/ 2B Standard. Compatible with Windows 9x / 2000 / XP / 7 / Vista operation systems 1.2 Check list Please make sure the following items are included with your LCD monitor; The monitor (and the pedestal) Lower stand Power cord Adapter VGA cable DVI cable (Optional) Documentation and software CD Setup poster Warranty certificate (Optional) If any of these items are missing, please contact your dealer for technical support and custom service. Note: Be sure to save original box and all packing materials for future transport. 2 Chapter II. Installation 2.1 Install the pedestal Please follow the steps illustrated below to install the pedestal. 3 2.2 Connect your monitor to your computer 1. 2. 3. 4. Power off and unplug your computer. Connect the 15-Pin ends of the signal cable to the VGA port of your monitor and the VGA OUT jack on the back of your computer. Secure the screws on both ends of the signal cable. Connect the round end of power adapter to the monitor, then connect one end of the power cords to the power adapter and the other end to the nearest electrical outlet. Power on your computer and monitor. If your monitor displays an image, the installation has been successfully done. If the monitor does not display any image, check all the connections. Cautions: 1. For installation, please complete signal cord connection before plugging the power cord into the electrical outlet to avoid damaging the monitor. 2. During installation, please support the front frame with your hand at its center of gravity to avoid dropping and damaging the monitor. Overview of the ports of the monitor: 1. DC power supply input 2. DVI signal input 3. VGA signal input 4 2.3 Disconnect the pedestal for shipping Press the clip button on the pedestal and remove the pedestal from the stand. 5 Chapter III. Monitor overview Overview of front panel controls 6 Chapter IV. 4.1 Operational Instruction Power ON/OFF Switch Press this button to power on/off your monitor. Note: The ON/OFF switch does not disconnect your monitor from the main voltage. To completely disconnect the main voltage, please remove the power plug from the socket. 4.2 Power indicator The power LED is blue when the monitor operates normally. If the monitor runs in power-saving mode, this indicator changes to amber. When the monitor is turned off, this indicator is unlit. 4.3 Menu features All the following features of your monitor can be accessed and adjusted by using the on screen display (menu) system. 1. If your monitor is not powered on, press the "Power” button to turn it on. 2. Press the "Menu” button to activate the OSD menu. The OSD main menu will be displayed. 3. To view the main menu or submenu, press the “+” on the front panel of your monitor to scroll up or the “-” to scroll down. Then press the "OK” button to select a highlighted function. When the highlight scrolls down to the bottom of the menu, it returns to top of the menu. When the highlight scrolls up to the top of the menu, it returns to bottom of the menu." 4. To adjust the selected option, press the “+” or “-” button. 5. Select “Save” and return. If you do not want to save the setting, select “Cancel” from the submenu or “Exit” from the main menu. 6. Press the “Menu” button to exit from the OSD menu. 7 4.4 OSD operational instructions Icon Main menu option Submenu option Note To adjust the brightness level of the screen. The factory default range is 90. To adjust the contrast level of the screen.The factory default range is 80. Brightness Contrast Selects the screen color.The factory is 6500K or Custom color,depending on the mode. Color Warm- 5000K Changes color to slightly reddish white. Standard- 6500K Uses standard colors (default). Cool- 9300K Change color to slightly blueish white. Selects and adjusts your own color scales: Red Color – sets your own red color levels. Custom (RGB) Green Color – sets your own green color levels. Image control Auto-adjustment Clock and Phase Blue Color – sets your own blue color levels. To adjust the image on the screen. The ambient brightness sensor can also be enabled or disabled (only applicable to some models) To automatically adjust the image on the screen (only applicable to VGA input). To adjust the clock phase of the screen. This adjustment eliminates all horizontal noises to enable clearer and more lifelike images and 8 Horizontal position Vertical position Custom Scaling Sharppness Dynamic Contrast OSD Control OSD position Horizontal OSD Position Vertical OSD Position OSD Transparency OSD Timeout characters (only applicable to VGA input) To adjust the horizontal position of an image (only applicable to VGA input). To adjust the vertical position of an image (only applicable to VGA input). Selects the method on how displayed information on the monitor will be formatted.Select Fill to Screen – image fills the entire screen and may look distorted or elongated because of non-proportional scaling of height and width. Fill to Aspect Ration – image is sized to fit the screen and maintains proportional image. Adjusts the screen imageto look sharper or soft. Turns Dynamic Contrast Ratio On or Off.The factory default is Off. Provides a menu for adjusting the on-screen display(OSD)control. To adjust OSD position for your monitor. To adjust the visual position of the OSD menu to the right or left of the screen. The factory default horizontal position value is 97. To adjust the visual position of the OSD menu up or down the screen. The factory default vertical position value is 13. To adjust the transparency to enable transparent background information under the OSD. To set the OSD display time (in seconds) after the last pressing the button. The factory default setting is 9 “30 seconds”. Management Power Saver To select the function of power management for your monitor. To enable the energy-saving function, Select On off The factory default setting is On. Restores power to the monitor following an unexpected removal of power. Select: Power-On Recall Mode Display Monitor Status DDC/CI support Bezel Power LED Sleep timer On Off The factory default is On. The resolution, refresh rate and frequency information will be displayed when the OSD main menu is accessed. Please select “On” or “Off” as the factory default on-off setting. The operational status of your monitor will be displayed when you power on your monitor. To select the positions where the status information is displayed: Top Middle Bottom Off The factory default setting is “Top” Controlling some OSD menu functions, such as brightness, contrast and color temperature, on your computer is allowed. This feature can be set as “On” or “Off”. The factory default setting is On. Power on/off the indicator (LED) on the power button. If the indicator is set as “Off”, it will be off all the time. The following timer adjustment menu options are available: 10 Set current time – to set the current time in hours and minutes. Set sleep time – to set the desired time when your monitor works under the sleeping mode. Set On time – to set the desired time when your monitor is awakened from the sleeping mode. Timer - Set “On’ or “Off” status for the Sleep Timer. The default setting is “Off”. Language Information Factory Reset Sleep Now – to activate the sleep mode for your monitor Selects the language in which the OSD menu is displayed.The factory default is English. To select and display important information about your monitor. The factory default settings will be reset Input Control When the monitor is connected to two active and valid video sources, switching between the video input source is available. Switching the video input signal sources may take you several seconds. EXIT Exits the OSD menu screen. 11 Chapter V. Technical Information 5.1 Factory preset display mode Criteria Resolution Horizontal frequency Vertical frequency 1 640X480 @60 Hz 31.469 59.94 2 720X400 @70 Hz 31.469 70.087 3 800X600 @60 Hz 37.879 60.317 4 1024X768 @60 Hz 48.363 60.004 5 1280X720 @60 Hz 45.00 60.00 6 1280X1024 @ 60 Hz 63.981 60.02 7 1440X900 @60 Hz 55.935 59.887 8 1600X900 @60 Hz 60.00 60.00 9 1680X1050@60 Hz 65.29 60.00 10 1920X1080@ 60Hz 67.50 60.00 Note: The factory preset display mode is subject to change without notice. 12 5.2 Product specifications Size 23.6" wide screen Max. resolution 1920 x 1080 @ 60 Hz Recommended resolution 1920 x 1080 @ 60 Hz Horizontal frequency 24-94 kHz Vertical frequency 50-76 Hz Viewable size 521.28x 293.22 mm Viewable angle 170 (H) 160 (V) Pitching angle -5º to 15º Pixel frequency 170 MHz OSD functions Brightness, Contrast, Image Control, Languages, Color, Management, Information, Factory Reset, Input Control, Exit, Size (Packing) 630 (L) x 119(W) x 479 (H) mm Net weight/ Gross weight 3.6 KG / 5.6 KG Power supply 100-240VAC,50/60Hz Altitude (under operational condition) 0 ~ 3658 m(0 ~12000 feet) Altitude (under storing condition) 0 ~ 12192 m(0 ~ 40,000 feet) Input signal VGA and DVI Contrast 1000: 1 Brightness 250 cd/m2 Response time 5 ms Color displayed 16.7 M Power (max) 26 W Operational environment Temperature: 5-35℃; humidity: 20% ~ 80% Storing environment Temperature: -20-60℃; humidity: 10% ~ 85% 13 5.3 Signal cable connector PIN Signal 1 Red Signal 2 Green Signal 3 Blue Signal 4 Ground 5 Cable testing 6 Red Signal Ground 7 Green Signal Ground 8 Blue Signal Ground 9 5 VDC 10 Null 11 Ground 12 SDA (for DDC) 13 Horizontal synchronization 14 Vertical synchronization 15 SCL (for DDC) VGA Interface 14 PIN SIGNAL 1 TMDS Data 2 - 2 TMDS Data 2 + 3 TMDS Data 2 / 4 Shield 4 TMDS Data 4 - 5 TMDS Data 4 + 6 DDC Clock 7 DDC Data 8 No Connect 9 TMDS Data 1 - 10 TMDS Data 1 + 11 TMDS Data 1 / 3 Shield 12 TMDS Data 3 - 13 TMDS Data 3 + 14 +3.3/+5V Power (from PC) 15 Ground (Return for +5V) 16 Hot Plug Detect 17 TMDS Data 0 - 18 TMDS Data 0 + 19 TMDS Data 0 / 5 Shield 20 TMDS Data 5 - 21 TMDS Data 5 + 22 TMDS Clock Shield 23 TMDS Clock + 24 TMDS Clock - DVI Interface 5.4 Panel testing The ratio of valid pixels on each LCD screen reaches 99.99% or higher. However, less than 0.01% of the pixels may cause dark dots displayed on the screen. 15 A Safety and Maintenance Guidelines Important Safety Information A power cord is included with the monitor. If another cord is used, use only a power source and connection appropriate for this monitor. For information on the correct power cord set to use with the monitor, refer to the “Power Cord Set Requirements” section in Agency Regulatory Notices. Warning! To reduce the risk of electric shock or damage to the equipment: • Do not disable the power cord grounding feature. The grounding plug is an important safety feature. • Plug the power cord into an easily accessible grounded outlet. • Disconnect the power from the equipment by unplugging the power cord from the electrical outlet. For your safety, do not place anything on power cords or cables. Arrange them so that no one may accidentally step on or trip over them. Do not pull on a cord or cable. When unplugging from the electrical outlet, grasp the cord by the plug. To reduce the risk of serious injury, read the Safety and Comfort Guide. It describes proper workstation, setup, posture, and health and work habits for computer users, and provides important electrical and mechanical safety information. This guide is located on the Web at http://www.hp.com/ergo and/or on the documentation CD, if one is included with the monitor. CAUTION: For the protection of the monitor, as well as the computer, connect all power cords for the computer and its peripheral devices (such as a monitor, printer and scanner) to some form of surge protection device such as a power strip or Uninterruptible Power Supply (UPS). Not all power strips provide surge protection; the power strips must be specifically labeled as having this ability. Use a power strip whose manufacturer offers a Damage Replacement Policy so you can replace the equipment, if surge protection fails. Use the appropriate and correctly sized furniture designed to properly support your HP LCD monitor. WARNING! LCD monitors that are inappropriately situated on dressers, bookcases, shelves, desks, speakers, chests, or carts may fall over and cause personal injury. Care should be taken to route all cords and cables connected to the LCD monitor so that they can not be pulled, grabbed, or tripped over. 16 Safety Precautions Use only a power source and connection compatible with this monitor, as indicated on the label/ back plate of the monitor. Be sure the total ampere rating of the products connected to the outlet does not exceed the current rating of the electrical outlet, and the total ampere rating of the products connected to the power cord does not exceed the rating of the power cord. Look on the power label to determine the ampere rating (Amps or A) for each device. Install your monitor near a power outlet that you can easily reach. Disconnect the monitor by grasping the plug firmly and pulling it from the outlet. Never disconnect the monitor by pulling the cord. Do not allow anything to rest on the power cord. Do not walk on the cord. 17 Maintenance Guidelines To enhance the performance and extend the life of your monitor: ● Do not open your monitor cabinet or attempt to service this product yourself. Adjust only those controls that are covered in the operating instructions. If your monitor is not operating properly or has been dropped or damaged, contact your HP authorized dealer, reseller, or service provider. ● Use only a power source and connection appropriate for this monitor, as indicated on the label/ back plate of the monitor. ● Be sure the total ampere rating of the products connected to the outlet does not exceed the current rating of the electrical outlet, and the total ampere rating of the products connected to the cord does not exceed the rating of the cord. Check the power label to determine the ampere rating (AMPS or A) for each device. ● Install your monitor near an outlet that you can easily reach. Disconnect the monitor by grasping the plug firmly and pulling it from the outlet. Never disconnect the monitor by pulling the cord. ● Turn your monitor off when not in use. You can substantially increase the life expectancy of your monitor by using a screen saver program and turning off the monitor when not in use. Note: The HP Warranty does not cover monitors with a burned-in image. ● Slots and openings in the cabinet are provided for ventilation. These openings must not be blocked or covered. Never push objects of any kind into cabinet slots or other openings. ● Do not drop your monitor or place it on an unstable surface. ● Do not allow anything to rest on the power cord. Do not walk on the cord. ● Keep your monitor in a well-ventilated area, away from excessive light, heat or moisture. ● When removing the monitor base, you must lay the monitor face down on a soft area to prevent it from being scratched, defaced, or broken. Cleaning your monitor 1. Turn off the monitor and the computer. 2. Unplug the monitor from the wall outlet. 3. Clean the monitor plastics with a clean cloth dampened with water. 4. Clean the monitor screen with an antistatic screen cleaner. CAUTION: Do not use benzene, thinner, ammonia, or any other volatile substances to clean the monitor or the screen. These chemicals may damage the cabinet finish as well as the screen. Shipping the monitor Keep the original packing box in a storage area. You may need it later if you move or ship your monitor. To prepare the monitor for shipping, refer to Chapter 2, “Disconnect the Pedestal for Shipping.” 18 B Agency Regulatory Notices Federal Communications Commission Notice European Union Regulatory Notice Korean Notice Japanese Notice Power Cord Set Requirements The monitor power supply is provided with Automatic Line Switching (ALS). This feature allows the monitor to operate on input voltages between 100–120V or 200–240V. The power cord set (flexible cord or wall plug) received with the monitor meets the requirements for use in the country where you purchased the equipment. If you need to obtain a power cord for a different country, you should purchase a power cord that is approved for use in that country. The power cord must be rated for the product and for the voltage and current marked on the product's electrical ratings label. The voltage and current rating of the cord should be greater than the voltage and current rating marked on the product. In addition, the cross-sectional area of the wire must be a minimum of 0.75 mm² or 18 AWG, and the length of the cord must be between 6 feet (1.8 m) and 12 feet (3.6 m).If you have questions about the type of power cord to use, contact an authorized HP service provider. A power cord should be routed so that it is not likely to be walked on or pinched by items placed upon it or against it. Particular attention should be paid to the plug, electrical outlet, and the point where the cord exits from the product. Japanese Power Cord Requirements For use in Japan, use only the power cord received with this product. CAUTION: Do not use the power cord received with this product on any other products. Product Environmental Notices 19 R Qualification ENERGY STAR○ R certification mark meet the requirements of the HP Displays marked with the ENERGY STAR○ R program. The EPA ENERGY U.S. Environmental Protection Agency (EPA) ENERGY STAR○ R certification mark does not imply endorsement by the EPA. As an ENERGY STAR○ R STAR○ R Partner, Hewlett Packard Company has determined that this product meets the ENERGY STAR○ program requirements for display energy efficiency. R certification mark appears on all ENERGY STAR○ R The following ENERGY STAR○ qualified displays: R program specifications for displays and computers were created by The ENERGY STAR○ the EPA to promote energy efficiency and reduce air pollution through more energy-efficient equipment in homes, offices, and factories. One way products achieve this goal is by using the Microsoft Windows power management feature to reduce power consumption when the product is not in use. The power management feature enables the computer to initiate a low-power or R “sleep” mode after a period of user inactivity. When used with an external ENERGY STAR○ qualified display, this feature also supports similar power management features for the display. To take advantage of these potential energy savings, users should use the default power management settings that are provided with ENERGY STAR qualified computers and displays. R qualified computers are preset to The default power management settings on ENERGY STAR○ behave in the following ways when the system is operating on AC power: ● Turn off an external display after 15 minutes of user inactivity ● Initiate a low power sleep mode for the computer after 30 minutes of user R qualified computers exit the low power sleep mode and ENERGY inactivity ENERGY STAR○ R qualified displays resume operation when the user resumes use of the computer. STAR○ Examples include the user pressing the power/sleep button, receiving an input signal from an input device, receiving an input signal from a network connection with the Wake On LAN (WOL) feature enabled, etc. R program, its environmental benefits and the Additional information on the ENERGY STAR○ potential energy and financial savings of the power management feature can be found on the EPA R Power Management Web site at http://www.energystar.gov/powermanagement, ENERGY STAR○ 20 HP Recycling Program HP encourages customers to recycle used electronic hardware, HP original print cartridges, and rechargeable batteries. For more information about recycling programs, go to http://www.hp.com/ recycle. Chemical Substances HP is committed to providing our customers with information about the chemical substances in our products as needed to comply with legal requirements such as REACH (Regulation EC No 1907/2006 of the European Parliament and Council). A chemical information report for this product can be found at http://www.hp.com/go/reach. Restriction of Hazardous Substances (RoHS) A Japanese regulatory requirement, defined by specification JIS C 0950, 2005, mandates that manufacturers provide Material Content Declarations for certain categories of electronic products offered for sale after July 1, 2006. To view the JIS C 0950 material declaration for this product, visit http://www.hp.com/go/jisc0950. 21 Disposal of Waste Equipment by Users in Private Household in the European Union This symbol on the product or on its packaging indicates that this product must not be disposed of with your household waste. Instead, it is your responsibility to dispose of your waste equipment by handing it over to a designated collection point for the recycling or waste electrical and electronic equipment. The separate collection and recycling of your waste equipment at the time of disposal will help to conserve natural resources and ensure that it is recycled in a manner that protects human health and the environment. For more information about where you can drop off your waste equipment for recycling, please contact the local city 22 C Troubleshooting Solving common problems Shown below are possible problems, reasons, and recommended solutions: Problems The LED power indicator is not lit Solutions Ensure the Power button is switched on and the power cord is properly connected to the grounded power outlet and the monitor. Select Management in the OSD menu before selecting the power indicator on the panel. Check if the Panel Power Indicator is set as Off. If so, set it as On. Nothing displayed on the screen Connect the power cord. Power on the device. Connect the video cable correctly. For more information, see "Installation" chapter. Press any key on your keyboard or move your mouse to disable the screensaver. Blurred or dark image Image is not centered. The screen display input signal is out of the valid scope. Press the Menu button to activate the OSD menu. Select Image Control. Then select Horizontal Position or Vertical Position to adjust the position of the image. Connect the monitor VGA signal cable to the VGA connector on the computer. Be sure that the computer power is off while connecting the video cable. Enter Safe Mode after your computer is restarted. Apply the setting supported by your monitor (See table 5.1 in Chapter 5. B: Factory Preset Display Mode). Restart your computer to activate the new setting. Blurred and ghost image. Adjust the contrast and brightness controls. Make sure no extension cord or switch box is used. HP suggests you to connect your monitor to the graphic card output port on the back of your computer. For VGA input, Auto-adjustment will solve problems of this kind. The optimum resolution of the monitor is not available Make sure the graphic card supports optimum resolution. Make sure latest applicable driver for graphic card is installed. For HP and Compaq systems, you may download the latest applicable graphic card drivers at: www.hp.com/support. For other systems, visit the websites for your graphic card. Plug-and-play is not available To enable the plug-and-play feature for your monitor, you should have plug-and-play-ready computer and graphic card. Please contact the manufacturer of your computer. Check the video cable of your monitor. Make sure there are no bent PINs. Make sure the HP monitor driver is installed. You may download the HP monitor driver at: www.hp.com/support 23 Problems Solutions (Continued) Withering, flicker or moiré effect Keep the monitor away from electric devices that may cause possible electrical interference. Use the maximum refresh rate of the monitor under current resolution. The “Sleep Mode” is always enabled for the monitor (yellow LED). Make sure your monitor is powered on. The graphic card of your computer should be secured in the slot. Make sure the video cable of your monitor is correctly connected to your computer. Check the video cable of your monitor. Make sure there are no bent PINs. Make sure your computer is working normally. Press the Caps Lock key on your keyboard and have a look at the Caps Lock LED (available on most keyboards). The LED will light or fade out. Contacting Support You may contact the customer service department by visiting HP technical support website at: www.hp.com/support Select the country / territory where you are. Follow the link to visit pages applicable to your monitor. Preparing to Call Technical Support If you cannot solve a problem by using the troubleshooting tips in this section, you might have to call technical support. For technical support contact information, refer to the printed documentation included with the monitor. Have the following information available when you call: Monitor model number (located on label on back of monitor) Monitor serial number (located on label on back of monitor or in the OSD display in the Information menu) Purchase date on invoice Conditions under which the problem occurred Error messages received Hardware configuration Name and version of hardware and software you are using Locating the Rating Label The rating label on the monitor provides the product number and serial number. You may need these numbers when contacting HP about your monitor model. The rating label is on the back of the monitor. 24