1
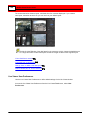
Buffalo
Surveillance
Server
Version 5.6.19
by
Administrator's Guide
This page left blank intentionally.
Contents
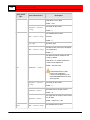
3
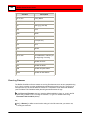
Table of Contents
Welcome
7
Software
License Agreement
...................................................................................................................................8
Contact
Information
...................................................................................................................................11
Documentation
Overview
...................................................................................................................................12
Getting Started
15
Quick...................................................................................................................................16
Start for IP Camera Users
Quick...................................................................................................................................27
Start for VMS System Users
How To
...................................................................................................................................34
Launch an Application
..........................................................................................................................................................34
Add and Schedule
..........................................................................................................................................................34
an IP Cam era
Create a Recording
..........................................................................................................................................................44
Policy
Create a Data Service
..........................................................................................................................................................45
Policy
Search For and
..........................................................................................................................................................46
Export Surveillance Videos
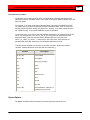
Record and Capture Video Feeds
47
Using ...................................................................................................................................49
Camera Policies to Record and Capture Video
Cam era Policies
..........................................................................................................................................................51
Advanced Mode
Add, Modify, or
..........................................................................................................................................................52
Delete Cam era Configurations
Add Camera
.........................................................................................................................................................53
Wizard
Add an IP Camera
.........................................................................................................................................................63
- Standard Mode
Add an IP Camera
.........................................................................................................................................................66
- Advanced Mode
Troubleshoot
.........................................................................................................................................................70
Camera Connection Problems
Add a VMS-managed
.........................................................................................................................................................71
Camera Configuration
Add a Milestone-managed
.........................................................................................................................................71
Camera
Add an OnSSI-managed
.........................................................................................................................................74
Camera
Modify a Camera
.........................................................................................................................................................77
Configuration
Delete a Camera
.........................................................................................................................................................77
Configuration
Import and Export
.........................................................................................................................................................78
Camera Configurations
Create, Modify,
..........................................................................................................................................................84
or Delete Recording Policies
Creating a Recording
.........................................................................................................................................................85
Policy: Overview
Create a Recording
.........................................................................................................................................................85
Policy
Modify a Recording
.........................................................................................................................................................86
Policy
Delete a Recording
.........................................................................................................................................................87
Policy
Import or Export
.........................................................................................................................................................87
Recording Policies
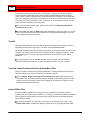
Cam era Tab:..........................................................................................................................................................104
Designate the Cam era
Cam era Tab -..........................................................................................................................................................106
Advanced Mode
Metadata Tab..........................................................................................................................................................110
and Configuration
Processing Tab:
..........................................................................................................................................................121
Set Processing Options for Recording or Capture
User Preferences:
.........................................................................................................................................................123
Set Default User Preferences
Destination Tab:
..........................................................................................................................................................123
Define Capture Destinations
Scheduling Tab:
..........................................................................................................................................................129
Define When Video Will Be Recorded
Advanced Tab:
..........................................................................................................................................................131
Set Advanced Capturing Options
4
Buffalo Surveillance Server
View Live Video Feeds: Live Viewer
137
View...................................................................................................................................140
a feed from a camera
View...................................................................................................................................141
feeds from a camera pool
Change,
Save, or Delete a Live View Layout
...................................................................................................................................142
Control
Camera Pan, Tilt, Zoom, and Focus
...................................................................................................................................143
Motion Detection Camera Configuration
145
AXIS...................................................................................................................................146
Camera Motion Detection Configuration
Panasonic
Camera Motion Detection Configuration
...................................................................................................................................150
Manage Data and the Information
Repository: Data Service Policies and Vault
Admin
156
Data Service Policies: Create Policies to Manage Data in the
Information
Repository
...................................................................................................................................157
How to Create
..........................................................................................................................................................159
a Data Service Policy - Overview
Create, Modify,
..........................................................................................................................................................160
or Delete Policies in Data Service Policies
Create a Policy
.........................................................................................................................................................160
Modify a Selected
.........................................................................................................................................................161
Policy
Delete a Selected
.........................................................................................................................................................163
Policy
Import or Export
.........................................................................................................................................................163
Data Service Policies
Source Tab: Specify
..........................................................................................................................................................175
Where Files Com e From
Criteria Tab: ..........................................................................................................................................................179
Set File Eligibility Definitions
Destination Tab:
..........................................................................................................................................................188
Define Data Destinations
Scheduling Tab:
..........................................................................................................................................................193
Define When Jobs Should Run
Advanced Tab:
..........................................................................................................................................................196
Set Advanced Data Service Options
Vault...................................................................................................................................204
Admin Overview: Manage Vaults and Media
How to Use Vault
..........................................................................................................................................................205
Adm in - Overview
Basic Media Concepts
..........................................................................................................................................................207
Actions
..........................................................................................................................................................208
Secure or .........................................................................................................................................................209
Unsecure Vault
Shut Dow n
.........................................................................................................................................................210
or Restart Vault
Manage Vault
.........................................................................................................................................................211
Properties
General
.........................................................................................................................................212
Device
.........................................................................................................................................213
Hard Disk Vault ...................................................................................................................................214
Tape Vault
...................................................................................................................................216
Database
.........................................................................................................................................217
License
.........................................................................................................................................219
Security
.........................................................................................................................................222
Add a New User,
...................................................................................................................................223
Group, Domain, or "Everyone"
Change a Security
...................................................................................................................................225
Entry
Delete a User, Group,
...................................................................................................................................226
Domain, or "Everyone"
Logs
.........................................................................................................................................226
Notifications
.........................................................................................................................................229
Diagnostics
.........................................................................................................................................231
Vault Checkup
.........................................................................................................................................................234
Prepare Media
.........................................................................................................................................................235
Contents
5
Add a New User,
.........................................................................................................................................240
Group, Domain, or "Everyone"
Change a Security
.........................................................................................................................................242
Entry
Delete a User, Group,
.........................................................................................................................................243
Domain, or "Everyone"
Prepare Existing
.........................................................................................................................................................243
Media
Add a New User,
.........................................................................................................................................247
Group, or Domain
Change a Security
.........................................................................................................................................249
Entry
Delete a User, Group,
.........................................................................................................................................250
Domain, or "Everyone"
Load Media:
.........................................................................................................................................................250
Load, Reload, or Re-index Media
Load Hard Disk Media
.........................................................................................................................................251
Load Shadow Hard
.........................................................................................................................................252
Disk Media
Load Tape Media.........................................................................................................................................253
Reload Media .........................................................................................................................................254
Unload Media
.........................................................................................................................................................255
Erase Media
.........................................................................................................................................................257
Start Vaults
.........................................................................................................................................................258
Manually
Options
..........................................................................................................................................................259
Options: Address
.........................................................................................................................................................260
Format
Options: Communications
.........................................................................................................................................................260
Timeout
Vault Details ..........................................................................................................................................................261
Information.........................................................................................................................................................262
Current Clients
.........................................................................................................................................................263
Media
.........................................................................................................................................................264
Drives
.........................................................................................................................................................266
Vault Adm in ..........................................................................................................................................................267
Com m and Line for Advanced Users (VaultAdm inCl)
Search for, Review, and Export Surveillance
Videos and View Live Feeds: SVM
273
How ...................................................................................................................................276
to Search for & Export Videos - Overview
Launch
the Surveillance Video Manager
...................................................................................................................................277
Configure
Rimage to Publish Videos
...................................................................................................................................278
Set User
Preferences
...................................................................................................................................281
View...................................................................................................................................284
Live Video Feeds
Search
for, Review, and Select Videos
...................................................................................................................................286
Metadata Extensions
..........................................................................................................................................................295
Configuration
Using Wildcards
..........................................................................................................................................................306
for Searching and Filtering
Set Export
Options & Export Videos
...................................................................................................................................319
ExportExtensions.cfg
..........................................................................................................................................................326
Monitor the Information Repository: Network
Activity & Vault Statistics
335
Mini ...................................................................................................................................338
Vault Stats
Vault...................................................................................................................................339
Stats
Buffalo Surveillance Server System
Requirements
340
Installation
Hardware & Software Requirements
...................................................................................................................................342
Product
Licensing
...................................................................................................................................344
6
Buffalo Surveillance Server
Add or Remove Vaults
345
Add a
Hard Disk Vault
...................................................................................................................................349
Add a
Tape Library
...................................................................................................................................359
Disable SCSI ..........................................................................................................................................................369
Devices on a Window s Com puter
Add a
Standalone Tape Drive Vault
...................................................................................................................................372
Disable SCSI ..........................................................................................................................................................381
Devices on a Window s Com puter
Remove
a Vault
...................................................................................................................................384
Scheduling Windows
386
Glossary
390
Index
398
Welcome
Welcome
Welcome to the Buffalo Surveillance Server Version 5.6.19.
The Buffalo Surveillance Server provides advanced video data storage management, including
live video feed capture and complete video lifecycle management focused on the record, store,
and manage aspects of a forensics-based video surveillance system. This highly scalable
solution supports a wide variety of RTSP enabled IP cameras for real time and forensic video
review.
See the Getting Started 15 section to get up and running quickly by enabling Buffalo
Surveillance Server capabilities, configuring an IP camera, recording and storing video feeds,
and searching for video clips.
See the How To
34
sections for step-by-step overviews of commonly performed tasks.
The rest of this guide includes advanced overview information as well as detailed directions
about using Buffalo Surveillance Server functionality.
Complete Overarching Management
The Buffalo Surveillance Server properly manages the storage of video surveillance assets for
long term retention. You can easily set up and configure the Buffalo Surveillance Server to
record, store, and manage video feeds from up to ten RTSP enabled IP cameras.
As your needs increase, you can add additional surveillance-enabled storage devices to your
network to increase retention, migrate and replicate your video assets, and add even more
cameras. The system will automatically take advantage of the new storage resources.
Replication and migration of video files to additional storage mediums, while fully managing the
storage location of these video files, allows for rapid search and retrieval of relevant video
scenes, regardless of how long ago they occurred.
The solution also enables the user to fully manage and track video feeds even when those video
feeds have been migrated to secondary storage. Don’t just “export” your video files to some
other media, keep total control of all of your video feeds for as long as you want them.
This guide documents the Buffalo Surveillance Server and avoids documenting OS
procedures.
7
8
Buffalo Surveillance Server
Software License Agreement
The Softw are Programs/Utilities and documentation provided by Buffalo under the name of Buffalo Surveillance
Server are licensed only on the condition that you (referred to as “YOU” or “Licensee”) agree w ith Buffalo
(referred to as “Company”) to the terms and conditions set forth below .
PLEASE READ THIS LICENSE AGREEMENT CAREFULLY BEFORE DOWNLOADING OR USING THE SOFTWARE
OR DOCUMENTATION.
BY CLICKING ON THE "ACCEPT" BUTTON, OPENING THE PACKAGE, DOWNLOADING THE PRODUCT, OR
USING THE EQUIPMENT THAT CONTAINS THIS PRODUCT, YOU ARE CONSENTING TO BE BOUND BY THIS
AGREEMENT. IF YOU DO NOT AGREE TO ALL OF THE TERMS OF THIS AGREEMENT, CLICK THE "DO NOT
ACCEPT" BUTTON AND THE INSTALLATION PROCESS WILL NOT CONTINUE, RETURN THE PRODUCT TO
THE PLACE OF PURCHASE FOR A FULL REFUND, OR DO NOT DOWNLOAD THE PRODUCT.
In consideration for use of the Softw are, Licensee hereby agrees to the follow ing terms and conditions:
1. DEFINITIONS
1.1 “Documentation” shall mean the documentation provided in connection w ith the Softw are.
1.2 “Effective Date” shall mean the date on w hich Licensee opens the package, dow nloads the product, or uses
equipment that contains the product.
1.3 “Softw are” shall mean the object code of the Programs/Utilities included on the delivered digital media.
2. TERMINATION
2.1 This Agreement may be terminated by Licensee at any time by destroying the Softw are, together w ith all
copies thereof. This Agreement w ill also terminate automatically and w ithout notice if Licensee fails to comply
w ith any term or condition of this Agreement. Termination of this Agreement shall terminate Licensee’s license
to the Softw are. All other terms and conditions of this Agreement shall survive termination in perpetuity.
3. LICENSE GRANT
3.1 Company grants to Licensee a nonexclusive, nontransferable license to use one (1) copy of the Softw are, in
object code form only, on one computer, and the Documentation, w hich use shall be limited to Licensee’s
internal use. The Softw are and Documentation are licensed, and not sold, to Licensee.
3.2 Licensee may make one (1) copy of the Softw are for archival purposes. Licensee may use the
Documentation only in connection w ith Licensee's use of the Softw are as authorized in Section 3.1 above.
Licensee shall have no right to reproduce, modify, transfer, disclose, or distribute any Documentation.
3.3 Licensee shall not, and shall not permit any third party to: (a) reverse engineer, disassemble, create derivative
w orks and/or modify the Softw are; (b) except as specifically set forth below in section 3.4, assign, rent,
lease, sell, transfer, or sublicense the Softw are; (c) electronically transfer or transmit the Softw are; (d)
translate the Softw are into another computer language; or (e) copy or otherw ise reproduce the Softw are or
Documentation, other than as specifically authorized in this Section.
3.4 Sublicense
Licensee may sublicense the Softw are to another party provided that such sublicense is granted on the same
terms and conditions as are set forth herein. It is the sole responsibility of the Licensee to obtain acceptance of
these terms and conditions from any party to w hom the Softw are is sublicensed.
In order to constitute a validly sublicensed copy, the Softw are must be reproduced in its entirety and w ithout
modification, including but not limited to any copyright notice, serial number, and any other notice affixed
thereto.
Welcome
4. OWNERSHIP; NOTICE
4.1 The Softw are and Documentation, and all intellectual property contained therein, are and shall remain the sole
and exclusive property of Company and its licensors and are protected by copyright and trade secret law s
and international copyright treaty provisions.
4.2 Licensee shall not remove, modify, or in any manner tamper w ith any copyright, trademark or other proprietary
notices embodied in the Softw are or on the Documentation, on any copy of the Softw are and Documentation,
in any form, in w hole or in part.
5. WARRANTY DISCLAIMERS; LIABILITY LIMITATIONS
5.1 COMPANY MAKES NO WARRANTY OR REPRESENTATION WITH RESPECT TO THE SOFTWARE AND IT IS
LICENSED “AS IS” WITHOUT WARRANTY OF ANY KIND EXPRESS OR IMPLIED, INCLUDING, BUT NOT LIMITED
TO, THE IMPLIED WARRANTIES OF MERCHANTABILITY, FITNESS FOR A PARTICULAR PURPOSE AND NONINFRINGEMENT, AND ANY STATEMENTS OR REPRESENTATIONS MADE BY ANY OTHER PERSON OR ENTITY
ARE VOID. COMPANY MAKES NO REPRESENTATIONS THAT ANY PROGRAMMABILITY COMPLIES WITH THE
APPLICABLE STATUTES, LAWS, OR REGULATIONS.
5.2 LICENSEE ASSUMES ALL RISK AS TO THE SELECTION, USE, PERFORMANCE AND QUALITY OF THE
SOFTWARE. IN NO EVENT WILL COMPANY OR ANY OTHER PARTY WHO HAS BEEN INVOLVED IN THE
CREATION, PRODUCTION OR DELIVERY OF THE SOFTWARE BE LIABLE FOR SPECIAL, DIRECT, INDIRECT,
INCIDENTAL OR CONSEQUENTIAL DAMAGES, INCLUDING LOSS OF PROFITS OR INABILITY TO USE THE
SOFTWARE, EVEN IF COMPANY OR SUCH OTHER PARTY HAS BEEN ADVISED OF THE POSSIBILITY OF
SUCH DAMAGES.
5.3 Some states and/or countries do not allow limitations on how long an implied w arranty lasts and some states
and/or countries do not allow the exclusion or limitation of incidental or consequential damages, so the above
limitation and exclusion may not apply to Licensee. This w arranty gives Licensee specific legal rights, and
Licensee may also have other rights w hich vary from state to state and/or country to country.
6. GENERAL
6.1 If any provision or portion of a provision of this Agreement is determined to be invalid or unenforceable, it shall
be deemed to be revised to the extent necessary to make it enforceable, or omitted if necessary, and the
remaining provisions of this Agreement shall remain in full force and effect.
6.2 This Agreement is governed by and construed in accordance w ith the law s of the State of California, w ithout
regard to its conflicts of law principles. The parties to this Agreement hereby irrevocably consent to the
personal jurisdiction of the state and federal courts located in San Diego, California to resolve any dispute or
controversy related to this Agreement.
6.3 This Agreement constitutes the entire agreement betw een the parties w ith respect to the subject matter
hereof, and all prior agreements, representations, statements and undertakings are hereby expressly
canceled.
6.4 Neither party hereto shall be liable in any manner for failure or delay in fulfillment of all or part of this
Agreement directly or indirectly ow ing to any causes or circumstances beyond its reasonable control,
including, but not limited to, acts of God.
7. EXPORT CONTROL REGULATIONS
Licensee acknow ledges and agrees that none of the Softw are, Documentation or underlying information or
technology may be installed or otherw ise exported or reexported (a) into (or to a national or resident of) Cuba,
Iran, North Korea, Sudan, Syria and any other country to w hich the U.S. has embargoed goods; or (b) to anyone
on the U.S. Treasury Department’s List of Specially Designated Nationals or the U.S. Commerce Department’s
Table of Denial Orders. Licensee further represents and w arrants that it is not located in, under the control of, or
a national or resident of any such country or on any such list, and w ill not transfer the Softw are to any of the
foregoing.
9
10
Buffalo Surveillance Server
8. U.S. GOVERNMENT RESTRICTED RIGHTS
The Softw are is provided w ith RESTRICTED RIGHTS. The use, duplication, or disclosure by the Government is
subject to restrictions as set forth in subdivision (c)(1)(ii) of The Rights in Technical Data and Computer Softw are
clause at 52.227-7013.
9. INCLUDED SOFTWARE
This product can be configured to use QuickTime softw are; Copyright 2009 Apple Inc., All rights reserved. This
product can be configured to use VLC media player softw are, Copyright VideoLAN team, All rights reserved. This
product uses w xWidgets softw are; Copyright 1998-2005 Julian Smart & Robert Roebling et al. This product can
be configured to use FFmpeg softw are, Copyright FFmpeg project.
Legal Disclaimer
The manufacturer provides this manual "as is," makes no representations or w arranties w ith respect to its
contents or use, and specifically disclaims any expressed or implied w arranties of merchantability or fitness for
any particular purpose. The manufacturer reserves the right to make changes to the content of this manual, at any
time, w ithout obligation to notify any person or entity of such changes.
The softw are described in this document is furnished under a license agreement. The softw are may be used or
copied only in accordance w ith the terms of the agreement. It is against the law to copy the softw are on any
medium except as specifically allow ed in the license agreement.
No part of this manual may be reproduced or transmitted in any form or by any means, electronic or mechanical,
including photocopying, recording, or information storage and retrieval systems, for any purpose other than the
purchaser’s personal use, w ithout the express w ritten permission of the manufacturer.
© SoleraTec 2012. All Rights Reserved. Printed in the United States of America.
Welcome
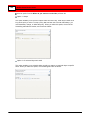
Contact Information
Please contact us with any comments or suggestions regarding how we can improve our
products or documentation.
Buffalo Technology.
11
12
Buffalo Surveillance Server
Documentation Overview
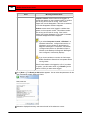
Notes About this Guide
Screen shots
The screen images in this guide are taken from Buffalo
Surveillance Server applications running on Windows XP.
The appearance of your applications may vary slightly
depending on your OS.
Buttons
Buttons are indicated by brackets. For example, if you
were to see "click [ Save ]" in the directions, you would
want to click the Save button.
Pathnames
All of the sample pathnames shown in this guide are for
a Windows OS. Use the path naming convention that is
appropriate to the OS on which you are running this
product. For example, if you are running a Unix OS,
where this guide states "C:\Program Files\BUFFALO",
you would instead use "/usr/local/BUFFALO".
This guide uses icon symbols to enable the reader to
easily identify tips, special documentation convention
information, cautionary statements, and advanced user
information:
= Tip
Help Icon Symbols
= Cautionary statement
= Advanced user information
= Documentation convention information
Buffalo Surveillance Server Conventions
Convention
Pathname and Case
Usage
Contents
Pathnames for hard disk media, log files, and
miscellaneous directories are case sensitive on nonWindows computers.
Welcome
Convention
Contents
Unless noted otherwise, values you enter, such as
when creating a Vault or searching for a file, are
not case sensitive but are case preserving. This
means that you can use case but case is ignored
by the application.
When entering pathnames or pathname searching
patterns, only the forward slash (/) may be used as
a pathname delimiter. If you use a backslash (\),
as is customary on some platforms, you may get
unexpected results.
Buffalo Surveillance Server privileged users have the
rights to override security in the application as it relates
to Buffalo Surveillance Server resources (e.g., media,
stored data, Vault operations). They cannot override local
computer security. The following are Buffalo Surveillance
Server privileged users:
Buffalo Surveillance
Server Privileged Users
Windows "Administrators" group
Windows "Backup Operators" group
Windows "Domain Administrator" user
Windows "Domain Admins" group
POSIX "root" user (UID:0)
POSIX "root" group (GID:0)
Opening a Buffalo
Surveillance Server
application in UNIX
When starting an application on Linux through
a terminal shell using cd /usr/local/
BUFFALO/Bin/..., if you click the X button on
the terminal shell itself, the terminal shell and
application closes. If you have not saved your
policy, any new parameters are not saved. If
you press Ctrl-C, an "Aborted" message
appears and the application closes. If you have
not saved your policy, any new parameters are
not saved.
13
14
Buffalo Surveillance Server
Convention
Contents
To avoid closing an application by accident,
start the application using the nohup
command. Type (nohup ./VaultAdmin >/dev/
null 2>&1 < /dev/null &) at the prompt. This
completely isolates the command from the
parent terminal shell.
Unsupported naming
conventions in Windows
Some Windows applications create filenames with
characters that are unreadable by Windows Explorer.
These files are also unreadable by Buffalo Surveillance
Server clients.
Questions?
For any questions that are not answered in this help resource, please contact us
11
.
Getting Started
Getting Started
This section presents information to help you get started quickly and easily, and give you an
overview of Buffalo Surveillance Server functionality.
See Quick Start for IP Camera Users 16 to perform the basic steps required to implement
the In using Buffalo Surveillance Server, set up an IP camera to record and store video, and
search for captured video footage.
See Quick Start for VMS System Users 27 to implement the Buffalo Surveillance Server,
begin to record and store video from your VMS system, and search for captured video
footage.
See How To 34 for high-level, step-by-step directions covering several frequently needed
tasks. For in-depth information on any given task, go to the respective section in this guide
This software has a product license associated with it. For more information see Product
Licensing 344 .
15
16
Buffalo Surveillance Server
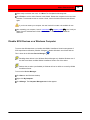
Quick Start for IP Camera Users
You can quickly and easily set up the Buffalo Surveillance Server and your RTSP enabled IP cameras to
begin to record, store, and manage surveillance video.
The brief steps below show you how to get started. They explain how to set up a camera configuration and
begin to record video, and then search for and view your video feeds.
To learn more about using the options and powerful capabilities of the Buffalo Surveillance Server, see the
Getting Started section and the remaining topics in this manual.
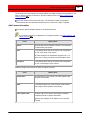
Step
When you want to:
Connect and set up the
storage device.
Perform the following steps:
Follow the instructions from your Buffalo storage device to:
Physically connect the device to your network, power it up, and
initialize it.
1
Ensure that your computer is properly configured and connected
to a network.
Open the web-based administration interface for the device.
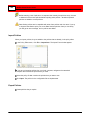
Enable Surveillance
capabilities.
In the Web Admin Interface, click Applications and then
Surveillance Camera to configure the surveillance camera.
2
Folder for saving video - Specifies where video will be stored; if
you are not sure of a location then keep the default value. Use the
Browse button to navigate to other folders.
Select a LAN Port. If there are multiple network connections, then
select the one that is connected to the desktop.
Getting Started
17
Click OK.
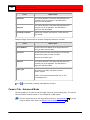
Download and Install
surveillance software
for desktop client.
3
Visit the Buffalo Technology website to download a copy of the
client software.
Ensure that Buffalo Surveillance Server will not be blocked
by your local firewall software.
All devices running the Buffalo Surveillance Server must be time
synchronized. If they are not, unexpected results may occur.
4
Connect your IP camera
and determine its IP
address.
Add a camera
configuration and
schedule video
recording.
Refer to the camera's user manual to install, configure, and initially
access the camera.
Use the camera's discovery software or other mechanism to
determine its IP address, and write it down. You need it for the next
step.
From the suite of Buffalo Surveillance Server applications on your
computer, open the Camera Policies application.
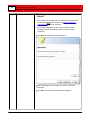
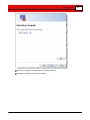
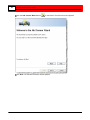
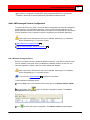
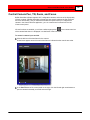
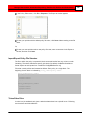
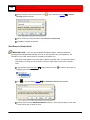
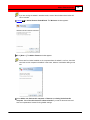
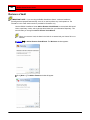
Click the Add Camera Wizard button
Welcome screen appears:
5
on the toolbar. The
18
Buffalo Surveillance Server
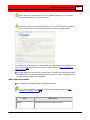
Click Next. The Camera Information window appears.
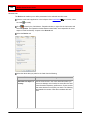
Getting Started
19
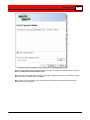
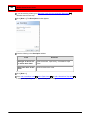
To add camera information either click the Find Cameras button to
display all the cameras found on the network, or from the pull-down
lists select the manufacturer and model.
If your camera manufacturer or model is not listed, use the
Camera Configuration window to add your camera, rather than
this wizard. See Add an IP Camera - Standard Mode 63 .
In the IP address box, enter the host name or IP address in dot
notation.
Enter the user name and password for the camera if they are
required to access it.
Click the Test Camera button to start a viewer to test whether the
supplied information is correct.
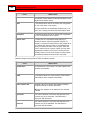
20
Buffalo Surveillance Server
What if my camera is not listed in the Add Camera
Wizard?
If your camera is not listed, add your camera's information using
the Camera Configurations window. See Add an IP Camera Standard Mode 63 for this procedure.
If your camera manufacturer and model are listed, Buffalo
Surveillance Server automatically fills the required camera
information.
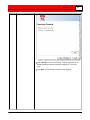
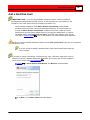
Click Next. The Description window appears.
Enter a meaningful name to identify the camera, and a brief
description.
Click Next. The Recording Schedule window appears.
Getting Started
21
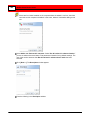
Select Always to record continuously. Video is captured into the
Buffalo Surveillance Server Information Repository in 5-minute
clips.
Click Next. The Recording Computer screen appears.
22
Buffalo Surveillance Server
Select the computer that should be used for recording video from
the drop-down list.
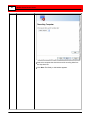
Click Next. The Ready to Add window appears.
Getting Started
23
Review the information. To make changes, use the Back button to
go to the appropriate wizard screen.
Click Next. The List of Cameras Added window appears.
24
Buffalo Surveillance Server
The cameras added during the wizard session are listed. To remove
any camera, select it and then click the Remove Selected
Camera button.
If you do not want to add another camera, select No. To add
another camera, select Yes in order to cycle through the wizard
again. Click Next.
If you have no more cameras to add, the Ready to Save Camera
Configurations and Recording Schedules window appears.
Getting Started
25
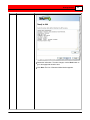
The list of cameras for save is displayed. To remove any camera,
select it and then click the Remove Selected Camera button.
Click Finish. The Add Camera Wizard closes, and the focus is in
the main Camera Policies application window.
By configuring a camera and setting a schedule for it to record,
the new recording policy is listed on the left side of the main
Camera Policies application.
6
Wait for your video feed
to be recorded and
processed.
Search for and review
recorded video.
After creating a recording policy, wait about 15 minutes to allow the
system time to record a 5-minute clip, process and store it, and
make it available for searching.
From the suite of Buffalo Surveillance Server applications on your
computer, open Surveillance Video Manager
7
.
Click the Search button on the lower left. The search results pane
in the middle of the screen displays the video clip that was just
recorded.
Also select the camera whose video you want to search.
26
Buffalo Surveillance Server
Click More Search Options to see more criteria to narrow search
results.
Refer to the section on Searching for, Reviewing, and Exporting
Surveillance Video 273 for more information about how to export
video out of the system.
8
Install Buffalo
Surveillance Server
clients on other
computers.
To run Buffalo Surveillance Server policies from other computers on
your network, repeat Step 3 to download and then run the client
software on those computers.
Getting Started
27
Quick Start for VMS System Users
If your hardware configuration supports VMS systems, you can quickly and easily set up the Buffalo
Surveillance Server to capture, store, and manage that video.
The brief steps below show you how to get started. They explain how to set up VMS-managed cameras and
begin to record video into the Buffalo Surveillance Server Information Repository, and search for and view
your video feeds.
To learn more about using the options and powerful capabilities of the Buffalo Surveillance Server, see the
How To section and the remaining topics in this manual.
Step
When you want to:
Connect and set up the
storage device.
Perform the following steps:
Follow the instructions from your Buffalo storage device to:
Physically connect the device to your network, power it up, and
initialize it.
1
Ensure that your computer is properly configured and connected
to a network.
Open the web-based administration interface for the device.
Enable Surveillance
capabilities.
Open the web-based administration interface (Web Admin) for
your Buffalo NAS device.
In the Web Admin Interface, click Applications and then
Surveillance Camera to configure the surveillance camera.
2
Folder for saving video - Specifies where video will be stored; if
you are not sure of a location then keep the default value. Use the
Browse button to navigate to other folders.
Select a LAN Port. If there are multiple network connections, then
select the one that is connected to the desktop.
28
Buffalo Surveillance Server
Click OK.
Download and Install
surveillance software
for desktop client.
3
Visit the Buffalo Technology website to download a copy of the
client software.
Ensure that Buffalo Surveillance Server will not be blocked
by your local firewall software.
All devices running the Buffalo Surveillance Server must be time
synchronized. If they are not, unexpected results may occur.
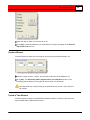
Add camera
configuration
information.
From Camera Policies > View menu, select Enable
Advanced Mode.
In the toolbar, click
to open the Camera
Configurations window. The Camera Configurations window
opens:
4
Click
to add a new camera configuration. The Add
New Camera window appears.
Getting Started
Select the appropriate camera from the Camera Type
drop-down list.
Type the name and location of the camera, and a
description.
To associate the camera with a Camera Pool, select it
from the drop-down list.
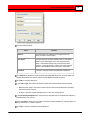
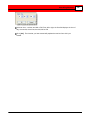
In the Target Camera section, click Change to populate
boxes. The Modify Target Camera dialog appears.
29
30
Buffalo Surveillance Server
Fill in the following text boxes:
Address:
The host name or IP address of the image
server to extract video from.
User Name:
User name for someone who has rights to
access the camera with video to extract.
Password:
Basic user password for the VMS system
database.
Click Refresh to update the list of cameras associated
with the server, and then select the camera with video to
capture into the Buffalo Surveillance Server.
Click OK to close the dialog box.
In Video Type, select the format the extracted video
should be stored.
MJPEG stores video in the same format it was stored
in Milestone, and takes the same amount of space.
H.264 is a loss-less format that takes 30% to 70% less
storage space.
Leave the Active check box selected so the camera can
be used in the policy to create in the next step.
Click OK to close the Add New Camera dialog box.
Getting Started
31
Click
to save the new camera configuration and add it
to the Information Repository.
Repeat the steps above to add the configurations for each camera
with video to capture into the Buffalo Surveillance Server Information
Repository.
Create a recording
policy to record and
store video.
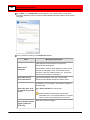
In the toolbar of the Camera Policies window, click Add
.
In the Create a Policy dialog box, enter a Policy Name and
Description, select the host, select the Active check box, and
click OK.
5
The policy is displayed in the left pane of the Camera Policies
window.
In the Camera tab of the Camera Policies window, select the
camera added.
32
Buffalo Surveillance Server
In the Scheduling tab, leave the defaults so video feeds are
recorded continuously.
Click Save
to save the policy.
Getting Started
6
Wait for your video
feed to be recorded
and processed.
Search for and review
recorded video.
33
After creating a recording policy, wait about 15 minutes to allow the
system time to record a 5-minute clip, process and store it, and
make it available for searching.
From the suite of Buffalo Surveillance Server applications on your
computer, open Surveillance Video Manager
.
Click the Search button on the lower left. The search results pane
in the middle of the screen displays the video clip that was just
recorded.
7
Also select the camera whose video you want to search.
Click More Search Options to see more criteria to narrow search
results.
Refer to the section on Searching for, Reviewing, and Exporting
Surveillance Video 273 for more information about how to export
video out of the system.
8
Install Buffalo
Surveillance Server
clients on other
computers.
To run Buffalo Surveillance Server policies from other computers on
your network, repeat Step 3 to download and then run the client
software on those computers.
34
Buffalo Surveillance Server
How To
Each "How To" section provides high-level directions on how to quickly execute a task. For indepth information on any given task, go to the respective section in this guide.
Launch a Buffalo Surveillance Server application
34
Capture Video Feeds from RTSP Enabled IP Camera
Add and Schedule an IP Camera
Create a Recording Policy
34
44
Create Data Service Policies
Create a Data Service Policy
45
Search for & Export Surveillance Video Files
Search for & Export Surveillance Video Files
46
Launch an Application
To launch a Buffalo Surveillance Server application, see the instructions for the OS below.
Windows
To launch a Buffalo Surveillance Server application from the Windows desktop,
click Start > All Programs > BUFFALO, and then select the application to run.
Macintosh
To launch a Buffalo Surveillance Server application on a Macintosh, browse to
Applications > BUFFALO > Bin, and then select the application to run.
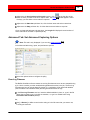
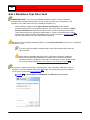
Add and Schedule an IP Camera
Follow the steps below to use the Camera Wizard to quickly and easily add a camera and start
to record video.
Getting Started
From the suite of Buffalo Surveillance Server applications on your computer, open the Camera
Policies application.
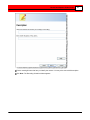
Click the Add Camera Wizard button
on the toolbar. The Welcome screen appears:
Click Next. The Camera Information window appears.
35
36
Buffalo Surveillance Server
To add camera information either click the Find Cameras button or from the pull-down lists Select
the manufacturer and model.
If you click the Find Cameras button a Search Results window appears showing a list of cameras
found on the network. If your camera is not on the list, select the Show all devices check box for
any additional cameras on the network and other devices to display. If your camera still does not
display, use the Select the Manufacturer and model pull-down list option and type the IP address,
or you can add it manually in Camera Configurations. In the Search Results window, cameras in use
appear grayed-out and available cameras for configuration have an asterisk (*) in the first column.
Select a camera and click OK, or double-click the camera item for the camera information to
configure.
Getting Started
37
If the camera manufacturer or model is not listed, use the Camera Configuration window to add
the camera, rather than this wizard. See Add an IP Camera - Standard Mode 63 .
In the IP address text box, type the host name or IP address in dot notation.
Type the user name and password for the camera if they are required to access it.
Click the Test Camera button to start a viewer to test whether the supplied information is correct.
What if my camera is not listed in the Add Camera Wizard?
If your camera is not listed in the Add Camera Wizard, you'll need to add the camera's information
manually using the Camera Configurations window for IP cameras. See Add an IP Camera - Standard
Mode 63 for this procedure.
Click Next. The Description window appears.
38
Buffalo Surveillance Server
Enter a meaningful name that lets you identify the camera. You may also enter a brief description.
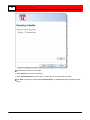
Click Next. The Recording Schedule window appears.
Getting Started
39
Indicate when you want to record video:
Select Always record video continuously.
Select At selected times to record only on certain days or at certain times of the day.
Click Next. If selecting to record video at selected times, an additional Recording Schedule window
opens.
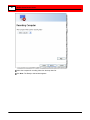
40
Buffalo Surveillance Server
Use the check boxes to select the days to record video.
Use the Start and Stop drop down lists to set the beginning and ending times for the period to
record. When you make your selections, the length of the time period is indicated.
Click Next. After scheduling to record video, the Recording Computer screen appears.
Getting Started
Select the computer for recording video from the drop down list.
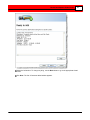
Click Next. The Ready to Add window appears.
41
42
Buffalo Surveillance Server
Review the information. To change anything, use the Back button to go to the appropriate wizard
screen.
Click Next. The List of Cameras Added window appears.
Getting Started
43
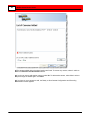
The cameras added during the wizard session are listed. To remove any camera, select it and then
click the Remove Selected Camera button.
If you do not want to add another camera, select No. To add another camera, select Yes in order to
cycle through the wizard again. Click Next.
If you have no more cameras to add, the Ready to Save Camera Configurations and Recording
Schedules window appears.
44
Buffalo Surveillance Server
The list of cameras ready for saving, is displayed. To remove any camera, select it and then click the
Remove Selected Camera button.
Click Finish. The Add Camera Wizard closes, and the focus is in the main Camera Policies
application window.
Through configuring a camera and setting a schedule for it to record, you created a new
recording policy that is listed on the left side of the main Camera Policies application.
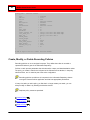
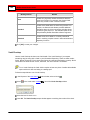
Create a Recording Policy
For most users, the quickest and easiest way to set up a camera and schedule and record
video is to use the Add Camera Wizard 53 .
If you cannot use the Add Camera Wizard (for example, if your camera information is not
included in the manufacturer or model list) you can create a recording policy in Basic Mode
manually as explained below.
Getting Started
Also, if you want to set up and define additional recording configuration options, you can use
the Advanced Mode 51 of the Camera Policies application.
To create a recording policy (Standard Mode):
1. Launch the Camera Policies
49
application.
2. The Camera tab 104 should already have focus. Select the video recording or capturing
options you desire.
3. Select the Scheduling tab 129 to choose whether to schedule recurring jobs or individual jobs.
4. Click
to save all policy settings and implement the recording policy.
To create a recording policy (Advanced Mode):
1. Launch the Camera Policies
49
application.
2. The Camera tab 104 should already have focus. Select the video recording or capturing
options you desire.
3. Select the Processing tab 121 to define video and file processing options.
4. Select the Destination tab 123 to define the Vault, media, and/or storage pool to which video
will be recorded or captured.
5. Select the Scheduling tab 129 to choose whether to schedule recurring jobs or individual jobs.
6. Select the Advanced tab 131 to set options such as Pre-Process Commands, Log Files
Location, etc.
7. Click
to save all policy settings and implement the recording policy.
For details, see Camera Policies: Create Policies to Automatically Capture Videos
49
.
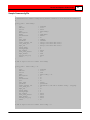
Create a Data Service Policy
Follow the steps below to create a Data Service policy:
1. Launch Data Service Policies 157 .
2. If a policy is not already open by default, create a policy 160 . Before you can set parameters
and initialize the process, a policy must be open.
3. Select the Source tab 175 to identify a Vault, media, or storage pool from which you want to
migrate, replicate, or purge files.
4. Select the Criteria tab 179 to denote which files to migrate, duplicate, or purge. You can also
add file and directory filters 183 .
45
46
Buffalo Surveillance Server
5. Select the Destination tab 188 to specify where you want the files migrated or replicated to.
6. Select the Scheduling tab 193 to define when you want jobs to occur. By default, Data
Service policies are not scheduled run.
7. Select the Advanced tab 196 to set options such as pre- and post-processing commands, log
output location, connection sharing, and throttling.
8. Click
to initiate the policy.
For details, see Data Service Policies: Create Policies to Manage Data in the Information
Repository 157 .
Search For and Export Surveillance Videos
Follow the steps below to search for and retrieve videos:
1. Launch the Surveillance Video Manager 273 .
2. Search for and Select Videos & Clips for Export 286 .
It is best to avoid using characters that the Buffalo Surveillance Server interprets as
wildcards or as otherwise special. If you need to use a character literally that the Buffalo
Surveillance Server uses as a wildcard, the character must be preceded by an escape
character ( \ ).
For example, \*This is an example using escape characters in a statement with a
wildcard\*.
The following are Buffalo Surveillance Server wildcards and special characters:
?, *, #, !, ~, ^, &, [ ], { }, \, ".
See the Advanced Wildcard Functionality section for details about wildcards.
3. Set Export Options & Export Videos and Clips 319 .
Record and Capture Video Feeds
Record and Capture Video Feeds
The Buffalo Surveillance Server allows for:
Recording live video feeds from an RTSP enabled IP camera directly into the Buffalo
Surveillance Server Information Repository.
Capturing video from cameras controlled by a VMS system such as Milestone or OnSSI into
the Buffalo Surveillance Server Information Repository.
Use the Buffalo Surveillance Server Camera Policies 49 application to configure RTSP IP
enabled or VMS-managed cameras and create recording policies to capture video into the
Buffalo Surveillance Server. Once inside the Buffalo Surveillance Server Information Repository,
take advantage of management, migration, replication, search, and archiving capabilities.
Video capture from VMS systems may not be available, depending on your hardware
device and depending on your product license.
The Camera Policies application controls all reporting, scheduling, and network bandwidth
utilization. Each Camera Policies client that is implemented runs independently and manages
all error logging, job operation completion times, and other information for its own computer
platform and file systems. Any Camera Policies client can see and capture video data from any
configured RTSP enabled IP or VMS-managed camera.
Load Balancing
You can denote a specific storage pool as part of the destination criteria for jobs. The Buffalo
Surveillance Server's clients locate the Vault (or Vaults) that contains the denoted storage pool
and stores the defined files to it. If there are multiple Vaults with media belonging to the storage
pool defined for the initial job, clients pick the one with the most available free space on it. This
keeps the entire Information Repository load balanced.
The Completeness and Accuracy of Stored Files
As a job is running, the Buffalo Surveillance Server continually verifies the completeness and
accuracy of the stored files.
Most products with data verification features require the data to be read from the media that it is
stored upon and compared to the original data on the client computer. While data verification is
imperative, this method is very resource intensive and time consuming. In contrast, the Buffalo
Surveillance Server uses a cyclic redundancy check (CRC) as the files are written to storage
media.
47
48
Buffalo Surveillance Server
If you are using policies to run jobs and an error or abnormal event occurs that prevents
targeted files from being processed, clients add the filename to an internal retry list. At the end
of the normal job and after the user-defined delay time, the client again attempts to process the
files that could not be processed on the first pass. If a file cannot be processed during the retry
session, the failure will be logged to a retry file and report. Any instance of videos that are not
processed is included in the Information Repository's error logs. When a subsequent job
starts, the Buffalo Surveillance Server looks for the retry file, and the videos slated for retry are
added, with first priority, to the list of videos to be captured.
Data Migration and Replication
Once videos have been captured into the Information Repository, Data Service policies 159 can
migrate and replicate data to and purge data from any Vault in the Information Repository. This
allows for creating an efficient and powerful multi-tiered Information Repository. See the Data
Service Policies 157 section for details.
Offline Media
When videos are being captured, offline media are never be used as a destination, even if offline
media is selected, it is not used. Attempting to use media that is offline may result in a “No
resources available” error if suitable media cannot be found.
Record and Capture Video Feeds
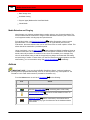
Using Camera Policies to Record and Capture Video
The Camera Policies application enables you to set up RTSP and VMS-managed camera
targets and then create policies that run unattended, on a scheduled basis. You can:
Configure RTSP enabled IP cameras 63 to create policies 84 that automatically record video
directly into the Buffalo Surveillance Server Information Repository.
Configure VMS-managed cameras 71 to create policies
Surveillance Server Information Repository.
84
to capture video into the Buffalo
Video capture from VMS systems may not be available, depending on your hardware
device and depending on your product license.
Automated scheduled recording jobs are controlled by policies that are defined by parameters
you set using the Camera Policies application. These policies control which video feeds are
captured, when jobs start, in which Vaults videos are stored, how often jobs run, when jobs
stop, and many other aspects of jobs.
The main Camera Policies window is divided into two main panes: the right pane contains the
tabs you will need to populate to create a policy, and the left pane provides an overview of all of
the recording policies in the Information Repository. Overview information includes the Policy
Name, Camera, Recording Computer, and a policy Description. When you move your mouse
over a policy listed in the left pane, a small popup displays summary information about the
policy.
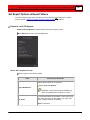
The Camera Policies window as it appears in standard mode is shown below. You may
also choose to use Advanced Mode 51 , which makes additional tabs and fields available.
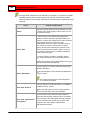
The Camera Policies menu bar includes the following:
File: Includes commands for importing and exporting recording policy configuration (.cfg) files
as well as saving policies you have created or modified.
Edit: Includes commands for adding, modifying, and deleting policies.
49
50
Buffalo Surveillance Server
View: Includes commands for refreshing the policies with the latest versions, and turning on
and off popup tips which you can hover over for more information about the fields in the tabs
in the right pane and the policies in the left pane, and enabling Advanced Mode, which lets
you configure additional, advanced recording policy options.
Tools: Provides access to Camera Configurations. If you are using the Camera Policies in
Advanced Mode, this menu also lets you access the User Preferences 123 dialog.
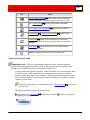
The Camera Policies toolbar includes the following buttons:
Saves all policy settings.
Opens the Add Camera Wizard so that you can easily configure a camera and
schedule it to record video.
Adds a new policy.
Deletes the selected policy.
Refreshes the view so that the latest version of each policy is displayed.
Provides access to Camera Configurations.
Important Tips:
The first time you launch Camera policies, before you have created any policies, the
Policy Name pane is empty. Before accessing any of the tabs, create a policy 85 .
When working with camera policies, there can be multiple recording policies per
camera, but it is not recommended to have multiple policies active and running at the
same time for a single camera.
A triangular caution symbol
superimposed on a policy icon in the left pane indicates
that the policy is not running. A policy does not run if its Active checkbox is deselected, if the camera associated with it is not marked as active, or if there is no
recording computer selected to run the policy.
Camera Polices are visible to all computers in the Information Repository that are
running Camera Polices and have appropriate permissions.
Because recording policies are implemented across the entire Information Repository,
another user can change policies while you are working in Camera Policies. To ensure
that you are viewing the most current list of policies, use
.
Record and Capture Video Feeds
If multiple people in your organization create or modify camera configurations or recording
policies, it is recommended that they not attempt to make their changes at the same
time. Doing so may cause someone's work to be unintentionally overwritten.
Camera Policies Advanced Mode
When you initially install the Camera Policies application, it is set in Standard Mode.
This lets you set up and connect RTSP enabled IP cameras and schedule jobs quickly and
easily. You can quickly create a recording policy by configuring IP cameras and setting the
options in the Camera and Scheduling tabs of the Camera Policies application.
To capture video from VMS systems such as Milestone or OnSSI, you must use the Advanced
Mode of Camera Policies. You may also want to use Advanced Mode to access additional,
more advanced options for direct-connect IP cameras.
Video capture from VMS systems may not be available, depending on your hardware
device and depending on your product license.
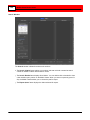
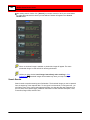
Compared to Standard Mode, Advanced Mode displays several additional fields on the Camera
tab and Camera Configuration window, as well as additional tabs for setting Processing,
Destination, and other Advanced options. See image below:
To enable Advanced Mode, select Enable Advanced Mode from the View menu on the main
Camera Policies window.
If you turn Advanced Mode on, it remains that way until you disable it.
51
52
Buffalo Surveillance Server
If you set an advanced option and later want to change it, you must be in Advanced
Mode in order to access the option. Keep in mind that some Buffalo Surveillance Server
users in your network may be using Standard Mode and thus might not be easily able to
see that you have made a change in an advanced setting.
In the following sections it is assumed that you are using Camera Policies in basic mode.
Additional options available only in Advanced Mode are noted as such.
Add, Modify, or Delete Camera Configurations
The Buffalo Surveillance Server enables you to view live feeds from RTSP enabled IP cameras
and record video directly from RTSP enabled IP cameras. Before you can do this, you will need
to add cameras to your Information Repository and configure them. When you add cameras,
the Buffalo Surveillance Server tracks them and they are listed on the Camera tab of every
Camera Policies application on any networked computer comprised by the Information
Repository.
To learn how to view live feeds, see the section titled, Search for & Export Surveillance
Video Files > View Live Camera Feeds 284 .
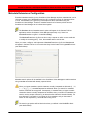
The Camera Configuration window displays a list of the camera configurations that have
been created and are available for use by recording policies. It displays the camera name,
manufacturer and model, capture URL, status, camera pool, recording computer, and a
description.
The toolbar at the top has buttons for saving, adding, and deleting configurations. In addition,
you can edit an existing configuration by selecting it, right-clicking, and selecting Edit.
Adding a camera configuration is the first step in using the Camera Policies application to
directly record video (if you have RTSP IP enabled cameras) or capture video from a VMS
system.
Video capture from VMS systems may not be available, depending on your hardware
device and depending on your product license.
If you want to record video from an IP camera, the quickest and easiest way to do it is to use
the Add Camera Wizard 53 . If you are a more advanced user you need to configure a VMSmanaged camera, you will do it by using the Add button in the Camera Configurations window,
shown below.
Record and Capture Video Feeds
Camera Allocation
In Camera Configurations window, from the Tools menu, select Camera Allocation. This is an
informational window to show how many cameras are licensed, how many cameras are being
used, and how many cameras are available for each recording computer. Use this information
to manage and change where cameras are allocated using functions in the Camera
Configurations window.
Add Camera Wizard
53
Add an IP Camera - Standard Mode
Add an IP Camera - Advanced Mode
63
66
Add a VMS-managed Camera Configuration
Modify a Camera Configuration
Delete a Camera
71
77
77
Licensing 344
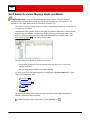
Add Camera Wizard
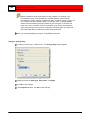
The Add New Camera Wizard is generally the quickest and easiest way to set up a camera
and start to record video into the Buffalo Surveillance Server Information Repository.
The Add New Camera Wizard cannot be used if extended metadata 295 (the
MetadataExtensions.cfg file) is in use. Add cameras manually using Camera
Configuration when using extended metadata.
To add a camera and start to record video:
From the suite of Buffalo Surveillance Server applications on your computer, open the Camera
Policies application.
53
54
Buffalo Surveillance Server
Click the Add Camera Wizard button
on the toolbar. The Welcome screen appears:
Click Next. The Camera Information window appears.
Record and Capture Video Feeds
55
To add camera information either click the Find Cameras button or from the pull-down lists Select
the manufacturer and model.
If you click the Find Cameras button a Search Results window appears showing a list of cameras
found on the network. If your camera is not on the list, select the Show all devices check box for
any additional cameras on the network and other devices to display. If your camera still does not
display, use the Select the Manufacturer and model pull-down list option and type the IP address,
or you can add it manually in Camera Configurations. In the Search Results window, cameras in use
appear grayed-out and available cameras for configuration have an asterisk (*) in the first column.
Select a camera and click OK, or double-click the camera item for the camera information to
configure.
56
Buffalo Surveillance Server
If the camera manufacturer or model is not listed, use the Camera Configuration window to add
the camera, rather than this wizard. See Add an IP Camera - Standard Mode 63 .
In the IP address text box, type the host name or IP address in dot notation.
Type the user name and password for the camera if they are required to access it.
Click the Test Camera button to start a viewer to test whether the supplied information is correct.
What if my camera is not listed in the Add Camera Wizard?
If your camera is not listed in the Add Camera Wizard, you'll need to add the camera's information
manually using the Camera Configurations window for IP cameras. See Add an IP Camera - Standard
Mode 63 for this procedure.
Click Next. The Description window appears.
Record and Capture Video Feeds
57
Enter a meaningful name that lets you identify the camera. You may also enter a brief description.
Click Next. The Recording Schedule window appears.
58
Buffalo Surveillance Server
Indicate when you want to record video:
Select Always record video continuously.
Select At selected times to record only on certain days or at certain times of the day.
Click Next. If selecting to record video at selected times, an additional Recording Schedule window
opens.
Record and Capture Video Feeds
Use the check boxes to select the days to record video.
Use the Start and Stop drop down lists to set the beginning and ending times for the period to
record. When you make your selections, the length of the time period is indicated.
Click Next. After scheduling to record video, the Recording Computer screen appears.
59
60
Buffalo Surveillance Server
Select the computer for recording video from the drop down list.
Click Next. The Ready to Add window appears.
Record and Capture Video Feeds
61
Review the information. To change anything, use the Back button to go to the appropriate wizard
screen.
Click Next. The List of Cameras Added window appears.
62
Buffalo Surveillance Server
The cameras added during the wizard session are listed. To remove any camera, select it and then
click the Remove Selected Camera button.
If you do not want to add another camera, select No. To add another camera, select Yes in order to
cycle through the wizard again. Click Next.
If you have no more cameras to add, the Ready to Save Camera Configurations and Recording
Schedules window appears.
Record and Capture Video Feeds
63
The list of cameras ready for saving, is displayed. To remove any camera, select it and then click the
Remove Selected Camera button.
Click Finish. The Add Camera Wizard closes, and the focus is in the main Camera Policies
application window.
Through configuring a camera and setting a schedule for it to record, you created a new
recording policy that is listed on the left side of the main Camera Policies application.
Add an IP Camera - Standard Mode
The Add New Camera Wizard 53 generally provides the quickest and easiest way to set up an
IP camera and start to record video into the Buffalo Surveillance Server Information Repository.
If your camera manufacturer or model are not found on the network, the wizard cannot be used
and you must add it manually, as described below.
To be able to view and record live video feeds, you must ensure that RTSP is enabled on
your IP camera. See your camera's documentation for details on enabling RTSP.
64
Buffalo Surveillance Server
To learn how to view live feeds, see the section titled Search for & Export Surveillance
Video Files > View Live Camera Feeds 284 .
This procedure assumes that you are using the standard mode for Camera Policies. If
you are using Advanced Mode 51 , see Add an IP Camera - Advanced Mode 66 .
To add an IP Camera Configuration:
From the toolbar at the top of the Camera Policies
Camera Configurations window:
Click
49
application, click
to open the
to add a camera. The Add New Camera window appears:
Fill in or select the following fields as needed:
Field
Results
A user defined value used in the menus and configuration
file, this is the name of the camera.
Name and/or Location
The name entered is for identification purposes only. It is
best to use a naming convention and a descriptive name.
Record and Capture Video Feeds
Field
Results
Description
A user defined value used in the menus and configuration
file, this is a description of the camera.
Manufacturer
The manufacturer of the camera. The Video Capture URL
populates automatically.
Model
A user defined value, this is the camera's model number.
Video Capture URL populates automatically.
Video Capture URL
The RTSP URL of the camera that enables the Buffalo
Surveillance Server to capture video feeds.
In the first text box displays the IP address for the
selected camera. The second text box populates
automatically with a known camera manufacturer and
model.
Test the RTSP URL by clicking Test. If the test fails, see
Troubleshoot Camera Connection Problems for
troubleshooting steps.
If the camera is not listed and you are unsure of your
camera's RTSP URL, check with the camera's manufacturer.
User Name
If the camera requires a user name and password to be
accessed, this is the username. This field works in
conjunction with Password.
Password
If the camera requires a user name and password to be
accessed, this is the password. This field works in
conjunction with User Name.
Recording Computer
Select from the drop-down list a computer that captures a
video feed from your camera.
When you are finished selecting options and entering values, click OK.
Click
to save the new camera configurations and add the camera to the Information
Repository.
Repeat this process for each camera to add.
65
66
Buffalo Surveillance Server
When you use Camera policies 49 to add a Buffalo Surveillance Server supported RTSP
enabled IP camera, the Buffalo Surveillance Server automatically configures camera settings
and preserves motion detection metadata along with captured video. This data is then used by
the Surveillance Video Manager (SVM) application to create histograms of detected motion.
See the section titled Motion Detection Camera Configuration 145 for information about
supported cameras and configuration.
Search Results window
From the Add New Camera window, click the Find Cameras button for the Search Results
window to appear, showing a list of cameras found on the network. The camera list is pulled
from a pre-populated list of manufacturers. If your camera is not on the list, select the Show
all devices check box for any additional cameras on the network and other devices to display.
If your camera still does not display, you can add it manually in Camera Configurations. In the
Search Results window, cameras in use appear grayed-out and available cameras for
configuration have an asterisk (*) in the first column. Select a camera and click OK, or doubleclick the camera item for the camera information to configure.
Add an IP Camera - Advanced Mode
The Add New Camera Wizard 53 generally provides the quickest and easiest way to set up an
IP camera and start to record video into the Buffalo Surveillance Server Information Repository.
If you are a more advanced user and want to set additional camera configuration options, such
as specifying a Camera Pool, or alternative frame size, or enabling PTZ, use the procedure
below.
To be able to view and record live video feeds, you must ensure that RTSP is enabled on
your IP camera. See your camera's documentation for details on enabling RTSP.
To learn how to view live feeds, see the section titled, Search for & Export Surveillance
Video Files > View Live Camera Feeds 284 .
This procedure assumes that you are using Advanced Mode 51 in Camera Policies. If
you are using the standard mode, see Add an IP Camera - Standard Mode 63 .
Record and Capture Video Feeds
To add an IP Camera Configuration:
From the toolbar at the top of the Camera Policies
Camera Configurations window:
Click
49
application, click
to open the
to add a camera. The Add New Camera window appears:
Fill in or select the following fields as needed:
Field
Results
A user defined value used in the menus and configuration
file, this is the name of the camera.
Name and/or Location
The name entered is for identification purposes only. It is
best to use a naming convention and a descriptive name.
Description
A user defined value used in the menus and configuration
file, this is a description of the camera.
67
68
Buffalo Surveillance Server
Field
Results
Camera Pool
A camera pool is a user defined virtual grouping of cameras
to search video from specified cameras. For example, a
camera pool called "Doors" that includes all of the cameras
that cover the doors of your establishment. When you need
to see who's come or gone, select the "Doors" camera pool
as a search criteria, and only video captured from cameras
in the "Doors" camera pool are included. There is no limit to
the number of camera pools your Buffalo Surveillance Server
solution may have.
Manufacturer
The manufacturer of the camera. The Video Capture URL
populates automatically.
Model
A user defined value, this is the camera's model number.
Video Capture URL populates automatically.
Video Capture URL
The RTSP URL of the camera that enables the Buffalo
Surveillance Server to capture video feeds.
In the first text box displays the IP address for the
selected camera. The second text box populates
automatically with a known camera manufacturer and
model.
Test the RTSP URL by clicking Test. If the test fails, see
Troubleshoot Camera Connection Problems for
troubleshooting steps.
If the camera is not listed and you are unsure of your
camera's RTSP URL, check with the camera's manufacturer.
Live View URL
View live video feeds using the Live Viewer application or
the Surveillance Video Manager 284 . By default, this option is
enabled. The RTSP URL allows a live view from your
camera.
In the first field, enter the IP address or hostname for the
selected camera. The second field is populated
automatically when you select a camera manufacturer and
model. You can also enter the entire URL manually.
You can test the RTSP URL by clicking Test. If the test
fails, see Troubleshoot Camera Connection Problems for
troubleshooting steps.
Record and Capture Video Feeds
Field
Results
If your camera is not listed and you are unsure of your
camera's RTSP URL, check with your camera's
manufacturer.
Management URL
Enables camera management from a web browser when this
type of functionality is supported by the camera.
If you select the checkbox, the fields to the right are for the
RTSP URL of the camera that enables you to manage your
camera. This is an http address provided by the
manufacturer.
You can test the URL you have entered by clicking Test. If
the test fails, ensure you have entered the correct URL and
that your camera and camera manufacturer support on-line
camera management.
User Name
If the camera requires a user name and password to be
accessed, this is the username. This field works in
conjunction with Password.
Password
If the camera requires a user name and password to be
accessed, this is the password. This field works in
conjunction with User Name.
Alternative Frame
Size
The height and width, in pixels, of video images. Use this
field if you want to define a frame size that is different from
the camera's default. The first field is for width; the second
field is for height.
Enable PTZ
"PTZ" stands for "pan, tilt, zoom." This setting enables the
pan, tilt, and zoom functionality for the camera when PTZ
functionality is supported by the camera. For PTZ to work,
this option must be selected.
Enable stream over
TCP
Causes the RTSP capture to stream data over a TCP
connection rather than over a default HTTP connection.
Recording Computer
Select from the drop-down list a computer that captures a
video feed from your camera.
Active
Determines whether the camera is active or inactive. To
capture video and view live feeds, this option must be
selected.
If this box is not checked, any policy that uses this camera
will not run.
When finished selecting options and entering values, click OK.
69
70
Buffalo Surveillance Server
Click
to save the new camera configurations and add the camera to the Information
Repository.
Repeat this process for each camera to add.
When you use Camera policies 49 to add a Buffalo Surveillance Server supported RTSP
enabled IP camera, the Buffalo Surveillance Server automatically configures camera settings
and preserves motion detection metadata along with captured video. This data is then used by
the Surveillance Video Manager (SVM) application to create histograms of detected motion.
See the section titled Motion Detection Camera Configuration 145 for information about
supported cameras and configuration.
Search Results window
From the Add New Camera window, click the Find Cameras button for the Search Results
window to appear, showing a list of cameras found on the network. The camera list is pulled
from a pre-populated list of manufacturers. If your camera is not on the list, select the Show
all devices check box for any additional cameras on the network and other devices to display.
If your camera still does not display, you can add it manually in Camera Configurations. In the
Search Results window, cameras in use appear grayed-out and available cameras for
configuration have an asterisk (*) in the first column. Select a camera and click OK, or doubleclick the camera item for the camera information to configure.
Troubleshoot Camera Connection Problems
This section is to help diagnose camera configuration problems that may be preventing the
Buffalo Surveillance Server from working with the RTSP enabled IP camera. If the RTSP URL
has been entered and the camera did not work when you clicked Test, ensure that:
The camera is properly connected to the network.
You selected the correct manufacturer in the Buffalo Surveillance Server camera
configuration.
You selected the correct model in the Buffalo Surveillance Server camera configuration.
You entered the correct IP address in the Buffalo Surveillance Server camera configuration.
Check the camera's documentation to determine how to detect the correct IP address.
The correct path was entered by the Buffalo Surveillance Server or you entered the correct
path. Check your camera's documentation to determine the correct path.
If your camera has security enabled, the user name and password in the Buffalo Surveillance
Server camera configuration are correct for viewing or managing the camera.
Record and Capture Video Feeds
The camera is configured to enable RTSP viewing with either MPEG4 or H.264 formats.
MPEG4 or H.264 are the formats preferred by the Buffalo Surveillance Server.
Add a VMS-managed Camera Configuration
To capture video from your VMS, you need to add the configurations for cameras managed by
those systems to your Information Repository. When you add camera configurations, the
Buffalo Surveillance Server tracks them and they are listed on the Camera tab of every Camera
Policies application on any networked computer comprised by the Information Repository.
Video capture from VMS systems may not be available, depending on your hardware
device and depending on your product license.
Add a Milestone-managed Camera
71
Add an OnSSI-managed Camera Configuration
74
Add a Milestone-managed Camera
Before you configure cameras managed by Milestone XProtect, you'll need to know the name
or the IP address of the server where your Milestone installation resides, as well as a user
name and password of a Basic User to access the Milestone database.
Video capture from VMS systems may not be available, depending on your hardware
device and depending on your product license.
You must be in Advanced Mode
51
to perform this procedure.
To add a Milestone-managed camera:
From the View menu on the Camera Policies menu bar, select Enable Advanced Mode.
From the toolbar, click
to open the Camera Configurations window. The Camera
Configurations window appears:
Click
to add a new camera configuration. The Add New Camera window appears.
71
72
Buffalo Surveillance Server
Select Milestone managed camera from the Camera Type drop down list. The relevant
fields are displayed.
In the next two fields, enter the name and/or location of the camera, and a description.
If you want the camera to be associated with a Camera Pool, select it from the drop down
list.
In the Target Camera section, click Change to populate the fields. The Modify Target Camera
dialog box appears.
Record and Capture Video Feeds
Fill in the following fields:
Field
Results
Address
The host name or IP address of the image server from
which you want to extract video.
User Name
The user name can be either a Basic User or a Windows
Domain User. When Basic User, user is just the user
name. If a Windows Domain User, then the user name
format is "<user>@<domain>" where user is the user and
domain is the Windows domain the user is valid within.
Password
Your Basic User password for the Milestone database.
Click Refresh to update the list of cameras associated with the server, and then select the
camera whose video you want to capture into the Buffalo Surveillance Server.
Click OK to close the dialog box.
In the Video Type field, select the format in which the extracted video should be stored.
MJPEG stores video in the same format in which it was stored in Milestone, and takes
the same amount of space.
H.264 is a loss-less format that takes 30% to 70% less storage space.
In the Recording Computer field, select from the drop-down list a computer that captures a
video feed from your camera.
Select the Active check box if you want to make the camera available for capturing video if a
policy references it, or leave it inactive.
Click OK to close the Add New Camera dialog box.
73
74
Buffalo Surveillance Server
Click
to save the new camera configuration and add it to your Information Repository.
Add an OnSSI-managed Camera
Before you configure cameras managed by OnSSI, you'll need to know the name or the IP
address of the server where your OnSSI installation resides, as well as a user name and
password of a Basic User to access the OnSSI database.
Video capture from VMS systems may not be available, depending on your hardware
device and depending on your product license.
You must be in Advanced Mode
51
to perform this procedure.
To configure an OnSSI-managed camera:
From the View menu on the Camera Policies menu bar, select Enable Advanced Mode.
From the toolbar, click
to open the Camera Configurations window. The Camera
Configurations window appears:
Click
to add a new camera configuration. The Add New Camera window appears.
Record and Capture Video Feeds
Select OnSSI managed camera from the Camera Type dropdown list. The relevant fields
are displayed.
In the next two fields, enter the name and/or location of the camera, and a description.
If you want the camera to be associated with a Camera Pool, select it from the dropdown list.
75
76
Buffalo Surveillance Server
In the Target Camera section, click Change so that you can fill in the fields. The Modify
Target Camera dialog appears.
Fill in the following fields:
Field
Results
Address
The host name or IP address of the image server from
which you want to extract video.
User Name
The user name can be either a Basic User or a Windows
Domain User. When Basic User, user is just the user
name. If a Windows Domain User, then the user name
format is "<user>@<domain>" where user is the user and
domain is the Windows domain the user is valid within.
Password
Your Basic User password for the OnSSI database.
Click Refresh to update the list of cameras associated with the server, and then select the
camera whose video you want to capture into the Buffalo Surveillance Server.
Click OK to close the dialog.
In the Video Type field, select the format in which the extracted video should be stored.
MJPEG stores video in the same format in which it was stored in OnSSI, and takes the
same amount of space.
H.264 is a loss-less format that takes 30% to 70% less storage space.
In the Recording Computer field, select from the drop-down list a computer that captures a
video feed from your camera.
Record and Capture Video Feeds
Select the Active check box if you want to make the camera available for capturing video if a
policy references it, or leave it inactive.
Click OK to close the Add New Camera dialog.
Click
to save the new camera configuration and add it to your Information Repository.
Modify a Camera Configuration
Modify an Existing Camera Configuration
To modify an existing camera configuration:
From the toolbar at the top of the Camera Policies 49 application, click
to open the
Camera Configurations window. The Camera Configurations window appears, populated
with a list of all of the cameras configured in the Information Repository.
Select the camera you want to modify from the list.
From the menu at the top of the window, select Edit > Modify Selected Camera. The
Modify Camera window appears. It is populated with camera parameters for the selected
camera and otherwise identical to the Add Camera window.
Change the options and values as needed, and then click OK.
Click
at the top of the Camera Configurations window to save the modified camera.
Right-click the camera of interest for easy access to edit, live view, manage, and delete
functionality.
Delete a Camera Configuration
Delete an Existing Camera Configuration
To delete an existing camera configuration:
From the toolbar at the top of the Camera Policies 49 application, click
to open the
Camera Configurations window. The Camera Configurations window appears, populated
with a list of all of the cameras configured in the Information Repository.
Select the camera to delete from the list.
Click
. A confirmation window appears.
77
78
Buffalo Surveillance Server
If you are certain that you want to delete the camera configuration from Information
Repository, select Yes. The camera is deleted from your Information Repository and the list
in the Camera Configurations window.
Click
at the top of the Camera Configurations window to save the modified camera
configurations.
Right-click the camera of interest for easy access to edit, live view, manage, and delete
functionality.
Delete All Camera Configurations
To delete all camera configurations:
From the menu at the top of the Camera Policies application, select Tools > Cameras. The
Camera Configurations window appears, populated with a list of all of the cameras
configured for your system.
From the menu at the top of the window, select Edit > Delete All Cameras. A confirmation
window appears.
If you are certain that you want to delete all camera configurations from your entire
Information Repository, select Yes.
Click
at the top of the Camera Configurations window to save changes.
Import and Export Camera Configurations
This overview is intended for advanced users. It provides directions for exporting and importing
camera configurations, and it details the format of the file that is created whenever you export
camera configurations from Camera Policies. While it is best to use Camera Policies to change
your camera configurations, you can also do so by creating and importing a specially formatted
file.
Export Current Camera Configurations to a File
From the menu at the top of the Camera Policies application, select Tools > Camera
Configurations. The Camera Configurations window appears.
From the menu at the top of the Camera Configurations window, select File > Export to.
The Export to window appears. The default file name is Cameras.cfg. You can use whatever
filename you wish.
Select the location to which you want to export the file, and then click Save. The file is saved
to the location you selected.
Record and Capture Video Feeds
Import a Configuration From a File
From the menu at the top of the Camera Policies application, select Tools > Camera
Configurations. The Camera Configurations window appears.
From the menu at the top of the Camera Configurations window, select File > Import
from. The Import from window appears.
Navigate to the file location where you have saved your camera configurations file, select it,
and then click Open. The camera configurations from the file are added to the Camera
Configurations window.
Click
to save the modified camera configurations to your Information Repository.
Before you can import a camera configuration file, you must create one. The following
sections contain reference information for doing so.
Camera Configuration File Structure
Camera configuration files are block structured but free from any column or order formatting.
The tokens listed below specify camera parameters. Each "policy_name" block is a single
camera.
policy_name="<camera name>"
[
<token>=<value>
<token>=<value>
. . .
]
policy_name="<camera name>"
[
<token>=<value>
<token>=<value>
. . .
]
. . .
Token/Value Pairs
Tokens define camera attributes and functionality. Following are the tokens and their
definitions.
79
80
Buffalo Surveillance Server
Token/Value
active=<Boolean>
Description
Determines whether the camera is active or
inactive. For Live View and camera
Management to work, this option must be set
to true.
Valid values: true | false
Default = true
description="<character string>"
A user defined value used in the menus and
configuration file, this is a description of the
camera.
Default = ""
frame_height = "<integer>"
The height of the video frame. Works in
conjunction with camera_frame_width.
Default = 0
frame_width = "<integer>"
The width of the video frame. Works in
conjunction with camera_frame_height
Default = 0
Enables SVM to receive and display live
feeds from the camera.
live_view_enable=<Boolean>
Valid values: true | false
Default = true
live_view_url="<pathname>"
The RTSP URL used to live view video from
the camera.
Default path = ""
The manufacturer of the camera.
manufacturer="<character string>"
Default = "Generic"
mgmt_enable=<Boolean>
Enables camera management from a web
browser when this type of functionality is
supported by the camera.
Valid values: true | false
Default = true
The URL used to manage the camera.
mgmt_url="<URL>"
Default URL = ""
Record and Capture Video Feeds
Token/Value
model="<character string>"
Description
A user defined value, this is the camera's
model number.
Default = "Generic"
Required. Must match the "policy_name".
name="<character string>"
A user defined value used in the menus and
configuration file, this is the name of the
camera.
Default = ""
password="<character string>"
The password for the camera when a
password is required to access the camera.
Default = ""
policy_name="<camera name>"
Required. Must match "camera_name". If you
created your configuration using the
Surveillance Video Manager, this value is
generated by the Surveillance Video Manager
from "camera_name".
Indicating the beginning of a camera block,
the name for the policy that defines camera
parameters.
Default = ""
pool="<character string>"
A camera pool is a user defined virtual
grouping of cameras that enables you to
search video from only specified cameras.
There is no limit to the number of camera
pools your Buffalo Surveillance Server solution
may have, and apart from hardware
limitations, there is no limit on which and how
many cameras you may add to a camera
pool.
Default = ""
ptz_enable=<Boolean>
"PTZ" stands for "pan, tilt, zoom." This
setting enables the pan, tilt, and zoom
functionality for the camera when PTZ
functionality is supported by the camera. For
PTZ to work, this option must be selected.
Valid values: true | false
Default = false
81
82
Buffalo Surveillance Server
Token/Value
stream_over_tcp = "<Boolean>"
Description
Causes the RTSP capture to stream data
over a TCP connection rather than over a
default HTTP connection.
Default = false
The policy type of the file.
type="<character string>"
Default = "camcfg"
user_name="<character string>"
The user name of the camera when a user
name is required to access the camera.
Default = ""
version= "<number>"
video_capture_url="<url>"
The version number of the currently installed
application. Only the current version number
is valid. This number will change.
The RTSP URL used to capture video from
the camera.
Default = ""
Record and Capture Video Feeds
83
Sample Cameras.cfg File
#
# Generated from 'Camera Config Policy Writer' version: 1.0 on 2011/02/02 10:58:23
#
policy_name = "ACT-Lobby"
[
type
version
active
name
description
model
manufacturer
pool
user_name
password
video_capture_url
live_view_url
mgmt_url
frame_width
frame_height
ptz_enable
live_view_enable
mgmt_enable
stream_over_tcp
owner
]
=
=
=
=
=
=
=
=
=
=
=
=
=
=
=
=
=
=
=
=
"camcfg"
"1.0"
false
"ACT-Lobby"
""
"TCM-4301"
"ACTi"
""
"admin"
"123456"
"rtsp://192.168.5.240:7070/"
"rtsp://192.168.5.240:7070/"
"http://192.168.5.240:7070/"
0
0
false
true
true
false
""
# end of object rule for Camera 'ACT-Lobby'
policy_name = "ACTi Lobby - 2"
[
type
= "camcfg"
version
= "1.0"
active
= true
name
= "ACTi Lobby - 2"
description
= ""
model
= ""
manufacturer
= ""
pool
= ""
user_name
= "user"
password
= "password"
video_capture_url
= "milestone://192.168.2.39/ACTi Lobby - 2/mjpeg"
live_view_url
= ""
mgmt_url
= ""
frame_width
= 0
frame_height
= 0
ptz_enable
= false
live_view_enable
= false
mgmt_enable
= false
stream_over_tcp
= false
owner
= ""
]
# end of object rule for Camera 'ACTi Lobby - 2'
84
Buffalo Surveillance Server
policy_name = "Arecont AV2805"
[
type
= "camcfg"
version
= "1.0"
active
= true
name
= "Arecont AV2805"
description
= "AV2805"
model
= "AV2805"
manufacturer
= "Arecont Vision"
pool
= ""
user_name
= ""
password
= ""
video_capture_url
= "rtsp://192.168.1.246/h264.sdp"
live_view_url
= "rtsp://192.168.1.246/h264.sdp"
mgmt_url
= "http://192.168.1.246/"
frame_width
= 0
frame_height
= 0
ptz_enable
= false
live_view_enable
= true
mgmt_enable
= true
stream_over_tcp
= false
owner
= ""
]
# end of object rule for Camera 'Arecont AV2805'
Create, Modify, or Delete Recording Policies
Recording policies run on an assigned computer. They define when video is recorded or
captured and where it goes in the Information Repository.
Policies contain process parameters that include media, camera, and data destination values.
The policy you create is listed in the left panel of the Camera Policies window, in the policy
selection frame, and is saved as part of the active configuration.
Recording policies are visible to all computers in the Information Repository that are
running the Camera Policies application and that have appropriate permissions.
If at any time after you add a policy you find that it no longer meets your needs, you can
always modify or delete it by following the directions below.
Duplicate policy names are permitted.
Create a Policy
Modify a Policy
Delete a Policy
85
86
87
Record and Capture Video Feeds
Creating a Recording Policy: Overview
For most users, the quickest and easiest way to set up a camera and schedule and record
video is to use the Add Camera Wizard 53 .
If you cannot use the Add Camera Wizard (for example, if your camera information is not
included in the manufacturer or model list) you can create a recording policy in Basic Mode
manually as explained below.
Also, if you want to set up and define additional recording configuration options, you can use
the Advanced Mode 51 of the Camera Policies application.
To create a recording policy (Standard Mode):
1. Launch the Camera Policies
49
application.
2. The Camera tab 104 should already have focus. Select the video recording or capturing
options you desire.
3. Select the Scheduling tab 129 to choose whether to schedule recurring jobs or individual jobs.
4. Click
to save all policy settings and implement the recording policy.
To create a recording policy (Advanced Mode):
1. Launch the Camera Policies
49
application.
2. The Camera tab 104 should already have focus. Select the video recording or capturing
options you desire.
3. Select the Processing tab 121 to define video and file processing options.
4. Select the Destination tab 123 to define the Vault, media, and/or storage pool to which video
will be recorded or captured.
5. Select the Scheduling tab 129 to choose whether to schedule recurring jobs or individual jobs.
6. Select the Advanced tab 131 to set options such as Pre-Process Commands, Log Files
Location, etc.
7. Click
to save all policy settings and implement the recording policy.
Create a Recording Policy
This procedure assumes that you are using the standard mode for Camera Policies. If
you are using Advanced Mode 51 , you can configure numerous additional options using
the additional fields and tabs displayed in the main Camera Policies window.
85
86
Buffalo Surveillance Server
To create a recording policy:
In the Camera Policies application toolbar, click
Policy window appears:
to create a new policy. The Create a
Enter a name and description for the policy. The name should tell you something about the
policy so that you can know what it does later on without having to open it. For example, if
you have a policy that is capturing or extracting video from the main entrance, you might call
it FrontEntrance.
Ensure that the policy is active, or uncheck the Active checkbox if you do not want the
policy to run. When the Active checkbox is unchecked, the
symbol is superimposed over
the policy icon in the Policy Name frame.
Click OK to close the Create a Policy window.
In the first field of the Camera Tab of the main Camera Policies window, select the camera
configuration the policy applies to.
In the Scheduling tab 129 , select when you want to record video.
Click
to save all policy settings and implement the policy.
Recording policies are visible to all computers in the Information Repository that are
running the Camera Policies application and that have appropriate permissions.
Modify a Recording Policy
You can modify a recording policy's name, and description.
Double-click the policy name in the Policy Name frame. The Modify Selected Policy
window appears.
Enter the new policy name in the Policy Name text box.
Ensure the policy is active, or de-select the Active check box if you do not want the policy to
run. When the Active check box is de-selected, the
symbol is superimposed over the
policy icon in the Policy Name pane.
Record and Capture Video Feeds
Click OK. The window closes, the policy name and description appear in the Policy Name
pane.
Modify the parameters as needed on each tab for the policy. See the subsequent sections for
details.
Click
to save all policy settings and implement the policy.
If you modify a recording policy while a job is running based on that policy, the job will
stop as soon as it is finished processing the current file. The job will restart as
scheduled. For example, if a job runs every day, starts at 11:00 AM, and runs for 30
minutes, and while the job is running you modify the policy, the job will stop. If the
scheduled start time was not changed, the job will start at 11:00 AM the next day.
When you modify a recording policy and then click Save, any other users who have the
Camera Policies application open will see a popup message asking them whether they
want to save or accept the changes. If they do not, your changes will not take effect.
Delete a Recording Policy
You can delete a policy that no longer meets your needs, or you can de-activate a policy at
present and re-activate it at a later time when needed.
To delete a policy:
In the Policy Name pane, click the policy to delete.
Click
.
Click
to save all policy settings and implement the policy.
If you delete a policy while a job is running based on that policy, the job will stop as soon
as it is finished processing the current file.
To make an active policy inactive:
In the Policy Name pane, double-click the policy.
In the Modify Selected Policy window, de-select the Active check box.
Import or Export Recording Policies
This section is intended for advanced users. Buffalo Surveillance Server policy importing and
87
88
Buffalo Surveillance Server
exporting functionality allows you to save policies, restore policies, and copy sets of policies
from one computer to another. After creating a set of policies, Export them to a policy file.
Later, if you want to re-implement the set of policies or implement them for the first time on
another computer, simply Import them. Use the import and export functionality to take a
snapshot of the working policy configuration, bring new computers on-line, test different policy
configurations, or restore user corrupted policy configurations.
By default, recording policies are exported to CameraPolicies.cfg. Data service policies are
exported to DataSvcsSvc.cfg.
Although each policy editor uses only one policy set at a time, multiple policy sets exported to
policy files can be used. Create, name, and use any file naming convention for policy files, and
be sure to keep track of where policies are exported to if it is a location other than the default
location (the user's home directory).
Before restoring a set of policies to a computer that currently has policies set up, be sure
to delete all of the current policies before importing other policies - otherwise imported
policies are added to current policies.
Data Service policies are incompatible with other client policies and vice versa. If you try
to import a Data Service policy into a non-Data Services policies client (or vice versa),
you will get an error message, and no policies are added.
Import Policies
When you import policies, they are added to the policies that are already in the policy editor.
In the Policy Editor menu, click File > Import from. The Import From window appears.
If you are not importing policies from your local computer, navigate to the networked
computer that contains the policies that you need.
Select the policy file that contains the policies that you want to use.
Click Open. The policies in the configuration file are implemented.
Record and Capture Video Feeds
Export Policies
Create policies that you require.
In the Policy Editor menu, click File > Export to. The Export to window appears.
To save your policies with the default policy file name, click Save without entering a new file
name.
Or,
To save your new policies under a new policy file name, enter a new name In the Export to
window, and then click Save.
Import/Export Policy File Structure
An exported policy file is block structured but free from any column or order formatting. The
tokens listed below specify job criteria. By default, the Buffalo Surveillance Server exports
policies to and imports them from the locations below:
Data Service Policies
<install-dir>/Config/DataSvcsSvc.cfg.
Camera Policies
<install-dir>/Config/CameraPolicies.cfg.
Files that contain policies are formatted as follows. Each policy is a single block. The
beginning of each block is indicated by policy_name="<policy name>".
89
90
Buffalo Surveillance Server
policy_name="<policy name>"
[
<token>=<value>
<token>=<value>
. . .
]
policy_name="<policy name>"
[
<token>=<value>
<token>=<value>
. . .
]
. . .
Token/Value Pairs (Standard and Camera)
A token is a job attribute that is given a value which determines how a job will be run. Following
are the tokens and their definitions.
Standard
Token/Value
Description
Enables the creation of activity logs.
act_log_enabled="<Boolean>"
Valid values: true | false
Default = false
act_log_pn="<pathname>"
Defines the path for the activity log. Supports
token substitution.
Default path = ""
absolute_start="<yyyy>/<mm>
/<dd>-<hh>:<mm>:<ss>"
Used only in the policy file. The exact start
time and date that the job is to run. Multiple
absolute start tokens may be entered.1
Used only in the policy file. Defines whether
the policy is active or inactive.
active="<Boolean>"
Valid values = true | false
Default = true
admin_pn="<pathname>"
Specifies the directory that contains the log,
retry, and history files. Supports token
substitution.
Default path = "<install-dir>/JobHistory/"
Record and Capture Video Feeds
Allows any user to retrieve a file in the job,
regardless of the initial read access.
any_user_retrieve="<Boolean>"
Valid values = true | false
Default = false
backup_data
Currently not supported.
backup_stub
Currently not supported.
complete="<Boolean>"
Prints all summary information plus the
pathnames of the files ingested to the file
indicated by the list_pn option (below).
Valid values = true | false
Default = false
compress
Currently not supported.
Creates job history files for each job.
create_job_history="<Boolean>"
Valid values = true | false
Default = false
data_paths="<number>"
The maximum number of concurrent files that
can be sent.
Default = 1
A description of the policy
description="<character string>"
Default = blank
Prints diagnostic information to the file
indicated by the list_pn option (below).
diag="<Boolean>"
Valid values = true | false
Default = false
dir_spec="<pathname>"
Specifies which directories to include.
Multiple dir_spec options can be specified.
The dir_spec check is made for every
directory found. This includes the directories
contained in the pathname list that the job will
traverse.
Default = "*" (any)
91
92
Buffalo Surveillance Server
display_only="<Boolean>"
Causes job to search for but not store
targeted files. Lists the files that would have
been ingested.
Valid values = true | false
Default = false
Causes job to use only a Vault local to the
computer from which service is running.
dst_local_only="<Boolean>"
Valid values = true | false
Default = false
dst_media_name="<character string>
"
Specifies by name the destination media to
be used. If you don't specify a value in this
option, the Buffalo Surveillance Server uses
the first available unit of media.
Default = "*" (any)
Specifies the destination media to be used
according to media speed.
dst_media_speed="<character
string>"
Valid values =
S0 - S10
unspecified
Default = unspecified
Specifies the media type to be used for a job.
Valid values =
Hdisk – hard disk
8mm – Eight-millimeter tape
Dds – Digital data storage
Dlt – Digital linear tape
dst_media_type="<character string>"
Ait – Advanced intelligent tape
SuperAit
Vxa - Exabyte Vxa tape
Travan - Travan tape
Lto – Linear tape open
MagOptical – Read/write optical
Record and Capture Video Feeds
NullDevice
unspecified
Default = unspecified
dst_storage_pool="<alpha>"
Specifies the name of the destination storage
pool. Use ''" for no storage pool name.
Default = "*" (any)
dst_vault_name="<character string>"
Specifies the destination Vault name. If not
specified, the first available Vault will be used.
Default = "*" (any)
dst_volume_format
Currently not supported.
dst_volume_name
Currently not supported.
dst_volume_pack
Currently not supported.
Ingests files based on time and date or job
level.
Valid values =
AO (Absolute Old) – Selects files with
a dtu (date_time_use) equal to or
before the specified date. Enter the
year as a 4-digit number.
dtu_type="<alpha><yyyy>/<mm>
/<dd>-<hh>:<mm>:<ss>"
or
dtu_type=L"<level>"
AN (Absolute New) – Selects files
with a dtu equal to or after the
specified date. Enter the year as a 4digit number.
RO (Relative Old) – Selects files with
a dtu equal to or before the relative
specified date.
RN (Relative New) – Selects files with
a dtu equal to or after the relative
specified date.
L0 – Ingests all files.
L1 – Ingests all data changed since
the last L0 job.
L2 – Ingests all data changed since
the last L1 job.
93
94
Buffalo Surveillance Server
L3 – Ingests all data changed since
the last L2 job.
L4 – Ingests all data changed since
the last L3 job.
Default = L0
error_log="<pathname>"
Specifies the path for the error log file. If you
specify "/dev/tty", error messages will display
on the default output device. Supports token
substitution.
Default path for the configuration file = "R/
Logs/%P.err"
Default path for the command line = "/dev/tty"
exclude_dir_spec="<pathname>"
Omits directories. Accepts multiple
instances.
Default = "" (no directories excluded)
Omits files. Accepts multiple instances.
exclude_file_spec="<pathname>"
Default = "" (no files excluded)
Extended metadata in a token/value pairs.
Token/values can be found in the Camera
policies section titled, Metadata Tab and
Configuration.
ext_metadata="<command>"
Format:
token="<command>"token="<command>"...
Default = ""
ext_metadata_plugin="<character
string>"
Enables the collection of extended metadata.
file_grouping_plugin="<character
string>"
Enables file grouping.
file_spec="< pathname>"
Default = ""
Default = ""
Sets the criteria for files that are to be
ingested. This token/value pair can be
specified multiple times to include multiple file
filters.
Default = "*" (any)
follow_links
Currently not supported.
Record and Capture Video Feeds
gen_low_res_proxy="<Boolean>"
Enables the Buffalo Surveillance Server to
generate low resolution proxy videos at
capture/ingest.
Valid values = true | false
Default = true
gen_preview_image="<Boolean>"
Enables the Buffalo Surveillance Server to
generate preview image thumbnails at
capture/ingest.
Valid values = true | false
Default = true
gen_video_components="<Boolean>
"
Enables the Buffalo Surveillance Server to
capture/ingest video files so they are readable
by Buffalo Surveillance Server search
applications.
Valid values = true | false
Default = false
Where the tap service will run.
host_Id="<character string>"
Default = blank
include_offline
Currently not supported.
Specifies the job type.
Valid values =
backup
job_type="<alpha>"
collapse
move
Default = backup
Specifies the filename to which all report
information is written. Supports token
substitution.
list_pn="<pathname>"
Default path for the configuration file is "%R/
Logs/%P.log"
Default path for the command line = "/dev/tty"
local_only="<Boolean>"
Specifies that the file to be ingested must
reside on the local computer.
95
96
Buffalo Surveillance Server
Valid values = true | false
Default = true
localize="<Boolean>"
Specifies that all subsequent files in the
same job are sent to the same unit of media
until it is full.
Valid values = true | false
Default = true
lock_vault
Currently not supported.
Determines the quality of the low resolution
proxy video.
low_res_proxy_quality="<setting>"
Valid values = High | Medium | Low
Default = Medium
The policy source.
Valid values =
native_fs
obj_type="<character string>"
mse_pst
mse_msg
surv_camera
Default = native_fs
out_of_band="<Boolean>"
Enables the application to constantly monitor
its processes and select the network
transmission protocol that best suits the files
being processed.
Valid values = true | false
Default = true
pathname="<pathname>"
Specifies the pathname that will be searched
for files matching the options. Files,
directories, and wildcard expressions are
valid. This token/value pair can be specified
multiple times to include multiple paths.
No default
The job identifier.
policy_name="<policy name>"
No default
Record and Capture Video Feeds
post_proc_cmd="<command>"
Specifies a post-process command that runs
immediately after the job is finished. Supports
token substitution.
Default = ””
pre_proc_cmd="<command>"
Specifies a pre-process command that runs
immediately before the job starts. Supports
token substitution.
Default = ””
Determines the quality of the preview image.
preview_image_quality="<setting>"
Valid values = High | Medium | Low
Default = Medium
Preserves the state of directories.
process_directories="<Boolean>"
Valid values = true | false
Default = true
ref_id="<character string>"
Internal use only.
repeat_interval="<hh:mm:ss>"
Used only in the policy file. The amount of
time that elapses before a job is repeated.1
Default = 24:00:00
retry_time="<alpha><yyyy>/<mm>
/<dd>-<hh>:<mm>:<ss>"
Specifies the date and time to retry the list of
files not ingested. These files match all job
criteria but were not sent to the Vault. You
must precede the date/time value with an A to
specify an absolute date and time or an R to
specify a date and time relative to the end of
the job. Enter the absolute year as a four-digit
number (for example, 2001, 2002, etc.).
Valid values =
A – Absolute date and time.
R – Relative date and time.
Default = R0000/00/00-00:00:00 (retry files
immediately after the job finishes)
save_low_res_proxy="<Boolean>"
Enables the user to save a copy of the low
resolution proxy video at the location entered
in save_low_res_proxy_dir_pn.
Valid values = true | false
97
98
Buffalo Surveillance Server
Default = false
save_low_res_proxy_dir_pn="
<pathname>"
The path at which the copy of the low
resolution proxy video will be saved.
Default path = ""
Enables user to save a preview image at the
path entered in save_preview_image_dir_pn.
save_preview_image="<Boolean>"
Valid values = true | false
Default = false
save_preview_image_dir_pn="
<pathname>"
The path at which the copy of the preview
image will be saved.
Default path = ""
Used only in the policy file. The days on
which the job will run. Use - to indicate days
that the job will not run.
start_days="<mtwtfss>"
For example, if the job is to run on Thursday,
you would enter ---t---.1
Default = mtwtfss
start_time="<hh:mm:ss>"
Used only in the policy file. Specifies the time
the job should start for each defined start day
in start_days.1
Default = 00:00:00 (midnight)
stop_time=R"<yyyy>/<mm>
/<dd>-<hh>:<mm>:<ss>"
Used only in the policy file. Specifies the date
and time at which the job will be stopped. The
date and time entered is relative to the start of
the job.
R = relative to the start of the job.
Default = R0 (no stop time)
summary="<Boolean>"
Prints the start and finish times of the job and
the final statistics to the file indicated by the
list_pn option (above).
Valid values = true | false
Default = true
Ingests system info and other system states.
system_info="<Boolean>"
Valid values = true | false
Record and Capture Video Feeds
Default = false
throttle="<setting>"
Throttling controls the amount of bandwidth
used by jobs (and, therefore, the speed at
which files are sent to Vaults). Throttle values
are relative to Information Repository capacity
and range from 1% to 100%. A lower setting
reduces the amount of available bandwidth
that will be used.
Default = 100
Specifies the timestamp of the file that is to
be examined when determining if the file
meets the dtu_type criteria.
timestamp="<alpha>"
atime - access time
mtime - modified time
Default = mtime
type="<alpha>"
The policy type of the policy file. Only "tap" is
valid for Camera policies.
Default = tap
update_run_record="<Boolean>"
Updates the job run record (<install-dir>/
JobHistory/run_record.trr) whenever a "level”
job runs.
Valid values = true | false
Default = true
Specifies the number of files (F) or number of
bytes (S) to ingest per single Vault
connection.
Valid values =
vcs="<alpha><max num files>"
F – files
S – bytes
1Default = F500
version="<number>"
The version number of the currently installed
application. Only the current version number
is valid. This number will change.
99
100
Buffalo Surveillance Server
vid_extract_closed_caption="<Boolean>"
Enables Buffalo Surveillance Server to extract
closed captioning data from a video at ingest.
Valid values = true | false Default = true
vid_save_closed_caption="<Boolean>"
Enables the user to save a copy of the closed
captioning data in a location specified by
vid_save_closed_caption_dir_pn. Valid values
= true | false Default = false
vid_save_closed_caption_dir_pn="<
pathname>"
Specifies the path where the closed
captioning file will be saved. Default path =
"".
1
Note: Timing tokens are mutually exclusive. Only one timing token may be set. In other
words, you may set either absolute_start, or repeat_interval, or start_days AND start_time.
Camera
Token/Value
camera_cache_pn = "<character string>"
Description
Required. The location of the cache to hold
the clips before sending to Vault.
Default is “”
camera_clip_duration = "<integer>"
The length of clip that incoming video streams
are captured into.
Default = 1800 seconds
camera_description = "<character
string>"
camera_frame_height = "<integer>"
The description of the camera.
Default = “”
The height of the video frame. Works in
conjunction with camera_frame_width.
Default = 0 (indicates native frame height)
camera_frame_width = "<integer>"
The width of the video frame. Works in
conjunction with camera_frame_height.
Default = 0 (indicates native frame width)
camera_manufacturer = "<character
string>"
The manufacturer of the camera.
Default = “”
The camera model.
camera_model = "<character string>"
Default = “”
Record and Capture Video Feeds
Token/Value
camera_motion_detect = "<Boolean>"
Description
Determines if motion detection data is
captured from RTSP enabled IP cameras that
support motion detection. If selected for
cameras that do not capture motion detection
data or otherwise are not supported by the
Buffalo Surveillance Server, no motion
detection data is preserved.
Default = true
Required. The name of the camera.
camera_name = "<character string>"
Default = ""
camera_password = "<character string>"
The password for the account needed to
access the camera. Works in conjunction
with camera_username.
Default = ""
camera_pool = "<character string>"
A camera pool is a user defined virtual
grouping of cameras to search video from
specified cameras. For example, a camera
pool called "Doors" that includes all of the
cameras that cover the doors of your
establishment. When you need to see who's
come or gone, select the "Doors" camera
pool as a search criteria, and only video
captured from cameras in the "Doors" camera
pool are included. There is no limit to the
number of camera pools your Buffalo
Surveillance Server solution may have.
Default = ""
camera_stream_over_tcp = "<Boolean>"
Causes the RTSP capture to stream data
over a TCP connection rather than over a
default HTTP connection.
Default = false
camera_use_config = "<Boolean>"
System defined value.
camera_username = "<character string>"
The user name for the account needed to
access the camera. Works in conjunction
with camera_password.
Default = “”
101
102
Buffalo Surveillance Server
Token/Value
camera_video_capture_url = "<character
string>"
Description
Required. The URL from which the selected
camera can be viewed.
Default = “”
Sample Recording Policy
If you were to export a policy, it would look similar to the following:
Record and Capture Video Feeds
#
# Generated from 'Camera Policies' 12:00:55
#
#
# Start of object rule for policy_name 'test'
#
policy_name = "test"
[
type
= "tap"
version
= "1.0"
active
= false
job_type
= move
obj_type
= "surv_camera"
dtu_type
= L0
local_only
= false
follow_links
= false
process_directories
= false
timestamp
= mtime
backup_stub
= false
backup_data
= false
include_offline
= false
dst_media_type
= Unspecified
dst_media_speed
= Unspecified
dst_volume_format
= Unspecified
dst_Vault_name
= "*"
dst_media_name
= "*"
dst_volume_name
= "*"
dst_storage_pool
= "*"
dst_volume_pack
= ""
dst_local_only
= false
localize
= true
start_time
= 00:00:00
start_days
= mtwtfss
stop_time
= R0000/00/00-00:00:00
pre_proc_cmd
= ""
post_proc_cmd
= ""
error_log
= "%R/Logs/%P.err"
summary
= true
complete
= false
diag
= false
list_pn
= "%R/Logs/%P.log"
display_only
= false
update_run_record
= true
create_job_history
= false
retry_time
= R0000/00/00-00:00:00
any_user_retrieve
= false
out_of_band
= true
vcs
= F500
data_paths
= 1
throttle
= 100
system_info
= false
act_log_enabled
= false
act_log_pn
= "%R/Logs/%P.act"
ext_metadata_plugin
= "EmdProcessNone"
file_grouping_plugin
= "FgProcessNone"
gen_video_components
= true
gen_low_res_proxy
= true
low_res_proxy_quality
= Medium
save_low_res_proxy
= false
save_low_res_proxy_dir_pn = ""
gen_preview_image
= true
103
104
Buffalo Surveillance Server
preview_image_quality
= Medium
save_preview_image
= false
save_preview_image_dir_pn = ""
ext_metadata
= ""
camera_name
= "test"
camera_manufacturer
= "4XEM"
camera_model
= "DM38"
camera_description
= "test"
camera_cache_pn
= "C:\Documents and Settings\JohnDoe\Desktop\test"
camera_video_capture_url = "rtsp://89.73.01.5/live.sdp"
camera_clip_duration
= 1800
camera_frame_width
= 480
camera_frame_height
= 640
camera_stream_over_tcp
= true
camera_username
= ""
camera_password
= ""
camera_use_config
= false
compress
= false
lock_Vault
= true
]
# end of object rule for policy_name 'test'
Camera Tab: Designate the Camera
This tab enables you to select or enter the target camera for your recording policy.This may be
either an RTSP IP enabled camera, or one managed by a VMS system.
Video capture from VMS systems may not be available, depending on your hardware
device and depending on your product license.
To be able to view and record live video feeds, you must ensure that RTSP is enabled on
your IP camera. See your camera's documentation for details on enabling RTSP.
This topic assumes that you are using Standard Mode for Camera Policies. If you are
using Advanced Mode 51 , see Camera Tab - Advanced Mode 106 .
Record and Capture Video Feeds
The first field of this tab displays all configured RTSP and VMS-managed camera targets. If you
want to add and configure a camera for use with multiple policies, see Add, Configure, and
Delete Cameras 63 .
Select the camera to be used for this policy. The Camera Info fields are populated
automatically with the information entered when the camera was initially configured..
Add Camera Information
The camera options available depend on the Camera selected.
If you need to change the configuration of a configured camera, see Add, Configure, and
Delete Cameras 63 .
Field
What it does
Camera
This drop-down lists all available cameras. Once selected
the fields below pre-populate.
Name
A user defined value used in the menus and configuration
file, this is the name of the camera.
The name entered is for identification purposes only. It is
best to use a naming convention and a descriptive name.
Description
A user defined value used in the menus and configuration
file, this is a description of the camera.
Additional Target Camera fields for RTSP IP enabled cameras:
Field
What it does
Manufacturer
The manufacturer of the camera. The Video Capture URL
populates automatically.
Model
A user defined value, this is the camera's model number.
Video Capture URL populates automatically.
Video Capture URL
The RTSP URL of the camera that enables the Buffalo
Surveillance Server to capture video feeds.
The text box displays the IP address for the selected
camera.
105
106
Buffalo Surveillance Server
Field
User Name
What it does
If the camera requires a user name and password to be
accessed, this is the username. This field works in
conjunction with Password.
If the camera requires a user name and password to be
accessed, this is the password. This field works in
conjunction with User Name.
Password
Recording Computer
Displays the computer that captures a video feed from
your camera.
Additional Target Camera fields for cameras managed by Milestone or OnSSI:
Field
What it does
Server Address
The host name or IP address of the image server from
which you want to extract video.
User Name
The user name for a user who has rights to access the
camera whose video you want to extract.
This must be a "Basic User."
Password
If the camera requires a user name and password to be
accessed, this is the password. This field works in
conjunction with User Name.
Video Type
MJPEG stores video in the same format in which it
was stored in the VMS, and takes the same
amount of space.
H.264 is a loss-less format that takes 30% to 70%
less storage space.
Click
to save all policy settings and implement the policy.
Camera Tab - Advanced Mode
This tab enables you to select or enter the target camera for your recording policy. This may be
either an RTSP IP enabled camera, or one managed by a VMS system.
This topic assumes that you are using Camera Policies in Advanced Mode 51 . If you are
using the default, basic mode, see Camera Tab: Designate the Camera 104 .
Record and Capture Video Feeds
Video capture from VMS systems may not be available, depending on your hardware
device and depending on your product license.
To be able to view and record live video feeds, you must ensure that RTSP is enabled on
your IP camera. See your camera's documentation for details on enabling RTSP.
The first field of this tab displays all configured RTSP and VMS-managed camera targets. If you
want to add and configure a camera for use with multiple policies, see Add, Configure, and
Delete Cameras 63 .
Select the camera to be used for this recording policy. The Camera Info fields are populated
automatically with the information entered when the camera was initially configured, and only
the Video Recording options are configurable.
Add Camera Information
The camera options available depend on the Camera selected.
If you need to change the configuration of an already configured camera, see Add,
Configure, and Delete Cameras 63 .
Field
Camera
What it does
This drop-down list lets you select a camera.
107
108
Buffalo Surveillance Server
Field
What it does
The Camera chosen determines the fields displayed in the
Target Camera section below.
Name
A user defined value used in the menus and configuration
file, this is the name of the camera.
The name entered is for identification purposes only. It is
best to use a naming convention and a descriptive name.
Description
A user defined value used in the menus and configuration
file, this is a description of the camera.
Camera Pool
A camera pool is a user defined virtual grouping of
cameras to search video from specified cameras. For
example, a camera pool called "Doors" that includes all of
the cameras that cover the doors of your establishment.
When you need to see who's come or gone, select the
"Doors" camera pool as a search criteria, and only video
captured from cameras in the "Doors" camera pool are
included. There is no limit to the number of camera pools
your Buffalo Surveillance Server solution may have.
Additional Target Camera fields for RTSP IP enabled cameras:
Field
What it does
Manufacturer
The manufacturer of the camera. The Video Capture URL
populates automatically.
Model
A user defined value, this is the camera's model number.
Video Capture URL populates automatically.
Video Capture URL
The RTSP URL of the camera that enables the Buffalo
Surveillance Server to capture video feeds.
The text box displays the IP address for the selected
camera.
User Name
Password
If the camera requires a user name and password to be
accessed, this is the username. This field works in
conjunction with Password.
If the camera requires a user name and password to be
accessed, this is the password. This field works in
conjunction with User Name.
Record and Capture Video Feeds
Field
Alternative Frame Size
What it does
The height and width, in pixels, of video images. Use this
field if you want to define a frame size that is different from
the camera's default. The first field is for width; the second
field is for height.
Enable stream over TCP Causes the RTSP capture to stream data over a TCP
connection rather than over a default HTTP connection.
Recording Computer
Displays the computer that captures a video feed from
your camera.
Video Recording
Options
Select the clip duration, and set the cache folder. More
information below.
Additional Target Camera fields for cameras managed by Milestone or OnSSI:
Field
What it does
Server Address
The host name or IP address of the image server from
which you want to extract video.
User Name
The user name for a user who has rights to access the
camera whose video you want to extract.
This must be a "Basic User."
Password
If the camera requires a user name and password to be
accessed, this is the password. This field works in
conjunction with User Name.
Video Type
MJPEG stores video in the same format in which it
was stored in the VMS, and takes the same
amount of space.
H.264 is a loss-less format that takes 30% to 70%
less storage space.
Set Video Recording Options
Note: Video Recording Option fields are available in Advanced Mode
Set the following options for existing and newly added cameras:
51
only.
109
110
Buffalo Surveillance Server
Field
Clip Duration
What it does
When you capture video feeds, the Buffalo Surveillance
Server parses them into individual files. This field enables
you to choose the size of these files and, therefore, the
duration of individual videos.
Shorter videos (smaller files) enable the Surveillance Video
Manager 277 to retrieve files for review more quickly and
causes your Buffalo Surveillance Server Information
Repository to contain more files. Longer clips (larger files)
enable your Buffalo Surveillance Server device to have
fewer files. In either case, the amount of storage space
used depends only on the amount of data that is captured,
not the number of files.
The cache folder is where incoming video streams are
staged when they are first captured but not yet in the
Information Repository.
Cache Folder
Each camera should have its own cache directory.
Leave the setting Default Location or select At
Pathname and enter the path.
Click
to save all policy settings and implement the policy.
Metadata Tab and Configuration
The Metadata Tab is only displayed if it has been configured as described below.
This section is intended only for advanced users. It covers MetadataExtensions.cfg, a text file
you can create to add and configure an additional, optional Metadata tab in the Camera
Policies application and optional extended metadata search fields in SVM. Extended metadata
enable you to ingest custom metadata that you want associated with videos. Later, when you
need to find and retrieve videos, you can search using the extended metadata that was
ingested when the video was processed.
Extended metadata searching in the Surveillance Video Manager requires metadata that can be
collected at ingest only if MetadataExtensions.cfg is configured correctly for Camera policies.
In short, the metadata you ingest using Camera policies will be searchable using the
Surveillance Video Manager. Therefore, metadata extensions for Camera policies and the
Surveillance Video Manager are all covered here together.
The Metadata tab and metadata search options will appear in the Camera Policies
application and the Surveillance Video Manager respectively only if there is a
MetadataExtensions.cfg file in <install-dir>\Config.
Record and Capture Video Feeds
The MetadataExtensions.cfg file must be on every computer on which a user would edit
or modify the recording policy. If not, the metadata values could be lost.
When you create, configure, and implement a MetadataExtensions.cfg file, the Metadata tab
will appear in Camera Policies. It will contain the Query blocks listed in the IngestMdExt block
(see details below):
Metadata search options will be available in the Surveillance Video Manager to enable searches
using metadata associated with already captured videos.
When you ingest metadata, special characters normally interpreted as wildcards (?, *, #,
!, ~, ^, &, [ ], { }, \, ") are not interpreted as wildcards. When you search for metadata,
however, wildcards are recognized. Consequently, if metadata that you ingest contains
characters that are normally interpreted as wildcards, when you search for metadata you
need to use the escape character (\) to denote that the wildcard is intended literally, not
as a wildcard. For example, if you ingest 16*37 as metadata, and you then want to
search for this expression, you would search using 16\*13.
The search type options will be identical to those you defined in the ModMdExt block
(see details below).
Create a MetadataExtensions.cfg
You can create MetadataExtensions.cfg using any text editor. Once created, it needs to be
added to the following path: <install-dir>\Config.
MetadataExtensions.cfg is block structured text file. At the end of this section, you will find a
sample MetadataExtensions.cfg. You can implement the file as is (at the path noted above) to
see how it works or modify the file to meet your own criteria and then implement it.
MetadataExtensions.cfg comprises three Blocks (IngestMdExt, SearchMdExt, and ModMdExt)
which comprise one or more Query blocks each.
111
112
Buffalo Surveillance Server
Pay particular attention to braces [ ]; there needs to be an opening brace after
"IngestMdExt" and a closing brace after its last Query block; an opening brace after
"SearchMdExt" and a closing brace after its last Query block; and an opening brace after
"ModMdExt" and a closing brace after its last Query block.
Query block statements describe the controls that will appear on the application. These can
include any number of string fields, check boxes, spin controls, pathname fields, and choice
controls. Each Block can have any number of Query blocks. Its best to ensure that the
IngestMdExt block and SearchMdExt contain the same Query blocks since the Buffalo
Surveillance Server will search for only ingested metadata. However, if you prefer, the Query
blocks contained in SearchMdExt can be limited to a subset of those you have in IngestMdExt.
In this case, you will be able to search only based on the Query blocks listed in SearchMdExt.
If a Query block contains an error, the entire metadata extension block (IngestMdExt or
SearchMdExt) will be ignored.
Metadata Extension Block Structure
The following example is only for the sake of illustration. Note that tokens can not be used in
Query blocks indiscriminately. Each Query block supports only specific tokens. See Valid
Token/Values for Query Blocks below for details.
<block identifier> # This identifies the beginning of the Block.
[ # This is the opening brace for the Block.
Query
[
<token>=<value>
<token>=<value>
<token>=<value>
<token>=<value>
<token>=<value>
<token>=<value>
]
Query
[
<token>=<value>
<token>=<value>
<token>=<value>
<token>=<value>
<token>=<value>
<token>=<value>
]
] # This is the closing brace for the Block.
Blocks
The following are the Blocks used in MetadataExtensions.cfg.
Record and Capture Video Feeds
Block Identifier
IngestMdExt
Description
Identifies the beginning of the metadata
extensions block for Buffalo Surveillance Server
ingesting and capturing applications. May not
contain a SearchMdExt block or ModMdExt
block.
Required.
SearchMdExt
Identifies the beginning of the metadata
extensions block for Buffalo Surveillance Server
search and retrieve applications. It may not
contain an IngestMdExt block or ModMdExt
block.
Required.
ModMdExt
Identifies the beginning of the "edit metadata"
metadata extension block for Buffalo
Surveillance Server search and retrieve
applications. May not contain an IngestMdExt
block or SearchMdExt block.
Required.
Identifies the beginning of a Query block
contained within a metadata extensions block.
Required.
Query
As illustrated in the examples below,
Query blocks must be contained within
metadata extension blocks (SearchMdExt
and IngestMdExt).
Valid Token/Values for Query Blocks
The tokens in the table below can be used only in Query blocks. Although the IngestMdExt
block, SearchMdExt block, and ModMdExt block use the same types of Query blocks, each
must have its own individual Query blocks.
113
114
Buffalo Surveillance Server
It is best to avoid using characters that the Buffalo Surveillance Server interprets as
wildcards or as otherwise special. If you need to use a character literally that the Buffalo
Surveillance Server uses as a wildcard, the character must be preceded by an escape
character ( \ ).
For example, \*This is an example using escape characters in a statement with a
wildcard\*.
The following are Buffalo Surveillance Server wildcards and special characters:
?, *, #, !, ~, ^, &, [ ], { }, \, ".
See the Advanced Wildcard Functionality section for details about wildcards.
Query block
Type
Valid Token/Values
Description
The metadata item's name.
Name = <character string>
Required
Default = ""
Type=Checkbox
The Query type.
Label = <character string>
The label for the control as it will appear
in the application.
Checkbox
Default = ""
The value that will be loaded into the
control by default.
DefaultValue = <Boolean>
Valid values = true | false
Defaults = true (checked)
Description = <character
string>
The tooltip for the control.
Default = ""
The metadata item's name.
Name = <character string>
Required
Default = ""
Choice
Type=Choice
The Query type.
Label = <character string>
The label for the control as it will appear
in the application.
Record and Capture Video Feeds
Query block
Type
Valid Token/Values
Description
Default = ""
The value that will be loaded into the
control by default.
Valid values = the number of the entry in
the pull-down list
DefaultValue = <number>
Default = the first choice listed.
If the DefaultValue for a Choice
block is greater than the number
of Choices entered, the entire
MetadataExtensions block will be
ignored.
Description = <character
string>
Choice = <character
string>
The tooltip for the control.
Default = ""
A choice statement that can be
selected. Must have at least one
Choice. Can be reused as many times
as needed.
The metadata item's name.
Name = <character string>
Required
Default = ""
Type=Pathname
The Query type.
Label = <character string>
The label for the control as it will appear
in the application.
Default = ""
Pathname
DefaultValue = <character
string>
The value that will be loaded into the
control by default.
Valid value= a string
Default = ""
Indicates whether the value may be left
blank. Valid for String and Pathname
BlankValueOk = <Boolean>
only.
115
116
Buffalo Surveillance Server
Query block
Type
Valid Token/Values
Description
Valid values = true | false.
Default = true
Description = <character
string>
The tooltip for the control.
Default = ""
The metadata item's name.
Name = <character string>
Required
Default = ""
Type = Spin
The Query type.
Label = <character string>
The label for the control as it will appear
in the application.
Default = ""
The value that will be loaded into the
control by default.
Valid values = a number between the
LowerLimit and UpperLimit
Spin
DefaultValue = <number>
Default = the lower limit
If the DefaultValue for a Spin
block is not between the
LowerLimit and UpperLimit, the
entire MetadataExtensions block
will be ignored.
Description = <character
string>
The tooltip for the control.
Default = ""
The lower limit for the spin control.
LowerLimit = <number>
Default = 0
UpperLimit = <number>
The upper limit for the spin control. Valid
only for Spin.
Default = lower limit + 100
String
Name = <character string>
The metadata item's name.
Record and Capture Video Feeds
Query block
Type
Valid Token/Values
Description
Required
Default = ""
Type = String
The Query type.
Label = <character string>
The label for the control as it will appear
in the application.
Default = ""
DefaultValue = <character
string>
The value that will be loaded into the
control default.
Valid values = a string
Defaults = ""
BlankValueOk = <Boolean>
Indicates whether the value may be left
blank. Valid for String and Pathname
only.
Valid values = true | false.
Default = true
Description = <character
string>
The tooltip for the control.
Default = ""
117
118
Buffalo Surveillance Server
Sample "Generic" MetadataExtensions.cfg
# This is a sample of an MetadataExtensions.cfg file.
#
IngestMdExt # Required: This identifies the beginning of the metadata extension
block for Target & Process.
[
# This is the opening brace for the IngestMdExt block.
Query
[
Name
Type
Label
DefaultValue
=
=
=
=
Name1
String
Sample String Label
This field can be left blank (\"\") or pre-populated with
BlankValueOk
Description
= false
= This is a sample of the \"Description\" field.
Name
Type
Label
DefaultValue
=
=
=
=
BlankValueOk
Description
= false
= This is a sample of the \"Description\" field.
Name
Type
Label
DefaultValue
Description
Choice
Choice
Choice
=
=
=
=
=
=
=
=
Name3
Choice
Sample Choice Label
2
This is a sample of the \"Description\" field.
Sample \"Choice\".
Sample \"Choice\".
Sample \"Choice\".
Name
Type
Label
DefaultValue
Description
=
=
=
=
=
Name4
Checkbox
Sample Checkbox Label
true
This is a sample of the \"Description\" field.
Name
Type
Label
DefaultValue
Description
LowerLimit
=
=
=
=
=
=
Name5
Spin
Sample Spin Label
26
This is a sample of the \"Description\" field.
0
a value.
]
Query
[
Name2
Pathname
Sample Pathname Label
This field can be left blank (\"\") or pre-populated with
a value.
]
Query
[
]
Query
[
]
Query
[
Record and Capture Video Feeds
UpperLimit
119
= 100
]
] # This is the closing brace for the IngestMdExt block.
SearchMdExt # Required: This identifies the beginning of the metadata extension
block.
[
# This is the opening brace for the SearchMdExt block.
Query
[
Name
Type
Label
DefaultValue
=
=
=
=
Name1
String
Sample String Label
This field can be left blank (\"\") or pre-populated with
BlankValueOk
Description
= false
= This is a sample of the \"Description\" field.
Name
Type
Label
DefaultValue
=
=
=
=
BlankValueOk
Description
= false
= This is a sample of the \"Description\" field.
Name
Type
Label
DefaultValue
Description
Choice
Choice
Choice
=
=
=
=
=
=
=
=
Name3
Choice
Sample Choice Label
2
This is a sample of the \"Description\" field.
Sample \"Choice\".
Sample \"Choice\".
Sample \"Choice\".
Name
Type
Label
DefaultValue
Description
=
=
=
=
=
Name4
Checkbox
Sample Checkbox Label
true
This is a sample of the \"Description\" field.
Name
Type
Label
DefaultValue
Description
LowerLimit
=
=
=
=
=
=
Name5
Spin
Sample Spin Label
26
This is a sample of the \"Description\" field.
0
a value.
]
Query
[
Name2
Pathname
Sample Pathname Label
This field can be left blank (\"\") or pre-populated with
a value.
]
Query
[
]
Query
[
]
Query
[
120
Buffalo Surveillance Server
UpperLimit
= 100
]
] # This is the closing brace for the SearchMdExt block.
ModMdExt # Required: This identifies the beginning of the metadata extension block
for Search & Retrieve.
[
# This is the opening brace for the ModMdExt block.
Query
[
Name
Type
Label
DefaultValue
=
=
=
=
Name1
String
Sample String Label
This field can be left blank (\"\") or pre-populated with
BlankValueOk
Description
= false
= This is a sample of the \"Description\" field.
Name
Type
Label
DefaultValue
=
=
=
=
BlankValueOk
Description
= false
= This is a sample of the \"Description\" field.
Name
Type
Label
DefaultValue
BlankValueOk
Description
Choice
Choice
Choice
=
=
=
=
=
=
=
=
=
Name3
Choice
Sample Choice Label
2
true
This is a sample of the \"Description\" field.
Sample \"Choice\".
Sample \"Choice\".
Sample \"Choice\".
Name
Type
Label
DefaultValue
Description
=
=
=
=
=
Name4
Checkbox
Sample Checkbox Label
true
This is a sample of the \"Description\" field.
Name
Type
Label
DefaultValue
Description
=
=
=
=
=
Name5
Spin
Sample Spin Label
26
This is a sample of the \"Description\" field.
a value
]
Query
[
Name2
Pathname
Sample Pathname Label
This field can be left blank (\"\") or pre-populated with
a value
]
Query
[
]
Query
[
]
Query
[
Record and Capture Video Feeds
LowerLimit
UpperLimit
= 0
= 100
]
] # This is the closing brace for the ModMdExt block.
Processing Tab: Set Processing Options for Recording or Capture
Note: This tab is only displayed if you are using Advanced Mode
51
.
The Processing Tab enables you to set video and file processing options for your recording
policy.
Process video components, Generate low resolution proxy, and Generate
preview image
This feature enables video files to be captured so that they are viewable by the Buffalo
Surveillance Server. It also enables you to choose to have Buffalo Surveillance Server generate
low resolution companion files and preview images when video data is being captured.
Because of their relatively small sizes, low resolution companion files and preview images
enable you to search for needed video files and clips within files without having to first wait for
the retrieval of large, original video files.
The Buffalo Surveillance Server is unable to generate thumbnails and low resolution
companion files.
Process Video Components is selected by default and cannot be disabled.
To generate a low resolution companion files, select Generate low resolution proxy. If you
do not select this option, the proxies will not create. However, you can always view the
regular video files contained in the Information Repository.
Use the Low resolution proxy quality field, to select a resolution setting for the proxy
video/companion file to generate. A lower setting produces a smaller file.
Setting
Resolution and Audio Compression
same frame size as original
High
high video quality
audio is compressed to QDesign 44kHz
Medium
320x240 frame size
121
122
Buffalo Surveillance Server
Setting
Resolution and Audio Compression
medium video quality
audio is compressed to QDesign 44kHz
320x240 frame size
Low
low video quality
audio is compressed to QDesign 14 kHz
To save an additional copy of the low resolution file, select Save copy of low resolution
proxy and type a path after Location.
To generate a preview image, select Generate preview image. If you do not select this
option, preview images will not create.
Use the Preview image quality field, to select a resolution setting for the preview image to
generate. A lower setting produces a smaller file.
Setting
High
Resolution
original size
Medium
320x240
Low
100x75
To save an additional copy of the preview image file to a location outside of the Information
Repository, select Save copy of preview image and type a path after Location.
Override original file permissions to allow any user to retrieve
The Buffalo Surveillance Server adheres to the level of rights and access control that is set for
the OS from which files are being ingested. Buffalo Surveillance Server adheres to the level of
rights and access control that is set for the camera from which files are being captured or
extracted. Typically, only the OS "owner" and author of the files or a system administrator with
Administrative or Root level access privileges will be able to view, open, and retrieve their own
files in the Information Repository.
To grant permission to any users who might want to retrieve files, check Override original
file permissions to allow any user to retrieve.
This feature negates all protection associated with your files; anyone in your network
environment using the Buffalo Surveillance Server will be able to access your stored files
when this feature is activated.
Record and Capture Video Feeds
User Preferences: Set Default User Preferences
The User Preferences window enables you to set defaults for the application. The fields are
identical to those on the Processing tab; the choices you make in this dialog become the
defaults each time you use the Processing Tab. See the Processing tab 121 for more details
about the fields.
Note: You must be in Advanced Mode
51
to set default User Preferences.
To set defaults, select Tools > User Preferences from the menu at the top of the respective
window.
Destination Tab: Define Capture Destinations
Note: This tab is only displayed if you are using Advanced Mode
51
.
The Destination tab enables you to determine the Vaults, media, and/or storage pools where
your video files are recorded or captured. Read this section before you set Vault, Media Name,
Storage Pool, Media Type, and Media Speed parameters.
123
124
Buffalo Surveillance Server
If you leave any field set to the default (<any>), the Buffalo Surveillance Server will use all of the
parameters for the given field in the Information Repository. For example, if you leave Vault set
to <any>, the Buffalo Surveillance Server will use all of the Vaults in your Information
Repository, choosing the one with the most free space that is most readily available for any
given job.
If you wish to create a new name for any parameter, you may not use the following
names already used by the Information Repository: unnamed, any, new entry.
Only <any>, <unnamed>, <new entry> and/or the names of Vaults, storage pools, media,
media types, and media speeds that are already implemented in the Information Repository
appear in the pull-down lists unless you have added new parameters. If you plan to add new
Vaults, media, or storage pools to the Information Repository at a later time and know the
name(s) that you will assign to these resources, you can add the name(s) of these resources
manually before actually implementing them. They will be listed beneath <any> in the given
field. However, to minimize the risk of error, it is best to choose only media that
appears in the pull-down list. There are several options for doing this:
Leave all of the fields set to the default (<any>) and let Buffalo Surveillance Server take
care of everything.
Record and Capture Video Feeds
The Buffalo Surveillance Server will choose the most accessible Vault
and media with the most free space.
Select a parameter from the field that best meets the data's requirements, and let Buffalo
Surveillance Server take care of the rest.
If, for example, you select a Media Speed of S8, the Buffalo Surveillance
Server will write only to media that runs at the speed associated with S8.
Likewise, if you select only a Storage Pool or Media Name, the Buffalo
Surveillance Server will send the files to only the storage pool or media
that you select. Similarly, if you select only a Vault, the Buffalo
Surveillance Server will choose the best unit of media within the Vault and
the data will not have Storage Pool metadata. In general, the Buffalo
Surveillance Server will use the most readily available Vault and/or media
with the most available free space.
Select a parameter from the field that best meets the data's requirements, and then
select available parameters from the remaining fields.
When you select a parameter from Vault, Media Name, or Storage
Pool, the Buffalo Surveillance Server will limit the options
available in the remaining fields to only those commensurate
with the parameter you have selected.
You can assign several units of media to a single storage pool.
(See Prepare Media, Storage Pool 237 for more information about
Storage Pools.) To return the tab to a state where you can
choose any parameter from any field, select <any> in the Vault
field.
Create a new entry or new entries for Vault, Media Name, and/or Storage Pool.
Use the pull-down control for Vault, Media Name, and/or Storage
Pool, and then select <new entry>. A window will appear into
which you can enter the new name for the field that you have
select. Enter the new Vault, Media Name, or Storage Pool, and
then click [ OK ]. The new entry will appear in field's pull-down
list.
This method is recommended only for special circumstances. If
you try to run a job with a Vault or media that is not actually
running in the Information Repository, the job will fail.
125
126
Buffalo Surveillance Server
<any> will divide the names of Vaults, media, and storage pools
already implemented from the names that you have added for
Vaults, media, and storage pools that have not yet been
implemented. In other words, the names above <any> represent
Vaults, media, or storage pools actually running in your
Information Repository. The names below the divider are the
ones that you have entered that do not yet have hardware
implemented in the Information Repository. These will not be
saved if they are not selected when you save the policy.
Limitations to adding a new name for Vault, Media Name, or
Storage Pool:
If you enter a new name for a Vault, Media Name and Storage
Pool options will be limited to <any> and <new entry>.
New entries in Media Name or Storage Pool do not limit options
in the remaining fields.
If you add a wildcard (for example, Ac*), the wildcard will appear
beneath <any> even thought there may be Vaults in the
Information Repository the wildcard comprises.
When entering pathnames or pathname searching patterns, only the forward slash
(/) may be used as a pathname delimiter. If you use a backslash (\), as is
customary on some platforms, you may get unexpected results.
Wildcard Operators for Vault, Media Name, and Storage Pool
The Buffalo Surveillance Server supports the following wildcards with case sensitive alpha
characters in the Vault, Media Name, and Storage Pool fields:
* for zero or more of any character
? for any single character
* Substitutes for zero or more characters. Can be used in truncation and for multiple
characters. If used in a pathname, it cannot replace a forward slash (/). Use * for all possible
alternative spellings and an unlimited number of characters within a name.
For example, h*ophilia substitutes for all names containing h+<any character or number
of characters>+ophilia, such as haemophilia, hemophilia, or h.123ophelia; behavi*r
substitutes for all names containing behavi+<any character or number of characters>+r,
such as behaviour, behavior, or behavi123.zr; patent* substitutes for only all names
containing patent+<a character or any number of characters>, such as patents,
patentable, patented, patent123, and so on; patent*.jpg substitutes for only all names
containing patent+<a character or any number of characters>+.jpg, such as patents.jpg,
patentable.jpg, patented.jpg, patent123.jpg, etc; *.jpg substitutes for only all names containing
<any character or set of characters>+.jpg.
Record and Capture Video Feeds
? Substitutes for any single character and can be combined to denote multiple
characters. If used in a pathname, it cannot replace a forward slash (/). Use ? for specific
alternative spellings. ? substitutes for a single character; ?? substitutes for two characters;
??? substitutes for three characters, and so on. Only names with characters equal to the
number of ? used are processed. For example, cell? substitutes for all names containing cell
+<one additional character>.
For example, cells and cello but not cell. You can use ? within or at the end of a phrase. For
example, .xl? substitutes for only names containing .xl+<a third character>, such as .xls, .
xlr, and so on; wom?n substitutes for only names containing wom+<a third character>+n,
such as woman or women; carbon fib?? substitutes for only names containing carbon fib+
<two characters>, such as carbon fiber or carbon fibre.
In the Vault, Media Name, or Storage Pool fields, substitute the appropriate wildcard
character for any letter or letters. For example, lets say you have four Vaults:
Accounting
Administrative
Development
Sarbanes-Oxley
And, you want to migrate data only to Vaults named "Accounting" and "Actuarial". In the Vault
field, you would enter Ac*, and data will be stored only to Vaults beginning with Ac, regardless
of what comes after c. The same type of scenario would pertain if you wanted to use wildcards
in the Media Name field.
When you use a wildcard in the Vault field, only media and storage pools associated with the
selected Vault are displayed in the Media Name and Storage Pool fields. For example, if you
enter j* in the Vault field, only Media and Storage Pools in Vaults beginning with j will appear
in the Media Name and Storage Pool fields. The functionality is similar for Media Name. For
example, if you enter Ni*, only storage pools beginning with Ni will be displayed in the Storage
Pool field.
See Advanced Wildcard Functionality for a complete list of and more complete
information about wildcards.
Destination Tab Fields
Vault
Vaults are the basic units of storage in your Information Repository.
Click the pull-down control arrow and, from the list that appears, select a Vault; or, select
<new entry> to add a new Vault name. When you select a Vault, the Buffalo Surveillance
Server will populate the Media Name pull-down menu with the media that it finds on the given
Vault.
127
128
Buffalo Surveillance Server
If you enter a new name for a Vault, the Media Name and Storage Pool options will be
limited to <any> or <unnamed> and <new entry>.
Media Name
Media Name refers to the names of individual units of media in the Vaults of your Information
Repository.
Click the pull-down control arrow and, from the list that appears, select the media; or, select
<new entry> to add a new media name. The Buffalo Surveillance Server will then
automatically look for the Storage Pools that comprise the media. If the Buffalo Surveillance
Server cannot find storage pools that comprise the media that you have selected, the Storage
Pool field will display <any>.
Storage Pool
Storage Pools are groupings of media utilized for a particular purpose. A typical example of
storage pooling is the utilization of several units of media for a single policy. For example, if you
want to have the "Monday night backup" write to several units of media, you would use a
"Monday night backup" storage pool and assign to it every unit of media that you want to use
for that purpose. (See Prepare Media, Storage Pool for information about creating storage
pools using Vault Admin.)
Click the pull-down control arrow and, from the list that appears, select a storage pool; or,
select <new entry> to add a new storage pool name.
Media Type
You can determine the types of media your policy will use by specifying a media type. For
example, if "Hdisk" is an option and you select it, only Hdisk media will be utilized. This setting
is useful for processing data of lower importance or less rigorous recovery time objectives.
You can set either Media Type or Media Speed but not both.
Although only Hdisk media will be used, the names displayed in the other fields will not
change.
Click the pull-down control arrow under the Media Type label, and select the media type.
Only the media types that are available for the parameters you have chosen in the Vault,
Media Name, or Storage Pool fields will be displayed. If no Vault, media, or storage pool is
chosen, only the media types from media available within the Information Repository will be
displayed.
Record and Capture Video Feeds
Media Speed
Storage technologies supported by the Buffalo Surveillance Server are categorized by their
performance. The Media Speed setting is useful for processing data of lower importance or less
rigorous recovery time objectives. Media Speed enables you to specify what media will be used
based on media performance. For example, if "S4" is an option and you select it, only S4
media will be utilized.
Although only S4 media will be used, the names displayed in the other fields will not
change.
Hard disk is considered a high performance media and is assigned a high rating (S8). Slower
tape technologies are lower performance and are assigned a lower rating (S0). You can set
either Media Type or Media Speed but not both.
Click the pull-down control arrow under the Media Speed label, and then select a
performance rating. The Buffalo Surveillance Server will display only the media speeds that
are available for the parameters you have chosen in the Vault, Media Name, or Storage Pool
fields. If no Vault, media, or storage pool is chosen, only the speeds from media available
within the Information Repository will be displayed.
Miscellaneous Options
Check Keep files grouped together on the same media to specify that the Buffalo
Surveillance Server continue to write files to the same media. If this option is not selected,
targeted files will be stored across the Information Repository on whatever media has the
most space and/or best availability.
Check Store on local vaults only to specify that the files be stored on the host machine on
which the policy resides.
Scheduling Tab: Define When Video Will Be Recorded
Use the Scheduling tab to define when videos will be recorded from your RTSP enabled IP
camera or captured from your VMS-managed camera. You can record or capture videos always
or on a daily basis. As soon as you save the given policy, the schedule you created is
implemented.
When Do You Want to Record Video?
The option that you choose defines the times when video will be recorded or captured and
controls which options will be active in the rest of the scheduling tab. When do you want to
record video? contains the following options:
Option 1: Always
Option 2: On selected days each week
129
130
Buffalo Surveillance Server
Select an option from the When do you want to record video pull-down list.
Option 1: Always
This option enables you to record or capture video 24 hours a day, seven days a week for as
long as the policy is active. To stop a policy that has been set to record video always, you
must deactivate, change, or delete the policy. When you select this option, the rest of the
Scheduling tab fields are inactive, and it looks as follows:
Option 2: On selected days each week
This option enables you to schedule video recording or capture on particular days at specific
times. When you select this option, the scheduling tab looks as follows:
Record and Capture Video Feeds
Adjacent to the On what days of the week text box, click
to set the days of the
week on which you want to record or capture video. The Days 386 window appears. Select
the days you want video to be recorded or captured.
Adjacent to the Start time pull-down list, click the down arrow and select a start time.
Adjacent to the Stop pull-down list, click the down arrow and select a stop time.
Once you have selected start and stop times, the Length field displays the total number of
hours video will be recorded or captured per day.
Advanced Tab: Set Advanced Capturing Options
Note: This tab is only displayed if you are using Advanced Mode
51
.
In the Advanced tab set log, report, and performance options.
Select the options below to configure the policy.
Error-Log Filename
The Buffalo Surveillance Server creates an error log file whenever errors are encountered during
a job. Use it to assist you when troubleshooting problems that arise in the job. The Error Log
Filename text box can include literal file names or a combination of file name field variables
(see File Name Field Variables below) that will generate filenames for logs.
In the Error Log Filename text box, leave the default variables in place; or, type in the file
name that you want to use, including an extension; or, type in a variable name using
Filename Field Variables (below).
Or,
Use [ < Browse ] to define a new location and type in the file name that you want to use,
including an extension.
131
132
Buffalo Surveillance Server
Filename Field Variables
The file path can include a literal file name or a combination of variables that will generate
filenames for reports. Variables make it much easier to distinguish between reports and to find
particular reports.
For example, if you enter a path with a literal file name, C:/Program Files/BUFFALO/Logs/
Job_Report.log, the system will generate the report destination folder "Logs" (if it does not
already exist) and a report named "Job_Report.log". Similarly, if you enter a literal file name,
say "DataErrors.log", a log named DataErrors.log will be generated.
On the other hand, if you enter a path with variables (separated by an underscore) for the file
name, say %R/Logs/%P_from_%H_on_%D_at_%T, the system will generate the report
destination folder "Logs" and a report named, "Monday Night Set_from_Rex<host
name>_on_<date>_at_<time>" — where policy name, host name, date, and time are
populated with the actual details from your Information Repository and job.
Following are the variables you can enter in the order you prefer. When using multiple
variables, separate them from each other with an underscore (_).
Variable
Description
%P or %Pn
Policy Name
%H or %Hn
Host Name
%D
Date (yyyy:mm:dd)
%Dy
Year
%Dm
Month
%Dd
Day
%T
Time (hh:mm)
%Th
Hour
%Tm
Minute
%Ts
Second
%R or %Rn
Root Pathname. Valid only at
the beginning of a string.
Report Options
The Buffalo Surveillance Server creates one of three report files when a job runs:
Record and Capture Video Feeds
Type of Report
Contents
Summary
A header and summary report
Complete
Same as Summary but lists all files effected
Diagnostic
Complete but adds diagnostic-relevant information
Click the pull-down menu to select the report option that you want. Use the Summary or
Complete options on a normal basis and switch to Diagnostics if you run into problems.
In the Report Options text box, leave the default variables in place, enter in the file name
that you want to use, including an extension, or enter a variable name using File Name
Field Variables (below).
Or,
If you want to overwrite an already existing log file, use [ < Browse ] to find the file.
Filename Field Variables
The file path can include a literal file name or a combination of variables that will generate
filenames for reports. Variables make it much easier to distinguish between reports and to find
particular reports.
For example, if you enter a path with a literal file name, C:/Program Files/BUFFALO/Logs/
Job_Report.log, the system will generate the report destination folder "Logs" (if it does not
already exist) and a report named "Job_Report.log". Similarly, if you enter a literal file name,
say "DataErrors.log", a log named DataErrors.log will be generated.
On the other hand, if you enter a path with variables (separated by an underscore) for the file
name, say %R/Logs/%P_from_%H_on_%D_at_%T, the system will generate the report
destination folder "Logs" and a report named, "Monday Night Set_from_Rex<host
name>_on_<date>_at_<time>" — where policy name, host name, date, and time are
populated with the actual details from your Information Repository and job.
Following are the variables you can enter in the order you prefer. When using multiple
variables, separate them from each other with an underscore (_).
133
134
Buffalo Surveillance Server
Variable
Description
%P or %Pn
Policy Name
%H or %Hn
Host Name
%D
Date (yyyy:mm:dd)
%Dy
Year
%Dm
Month
%Dd
Day
%T
Time (hh:mm)
%Th
Hour
%Tm
Minute
%Ts
Second
%R or %Rn
Root Pathname. Valid only at
the beginning of a string.
Activity Logging
Activity logs provide logistical information about jobs. Enable activity logging when you want the
Buffalo Surveillance Server to create activity logs. Refer to the logs after a job runs; they are
stored in a specified location.
Set Activity Logging to enabled. The activity log text box becomes active.
In the activity log text box, leave the default variables in place; or, type in the file name that
you want to use, including an extension; or, type in a variable name using Filename Field
Variables (below).
Or,
Use Browse to define a new location and type in the file name.
Filename Field Variables
The file path can include a literal file name or a combination of variables that will generate
filenames for reports. Variables make it much easier to distinguish between reports and to find
particular reports.
For example, if you enter a path with a literal file name, C:/Program Files/BUFFALO/Logs/
Job_Report.log, the system will generate the report destination folder "Logs" (if it does not
already exist) and a report named "Job_Report.log". Similarly, if you enter a literal file name,
say "DataErrors.log", a log named DataErrors.log will be generated.
Record and Capture Video Feeds
On the other hand, if you enter a path with variables (separated by an underscore) for the file
name, say %R/Logs/%P_from_%H_on_%D_at_%T, the system will generate the report
destination folder "Logs" and a report named, "Monday Night Set_from_Rex<host
name>_on_<date>_at_<time>" — where policy name, host name, date, and time are
populated with the actual details from your Information Repository and job.
Following are the variables you can enter in the order you prefer. When using multiple
variables, separate them from each other with an underscore (_).
Variable
Description
%P or %Pn
Policy Name
%H or %Hn
Host Name
%D
Date (yyyy:mm:dd)
%Dy
Year
%Dm
Month
%Dd
Day
%T
Time (hh:mm)
%Th
Hour
%Tm
Minute
%Ts
Second
%R or %Rn
Root Pathname. Valid only at
the beginning of a string.
Enable Transmission Optimization
This feature enables the client to constantly monitor its processes and select the network
transmission protocol that best suits the files being processed. To get up to a 20% increase in
performance, it is generally best to leave this option checked. However, depending on your
particular network configuration, you may find that you can get better performance by unchecking this option. If your Information Repository seems to be slower than you would expect,
run a few timed tests to see which setting will work best for your Information Repository.
To enable this feature, check Enable transmission optimization.
135
136
Buffalo Surveillance Server
Maintain Client/Vault Connection
Vault connection sharing determines how many files are sent from the source Vault to the
destination Vault in a single connection. The higher the number of files or bytes transferred, the
longer the connection between the source and destination Vault will be maintained. Access to
a particular Vault resource (such as one drive of a multi-drive storage device) used by a process
on one client will be restricted and inaccessible to other clients in the network for the duration
of the connection.
To understand how this setting can affect a configuration, imagine an environment where a
single Vault with a single tape drive is used to service several Buffalo Surveillance Server
clients. When a client is configured with connection sharing set to 250 files, and several other
clients are configured to start jobs at the same time, no client can connect until the first client
is finished. Each client's connection to the server will lock out all other connections; all other
clients will have to wait before processing files.
To set the connection sharing value, enter a value number in the Maintain Client/Vault
Connection for text box.
Click the Files radio button or Bytes radio button depending on which you prefer. If you click
Files, connection sharing will proceed based on the number of files transmitted; if you click
bytes, based on the number of bytes.
Throttle
Throttling controls the speed at which files are sent to the Vault. Lower numbers reduce the
bandwidth. Throttle values range from 1% to 100% of total available bandwidth.
The Buffalo Surveillance Server is designed to operate at the maximum performance of its host
computer, the network environment, and the storage resources available. Sometimes, during
normal working hours, running a job at peak performance will interfere with other network
operations.
To adjust throttling, click the Throttle pull-down menu, and select the percentage of
maximum performance at which you want to operate the client on its host computer.
View Live Video Feeds: Live Viewer
View Live Video Feeds: Live Viewer
In the Buffalo Surveillance Server Live Viewer application, view live video feeds directly from
RTSP enabled IP cameras.
Before seeing live feeds, cameras must be configured in the Camera Policies application as
part of your Information Repository. To view live feeds in the Live Viewer, the Live View URL
check box must be selected and the IP address must be entered in the first field of the Video
Capture or Live View URL when adding the camera configuration.
To be able to view and record live video feeds, you must ensure that RTSP is enabled on
your IP camera. See your camera's documentation for details on enabling RTSP.
Most cameras can manage a single live feed while video streams are being captured.
More than a single live feed on any given camera affects performance.
The Live Viewer window is divided into two main areas: the Control panel on the right side
contains controls to select the camera feeds to view and the layout of the viewer window (the
number of rows and columns of camera views) displayed at one time. There are also controls to
access the pan, tilt, zoom, and focus of cameras (if cameras support it, and if the control is
enabled when configuring the Camera Policies application).
The Live Viewer main menu bar includes a File menu to close the application, a View menu to
access commands for save, rename and delete layouts, a Tools menu for User Preferences,
and a Help menu.
The view frames in the left side of the window display the live feeds from the cameras selected.
By default, the Live Viewer is set to display feeds from four cameras, arranged in two rows of
two across. Change that default layout by using the View drop down list at the top of the righthand control panel.
In the Live Viewer, each camera view frame includes a Title bar. Right-click on the camera
Title bar to display a right-click menu with the following menu items:
Wiper - Select for Wiper sub-menu containing duration options for the wiper to clean.
Duration options are: 10 seconds, 1 minute, 15 minutes, and 30 minutes, 1 hour, and 2
hours. Also access the Stop menu item. (Displays only if camera has wiper
functionality.)
Day/Night Mode - Select for the Day/Night Mode sub-menu containing mode options of
Day, Night, and Auto. If Auto is selected the camera automatically adjusts to determine
the correct mode. (This displays only if it is supported by Buffalo Surveillance Server for
your camera, and if the camera has Day/Night Mode functionality.)
Select - Highlight the camera view frame. PTZ and Volume options are available, if
applicable.
Close - Close the camera view (or click the Close button on the Title bar).
137
138
Buffalo Surveillance Server
The screenshot below shows a layout, with feeds from four cameras displayed. If you create a
new layout, remember to save it so you can use it as your default layout.
Double-click the Title bar of the view frame for the camera to quickly change the default layout
to a single full screen camera view layout. Double-click again to return to the original layout.
View a feed from a camera 140
View feeds from a camera pool 141
Change, save, or delete a live view layout 142
Control camera pan, tilt, zoom, and focus 143
Live Viewer User Preferences
Use the Live Viewer User Preferences to define default settings for the Live Viewer window.
Access the Live Viewer User Preferences from the Live Viewer Tools menu, select User
Preferences.
View Live Video Feeds: Live Viewer
139
Enable tool tips - A check mark by this element indicates that tool tips for the Live
Viewer display. De-select to turn tool tips off.
Manual record cache folder - Specify where to store Live Viewer recordings. Click the
Browse button to navigate to the cache location using the Browse for Folder dialog box.
Preferred Viewer - Select the type of video viewer to drive the play back of videos with,
in the order to use the media players: QuickTime first, then VLC, QuickTime only,
VLC first, then QuickTime, or VLC only.
Video Stream Delay - This selection determines how fast video feed streams to your
camera view frame in Live Viewer. Changing the delay causes the video you are viewing
to be delayed by that amount. The default value is 500 ms (milliseconds), but the options
range from 50ms to 2 seconds. The smaller the delay value the video is viewed closer to
real-time, but if the delay time is too small the video could freeze or hang.
Be sure to change the video stream delay setting before adding the camera to a view
frame. If you change the preference after the camera has been added to the view frame,
you will have to close it, change the setting again, and then re-add the camera to the
view frame. If you close the Live Viewer application, your video stream delay preferences
are saved, and ready for your next session.
If video freezes in low light conditions, set the video stream delay value to a larger value - at
least 700ms or greater - especially on slow frame rate high definition cameras (such as
Cohu).
Enable advanced user mode - A check mark by this element allows the shortcut menu
to display from the Live Viewer when you right-click the Title bar. The advanced mode
shortcut menu features camera related options if the camera has the available
functionality (such as pan, tilt, zoom).
140
Buffalo Surveillance Server
View a feed from a camera
If the live view option is enabled from a camera during configuration, you can view a camera's
live feed in the Buffalo Surveillance Server Live Viewer.
View live feeds from up to 16 cameras at a time.
To view a live feed from a camera:
Launch the Live Viewer 284 directly, or from the menu bar of the Surveillance Video Manager,
select Tools > Live Viewer.
The Live Viewer window opens, with frames for four camera views, by default. The title bar for
each frame reads "Not in Use" as no cameras have been selected yet.
Double-click the Cameras folder on the top right. The names of live view enabled cameras
are displayed.
Select the camera feed to view and drag it into a view frame.
The camera's live feed is displayed, and the camera name is displayed in the title bar of the
view frame.
To view the feed from an additional camera, repeat the step above.
View feeds from a camera pool 141
Change, save, or delete a live view layout 142
View Live Video Feeds: Live Viewer
View feeds from a camera pool
Camera pools are virtual groupings of cameras that users can define. For example, you might
have a camera pool called "Doors" that includes all of the cameras that are videotaping the
doors of your establishment.
It is often useful to see at a glance the live feeds from all of the cameras that belong to a
certain pool. The Live Viewer lists camera pools as well as individual cameras so that you can
easily see the live feeds from all of the cameras that belong to a particular pool.
You will only see live feeds from cameras that are configured with the live view option
enabled.
To view live feeds from a camera pool:
Launch the Live Viewer 284 directly, or from the menu bar of the Surveillance Video Manager,
select Tools > Live Viewer.
The Live Viewer window opens, with frames for four camera views, by default. The title bar of
each view frame reads "Not in Use" as no cameras have been selected yet.
Click the Pools folder on the top right. The names of the camera pools are displayed.
Select the pool whose feeds you want to view and drag it into a view frame.
Live views of the cameras contained in that camera pool will be displayed in the viewer
window. The camera name for each camera is displayed in the title bar of its view frame.
Change, save, or delete a live view layout 142
141
142
Buffalo Surveillance Server
Change, Save, or Delete a Live View Layout
The first time opened, the Live Viewer is set to display four feeds from two cameras, arranged
as "2x2" (two rows of two across).
You can change the default Live Viewer display by modifying, renaming, deleting, and then
saving the new layout. The Live Viewer remembers the last display and gives you the option to
open it the next time you use Live Viewer.
To change the Live Viewer display:
Click the View drop-down list at the top of the right-hand viewer control panel.
Select the view configuration you want. The first number represents the number of live views
across, in the row; the second number represents the number of rows, from top to bottom.
You can view a maximum of 16 feeds (4x4) at a time.
To save a Live Viewer layout:
Right-click the Layouts folder under the Entire Network area in the top right portion of the
control panel, and select Save Layout As.
In the Save As dialog box, enter a name for the layout, and a description.
Click OK. The layout name you entered is listed under the Layouts folder in the Control
Panel.
To rename a Live Viewer layout:
Right-click the layout's name listed under the Layouts folder, and select Rename Layout.
Enter the new name for the layout.
To delete a Live Viewer layout:
Right-click the layout's name listed under the Layouts folder, and select Delete Layout.
For more information see View a feed from a camera 140 and View feeds from a camera pool 141
.
View Live Video Feeds: Live Viewer
Control Camera Pan, Tilt, Zoom, and Focus
Buffalo Surveillance Server supports all IP configurable cameras, and most of the functionality
of those cameras. If Buffalo Surveillance Server and your camera supports the Pan-Tilt-Zoom
and focus functionality, and you selected the Enable PTZ option when you configured the
camera in the Camera Policies application, you can control those functions from the Live
Viewer control panel.
If those functions are enabled, you will see a white target symbol
in the camera name bar
of the camera feed when it is displayed in a view frame of the Live Viewer.
To control a camera's pan and tilt:
Click the title bar of the view frame for the camera.
A blue frame appears around the entire view frame to indicate that the controls are active.
In the Pan/Tilt area of the control panel on the right, click the left and right arrow buttons to
pan the camera horizontally to the left and to the right.
143
144
Buffalo Surveillance Server
Click the up and down arrow buttons to tilt the camera vertically, up and down.
To control a camera's zoom:
In the Zoom section of the control panel on the right, use the In button to zoom in on the
center of the view. Use the Out button to zoom out from the center and include a wider angle
of view.
To control a camera's focus:
In the Focus section of the control panel on the right, use the Auto button to activate the
camera's autofocus feature.
Use the Near button to focus on near objects in the foreground.
Use the Far button to focus on objects in the background.
View a feed from a camera 140
View feeds from a camera pool 141
Change, save, or delete a live view layout 142
Motion Detection Camera Configuration
Motion Detection Camera Configuration
When you add an RTSP enabled IP camera that provides motion detection information and
gathering of that information is supported by the Buffalo Surveillance Server, the system
automatically configures camera settings and automatically preserves motion metadata along
with captured video. This data is then used by the Surveillance Video Manager (SVM)
application to create histograms of detected motion. See the appropriate section for your
camera.
AXIS Camera Motion Detection Configuration 146
Panasonic Camera Motion Detection Configuration 150
145
146
Buffalo Surveillance Server
AXIS Camera Motion Detection Configuration
When you use Camera policies 49 to add an RTSP enabled AXIS IP camera that utilizes
versions 2 or 3 of AXIS' VAPIX API, the Buffalo Surveillance Server automatically configures
AXIS camera settings and automatically preserves motion detection metadata along with
captured video. This data is then used by Surveillance Video Manager (SVM) to create
histograms of detected motion. Default settings will be sufficient to meet most needs. You can,
however, manually configure several parameters that affect performance.
Be sure to see your AXIS cameras' specifications to determine if your camera supports
motion detection.
This section is intended for advanced users only and documents only the AXIS network
camera configuration affected by the Buffalo Surveillance Server. For general and in-depth
information about the AXIS network camera configuration web interface, please see your
specific AXIS camera documentation.
Except for Image Compression and Motion Detection settings, do not modify pre-set
Buffalo Surveillance Server configuration settings for your AXIS camera, as doing so may
prevent the Buffalo Surveillance Server from capturing motion detection data.
To get started, open your AXIS camera management web interface:
Modify Video Image Compression
The Buffalo Surveillance Server does not modify the default AXIS image compression
parameter. To maximize performance and minimize loss of image quality, you may want to
modify this value manually.
Motion Detection Camera Configuration
Select Video & Image. The Image Settings page will appear:
Set Compression to 20. This setting will not be reset if you disable and then enable the
camera via the Buffalo Surveillance Server. If you choose a setting that is less than 20,
system performance may be impaired while motion is being recorded. If you choose a setting
higher than 20, image quality may begin to degrade.
Modify Motion Detection Settings
Along with video compression, you may want to change the part of the camera's field of view
that is covered by motion detection and motion detection sensitivity.
Select Event Configuration. The Instructions page will appear:
147
148
Buffalo Surveillance Server
Select Motion Detection. The Motion Detection Page will appear:
Each camera supports one motion detection area. This is the part of the camera's field of view
that is covered by motion detection. By default, the entire field of view is selected. You can
change the covered area to suit your needs by dragging the borders of the motion detection
area frame (titled SoleraTec_me above) and the entire frame itself so that it covers the area
that you want monitored for motion.
Adjust the following parameters to suit your needs:
By default, Include is selected and the motion detection area is titled SoleraTec_me.
Do not change these values
Field
Function
Object Size
Enables you to determine how large or small a moving object
must be in order to trigger motion detection.
History
Enables you to determine the number of frames against
which motion will be measured.
Sensitivity
Enables you to determine how much change will trigger a
motion even.
Activity
Displays a histogram of motion activity. The amount of
activity displayed will be determined by the settings you
choose.
When you are finished changing your Motion Detection settings, be sure to click [ Save ].
Motion Detection Camera Configuration
Supported Cameras
The Buffalo Surveillance Server supports RTSP enabled AXIS IP cameras that utilize versions 2
or 3 of AXIS' VAPIX API. For a complete listing of cameras, go to AXIS's on-line Product
Interface Guide: www.axis.com/techsup/cam_servers/dev/product_interface_guide.htm.
149
150
Buffalo Surveillance Server
Panasonic Camera Motion Detection Configuration
This section is intended for advanced users only and documents only the Panasonic
network camera configuration affected by the Buffalo Surveillance Server. For general and
in-depth information about the Panasonic network camera configuration web interface,
please see your specific Panasonic camera documentation.
When you use Camera policies 49 to add a supported RTSP enabled Panasonic cameras that
feature motion alarms, the Buffalo Surveillance Server automatically configures Panasonic
camera settings and automatically preserves motion detection metadata along with captured
video. This data is then used by the Buffalo Surveillance Server Surveillance Video Manager
(SVM) to create histograms of detected motion. Default settings will be sufficient to meet most
needs. You can, however, manually configure several parameters that affect performance.
Be sure to see your Panasonic cameras' specifications to determine if your camera
features motion alarms.
Modify Alarm and Motion Detection Settings
The Panasonic camera web interface enables you to set customized motion alarms for up to
four individual areas per camera. To enable the Buffalo Surveillance Server to capture motion
metadata, you will set up motion alarms.
To get started, open your Panasonic Network Camera management web interface:
Motion Detection Camera Configuration
Select Setup. The Setup page will appear:
Select [ Camera setup ]. The Camera setup page will appear:
151
152
Buffalo Surveillance Server
Select the Image/Position tab. Your camera's video feed will appear with the date, time and
Preset ID listed at the top of the image. Ensure that Preset ID is set to SOLERATEC-TM:
If the preset ID is not set to SOLERATEC-TM, set the Preset Position:
Beneath the video feed, find Preset Position, and then click [ SETUP ]. The Position No
page will appear:
In the Preset No field at the top of the page, use the pull down list to select SOLERATEC-TM
, and then click [ SET ]. Beneath Position No 1, the Preset ID radio button should be set to
ON, and the Preset ID (0 - 9,A - Z) field should be populated with SOLERATEC-TM.
If SOLERATEC-TM is not an option in the Preset No field, ensure that you have added
your camera to the Information Repository correctly.
Motion Detection Camera Configuration
Select [ CLOSE ] to close the window and return to the Image/Position tab on the Camera
setup page. The Preset ID beneath the date and time should be SOLERATEC-TM.
Select [ Alarm setup ]. The alarm setup page will appear:
Select the VMD area (Video Motion Detection) tab. The video feed will appear. The white
square enclosing most of the video feed indicates the area for which motion alarms can be
set and motion detection metadata collected. This tab also enables you to modify the
following parameters:
Field
Function
Status
Enables you to turn motion alarms and motion metadata
gathering on and off. When set to ON, alarms are enabled
and the Buffalo Surveillance Server will capture motion
metadata. When set to OFF, alarms are disabled and no
motion detection metadata will be captured.
Detection sensitivity
Enables you to define the level at which motion will be
detected and recorded for the area of the feed for which a
motion alarm can be set. This area is defined by the white
square enclosing most of the video feed. You can choose a
setting from Super high to Low, with Super high being the
most sensitive to motion.
If you set Preset position select (below), the
Detection sensitivity settings on this tab will be
ignored.
153
154
Buffalo Surveillance Server
Field
Preset position select
Function
Enables you to define up to four discrete motion detection
areas. If you do not select areas or all individual areas are
deactivated, the system will detect motion in the entire,
default area defined by the white square on the VMD area
page.
Each camera supports up to four motion detection areas.
This is the part of the camera's field of view for which motion
is monitored. By default, the entire field of view is selected.
You can change covered areas to suit your needs by (1)
deleting current areas, (2) creating new ones by dragging
your cursor across the area you want covered, and (3)
setting detection sensitivity.
See the Preset position select section immediately below
this table for detailed directions for creating motion detection
areas.
Information addition
Should be set to OFF. Adds additional information, such as
timestamp, that the Buffalo Surveillance Server does not use.
When you are finished changing your motion detection settings, click [ SET ].
Preset position select
Beneath the video feed on the VMD area tab find the Video area setting for Preset
position section. Select [ Setup ] to the right of Preset position select. The VMD area
page (for Position No.1) will appear:
Each color-coded section represents one motion detection area. You can define up to four
areas.
If you set Preset position select options, settings on the VMD area tab will be ignored.
Change the covered areas to suit your needs by (1) deleting current areas and (2) creating
new ones by dragging your cursor across the area you want covered.
Setting the Detection sensitivity.
Motion Detection Camera Configuration
Click [ SET ] to save and activate your settings.
Supported Cameras
The Buffalo Surveillance Server currently supports all RTSP enabled Panasonic 202 series
cameras.
155
156
Buffalo Surveillance Server
Manage Data and the Information Repository: Data
Service Policies and Vault Admin
This section covers the applications you need to manage the Information Repository and the
data it contains. This includes creating Data Service policies and managing devices and Vaults
in the Information Repository.
See Data Service Policies: Create Policies to Manage Data in the Information Repository 157
to learn how to use Data Service Policies to create powerful migrate, duplicate, and purge
policies to automatically manage data in the Information Repository.
See Vault Admin: Manage Vaults & Media 204 to learn basic media concepts as well as how
to use Vault Admin to manage Vaults and media.
Manage Data and the Information Repository: Data Service Policies and Vault Admin
Data Service Policies: Create Policies to Manage Data in the
Information Repository
Once files are in the Information Repository, you can use Data Service Policies to create
policies to migrate, duplicate, or purge them. Policies control which files are affected during a
particular migrate, replicate, or purge job, when the job starts, where the files are to be stored,
how often the job runs, when it stops, and all other aspects of the job. Initial and subsequent
storage devices do not have to be of the same technology, so you can easily build
configurations that include disk to tape (D2T), disk to disk to tape (D2D2T) or virtually anything
to anything. Unlike other policies that run on the computer on which they are created, every
Data Service policy you create affects the entire Information Repository, and all Data Service
policies appear and can be edited in any instance of Data Service Policies.
Policies can be broad or narrow. You can create replicate policies that provide multiple
instances of the stored files that can be accessed for retrieval. Or, you can create migrate
policies that move files from one Vault to another. For files that are no longer needed, you can
create purge policies to manage the scheduled purging, thus keeping your Vaults free from
unnecessary clutter. A single Vault can contain any number of policies that, when coordinated,
migrate and duplicate files through a complex storage hierarchy that can span multiple sites.
The Data Services Policies window displays all of the Data Service policies implemented
across the Information Repository. Consequently, if two or more users attempt to modify
Data Service policies simultaneously, a conflict will occur, and only the changes by one
of the users will be saved.
The Data Service Policies window is divided into two main frames: the right frame contains the
tabs you will need to populate to create a policy, and the left frame provides an overview of all of
the data service policies in the Information Repository. Overview information includes Policy
Name, policy Host, data Source, and a policy Description.
The Data Service Policies menu bar includes the following:
File: Includes commands for importing and exporting data service configuration (.cfg) files as
well as saving settings for policies you have created or modified.
Edit: Includes commands for adding, editing, and deleting policies.
View: Includes commands for refreshing the policies with the latest versions, and turning on
and off popup tips which you can hover over for more information about the fields in the tabs
in the right frame and the policies in the left frame.
The Data Service Policies toolbar includes the following buttons:
Saves all policy settings.
Adds a new policy.
Deletes the selected policy.
157
158
Buffalo Surveillance Server
Refreshes the view so that the latest version of each policy is displayed.
A triangular caution symbol
that the policy is not active.
superimposed on a policy icon in the left frame indicates
Offline Media
During a data service job, offline media will be used only if Include offline files is selected on
the Advanced tab 196 . If Include offline files is not selected, attempting to use media that is
offline may result in a “No resources available” error if suitable media cannot be found.
Load Balancing
You can denote a specific storage pool as part of the destination criteria for jobs. The Buffalo
Surveillance Server's clients locate the Vault (or Vaults) that contains the denoted storage pool
and stores the defined files to it. If there are multiple Vaults with media belonging to the storage
pool defined for the initial job, clients pick the one with the most available free space on it. This
keeps the entire Information Repository load balanced.
The Completeness and Accuracy of Stored Files
As a job is running, the Buffalo Surveillance Server continually verifies the completeness and
accuracy of the stored files.
Most products with data verification features require the data to be read from the media that it is
stored upon and compared to the original data on the client computer. While data verification is
imperative, this method is very resource intensive and time consuming. In contrast, the Buffalo
Surveillance Server uses a cyclic redundancy check (CRC) as the files are written to storage
media.
Manage Data and the Information Repository: Data Service Policies and Vault Admin
If you are using policies to run jobs and an error or abnormal event occurs that prevents
targeted files from being processed, clients add the filename to an internal retry list. At the end
of the normal job and after the user-defined delay time, the client again attempts to process the
files that could not be processed on the first pass. If a file cannot be processed during the retry
session, the failure will be logged to a retry file and report. Any instance of videos that are not
processed is included in the Information Repository's error logs. When a subsequent job
starts, the Buffalo Surveillance Server looks for the retry file, and the videos slated for retry are
added, with first priority, to the list of videos to be captured.
Refresh your view of policies in the Information Repository
Because all Data Service policies are implemented across the entire Information Repository,
another user can change policies while you are working in Data Service Policies. To ensure
that you are viewing the most current list of policies, use
. You can also use
to update
the contents of the Vault, Media Name, and Storage Pool fields in case you have added Vaults,
media, or storage pools via Vault Admin 204 while working in Data Service Policies.
If you use
, any changes that you have made or policies you have added will be lost
unless you first save.
How to Create a Data Service Policy - Overview
Follow the steps below to create a Data Service policy:
1. Launch Data Service Policies 157 .
2. If a policy is not already open by default, create a policy 160 . Before you can set parameters
and initialize the process, a policy must be open.
3. Select the Source tab 175 to identify a Vault, media, or storage pool from which you want to
migrate, replicate, or purge files.
4. Select the Criteria tab 179 to denote which files to migrate, duplicate, or purge. You can also
add file and directory filters 183 .
5. Select the Destination tab 188 to specify where you want the files migrated or replicated to.
6. Select the Scheduling tab 193 to define when you want jobs to occur. By default, Data
Service policies are not scheduled run.
7. Select the Advanced tab 196 to set options such as pre- and post-processing commands, log
output location, connection sharing, and throttling.
8. Click
to initiate the policy.
159
160
Buffalo Surveillance Server
Create, Modify, or Delete Policies in Data Service Policies
Policies define what data will be moved and how it will be moved. They define process
parameters that include the media, data source, and data destination values. Every policy that
you create using Data Service Policies must be for migrating, duplicating, or purging files. To
meet complex ILM needs, you would create several policies, each one responsible for one part
of the overall data movement process. The policy name that you create appears in the left half
of the application window, in the policy selection frame, and is saved as part of the active
configuration.
If at any time after you add a policy you find that the policy no longer meets your needs, you
can always modify or delete it by following the directions below.
Once a policy is created that meets your requirements, be sure to back it up by
exporting it. This enables you to easily restore (import) lost or corrupted policies. See
Import or Export Policies for directions.
Duplicate policy names are permitted.
For directions on policy creation, see Create a Policy 160 .
For directions on policy modification, see Modify a Policy 161 .
For directions on policy deletion, see Delete a Policy 163 .
Create a Policy
Click
to create a new policy. The Create a Policy window appears.
Enter a name for the policy.
Enter a description that tells you something about the policy so that you can know what it
does without having to open it.
Select a Policy Type:
Manage Data and the Information Repository: Data Service Policies and Vault Admin
Policy Type
Action
Moves files from one location to another.
Migrate
When migrating from tape media, files are marked as deleted,
not actually deleted until the media is reused and files are
overwritten. This enables migration jobs to finish in a timely
manner.
Duplicate
Purge
Copies files from one Vault to another, retaining the original stored
copy.
Permanently deletes files from the Information Repository. When you
select Purge for files on a unit of tape media, a flag indicating that the
files on the tape are "deleted" is logged in the database log index.
However, the files are not actually removed from the tape until you run
Erase Selected Media 257 and media is reused and files are
overwritten. In contrast, files on hard disk media are purged
immediately.
Do not run purge policies on critical data that you might want to
preserve. Once data is purged, it is gone forever.
Ensure the policy is active, or de-select the Active check box if you do not want the policy to
run. When the Active check box is de-selected, the
symbol is superimposed over the
policy icon in the Policy Name pane.
Click OK. The window closes, the policy name and description appear in the Policy Name
pane.
Modify the parameters as needed on each tab for the policy. See the subsequent sections for
details.
Click
to save all policy settings and implement the policy.
Modify a Selected Policy
With this feature, you can modify a policy's name, description, and type apart from its
parameters (included files, destination, scheduling, etc.).
161
162
Buffalo Surveillance Server
Double-click the policy name in the Policy Name frame. The Modify Selected Policy
window appears.
Enter the new name in the Policy Name text box.
Enter the modified description in the Description text box.
Select a Policy Type:
Policy Type
Action
Moves files from one location to another.
Migrate
Duplicate
Purge
When migrating from tape media, files are marked as deleted,
not actually deleted until the media is reused and files are
overwritten. This enables migration jobs to finish in a timely
manner.
Copies files from one Vault to another, retaining the original stored
copy.
Permanently deletes files from the Information Repository. When you
select Purge for files on a unit of tape media, a flag indicating that the
files on the tape are "deleted" is logged in the database log index.
However, the files are not actually removed from the tape until you run
Erase Selected Media 257 and media is reused and files are
overwritten. In contrast, files on hard disk media are purged
immediately.
Do not run purge policies on critical data that you might want to
preserve. Once data is purged, it is gone forever.
Ensure the policy is active, or de-select the Active check box if you do not want the policy to
run. When the Active check box is de-selected, the
symbol is superimposed over the
policy icon in the Policy Name pane.
Click OK. The window closes, the policy name and description appear in the Policy Name
pane.
Manage Data and the Information Repository: Data Service Policies and Vault Admin
Modify the parameters as needed on each tab for the policy. See the subsequent sections for
details.
Click
to save all policy settings and implement the policy.
Delete a Selected Policy
You can delete a policy that no longer meets your needs, or you can de-activate a policy at
present and re-activate it at a later time when needed.
To delete a policy:
In the Policy Name pane, click the policy to delete.
Click
.
Click
to save all policy settings and implement the policy.
If you delete a policy while a job is running based on that policy, the job will stop as soon
as it is finished processing the current file.
To make an active policy inactive:
In the Policy Name pane, double-click the policy.
In the Modify Selected Policy window, de-select the Active check box.
Import or Export Data Service Policies
This section is intended for advanced users. Buffalo Surveillance Server policy importing and
exporting functionality allows you to save policies, restore policies, and copy sets of policies
from one computer to another. After creating a set of policies, Export them to a policy file.
Later, if you want to re-implement the set of policies or implement them for the first time on
another computer, simply Import them. Use the import and export functionality to take a
snapshot of the working policy configuration, bring new computers on-line, test different policy
configurations, or restore user corrupted policy configurations.
By default, recording policies are exported to CameraPolicies.cfg. Data service policies are
exported to DataSvcsSvc.cfg.
Although each policy editor uses only one policy set at a time, multiple policy sets exported to
policy files can be used. Create, name, and use any file naming convention for policy files, and
be sure to keep track of where policies are exported to if it is a location other than the default
location (the user's home directory).
163
164
Buffalo Surveillance Server
Before restoring a set of policies to a computer that currently has policies set up, be sure
to delete all of the current policies before importing other policies - otherwise imported
policies are added to current policies.
Data Service policies are incompatible with other client policies and vice versa. If you try
to import a Data Service policy into a non-Data Services policies client (or vice versa),
you will get an error message, and no policies are added.
Import Policies
When you import policies, they are added to the policies that are already in the policy editor.
In the Policy Editor menu, click File > Import from. The Import From window appears.
If you are not importing policies from your local computer, navigate to the networked
computer that contains the policies that you need.
Select the policy file that contains the policies that you want to use.
Click Open. The policies in the configuration file are implemented.
Export Policies
Create policies that you require.
Manage Data and the Information Repository: Data Service Policies and Vault Admin
In the Policy Editor menu, click File > Export to. The Export to window appears.
To save your policies with the default policy file name, click Save without entering a new file
name.
Or,
To save your new policies under a new policy file name, enter a new name In the Export to
window, and then click Save.
Import/Export Policy File Structure
The file to which the policy is exported is block structured but free from any column or order
formatting. The tokens listed below specify job criteria. By default, the Buffalo Surveillance
Server exports to and imports from <install-dir>/Config/DataSvcsSvc.cfg.
Files that contain policies are formatted as follows. Each policy is a single block. The
beginning of each block is indicated by policy_name="<policy name>".
policy_name="<policy name>"
[
<token>=<value>
<token>=<value>
. . .
]
policy_name="<policy name>"
[
<token>=<value>
<token>=<value>
. . .
]
. . .
Token/Value Pairs
A token is a job attribute that is given a value that determines how a job will be run. Following
are the tokens and their definitions.
165
166
Buffalo Surveillance Server
Token/Value
absolute_start=<yyyy>/<mm>
/<dd>-<hh>:<mm>:<ss>
Description
Used only in the policy file. The exact start time
and date that the job is to run. Multiple absolute
start tokens may be entered.1
Used only in policy file. Defines whether the policy
is active or inactive.
active=<Boolean>
Valid values = true | false
Default = true
complete=<Boolean>
Prints all summary information plus the pathnames
of the files migrated to the file indicated by the
list_pn option. (Below)
Valid values = true | false
Default = false
A word or phrase in the file to be processed.
content_filter="<character string>"
Default = ""
data_paths=<number>
The maximum number of concurrent files permitted
to be sent during a job.
Default = 1
Includes files tagged for deletion.
deleted_files=<Boolean>
Valid values = true | false
Default = false
Prints diagnostic information to the path indicated
in the list_pn option (below).
diag=<Boolean>
Valid values = true | false
Default = false
dir_spec="<pathname>"
Specifies which directories to include. Multiple
dir_spec options can be specified. The dir_spec
check is made for every directory found. This
includes the directories contained in the pathname
list that the job will traverse.
Default = "*" (any)
Manage Data and the Information Repository: Data Service Policies and Vault Admin
Token/Value
display_only=<Boolean>
Description
Causes job to search for target files without
processing them. Lists the files that would have
been processed.
Valid values = true | false
Default = false
dst_media_name="<character
string>"
Specifies the destination media name. If you don't
specify a value in this option, the Buffalo
Surveillance Server uses the first available unit of
media.
Default = "*" (any)
Specifies the destination media to be used
according to media speed.
dst_media_speed=<character
string>
Valid values =
S0 - S10
Unspecified
Default = unspecified
Specifies the destination media type to be used.
Valid Values =
Hdisk – hard disk
8mm - Eight-millimeter tape
Dds – Digital data storage
Dlt - Digital linear tape
Ait – Advanced intelligent tape
dst_media_type=<character string>
SuperAit – Super advanced intelligent tape
Vxa – Exabyte VXA tape
Travan - Travan tape
Lto – Linear tape open
MagOptical – Read/write optical
Unspecified
Default = unspecified
167
168
Buffalo Surveillance Server
Token/Value
dst_storage_pool="<character
string>"
Description
Specifies the name of the destination storage pool
to be used. Use ''" for no storage pool name.
Default = "*" (any)
dst_Vault_name="<character
string>"
Specifies the destination Vault to be used.
dst_volume_format
Currently not supported.
dst_volume_name
Currently not supported.
Default = "*" (any)
Processes files based on the accessed date and
time.
Valid values =
AO (Absolute Old) – Selects files with a dtu
(date_time_use) equal to or before the
specified date. Enter the year as a 4-digit
number.
dt_access=<alpha><yyyy>/<mm>
/<dd>-<hh>:<mm>:<ss>
AN (Absolute New) – Selects files with a
dtu equal to or after the specified date.
Enter the year as a 4-digit number.
RO (Relative Old) – Selects files with a dtu
equal to or before the relative specified
date.
RN (Relative New) – Selects files with a dtu
equal to or after the relative specified date.
I (Inactive) – Do not use date.
Default = I
Processes files based on the date and time stored
on the Vault.
Valid values =
dt_stored=<alpha><yyyy>/<mm>
/<dd>-<hh>:<mm>:<ss>
AO (Absolute Old) – Selects files with a dtu
(date_time_use) equal to or before the
specified date. Enter the year as a 4-digit
number.
AN (Absolute New) – Selects files with a
dtu equal to or after the specified date.
Enter the year as a 4-digit number.
Manage Data and the Information Repository: Data Service Policies and Vault Admin
Token/Value
Description
RO (Relative Old) – Selects files with a dtu
equal to or before the relative specified
date.
RN (Relative New) – Selects files with a dtu
equal to or after the relative specified date.
I (Inactive) – Do not use date.
Default = I
error_log="<pathname>"
Specifies the path for the error log file. If you
specify "/dev/tty", error messages will display on
the default output device. Supports token
substitution.
Default path for the configuration file = "%R/Logs/
%P.err"
Default path for the command line = "/dev/tty"
Omits directories. Accepts multiple instances.
exclude_dir_spec="<pathname>"
Default = "" (no directories excluded)
Omits files. Accepts multiple instances.
exclude_file_spec="<pathname>"
Default = "" (no files excluded)
file_spec="<pattern>"
Sets the criteria for files that are to be processed.
This token/value pair can be specified multiple
times to include multiple file filters.
Default = "*" (any)
hostname="<host name>"
Selects the files that are to be processed based on
the original host name for the file.
Default = ""
Processes files from off-line media.
include_offline=<Boolean>
Valid values = true | false
Default = false
Specifies the job type.
job_type=<alpha>
Valid values =
169
170
Buffalo Surveillance Server
Token/Value
Description
replicate
migrate
purge
Default = migrate
Keeps a copy of the source files after they have
been processed.
Valid values = true | false
keep=<Boolean>
You would use "false" to create a move
policy; use "true" to create a replicate
policy.
Default = false
Specifies the filename to which all report
information is written. Supports token substitution.
list_pn="<pathname>"
Default path for the policy file = "%R/Logs/%P.log"
Default path for the command line = "/dev/tty"
max_file_size=<number>
Specifies the maximum size in bytes of a source
file. The min_file_size and max_file_size options
are mutually exclusive.
Default = 18446744073709551615
min_file_size=<number>
Specifies the minimum size in bytes of a source
file. The max_file_size and min_file_size options
are mutually exclusive.
Default = 0 (none)
out_of_band=<Boolean>
Enables the application to constantly monitor its
processes and select the network transmission
protocol that best suits the files being processed.
Valid values = true | false
Default = true
post_proc_cmd="<command>"
Specifies a command that runs immediately after
the job is finished. Supports token substitution.
Default = ””
Manage Data and the Information Repository: Data Service Policies and Vault Admin
Token/Value
pre_proc_cmd="<command>"
Description
Specifies a pre-process command that runs
immediately before a job starts. Supports token
substitution.
Default = ””
Purges the targeted file from the source Vault
instead of migrating or replicating it.
remove_only=<Boolean>
Valid values = true | false
Default = false
repeat_interval=<hh:ss:mm>
Used only in the policy file. The amount of time
that elapses before a job is repeated.1
Default = 24:00:00
src_high_water_mark=<number>
Specifies the maximum percent (%) of media that
will be used. If the % used is greater than the
entered value, the file is processed.
Valid values = 1 - 100
Default = 0
src_low_water_mark=<number>
Specifies the minimum percent (%) of media used
after the high watermark has been reached. If the
% of media used is greater than this value and the
high watermark has been reached, the file is
processed.
Valid values = 1 - 100
Default = 0
src_media_name="<character
string>"
Specifies the source media name.
Default = "*" (any)
Specifies the source media speed.
Valid values =
src_media_speed=<character
string>
S0 - S10
Unspecified
Default = unspecified
src_media_type=<character string>
Specifies the source media type from which the file
should be processes.
171
172
Buffalo Surveillance Server
Token/Value
Description
Hdisk – hard disk.
8mm – Eight-millimeter tape.
Dds – Digital data storage.
Dlt – Digital linear tape.
Ait – Advanced intelligent tape.
SuperAit – Super advanced intelligent
tape.
Lto – Linear tape open.
Vxa – Exabyte Vxa tape.
Travan - Travan tape.
MagOptical – Read/write optical.
NullDevice
unspecified
Default = unspecified
src_storage_pool="<character
string>"
Specifies the source storage pool.
src_Vault_name="<character
string>"
Specifies the source Vault.
src_volume_format
Currently not supported.
src_volume_name
Currently not supported.
Default = "*" (any)
Default = "*" (any)
Used only in the policy file. Specifies the days on
which the job will run. Use - to indicate days that
job will not run.
start_days=<mtwtfss>
For example, if the job is to run on Thursday, you
would enter ---t---.1
Default = mtwtfss
start_time=<hh:mm:ss>
Used only in the policy file. Specifies the time the
job should start for each defined start day in
start_days.1
Default = 0:0:0 (midnight)
Manage Data and the Information Repository: Data Service Policies and Vault Admin
Token/Value
stop_time=R<yyyy>/<mm>
/<dd>-<hh>:<mm>:<ss>
Description
Used only in the policy file. Specifies the date and
time at which the job will be stopped. The date and
time entered is relative to the start of the job.
Default = 0/0/0-0:0:0 (no stop time)
summary=<Boolean>
Prints the start and stop times and final statistics
of the job to the file indicated by the list_pn option
(above).
Valid values = true | false
Default = true
throttle=<number>
Throttling controls the amount of bandwidth used
by jobs (and, therefore, the speed at which files are
sent to Vaults). Throttle values are relative to
Information Repository capacity and range from 1%
to 100%. A lower setting reduces the amount of
available bandwidth that will be used.
Valid values = 1 - 100
Default = 100
type="<alpha>"
The policy type of the policy file. Only "ds" is valid
for Data Service policies.
Specifies the number of files (F) or number of bytes
(S) to store per single Vault connection.
Valid values =
vcs= <alpha><number>
F – files
S – bytes
1Default = F500
version="<number>"
The version number of the currently installed
command line application. Only the current version
number is valid. This number will change with new
releases.
volume_use
Currently not supported.
1
Note: Timing tokens are mutually exclusive. Only one timing token may be set. In other
words, you may set either absolute_start, or repeat_interval, or start_days AND start_time.
173
174
Buffalo Surveillance Server
Sample Data Service Policy
If you were to export a policy, it would look similar to the following:
# Start of object rule for policy name 'Long Term Storage'
#
policy_name = "Long Term Storage"
[
type
= "ds"
version
= "1.0"
active
= true
content_filter
= ""
data_paths
= 1
deleted_files
= false
diag
= false
display_only
= false
dst_Vault_name
= "*"
dst_media_name
= "*"
dst_storage_pool
= "*"
dst_media_speed
= Unspecified
dst_media_type
= Unspecified
dst_volume_format
= Unspecified
dst_volume_name
= "*"
dt_access
= I
dt_stored
= I
error_log
= "%R/Logs/%P.err"
hostname
= ""
include_offline
= false
job_type
= "migrate"
list_pn
= "%R/Logs/%P.log"
min_file_size
= 0
max_file_size
= 18446744073709551615
src_Vault_name
= "*"
src_media_name
= "*"
src_storage_pool
= "*"
src_media_speed
= Unspecified
src_media_type
= Unspecified
src_volume_format
= Unspecified
src_volume_name
= "*"
volume_use
= Unspecified
out_of_band
= true
post_proc_cmd
= ""
pre_proc_cmd
= ""
start_days
= mtwtfss
start_time
= 0:0:0
src_high_water_mark
= 0
src_low_water_mark
= 0
stop_time
= 0/0/0-0:0:0
summary
= true
throttle
= 100
vcs
= F500
verbose
= false
]
Manage Data and the Information Repository: Data Service Policies and Vault Admin
Source Tab: Specify Where Files Come From
After you add a policy, the next step is to define the source from which files will be migrated,
replicated, or purged. "Source" indicates from which Vault, media, storage pool, media type,
and/or media speed you will migrate, duplicate, or purge files.
If you leave any field set to the default (<any>), the Buffalo Surveillance Server will process all
of the information from all of the sources for the given field in the Information Repository. For
example, if you leave Vault set to <any>, the Buffalo Surveillance Server will process data from
all of the Vaults in your Information Repository.
If you wish to create a new name for any parameter, you may not use the following
names already used by the Information Repository: unnamed, any, new entry.
Only <any>, <unnamed>, <new entry> and/or the names of Vaults, media, storage pools,
media types, and media speeds that are already implemented in the Information Repository
appear in the pull-down lists unless you have added new parameters. If you plan to add new
Vaults, media, or storage pools to the Information Repository at a later time and know the
name that you will assign to the Vaults, media, or storage pools, you can add them manually.
However, to minimize the risk of error, it is best to choose only media that appear in the pulldown list. There are several options for doing this:
Leave all of the fields set to the default (<any> or <unnamed>) and use the Criteria tab to
define what data will be processed.
The Buffalo Surveillance Server will choose the most accessible Vault
and Media with the most free space.
Select a value from the field that you know contains the data you want to process and let
Buffalo Surveillance Server take care of the rest.
175
176
Buffalo Surveillance Server
If, for example, you select a Media Speed of S8, the Buffalo Surveillance Server will process
data only from media with an S8 speed rating. Likewise, if you select only a Storage Pool
or Media Name, the Buffalo Surveillance Server will process only files from the storage pool
or media that you select. Similarly, if you select only a Vault, the Buffalo Surveillance
Server will process data only from the Vault that you select, including all of the media and
storage pools within the Vault.
Select values from every field for a more focused process.
When you select a value from Vault, Media Name, or Storage Pool, the Buffalo Surveillance
Server limits the options available in the remaining fields to only those commensurate with
the value you have selected. A single storage pool may comprise several units of media
and/or Vaults.
Create a new entry or entries for Vault, Media Name, and/or Storage Pool.
Use the pull-down control for Vault, Media Name, and/or Storage Pool, and then select
<new entry>. A window appears into which you can enter the new name for the field.
Enter the new Vault, Media Name, or Storage Pool, and click [ OK ]. The new entry
appears in the field's pull-down list.
Although you can enter a new name here, it is a placeholder that cannot be used to
run jobs until you have actually created and configured the Vault, media, storage pool
in the VaultAdmin application. If you try to run a job with a Vault, media, or storage
pool that has not yet been created using VaultAdmin, the job will fail.
The names above <any> represent Vaults, media, or storage pools actually running in your
Information Repository. The names below the divider are the ones that you have not yet
been configured in the VaultAdmin application.
If you enter a new name for a Vault, the Media Name and Storage Pool options are
limited to <any> and <new entry>. New entries in Media Name or Storage pool do
not limit options in the remaining fields.
<unnamed> and <any> are not just placeholders. They are literal names that are
used in your Information Repository unless you provide alternate names.
To return the tab to a state where you can choose any value from any field, select
<any> in the Vault field.
When entering pathnames or pathname searching patterns, only the forward slash (/)
may be used as a pathname delimiter. If you use a backslash (\), as is customary on
some platforms, you may get unexpected results.
Manage Data and the Information Repository: Data Service Policies and Vault Admin
Wildcard Operators for Vault, Media Name, and Storage Pool
The Buffalo Surveillance Server supports the following wildcards with case sensitive alpha
characters in the Vault, Media Name, and Storage Pool fields:
* for zero or more of any character
? for any single character
* Substitutes for zero or more characters. Can be used in truncation and for multiple
characters. If used in a pathname, it cannot replace a forward slash (/). Use * for all possible
alternative spellings and an unlimited number of characters within a name.
For example, h*ophilia substitutes for all names containing h+<any character or number
of characters>+ophilia, such as haemophilia, hemophilia, or h.123ophelia; behavi*r
substitutes for all names containing behavi+<any character or number of characters>+r,
such as behaviour, behavior, or behavi123.zr; patent* substitutes for only all names
containing patent+<a character or any number of characters>, such as patents,
patentable, patented, patent123, and so on; patent*.jpg substitutes for only all names
containing patent+<a character or any number of characters>+.jpg, such as patents.jpg,
patentable.jpg, patented.jpg, patent123.jpg, etc; *.jpg substitutes for only all names containing
<any character or set of characters>+.jpg.
? Substitutes for any single character and can be combined to denote multiple
characters. If used in a pathname, it cannot replace a forward slash (/). Use ? for specific
alternative spellings. ? substitutes for a single character; ?? substitutes for two characters;
??? substitutes for three characters, and so on. Only names with characters equal to the
number of ? used are processed. For example, cell? substitutes for all names containing cell
+<one additional character>.
For example, cells and cello but not cell. You can use ? within or at the end of a phrase. For
example, .xl? substitutes for only names containing .xl+<a third character>, such as .xls, .
xlr, and so on; wom?n substitutes for only names containing wom+<a third character>+n,
such as woman or women; carbon fib?? substitutes for only names containing carbon fib+
<two characters>, such as carbon fiber or carbon fibre.
In the Vault, Media Name, or Storage Pool fields, substitute the appropriate wildcard
character for any letter or letters. For example, lets say you have four Vaults:
Accounting
Administrative
Development
Sarbanes-Oxley
And, you want to migrate data only to Vaults named "Accounting" and "Actuarial". In the Vault
field, you would enter Ac*, and data will be stored only to Vaults beginning with Ac, regardless
of what comes after c. The same type of scenario would pertain if you wanted to use wildcards
in the Media Name field.
177
178
Buffalo Surveillance Server
When you use a wildcard in the Vault field, only media and storage pools associated with the
selected Vault are displayed in the Media Name and Storage Pool fields. For example, if you
enter j* in the Vault field, only Media and Storage Pools in Vaults beginning with j will appear
in the Media Name and Storage Pool fields. The functionality is similar for Media Name. For
example, if you enter Ni*, only storage pools beginning with Ni will be displayed in the Storage
Pool field.
See Advanced Wildcard Functionality for a complete list of and more complete
information about wildcards.
Source Fields
Vault
Vaults are the basic units of storage in your Information Repository.
Click the pull-down control arrow and, from the list that appears, select a Vault; or, select
<new entry> to add a new Vault name. When you select a Vault, the Buffalo Surveillance
Server will populate the Media Name pull-down menu with the media that it finds on the given
Vault.
If you enter a new name for a Vault, the Media Name and Storage Pool options will be
limited to <any> or <unnamed> and <new entry>.
Media Name
Media Name refers to the names of individual units of media in the Vaults of your Information
Repository.
Click the pull-down control arrow and, from the list that appears, select the media; or, select
<new entry> to add a new media name. The Buffalo Surveillance Server will then
automatically look for the Storage Pools that comprise the media. If the Buffalo Surveillance
Server cannot find storage pools that comprise the media that you have selected, the Storage
Pool field will display <any>.
Storage Pool
Storage Pools are groupings of media utilized for a particular purpose. A typical example of
storage pooling is the utilization of several units of media for a single policy. For example, if you
want to have the "Monday night backup" write to several units of media, you would use a
"Monday night backup" storage pool and assign to it every unit of media that you want to use
for that purpose. (See Prepare Media, Storage Pool for information about creating storage
pools using Vault Admin.)
Click the pull-down control arrow and, from the list that appears, select a storage pool; or,
select <new entry> to add a new storage pool name.
Manage Data and the Information Repository: Data Service Policies and Vault Admin
Media Type
You can determine the types of media your policy will use by specifying a media type. For
example, if "Hdisk" is an option and you select it, only Hdisk media will be utilized. This setting
is useful for processing data of lower importance or less rigorous recovery time objectives.
You can set either Media Type or Media Speed but not both.
Although only Hdisk media will be used, the names displayed in the other fields will not
change.
Click the pull-down control arrow under the Media Type label, and select the media type.
Only the media types that are available for the parameters you have chosen in the Vault,
Media Name, or Storage Pool fields will be displayed. If no Vault, media, or storage pool is
chosen, only the media types from media available within the Information Repository will be
displayed.
Media Speed
Storage technologies supported by the Buffalo Surveillance Server are categorized by their
performance. The Media Speed setting is useful for processing data of lower importance or less
rigorous recovery time objectives. Media Speed enables you to specify what media will be used
based on media performance. For example, if "S4" is an option and you select it, only S4
media will be utilized.
Although only S4 media will be used, the names displayed in the other fields will not
change.
Hard disk is considered a high performance media and is assigned a high rating (S8). Slower
tape technologies are lower performance and are assigned a lower rating (S0). You can set
either Media Type or Media Speed but not both.
Click the pull-down control arrow under the Media Speed label, and then select a
performance rating. The Buffalo Surveillance Server will display only the media speeds that
are available for the parameters you have chosen in the Vault, Media Name, or Storage Pool
fields. If no Vault, media, or storage pool is chosen, only the speeds from media available
within the Information Repository will be displayed.
Criteria Tab: Set File Eligibility Definitions
After you have selected a data source, you can further refine which specific files are moved by
configuring parameters under the Criteria tab. If you leave all the fields on this tab empty, all of
the files that reside on the source media are migrated, replicated, or purged. To select files
from specific locations or of specific types, use filters as described below.
179
180
Buffalo Surveillance Server
Type of Objects
This option enables you to select which types of objects are processed. If you select "Files and
Directories", both files and directories are processed and rights for both are preserved. If you
select "Directories Only", directories and their rights are processed. Files are ignored. If you
select, "Files Only", only files and their rights are preserved. Directories are ignored.
Host Name
This option enables you to migrate all of the files from a particular host computer. If you use
this parameter, the policy processes only files that originally came from the host computer that
you name.
Enter the name of the computer, as shown in your network, that you want to define as the
Host.
Content
This option enables you to limit the files that are processed to only those containing a
particular word or phrase. If you want to process only files that contain a particular phrase, be
sure to enclose the phrase in quotation marks. Otherwise, the application processes all of the
files containing any word that you enter. For example, if you enter "Information Repository",
only files that contain the complete phrase "information repository" are processed. In contrast,
if you enter Information Repository, any file containing "information repository", "repository
information", "information", or "repository" are processed. Regardless of quotes, case is
ignored.
The Content field supports the following single and multiple wildcards:
* for zero or more of any character
Manage Data and the Information Repository: Data Service Policies and Vault Admin
? for any single character
* Substitutes for zero or more characters. Can be used in truncation and for multiple
characters. If used in a pathname, it cannot replace a forward slash (/). Use * for all possible
alternative spellings and an unlimited number of characters within a name.
For example, h*ophilia substitutes for all names containing h+<any character or number
of characters>+ophilia, such as haemophilia, hemophilia, or h.123ophelia; behavi*r
substitutes for all names containing behavi+<any character or number of characters>+r,
such as behaviour, behavior, or behavi123.zr; patent* substitutes for only all names
containing patent+<a character or any number of characters>, such as patents,
patentable, patented, patent123, and so on; patent*.jpg substitutes for only all names
containing patent+<a character or any number of characters>+.jpg, such as patents.jpg,
patentable.jpg, patented.jpg, patent123.jpg, etc; *.jpg substitutes for only all names containing
<any character or set of characters>+.jpg.
? Substitutes for any single character and can be combined to denote multiple
characters. If used in a pathname, it cannot replace a forward slash (/). Use ? for specific
alternative spellings. ? substitutes for a single character; ?? substitutes for two characters;
??? substitutes for three characters, and so on. Only names with characters equal to the
number of ? used are processed. For example, cell? substitutes for all names containing cell
+<one additional character>.
For example, cells and cello but not cell. You can use ? within or at the end of a phrase. For
example, .xl? substitutes for only names containing .xl+<a third character>, such as .xls, .
xlr, and so on; wom?n substitutes for only names containing wom+<a third character>+n,
such as woman or women; carbon fib?? substitutes for only names containing carbon fib+
<two characters>, such as carbon fiber or carbon fibre.
For a full list and detailed coverage of everything you can do using wildcards, see the Advanced
Wildcard Functionality, Content Searching Wildcards section.
Enter a word or phrase that you want used as a criteria for processing.
Time
This option enables you to select files based on the time and date that they were stored or
accessed on the host computer. Use the pull-down controls to select one of several options.
You can process files that have been stored or accessed before or after a specific interval of
time or date and time that you designate.
Select one of the options:
Process files relative to a specific time and date
Select one of the options that includes a specific time and date (such as "Accessed in
after HH:MM AM on Day). The clock icon
, the calendar icon
Accessed/Stored pull-down list are activated.
, and the
181
182
Buffalo Surveillance Server
Select Accessed or Stored. The text in the Time pull-down list changes to reflect your
selection.
Select the clock icon
to launch Time 388 window, and then enter a time. The time
you enter is displayed in the Time pull-down list.
Select the calendar icon
to launch Date 386 window, and then enter a date. The
date you enter is displayed in the Time pull-down list.
Process files relative to when they were last accessed or stored
Select one of the options that includes an interval of time (such as "Accessed in the past
x"). The clock icon
and Accessed/Modified icon are activated.
Select Accessed or Stored. The text in the Time pull-down list changes to reflect your
selection.
Select the clock icon
to launch the Period of Time 387 window, and then enter a
period of time in terms of years, months, days, hours, minutes, AND/OR seconds. The
period of time you enter is displayed in the pull-down list.
File Size
Refine your file selection criteria further by specifying a minimum or maximum file size
associated with the policy.
If you enter a file size in the text box and select Minimum file size, the policy manipulates
only files that are larger than the size you have specified. If you enter a number and select
Maximum file size, the policy manipulates only files that are smaller than the size specified.
If you want data to be processed according to maximum or minimum files size, enter the files
size, select the unit of measurement (bytes, KB, MB, GB), and then select Maximum or
Minimum.
Manage Data and the Information Repository: Data Service Policies and Vault Admin
Watermark
The Buffalo Surveillance Server enables you to set High and Low watermarks. Watermarks
modify when data should be processed, as a policy runs, in relation to the percentage of
available space on source media. If a high watermark is greater than 0 (zero), data is
processed only when the percentage of used space on the source media is greater than the
entered value. In other words, when a high watermark is greater than 0 (zero), if a scheduled
policy runs, data is transferred only when the amount of data on the source exceeds the high
watermark. When this happens, data processing will continue until the source media is
emptied to the level indicated by the Low watermark. In short, processing begins when a policy
executes and the amount of data on the source media exceeds the high watermark; and
processing stops when the amount of data on the source media reaches the low watermark.
Enter a High watermark to limit processing to until after the level of data on the source media
has exceeded the high watermark. And/or, enter a Low watermark to enable the policy to
stop processing data when the media's capacity has reached the low watermark level.
Files and Directories to Include/Exclude
Once you have denoted the files and directories you want to process, you can further refine
your session with file and directory filters. You can use Include and Exclude filters at the file
level and the directory level. You can create Exclude filters that exclude specific files and/or
directories from the job and Include filters that include only specific files and/or directories in
the job.
Both file and directory filters work similarly, the difference being that file filters work at the file
level and directory filters work at the directory level. File and Directory filters support the use of
wildcards. See Wildcard Operators below and Advanced Wildcard Functionality for details on
how to use wildcards in file and directory filters.
Rules for File Filters and Directory Filters
File filters and directory filters operate on filenames and directory names respectively. When a
policy features both file and directory filters, both types of filters are employed. Although file
filters and directory filters can complement each other, the Buffalo Surveillance Server applies
file filters discretely from directory filters, first processing all of the directory filters and then
processing all of the file filters.
When exclude filters are used, there is an implied "include all" at the end of the list of exclude
filters. This means that everything will be included in the job that is not explicitly excluded.
When only include filters are used, there is an implied "exclude all" at the end of the list of
include filters. This means that only the files and file types denoted by an include filter will be
included in jobs.
Filters process exactly what you enter. For example, if you create an include filter for .
doc, the Buffalo Surveillance Server will process files that are literally named .doc. If you
want to process all files that are of a .doc type, your filter would include a wildcard: *.doc
.
183
184
Buffalo Surveillance Server
File Filters
If a file filter has no pathname delimiters, the Buffalo Surveillance Server matches the pattern
against only the last leaf of the candidate pathname, which is the filename itself. If the file filter
has pathname delimiters, the Buffalo Surveillance Server matches the pattern against the entire
pathname, including the filename.
File filters are read from the top down. For example, if you have an exclude file filter that
excludes all .jpg files followed by a filter that includes all .jpg files, .jpg files will be excluded.
Directory Filters
If a directory filter has no pathname delimiters, the Buffalo Surveillance Server tries matching
the pattern against each leaf of the pathname separately, looking for the first match. If a
directory filter has pathname delimiters, the Buffalo Surveillance Server matches the pattern
against the entire pathname.
Directory filters are read from the top down. For example, if you have an exclude directory filter
that excludes all folders named Pictures followed by a filter that includes
Pictures/2003Convention, the first filter will take precedence and Pictures/2003Convention
will not be included.
Create or Delete File Filters and Directory Filters
Decide whether you want to first create file filters or directory filters. File filters will enable you
to include or exclude particular files by file name or file type. Directory filters enable you to
include or exclude directories and their contents in their entirety, including sub-directories
and their contents. You can use file and directory filters simultaneously.
To create a filter, select
beneath Files to Include/Exclude or Directories to Include/
Exclude, depending on whether you want to create a file or directory filter. The Add Filter
window will appear:
Select a filter type. Use Include to ensure the inclusion of particular files, directories, and file
types. Use Exclude to exclude particular files, directories, and file types.
Enter the filter. See the examples below for details.
Manage Data and the Information Repository: Data Service Policies and Vault Admin
Click [ OK ]. If you were to enter *.vsd and then *.xls, the File to Include/Exclude text box
would appear as follows. Include filters are preceded by ; exclude filters, :
To determine which filters are given priority, you can move them up or down by using
and
respectively.
When entering pathnames or pathname searching patterns, only the forward slash (/)
may be used as a pathname delimiter. If you use a backslash (\), as is customary on
some platforms, you may get unexpected results.
To delete a filter, simply select the filter by single clicking it, and then click
.
Examples of File Filters and Directory Filters
Suppose you have a directory that contains several different files types and you want to
process all of the files in the directory except .jpg files. To do this, you can create an exclude
filter for files with a .jpg extension:
. In this example,
denotes "exclude"; * (asterisk)
is the wildcard symbol for "all"; .jpg is the file extension that is subject to the prefixed
symbols.
In the table below, the column on the left lists all of the files in a hypothetical directory. The
column in the center shows the filter that will be applied. The column on the right shows which
files will actually be processed. Notice that none of the .jpg files are processed.
185
186
Buffalo Surveillance Server
Files in specified directory
Filter
Files that are processed
Elevator design 12502.vsd
Elevator design 12502.vsd
Elevator design rev 20502.vsd
Elevator design rev 20502.vsd
Elevator design rev 21502.vsd
Elevator design rev 21502.vsd
Part345X.xls
Part345X.xls
Part236.xls
Part236.xls
Part 532.xls
Part 532.xls
Ref-guide rev21502.doc
Ref-guide rev21502.doc
Ref-guide rev21802.doc
Ref-guide rev21802.doc
Install guide 21502.ind
Install guide 21502.ind
Illustration 532.psd
Illustration 532.psd
Illustration 236.psd
Illustration 236.psd
Vacation 1.jpg
Vacation 2.jpg
Vacation 3.jpg
Filter strings may contain a variety of wildcard symbols, making the Information Repository
very flexible. You can use several filters together to create almost any include/exclude
combination.
Using the same file set as an example, the only files that will be processed in the following
example are the .vsd and .xls files:
Manage Data and the Information Repository: Data Service Policies and Vault Admin
Files in specified directory
Filter
Files that are processed
Elevator design 12502.vsd
Elevator design 12502.vsd
Elevator design rev 20502.vsd
Elevator design rev 20502.vsd
Elevator design rev 21502.vsd
Elevator design rev 21502.vsd
Part345X.xls
Part345X.xls
Part236.xls
Part236.xls
Part 532.xls
Part 532.xls
Ref-guide rev21502.doc
Ref-guide rev21802.doc
Install guide 21502.ind
Illustration 532.psd
Illustration 236.psd
Vacation 1.jpg
Vacation 2.jpg
Vacation 3.jpg
Basic Wildcard Operators for File and Directory Filters
File and directory filters operate on filenames and directory names respectively. The Buffalo
Surveillance Server supports the following wildcards with case sensitive alpha characters in file
and directory filters:
* for zero or more of any character
? for any single character
* Substitutes for zero or more characters. Can be used in truncation and for multiple
characters. If used in a pathname, it cannot replace a forward slash (/). Use * for all possible
alternative spellings and an unlimited number of characters within a name.
For example, h*ophilia substitutes for all names containing h+<any character or number
of characters>+ophilia, such as haemophilia, hemophilia, or h.123ophelia; behavi*r
substitutes for all names containing behavi+<any character or number of characters>+r,
such as behaviour, behavior, or behavi123.zr; patent* substitutes for only all names
containing patent+<a character or any number of characters>, such as patents,
patentable, patented, patent123, and so on; patent*.jpg substitutes for only all names
containing patent+<a character or any number of characters>+.jpg, such as patents.jpg,
patentable.jpg, patented.jpg, patent123.jpg, etc; *.jpg substitutes for only all names containing
<any character or set of characters>+.jpg.
187
188
Buffalo Surveillance Server
? Substitutes for any single character and can be combined to denote multiple
characters. If used in a pathname, it cannot replace a forward slash (/). Use ? for specific
alternative spellings. ? substitutes for a single character; ?? substitutes for two characters;
??? substitutes for three characters, and so on. Only names with characters equal to the
number of ? used are processed. For example, cell? substitutes for all names containing cell
+<one additional character>.
For example, cells and cello but not cell. You can use ? within or at the end of a phrase. For
example, .xl? substitutes for only names containing .xl+<a third character>, such as .xls, .
xlr, and so on; wom?n substitutes for only names containing wom+<a third character>+n,
such as woman or women; carbon fib?? substitutes for only names containing carbon fib+
<two characters>, such as carbon fiber or carbon fibre.
See Advanced Wildcard Functionality for a complete list of and more complete
information about wildcards.
Destination Tab: Define Data Destinations
After you have defined your policy criteria, use the Destination tab to define criteria to
determine in what Vaults, media, and/or storage pools your data will be stored. Read this
section before you set Vault, Media Name, Storage Pool, Media Type, and Media Speed
parameters.
If you leave any field set to the default (<any>), the Buffalo Surveillance Server will use all of the
parameters for the given field in the Information Repository. For example, if you leave Vault set
to <any>, the Buffalo Surveillance Server will use all of the Vaults in your Information
Repository, choosing the one with the most free space that is most readily available for any
given job.
If you wish to create a new name for any parameter, you may not use the following
names already used by the Information Repository: unnamed, any, new entry.
Manage Data and the Information Repository: Data Service Policies and Vault Admin
Only <any>, <unnamed>, <new entry> and/or the names of Vaults, storage pools, media,
media types, and media speeds that are already implemented in the Information Repository
appear in the pull-down lists unless you have added new parameters. If you plan to add new
Vaults, media, or storage pools to the Information Repository at a later time and know the
name(s) that you will assign to these resources, you can add the name(s) of these resources
manually before actually implementing them. They will be listed beneath <any> in the given
field. However, to minimize the risk of error, it is best to choose only media that
appears in the pull-down list. There are several options for doing this:
Leave all of the fields set to the default (<any>) and let Buffalo Surveillance Server take
care of everything.
The Buffalo Surveillance Server will choose the most accessible Vault
and media with the most free space.
Select a parameter from the field that best meets the data's requirements, and let Buffalo
Surveillance Server take care of the rest.
If, for example, you select a Media Speed of S8, the Buffalo Surveillance
Server will write only to media that runs at the speed associated with S8.
Likewise, if you select only a Storage Pool or Media Name, the Buffalo
Surveillance Server will send the files to only the storage pool or media
that you select. Similarly, if you select only a Vault, the Buffalo
Surveillance Server will choose the best unit of media within the Vault and
the data will not have Storage Pool metadata. In general, the Buffalo
Surveillance Server will use the most readily available Vault and/or media
with the most available free space.
Select a parameter from the field that best meets the data's requirements, and then
select available parameters from the remaining fields.
When you select a parameter from Vault, Media Name, or Storage
Pool, the Buffalo Surveillance Server will limit the options
available in the remaining fields to only those commensurate
with the parameter you have selected.
You can assign several units of media to a single storage pool.
(See Prepare Media, Storage Pool 237 for more information about
Storage Pools.) To return the tab to a state where you can
choose any parameter from any field, select <any> in the Vault
field.
Create a new entry or new entries for Vault, Media Name, and/or Storage Pool.
189
190
Buffalo Surveillance Server
Use the pull-down control for Vault, Media Name, and/or Storage
Pool, and then select <new entry>. A window will appear into
which you can enter the new name for the field that you have
select. Enter the new Vault, Media Name, or Storage Pool, and
then click [ OK ]. The new entry will appear in field's pull-down
list.
This method is recommended only for special circumstances. If
you try to run a job with a Vault or media that is not actually
running in the Information Repository, the job will fail.
<any> will divide the names of Vaults, media, and storage pools
already implemented from the names that you have added for
Vaults, media, and storage pools that have not yet been
implemented. In other words, the names above <any> represent
Vaults, media, or storage pools actually running in your
Information Repository. The names below the divider are the
ones that you have entered that do not yet have hardware
implemented in the Information Repository. These will not be
saved if they are not selected when you save the policy.
Limitations to adding a new name for Vault, Media Name, or
Storage Pool:
If you enter a new name for a Vault, Media Name and Storage
Pool options will be limited to <any> and <new entry>.
New entries in Media Name or Storage Pool do not limit options
in the remaining fields.
If you add a wildcard (for example, Ac*), the wildcard will appear
beneath <any> even thought there may be Vaults in the
Information Repository the wildcard comprises.
When entering pathnames or pathname searching patterns, only the forward slash
(/) may be used as a pathname delimiter. If you use a backslash (\), as is
customary on some platforms, you may get unexpected results.
Wildcard Operators for Vault, Media Name, and Storage Pool
The Buffalo Surveillance Server supports the following wildcards with case sensitive alpha
characters in the Vault, Media Name, and Storage Pool fields:
* for zero or more of any character
? for any single character
Manage Data and the Information Repository: Data Service Policies and Vault Admin
* Substitutes for zero or more characters. Can be used in truncation and for multiple
characters. If used in a pathname, it cannot replace a forward slash (/). Use * for all possible
alternative spellings and an unlimited number of characters within a name.
For example, h*ophilia substitutes for all names containing h+<any character or number
of characters>+ophilia, such as haemophilia, hemophilia, or h.123ophelia; behavi*r
substitutes for all names containing behavi+<any character or number of characters>+r,
such as behaviour, behavior, or behavi123.zr; patent* substitutes for only all names
containing patent+<a character or any number of characters>, such as patents,
patentable, patented, patent123, and so on; patent*.jpg substitutes for only all names
containing patent+<a character or any number of characters>+.jpg, such as patents.jpg,
patentable.jpg, patented.jpg, patent123.jpg, etc; *.jpg substitutes for only all names containing
<any character or set of characters>+.jpg.
? Substitutes for any single character and can be combined to denote multiple
characters. If used in a pathname, it cannot replace a forward slash (/). Use ? for specific
alternative spellings. ? substitutes for a single character; ?? substitutes for two characters;
??? substitutes for three characters, and so on. Only names with characters equal to the
number of ? used are processed. For example, cell? substitutes for all names containing cell
+<one additional character>.
For example, cells and cello but not cell. You can use ? within or at the end of a phrase. For
example, .xl? substitutes for only names containing .xl+<a third character>, such as .xls, .
xlr, and so on; wom?n substitutes for only names containing wom+<a third character>+n,
such as woman or women; carbon fib?? substitutes for only names containing carbon fib+
<two characters>, such as carbon fiber or carbon fibre.
In the Vault, Media Name, or Storage Pool fields, substitute the appropriate wildcard
character for any letter or letters. For example, lets say you have four Vaults:
Accounting
Administrative
Development
Sarbanes-Oxley
And, you want to migrate data only to Vaults named "Accounting" and "Actuarial". In the Vault
field, you would enter Ac*, and data will be stored only to Vaults beginning with Ac, regardless
of what comes after c. The same type of scenario would pertain if you wanted to use wildcards
in the Media Name field.
When you use a wildcard in the Vault field, only media and storage pools associated with the
selected Vault are displayed in the Media Name and Storage Pool fields. For example, if you
enter j* in the Vault field, only Media and Storage Pools in Vaults beginning with j will appear
in the Media Name and Storage Pool fields. The functionality is similar for Media Name. For
example, if you enter Ni*, only storage pools beginning with Ni will be displayed in the Storage
Pool field.
191
192
Buffalo Surveillance Server
See Advanced Wildcard Functionality for a complete list of and more complete
information about wildcards.
Destination Fields
Vault
Vaults are the basic units of storage in your Information Repository.
Click the pull-down control arrow and, from the list that appears, select a Vault; or, select
<new entry> to add a new Vault name. When you select a Vault, the Buffalo Surveillance
Server will populate the Media Name pull-down menu with the media that it finds on the given
Vault.
If you enter a new name for a Vault, the Media Name and Storage Pool options will be
limited to <any> or <unnamed> and <new entry>.
Media Name
Media Name refers to the names of individual units of media in the Vaults of your Information
Repository.
Click the pull-down control arrow and, from the list that appears, select the media; or, select
<new entry> to add a new media name. The Buffalo Surveillance Server will then
automatically look for the Storage Pools that comprise the media. If the Buffalo Surveillance
Server cannot find storage pools that comprise the media that you have selected, the Storage
Pool field will display <any>.
Storage Pool
Storage Pools are groupings of media utilized for a particular purpose. A typical example of
storage pooling is the utilization of several units of media for a single policy. For example, if you
want to have the "Monday night backup" write to several units of media, you would use a
"Monday night backup" storage pool and assign to it every unit of media that you want to use
for that purpose. (See Prepare Media, Storage Pool for information about creating storage
pools using Vault Admin.)
Click the pull-down control arrow and, from the list that appears, select a storage pool; or,
select <new entry> to add a new storage pool name.
Media Type
You can determine the types of media your policy will use by specifying a media type. For
example, if "Hdisk" is an option and you select it, only Hdisk media will be utilized. This setting
is useful for processing data of lower importance or less rigorous recovery time objectives.
Manage Data and the Information Repository: Data Service Policies and Vault Admin
You can set either Media Type or Media Speed but not both.
Although only Hdisk media will be used, the names displayed in the other fields will not
change.
Click the pull-down control arrow under the Media Type label, and select the media type.
Only the media types that are available for the parameters you have chosen in the Vault,
Media Name, or Storage Pool fields will be displayed. If no Vault, media, or storage pool is
chosen, only the media types from media available within the Information Repository will be
displayed.
Media Speed
Storage technologies supported by the Buffalo Surveillance Server are categorized by their
performance. The Media Speed setting is useful for processing data of lower importance or less
rigorous recovery time objectives. Media Speed enables you to specify what media will be used
based on media performance. For example, if "S4" is an option and you select it, only S4
media will be utilized.
Although only S4 media will be used, the names displayed in the other fields will not
change.
Hard disk is considered a high performance media and is assigned a high rating (S8). Slower
tape technologies are lower performance and are assigned a lower rating (S0). You can set
either Media Type or Media Speed but not both.
Click the pull-down control arrow under the Media Speed label, and then select a
performance rating. The Buffalo Surveillance Server will display only the media speeds that
are available for the parameters you have chosen in the Vault, Media Name, or Storage Pool
fields. If no Vault, media, or storage pool is chosen, only the speeds from media available
within the Information Repository will be displayed.
Scheduling Tab: Define When Jobs Should Run
After you have set destination criteria, use the Scheduling tab to define when jobs will run.
You can set scheduling parameters to be very narrow or broad. For example, you can define
schedules that run jobs on a daily or weekly basis, setting a few parameters and letting the
Buffalo Surveillance Server take care of many of the other details. Or, you can be very specific,
defining exact dates and times for jobs to run.
As soon as you save a policy, the schedule that you have created is implemented
granted
all of the other parameters are acceptable. So, if you schedule a job to run at intervals of, say,
2 hours and leave all other values set to the default, a job will execute as soon as you click
Save, and the subsequent jobs will run at two hour intervals.
193
194
Buffalo Surveillance Server
Because Data Service policies effect the entire information repository, new Data Service
policies are not scheduled to run.
When Should the Job Run?
The option that you choose defines the mode in which jobs will run and controls which options
will appear in the rest of the scheduling tab. When should the job run? contains the following
options:
Option 1: On selected days each week
Option 2: Repeatedly at a defined interval
Option 3: On specific dates and times
Select an option from the When should the job run pull-down list to schedule recurring
processes.
Option 1: On selected days each week
This option enables you to schedule jobs that run on particular days at specific times. When
you select this option, the scheduling tab will look as follows:
Adjacent to the On what days of the week text box, click
to set the days of the
week on which you want the job to run. The Days 386 window will appear. Select the days
you want jobs to run.
Adjacent to the At what time of the day text box, click
to set the specific time of
day at which you want the job to run. The Time 388 window will appear. Select a start time.
Manage Data and the Information Repository: Data Service Policies and Vault Admin
Determine whether the job should be stopped before it is completed. Set a job to stop before
it is completed if another process will otherwise conflict with the Buffalo Surveillance Server
job. If you select Yes, the Duration 387 window will appear.
Option 2: Repeatedly at a defined interval
This option enables you to create jobs that will run repeatedly, at the interval that you set, for
as long as the policy is active. To stop a policy that has been set to run repeatedly, you must
deactivate, change, or delete the policy. When you select this option, the scheduling tab will
look as follows:
Adjacent to the How often should this job run text box, click
to set the interval at
which you want the job to run. The Time Interval 388 window will appear. Select an interval.
Determine whether the job should be stopped before it is completed. Set a job to stop before
it is completed if another process will otherwise conflict with the Buffalo Surveillance Server
job. If you select Yes, the Duration 387 window will appear.
Option 3: On specific dates and times
This option enables you to create jobs that will run on specific dates and times. You can add
as many jobs as you wish. When you select this option, the scheduling tab will look as
follows:
195
196
Buffalo Surveillance Server
To Add scheduled run Dates and Times, click [ Add ] to add dates and times at which
the job will run. First the Date 386 window will appear. Select a date. After you select a date,
the Time 388 window will appear. Select a time.
To Delete scheduled run dates and times, select date and time settings, and then click [
Delete ] to remove the setting.
To Edit scheduled run dates and times, delete the entry that you want to change, and
then Add a new run date and time.
Determine whether the job should be stopped before it is completed. Set a job to stop before
it is completed if another process will otherwise conflict with the Buffalo Surveillance Server
job. If you select Yes, the Duration 387 window will appear.
Advanced Tab: Set Advanced Data Service Options
After you have defined a schedule, there are several options under Data Service Policies's
Advanced tab that enable you to further define how your jobs operate.
Manage Data and the Information Repository: Data Service Policies and Vault Admin
Select the options below that you need to configure the policy as you wish.
Pre- & Post-Processing Commands
Use the pre- and post-processing commands to execute commands before and after each
session. You can also enter commands to send process completion notification emails.
Type your pre- and/or post-processing command strings in the appropriate text boxes.
Command strings can be pointers to executable files with arguments, pointers to shell
scripts, or a command string that the local processor is equipped to accept.
You can use the following variables in pre- and post-processing commands:
197
198
Buffalo Surveillance Server
Variable
Description
%P or %Pn
Policy Name
%H or %Hn
Host Name
%D
Date (yyyy:mm:dd)
%Dy
Year
%Dm
Month
%Dd
Day
%T
Time (hh:mm)
%Th
Hour
%Tm
Minute
%Ts
Second
%R or %Rn
Root Pathname. Valid only at
the beginning of a string.
%Ne
Number of errors
%Nr
Number of retries
%Nb
Number of bytes written
%Nf%
Number for files written
Error-Log Filename
The Buffalo Surveillance Server creates an error log file whenever errors are encountered during
a job. Use it to assist you when troubleshooting problems that arise in the job. The Error Log
Filename text box can include literal file names or a combination of file name field variables
(see File Name Field Variables below) that will generate filenames for logs.
In the Error Log Filename text box, leave the default variables in place; or, type in the file
name that you want to use, including an extension; or, type in a variable name using
Filename Field Variables (below).
Or,
Use [ < Browse ] to define a new location and type in the file name that you want to use,
including an extension.
Manage Data and the Information Repository: Data Service Policies and Vault Admin
Filename Field Variables
The file path can include a literal file name or a combination of variables that will generate
filenames for reports. Variables make it much easier to distinguish between reports and to find
particular reports.
For example, if you enter a path with a literal file name, C:/Program Files/BUFFALO/Logs/
Job_Report.log, the system will generate the report destination folder "Logs" (if it does not
already exist) and a report named "Job_Report.log". Similarly, if you enter a literal file name,
say "DataErrors.log", a log named DataErrors.log will be generated.
On the other hand, if you enter a path with variables (separated by an underscore) for the file
name, say %R/Logs/%P_from_%H_on_%D_at_%T, the system will generate the report
destination folder "Logs" and a report named, "Monday Night Set_from_Rex<host
name>_on_<date>_at_<time>" — where policy name, host name, date, and time are
populated with the actual details from your Information Repository and job.
Following are the variables you can enter in the order you prefer. When using multiple
variables, separate them from each other with an underscore (_).
Variable
Description
%P or %Pn
Policy Name
%H or %Hn
Host Name
%D
Date (yyyy:mm:dd)
%Dy
Year
%Dm
Month
%Dd
Day
%T
Time (hh:mm)
%Th
Hour
%Tm
Minute
%Ts
Second
%R or %Rn
Root Pathname. Valid only at
the beginning of a string.
Report Options
The Buffalo Surveillance Server creates one of three report files when a job runs:
199
200
Buffalo Surveillance Server
Type of Report
Contents
Summary
A header and summary report
Complete
Same as Summary but lists all files effected
Diagnostic
Complete but adds diagnostic-relevant information
Click the pull-down menu to select the report option that you want. Use the Summary or
Complete options on a normal basis and switch to Diagnostics if you run into problems.
In the Report Options text box, leave the default variables in place, enter in the file name
that you want to use, including an extension, or enter a variable name using File Name
Field Variables (below).
Or,
If you want to overwrite an already existing log file, use [ < Browse ] to find the file.
Filename Field Variables
The file path can include a literal file name or a combination of variables that will generate
filenames for reports. Variables make it much easier to distinguish between reports and to find
particular reports.
For example, if you enter a path with a literal file name, C:/Program Files/BUFFALO/Logs/
Job_Report.log, the system will generate the report destination folder "Logs" (if it does not
already exist) and a report named "Job_Report.log". Similarly, if you enter a literal file name,
say "DataErrors.log", a log named DataErrors.log will be generated.
On the other hand, if you enter a path with variables (separated by an underscore) for the file
name, say %R/Logs/%P_from_%H_on_%D_at_%T, the system will generate the report
destination folder "Logs" and a report named, "Monday Night Set_from_Rex<host
name>_on_<date>_at_<time>" — where policy name, host name, date, and time are
populated with the actual details from your Information Repository and job.
Following are the variables you can enter in the order you prefer. When using multiple
variables, separate them from each other with an underscore (_).
Manage Data and the Information Repository: Data Service Policies and Vault Admin
Variable
Description
%P or %Pn
Policy Name
%H or %Hn
Host Name
%D
Date (yyyy:mm:dd)
%Dy
Year
%Dm
Month
%Dd
Day
%T
Time (hh:mm)
%Th
Hour
%Tm
Minute
%Ts
Second
%R or %Rn
Root Pathname. Valid only at
the beginning of a string.
Enable Transmission Optimization
This feature enables the client to constantly monitor its processes and select the network
transmission protocol that best suits the files being processed. To get up to a 20% increase in
performance, it is generally best to leave this option checked. However, depending on your
particular network configuration, you may find that you can get better performance by unchecking this option. If your Information Repository seems to be slower than you would expect,
run a few timed tests to see which setting will work best for your Information Repository.
To enable this feature, check Enable transmission optimization.
Maintain Client/Vault Connection
Vault connection sharing determines how many files are sent from the source Vault to the
destination Vault in a single connection. The higher the number of files or bytes transferred, the
longer the connection between the source and destination Vault will be maintained. Access to
a particular Vault resource (such as one drive of a multi-drive storage device) used by a process
on one client will be restricted and inaccessible to other clients in the network for the duration
of the connection.
201
202
Buffalo Surveillance Server
To understand how this setting can affect a configuration, imagine an environment where a
single Vault with a single tape drive is used to service several Buffalo Surveillance Server
clients. When a client is configured with connection sharing set to 250 files, and several other
clients are configured to start jobs at the same time, no client can connect until the first client
is finished. Each client's connection to the server will lock out all other connections; all other
clients will have to wait before processing files.
To set the connection sharing value, enter a value number in the Maintain Client/Vault
Connection for text box.
Click the Files radio button or Bytes radio button depending on which you prefer. If you click
Files, connection sharing will proceed based on the number of files transmitted; if you click
bytes, based on the number of bytes.
Throttle
Throttling controls the speed at which files are sent to the Vault. Lower numbers reduce the
bandwidth. Throttle values range from 1% to 100% of total available bandwidth.
The Buffalo Surveillance Server is designed to operate at the maximum performance of its host
computer, the network environment, and the storage resources available. Sometimes, during
normal working hours, running a job at peak performance will interfere with other network
operations.
To adjust throttling, click the Throttle pull-down menu, and select the percentage of
maximum performance at which you want to operate the client on its host computer.
Test Run: Output Results but Do Not Actually Move Files
When you create a complex set of process parameters, including several filters and options,
Test Run enables you to test the job before you execute a live job.
Check Test Run: Output results but do not actually move files. When the process is
scheduled to run, the Buffalo Surveillance Server will build the list of files that match all the
criteria, but it will not actually move the files. Results will be output in the report you have
defined in the Report Options fields.
Include Offline Files
Since the Buffalo Surveillance Server logs all of your stored files, you have the option of
including even off-line files in jobs. However, if in your policy you denote files that are located on
off-line media, the job will require more time as the system will enter a wait state whenever
offline media is required.
To include files that are on media that you have physically removed from a Vault, check
Include offline files. A window will appear to request that you physically load the media.
Manage Data and the Information Repository: Data Service Policies and Vault Admin
Include Deleted Files
This feature enables you to process files that are marked as "deleted" in tape media. For some
media types, such as magnetic tape, it is not possible to remove files that have been deleted or
purged from the Information Repository. Due to its sequential write nature, a file marked for
deletion may lie on the media between two files that remain viable. On such media, files that
are eligible for removal are marked as deleted even though they remain on the media.
Leave the checkbox unchecked to set the policy to ignore files that are marked for deletion.
The "deleted" files will not be moved.
Or,
Check the checkbox to set the policy to manipulate files marked as deleted.
203
204
Buffalo Surveillance Server
Vault Admin Overview: Manage Vaults and Media
IMPORTANT NOTE: If you are using the Buffalo Surveillance Server Vaults and media are
preconfigured and prepared automatically; there is no need to perform any Vault operations. The
information in this Vault Admin section is provided for information only.
Vault Admin is used to manage Vaults and media in the Information Repository. Install and use
it anywhere in the network.
Understanding Vault operation is key to managing an Information Repository. There are several
facets to Vault management, most having to do with preparing and managing media. Vault
Admin is designed to support the day-to-day tasks associated with managing Vaults. See
Basic Media Concepts 207 to learn about storage media.
The Vault Admin main window is divided into two panes:
The left pane displays the list of the tracked Vaults and views, like a common file
manager application.
The right pane displays details for the object selected.
All of the Vaults in the Information Repository are displayed under Entire Network. For each
Vault, view the following details:
Information 262
Current Clients 263
Media 264
Drives 266
The type of information that is displayed in Media and Drives varies slightly depending on
whether a hard disk or tape is selected.
To update information view in Vault Admin, click the Refresh icon
.
Manage Data and the Information Repository: Data Service Policies and Vault Admin
When executing Vault and media operations, the Buffalo Surveillance Server may appear
as if it is not responding. However, when the Buffalo Surveillance Server completes its
given task, it responds normally.
Rights
The following users have unlimited access to Vault resources:
UNIX "root"
Windows "local group administrators"
Windows "backup operators"
How to Use Vault Admin - Overview
IMPORTANT NOTE: If you are using the Buffalo Surveillance Server Vaults and media are
preconfigured and prepared automatically; there is no need to perform any Vault operations. The
information in this Vault Admin section is provided for information only.
Actions and Options
Unlike other Buffalo Surveillance Server interfaces, in which you choose options tab by tab,
most Vault Admin 204 functionality can be executed from either the Actions 208 and Options 259
menu or buttons on the toolbar.
Vault Admin Toolbar
Actions
From the Actions menu or tool bar of Vault Admin 204 , do the following:
Icon
Action
Launches Mini Vault Stats 338 for monitoring basic Vault activity.
Secure/Unsecure Vault 209 . To secure a Vault means to lock it so
no further media can be added.
Shut Down Vaults 210 (take a Vault off-line). Take Vaults off-line
before performing any type of maintenance to the hardware where a
Vault resides.
205
206
Buffalo Surveillance Server
Icon
Action
Change Vault's Properties 211 . Define Vaults, devices, databases,
licensing, diagnostics, notifications, logs, and security for Vaults.
Run a Vault Checkup 234 . Quickly check general Vault health.
Load, Reload, or Re-index Media 250 . Bring previously prepared
media back on-line.
Prepare Media 235 or Prepare Existing Media 243 . Prepare new or
previously used media.
Unload Media 255 . Media can be removed from the Information
Repository or labeled as “off-line” and be tracked by the Information
Repository.
Erase Media 257 . Remove all data from a unit of media without
reformatting the media.
Refresh. Update the view of the currently displayed data.
Options
From the Options menu of Vault Admin 204 , you can set the Address Format 260 and
Communications Timeouts 260 for Vaults.
Vault Details
The active Vaults in the network are represented in the left frame of the Vault Admin 204 main
window.
Manage Data and the Information Repository: Data Service Policies and Vault Admin
Click the plus box
in front of a Vault
name to open the subcategories associated with
the Vault and to activate the icons in the Vault Admin toolbar 205 . Certain icons in the toolbar
will be active only when a Vault, Media, or Drive is selected.
Advanced View
Some features within Vault Admin have an advanced view option that presents details about the
item being queried.
Select View > Advanced from the Vault Admin menu to activate this option.
Basic Media Concepts
IMPORTANT NOTE: If you are using the Buffalo Surveillance Server Vaults and media are
preconfigured and prepared automatically; there is no need to perform any Vault operations. The
information in this Vault Admin section is provided for information only.
Buffalo Surveillance Server Vaults use media to store all files that are protected and managed
by the Information Repository. You use Vault Admin to manage media in your Information
Repository. It is important to understand some basic concepts about media before the actual
steps of media preparation and management are attempted.
Buffalo Surveillance Server managed media can be in a physical form, such as individual
computer digital tape cartridges, or it can be in a virtual form, such as a portion of hard disk
assigned for use by the Information Repository. The list of media that the Buffalo Surveillance
Server can utilize is constantly being expanded, and every type of media has features that
make it suitable for a particular purpose. For example, hard disk is a good medium to initially
process files to because there is no latency associated with it. It is ready to accept data as it
is sent from network clients, and it can service several clients at the same time.
Media is organized hierarchically:
The highest level of the hierarchy is the Vault itself.
Media units are the next level and they coincide with logical media units such as
individual tapes or portions of hard disks.
The volume level is lowest. Volumes are sections of media units. They can be as large as
the media itself or as small as desired.
On some media, there can be one or several volumes on a unit. There can be one or more units
of media in a Vault. There can also be multiple Vaults on a single host computer, depending on
its performance and resources. The Buffalo Surveillance Server uses a concept called storage
pools to describe one or more pieces of media that are linked together for a common use.
All Buffalo Surveillance Server managed media is configured with common elements including:
Label
Header
207
208
Buffalo Surveillance Server
Data Storage Area
On-Media Catalog
Physical (tape) Media and/or Hard Disk Media
Virtual Media
Media Retention and Purging
Administrators can eliminate outdated data on media using any one of several methods. The
various methods are NOT restricted to usage on hard disk based media only but can be used
on all supported media, including tape and optical devices.
For hard disk Vaults, use Data Service Policies 160 to define file retention rules to remove
duplicated data or to retain source data indefinitely (or for a pre-defined period of time).
Furthermore, the same retention rules can be used even if files are never copied or moved. This
allows data to be erased after a pre-defined period.
Using Vault Admin, you can erase media 257 . Erasing allows the Buffalo Surveillance Server to
overwrite erased files. When you erase tape media, the Buffalo Surveillance Server delays the
actual event until just before the media is to be re-used. This enables you to manage many
units of media without having to wait for the typically long delays associated with the loading
and positioning of media. In cases where you need to ensure that an erase operation executes
without delay, you can override the delay and execute format/erase 257 immediately.
Actions
IMPORTANT NOTE: If you are using the Buffalo Surveillance Server Vaults and media are
preconfigured and prepared automatically; there is no need to perform any Vault operations. The
information in this Vault Admin section is provided for information only.
From the Actions menu or tool bar of Vault Admin 204 , do the following:
Icon
Action
Launches Mini Vault Stats 338 for monitoring basic Vault activity.
Secure/Unsecure Vault 209 . To secure a Vault means to lock it so
no further media can be added.
Shut Down Vaults 210 (take a Vault off-line). Take Vaults off-line
before performing any type of maintenance to the hardware where a
Vault resides.
Manage Data and the Information Repository: Data Service Policies and Vault Admin
Icon
Action
Change Vault's Properties 211 . Define Vaults, devices, databases,
licensing, diagnostics, notifications, logs, and security for Vaults.
Run a Vault Checkup 234 . Quickly check general Vault health.
Load, Reload, or Re-index Media 250 . Bring previously prepared
media back on-line.
Prepare Media 235 or Prepare Existing Media 243 . Prepare new or
previously used media.
Unload Media 255 . Media can be removed from the Information
Repository or labeled as “off-line” and be tracked by the Information
Repository.
Erase Media 257 . Remove all data from a unit of media without
reformatting the media.
Refresh. Update the view of the currently displayed data.
Secure or Unsecure Vault
IMPORTANT NOTE: If you are using the Buffalo Surveillance Server Vaults and media are
preconfigured and prepared automatically; there is no need to perform any Vault operations. The
information in this Vault Admin section is provided for information only.
To ensure Information Repository protection, Vaults are normally run in a secured mode. When
in a secured mode, a Vault's media cannot be manipulated. Media cannot be imported or
exported, copied, reformatted, or even relabeled. In Vaults equipped with storage devices that
can be locked via software, the front panel and all access panels are locked when the Vault is
operating in secure mode.
Before any media operation can be performed, such as preparing media 235 , a Vault must
be unsecured.
Follow the steps below to secure or unsecure a Vault.
In the left pane of the Vault Admin 204 window, select the Vault
highlighting its name:
to secure or unsecure by
209
210
Buffalo Surveillance Server
When the toolbar icons become active, click
Security window launches.
in the Vault Admin tool bar 205 . The Vault
Use the combo box menu and select either Secured or Unsecured.
Click OK to complete the process.
Shut Down or Restart Vault
IMPORTANT NOTE: If you are using the Buffalo Surveillance Server Vaults and media are
preconfigured and prepared automatically; there is no need to perform any Vault operations. The
information in this Vault Admin section is provided for information only.
Shut Down Vault enables you to shut down or restart a selected Vault. You must shut down a
Vault before you modify its host computer. Follow the steps below to shut down or restart a
Vault.
In the left pane of the Vault Admin 204 window, select the Vault
highlighting its name:
Click
to restart or shut down by
in the Vault Admin toolbar 205 . The Shut Down Vault window appears:
Select an option from the Shutdown Method combo box. There are three ways to shut down
a Vault and one way to restart a Vault:
Manage Data and the Information Repository: Data Service Policies and Vault Admin
Type of Shutdown
Description
Normal
Normal shutdown is the standard way to shut down a Vault.
A Normal shutdown stops current client activity after the
running transaction completes all database transactions
and performs any cleanup activity required, but it does not
remove media from the drive. A Vault restarted after a
normal shutdown should not report errors.
Extended
Extended shutdown is the best way to shut down a Vault if
it is going to be taken offline for an extended period of time.
TheBuffalo Surveillance Server waits until running client
processes are finished before closing connections to
clients. Buffalo Surveillance Server then completes all
database transactions, removes media from drives, and
performs any required cleanup activity. An Extended
shutdown is more time consuming than a Normal
shutdown.
Restart
Restart executes a Normal shutdown and then restarts the
selected Vault. Client activity stops after the running
transaction completes all database transactions and
performs any cleanup activity required, but does not remove
media from the drive.
Emergency
Use only for emergencies! The emergency shutdown
behaves as if removing power from the host computer. A
Vault restarted after an emergency shutdown may report
connection timeouts, incomplete database translations, and
other items.
Click [ OK ] to complete the process.
Manage Vault Properties
IMPORTANT NOTE: If you are using the Buffalo Surveillance Server Vaults and media are
preconfigured and prepared automatically; there is no need to perform any Vault operations. The
information in this Vault Admin section is provided for information only.
After Vault installation, use Vault Properties to change Vault settings. These include security,
logs, notifications, diagnostics, memory allocation for devices, database optimization
parameters, and licensing.
Open the Vault Admin application. In the left pane of the Vault Admin 204 main window, select
the Vault
to modify.
211
212
Buffalo Surveillance Server
Click
to launch the <Vault Name> Properties window, or right-click the Vault name and
select Properties. The Properties window features several tabs; each responsible for some
aspect of Vault functionality. It opens to the General tab.
Select a tab from those listed below:
General 212 - Rename the Vault and view the Vault type and status information, including
location, software version, and start time.
Device 213 - View SCSI information for Vaults as well as maximum files kept in a directory
and maximum number of data streams. Also, change the amount of virtual memory used
for each data stream cache for tape and hard disk Vaults.
Database 217 - View the database pathname. Also, change the time when the database is
optimized, set the number of maximum open files, and set the amount maximum virtual
memory used.
License 219 - Access your Host Id and view license summary, activate a product key, and
change, delete or import a license file.
Security 222 - Define Vault access for users, groups, and domains.
Logs 226 - Activate activity logging, define an activity log pathname, set maximum log
size, set what action to take when logs reach their maximum size, and define the error
log pathname.
Notifications 229 - Set where events and email notifications are sent.
Diagnostics 231 - Define where output messages are sent, the type of messages sent,
and the level of message detail.
General
Use the General tab to change the name of the selected Vault and view Vault type, location,
software version, and start time.
Open the Vault Admin application. In the left pane of the Vault Admin 204 main window, select
the Vault
to modify.
Click
to launch the <Vault Name> Properties window, or right-click the Vault name and
select Properties. The Properties window features several tabs; each responsible for some
aspect of Vault functionality. It opens to the General tab.
Manage Data and the Information Repository: Data Service Policies and Vault Admin
To change the selected Vault's name, enter a new name in the Vault Name field.
Click [ OK ]. The new Vault name is listed under Entire Network in the left frame of the main
Vault Admin window 204 .
The following fields can be set only when a Vault is installed. Subsequently, they are
read only:
Type indicates the type of Vault.
Location indicates the IP address of the Vault device.
Software Version indicates the version of the Buffalo Surveillance Server.
Start Time indicates when the Vault was first started.
Device
Use the Device tab to change the selected Vault's storage connection resource settings. The
values displayed depend on whether you selected a hard disk or tape Vault.
Follow the steps in the sections listed below to set up a hard disk or tape Vault.
Hard Disk Vault 214
Tape Vault 216
213
214
Buffalo Surveillance Server
Hard Disk Vault
The Device tab enables you to define parameters for the selected hard disk Vault.
Open the Vault Admin application. In the left pane of the Vault Admin 204 main window, select
the Vault
to modify.
Click
to launch the <Vault Name> Properties window, or right-click the Vault name and
select Properties. The Properties window features several tabs; each responsible for some
aspect of Vault functionality. It opens to the General tab.
Select the Device tab.
Select the values that you prefer for the Vault from the following:
Field
Meaning
Maximum files kept in a
directory
Data is stored in files in the Vault. More files enable you
store more data per unit of media, but more files also slow
down Information Repository performance. Choose a value
that meets but does not exceed your needs. The following
table details the number of files that correlates with each
value.
Manage Data and the Information Repository: Data Service Policies and Vault Admin
Field
Default location to store
media
Meaning
Value
Number of Files
50
125 billion
100
250 billion
150
375 billion
200
500 billion
300
750 billion
400
1 trillion
500
125 trillion
"Default location" defines where, by default, media will be
stored and managed. Wherever in Buffalo Surveillance
Server there is an option to use a default location, Buffalo
Surveillance Server will use the default location.
Maximum number of
data streams
"Data streams" refers to how many connections can be
made to a Vault simultaneously. Having several
connections enables several clients to communicate with
the Vault simultaneously, so the more streams you permit
the greater the requirements for processing power.
Virtual memory used for
each data stream cache
This setting defines how much virtual memory is set aside
for incoming and outgoing data during file storage and
retrieval. A larger cache may improve performance but will
do so at the expense of using more virtual memory. The
total amount of space used equals the number of data
streams multiplied by the selected cache size. So, if you
select 10 data streams and 10 MB of cache, the Vault will
set aside 100 MB of total virtual memory for caching data.
A selection of 10 MB is usually sufficient.
Location where
temporary files can be
stored
This setting enables you to define where the working
cache will be located. The default location is '<install-dir>/
WorkingCache'.
When Buffalo Surveillance Server is processing files, it
sometimes creates temporary files. These enable Buffalo
Surveillance Server to work more quickly and efficiently
and are especially important when you are clipping video
files. Temporary files are kept in the "working cache."
215
216
Buffalo Surveillance Server
Field
Meaning
The changes you make here will override the values
you entered when you first added the Vault using
the Add or Remove Vault Wizard 345 .
Amount of disk space
that can be used
This setting defines how much working cache space
Buffalo Surveillance Server will be permitted to use for
temporary files.
Click [ OK ] to save the new settings.
Tape Vault
The Device tab enables you to define parameters for the selected tape Vault.
Open the Vault Admin application. In the left pane of the Vault Admin 204 main window, select
the Vault
to modify.
Click
to launch the <Vault Name> Properties window, or right-click the Vault name and
select Properties. The Properties window features several tabs; each responsible for some
aspect of Vault functionality. It opens to the General tab.
Select the Device tab.
On the Device tab for tape Vaults, only the amount of virtual memory used for each data
stream cache can be changed.
Manage Data and the Information Repository: Data Service Policies and Vault Admin
SCSI device is read only. It indicates the hardware in use and where it is located in the
network.
Select the values that you prefer for the Vault from the following:
Field
Meaning
Virtual memory used for
each data stream cache
This setting defines how much virtual memory is set aside
for incoming and outgoing data during file storage and
retrieval. A larger cache may improve performance but will
do so at the expense of using more virtual memory. The
total amount of space used equals the number of data
streams multiplied by the selected cache size. So, if you
select 10 data streams and 10 MB of cache, the Vault will
set aside 100 MB of total virtual memory for caching data.
A selection of 10 MB is usually sufficient.
Location where
temporary files can be
stored
This setting enables you to define where the working
cache will be located. The default location is '<install-dir>/
WorkingCache'.
When Buffalo Surveillance Server is processing files, it
sometimes creates temporary files. These enable Buffalo
Surveillance Server to work more quickly and efficiently
and are especially important when you are clipping video
files. Temporary files are kept in the "working cache."
The changes you make here will override the values
you entered when you first added the Vault using
the Add or Remove Vault Wizard 345 .
Amount of disk space
that can be used
This setting defines how much working cache space
Buffalo Surveillance Server will be permitted to use for
temporary files.
The working cache should be large enough to hold
multiple large video files. The default size is 100 GB.
Click [ OK ] to save the new settings.
Database
Use the Database tab to change when the selected Vault is optimized, set the maximum
number of files that can be open at a single time, and set the amount of virtual memory the
selected Vault uses.
217
218
Buffalo Surveillance Server
Open the Vault Admin application. In the left pane of the Vault Admin 204 main window, select
the Vault
to modify.
Click
to launch the <Vault Name> Properties window, or right-click the Vault name and
select Properties. The Properties window features several tabs; each responsible for some
aspect of Vault functionality. It opens to the General tab.
Select the Database tab.
Select the values that you prefer for the Vault from the following:
Field
Meaning
Database pathname
This field can be defined only when installing a Vault. It
indicates the location at which the database is stored on
the host computer's hard disk.
Time daily when
database is optimized
This option enables you to set how often the database will
be optimized. To ensure that Buffalo Surveillance Server
and your Information Repository continue to function
optimally, the database for every Vault is optimized daily.
Maximum open files
This option enables you to limit how many files may be
open simultaneously. Having more files open enables
Buffalo Surveillance Server to search faster. However, more
files require more Information Repository resources.
Manage Data and the Information Repository: Data Service Policies and Vault Admin
Field
Maximum virtual
memory used
Meaning
This option enables you to limit how much virtual memory
the database will use. For best Information Repository
performance, choose a value that does not exceed 75% of
the physical memory on the computer.
Click [ OK ] to save the new settings.
License
Obtain a licensed product from Buffalo. You can purchase a licensed product online. For more
information see Product Licensing 344 .
From Vault Properties, use the License tab to manage Vault licenses.
The Summary group displays your license totals for the selected Vault.
The Host Id group displays the Vault Host Id. The Host Id information is used to activate your
product key.
The Installed Licenses group displays all the individual licenses assigned to a Vault. The
license statistics shown are Serial #, Type, Capacity, Expiration, Product Type, and Platform
Type. Click the Add button to open the Add License window where you can add a new
license by activating a product key, or import a license file. Select an installed license from
the group and then click the Delete button to remove the license from the Vault.
Once the Add or Delete button is clicked, the changes are immediate.
You can add the same license as many times as you like, but the Vault Admin just
overwrites the license file so only one instance is displayed in the Installed Licenses group
Activate Free License
If your product comes with bundled licenses, and no licenses display in the Installed Licenses
group, then an Activate Free License button displays enabled in the Vault Properties. Click
this button to install and activate any free licenses in the bundle automatically without having to
type in a product key. Once activated, they appear in the Installed Licenses group.
If you are having problems activating your license, visit the Buffalo website for manual
activation.
219
220
Buffalo Surveillance Server
Add license and activate product key - Connected to Internet
Once you have received your product key, and you are connected to the Internet, follow the
steps below to activate your license.
Open the Vault Admin application. In the left pane of the Vault Admin 204 main window, select
the Vault
to modify.
Click
to launch the <Vault Name> Properties window, or right-click the Vault name and
select Properties. The Properties window features several tabs; each responsible for some
aspect of Vault functionality. It opens to the General tab.
Select the License tab.
Click the Add button. When the Add window appears, select Activate Product Key, and
type the product key into the required text box.
Add license and activate product key - Not connected to Internet
If you have received a product key, and are not connected to the internet, follow these steps:
Find a computer with internet access.
Go to Buffalo's website and locate the product key activation page.
Manage Data and the Information Repository: Data Service Policies and Vault Admin
Type your Host Id, e-mail, and product key. The Host Id is located in Buffalo Surveillance
Server, from the <Vault Name> Properties > License tab, as shown in the image below. The
product will run for up to two hours regardless of license status, so you still have access to
the Vault Admin. You may need to reboot your computer to initiate the product.
A license file will be sent to you via e-mail.
After receiving the license file, from <Vault Name> Properties > License tab, click the Add
button.
From the Add License window, select Import License File.
Type, or click the Browse button to navigate to the received license file.
Click Ok to complete manual activation.
If you are having problems activating your license, visit the Buffalo website for manual
activation.
.
221
222
Buffalo Surveillance Server
Security
Use the Security tab to add, change, and delete user, group, and domain rights for the
selected Vault. Vault rights override media rights 238 .
Open the Vault Admin application. In the left pane of the Vault Admin 204 main window, select
the Vault
to modify.
Click
to launch the <Vault Name> Properties window, or right-click the Vault name and
select Properties. The Properties window features several tabs; each responsible for some
aspect of Vault functionality. It opens to the General tab.
Select the Security tab.
Manage Data and the Information Repository: Data Service Policies and Vault Admin
The Security tab displays users, groups, and domains and the level of rights granted each:
indicates full rights.
indicates rights to store and retrieve data.
indicates rights to retrieve (but not store) data.
indicates no rights.
Buffalo Surveillance Server reads rights from top to bottom. For example, if the
Documentation group is denied rights and JohnDoe appears in the list below
Documentation, even if JohnDoe is granted full rights, he will not have any rights if he is
a member of the Documentation group. On the other hand, if JohnDoe appears above the
Documentation group and JohnDoe is given full rights, he will retain full rights even if he
is a member of the Documentation group and the Documentation group is denied rights.
Also note that Vault rights and media rights are hierarchical, with media rights being
subordinate to overall Vault permissions.
Follow the steps in the sections listed below to add, change, or delete security rights:
Add a New User, Group, Domain, or "Everyone" 223
Change a Security Entry 225
Delete a User, Group, Domain, or "Everyone" 226
Add a New User, Group, Dom ain, or
"Everyone"
Click
. The Add Entry window will appear:
223
224
Buffalo Surveillance Server
Select a Name type. This indicates the type of rights.
Enter an Entry name. This is the name that will appear under Name.
The name you enter must be valid on the computer on which the Vault is running.
Select the Rights for the new user, group, domain or everyone. This is the actual rights
granted to the given user, group, domain, or everyone.
Right
Meaning
Full Control
Enables the user, group, domain, or "everyone" to have full control.
Store/Retrieve
Enables the user, group, domain, or "everyone" to store and retrieve
data.
Retrieve
Enables the user, group, domain, or "everyone" to retrieve (but not
store) data.
None
Blocks the user, group, domain, or "everyone" from doing anything
with data.
Click [ OK ].
Use
or
to respectively move the new entry up or down in the list to change the priority
the new entry is given in relation to other users, groups, and domains.
Manage Data and the Information Repository: Data Service Policies and Vault Admin
Buffalo Surveillance Server reads rights from top to bottom. For example, if the
Documentation group is denied rights and JohnDoe appears in the list below
Documentation, even if JohnDoe is granted full rights, he will not have any rights if he
is a member of the Documentation group. On the other hand, if JohnDoe appears
above the Documentation group and JohnDoe is given full rights, he will retain full
rights even if he is a member of the Documentation group and the Documentation
group is denied rights. Also note that Vault rights and media rights are hierarchical,
with media rights being subordinate to overall Vault permissions.
When you are finished adding new entries, click [ OK ] to save them.
Change a Security Entry
To change a security entry, double-click it. The Change Entry window appears:
Change the values for Name type, Entry name, and Rights.
Click OK to save changes.
In the Properties window, click OK to save changes.
225
226
Buffalo Surveillance Server
Delete a User, Group, Dom ain, or
"Everyone"
To delete an entry from the Vault Access Control List, select it by single clicking it.
Click
. The entry will be removed from the list.
Click [ OK ] to save changes.
Logs
Use the Logs tab to enable the selected Vault's activity logging and to set activity and error log
pathnames as well as maximum log size and the event to be executed when a log reaches
maximum size.
Open the Vault Admin application. In the left pane of the Vault Admin 204 main window, select
the Vault
to modify.
Click
to launch the <Vault Name> Properties window, or right-click the Vault name and
select Properties. The Properties window features several tabs; each responsible for some
aspect of Vault functionality. It opens to the General tab.
Select the Logs tab.
Manage Data and the Information Repository: Data Service Policies and Vault Admin
Select or enter the values that you prefer for the Vault from the following:
Field
Meaning and Directions
This checkbox will enable activity logging and the activity
log fields listed below. If unchecked, Buffalo Surveillance
Server will not create activity logs.
Enable activity logging
227
228
Buffalo Surveillance Server
Field
Meaning and Directions
Buffalo Surveillance Server supports event auditing,
providing a security audit trail, through activity logs.
Activity logs include following events: Vault start, Vault
stop, file read, file write, file create, file delete, media load,
media unload, and media erase. For these events, the
following information is recorded: name and IP of the user
who executed the event and the date and time the event
was executed. Activity logging is optional.
Buffalo Surveillance Server creates activity logs in tabdelimited format. Consequently, logs can be imported into
any application that supports the tab-delimited format,
such as Microsoft Excel.
Activity log pathname
This field defines to where your activity logs will be written.
Maximum log size
This option defines the maximum size to which the activity
log will be permitted to grow. It is important to limit the
size of the activity log because it may be difficult to find
needed the information in an overly large activity log.
This option enables you to overwrite the existing activity
log. Overwriting the activity log prevents activity log
proliferation.
Action to take when the
log reaches it maximum
If you select No for this option, a new activity log will be
size
created whenever the current activity log reaches the
maximum size you defined in the previous field.
Error logs are created only when a Buffalo Surveillance
Server Vault encounters a problem. Error logs include
warning and Vault start and Vault stop information. Buffalo
Surveillance Server supports error logging for every Vault in
your Information Repository, and error logging is always
enabled.
Error log pathname
This field enables you to define where error logs will be
stored. Where "activity logs" record all Buffalo Surveillance
Server activity, "error logs" record only events that have
gone wrong. Be sure to remember where you are storing
your error logs so that you can refer to them should an
error condition occur during Buffalo Surveillance Server
processing.
Click [ OK ] to save the new settings.
Manage Data and the Information Repository: Data Service Policies and Vault Admin
Notifications
Use the Notifications tab to set how Buffalo Surveillance Server event notifications are
published and to enable the selected Vault's email notification, set the email recipient, and set
the mail server address. Events include anything of interest for managing a Vault, including
Vault start, Vault stop, media requests, etc. Notifications are always enabled.
Open the Vault Admin application. In the left pane of the Vault Admin 204 main window, select
the Vault
to modify.
Click
to launch the <Vault Name> Properties window, or right-click the Vault name and
select Properties. The Properties window features several tabs; each responsible for some
aspect of Vault functionality. It opens to the General tab.
Select the Notifications tab.
Select or enter the values for the Vault:
Field
Meaning and Directions
Enable optional email notifications and the email
notification fields listed below.
Enable email
notification
Email recipient
When enabled, receive an email whenever an event occurs
of interest for managing a Vault. These events include
Vault start, Vault stop, media requests, etc., and are the
same as those recorded for notifications.
Type the email address of the user receiving email
notifications about Buffalo Surveillance Server events.
229
230
Buffalo Surveillance Server
Field
Meaning and Directions
The address of your mail server. Use either IP address or
computer name.
Click Send Test Email to test the path.
Mail server address
Buffalo Surveillance Server does not test valid
parameters here. If an invalid IP address or computer
name is entered, email notifications do not work.
Define where events are logged.
Computer Console causes events to be logged in a
console that appears on the computer monitor. It remains
open as long as the Vault is running. If the Vault is
stopped, the console disappears. If the Vault is restarted,
the console disappears and then reappears.
Window causes events to be logged in a window that
appears on the computer monitor. This window remains
open as long as the Vault is running. If the Vault is
stopped, the window disappears. If the Vault is restarted,
the window disappear and then reappears.
If you select Computer Console or Window in a
Windows environment, configure Vault service on
Windows to open a window on the desktop for
diagnostic messages. For directions, see section,
"Configure Vault Service on Windows to Open a
Window on the Desktop for Diagnostic Messages".
Once configured, Vault activity displays.
Where events are sent
If you close a window or console, the Vault stops.
Buffalo Surveillance Server does not operate without
running Vaults.
File causes events to be logged to a file. Type the path
where you want events logged.
If a window or console is open when changing the mode of
output to File, the console or window closes. However, the
Vault continues to run.
Click OK to save the new settings.
Manage Data and the Information Repository: Data Service Policies and Vault Admin
Diagnostics
Use the Diagnostics tab to enable diagnostic logging for the selected Vault. When you enable
diagnostics, the Buffalo Surveillance Server creates diagnostics logs for all Vault activity for the
selected Vault. Diagnostic logging is optional. Because diagnostic logging significantly impacts
system performance, it is disabled by default. When enabled, diagnostic logging is set to
output to a window or console by default. If you restart the Vault and return to this tab, it will be
set to the default, Disabled.
If you use diagnostic logging to assist in the resolution of problem conditions, be aware
that it will seriously impact Information Repository performance. This is a complex
feature and should be used with discretion.
Open the Vault Admin application. In the left pane of the Vault Admin 204 main window, select
the Vault
to modify.
Click
to launch the <Vault Name> Properties window, or right-click the Vault name and
select Properties. The Properties window features several tabs; each responsible for some
aspect of Vault functionality. It opens to the General tab.
Select the Diagnostics tab.
Click the down arrow of the Vault's Diagnostics State combo box.
Select Enabled.
Use the combo box menu beneath Where Messages Will Be Sent, and select from the
available options:
231
232
Buffalo Surveillance Server
Where Messages Will Be Sent
Results
On a Windows OS, this option sends the output
information to an on-screen window that is opened
by the process. On a UNIX OS, this option sends
the output to the on-screen window associated with
the running processes.
Output messages to window
To enable this option in Windows, you need to
configure Vault service on Windows to open a
window on the desktop for diagnostic messages.
For directions, see the section titled, "Configure
Vault Service on Windows to Open a Window on
the Desktop for Diagnostic Messages".
If you select this option, a window will appear
to display Vault activity. If you close this
window, you will stop the Vault. The
Buffalo Surveillance Server will not operate
without running Vaults.
On a Windows OS, this option sends the output
information to an on-screen window that is opened
by the process. On a UNIX OS, this option sends
the output to the computer's console window.
Output messages to console
To enable this option in Windows, you need to
configure Vault service on Windows to open a
window on the desktop for diagnostic messages.
For directions, see the section titled, "Configure
Vault Service on Windows to Open a Window on
the Desktop for Diagnostic Messages".
If you select this option, a window will appear
to display Vault activity. If you close this
window, you will stop the Vault. The
Buffalo Surveillance Server will not operate
without running Vaults.
Output messages to file
This field will be pre-populated with "con:" to
indicate "output messages to console." Overwrite
this value: in the Enter Pathname text box
beneath Where Messages Will Be Sent, type the
path (including filename) to where you want
message files written. On all OSs, this option
creates a file that contains all the output data.
If a window or console is open when you change
the mode of output to File, the console or window
will close. However, the Vault will continue running.
Manage Data and the Information Repository: Data Service Policies and Vault Admin
If you have enabled and are running a console to monitor a Vault, you must close the
console only via Vault Admin. Closing the console or window manually will shut the
Vault.
Define where Output is sent to. The file path (including filename) that you enter here defines
where message files are written to. On all OSs, this option creates a file that contains all of
the output data.
Select Type of Messages. The lower left box of the window displays the types of devices
from which you can capture diagnostic information. Check the checkbox in front of each of
the option that you want to select. You can make multiple selections simultaneously.
The following provides details about the available options:
Type of Message
Results
General Vault
Provides information about client connections and data
moving in and out of the Vault.
Library
Provides details about SCSI activity regarding moving
media within a robotic tape storage device.
File system
Includes any messaging about the host computer's
working environment.
Tape devices
Provides information about the inner workings of the
storage device itself.
Optical devices
Provides information about the inner workings of the
storage device itself.
CD-ROM devices
Provides information about the inner workings of the
storage device itself.
DVD devices
Provides information about the inner workings of the
storage device itself.
Hard disk devices
Provides information about the inner workings of the
storage device itself.
Database subsystem
For use only by Buffalo Surveillance Server engineers.
RPC mechanism
For use only by Buffalo Surveillance Server engineers.
Lock subsystem
For use only by Buffalo Surveillance Server engineers.
Select Message Detail. The Buffalo Surveillance Server lets you choose a level of detail to
include in your diagnostic logs. Use the combo box menu in the Message Detail section and
select from the available list.
233
234
Buffalo Surveillance Server
Message Detail
Results
Short
Provides only high-level overview information about the
issues being tracked. For example, the General Vault
feature only contains client connection names.
Standard
Provides more detail about the issue being tracked. For
example, the General Vault feature provides additional
information about the client connections including times,
connection types and so on. The Standard option is the
level preferred by Buffalo Surveillance Server engineers.
Extended
Provides a full set of details. It is usually reserved to
assist in resolving complex issues in low-level Information
Repository functions.
Click [ OK ] to save your changes.
Vault Checkup
Use the Vault Checkup window to see Vault health. Run Vault Checkup if you suspect
something may be wrong with a Vault in your Information Repository. There are three modes:
Quick, Normal, Extensive. Each check tests Vaults for speed and load bearing capacity. Quick
check takes the least amount of time; Extensive, the most. Normal is in-between.
To run Vault Checkup the Vault Admin requires at least one piece of media with available
space and that it does not belong to a storage pool.
Follow the steps below to run a Vault checkup.
In the left pane of the Vault Admin 204 main window, select a Vault
Select
.
in the Vault Admin toolbar 205 to launch the Vault Checkup window.
Select the level of check to run.
Press OK. The Vault Checkup output window appears containing the results of the check.
Manage Data and the Information Repository: Data Service Policies and Vault Admin
Prepare Media
IMPORTANT NOTE: If you are using the Buffalo Surveillance Server Vaults and media are
preconfigured and prepared automatically; there is no need to perform any Vault operations. The
information in this Vault Admin section is provided for information only.
Use the Prepare Media window to add and load new media to your Information Repository.
Prepare Media enables you to set all of the parameters required to prepare a unit of media for
use by a Buffalo Surveillance Server Vault. Some of these parameters cannot be changed
unless you reformat the media 243 . The Prepare Media window is slightly different for each type
of media.
Before you can prepare media, you must already have Vaults added to your Buffalo
Surveillance Server Information Repository. See the Buffalo Surveillance Server Configuration 345
sections for information and directions for adding Vaults. The Vault to which you want to add
media must be unsecured 209 before any media preparation will be permitted.
When executing Vault and media operations, the Buffalo Surveillance Server may appear
as if it is not responding. However, when the Buffalo Surveillance Server completes its
given task, it responds normally.
Follow the steps below to prepare media.
In the left pane of the Vault Admin 204 window, click
Select the media's name next to the Media icon
Click
in front of the Vault
to add media.
.
in the Vault Admin tool bar 205 . The Prepare Media window appears:
The options in the Prepare Media window are based on the media type of the Vault
selected. For example, if the Vault is being prepared for data tape media, then tape
media options display. If the Vault is being prepared for hard disk media, the Prepare
window will display options for disk media.
235
236
Buffalo Surveillance Server
Prepare Media window
for hard disk media
Prepare media window
for tape media
In the Prepare Media window, enter values in the fields listed below. Only Media Name and
Size are required. The names you enter for Media Name and Storage Pool appear in the
Source tab of Data Service Policies 175 as well as the Destination tabs of Camera policies,
49 and Data Service Policies 188 .
Field
Media Name
Description
This is the name the Information Repository will use when
referencing this media. The name is displayed on all
media referencing interfaces and reports. It is best to use
a descriptive name. For example, you might use
"Monday-1" for a unit of media being used as part of a
Monday night job set.
Barcode/ID - available only This number corresponds to the barcode or a unique ID
for tape media that support for the media. If used, Buffalo Surveillance Server tracks
barcodes
the media by its barcode.
Manage Data and the Information Repository: Data Service Policies and Vault Admin
Field
Description
Barcode systems provide a significant performance
increase whenever media is being loaded,
unloaded, or indexed by the Information Repository.
Description
This description is used on all media-referencing
interfaces and reports. It is best to carry forward the
naming convention used for the Media Name. For
example, "Monday night job, tape 1 of 5", could be a
good description for a tape named "Monday-1."
Storage Pool
Storage pools enable you to group disparate units of
media. Used properly, storage pools offer a convenient
way to accommodate multiple jobs simultaneously and,
by providing fail-over should a problem occur during a
process, prevent incomplete processing. A typical
example of storage pooling is the utilization of several
units of media (which may reside in several different
Vaults) together for use by a single policy. For example, if
you want to have the "Monday night backup" write to
several units of media, you would create a "Monday night
backup" storage pool and assign to it every unit of media
that you want to use for that purpose. To assign a unit of
media to a storage pool, select a storage pool from the
pull-down list or enter the name of the storage pool (for
example, Monday night backup).
Size (GB) - available only
for hard disk media; not
available for tape media
This value defines the amount of storage space you want
to make available for the Information Repository on the
given unit of media. It enables you to limit how much
physical space on a single hard disk the Information
Repository will use. For example, if the given unit of
media has a physical capacity of 100 GB, you can limit
the amount available to the Information Repository to,
say, 50 GB by entering 50. If you enter a value greater
than the amount of space actually available, Buffalo
Surveillance Server will nevertheless recognize and use
only as much space as is physically available.
Content Searching
This feature enables you to search the content of files in
the Information Repository. With this feature activated,
you can run content specific searches. For example, you
can find all content containing the phrase "1Q2006." If not
selected, you will not be able to search for content in your
Information Repository. Enabling this feature will increase
the size of your metadata catalogs.
237
238
Buffalo Surveillance Server
Field
Digital Fingerprinting always selected for hard
disk and tape media.
File De-duplication
Description
This option supports proper chain-of-custody
management. When enabled, Buffalo Surveillance Server
automatically assigns a digital fingerprint to all data
captured or ingested into the Information Repository. This
option is always selected and cannot be changed for hard
disk and tape Vaults.
De-duplication enables you to prevent the duplication of
data in the Information Repository. If you enable this
option, Buffalo Surveillance Server will check the
destination media, before moving data, for exact copies of
data you want to process. If an exact copy of the data
exists in the destination media, Buffalo Surveillance
Server will not store the part of the data that is redundant.
Instead, it will reference the already-stored data on the
destination media.
If you use de-duplication, you may end up with only
one full copy of any given piece of data in your
Information Repository. This means that if the Vault
or media upon which the data is stored fails, you
will lose your data. To prevent this from happening,
be sure to back up all critical data without using deduplication.
Owner - read-only
This is the name of the owner of the media to whom rights
that you set will pertain. The media owner value is a passthrough from the Vault's host computer and the login
being used. The information in this field cannot be
modified.
Permissions, also called "rights," are the limitations set
for users in processing files. Rights determine how users
(also know as "roles") are permitted to manipulate given
files. Each unit of media may have as many as sixteen
(16) different permission levels. The permissions
information entered creates an access control list (ACL)
for the unit of media.
Additional Permissions
For new media, all users on the network are granted
rights to use media by default. To restrict specific users
or groups from having access to a given unit of media,
you must restrict rights by deleting Buffalo Surveillance
Server default rights and adding new, limited rights for the
specific groups and/or users you want to restrict.
Manage Data and the Information Repository: Data Service Policies and Vault Admin
Field
Description
Buffalo Surveillance Server reads rights from top to
bottom. For example, if the Documentation group is
denied rights and JohnDoe appears in the list
below Documentation, even if JohnDoe is granted
full rights, he will not have any rights if he is a
member of the Documentation group. On the other
hand, if JohnDoe appears above the Documentation
group and JohnDoe is given full rights, he will retain
full rights even if he is a member of the
Documentation group and the Documentation group
is denied rights. Also note that Vault rights and
media rights are hierarchical, with media rights
being subordinate to overall Vault permissions.
To add new permissions, see Add a New User,
Group, Domain, or "Everyone".
To change existing permissions, see Change a
Security Entry.
To delete existing permissions, see Delete a User,
Group, Domain, or "Everyone".
Assign a Media Location. This option is active only when you are preparing new media in
the Prepare Media window. It is not active in the Prepare Existing Media 243 window.
You will have different options depending on whether you are preparing hard disk or tape
media:
Media Type
Directions
Leave the default location, Store media at default
location. (This location was set when the vault was
initially added, and can be changed using the Device tab
in the Properties window for the vault.)
Hard disk
Or,
Select Store media at pathname to store media at
some location other than the default. The Enter
Pathname field will be activated.
239
240
Buffalo Surveillance Server
Media Type
Directions
Enter the Pathname, including drive letter of the location
at which you want media-related files and directories
stored. For example, C:/Archive/SaturdayBackups.
When you prepare new hard disk media, the Media
Location default option is set to "Store media in the
default location." If you enter a pathname, the parent
folder of the pathname you specify must already
exist and no other media can already be loaded at
that same pathname. This pathname is relative to
the computer on which the Vault Service is running.
The Buffalo Surveillance Server Vault Service must
have rights to add files and/or subsequent folders at
the specified location.
Tape
Choose a media.
Use When to Prepare to assign a Preparation Time. Select from the choices available:
Preparation Time
Results
Prepare media at next
use
Buffalo Surveillance Server will operate without preparing
the media until a job is started that requires the media.
Prepare media now
Buffalo Surveillance Server will load the specified media
unit into a drive and format it.
Click [ OK ] to set your options.
Add a New User, Group, Domain, or
"Everyone"
Click
. The Add Entry window will appear:
Manage Data and the Information Repository: Data Service Policies and Vault Admin
Select a Name type. This indicates the type of rights.
Enter an Entry name. This is the name that will appear under Name.
The name you enter must be valid on the computer on which the Vault is running.
Select the Rights for the new user, group, domain or everyone. This is the actual rights
granted to the given user, group, domain, or everyone.
Right
Meaning
Full Control
Enables the user, group, domain, or "everyone" to have full control.
Store/Retrieve
Enables the user, group, domain, or "everyone" to store and retrieve
data.
Retrieve
Enables the user, group, domain, or "everyone" to retrieve (but not
store) data.
None
Blocks the user, group, domain, or "everyone" from doing anything
with data.
Click [ OK ].
Use
or
to respectively move the new entry up or down in the list to change the priority
the new entry is given in relation to other users, groups, and domains.
241
242
Buffalo Surveillance Server
Buffalo Surveillance Server reads rights from top to bottom. For example, if the
Documentation group is denied rights and JohnDoe appears in the list below
Documentation, even if JohnDoe is granted full rights, he will not have any rights if he
is a member of the Documentation group. On the other hand, if JohnDoe appears
above the Documentation group and JohnDoe is given full rights, he will retain full
rights even if he is a member of the Documentation group and the Documentation
group is denied rights. Also note that Vault rights and media rights are hierarchical,
with media rights being subordinate to overall Vault permissions.
When you are finished adding new entries, click [ OK ] to save them.
Change a Security Entry
To change a security entry, double-click it. The Change Entry window appears:
Change the values for Name type, Entry name, and Rights.
Click OK to save changes.
In the Properties window, click OK to save changes.
Manage Data and the Information Repository: Data Service Policies and Vault Admin
Delete a User, Group, Domain, or
"Everyone"
To delete an entry from the Vault Access Control List, select it by single clicking it.
Click
. The entry will be removed from the list.
Click [ OK ] to save changes.
Prepare Existing Media
IMPORTANT NOTE: If you are using the Buffalo Surveillance Server Vaults and media are
preconfigured and prepared automatically; there is no need to perform any Vault operations. The
information in this Vault Admin section is provided for information only.
Use the Prepare Existing Media window to modify values and reformat media already
implemented in the Information Repository. The Prepare Existing Media window is slightly
different for each type of media.
Preparing existing media reformats media on tape and hard disk. If you need to preserve
information on media that you need to "re-prepare" (i.e., reformat), be sure to first create
and run a Data Service policy 157 to migrate or move the data to the media on which it
will be preserved.
When executing Vault and media operations, the Buffalo Surveillance Server may appear
as if it is not responding. However, when the Buffalo Surveillance Server completes its
given task, it responds normally.
Follow the steps below to prepare existing media.
In the left frame of the Vault Admin 204 main window, click the plus icon
to which you want to add media.
Click (and highlight) the Vault's media icon
in front of the Vault
.
In the right frame of the Vault Admin main window, click (and highlight) the unit of media that
you want prepare.
Click
in the Vault Admin tool bar 205 . The Prepare Existing Media window appears.
The options presented in the Prepare Existing Media window will be based on the
media type in use by the Vault you selected. If the Vault is being prepared for tape
media, the Prepare Existing Media window will display options for tape media. If the
Vault is being prepared for hard disk media, the Prepare Existing Media window will
display options for disk media.
243
244
Buffalo Surveillance Server
Prepare Existing Media
window for hard disk media
Prepare Existing Media
window for tape media
In the Prepare Existing Media window, enter values in the fields listed below. Only Media
Name and Size are required. The names you enter for Media Name and Storage Pool
appear in the Source tab of Data Service Policies 175 as well as the Destination tabs of
Camera policies 49 , and Data Service Policies 188 .
Field
Media Name
Description
This is the name the Information Repository will use when
referencing this media. The name is displayed on all
media referencing interfaces and reports. It is best to use
a descriptive name. For example, you might use
"Monday-1" for a unit of media being used as part of a
Monday night job set.
Barcode/ID - available only This number corresponds to the barcode or a unique ID
for tape media that support for the media. If used, Buffalo Surveillance Server tracks
barcodes
the media by its barcode.
Manage Data and the Information Repository: Data Service Policies and Vault Admin
Field
Description
Barcode systems provide a significant performance
increase whenever media is being loaded,
unloaded, or indexed by the Information Repository.
Description
This description is used on all media-referencing
interfaces and reports. It is best to carry forward the
naming convention used for the Media Name. For
example, "Monday night job, tape 1 of 5", could be a
good description for a tape named "Monday-1."
Storage Pool
Storage pools enable you to group disparate units of
media. Used properly, storage pools offer a convenient
way to accommodate multiple jobs simultaneously and,
by providing fail-over should a problem occur during a
process, prevent incomplete processing. A typical
example of storage pooling is the utilization of several
units of media (which may reside in several different
Vaults) together for use by a single policy. For example, if
you want to have the "Monday night backup" write to
several units of media, you would create a "Monday night
backup" storage pool and assign to it every unit of media
that you want to use for that purpose. To assign a unit of
media to a storage pool, select a storage pool from the
pull-down list or enter the name of the storage pool (for
example, Monday night backup).
Size (GB) - available only
for hard disk media; not
available for tape media
This value defines the amount of storage space you want
to make available for the Information Repository on the
given unit of media. It enables you to limit how much
physical space on a single hard disk the Information
Repository will use. For example, if the given unit of
media has a physical capacity of 100 GB, you can limit
the amount available to the Information Repository to,
say, 50 GB by entering 50. If you enter a value greater
than the amount of space actually available, Buffalo
Surveillance Server will nevertheless recognize and use
only as much space as is physically available.
Content Searching
This feature enables you to search the content of files in
the Information Repository. With this feature activated,
you can run content specific searches. For example, you
can find all content containing the phrase "1Q2006." If not
selected, you will not be able to search for content in your
Information Repository. Enabling this feature will increase
the size of your metadata catalogs.
245
246
Buffalo Surveillance Server
Field
Digital Fingerprinting always selected for hard
disk and tape media.
File De-duplication
Description
This option supports proper chain-of-custody
management. When enabled, Buffalo Surveillance Server
automatically assigns a digital fingerprint to all data
captured or ingested into the Information Repository. This
option is always selected and cannot be changed for hard
disk and tape Vaults.
De-duplication enables you to prevent the duplication of
data in the Information Repository. If you enable this
option, Buffalo Surveillance Server will check the
destination media, before moving data, for exact copies of
data you want to process. If an exact copy of the data
exists in the destination media, Buffalo Surveillance
Server will not store the part of the data that is redundant.
Instead, it will reference the already-stored data on the
destination media.
If you use de-duplication, you may end up with only
one full copy of any given piece of data in your
Information Repository. This means that if the Vault
or media upon which the data is stored fails, you
will lose your data. To prevent this from happening,
be sure to back up all critical data without using deduplication.
Owner - read-only
This is the name of the owner of the media to whom rights
that you set will pertain. The media owner value is a passthrough from the Vault's host computer and the login
being used. The information in this field cannot be
modified.
Permissions, also called "rights," are the limitations set
for users in processing files. Rights determine how users
(also know as "roles") are permitted to manipulate given
files. Each unit of media may have as many as sixteen
(16) different permission levels. The permissions
information entered creates an access control list (ACL)
for the unit of media.
Additional Permissions
For new media, all users on the network are granted
rights to use media by default. To restrict specific users
or groups from having access to a given unit of media,
you must restrict rights by deleting Buffalo Surveillance
Server default rights and adding new, limited rights for the
specific groups and/or users you want to restrict.
Manage Data and the Information Repository: Data Service Policies and Vault Admin
Field
Description
Buffalo Surveillance Server reads rights from top to
bottom. For example, if the Documentation group is
denied rights and JohnDoe appears in the list
below Documentation, even if JohnDoe is granted
full rights, he will not have any rights if he is a
member of the Documentation group. On the other
hand, if JohnDoe appears above the Documentation
group and JohnDoe is given full rights, he will retain
full rights even if he is a member of the
Documentation group and the Documentation group
is denied rights. Also note that Vault rights and
media rights are hierarchical, with media rights
being subordinate to overall Vault permissions.
To add new permissions, see Add a New User,
Group, Domain, or "Everyone".
To change existing permissions, see Change a
Security Entry.
To delete existing permissions, see Delete a User,
Group, Domain, or "Everyone".
Assign a Media Location. This option not available in the Prepare Existing Media window. It
is available only in the Prepare Media 235 window, .
Use When to Prepare to assign a Preparation Time. Select from the choices available:
Preparation Time
Results
Prepare media at next
use
Buffalo Surveillance Server will operate without preparing
the media until a job is started that requires the media.
Prepare media now
Buffalo Surveillance Server will load the specified media
unit into a drive and format it.
Click [ OK ] to set your options.
Add a New User, Group, or Domain
Click
. The Add Entry window will appear:
247
248
Buffalo Surveillance Server
Select a Name type. This indicates the type of rights.
Enter an Entry name. This is the name that will appear under Name.
The name you enter must be valid on the computer on which the Vault is running.
Select the Rights for the new user, group, domain or everyone. This is the actual rights
granted to the given user, group, domain, or everyone.
Right
Meaning
Full Control
Enables the user, group, domain, or "everyone" to have full control.
Store/Retrieve
Enables the user, group, domain, or "everyone" to store and retrieve
data.
Retrieve
Enables the user, group, domain, or "everyone" to retrieve (but not
store) data.
None
Blocks the user, group, domain, or "everyone" from doing anything
with data.
Click [ OK ].
Use
or
to respectively move the new entry up or down in the list to change the priority
the new entry is given in relation to other users, groups, and domains.
Manage Data and the Information Repository: Data Service Policies and Vault Admin
Buffalo Surveillance Server reads rights from top to bottom. For example, if the
Documentation group is denied rights and JohnDoe appears in the list below
Documentation, even if JohnDoe is granted full rights, he will not have any rights if he
is a member of the Documentation group. On the other hand, if JohnDoe appears
above the Documentation group and JohnDoe is given full rights, he will retain full
rights even if he is a member of the Documentation group and the Documentation
group is denied rights. Also note that Vault rights and media rights are hierarchical,
with media rights being subordinate to overall Vault permissions.
When you are finished adding new entries, click [ OK ] to save them.
Change a Security Entry
To change a security entry, double-click it. The Change Entry window appears:
Change the values for Name type, Entry name, and Rights.
Click OK to save changes.
In the Properties window, click OK to save changes.
249
250
Buffalo Surveillance Server
Delete a User, Group, Domain, or
"Everyone"
To delete an entry from the Vault Access Control List, select it by single clicking it.
Click
. The entry will be removed from the list.
Click [ OK ] to save changes.
Load Media: Load, Reload, or Re-index Media
IMPORTANT NOTE: If you are using the Buffalo Surveillance Server Vaults and media are
preconfigured and prepared automatically; there is no need to perform any Vault operations. The
information in this Vault Admin section is provided for information only.
Loading media means adding media that has at one time been part of the Information
Repository but is no longer being tracked, to a Vault. If you attempt to load unprepared tape
media to a Vault, the Buffalo Surveillance Server will label it Unknown. This label will be
replaced with the one that you enter when you prepare the media 235 . If you attempt to load
unprepared media to a hard disk or Vault, the Buffalo Surveillance Server will not recognize the
media. If you simply need to re-catalogue (in other words, "re-index") media that is being
tracked in the Information Repository, you must reload it.
Reloading media means re-adding media, to the Information Repository, that has already
been in use and is being tracked. When you reload media, the Vault uses its already existing
catalog for the media unless it finds corruption (or you force re-index of the media). When
reloading media onto the Information Repository, you must use the reload process.
If you need to re-index media, you must first unload the media 255 . If you attempt to
reload media without first unloading it, the operation will fail and an error message will
appear.
Re-indexing media means to have the Information Repository survey the data on the media
and create a new catalog on the media (if needed) and on the Vault on which the media will
reside. If a unit of media that is or has been in use in the Information Repository becomes
unreliable, you should re-index it. To do this, you must unload 255 and then reload the unit of
media.
When executing Vault and media operations, the Buffalo Surveillance Server may appear
as if it is not responding. However, when the Buffalo Surveillance Server completes its
given task, it responds normally.
Manage Data and the Information Repository: Data Service Policies and Vault Admin
Add New Vaults or Media On the Fly
You can increase automatic fail-over performance with a more flexible Information Repository
design that eliminates the possibility of a single point of failure. For example, you can move
media freely between Vaults of the same type, so if a tape is taken out of one Vault and
inserted into another, the Information Repository will automatically locate the data without being
notified of the move. If a tape library is getting full, a second library can be brought online
seamlessly. Half of the new tapes can be inserted into the older library, and half of its full tapes
can be inserted into the new library. The result is a balanced Information Repository with two
libraries that are accessible to the network.
If there is more than one Vault available, clients can divide use of the available Vaults.
They can also fail-over to other Vaults should a Vault fail. The same logic applies even if
there is more than a single tape-based Vault containing tapes with the same label (for
example, "Monday Incremental").
Follow the steps in the sections listed below to load, reload, or re-index media:
Load Hard Disk Media 251
Load Tape Media 253
Reload Media 254
Load Hard Disk Media
You can load media only to existing Vaults. If you have not yet added Vaults, you can do so
using the Add or Remove Vault Wizard 345 .
In the left frame of the Vault Admin 204 main window, click
which you wish to load media.
Click (and highlight)
.
in front of the Vault
into
251
252
Buffalo Surveillance Server
Click
in the Vault Admin tool bar 205 to launch the Load Media window. The Load Media
window will appear.
In the Media Name text box, enter the name for the media unit being "loaded".
In the Media Location pull-down list, leave the default location ("Media is located in default
location"); or, select Media is located at pathname. If you select Media is located at
pathname, Enter Pathname will become active.
If you select Media is located at pathname, enter the directory path for the media unit
being "loaded" in the Enter Pathname text box.
Buffalo Surveillance Server will always look for the media at the default location.
Leave Force Re-Index set to Only re-index if needed. Buffalo Surveillance Server will
index the media if necessary. You can use forced re-indexing to ensure that your media is reindexed.
Click [ OK ] to complete the process. A new unit of media will appear in the media list.
Load Shadow Hard Disk Media
You can load media only to existing shadow hard disk Vaults. If you have not yet added Vaults,
you can do so using the Add or Remove Vault Wizard 345 .
In the left frame of the Vault Admin 204 main window, click
which you wish to load media.
Click (and highlight)
.
in front of the Vault
into
Manage Data and the Information Repository: Data Service Policies and Vault Admin
Click
in the Vault Admin tool bar 205 to launch the Load Media window. The Load Media
window will appear.
In the Enter Pathname field of Media Location, enter the pathname of the directory you
want to shadow into the Information Repository.
Leave Force Re-Index set to Only re-index if needed. Buffalo Surveillance Server will
index the media if necessary. You can use forced re-indexing to ensure that your media is reindexed.
Click [ OK ] to complete the process. A new unit of media will appear in the media list.
Load Tape Media
You can load media only to existing Vaults. If you have not yet added Vaults, you can do so
using the Add or Remove Vault Wizard 345 .
Ensure that there is a new unit of media in the storage device. How to do this will vary
depending on the hardware that you are using. See the documentation for your hardware for
assistance.
In the left frame of the Vault Admin 204 main window, click
which you wish to load media.
Click (and highlight)
.
in front of the Vault
into
253
254
Buffalo Surveillance Server
Click
in the Vault Admin tool bar 205 to launch the Load Media window. The Load Media
window will appear.
Select an option from the Media Location combo box. Select Load unknown media when
you want to load a unit of media that is already physically loaded into the Vault's storage
device. Select Load from storage slot when you want to load a unit of media from a known
storage slot within the Vault's storage library.
Select a unit of media from the Choose media pull-down list (which will display all of the
media in the storage device).
Leave Force Re-Index set to Only re-index if needed. Buffalo Surveillance Server will
index the media only if necessary.
Click [ OK ] to complete the process. A new unit of media will appear in the media list 204 .
Reload Media
As long as you are tracking media, your Vault will display the media, even if the media has
been unloaded from the storage device. Reloading media means to add it to the storage device
after it has been taken off line. If you are using tapes or glass media, insert the media into its
storage device. If you are using virtual media, you will not physically handle the media.
Use the Reload Selected Media window to load tape media (such as tapes that are outside
of a storage device) into a Vault or to re-index hard disk media. The Reload Selected Media
window is almost identical to the Load Media window.
In the left frame of the Vault Admin 204 main window, click
which you wish to load media.
Click (and highlight)
.
in front of the Vault
into
Manage Data and the Information Repository: Data Service Policies and Vault Admin
Right-click the particular unit of media that you want to reload, and select Reload Media.
The Reload Media window will appear. It looks just like the Load Media window except for
the header and the available fields in which you can modify values:
Reload Media window
for hard disk media
Reload Media window
for tape media
Select a re-indexing option. If the Vault has a good listing of the media in its catalog, select
Only re-index if needed. The media unit will not be re-indexed if Buffalo Surveillance Server
determines that re-indexing is not called for. On the other hand, if the catalog entries for the
media are suspect or do not exist, the Information Repository will attempt to re-index the
media to update its catalog. Select Force a re-index of media only if you have a reason to
suspect that the catalog on the Vault or the media is incorrect.
Click [ OK ]. The media will be reloaded and no longer have a gold bar beneath it.
Unload Media
IMPORTANT NOTE: If you are using the Buffalo Surveillance Server Vaults and media are
preconfigured and prepared automatically; there is no need to perform any Vault operations. The
information in this Vault Admin section is provided for information only.
Most typically, you remove media when it is full. You can remove media from a Vault in two
ways:
255
256
Buffalo Surveillance Server
Tracked and managed by the Information Repository. This is known as unloading to offline status. As long as media is tracked, its Vault catalog remains on the Vault in which
the media normally resides. It also appears in Vault Admin 204 (denoted as off-line), and
its files and metadata are searchable.
Not tracked by the Information Repository.
The process of unloading media is identical for hard disk media and tape media
with one
exception. On tape media you can either leave the media inside the storage library or remove it
from the Information Repository entirely. Stand-alone tape drive-based Vaults work the same as
tape library-based Vaults.
When executing Vault and media operations, the Buffalo Surveillance Server may appear
as if it is not responding. However, when the Buffalo Surveillance Server completes its
given task, it responds normally.
Follow the steps below to unload media.
From the left frame of the Vault Admin 204 main window, click
which you want to remove media.
Click
in front of the Vault's Media icon
in front of the Vault
to open the media list.
Click (and highlight) the media unit that you want to unload.
Click
in the Vault Admin tool bar 205 . The Unload Media window will appear.
Use the Media Tracking pull-down list, and select one of the options available:
Media Tracking Options
Required Input and Results
Enter a descriptive note about where media will be
stored in the text box labeled Location where
media will be stored.
Track media after
unloading
The Vault's catalog will be updated with this
information. Should data on this unit of media be
required for retrieval, a media request alert (including
the location note) will be displayed by the Information
Repository, prompting an administrator to load the
required media.
from
Manage Data and the Information Repository: Data Service Policies and Vault Admin
Media Tracking Options
Do not track media any
longer
Required Input and Results
The Location where media will be stored text box will
be disabled. When the media leaves the Information
Repository, its entries will be removed from the Vault's
catalog.
Select an option from Media Updating combo box:
Media Updating Options
Update media if needed
Do not update media
Results
The Vault will update the on-media catalog (on the
media unit being unloaded) only if it is out of date.
The Vault will not update the on-media catalog for the
media unit being unloaded.
Click [ OK ] to complete the process. The media will appear with a gold background in the
main window 204
.
Erase Media
IMPORTANT NOTE: If you are using the Buffalo Surveillance Server Vaults and media are
preconfigured and prepared automatically; there is no need to perform any Vault operations. The
information in this Vault Admin section is provided for information only.
The erase media feature erases data from a unit of media but leaves the media header
information intact. Header information comprises the information entered when the media was
prepared 235 : media name, owner, rights, and other pertinent information are retained for future
use. It is better to erase media than to reformat media 243 wherever possible. When you erase
media, the Buffalo Surveillance Server simply flags data ("erased") that can be overwritten.
There may be several reasons to erase media. Whenever physical, sequential write media,
such as tape, is used as the storage media, it must be erased as part of the purge process.
Therefore, if this type of media is being used as part of a multi-level storage hierarchy through
which files are being migrated and replicated, viable data on the media must be moved to other
media and the original media erased in order to purge old, expired data from the media. Media
being used in a cycled Information Repository must also go through erasures. At the end of a
cycle, the old media being reintroduced needs to be erased by the Information Repository
before it can be reused.
Media erasing is managed through the Erase Media window. Follow the steps below to erase
media:
In the left frame of the Vault Admin 204 main window, click
which you intend to remove media.
Click
in front of the Vault's media icon
in front of the Vault
to open the media list beneath it.
from
257
258
Buffalo Surveillance Server
Click (and highlight) the media unit that you want to erase.
Click
in the Vault Admin tool bar 205 . The Erase Media window will appear.
Choose an option from the When to Erase pull-down list:
When to Erase
Results
Erase media at next use
The unit of media will be erased just prior to the next
time it is used in a job.
Erase media now
The unit of media will be loaded into a drive and erased
immediately.
Click [ OK ] to activate your selection.
Start Vaults Manually
IMPORTANT NOTE: If you are using the Buffalo Surveillance Server Vaults and media are
preconfigured and prepared automatically; there is no need to perform any Vault operations. The
information in this Vault Admin section is provided for information only.
When managing an Information Repository, there may be times when Vaults do not start
automatically. You will need to start them manually.
To start a Vault, follow the steps for your OS below.
Windows
Use Windows Services to start Vaults and to perform other Vault related OS operations.
You may need Windows administrator rights to perform certain tasks. General
information about using Services is provided by Microsoft: Click Action > Help (on
Services window toolbar).
From your Window's Taskbar, click Start > All Programs > Control Panel.
If you are displaying the Category View, click Performance and Maintenance. If you
are displaying the Classic View, skip this step and go to the next.
Manage Data and the Information Repository: Data Service Policies and Vault Admin
259
Click Administrative Tools. (The icon and name are identical for both the Category and
Classic views.)
Double-click
. The Services window appears:
Scroll down to find Buffalo Vault Service.
Right click the Vault Service that you want to start, and then select Start. If Start is
disabled, you need Windows administrator rights to start Vaults. These rights are not the
same as the Buffalo Surveillance Server rights that are set for processing data or adding
media to the Information Repository.
Linux
Simply reboot your system to start Vaults.
Advanced users can open a shell and type sudo /sbin/service VaultSvc start.
Macintosh
Simply reboot your system to start Vaults.
Advanced users can open a shell and type sudo /sbin/SystemStarter start
VaultSvc. You will be prompted to enter your administrator password.
Options
From the Options menu of Vault Admin 204 , you can set the Address Format 260 and
Communications Timeouts 260 for Vaults.
260
Buffalo Surveillance Server
Options: Address Format
Address Format refers to the format in which client addresses are displayed in Vault Admin.
Change the Address Format when you want to see Current Client 263 addresses displayed in
an alternate format.
Follow the steps below.
Select Options > Address Format from the menu bar at the top of the Vault Admin 204 main
window.
Select the view that you prefer. You have the option of choosing between three alternate
formats for viewing the client computer names. Each option provides a different level of detail:
View Formats
Results
Dot Notation
The client computers' network address is displayed.
Full Domain Name
The client computer is displayed along with the domain and
subnet names.
Host Name Only
The client's host name and port number are displayed
Right-clicking the mouse anywhere on the active window activates a Refresh button. Use
this button to redisplay the active clients any time.
Options: Communications Timeout
If Buffalo Surveillance Server is unable to connect with a computer in the network or
communications are interrupted during a job, Buffalo Surveillance Server will wait a predefined
period of time before completely dropping the connection. This period of time is called the
"communications timeout."
The Communications Timeout feature enables you to set a higher or lower timeout wait value to
better suit network conditions should communications between various Buffalo Surveillance
Server components fail or hang during a job. Network failures are usually due to network
conditions that occur from time to time.
To make changes to the connection time out value, follow the steps below.
Manage Data and the Information Repository: Data Service Policies and Vault Admin
Select Options > Communications Timeout from the menu at the top of the Vault Admin
204 main window.
Click the value you wish to set as the new time out value for the Information Repository.
Values are relative.
The Communications Timeout value impacts several Information Repository components.
Vault Details
The active Vaults in the network are represented in the left frame of the Vault Admin 204 main
window.
Click the plus box
in front of a Vault
name to open the subcategories associated with
the Vault and to activate the icons in the Vault Admin toolbar 205 . Certain icons in the toolbar
will be active only when a Vault, Media, or Drive is selected.
Advanced View
Some features within Vault Admin have an advanced view option that presents details about the
item being queried.
261
262
Buffalo Surveillance Server
Select View > Advanced from the Vault Admin menu to activate this option.
Information
This view displays overall Vault details.
In the left frame of the Vault Admin 204 main window, click the Information icon
Vault
under a
to see the Vault's details (as listed below).
Address: The network address of the Vault selected and the Vault's port number.
Boot Time: The date and time of the Vault's last startup cycle.
Current Time: The time on the Vault's internal clock. This is mapped to the Vault's host
computer.
Free Space: The amount of free space available in the Vault.
Garbage Space: The amount of purgeable space in the Vault (this will normally be zero on
hard disk based Vaults).
Media Type: Additional information about the storage device technology used by the Vault.
(Hard disk based Vaults always have a Media Type of Hdisk while tape-based Vaults list the
type of tape technology being used, such as DLT or LTO).
Name: The name of the Vault selected.
Secured: Whether the Vault is secured or unsecured.
Serial Number: A number created at the time of manufacture that maps to a right-to-use
license.
Software Version: The version of Buffalo Surveillance Server software being used by the Vault.
Status: The status of the Vault regarding serious error conditions or media requests.
Total Drives: The total number of storage media drives within the Vault's storage device.
Manage Data and the Information Repository: Data Service Policies and Vault Admin
It is important to note that hard disk Vaults are mapped differently than other Vault
storage devices. The Vault drive to physical drive representation may be a one-to-one
mapping or may be virtualized so that the ratio may be higher or lower.
Total Errors: A cumulative list of errors since the Vault has been on-line. This number is reset
whenever the Vault is restarted.
Total Media: The amount of media being tracked and managed by the Vault. Includes all online and off-line media being tracked.
Total Media Off-line: Includes only formatted media that is housed outside the Vault's storage
device and that is still being tracked by the Information Repository.
Total Media On-line: Includes only formatted media housed within the Vault's storage device
that is being tracked by the Information Repository.
Total Robotic Arms: The number of robotic devices within the Vault's storage device that are
used to move media from storage slots to drives and back. Hard disk based Vaults usually
have as many robotic arms as drives. Other storage devices, like tape-based devices, usually
have only one robotic arm.
Total RPC Calls In: The number of remote procedural calls that have been made to the Vault
since its latest startup cycle.
Total RPC Calls Out: The number of remote procedural calls made by the Vault since its
latest startup cycle.
Total RPC Packets In: The number of network packets that have been received by the Vault
since its latest startup cycle.
Total RPC Packets Out: The number of network packets that have been sent by the Vault
since its latest startup cycle.
Total Storage Slots: Storage slots are areas where media is stored in a Vault's storage device
when it is not in a media drive. In tape and other physical media-based storage devices, the
total storage slots number is fixed by the storage device. In hard disk Vaults the number is
usually mapped to the number of virtual media units set up in the Vault.
Total Volumes: The number of volumes on media being tracked and managed by the Vault. It
includes all on-line and off-line media being tracked.
Total Volumes Off-line: Includes only volumes on formatted media that is housed outside the
Vault's storage device, yet is still being tracked by the Information Repository.
Total Volumes On-line: Includes only volumes on formatted media housed within the Vault's
storage device that is being tracked by the Information Repository.
Type: The storage device technology the Vault uses.
Current Clients
This view displays details about the computers with which the Information Repository is
263
264
Buffalo Surveillance Server
currently working.
In the left frame of the Vault Admin 204 main window, click the Current Clients icon
a Vault
under
to see a list of computers with which the Vault is currently working.
Use Options > Address Format 260 to modify the view of the details in the right frame.
Media
This view displays a list of the media in the Vault that you select and, after you select a
particular unit of media, the specific details about the unit of media.
In the left frame of the Vault Admin 204 main window, click the Media icon
under a Vault
to see a list of media in the Vault.
Click a particular unit of media from the directory tree or from the right frame to see detailed
information about the media, as illustrated below:
Access Control #1 (ACL): The first of sixteen controls that can be assigned to the selected
unit of media.
Barcode/ID (tape media only): The barcode number or label assigned to the media selected. (If
the storage device has a barcode reader, the data for this field is assigned by the physical
barcode label on the media, and any other information in this field is ignored by the Information
Repository.)
Manage Data and the Information Repository: Data Service Policies and Vault Admin
Block Size: The block size used by the media unit selected.
Content Search: Indicates whether content search is enabled.
Current Location (tape media only): The location at which the media is located currently.
Date/Time Formatted: Information about the most recent time the media unit was formatted
for use by the Buffalo Surveillance Server.
Date/Time Last Accessed: Information about the last time the media unit was accessed for
use by the Information Repository.
Date/Time Last Written: Information about the last time data was written to the selected
media unit.
Description: The description entered in the Prepare Media 235 window.
File De-duplication: Indicates whether de-duplication is enabled.
Free Space: The amount of space on the media unit that is available for use.
Garbage Space: The amount of space on the media unit that is used by data that is eligible to
be purged from the Information Repository.
Home Location (tape media only): The slot in a drive to which media is assigned.
Media Name: The name of the media unit selected. The media name is part of the media label
.
Owner: Displays the user logged onto the Information Repository during the media format for
this media unit.
Pathname (hard disk media only): The directory pathname of the subdirectory where the
media unit's space actually resides.
Random Access: Indicates if random access of the media is permitted.
Size: The capacity of the media unit selected.
Speed: A performance rating utilized by Buffalo Surveillance Server by which different types of
media are rated by their access and read/write performance. Hard disk is considered the
highest performance media and DDS-2 tape is (currently) the lowest performing media.
Status: The overall health and usability of the media.
Storage Pool: The name of the storage pool, if any, to which the media belongs.
Total Errors (tape media only): The number errors the selected media unit has generated.
Total Loads (tape media only): The number of times the selected media unit has been loaded
into a drive.
Type: The storage device technology utilized by the media (hard disk, tape, etc.)
265
266
Buffalo Surveillance Server
Drives
This view displays a list of drives in the Vault that you select, and after you select a particular
drive, the specific details about the drive.
In the left frame of the Vault Admin 204 main window, click the Plus icon
Drives icon
Click
under a Vault
to the left of the
to expand the list of the drives within a Vault.
to see a list of drives within the Vault and information about the drives.
Click (to highlight) a particular drive, from the directory tree or from the right frame, to see
detailed information, as listed below, about the selected drive.
Access Control #1 (ACL): The first of a possible sixteen controls that can be assigned to the
selected unit of media.
Block Size: The block size employed by the media when it is accepting data.
Current I/O Rate: The rate at which data is being written to media.
Last Cleaning (tape media only): The last time that a unit of media has been physically
cleaned.
Location: The slot number in the drive that the unit of media occupies.
Manufacturer: The name of the company that manufactured the drive.
Media in Drive: The name assigned to the unit media.
Total Errors: The number errors a unit of media unit has generated.
Total Loads (tape media only): The total number of times a unit of media has been physically
loaded into the drive.
Type: The type of drive.
Manage Data and the Information Repository: Data Service Policies and Vault Admin
Vault Admin Command Line for Advanced Users (VaultAdminCl)
This section is intended for advanced Buffalo Surveillance Server users. Use the
command line interface ONLY if you are an advanced Buffalo Surveillance Server user
and are familiar with command line environments. Otherwise, use a Buffalo Surveillance
Server application.
Buffalo Surveillance Server Command Line Applications Overview
Buffalo Surveillance Server command line applications provide an alternative way for users to
execute much of the functionality that can be executed using Buffalo Surveillance Server
applications. Because Buffalo Surveillance Server command line application functionality is
similar to application functionality, you can gain a better understanding of the dynamics of each
command line application by referring to the user's guide section for the application that
performs the same operations as the command line in which you are interested.
To see a list of available options, use <executable name> -usage in any of the command line
executables.
About VaultAdminCl
Use VaultAdminCl to manage media and Vaults in your Information Repository.
To execute Vault Admin tasks 204 , ensure that the folder to which you have installed the
Buffalo Surveillance Server is in your command path, open a command prompt, and run
VaultAdminCl at the command line. As needed, use the commands listed below. See Vault
Admin: Manage Vaults 204 for documentation covering Vault Admin tasks.
Command Line Options
As needed, append the following options to the execution path. When you run VaultAdminCl,
the command line is formed as follows:
VaultAdminCl <option>
Option
Description
-input_pathname <pathname>
Contains the input list of commands.
-output_pathname <pathname>
Defines the path to the file containing the output
results.
-usage
Lists all valid parameters.
-version
Displays the current version information.
267
268
Buffalo Surveillance Server
Interactive Commands and their Arguments
After starting the application, you can enter the following arguments, one at a time, at the
prompt. When entering arguments, you can simultaneously enter required variables. You can
also enter just a given argument and wait for the system to prompt you for its required
variables.
Argument
Description
clist
Lists all current clients for the selected Vault.
close
Closes the connection to the selected Vault.
diag
Sets the diagnostic mode for the selected Vault.
drives
Lists drives for selected Vault.
dstat <drive name>
Displays information about a selected drive. If the name
is not listed on the command line, you will be asked to
provide the name.
errorlog <pathname>
Sets the Vault's error log pathname.
Valid values:
pathname – the new error log pathname.
format <notation type>
Enables users to set the current client address format.
Valid notations:
dot – the client computer network address will be
displayed.
host – the client computer name will be displayed
along with domain and subnet names.
full – The client's host name and port number will be
displayed.
help | ?
Shows valid usage for commands. You can use only one
command at a time.
license <pathname>
Sets the pathname for Information Repository license.
Valid values:
pathname – the new pathname to the license
file.
load <argument>
Loads the media for the selected Vault.
Manage Data and the Information Repository: Data Service Policies and Vault Admin
Argument
Description
Arguments for a tape Vault with a mailslot:
load from mail slot? <yes | no>
if loading from mailslot, mailslot loc
if not loading from mailslot, storage loc
Arguments for a tape Vault with no mailslot:
storage loc
force reindex of media? <yes | no>
Arguments for a hard disk Vault:
media name
media in default location <yes | no>
if not in a default location, pathname
force reindex of media? <yes | no>
media
Lists the media for the selected Vault.
Displays media status.
mstat <name>
name – the name of the media for which status will be
displayed.
Sets the name for the Vault.
name <name>
Valid values:
name – the new name for the Vault.
prepare <arguments>
Prepare media for the selected Vault.
Arguments for a tape Vault with a mailslot:
media name
Barcode/ID
description
storage pool
content searching <yes | no>
file de-duplication <yes | no>
load from mail slot? <yes | no>
269
270
Buffalo Surveillance Server
Argument
Description
if loading from mailslot, mailslot loc
if not loading from mailslot, storage loc
prepare media now? <yes | no>
Arguments for a tape Vault with no mailslot:
media name
Barcode/ID
description
storage pool
content searching
file de-duplication
storage loc
prepare media now? <yes | no>
Arguments for a hard disk Vault:
media name
description
storage pool
media size
content searching
file de-duplication
if not in default location, store media in default location
<yes | no>
prepare media now? <yes | no>
quit
Exits the application.
reload <arguments>
Reloads media for the selected Vault.
Valid arguments:
media name
force reindex of media? <yes | no>?
Manage Data and the Information Repository: Data Service Policies and Vault Admin
Argument
Description
Secures/unsecures the selected Vault from any media
eject or load commands. You must have administrator
rights to execute this command.
secure <Boolean>
Valid values:
on
off
select <Vault name>
Selects the Vault that will be operated upon.
Closes the selected Vault. You must have administrator
access to execute this command.
Valid values:
shut <type of shutdown>
extended – Closes the Vault after all clients and
callbacks have been serviced. Closes all open
databases.
normal – Closes the Vault and all current connections.
restart – executes a normal shutdown and then
restarts the Vault.
emergency – Closes the Vault immediately.
stat
Displays status information of current Vault.
Sets the communication timeout value.
timeout <number>
Valid values:
1 - 10 (where "0" is the shortest, "9" is the longest,
and "10" is never.
unload <arguments>
Unloads media for the selected Vault.
Valid arguments:
media name
media tracking? <yes | no>
if keeping track, enter storage location
update the media if needed? <yes | no>
Vaults
Displays a list of registered Vaults.
vexer <arguments>
Run the canned Vault exercises.
271
272
Buffalo Surveillance Server
Argument
Description
Valid arguments:
storage pool
scale factor
minimum file size
maximum file size
maximum sleep time
check file? <yes | no>
stop test on error? <yes | no>
time to run <hh:mm:ss>
Search for, Review, and Export Surveillance Videos and View Live Feeds: SVM
273
Search for, Review, and Export Surveillance Videos and
View Live Feeds: SVM
The Surveillance Video Manager (SVM) application enables powerful searching, reviewing, and
exporting of video that is being managed in the Information Repository, including metadata, to
any computer in your network. It also enables you to view live video feeds 284 from configured
RTSP enabled IP cameras. While very powerful, the Surveillance Video Manager is very easy to
use.
Overview
This section outlines the main parts of the application window.
Buffalo Surveillance Server jobs feature two phases: Search and Export. The Search and
Export buttons at the top of the application enable you to toggle between the Search and
Export windows. Use Search Results and the Export Queue in the Search window to find
videos and place them in the Export window. Use the Export window when you are ready to
export all of the videos you have found.
To play back videos in the Buffalo Surveillance Server media viewer, you will need
VideoLAN's VLC media player (VLC 1.1.11) or Apple QuickTime version 7 (free or Pro)
installed on your computer. If you are viewing primarily MPEG-4 videos, which are
commonly used for surveillance video, VLC is best.
To utilize low resolution companion files, you will need to enable them when you set up
your recording policies. On the Processing tab in the Camera Policies application
(available in Advanced mode 51 ), ensure that Generate low resolution proxy is
selected. If this option is not enabled, low resolution companion files and thumbnails will
not be available.
274
Buffalo Surveillance Server
Search Window
The Search window is divided into three main sections:
The Search Criteria frame enables you to select and enter minimal or extensive search
criteria as needed to obtain relevant search results.
The Search Results frame displays found videos. You can double-click a thumbnail to view
a low resolution proxy version on the Media Viewer. When you want to export only part of a
clip, the Media Viewer enables you to choose the part for export.
The Export Queue frame displays the videos selected for export.
Search for, Review, and Export Surveillance Videos and View Live Feeds: SVM
Export Window
The Export window is divided into two main sections:
The Export Job Configuration frame enables you to select the specific parameters for the
videos you will export. You can export to a local file system, a Rimage system, or through
FTP. Each type of export has its own configuration options. Select [ Start Export ] when you
are ready to export videos.
The Job Status frame displays results as videos are being exported.
275
276
Buffalo Surveillance Server
How to Search for & Export Videos - Overview
Follow the steps below to search for and retrieve videos:
1. Launch the Surveillance Video Manager 273 .
2. Search for and Select Videos & Clips for Export 286 .
It is best to avoid using characters that the Buffalo Surveillance Server interprets as
wildcards or as otherwise special. If you need to use a character literally that the Buffalo
Surveillance Server uses as a wildcard, the character must be preceded by an escape
character ( \ ).
For example, \*This is an example using escape characters in a statement with a
wildcard\*.
The following are Buffalo Surveillance Server wildcards and special characters:
?, *, #, !, ~, ^, &, [ ], { }, \, ".
See the Advanced Wildcard Functionality section for details about wildcards.
3. Set Export Options & Export Videos and Clips 319 .
Search for, Review, and Export Surveillance Videos and View Live Feeds: SVM
Launch the Surveillance Video Manager
To launch a Buffalo Surveillance Server application, see the instructions for the OS below.
Windows
To launch a Buffalo Surveillance Server application from the Windows desktop,
click Start > All Programs > BUFFALO, and then select the application to run.
Macintosh
To launch a Buffalo Surveillance Server application on a Macintosh, browse to
Applications > BUFFALO > Bin, and then select the application to run.
277
278
Buffalo Surveillance Server
Configure Rimage to Publish Videos
To export to Rimage, you need to ensure that required system folders are in place and system
permissions are set correctly. You must then enable Rimage export using the Rimage
Configuration window. Once enabled, Rimage will be activated as an option in the Where do
you want to export the files field in Export Job Configuration.
How Buffalo Surveillance Server Interacts with Rimage
As illustrated in the diagram below, when an Export job is executed, Buffalo Surveillance Server
sends data to the Export folder in the local file system and an Order file to the Network
Publisher Order Files folder on the Rimage computer. Rimage takes care of the rest. In the
diagram, the label file resides on the Rimage computer; however, it can just as easily reside on
any networked computer for which Rimage has access and security permissions.
Folder Access and Permissions Settings
To enable Rimage export functionality, Rimage Network Publisher must be installed and
running somewhere in the network and the Rimage Orders folder must be visible from the
computer on which Buffalo Surveillance Server is running. Ensure the following:
There is a Rimage export folder on the Buffalo Surveillance Server client computer.
Buffalo Surveillance Server users have write access to the export folder and Rimage has at
least read permissions.
Security is set so that domain users have full control.
Configure Rimage Export using the Rimage Export Configuration Window
The Rimage Export Configuration dialog box is accessible from the Tools menu option. It
enables you to use Buffalo Surveillance Server to export to a Rimage system.
Search for, Review, and Export Surveillance Videos and View Live Feeds: SVM
If you do not enable Rimage export, Rimage will not be activated as an option in the
Where do you want to export the files? field in Export Job Configuration.
To enable export to Rimage, select Tools > Rimage Configuration. The Rimage
Configuration window appears:
Check Enable Rimage export to enable this feature. The fields in the window will become
active.
Enter values in the fields listed below:
Field
Local View: Export
folder
Details
The view of the export folder on the Buffalo Surveillance Server
client computer from the Buffalo Surveillance Server client
computer. "Client computer" refers to the computer on which
the Buffalo Surveillance Server client is running.
The Network Publisher Order Files folder resides on the
Local View: Network Rimage computer. This is the Buffalo Surveillance Server client
Publisher Orders
computer's view of the export folder on the Rimage computer.
folder
"Client computer" refers to the computer on which the Buffalo
Surveillance Server client is running.
Remote View:
Export folder
The view of the export folder on the Buffalo Surveillance Server
client computer from the Rimage computer. This is the export
folder on the client computer on which Buffalo Surveillance
Server is running. The path you enter needs to indicate how
this folder is viewed by the Rimage system.
279
280
Buffalo Surveillance Server
Field
Remote View: Disc
label
Details
The client computer's view of the path from which Rimage gets
the label file for the discs to be burned. "Client computer"
refers to the computer on which the Buffalo Surveillance Server
client is running.
For Buffalo Surveillance Server to interact with the disc
label that Rimage will use when creating discs, the disc
label must already be created.
The number of user defined fields (0 - 30). Use these fields to
add label merge text to the label that will be used for your
media. Every field you define here will be added to Export Job
Configuration, where you can define the contents of each
field.
User Assigned Merge
fields: Number of
fields
If you enter a number manually, you must press the Tab
key or the Enter key for the new number to take effect.
Ensure that the fields you enter here match the fields on
the disc label Rimage will use. If the fields do not match,
disc labels will not print correctly.
Save configuration
for all users
Check this box to keep the same values for all logged-in users
who use Buffalo Surveillance Server on the current computer.
Click Save. Rimage will be activated as an option in the Where do you want to export
the files? field in Export Job Configuration.
Search for, Review, and Export Surveillance Videos and View Live Feeds: SVM
Set User Preferences
Use the User Preferences window to define some default settings, such as if tool tips display,
if a time-code displays in the Media Viewer, where the cache folder is located, and how large
the cache folder is.
In the tool bar of the main window, click Tools > User Preferences to launch the User
Preferences window:
Select or enter values in the fields listed below:
Field
Details
Enable tool tips
When checked, tool tips appear in the window whenever you
hover the mouse cursor over a button, field, or other control.
Load images
immediately when
scrolling
When checked, thumbnail images are loaded as you scroll
down the Search Results pane. If de-selected, thumbnail
images load only when scrolling stops.
Preferred format for
embedded time
display
Select the type of time code that displays in the Media
Viewer.
281
282
Buffalo Surveillance Server
Field
Cache folder
Details
Define the folder where Buffalo Surveillance Server caches
search results. Similar to the cache of a web browser, the
cache stores found thumbnails, low resolution proxy videos,
and other associated files and enables you to replay already
found videos more quickly.
Define the size of the cache where Buffalo Surveillance Server
caches thumbnails, low resolution proxy videos, and
associated files. When full, contents will be overwritten in the
order of oldest to newest.
Cache size
If unsure about cache size, leave it set to the default
value. If you find that Buffalo Surveillance Server often
needs to retrieve videos from storage rather than from
the cache, increase the cache size.
Clear cache when
exiting
Select for Buffalo Surveillance Server to empty the cache when
the application closes.
Select the type of video viewer.
Preferred viewer
To play back videos in the Buffalo Surveillance Server
media viewer, you will need VideoLAN's VLC media
player (VLC 1.1.11) or Apple QuickTime version 7 (free
or Pro) installed on your computer. If you are viewing
primarily MPEG-4 videos, which are commonly
used for surveillance video, VLC is best.
Be sure to restart the Surveillance Video Manager if you
change the preferred viewer.
Search the ingest server for video files, such as preview
images, low resolution proxies/companion files, or other
related files.
Searching Options
Select search options Search for preview images or
Search for low resolution proxies if your ingest server
supports preview images or low resolution proxies. Video
surveillance files typically do not have other related files
associated with them.
Searches with multiple search options selected can be
time intensive because several passes through the
ingest server are taking place.
Search for, Review, and Export Surveillance Videos and View Live Feeds: SVM
Field
Details
Select Search for preview images to perform an
exhaustive search and return all preview images.
Select Search for low resolution proxies to perform an
exhaustive search and return all low resolution proxy videos.
Select Search for related files to perform an exhaustive
search and return all related files (including high resolution
originals, preview images, low resolution proxy videos, and
any other related files in the Information Repository).
Enable Storyboard
Select to display a storyboard strip in the Media Viewer. The
storyboard displays still images from the video. Click an image
to jump to that point in the video.
Enable advanced
user mode
Select to view advanced information such as camera URL, run
time, size, and frame size in the Search Results pane for each
video clip.
Click Save to save your settings when finished.
283
284
Buffalo Surveillance Server
View Live Video Feeds
You can access the Buffalo Surveillance Server Live Viewer from the Tools menu of the Buffalo
Surveillance Server Surveillance Video Manager application.
In the Buffalo Surveillance Server Live Viewer application, view live video feeds directly from
RTSP enabled IP cameras.
Before seeing live feeds, cameras must be configured in the Camera Policies application as
part of your Information Repository. To be able to view live feeds in the Live Viewer, select the
Live View URL check box and enter the URL when adding the camera configuration.
To be able to view and record live video feeds, you must ensure that RTSP is enabled on
your IP camera. See your camera's documentation for details on enabling RTSP.
Most cameras can manage a single live feed while video streams are being captured.
More than a single live feed on any given camera affects performance.
The Live Viewer window is divided into two main areas: the panel on the right side contains
controls to select the cameras whose feeds you want to view and the layout of the viewer
window (the number of rows and columns of camera views) displayed at one time. There are
also controls to access the pan, tilt, zoom, and focus of cameras (if cameras support it, and if
the control is enabled when configuring the Camera Policies application).
The Live Viewer main menu bar includes a File menu to close the application, a View menu to
access commands for tool tips, save, rename, and delete layouts, and a Help menu.
The view frames in the left side of the window display the live feeds from the cameras selected.
By default, the Live Viewer is set to display feeds from four cameras, arranged in two rows of
two across. Change that default layout by using the View drop down list at the top of the righthand control panel.
In the Live Viewer, each camera view frame includes a Title bar. Right-click on the camera
Title bar to display a right-click menu with the following menu items:
Wiper - Select for Wiper sub-menu containing duration options for the wiper to clean.
Duration options are: 10 seconds, 1 minute, 15 minutes, and 30 minutes, 1 hour, and 2
hours. Also access the Stop menu item. (Displays only if camera has wiper
functionality.)
Day/Night Mode - Select for the Day/Night Mode sub-menu containing mode options of
Day, Night, and Auto. If Auto is selected the camera automatically adjusts to determine
the correct mode. (Displays only if camera has Day/Night Mode functionality.)
Select - Highlight the camera view frame. PTZ and Volume options are available, if
applicable.
Close - Close the camera view (or click the Close button on the Title bar).
The screenshot below shows the default layout, with feeds from four cameras displayed
Search for, Review, and Export Surveillance Videos and View Live Feeds: SVM
285
Double-click the Title bar of the view frame for the camera to quickly change the default layout
to a single camera view layout. Double-click again to return to the original layout.
View a feed from a camera 140
View feeds from a camera pool 141
Change, save, or delete a live view layout 142
Control camera pan, tilt, zoom, and focus 143
286
Buffalo Surveillance Server
Search for, Review, and Select Videos
The Buffalo Surveillance Server is designed to support powerful searching and reviewing of
surveillance video. It also enables you to export entire videos or just clips of interest. Finding,
reviewing, and selecting videos is the first part of the video exporting process. Follow the steps
below to search for and review video clips. Then, if you want to export what you have found,
work through the subsequent section: Set Export Options & Export Videos 319 .
Launch 277 Surveillance Video Manager (SVM). The Surveillance Video Manager will open and
be ready to accept search criteria:
Searching
Buffalo Surveillance Server enables you to create focused search requests. Define fewer search
parameters for a broader set of results. Define more parameters for the system to return more
relevant search results.
To search for video captured on a particular date or between particular dates and times,
select Search using date range. Selecting Search using date range activates the
calendar control.
Search for, Review, and Export Surveillance Videos and View Live Feeds: SVM
When activated, the calendar control is interactive for you to select start and end dates
and times to search. As shown above, the top of the calendar control displays the
months and dates. The bottom half of the calendar control features start and end times.
Use the calendar to select a search date range: Click the start date and select Start Date;
click the end date and select End Date. (Start and end date can be the same.)
Use the calendar to select a search time range within selected search dates:
Click the start date and select Start Time.
Select a start time, and then click OK.
Click the end date and select End Time.
Select an end time, and then click OK.
To search all stored video regardless of date and time, de-select the Search using date
range check box.
In the Camera field, select the camera that captured the video to search, or leave the
Camera field set to <any>. If set at <any>, video streams captured from all cameras are
searched.
Select the More Search Options check box. The options selected narrow down videos to be
returned. Narrower searches return more relevant search results. Select from the options
listed below.
To ensure that search results include all contiguously captured video, do not limit your
search to a specific NAS device, computer, or unit of media.
287
288
Buffalo Surveillance Server
Pull-down fields support the use of wildcards. For example, if you type Axis*, Buffalo
Surveillance Server returns results from all Axis cameras. See the section titled
Advanced Wildcard Functionality, Wildcards for File Searching for details about using
wildcards.
Field
Camera
Camera Pool
Purpose and Directions
Select the camera name from the pull-down list or type
a camera name. When typing a camera name you can
use wildcard functions.
A camera pool is a user defined virtual grouping of
cameras to search video from specified cameras. For
example, a camera pool called "Doors" that includes all
of the cameras that cover the doors of your
establishment. When you need to see who's come or
gone, select the "Doors" camera pool as a search
criteria, and only video captured from cameras in the
"Doors" camera pool are included. There is no limit to
the number of camera pools your Buffalo Surveillance
Server solution may have.
If you know a video is located in a specific camera
pool, select the camera pool using the pull-down list.
Select the camera pool from the pull-down list or type
a camera pool name and wildcard.
Limit your search to a specific camera by entering the
camera's description.
Camera Description
Type the description for the camera that captured the
video to search.
No results are returned if a camera description
is not part of the solution.
Limit your search to a particular device in your Buffalo
Surveillance Server solution.
Show video stored on
Select the device that you want from the pull-down
list or enter the device name and a wildcard.
Show video captured from
this computer
Limit your search to the particular host computer to
which video was originally captured. When a computer
name is entered, only video stored from that computer
is listed. This field may contain only a portion of the
computer name and is always case sensitive.
Wildcards are permitted.
Search for, Review, and Export Surveillance Videos and View Live Feeds: SVM
To select a specific computer, type the name of the
computer into the text box.
No results are returned if a camera description
is not part of the solution.
Show video stored on this
media
Increase the speed of your search by limiting the
search to a particular unit of media.
Select the unit of media to search from the pull-down
list or type a media name and a wildcard.
Limit your search to only a specific storage pool.
Show video stored in this
storage pool
Select the storage pool from the pull-down list or type
a storage pool name and a wildcard.
With user defined search metadata criteria, click Add for additional search criteria. Add as
many search criteria blocks with as much additional criteria as you need to obtain the level of
refinement you want.
The Buffalo Surveillance Server supports searches using wildcards. For details, see the
section titled Advanced Wildcard Functionality.
289
290
Buffalo Surveillance Server
After setting search criteria, click [ Search ] to execute a search of all of your stored videos
for videos that matched the criteria you have defined. Results will appear in the Search
Results frame:
When no thumbnail image is available, a placeholder image will appear. The same
placeholder image is used as SVM is retrieving thumbnails.
Unless you have checked Load images immediately when scrolling in User
Preferences 281 , thumbnail images will be loaded only when you stop scrolling.
Search Results
Search results comprise several types of information: The thumbnail image you see is captured
from the beginning of the captured video. To the right of each thumbnail, in bold green text, you
will find the name of the camera that captured the video, the date the video was captured, and
the time when each capture began. Additional information includes Camera Description, Host,
Frame Size, Begin Date, and Run Time.
Search for, Review, and Export Surveillance Videos and View Live Feeds: SVM
Beneath the camera and video information, you will notice a sunken horizontal bar. This is a
histogram. When motion detection information has been captured by a motion detection
enabled camera supported by the Buffalo Surveillance Server, the histogram indicates the
motion detection threshold was reached. It enables you to skip past sections of video in which
no motion was detected. When supported motion detection cameras are utilized, this bar is
populated with histogram information and will look something like this:
Line height and color indicate the magnitude of the motion detected (based on how your
motion detection enabled camera is configured). For information about how Buffalo Surveillance
Server automatically configures supported cameras, see the Customization Settings section
titled AXIS Camera Motion Detection Configuration.
When no motion has reached the detection threshold, the histogram will be empty. Where no
motion detection data has been gathered, whether because the camera does not support
motion detection or had a technical problem, the histogram will be filled with a black bar.
In the Search Results frame, click the thumbnail image for the file you want to view, or click a
point of interest in the histogram. Either of these actions will open the Media Viewer with the
original video file ready for playback and review.
The Media Viewer
The Media Viewer enables you to play back and review videos at variable speeds, search
metadata content, navigate to a particular point in a file, clip particular parts of videos for export,
and send clips to the Export Queue.
291
292
Buffalo Surveillance Server
Once the Media Viewer is opened, you will notice another histogram depicted above the
timeline “scrubber” bar (shown above). This histogram is different from the one on the Search
Results window in that this histogram is representative of all of the found videos for the one
particular camera chosen from the Search Results window.
Each Media Viewer will, upon the selection of any video clip within the Search Results window,
allow the playback and review of the entire timeline that was specified in the Search Criteria
frame for each individual camera. For example, if you entered in a date range of July 20 to July
26 and the “Back Lot” Camera Pool, you may have a large number of thumbnail Search Results
to choose from. Once you click on any of those thumbnail items, a Media Viewer will display
the entire timeline from July 20 to July 26 for the camera that was associated to the thumbnail
selected
This gives the user greater flexibility to search back and forth within the timeline of the
requested search selection and to view the histogram associated to the entire timeline of that
selected camera with the timeline indicator moved to the selected time.
If you leave the current Media Viewer open and go back and click on another thumbnail, the
Media Viewer will regain focus and the timeline indicator will move to the new point in time
selected. If this new thumbnail was associated with a camera other than one originally
selected, a new Media Viewer will open to the point in time associated to this thumbnail image.
You can have as many Media Viewers open as you need, and each will depict the entire
timeline associated to the Search Criteria date and time request. This enables you quickly and
easily identify the specific areas of interest within found video files.
The Media Viewer comprises the controls that you will find in any popular video viewer (such as
volume, play, stop, skip forward, skip back, beginning, and end) and the following additional
controls:
This bar is a histogram. When motion detection information has been captured by a
motion detection enabled camera supported by the Buffalo Surveillance Server, the
histogram indicates when motion was detected. Unlike the histograms for individual
clips in the Search Results frame, the histogram in the Media Viewer displays all of the
motion for the entire timeline of search results for a particular camera. The
histogram enables you to skip to the sections of video which are of most interest.
Line height and color indicate the magnitude of the motion detected (based on how
your motion detection enabled camera is configured). For information about how
Buffalo Surveillance Server automatically configures supported cameras, see the
Customization Settings section titled AXIS Camera Motion Detection Configuration.
When no motion has reached the detection threshold, the histogram will be empty.
Where no motion detection data has been gathered, whether because the camera
does not support motion detection or had a technical problem, the histogram will be
filled with a black bar.
Search for, Review, and Export Surveillance Videos and View Live Feeds: SVM
The pointer on the timeline indicates which part of the clip is being displayed. Click, hold, and
drag the pointer to progress or rewind the video. Click to the left of the pointer to rewind the
video one second at a time. Click to the right of the pointer to advance the video one second at
a time. When you click and hold in either direction, the pointer will move automatically one
second at a time.
The number to the left is a time code that indicates where the pointer is in the video (and which
part is being displayed). The number to the right indicates the total length of the video. The
vertical green line to the left indicates where the clip begins. The vertical green line to the right
indicates where the clip ends. Only the segment of video between the vertical green lines will be
exported. By default, the lines mark the beginning and the end of the video; they can be
adjusted using the scissor icons.
If you set the beginning of the clip to within one second of the beginning of the file and
one second of the end of the file, the entire original full-resolution file will be exported.
Clicking the small golden triangle enables you to select an embedded time display type
(when they are available for the video you are working with).
The scissor icons enable you to select clips from the video. Numbers indicate beginning and
ending times. Click the left icon to denote the beginning of the clip. Click the right icon to
denote the end of the clip. You can select and export multiple clips from a single instance of
the Media Viewer.
The control on the left (when available), Jog shuttle, enables you to fast forward or fast reverse
the video clip. Simply click, drag, and hold the orange control left or right to respectively rewind
or fast forward. The control on the right, Playback speed, enables you to run the video faster or
more slowly. Simply drag the orange control left to play more slowly or right to play more
quickly.
The Media Viewer also supports the following case sensitive keyboard navigation:
Action
Key Combination
Move one second forward
(right arrow)
Move one second backward
(left arrow)
Skip forward 30 seconds
Shift +
(right arrow)
Skip backwards 30 seconds
Shift +
(left arrow)
Toggle play/pause
[ Space Bar ]
Skip to "in" point
Shift + I
293
294
Buffalo Surveillance Server
Action
Key Combination
Skip to "out" point
Shift + O
Set "in" point
I
Set "out" point
O
Increase playback speed
J
Decrease playback speed
L
Stop playback
K
To select the clip you want to export, place the cursor where you want the clip for export to
begin, and then click the left scissor icon; then, place the cursor where you want the clip for
export to end, and then click the right scissor icon. You can repeat this process to export as
many clips from a file as you need. However, before selecting and exporting a second clip
from a file, you will need to export the currently selected clip by selecting [ Export ].
Once you have selected the part of the video you want to export, click [ Export ]. The clip will
be sent to the Export Queue:
Once a clip is in the Export Queue, you still have the option of changing which part of
the video will be exported. Simply click the video in the Export Queue. The Media
Viewer will again appear. After you have made your desired changes, click [ Commit ] to
save changes, and then close the Media Viewer window.
Once you have selected all of the videos and files you want to export and they are in the
Export Queue, click [ Export ] at the top of the main window to activate the Export window.
Follow the directions in the next section, Set Export Options and Export Video Files, to
complete the export process.
Search for, Review, and Export Surveillance Videos and View Live Feeds: SVM
Metadata Extensions Configuration
Extended metadata searching in the Surveillance Video Manager requires metadata that can be
collected at ingest only if MetadataExtensions.cfg is configured correctly for Camera policies.
In short, the metadata you ingest using Camera policies will be searchable using the
Surveillance Video Manager. Therefore, metadata extensions for Camera policies and the
Surveillance Video Manager are all covered here together.
The Metadata tab and metadata search options will appear in the Camera Policies
application and the Surveillance Video Manager respectively only if there is a
MetadataExtensions.cfg file in <install-dir>\Config.
The MetadataExtensions.cfg file must be on every computer on which a user would edit
or modify the recording policy. If not, the metadata values could be lost.
When you create, configure, and implement a MetadataExtensions.cfg file, the Metadata tab
will appear in Camera Policies. It will contain the Query blocks listed in the IngestMdExt block
(see details below):
Metadata search options will be available in the Surveillance Video Manager to enable searches
using metadata associated with already captured videos.
When you ingest metadata, special characters normally interpreted as wildcards (?, *, #,
!, ~, ^, &, [ ], { }, \, ") are not interpreted as wildcards. When you search for metadata,
however, wildcards are recognized. Consequently, if metadata that you ingest contains
characters that are normally interpreted as wildcards, when you search for metadata you
need to use the escape character (\) to denote that the wildcard is intended literally, not
as a wildcard. For example, if you ingest 16*37 as metadata, and you then want to
search for this expression, you would search using 16\*13.
The search type options will be identical to those you defined in the ModMdExt block
(see details below).
295
296
Buffalo Surveillance Server
Create a MetadataExtensions.cfg
You can create MetadataExtensions.cfg using any text editor. Once created, it needs to be
added to the following path: <install-dir>\Config.
MetadataExtensions.cfg is block structured text file. At the end of this section, you will find a
sample MetadataExtensions.cfg. You can implement the file as is (at the path noted above) to
see how it works or modify the file to meet your own criteria and then implement it.
MetadataExtensions.cfg comprises three Blocks (IngestMdExt, SearchMdExt, and ModMdExt)
which comprise one or more Query blocks each.
Pay particular attention to braces [ ]; there needs to be an opening brace after
"IngestMdExt" and a closing brace after its last Query block; an opening brace after
"SearchMdExt" and a closing brace after its last Query block; and an opening brace after
"ModMdExt" and a closing brace after its last Query block.
Query block statements describe the controls that will appear on the application. These can
include any number of string fields, check boxes, spin controls, pathname fields, and choice
controls. Each Block can have any number of Query blocks. Its best to ensure that the
IngestMdExt block and SearchMdExt contain the same Query blocks since the Buffalo
Surveillance Server will search for only ingested metadata. However, if you prefer, the Query
blocks contained in SearchMdExt can be limited to a subset of those you have in IngestMdExt.
In this case, you will be able to search only based on the Query blocks listed in SearchMdExt.
If a Query block contains an error, the entire metadata extension block (IngestMdExt or
SearchMdExt) will be ignored.
Metadata Extension Block Structure
The following example is only for the sake of illustration. Note that tokens can not be used in
Query blocks indiscriminately. Each Query block supports only specific tokens. See Valid
Token/Values for Query Blocks below for details.
Search for, Review, and Export Surveillance Videos and View Live Feeds: SVM
<block identifier> # This identifies the beginning of the Block.
[ # This is the opening brace for the Block.
Query
[
<token>=<value>
<token>=<value>
<token>=<value>
<token>=<value>
<token>=<value>
<token>=<value>
]
Query
[
<token>=<value>
<token>=<value>
<token>=<value>
<token>=<value>
<token>=<value>
<token>=<value>
]
] # This is the closing brace for the Block.
Blocks
The following are the Blocks used in MetadataExtensions.cfg.
Block Identifier
IngestMdExt
Description
Identifies the beginning of the metadata
extensions block for Buffalo Surveillance Server
ingesting and capturing applications. May not
contain a SearchMdExt block or ModMdExt
block.
Required.
SearchMdExt
Identifies the beginning of the metadata
extensions block for Buffalo Surveillance Server
search and retrieve applications. It may not
contain an IngestMdExt block or ModMdExt
block.
Required.
ModMdExt
Identifies the beginning of the "edit metadata"
metadata extension block for Buffalo
Surveillance Server search and retrieve
applications. May not contain an IngestMdExt
block or SearchMdExt block.
Required.
297
298
Buffalo Surveillance Server
Block Identifier
Description
Identifies the beginning of a Query block
contained within a metadata extensions block.
Required.
Query
As illustrated in the examples below,
Query blocks must be contained within
metadata extension blocks (SearchMdExt
and IngestMdExt).
Valid Token/Values for Query Blocks
The tokens in the table below can be used only in Query blocks. Although the IngestMdExt
block, SearchMdExt block, and ModMdExt block use the same types of Query blocks, each
must have its own individual Query blocks.
It is best to avoid using characters that the Buffalo Surveillance Server interprets as
wildcards or as otherwise special. If you need to use a character literally that the Buffalo
Surveillance Server uses as a wildcard, the character must be preceded by an escape
character ( \ ).
For example, \*This is an example using escape characters in a statement with a
wildcard\*.
The following are Buffalo Surveillance Server wildcards and special characters:
?, *, #, !, ~, ^, &, [ ], { }, \, ".
See the Advanced Wildcard Functionality section for details about wildcards.
Query block
Type
Valid Token/Values
Description
The metadata item's name.
Name = <character string>
Required
Default = ""
Checkbox
Type=Checkbox
The Query type.
Label = <character string>
The label for the control as it will appear
in the application.
Default = ""
Search for, Review, and Export Surveillance Videos and View Live Feeds: SVM
Query block
Type
Valid Token/Values
Description
The value that will be loaded into the
control by default.
DefaultValue = <Boolean>
Valid values = true | false
Defaults = true (checked)
Description = <character
string>
The tooltip for the control.
Default = ""
The metadata item's name.
Name = <character string>
Required
Default = ""
Type=Choice
The Query type.
Label = <character string>
The label for the control as it will appear
in the application.
Default = ""
The value that will be loaded into the
control by default.
Valid values = the number of the entry in
the pull-down list
Choice
DefaultValue = <number>
Default = the first choice listed.
If the DefaultValue for a Choice
block is greater than the number
of Choices entered, the entire
MetadataExtensions block will be
ignored.
Description = <character
string>
Choice = <character
string>
Pathname
Name = <character string>
The tooltip for the control.
Default = ""
A choice statement that can be
selected. Must have at least one
Choice. Can be reused as many times
as needed.
The metadata item's name.
299
300
Buffalo Surveillance Server
Query block
Type
Valid Token/Values
Description
Required
Default = ""
Type=Pathname
The Query type.
Label = <character string>
The label for the control as it will appear
in the application.
Default = ""
DefaultValue = <character
string>
The value that will be loaded into the
control by default.
Valid value= a string
Default = ""
BlankValueOk = <Boolean>
Indicates whether the value may be left
blank. Valid for String and Pathname
only.
Valid values = true | false.
Default = true
Description = <character
string>
The tooltip for the control.
Default = ""
The metadata item's name.
Name = <character string>
Required
Default = ""
Spin
Type = Spin
The Query type.
Label = <character string>
The label for the control as it will appear
in the application.
Default = ""
The value that will be loaded into the
control by default.
DefaultValue = <number>
Valid values = a number between the
LowerLimit and UpperLimit
Default = the lower limit
Search for, Review, and Export Surveillance Videos and View Live Feeds: SVM
Query block
Type
Valid Token/Values
Description
If the DefaultValue for a Spin
block is not between the
LowerLimit and UpperLimit, the
entire MetadataExtensions block
will be ignored.
Description = <character
string>
The tooltip for the control.
Default = ""
The lower limit for the spin control.
LowerLimit = <number>
Default = 0
UpperLimit = <number>
The upper limit for the spin control. Valid
only for Spin.
Default = lower limit + 100
The metadata item's name.
Name = <character string>
Required
Default = ""
Type = String
The Query type.
Label = <character string>
The label for the control as it will appear
in the application.
Default = ""
String
DefaultValue = <character
string>
The value that will be loaded into the
control default.
Valid values = a string
Defaults = ""
BlankValueOk = <Boolean>
Indicates whether the value may be left
blank. Valid for String and Pathname
only.
Valid values = true | false.
Default = true
Description = <character
string>
The tooltip for the control.
301
302
Buffalo Surveillance Server
Query block
Type
Valid Token/Values
Description
Default = ""
Search for, Review, and Export Surveillance Videos and View Live Feeds: SVM
303
Sample "Generic" MetadataExtensions.cfg
# This is a sample of an MetadataExtensions.cfg file.
#
IngestMdExt # Required: This identifies the beginning of the metadata extension
block for Target & Process.
[
# This is the opening brace for the IngestMdExt block.
Query
[
Name
Type
Label
DefaultValue
=
=
=
=
Name1
String
Sample String Label
This field can be left blank (\"\") or pre-populated with
BlankValueOk
Description
= false
= This is a sample of the \"Description\" field.
Name
Type
Label
DefaultValue
=
=
=
=
BlankValueOk
Description
= false
= This is a sample of the \"Description\" field.
Name
Type
Label
DefaultValue
Description
Choice
Choice
Choice
=
=
=
=
=
=
=
=
Name3
Choice
Sample Choice Label
2
This is a sample of the \"Description\" field.
Sample \"Choice\".
Sample \"Choice\".
Sample \"Choice\".
Name
Type
Label
DefaultValue
Description
=
=
=
=
=
Name4
Checkbox
Sample Checkbox Label
true
This is a sample of the \"Description\" field.
Name
Type
Label
DefaultValue
Description
LowerLimit
=
=
=
=
=
=
Name5
Spin
Sample Spin Label
26
This is a sample of the \"Description\" field.
0
a value.
]
Query
[
Name2
Pathname
Sample Pathname Label
This field can be left blank (\"\") or pre-populated with
a value.
]
Query
[
]
Query
[
]
Query
[
304
Buffalo Surveillance Server
UpperLimit
= 100
]
] # This is the closing brace for the IngestMdExt block.
SearchMdExt # Required: This identifies the beginning of the metadata extension
block.
[
# This is the opening brace for the SearchMdExt block.
Query
[
Name
Type
Label
DefaultValue
=
=
=
=
Name1
String
Sample String Label
This field can be left blank (\"\") or pre-populated with
BlankValueOk
Description
= false
= This is a sample of the \"Description\" field.
Name
Type
Label
DefaultValue
=
=
=
=
BlankValueOk
Description
= false
= This is a sample of the \"Description\" field.
Name
Type
Label
DefaultValue
Description
Choice
Choice
Choice
=
=
=
=
=
=
=
=
Name3
Choice
Sample Choice Label
2
This is a sample of the \"Description\" field.
Sample \"Choice\".
Sample \"Choice\".
Sample \"Choice\".
Name
Type
Label
DefaultValue
Description
=
=
=
=
=
Name4
Checkbox
Sample Checkbox Label
true
This is a sample of the \"Description\" field.
Name
Type
Label
DefaultValue
Description
LowerLimit
=
=
=
=
=
=
Name5
Spin
Sample Spin Label
26
This is a sample of the \"Description\" field.
0
a value.
]
Query
[
Name2
Pathname
Sample Pathname Label
This field can be left blank (\"\") or pre-populated with
a value.
]
Query
[
]
Query
[
]
Query
[
Search for, Review, and Export Surveillance Videos and View Live Feeds: SVM
UpperLimit
305
= 100
]
] # This is the closing brace for the SearchMdExt block.
ModMdExt # Required: This identifies the beginning of the metadata extension block
for Search & Retrieve.
[
# This is the opening brace for the ModMdExt block.
Query
[
Name
Type
Label
DefaultValue
=
=
=
=
Name1
String
Sample String Label
This field can be left blank (\"\") or pre-populated with
BlankValueOk
Description
= false
= This is a sample of the \"Description\" field.
Name
Type
Label
DefaultValue
=
=
=
=
BlankValueOk
Description
= false
= This is a sample of the \"Description\" field.
Name
Type
Label
DefaultValue
BlankValueOk
Description
Choice
Choice
Choice
=
=
=
=
=
=
=
=
=
Name3
Choice
Sample Choice Label
2
true
This is a sample of the \"Description\" field.
Sample \"Choice\".
Sample \"Choice\".
Sample \"Choice\".
Name
Type
Label
DefaultValue
Description
=
=
=
=
=
Name4
Checkbox
Sample Checkbox Label
true
This is a sample of the \"Description\" field.
Name
Type
Label
DefaultValue
Description
=
=
=
=
=
Name5
Spin
Sample Spin Label
26
This is a sample of the \"Description\" field.
a value
]
Query
[
Name2
Pathname
Sample Pathname Label
This field can be left blank (\"\") or pre-populated with
a value
]
Query
[
]
Query
[
]
Query
[
306
Buffalo Surveillance Server
LowerLimit
UpperLimit
= 0
= 100
]
] # This is the closing brace for the ModMdExt block.
Using Wildcards for Searching and Filtering
Wildcards enable you to select multiple files with a single specification:
File filter wildcards are for creating file and directory filters and searching for files in the
Information Repository.
Content searching wildcards are for content searching of the Information Repository as
well as for content criteria filtering using the Data Service Policies Criteria tab 157 .
Wildcards for File Searching
Buffalo Surveillance Server enables you to use wildcards when you are searching for stored
video files. Wildcards for searching work on file and directory names.
Wildcards for File and Directory Filtering, File Searching, and Vault, Media Name,
Storage Pool, and Metadata Fields
Buffalo Surveillance Server enables you to use wildcards when creating file and directory filters
as well as when searching for files. Wildcards for file filters operate on filenames; directory
filters operate on directory name. Wildcards for searching work on file and directory names.
You can also use wildcards for the Vault, Media Name, and Storage Pool fields in the Source
tab and Destination tab of Data Services Policies and Destination tab of Camera Policies. See
respective Source or Destination tabs for details on how to utilize filters in the Vault, Media
Name, Storage Pool fields.
Wildcards can be used in combination with one another. See the last row of the table
below for examples.
Unless otherwise noted, searching is not case sensitive.
These wildcard operators will not work for content searching.
To obtain predictable results when using wildcards for metadata, it is best to avoid using
* and #.
Search for, Review, and Export Surveillance Videos and View Live Feeds: SVM
Operators
Following are all of the wildcard operators you can use when creating file or directory filters or
carrying out file searches. The wildcard operators below will not work for content searching.
Wildcard
?
Any single character in
a name
Description
? Substitutes for any single character
and can be combined to denote
multiple characters. If used in a
pathname, it cannot replace a forward
slash (/). Use ? for specific alternative
spellings. ? substitutes for a single
character; ?? substitutes for two
characters; ??? substitutes for three
characters, and so on. Only names with
characters equal to the number of ? used
are processed. For example, cell?
substitutes for all names containing cell+
<one additional character>.
For example, cells and cello but not cell.
You can use ? within or at the end of a
phrase. For example, .xl? substitutes for
only names containing .xl+<a third
character>, such as .xls, .xlr, and so on;
wom?n substitutes for only names
containing wom+<a third character>+n,
such as woman or women; carbon fib??
substitutes for only names containing
carbon fib+<two characters>, such as
carbon fiber or carbon fibre.
* Substitutes for zero or more
characters. Can be used in truncation
and for multiple characters. If used in a
pathname, it cannot replace a forward
slash (/). Use * for all possible alternative
spellings and an unlimited number of
characters within a name.
*
Zero or more characters
in a name
307
308
Buffalo Surveillance Server
Wildcard
Description
For example, h*ophilia substitutes for all
names containing h+<any character or
number of characters>+ophilia, such
as haemophilia, hemophilia, or
h.123ophelia; behavi*r substitutes for all
names containing behavi+<any
character or number of characters>+r,
such as behaviour, behavior, or behavi123.
zr; patent* substitutes for only all names
containing patent+<a character or any
number of characters>, such as
patents, patentable, patented, patent123,
and so on; patent*.jpg substitutes for
only all names containing patent+<a
character or any number of
characters>+.jpg, such as patents.jpg,
patentable.jpg, patented.jpg, patent123.
jpg, etc; *.jpg substitutes for only all
names containing <any character or set
of characters>+.jpg.
*?? Substitutes for a minimum number or
more characters. If used in a pathname, it
cannot replace a forward slash (/). The
minimum number of characters matched
is equal to the number of ? that follow the
*. *?? substitutes for at least two
characters; *??? substitutes for at least
three characters, and so on. You can use
*? within or at the end of a word.
*?
One or more characters
in a name
#
Zero or more characters
in a pathname, including
slashes
For example, carbon fib*?? substitutes
for carbon fiber, carbon fibre, as well as
carbon fibers, carbon fibres, and
carbonfib123. Only names containing at
least the number of ? present are
processed; names with more letters are
also processed. For example,
actua*???? substitutes for all filenames
containing actua+<four or more
additional characters>, such as
actuarial, actuaries, actualization,
actua12345.xls but not actual.
Similar to *, Substitutes for zero or more
characters in a pathname; valid for use
only within a pathname. Can be used to
denote the forward slash (/).
Search for, Review, and Export Surveillance Videos and View Live Feeds: SVM
Wildcard
Description
For example, document#Q42007
substitutes for document+<any
character, including slashes or no
character>+Q42007, such as
documentQ42007, documentsQ42007,
document1Q42007, and document/
Q42007.
#?
One or more characters
in a pathname, including
slashes
[]
Set of characters
Substitutes for a minimum number or
more characters in a pathname; valid for
use only within a pathname. Matches the
forward slash (/). Similar to *?, the
minimum number of characters matched
is equal to the number of ? that follow the
#.
For example, document#?Q42007
substitutes for document+<any
character, including slashes>+Q42007,
such as documentsQ42007, document/
Q42007, and documents/123Q42007.
Substitutes for a set and includes any one
of the characters in the set. Or, an ASCII
sequential run of characters may be
indicated by using a hyphen to separate
the first character in the sequence from
the last character in the sequence:
[<beginning character>-<end character>].
For example, [afe] matches a, f, or e; [am] matches any single character in the
range of a to m.
[!]
Characters not in set
Substitutes for any one character that is
not specified in the set. Or, an ASCII
sequential run of characters may be
indicated by using a hyphen to separate
the first character in the sequence from
the last character in the sequence: [!
<beginning character>-<end character>].
For example, [!afe] substitutes for any
single character other than a, f, or e; [!am] substitutes for any single character
that is not in the range of a-m.
309
310
Buffalo Surveillance Server
Wildcard
Description
When ! is the first character of a pattern,
the entire pattern is omitted.
For example, a search using !primary will
return everything except "primary".
!
Entire pattern not in set
\
Escape next character
When using this wildcard in
extended metadata searches, it is
best to use "is equal to". To obtain
predictable results, avoid "contains",
"does not contain", and "is not
equal to".
Causes the character immediately
following the backslash to be treated as a
literal character. Normally, this is used
with one of the wildcard characters to
denote that character itself, not its
wildcard expression meaning.
For example, if you wanted to process
literally Accounting*2007, you would enter
Accounting\*2007 since * is normally
interpreted by the Information Repository
as a wildcard.
Along with using wildcards individually,
you can also combine them to create very
powerful filters and search criteria.
Multiple wildcards
For example, [abc]*.xls substitutes for
any phrase beginning with a, b, or c+
<any character or number of
characters>+.xls; [!abc]*.xls substitutes
for any phrase not beginning with a, b, or
c+<any character or number of
characters>+.xls; and*.??? substitutes
for and+<any number of characters>+.
+any three characters
More examples of wildcards
The examples in this table enable you to contrast how wildcards function differently from one
another.
Search for, Review, and Export Surveillance Videos and View Live Feeds: SVM
Wildcard
Sample Phrase
path?.doc
Matches
Does not match
path1.doc
path
?
paths.doc
path/.doc
Any single character in a
name
pathq.doc
path.doc
etc.
path_sample.doc
etc.
path*.doc
*
Zero or more characters
in a name
path*?.doc
*?
One or more characters
in a name
path#.doc
#
Zero or more characters
in a pathname, including
slashes
path.doc
path
path1.doc
path/1.doc
path_sample.doc
path1.docs
etc.
etc.
path1.doc
path
paths.doc
path.doc
path_sample.doc
path/.doc
etc.
etc.
path.doc
path
path1.doc
path1.docs
path_sample.doc
sample/path.doc
path/1.doc
etc.
etc.
#?
path#?.doc
One or more characters
in a pathname, including
slashes
path[1-3].doc
[]
Set of characters
path1.doc
path
path_sample.doc
path.doc
path/1.doc
path1.docs
etc.
etc.
path1.doc
path
path2.doc
path.doc
path3.doc
path.docs
path4.doc
path5.doc
311
312
Buffalo Surveillance Server
Wildcard
Sample Phrase
Matches
Does not match
patha.doc
pathq.doc
etc.
path[!1,2,3].doc
path0.doc
path1.doc
path4.doc
path2.doc
path5.doc
path3.doc
patha.doc
path
pathq.doc
path.doc
etc.
path.docs
[!]
Characters not in set
etc.
!
!path.doc
Entire pattern not in set
all other files in
repository
!path.doc
Wildcards for Content Searching
Buffalo Surveillance Server features powerful content searching capability. Data Service Policies
157 features powerful content criteria filtering functionality. See the Data Service Policies
Criteria tab 179 for details.
Operators
Following are all of the wildcard operators you can use for content searching or defining criteria
for Data Service policies.
.
Use quotation marks when you want treat a phrase as if it is a single word. For example,
if you wanted to search for "2007 compliance", you would enter "2007 compliance".
Otherwise, Buffalo Surveillance Server will search for all instances of "2007",
"compliance", and "2007 compliance".
The wildcard operators below will not work for file/directory filtering and file searches.
Search for, Review, and Export Surveillance Videos and View Live Feeds: SVM
Wildcard
?
Any single character in a
name
Description
? Substitutes for any single character
and can be combined to denote
multiple characters. If used in a
pathname, it cannot replace a forward
slash (/). Use ? for specific alternative
spellings. ? substitutes for a single
character; ?? substitutes for two
characters; ??? substitutes for three
characters, and so on. Only names with
characters equal to the number of ? used
are processed. For example, cell?
substitutes for all names containing cell+
<one additional character>.
For example, cells and cello but not cell.
You can use ? within or at the end of a
phrase. For example, .xl? substitutes for
only names containing .xl+<a third
character>, such as .xls, .xlr, and so
on; wom?n substitutes for only names
containing wom+<a third character>+n
, such as woman or women; carbon
fib?? substitutes for only names
containing carbon fib+<two
characters>, such as carbon fiber or
carbon fibre.
* Substitutes for zero or more
characters. Can be used in truncation
and for multiple characters. If used in a
pathname, it cannot replace a forward
slash (/). Use * for all possible alternative
spellings and an unlimited number of
characters within a name.
*
Zero or more characters
in a name
313
314
Buffalo Surveillance Server
Wildcard
Description
For example, h*ophilia substitutes for all
names containing h+<any character or
number of characters>+ophilia, such
as haemophilia, hemophilia, or
h.123ophelia; behavi*r substitutes for all
names containing behavi+<any
character or number of characters>+r,
such as behaviour, behavior, or
behavi123.zr; patent* substitutes for only
all names containing patent+<a
character or any number of
characters>, such as patents,
patentable, patented, patent123, and so
on; patent*.jpg substitutes for only all
names containing patent+<a character
or any number of characters>+.jpg,
such as patents.jpg, patentable.jpg,
patented.jpg, patent123.jpg, etc; *.jpg
substitutes for only all names containing
<any character or set of characters>+.
jpg.
*?? Substitutes for a minimum number or
more characters. If used in a pathname, it
cannot replace a forward slash (/). The
minimum number of characters matched
is equal to the number of ? that follow the
*. *?? substitutes for at least two
characters; *??? substitutes for at least
three characters, and so on. You can use
*? within or at the end of a word.
*?
One or more characters
in a name
For example, carbon fib*?? substitutes
for carbon fiber, carbon fibre, as well as
carbon fibers, carbon fibres, and
carbonfib123. Only names containing at
least the number of ? present are
processed; names with more letters are
also processed. For example,
actua*???? substitutes for all filenames
containing actua+<four or more
additional characters>, such as
actuarial, actuaries, actualization,
actua12345.xls but not actual.
Search for, Review, and Export Surveillance Videos and View Live Feeds: SVM
Wildcard
~
Proximity searches
Description
Proximity searches enable you to search
based on whether words are proximate to
one another. To do a proximity search
use ~ (the tilde symbol) and a value at
the end of a phrase.
For example, to search for "compliance"
and "December" within 10 words of each
other in a document use compliance
December~10.
Fuzzy searches enable you to search
based on an approximate spelling. To
execute a fuzzy search, use ~ (the tilde
symbol) at the end of a single term.
~
Fuzzy searches
For example to search for a term similar
in spelling to "report" use report~. This
search will find terms like deport, reports,
and reporting.
You can also specify the level of required
similarity. Using a value between 0 and 1,
only terms with a higher similarity will be
matched with values closer to 1. For
example, roam~0.8.
The default is 0.5 if a value is not defined.
[]
Range searches enable you to match
documents whose field values are
between the lower and upper bound
specified by the search. Range searches
can be inclusive or exclusive of the upper
and lower bounds. Inclusive range
searches are denoted by square
brackets. Exclusive range searches are
denoted by curly brackets. Sorting is
done lexicographically.
{}
Range searches (TO)
For example, mod_date:[20020101 TO
20030101] will find files whose mod_date
fields have values between 20020101 and
20030101, inclusive.
Range searches are not reserved
for only date fields.
315
316
Buffalo Surveillance Server
Wildcard
Description
You can also use range searches with
non-date fields. For example, title:
{accounting TO sarbanes}. Will find all
files whose titles are between
accounting and sarbanes, but not
including accounting and sarbanes.
Boosting enables you to control the
relevance of a document by boosting the
value of the specific term you are
searching for. To boost a term, use ^ (the
caret symbol) with a boost factor (a
number) at the end of the term you are
searching for. The higher the boost factor
number, the more relevant the returned
term will be. By default, the boost factor
is 1. Although the boost factor must be
positive, it can be less than 1 (for
example, 0.2).
^
Boosting a term
For example, if you are searching for
corporate compliance and you want the
term compliance to be more relevant,
boost it using ^ along with the boost
factor next to the term. You would type
the following: corporate compliance^4.
This will make documents with the term
compliance appear on the list as more
relevant. You can also boost phrase
terms by enclosing a phrase in quotation
marks. For example, "corporate
compliance"^4 "Second Quarter
2007"
Boolean operators allow terms to be
combined through logic operators. AND,
+, OR, NOT and - are supported as
Boolean operators.
OR
AND, &&
+
NOT, !, Boolean operators
Boolean operators must be ALL
CAPS).
OR
Search for, Review, and Export Surveillance Videos and View Live Feeds: SVM
Wildcard
Description
OR links two terms and finds a matching
document when either of the terms exist
in a document. || can be used in place of
OR. OR is the default conjunction
operator. This means that if there is no
Boolean operator between two terms, OR
is assumed.
For example, to search for documents
that contain corporate compliance or
just compliance, you would use
"corporate compliance" OR
compliance. The quotes indicate a
single phrase.
AND
AND matches documents where both
terms exist anywhere in the text of a
single document. && can be used in
place of AND.
For example, to search for documents
that contain corporate compliance and
Second Quarter 2007 you would use
"corporate compliance" AND "Second
Quarter 2007". The quotes indicate a
single phrase.
+
+ (plus symbol) requires that the term
after + exist somewhere in a single file.
For example, to search for files that must
contain compliance and may contain
corporate you would use
corporate +compliance.
NOT
NOT excludes documents that contain
the term after NOT. ! (exclamation point)
or - (minus symbol) can be used in place
of NOT.
For example, to search for documents
that contain corporate but not
compliance use, corporate NOT
compliance.
317
318
Buffalo Surveillance Server
Wildcard
Description
NOT cannot be used with just one
term. For example, the following search
would return no results: NOT compliance
Grouping
If you want to control the Boolean logic for
a query, you can use parentheses to
group clauses to form sub queries.
For example, to search for either
corporate or compliance and Second
Quarter 2007 you would use (corporate
OR compliance) AND "Second Quarter
2007". This ensures the phrase after AND
must exist and either term within the
parentheses may exist.
Field Grouping
Use parentheses to group multiple
clauses to a single field.
For example, to search for a file that
contains both return and the phrase
overdue accounts you would use title:
(+return +"pink panther"). Notice that
the field is followed by a colon.
\
Escaping special
characters
Buffalo Surveillance Server supports
escaping special characters that are part
of the query syntax. The current list of
special characters is + - && || ! ( ) { } [ ] ^
" ~ * ? : \. To execute a search using the
any of these characters literally (in other
words, to escape any of these character),
use \ before the given character.
For example to search for (1+1):2, you
would use \(1\+1\)\:2. If you were to not
use the escape character for (1+1):2,
Buffalo Surveillance Server would search
for ( OR 1 OR AND 1 OR ) OR : OR 2.
Search for, Review, and Export Surveillance Videos and View Live Feeds: SVM
Set Export Options & Export Videos
You will be able to export video only after you have searched for and selected it. See the
previous section, Search for, Review, & Select Videos & Clips 286 for details.
Export to Local File System
Export Job Configuration supports several user defined export criteria.
Click Export at the top of the SVM application.
Export Job Configuration Fields
Set the criteria for the following fields.
Field
Meaning and Directions
Defines where videos will be exported.
Select Local File System.
Export Destination
Additional, custom options will be available only
when an ExportExtensions.cfg file is in place.
Job name
A user defined field that associates a name with the job.
The name you enter here will appear in job logs. If left
blank, a default value will be entered.
Enter a job name.
319
320
Buffalo Surveillance Server
Field
Meaning and Directions
Default Path or Different location: You can export
data back to its original location or to any other location
in the network.
Leave this setting as is to export data to the default
path.
Or,
Where to save files
To export data to a different location, such as your
desktop, select Different location. A browser window
will display so that you can choose where you want to
export files.
Select a destination.
Click OKto set your choice.
Determines whether videos already on the target
computer will be overwritten.
Select an option.
When to overwrite
existing files
If a file that is being exported already resides in
the directory on the target computer to which you
want to export it, there will be a conflict and the
file will not be exported. The "target computer" is
the computer to which files are to be exported.
When you have selected several clips captured from the
How to export the selected same camera, Buffalo Surveillance Server can export
them as discrete videos or as a single video.
video
Select an option.
After setting the parameters, click Start Export to export videos. Buffalo
Surveillance Server begins to export files and a job status box appears in the Job
Status pane. While the job is running, Stop is active.
If you click Stop while Buffalo Surveillance Server is exporting files, the export is
stopped, and not all of the files in the Export Queue are exported. However, files
that have already been completely exported will remain on the target computer.
Click Dismiss to close the job status box.
Search for, Review, and Export Surveillance Videos and View Live Feeds: SVM
Problems Exporting?
Click View to open a log file that details the export job and what may be causing
problems.
To ensure that viable data on networked computers is not accidentally
overwritten, existing files on networked computers are not overwritten. If an
export job is unsuccessful, as indicated by zero files being retrieved, the
failure is most likely due to an unexpected condition, such as there already
being a copy of the files on the target computer. Mitigate most error
conditions by setting additional export parameters. For example, to overwrite
files on a networked computer, select Always overwrite files or Overwrite
file only if the stored file is newer.
Export to FTP site
Click Export at the top of the window. The Export window is displayed. The left hand
pane enables you to specify the export job configuration.
Fields for Export to FTP site Job Configuration
Set the criteria for the following fields.
Field
Meaning and Directions
Define where files are exported to.
Export Destination
Select the FTP site option.
321
322
Buffalo Surveillance Server
Field
Meaning and Directions
When FTP site is selected, the fields available
change to support FTP.
Job name
A user defined field that associates a name with the job.
The name entered here appears in job logs.
Type a job name.
The FTP host name or address.
FTP site address
Type the host name or address.
User name required to log into the FTP site.
FTP site user name
Type the user name to log into the site.
Password required to log into the FTP site.
FTP site password
Type the password to log into the site
Destination directory to store the files.
Destination folder at FTP
site
Type the destination path and directory the files
should be exported to.
After setting the parameters, click Start Export to export videos. Buffalo Surveillance
Server begins to export files and a job status box appears in the Job Status pane.
While the job is running, Stop is active.
If you click Stop while Buffalo Surveillance Server is exporting files, the export is
stopped, and not all of the files in the Export Queue are exported. However, files
that have already been completely exported will remain on the target computer. Click
Dismiss to close the job status box.
Export to Rimage
This section deals with setting Retrieval Options for exporting to Rimage. The
options for export to Rimage appear when Export to Rimage is selected.
Export to Rimage works only if the Rimage system and Buffalo Surveillance
Server export are configured properly. If you have not done so already,
configure Rimage export using Rimage Export Configuration.
Search for, Review, and Export Surveillance Videos and View Live Feeds: SVM
When exporting to the Rimage, do not stop Buffalo Surveillance Server until
all jobs have finished. If stopped, it does not remove temporary files, and they
will need to be removed manually. To manually remove temporary files, go to
the Rimage Export folder, and remove <user name>_<uid>.
Click Export at the top of the window. The Export window displays:
Fields for Set Retrieval Options to Export to Rimage
Set the criteria for the following fields.
Field
Meaning and Directions
Define where files are exported to.
Select the Rimage option.
Export Destination
When Rimage is selected, the fields available
change to support Rimage.
Job name
A user defined field that associates a name with the job.
The name entered here appears in job logs.
Type a job name.
How to name files - Active
for only "Different Location"
and "Export to Rimage"
Define how selected data is arranged when exported.
There are three options:
323
324
Buffalo Surveillance Server
Field
Meaning and Directions
Include full original pathnames - This option
recreates the source file structure. The exported data,
and its file structure matches the file structure of the
source from which the files originated. For example, if
the directory structure on the source is "C:
\Accounting\Marketing\...", the directory structure on
the exported data will be
"C\Accounting\Marketing\...".
Include pathnames starting at selected items This option creates only the directory structure of the
files selected for export. For example, if the source
directory structure is "C:\Accounting\Marketing\..."
and you select "Marketing", the retrieved data
includes only "Marketing" and the files beneath it.
"Accounting" are not included. Similarly, if selecting
the "Marketing" folder and it contains a folder, say,
2008Q3, then 2008Q3 appears in the exported data at
the same file level as "Marketing", not beneath it.
Finally, if you select only files, the exported data is
comprised of only files.
Include filenames only - This option ignores file
folders, so the exported data is comprised of only
files.
Include filenames only does not work correctly
if selected files have identical names. When files
have identical names, use Include full original
pathnames or Include pathnames starting at
selected items.
Email address for job
completion notice
Define the e-mail address for Rimage to send an e-mail
when the Rimage job is finished.
Type a valid e-mail address.
Disc type
Define what type of media Rimage is to produce.
Define how many copies of the data Rimage is to
produce.
Number of copies
If typing a number manually, press TAB or
ENTER for the new number to take effect.
Disc Labeling
Define the information on media labels that Rimage is to
produce.
Search for, Review, and Export Surveillance Videos and View Live Feeds: SVM
Field
Meaning and Directions
The number and titles of the fields available depend on
the Rimage Export Configuration window.
If a field is not present, add it using the Rimage Export
Configuration window.
After setting the parameters, click Start Export to export videos. Buffalo
Surveillance Server begins to export files and a job status box appears in the Job
Status pane. While the job is running, Stop is active.
If you click Stop while Buffalo Surveillance Server is exporting files, the export is
stopped, and not all of the files in the Export Queue are exported. However, files
that have already been completely exported will remain on the target computer.
Click Dismiss to close the job status box.
Customized Export Options
This section covers customized export options for Export Job Configuration.
Custom options are available only when an ExportExtensions.cfg file is in place.
The options in this frame appear when a custom option is available.
Custom export options are customizable via the ExportExtensions.cfg file at
<install-dir>\Config.
Click Export at the top of the application window. The Export window displays:
325
326
Buffalo Surveillance Server
Fields for Exporting to Custom Locations
Set the criteria for the following fields.
Field
How do you want to
export the files?
Meaning and Directions
Select the custom option.
The image above displays the arguments from the
sample ExportExtensions.cfg file.
Argument <1 - 8 >
If typing a number into a spin control manually,
press TAB or ENTER for the new number to take
effect.
Blank fields are ignored.
After setting the parameters, click Start Export to export videos. Buffalo
Surveillance Server begins to export files and a job status box appears in the Job
Status pane. While the job is running, Stop is active.
If you click Stop while Buffalo Surveillance Server is exporting files, the export is
stopped, and not all of the files in the Export Queue are exported. However, files
that have already been completely exported will remain on the target computer.
Click Dismiss to close the job status box.
ExportExtensions.cfg
This section is intended only for advanced users. It covers ExportExtensions.cfg, a text
file you can create to configure the fields that appear in the Export Job Configuration frame of
the Surveillance Video Manager.
You can create ExportExtensions.cfg using any text editor. Once created, it needs to be added
to the following path: <install-dir>\Config.
ExportExtensions.cfg is a block structured text file. At the end of this section, you will find a
sample ExportExtensions.cfg. You can implement the file as is (at the path noted above) to
see how it affects the Surveillance Video Manager, or modify the file to meet your own criteria
and then implement it.
Search for, Review, and Export Surveillance Videos and View Live Feeds: SVM
327
ExportExtensions.cfg comprises at least one or more ExportExtension block. An
ExportExtension block has two main sections: the "Command" section (from
"ExportExtension" to the command specification) and the "Query" block section. Pay particular
attention to braces [ ]; there needs to be an opening brace [ after "ExportExtensions" and a
closing brace ] after the last Query block.
It is best to avoid using characters that the Buffalo Surveillance Server interprets as
wildcards or as otherwise special. If you need to use a character literally that the Buffalo
Surveillance Server uses as a wildcard, the character must be preceded by an escape
character ( \ ).
For example, \*This is an example using escape characters in a statement with a
wildcard\*.
The following are Buffalo Surveillance Server wildcards and special characters:
?, *, #, !, ~, ^, &, [ ], { }, \, ".
See the Advanced Wildcard Functionality section for details about wildcards.
Command Section of the ExportExtension Block
The "Command" section includes the ExportExtension statement that defines the beginning of
an Export Extensions block and includes the command that will be executed as well as other
tokens:
ExportExtension # This identifies the beginning of the ExportExtension block.
[ # This is the opening brace for the ExportExtension block.
<token>=<value>
<token>=<value>
Command = <%# %# %# %# ... %U %M ...> # This is REQUIRED statement.
The following block name defines the beginning of an ExportExtension block in an
ExportExtensions.cfg file:
Block name
ExportExtension
Description
Identifies the beginning of an ExportExtension
block.
Required.
The command below is required.
328
Buffalo Surveillance Server
Note that the entire block will be ignored if there are fewer Query block statements than
%# in the Command. In other words, if you have three Query block sections and four %
#, the block will not be read.
Command
Description
Defines the command specification that will be
executed. Along with the command, the
command line must enumerate each Query
block. See the sample file below for an
illustration.
Required.
Command = <command specification>
%# (where # is a number) is the substitution
query value. Each %# enumerates a Query.
There should be one %# per Query. %# values
may be in any order. The command specification
cannot have more %# than Query statements.
However, you may specify only certain blocks
by omitting query numbers. For example, you
would include only query blocks 1, 3, and 7 by
using only <%1, %3, %7>
The following substitution tokens may also be in
the Command specification:
%U = User
%M = Host
%D = Date
%T = Time
%P = Pathname to where the files are to be
retrieved
%O = Filename containing list of files
in the export list.
You can use tokens to define optional functionality in the "Command" section. Unless noted
otherwise, tokens do not have to be present in the "Command" section. When tokens are
omitted, default values will be used. Include any of the following tokens when you want to use
non-default values:
Token/Value
DeleteWhenDone = <Boolean>
Description
Defines whether files will be deleted from the
local system when command is completed.
Search for, Review, and Export Surveillance Videos and View Live Feeds: SVM
Token/Value
Description
Valid values = true | false
Default = true
The tooltip for the label.
Description = <character string>
Default = ""
DestinationPathname = <pathname>
The pathname to where the files will be
exported.
Default = ""
FileNaming = <alpha>
Defines how files will be named.
Valid values = Original | AtSelection |
FilenameOnly".
Default = Original
Label = <character string>
The label found in the "How do you want to
export files?" box.
Default = Export Extension
When files will be overwritten.
Overwrite = <alpha>
Valid values = Never | Always | IfNewer
Default = Never
Defines if original security settings will be
restored.
RestoreSecurity = <Boolean>
Valid values = true | false
Default = true
Defines which times will be used.
RestoreTimes = <Boolean>
Valid values = true | false
Default = true
The Query Blocks Section of the ExportExtension Block
Query block statements describe the controls that will appear on the application. You may
have any number of queries.
329
330
Buffalo Surveillance Server
Query
[
<token>=<value>
<token>=<value>
<token>=<value>
<token>=<value>
<token>=<value>
<token>=<value>
]
Query
[
<token>=<value>
<token>=<value>
<token>=<value>
<token>=<value>
<token>=<value>
<token>=<value>
]
] # This is the closing brace for the ExportExtension block.
The following block name defines the beginning of a Query block in an ExportExtensions.cfg
file.
Block name
Description
Identifies the beginning of a Query block.
Query
Required
The following tokens can be used in Query blocks:
Token/Value
Description
Indicates whether the value may be left blank.
Valid for String and Pathname only.
BlankValueOk = <Boolean>
Valid values = true | false.
Default = true
Choice = <character string>
A choice statement to select. Valid only for
Choice. Must have at least one Choice.
These are the default values that load into the
control.
Valid values:
DefaultValue = <depends on token>
String type = a string
Pathname type = a string
Search for, Review, and Export Surveillance Videos and View Live Feeds: SVM
Token/Value
Description
Checkbox type = true | false
Spin type = a number between the LowerLimit
and UpperLimit
Choice type = a number
Default values:
String type = ""
Pathname type = ""
Checkbox type = true (checked)
Spin type = the lower limit
Choice type = 1
When typing a number into a spin control
manually, press the Tab key or the Enter
key for the new number to take effect.
This is the tooltip for the control.
Description = <character string>
Default = ""
The label for the control.
Label = <character string>
Default = ""
LowerLimit = <number>
Valid only for Spin. The lower limit for the spin
control.
Default = 0
The item's name.
Name = <character string>
Required
Default = ""
Defines the type of control.
Valid Values:
Type = <alpha>
String
Checkbox
Spin
331
332
Buffalo Surveillance Server
Token/Value
Description
Pathname
Choice
Default = none
UpperLimit = <number>
The upper limit for the spin control. Valid only for
Spin.
Default = lower limit + 100
Search for, Review, and Export Surveillance Videos and View Live Feeds: SVM
333
Sample ExportExtensions.cfg
# This is a sample of an ExportExtensions.cfg file.
#
ExportExtension # Required: This identifies the beginning of the ExportExtension
block.
[ # This is the opening brace for the ExportExtension block.
Label = Sample Value for the \"How do you want to export the retrieved files?\"
field.
Description = This is a sample of the description field for the Label.
Command = echo %1 %2 %3 %4 %5 %P %U %M %D %T
command that will be executed.
# Required: this is the
Query
[
Name
Type
Label
DefaultValue
BlankValueOk
Description
=
=
=
=
=
=
Name1
String
Sample String Label
This field can be left blank (\"\") or pre-populated
false
This is a sample of the \"Description\" field.
Name
Type
Label
DefaultValue
BlankValueOk
Description
=
=
=
=
=
=
Name2
Pathname
Sample Pathname Label
This field can be left blank (\"\") or pre-populated
false
This is a sample of the \"Description\" field.
Name
Type
Label
DefaultValue
BlankValueOk
Description
Choice
Choice
Choice
=
=
=
=
=
=
=
=
=
Name3
Choice
Sample Choice Label
2
true
This is a sample of the \"Description\" field.
Sample \"Choice\".
Sample \"Choice\".
Sample \"Choice\".
Name
Type
Label
DefaultValue
Description
=
=
=
=
=
Name4
Checkbox
Sample Checkbox Label
true
This is a sample of the \"Description\" field.
]
Query
[
]
Query
[
]
Query
[
]
334
Buffalo Surveillance Server
Query
[
Name
Type
Label
DefaultValue
Description
LowerLimit
UpperLimit
=
=
=
=
=
=
=
Name5
Spin
Sample Spin Label
26
This is a sample of the \"Description\" field.
0
100
]
] # This is the closing brace for the ExportExtension block.
Monitor the Information Repository: Network Activity & Vault Statistics
335
Monitor the Information Repository: Network Activity &
Vault Statistics
Network Activity graphically represents, in real-time, each client and Vault in the network.
Remember that a Vault is a storage device used to store files. The Vault drives the
storage device and provides memory resources for program execution, metadata
management, and continuous monitoring.
From your suite of product applications, open the Network Activity application (NetActivity.exe).
From Network Activity access Mini Vault Stats 338 to see high level vault activity information.
Every client and vault in the Information Repository is represented by a sphere and a label in
the Network Activity window. Clients appear when jobs are running and the activity is denoted
by dynamic lines connecting clients and vaults. As a job is running, move the mouse pointer
over the client symbol to view Job, User, and Status details. If you need to freeze the current
display of Network Activity, right-click and hold the application's title bar.
Move Vault Symbols
Using Network Activity, the Buffalo Surveillance Server generates and places Vault symbols
randomly. Move the Vaults within the window:
Position the cursor over the symbol until the hand cursor is displayed.
Click and hold the left mouse button and drag the Vault symbol to a new location.
Under the Advanced menu option, find controls that enable you to modify how Network
Activity's view of the network is updated.
336
Buffalo Surveillance Server
Updating Mode
Results
Update Fast
Increases screen update rate.
Force Vault Lookup
Forces update of view of Vaults in the network more
frequently.
Vault Expires Fast
Clears view of inactive Vault quickly.
Client Expires Fast
Clears view of inactive client quickly.
Key: Symbols, Colors, and Data Movement Direction
The following table details what the various colors of lines and shapes mean in Network
Activity.
Object
Meaning
The hand is displayed when the cursor is hovered over a
Vault label.
Right-click to open Mini Vault Stats 338 or standard Vault
Stats.
Double-click to open Mini Vault Stats.
Right-click and hold the application's title bar to freeze the
current image of network activity.
red circle
A Vault in the Information Repository.
yellow circle
A client in the Information Repository.
red line, pulsing
The Information Repository is waiting for offline media, and
operator intervention is required.
white line, pulsing
The Information Repository is waiting for a connection slot;
Normal activity.
green line, pulsing
The client is waiting for a unit of media to be moved into a
drive. This is mostly seen with tape and optical libraries.
white line, stationary
The client is connected and the connection is idle, waiting
for resources.
blue line, stationary
The client status is unknown.
Monitor the Information Repository: Network Activity & Vault Statistics
Object
Meaning
green line, moving
The Information Repository is transferring data; The direction
of line's movement indicates the direction the data is
moving.
blue line, moving
A media operation is in progress. Load, unload, prepare,
erase, etc.
337
338
Buffalo Surveillance Server
Mini Vault Stats
Mini Vault Stats provides a high level perspective of vault activity through a graphical display of
Vault performance when data is transferred from clients or between Vaults on the network.
To access Mini Vault Stats:
From Network Activity double-click a Vault label or symbol.
Or,
1. From Network Activity, move the mouse pointer over a Vault symbol, and right-click.
2. From the shortcut menu, select Mini Vault Stats.
On the Mini Vault Stats window the Files per Second monitors performance of data transfer
between vaults and the Mbytes per Second displays data transfer from clients.
The display at the bottom right of the Mini Vault Stats window, shows Nominal, Media Request,
or Trouble.
Nominal - Everything is okay.
Media Request - Request for offline media to be reloaded.
Trouble - Indicates a serious problem.
For more information see Network Activity 335
Launch Mini Vault Stats
From Network Activity, hover the mouse cursor over the symbol for the Vault for which you
want to launch Mini Vault Stats (the cursor will change from an arrow to a pointing hand)
Right-click the symbol using the right mouse button.
Select Mini Vault Stats from the available options. The Mini Vault Stats window appears.
Move Mini Vault Stats to a location on your monitor that allows you to see it and Network
Activity.
Monitor the Information Repository: Network Activity & Vault Statistics
Vault Stats
See Mini Vault Stats 338 .
339
340
Buffalo Surveillance Server
Buffalo Surveillance Server System Requirements
The Buffalo Surveillance Server fully manages data in an Information Repository comprising
computers equipped with diverse OSs, including Microsoft Windows 342 , Linux 343 , and
Macintosh OS X 342 . All data attributes, including streams, access forks, access control lists,
and rights are preserved by the Information Repository. Regardless of which OS you are
running, you will need a keyboard and monitor to run the Buffalo Surveillance Server. If you are
running a Buffalo Surveillance Server application, you will also need a pointing device such as a
mouse. If you are using a single-button mouse, press Control+click where the documentation
states "right-click."
Buffalo Surveillance Server processes will run less than optimally if your hardware does
not meet or exceed requirements.
The appearance of Buffalo Surveillance Server applications will vary slightly depending on
the platform on which they are installed. For example, where the Window's application
menu displays Exit, the Macintosh application menu displays Quit.
Retrieval of files requires TCP/IP - Ethernet Network Protocol.
Supported Configurations
Buffalo Surveillance Server Vaults support many different types of storage hardware. The
following table covers a few of the device technologies that the Buffalo Surveillance Server
supports.
Hard Disk
The Buffalo Surveillance Server uses an assigned portion of a computer’s file
system disk space when a hard disk based Vault is set up. Space in this dynamic
media environment can be added or removed very easily using the media
management tools in Vault Admin.
Tape Stackers, Changers, Auto-loaders, and Libraries
A tape automation system is a single unit of equipment with one or more tape drives and
internal shelves or slots in which several units of media are stored. Tape automation
systems contain robotic systems that move media between storage slots and the drives.
These units range from single drive systems, with just a few tape slots, to large, truck
shipped systems that can accommodate over 100 drives and thousands of tapes.
Tape automation systems fit into two basic categories:
Stackers and changers are sequential automation systems. They are designed to
change tapes in a sequence, from 1 through x.
Buffalo Surveillance Server System Requirements
Auto loaders and libraries move media as tasked by the host system.
SCSI 2 Compliant Auto Loaders & Libraries
This category encompasses almost all tape automation systems created within the last
decade.
Single, "standalone" Tape Drives
This device manages a single tape at a time without using robotics.
341
342
Buffalo Surveillance Server
Installation Hardware & Software Requirements
Windows
Server Not applicable.
Client
OS Requirements: Windows Server 2003 SP2; Windows XP SP3; Windows Vista SP2
(32-bit and 64-bit); Windows 7 SP1 (32-bit and 64-bit); Windows Server 2008 SP2 (32-bit
and 64-bit).
Processor Requirements: Intel Dual Core 2.20 GHz or better.
Hard Drive Requirements: 10 GB of available space to install and run the product.
Memory Requirements: 2 GB of RAM.
Third Party Requirements: Apple QuickTime 7.7.1; VideoLAN's VLC media player
(VLC 1.1.11). Apple QuickTime is recommended for viewing production videos and VLC is
recommended for viewing surveillance videos.
If you are using VLC media player, it must be installed in the default location.
M acintosh
ServerNot applicable.
Client
OS Requirements: Mac OS X 10.5.8 or newer.
Processor Requirements: Intel Dual Core 2.20 or better..
Hard Drive Requirements: 10 GB of available space to install and run the product.
Memory Requirements: 2 GB of RAM.
Third party Recommendation: VideoLAN media player (VLC 1.1.10).
If you are using VLC media player, it must be installed in the /Applications folder.
Buffalo Surveillance Server System Requirements
Linux:
ServerNot applicable.
Client
OS Requirements: Red Hat 7.2 or better; Fedora Core 12 or better.
Processor Requirements: Intel Pentium IV 3.40 GHz or better
Hard Drive Requirements: 10 GB of available space to install and run the product
Memory Requirements: 2 GB of RAM.
Third party Requirements: None.
343
344
Buffalo Surveillance Server
Product Licensing
Get started with Buffalo Surveillance Server by purchasing a product license.
Product License
Product licensing is based on storage capacity and the number of cameras associated to a
recording computer. The server and recording computer are your NAS unit. Each Vault within
your Information Repository requires a storage license to store video on a Vault, and every
recording computer requires a camera license to record video.
Licenses for your products are tied to the computer where they were activated. You can move
licenses between computers by requesting a new product key. Optional available licensed uses
include: Data Service Policies, Vault platform devices, surveillance, or module extensions
(Milestone, OnSSI).
The following is a breakdown of the two types of licensing:
Capacity licensing – This license is used to increase Vault storage capacity for storing
video, such as terabyte for hard disk storage or slot count for data tape storage device.
Camera licensing – This license is used to allocate the number of cameras used to capture
video per recording computer.
These licenses can be bundled together to achieve your needed storage capacity or camera
count.
Run as many Buffalo Surveillance Server software clients as you need on the network at no
additional charge. Every Buffalo Surveillance Server comes with a single camera license and a
storage license which must be activated.
Your licenses are managed through the Vault Admin, to activate or add a license see Vault
Admin > Actions > Vault Properties > License 219 .
Add or Remove Vaults
Add or Remove Vaults
IMPORTANT NOTE: If you are using the Buffalo Surveillance Server Vaults and media are
preconfigured and prepared automatically; there is no need to perform any Vault operations. The
information in this Vault Admin section is provided for information only.
Since your Buffalo Surveillance Server clients are already configured for use upon installation,
this section deals only with the addition and removal of Vaults.
If you want to change Vault settings, including security, logs, notifications,
diagnostics, memory allocation for devices, database optimization parameters,
and licensing after you have installed a Vault, see the section titled Vault
Properties 211 .
You must have administrative rights to add a Vault.
All devices running the Buffalo Surveillance Server must be time synchronized. If they
are not, unexpected results may occur.
Add Vaults Overview
Work through the following steps to add Vaults to your Information Repository:
Add Vaults 346 . See Add a Hard Disk Vault 349 , Add a Tape Library 359 , or Add a Standalone
Tape Drive 372 .
Reboot the computer with added Vaults. To rename a Vault, use Vault Admin 204 > Actions
> Change Vault's Properties 211 .
Prepare media 235 using Vault Admin 204 .
Vault Considerations
Vaults are installed on computers to control and manage storage devices. The computer
hosting a Vault needs adequate resources to operate and manage the storage device, and
considerations should be made for growth and scale. As the amount of data being stored
increases, the volume of entries in the Vault catalog also increases. Vaults that use high
capacity storage devices need system resources that can accommodate larger catalogs.
345
346
Buffalo Surveillance Server
Consideration
Calculating Needed
Memory for the Vault
Catalog
Date and Time Properties
on Computers with Vaults
Hosting More than a
Single Vault on One
Computer
Starting or Restarting
Vaults Manually
Details
The Vault catalog requires about 2% of the total amount
of available storage space.
All computers in the Information Repository that contain
Vaults and any VMS system that video is captured from
must be synchronized to the same time source for the
Information Repository to function correctly.
A single computer can host up to four Vaults as long as
it is equipped with enough processor power, memory,
and disk space to accommodate the needs of the
storage Vaults. This type of configuration is common in
smaller environments where a disk-based and a tapebased Vault are both configured on a single computer.
If Vaults that you have added to the Information
Repository are not visible to the Information Repository,
you may have to start them manually. See Vault Admin
> Start Vaults 258 in the User's Guide.
.
Security/Rights
When you add a Vault, it is accessible to all users. To
change Vault rights, use Vault Admin > Vault
Properties > Security 222 .
Remove Vaults Overview
Remove Vaults 384 . See Removing Vaults from the Information Repository 384 .
Reboot the computer to which you have added Vaults.
Add or Remove Vault Wizard
Use the Buffalo Surveillance Server Add or Remove Vault Wizard to add or remove a Buffalo
Surveillance Server hard disk Vault, standalone tape Vault, or tape library Vault. This section
leads you through the first few windows of the Add or Remove Vault wizard in advanced user
mode. Unless you are an advanced user and have clearly defined reasons for changing the
default values, it is best to use default values, leaving advanced user mode unchecked. After
adding a Vault, see the Vault Admin, Prepare Media 235 section to add media to your Vault and
information repository.
Add or Remove Vaults
If you are running the wizard in standard mode, some of the windows shown below will
not be included.
Launch
34
the Add or Remove Vault Wizard. The Welcome window appears:
Click [ Next > ]. The Add or Remove window appears.
If there are four Vaults installed on the computer where the wizard is run from, then Add
new Vault to this computer is disabled. In that case, delete a Vault before adding a new
one.
Select Add a new Vault to this computer or Remove an existing Vault from this
computer. Select Run this wizard in advanced mode if you are an advanced user and
want to set parameters instead of using default settings.
347
348
Buffalo Surveillance Server
If you are removing a Vault, go to Removing Vaults from the Information Repository 384 ,
otherwise see the next step.
Click [ Next > ]. The Description window appears:
Enter the following in the Description window:
Field
Directions
What type of device will
be used to store data?
Select Hard Disk, Tape Library, or Standalone Tape
Drive.
What is the name of this
Vault?
Enter a name for the Vault.
Click [ Next > ].
Go to Add a Hard Disk Vault 351 , Add a Tape Library 361 , or Add a Standalone Tape Drive 374
in this guide, depending on what type of Vault you are adding.
Add or Remove Vaults
349
Add a Hard Disk Vault
IMPORTANT NOTE: If you are using the Buffalo Surveillance Server Vaults and media are
preconfigured and prepared automatically; there is no need to perform any Vault operations. The
information in this Vault Admin section is provided for information only.
Use the Buffalo Surveillance Server Add or Remove Vault Wizard to add a Buffalo
Surveillance Server hard disk Vault to the Information Repository. This section leads you
through the Add or Remove Vault Wizard in advanced user mode. Unless you are an
advanced user and have clearly defined reasons for changing the default values, it is best to
use default values, leaving advanced user mode unchecked. After adding a Vault, see the
Vault Admin, Prepare Media 235 section to add media to your Vault and Information Repository.
All devices running the Buffalo Surveillance Server must be time synchronized. If they are not, unexpected
results may occur.
If you are running the wizard in standard mode, some of the windows shown below will
not be included.
If you want to change Vault settings, including security, logs, notifications, diagnostics, memory
allocation for devices, database optimization parameters, and licensing after you have installed a
Vault, see the section titled Vault Properties 211 .
Launch
34
the Add or Remove Vault Wizard. The Welcome window appears:
Click [ Next > ]. The Add or Remove window appears.
350
Buffalo Surveillance Server
If there are four Vaults installed on the computer where the wizard is run from, then Add
new Vault to this computer is disabled. In that case, delete a Vault before adding a new
one.
Select Add a new Vault to this computer. Select Run this wizard in advanced mode if
you are an advanced user and want to set parameters instead of using defaults settings. The
rest of this section assumes that Run this wizard in advanced user mode has been
selected.
Click [ Next > ]. The Description window appears:
Enter the following in the Description window:
Add or Remove Vaults
Field
Directions
What type of device will
be used to store data?
Select Hard Disk.
What is the name of this
Vault?
Enter a name for the Vault, or use the default if the field
is already populated.
Click [ Next > ]. The Device window (advanced mode only) appears. The Device window
enables you to define how many data streams are allowed simultaneously and how many
files are kept in a directory. The options are detailed below.
Enter the following in the Device window:
Field
Meaning
How many data streams
are allowed at a time?
"Data streams" refers to how many connections can be
made to a Vault simultaneously. Having several
connections enables several clients to communicate with
the Vault simultaneously, so the more streams you permit
the greater the requirements for processing power.
How much memory
should be used for each
data stream cache?
This setting defines how much virtual memory is set aside
for incoming and outgoing data during file storage and
retrieval. A larger cache may improve performance but will
do so at the expense of using more virtual memory. The
total amount of space used equals the number of data
streams multiplied by the selected cache size. So, if you
select 10 data streams and 10 MB of cache, the Vault will
set aside 100 MB of total virtual memory for caching data.
A selection of 10 MB is usually sufficient.
351
352
Buffalo Surveillance Server
Field
Meaning
Data is stored in files in the Vault. More files enable you
store more data per unit of media, but more files also slow
down Information Repository performance. Choose a value
that meets but does not exceed your needs. The following
table details the number of files that correlates with each
value.
When storing data, how
many files will be kept
in a directory?
Value
Number of Files
50
125 billion
100
250 billion
150
375 billion
200
500 billion
300
750 billion
400
1 trillion
500
125 trillion
Where will media be
stored by default?
"Default location" defines where, by default, media will be
stored and managed. Wherever in Buffalo Surveillance
Server there is an option to use a default location, Buffalo
Surveillance Server will use the default location.
Where can temporary
files be stored?
This setting enables you to define where the working
cache will be located. The default location is '<install-dir>/
WorkingCache'.
When Buffalo Surveillance Server is processing files, it
sometimes creates temporary files. These enable Buffalo
Surveillance Server to work more quickly and efficiently
and are especially important when you are clipping video
files. Temporary files are kept in the "working cache."
If you do not want to use the location chosen by Buffalo
Surveillance Server, you can chose an alternate location
by clicking [ < Browse ].
This setting can be changed with Vault Admin >
Vault Properties > Devices 213 at a later time.
How much disk space
can be used for storing
temporary files?
This setting defines how much working cache space
Buffalo Surveillance Server will be permitted to use for
temporary files.
Add or Remove Vaults
Field
Meaning
This setting can be changed with Vault Admin >
Vault Properties > Devices 213 at a later time.
Click [ Next > ]. The Database window (advanced mode only) appears. This is the
database that keeps track of Vault contents, information, and metadata. Define where the
Vault database resides, the time of day for database optimization, how many database files
can be opened simultaneously, and how much virtual memory the database can use. These
options are detailed below.
Enter or select the following in the Database window:
Field
Meaning
Where will the database This field enables you to set the location on the hard disk
be stored?
where the database will be stored.
At what time daily do
you want the database
optimized?
This option enables you to set how often the database will
be optimized. To ensure that Buffalo Surveillance Server
and your Information Repository continue to function
optimally, the database for every Vault is optimized daily.
This option enables you to limit how many files may be
How many database
open simultaneously. Having more files open enables
files can be opened at a
Buffalo Surveillance Server to search faster. However, more
time?
files require more Information Repository resources.
353
354
Buffalo Surveillance Server
Field
How much virtual
memory can the
database use?
Meaning
This option enables you to limit how much virtual memory
the database will use. For best Information Repository
performance, choose a value that does not exceed 75% of
the physical memory on the computer.
Click [ Next > ]. The Logs window (advanced mode only) appears. Use to define to where
activity and error logs are written.
Enter or select the following in the Logs window:
Field
Meaning and Directions
This checkbox will enable activity logging and the activity
log fields listed below. If unchecked, Buffalo Surveillance
Server will not create activity logs.
Enable activity logging.
Buffalo Surveillance Server supports event auditing,
providing a security audit trail, through activity logs.
Activity logs include following events: Vault start, Vault
stop, file read, file write, file create, file delete, media load,
media unload, and media erase. For these events, the
following information is recorded: name and IP of the user
who executed the event and the date and time the event
was executed. Activity logging is optional.
Buffalo Surveillance Server creates activity logs in tabdelimited format. Consequently, logs can be imported into
any application that supports the tab-delimited format,
such as Microsoft Excel.
Add or Remove Vaults
Field
Meaning and Directions
This field defines to where your activity logs will be written.
Where should the
activity log be stored?
How large can the
activity log grow?
Overwrite the activity
log when it reaches
maximum size?
Use [ < Browse ] to launch the Activity Log Location
window. Then, select a location.
This option defines the maximum size to which the activity
log will be permitted to grow. It is important to limit the
size of the activity log because it may be difficult to find
needed the information in an overly large activity log.
This option enables you to overwrite the existing activity
log. Overwriting the activity log prevents activity log
proliferation.
If you select No for this option, a new activity log will be
created whenever the current activity log reaches the
maximum size you defined in the previous field.
Error logs are created only when a Buffalo Surveillance
Server Vault encounters a problem. Error logs include
warning and Vault start and Vault stop information. Buffalo
Surveillance Server supports error logging for every Vault in
your Information Repository, and error logging is always
enabled.
Where should the error
log be stored?
This field enables you to define where error logs will be
stored. Where "activity logs" record all Buffalo Surveillance
Server activity, "error logs" record only events that have
gone wrong. Be sure to remember where you are storing
your error logs so that you can refer to them should an
error condition occur during Buffalo Surveillance Server
processing.
Use [ < Browse ] to launch the Error Log Location
window. Then, select a location.
355
356
Buffalo Surveillance Server
Click [ Next > ]. The Notification window appears. Use to define where e-mails about
Information Repository events are sent and where Buffalo Surveillance Server events should
be logged.
Enter or select the following in the Notification window:
Field
Meaning and Directions
Enable optional email notifications and the email
notification fields listed below.
Enable email
notification.
Who should receive
email notifications?
When enabled, receive an email whenever an event occurs
of interest for managing a Vault. These events include
Vault start, Vault stop, media requests, etc., and are the
same as those recorded for notifications.
Type the email address of the user receiving email
notifications about Buffalo Surveillance Server events.
The address of your mail server. Use either IP address or
computer name.
What is the name or IP
the address of your mail
server?
Click Send Test Email to test the path.
Buffalo Surveillance Server does not test valid
parameters here. If an invalid IP address or computer
name is entered, email notifications do not work.
Where should events be Define where events are logged.
logged? (advanced
mode only)
Add or Remove Vaults
Field
Meaning and Directions
Computer Console causes events to be logged in a
console that appears on the computer monitor. It remains
open as long as the Vault is running. If the Vault is
stopped, the console disappears. If the Vault is restarted,
the console disappears and then reappears.
Window causes events to be logged in a window that
appears on the computer monitor. This window remains
open as long as the Vault is running. If the Vault is
stopped, the window disappears. If the Vault is restarted,
the window disappear and then reappears.
If you select Computer Console or Window in a
Windows environment, configure Vault service on
Windows to open a window on the desktop for
diagnostic messages. For directions, see section,
"Configure Vault Service on Windows to Open a
Window on the Desktop for Diagnostic Messages".
Once configured, Vault activity displays.
If you close a window or console, the Vault stops.
Buffalo Surveillance Server does not operate without
running Vaults.
File will cause events to be logged to a file. If you select
this option, you will need to enter or [ < Browse ] to the
location to which you want events logged.
357
358
Buffalo Surveillance Server
Click [ Next > ]. The Ready to Add window appears. Use to review the parameters for the
new Vault before actually adding the Vault.
Review the displayed summary and ensure that all of the values are correct.
When ready to add the new Vault, click Next. The Completed window appears.
Click Finish to exit the Add or Remove Vault Wizard. Restart the computer for the new Vault
activation. To add another Vault or remove a Vault, launch the Add or Remove Vault Wizard
again.
If you do not restart your computer, the new Vault will not start or be available for use.
After restarting your computer, Launch Vault Admin 204 to prepare media 235 for the Vault just
added. See the Administrator's Guide > Vault Admin > Actions > Prepare Media for
directions.
Add or Remove Vaults
359
Add a Tape Library
IMPORTANT NOTE: If you are using the Buffalo Surveillance Server Vaults and media are
preconfigured and prepared automatically; there is no need to perform any Vault operations. The
information in this Vault Admin section is provided for information only.
Use the Buffalo Surveillance Server Add or Remove Vault Wizard to add a Buffalo
Surveillance Server Vault to a tape library. This section leads you through the Add or Remove
Vault Wizard in advanced user mode. Unless you are an advanced user and have clearly
defined reasons for changing the default values, it is best to use default values, leaving
advanced user mode unchecked. After adding a Vault, see the Vault Admin, Prepare Media 235
section to add media to your Vault and information repository.
All devices running the Buffalo Surveillance Server must be time synchronized. If they are not, unexpected
results may occur.
If you are running the wizard in standard mode, some of the windows shown below will
not be included.
Before adding a Vault to a tape library in a Windows environment, disable the tape library
and tape drives within the tape library in the Windows Device Manager so Windows does
not interfere with Buffalo Surveillance Server's management of the device. For directions
on how to disable a tape library, see the section titled Disable a SCSI Devices on a
Windows Computer 369 .
If you want to change Vault settings, including security, logs, notifications, diagnostics, memory
allocation for devices, database optimization parameters, and licensing after you have installed a
Vault, see the section titled Vault Properties 211 .
Launch
34
the Add or Remove Vault Wizard. The Welcome window appears:
360
Buffalo Surveillance Server
Click [ Next > ]. The Add or Remove window appears.
If there are four Vaults installed on the computer where the wizard is run from, then Add
new Vault to this computer is disabled. In that case, delete a Vault before adding a new
one.
Select Add a new Vault to this computer. Select Run this wizard in advanced mode if
you are an advanced user and want to set parameters instead of using defaults settings. The
rest of this section assumes that Run this wizard in advanced user mode has been
selected.
Click [ Next > ]. The Description window appears:
Enter the following in the Description window:
Add or Remove Vaults
Field
Directions
What type of device will
be used to store data?
Select Tape Library.
What is the name of this
Vault?
Enter a name for the Vault, or use the default if the field
is already populated with a name you want to use.
Click [ Next > ]. The Device window appears. Use to select a tape drive or tape library
(depending on selection in the Description window).
Field
Devices Found
Directions
Select a device. If no devices are listed, ensure that the
tape drive is connected to your computer and powered
on. If you are adding a Vault to a Windows computer,
ensure that the device or devices are disabled in the
Windows Device Manager 369 . Then, click [ Look for
Devices ] to refresh the list.
Some tape libraries do not support automatic detection of
their tape drives. In such cases, the phrase
"(drives need to be identified)" will appear to the right
of the device name. When you click [ Next ] , you will
need to select the drives.
361
362
Buffalo Surveillance Server
Field
How much memory
should be used for each
data stream cache
Where can temporary
files be stored?
Directions
Select How much memory should be used for each
data stream cache. This setting defines how much
virtual memory is set aside for incoming and outgoing
data during file storage and retrieval. A larger cache
may improve performance but will do so at the expense
of using more virtual memory. The total amount of
space used equals the number of tapes in the library
multiplied by the selected cache size. So, if you select
10 data streams and 10 MB of cache, the Vault will set
aside 100 MB of total virtual memory for caching data.
A selection of 10 MB is usually sufficient.
This setting enables you to define where the working
cache will be located. The default location is '<install-dir>/
WorkingCache'.
When Buffalo Surveillance Server is processing files, it
sometimes creates temporary files. These enable Buffalo
Surveillance Server to work more quickly and efficiently
and are especially important when you are clipping video
files. Temporary files are kept in the "working cache."
If you do not want to use the location chosen by Buffalo
Surveillance Server, you can chose an alternate location
by clicking [ < Browse ].
This setting can be changed with Vault Admin >
Vault Properties > Devices 213 at a later time.
How much disk space
can be used for storing
temporary files?
This setting defines how much working cache space
Buffalo Surveillance Server will be permitted to use for
temporary files.
The working cache should be large enough to hold
multiple large video files. The default size is 100 GB.
This setting can be changed with Vault Admin >
Vault Properties > Devices 213 at a later time.
Click [ Next > ]. If the tape library was not able to provide the identification for its tape drives,
the screen below appears. If the device was able to identify its tape drive, then the next
wizard window appears.
Add or Remove Vaults
Field
Drives to identify
(Drive #1
Drive #2, etc.)
Directions
Identify each drive by selecting it from the associated
drop down list.
363
364
Buffalo Surveillance Server
Click [ Next > ]. The Database window (advanced mode only) appears. This is the
database that keeps track of Vault contents, information, and metadata. Define where the
Vault database resides, the time of day for database optimization, how many database files
can be opened simultaneously, and how much virtual memory the database can use. These
options are detailed below.
Enter or select the following in the Database window:
Field
Meaning
Where will the database This field enables you to set the location on the hard disk
be stored?
where the database will be stored.
At what time daily do
you want the database
optimized?
This option enables you to set how often the database will
be optimized. To ensure that Buffalo Surveillance Server
and your Information Repository continue to function
optimally, the database for every Vault is optimized daily.
This option enables you to limit how many files may be
How many database
open simultaneously. Having more files open enables
files can be opened at a
Buffalo Surveillance Server to search faster. However, more
time?
files require more Information Repository resources.
How much virtual
memory can the
database use?
This option enables you to limit how much virtual memory
the database will use. For best Information Repository
performance, choose a value that does not exceed 75% of
the physical memory on the computer.
Add or Remove Vaults
Click [ Next > ]. The Logs window (advanced mode only) appears. Use to define to where
activity and error logs are written.
Enter or select the following in the Logs window:
Field
Meaning and Directions
This checkbox will enable activity logging and the activity
log fields listed below. If unchecked, Buffalo Surveillance
Server will not create activity logs.
Enable activity logging.
Buffalo Surveillance Server supports event auditing,
providing a security audit trail, through activity logs.
Activity logs include following events: Vault start, Vault
stop, file read, file write, file create, file delete, media load,
media unload, and media erase. For these events, the
following information is recorded: name and IP of the user
who executed the event and the date and time the event
was executed. Activity logging is optional.
Buffalo Surveillance Server creates activity logs in tabdelimited format. Consequently, logs can be imported into
any application that supports the tab-delimited format,
such as Microsoft Excel.
This field defines to where your activity logs will be written.
Where should the
activity log be stored?
Use [ < Browse ] to launch the Activity Log Location
window. Then, select a location.
365
366
Buffalo Surveillance Server
Field
How large can the
activity log grow?
Overwrite the activity
log when it reaches
maximum size?
Meaning and Directions
This option defines the maximum size to which the activity
log will be permitted to grow. It is important to limit the
size of the activity log because it may be difficult to find
needed the information in an overly large activity log.
This option enables you to overwrite the existing activity
log. Overwriting the activity log prevents activity log
proliferation.
If you select No for this option, a new activity log will be
created whenever the current activity log reaches the
maximum size you defined in the previous field.
Error logs are created only when a Buffalo Surveillance
Server Vault encounters a problem. Error logs include
warning and Vault start and Vault stop information. Buffalo
Surveillance Server supports error logging for every Vault in
your Information Repository, and error logging is always
enabled.
Where should the error
log be stored?
This field enables you to define where error logs will be
stored. Where "activity logs" record all Buffalo Surveillance
Server activity, "error logs" record only events that have
gone wrong. Be sure to remember where you are storing
your error logs so that you can refer to them should an
error condition occur during Buffalo Surveillance Server
processing.
Use [ < Browse ] to launch the Error Log Location
window. Then, select a location.
Add or Remove Vaults
Click [ Next > ]. The Notification window appears. Use to define where e-mails about
Information Repository events are sent and where Buffalo Surveillance Server events should
be logged.
Enter or select the following in the Notification window:
Field
Meaning and Directions
Enable optional email notifications and the email
notification fields listed below.
Enable email
notification.
Who should receive
email notifications?
When enabled, receive an email whenever an event occurs
of interest for managing a Vault. These events include
Vault start, Vault stop, media requests, etc., and are the
same as those recorded for notifications.
Type the email address of the user receiving email
notifications about Buffalo Surveillance Server events.
The address of your mail server. Use either IP address or
computer name.
What is the name or IP
the address of your mail
server?
Click Send Test Email to test the path.
Buffalo Surveillance Server does not test valid
parameters here. If an invalid IP address or computer
name is entered, email notifications do not work.
Where should events be Define where events are logged.
logged? (advanced
mode only)
367
368
Buffalo Surveillance Server
Field
Meaning and Directions
Computer Console causes events to be logged in a
console that appears on the computer monitor. It remains
open as long as the Vault is running. If the Vault is
stopped, the console disappears. If the Vault is restarted,
the console disappears and then reappears.
Window causes events to be logged in a window that
appears on the computer monitor. This window remains
open as long as the Vault is running. If the Vault is
stopped, the window disappears. If the Vault is restarted,
the window disappear and then reappears.
If you select Computer Console or Window in a
Windows environment, configure Vault service on
Windows to open a window on the desktop for
diagnostic messages. For directions, see section,
"Configure Vault Service on Windows to Open a
Window on the Desktop for Diagnostic Messages".
Once configured, Vault activity displays.
If you close a window or console, the Vault stops.
Buffalo Surveillance Server does not operate without
running Vaults.
File will cause events to be logged to a file. If you select
this option, you will need to enter or [ < Browse ] to the
location to which you want events logged.
Click [ Next > ]. The Ready to Add window appears. Use to review the parameters for the
new Vault before actually adding the Vault.
Review the displayed summary and ensure that all of the values are correct.
Add or Remove Vaults
When ready to add the new Vault, click Next. The Completed window appears.
Click Finish to exit the Add or Remove Vault Wizard. Restart the computer for the new Vault
activation. To add another Vault or remove a Vault, launch the Add or Remove Vault Wizard
again.
If you do not restart your computer, the new Vault will not start or be available for use.
After restarting your computer, Launch Vault Admin 204 to prepare media 235 for the Vault just
added. See the Administrator's Guide > Vault Admin > Actions > Prepare Media for
directions.
Disable SCSI Devices on a Windows Computer
IMPORTANT NOTE: If you are using the Buffalo Surveillance Server Vaults and media are
preconfigured and prepared automatically; there is no need to perform any Vault operations. The
information in this Vault Admin section is provided for information only.
To ensure that Windows does not interfere with Buffalo Surveillance Server's management of
SCSI tape drives and libraries ("Medium Changers"), disable Windows' use of these devices.
This is done via the Windows Device Manager.
Disabling these devices in the Windows Device Manager only disables Windows use of
the device and does not affect Buffalo Surveillance Server's use of the device.
Devices that are active (not disabled) in Windows will not be visible to or used by Buffalo
Surveillance Server.
To access the Device Manager:
Click Start on the Windows desktop.
Right-click My Computer.
Click Manage. The Computer Management window appears.
369
370
Buffalo Surveillance Server
In the left pane of Computer Management, click Device Manager:
In the right pane, find the tape drive or tape library installed on the computer.
Right-click the tape drive, and then select Properties.
If running a tape library, be sure to disable the tape library ("Medium Changers") and the
actual tape drives in the library. Repeat the disabling process for each tape drive within
the library.
Add or Remove Vaults
The Tape Drive Properties window appears:
Under Device Usage, click the down arrow, and select Do not use this device (disable).
Click OK. The Tape Drive Properties window closes, and the icon for the device in the right
pane of Computer Management should now have
superimposed upon it:
. The tape drive is now disabled.
371
372
Buffalo Surveillance Server
Add a Standalone Tape Drive Vault
IMPORTANT NOTE: If you are using the Buffalo Surveillance Server Vaults and media are
preconfigured and prepared automatically; there is no need to perform any Vault operations. The
information in this Vault Admin section is provided for information only.
Use the Buffalo Surveillance Server Add or Remove Vault Wizard to add a Buffalo
Surveillance Server Vault to a standalone tape drive. This section leads you through the Add or
Remove Vault Wizard in advanced user mode. Unless you are an advanced user and have
clearly defined reasons for changing the default values, it is best to use default values, leaving
advanced user mode unchecked. After adding a Vault, see the Vault Admin, Prepare Media 235
section to add media to your Vault and information repository.
All devices running the Buffalo Surveillance Server must be time synchronized. If they are not, unexpected
results may occur.
If you are running the wizard in standard mode, some of the windows shown below will
not be included.
Before adding a standalone tape drive Vault in a Windows environment, disable the
device in the Windows Device Manager so Windows does not interfere with Buffalo
Surveillance Server's management of the device. For directions on how to disable a tape
drive, see the section titled Disable a SCSI Devices on a Windows Computer 381 .
If you want to change Vault settings, including security, logs, notifications, diagnostics, memory
allocation for devices, database optimization parameters, and licensing after you have installed a
Vault, see the section titled Vault Properties 211 .
Launch
34
the Add or Remove Vault Wizard. The Welcome window appears:
Add or Remove Vaults
Click [ Next > ]. The Add or Remove window appears.
If there are four Vaults installed on the computer where the wizard is run from, then Add
new Vault to this computer is disabled. In that case, delete a Vault before adding a new
one.
Select Add a new Vault to this computer. Select Run this wizard in advanced mode if
you are an advanced user and want to set parameters instead of using defaults settings. The
rest of this section assumes that Run this wizard in advanced user mode has been
selected.
Click [ Next > ]. The Description window will appear:
Enter the following in the Description window:
373
374
Buffalo Surveillance Server
Field
Directions
What type of device will
be used to store data?
Select Standalone Tape Drive.
What is the name of this
Vault?
Enter a name for the Vault, or use the default if the field
is already populated with a name you want to use.
Click [ Next > ]. The Device window appears. Use to select a tape drive or tape library
(depending on the selection in the Description window).
Enter the following in the Device window:
Field
Directions
Devices Found
Select a device. If no devices are listed, ensure that the
tape drive is connected to your computer and powered
on. If you are adding a Vault to a Windows computer,
ensure that the device is disabled in the Windows
Device Manager 369 . Then, click [ Look for Devices ]
to refresh the list.
How much memory
should be used for each
data stream cache
Select How much memory should be used for each
data stream cache. This setting defines how much
virtual memory is set aside for incoming and outgoing
data during file storage and retrieval. A larger cache
may improve performance but will do so at the expense
of using more virtual memory. A selection of 10 MB is
usually sufficient.
Add or Remove Vaults
Field
Where can temporary
files be stored?
Directions
This setting enables you to define where the working
cache will be located. The default location is '<install-dir>/
WorkingCache'.
When Buffalo Surveillance Server is processing files, it
sometimes creates temporary files. These enable Buffalo
Surveillance Server to work more quickly and efficiently
and are especially important when you are clipping video
files. Temporary files are kept in the "working cache."
If you do not want to use the location chosen by Buffalo
Surveillance Server, you can chose an alternate location
by clicking [ < Browse ].
This setting can be changed with Vault Admin >
Vault Properties > Devices 213 at a later time.
How much disk space
can be used for storing
temporary files?
This setting defines how much working cache space
Buffalo Surveillance Server will be permitted to use for
temporary files.
The working cache should be large enough to hold
multiple large video files. The default size is 100 GB.
This setting can be changed with Vault Admin >
Vault Properties > Devices 213 at a later time.
375
376
Buffalo Surveillance Server
Click [ Next > ]. The Database window (advanced mode only) appears. This is the
database that keeps track of Vault contents, information, and metadata. Define where the
Vault database resides, the time of day for database optimization, how many database files
can be opened simultaneously, and how much virtual memory the database can use. These
options are detailed below.
Enter or select the following in the Database window:
Field
Meaning
Where will the database This field enables you to set the location on the hard disk
be stored?
where the database will be stored.
At what time daily do
you want the database
optimized?
This option enables you to set how often the database will
be optimized. To ensure that Buffalo Surveillance Server
and your Information Repository continue to function
optimally, the database for every Vault is optimized daily.
This option enables you to limit how many files may be
How many database
open simultaneously. Having more files open enables
files can be opened at a
Buffalo Surveillance Server to search faster. However, more
time?
files require more Information Repository resources.
How much virtual
memory can the
database use?
This option enables you to limit how much virtual memory
the database will use. For best Information Repository
performance, choose a value that does not exceed 75% of
the physical memory on the computer.
Add or Remove Vaults
Click [ Next > ]. The Logs window (advanced mode only) appears. Use to define to where
activity and error logs are written.
Enter or select the following in the Logs window:
Field
Meaning and Directions
This checkbox will enable activity logging and the activity
log fields listed below. If unchecked, Buffalo Surveillance
Server will not create activity logs.
Enable activity logging.
Buffalo Surveillance Server supports event auditing,
providing a security audit trail, through activity logs.
Activity logs include following events: Vault start, Vault
stop, file read, file write, file create, file delete, media load,
media unload, and media erase. For these events, the
following information is recorded: name and IP of the user
who executed the event and the date and time the event
was executed. Activity logging is optional.
Buffalo Surveillance Server creates activity logs in tabdelimited format. Consequently, logs can be imported into
any application that supports the tab-delimited format,
such as Microsoft Excel.
This field defines to where your activity logs will be written.
Where should the
activity log be stored?
Use [ < Browse ] to launch the Activity Log Location
window. Then, select a location.
377
378
Buffalo Surveillance Server
Field
How large can the
activity log grow?
Overwrite the activity
log when it reaches
maximum size?
Meaning and Directions
This option defines the maximum size to which the activity
log will be permitted to grow. It is important to limit the
size of the activity log because it may be difficult to find
needed the information in an overly large activity log.
This option enables you to overwrite the existing activity
log. Overwriting the activity log prevents activity log
proliferation.
If you select No for this option, a new activity log will be
created whenever the current activity log reaches the
maximum size you defined in the previous field.
Error logs are created only when a Buffalo Surveillance
Server Vault encounters a problem. Error logs include
warning and Vault start and Vault stop information. Buffalo
Surveillance Server supports error logging for every Vault in
your Information Repository, and error logging is always
enabled.
Where should the error
log be stored?
This field enables you to define where error logs will be
stored. Where "activity logs" record all Buffalo Surveillance
Server activity, "error logs" record only events that have
gone wrong. Be sure to remember where you are storing
your error logs so that you can refer to them should an
error condition occur during Buffalo Surveillance Server
processing.
Use [ < Browse ] to launch the Error Log Location
window. Then, select a location.
Add or Remove Vaults
Click [ Next > ]. The Notification window appears. Use to define where e-mails about
Information Repository events are sent and where Buffalo Surveillance Server events should
be logged.
Enter or select the following in the Notification window:
Field
Meaning and Directions
Enable optional email notifications and the email
notification fields listed below.
Enable email
notification.
Who should receive
email notifications?
When enabled, receive an email whenever an event occurs
of interest for managing a Vault. These events include
Vault start, Vault stop, media requests, etc., and are the
same as those recorded for notifications.
Type the email address of the user receiving email
notifications about Buffalo Surveillance Server events.
The address of your mail server. Use either IP address or
computer name.
What is the name or IP
the address of your mail
server?
Click Send Test Email to test the path.
Buffalo Surveillance Server does not test valid
parameters here. If an invalid IP address or computer
name is entered, email notifications do not work.
Where should events be Define where events are logged.
logged? (advanced
mode only)
379
380
Buffalo Surveillance Server
Field
Meaning and Directions
Computer Console causes events to be logged in a
console that appears on the computer monitor. It remains
open as long as the Vault is running. If the Vault is
stopped, the console disappears. If the Vault is restarted,
the console disappears and then reappears.
Window causes events to be logged in a window that
appears on the computer monitor. This window remains
open as long as the Vault is running. If the Vault is
stopped, the window disappears. If the Vault is restarted,
the window disappear and then reappears.
If you select Computer Console or Window in a
Windows environment, configure Vault service on
Windows to open a window on the desktop for
diagnostic messages. For directions, see section,
"Configure Vault Service on Windows to Open a
Window on the Desktop for Diagnostic Messages".
Once configured, Vault activity displays.
If you close a window or console, the Vault stops.
Buffalo Surveillance Server does not operate without
running Vaults.
File will cause events to be logged to a file. If you select
this option, you will need to enter or [ < Browse ] to the
location to which you want events logged.
Click [ Next > ]. The Ready to Add window appears. Use to review the parameters for the
new Vault before actually adding the Vault.
Review the displayed summary and ensure that all of the values are correct.
Add or Remove Vaults
When ready to add the new Vault, click Next. The Completed window appears.
Click Finish to exit the Add or Remove Vault Wizard. Restart the computer for the new Vault
activation. To add another Vault or remove a Vault, launch the Add or Remove Vault Wizard
again.
If you do not restart your computer, the new Vault will not start or be available for use.
After restarting your computer, Launch Vault Admin 204 to prepare media 235 for the Vault just
added. See the Administrator's Guide > Vault Admin > Actions > Prepare Media for
directions.
Disable SCSI Devices on a Windows Computer
To ensure that Windows does not interfere with Buffalo Surveillance Server's management of
SCSI tape drives and libraries ("Medium Changers"), disable Windows' use of these devices.
This is done via the Windows Device Manager.
Disabling these devices in the Windows Device Manager only disables Windows use of
the device and does not affect Buffalo Surveillance Server's use of the device.
Devices that are active (not disabled) in Windows will not be visible to or used by Buffalo
Surveillance Server.
To access the Device Manager:
Click Start on the Windows desktop.
Right-click My Computer.
Click Manage. The Computer Management window appears.
381
382
Buffalo Surveillance Server
In the left pane of Computer Management, click Device Manager:
In the right pane, find the tape drive or tape library installed on the computer.
Right-click the tape drive, and then select Properties.
If running a tape library, be sure to disable the tape library ("Medium Changers") and the
actual tape drives in the library. Repeat the disabling process for each tape drive within
the library.
Add or Remove Vaults
The Tape Drive Properties window appears:
Under Device Usage, click the down arrow, and select Do not use this device (disable).
Click OK. The Tape Drive Properties window closes, and the icon for the device in the right
pane of Computer Management should now have
superimposed upon it:
. The tape drive is now disabled.
383
384
Buffalo Surveillance Server
Remove a Vault
IMPORTANT NOTE: If you are using the Buffalo Surveillance Server Vaults and media are
preconfigured and prepared automatically; there is no need to perform any Vault operations. The
information in this Vault Admin section is provided for information only.
Use the Buffalo Surveillance Server Add or Remove Vault Wizard to remove hard disk based
Vaults, tape library Vaults, and single tape drive Vaults from your Information Repository. This
section leads you through the Add or Remove Vault Wizard.
When you remove a Vault, the data in the Vault is not erased and your license file is not
effected.
Launch
34
the Add or Remove Vault Wizard. The Welcome window appears:
Click [ Next > ]. The Add or Remove window will appear.
Add or Remove Vaults
Select Remove an existing Vault from this computer.
Click [ Next > ]. The Select window will appear.
Select the Vault you want to remove.
Click [ Next > ]. The Ready to Remove window will appear.
Review the displayed summary to ensure that you have selected the correct Vault.
When you are ready to remove the Vault, click [ Next > ]. The Completed window will
appear.
Click [ Finish ] to exit the Add or Remove Vault Wizard. You will need to restart your
computer for changes to take effect. If you want to remove another Vault or add a Vault,
launch Add Remove Vault Wizard again.
385
386
Buffalo Surveillance Server
Scheduling Windows
Following are all of the windows that support policy scheduling in Buffalo Surveillance Server:
Date Window 386
Days Window 386
Duration Window 387
Period of Time Window 387
Time Interval Window 388
Time Window 388
Date Window
Follow the directions below to set the date on which you want a job to run.
Ensure that the month and year are set to your preference, and then click a particular day
from the calendar.
Click [ OK ]. The Time window will appear. In the Time window, Set the time at which you
want the process to run.
Days Window
Follow the directions below to define on which days of the week you want a job to run.
Scheduling Windows
Check the days on which you want the job to run.
Click [ OK ] to save the values that you have selected. The days will appear in the On what
days of the week text box.
Duration Window
Follow the directions below to set a maximum time that a job should be allowed to run.
Enter the number of hours, minutes, and seconds the process will be allowed to run.
Click [ OK ]. The Should the job be stopped before it is completed text box on the
Scheduling tab will display how long the job will run before it is terminated.
This feature will stop a job according to the parameters that you set—even if the job is
not finished.
Period of Time Window
Follow the directions below to enable Buffalo Surveillance Server to search for files that have
been modified within a defined period of time.
387
388
Buffalo Surveillance Server
Enter a period of time in terms of years, months, days, hours, minutes, AND/OR seconds.
You may enter any combination or up to a maximum period of 10 Years, 100 Months,
1000 Days, 100000 Hours, 1000000 Minutes, and 1000000 Seconds.
" " means "less than or equal to".
Click [ OK ]. The text box from which you started will display the value that you have entered.
Time Interval Window
Follow the directions below to set the interval at which the jobs will be run. The job will run at the
interval that you enter until you change it. To stop a job that is using the repeat setting, you must edit
or delete the policy.
Enter the interval, in hours, minutes, and seconds, at which the job is to run. The clock for
the interval begins as soon as you save the policy
.
So, if you want a job to run every three hours, enter 3:00:00. If you want the job to run once a
day, enter 24:00:00; Every two days, 48:00:00. For example, if you enter 3:30:30, the job will
repeat every three hours, thirty minutes, and thirty seconds from the time that you first save
the policy. So, if you save your policy at exactly 12:00 AM, the job will run at 12:00 AM,
3:30:30 AM, 7:01:00 AM, 10:31:30 AM, 2:02:00 PM etc. If you enter 72:00:00 and start the
job on Monday at exactly noon, it will again run on Thursday at exactly noon.
Click [ OK ]. The job interval will be displayed in the text box from which you started.
Time Window
Follow the directions below to select a time.
Scheduling Windows
Select an hour, a minute, and AM or PM. From left to right, the first field displays the hour of
day; the second, the minute; the third, AM or PM.
Click [ OK ]. The time that you have entered will populate the text box from which you
started.
389
390
Buffalo Surveillance Server
Glossary
Administrator
Administrators have complete and unrestricted access to a computer or domain.
Automatic Failover
If there is more than one Vault available, Buffalo Surveillance Server clients can divide their use
of the available Vaults. Clients can also fail-over from the current Vault in use to another Vault
should the current Vault fail. The same logic applies even if there is more than a single tapebased Vault containing tapes with the same label (for example, "Monday Incremental").
Camera Pool
A camera pool is a user defined virtual grouping of cameras to search video from specified
cameras. For example, a camera pool called "Doors" that includes all of the cameras that
cover the doors of your establishment. When you need to see who's come or gone, select the
"Doors" camera pool as a search criteria, and only video captured from cameras in the "Doors"
camera pool are included. There is no limit to the number of camera pools your Buffalo
Surveillance Server solution may have.
Catalog
A catalog contains metadata for files on media in the Information Repository. Catalogs are
created and supported on media and in Vaults. Catalogs on Vaults contain metadata about
what files are on media assigned to the Vault as well as information about the files. In other
words, catalogs on Vaults track information about what files contain and where they are
stored. Catalogs on media contain information about the files on the media.
Client
Buffalo Surveillance Server clients can also be thought of as "fat clients." They provide
interfaces for system administrators and end users. Although divided by functionality, in
Buffalo Surveillance Server's balanced, extended client/server architecture, clients often play
roles normally supported by servers. This enables increased Information Repository flexibility,
security, robustness, and capacity.
Communications Timeout
If Buffalo Surveillance Server is unable to connect with a computer in the network or
communications are interrupted during a job, Buffalo Surveillance Server will wait a predefined
period of time before completely dropping the connection. This period of time is called the
"communications timeout."
Glossary
Companion File
"Companion file" is another name for the low-resolution proxy file that Buffalo Surveillance
Server can create when capturing or ingesting videos.
Component
A component is a single, independently running application or utility that might or might not
interact with or have dependencies on other applications. Buffalo Surveillance Server software
consists of several separate components (for example, clients and servers) that work together
to protect your files.
CRC
CRC stands for "cyclic redundancy check." Buffalo Surveillance Server uses CRCs to ensure
data integrity by detecting accidental alterations of data during transmission or storage. Using
this method, a unique numeric CRC value is assigned to the files that are being captured or
ingested. An algorithm calculates this value based on the file's size, data stream, and other
unique characteristics. The CRC value is calculated on the client host computer as data is
sent to Vaults. It is also calculated independently as the Vault is writing the files to its storage
device.
When the data write sequence is completed, the Vault compares the client- and servercalculated values. If they match, the data on the storage media is considered valid. If they
don't match, the files are marked with an error.
Buffalo Surveillance Server's uses CRCs for data verification every time stored files are moved
or replicated within the Information Repository. CRCs provide the same level of data continuity
verification as other methods that require a read-after-write of the stored data, but CRCs do so
with much higher performance and less resource overhead.
Data Storage Area
The Data Storage Area is the space on media used to store protected files.
Default
A default value or setting is the value or setting that a device or program automatically selects
if you do not specify an alternative.
Default Location
"Default location" defines where, by default, media will be stored and managed. Wherever in
Buffalo Surveillance Server there is an option to use a default location, Buffalo Surveillance
Server will use the default location.
391
392
Buffalo Surveillance Server
Dynamic Resource Allocation
Any network computer with Buffalo Surveillance Server installed has access to any storage
resource accessible by the network. This makes it possible to build an Information Repository
using as many storage devices as you need, based on whatever storage media and drive
technology you want. Flexible parameters are available to build configurations that can send
stored files to different storage devices based on the storage performance and longevity
requirements of the files.
Embedded Time Display
The embedded time display (i.e., time code) system assigns a number to each frame of video,
analogous to the way film is manufactured with edge numbers, to enable each frame to be
uniquely identified. Time data is coded in digits in the form HH:MM:SS, in the range 00:00:00
to 23:59:59. When available, Buffalo Surveillance Server also enables you to view and use
other units of measurement, such as frame number.
Frame
Frame refers to a section of a GUI window that is set apart by borders or a single image
comprised in a video.
Header
In the context of data storage, a header is an area on media in which the parameters assigned
during preparation of the media are stored. The information contained in the header includes
access control lists (ACL), storage pool information, media size, type, etc.
Host
Host refers to the computer from which files originate or the computer on which a policy
resides.
Indexing
Indexing is the process of surveying data on media to create a catalog on media or on a Vault.
Re-indexing refers to when the indexing process is repeated and the catalog is recreated.
When media is re-indexed, the original catalog is overwritten.
Information Lifecycle Management (ILM)
ILM stands for Information Lifecycle Management. Information Lifecycle Management refers to
the policies, processes, practices, and tools used to align the business value of information
with the most appropriate and cost-effective IT infrastructure from the time information is
conceived through its final disposition. When ILM is video aware, it is called Video Lifecycle
Management (VLM).
Glossary
Information Repository
Whenever you see "Information Repository" in this documentation, the "Buffalo Surveillance
Server Information Repository" is intended. In general, an information repository is an easy to
deploy active tiered storage environment. Specifically, in the Buffalo Surveillance Server the
information repository is the collection of all of your networked Buffalo Surveillance Server NAS
devices.
Ingesting
Also referred to as "capturing," ingesting refers to the process of using Buffalo Surveillance
Server clients to get data into the Information Repository. Capturing video from RTSP enabled
IP -cameras is a type of ingesting.
Interface
In this help documentation, "interface" refers to a Buffalo Surveillance Server application.
Load Balancing
Load balancing refers to keeping job loads and data distributed throughout the Information
Repository. Buffalo Surveillance Server queries each Vault regarding the availability of storage
resources that match the requirements of the files to be processed. It then negotiates a
connection with the Vault that best matches files' lifecycle requirements and copies the files to
Vaults. When there is more than one candidate Vault that matches the client's criteria, the
client makes a determination based on which Vault is most readily available and has the most
free space. Through this process, the network remains load balanced.
Locator
The Locator comprises components in Buffalo Surveillance Server's extended client/server
architecture that make it possible to link clients and servers together dynamically and only as
they are needed. Instead of network clients being hard-coded to work with only a single server
resource, the Locator makes it possible for any network client to take advantage of any server
resource.
Low Resolution Proxy
Low resolution proxies (also called companion files) are playable videos, created by Buffalo
Surveillance Server when data is captured or ingested, that are a fraction of the size of stored
original files. They enable the user to quickly retrieve and visually peruse stored video files in
their entirety and select and retrieve only clips from large, stored originals when the entire
original is not needed. Because low resolution proxies always remain on-line, even when
original files are taken off-line, managed data remains fully searchable.
393
394
Buffalo Surveillance Server
Media
"Media" refers to containers, within Buffalo Surveillance Server Vaults, on which data is stored.
There are various types of media, including hard disk, tape, CD, DVD, and Blu-ray. Hard disks
are sometimes referred to as "virtual media"; CD, DVD, and Blu-ray are sometimes referred to
as "optical media". Tape is sometimes referred to as "physical media".
Metadata Catalog
Metadata is "data about data". It is structured data which describes the characteristics of a
data asset. In can include information such as how and when and by whom a particular set of
data was collected, and how the data is formatted.
Metadata catalogs reside in Vaults and servers and contain metadata files. The Vault uses a
portion of its host computer's hard disk to house the primary working copy of the metadata
catalog. This catalog will grow in direct relation to the amount of data stored in the Vault.
The ratio between the size of the metadata catalog and the Vault's data store is an
average of 1%. This can vary based on the length of a file's pathname of origin and the
average file size. For example, small files with long pathnames will result in a higher
catalog to data store ratio than large files with short pathnames. The metadata catalog
is replicated for safety and redundancy. Every unit of media used to store data is
equipped with the metadata of the data it contains, which is updated every time the
media is utilized. A metadata file is created for every file managed by a Buffalo
Surveillance Server Vault. The metadata file contains information about the files in the
Information Repository, including file name, pathname, original owner rights, ACLs, date
and time stamp, file size, file type, and the file's stored location. This information is used
to track and manage files while they are in the Information Repository. It is also used to
provide a quick response to queries about files required for retrieval.
Object
As used in this help documentation, an "object" is any thing that can be clearly identified apart
from other things. For example, networks, computers, drives, folders, files, icons, etc.
On-Media Catalog
The On-Media Catalog is the metadata catalog, stored on every media unit, that contains
metadata for all the files. The on-media catalog is an Information Repository safeguard. Should
a Vault catalog become lost or corrupted, the on-media catalogs are used to rebuild it.
OS
OS is an abbreviation for Operating System. For example, Windows, OS X, Linux.
Glossary
Pathname
A pathname is a sequence of symbols that denotes the location of the file or directory by
outlining the route or "path" from the host name (if the file resides on a remote server), through
the directory structure, to and including the final filename or directory name.
Each directory name (in the series of names that compose a path) is separated by a symbol,
called a "delimiter", such as a forward slash (/) or a colon. A "leaf" refers to the component of
the file name between delimiters. For example, in C:/development/test/Build132.xls, the
forward slashes are delimiters and development, test and build132.xls are leafs.
When entering pathnames in Buffalo Surveillance Server, only the forward slash (/) may be
used as a pathname delimiter. If a file is located in the current working directory on your
computer, it is referred to by only its filename.
Permissions/Rights
"Permissions", also known as "rights", refers to rules that determine how users (aka, "roles")
are permitted to interact with given files or Vaults.
RTSP
"RTSP" stands for Real Time Streaming Protocol. RTSP is a network control protocol for use
in entertainment and communications systems to control streaming media servers. RTSP is
used to establish and control media sessions between end points. Clients of media servers
issue VCR-like commands, such as play and pause, to facilitate real-time control of playback
of media files from the server.
Secondary Storage
Secondary storage is synonymous with external storage and auxiliary storage. It refers to data
storage that is not currently in a computer's primary hard disk storage or memory.
Source
Source refers to the location from which data is captured, ingested, or extracted.
Storage Pool
A storage pool is one or more pieces of media grouped, by storage pool name, for a common
use. Additional media can be added to storage pools at any time, and searches can be limited
to single storage pools comprising countless units of media, regardless of which Vaults the
media resides on.
URL
URL is short for Uniform Resource Locator. A URL is a resource identifier that specifies where
an identified resource is available. Buffalo Surveillance Server uses the URLs of RTSP enabled
IP cameras to connect them to Buffalo Surveillance Server.
395
396
Buffalo Surveillance Server
Vault
A Vault consists of a storage device used to store files and a computer host that drives the
storage device and provides computing and memory resources for program execution,
metadata management, and on-going monitoring and management. A Vault can utilize hard
disk, single tape, tape autoloaders, tape libraries, and optical media as storage resource. A
single computer can host up to four Vaults depending on the resources and capabilities of the
computer and the scale of the hosted storage device.
All computers in the Information Repository that contain Vaults and any VMS system that
video is captured from must be synchronized to the same time source for the Information
Repository to function correctly.
Vault Catalog
Vault catalogs reside in Vault memory and contain a listing of all of the files and metadata
stored to media on the Vault and that is off-line but still being tracked.
Version Number
Buffalo Surveillance Server uses a numeric version numbering scheme according to which
every release has a unique, four number identifier: four numbers separated by periods, such as
2.4.13.1. These numbers represent the following: <major>.<minor>.<revision>.<build>. In other
words, the first number of the series is the number of the major release; the second, the minor
release; the third, the revision; the fourth, the build of the revision.
Video Lifecycle Management
Video Lifecycle Management (VLM) is a video aware subset of Information Lifecycle
Management, providing a comprehensive approach to managing captured video and its
associated metadata from creation and initial storage to the time when it becomes obsolete
and is deleted. Unlike other approaches to video data management that just automate storage
procedures, such as hierarchical storage management (HSM), VLM involves all aspects of
dealing with video, starting with user practices. Also in contrast to other systems, which rely
on video age as the sole criteria for video storage and retrieval, VLM manages metadata such
as camera names, camera locations, and motion detection data (to name a few). This enables
the utilization of more complex criteria for storage management and video retrieval.
View menu
The View menu enables you to select Enable Tool Tips and Enable File Tips. Tool Tips are
brief descriptions of window controls that appear when you hover your cursor over a control. A
File Tip is a file's full name, and it appears when you hover over a file name that is not fully
visible in the file tree frame.
4/24/2012 6:52 PM AG-5.6.19
Glossary
397
398
Buffalo Surveillance Server
Index
Buffalo Surveillance Server
clients
12
documentation conventions
overview
12
-AAccess Control
264, 266
Accessed after
181
Accessed before
181
Accessed or Stored
181
ACL
264, 266
Action
160, 161
Active
85, 86, 160, 161
Activity Logging
134
Add a camera
63
Add a hard disk vault
349
Add a license
349, 359, 372
Add a tape library vault
359
Add a tape vault
372
Add Camera Wizard
Camera Policies
53
Add New Vaults or Media On the Fly
adding vaults
345
Address
262
Address Format
Dot Notation
260
Full Domain Name
260
Host name only
260
Vault Admin Options
260
Advanced Mode
51
Advanced tab
Camera Policies
131
Data Service Policies
196
Advanced view
Vault Details
261
autoloaders requirements
tape
340
12
-C-
251
-BBarcode ID
Prepare Media
236, 244
Barcode/ID
264
Basic Wildcard Operators for File and Directory Filters
187
Block Size
264, 266
Boot Time
262
Camera Policies
Add an IP Camera - Standard Mode
63
Add Camera Wizard
53
Advanced Mode
51
Advanced tab
131
Camera tab
104
Destination tab
123
Export policies
87
Import policies
87
Processing tab
121
Scheduling tab
129
User Preferences
123
Camera tab
Advanced Mode
51
Camera Policies
104
Cameras.cfg file structure
79
Case usage
12
CD-ROM devices message
233
Change
Prepare media
238, 246
change a license
219
Change Vaults Properties
211
changers requirements
tape
340
client/vault connection
maintain
136, 201
Command Line Applications Overview
267
Command Line Options
267
Communications Timeout
Vault Admin Options
260
Completeness and Accuracy of Stored Files
158
Configure a camera
63
console
Where Messages Will Be Sent
232
contact Buffalo
11
contains
273
Content
180
Content Search
264
content searching
286
Prepare media
237, 245
47,
© 2012 SoleraTec LLC
Index
Create a Policy
85
Migrate
160
Purge
160
Replicate
160
Criteria tab
Data Service Policies
Current Clients
Vault Admin
263
Current I/O Rate
266
Current Location
264
Current Time
262
179
remove
384
disk-drive requirements
340
Do not track media any longer
Do not update media
257
Domain, rights
delete
223, 226
Dot Notation
Address Format
260
Drives
262
Vault Admin
266
DVD devices message
233
256, 257
-D-
-E-
data migration and replication
48
Data Service Policies
Advanced tab
196
Criteria tab
179
Destination tab
188
Export policies
163
Import policies
163
overview
157
Scheduling tab
193
Source tab
175
data storage area
207
Database
217
Database subsystems message
233
Date/Time Formatted
264
Date/Time Last Accessed
264
Date/Time Last Written
264
Delete a Policy
87, 163
deleted files
include
203
Description
264
Prepare media
237, 245
Destination tab
Camera Policies
123
Data Service Policies
188
Device
213
Diagnostics
231
Digital Fingerprinting
Prepare media
238, 246
Directories to Include/Exclude
183
directory filters
create
184
rules
183
Disk Labeling Fields
324
disk vault
Emergency Halt
210
Enable transmission optimization
135, 201
Erase Media
257
Error-Log Filename
131, 198
Errors
262
Everyone, rights
delete
223, 226
Exchange Server
Microsoft
47, 160
Export Camera policies
87
Export Configuration Window
Rimage
278
Export Data Service policies
163
Export Job Configuration
273
Export Polices
89, 164
Export Queue
273, 286
Extended
Message Detail
234
© 2012 SoleraTec LLC
-FFeature Title
273
field variables
filename
132, 133, 134, 199, 200
file
Where Messages Will Be Sent
232
File De-duplication
264
Prepare media
238, 246
file filters
create
184
rules
183
file permissions
override
122
399
400
Buffalo Surveillance Server
File Size
182
File system message
233
File Tips
121, 123
Filename Field Variables
132, 133, 134, 199, 200
Files to Include/Exclude
183
Free Space
262, 264
Full Domain Name
Address Format
260
Import Data Service policies
163
Import Policies
88, 164
Import/Export Policy File Structure
89, 165
Include deleted files
203
Include offline files
202
index media
250
Information
Vault Admin
262
Interactive Commands and their Arguments
268
-G-JGarbage Space
262, 264
General
212
General Vault message
233
Generate
a low resolution proxy
121
preview image
121
Graceful Shutdown
210
Group, rights
delete
223, 226
job
Run on selected days each week
130, 194
Run on specific dates & times
195
Run repeatedly
130, 195
Job Status
273
job?
run when
129, 194
-L-Hhard disk based vault
add
349
license
349
Hard disk devices message
233
hard disk vault
214
hard-disk
virtual
207
hard-disk requirements
340
header
media
207
Home Location
264
Host Info
345
Host Name
180
Host name only
Address Format
260
How do you want the files named?
323
How do you want to create the selected video?
320
How do you want to export the files?
326
How do you want to export the retrieved files?
319,
321, 323
-IImport Camera policies
87
label
media
207
Last Cleaning
266
legal restrictions
8
libraries requirements
tape
340
Library message
233
license
349, 359, 372
add
219
adding
345
change
219
License Requirements
344
load
physical media
251
virtual media
251
Load Balancing
47, 158
Load Media
250
load physical media
253
load shadow hard disk media
252
load tape media
253
load virtual media
251
Local File System
160
Localize
129
Location
266
Lock subsystem message
233
© 2012 SoleraTec LLC
Index
Logs
226
low resolution proxy
generate
121
preview image
121
-M Maintain client/vault connection
136, 201
Manufacturer
266
media
262, 264
add new
251
catalog
207
concepts
207
Erase
257
header
207
label
207
load
251, 252, 253, 254
physical
207
purging
208
retention
208
virtual
207
Media in Drive
266
Media Name
128, 178, 192
Prepare Media
236, 244
Vault Admin
264
Media Off-line
262
Media On-line
262
Media Preparation Time
Prepare media at next use
240, 247
Prepare media now
240, 247
Media Request
338
Mini Vault Stats
338
Media Speed
129, 179, 193
Media Tracking Options
Do not track media any longer
256, 257
Track media after unloading
256, 257
Media Type
128, 179, 192, 262
Hard disk
239, 240
Tape
239, 240
Media Updating Options
Do not update media
257
Update media if needed
257
Message Detail
Vault Admin Actions
234
Message Type
Vault Admin Actions
233
Microsoft Exchange Server
47, 160
Migrate
© 2012 SoleraTec LLC
401
Create a Policy
160
Modify a Policy
161
Mini Vault Stats
launch
338
Media Request
338
Nominal
338
Trouble
338
Modify a Policy
86
Migrate
161
Purge
161
Replicate
161
monitor jobs
335
-NName
262
naming conventions in Windows
unsupported
14
Network Activity
Mini Vault Stats
335
Move Vault Symbols
335
symbols
336
Vault Stats
335
network protocol requirements
340
New
273
Nominal
338
Mini Vault Stats
338
Notifications
229
-Ooffline files
include
202
offline media
48
On selected days each week
130, 194
On specific dates & times
195
on-media catalog
207
Opening a Buffalo Surveillance Server GUI in UNIX
13
Optical devices message
233
Options overview
Vault Admin
259
Options, Vault Admin
Address Format
260
Communications Timeout
260
Override original file permissions
122
Owner
264
402
Buffalo Surveillance Server
Owner
264
Prepare media
238, 246
-PPathname
264
Pathname usage
12
physical media
207
load
251, 253
reload
254
Polices
Export
89, 164
Policies
Import
88, 164
policy
create
85, 160
Data Service sample
174
delete
87, 163
file structure
89, 165
modify
86, 161
Target & Process sample
83, 102
Post-Processing Commands
197
Prepare Existing Media
243
Prepare Media
235
at next use
240, 247
Barcode ID
236, 244
Change
238, 246
Content Searching
237, 245
Description
237, 245
Digital Fingerprinting
238, 246
File De-duplication
238, 246
Media Name
236, 244
now
240, 247
Owner
238, 246
Read
238, 246
Remove
238, 246
shadow hard disk
238, 246
Size
237, 245
Storage Pool
237, 245
Write
238, 246
Pre-Processing Commands
197
Privileged Users
13
Process Video Components
121
Processing tab
Camera Policies
121
Purge
Create a Policy
160
Modify a Policy
161
-RRandom Access
264
Read
Prepare media
238, 246
Refresh view of polices
159
Re-index Media
250
Reload Media
250
physical media
251
virtual media
251
reload physical media
254
reload shadow hard disk media
254
reload virtual media
254
Remove
Prepare media
238, 246
remove media
255
remove tape and disk vaults
384
removing vaults
345
Repeatedly at a defined interval
130, 195
Replicate
Create a Policy
160
Modify a Policy
161
Report Options
132, 199
rights
change
225
Domain
223, 226
Everyone
223, 226
Group
223, 226
User
223, 226
Rimage Configuration
278
Robotic Arms
262
RPC Calls In
262
RPC Calls Out
262
RPC mechanism message
233
RPC Packets In
262
RPC Packets Out
262
Rules for File Filters and Directory Filters
183
-SSample Data Service Policy
174
Sample Target & Process Policy
83, 102
Scheduling tab
Camera Policies
129
Data Service Policies
193
scheduling windows
386
© 2012 SoleraTec LLC
Index
SCSI devices on Windows
disable
369, 381
SCSI requirements
340
Search
273
Search Results
286
Secure Vault
209
Secure/Unsecure Vault
209
Secured
262
Security
222
Serial Number
262
shadow hard disk
reload media
254
shadow hard disk media
250
load
252
Short
Message Detail
234
Shutdown Fast
210
Shutdown Vault
Emergency Halt
210
Graceful Shutdown
210
preferred manner
210
Shutdown Fast
210
Size
264
Prepare media
237, 245
Software License Agreement
8
Software Version
262
Source
160
Source tab
Data Service Policies
175
Speed
264
stackers requirements
tape
340
Standard
Message Detail
234
start vault manually
258
Status
262, 264
Storage Pool
128, 178, 192, 264
Prepare media
237, 245
Storage Slots
262
Stored Files
Completeness and Accuracy
47, 158
Stored or Accessed
181
System requirements
Network Protocol
340
-T Tape devices message
© 2012 SoleraTec LLC
233
tape library
add
359
license
359
tape media
load
253
tape requirements
autoloaders
340
changers
340
libraries
340
stackers
340
tape vault
216
add
372
license
372
remove
384
Target & Process Policies
overview
49
Test Run
Output results but do not actually move files
202
Throttle
136, 202
Time
181
Token/Value Pairs
79, 90, 165
Tool Tips
121, 123
Total
Drives
262
Errors
262
Media
262
Media Off-line
262
Media On-line
262
Robotic Arms
262
RPC Calls In
262
RPC Calls Out
262
RPC Packets In
262
RPC Packets Out
262
Storage Slots
262
Volumes
262
Volumes Off-line
262
Volumes On-line
262
Total Errors
264, 266
Total Loads
264, 266
Track media after unloading
256, 257
Trouble
338
Mini Vault Stats
338
TTY
Where Messages Will Be Sent
232
Type
262, 264, 266
Type of Objects
180
Type of Shutdown
210
403
404
Buffalo Surveillance Server
Volumes Off-line
Volumes On-line
-UUNIX
Opening a Buffalo Surveillance Server GUI
Unload Media
255
Unsecure Vault
209
Update media if needed
257
user agreement
8
User Preferences
121, 123, 281, 284
Camera Policies
123
User, rights
delete
223, 226
-Vvault
127, 178, 192
hard disk
214
Secure
209
shut down
210
start manually
258
tape
216
Unsecure
209
Vault Admin
204
Current Clients
263
Drives
266
Information
262
Media
264
Mini Vault Stats
338
Vault Admin Command Line
Vault Admin Options
260
Communications Timeout
overview
259
Vault Checkup
234
Vault Details
Advanced view
261
Overview
261
VaultAdminCl
267
vaults
add new
251
adding
345
removing
345
virtual hard-disk
207
virtual media
207
load
251
reload
254
Volumes
262
267
262
262
-W13
Watermark
183, 319
What file times do you want to use when the files are
retrieved?
324
What security settings do you want to give the
retrieved files?
324
What type of disk do you want to produce?
324
When do you want to overwrite files on the destination
system?
320
When files will be processed
181
When should the job run
129, 194
Where do you want to write the retrieved files?
320
Where Messages Will Be Sent
console
232
file
232
TTY
232
wildcard operators
Media Name
126, 177, 190
Storage Pool
126, 177, 190
Vault
126, 177, 190
wildcards
advanced settings
306
file and directory filters
187
wizard
Add Camera wizard
53
Add or Remove Vault wizard
345
Write
Prepare media
238, 246
260
© 2012 SoleraTec LLC