1
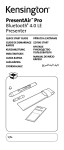
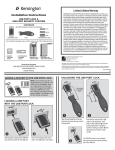
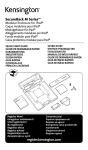
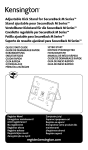
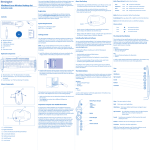
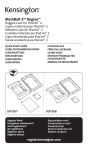
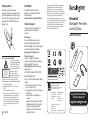
Hardware Reset
Need More?
If the device stops functioning
properly or has become unresponsive,
perform a hardware reset by pressing
the reset button gently using a small
paperclip. The front LED blinks once
during reset.
For additional instructions and
disclosures, see the full Instruction
Guide online at:
www.kensington.com/man/K39524
Technical Support
Technical support is available to all
registered users of Kensington
products.
Kensington and the ACCO name and design are
registered trademarks of ACCO Brands. The
Kensington Promise is a service mark of ACCO
Brands. Presentair is a trademark of ACCO Brands.
All other registered and unregistered trademarks
are the property of their respective owners.
© 2012 Kensington Computer Products Group, a
division of ACCO Brands USA LLC. Any unauthorized
copying, duplicating, or other reproduction of the
contents hereof is prohibited without written
consent from Kensington Computer Products
Group. All rights reserved. 05/12
QUICK START GUIDE
Web Support
You may find the answer to your
problem in the Frequently Asked
Questions (FAQ) section of the Support
area on the Kensington Website:
www.support.kensington.com.
CLASS 2 LASER SAFETY STATEMENT
This laser device complies
with International Standard
IEC/EN 60825-1: ED 2. 2007,
Class 2 Laser Product and
also complies with 21 CFR
ATTENTION:
LASER RADIATION
1040.10 and 1040.11,
DO NOT STARE INTO BEAM
CLASS 2 LASER PRODUCT
except for deviations
WAVELENGTH: 650+/- 20nm
OPTICAL POWER: <1mW
pursuant to laser Notice No.
IEC 60825-1: 2007-EN60825-1: 2007 ED 2.0
50, dated June 24, 2007:
1.Emission of a parallel beam of visible light;
2.Maximum Power of 1 milliwatt CW, wavelength
range 650±20 nanometers;
3.Operating temp between 0 ° C (32° F) to 40° C
(104° F).
• Do not disassemble the device
• Do not use the device outside of its specified
operating temperature range. If the device is
exposed to an environment outside of its
prescribed operation, turn off the device and
allow the temperature to stabilize within the
specified operating range before using the
device.
901-2624-00
KL
Telephone Support
There is no charge for technical
support except long-distance charges
where applicable. Please visit
www.kensington.com for telephone
support hours.
U.S. 800-535-4242 or 650-572-2700
Canada 800-268-3447
Please note the following when calling
support:
• Call from a phone where you have
access to your device.
• Be prepared to provide the following
information:
– Name, address, and telephone
number
– Name of the Kensington product
– Make and model of your computer
– System software and version
– Symptoms of the problem and
what led to them
Presentair™
Bluetooth® Presenter,
Laser & Stylus
QUICK
Complete warranty terms are available at:
www.warranty.kensington.com
START
GUIDE
Kensington Computer Products Group
A Division of ACCO Brands
333 Twin Dolphin Drive, Sixth floor
Redwood Shores, CA 94065
ACCO Australia
Level 2, 8 Lord St
Botany NSW 2019
Australia
ACCO Brands Europe
Oxford Road
Aylesbury
Bucks, HP21 8SZ
United Kingdom
Designed in California, U.S.A.
by Kensington
Made in China
Patents Pending
www.kensington.com
Register New Product Now
To Activate Warranty!
register.kensington.com
S/N:
Getting Started
Blue LED
1 Charge your Presentair™ Bluetooth
Presenter Remote on any USB port
or charging adapter for 2 hours
before initial use or when the front
LED blinks orange, indicating the
battery is low.
Power Button
Power On/Off and
Bluetooth pairing
a
Power On/Off
b
*
OR
NOTE: This device has USB
charging function only, and will
not appear on your system as a
data device when plugged into a
USB port.
2 The Rear LED blinks orange during
charging. When the Presenter
Remote is fully charged, the Rear
LED glows solid orange.
* Power supply not included
1 From On State—To Turn Power Off
Press and hold the Power Button.
The Presentair rear blue LED blinks
rapidly. Release button, the LED fades
off and the power turns off.
2a From Off State—To Turn Power On
Press the Power Button for 1 second
and release. The blue LED glows, the
power turns on, then the LED turns
off.
OR
2b From Off State—To Pair Device
Press and hold the Power Button from
3 to 6 seconds. The blue LED blinks
slowly and Presentair enters Pairing
Mode. Release button, it stays in
pairing mode for 3 minutes or until
paired to a device.
Pairing
Mode Switching
On the computer you are pairing
Presentair to, be sure the Bluetooth
Wireless is on, active, and ready
to connect to a device. Follow the
Bluetooth pairing instructions from
your computer manufacturer for
connecting Presentair. Presentair
appears as a mouse device for pairing.
Press and hold the Down Button to
switch between Presentation and
Media modes.
NOTE: Your computer’s Bluetooth
configuration settings need to be
set to allow devices to connect to
this computer. Some Windows
configuration and update settings
may interfere with the Bluetooth
connection or function. Ensure your
Windows services for Bluetooth Service
and Support are Started and set to
Automatic (found in Administrative
Tools > Services). Ensure your Windows
Bluetooth power management is not
set to turn off your Bluetooth Wireless
(found in Device Manager > Bluetooth
> Properties > Power Management).
Updating Bluetooth Drivers to
the latest version found on your
equipment manufacturer’s website is
recommended and may be necessary.
If you experience problems pairing
or using Presentair, additional
instructions, FAQs, and solutions
with illustrations are found in the
online guide at:
www.kensington.com/man/K39524
Presentation mode = Orange LED
Media mode* = Blue LED
* Laser does not activate in Media Mode.
Button
Presenter
Mode
(LED=Orange)
Media Mode
(LED=Blue)
Up Button
Turns laser
on as long
as button is
pressed.
Play/Pause
Down
Button
Black screen
Stop
Left Button
Page up
Previous
song/video
Right
Button
Page down
Next song/
video