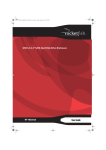
1
Register your product and get support at www.philips.com/welcome HD3021 HD3025 HD3027 User Manual HD3021,HD3025,HD3027 ENGLISH 5 19 Contents 1 2 3 Important information 20 Operation instructions Do not do the following: Handle with care Environment 20 20 21 21 Warranty and after-sales service guarantee 21 Introduction 21 Product overview Accessories 22 4 Control panel 23 5 Model specifications 23 6 Using the product Using for the first time Preparation before use 24 24 24 7 8 22 9 Function operation Cooking 27 Steaming 27 29 Maintenance Cleaning the steam valve 31 31 Cleaning the cover (seal) Cleaning the inner pot 32 32 Cleaning the sensor and heating plate Cleaning the accessories 33 33 Troubleshooting 34 20 1 Important information Please read this manual carefully before using the product and keep it for future reference. In order to ensure safe use, this manual refers to a variety of methods. Misuse or non-compliance with safety warnings could lead to accidents. Operation instructions ș This product is for indoor use only. ș Insert the plug into the multi cooker’s socket. Before turning on the power, make sure that the voltage marked on the cooker and the power supply voltage are the same. ș Only connect the appliance to an earthed wall socket.Always make sure the plug is inserted firmly into the socket. ș If the supply cord is damaged, it must be replaced with a special cord purchased from an authorised supplier. ș Make sure the multi cooker is out of children's reach to prevent it from being tipped over accidentally, which could cause burns.Be careful not to accidentally press a key while cooking, as this could cause the multi cooker to stop. ș This appliance is not intended for use by persons (including children) with physical, sensory or mental impairments, or lack of experience and knowledge, unless they have been given supervision or instruction in the use of the appliance by a person responsible for their safety.Ensure that children do not play with this product. ș 21 Keep the multi cooker on a level and stable surface.Do not use in a humid or hot environment, or near any other sources of heat. ș Before connecting the plug to the power outlet, make sure the heating elements, temperature sensors and the surface of the inner pot are all clean, dry and free of any rice, cooking residue or dirt that may affect the cooking. ș When removing the inner pot, make sure that you disconnect the plug first. Do not do the following: ș Do not use wet hands to connect the power plug or to press any buttons on the control panel. ș Do not attempt to modify, take apart or repair this multi cooker. ș Never connect this appliance to an external timer switch as this may be hazardous. ș Do not immerse the electric multi cooker in water when cleaning. Do not heat the inner pot directly over a naked flame. Do not expose this product to high temperatures, or place the multi cooker on a hot stove or cooker. Do not lift or move the multi cooker while cooking. Do not use a misshapen inner pot in the multi cooker. Do not use any attachments or components made by other manufacturers, unless they are specifically recommended by Philips.If you use such accessories or components, the manufacturers will not be responsible for any adverse consequences. Handle with care Before connecting the plug to the power outlet and turning on the switch, check that the inner pot has been placed inside the cooker. Be careful of heat from steam escaping during Notes:All content in this manual has been carefully checked and, if this content contains any printing errors, omissions or misunderstandings, the company holds the right to final interpretation The design and specifications are subject to change, please refer to the actual merchandise purchased cooking or when opening the lid.Hands and face must be kept away from the multi cooker to avoid burns from steam. Do not cover the lid with a cloth. This may cause the lid to become distorted or discoloured. To prevent the water from overflowing, which could be dangerous, do not exceed the maximum water level indicated on the inner pot. 2 Introduction The Philips multi cooker is an intelligent cooker developed using the company’s innovative technology, adopting a novel, user-friendly control panel design and an advanced structure. It is an ideal cooking tool for the modern household. To avoid scratching the coating inside the inner pot, it is recommended not to cook ingredients such as prawns, crabs and shellfish. If cooking, remove the hard shell beforehand. Do not place this product near magnetic materials while in use. Environment Advanced technology Innovative concepts 1 Use 6F technology:Spill-proof, scorch-proof, non-stick, durable, leak-proof, cockroach-proof, comprehensive, cutting-edge technology. Do not dispose of the appliance with normal household waste, but hand it in at a government-appointed collection point for recycling.By doing this, you help to preserve the environment. 2 Warranty and after-sales service guarantee If you need service or information, or if you have any questions, please visit the Philips website at www.philips.com.You can also contact your local Philips Customer Care Centre (you can find the phone number on your warranty card).If your country or region does not have a Philips Customer Care Centre, contact your local Philips dealer for help. Innovative design concepts Great tastes:Micro-pressure cooking, appropriate temperature control, scientific cooking, authentic tasting results. Health:Gold lined, boiling at high temperatures, healthy for the environment and for your family. 22 3 Product overview Steam valve Cover Inner pot Water storage "Cooking/Keep warm" function indicator "Cooking" function indicator Function select key Outer case Control key Base Accessories Measuring cup Steamer Spoon Mains cord Soup spoon Register your product and get support at www.philips.com/welcome HD3021 HD3025 HD3027 Instructions Warranty card User Manual 23 4 Control panel "Cooking/Keep warm" function indicator "Cooking" function indicator Function select key 5 Model specifications Model Number HD3021 HD3025 HD3027 Rated power supply ! ! ! Rated power output # "# "# Rated capacity (%& %& %& Rice volume (cups) $% $' $$ 252 x 252 x 225 269 x 269 x 233 269 x 269 x 253 2.7 %' 3.0 Length x width x height (mm) Weight (kg) 24 6 Using the product Using for the first time (1) Remove all accessories from within the pot. (2) Clean the body with a soft cloth. (3) Use the "Cooking" function to remove any unusual smells from the inner pot and inner lid. ͓Pour water into the inner pot until it is half full, attach the lid and connect to the power supply. ͓Press the control key, the "Cooking" function indicator lights up. ͓Washing the rice inside the pot is not recommended as this may damage the non-stick coating on the surface, shortening the lifespan of the product. (2) Put washed rice in the inner pot, and add water according to the scale line. ͓Disconnect the plug from the power supply. Once the pot has cooled, wash in water. (4) Wash all attachments with a sponge and washing-up liquid, then rinse with clean water and dry with a soft cloth. RICE WATER CONGEE WATER Preparation before use ͓Add water to the appropriate level according (1) Use cups for measuring rice as indicated in the diagram. Use clean water. Wash the rice until the water running through it is relatively clear. to the quantity of rice needed. ͓The water volume can be increased according to the softness of the rice required (note:the rice and water should not exceed the maximum water level inside the pot).For example:For cooking 4 cups of rice, add water to the "4" marker. 25 (3) Wipe the outer surface of the inner pot with a dry cloth, lightly pour water into the pot up to the arrow indicated and gently turn the pot 2 or 3 times, so that the entire bottom is located close to the heating plate. ͓Before using, wipe dry the bottom of the inner pot on the outside. If the inner pot is damp on the bottom, this will make a noise during cooking and could also lead to the multi cooker malfunctioning. (5) Starting the device:First of all, plug the power cord into the electric cooker, then plug the cord into the power outlet and connect the power. The multi cooker will be on standby mode. ͓ Do not connect the power until the rice cooker has been fully prepared for use. (4) When attaching the lid you will hear a click sound. This tells you that the lid has been closed completely. ͓ Do not open the lid during use, or cover with a towel or other objects. This can distort the lid, leading to malfunction. 26 7 Function operation Cooking (2) Once the rice has been cooked, the "Cooking" function indicator light switches off and the " Keep warm" function indicator light automatically switches on to show that the multi cooker is operating in "Keep warm" mode. Preparation (1) Use cups for measuring the rice. Once the inner pot has been cleaned, add water according to the scale line. (2) Wipe the outer surface of the inner pot dry with water and place it inside the cooker. (3) Attach the lid and connect to the power supply. ͓ For specific operation instructions, refer to the "pre-cooking preparation" diagrams on Pages 25-26. (3) If the multi cooker is not in use, disconnect the plug. The food starts to cook. (1) Press the control key, the "Cooking" function indicator lights up. - /8;<= >?@ BE@@G IJKB LN<>;Q< LQJ further 10 to 15 minutes will make the rice tastier. 27 Cooking congee (2) Press the control key to begin cooking the congee. Preparation (1) Use cups for measuring the rice. Once the inner pot has been cleaned, add water according to the scale line. (2) Wipe the outer surface of the inner pot dry with water and place it inside the cooker. (3) Attach the lid and connect to the power supply. - RQJ 8G@;L; QG@J>;Q< ;<8>JN>;Q<8S J@L@J >Q >?@ BGJ@QQV;<= GJ@GJ>;Q<B W;=JK8 Q< =@8 "% Starting to cook the congee -X>;J >?@ Q<=@@ ?YLIZ >?JQN=? >?@ cooking process to prevent it sticking to the pot. (3) To complete the congee cooking process, push the control key, switch off the power and disconnect the plug from the power outlet. (1) If you set the function select switch to CONGEE, the CONGEE function indicator light switches on. - Using the "Keep warm" function for a long time will result in the food being thicker and stickier. ' Steaming (2) When attaching the lid you will hear a click sound. This tells you that the lid has been closed completely. Preparation (1) Pour the appropriate amount of clean water into the inner pot (you can adjust the volume according to your needs), place the steamer into the multi cooker and add food (if needed it can be placed on the plate).Place the inner pot inside at the point indicated by the arrow and gently turn the pot 2 or 3 times, so that the entire bottom is located close to the heating plate. ͓*UTUZUVKTZNKROJJ[XOTM[YKUXIU\KX ]OZNGZU]KRUXUZNKXUHPKIZY:NOYIGT JOYZUXZZNKROJRKGJOTMZUSGRL[TIZOUT (3) Starting the device:First of all, plug the power cord into the electric cooker, then plug the cord into the power outlet and connect the power. The multi cooker will be on standby mode. ͓ Do not exceed the amount of water recommended, to prevent food from overflowing ͓ Food should not be left cooking in the pot for too long ͓ Do not connect the power until the multi cooker has been fully prepared for use. 29 The food starts to steam. (1) Press the control key, the "Cooking" function indicator lights up. (3) If the multi cooker is not in use, disconnect the plug. (2) Once the food has been steamed, turn the control key manually. The "Cooking" function indicator light switches off and the "Keep warm" function indicator light automatically switches on to show that the multi cooker is operating in " Keep warm" mode. 30 ' [;<>@<<@ (3) Rinse with water and wipe with a damp cloth. Before cleaning, disconnect the power plug and allow the product to cool.Do not wipe the surface with banana oil, petrol, household cleaning products or a hard brush. Rubber ring Steam valve Inner pot Sensor (in the centre, on the bottom of the inner pot) Heating plate Cleaning the steam valve (1) Remove the steam valve from the lid. (2) Turn the steam valve to the open position to remove. 31 ͓ After each use, it is recommended that you clean the steam valve, so as to prevent the steam valve from becoming blocked or overflowing the next time you use it. ͓ Clear any dirt from the steam valve, so as not to affect the cooking. Cleaning the cover (seal) (1) Use washing-up liquid to wipe the surface of the lid. (2) If stains on the inside of the pot lid are not washed promptly, dirt will stick to the inside and become difficult to wash. So it is recommended that you wipe the lid clean after each use. (2) Once water is boiling for about 5 minutes, push up the control key manually,and the "Keep warm" function indicator light automatically switches on. You may now disconnect the plug at any time. ͓*UTUZV[RRZNKX[HHKXYKGROTMXOTM Cleaning the inner pot (1) Pour the appropriate amount of water into the inner pot, place into the multi cooker and press the control key. The "Cooking" function indicator lights will switch on and the multi cooker will begin to work. 32 (3) After the cooker has cooled, drain the water from the pot and gently wipe over the surface of the pot with a sponge and washing-up liquid, rinse with clean water and then dry the outside of the pot. Do not use a wire brush or any other hard object to clean to avoid damaging the nonstick coating. Cleaning the sensor and heating plate ͓ Lightly wipe the heating plate with fine sandpaper (around P600) or a dry cloth to avoid the sensor at the base of the pot sticking to the heating plate, which can affect the quality of the cooking. ͓Use a small stick to remove grain and dirt from gaps. ͓ The surface of the heating plate and the protection frame may become discoloured, change in appearance or become striped, but this will have no adverse effects. Cleaning the accessories Clean with washing-up liquid, a sponge and water. ͓ Steamer, rice spoon, soup spoon, measuring cup, inner pot. ͓ Paint on the surface may become discoloured, change in appearance or become striped, but this will have no adverse effects. 33 ͓ After washing with water, clean with a sponge. 9 Troubleshooting If you encounter any problems while using this multi cooker, please check the following before you apply for assistance.If you cannot resolve the problem, please contact our designated specialised maintenance department. Serial number 2 The indicator light The indicator does not switch on light switches on 1 Faults Causes Electric heating plate does not heat up The multi cooker is not connected to the power supply Check that the power switch, fuse plugs and sockets and power supply lead are all in good working condition, and that the plug is connected properly Electric heating plate heats up 1.Indicator light wiring is loose Contact the designated maintenance department for repair 2.Indicator light is damaged Electric heating plate does not heat up 1.Internal wiring is loose Using different foods or cooking for too long 2.Electric heating plate is distorted 3.Inner pot is misshapen 4.Inner pot is installed incorrectly, leaving a gap. 5.Dirt between the inner pot and the heating plate 4 5 Contact the designated maintenance department for repair 2.Heating element is burnt out 1.Rice has not had long enough to cook 3 Solutions The food could burn or will not be able to keep warm automatically. 1.Instructions about the cooking button and lever should be complied with completely. 2.Magnet fails to limit the temperature 3.Keep-warm element burns out or has a loose connection Food (congee) overflow 1.Steam valve installed incorrectly 2.Steam valve is misshapen or blocked by dirt 3.Thermostat on lid not working correctly 1.Cook the rice to your liking Slightly misshapen equipment can be corrected using fine sandpaper. Severely misshapen equipment should be sent to the maintenance department to be replaced. 2.Contact the designated maintenance department to replace the pot 3.Gently rotate the inner pot to the correct position 4.Clean with fine sandpaper Contact the designated maintenance department for repair 1.Install according to the instructions in the manual 2.Clean or remove dirt as required 3.Contact the designated maintenance department for repair 34 ©2011 Royal Philips Electronics A ll rights reserved HD3021_HD3025_HD3027_UM_v1.0 www.philips.com Do not re-use paper