1
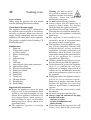
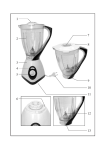
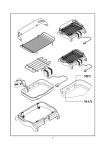
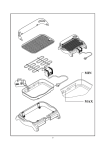
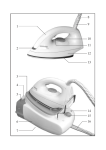
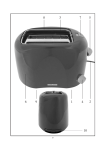
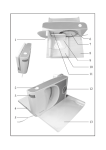
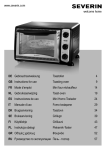
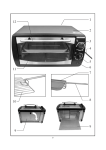
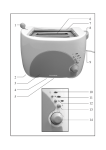
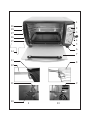
1
16
18
17
2
3
16
15
4
5
6
14
7
13
8
12
9
11
10
I
II
3
Toasting oven
Dear Customer,
Before using the appliance, the user should
read the following instructions carefully.
●
●
Connection to the mains supply
The appliance should only be connected to
an earthed socket installed in accordance
with the regulations. Make sure that the
supply voltage corresponds with the voltage
marked on the rating label of the appliance.
This product complies with all binding CE
labelling directives.
●
●
●
●
Familiarisation
1. Main unit
2. Temperature control
3. 6-position switch
4. Power cord with plug
5. Timer
6. Indicator lamp
7. Door
8. Grill rack
9. Spit end-piece (drive unit connection)
10. Spit end-piece (idle)
11. Recesses for spit handle
12. Baking tray handle
13. Baking tray
14. Spit handle
15. Crumb tray
16. Heating element
17. Rotating spit
18. Food clamps
●
●
●
Important safety instructions
● Before the appliance is used, the main
body as well as any attachments fitted
should be checked thoroughly for any
defects. If the appliance, for instance, has
been dropped onto a hard surface, it
must no longer be used: even invisible
damage may have adverse effects on its
operational safety.
● This appliance operates at very high
temperatures.
●
●
●
●
8
Warning: the door as well as
the accessible surfaces of the
appliance become hot during
operation - burns can result from
touching these hot parts.
Do not touch the heating elements.
Always ensure that the crumb tray is
properly fitted under the heating
elements while the appliance is in use.
Overheated oil or fat may tend to ignite.
Therefore do not overfill the baking tray.
Do not leave the appliance unattended
while in use.
The appliance is not intended to be
operated by means of an external timer
or separate remote-control system.
This appliance is not intended for use by
any persons (including children) with
reduced physical, sensory or mental
capabilities, or lacking experience and
knowledge, unless they have been given
supervision or instruction concerning the
use of the appliance by a person
responsible for their safety.
Children should be supervised to ensure
that they do not play with the appliance.
Do not position or operate the appliance
close to or underneath any wallcupboards or hanging objects such as
curtains or any inflammable materials,
and do not position any objects on top of
the appliance.
During operation, the appliance must be
placed on a heat-resistant surface,
impervious to splashes and stains. Do not
position the appliance on or near hot
surfaces, open flames or inflammable
vapours.
Do not allow the power cord to touch
hot surfaces.
Do not let the power cord hang free.
Always switch off and remove the plug
from the wall socket
- after use, as well as
- in cases of malfunction, and
- during cleaning.
When removing the plug from the wall
socket, never pull on the power cord;
always grip the plug itself.
● No responsibility will be accepted if
damage results from improper use, or if
these instructions are not complied with.
● This appliance is intended for domestic
use only and not for commercial
applications.
● In order to comply with safety
regulations and to avoid hazards, repairs
of electrical appliances must be carried
out by qualified personnel, including the
replacement of the power cord. If repairs
are needed, please send the appliance to
one of our customer service departments.
The address can be found in the
appendix to this manual.
Rotating spit
The rotating spit is used with the upper heat
function; in addition, the hot-air function
can be selected.
- Before the spit is used, always ensure that
the baking tray is properly inserted into
the guide rails.
● When food is put on the spit, make sure
that it cannot come into contact with
either the upper heating elements or the
baking tray; ensure sufficient distance.
- Make sure that the spit pierces through
the middle of the food. This is to ensure
that there is sufficient distance between
the baking tray, the oven interior and the
heating elements. Use the holding
clamps to secure it in the centre of the
spit.
- Any protruding parts (e.g. wings of a
chicken) should be held in with a toothpick, a suitable piece of string or other
suitable means. This ensures that no part
of the food can stick out or come off
during the cooking process.
Temperature control
With the temperature control knob, the
temperature can be set to the desired level.
6-position switch settings
Upper heat
Upper and lower heat
Upper heat with hot-air function
Upper and lower heat with hot-air
function
Upper heat with rotating spit
Upper heat with rotating spit and hotair function
The heating elements will only be switched
on once the timer is activated.
- Inserting and removing the rotating spit:
- Once the food has been securely
attached, place the spit onto the handle.
Ensure that the indentations in the
handle fit into the corresponding
recesses in the spit.
- Slide the spit end-piece with the drive
unit connection into the drive unit (see
picture II).
- Place the idle end of the spit into its
holding bracket on the opposite side
(see picture I).
- To remove the spit, follow these steps
in reverse order.
Timer
By using the timer, cooking time can be
selected up to a maximum of 60 minutes.
After the pre-programmed time has elapsed,
an acoustic signal indicates that the heating
elements are switched off.
Start up
- Clean the appliance (see General care
and cleaning) and remove any packing
materials completely.
- Before using the appliance for the first
time, let it heat up for 10 minutes with
both heating elements on. When the
appliance is first switched on, a slight
Indicator lamp
The indicator lamp lights up when the
appliance is switched on with the timer. It
goes out once the pre-programmed time has
elapsed, or if the timer is set back manually.
9
smell may be emitted. This is normal and
will only last for a very short time. Ensure
sufficient ventilation.
a different nature and consistency; please
also refer to the information contained on
the food packaging.
Operation
- Before using the appliance, make sure
that the crumb tray is fitted in its proper
position underneath the lower heating
element.
- Pre-heat the oven compartment for
several minutes with the door closed,
using both heating elements. Set the
temperature control knob to the required
level and use the timer control to select
the desired pre-heating time.
- Place the food to be cooked on the grill
rack. When cooking food containing fat
or moisture, use the baking tray to stop
any drips into the interior of the
appliance. When using the spit, always
ensure that the baking tray is properly
inserted in the lowest guide rails.
- Close the door, set the temperature
control to the required level and use the
timer knob to select the desired cooking
time.
- For baking or grilling from above, either
the upper or the upper and lower
elements may be selected.
- The switch settings may be changed
during the cooking process.
- After the pre-programmed cooking time
has elapsed, the timer will automatically
switch off the heating elements.
- To switch off the appliance earlier, set
the timer to ‘●’.
- Always use the door handle to open the
hot glass door after use. When removing
the baking tray or grill rack, use the
baking tray handle provided. Likewise,
when removing the spit, the spit handle
must be used. Always place the baking
tray on a heat-resistant surface.
- Remove the plug from the wall socket.
Food
Temperature /
Grilling /
Chicken
switch setting
180°C
cooking time
60 mins.
(rotating spit)
Pizza
200°C
10-12 mins.
Pizza
(deep-frozen)
220°C
13-15 mins.
‘Hawaii’
Toast
220°C
10-14 mins.
Baguette
200°C
14-15 mins.
(deep-frozen)
Baguette
220°C
15-16 mins.
175°C
15-17 mins.
150°C
50-60 mins.
(deep-frozen)
(deep-frozen)
Cookies,
biscuits
Cakes,
pastry
General care and cleaning
● Before cleaning the appliance, ensure it is
disconnected from the power supply and
has completely cooled down.
● To avoid the risk of electric shock, do not
clean the appliance with water and do
not immerse it in water.
● Do not use abrasives, harsh cleaning
solutions or spray-type oven cleaners.
- The exterior of the housing may be
cleaned with a damp, lint-free cloth.
- The baking tray, grill rack, rotating spit
and holding clamps may be cleaned using
hot water and a mild detergent, or in a
dish-washer.
- If necessary, the crumb tray may be
removed and cleaned using hot water
and a mild detergent. Be sure to replace
it in the proper position underneath the
heating element after cleaning.
Cooking times
The grilling/cooking times listed are
approximate only, as each type of food is of
10
Disposal
Do not dispose of old or defective
appliances in domestic garbage;
this should only be done through
public collection points.
Guarantee
This product is guaranteed against defects in
materials and workmanship for a period of
two years from the date of purchase. Under
this guarantee the manufacturer undertakes
to repair or replace any parts found to be
defective, providing the product is returned
to one of our authorised service centres. This
guarantee is only valid if the appliance has
been used in accordance with the
instructions, and provided that it has not
been modified, repaired or interfered with
by any unauthorised person, or damaged
through misuse.
This guarantee naturally does not cover
wear and tear, nor breakables such as glass
and ceramic items, bulbs etc. If the product
fails to operate and needs to be returned,
pack it carefully, enclosing your name and
address and the reason for return. If within
the guarantee period, please also provide the
guarantee card and proof of purchase.
11