1
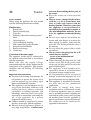
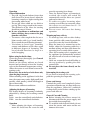
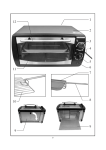
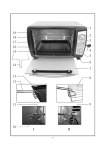
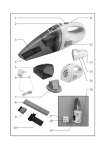
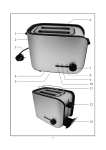
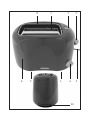
8
6
3
9
7
1
5
4
2
10
3
Toaster
●
●
Dear Customer,
Before using the appliance, the user should
read the following instructions carefully.
Familiarisation
1
Rating label
2
Power cord with plug
3
Toast slot
4
Infinitely adjustable browning control
knob
5
Operating lever
6
Cool touch plastic housing
7
Slide control for bread roll holder
8
Integral bread roll holder
9
Power cord storage
10 Crumb tray
●
●
●
Connection to the mains supply
The appliance should only be connected to
an earthed socket installed in accordance
with the regulations.
Make sure that the supply voltage
corresponds with the voltage marked on the
rating label of the appliance. This product
complies with all binding CE labelling
directives.
●
●
●
Important safety instructions
● To protect the housing from damage, do
not position or operate the toaster on or
near hot surfaces (eg oven plates), open
flames or inflammable vapours.
● This appliance is not intended for use by
any person (including children) with
reduced physical, sensory or mental
capabilities, or lacking experience and
knowledge, unless they have been given
supervision or instruction concerning the
use of the appliance by a person
responsible for their safety.
● Children should be supervised to ensure
that they do not play with the appliance.
● Electric heating appliances operate at
very high temperatures. Caution: burns
●
●
7
can occur from touching the hot parts of
the toaster.
Place the toaster on a heat-resistant
surface.
There is always a danger that bread may
catch fire, e.g. if it is toasted more than
once or comes into contact with the
heating elements. Therefore ensure that
the appliance is not positioned or
operated in close proximity to curtains or
any such inflammable materials. Do not
leave the appliance unattended during
use.
Do not try to remove bread from the
toaster with your fingers or to insert any
other objects (eg knives, forks) into the
toast slot. The heating elements carry a
live current.
Do not allow the power cord to touch
hot surfaces.
Always remove the plug from the wall
socket after use, and also
- in case of any malfunction and
- during cleaning.
When removing the plug from the wall
socket, never pull on the power cord;
always grip the plug itself. Do not let the
power cord hang free.
The appliance is not intended to be
operated by means of an external timer
or separate remote-control system
No responsibility will be accepted if
damage results from improper use, or if
these instructions are not complied with.
This appliance is intended for domestic
use only and not for commercial
applications.
In order to comply with safety
regulations and to avoid hazards, repairs
to electrical appliances must be carried
out by qualified personnel, including the
replacement of the power cord. If repairs
are needed, please send the appliance to
one of our customer service departments.
The addresses can be found in the
appendix to this manual.
Operation
General Information
- Day-old, dry bread darkens faster than
fresh bread. For brown bread, adjust the
browning control to a higher setting than
for toasting white bread.
- Do not use slices which are too thick or
too big. They can get stuck in the toaster.
The thickness of the slices for toasting
should not exceed 14 mm.
● In case of problems or malfunctions and
before cleaning, always remove the plug
from the wall socket
- To remove a slice caught in the slot, use a
blunt wooden stick (eg a brush handle).
Never touch the metal heating elements.
- Variations in bread type, humidity
content and thickness of the slices result
in different degrees of browning. The
bread should therefore be kept in a
sealed wrapping.
press the operating lever down.
- Once the desired degree of browning is
reached, the toaster will switch off
automatically and the slices are ejected
and can be removed.
- To achieve regular browning when
toasting several slices in succession, allow
the toaster to cool down for 60 - 90
seconds after each cycle.
● Do not cover the toast slot during
operation.
Warming up buns, rolls etc
- To warm up buns, rolls or other bakery
items, push the slide control towards the
toast slot to raise the bread roll holder.
- Place the items to be warmed up on the
holder, adjust the browning control to a
medium setting and then push down the
operating lever to switch on the toaster.
- Once the browning cycle is complete and
the appliance has automatically switched
off, turn the roll or bread over and repeat
the cycle.
- After use, return the bread roll holder to
the rest position by pushing the slide
control back.
● Do not place the items directly on the
toast slot.
Before using for the first time
Clean the toaster thoroughly (see General
Care and Cleaning).
Switch on the toaster without any bread
inserted and go through at least five toasting
cycles at the maximum temperature setting.
Allow the toaster to cool down between the
toasting cycles.
Please note: the main lever locks down only
when the plug is inserted.
When switching on the appliance for the first
time, the toaster may emit a slight smell (and
possibly a little smoke), which will disappear
after a short while.
Please ensure sufficient ventilation.
Interrupting the toasting cycle
If you want to interrupt the toasting cycle,
push the operating lever upwards.
Power cord storage
Unwind the power cord completely before
operation and make sure it is kept well away
from the appliance. Allow for a sufficient
cooling-down period before winding up the
power cord after use.
Adjusting the degree of browning
The desired degree of browning is infinitely
adjustable by turning the browning control
knob.
Light: turn the control knob anti-clockwise.
Dark: turn the control knob clockwise.
General Care and Cleaning
● Before cleaning the toaster, ensure it is
disconnected from the power supply and
has cooled down completely.
● To avoid the risk of electric shock, do not
clean the toaster with water and do not
immerse it in water.
Operation
- After adjusting the degree of browning,
insert the bread into the toast slot and
8
● Do not use abrasives or harsh cleaning
solutions.
- The exterior may be wiped with a dry or
slightly damp lint-free cloth.
Crumb tray
- During use, any bread crumbs falling
down are collected in the crumb tray. To
remove the crumbs, pull the tray out
sideways and empty it.
Disposal
Do not dispose of old or defective
appliances in domestic garbage;
this should only be done through
public collection points.
Guarantee
This product is guaranteed against defects in
materials and workmanship for a period of
two years from the date of purchase. Under
this guarantee the manufacturer undertakes
to repair or replace any parts found to be
defective, providing the product is returned
to one of our authorised service centres. This
guarantee is only valid if the appliance has
been used in accordance with the
instructions, and provided that it has not
been modified, repaired or interfered with
by any unauthorised person, or damaged
through misuse.
This guarantee naturally does not cover
wear and tear, nor breakables such as glass
and ceramic items, bulbs etc. If the product
fails to operate and needs to be returned,
pack it carefully, enclosing your name and
address and the reason for return. If within
the guarantee period, please also provide the
guarantee card and proof of purchase.
9