1
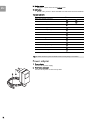
Wireless Multimedia Adapter
User manual
SLM5500
2
EN
Contents
EN
What’s in the box..........................................................................................5
Your product..................................................................................................6
Wireless multimedia adapter .......................................................................................................6
Before you start.............................................................................................7
User manual......................................................................................................................................7
Broadband internet.........................................................................................................................7
Wireless home network ...............................................................................................................7
Safety precautions ...........................................................................................................................7
European regulations......................................................................................................................8
Need help? ......................................................................................................9
Troubleshooting ..............................................................................................................................9
Online help .......................................................................................................................................9
Club Philips .......................................................................................................................................9
Philips Media Manager....................................................................................................................9
Helpline..............................................................................................................................................9
Overview...................................................................................................... 10
Wireless multimedia adapter .....................................................................................................10
Remote control .............................................................................................................................11
Power adapter ...............................................................................................................................12
Install ............................................................................................................. 13
Install the software .......................................................................................................................13
Install the TV connection ............................................................................................................13
Install the digital audio connection (optional) ........................................................................14
Install the network connection ..................................................................................................14
Install the power connection......................................................................................................15
Install the batteries .......................................................................................................................15
Connect ........................................................................................................ 15
Set the correct TV channel.........................................................................................................15
Start the configuration wizard....................................................................................................15
Enjoy .............................................................................................................. 16
Compression formats ..................................................................................................................16
Digital Rights Management (DRM)............................................................................................16
Turn the product on ....................................................................................................................16
Start the Philips Media Manager ................................................................................................16
Share a movie file ..........................................................................................................................17
Play a movie file .............................................................................................................................17
Share a music file...........................................................................................................................18
Play a music file..............................................................................................................................19
Share a picture file ........................................................................................................................20
Play a picture slideshow...............................................................................................................20
Play a picture slideshow with music .........................................................................................21
Set to stand-by...............................................................................................................................21
3
EN
Configure...................................................................................................... 21
Open the Settings menu..............................................................................................................21
Overview.........................................................................................................................................22
Change the language.....................................................................................................................22
Start the configuration wizard....................................................................................................23
Start the network wizard ............................................................................................................23
Restore the factory default values ............................................................................................24
Change the slide show interval ..................................................................................................24
Change the TV shape ...................................................................................................................24
Change the TV system.................................................................................................................25
Change the image quality ............................................................................................................26
Enable the screen saver ...............................................................................................................27
View the device name ..................................................................................................................27
View the IP details.........................................................................................................................28
View the connection method.....................................................................................................28
View the wireless details .............................................................................................................29
Change the device name .............................................................................................................29
Change the IP assignment ...........................................................................................................30
Change the connection method ................................................................................................31
Register for Internet services.....................................................................................................32
Upgrade the software ..................................................................................................................32
Set the bandwidth for Internet media files..............................................................................32
View the product information ...................................................................................................33
Troubleshooting ......................................................................................... 34
Problems and tips..........................................................................................................................34
Technical data.............................................................................................. 35
Video playback ...............................................................................................................................35
Audio playback...............................................................................................................................35
Still picture playback.....................................................................................................................35
Connectivity ...................................................................................................................................35
Software ..........................................................................................................................................35
System requirements....................................................................................................................35
Dimensions .....................................................................................................................................36
Power...............................................................................................................................................36
Internet services............................................................................................................................36
Information .................................................................................................. 37
Respect copyrights........................................................................................................................37
Disclaimer .......................................................................................................................................37
Trademarks.....................................................................................................................................37
Wireless transmission..................................................................................................................38
Health and safety...........................................................................................................................38
Maintenance and service..............................................................................................................38
Disposal of your old product .....................................................................................................38
Warranty.........................................................................................................................................38
Glossary........................................................................................................ 39
Terms and definitions...................................................................................................................39
4
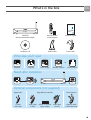
What’s in the box
EN
W elcome
Quick start guide
1 Install
2 Connect
3 Enjoy
SLM5500
Wireless Multimedia Adapter
Remote control
2x AA batteries
Quick start guide
Installation CD
SCART cable
Power cable
What else you’ll need
TM
or
TV
PC
AC
WiFi
Ethernet
Television
Computer
Power supply
Wireless network
Wired network
Result after installation
TM
PC
WiFi
TV
Optional components (not supplied)
Digital audio
Coaxial
audio cable
Wired network
High-definition television
Audio cable
2x RCA
SCART to 3x RCA
output adapter
Video cable
3x RCA
Network cable
(UTP5e Ethernet)
5
EN
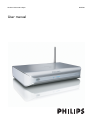
Your product
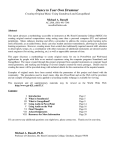
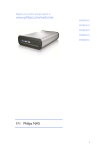
Wireless multimedia adapter
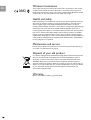
Watch downloaded movies
Download and store movies on your PC then watch them on your TV from the comfort
of your living room couch. No need to burn movies from your hard disk to CD or DVD,
just the ease and convenience of wireless access with fingertip control.
You can playback secure WMV (DRM) movies from online movie services and even
stream movies from the Internet. The Wireless Multimedia Adapter supports MPEG1,
MPEG2, MPEG4, WMV, WMV-DRM, DivX and Xvid video formats.
Enjoy PC music anywhere at home
Stream music files from your PC and listen to them in high quality in any room on your
audio system. Keep your music collection stored on your PC's hard disk. Use your
remote control to select songs according to artist, album or genre.
You can play secure WMA (DRM) songs from online music services, and even listen to
Internet Radio without a PC. The Wireless Multimedia Adapters supports WMA,
WMA-DRM, MP3 and AAC-MPEG4 music formats, and so you have access to all your
downloaded songs. And you can add more radio stations to your current entertainment
system by connecting to online radio stations.
Share your digital photos
Relax on the couch and look at your holiday photos with the whole family or friends.
Simply store your photo collections centrally on a PC and enjoy them anytime on your
TV. If you have a high-definition TV input on an LCD or plasma TV, your digital photos
will be brought to life!
Smart and simple
The Wireless Multimedia Adapter is easily installed thanks to a user-friendly step-by-step
approach. All the steps needed to install it are displayed on your TV screen.
You can add new or updated functionality simply by upgrading the software on line. The
Wireless Media Adapter checks via a broadband Internet connection for new software
versions.
Wireless convenience
You can access multimedia content from other PCs in your house. The media manager
works on most PCs, including older types. So with just one Wireless Media Adapter you
can access content on several PCs, and there's no need to copy files across. The 2.4 GHz
wireless link between the Multimedia Adapter and the PC means you don't have to lay
cables or drill holes through walls.
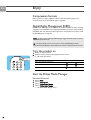
Club Philips: club.philips.com
Check out what you can do with your latest Philips product! Club Philips is your portal
to a variety of content, services and product information. Come here for content to
enrich your Philips product!
6
Before you start
EN
User manual
•
•
Follow the procedures described in the user manual.
Keep the installation CD for future reference.
Tip The documents of the connected devices can contain additional information. For
example, the user manual of your TV.
Broadband internet
•
Make sure that you have broadband internet access (> 256 kbps) to use the internet
functions of the product.
The Internet service provider can charge extra fees for exceeding a certain limit of
transferred data.
Wireless home network
•
The performance in a wireless home network is dependent upon the location of the
wireless network devices and the structure of the building.
Safety precautions
•
•
•
•
•
•
•
•
•
Do not use the product outdoors.
The product can cause interference between the product and other devices. Make
sure that the interference does not have an effect on the devices that are installed
close to the product.
Do not connect or disconnect devices when the product is connected to a power
supply.
Before you operate the product, make sure that the voltage on the type plate of the
product is the same as the voltage of the connected power supply. When the
voltages are not the same, refer to your dealer.
Do not expose the product to moisture or water. Do not put objects that contain
liquids on the product (for example, vases).
Do not expose the product to heat sources (for example, heating equipment or
direct sunlight).
Do not expose the product to sand.
Make sure that there is enough free space around the product for ventilation.
Do not open the product. When you have technical difficulties, contact your dealer.
7
EN
European regulations
The product has been designed, tested and manufactured according to the European
R&TTE directive 1999/5/EC. Under this directive, the product can be put into service in
the following countries:
/i
SLM5500/00
B
9
IRL
P
9
D
9
DK
I
SU
CH
SLM5500/05
B
IRL
9
P
D
DK
I
SU
CH
9
9
9
9
E
L
S
9
9
9
GR
NL
UK
9
F
A
N
/i
8
E
L
S
GR
NL
UK
9
F
A
N
9
9
9
Need help?
EN
Troubleshooting
Refer to page 34.
Online help
Refer to www.philips.com/support for:
• Interactive help
• Frequently asked questions
Club Philips
Refer to club.philips.com for:
• Interactive help
• Internet services
Registration can be required.
Philips Media Manager
Refer to the embedded help of the Philips Media Manager software.
Helpline
/i
Country
België/Belgique/Belgien
Danmark
Deutschland
España
France
Ireland
Italia
Luxemburg/Luxembourg
Nederland
Norge
Österreich
Portugal
Schweiz/Suisse/Svizzera
Suomi
Sverige
United Kingdom
Telephone number
070 253 010
3525 8761
0180 5 007 532
902 888 785
08 9165 0006
01 601 1161
199 404 042
26 84 30 00
0900 0400 063
2270 8250
0820 901115
2 1359 1440
02 2310 2116
09 2290 1908
08 632 0016
0906 1010 017
Costs per minute
€ 0.17
€ 0.20
€ 0.15
€ 0.23
€ 0.21
€ 0.20
€ 0.20
£ 0.15
Be prepared to give this information:
• A description of the problem and when it occurs
• The type number on the label of the product
• The date of purchase
9
EN
Overview
Wireless multimedia adapter
A
1
2
3
4
5
B
6
7
8
9
10
11
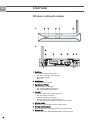
1 On/off light
Shows the on/off status of the product.
• Off - Not connected to a power supply
• Red - Stand-by mode
• Blue - On
2 On/off button
Turns the product on and off.
3 High-definition TV light
Indicates the type of video signal.
• Off - Standard definition video signal
• Blue - High-definition video signal
4 Link light
Indicates the status of the network connection.
• Off - No network connection
• Flashing - Connecting to network, or
• Flashing - Searching for a media file server, or
• On - Connection to a network and media file server found
5 Infra-red receiver
Receives the infra-red signals from the remote control.
6 Wireless network antenna
Receives signals from and sends signals to the wireless network.
7 Ethernet port
Connects a network cable (UTP5e Ethernet) to a wired network.
10
12
8 SCART port
Connects a SCART cable to all types of TVs.
9 Video output switch
• Left - The SCART port is used
• Right - The component video port is used
10 Component video port
Connects a video cable to a high-definition TV.
11 Digital audio port
Connects a coaxial audio cable to a digital audio system.
12 Power socket
Connects the power cable to a power supply.
EN
Remote control
1
2
3
22
4
21
5
6
7
8
20
19
18
17
9
16
10
15
11
14
12
13
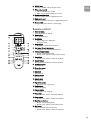
1 Stand-by button
Turns the product on and off.
2 Number keys
Enter digits and texts.
3 Back button
• Text or digit entry - Backspace
• Navigation - Back
4 Home button
• Navigation - Opens the home menu
5 Up, down, left and right buttons
• Navigation - Go in the specified direction
6 Previous/Rewind button
• Movies - Rewind (long press)
• Movies, music, pictures - Previous (short press)
7 Stop button
• Movies, music, pictures - Stops the media file
8 Colour buttons
The functions of the buttons is shown by the TV.
9 Follow me button
For future use.
10 Favourites button
For future use.
11 Jump back
For future use.
12 Jump to button
For future use.
13 Jump forward
For future use.
14 Page down button
• Navigation - Go 1 page down
15 Shuffle button
Shuffles the playlist.
16 Page up button
• Navigation - Go 1 page up
17 Play button
• Movies, music, picture - Starts the media file
18 Pause button
• Movies, music, picture - Pauses the media file
19 Next/Forward button
• Movies - Forward (long press)
• Movies, music, pictures - Next (short press)
20 OK button
Selects and confirms the current item.
• Movies, music, pictures - Starts the media file
11
21 Settings button
• Navigation - Opens and closes the Settings menu
22 Info button
• Movies, music, pictures - Shows and hides extra information about the media file
EN
/i
Text and digit entry
Action
Select the available characters
Button
Select the next or previous character
Confirm a choice
Select characters . @ 0
Select characters <space> _ - 1
Select characters a b c A B C 2
Select characters d e f D E F 3
Select characters g h i G H I 4
Select characters k l m K L M 5
Select characters m n o M N O 6
Select characters p q r s P Q R S 7
Select characters t u v T U V 8
Select characters w x y z W X Y Z 9
Tip To select characters, press the button several times quickly in succession.
Power adapter
1 Power adapter
Connects to the power supply.
2 Power cable connector
Connects to the power socket of the product.
2
12
1
Install
EN
Install the software
1
2
3
4
5
Put the installation CD in the CD or DVD drive of the computer.
Click on your preferred language.
Click on Install.
Click on Philips Media Manager.
Follow the on-screen instructions.
You will be asked to select the folders in which you have put movies, music and
pictures. Make sure that you select the correct folders. The movies, music and
pictures in the selected folders are available for the product.
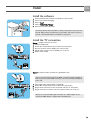
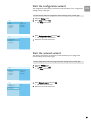
Install the TV connection
Option 1, SCART connection for all TVs
1 Take the SCART cable.
2 Set the video output switch on the product to the left position.
3 Plug one connector into the SCART port on the product.
4 Plug the other connector into the SCART port on the TV.
5 Manual restart needed.
2
3
1
4
TV
Option 2, component video connection for high-definition TVs
2
Only for use with TVs that support the YPbPr connection (typically available on
LCD or plasma TVs). The YPbPr connection is also known as YUV, 3x RCA (blue,
green, red).
3
1
2
3
4
Take a digital video cable (3x RCA, not supplied).
Set the video output switch on the product to the right position.
Plug the three connectors into the component video port on the product.
Plug the other three connectors into the component video port on the TV.
4
1
TV
When you connect the YPbPr signal to a Philips TV, a YPbPr adapter can be
required. A YPBPr adapter is supplied with some Philips TVs.
13
5
6
7
8
9
10
EN
7
5
8
Take a SCART to 3x RCA output adapter (not supplied).
Take a stereo audio cable (2x RCA, not supplied).
Plug the SCART to 3x RCA output adapter into the SCART port on the product.
Plug the stereo audio cable into the SCART to 3x RCA output adapter.
Plug the other end into the stereo input on the TV.
Manual restart needed.
9
6
TV
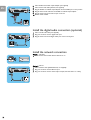
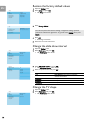
Install the digital audio connection (optional)
1 Take a coaxial audio cable (not supplied).
2 Plug one connector into the digital audio port.
3 Plug the other end into the digital audio port on the sound system.
2
3
1
Audio
Install the network connection
Option 1 - Wireless
1 Make sure that the wireless network devices are on.
TM
WiFi
Option 2 - Wired
1 Take a network cable (UTP5e Ethernet, not supplied).
2 Plug one connector into the Ethernet port.
3 Plug one connector into the network (for example, the base station or router).
2
3
1
14
Ethernet
Install the power connection
1 Take the power cable.
2 Plug the connector of the power cable into the power socket of the product.
3 Plug the power adapter into the power supply.
EN
> The on/off light on the front of the product comes on as red.
2
AC
3
1
Install the batteries
1 Open the battery compartment of the remote control.
2 Insert the batteries correctly.
3 Close the battery compartment.
+
+
Connect
Set the correct TV channel
1 Turn the TV on.
2 Set the TV to the correct external input. Refer to the user manual of the TV for
details.
TV
Start the configuration wizard
1 Take the remote control.
2 Point the remote control at the product.
3 Press the stand-by button.
> The on/off light on the front of the product comes on as blue.
4 Follow the on-screen instructions.
/i
Navigation
Action
Go up or down in a list
Button
Confirm a choice
Select the previous page
Show help information (when available)
15
EN
Enjoy
Compression formats
Before you share or play a media file, make sure that the product supports the
compression format of the media file (refer to page 35).
Digital Rights Management (DRM)
DRM protects the integrity of the media file so that the intellectual property, including
copyright, in such media file is not misappropriated. Before you share or play a media file
with DRM, make sure that the product supports the compression format of the media
file with DRM (refer to page 35).
Either – A future version of Philips Media Manager might include the option to stream
WM-DRM protected music.
Or – Windows Media Connect can be used to stream WMA-DRM protected
music.The Philips SLM5500 must be added to the safe list of Windows Media Connect.
Turn the product on
1 Set the correct TV channel.
2 Press the stand-by button on the supplied remote control.
> The home menu shows.
/i
Action
Select the available menu items
Button
Select the next or previous menu
Confirm a choice
Start the Philips Media Manager
Microsoft Windows®
1
2
3
4
Click on Start.
Click on All Programs.
Click on Philips Media Manager.
Click on Philips Media Manager.
> The Philips Media Manager starts.
16
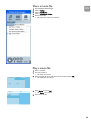
Share a movie file
1
2
3
4
5
Start the Philips Media Manager.
Click on Movies.
Click on Add Movies.
Click on Add Files or Folders.
Add the movie file.
EN
> The properties of the movie file show.
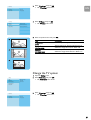
Play a movie file
1 Share a movie file.
2 Turn the product on.
> The home menu shows.
3 Select the media file server that shares the movie file and press OK.
Home Network
PMM (My PC)
Internet
(0 items)
PMM (My PC)
Movies
Music
All Movies
Pictures
> The media files menu shows.
4 Select Movies and press OK.
> The Movies menu shows.
5 Select the movie file.
Movies
17
6 Play the movie file with the supplied remote control.
EN
/i
Action
Start the movie file
Go forward in the movie file
(long)
Go to the next movie file
(short)
Go back in the movie file
(long)
Go to the previous movie file
(short)
Pause the movie file
Stop the movie file
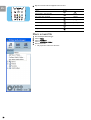
Share a music file
1
2
3
4
5
Start the Philips Media Manager.
Click on Music.
Click on Add Music.
Click on Add Files or Folders.
Add the music file.
> The properties of the music file show.
18
Button
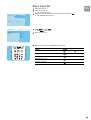
Play a music file
EN
1 Share the music file.
2 Turn the product on.
> The home menu shows.
3 Select the media file server that shares the music file and press OK.
Home Network
PMM (My PC)
Internet
(0 items)
PMM (My PC)
Music
Music
All Music
Pictures
Artists
Movies
Artists/Album
> The media files menu shows.
4 Select Music and press OK.
> The Music menu shows.
5 Select the music file.
Albums
Genres
6 Play the music file with the supplied remote control.
/i
Action
Start the music file
Button
Select the next music file
Select the previous music file
Pause the music file
Stop the music file
19
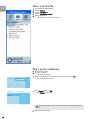
Share a picture file
EN
1
2
3
4
5
Start the Philips Media Manager.
Click on Pictures.
Click on Add Pictures.
Click on Add Files or Folders.
Add the picture file.
> The properties of the picture file show.
Play a picture slideshow
1 Share the picture files.
2 Turn the product on.
> The home menu shows.
3 Select the media file server that shares the picture files and press OK.
Home Network
PMM (My PC)
Internet
(0 items)
PMM (My PC)
Pictures
Music
All Pictures
> The media files menu shows.
4 Select Pictures and press OK.
> The Pictures menu shows.
Pictures
Movies
Tip To go to the thumbnail view, press the blue button on the supplied remote
control.
5 Select the first picture file.
20
6 Play the picture slideshow with the supplied remote control.
/i
Action
Start the picture slide show
Button
EN
Go to the next picture
Go to the previous picture
Pause the picture slide show
Stop the picture slide show
Tip To change the settings of the picture slide show, use the Settings menu.
Play a picture slideshow with music
1 Play the music file.
2 Press the home button on the supplied remote control.
3 Play the picture slide show.
Set to stand-by
1 Press the stand-by button on the supplied remote control.
> The on/off light on the front of your product comes on as red.
When the product is switched to stand-by, it still uses power. To turn the product off,
remove the power adapter from the power supply.
Configure
Open the Settings menu
With the Settings menu, you can change the settings of the product.
1 Take the supplied remote control.
2 Turn the product on.
3 Press the settings button.
> The Settings menu shows.
21
Overview
EN
/i
Setup
Preferences
Network settings
Internet services
Language
Configuration wizard
Network wizard
Factory defaults
Slide show interval
TV settings
TV Shape
TV System
Image quality
Screen saver
View
Device name
IP details
Connection method
Wireless details
Change
Device name
IP Assignment
Connection method
Register
Software upgrade
Bandwidth
Product info
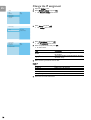
Change the language
1 Open the Settings menu.
2 Select Setup and press OK.
Settings
Setup
Language
Preferences
Configuration wizard
Network settings
Network wizard
Internet services
Factory defaults
> The Setup menu shows.
Product info
3 Select Language and press OK.
Setup
English
Configuration wizard
Français
4 Select the preferred item and press OK.
Network wizard
Español
/i
Factory defaults
Deutsch
Nederlands
Italiano
22
> The Language menu shows.
Language
Item
English
Français
Español
Deutsch
Nederlands
Italiano
Description
English
French
Spanish
German
Dutch
Italian
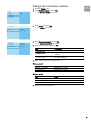
Start the configuration wizard
The configuration wizard starts an automatic process that allows you to configure the
settings of the product again.
EN
Use the network wizard to configure the network settings of the product again.
1 Open the Settings menu.
2 Select Setup and press OK.
Settings
Setup
Language
Preferences
Configuration wizard
Network settings
Network wizard
Internet services
Factory defaults
> The Setup menu shows.
Product info
3 Select Configuration wizard and press OK.
Setup
Language
Start
> The configuration wizard starts.
4 Follow the on-screen instructions.
Configuration wizard
Network wizard
Factory defaults
Start the network wizard
The network wizard starts an automatic process that allows you to configure the
network settings of the product again.
Use the configuration wizard to configure the other settings of the product again.
1 Open the Settings menu.
2 Select Setup and press OK.
Settings
Setup
Language
Preferences
Configuration wizard
Network settings
Network wizard
Internet services
Factory defaults
> The Setup menu shows.
Product info
3 Select Network wizard and press OK.
Setup
Language
Configuration wizard
Start
> The network wizard starts.
4 Follow the on-screen instructions.
Network wizard
Factory defaults
23
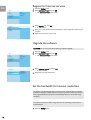
Restore the factory default values
EN
1 Open the Settings menu.
2 Select Setup and press OK.
Settings
Setup
Language
Preferences
Configuration wizard
Network settings
Network wizard
Internet services
Factory defaults
> The Setup menu shows.
Product info
3 Select Factory defaults.
Setup
Language
Configuration wizard
Network wizard
Resets all preferences and network settings
to their initial values.
The next step erases the network settings, configuration settings, personal
preferences and Internet registration. To go back to the Settings menu, press
BACK.
Press OK to start clearing all settings.
Factory defaults
4 Press OK.
> All settings are erased.
5 Follow the on-screen instructions.
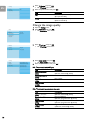
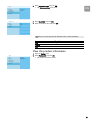
Change the slide show interval
1 Open the Settings menu.
2 Select Preferences and press OK.
Settings
Setup
Slide show interval
Preferences
TV settings
Network settings
Screen saver
> The Preferences menu shows.
Internet services
Product info
3 Select Slide show interval and press OK.
Preferences
> The Slide show interval menu shows.
Slide show interval
Off
TV settings
3 seconds
4 Select the preferred item and press OK.
Screen saver
5 seconds
/i
10 seconds
Item
Off
3 seconds
5 seconds
10 seconds
Description
Each picture shows until you press the
next/forward button.
Each picture shows for 3 seconds.
Each picture shows for 5 seconds.
Each picture shows for 10 seconds.
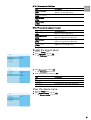
Change the TV shape
1 Open the Settings menu.
2 Select Preferences and press OK.
Settings
Setup
Slide show interval
Preferences
TV settings
Network settings
Screen saver
Internet services
Product info
24
> The Preferences menu shows.
3 Select TV settings and press OK.
Preferences
Slide show interval
TV Shape
TV settings
TV System
Screen saver
Image quality
> The TV settings menu shows.
EN
4 Select TV Shape and press OK.
TV settings
TV Shape
Widescreen (16:9)
TV System
Standard (4:3, Cut sides)
Image quality
Standard (4:3, Black bars)
> The TV shape menu shows.
5 Select the preferred item and press OK.
/i
A
Item
Widescreen
(16:9)
Standard
(4:3, Cut sides)
Standard
(4:3, Black bars)
B
Description
The TV shape is 16:9 (widescreen). Refer to A.
The TV shape is 4:3. The left and right parts of
widescreen images do not show. Refer to B.
The TV shape is 4:3. The top and bottom parts of
widescreen images show black bars. Refer to C.
C
Change the TV system
1 Open the Settings menu.
2 Select Preferences and press OK.
Settings
Setup
Slide show interval
Preferences
TV settings
Network settings
Screen saver
> The Preferences menu shows.
Internet services
Product info
3 Select TV settings and press OK.
Preferences
Slide show interval
TV Shape
TV settings
TV System
Screen saver
Image quality
> The TV settings menu shows.
25
EN
4 Select TV System and press OK.
TV settings
TV shape
PAL
TV system
NTSC
Image quality
> The TV system menu shows.
5 Select the preferred item and press OK.
/i
Item
PAL
NTSC
Description
Sets the TV system of the product to PAL
(European standard).
Sets the TV system of the product to NTSC
(American standard).
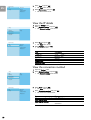
Change the image quality
1 Open the Settings menu.
2 Select Preferences and press OK.
Settings
Setup
Slide show interval
Preferences
TV settings
Network settings
Screen saver
> The Preferences menu shows.
Internet services
Product info
3 Select TV settings and press OK.
Preferences
Slide show interval
TV Shape
TV settings
TV System
Screen saver
Image quality
> The TV settings menu shows.
4 Select Image quality and press OK.
TV settings
> The Image quality menu shows.
TV shape
Standard-definition (576i)
TV system
Enhanced-definition (576p)
5 Select the preferred item and press OK.
Image quality
High-definition (720p)
/i
High-definition (1080i)
PAL, TV connected to SCART port
Item
Standard-definition
(576i)
Enhanced-definition
(576p)
High-definition
(720p)
High-definition
(1080i)
Description
Standard-definition
(576 lines, interlaced @ 50 Hz)
Not available
Not available
Not available
/i
PAL, TV connected to component video port
Item
Standard-definition
(576i)
Enhanced-definition
(576p)
High-definition
(720p)
High-definition
(1080i)
/i
26
Description
Standard-definition
(576 lines, interlaced @ 50 Hz)
Enhanced-definition
(576 lines, progressive scan @ 50 Hz)
High-definition
(720 lines, progressive scan @ 50 Hz)
High-definition
(1080 lines, interlaced @ 50 Hz)
NTSC, TV connected to SCART port
Item
Standard-definition
(480i)
Enhanced-definition
(480p)
High-definition
(720p)
High-definition
(1080i)
Description
Standard-definition
(480 lines, interlaced @ 60 Hz)
Not available
EN
Not available
Not available
/i
NTSC, TV connected to component video port
Item
Standard-definition
(480i)
Enhanced-definition
(480p)
High-definition
(720p)
High-definition
(1080i)
Description
Standard-definition
(480 lines, interlaced @ 60 Hz)
Enhanced-definition
(480 lines, progressive scan @ 60 Hz)
High-definition
(720 lines, progressive scan @ 60 Hz)
High-definition
(1080 lines, interlaced @ 60 Hz)
Enable the screen saver
1 Open the Settings menu.
2 Select Preferences and press OK.
Settings
Setup
Slide show interval
Preferences
TV settings
Network settings
Screen saver
> The Preferences menu shows.
Internet services
Product info
3 Select Screen saver and press OK.
Preferences
> The Screen saver menu shows.
Slide show interval
Off
TV settings
5 minutes
4 Select the preferred item and press OK.
Screen saver
10 minutes
/i
20 minutes
Item
Off
5 minutes
10 minutes
20 minutes
Description
The screen saver does never start
The screen saver starts after 5 minutes
The screen saver starts after 10 minutes
The screen saver starts after 20 minutes
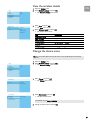
View the device name
1 Open the Settings menu.
2 Select Network settings and press OK.
Settings
Setup
View
Preferences
Change
> The Network settings menu shows.
Network settings
Internet services
Product info
27
EN
3 Select View and press OK.
Network settings
View
Device name
Change
IP details
> The View menu shows.
4 Select Device name and press OK.
> The device name shows.
Connection method
Wireless details
View the IP details
1 Open the Settings menu.
2 Select Network settings and press OK.
Settings
Setup
View
Preferences
Change
> The Network settings menu shows.
Network settings
Internet services
Product info
3 Select View and press OK.
Network settings
View
Device name
Change
IP details
> The View menu shows
4 Select IP details and press OK.
> The IP details show.
Connection method
Wireless details
/i
Item
Assignment
IP Address
NetMask
Gateway
Primary DNS
Secondary DNS
Description
DHCP or Static IP
IP address
Network mask
Gateway
Primary domain name server
Secondary domain name server
View the connection method
1 Open the Settings menu.
2 Select Network settings and press OK.
Settings
Setup
View
Preferences
Change
> The Network settings menu shows.
Network settings
Internet services
Product info
3 Select View and press OK.
Network settings
View
Device name
Change
IP details
> The View menu shows
4 Select Connection method and press OK.
> The connection method shows.
Connection method
Wireless details
/i
Item
Current connection method
MAC address wired
MAC address wireless
28
Description
Wired or Wireless
MAC address of the wired network connection.
MAC address of the wireless network
connection.
View the wireless details
1 Open the Settings menu.
2 Select Network settings and press OK.
Settings
Setup
View
Preferences
Change
EN
> The Network settings menu shows.
Network settings
Internet services
Product info
3 Select View and press OK.
Network settings
View
Device name
Change
IP details
> The View menu shows.
4 Select Wireless details and press OK.
> The wireless details show.
Connection method
Wireless details
/i
Item
Connection status
Signal strength
Network name
Wireless mode
Channel
Encryption type
Description
Status of the wireless network connection
Signal strength (%)
Network name
Infrastructure or Ad-hoc
Channel number
Off, WEP or WPA
Change the device name
Tip You can use the device name to tell two or more products apart on the same
network.
1 Open the Settings menu.
2 Select Network settings and press OK.
Settings
Setup
View
Preferences
Change
> The Network settings menu shows.
Network settings
Internet services
Product info
3 Select Change and press OK.
Network settings
View
Device name
Change
IP Assignment
> The Change menu shows.
Connection method
4 Select Device name and press OK.
Network settings
Device name
Philips SLM5500
> The device name shows.
IP assignment
Connection method
The default name is Philips SLM5500.
5 Change the device name and press OK.
29
Change the IP assignment
EN
1 Open the Settings menu.
2 Select Network settings and press OK.
Settings
Setup
View
Preferences
Change
> The Network settings menu shows.
Network settings
Internet services
Product info
3 Select Change and press OK.
Network settings
View
Device name
Change
IP Assignment
> The Change menu shows.
Connection method
4 Select IP Assignment and press OK.
Network settings
Device name
DHCP
IP Assignment
Static IP
> The IP Assignment menu shows.
5 Select the preferred item and press OK.
> A wizard starts.
Connection method
/i
Item
DHCP
Static IP
Description
The base station or router gives an IP address to
the product.
You give the product a static IP address. (Only for
advanced users.)
6 Make sure that you have the correct data.
/i
Static IP
Data
IP address
Network mask
Gateway
DNS primary
From
Valid range of IP addresses
Base station or router
Base station or router
Internet service provider
7 Follow the on-screen instructions.
30
Change the connection method
1 Open the Settings menu.
2 Select Network settings and press OK.
Settings
Setup
View
Preferences
Change
EN
> The Network settings menu shows.
Network settings
Internet services
Product info
3 Select Change and press OK.
Network settings
View
Device name
Change
IP Assignment
> The Change menu shows.
Connection method
4 Select Connection method and press OK.
Network settings
> The Connection method menu shows.
Device name
Wired (Ethernet)
IP Assignment
Wireless, wizard
5 Select the preferred item and press OK.
Connection method
Wireless, manual
/i
Item
Wired, Ethernet
Wireless, wizard
Wireless, manual
Description
Connection to a wired Ethernet network.
Automatic connection to a wireless network with
a wizard.
Manual connection to a wireless network (only
for advanced users).
6 Make sure that you have the correct data.
/i
Wireless, wizard
Data
Network name (SSID)
Encryption type
From
Base station or router
Base station or router
/i
Wireless, manual
Data
Network name (SSID)
Infrastructure
Encryption type
From
Base station or router
Wireless network
Base station or router
7 Follow the on-screen instructions.
31
Register for Internet services
EN
1 Open the Settings menu.
2 Select Internet services and press OK.
Settings
Setup
Register
Preferences
Software upgrade
Network settings
Bandwidth
> The Internet services menu shows.
Internet services
Product info
3 Select Register and press OK.
Internet services
Register
Register
> A wizard starts.
4 Enter your e-mail address so that Club Philips can send a registration e-mail to your
computer.
5 Follow the instructions in the e-mail.
SW upgrade
Bandwidth
Upgrade the software
CAUTION Do not turn the product off during a software upgrade.
1 Open the Settings menu.
2 Select Internet services and press OK.
Settings
Setup
Register
Preferences
Software upgrade
Network settings
Bandwidth
> The Internet services menu shows.
Internet services
Product info
3 Select Software upgrade and press OK.
Internet services
Register
Software upgrade
Bandwidth
There are no software
upgrades available.
Your software is up to date.
The software version is
V4.2.107D41.SD5.1.
> A wizard starts.
4 Follow the on-screen instructions.
Set the bandwidth for Internet media files
The product can automatically select a specific Internet media file when an Internet
media file is available in multiple sizes. For example, if you have an Internet connection
with a high bandwidth, the product can automatically select for movies with a high
resolution.
Some Internet service providers charge extra fees for exceeding a certain limit of
transferred data.
1 Open the Settings menu.
32
2 Select Internet services and press OK.
Settings
Setup
Register
Preferences
Software upgrade
Network settings
Bandwidth
> The Internet services menu shows.
EN
Internet services
Product info
Internet services
Register
High
SW upgrade
Medium
Bandwidth
Low
3 Select Bandwidth and press OK.
4 Select the preferred item and press OK.
Tip When you cannot play Internet media files, select a lower bandwidth.
/i
Item
High
Medium
Low
Description
High bandwidth
Medium bandwidth
Low bandwidth
View the product information
1 Open the Settings menu.
2 Select Product info and press OK.
Settings
Setup
Preferences
Software Version:
V4.2.107D41.SD5.1
Hardware Version: R0A
> The product information shows.
Network settings
Internet services
Product info
33
Troubleshooting
EN
Problems and tips
Problem
No reaction to the supplied remote control
No video signal on the TV screen
No sound signal from the loudspeakers of the audio system
Cannot find the wired network
Cannot find the wireless network
Cannot connect to the wireless network
No access to media files (movies, music or pictures)
Cannot play a media file
Cannot play Internet media files
34
Tip
Connect the power adapter to the power supply.
Point the remote control at the product.
Insert the batteries correctly.
Insert new batteries in the remote control.
Turn the TV on.
Set the TV to the correct external input
Set the To TV switch on the rear of the product to the correct
position and restart the product.
Make sure that the TV supports the video signal of the product. Press
the green button on the supplied remote control for 3 seconds to
restore the video signal to the factory default values.
Turn the audio system on.
Set the audio system to the correct external input.
Increase the volume level of the audio system.
Turn the other wired network devices on.
Use a straight network cable (Ethernet, UTP 5e) to make a
connection from the product to the wired network.
Turn the other wireless network devices on.
Decrease the distance between the base station or router and the
product.
Either - make sure that the broadcast wireless network name (SSID
Broadcast) is enabled on the base station or router
Or - enter the network name (SSID) manually. Copy the network
name from the base station or router.
Enter the correct security code (WEP or WPA). Copy the security
code (WEP or WPA) from the base station or router
Make sure that the firewalls in the wireless network give the product
access to the wireless network. For example, allow or unblock the
MAC address of the product on the network.
Make sure that the wireless network uses the first security code of
the base station or router.
Start the Philips Media Manager.
Make sure that the Philips Media Manager shares media files with the
product.
Connect the product to the correct network.
Make sure that the firewalls in the computer and base station or
router give the Philips Media Manager access to the network. For
example, allow or unblock the Philips Media Manager.
Make sure that the product supports the file format (refer to page
35).
Make sure that the Philips Media Manager shares the media file with
the product.
When you play a protected media file (WMA-DRM, WMV-DRM) for
the first time, the product must have a connection to the Internet.
Try again later. The Internet service can be down temporarily.
Make sure that the product supports the Internet format
Make sure that the firewalls in the network give the Internet service
access to the network.
Technical data
EN
Video playback
/i
Compression formats
DivX 3.11, DivX 4, DivX 5, MPEG1,
MPEG2, MPEG4, XviD, WMV, WMV-DRM
HD-MPEG2 (on wired network)
Audio playback
/i
Compression formats
MP3, PCM, WAV, WMA-DRM, WMA,
AAC-MPEG4
ID3-tag support
Still picture playback
/i
Picture compression format
Picture enhancement
JPEG
Slideshow with audio playback, High
Definition Resolution
Thumbnail view
Connectivity
/i
Encryption/security
LAN wired
Video output - Analog
Wireless connections
Audio output - Digital
WEP 128 bit, WEP 64 bit, WPA
Ethernet (on RJ 45) 1 x
Audio L + R (on SCART), Component
RGB (on SCART), Composite CVBS (on
SCART), Component Y Pb Pr (on cinch)
Wireless LAN (802.11b/g)
Coaxial SP/DIF (on cinch)
Software
/i
Philips Media Manager
UPnP multimedia content server
System requirements
/i
CD-ROM drive
Hard disk space
PC OS
Processor
RAM memory
PC network required
Internet connection
Club Philips
100 MB
Windows® 98SE, Windows® 2000,
Windows® ME, Windows® XP
Pentium II or better
64 MB
Wireless or wired PC network
Broadband Internet (> 256 kbps)
Internet access and e-mail
35
EN
Dimensions
/i
Product dimensions (WxDxH)
Product weight
207 x 152 x 40 mm
0.84 kg
Power
/i
Mains power
On/Off switch
Power consumption
Power LED indicator
AC 100-240 V 50-60 Hz
15 W (2.5 W stand-by)
Blue, red
Internet services
Refer to Club Philips for the latest list of Internet services.
/i
Audio services
Video services
Photo services
My media
36
Live 365.com, Andante, Radio Free Virgin,
Playhouse radio, ... and more
Yahoo! Movies, Launch, iFILM
Yahoo! Photos
Add your own Internet streams
Information
EN
Respect copyrights
Be responsible
Respect copyrights
The making of unauthorised copies of copy-protected material, including computer
programmes, files, broadcasts and sound recordings, may be an infringement of
copyrights and constitute a criminal offence. This equipment should not be used for such
purposes.
Disclaimer
This product is protected by certain intellectual property rights of Microsoft
Corporation. Use or distribution of such technology outside of this product is
prohibited without a license from Microsoft or an authorized Microsoft subsidiary.
Content providers are using the digital rights management technology for Windows
Media contained in this device ("WM-DRM") to protect the integrity of their content
("Secure Content") so that their intellectual property, including copyright, in such
content is not misappropriated. This device uses WM-DRM software to play Secure
Content ("WM-DRM Software"). If the security of the WM-DRM Software in this device
has been compromised, Microsoft may revoke (either on its own or upon the request
of the owners of Secure Content ("Secure Content Owners")) the WM-DRM Software's
right to acquire new licenses to copy, display and/or play Secure Content. Revocation
may also prevent your device's ability to transfer, store, copy, display and/or play Secure
Content which you have previously stored on your Device. Revocation does not alter
the WM-DRM Software's ability to play unprotected content. A list of revoked
WM-DRM Software is sent to your device whenever you download a license for Secure
Content from the Internet or from a PC. Microsoft may, in conjunction with such
license, also download revocation lists onto your device on behalf of Secure Content
Owners, which may disable your device's ability to copy, display and/or play Secure
Content.
In the event of revocation, Philips will attempt to make available software updates to
restore some or all of your device's ability to transfer, store, access, copy, display and/or
play Secure Content. However, the ability to make such updates available does not rest
solely with Philips. Philips does not guarantee that, after revocation, such software
updates will be available. If such updates are not available, your device will not have the
ability to transfer, store, copy, display and/or play Secure Content - even Secure Content
which you have previously stored on your device.
In addition, even if such software updates are available, they may not enable your Device
to transfer, store, copy, display, and/or play Secure Content which was previously stored
on your Device. In some cases you may be able to transfer the content from the PC . In
other cases, you may have to repurchase previously obtained Secure Content.
To summarize - Microsoft, Secure Content Owners, and Secure Content distributors
may deny you access, or restrict your access, to Secure Content. They may also disable
your device's ability to transfer, store, copy, display and/or play Secure Content even
after you have paid for and obtained it. Neither your consent nor the consent or
approval of Philips is necessary for any of them to deny, withhold or otherwise restrict
your access to Secure Content or to disable your device's ability to transfer, store,
access, copy, display, and/or play Secure Content. Philips does not guaranty that you will
be able to transfer, store, access, copy, display, and/or play Secure Content.
Trademarks
Windows is a registered trademark of Microsoft Corporation in the United States and
other countries.
37
EN
Wireless transmission
0682
The product transmits and receives radio waves when it is switched on. The product
complies with the standards that are defined for it. The quality of the image can be
influenced by the use of microwave ovens. Other wireless systems (Bluetooth, wireless
networks etc.) can also have influence on the quality of the image.
Health and safety
Philips Royal Electronics manufactures and sells many products targeted at consumers,
which, like any electronic apparatus, in general have the ability to emit and receive
electro magnetic signals. One of Philips’ leading Business Principles is to take all
necessary health and safety measures for our products, to comply with all applicable legal
requirements and to stay well within the EMF standards applicable at the time of
producing the products. Philips is committed to develop, produce and market products
that cause no adverse health effects. Philips confirms that if its products are handled
properly for their intended use, they are safe to use according to scientific evidence
available today. Philips plays an active role in the development of international EMF and
safety standards, enabling Philips to anticipate further developments in standardization
for early integration in its products.
Maintenance and service
If the product is defective and needs repair, but the warranty period has expired, you
can consult our specialists (refer to page 9).
Disposal of your old product
Your product is designed and manufactured with high quality materials and components,
which can be recycled and reused. When this crossed-out wheeled bin symbol is
attached to a product it means the product is covered by the European Directive
2002/96/EC Please inform yourself about the local separate collection system for
electrical and electronic products. Please act according to your local rules and do not
dispose of your old products with your normal household waste. The correct disposal
of your old product will help prevent potential negative consequences for the
environment and human health.
Warranty
Refer to the installation CD for a guarantee leaflet.
38
Glossary
EN
Terms and definitions
Ad-hoc network
A direct connection between two devices. For example, a
connection between a computer and the product.
Codec
Coder-decoder. A program that can decode a signal into music or a
movie (for example, MP3 or DivX).
Component video
A type of analog video information.
DHCP
Dynamic Host Configuration Protocol. The DHCP gives IP addresses
to the computer network devices.
DNS
Domain Name Server. A server that changes the names of domains
(for example, www.philips.com) in IP addresses.
DRM
Digital Rights Management. DRM protects the integrity of the media
file so that the intellectual property, including copyright, in such
media file is not misappropriated.
Firewall
A program or computer network device that makes sure that the
computer network is secure.
Gateway
An IP address that a computer network uses to get access to the
another computer network. For example, the IP address that a local
area network uses to get access to the Internet.
Infrastructure network
A computer network of two or more devices that are connected
through a central host (for example, a base station or a router).
IP address
A unique combination of four numbers (0 - 255) that identifies a
device in a computer network. An IP address can be static or
dynamic (given by a DHCP).
MAC address
A unique combination of 6 hexadecimal numbers (00 - FF) that
identifies (a part of) a physical device.
Network mask
A combination of four numbers (0 - 255) that identifies the maximum
number of IP addresses in a computer network. For example, when
the network mask is 255.255.255.0, the first, second and third
numbers of all IP addresses in the computer network are the same.
NTSC
National Television System Committee. A type of analog TV system.
NTSC is mostly used in the Americas.
PAL
Phase-alternating line. A type of analog TV system.
Philips Media Manager
The program that can share the media files on a computer with the
product.
SSID
Service Set Identifier. The name of the wireless computer network.
Streamium
The Philips range of Internet-enabled products.
UPnP
Universal plug-and-play. A method to share media files in a home
network.
WEP
Wired Equivalent Privacy. A security type for wireless computer
networks.
WPA
WiFi-protected Access. A security type for wireless computer
networks.
39
/i
Specifications are subject to change without notice.
Trademarks are the property of Koninklijke Philips Electronics N.V. or their respective owners.
2005 © Koninklijke Philips Electronics N.V. All rights reserved.
www.philips.com
3122 337 0341