1
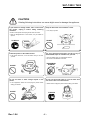
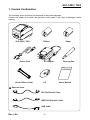
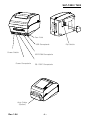
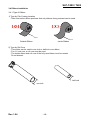
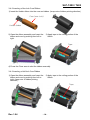
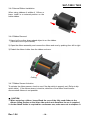
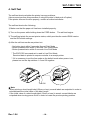
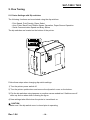
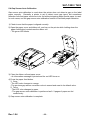
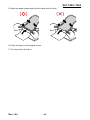
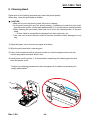
User's Manual
SLP-T400 / T403
Label Printer
Rev. 1.04
http://www.bixolon.com
SLP-T400 / T403
■ Table of Contents
※ Manual Information & Usage Precautions..................................................................3
1. Content Confirmation ....................................................................................................7
2. Product Part Names.......................................................................................................8
3. Installation & Usage.....................................................................................................10
3-1 Power Connection ....................................................................................................10
3-2 Interface Cable Connection ...................................................................................... 11
3-3 Paper Installation ......................................................................................................12
3-4 Ribbon Installation ....................................................................................................13
3-5 LED Display ..............................................................................................................17
4. Self-Test........................................................................................................................18
5. Fine Tuning...................................................................................................................19
5-1 Printer Settings with Dip switches.............................................................................19
5-2 Printer Settings with Utility Program .........................................................................21
5-3 Pause/Cancel ...........................................................................................................22
5-4 Gap Sensor Auto-Calibration ....................................................................................23
5-5 Gap Sensor Manual-Calibration ...............................................................................24
5-6 The Peel-Off .............................................................................................................25
5-7 Using Fan-Fold Paper...............................................................................................27
5-8 Auto Cutter (Option)..................................................................................................28
6. Cleaning Head..............................................................................................................29
7. Appendix.......................................................................................................................30
7-1 Specifications............................................................................................................30
7-2 Certification...............................................................................................................31
7-3 Label Types ..............................................................................................................31
Rev. 1.04
-2-
SLP-T400 / T403
■ Manual Information
※ Manual Information & Usage Precautions
This user manual contains basic information for product usage as well as for emergency
measures that may be required.
※ The following separate manuals provide more detailed content on various technological
issues and areas.
1. Windows Driver Manual
This manual provides information on the installation instructions and main functions
of the Windows Driver.
2. Unified Label Printer Utility Manual
This manual provides information on the usage of software for function selection of
this product, operating condition modification, etc.
The following functions are available.
1) Firmware Downloader
2) Factory Font Downloader
3) Soft-Font (or Downloadable-font) Downloader
4) PCX File Downloader
5) User Setting Manager
6) File Transfer Manager
7) SLCS Tester
3. Z Driver Manual
This manual provides information on the usage of the Z Driver, which contains a
function that can reduce A4-sized original copy data to 4-inch size.
4. Programming (SLCS) Manual
This manual provides information on label printer commands.
5. True Font Downloader Manual
This manual provides information on the usage of the font downloader that can
download True Fonts and facilitate their usage as Device Fonts.
We at BIXOLON maintain ongoing efforts to enhance and upgrade the functions and
quality of all our products. In following, product specifications and/or user manual content
may be changed without prior notice.
Rev. 1.04
-3-
SLP-T400 / T403
■ Safety Precautions
In using the present appliance, please keep the following safety regulations in order to
prevent any hazard or material damage.
WARNING
Violating following instructions can cause serious injury or death.
Do not plug several products in one multi-outlet.
You must use only the supplied adapter.
• This can provoke over-heating and a fire.
• If the plug is wet or dirty, dry or wipe it before usage.
• If the plug does not fit perfectly with the outlet, do not plug in.
• Be sure to use only standardized multi-outlets.
• It is dangerous to use other adapters.
ONLY SUPPLIED ADAPTER
PROHIBIT
PROHIBIT
Do not pull the cable to unplug.
Keep the plastic bag out of children’s reach.
• This can damage the cable, which is the origin of a fire or a
breakdown of the printer.
• If not, a child may put the bag on his head.
PROHIBIT
Do not plug in or unplug with your hands wet.
• You can be electrocuted.
PROHIBIT
Do not bend the cable by force or leave it under any
heavy object.
• A damaged cable can cause a fire.
PROHIBIT
PROHIBIT
Rev. 1.04
-4-
SLP-T400 / T403
CAUTION
Violating following instructions can cause slight wound or damage the appliance.
If you observe a strange smoke, odor or noise from
the printer, unplug it before taking following
measures.
Keep the desiccant out of children’s reach.
• If not, they may eat it.
• Switch off the printer and unplug the set from the mains.
• After the disappearance of the smoke, call your dealer to
repair it.
TO UNPLUG
PROHIBIT
PRINTER
Install the printer on the stable surface.
• If the printer falls down, it can be broken and you can hurt
yourself.
Use only approved accessories and do not try to
disassemble, repair or remodel it for yourself.
• Call your dealer when you need these services.
• Do not touch the blade of auto cutter.
PRINTER
DISASSEMBLING
PROHIBITED
PROHIBIT
PRINTER
Do not let water or other foreign objects in the
printer.
Do not use the printer when it is out of order. This
can cause a fire or an electrocution.
• If this happened, switch off and unplug the printer before
calling your dealer.
• Switch off and unplug the printer before calling your dealer.
PROHIBIT
TO UNPLUG
PRINTER
PRINTER
DEALER
Rev. 1.04
-5-
SLP-T400 / T403
■ Other Precautions
The copyright for this user manual and various other manuals is property of the BIXOLON
Co., Ltd. Any copying or conversion into electronic firm and saving of this material
without the express written permission of BIXOLON Co., Ltd. is strictly prohibited.
Use of the information contained in this manual is not subject to any patent liability. This
manual has been prepared with utmost care and attention to detail but may contain certain
errors and/or omissions.
BIXOLON Co., Ltd. is not legally liable for any damages resulting from the use of the
information in this manual.
BIXOLON Co., Ltd. and its affiliates are not legally liable (United States excluded) for any
damages, loss, costs, and/or expenses that result from the breakdown, malfunction, and/or
misuse of the product due to violation or neglect of the operation and maintenance
information and instructions provided by the BIXOLON Co., Ltd., as well as from the
unauthorized alteration, repair, and/or modification of the product by the user and/or third
party.
BIXOLON Co., Ltd. is not legally liable for any damages and/or issues resulting from the
use of options and/or parts that are not authentic BIXOLON products or authorized
products.
Rev. 1.04
-6-
SLP-T400 / T403
1. Content Confirmation
The following items should all be contained in the printer package.
Contact the dealer from which the purchase was made if any item is damaged and/or
missing.
SLP-T400 / T403
Power Cord
Holder Ribbon (2ea)
Ribbon
Paper
AC Adapter
CD
Cleaning Pen
User’s Manual
※ Optional items
RS-232C(Serial) Cable
IEEE1284 (Parallel) Cable
USB Cable
Rev. 1.04
-7-
SLP-T400 / T403
2. Product Part Names
Pause Button
Feed Button
Cover Peel-off
Cover Lever
Paper Cover
Ribbon Assembly
Printer Head
Paper Holder
Paper Reflector
Sensor
Paper Guide
(Gap Sensor)
Peel-off Sensor
Rev. 1.04
-8-
SLP-T400 / T403
Fan-Fold
USB Receptacle
Power Switch
IEEE1284 Receptacle
Power Receptacle
RS-232C Receptacle
Auto Cutter
(Option)
Rev. 1.04
-9-
Dip Switch
SLP-T400 / T403
3. Installation & Usage
3-1 Power Connection
Connect power to the printer as shown below.
OFF
Power Switch
AC Adapter
Power Cord
1) Turn off the printer power switch.
2) Check to see that the AC adapter voltage matches that of the power source.
3) Connect the AC adapter jack to the printer power connector.
4) Connect the power cord to the AC adapter.
5) Connect the power cord to a power source/outlet.
Rev. 1.04
- 10 -
SLP-T400 / T403
3-2 Interface Cable Connection
Connect the interface cable as shown below.
This printer supports the following communications interface standards.
- RS-232C (Serial)
- IEEE1284 (Parallel)
- USB
RS-232 (Serial) Cable
USB Cable
IEEE1284 (Parallel) Cable
1) Turn off the power switch.
2) Connect the interface cable to the printer interface connector.
- For a Serial cable, secure by tightening the screws on both sides.
- For a Parallel cable, secure by fastening the clips on both sides.
Rev. 1.04
- 11 -
SLP-T400 / T403
3-3 Paper Installation
1) Open the Paper Cover.
2) Spread the paper holder and insert
paper as shown.
3) Open the Ribbon Assembly and spread
the paper guide.
4) Adjust the paper guide to the width of
the paper and close the Ribbon
Assembly. (keep note of paper printing
direction)
Ribbon Assembly
Paper Guide
5) Close the Paper Cover.
Rev. 1.04
- 12 -
SLP-T400 / T403
3-4 Ribbon Installation
3-4-1 Type of Ribbon
1) Type by Film Coating Location
- Take note before ribbon purchase that only ribbons facing outward can be used.
(O)
(X)
face
face
Outside Ribbon
Inside Ribbon
2) Type by Roll Core
- This printer can be used to one-inch or half-inch core ribbon.
- For a 1-inch core, a roll core must be used.
- The holder ribbon and roll core of the fully used ribbon must be reused.
Do not discard.
half-inch
one-inch
Rev. 1.04
- 13 -
SLP-T400 / T403
3-4-2 Inserting a One-Inch Core Ribbon
1) Insert the Holder ribbon into the core and ribbon. (keep note of ribbon printing direction)
Core (one-inch)
Holder ribbon
2) Open the ribbon assembly and insert the
ribbon and core by pushing from left to
right.
3) Apply tape to the coiling portion of the
ribbon.
Tape
4) Press the Close area to shut the ribbon assembly.
3-4-3 Inserting a Half-Inch Core Ribbon
1) Open the ribbon assembly and insert the
ribbon and core by pushing from left to
right. (keep note of ribbon printing
direction)
2) Apply tape to the coiling portion of the
ribbon.
Tape
Rev. 1.04
- 14 -
SLP-T400 / T403
3-4-4 Knob Adjustment by Ribbon Length
Ribbon lengths of 74m, 100m (0.5” core), and 300m (1” core) can all be used with this
product. Adjust the knob accurately according to the ribbon length (74 ~ 300 m).
Exercise care as print quality and operation can be affected.
z The product is shipped with a default
setting for a ribbon length of 300m
(1” core). To use a 74m (0.5” core)
ribbon, adjust (rotate) the knob in the
direction of 74m prior to use.
.
z When the cover is outside the knob
as shown in the image, the ribbon
length is set to 74m. If the cover is
inside the knob as shown in Image
B, the ribbon length is set to 300m.
Knob
Cover
Image-A (74m)
Image -B (300m)
■ Knob Adjustment
- Grasp the ribbon while it is fitted and rotate the knob as shown in the image.
Knob
Rev. 1.04
Ribbon
- 15 -
SLP-T400 / T403
3-4-5 Narrow Ribbon Installation
When using ribbons of widths of 110mm or
lower, install in a centered position on the
holder ribbon.
3-4-6 Ribbon Removal
1) Use a knife or other sharp-edged object to cut the ribbon.
(Take care not to injure hands)
2) Open the ribbon assembly and remove the ribbon and core by pushing from left to right.
3) Detach the ribbon holder from the ribbon and core.
Cutting
3-4-7 Ribbon Sensor Activation
To activate the ribbon sensor, check to see if the dip switch is properly set. (Refer to dip
switch table) If the ribbon sensor is inactive, detection of low ribbon levels and/or
disconnected ribbons is not possible.
※ CAUTION
1. When replacing a ribbon, keep affixed the core of the fully used ribbon to the
ribbon coiling portion on the other side and do not discard as its use is required.
2. As the ribbon holder is required for continuous use, make sure not to misplace it.
Rev. 1.04
- 16 -
SLP-T400 / T403
3-5 LED Display
Pause
: During print jobs, this button can be used to temporarily cease printing
and/or again to resume printing.
Status
: The current printer status can be viewed. (Refer to table)
Error
: The current printer status can be viewed. (Refer to table)
Feed/Cancel
: Paper feed or cancel the print job.
The current printer status can be viewed via the printer’s LED display.
LED Type
Printer Status
Error
Status
Normal status, on standby to receive date from the host
Green On
Green On
(e.g. PC)
Red Blinking
Red On
Ribbon cover open
Orange
Red On
No paper
Blinking
Green
Red On
Print stoppage due to TPH (print head) overheating
Blinking
Red On
Red On
No ribbon
On standby for user button input for automatic sensor
Red On
Off
level correction
Green
Print stoppage after input of Pause button, Press Pause
Red On
Blinking
button again to resume printing
Print cancellation after input of Cancel button, Press
Red Blinking
Green On
Cancel button to return to standby mode, all data received
deleted in Cancel mode
Rev. 1.04
- 17 -
SLP-T400 / T403
4. Self-Test
The self-test checks whether the printer has any problems.
(Users cannot perform this procedure if using the printer’s label peel-off option.)
If the printer does not function properly, contact an authorized dealer.
The self-test checks the following;
1) Make sure that the paper roll has been installed properly.
2) Turn on the power while holding down the FEED button. The self-test begins.
3) The self-test prints the current printer status, which provides the control ROM version
and the DIP switch settings.
4) After the self-test results are printed out:
- No button input within 2 seconds: Normal Print Mode
- Button pressed once within 2 seconds: Hex Dump Mode
- Button pressed twice within 2 seconds: Line Print Mode
* The ESC-POS command set is used in Line Print Mode.
Received data is printed in sequence similar to a receipt printer.
* If it is necessary to set the line mode as the default mode when power is on,
please turn on the dip switches 1-6 and 2-8 together.
ON
※ Note
- When printing a short-length label (56mm or less), several labels are outputted in order to
calculate/save the initial value of the label length.
- If the initial value of a short-length label (56mm or less) is saved, several labels are
outputted when turning power on/off in order to locate the precise printing position.
Rev. 1.04
- 18 -
SLP-T400 / T403
5. Fine Tuning
5-1 Printer Settings with Dip switches
The following functions can be selected using the dip switches.
- Print Speed, Print Density, Paper Select
- Auto Cutter, Back Feed, Ribbon Sensor Operation, Paper Sensor Operation
- Serial Communication Speed and Busy Status
The dip switches are located on the bottom of the printer.
Follow these steps when changing dip switch settings:
1) Turn the printer power switch off.
2) Turn the printer upside down and remove the dip switch cover on the bottom.
3) Flip the dip switches using tweezers or another narrow-ended tool. Switches are off
when up and on when down following the figure.
4) New settings take effect when the printer is turned back on.
※ CAUTION
- Make sure if the dip switch cover is closed prior to operating
Rev. 1.04
- 19 -
SLP-T400 / T403
[Table 1] Dip Switch 1
No
Functions
1-1
Details
Off
On
4
Off
Off
Off
Off
On
On
On
On
Off
On
Off
On
Off
On
Off
On
Speed Selection
1-2
1-3
Density Selection
1-4
1-5
Exhibition
Selection
1-6
Media Selection
1-7
Auto Cutter
1-8 Back Feed Option
[Table 2] Dip Switch 2
No
Functions
2-1
Baud Rate
Selection
2-2
2-3
Media Detection
2-4
Ribbon Sensor
2-5
Reserved
2
Off
Off
On
On
Off
On
off
On
Off
2-6
Busy Condition
Paper End Sensor
Status
Long Label
2-8
Split Printing
2-7
Rev. 1.04
On
Off
On
Off
On
5.0 ips
6.0 ips
2
Off
On
Off
On
Off
On
Off
On
3
Off
Off
On
On
Off
Off
On
On
Normal Mode
Demo Mode
Label Paper
Thermal Continuous Paper
Without Auto Cuter
With Auto Cuter
Back Feeding Enable
Back Feeding Disable
Density
6
8
10
12
14
16
18
20
Details
1
Baud Rate
Off
9,600 bps
On
19,200 bps
Off
230,400 bps
On
115,200 bps
Detect Gap
Detect Black Mark
1)Dip S/W 1-6 OFF: Reverse Side Black Mark
2)Dip S/W 1-6 On: Printed Side Black Mark (Option)
Enable
Disable
Default --- off
Receive Buffer Full
*Offline
*Receive Buffer Full
Enable
Disable
Disable
Enable
- 20 -
SLP-T400 / T403
5-2 Printer Settings with Utility Program
The printer settings utility program offered by the manufacturer can be used to change a
variety of basic printer settings. The basic settings set via the utility override printer
command settings. Thus, users wishing to use command settings to control the printer
should not change the basic settings via the utility.
Run the BIXOLON United Label Printer Utility from the enclosed CD and click the User
Setting Manager button.
1) Serial Communications Settings
Handshake, Stop Bit, Data Bit, Parity, Baud Rate, etc. can be set.
2) Language Selection
Code Page and International Character Set can be set.
3) Basic Ribbon Size & Print Density Settings
Paper Width and Length, Left/Right Margins, Print Density, etc. can be set.
4) Hardware Information Storage
For user management of equipment, the hardware version, serial number, ID, etc. can
be saved and/or confirmed via command.
Rev. 1.04
- 21 -
SLP-T400 / T403
5-3 Pause/Cancel
During multiple-page print jobs, the Pause and Cancel button can be used to temporarily
cease printing and cancel the print job altogether, respectively.
Print Pause/Resume
Print Cancel/Standby
5-3-1 Pause/Resume Function
1) When printing labels, pressing the Pause button will result in the temporary stoppage of
printing after the currently printed label is completed, and a change in the LED status.
- Status LED: Green Blinking
- Error LED: Red On
2) While the print job is paused, press the Pause button again to resume printing.
5-3-2 Print Cancellation
1) During label printing and/or pause mode, pressing the Cancel button enters the print
cancellation mode.
2) The following processes occur in the print cancellation mode.
- All label printing cancelled
- All data received in the printer communications buffer deleted.
- All received data deleted.
3) The LED status in the print cancellation mode can be as follows.
- Status LED: Green On
- Error LED: Red Blinking
4) While in the print cancellation mode, press the Cancel button again to return to print
standby mode.
Rev. 1.04
- 22 -
SLP-T400 / T403
5-4 Gap Sensor Auto-Calibration
Gap sensor auto-calibration is used when the printer does not detect a gap on the label
paper correctly. Generally a printer is set to detect most gap types, but sometimes
detection fails and paper continues to be fed without stopping when special paper is used.
In such cases, use the gap sensor auto-calibration function to facilitate proper detection.
1) Check to see that the paper is aligned correctly.
2) Open the paper cover and ribbon roll, and turn on the printer while holding down the
paper feed button located near the ribbon roll.
- The green LED blinks.
3) Close the ribbon roll and paper cover.
- An information message is printed and the red LED turns on.
4) Press the paper feed button.
① Once
- The LED color changes to orange.
- The previous gap sensor correction value is erased and reset to its default value.
② Twice
- The LED color changes to green.
- The gap sensor auto-calibration is performed as 2~3 pages of paper are fed
continuously.
5) Gap sensor auto-calibration is complete.
Rev. 1.04
- 23 -
SLP-T400 / T403
5-5 Gap Sensor Manual-Calibration
Manual-calibration of media detection can be used when the printer cannot detect a media
gap (or black mark) even after auto-calibration has been executed.
Users can calibrate sensor parameters in detail by using the utility program provided by
the manufacturer.
The utility can be obtained from the enclosed CD or downloaded from the Internet via the
BIXOLON website www.bixolon.com
Please make sure the printer is connected and execute the utility program.
Please the Calibration Setting Manager Button after setting the interface type.
1) If the firmware version is Ver.1.39 or higher, please click “F/W Ver. 1.39 or Later” tap.
If the firmware is lower than Ver.139, please click on “F/W Ver. Less than” tab.
2) Select the sensing type and input the label length by millimeter and click on “Check
Sensing Value” tap. Then printer starts to calibrate.
3) Printer will print the scanned values after calibration and the values will appear on the
Screen.
4) Optimal sensing values will appear in black bold letters on the left of the utility screen
and select one of the values and click on “Save Calibration”
5) If chosen value does not work properly, please try the other values among the black
bold letters.
6) To go back to the initial value, please click on “Cancel Calibration”
Rev. 1.04
- 24 -
SLP-T400 / T403
5-6 The Peel-Off
As a function that is used to peel-off labels, it is used only with label paper.
(After adjusting the peeler switch, power must be turned off and on in order for the
operation to be acknowledged.)
1) Open the paper cover.
2) Open the ribbon roll.
3) Open the label peel-off cover and set the peeler switch to the ON position.
- Check to see that the LED has turned on.
LED
4) Remove one sheet of the label paper, and insert the paper as shown in the image below.
- Prior to removing a label, the peeler switch must be set to the ON position.
Remove
Rev. 1.04
- 25 -
SLP-T400 / T403
5) Adjust the paper guides and close the label peel-off cover.
6) Close the ribbon roll and paper covers.
7) Turn the printer off and on.
Rev. 1.04
- 26 -
SLP-T400 / T403
5-7 Using Fan-Fold Paper
Supplying paper to the printer externally is done as follows.
5-7-1 Printer Preparation
Remove the rear paper supply cover on the back side of the printer with a knife or other
cutting instrument.
(Take care not to injure the hands and/or any other part of the body when performing this
step.)
Remove
5-7-2 When Using Pan-Fold Paper
1) Insert the paper at the rear of the printer using the slot and guides.
2) Adjust the holder and guides to the width of the paper.
Holder
Paper Holder
Rev. 1.04
- 27 -
SLP-T400 / T403
5-8 Auto Cutter (Option)
The Auto Cutter can be used for automatic cutting.
1) Open the dip switch cover, and turn switch 1 number 7 "On".
(Refer to the printer mode settings in Chapter 5-1.)
2) Insert a paper roll into the printer and close the cover.
Rev. 1.04
- 28 -
SLP-T400 / T403
6. Cleaning Head
Paper dust on the heating elements may lower the printer quality.
When dirty, clean the print head as follows:
※ CAUTION
- Make sure to turn the printer power off prior to cleaning.
- As the print head gets very hot during printing, if intending to clean the print head,
turn the printer power off and wait approximately 2~3 minute before commencement.
- When cleaning the print head, take care not to touch the heated portion of the print
head.
→ Printer Head is susceptible to damage from static electricity, etc.
- Take care not to allow the print head to become scratched and/or damaged in any
way.
1) Open the paper cover and remove paper and ribbon.
2) Wipe the print head with a cleaning pen.
3) Use a cloth moistened with an alcohol solution to clean the paper sensor are and
remove any paper remnants and/or dust.
4) Insert paper into the printer 1~2 minutes after completing the cleaning process and
close the printer cover.
※ Perform the cleaning process each time the paper roll is replaced to prevent print
quality deterioration.
Rev. 1.04
- 29 -
SLP-T400 / T403
7. Appendix
7-1 Specifications
Printer
Paper
Ribbon
AC
Adapter
Usage
Conditions
Item
Printing Method
Dot Density
Printing Width
Printing Speed
Width
Roll
Core
Length / Width
Type
Core
Input Voltage
Frequency
Output Voltage
Temperature
Humidity
(except for paper)
Description
Thermal Transfer / Direct Thermal Printing
203 dpi (8 dot/mm)
Max 104 mm
150 mm/sec (6ips)
25 ~ 116 mm
Max 130mm
25.4~38.1mm (1~1.5”)
Max 300m / 33 ~ 110mm
Wax, Wax/Resin, Resin ,Outside type
0.5” / 1”
AC 100~240V
50/60 Hz
DC 24V
0 ~ 45 ℃ (Operating)
-25 ~ 70 ℃ (Storage)
30 ~ 80 % RH (Operating)
10 ~ 90 % RH (Storage)
※ Note
Printing speed can vary depending on the data transmission speed and combination of
control commands.
Rev. 1.04
- 30 -
SLP-T400 / T403
7-2 Certification
1) EMC & Safety Standards
• Europe: CE EMC,CB-Scheme:IEC60950-1, GS: EN60950-1: 2001
• North America: FCC rules parts 15B
WARNING
Use of an unprotected interface cable with this printer conflicts with EMC standards.
Users should only use cables approved by BIXOLON.
2) CE Mark
• EMC Directive 89/336/EEC
EN55002:1994+A1:1995+A2:1997
EN55024:1998+A1:2001+A2:2003
EN61000-3-2:2000
EN61000-3-3:1995+A1:2001
EN6100-4-2:1995+A1:1998+A2:2001
EN6100-4-3: 2002+A1:2002
EN6100-4-4:2004
EN6100-4-5:1995+A1:2001
EN6100-4-6:1996+A1:2001
EN6100-4-8:1993+A1:2001
EN6100-4-11:1994+A1:2001
• Low Voltage Directive 73/23/EEC
Safety: EN60950-1:2001
3) WEEE (Waste Electrical and Electric Equipment)
This mark shown on the product or its literature indicates that the
corresponding item should not be discarded at the end of its working life with
other household waste. To prevent possible harm to the environment or
human health from uncontrolled waste disposal, please separate marked
items from other types of waste and recycle them responsibly to promote the
sustained reuse of material resources. Household users should contact either the
retailer where they purchased this product, or their local government office for details
of where and how they can conduct environmentally safe recycling of such items.
Commercial users should contact their suppliers and check the terms and conditions of
purchase contracts. This product should not be combined with other commercial
waste for disposal.
7-3 Label Types
The label types used with this printer are as follows.
• Control Labels: PC
• Other Labels: PET
Rev. 1.04
- 31 -