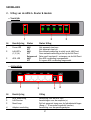
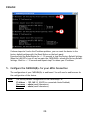
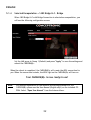
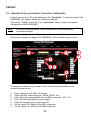
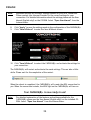
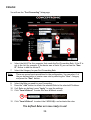
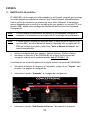
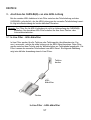
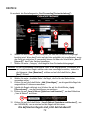
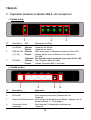
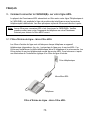
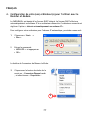
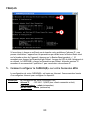
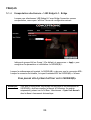
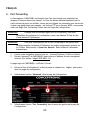
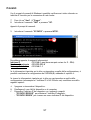
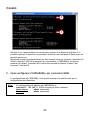
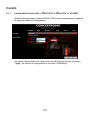
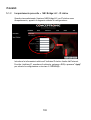
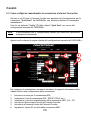
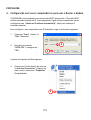
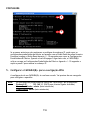
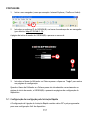
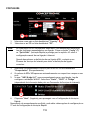
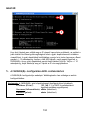
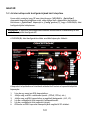
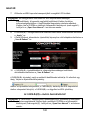
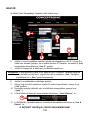
1
NEDERLANDS Conceptronic CADSLR4+ / CADSLR4B+ Snelstart handleiding Hartelijk gefeliciteerd met de aanschaf van uw Conceptronic ADSL2+ Router & Modem. In de bijgaande Snelstart handleiding wordt stap voor stap uitgelegd hoe u de Conceptronic ADSL2+ Router & Modem configureert en gebruikt. Ingeval van problemen adviseren wij u onze support-site te bezoeken (ga naar: www.conceptronic.net en klik op ‘Support’). Hier vindt u een database met veelgestelde vragen waar u hoogstwaarschijnlijk de oplossing voor uw probleem kunt vinden. Heeft u andere vragen over uw product die u niet op de website kunt vinden, neem dan contact met ons op via e-mail: support@conceptronic.net. Voor meer informatie over Conceptronic producten kunt u terecht op de Conceptronic website: www.conceptronic.net. De Hardware configuratie beschreven in deze handleiding kan afwijken op uw computer. Dit is afhankelijk van het besturingssysteem dat u gebruikt. 1. Inhoud van de verpakking De volgende onderdelen dienen aanwezig te zijn in de verpakking van de Conceptronic ADSL2+ Router & Modem: • • • • • • Conceptronic ADSL2+ Router & Modem (PSTN of ISDN). Het apparaat in de verpakking is 1 van onderstaande modellen: CADSLR4+ [C03-013]: Annex-A Versie van de Router & Modem. Geschikt voor Analoge ADSL Lijnen. CADSLR4B+[C03-014]: Annex-B Versie van de Router & Modem. Geschikt voor ISDN en UR-2 ADSL Lijnen. Spanningsadapter 12V AC, 800mA Netwerk kabel 1,8 M Telefoon kabel 1,8 M Meertalige Snelstart Handleiding Product CD-ROM 1 NEDERLANDS 2. Uitleg van de ADSL2+ Router & Modem • Voorzijde 1 2 3 Nr Beschrijving Status Status Uitleg 1 Power LED 2 LAN LED’s (1,2,3,4) 3 ADSL LED AAN UIT AAN UIT Knipperend AAN UIT Het apparaat staat aan Het apparaat staat uit Een netwerkverbinding is actief op de LAN Poort Geen netwerkverbinding actief op de LAN Poort Data wordt verstuurd / ontvangen via de LAN Poort Een ADSL verbinding is aangemaakt Er is geen ADSL verbinding aangemaakt • Achterzijde 1 3 2 4 Nr Beschrijving Uitleg 1 2 3 ADSL Aansluiting LAN Poorten Reset knop 4 Adapter aansluiting Aansluiting voor de ADSL Lijn Aansluitingen voor de computer(s) Zet het apparaat terug naar de fabrieksinstellingen (Knop +/- 10 seconden ingedrukt houden) Aansluiting voor de spanningsadapter 2 NEDERLANDS 3. De CADSLR4(B)+ met uw ADSL Lijn verbinden De meeste ADSL Providers vereisen het gebruik van een filter tussen de telefoonlijn en de CADSLR4(B)+ om te voorkomen dat de ADSL lijn stoort met de standaard telefoondiensten. De 2 soorten basisfilters worden hier beschreven. Let op: De CADSLR4(B)+ wordt geleverd zonder ADSL Filter! Neem contact op met uw telefoon of internet leverancier voor het de ADSL Filter. 3.1 In-Line Filter – ADSL MicroFilter De In-Line filters worden gebruikt voor iedere telefoon of apparaat dat de lijn deelt met de telefoonlijn waarop het ADSL signaal actief is. Dit filter wordt geplaatst tussen de telefoonaansluiting en de telefoon. Door gebruik van deze filters worden de normale telefoondiensten gescheiden van het ADSL signaal. Een voorbeeldinstallatie met een In-Line filter is hieronder afgebeeld: Phone Jack ADSL Microfilter Phone In-line filter – ADSL Microfilter 3 NEDERLANDS 3.2 Drie-Poorts ADSL Filter (Gebruikt in de meeste ADSL situaties) De drie-poorts filter wordt geplaatst op het punt waar de Router wordt aangesloten op de telefoonlijn. In deze situatie is maar 1 filter nodig. De aansluitingen worden aangeduid met: Line - Deze poort wordt aangesloten op de telefoonaansluiting. ADSL – Deze poort wordt aangesloten op de router. Phone – Deze poort wordt aangesloten op een telefoon. Het onderstaande diagram geeft de correcte aansluiting van het filter weer. Zorg ervoor dat de kabels goed zijn aangesloten. Als u geen kiestoon te horen krijgt op uw telefoon, dient u te controleren of de kabels op het filter goed vast zitten en correct geplaatst zijn. Phone Jack Line Splitter Phone CADSLR4(B) PC 3-poorts Filter 4 NEDERLANDS 4. Uw computer(s) configureren voor gebruik met de Router & Modem De CADSLR4(B)+ is voorzien van een ingebouwde DHCP Server. Deze DCHP Server zal automatisch een IP adres toekennen aan een aangesloten computer als deze ingesteld staat op “automatisch een IP adres verkrijgen”. Om uw computer in te stellen voor een automatisch IP adres kunt u de volgende instructies volgen: 1. Klik op “Start” Æ “Uitvoeren”. 2. Voer het commando “NCPA.CPL” in en klik op “OK”. 2 2 De netwerkverbindingen worden getoond op uw scherm. 3. Klik met de rechtermuisknop op “LAN Verbinding” en kies “Eigenschappen”. 3 5 NEDERLANDS De eigenschappen van de LAN Verbinding worden getoond op uw scherm. 4. Selecteer “Internet Protocol (TCP/IP” en klik op “Eigenschappen”. 4 4 De eigenschappen van het Internet Protocol (TCP/IP) worden getoond op uw scherm. 5. Zet de eigenschappen op “Automatisch een IP adres verkrijgen” en klik op “OK” om de instellingen op te slaan. 6. Klik op “OK” in het eigenschappen scherm van de LAN Verbinding om de instellingen op te slaan. 5 6 6 NEDERLANDS Met behulp van de Command prompt van Windows kunt u controleren of het juiste IP adres is toegewezen aan de LAN Verbinding: 7. 8. Klik op “Start” Æ “Uitvoeren”. Voer het commando “CMD” in en klik op “OK”. De Command Prompt zal getoond worden op uw scherm. 9. Voer het commando “IPCONFIG” in en druk op ENTER. 9 De volgende informatie zal getoond worden: IP Adres : 192.168.1.xxx (waar xxx kan variëren tussen 2 ~ 254). Subnet Masker : 255.255.255.0 Standaard Gateway : 192.168.1.1 Als de informatie hierboven vergelijkbaar is met de getoonde informatie op uw scherm kunt u doorgaan met de configuratie van de CADSLR4(B)+ in Hoofdstuk 4. Als de informatie hierboven niet klopt met de getoonde informatie op uw scherm (bijvoorbeeld: het IP adres is 169.254.xxx.xxx) controleer dan onderstaande punten: A. B. C. Schakel het apparaat UIT en AAN. Sluit de Netwerk kabel opnieuw aan op de CADSLR4(B)+ en uw computer. Ververs het IP adres van uw computer met de volgende commando’s: - “IPCONFIG /RELEASE” om het foutieve IP adres vrij te geven. - “IPCONFIG /RENEW” om een nieuw IP adres op te vragen van de CADSLR4(B)+. 7 NEDERLANDS C C Als de voorgaande stappen uw IP adres probleem niet oplossen kunt u de CADSLR4(B)+ terugzetten naar de fabrieksinstellingen met de Reset knop op de achterzijde van het apparaat. Houd de Reset Knop +/- 10 seconden ingedrukt om de fabrieksinstellingen te laden. Als de LAN LED’s uit en aan gaan is het apparaat bezig met het laden van de fabrieksinstellingen. Wacht +/- 10 seconden en herhaal stap C om uw IP adres te vernieuwen. 5. De CADSLR4(B)+ configureren voor uw ADSL verbinding De configuratie van de CADSLR4(B)+ is web based. Het gebruik van een internet browser is vereist voor de configuratie van het apparaat. Let op: De fabrieksinstellingen van de CADSLR4(B)+ zijn: IP adres : 192.168.1.1 (DHCP voor computers ingeschakeld) Gebruikersnaam : admin (kleine letters) : admin (kleine letters) Wachtwoord 8 NEDERLANDS 1. Start uw internet browser (bijvoorbeeld: Internet Explorer, FireFox of Safari). 2 2. Voer het IP adres van de CADSLR4(B)+ in op de adresbalk van uw browser. (standaard: http://192.168.1.1/). De inlog pagina van de CADSLR4(B)+ zal getoond worden op uw scherm: 3 3 3. Voer de Gebruikersnaam en Wachtwoord in en klik op “Login” om de configuratie pagina’s te openen. Als de Gebruikersnaam en Wachtwoord correct zijn ingevoerd op de inlogpagina zal de CADSLR4(B)+ de configuratiepagina tonen: 5.1 Configuratie van uw ADSL verbinding via de Quick Start De Quick Start Connectie Setup bevat een lijst met voorgeprogrammeerde providers om het apparaat snel en simpel in te stellen. 9 NEDERLANDS 1 2 3 6 7 1. 2. Let op: Selecteer uw land in de “Country” lijst op uw scherm. Selecteer uw provider in de “ISP” lijst op uw scherm. Als uw land en/of provider niet getoond worden in de bovenstaande lijsten dient u uw verbinding handmatig in te stellen. Klik op de “Config” knop (7) in het “Quick Start” scherm en ga verder in hoofdstuk 4.2 voor de handmatige configuratie van uw ADSL verbinding. Als u de instellingen voor uw ADSL verbinding niet weet dient u contact op te nemen met uw provider voor de juiste instellingen. 3. 4. 5. Selecteer de juiste encapsulatie voor uw provider in de “Encapsulation” lijst op uw scherm. De VPI en VCI waarden worden automatisch ingevuld in de bijbehorende velden op uw scherm. Als“1483 Bridge LLC” is geselecteerd als encapsulatie voor uw verbinding dient u tevens in te stellen hoe het IP adres toegekend wordt. Selecteer “Static”, “DHCP” of “Bridge” (Afhankelijk van de ontvangen informatie van uw provider). 5 6. Klik op “Next” om door te gaan met de Quick Start Setup. 10 NEDERLANDS Afhankelijk van de gekozen encapsulatie dient u diverse instellingen te maken in het 2e scherm van de Quick Start Setup. 5.1.1 Gekozen encapsulatie = PPPoE (LLC) of PPPoA (LLC of VC-MUX) Als PPPoE of PPPoA is geselecteerd als encapsulatie zal het volgende scherm getoond worden: Voer de Gebruikersnaam en Wachtwoord in die u van uw provider heeft ontvangen en klik op “Apply” om de instellingen op te slaan en de CADSLR4(B)+ te herstarten. 11 NEDERLANDS 5.1.2 Gekozen encapsulatie = 1483 Bridge LLC – Static IP Als 1483 Bridge LLC met een Statisch IP is gekozen als encapsulatie zal het volgende scherm getoond worden: Voer de Statische IP informatie in die u van uw provider heeft ontvangen (IP Adres, Subnet Masker, Standaard Gateway en DNS) en klik op “Apply” om de instellingen op te slaan en de CADSLR4(B)+ te herstarten. 12 NEDERLANDS 5.1.3 Gekozen encapsulatie = 1483 Bridge LLC – Dynamic IP (DHCP) Als 1483 Bridge LLC met Dynamisch IP is geselecteerd als encapsulatie zal het volgende scherm getoond worden: Behoud de standaard instellingen en klik op “Apply” om de instellingen op te slaan en de CADSLR4(B)+ te herstarten. 13 NEDERLANDS 5.1.4 Gekozen encapsulatie = 1483 Bridge LLC – Bridge Als 1483 Bridge LLC met een Bridge verbinding is gekozen als encapsulatie zal het volgende scherm getoond worden: Zet de LAN groep op “Group 1” (Standaard waarde) en klik op “Apply” om de instellingen op te slaan en de CADSLR4(B)+ te herstarten. Als de herstart is voltooid zal de CADSLR4(B)+ de ADSL verbinding opzetten. Als de verbinding is gemaakt zal de ADSL LED op de voorkant van de CADSLR4(B)+ aangaan. De CADSLR4(B)+ is nu klaar voor gebruik! Let op: Voor gedetailleerde uitleg over de mogelijkheden en instellingen van de CADSLR4(B)+ kunt u de Gebruikershandleiding op de meegeleverde CD-ROM raadplegen (Alleen Engels!). Selecteer de optie “View User Manual” in het Autorun Menu van de CD-ROM. 14 NEDERLANDS 5.2 Handmatig de ADSL verbinding instellen Als uw land en/of provider niet getoond wordt in de “Quick Start” Setup van de CADSLR4(B)+ dient u de verbinding handmatig in te stellen. Klik op de “Config” knop (7) op het “Quick Start” scherm om de handmatige configuratiepagina van de CADSLR4(B)+ te openen. Let op: U kunt de handmatige configuratie ook gebruiken om geavanceerde instellingen voor uw verbinding in te stellen! De handmatige configuratiepagina van de CADSLR4(B)+ zal op het scherm getoond worden: 2 1 7 3 9 4 5 8 Om de verbinding op te zetten dient u de volgende informatie in te vullen op de configuratiepagina: 1. 2. 3. 4. 5. 6. Voer een naam in voor de ADSL verbinding. Kies de soort ADSL verbinding. (PPPoE, PPPoA, etc.) Kies de juiste encapsulatie voor de ADSL verbinding. (LLC, VC) Voer de Gebruikersnaam in die u van de provider heeft ontvangen. Voer het Wachtwoord in dat u van de provider heeft ontvangen. Selecteer de juiste VPI waarde voor de ADSL verbinding. 15 6 NEDERLANDS 7. Let op: 8. 9. Selecteer de juiste VCI waarde voor de ADSL verbinding. De uitgelegde instellingen zijn de basisinstellingen die benodigd zijn voor een ADSL verbinding. Neem contact op met uw provider voor de juiste instellingen van uw ADSL verbinding. Voor gedetailleerde informatie over de instellingen van de CADSLR4(B)+ kunt u de Gebruikershandleiding op de meegeleverde CDROM raadplegen (Alleen Engels!). Selecteer de optie “View User Manual” in het Autorun Menu van de CD-ROM. Klik op “Apply” om de wijzigingen in de configuratie op te slaan Klik op “Save & Reboot” om het Save & Reboot scherm te openen. 10 10. Klik op “Save & Reboot” om de CADSLR4(B)+ te herstarten en om de instellingen voor de verbinding te activeren. De CADSLR4(B)+ zal herstarten en de instellingen activeren. Dit kan even duren. Wacht tot de herstart is voltooid. Als de herstart is voltooid zal de CADSLR4(B)+ de ADSL verbinding opzetten. Als de verbinding is gemaakt zal het ADSL LED op de voorkant van de CADSLR4(B)+ aangaan. De CADSLR4(B)+ is nu klaar voor gebruik! Let op: Voor gedetailleerde uitleg over de mogelijkheden en instellingen van de CADSLR4(B)+ kunt u de Gebruikershandleiding op de meegeleverde CD-ROM raadplegen (Alleen Engels!). Selecteer de optie “View User Manual” in het Autorun Menu van de CD-ROM. 16 NEDERLANDS 6. Port Forwarding – Poorten doorsturen De Conceptronic CADSLR4(B)+ is voorzien van een inbouwde Firewall om aanvallen vanaf internet op uw netwerk te voorkomen. Deze Firewall blokkeert automatisch al het inkomende verkeer op ongebruikte poorten. Als een geblokkeerde poort benodigd is voor een service of programma (bijvoorbeeld: een FTP of Web Server) kunt u deze open zetten door middel van de optie Port Forwarding in de Configuratie van de CADSLR4(B)+. Let op: Bij het gebruik van Port Forwarding wordt geadviseerd om de computers te voorzien van een vast IP adres in plaats van een dynamisch IP adres. Let op: Voor gedetailleerde uitleg over de Port Forwarding & DMZ opties kunt u de Gebruikershandleiding op de meegeleverde CD-ROM raadplegen (Alleen Engels!). Selecteer de optie “View User Manual” in het Autorun Menu van de CD-ROM. 1. 2. Start uw internet browser (bijvoorbeeld: Internet Explorer, FireFox of Safari). Voer het IP adres van de CADSLR4(B)+ in op de adresbalk van uw browser (standaard: http://192.168.1.1/). De inlogpagina van de CADSLR4(B)+ zal getoond worden op uw scherm. 3. 4. Voer de Gebruikersnaam en Wachtwoord in en klik op “Login” om de configuratiepagina’s te openen. Selecteer de optie “Advanced” op het scherm. 5 5. 4 Selecteer de optie “Port Forwarding” aan de linkerkant op het scherm. 17 NEDERLANDS De Setup pagina voor “Port Forwarding” zal getoond worden op het scherm: 6 9 10 7 6. 7. Let op: 8. 9. 10. 11. 8 Selecteer het IP adres voor de computer waarvoor de Port Forwarding regel nodig is. Als het IP adres niet in de lijst voorkomt (bijvoorbeeld: als de computer een statisch IP adres heeft) kunt u deze toevoegen door op de knop “New IP” te klikken. Selecteer de Categorie voor de Port Forwarding regel. Er zijn diverse poorten voorgeprogrammeerd in de configuratie van de CADSLR4(B)+. U kunt 1 van de voorgeprogrammeerde poorten gebruiken of een nieuwe poort aanmaken door te kiezen voor de Categorie “User” en vervolgens op de “New” knop te klikken. Selecteer de regel die benodigd is voor de Forwarding. Klik op de “Add” knop om de geselecteerde regel te koppelen aan het IP adres. Klik op “Apply” om de instellingen op te slaan als alle regels ingesteld zijn. Klik op “Save & Reboot” om het Save & Reboot scherm te openen. 12 12. Klik op “Save & Reboot” om de CADSLR4(B)+ te herstarten en de regels te activeren. Bovenstaande instellingen zijn nu gereed voor gebruik! 18 ENGLISH Conceptronic CADSLR4+ / CADSLR4B+ Quick Installation Guide Congratulations on the purchase of your Conceptronic ADSL2+ Router & Modem. The enclosed Hardware Installation Guide gives you a step-by-step explanation of how to install the Conceptronic ADSL2+ Router & Modem. When problems occur, we advise you to go to our support-site (go to www.conceptronic.net and click ‘Support’. Here you will find the Frequently Asked Questions Database. When you have other questions about your product and you cannot find it at our website, then contact us by e-mail: support@conceptronic.net For more information about Conceptronic products, please visit the Conceptronic Web Site: www.conceptronic.net The Hardware configuration as described below, may be slightly different on your computer. This depends on the Windows version you are using. 1. Package Contents The following items are present in the package of the Conceptronic ADSL2+ Router & Modem: • • • • • • Conceptronic ADSL2+ Router & Modem (PSTN or ISDN). The device in the package is 1 of the 2 models listed below: CADSLR4+ [C03-013]: Annex-A Version of the Router & Modem. Suitable for Analog ADSL Lines. CADSLR4B+[C03-014]: Annex-B Version of the Router & Modem. Suitable for ISDN and UR-2 ADSL Lines. Power supply 12V AC, 800mA Ethernet Cable 1,8 M Phone Cable 1,8 M Multi Language Quickstart Manual Product CD-ROM 19 ENGLISH 2. The ADSL2+ Router & Modem Explained • Front Panel 1 2 3 Nr Description Status Status Explanation 1 Power LED 2 LAN LED’s (1,2,3,4) 3 ADSL LED ON OFF ON OFF Flashing ON OFF Device is turned on Device is turned off A Network Link is created on the LAN Port No Network Link is created to the LAN Port Data is send or received through the LAN Port An ADSL Connection is created No ADSL Connection is created • Back Panel 1 3 2 4 Nr Description Explanation 1 2 3 ADSL Connection LAN Ports Reset Button 4 Power Connection Connect your ADSL Line to the device Connect your Computer(s) to the device Reset the device to the Factory Default Settings (Press and Hold for +/- 10 seconds) Connect the Power Supply to the device 20 ENGLISH 3. Connecting the CADSLR4(B)+ to your ADSL Line Most ADSL Providers require a filter between your Phone Line and the CADSLR4(B)+ that prevents the ADSL line from interfering with regular telephone services. The two basic styles of filters are described below. Note: The CADSLR4(B)+ is not delivered with a filter for the ADSL connection. Please contact your Telephone or Internet Provider for the correct ADSL Filter. 3.1 In-Line Filter – ADSL MicroFilter In line filters are used for each telephone or telephone device (answering machines, faxes etc.) that shares the line with the ADSL service. These filters are attached to the telephone cable between the telephone and wall jack. The filters will separate the normal telephone service from the ADSL service. A typical in-line filter installation is shown in the diagram below. Phone Jack ADSL Microfilter Phone In-line filter – ADSL Microfilter 21 ENGLISH 3.2 Three-Port ADSL Filter (Used in most ADSL Situations) Another type of filter is installed at the same point where the Router connects to the telephone line. Only a single filter is required. The connection ports are typically labelled as shown below: Line - This port connects to the wall jack. ADSL – This port connects to the Router. Phone – This port connects to a telephone or other telephone device. The diagram below illustrates the proper use of this type of filter. Make sure the lines are properly connected. If you are unable to hear a dial tone with the telephone, check the connections to make sure the cables are securely attached and connected to the correct port. Phone Jack Line Splitter Phone ADSL Device CADSLR4(B) 3-port Filter 22 PC ENGLISH 4. Configure your computer(s) for use with the Router & Modem The CADSLR4(B)+ is equipped with a build-in DHCP Server. The DHCP Server will automatically assign an IP to a connected computer if the connected computer is set to “obtain an IP address automatically”. To configure your computer for Automatic IP follow the instructions below: 1. Click “Start” Æ “Run”. 2. Enter the command “NCPA.CPL” and press “OK”. 2 2 The Network Connections window will appear. 3. Right click your “Local Area Connection” and select “Properties”. 3 23 ENGLISH The Properties window of your Local Area Connection will appear. 4. Select the “Internet Protocol (TCP/IP” and click “Properties”. 4 4 The Properties window of the Internet Protocol (TCP/IP) will appear. 5. Set the properties to “Obtain an IP address automatically” and press “OK” to save the settings. 6. Press “OK” in the properties window of the Local Area Connection to save the settings. 5 6 24 ENGLISH With the Command prompt of Windows you can verify if you have received a correct IP address on your Local Area Connection: 7. 8. Click “Start” Æ “Run”. Enter the command “CMD” and press “OK”. The Command Prompt will appear. 9. Enter the command “IPCONFIG” and press ENTER. 9 You should see the IP Address Subnet Mask Default Gateway following information : 192.168.1.xxx (Where xxx can vary between 2 ~ 254). : 255.255.255.0 : 192.168.1.1 If the information shown above matches your configuration you can continue the configuration of the CADSLR4(B)+ in Chapter 4. If the shown information does not match your configuration (i.e. your IP address is 169.254.xxx.xxx) please check the options below: A. B. C. Power OFF and Power ON the device. Reconnect the LAN Cable to the device and to your computer. Renew the IP address of your computer with the following commands: - “IPCONFIG /RELEASE” to release the wrong IP address. - “IPCONFIG /RENEW” to receive a new IP address from the device. 25 ENGLISH C C If above steps don’t solve the IP address problem, you can reset the device to the factory default settings with the Reset Button on the back panel. Press and hold the Reset Button for +/- 10 seconds to load the Factory Default Settings. When the LAN LED’s turn off and on again the CADSLR4(B)+ reloads the Factory Default Settings. Wait for +/- 10 seconds and repeat step C to renew your IP address. 5. Configure the CADSLR4(B)+ for your ADSL Connection The configuration of your CADSLR4(B)+ is web based. You will need a web browser for the configuration of the device. Note: The factory IP Address Username Password default configuration of the CADSLR4(B)+ is: : 192.168.1.1 (DHCP for connected clients Enabled) : admin (small characters) : admin (small characters) 26 ENGLISH 10. Start your web browser (like: Internet Explorer, FireFox or Safari). 2 11. Enter the IP address of the CADSLR4(B)+ in the address bar of your web browser (By default: http://192.168.1.1/). The Login page of the CADSLR4(B)+ will be shown on your screen: 3 3 12. Enter the Username and Password and click “Login” to enter the configuration pages. When the Username and Password are entered correct in the login page the CADSLR4(B)+ will display the configuration pages of the device. 5.1 Configuration of your connection through the Quick Start The Quick Start Connection Setup contains several pre-programmed ISP’s for easy configuration of the device. 27 ENGLISH 1 2 3 6 7 1. 2. Note: Select your country in the “Country” drop-down list. Select your ISP in the “ISP” drop-down list. If your country and/or ISP is not displayed in 1 of the 2 above drop-down lists, you need to manually configure your connection. Click the “Config” button (7) in the “Quick Start” and continue to chapter 4.2 for the manual configuration of your Internet Connection. When your ADSL connection settings are unknown, contact your Internet Provider for the correct connection settings. 3. 4. 5. Select the correct Encapsulation for your ISP in the “Encapsulation” drop-down list. The VPI and VCI value will automatically appear in the assigned fields on your screen. If “1483 Bridge LLC” is used as encapsulation for your connection, you need to set the WAN-IP assignment. Select “Static”, “DHCP” or “Bridge” (Depending on the given information by your Internet Provider). 5 6. Click “Next” to continue the Quick Start Setup. Depending on the chosen encapsulation, you can get various settings options in the 2nd screen of the Quick Start Setup. 28 ENGLISH 5.1.1 Selected Encapsulation = PPPoE (LLC) or PPPoA (LLC or VC-MUX) When PPPoE or PPPoA is selected as encapsulation, you will see the following configuration screen: Enter the Username and Password given by your Internet Provider and press “Apply” to save the settings and reboot the CADSLR4(B)+. 29 ENGLISH 5.1.2 Selected Encapsulation = 1483 Bridge LLC – Static IP When 1483 Bridge LLC with Static IP is selected as encapsulation, you will see the following configuration screen: Enter the Static IP information received from your Internet Provider (IP Address, Subnet Mask, Gateway and DNS) and press “Apply” to save the settings and reboot the CADSLR4(B)+. 30 ENGLISH 5.1.3 Selected Encapsulation = 1483 Bridge LLC – Dynamic IP (DHCP) When 1483 Bridge LLC with Dynamic IP is selected as encapsulation, you will see the following configuration screen: Keep the current settings and press “Apply” to save the settings and reboot the CADSLR4(B)+. 31 ENGLISH 5.1.4 Selected Encapsulation = 1483 Bridge LLC – Bridge When 1483 Bridge LLC with Bridge Connection is selected as encapsulation, you will see the following configuration screen: Set the LAN group to Group 1 (Default) and press “Apply” to save the settings and reboot the CADSLR4(B)+. When the reboot is completed, the CADSLR4(B)+ will create the ADSL connection for you. When the connection is made, the ADSL light on the CADSLR4(B)+ will turn on. Your CADSLR4(B)+ is now ready to use! Note: For detailed explanation of the features and settings available for the CADSLR4(B)+ please see the User Manual (English only!) on the included CDROM. Select “Open User Manual” from the Autorun Menu. 32 ENGLISH 5.2 Manually Set-Up your Internet Connection Configuration If your Country and/or ISP is not displayed in the “Quick Start” Connection Setup of the CADSLR4(B)+ you need to define the connection manually. Click on the “Config” button (7) in the “Quick Start” screen to enter the manual configuration of the CADSLR4(B)+. Note: You can also use the Manual Setup Configuration to modify advanced connection settings! The manual configuration page of the CADSLR4(B)+ will be shown on your screen: 2 1 7 3 9 4 5 8 To setup your connection, you need to enter the following information in the connection setup screen: 1. 2. 3. 4. 5. 6. 7. Enter a name for your ADSL Connection. Select the ADSL connection type. (PPPoE, PPPoA, etc.) Select the correct encapsulation for the ADSL connection. (LLC, VC) Enter the Username given by your provider. Enter the Password given by your provider. Set the correct VPI value for the ADSL connection. Set the correct VCI value for the ADSL connection. 33 6 ENGLISH Note: 8. 9. Explained settings are the basic settings needed for your ADSL connection. Please contact your Internet Provider for the correct settings for your connection. For detailed information about the settings please see the User Manual (English only!) on the CD-ROM. Select “Open User Manual” from the Autorun Menu. Click “Apply” to save the settings made in the configuration of the CADSLR4(B)+ Click “Save & Reboot” to enter the Save & Reboot screen. 10 10. Click “Save & Reboot” to restart the CADSLR4(B)+ and activate the settings for your connection. The CADSLR4(B)+ will restart and activate the made settings. This can take a little while. Please wait for the completion of the restart. When the reboot is completed, the CADSLR4(B)+ will create the ADSL connection for you. When the connection is made, the ADSL light on the CADSLR4(B)+ will turn on. Your CADSLR4(B)+ is now ready to use! Note: For detailed explanation of the features and settings available for the CADSLR4(B)+ please see the User Manual (English only!) on the included CDROM. Select “Open User Manual” from the Autorun Menu. 34 ENGLISH 6. Port Forwarding The Conceptronic CADSLR4(B)+ is equipped with a build-in Firewall to prevent attacks from the Internet on your network. This Firewall blocks automatically all incoming traffic on unused ports. When a blocked port is needed for a service or application (for example: a FTP Server or WEB Server) you can create a Port Forwarding Rule in the Configuration Pages. Note: When using Port Forwarding rules, it is advised to configure the computer(s) with a Fixed IP Address instead of a Dynamic IP Address. Note: For detailed information about the Port Forwarding & DMZ options, see the User Manual (English only!) on the CD-ROM. Select “Open User Manual” from the Autorun Menu. 1. 2. Start your web browser (like: Internet Explorer, FireFox or Safari). Enter the IP address of the CADSLR4(B)+ in the address bar of your web browser (By default: http://192.168.1.1/). The Login page of the CADSLR4(B)+ will be shown on your screen. 3. 4. Enter the Username and Password and click “Login” to enter the configuration pages. Select the option “Advanced” on the Configuration Page. 5 5. 4 Select the option “Port Forwarding” on the left menu of the Configuration Page. 35 ENGLISH You will see the “Port Forwarding” Setup page: 6 9 10 7 6. 7. 8 Select the LAN IP for the computer that needs the Port Forwarding Rule. If the IP is not in the list (for example: if the device uses a Static IP) you can use the “New IP” Button to add the device IP. Select the Category for your Port Forwarding Rule. Note: There are several ports pre-defined in the configuration. You can select 1 of the pre-defined ports or create a new rule by selecting the “User” Category and press the “New” button. 8. 9. 10. 11. Select the Rule you need for your Forwarding. Press the “Add” button to attach the selected Rule to the selected IP Address. If all Rules are defined, press “Apply” to save the settings. Click “Save & Reboot” to enter the Save & Reboot screen. 12 12. Click “Save & Reboot” to restart the CADSLR4(B)+ and activate the rules. The defined Rules are now ready to use! 36 ESPAÑOL CADSLR4+ / CADSLR4B+ de Conceptronic Guía de Instalación Rápida Felicidades por la compra de su Router y módem ADSL2+ de Conceptronic. Esta guía de instalación le orientará paso a paso acerca de cómo instalar el Router y módem ADSL2+ de Conceptronic. Si encuentra problemas, le aconsejamos que se dirija a nuestra página web www.conceptronic.net y haga clic en «Support». Aquí encontrará la base de datos de las preguntas más frecuentes o FAQ. Si tiene otras preguntas sobre su producto y no las encuentra en nuestro sitio web, póngase en contacto con nuestro servicio técnico por correo electrónico: support@conceptronic.net Para obtener más información acerca de productos de Conceptronic por favor visite el lugar Web de Conceptronic: www.conceptronic.net La configuración del hardware que se describe a continuación puede diferir ligeramente en su ordenador, lo cual depende de la versión de Windows que utilice. 1. Contenido del paquete El paquete del Router y módem ADSL2+ de Conceptronic debe incluir los elementos siguientes: • • • • • • Router y módem ADSL2+ de Conceptronic (PSTN o ISDN). El dispositivo que incluye el paquete es 1 de los 2 modelos siguientes: CADSLR4+ [C03-013]: Versión del Anexo A del Router y módem. Apto para líneas ADSL analógicas. CADSLR4B+[C03-014]: Versión del Anexo B del Router y módem. Apto para líneas ISDN y ADSL UR2 Fuente de alimentación: 12V AC, 800 mA Cable Ethernet ?? M Cable de teléfono ?? M Manual multilingüe de inicio rápido CD-ROM del producto 37 ESPAÑOL 2. Descripción del Router y módem ADSL2+ • Panel delantero 1 2 Nº Descripción Estado 1 LED de encendido 2 LEDs LAN (1,2,3,4) 3 LED ADSL 3 Explicación del estado ON OFF ON OFF Parpadeando ON OFF El dispositivo está encendido El dispositivo está apagado Se ha creado un enlace de red en el puerto LAN No se ha creado ningún enlace de red al puerto LAN Los datos se envían o se reciben por el puerto LAN Se ha creado una conexión ADSL No se ha creado ninguna conexión ADSL • Panel trasero 1 Nº Descripción 1 2 3 Conexión ADSL Puertos LAN Botón de reinicio 4 3 2 4 Explicación Conecta el dispositivo a su línea ADSL Conecta el dispositivo a su ordenador u ordenadores Vuelve a activar la configuración predeterminada (mantener pulsado durante 10 segundos aprox.) Conexión de alimentación Conecta el dispositivo a la fuente de alimentación 38 ESPAÑOL 3. Conexión del CADSLR4(B)+ a su línea ADSL La mayoría de proveedores de conexiones ADSL requiere un filtro entre la línea telefónica y el CADSLR4(B)+ que evita que la línea ADSL interfiera con los servicios telefónicos habituales. A continuación se describen los dos estilos básicos de filtros: Nota: El CADSLR4(B)+ no incluye un filtro para la conexión ADSL. Para obtener el filtro ADSL adecuado póngase en contacto con su proveedor de teléfono o de Internet. 3.1 Filtro en línea – Microfiltro ADSL Los filtros en línea se utilizan para cada teléfono o para cada aparato telefónico (contestadores automáticos, faxes, etc.) que comparte la línea con el servicio ADSL. Estos filtros están conectados al cable de teléfono entre el aparato telefónico y la toma de la pared, de tal manera que separan el servicio telefónico habitual del servicio ADSL. La imagen siguiente describe la instalación de un filtro en línea común: Toma de la pared Microfiltro ADSL Teléfono Filtro en línea – Microfiltro ADSL 39 ESPAÑOL 3.2. Filtro ADSL de 3 puertos (utilizado en la mayoría de conexiones ADSL) Este tipo de filtro se instala en el mismo punto donde el Router conecta con la línea telefónica y tan sólo es necesario un único filtro. A continuación se describe la nomenclatura habitual de los puertos de conexión: Línea - Este puerto se conecta a la toma de la pared. ADSL – Este puerto se conecta al Router. Teléfono – Este puerto se conecta a un teléfono o a otro dispositivo telefónico. La imagen siguiente ilustra el uso correcto de este tipo de filtro. Compruebe que las líneas están conectadas de forma adecuada. Si no oye el tono de marcación del teléfono, revise las conexiones para garantizar que los cables están acoplados con firmeza a los puertos correctos. Toma de la pared Distribuidor de líneas Teléfono ADSL Device CADSLR4(B) PC Filtro de 3 puertos 40 ESPAÑOL 4. Configuración de su ordenador u ordenadores para su uso con el Router y módem El CADSLR4(B)+ está equipado con un servidor DHCP integrado que asignará automáticamente una dirección IP al ordenador conectado en caso de que éste tenga activada la opción “Obtener una dirección IP automáticamente”. Siga las instrucciones siguientes para configurar su ordenador y obtener una dirección IP automáticamente: 1. Haga clic en “Inicio” Æ “Ejecutar”. 2. Acceda al comando “NCPA.CPL”y pulse “Aceptar”. 2 2 A continuación aparecerá la ventana de Conexiones de Red. 3. Haga clic con el botón derecho del ratón en “Conexión de Área Local” y seleccione “Propiedades”. 3 41 ESPAÑOL A continuación aparecerá la ventana de Propiedades de la Conexión de Área Local. 4. Seleccione el “Protocolo de Internet (TCP/IP)” y haga clic en “Propiedades”. 4 4 A continuación aparecerá la ventana de Propiedades del Protocolo de Internet (TCP/IP). 5. Active la opción “Obtener una dirección IP automáticamente” y pulse “Aceptar” para guardar la configuración. 6. Pulse “Aceptar” en la ventana de Propiedades de la Conexión de Área Local para guardar la configuración. 5 6 42 ESPAÑOL Mediante la línea de comandos de Windows podrá verificar si ha recibido una dirección IP correcta en su Conexión de Área Local: 7. 8. Haga clic en “Inicio” Æ “Ejecutar”. Introduzca el comando “CMD” y pulse “Aceptar”. A continuación aparecerá la línea de comandos. 9. Introduzca el comando “IPCONFIG” y pulse ENTER. 9 A continuación deberá ver la información siguiente: Dirección IP : 192.168.1.xxx (en la que xxx puede oscilar entre 2 y 254). Máscara de subred : 255.255.255.0 Puerta de enlace predeterminada : 192.168.1.1 Si la información coincide con su configuración, puede pasar al apartado 4 para continuar con la configuración del CADSLR4(B)+. Si la información no coincide con su configuración (por ejemplo, su dirección IP es 169.254.xxx.xxx), proceda de acuerdo con las siguientes opciones: A. B. C. Apague (OFF) y encienda (ON) el dispositivo. Vuelva a conectar el cable LAN al dispositivo y a su ordenador. Renueve la dirección IP de su ordenador con los comandos siguientes: - “IPCONFIG /RELEASE” para desechar la dirección IP incorrecta. - “IPCONFIG /RENEW” para recibir la nueva dirección IP del dispositivo. 43 ESPAÑOL C C Si los pasos anteriores no resuelven el problema de la dirección IP, puede volver a activar la configuración predeterminada del dispositivo pulsando el Botón de Reinicio que se encuentra en el lateral del aparato. Mantenga pulsado el Botón de Reinicio durante 10 segundos aproximadamente para activar la configuración predeterminada. Cuando el LED LAN se apague y vuelva a encenderse, el CADSLR4(B)+ tendrá activada la configuración predeterminada. Espere 10 segundos aproximadamente y repita el paso C para renovar la dirección IP. 2. Configuración del CADSLR4(B)+ para su conexión ADSL La configuración de su CADSLR4(B)+ está basada en la web y, por tanto, necesitará un navegador web para configurar el dispositivo. Nota: Ésta es la configuración predeterminada del CADSLR4(B)+: Dirección IP : 192.168.1.1 (DHCP para clientes conectados Activo) Nombre de usuario : admin (caracteres en minúscula) Contraseña : admin (caracteres en minúscula) 44 ESPAÑOL 1. Inicie su navegador web (por ejemplo, Internet Explorer, FireFox o Safari). 2 2. Introduzca la dirección IP del CADSLR4(B)+ en la barra de direcciones del navegador web (dirección predeterminada: http://192.168.1.1/). A continuación en la pantalla aparecerá la página de inicio de sesión del CADSLR4(B)+: 3 3 3. Introduzca el Nombre de Usuario y la Contraseña, y haga clic en “Aceptar” para acceder a las páginas de configuración. Al introducir el Nombre de Usuario y la Contraseña correctos en la página de inicio de sesión, el CADSLR4(B)+ mostrará las páginas de configuración del dispositivo. 5.1 Configuración de la conexión a través del apartado Inicio Rápido La configuración de la conexión a través del apartado Inicio Rápido contiene diversos proveedores de Internet programados previamente para facilitar la configuración del dispositivo. 45 ESPAÑOL 1 2 3 6 1. 2. Nota: 7 Seleccione su país en la lista desplegable “País”. Seleccione su proveedor de Internet en la lista desplegable “ISP”. En caso de que su país y/o su proveedor de Internet no figuren en las listas desplegables indicadas, deberá configurar la conexión manualmente. Haga clic en el botón “Config” (7) del apartado “Inicio rápido” y pase al apartado 4.2 para proceder a la configuración manual de la conexión a Internet. Si desconoce la configuración de su conexión ADSL, póngase en contacto con su proveedor de Internet para obtener los ajustes correctos. 3. 4. 5. Seleccione la encapsulación correcta de su proveedor de Internet en la lista desplegable “Encapsulación”. Los valores VPI y VCI aparecerán automáticamente en los campos asignados de la pantalla. Si utiliza “1483 Puente LLC” como encapsulación para su conexión, necesitará configurar la IP WAN. Seleccione “Estática”, “DHCP” o “Puente” (en función de la información facilitada por su proveedor de Internet). 5 6. Haga clic en “Siguiente” para continuar con la Configuración por el apartado Inicio Rápido. En función de la encapsulación seleccionada, podrá obtener diversas opciones de configuración en la 2ª pantalla de configuración por el apartado Inicio Rápido. 46 ESPAÑOL 5.1.1 Encapsulación seleccionada: PPPoE (LLC) o PPPoA (LLC o VC-MUX) Si selecciona PPPoE o PPPoA como encapsulación, a continuación verá la pantalla de configuración siguiente: Introduzca el Nombre de Usuario y la Contraseña facilitados por su proveedor de Internet y haga clic en “Aplicar” para guardar la configuración y reiniciar el CADSLR4(B)+. 47 ESPAÑOL 5.1.2 Encapsulación seleccionada: 1483 Puente LLC (IP estática) Si selecciona 1483 Puente LLC con IP estática como encapsulación, a continuación verá la pantalla de configuración siguiente: Introduzca la información de la IP estática facilitada por su proveedor de Internet (dirección IP, Máscara de subred, Puerta de enlace y DNS) y haga clic en “Aplicar” para guardar la configuración y reiniciar el CADSLR4(B)+. 48 ESPAÑOL 5.1.3 Encapsulación seleccionada: 1483 Puente LLC, IP dinámica (DHCP) Si selecciona 1483 Puente LLC con IP dinámica como encapsulación, a continuación verá la pantalla de configuración siguiente: Mantenga la configuración actual y haga clic en “Aplicar” para guardar la configuración y reiniciar el CADSLR4(B)+. 49 ESPAÑOL 5.1.4 Encapsulación seleccionada: 1483 Puente LLC (Puente) Si selecciona 1483 Puente LLC con Conexión de puente como encapsulación, a continuación verá la pantalla de configuración siguiente: Seleccione el Grupo 1 (predeterminado) en el campo Grupo LAN y haga clic en “Aplicar” para guardar la configuración y reiniciar el CADSLR4(B)+. Una vez reiniciado, el CADSLR4(B)+ creará la conexión ADSL. Cuando se haya creado la conexión, el LED ADSL del CADSLR4(B)+ se encenderá. El CADSLR4(B)+ ya está listo para su uso Nota: Si desea obtener información detallada sobre las funciones y configuración del CADSLR4(B)+ acceda al Manual de Usuario (disponible sólo en inglés) del CD-ROM que incluye el producto y seleccione “Abrir el Manual de Usuario” del menú autoejecutable. 50 ESPAÑOL 5.2 Configuración manual de la Conexión a Internet En caso de que su país y/o su proveedor de Internet no figuren en la Configuración de la conexión a través del apartado “Inicio Rápido” del CADSLR4(B)+, deberá configurar la conexión manualmente. Haga clic en el botón “Config” (7) del apartado “Inicio rápido” para acceder a la configuración manual del CADSLR4(B)+. Nota: También puede utilizar la Configuración Manual para modificar opciones de conexión avanzadas. A continuación aparecerá la página de configuración manual del CADSLR4(B)+: 2 1 7 3 9 4 6 5 8 Para configurar su conexión, deberá introducir los datos siguientes en la pantalla de configuración de la conexión: 1. 2. 3. 4. 5. 6. 7. Asigne un nombre a su conexión ADSL. Seleccione un tipo de conexión ADSL (PPPoE, PPPoA, etc.). Seleccione la encapsulación correcta para la conexión ADSL (LLC, VC). Introduzca el Nombre de Usuario que le facilite su proveedor de Internet. Introduzca la Contraseña que le facilite su proveedor de Internet. Active el valor VPI correcto para la conexión ADSL. Active el valor VCI correcto para la conexión ADSL. 51 ESPAÑOL Nota: 8. 9. Las opciones de configuración descritas constituyen las opciones básicas necesarias para su conexión ADSL. Póngase en contacto con su proveedor de Internet para obtener las opciones correctas para su conexión. Si desea obtener información detallada sobre la configuración, acceda al Manual de Usuario (disponible sólo en inglés) del CD-ROM que incluye el producto y seleccione “Abrir el Manual de Usuario” del menú autoejecutable. Haga clic en “Aplicar” para guardar los cambios que haya realizado en la configuración del CADSLR4(B)+. Haga clic en “Guardar y reiniciar” para acceder a la pantalla Guardar y Reiniciar. 10 10. Haga clic en “Guardar y reiniciar” para reiniciar el CADSLR4(B)+ y activar la configuración de la conexión. A continuación, el CADSLR4(B)+ se reiniciará y se activará la configuración que haya seleccionado. Este proceso puede durar unos minutos. Por favor, espere hasta que finalice el proceso de reinicio. Una vez reiniciado, el CADSLR4(B)+ creará la conexión ADSL. Cuando se haya creado la conexión, el LED ADSL del CADSLR4(B)+ se encenderá. El CADSLR4(B)+ ya está listo para su uso Nota: Si desea obtener información detallada sobre las funciones y configuración del CADSLR4(B)+ acceda al Manual de Usuario (disponible sólo en inglés) del CD-ROM que incluye el producto y seleccione “Abrir el Manual de Usuario” del menú autoejecutable. 52 ESPAÑOL 3. Habilitación de puertos El CADSLR4(B)+ de Conceptronic está equipado con un Firewall integrado para proteger su red de ataques procedentes de Internet. Este Firewall bloquea automáticamente todo el tráfico de entrada en los puertos que no se están utilizando. Si necesita un puerto bloqueado para un servicio o una aplicación (por ejemplo, un servidor FTP o un servidor WEB), puede crear una Regla de Habilitación de Puertos en las Páginas de Configuración. Nota: Si utiliza Reglas de Habilitación de Puertos, es recomendable configurar el ordenador u ordenadores con una dirección IP fija en lugar de una dinámica. Nota: Si desea obtener información detallada sobre la Habilitación de Puertos y las opciones DMZ, acceda al Manual de Usuario (disponible sólo en inglés) del CDROM que incluye el producto y seleccione “Abrir el Manual de Usuario” del menú autoejecutable. 1. 2. Inicie su navegador web (por ejemplo, Internet Explorer, FireFox o Safari). Introduzca la dirección IP del CADSLR4(B)+ en la barra de direcciones del navegador web (dirección predeterminada: http://192.168.1.1/). A continuación en la pantalla aparecerá la página de inicio de sesión del CADSLR4(B)+. 3. Introduzca el Nombre de Usuario y la Contraseña, y haga clic en “Aceptar” para acceder a las páginas de configuración. 4. Seleccione la opción “Avanzado” de la página de configuración. 5 5. 4 Seleccione la opción “Habilitación de Puertos” del menú de la izquierda. 53 ESPAÑOL A continuación verá la página de configuración “Habilitación de puertos”: 6 9 10 7 6. 7. Nota: 8 Seleccione la IP LAN del ordenador que necesite la Regla de Habilitación de Puertos. En caso de que la IP no esté en la lista (por ejemplo, si el dispositivo utiliza una IP estática), puede pulsar el botón “Nueva IP” para añadir la IP al dispositivo. Seleccione la categoría de su Regla de Habilitación de Puertos. Hay diversos puertos predefinidos en la configuración. Puede seleccionar 1 de los puertos predefinidos o crear una nueva regla seleccionando la categoría “Usuario” y haciendo clic en el botón “Nuevo”. 8. 9. Seleccione la regla que necesita para su habilitación. Pulse el botón “Añadir” para unir la regla seleccionada a la dirección IP seleccionada. 10. Una vez definidas todas las reglas, haga clic en “Aplicar” para guardar los cambios. 11. Haga clic en “Guardar y reiniciar” para acceder a la pantalla Guardar y Reiniciar. 12 12. Haga clic en “Guardar y reiniciar” para reiniciar el CADSLR4(B)+ y activar las reglas. Las reglas definidas ya están listas para su us 54 DEUTSCH Conceptronic CADSLR4+ / CADSLR4B+ Schnellinstallationsanleitung Wir gratulieren Ihnen zum Kauf Ihres Conceptronic ADSL2+ Routers & Modems. In beiliegender Hardware-Installationsanleitung wird Ihnen Schritt für Schritt gezeigt, wie der/das ADSL2+ Router / Modem von Conceptronic installiert werden muss. Sollten irgendwelche Probleme auftreten, empfehlen wir ihnen, auf unsere Support-Seite im Internet zu gehen (www.conceptronic.net) und auf 'Support’ zu klicken. Dort werden sie die "Frequently Asked Questions" Datenbank finden. Falls sie andere Fragen zu ihrem Produkt haben und sie diese nicht auf unserer Website finden können, kontaktieren sie uns bitte per E-Mail: support@conceptronic.net Weitere Informationen zu den Conceptronic Produkte finden Sie auf der Website von Conceptronic: www.conceptronic.net Möglicherweise weicht die Hardware-Konfiguration auf Ihrem Computer von der im Folgenden beschriebenen etwas ab. Dies hängt vom Windows-Betriebssystem ab, das Sie verwenden. 1. Packungsinhalt In der Verpackung des Conceptronic ADSL2+ Routers & Modems ist Folgendes enthalten: • • • • • • Conceptronic ADSL2+ Router & Modem (PSTN oder ISDN). Beim Gerät in der Verpackung handelt es sich um eines der beiden folgenden Modelle: • CADSLR4+ [C03-013]: Version Annex-A des Routers & Modems. Geeignet für ADSL über analoge Leitungen. • CADSLR4B+[C03-014]: Version Annex-B des Routers & Modems. Geeignet für ADSL über UR-2- und ISDN-Leitung. Netzteil 12V Wechselstrom 800mA Ethernet-Kabel 1,8 M Telefonkabel 1,8 M Mehrsprachiges Schnellstarthandbuch Produkt-CD-ROM 55 DEUTSCH 2. Conceptronic ADSL2+ Router & Modem - Bedienungstasten • Vorderseite 1 2 3 Nr. Beschreibung Status Status-Erklärung 1 Power LED Gerät ist eingeschaltet Gerät ist ausgeschaltet Es besteht eine Netzwerkverbindung zum LAN-Port Es besteht keine Netzwerkverbindung zum LAN-Port Es werden Daten über den LAN-Port gesendet oder empfangen Es besteht eine ADSL-Verbindung Es besteht keine ADSL-Verbindung ON [EIN] OFF [AUS] LAN LED-ANZEIGEN ON [EIN] (1,2,3,4) OFF [AUS] Blinkt 2 3 ADSL LED-ANZEIGE ON [EIN] OFF [AUS] • Rückseite 1 Nr. Beschreibung 1 2 3 ADSL-Anschluss LAN-Anschlüsse Reset-Taste 4 Stromanschluss 3 2 4 Erklärung Anschluss Ihrer ADSL-Leitung an das Gerät Anschluss Ihres Computers/Ihrer Computer an das Gerät Zurücksetzen des Geräts auf die Werkseinstellungen (Drücken und während +/- 10 Sekunden gedrückt halten) Anschluss des Geräts an die Stromversorgung 56 DEUTSCH 3. Anschluss des CADSLR4(B)+ an eine ADSL-Leitung Bei den meisten ADSL-Anbietern ist ein Filter zwischen der Telefonleitung und dem CADSLR4(B)+ erforderlich, der die ADSL-Leitung von der normalen Telefonleitung trennt. Es folgt eine Beschreibung der beiden üblichen Filterarten. Hinweis: Der Filter für die ADSL-Verbindung ist nicht im Lieferumfang des CADSLR4(B)+ enthalten. Den korrekten ADSL-Filter erhalten Sie über Ihren Telefon- oder Internetdienstanbieter. 3.1 In-Line-Filter – ADSL-Mikrofilter In-Line-Filter werden für alle Telefone oder Telefongeräte (Anrufbeantworter, Fax usw.) verwendet, welche die selbe Leitung wie der ADSL-Dienst benutzen. Diese Filter werden zwischen dem Telefon und der Wandsteckdose am Telefonkabel angebracht. Die Filter trennen den normalen Telefondienst vom ADSL-Dienst. Die folgende Abbildung zeigt eine übliche Anwendung eines In-Line-Filters. Telefonbuchse ADSLMikrofilter Telefon In-Line-Filter – ADSL-Mikrofilter 57 DEUTSCH 3.2 Drei-Port-Filter für ADSL (häufigster Filter für ADSL-Anschlüsse) Der andere Filtertyp wird an der Stelle angebracht, an der der Router mit der Telefonleitung verbunden ist. Es wird nur ein einziger Filter benötigt. Die Anschlüsse sind normalerweise wie folgt gekennzeichnet: Line [Leitung] - Anschluss an die Wandbuchse ADSL - Anschluss an den Router Phone [Telefon]: - Anschluss an das Telefon oder andere Telefongeräte Folgende Abbildung zeigt die richtige Verwendung dieses Filtertyps. Stellen Sie sicher, dass die Leitungen korrekt angeschlossen sind. Wenn Sie den Wählton des Telefons nicht hören, überprüfen Sie die Verbindungen um sicherzustellen, dass die Kabel richtig befestigt und am korrekten Port angeschlossen sind. Telefonbuchse Leitungssplitter Telefon Telefon PC 3-Port-Filter 58 DEUTSCH 4. Computer-Konfiguration für die Verwendung mit dem Router & Modem Der CADSLR4(B)+ ist mit einem eingebauten DHCP-Server ausgerüstet. Der DHCP-Server weist automatisch einem angeschlossenen Computer eine IP-Adresse zu, wenn dieser auf „IP-Adresse automatisch beziehen“ eingestellt ist. Befolgen Sie unten stehende Anweisungen, um Ihren Computer auf „Automatisches IP“ einzustellen: 1. Klicken Sie auf „Start” Æ „Ausführen”. 2. Geben Sie den Befehl „NCPA.CPL” ein und klicken Sie auf „OK”. 2 2 Es erscheint das Fenster ‚Netzwerkverbindungen’. 3. Rechtsklicken Sie auf Ihre „LANVerbindung“ und wählen Sie „Eigenschaften“. 3 59 DEUTSCH Es erscheint das Fenster ‚Eigenschaften von LAN-Verbindung’. 4. Wählen Sie das „Internetprotokoll TCP/IP“ und klicken Sie auf „Eigenschaften“. 4 4 Es erscheint das Fenster ‚Eigenschaften von Internetprotokoll (TCP/IP)’. 5. Aktivieren Sie das Feld „IPAdresse automatisch beziehen“ und klicken Sie auf „OK“, um die Einstellungen zu speichern. 6. Klicken Sie im Fenster ‚Eigenschaften-von LANVerbindung’ auf „OK“, um die Einstellungen zu speichern. 5 6 60 DEUTSCH Über die Eingabeaufforderung von Windows können Sie überprüfen, ob Sie für Ihre LANVerbindung eine korrekte IP-Adresse erhalten haben: 7. 8. Klicken Sie auf „Start” Æ „Ausführen”. Geben Sie den Befehl „CMD” ein und klicken Sie auf „OK”. Es erscheint die Eingabeaufforderung. 9. Geben Sie den Befehl „IPCONFIG” ein und drücken Sie die „ENTER”-Taste. 9 Es sollten die folgenden Informationen angezeigt werden: IP-Adresse : 192.168.1.xxx (wobei xxx eine Zahl zwischen 2 ~ 254 sein sollte). Subnetzmaske : 255.255.255.0 Standardgateway : 192.168.1.1 Wenn Ihre Konfiguration mit obigen Informationen übereinstimmt, gehen Sie zu Kapitel 4, um mit der Konfiguration des CADSLR4(B)+ fortzufahren. Wenn Ihre Konfiguration nicht mit diesen Angaben übereinstimmt (z.B. wenn Ihre IPAdresse 169.254.xxx.xxx lautet), überprüfen Sie bitte Folgendes: A. B. C. Schalten Sie das Gerät aus und wieder ein. Trennen Sie das LAN-Kabel vom Gerät und von Ihrem Computer und schließen Sie es erneut an. Erneuern Sie die IP-Adresse Ihres Computers mit den folgenden Befehlen: - „IPCONFIG /RELEASE”, um die falsche IP-Adresse zu löschen. - „IPCONFIG /RENEW”, um eine neue IP-Adresse vom Gerät zu erhalten. 61 DEUTSCH C C Wenn diese Maßnahmen das Problem mit der IP-Adresse nicht lösen, können Sie durch Betätigen der Reset-Taste auf der Rückseite das Gerät auf die Werkseinstellungen zurücksetzen. Drücken Sie die Reset-Taste und halten Sie diese während + / - 10 Sekunden gedrückt, um die Werkseinstellungen zu laden. Wenn die LAN-LED-Anzeige aus- und wieder einschaltet, lädt der CADSLR4(B)+ die Werkseinstellungen. Warten Sie +/- 10 Sekunden und wiederholen Sie Schritt C, um die IP-Adresse zu erneuern. 5. Konfiguration des CADSLR4(B)+ für eine ADSL-Verbindung Die Konfiguration des CADSLR4(B)+ ist webbasierend. Für die Konfiguration des Gerätes benötigen Sie einen Webbrowser. Hinweis: Folgendes sind die Werkseinstellungen des CADSLR4(B)+: IP-Adresse : 192.168.1.1 (DHCP für verbundene Clients aktiviert) Username [Benutzername] : admin (Kleinbuchstaben) Password [Passwort] : admin (Kleinbuchstaben) 62 DEUTSCH 1. Starten Sie Ihren Webbrowser (z.B. Internet Explorer, FireFox oder Safari). 2 2. Geben Sie die IP-Adresse des CADSLR4(B)+ in das Adressfeld Ihres Webbrowsers ein (standardmäßig: http://192.168.1.1/). Es erscheint die Anmeldeseite des CADSLR4(B)+ auf Ihrem Bildschirm: 3 3 3. Geben Sie den Benutzernamen und das Passwort ein und klicken Sie auf „Log In“, um die Konfigurationsseiten zu öffnen. Wenn auf der Anmeldeseite der Benutzername und das Passwort korrekt eingegeben wurden, werden die Konfigurationsseiten für den CADSLR4(B)+ geöffnet. 5.1 Konfiguration der Verbindung über den Schnellstart Das Quick Start Connection Setup [Schnellstart-Einstellung der Verbindung] enthält mehrere vorprogrammierte Internetdienstanbieter, um die Konfiguration des Gerätes zu vereinfachen. 63 DEUTSCH 1 2 3 6 7 1. 2. Wählen Sie Ihr Land in der Dropdown-Liste „Country“. Wählen Sie Ihren Internetdienstanbieter in der Dropdown-Liste „ISP“. Hinweis: Wenn Ihr Land und/oder Internetdienstanbieter in den entsprechenden Dropdown-Listen nicht aufgeführt ist, müssen Sie Ihre Verbindung manuell konfigurieren. Klicken Sie auf die Schaltfläche „Config” (7) in „Quick Start” und gehen Sie zu Kapitel 4.2, um die manuelle Konfiguration Ihrer Internetverbindung durchzuführen. Wenn Sie die korrekten Einstellungen für Ihre ADSL-Verbindung nicht kennen, erfahren Sie diese bei Ihrem Internetdienstanbieter 3. 4. 5. Wählen Sie die korrekte Kapselung für Ihren Internetdienstanbieter in der Dropdown-Liste „Encapsulation”. Die Werte VPI und VCI erscheinen automatisch in den entsprechenden Feldern. Wenn „1483 Bridge LLC” als Kapselung für Ihre Verbindung verwendet wird, müssen Sie dieWAN-IP-Zuweisung einstellen. Wählen Sie „Static [Statisch]”, „DHCP” oder „Bridge” (je nach Angaben von Ihrem Internetdienstanbieter). 5 6. Klicken Sie auf „Next [Weiter]”, um die Quick Start-Einstellungen fortzusetzen. Je nach gewählter Kapselung erscheinen auf dem zweiten Bildschirm der Quick StartEinstellungen unterschiedliche Einstellungsoptionen. 64 DEUTSCH 5.1.1 Gewählte Kapselung = PPPoE (LLC) oder PPPoA (LLC oder VC-MUX) Wenn PPPoE oder PPPoA als Kapselung gewählt wird, erscheint die folgende Anzeige: Geben Sie den Benutzernamen und das Passwort ein, die Sie von Ihrem Internetdienstanbieter erhalten haben, um die Einstellungen zu speichern und den CADSLR4(B)+ neu zu starten. 65 DEUTSCH 5.1.2 Gewählte Kapselung = 1483 Bridge LLC – Statisches IP Wenn 1483 Bridge LLD mit statischem IP als Kapselung gewählt wird, erscheint die folgende Anzeige: Geben Sie die Angaben für das statische IP ein, die Sie von Ihrem Internetdienstanbieter erhalten haben (IP-Adresse, Subnetzmaske, Gateway und DNS) und klicken Sie „Apply [Übernehmen]“, um die Einstellungen zu speichern und den CADSLR4(B)+ neu zu starten. 66 DEUTSCH 5.1.3 Gewählte Kapselung = 1483 Bridge LLC – Dynamisches IP (DHCP) Wenn 1483 Bridge LLD mit dynamischem IP als Kapselung gewählt wird, erscheint die folgende Anzeige: Behalten Sie die gegenwärtigen Einstellungen bei und klicken Sie auf „Apply [Übernehmen]“, um die Einstellungen zu speichern und den CADSLR4(B)+ neu zu starten. 67 DEUTSCH 5.1.4 Gewählte Kapselung = 1483 Bridge LLC – Bridge Wenn 1483 Bridge LLD mit Bridge-Verbindung als Kapselung gewählt wird, erscheint die folgende Anzeige: Wählen Sie „LAN group 1 (Standard)“ unter ‚Select LAN’ und klicken Sie auf „Apply [Übernehmen]“, um die Einstellungen zu speichern und den CADSLR4(B)+ neu zu starten. Wenn der Neustart abgeschlossen ist, erstellt der CADSLR4(B)+ Ihre ADSL-Verbindung. Sobald die Verbindung hergestellt ist, leuchtet die ADSL-Anzeige am CADSLR4(B)+. Damit ist ihr CADSLR4(B)+ betriebsbereit! Hinweis: Detaillierte Erklärungen zu den für den CADSLR4(B)+ verfügbaren Funktionen und Einstellungen finden Sie im Benutzerhandbuch auf der im Lieferumfang enthaltenen CD-ROM (nur auf Englisch). Select “Open User Manual” from the Autorun Menu. 68 DEUTSCH 5.2 Manuelle Konfiguration der Internetverbindung Wenn Ihr Land und/oder Internetdienstanbieter nicht bei den „Quick Start“Verbindungseinstellungen des CADSLR4(B)+ aufgeführt ist, müssen Sie die Verbindung manuell konfigurieren. Klicken Sie auf dem „Quick Start”-Bildschirm auf die Schaltfläche „Config” (7), um die manuelle Konfiguration für den CADSLR4(B)+ zu öffnen. Hinweis: Sie können über die manuelle Einstellungskonfiguration auch erweiterte Konfigurationseinstellungen ändern! Es erscheint die Seite für die manuelle Konfiguration des CADSLR4(B)+: 2 1 7 3 9 4 6 5 8 Um die Verbindung einzustellen, müssen Sie auf dem Bildschirm „Connection Setup [Verbindungseinstellungen]“ folgende Angaben eingeben: 1. 2. 3. 4. 5. 6. 7. Geben Sie einen Namen für Ihre ADSL-Verbindung ein. Wählen Sie unter ‚Type’ die Art der ADSL-Verbindung. (PPPoE, PPPoA, usw.) Wählen Sie unter ‚Encapsulation” die korrekte Kapselung für Ihre ADSL-Verbindung. (LLC, VC) Geben Sie unter ‚Username’ den Benutzernamen ein, den Sie von Ihrem Internetdienstanbieter erhalten haben. Geben Sie unter ‚Password’ das Passwort ein, das Sie von Ihrem Internetdienstanbieter erhalten haben. Geben Sie unter ‚VPI’ den korrekten VPI-Wert für die ADSL-Verbindung ein. Geben Sie unter ‚VCI’ den korrekten VCI-Wert für die ADSL-Verbindung ein. 69 DEUTSCH Hinweis: Bei den beschriebenen Einstellungen handelt es sich um die Grundeinstellungen, die Sie für Ihre ADSL-Verbindung benötigen. Fragen Sie bitte Ihren Internetdienstanbieter nach den korrekten Einstellungen für Ihre Verbindung. Detaillierte Erklärungen zu den Einstellungen finden Sie im Benutzerhandbuch auf der CD-ROM (nur auf Englisch). Wählen Sie „Open User Manual [Benutzerhandbuch öffnen]” im Autorun-Menü. 8. 9. Klicken Sie auf „Apply [Übernehmen]“, um die vorgenommenen Einstellungen der Konfiguration des CADSLR4(B)+ zu speichern. Klicken Sie auf „Save & Reboot [Speichern und Neustart]“, um den Bildschirm „Save & Reboot“ zu öffnen. 10 10. Klicken Sie auf die Schaltfläche „Save & Reboot [Speichern und Neustart]“, um den CADSLR4(B)+ neu zu starten und die Einstellungen für Ihre Verbindung zu aktivieren. Daraufhin führt der CADSLR4(B)+ einen Neustart durch und aktiviert die vorgenommenen Einstellungen. Dies kann eine Weile dauern. Warten Sie bitte, bis der Neustart vollständig durchgeführt ist. Wenn der Neustart abgeschlossen ist, erstellt der CADSLR4(B)+ Ihre ADSL-Verbindung. Sobald die Verbindung hergestellt ist, leuchtet die ADSL-Anzeige am CADSLR4(B)+. Damit ist ihr CADSLR4(B)+ betriebsbereit! Hinweis: Detaillierte Erklärungen zu den für den CADSLR4(B)+ verfügbaren Funktionen und Einstellungen finden Sie im Benutzerhandbuch auf der im Lieferumfang enthaltenen CD-ROM (nur auf Englisch). Wählen Sie „Open User Manual [Benutzerhandbuch öffnen]” im Autorun-Menü. 70 DEUTSCH 6. Portweiterleitung Der Conceptronic CADSLR4(B)+ ist mit einer eingebauten Firewall ausgerüstet, um Angriffe aus dem Internet auf Ihr Netzwerk zu verhindern. Diese Firewall blockiert automatisch allen eingehenden Verkehr auf nicht benutzten Ports. Wenn ein blockierter Port für einen Dienst oder eine Anwendung benötigt wird (zum Beispiel für einen FTPServer oder WEB-Server), können Sie auf den Konfigurationsseiten eine Regel für die Portweiterleitung [Port Forwarding Rule] erstellen. Hinweis: Wir empfehlen, bei der Verwendung von Portweiterleitungsregeln den/die Computer mit einer festen IP-Adresse statt mit einer dynamischen IP-Adresse zu konfigurieren. Hinweis: Detaillierte Erklärungen zu den Portweiterleitungs- und DMZ-Optionen finden Sie im Benutzerhandbuch auf der CD-ROM (nur auf Englisch). Wählen Sie „Open User Manual [Benutzerhandbuch öffnen]” im Autorun-Menü. 1. 2. Starten Sie Ihren Webbrowser (z.B. Internet Explorer, FireFox oder Safari). Geben Sie die IP-Adresse des CADSLR4(B)+ in das Adressfeld Ihres Webbrowsers ein (standardmäßig: http://192.168.1.1/). Es erscheint die Anmeldeseite des CADSLR4(B)+ auf Ihrem Bildschirm. 3. 4. Geben Sie den Benutzernamen und das Passwort ein und klicken Sie auf „Log In“, um die Konfigurationsseiten zu öffnen. Wählen Sie die Option „Advanced [Erweitert]“ auf der Konfigurationsseite. 5 5. 4 Wählen Sie im linken Menü auf der Konfigurationsseite die Option „Port Forwarding [Portweiterleitung]”. 71 DEUTSCH Es erscheint die Einstellungsseite „Port Forwarding [Portweiterleitung]“: 6 9 10 7 6. 7. 8 Wählen Sie das LAN IP für den Computer, für den die Portweiterleitungsregel benötigt wird. Wenn das IP nicht auf der Liste aufgeführt ist (zum Beispiel, wenn das Gerät ein statisches IP verwendet) können Sie über die Schaltfläche „New IP [Neues IP]” das IP des Gerätes hinzufügen. Wählen Sie unter ‚Category’ die Kategorie Ihrer Portweiterleitungsregel. Hinweis: Es gibt verschiedene vordefinierte Ports in der Konfiguration. Sie können eine der vordefinierten Regeln wählen oder eine neue Regel erstellen, indem Sie die Kategorie „User [Benutzer]“ wählen und auf die Schaltfläche „New [Neu]“ klicken. 8. Wählen Sie unter ‚Available Rules’ die Regel, die Sie für das Weiterleiten anwenden wollen. 9. Klicken Sie auf die Schaltfläche „Add [Hinzufügen]”, um die gewählte Regel der ausgewählten IP-Adresse zuzuordnen. 10. Sobald alle Regeln definiert sind, klicken Sie auf die Schaltfläche „Apply [Übernehmen]“, um die Einstellungen zu speichern. 11. Klicken Sie auf „Save & Reboot [Speichern und Neustart]“, um den Bildschirm „Save & Reboot“ zu öffnen. 12 12. Klicken Sie auf die Schaltfläche „Save & Reboot [Speichern und Neustart]“, um den CADSLR4(B)+ neu zu starten und die Regeln zu aktivieren. Die definierten Regeln sind jetzt betriebsbereit! 72 FRANÇAIS CADSLR4+ / CADSLR4B+ de Conceptronic Guide d'installation rapide Nous vous félicitons d'avoir acheté votre Router et Modem ADSL2+ de Conceptronic Vous trouverez dans le Guide d'Installation du Hardware fourni avec le produit une explication détaillée de l'installation du Router et Modem ADSL2+ de Conceptronic. En cas de problèmes, nous vous recommandons de vous adresser à notre service technique (allez à www.conceptronic.net et cliquez sur « support »). Vous trouverez dans cette section la Base de Données des Foires Aux Questions. Si vous avez d’autres questions concernant votre produit et que vous ne trouvez pas la solution sur notre site web, contactez-nous par e-mail : support@conceptronic.net. Pour plus d'informations sur les produits de Conceptronic, visitez notre Site Internet Conceptronic: www.conceptronic.net. La configuration du Hardware décrite ci-après peut être légèrement différente de l’installation sur votre ordinateur. Cela dépendra de la version Windows que vous utilisez. 1. Contenu du Coffret Les éléments suivants sont fournis dans le paquet avec le Router et Modem ADSL2+ de Conceptronic : • • • • • • Router et Modem ADSL2+ de Conceptronic (PTSN ou ISDN) L’appareil contenu dans ce coffret est l’un des deux modèles indiqués ci-après : CADSLR4+ [C03-013]: Annexe - Version A du Router et Modem. À utiliser avec les Lignes ADSL analogiques. CADSLR4B+[C03-014]: Annexe - Version B du Router et Modem. À utiliser pour les lignes ADSL ISDN et UR-2. Alimentation électrique 12V CC – 800mA Câble Éthernet 1,8 M Câble Téléphonique 1,8 M Manuel de démarrage rapide en plusieurs langues CD-ROM sur le produit 73 FRANÇAIS 2. Explication du Router et Modem ADSL2+ de Conceptronic • Façade Avant 1 Nº Description État 1 Led d'Alim. 2 LEDS de LAN (1,2,3,4) Allumée Éteinte Allumée Éteinte 3 LED ADSL 2 3 Explication de l’État L'appareil est allumé. L'appareil est éteint. Une Liaison avec un Réseau est créée sur le Port LAN Aucune Liaison avec un Réseau n’est créée sur le Port LAN Clignotant Des données sont envoyées ou reçues par le Port LAN Allumée Une Connexion ADSL est créée Éteinte Aucune Connexion ADSL n’est créée • Façade arrière 1 Nº 1 2 3 4 3 2 Description Connexion ADSL Ports LAN 4 Explication Pour connecter votre ligne ADSL sur l’appareil Pour connecter votre(vos) Ordinateur(s) sur l’appareil Bouton de Réinitialisation Pour charger les Paramètres par Défaut. (Appuyez sur le Bouton pendant +/- 10 secondes) Connexion d’alim. Pour brancher l’alimentation électrique sur électrique l’appareil 74 FRANÇAIS 3. Comment connecter le CADSLR4(B)+ sur votre ligne ADSL La plupart des Fournisseurs ADSL nécessitent un filtre entre votre Ligne Téléphonique et le CADSLR4(B)+ qui empêche la ligne de produire des interférences avec les services téléphoniques traditionnels. Les deux principaux styles de filtres sont décrits ci-après. Note: Aucun filtre pour connexion ADSL n’est fourni avec le CADSLR4(B)+ Veuillez prendre contact avec votre Compagnie de téléphone ou votre Fournisseur Internet pour obtenir le filtre ADSL correct. 3.1 Filtre d’Entrée de Ligne – Micro-filtre ADSL Les filtres d’entrée de ligne sont utilisés pour chaque téléphone ou appareil téléphonique (répondeurs, fax, etc.) qui partage la ligne avec le service ADSL. Ces filtres sont installés sur le câble téléphonique entre le téléphone et la prise murale. Les filtres isolent le service téléphonique normal du service ADSL. Vous trouverez ci-après une illustration de l’installation typique d’un filtre de ligne d’entrée. Prise téléphonique Microfiltre ADSL Téléphone Filtre d’Entrée de Ligne – Micro-filtre ADSL 75 FRANÇAIS 3.2 Filtre ADSL à trois ports (Utilisés dans la plupart des cas ADSL) Un autre type de filtre est installé sur le point où le Router est connecté à la ligne téléphonique. Un seul filtre est nécessaire. Les ports de connexion sont généralement intitulés comme suit : • Line - Ce port se connecte à la prise murale. • ADSL - Ce port se connecte au Router. • Phone - Ce port se connecte à un téléphone ou à un autre appareil téléphonique. Le diagramme ci-après indique comment bien utiliser ce type de filtre. Vérifiez que les lignes sont bien connectées. Si vous n’entendez pas de tonalité avec le téléphone, vérifiez les connexions pour vous assurer que les câbles sont bien fixés et connectés au port correspondant. Prise de téléphone Séparateur de ligne Phone CADSLR4(B)+ PC Filtre à 3 ports 76 FRANÇAIS 4. Configuration de votre(vos) ordinateur(s) pour l’utiliser avec le Routeur et Modem. Le CADSLR4(B)+ est équipé d’un Serveur DHCP intégré. Le Serveur DHCP affectera automatiquement une adresse IP à un ordinateur connecté si l’ordinateur connecté est réglé sur l’option « obtenir automatiquement une adresse IP ». Pour configurer votre ordinateur pour l’adresse IP automatique, procédez comme suit : 1. Cliquez sur « Start » -> « Run ». 2. Entrez la commande « NCPA.CPL » et appuyez sur « OK ». 2 2 La fenêtre de Connexions de Réseau s’affiche. 3. Cliquez avec le bouton de droite de la souris sur « Connexion Réseau Local » , et sélectionnez « Propriétés ». 3 77 FRANÇAIS La Fenêtre Propriétés de votre Connexion de Réseau Local s’affiche. 4. Sélectionnez « Internet Protocol (TCP/IP » et cliquez sur « Properties ». 4 4 La fenêtre Properties du Protocol Internet (TCP/IP) apparaît. 5. Réglez les propriétés sur « Obtain an IP address automatically » et appuyez sur «OK » pour enregistrer les paramètres. 6. Appuyez sur « OK » dans la fenêtre de propriétés de la Connexion de Réseau Local pour enregistrer les paramètres. 5 6 78 FRANÇAIS Avec le message de Commande de Windows, vous pouvez vérifier si vous avez reçu une adresse IP correcte sur votre Connexion de Réseau Local : 7. 8. Cliquez sur « Start » -> « Run ». Entrez la commande « CMD » et appuyez sur « OK ». L’Invite suivante apparaît. 9. Entrez la commande « IPCONFIG» et appuyez sur ENTER. 9 Vous verrez s’afficher les informations suivantes Adresse IP : 192.168.1.xxx (Où xxx peut être un nombre entre 2 ~ 254). Masque de Sous-réseau : 255.255.255.0 Passerelle par Défaut : 192.168.1.1 Si les informations présentées ci-dessus correspondent à votre configuration, vous pouvez poursuivre la configuration du CADSLR4(B)+ Chapitre 4. Si les informations présentées ci-dessus ne correspondent pas à votre configuration (par ex. votre adresse IP est 169.254.xxx.xxx), procédez comme indiqué ci-après : A. B. C. Éteignez et rallumez l’appareil. Rebranchez le Câble LAN sur l’appareil et sur votre ordinateur. Réécrivez l’adresse IP de votre ordinateur avec les commandes suivantes : - « IPCONFIG/RELEASE » pour éditer l’adresse IP incorrecte. - « IPCONFIG/RENEW » pour recevoir une nouvelle adresse IP du dispositif. 79 FRANÇAIS C C Si les actions ci-dessus ne suffisent pas à résoudre votre problème d’adresse IP, vous pouvez réinitialiser l’appareil sur les paramètres par défaut avec le Bouton Reset situé sur la façade arrière de l’appareil. Appuyez sur le Bouton Reset pendant +/- 10 secondes pour charger les Paramètres par Défaut. Lorsque les LED de LAN s’éteignent et se rallume, le CADSLR4(B)+ charge les Paramètres par Défaut. Attendez environ 10 secondes et recommencez l’opération C pour renouveler votre adresse IP. 5. Comment configurer le CADSLR4(B)+ sur votre Connexion ADSL La configuration de votre CADSLR4(B)+ est basée sur Internet. Vous aurez donc besoin d’un navigateur Internet pour configurer le dispositif. Remarque : La configuration de votre CADSLR4(B)+ est : Adresse IP : 192.168.1.1 (DHCP pour clients connectés activé) Nom d'utilisateur : admin (minuscules) Mot de Passe : admin (minuscules) 80 FRANÇAIS 1. Lancez votre navigateur Internet (par ex. : Internet Explorer, FireFox ou Safari). 2 2. Entrez l’adresse IP du CADSLR4(B)+ dans la barre d’adresse de votre navigateur Internet (Par défaut : http://192.168.1.1/). La page Login du CADSLR4(B)+ s’affiche à l’écran : 3 3 3. Entrez le Nom d’utilisateur et le Mot de passe et cliquez sur « Login » pour entrer dans les pages de configuration. Si le Nom d’utilisateur et le Mot de passe introduits dans la page login sont corrects, le CADSLR4(B)+ affiche les pages de configuration de l’appareil. 5.1 Configuration de votre connexion avec le Démarrage Rapide Le Démarrage Rapide de Connexion contient plusieurs ISP préprogrammées pour configurer facilement l’appareil. 81 FRANÇAIS 1 2 3 6 7 1. 2. Sélectionnez votre pays dans la liste déroulante « Country ». Sélectionnez votre ISP dans la liste déroulante « ISP ». Remarque : Si votre pays et/ou ISP n’est pas affiché l’une des 2 listes déroulantes vous avez besoin de définir manuellement la connexion. Cliquez sur le bouton "Config" (7) dans l'écran de démarrage rapide "Quick Start" et poursuivez au chapitre 4.2 pour configurer manuellement votre Connexion Internet. Contactez votre Fournisseur d’Accès à Internet pour connaître les paramètres ADSL de votre connexion. 3. 4. 5. Sélectionnez l’encapsulation correcte pour votre ISP dans la liste déroulante « Encapsulation ». Les valeurs VPI et VCI s’affichent automatiquement dans les champs associés à l’écran. Si le « 1483 Bridge LCC » est utilisé comme encapsulation pour votre connexion, vous devez régler l’affectation WAN-IP. Sélectionnez « Static », « DHCP » ou « Bridge » (En fonction des informations données par votre fournisseur Internet). 5 6. Appuyez sur « Next » pour poursuivre la configuration rapide. En fonction de l'encapsulation choisie, vous pouvez obtenir plusieurs options de paramètres dans le deuxième écran du Guide de configuration rapide. 82 FRANÇAIS 5.1.1 Encapsulation sélectionnée = PPPoE (LLC) ou PPPoA (LLC ou VC-MUX) Lorsque vous sélectionnez PPPoE ou PPPoA comme encapsulation, vous voyez s’afficher l’écran suivant : Indiquez le Nom d’utilisateur et le Mot de passe donnés par votre Fournisseur Internet et appuyez sur « Apply » pour enregistrer les paramètres et réinitialiser le CADSLR4(B)+. 83 FRANÇAIS 5.1.2 Encapsulation sélectionnée = 1483 Bridge LLC – Static IP Lorsque vous sélectionnez 1483 Bridge LLC avec Static IP comme encapsulation, vous voyez s’afficher l’écran de configuration suivant : Indiquez les informations de Static IP donnés par votre Fournisseur Internet (Adresse IP, Masque de sous-réseau, Passerelle et DNS) et appuyez sur « Apply » pour enregistrer les paramètres et réinitialiser le CADSLR4(B)+. 84 FRANÇAIS 5.1.3 Encapsulation sélectionnée = 1483 Bridge LLC – Dynamic IP (DHCP) Lorsque vous sélectionnez 1483 Bridge LLC avec Dynamic IP comme encapsulation, vous voyez s’afficher l’écran de configuration suivant : Conservez les paramètres actuels et appuyez sur « Apply » pour enregistrer les paramètres et réinitialiser le CADSLR4(B)+. 85 FRANÇAIS 5.1.4 Encapsulation sélectionnée = 1483 Bridge LLC – Bridge Lorsque vous sélectionnez 1483 Bridge LLC avec Bridge Connection comme encapsulation, vous voyez s’afficher l’écran de configuration suivant : Indiquez le groupe LAN sur Group 1 (Par défaut) et appuyez sur « Apply » pour enregistrer les paramètres et réinitialiser le CADSLR4(B)+. Lorsque le redémarrage est terminé, le CADSLR4(B)+ crée pour vous la connexion ADSL. Lorsque la connexion est établie, le voyant lumineux ADSL du CADSLR4(B)+ s’allume. Vous pouvez dès à présent utiliser votre CADSLR4(B)+ Remarque : Pour plus d’explications concernant les fonctions et les paramètres du CADSLR4(B)+ veuillez consulter le Manuel d’Utilisateur (en anglais uniquement) présent sur le Cd-Rom. Sélectionnez « Open User Manual » dans le Menu à Lancement Automatique. 86 FRANÇAIS 5.2 Configuration manuelle de votre Connexion à Internet Si votre pays et/ou ISP n’est pas affiché dans le Guide de connexion rapide du CADSLR4(B)+, vous avez besoin de définir manuellement la connexion. Cliquez sur le bouton "Config" (7) dans l'écran de démarrage rapide "Quick Start" pour entrer dans la configuration manuelle du CADSLR4(B)+. Remarque : Vous pouvez aussi utiliser la Configuration du Manuel pour modifier les | paramètres de connexion avancés ! La page de configuration manuelle du CADSLR4(B)+ s’affiche à l’écran : 2 1 7 3 9 4 6 5 8 Pour paramétrer votre connexion, vous devez introduire les informations suivantes à l’écran de paramétrage de la connexion. 1. 2. 3. 4. 5. 6. 7. Entrez le nom de votre Connexion ADSL. Sélectionnez le type de connexion ADSL. (PPPoE, PPPoA, etc.) Sélectionnez la bonne encapsulation pour la connexion ADSL. (LLC, VC) Entrez le Nom d’utilisateur donné par votre fournisseur. Entrez le Mot de passe donné par votre fournisseur. Sélectionnez la bonne valeur VPI pour la connexion ADSL. Sélectionnez la bonne valeur VCI pour la connexion ADSL. 87 FRANÇAIS Remarque : Les paramètres expliqués ici sont les paramètres de base nécessaires pour votre connexion ADSL. Contactez votre Fournisseur d’Accès à Internet pour connaître les paramètres de votre connexion. Pour plus d’explications sur les paramètres, veuillez consulter le Manuel d’Utilisateur (en anglais uniquement) présent sur le Cd-Rom. Sélectionnez « Open User Manual » dans le Menu à Lancement Automatique. 8. 9. Cliquez sur « Apply » pour enregistrer les paramètres faits dans la configuration du CADSLR4(B)+. Cliquez sur « Save & Reboot » pour entrer dans l'écran Save & Reboot. 10 10. Cliquez sur « Save & Reboot » pour rédémarrer le CADSLR4(B)+ et activez les paramètres de votre connexion. Le CADSLR4(B)+ redémarre et active les paramètres établis. Ceci peut prendre quelques instants. Attendez que l’opération soit terminée pour redémarrer l’ordinateur. Lorsque le redémarrage est terminé, le CADSLR4(B)+ crée pour vous la connexion ADSL. Lorsque la connexion est établie, le voyant lumineux ADSL du CADSLR4(B)+ s’allume. Vous pouvez dès à présent utiliser votre CADSLR4(B)+ Remarque : Pour plus d’explications concernant les fonctions et les paramètres du CADSLR4(B)+ veuillez consulter le Manuel d’Utilisateur (en anglais uniquement) présent sur le Cd-Rom. Sélectionnez « Open User Manual » dans le Menu à Lancement Automatique. 88 FRANÇAIS 6. Port Forwarding Le Conceptronic CADSLR4(B)+ est équipé d’un Pare-feu intégré pour empêcher les attaques d’Internet dans votre réseau. Ce Pare-feu bloque automatiquement tout le trafic entrant de ports non utilisés. Lorsqu’un port bloqué est nécessaire pour un service ou pour une application (par exemple : un Serveur FTP ou un Serveur WEB), vous pouvez créer une Règle Port Forwarding Virtuel dans les Pages de Configuration. Remarque : Lorsque vous utilisez des règles de Port Forwarding, nous vous conseillons de configurer le/s ordinateur/s avec une Adresse IP Fixe au lieu d’une Adresse IP Dynamique. Remarque : Pour plus d’explications sur le Port Forwarding et les options DMZ, veuillez consulter le Manuel d’Utilisateur (en anglais uniquement) présent sur le Cd-Rom. Sélectionnez « Open User Manual » dans le Menu à Lancement Automatique. 1. 2. Lancez votre navigateur Internet (par ex. : Internet Explorer, FireFox ou Safari). Entrez l’adresse IP du CADSLR4(B)+ dans la barre d’adresse de votre navigateur Internet (Par défaut : http://192.168.1.1/). La page Login du CADSLR4(B)+ s’affiche à l’écran : 3. Entrez le Nom d’utilisateur et le Mot de passe et cliquez sur « Login » pour entrer dans les pages de configuration. 4. Sélectionnez l'option "Advanced" dans la page de Configuration. 5 5. 4 Sélectionnez l'option "Port Forwarding" dans le menu de gauche de la page de Configuration. 89 FRANÇAIS Vous verrez s’afficher la page de Configuration de « Port Forwarding" suivante : 6 9 10 7 6. 7. 8 Sélectionnez l’IP de LAN de votre ordinateur qui a besoin d’une Règle Port Forwarding. Si l’IP n’est pas dans la liste (par exemple : si le dispositif utilise un IP Statique), vous pouvez utiliser le bouton « New IP » pour ajouter l’IP du dispositif. Sélectionnez la Catégorie de votre Règle de Port Forwarding. Remarque : Plusieurs ports sont prédéfinis dans la configuration. Vous pouvez sélectionner l’un des ports prédéfinis ou créer une nouvelle règle en sélectionnant la Catégorie « User ». Puis appuyez sur le bouton « New ». 8. 9. Sélectionnez la Règle nécessaire pour le Forwarding. Appuyez sur le bouton « Add » pour joindre la Règle sélectionnée à l’Adresse IP sélectionnée. 10. Si toutes les Règles sont définies, appuyez sur « Apply » pour enregistrer les paramètres. 11. Cliquez sur « Save & Reboot » pour entrer dans l'écran Save & Reboot. 12 12. Cliquez sur « Save & Reboot » pour rédémarrer le CADSLR4(B)+ et activez les règles. Les Règles définies sont prêtes à fonctionner ! 90 ITALIANO Conceptronic CADSLR4+ / CADSLR4B+ Guida d’installazione rapida Vi ringraziamo per aver acquistato il Router e Modem Wireless ADSL2+ di Conceptronic. La presente Guida per l’installazione dell’hardware spiega passo a passo come installare il Router e Modem Wireless ADSL2+ di Conceptronic. Se dovessero esserci dei problemi, vi consigliamo di visitare il nostro sito di supporto (andate su www.conceptronic.net e cliccate ‘support’), dove potrete trovare il Database delle Risposte alle Domande più Frequenti (FQA). Se doveste avere altre domande riguardanti il prodotto che non trovate sul nostro sito Web vi preghiamo di contattarci attraverso l’e-mail: support@conceptronic.net Per ulteriori informazioni dei prodotti Conceptronic, la preghiamo di visitare il sito Web della Conceptronic: www.conceptronic.net. La configurazione dell’hardware così come viene descritta di seguito potrebbe essere leggermente diversa da quella del computer in uso, poiché ciò dipenderà dalla versione di Windows utilizzata. 1. Contenuto della confezione Nella confezione del Router e Modem ADSL2+ di Conceptronic devono essere presenti i seguenti elementi: • Router e Modem ADSL2+ di Conceptronic (PSTN o ISDN). Il dispositivo presente nella confezione deve corrispondere a uno dei due modelli descritti qui di seguito: CADSLR4+ [C03-013]: Versione del Router e Modem Annex-A. Adatto per linee ADSL analogiche. CADSLR4B+[C03-014]: Versione del Router e Modem Annex-B. Adatto per linee ISDN e UR-2 ADSL. • Alimentatore di corrente 12V AC, 800mA • Cavo ethernet 1,8 M • Cavo telefonico 1,8 M • Manuale di avvio rapido multilingue • CD-ROM del prodotto 91 ITALIANO 2. Spiegazione del Router e Modem ADSL2+ • Pannello frontale 1 2 3 N. Descrizione Stato 1 LED Power 2 LED LAN (1,2,3,4) 3 LED ADSL SPENTO Il dispositivo è spento ACCESO Il dispositivo è acceso ACCESO Connessione di rete stabilita verso la porta LAN SPENTO Nessuna connessione di rete verso la porta LAN Lampeggiante Dati inviati o ricevuti attraverso la porta LAN ACCESO Connessione ADSL stabilita SPENTO Non esiste nessuna connessione ADSL • Spiegazione stato Pannello posteriore 1 3 2 4 N Descrizione Spiegazione 1 2 3 Connessione ADSL Porte LAN Pulsante di reset 4 Presa alimentazione Collega la linea ADSL al dispositivo Collega il/i computer al dispositivo Riporta il dispositivo sui parametri default (mantenerlo premuto per 10 secondi circa) Collega l’alimentatore di corrente al dispositivo 92 ITALIANO 3. Come collegare il CADSLR4(B)+ alla linea ADSL La maggior parte dei provider ADSL hanno bisogno di un filtro fra la linea telefonica e il CADSLR4(B)+ affinché la linea ADSL non interferisca con i servizi telefonici normali. I due tipi di filtri più comuni sono quelli descritti qui di seguito. Nota: Nella confezione del CADSLR4(B)+ non viene accluso nessun filtro per la connessione ADSL. È necessario rivolgersi al provider della linea telefonica o dei servizi Internet per ottenere il filtro ADSL appropriato. 3.1 Filtro in-line – Microfiltro ADSL I filtri in-line vengono utilizzati per ogni telefono o dispositivo telefonico (segreterie telefoniche, fax, ecc.) che condivide la linea con il servizio ADSL. Tali filtri sono uniti al cavo telefonico nella parte fra il telefono e la presa a muro, e servono per separare i servizi telefonici normali da quelli ADSL. L’immagine qui di seguito mostra un’installazione classica con filtro in-line. Phone Jack ADSL Microfilter Phone Filtro in-line – Microfiltro ADSL 93 ITALIANO 3.2 Filtro ADSL a tre porte (usato nella maggior parte delle connessioni ADSL) Un altro tipo di filtro viene installato nello stesso punto in cui il router si collega alla linea telefonica. È necessario un unico filtro. Le porte di connessione appaiono di solito con le seguenti etichette: • Line - È la porta per la connessione alla presa a muro. • ADSL – È la porta per la connessione al router. • Phone – È la porta per la connessione a un telefono o a un altro dispositivo telefonico. L’immagine qui di seguito mostra l’uso appropriato di questo tipo di filtro. È necessario assicurarsi che le linee siano collegate in maniera corretta. Se non si sente nessun tono di chiamata attraverso il telefono, verificare le connessioni per accertarsi che i cavi siano stati collegati fino in fondo e che siano connessi alla porta giusta. Phone Jack Line Splitter Phone ADSL Device CADSLR4(B)+ CADSLR4(B) Filtro a tre porte 94 PC ITALIANO 4. Come configurare il/i computer per usarlo/i con il Router e Modem Il CADSLR4(B)+ è dotato di un server DHCP incorporato, il quale assegna automaticamente un indirizzo IP al computer connesso, nel caso in cui quest’ultimo sia impostato sull’opzione “Ottieni automaticamente un indirizzo IP”. Per configurare il computer in modo tale da ottenere automaticamente l’indirizzo IP, attenersi alle seguenti istruzioni: 1. Fare clic su “Start” Æ “Esegui”. 2. Introdurre il comando “NCPA.CPL” e premere “OK”. 2 2 Apparirà la videata relativa alle connessioni di rete. 3. Fare clic con il pulsante destro del mouse su “Connessione alla rete locale” e selezionare “Proprietà”. 3 95 ITALIANO Apparirà la schermata delle Proprietà della Connessione alla rete locale. 4. Selezionare il “Protocollo Internet (TCP/IP)” e fare clic su “Proprietà”. 4 4 Apparirà la schermata delle Proprietà del Protocollo Internet (TCP/IP). 5. Impostare le Proprietà su “Ottieni automaticamente un indirizzo IP” e premere “OK” per salvare le modifiche. 6. Premere “OK” nella schermata delle Proprietà della Connessione alla rete locale per salvare le modifiche. 5 6 96 ITALIANO Con il prompt di comandi di Windows è possibile verificare se è stato ottenuto un indirizzo IP corretto per la connessione di rete locale: 7. 8. Fare clic su “Start” Æ “Esegui”. Introdurre il comando “CMD” e premere “OK”. Apparirà il prompt di comandi. 9. Introdurre il comando “IPCONFIG” e premere INTRO. 9 Dovrebbero apparire le Indirizzo IP Maschera di sottorete Gateway di default seguenti informazioni : 192.168.1.xxx (dove xxx può variare fra 2 ~ 254). : 255.255.255.0 : 192.168.1.1 Se le informazioni riportate qui in alto corrispondono a quelle della configurazione, è possibile continuare la configurazione del CADSLR4(B)+ andando al capitolo 4. Se invece le informazioni riportate qui in alto non corrispondono a quelle della configurazione (ad esempio se l’indirizzo IP è 169.254.xxx.xxx) consultare una delle seguenti opzioni: A. B. C. Spegnere e riaccendere il dispositivo. Ricollegare il cavo LAN al dispositivo e al computer. Rinnovare l’indirizzo IP del computer con i seguenti comandi: - “IPCONFIG /RELEASE” per eliminare l’indirizzo IP sbagliato. - “IPCONFIG /RENEW” per ricevere un nuovo indirizzo IP dal dispositivo. 97 ITALIANO C C Nel caso in cui i passi suddetti non servano per risolvere il problema di indirizzo IP, è possibile riportare il dispositivo ai parametri di default con il pulsante di Reset posto sul pannello posteriore. Mantenere premuto il pulsante Reset per dieci secondi circa per riattivare i parametri di default. Quando il LED LAN si psegnerà e si riaccenderà, il CADSLR4(B)+ tornerà sui parametri di default. Attendere più o meno dicei secondi e ripetere il passo C per rinnovare l’indirizzo IP. 5. Come configurare il CADSLR4(B)+ per connessioni ADSL La configurazione del CADSLR4(B)+ Sarà quindi necessario un web browser per la configurazione del dispositivo. Nota: La configurazione di fabbrica del CADSLR4(B)+ è: Indirizzo IP : 192.168.1.1 (DHCP attivato per client connessi) : admin (minuscolo) Nome utente Password : admin (minuscolo) 98 ITALIANO 1. Aprire il web browser (ad esempio: Internet Explorer, FireFox o Safari). 2 2. Introdurre l’indirizzo IP del CADSLR4(B)+ nella barra degli indirizzi del web browser (per default: http://192.168.1.1/). Apparirà una finestra di login del CADSLR4(B)+ sullo schermo: 3 3 3. Introdurre il nome utente e la password dopo di che fare clic su “Login” per accedere alle pagine di configurazione. Nel caso in cui il nome utente e la password siano inseriti correttamente nella pagina di login, il CADSLR4(B)+ mostrerà le pagine di configurazione nel dispositivo. 5.1 Configurazione della connessione mediante Quick Start La configurazione per conessione Quick Start contiene diversi Internet Provider preprogrammati per una facile configurazione del dispositivo. 99 ITALIANO 1 2 3 6 7 1. 2. Nota: 3. 4. 5. Selezionare il paese nell’elenco a discesa “Country”. Selezionare l’Internet Provider nell’elenco a discesa “ISP”. Nel caso in cui il paese o l’Internet Provider non appaiano in un dei due suddetti elenchi a discesa, sarà necessario configurare manualmente la connessione. Fare clic sul pulsante “Config” button (7) in “Quick Start” e procedere al capitolo 4.2 per la configurazione manuale della connessione a Internet. Se non si conoscono i parametri di configurazione della connessione ADSL rivolgetevi all’Internet Provider per ottenerli. Selezionare il corretto incapsulamento dell’Internet Provider, nell’elenco a discesa “Encapsulation”. I valori VPI e VCI appariranno automaticamente nei campi assegnati sullo schermo. Se come incapsulamento viene usata l’opzione “1483 Bridge LLC” per la connessione, sarà necessario configurare l’assegnazione WAN-IP. Selezionare “Static”, “DHCP” o “Bridge” (a seconda delle informazioni fornite dall’Internet Provider). 5 6. Fare clic su “Next” per continuare con la configurazione Quick Start. A seconda dell’incapsulamento prescelto, è possibile ottenere diverse opzioni di configurazione nella seconda schermata della Configurazione Quick Start. 100 ITALIANO 5.1.1 Incapsulamento prescelto = PPPoE (LLC) o PPPoA (LLC or VC-MUX) Quando viene selezionata l’opzione PPPoE o PPPoA come incapsulamento, apparirà la seguente videata di configurazione: Introdurre il Nome utente e la Password forniti dall’Internet Provider e premere “Apply” per salvare la configurazione e riavviare il CADSLR4(B)+. 101 ITALIANO 5.1.2 Incapsulamento prescelto = 1483 Bridge LLC – IP statico Quando viene selezionata l’opzione 1483 Bridge LLC con IP statico come incapsulamento, apparirà la seguente videata di configurazione: Introdurre le informazioni relative all’indirizzo IP statico fornite dall’Internet Provider (indirizzo IP, maschera di sottorete, gateway e DNS) e premere “Apply” per salvare la configurazione e riavviare il CADSLR4(B)+. 102 ITALIANO 5.1.3 Incapsulamento prescelto = 1483 Bridge LLC – IP dinamico (DHCP) Quando viene selezionata l’opzione 1483 Bridge LLC con IP dinamico come incapsulamento, apparirà la seguente videata di configurazione: Mantenere la configurazione attuale e premere “Apply” per salvare la configurazione e riavviare il CADSLR4(B)+. 103 ITALIANO 5.1.4 Incapsulamento prescelto = 1483 Bridge LLC – Bridge Quando viene selezionata l’opzione 1483 Bridge LLC con connessione Bridge come incapsulamento, apparirà la seguente videata di configurazione: Impostare il Gruppo LAN su Group 1 (default) e premere “Apply” per salvare la configurazione e riavviare il CADSLR4(B)+. Una volta terminato il processo di riavvio, il CADSLR4(B)+ creerà la connessione ADSL. Una volta realizzata la connessione, la spia dell’ADSL del CADSLR4(B)+ si accenderà. Il CADSLR4(B)+ è pronto per essere usato! Nota: Per maggiori informazioni sulle varie funzioni e impostazioni del CADSLR4(B)+ consultare il Manuale utente (solo in inglese!) contenuto nel CD-ROM accluso. Selezionare “View User Manual” (Visualizza Manuale Utente) dal Menu di avvio automatico. 104 ITALIANO 5.2 Come configurare manualmente la connessione a Internet Connection Nel caso in cui il Paese o l’Internet Provider non appaiano nella Configurazione per la connessione “Quick Start” del CADSLR4(B)+ sarà necessario definire la connessione manualmente. Fare clic sul pulsante “Config” (7) della videata “Quick Start” per accere alla configurazione manuale del CADSLR4(B)+. Nota: è anche possibile usar la Configurazione manuale per modificare impostazioni avanzate di connessione! Apparirà sullo schermo la pagina relativa alla configurazione manuale del CADSLR4(B)+: 2 1 7 3 9 4 6 5 8 Per congiurare la connessione è necessario introdurre le seguenti informazioni nella videata relativa alla configurazione della connessione: 1. 2. 3. 4. 5. 6. Introdurre un nome per la connessione ADSL. Selezionare il tipo di connessione ADSL. (PPPoE, PPPoA, ecc.) Selezionare il corretto incapsulamento della connessione ADSL. (LLC, VC) Introdurre il Nome utente fornito dall’Internet Provider. Introdurre la Password fornita dall’Internet Provider. Impostare il valore VPI corretto della connessione ADSL. 105 ITALIANO 7. Nota: 8. 9. Impostare il valore VCI corretto della connessione ADSL. la configurazione spiegata è solo quella di base, necessaria per la configurazione ADSL. Rivolgetevi all’Internet Provider per ottenere i parametri di configurazione corretti per la connessione. Per maggiori informazioni sulla consultare il Manuale utente (solo in inglese!) contenuto nel CD-ROM accluso. Selezionare “Open User Manual” (Apri Manuale Utente) dal Menu di avvio automatico. Fare clic su “Apply” pe4 salvare la configurazione del CADSLR4(B)+ Fare clic su “Save & Reboot” per accedere alla videata per salvare le modifiche e riavviare il dispositivo. 10 10. Fare clic su “Save & Reboot” per riavviare il CADSLR4(B)+ e attivare la configurazione della connessione. Il CADSLR4(B)+ si riavvierà e attiverà la configurazione determinata; potrebbe volerci un po’ di tempo. Attendere fino al termine del processo di riavvio. Una volta terminato il processo di riavvio, il CADSLR4(B)+ creerà la connessione ADSL, dopo di che la spia dell’ADSL del CADSLR4(B)+ si accednerà. Il CADSLR4(B)+ è pronto per essere usato! Nota: Per maggiori informazioni sulle varie funzioni e impostazioni del CADSLR4(B)+ consultare il Manuale utente (solo in inglese!) contenuto nel CD-ROM accluso. Selezionare “Open User Manual” (Apri Manuale Utente) dal Menu di avvio automatico. 106 ITALIANO 6. Reindirizzamento Il CADSLR4(B)+ Conceptronic Il C54APRA2+/C54APRB2+ Conceptronic è dotato di un firewall incorporato per evitare attacchi provenienti da Internet contro la rete in uso. Il firewall blocca automaticamente tutto il traffico in entrata nelle porte non usate. Quando è necessaria una porta bloccata per un servizio o un’applicazione (ad esempio un server FTP o un server WEB) è possibile creare una Regola per Server Virtuale nelle Pagine di configurazione. Nota: Quando vengono usate regole di Server Virtuale, si consiglia di configurare il/i computer con un Indirizzo IP fisso invece di uno dinamico. Nota: Per maggiori informazioni sul Server Virtuale e DMZ consultare il Manuale utente (solo in inglese!) contenuto nel CD-ROM accluso. Selezionare “Open User Manual” (Apri Manuale Utente) dal Menu di avvio automatico. 1. 2. Aprire il browser (come Internet Explorer, FireFox o Safari). Introdurre l’indirizzo IP del CADSLR4(B)+ nella barra degli indirizzi del web browser (per default: http://192.168.1.1/). Apparirà la finestra di login del CADSLR4(B)+ sullo schermo. 3. 4. Introdurre il nome utente e la password dopo di che fare clic su “Login” per accedere alle pagine di configurazione. Selezionare “Advanced” dalla Pagina di configurazione. 5 5. 4 Selezionare l’opzione “Port Forwarding” dal menu di sinistra della Pagina di configurazione. 107 ITALIANO Apparirà la pagina di configurazione di “Port Forwarding” (Reindirizzamento): 6 9 10 7 6. 7. Nota: 8 Selezionare l’indirizzo della LAN del computer che ha bisogno della regola di reindirizzamento. Se l’indirizzo IP non appare nell’elenco (se ad esempio il dispositivo usa un indirizzo IP statico) è possibile usare il pulsante “New IP” per aggiungere l’IP del dispositivo. Selezionare la Categoria della regola di reindirizzamento. Esistono diverse regole predefinite nella configurazione. È possibile selezionarne una o crearne una nuova scegliendo la categoria “User” e premendo il pulsante “New”. 8. 9. Selezionare la regola che si desidera per il reindirizzamento. Premere il pulsante “Add” per applicare la regola selezionata all’indirizzo IP selezionato. 10. Se tutte le regole sono definite premere “Apply” per salvare le modifiche. 11. Click “Save & Reboot” to enter the Save & Reboot screen. 12 12. Fare clic su “Save & Reboot” per riavviare il CADSLR4(B)+ e attivare le regole Le regole definite sono pronte per essere usate! 108 PORTUGUÊS Conceptronic CADSLR4+ / CADSLR4B+ Manual de Instalação Rápida Parabéns pela compra dos seus Router e Modem ADSL2+ da Conceptronic. O Manual de Instalação Rápida incluído fornece-lhe uma explicação passo a passo sobre como instalar o Router e Modem ADSL2+ da Conceptronic. Se tiver algum problema, aconselhamos consultar o nosso site de assistência (vá a www.conceptronic.net e clique em ‘assistência’ Aqui pode encontrar a Base de Dados das Perguntas Mais Frequentes. Se tiver outras questões relativas ao nosso produto e não as conseguir encontrar no nosso webiste, pode-nos contactar através do e-mail: support@conceptronic.net Para mais informações sobre produtos de Conceptronic, por favor visite o Web Site da Conceptronic: www.conceptronic.net A configuração do hardware tal como se descreve a seguir pode ser ligeiramente diferente no seu computador. Depende da versão do Windows que estiver a usar. 1. Conteúdo da Embalagem Existem os seguintes elementos na embalagem do Router e Modem ADSL2+ da Conceptronic: • • • • • • Router e Modem ADSL2+ Conceptronic (PSTN ou RDIS). O dispositivo da embalagem é 1 dos 2 modelos seguintes: CADSLR4+ [C03-013]: Versão do Anexo A do Router e Modem. Adequado para Linhas ADSL Analógicas. CADSLR4B+[C03-014]: Versão do Anexo B do Router e Modem. Adequado para Linhas ADSL RDIS e UR-2. Fonte de alimentação 12 V AC, 800 mA Cabo de Ethernet 1,8 M Cabo Telefónico 1,8 M Manual de Iniciação Rápida Multilingue CD-ROM do produto 109 PORTUGUÊS 2. Explicação do Router e Modem ADSL2+ • Painel Frontal 1 Nº 1 2 Descrição Luz de alimentação Luzes LAN (1,2,3,4) 3 Luz ADSL 2 3 Estado ON (LIGADA) OFF (DESLIGADA) ON (LIGADAS) Explicação do Estado O aparelho está ligado O aparelho está desligado Existe uma Ligação de Rede para a Porta LAN OFF (DESLIGADAS) Não existe nenhuma Ligação de Rede para a Porta LAN A piscar Estão a ser enviados ou recebidos dados pela Porta LAN ON (LIGADA) Existe uma ligação ADSL OFF (DESLIGADA) Não existe nenhuma ligação ADSL • Painel Traseiro 1 Nº Descrição 1 2 3 Ligação ADSL Portas LAN Botão de reiniciar 4 3 2 4 Explicação Para ligar a Linha ADSL ao aparelho Para ligar os/s seu/s computador/es ao aparelho Para voltar a pôr o aparelho com as Definições Predefinidas de Fábrica (carregue e segure durante +/- 10 segundos) Ficha de alimentação Para ligar a Fonte de Alimentação ao aparelho 110 PORTUGUÊS 3. Ligar o CADSLR4(B)+ à sua linha ADSL A maioria dos fornecedores de ADSL precisa de um filtro entre a sua Linha Telefónica e o CADSLR4(B)+ para impedir que a linha ADSL interfira com os serviços normais de telefone. Os dois tipos básicos de filtros são descritos a seguir. Nota: O CADSLR4(B)+ não é entregue com um filtro para a ligação ADSL. Por favor, contacte o seu Fornecedor de Serviços Telefónicos ou de Internet para obter o Filtro ADSL correcto. 3.1 Filtro In-Line – Micro Filtro ADSL Os filtros in-line são usados para cada telefone ou aparelho de telefone (atendedores automáticos, faxes, etc.) que partilhem a linha com o serviço ADSL. Estes filtros colocam-se no cabo telefónico entre o telefone e a tomada de parede. Os filtros separam o serviço telefónico normal do serviço ADSL. Na figura seguinte mostra-se a instalação de um filtro normal in-line. Phone Jack ADSL Microfilter Phone Filtro In-Line – Micro Filtro ADSL 111 PORTUGUÊS 3.2 Filtro ADSL de Três Portas (usado na maioria das situações de ADSL) Outro tipo de filtro é instalado no mesmo ponto em que o Router se liga à linha do telefone. Só é necessário um filtro. As portas de ligação estão normalmente marcadas da seguinte forma: • Line - Esta porta liga-se à tomada de parede. • ADSL - Esta porta liga-se ao Router. • Phone - Esta porta liga-se a um telefone ou a outro dispositivo telefónico. A figura seguinte ilustra a utilização adequada deste tipo de filtro. Assegure-se de que os cabos estão bem ligados. Se não conseguir o sinal de marcação no telefone, verifique as ligações para se certificar que os cabos estão bem metidos e ligados à porta correcta. Phone Jack Line Splitter Phone ADSL Device CADSLR4(B) CADSLR4(B)+ PC Filtro de 3 portas 112 PORTUGUÊS 4. Configuração do/s seu/s computador/es para usar o Router e Modem O CADSLR4(B)+ está equipado com um servidor DHCP incorporado. O Servidor DHCP atribui automaticamente um IP a um computador ligado se esse computador estiver configurado para “obtain an IP address automatically” (obter um endereço IP automaticamente). Para configurar o seu computador para IP Automático siga as instruções seguintes: 1. Clique em “Start” (Iniciar) Æ “Run” (Executar). 2. Introduza o comando “NCPA.CPL” e carregue em “OK”. 2 2 A janela de Ligações de Rede aparece. 3. Clique com o botão direito do rato em “Local Area Connection” (Ligação de Área Local) e seleccione “Properties” (Propriedades). 3 113 PORTUGUÊS A janela das Propriedades da sua Ligação de Área Local aparece. 4. Seleccione “Internet Protocol (TCP/IP)” (Protocolo de Internet (TCP/IP)) e clique em “Properties” (Propriedades). 4 4 A janela de Propriedades do Protocolo de Internet (TCP/IP) aparece. 5. 6. Configure as propriedades para “Obtain an IP address automatically” (Obter um endereço IP automaticamente) e carregue em “OK” para guardar as configurações. 5 Carregue em “OK” na janela de propriedades de Ligação de Área Local para guardar as configurações. 6 114 PORTUGUÊS Com a Linha de Comandos do Windows pode verificar se recebeu um endereço IP correcto na sua Ligação de Área Local: 7. 8. Clique em “Start” (Iniciar) Æ “Run” (Executar). Introduza o comando “CMD” e carregue em “OK”. A Linha de Comandos aparece. 9. Introduza o comando “IPCONFIG” e carregue em “ENTER”. 9 Deverá ver a seguinte informação: IP Address : 192.168.1.xxx (em que xxx pode variar entre 2 ~ 254). Subnet Mask : 255.255.255.0 Default Gateway : 192.168.1.1 Se a informação mostrada antes coincidir com a sua configuração, pode prosseguir com a configuração do CADSLR4(B)+ no Capítulo 4. Se a informação apresentada não coincidir com a sua configuração (i.e., o seu endereço IP for o 169.254.xxx.xxx), por favor verifique as opções seguintes: A. B. C. Desligue e volte a ligar o aparelho. Volte a ligar o Cabo LAN ao aparelho e ao seu computador. Renove o endereço IP do seu computador com os seguintes comandos: - “IPCONFIG /RELEASE” para libertar o endereço IP errado. - “IPCONFIG /RENEW” para receber um novo endereço IP do aparelho. 115 PORTUGUÊS C C Se os passos anteriores não resolverem o problema do endereço IP, pode repor as configurações predefinidas de fábrica no aparelho com o Botão Reset do painel traseiro. Pressione e segure o Botão Reset durante +/- 10 segundos para repor as Configurações Predefinidas de Fábrica. Quando a Luz LAN apagar e ligar outra vez, o CADSLR4(B)+ volta a carregar as Configurações Predefinidas de Fábrica. Aguarde +/- 10 segundos e repita o passo C para renovar o endereço IP. 5. Configurar o CADSLR4(B)+ para a sua ligação ADSL A configuração do seu CADSLR4(B)+ é com base na web. Vai precisar de um navegador para configurar o aparelho. Nota: As configurações predefinidas de fábrica do CADSLR4(B)+ são as seguintes: Endereço IP: 192.168.1.1 (DHCP para clientes ligados Activado) Nome de utilizador: admin (letra minúscula) Palavra-passe: admin (letra minúscula) 116 PORTUGUÊS 1. Inicie o seu navegador (como por exemplo: Internet Explorer, FireFox ou Safari). 2 2. Introduza o endereço IP do CADSLR4(B)+ na barra de endereços do seu navegador (por defeito: http://192.168.1.1/). A página de início de sessão do CADSLR4(B)+ aparece no seu ecrã: 3 3 3. Introduza o Nome de Utilizador e a Palavra-passe e clique em “Login” para entrar nas páginas de configuração. Quando o Nome de Utilizador e a Palavra-passe são introduzidos correctamente na página de início de sessão, o CADSLR4(B)+ apresenta as páginas de configuração do dispositivo. 5.1 Configuração da sua ligação pela Iniciação Rápida A Configuração da Ligação de Iniciação Rápida contém vários ISP’s pré-programados para uma configuração fácil do dispositivo. 117 PORTUGUÊS 1 2 3 6 1. 2. Nota: 7 Seleccione o seu país na lista desdobrável “Country” (País). Seleccione o seu ISP na lista desdobrável “ISP”. Se o seu país e/ou ISP não aparecer numa das 2 lista desdobráveis anteriores, tem de configurar manualmente a sua ligação. Clique no botão “Config” (7) na “Quick Start” (Iniciação Rápida) e prossiga para o capítulo 4.2 sobre a configuração manual da sua Ligação à Internet. Quando desconhecer as definições da sua ligação ADSL, contacte o seu Fornecer de Serviços de Internet para obter as definições de ligação correctas. 3. 4. 5. Seleccione o Encapsulamento correcto para o seu ISP na lista desdobrável “Encapsulation” (Encapsulamento). Os valores de VPI e VCI aparecem automaticamente nos respectivos campos no seu ecrã. Se usar “1483 Bridge LLC” como encapsulamento para a sua ligação, tem de configurar a atribuição WAN-IP. Seleccione “Static”, “DHCP” or “Bridge” (dependendo da informação dada pelo seu Fornecedor de Serviços de Internet). 5 6. Clique em “Next” (Seguinte) para prosseguir com a Configuração de Iniciação Rápida. Dependendo do encapsulamento escolhido, pode obter várias opções de configuração no 2º ecrã da Configuração de Iniciação Rápida. 118 PORTUGUÊS 5.1.1 Encapsulamento escolhido = PPPoE (LLC) ou PPPoA (LLC ou VC-MUX) Quando escolher PPPoE ou PPPoA como encapsulamento, vai ver o seguinte ecrã de configuração: Introduza o Nome de Utilizador e a Palavra-passe fornecidos pelo seu Fornecedor de Serviços de Internet e carregue em “Apply” (Aplicar) para guardar as definições e reiniciar o CADSLR4(B)+. 119 PORTUGUÊS 5.1.2 Encapsulamento escolhido = 1483 Bridge LLC – IP Fixo Quando escolher 1483 Bridge LLC com IP Fixo como encapsulamento, vai ver o seguinte ecrã de configuração: Introduza a informação do IP Fixo recebida do seu Fornecedor de Serviços de Internet (Endereço IP, Subnet Mask, Gateway e DNS) e carregue em “Apply” (Aplicar) para guardar as definições e reiniciar o CADSLR4(B)+. 120 PORTUGUÊS 5.1.3 Encapsulamento escolhido = 1483 Bridge LLC – IP Dinâmico (DHCP) Quando escolher 1483 Bridge LLC com IP Dinâmico como encapsulamento, vai ver o seguinte ecrã de configuração: Mantenha as configurações actuais e carregue em “Apply” (Aplicar) para guardar as definições e reiniciar o CADSLR4(B)+. 121 PORTUGUÊS 5.1.4 Encapsulamento escolhido = 1483 Bridge LLC – Bridge Quando escolher 1483 Bridge LLC com Ligação Bridge como encapsulamento, vai ver o seguinte ecrã de configuração: Defina o grupo LAN como Grupo 1 (Predefinido) e carregue em “Apply” (Aplicar) para guardar as definições e reiniciar o CADSLR4(B)+. Depois de reiniciar, o CADSLR4(B)+ vai-lhe criar a ligação ADSL. Quando a ligação estiver estabelecida, a luz do ADSL no CADSLR4(B)+ acende. O seu CADSLR4(B)+ já está pronto a usar! Nota: Para mais informações sobre as características e configurações disponíveis para o CADSLR4(B)+, consulte o Manual do Utilizador (apenas em Inglês!) no CD-ROM incluído. Seleccione “Open User Manual” (Abrir Manual do Utilizador) no menu de Execução Automática. 122 PORTUGUÊS 5.2 Configuração manual das suas Configurações de Ligação Se o seu País e/ou ISP não aparecer na Configuração de Ligação “Quick Start” (Iniciação Rápida) do CADSLR4(B)+ tem de configurar a ligação manualmente. Clique no botão “Config” (7) no ecrã de “Quick Start” (Iniciação Rápida) para introduzir a configuração manual do CADSLR4(B)+. Nota: Também pode usar a Configuração Manual para modificar as configurações de ligação avançadas! A página de configuração manual do CADSLR4(B)+ aparece no seu ecrã: 2 1 7 3 9 4 6 5 8 Para configurar a sua ligação, tem de introduzir as seguintes informações no ecrã de configuração da ligação: 1. 2. 3. 4. 5. 6. 7. Introduza um nome para a sua Ligação ADSL. Seleccione um tipo de ligação ADSL. (PPPoE, PPPoA, etc.) Seleccione o encapsulamento correcto para a ligação ADSL. (LLC, VC) Introduza o Nome de Utilizador fornecido pelo seu fornecedor. Introduza a Palavra-passe fornecida pelo seu fornecedor. Defina o valor VPI correcto para a ligação ADSL. Defina o valor VCI correcto para a ligação ADSL. 123 PORTUGUÊS Nota: 8. 9. As configurações explicadas são as configurações básicas necessárias para a sua ligação ADSL. Por favor, contacte o seu Fornecedor de Serviços de Internet para obter as configurações correctas para a sua ligação. Para mais informações sobre as configurações, consulte o Manual do Utilizador (apenas em Inglês!) no CD-ROM. Seleccione “Open User Manual” (Abrir Manual do Utilizador) no menu de Execução Automática. Clique em “Apply” (Aplicar) para guardar as definições feitas na configuração do CADSLR4(B)+. Clique em “Save & Reboot” (Guardar e Reiniciar) para entrar no ecrã de Guardar e Reiniciar. 10 10. Clique em “Save & Reboot” (Guardar e Reiniciar) para reiniciar o CADSLR4(B)+ e activar as definições da sua ligação. O CADSLR4(B)+ vai reiniciar e activar as definições estabelecidas. Este processo pode demorar um pouco. Por favor, aguarde a conclusão da reinicialização. Depois de reiniciar, o CADSLR4(B)+ vai-lhe criar a ligação ADSL. Quando a ligação estiver estabelecida, a luz do ADSL no CADSLR4(B)+ acende. O seu CADSLR4(B)+ já está pronto a usar! Nota: Para mais informações sobre as características e configurações disponíveis para o CADSLR4(B)+, consulte o Manual do Utilizador (apenas em Inglês!) no CD-ROM incluído. Seleccione “Open User Manual” (Abrir Manual do Utilizador) no menu de Execução Automática. 124 PORTUGUÊS 6. Reencaminhamento de Portas O CADSLR4(B)+ da Conceptronic está equipado com um Firewall incorporado para impedir ataques da Internet à sua rede. Este Firewall bloqueia automaticamente todo o tráfico de entrada nas portas não usadas. Quando uma porta bloqueada é necessária para um serviço ou aplicação (por exemplo: um Servidor FTP ou um Servidor WEB) pode criar uma Regra de Reencaminhamento de Porta nas Páginas de Configuração. Nota: Quando usar regras de Reencaminhamento de Portas, aconselha-se configurar o(s) computador(es) com um Endereço IP Fixo em vez de um Endereço IP Dinâmico. Nota: Para mais informações sobre as opções de Reencaminhamento de Portas e DMZ, consulte o Manual do Utilizador (apenas em Inglês!) no CD-ROM. Seleccione “Open User Manual” (Abrir Manual do Utilizador) no menu de Execução Automática. 1. 2. Inicie o seu navegador (como por exemplo: Internet Explorer, FireFox ou Safari). Introduza o endereço IP do CADSLR4(B)+ na barra de endereços do seu navegador (por defeito: http://192.168.1.1/). A página de início de sessão do CADSLR4(B)+ aparece no seu ecrã. 3. 4. Introduza o Nome de Utilizador e a Palavra-passe e clique em “Login” para entrar nas páginas de configuração. Seleccione a opção “Advanced” (Avançadas) na Página de Configuração. 5 5. 4 Seleccione a opção “Port Forwarding” (Reencaminhamento de Portas) no menu do lado esquerdo da Página de Configuração. 125 PORTUGUÊS Vai ver a página de configuração “Port Forwarding” (Reencaminhamento de Portas): 6 9 10 7 6. 7. Nota: 8 Seleccione o IP LAN para o computador que precisa da Regra de Reencaminhamento de Portas. Se o IP não estiver na lista (por exemplo: se o dispositivo usar um IP Fixo) pode usar o botão “New IP” (Novo IP) para adicionar o IP do dispositivo. Seleccione a Categoria para a Regra de Reencaminhamento de Portas. Existem várias portas predefinidas na configuração. Pode seleccionar 1 das portas predefinidas ou criar uma nova regra seleccionando a Categoria “User” (Utilizador) e carregando no botão “New” (Novo). 8. 9. Seleccione a Regra que precisa para o Reencaminhamento. Carregue no botão “Add” (Adicionar) para juntar a Regra seleccionada ao Endereço IP seleccionado. 10. Quando tiver definido todas as Regras carregue em “Apply” (Aplicar) para guardar as configurações. 11. Clique em “Save & Reboot” (Guardar e Reiniciar) para entrar no ecrã de Guardar e Reiniciar. 12 12. Clique em “Save & Reboot” (Guardar e Reiniciar) para reiniciar o CADSLR4(B)+ e activar as regras. As Regras definidas estão prontas a usar! 126 MAGYAR Conceptronic CADSLR4+ / CADSLR4B+ Gyorstelepítési útmutató Köszönjük, hogy a Conceptronic ADSL2+ útválasztót és modemet választotta. A mellékelt hardvertelepítési útmutató lépésről-lépésre elmagyarázza, miként kell a Conceptronic ADSL2+ útválasztót és modemet telepítenie. Probléma esetén javasoljuk, hogy vegye igénybe a Support-site-en nyújtott segítséget(menjen a www.conceptronic.net-re és kattintson a ‘Support’-ra, ahol megtalálja a Gyakran Ismételt Kérdések adatbázist. Ha termékünkkel kapcsolatban további kérdése lenne, és weboldalunkon nem talál rá választ, forduljon hozzánk e-mailben: support@conceptronic.net. A Conceptronic termékekkel kapcsolatos további információért kérjük tekintse meg a Conceptronic weboldalát: www.conceptronic.net. A továbbiakban ismertetett hardverkonfiguráció az adott számítógép esetében kicsit eltérhet. Mindez az éppen használt Windows-verziótól függ. 1. A csomag tartalma A Conceptronic ADSL2+ útválasztó és modem csomagjához a következők tartoznak: • • • • • • Conceptronic ADSL2+ útválasztó és modem (PSTN vagy ISDN). A csomaghoz tartozó eszköz az alábbi két modell egyike: CADSLR4+ [C03-013]: A melléklet — az útválasztó és modem verziója. Az analóg ADSL vonalakhoz alkalmas. CADSLR4B+[C03-014]: B melléklet — az útválasztó és modem verziója. Az ISDN és UR-2 ADSL vonalakhoz alkalmas. 12 V-os váltakozó áramú, 800 mA-s tápegység Ethernet kábel 1,8 M Telefonkábel 1,8 M Többnyelvű gyorsindítási kézikönyv A terméket tartalmazó CD-ROM 127 MAGYAR 2. Az ADSL2+ útválasztó és modem ismertetése • Előlap 1 2 3 Sz. Leírás Állapot Az állapot ismertetése 1 Power LED 2 LAN LED-ek (1,2,3,4) 3 ADSL-LED BEKAPCSOLVA KIKAPCSOLVA BEKAPCSOLVA KIKAPCSOLVA Villog BEKAPCSOLVA KIKAPCSOLVA Az eszköz bekapcsolva Az eszköz kikapcsolva A LAN-port felé hálózati kapcsolat kialakítva Nincs kialakítva hálózati kapcsolat a LAN-port felé Adatküldés vagy –vétel a LAN-porton keresztül ADSL-kapcsolat kialakítva Nincs kialakítva ADSL-kapcsolat • Hátlap 1 3 2 4 Sz. Leírás Magyarázat 1 2 3 ADSL-csatlakozás LAN-portok Alaphelyzetbe állító gomb 4 Hálózati csatlakozás ADSL-vonalat csatlakoztat az eszközhöz A számítógépe(ke)t csatlakoztatja az eszközhöz Az eszközt a gyári alapértékekre állítja vissza (Nyomja le és tartsa lenyomva a +/- gombot 10 másodpercig) Az áramellátást csatlakoztatja az eszközhöz 128 MAGYAR 3. A CADSLR4(B)+ csatlakoztatása ADSL vonalhoz A legtöbb ADSL-szolgáltató olyan szűrőről gondoskodik a telefonvonal és az CADSLR4(B)+ között, amely megakadályozza, hogy az ADSL-vonal a normális telefonszolgáltatást megzavarja. A szűrők két alapvető típusát az alábbiakban ismertetjük. Note: A CADSLR4(B)+-hoz nem mellékelünk az ADSL-csatlakozáshoz szükséges szűrőt. A megfelelő ADSL-szűrővel kapcsolatban lépjen érintkezésbe telefonos vagy internetes szolgáltatójával. 3.1 Beiktatott (in-line) szűrő — ADSL mikroszűrő In-line szűrőket használunk minden olyan telefon vagy telefonnal együtt alkalmazott eszköz (üzenetrögzítők, faxok stb.) esetében, amely ADSL-szolgáltatással osztozik a vonalon. Ezeket a szűrőket a telefon és a fali dugaszhüvely között csatlakoztatjuk a telefonkábelhez. A szűrők különválasztják a közönséges telefonszolgáltatást az ADSLszolgáltatástól. Az alábbi ábra egy tipikus in-line szűrő telepítését mutatja. Telefon dugaszhüvelye ADSL mikroszuro Telefon In-line szűrő – ADSL mikroszűrő 129 MAGYAR 3.2 Háromportos ADSL szűrő (a legtöbb ADSL esetében ilyet használnak) Másmilyen szűrő telepítésére kerül sor ugyanazon a helyen, ahol az útválasztó a telefonvonalhoz csatlakozik. Csupán egy szűrőre van szükség. A csatlakoztatásra szolgáló portok címkézése általában az alábbi: • Line - Ez a port csatlakozik a fali dugaszhüvelyhez. • ADSL – Ez a port csatlakozik az útválasztóhoz. • Phone – Ez a port telefonhoz vagy más telefonos eszközhöz csatlakozik. Az alábbi ábrán látható ennek a tipikus szűrőnek a megfelelő alkalmazása. Ügyeljen arra, hogy a vonalak megfelelően legyenek csatlakoztatva. Ha a telefonban nem hallható tárcsahang, ellenőrizze a csatlakozásokat annak biztosítására, hogy a kábeleket szilárdan csatlakoztatták és azok a megfelelő porthoz iscsatlakoznak. Telefon dugaszhüvely Vonalosztó Telefon CADSLR4(B)+ Háromportos szűrő 130 PC MAGYAR 4. A számítógép(ek) konfigurálása útválasztóval és modemmel történő alkalmazásra A CADSLR4(B)+ beépített DHCP-szerverrel egészül ki. A DHCP-szerver automatikusan IPcímet rendel hozzá a csatlakoztatott számítógéphez, amennyiben annak beállítása a következő: „obtain an IP address automatically”. A számítógépnek automatikus IP-hez történő konfigurálásakor kövesse az alábbi utasításokat: 1. Kattintson a következőkre: „Start” Æ „Run”. 2. Írja be a „NCPA.CPL” parancsot, majd nyomja le az „OK”-t. 2 2 A hálózati csatlakozások (Network Connections) ablaka jelenik meg. 3. Kattintson az egér jobb oldali gombjával a „Local Area Connection”-ra, majd jelölje ki a „Properties”-t. 3 131 MAGYAR A helyi hálózati kapcsolat tulajdonságainak ablaka jelenik meg. 4. Jelölje ki az „Internet Protocol (TCP/IP”-t, majd kattintson a „Properties”-re. 4 4 Az internetprotokoll (TCP/IP) tulajdonságainak ablaka jelenik meg. 5. Állítsa be a tulajdonságokat az „Obtain an IP address automatically”-re, majd a beállítások elmentéséhez nyomja le az „OK”-t. 6. A beállítások elmentéséhez nyomja le az „OK”-t a helyi kapcsolat tulajdonságainak ablakában. 5 6 5 132 MAGYAR A Windows parancssora segítségével ellenőrizheti, vajon megfelelő IP-címet kapott-e a helyi kapcsolat vonatkozásában: 7. 8. Kattintson a következőkre: „Start” Æ „Run”. Írja be a „CMD” parancsot, majd nyomja le az „OK”-t. Ezután megjelenik a parancssor. 9. Írja be a „IPCONFIG” parancsot, majd nyomja le az ENTER-t. 9 A következőket fogja látni: IP Address (IP-cím) : 192.168.1.xxx (ahol az xxx 2 ~ 254 között változhat). Subnet Mask (alhálózati maszk) : 255.255.255.0 Default Gateway (alapértelmezett átjáró) : 192.168.1.1 Ha a fenti adatok egyeznek a konfigurációval, folytathatja a CADSLR4(B)+ eszköz konfigurálását (4. fejezet). Ha a fenti adatok a konfigurációval nem egyeznek (azaz az adott IP-cím 169.254.xxx.xxx), a következő lehetőségek közül választhat: A. B. C. Kapcsolja KI, majd újra BE az eszközt. Csatlakoztassa újra a LAN-kábelt az eszközhöz és a számítógéphez. Újítsa meg a számítógép IP-címét az alábbi parancsok segítségével: - „IPCONFIG /RELEASE” a rossz IP-cím feloldásához. - „IPCONFIG /RENEW” az eszköztől új IP-cím fogadásához. 133 MAGYAR C C Ha a fenti lépések nem oldják meg az IP-címmel kapcsolatos problémát, az eszközt a jobb oldalán lévő Reset gomb segítségével lehet a gyári alapértelmezett értékekre visszaállítani. A gyári alapértékek betöltéséhez nyomja le és tartsa lenyomva a Reset gombot +/- 10 másodpercig. Amikor a LAN-LED kialszik, majd megint kigyullad, a CADSLR4(B)+ újra a gyári alapértékek szerinti beállításokat tölti be. Várjon +/- 10 másodpercig, majd ismételje meg a C lépést az IP-cím megújításához. 5. A CADSLR4(B)+ konfigurálása ADSL csatlakozáshoz A CADSLR4(B+ konfigurációja webalapú. Webböngészőre lesz szüksége az eszköz konfigurálásához. Megjegyzés: A CADSLR4(B)+ gyári alapértelmezett konfigurációja a következő: IP Address (IP-cím) : 192.168.1.1 ( a DHCP a csatlakoztatott ügyfelek esetében engedélyezve) Username (felhasználónév): admin (kisbetűvel) Password (jelszó): admin (kisbetűvel) 134 MAGYAR 1. Indítsa el webböngészőjét (például Internet Explorer, FireFox vagy Safari). 2 2. Írja be az eszköz IP-címét a webböngésző címsorába (alapértelmezett: http://192.168.1.1/). A képernyőn a CADSLR4(B)+ bejelentkezési oldala jelenik meg: 3 3 3. Írja be a felhasználónevet és a jelszót, majd — hogy a konfigurációs oldalakhoz eljuthasson — kattintson a „Login”-re. Ha a felhasználónevet ás a jelszót helyesen írta be a bejelentkezési oldalon, a CADSLR4(B)+ az eszköz konfigurációs oldalait fogja megjeleníteni. 5.1 Kapcsolat konfigurálása gyorsindításon keresztül A gyorsindításos kapcsolat telepítése több, előre programozott ISP-t tartalmaz az eszköz könnyű konfigurálhatósága érdekében. 135 MAGYAR 1 2 3 6 7 1. 2. Jelölje ki az országot a „Country” legördülő listaablakban. Jelölje ki az ISP-t az „ISP” a legördülő listaablakban. Megjegyzés: Ha az adott ország és/vagy ISP nem jelenik meg a fenti két legördülő lista egyikén sem, kézzel kell konfigurálnia a kapcsolatot. Kattintson a „Config” gombra (7) a „Quick Start”-nál, majd menjen a 4.2. fejezethez az internetkapcsolat kézzel történő konfigurálásával kapcsolatban. Ha az adott ADSL-kapcsolat beállításait nem ismeri, a kapcsolat helyes beállításaival kapcsolatban forduljon internetszolgáltatójához. 3. 4. 5. Jelölje ki az adott ISP megfelelő beágyazását az „Encapsulation” legördülő listaablakban. A VPI- és VCI-érték automatikusan megjelenik a képernyőn hozzárendelt mezőn. Ha a kapcsolatnál beágyazásként „1483 Bridge LLC”-t használ, be kell majd állítania a WAN-IP hozzárendelését. Jelölje ki a „Static”-ot, a „DHCP”-t vagy a „Bridge”-t (az internetszolgáltató által közöltektől függően). 5 6. A gyorsindítás telepítésének folytatásához kattintson a „Next”-re. A választott beágyazástól függően különböző beágyazási opciók közül választhat a gyorsindítás telepítésének második képernyőjén. 136 MAGYAR 5.1.1 Választott beágyazás = PPPoE (LLC) vagy PPPoA (LLC vagy VC-MUX) Ha beágyazásként PPPoE-t vagyr PPPoA-t választ, a következő konfigurációs képernyő jelenik meg: Írja be az internetszolgáltató által közölt felhasználónevet és jelszót, majd nyomja le az “Apply”-t, ha a beállításokat el akarja menteni, valamint a CADSLR4(B)+-t újra kívánja indítani. 137 MAGYAR 5.1.2 Választott beágyazás = 1483 Bridge LLC – statikus IP Ha beágyazásként a 1483 Bridge LLC-t választja, amelynek statikus az IP-je, az alábbi konfigurációs képernyő jelenik meg: Írja be a statikus IP-re vonatkozó, az internetszolgáltatótól kapott adatokat (IPcím, alhálózati maszk, átjáró és DNS), majd nyomja le az „Apply”-t, ha a beállításokat el akarja menteni, egyszersmind a CADSLR4(B)+-t újra kívánja indítani. 138 MAGYAR 5.1.3 Választott beágyazás = 1483 Bridge LLC – dinamikus IP (DHCP) Ha beágyazásként a dinamikus IP-jű, 1483-as Bridge LLC-t választja, akkor a következő konfigurációs képernyő jelenik meg: Tartsa meg az aktuális beállításokat és nyomja le az „Apply”-t, ha a beállításokat el akarja menteni, egyszersmind a CADSLR4(B)+-t újra kívánja indítani. 139 MAGYAR 5.1.4 Választott beágyazás = 1483 Bridge LLC – híd Ha beágyazásként a hídkapcsolású, 1483-as Bridge LLC-t választja, a következő konfigurációs képernyő jelenik meg: Állítsa be a LAN-csoportot 1. csoportra (ez az alapértelmezett), majd nyomja le az „Apply”-t, ha az alapbeállításokat el akarja menteni és a CADSLR4(B)+-t újra kívánja indítani. Amikor az újraindítás befejeződött, a CADSLR4(B)+ kialakítja az ADSL-csatlakozást. Amikor a kapcsolat létrejött, a CADSLR4(B)+-on az ADSL-jelzőfény kigyullad. A CADSLR4(B)+ezután használatkész! Megjegyzés: A CADSLR4(B)+ szempontjából rendelkezésre álló jellemzők és beállítások részletes magyarázatával kapcsolatban lásd a mellékelt CD-ROM-on a felhasználói kézikönyvet (csak angolul!). Jelölje ki az „Open User Manual”-t az Autorun menün. 140 MAGYAR 5.2 Az internetkapcsolat konfigurációjának kézi telepítése Ha az adott ország és/vagy ISP nem jelenik meg a CADSLR4(B)+ „Quick Start” elnevezésű kapcsolattelepítése során, akkor kézzel kell a kapcsolatot definiálnia. Kattintson a „Quick Start” képernyőn a „Config”gombra (7), hogy a CADSLR4(B)+ kézi konfigurációjába beléphessen. Megjegyzés: A kapcsolat különleges beállításainak módosítására is használhatja a kézi telepítésű konfigurációt! A CADSLR4(B)+ kézi konfigurációs oldala az alábbi képernyőn látható: 2 1 7 3 9 4 5 8 A kapcsolat telepítéséhez a következő adatokat kell beírnia a kapcsolattelepítési képernyőn: 1. 2. 3. 4. 5. 6. Írjon be egy nevet az ADSL-kapcsolathoz. Jelölje meg az ADSL-csatlakozás típusát. (PPPoE, PPPoA, stb.) Jelölje meg az ADSL-kapcsolathoz a megfelelő beágyazást. (LLC, VC) Irja be a szolgáltató által megadott felhasználónevet. Irja be a szolgáltató által megadott jelszót. Állítsa be az ADSL-kapcsolat szempontjából megfelelő VPI-értéket. 141 6 MAGYAR 7. Állítsa be az ADSL-kapcsolat szempontjából a megfelelő VCI-értéket. Megjegyzés: Az elmagyarázott beállítások az ADSL-kapcsolathoz szükséges alapbeállítások. A kapcsolat megfelelő beállításait illetően forduljon internetszolgáltatójához. A beállításokkal kapcsolatos részletes adatokat illetően lásd a CD-ROM-on található felhasználói kézikönyvet (csak angolul!). Jelölje ki az „Open User Manual”-t az Autorun menün. 8. 9. A CADSLR4(B)+ konfigurálása során eszközölt beállítások elmentéséhez kattintson a „Apply”-ra. A Save & Reboot (elmentés és újraindítás) képernyőre való belépéshez kattintson a „Save & Reboot”-ra. 10 10. A CADSLR4(B)+ újraindításához és a kapcsolathoz szükséges beállítások aktiválásához kattintson a „Save & Reboot”-ra. A CADSLR4(B)+ újraindul, majd az eszközölt beállításokat aktiválja. Ez eltarthat egy ideig. Várjon az újraindítás befejezéséig. Amikor az újraindítás befejeződött, a CADSLR4(B)+ kialakítja az ADSL-kapcsolatot. Amikor a kapcsolat létrejött, a CADSLR4(B)+-on kigyullad az ADSL-jelzőfény. Az CADSLR4(B)+ ezután használatkész! Megjegyzés: A CADSLR4(B)+ szempontjából rendelkezésre álló jellemzők és beállítások részletes magyarázatát illetően lásd a mellékelt CD-ROM-on a felhasználói 6. Port továbbítása kézikönyvet (csak angolul)Q!. Jelölje ki az „Open User Manual”-t az Autorun menün. 142 MAGYAR 6. Port továbbítása A Conceptronic CADSLR4(B)+ beépített tűzfallal egészül ki, amelynek célja az internetről a hálózatra irányuló támadások megakadályozása. Ez a tűzfal automatikusan blokkol minden bejövő forgalmat az éppen nem használt portokon. Ha egy szolgáltatáshoz vagy alkalmazáshoz (például: FTP-szerver vagy WEB-szerver) blokkolt portra van szükség, a konfigurációs oldalakon elő is állíthat egy port-továbbítási szabályt. Megjegyzés: Port-továbbítási szabályok alkalmazásakor tanácsos a számítógép(ek)et — dinamikus IP-cím helyett — fix IP-címmel konfigurálni. Megjegyzés: A port-továbbítással és a DMZ-opciókkal kapcsolatos részleteket illetően lásd a CD-ROM-on található felhasználói kézikönyvet (csak angolul!). Jelölje ki az „Open User Manual”-t az Autorun menün. 1. 2. Indítsa el a webböngészőt (például Internet Explorer, FireFox vagy Safari). Írja be a CADSLR4(B)+ IP-címét a webböngésző címsorába (alapértelmezett: http://192.168.1.1/). A CADSLR4(B)+ bejelentkezési oldala jelenik meg a képernyőn. 3. 4. Írja be a felhasználónevet és a jelszót, majd kattintson a „Login”-ra, ha be akar lépni a konfigurációs oldalakra. Jelölje ki az „Advanced”-ot a konfigurációs oldalon. 5 5. 4 Jelölje ki a „Port Forwarding” opciót a konfigurációs oldal bal oldali menüjén. 143 MAGYAR Az alábbi „Port Forwarding” telepítési oldal jelenik meg: 6 9 10 7 6. 7. 8 Jelölje ki a port-továbbítási szabályt igénylő számítógéphez a LAN IP-t. Ha az IP a listán nem szerepel (például, ha az eszköz statikus IP-t használ), az eszköz IP-jének hozzáadására használhatja a „New IP” gombot. Jelöljön ki kategóriát az adott port-továbbítási szabályhoz. Megjegyzés: A konfigurációhoz több, előre definiált port is tartozik. Válasszon egyet az előre definiált portok közül, vagy állítson elő új szabályt a „User” kategória kijelölésével és a „New” gomb lenyomásával. 8. 9. Jelölje ki a továbbításhoz szükséges szabályt. Ahhoz, hogy a kijelölt szabályt a kijelölt IP-címhez kapcsolhassa, nyomja le az „Add” gombot. 10. Ha minden szabályt definiált már, a beállítások elmentéséhez nyomja le az „Apply”-t. 11. A Save & Reboot képernyő elmentéséhez kattintson a „Save & Reboot”-ra. 12 12. A CADSLR4(B)+ újraindításához és a szabályok aktiválásához kattintson a „Save & Reboot”-ra. A definiált szabályok ezután használatkészek! 144 Declaration of CE Conformity The manufacturer Address Conceptronic Databankweg 7 3821 AL Amersfoort, the Netherlands Hereby declares that the product Type ADSL2+ ROUTER / MODEM ANNEX A & ANNEX B Product CADSLR4+ & CADSLR4B+ Complies with following directives: • 1995/5/EEC R&TTE directive: Telecommunications Terminal Equipment and Satellite Earth Station Equipment • 89/336/EECEMC directive: Electromagnetic Compatibility • 73/23/EEC Low Voltage Directive: Electrical equipment designed for use within certain voltage limits The following standards were consulted to assess conformity: ETSI 300 328-2/2000 (CTR21) EN 301 489-17-2000 EN 301 489-1-2000 EN55022/9.98 Class B EN 61000-3-2/3/4/1995 EN 50082-1/1994 EN 60950/1995 The CE symbol confirms that this product conforms to the above named standards and regulations. This product is suitable for all EU countries. Place and date of issue: Amersfoort, April 30th, 2006 Herman Looijen, Product Marketing Manager 145 Licensing Information This Conceptronic product CADSLR4+ / CADSLR4B+ includes copyrighted third-party software licensed under the terms of the GNU General Public License. Please see The GNU General Public License for the exact terms and conditions of this license. Specially, the following parts of this product are subject to the GNU GPL: Linux Kernel 2.4.17 Busybox 0.61pre ARP 1.60 Dproxy 1.0 Cfgmgr 0.9 udhcp 0.9.7 br2684ctl 0.1 dhcp-fwd 0.4 IPtables 1.2.6a mini_httpd 1.19 MTD 20020722 SquashFS 2.4.17 TI checksum 0.1 Telnetd 0.1.2 Zlib 1.1.3 Libatm 2.4.0 Libopt 0.1 Uclibc 0.9.19 IGMP proxy 0.1 LEDapp 0.1 RIP 0.1 RIP daemon (v1 and v2) PPPd 2.4.1 UPnP N/A UPnP IGD generated from Intel Authoring tool, version 1825 Dropbear (SSH) 0.38 SSH v2 daemon SNTP 1.6 All listed software packages are copyright by their respective authors. Please see the source code for detailed information. Availability of source code Conceptronic. has eposed the full source code of the GPL licensed software, including any scripts to control compilation and installation of the object code. All future firmware updates will also be accompanied with their respective source code. For more information on how you can obtain our open source code, please visit our web site. 146 Licensing Information GNU GENERAL PUBLIC LICENSE Version 2, June 1991 Copyright (C) 1989, 1991 Free Software Foundation, Inc. Temple Place, Suite 330, Boston, MA 02111-1307 USA Everyone is permitted to copy and distribute verbatim copies of this license document, but changing it is not allowed. Preamble The licenses for most software are designed to take away your freedom to share and change it. By contrast, the GNU General Public License is intended to guarantee your freedom to share and change free software--to make sure the software is free for all its users. This General Public License applies to most of the Free Software Foundation's software and to any other program whose authors commit to using it. (Some other Free Software Foundation software is covered by the GNU Library General Public License instead.) You can apply it to your programs, too. When we speak of free software, we are referring to freedom, not price. Our General Public Licenses are designed to make sure that you have the freedom to distribute copies of free software (and charge for this service if you wish), that you receive source code or can get it if you want it, that you can change the software or use pieces of it in new free programs; and that you know you can do these things. To protect your rights, we need to make restrictions that forbid anyone to deny you these rights or to ask you to surrender the rights. These restrictions translate to certain responsibilities for you if you distribute copies of the software, or if you modify it. For example, if you distribute copies of such a program, whether gratis or for a fee, you must give the recipients all the rights that you have. You must make sure that they, too, receive or can get the source code. And you must show them these terms so they know their rights. We protect your rights with two steps: (1) copyright the software, and (2) offer you this license which gives you legal permission to copy, distribute and/or modify the software. Also, for each author's protection and ours, we want to make certain that everyone understands that there is no warranty for this free software. If the software is modified by someone else and passed on, we want its recipients to know that what they have is not the original, so that any problems introduced by others will not reflect on the original authors' reputations. Finally, any free program is threatened constantly by software patents. We wish to avoid the danger that redistributors of a free program will individually obtain patent licenses, in effect making the program proprietary. To prevent this, we have made it clear that any patent must be licensed for everyone's free use or not licensed at all. The precise terms and conditions for copying, distribution and modification follow. GNU GENERAL PUBLIC LICENSE TERMS AND CONDITIONS FOR COPYING, DISTRIBUTION AND MODIFICATION 0. This License applies to any program or other work which contains a notice placed by the copyright holder saying it may be distributed under the terms of this General Public License. The "Program", below, refers to any such program or work, and a "work based on the Program" means either the Program or any derivative work under copyright law: that is to say, a work containing the Program or a portion of it, either verbatim or with modifications and/or translated into another language. (Hereinafter, translation is included without limitation in the term "modification".) Each licensee is addressed as "you". Activities other than copying, distribution and modification are not covered by this License; they are outside its scope. The act of running the Program is not restricted, and the output from the Program is covered only if its contents constitute a work based on the Program (independent of having been made by running the Program). Whether that is true depends on what the Program does. 147 Licensing Information 1. You may copy and distribute verbatim copies of the Program's source code as you receive it, in any medium, provided that you conspicuously and appropriately publish on each copy an appropriate copyright notice and disclaimer of warranty; keep intact all the notices that refer to this License and to the absence of any warranty; and give any other recipients of the Program a copy of this License along with the Program. You may charge a fee for the physical act of transferring a copy, and you may at your option offer warranty protection in exchange for a fee. 2. You may modify your copy or copies of the Program or any portion of it, thus forming a work based on the Program, and copy and distribute such modifications or work under the terms of Section 1 above, provided that you also meet all of these conditions: a) You must cause the modified files to carry prominent notices stating that you changed the files and the date of any change. b) You must cause any work that you distribute or publish, that in whole or in part contains or is derived from the Program or any part thereof, to be licensed as a whole at no charge to all third parties under the terms of this License. c) If the modified program normally reads commands interactively when run, you must cause it, when started running for such interactive use in the most ordinary way, to print or display an announcement including an appropriate copyright notice and a notice that there is no warranty (or else, saying that you provide a warranty) and that users may redistribute the program under these conditions, and telling the user how to view a copy of this License. (Exception: if the Program itself is interactive but does not normally print such an announcement, your work based on the Program is not required to print an announcement.) These requirements apply to the modified work as a whole. If identifiable sections of that work are not derived from the Program, and can be reasonably considered independent and separate works in themselves, then this License, and its terms, do not apply to those sections when you distribute them as separate works. But when you distribute the same sections as part of a whole which is a work based on the Program, the distribution of the whole must be on the terms of this License, whose permissions for other licensees extend to the entire whole, and thus to each and every part regardless of who wrote it. Thus, it is not the intent of this section to claim rights or contest your rights to work written entirely by you; rather, the intent is to exercise the right to control the distribution of derivative or collective works based on the Program. In addition, mere aggregation of another work not based on the Program with the Program (or with a work based on the Program) on a volume of a storage or distribution medium does not bring the other work under the scope of this License. 3. You may copy and distribute the Program (or a work based on it, under Section 2) in object code or executable form under the terms of Sections 1 and 2 above provided that you also do one of the following: a) Accompany it with the complete corresponding machine-readable source code, which must be distributed under the terms of Sections 1 and 2 above on a medium customarily used for software interchange; or, b) Accompany it with a written offer, valid for at least three years, to give any third party, for a charge no more than your cost of physically performing source distribution, a complete machine-readable copy of the corresponding source code, to be distributed under the terms of Sections 1 and 2 above on a medium customarily used for software interchange; or, c) Accompany it with the information you received as to the offer to distribute corresponding source code. (This alternative is allowed only for noncommercial distribution and only if you received the program in object code or executable form with such an offer, in accord with Subsection b above.) 148 Licensing Information The source code for a work means the preferred form of the work for making modifications to it. For an executable work, complete source code means all the source code for all modules it contains, plus any associated interface definition files, plus the scripts used to control compilation and installation of the executable. However, as a special exception, the source code distributed need not include anything that is normally distributed (in either source or binary form) with the major components (compiler, kernel, and so on) of the operating system on which the executable runs, unless that component itself accompanies the executable. If distribution of executable or object code is made by offering access to copy from a designated place, then offering equivalent access to copy the source code from the same place counts as distribution of the source code, even though third parties are not compelled to copy the source along with the object code. 4. You may not copy, modify, sublicense, or distribute the Program except as expressly provided under this License. Any attempt otherwise to copy, modify, sublicense or distribute the Program is void, and will automatically terminate your rights under this License. However, parties who have received copies, or rights, from you under this License will not have their licenses terminated so long as such parties remain in full compliance. 5. You are not required to accept this License, since you have not signed it. However, nothing else grants you permission to modify or distribute the Program or its derivative works. These actions are prohibited by law if you do not accept this License. Therefore, by modifying or distributing the Program (or any work based on the Program), you indicate your acceptance of this License to do so, and all its terms and conditions for copying, distributing or modifying the Program or works based on it. 6. Each time you redistribute the Program (or any work based on the Program), the recipient automatically receives a license from the original licensor to copy, distribute or modify the Program subject to these terms and conditions. You may not impose any further restrictions on the recipients' exercise of the rights granted herein. You are not responsible for enforcing compliance by third parties to this License. 7. If, as a consequence of a court judgment or allegation of patent infringement or for any other reason (not limited to patent issues), conditions are imposed on you (whether by court order, agreement or otherwise) that contradict the conditions of this License, they do not excuse you from the conditions of this License. If you cannot distribute so as to satisfy simultaneously your obligations under this License and any other pertinent obligations, then as a consequence you may not distribute the Program at all. For example, if a patent license would not permit royalty-free redistribution of the Program by all those who receive copies directly or indirectly through you, then the only way you could satisfy both it and this License would be to refrain entirely from distribution of the Program. If any portion of this section is held invalid or unenforceable under any particular circumstance, the balance of the section is intended to apply and the section as a whole is intended to apply in other circumstances. It is not the purpose of this section to induce you to infringe any patents or other property right claims or to contest validity of any such claims; this section has the sole purpose of protecting the integrity of the free software distribution system, which is implemented by public license practices. Many people have made generous contributions to the wide range of software distributed through that system in reliance on consistent application of that system; it is up to the author/donor to decide if he or she is willing to distribute software through any other system and a licensee cannot impose that choice. This section is intended to make thoroughly clear what is believed to be a consequence of the rest of this License. 8. If the distribution and/or use of the Program is restricted in certain countries either by patents or by copyrighted interfaces, the original copyright holder who places the Program under this License may add an explicit geographical distribution limitation excluding those countries, so that distribution is permitted only in or among countries not thus excluded. In such case, this License incorporates the limitation as if written in the body of this License. 9. The Free Software Foundation may publish revised and/or new versions of the General Public License from time to time. Such new versions will be similar in spirit to the present version, but may differ in detail to address new problems or concerns. 149 Licensing Information Each version is given a distinguishing version number. If the Program specifies a version number of this License which applies to it and "any later version", you have the option of following the terms and conditions either of that version or of any later version published by the Free Software Foundation. If the Program does not specify a version number of this License, you may choose any version ever published by the Free Software Foundation. 10. If you wish to incorporate parts of the Program into other free programs whose distribution conditions are different, write to the author to ask for permission. For software which is copyrighted by the Free Software Foundation, write to the Free Software Foundation; we sometimes make exceptions for this. Our decision will be guided by the two goals of preserving the free status of all derivatives of our free software and of promoting the sharing and reuse of software generally. NO WARRANTY 11. BECAUSE THE PROGRAM IS LICENSED FREE OF CHARGE, THERE IS NO WARRANTY FOR THE PROGRAM, TO THE EXTENT PERMITTED BY APPLICABLE LAW. EXCEPT WHEN OTHERWISE STATED IN WRITING THE COPYRIGHT HOLDERS AND/OR OTHER PARTIES PROVIDE THE PROGRAM "AS IS" WITHOUT WARRANTY OF ANY KIND, EITHER EXPRESSED OR IMPLIED, INCLUDING, BUT NOT LIMITED TO, THE IMPLIED WARRANTIES OF MERCHANTABILITY AND FITNESS FOR A PARTICULAR PURPOSE. THE ENTIRE RISK AS TO THE QUALITY AND PERFORMANCE OF THE PROGRAM IS WITH YOU. SHOULD THE PROGRAM PROVE DEFECTIVE, YOU ASSUME THE COST OF ALL NECESSARY SERVICING, REPAIR OR CORRECTION. 12. IN NO EVENT UNLESS REQUIRED BY APPLICABLE LAW OR AGREED TO IN WRITING WILL ANY COPYRIGHT HOLDER, OR ANY OTHER PARTY WHO MAY MODIFY AND/OR REDISTRIBUTE THE PROGRAM AS PERMITTED ABOVE, BE LIABLE TO YOU FOR DAMAGES, INCLUDING ANY GENERAL, SPECIAL, INCIDENTAL OR CONSEQUENTIAL DAMAGES ARISING OUT OF THE USE OR INABILITY TO USE THE PROGRAM (INCLUDING BUT NOT LIMITED TO LOSS OF DATA OR DATA BEING RENDERED INACCURATE OR LOSSES SUSTAINED BY YOU OR THIRD PARTIES OR A FAILURE OF THE PROGRAM TO OPERATE WITH ANY OTHER PROGRAMS), EVEN IF SUCH HOLDER OR OTHER PARTY HAS BEEN ADVISED OF THE POSSIBILITY OF SUCH DAMAGES. END OF TERMS AND CONDITIONS How to Apply These Terms to Your New Programs If you develop a new program, and you want it to be of the greatest possible use to the public, the best way to achieve this is to make it free software which everyone can redistribute and change under these terms. To do so, attach the following notices to the program. It is safest to attach them to the start of each source file to most effectively convey the exclusion of warranty; and each file should have at least the "copyright" line and a pointer to where the full notice is found. , 1 April 1989 Ty Coon, President of Vice This General Public License does not permit incorporating your program into proprietary programs. If your program is a subroutine library, you may consider it more useful to permit linking proprietary applications with the library. If this is what you want to do, use the GNU Library General Public License instead o 150