1
i
,)
{
4
EDITOR'S
NOTES
j
t
I
PRESIDENT
& PUBLISHER
DonaldB. Peschke
I
\
EDITOR
Tim Robertson
SENIOR
DESIGN
EDITOR
JamesR.Downing
SENIOR
EDITORS
BillLink.DavidStone
ASSOCIATE
EDITOR
Wyatt Myers
ASSISTANT
EDITOR
Kate Busenbanick
PROJECT
BUItDER
Mike Donovan
ARTDIRECTOR
Kim Downing
ASSISTANT
ARTDIRECTOR
Kurt Schultz
SENIOR
GRAPHIC
DESIGNER
DougAppleby
SENIOR
ILLUSTRATORS
ErichLage,Matt Scott
SENIOR
PHOTOGRAPHER
CrayolaEngland
PHOTOGRAPHER
DennisKennedy
ASSOCIATE
STYTE
DIRECTOR
Rebecca
Cunningham
ETECTRONIC
IMAGESPECIALIST
AllanRuhnke
CONTRIBUTING
lIIUSTRATOR
John Hartman
CREATIVE
DIRECTOR
TedKralicek
SR.PROJECI
DESIGNERS
Ken Munkel,KentWelsh.
ChrisFitch,RyanMimick
SHOPCRAFTSMEN
SteveCurtis.SteveJohnson
ADVERTISING
SATES
MANAGERS
GeorgeA. Clark,Mary K. Day
EDITORIAL
DIRECToR
Terry1. Strohman
EXECUTIVE
ARTDIRECTOR
Todd Lambirth
i"
F
$
rt
i1
'n.\
h'r
il
lI
CoPontc
Sedcs:
Cd?o'ak Vie PBidenB: DordtL.
Hickr, Mary R. S€hcvc, Crihildi
Cdg
Stllc, Di ol Fnnndol Atalys;r: L6ir Smith, Sr .4@"ietrrr LunJ. Thomil,.4norfl!
Payable: M2\1.
Schdrz, A@rilb keitahL: MaW P.tu!, Eld. Prr. Dirr Dougls M. Li&tca Aod. Dtij C.orge
Chfr.lu,
lnlomarM T.chilolqy MXi: Btu VuHcuvcEwln,
Slsh /drt.r
Clit Schwcbeb
rc
Mhtdaila
Teh.: \obctD.
Cook, Nil Mdk Mgr.: cordon C. caippc, 7., Si& 1d Dir I Eug€nc
P.d.srn, Mubin dtu Mipffi.tuPxtoot,
W.b kw,
d"i". j Cml Schocpplcr, W.b $il. Coiltdl
M{i' D.frd Bns,
Si Web kwlo?d: T.try vdkq,
W.b Dwlopcr.pdnGilc
, ReMd' C@tdinatof,
Nichola A. Jacscr, ftrJ D.riotnrri
Dii r Mi.h.l Sigcl, &fld!
Staicttrr]cnnifd
Hunru,
HidrJ
qffa W:
s?drfttjJcsica
Tsi
Mail/D.liry
JcMn Johmn, Adnh. Ar''t.: Bffidi Hffin4
. Circahtid:
Cl'*, Lou V.bbci
Fcdlirir '&i: KufrJohrcn
Cir q'. Di' Sudy Baun, Ch
j
Mtuiry
Dh.: Waydc J. l<\ngbcil, R."Ml ndr. Paigc Rogn, Ck. Stdt{.b Buin4t AMgt: t<n
Scilcmct,
ail. Md*aikg Aerytj P.rrick A. WaLh, Cir Ma*?riry,&e;
Chrilrin. Fon r,
Fafilm."r i4l.i Stcph Fonnsh, Su'mc H.jkal . Produ@ Grcup: OFrdm
Dir Bob Beker,
Ceont
Stuk Msr: Jcnnte En6, Wa\hoae Suptuku: NilryJohNn,
8!rr
Lind.Jon6, hn. BuF
Nmcy DoMcy, Si Crur. Snk R4pr.r Tffiy
Tdckcnbrcd, Anm Cox, Aplil Rdcl, Dcbonh Rich,
Vrl.rieJo Rnq, Cct. &nh R"'.r Kin Fhhn, Tm Bdhooi
kthdinc
Pdks, t/ft10tr0 S4f
Sylda Gry, Kin Frceue Stahen C!i6n
CUSTOMER
SERVICE
Phone:
800-31
1-3eel
f;
SUBSCRIPTIONS
EDITORIAI.
i
WkbenchCtstomerServce
PO.Box842,
DesMoines,lA50304-9961
WrkberchManane
2200GmdAie.
DesMoina.IA 50312
I
I
I
I
emil Editor@Workbenchmag.com
Audlt Bureau
of Circulations
WORI(BNCH
(Fcb., April, June, Aug., Oct.,
0SSN 0043-8057) is publish€d bhonrhly
Dec.) by Augut Homc Publtohhg Conpuy,
2200 ctud
Avc., D6 Mohes, IA s0312.
Wo*badt is ^ ndsffik
of Aup*
Hone Publishhg. CopFight @2004 Augu$ Home
Pub[shing Compmy. AI dgh$ lcaflcd.
Subscdpdd
rat€!: Sinelc copy, 14.9. Oneyce
subsnpdon (6 isu6), 122; vo-yce
sub., t33;
thrcc-yc& sub., t4. Cmadim/Ind.,
.dd t10 per ytr. Pedodic.ls posE$ paid at Der Moin6,
Iowa. and ar additionrt o6ces. "USPS/Pry-Judd's
Hcadod
Di*ion
poly."
aurombblc
Pochaster: Send addies chnF
6 Wo*bwJ,PO
Box 37272,Boon, A 5@37-0272.
Cbadie
Sub3triptions:
Cu.da Po$ AFcemcnr No. 40038201. Scnd chms ofaddls
infomadon to: PO Box 881, St.don Md4 Msktm,
ON L3P 8M6. ht€d
h U.S.A.
woRKBENcH
tr rrsR.uaR.y 2005
alwayslook forward to the new year.One reasonis this annualspecialissue
I
that we devote largely to the tools of our trade.In addition to our regI
I ular in-depth tool test (a review of new "hybrid" tablesawsin this issue),
it's the time when we make our much anticipated announcementof
Worbbench\
Top 10 InnovativeTool Awards.
Top 10 Tools - In preparationfor theseawards,th e Workbeneh
editors
have been busy trying out hundreds of new tools.
Most of these tools performed their jobs very
capably.Aselectfew haveactuallyraisedthe
bar for their particular tool category
by providing either a safer,a more
accurate,or a more emcient way to
work wood. These are the tools
we selectedasthis year's10 most
innovative.For a complete rundown of these breakthrough
tools, turn to page 56.
Bench Basics - Now
there's no doubt that
having the right tools is
a huge help when building a
project. But as every woodworker knows, it's the skills in
usingthosetools that really make
or breaka project.
That's where Bench Basics
comesin.This new seriesof articles
and online extrasfocuseson the essentials of woodworking. Whether youte
just getting started,or you're a seasoned
craftsman,BenchBasics
will provide you
with all the information you need to
improve your skills.In this issuefteginning on page 40), we take a look at the
most fundamental"tool" of dl - the shoo.
4
/ l'tlt
H'.February
2005
WORKBENC
C
N TENTS
FEATURES
BootBench
49 e^rlrdoor
half-lappe
d grids,and
Solid-wood construction,
knock-down
hardware
makeJora simple,sturdy
bootbenchthatyoucanbuildin a weekend.
Tools
J 0 fop 10Innovative
Froma revolutionary
newbeltsanderto a digital
mitersaut,the2005 winnersofWorkbench\Top
70 Innouatiue
ToolAwardsraisethebar- again.
() Z tlegantEntryDivider
Thisewy-to-builddiuiderfeatures
a lighteddisplay
pedestal,
wood
cabinet,
stone-clad
anddecoratiue
columnthatwill transform
theentryof yourhome.
-lA
/ * "Hybrid"TableSawReview
or cabinet
saw?These"hybid" table
Contractor
sawscombine
thebestof bothworlds.We
test-driue
fournewsawsto trt wirichonesmakethecut.
woRKBENcH
!
rrsnuaR.v
2005
IN EVERY
ISSUE
READER'S
WORKSHOP
28 MiterSawWorkstation
Thisshop-made
workstationfeatures
a pair of
adjustable
hold-downs
thatseanelongboads
before,
during,andafierthecut.
<The goalof a
jointis
half-lap
to removehalf
of
thethickness
the matingpieces
sotheirfacesfit
flush.Ourtable
sawtipsand
techniques
make
it easyto achieve
thatperfectfit.
WORKBENCH
TIPS
SHOP
.tA
J+ Sharpin 60Seconds
ThreeWorlebench
projectdesigners
sharetheirsecrets
jobsite.
Honeyour
sharpening
tools
on
the
for
fast
ownsharytening
skillsby leamingtheirshortcuts.
BENCH
BASICS
4}settins Upshop
In thispremiereinstallmentof BenchBasia,we
explainthepros,cons,andconsequences
of setting
garage,
up shopin a basement,
or outbuilding.
SKILL
BUILDER
-^
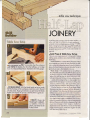
Joinery
f -f ttalt-Lap
joint usedfor building
HalfJapsarea strong
grids,
and
latticework.This
tablesaw
frames,
technique
makescuttingthemeasyandarcurate.
DEPARTMENTS
B Questions
& Answers
14 Tips& Techniques
Fundamentals
zo Finishing
24 CuttingEdge
84 ModernMaterials
94 Tools& Products
woRKBENcH
tr rEsR.uanv 2005
6Gluesfions
6(ANSWERS
the bosicsof
FINISHING
SPRAY
I'uealwaysappliedfnishby brushingor wipingit on,but I'd lilee
to try spraying.Doessprayingffir any aduantages,
and what
A Youcon ochieveprofessionol-looking
sproyfinishes
equipment
will I needtoget started?
in
your
point
shop
with
either
or
cleor
topcoots
by
DauidValish
(HVLP)
using
o
high-volume,
low-pressure
sproyer.
Schuyler,
NE
The main advantage
of sprayingis speed.
Plus, spraying lays
down a smooth finish thatt
free of brush marks.
Ifthese benefitsappealto
you, then you first need to
choose the right sprayer.A11
fall into one of two categories:
standard, or high-volume,
Iow-pressure(HVLP).
Standard Sprayers- A
standard spray gun (top left)
drawsfrom an air compressor
and spraysout air and coating
material (paint or finish) at
high pressure(up to 80 psi).
Standardsprayen,though,have
transfereficiency (how much
coatingreachesthe surface)as
low as20 to 45 percent.That
means55 to 80 percentofthe
finish you spraybounces off
as overspray.
These sprayers
little
costas
as$25.
HVLP Sprayers- Highvolume, Iow-pressure(HVLP)
sprayers,
on the other hand,
deliver a high volume of air
and coating at low pressure
(15 to 50 psi).Thisyieldsa
transferefficiencyof 75 to 90
percent (seelllustrationbelow).
Ifyou alreadyhavean air
you can get an
comPressor,
HVLP "conversion" sprayer
(middleleft). It comes with a
regulatorthat letsyou reduce
the pressureat the gun. (The
gun shown is a "gravity-feed"
version with the cup on top.
"Siphon feed"modelshavea
cup on the bottom.) These
usuallycost$50 or more.
Another option is to use
an HVLP rurbine (bottomleft).
It producesairflow using an
integralfan insteadof an air
compressor.
Most turbinesare
designedfor professionals
and
cost$250to $1,000.But the
Fine Sprayfrom'Wagnersells
for lessthan $125.Learnmore
com
at WagnerSprayTech.
HVLPTurbine System
8
woRKBENcH
ft FEBRUARY
2005
ANSWERS
vs.
rqtedhorsepower
TOOIPOWER
TRUE
seemto
I'ue noticedthat manufacturers
Whentoolshopping,
rutings.Is therea
beall overthe boad with theirhorsepower
way I canreliablygaugetruepowerfromtheseratings?
Jef Miles
Cedar Rapidq M
Looking just at horsepoweron
tool motors can be deceiving.
That's becausethere'sno widely
acceptedstandardfor horsepowerratings.
Some manufacturersrate their tools using
"maximum-developed"motor horsepower.
Others use "continuous-duty," or actual
horsepower.Youcan still reliably judge
power,though, if you understandtwo ratings: ampsand watts.
Amps - Every motor hasan amperage
raring that tellshow many ampsthe motor
draws under full load a
specific voltage.This number never lies
becausethe motor cant draw more amps
than this.As a rule, a higher amp rating
meansa more powerful motor.
'WattsMotor constructiondictates
how much power the motor can produce
at a given input amperage.This power is
measuredin wara, the most reliablemeasure
of power. Many motor labels don't list
watts,but you can calculateit easilyby
multiplying ampsby volts. For example,a
motor ratedon the labelat 18 ampsat 120
volts develops2,160watts (18 x120).
Many people,by the way,rewire such
tools as table sawsfor "more power." But
ifyou double electricalvoltage,amp draw
dropsby half.Thatmeansa motor develops
the samepower whether itk wired for 120
volts or 240. Rewire the above motor,
then, and it will drawjust nine amps.Yet
output remains2,160 watts (9 x240).
powerploner
FLATTENING
PANEL
One boardin a panelI gluedup is uneuenand
sticksup abovetheotherson thefnishedface.Can
I shavethe boardJlushwith mypowerplaner?
SteueMawhorter
Millbury, OH
/
--Storbr
Bood
--fcoNo, r'rot"
overloppinglengthwise
possesto ploneremoinder
of protrudingboord
FIRST:
Plone
diogonolly
ocrossprohudinqbooro
h.io estobliiho flotoreo
on one end of ponel
Protruding
Boord ..'*ti:
.,
I generallyusea belt sanderto makeprotruding
1f
flush in panels.But it if a boardsticksup
boards
!l
Ffll/ru"
or more, a power planer can do the job
be careful,or you can gougethe workpiece.
faster.Just
First,setthe planer on the board you want to match
(call this the "starter").Then set the cutting depth to
slighdy lessthan the height of the protruding board.
Make diagonalpasses
acrossthe protruding board.To
gouging,
overlap
each pass,push down on
minimize
your
hand, and avoid tipplaner
with
back
the
only
ping the planer asyou work.
Once you've pianed an areaat one end of the panel
large enough for the for the planer to sit on, switch to
lengthwisepasses
to removeremainingwaste(Photos,left).
woRKBENcH
!
FEBRUAnv
2005
ANSWERS
Corrugoted
RoofingPonel
Skirthongsdown
to hideendof
ponel
A DECK
UNDER
with #8
-_=-Afioch
deck screw,ond s
/with
keeproin out
siliconecoulk
I'm buildinga patioundermy second-story
deck.
Is therea way to create
a "rooJ"underthedeck,so
I canusethepatio whenit rains?
Doug Haluerson
Denuer,CO
Homemade Solution - You can createyour own
deck drainagesystemusing corrugatedroofing material
runs down between deck boards.You mieht
(Illustration).It's availablein a variety of sizes and
not be ableto catchall ofthe runoff, but you can cer- materials,including metal,fiberglass,
and PVC. In my
tainly stop enoughof it to make the spacesuitablefor area,I found 48" x 79" sheetsofPVC roofing for about
storageor additionaloutdoor living space.
913 each.Theywere availablein severalcolors.
Products Available - A number of companiesmake
To installcorrugatedpanels,startby cutting spacer
productsdesignedto catchand managewater that drips blocksfrom 2x stock.Placea spacerabout everytwo feet
through deck boards.Marketed under nameslike alongeachjoist if the roofing panelruns parallelto the
DrySpace,RainEscape,and Dry-B-Lo, they'remounted joists,or on everyjoist ifthe panelruns perpendicular
under the deckjoists so they pitch awayfrom the house to them.Each spacershouldbe slightlytaller than the
and channelwater toward the outside.There,the water lastto establish
a pitch ofabout t/4" for every4 feet.
can run out or flow into a gutter attachedto the deck.
After cutting the spacers,
screwthem to the bottom
The biggestproblem with thesecommercialsystems of eachjoist.Then securethe panelsby driving screws
is cost.Depending on the systemand the complexiry of through them and into each spacer.Sealeach screw
your deck,you may spend$4 or more per squarefoot, with a dab of siliconecauik.
even ifyou install the systemyourself.
At the outside of the deck, you can hang a skirt
You can add a lot of functionaliry to the area
under a deck by shielding it from water that
board to cover the exposed ends ofthe paneis,
as shown. Or mount a gutter inside the rim
skirt board, and pitch it toward a downspout
located on one ofthe deck oosts.
GoT
QUE5T|0N5?
WEHAVE
ANSWERS!
In the October
2004 issue,
a $130 and corneswith everything you
gentleman
askedaboutpowder need, including a sprayer,a power
coating
menl.You
saidyoumust supply to charge the powder and the
haueit doneprofessionally,but afriend oJ
mine said he thought he'd seen a kit
aduertisedforpowdercoatingat home,Do
you know anythingabout this kit?
workpiece, and three colors ofpowder.
(There are about 75 colors available.)
After sprayng, bake the workpiece
in an electric oven (use an old range
or toaster oven you no longer cook
Aaron Olmstead with) to cure the powder. Learn more
Cincinnati, OH
about the system at Hotcoat.conl
1.2
HOW
TOSEND
YOUR
OUESTIONS:
Email: editor@workbenchmaq.com
Forurns : forums.woodnet.net
Mail: WorkbenchQ&4 2200Grand
Ave.,DesMoines,IA 50312
lncludefull name,address,and
daytimephonenumber.You'll
receiveone of our handsome
Workbench capsif we
publishyour letter.
woRKBENcH
ft FEBRUAnv
2005
o
rp
tethniques
CONSTRUCTION
VIEW
-----...-Top
0/n"Hordboord,
24" x24"1
FromeCenter
l3/t"x lVz" x2l"l
stowit for storoge:
OUTFEED
SUPPORT
\
-:-
1gttLocking
,""1*
Assembly
l7z"-wide
robbet,
# 1 0x l % , ,
#6x3/t,
UqPer
fi;.h;;;.'"*,.r.T;:),ii3,
*ffi #"q Fh
r''
t/t" x ll/t" Hex Bolt
.--..--l
#8x3A,'J
,
V+
-b
An outfeed support for a table saw is an indispensable
accessory.Andit doesn't need to be elaborate or expensive to do its job well.Thke this one, for example.'When
you need to cut a long board or wide panel, you simply
Lower
lMetol
Strop
_ Spocer
l/2" x3/4" x2"l 1s4r"x3/t" x'5"1
NOTE:Spocerthickness
moy vory dependingon sow
attach it to the table saw by means of a couple of shopmade hangers (InsetPhoto).When you're done, the support can be removed in secondsand folded for storage.
Top - The top of this outfeed support is a piece of
1/4" hardboard that attaches to a wood frame
(C onstructionVi ew).The frame consistsof severalpieces
of 3,/+"-thick stock rhat are simply cut to length, rhen
screwed to the top.
Legs - The outfeed support is held up by two legs
which are connected by a pair of thick rails.The rails are
rabbeted to fit over the legs and fastened with screws.
AT:nut and bolt installed in the bottom of each leg lets
you adjust the height ofthe support for uneven floors.
The legs are connected to the top with strap hinges.
And a pair of locking support hinges prevent the legs
from collapsing during use.
Hangers - To attach the outfeed support to the
table saw, you'll need to add the two hangers. Each
hanger consistsof two metal strapswith a wood spacer
block sandwiched in between them (HangerDetail).The
upper strap is bent to fit over the back rail ofthe rip
fence. (l bent the strap in a machinist's vise.)The lower
strap,which is straight, is cut to length and screwed ro
the top frame.
As for the spacerblock, size it so the outfeed support
will sit just a hair below the table saw.Then secure it
befween the rwo strapswith machine screws and nurs.
Forsending
us thisfeaturetip,
AlbertDowdwinsa new8T3700
Ryobitahlev,w!
s
t.'
Mailfipsto:
Workbench
Tips&
Techniques
2200Grand
Ave.
DesMoines,
lA50312
Emait eoito@
workbenchmag.com
T4
/t-
AlbertDowd
Concord,
NC
woRKtsENcH
!
FEBI{uAnv
2005
TECHNIQUES
\oo
-\-oo
flex-hose
HOOK'UP
Connecting a 4" flexible hose from a dust collector to
a shop-made fixture (like the sanding downdraft table
shown here) can be a nuisance.The outside diameter
of all the 4" metal HVAC fittings I've seen is just a bit
too large to get the hose to fit over them. So I have
to cut slits in the fitting and then compress it to make
the hose fit.
To avoid all that fussing around, I used a 4" x 3" PVC
toilet flange to make a dust collection port. The flex
hose fits snugly over the flange.And best of all, it doesn't
require any modification. Note: Toilet flange fittings are
availableat most home centers.
NOTE:Secureflexible
hosewith hoseclomp
4" flexiblehoseto o
PaquetteA An eosywoy to connecto dustcollector's
Jacques
MA shopmodefixtureis with o commontoiletflonge.
Somerset,
Product lnformation Number 225
TECHNIGIUES
jig ensures
zero-cleqronce
SAFE,
SMOOTH
CUTS
Recently, I was building a project
that required cutting 1/+"-wide
grooves centered on the edge of
some 3/.1"-thick frame pieces. I
are fully supported, tearout is virt u a l l y e l i m i n a t e d ,w h i c h r r n p r o v e s
the qualiry of cut.
This accessory consists of two
pieces:a basemade of 1/4"hardboard
mounted a 1/4" dado blade in the
table saw and installed a dado blade and a plywood fence that are screwed
insert. The only problem was the
together (CrossSection).A couple of
opening around the blade seenred screws secure the jig to the rip fence.
huge. So big, in fact, I was concerned
To form the zero-clearance
that the workpiece might actually opening, lower the dado blade and
tip down into the opening.
position the rip fence so the blade
That led me to build an L-shaped will cut through the base at the
accessorythat attaches to the rip
desired location.Then turn on the
fence on the table saw (seePhoto saw and slou,ly raise the blade
aboue).It createsa "zero-clearance"
through the base.Additional openopening that provides support for
the workpiece right up next to the
dado blade. As a result, theret no
way for the piece to drop into the
opening.And since the wood fibers
A Thissimple
L-shoped
iig
l3/t"ply,x
5"x27"1
creoleso
zero-cleoronce
ings can be made for cutting grooves openingfor o
in stock ofdifferent thicrnesses.
dodo blode,
whichresults
AnthonyD'Alessandro in o sofe,
Williamsburg,VA chip-free
cut.
Eosefl/n"
Hordboord
x4" x27"1
plonersledsolvoges
PIECES
SHORT
'With
the cost of lumber, I'm not crazy about throwing
out short scrappiecesof wood. But planing short pieces
(lessthan 12" long) isn't recommended by most manufacturers.Thatt because the pieces can ger caught
between the feed rollers and chewed up by the blades.
To salvagethese pieces, I use a simple sled to plane
A Thisshop-modesled letsyou
sofelyploneshortpiecesof wood.
Stripsof doubl+sided
topeond o
cleotholdthe piecesin proce.
l/2" xVz"x 972"1\
them to thickness (seePhoto).The "shorts" ride piggyback on the sied, which is long enough to go through
the planer safely.
The sled is a piece of 3/a" plp,vood with a cleat near
the back end (Sled Detail). The cleat, rogerher wirh
strips of double-sided tape, hold the short pieces in
place during machining.
The cleat fits into a dado near the back edge
ofthe sled. Size the dado so the cleat sticks up
about 1/e" above the suface of the sled.This way,
,- Workpiece
you can plane material down to that thickness.
To use the sled,affix the short strips to the surface, as shown. Then pass the sled - and the
strips - through the planer until you reach the
desired thickness.
(3/t"ply.x9Vz" x24"1
16
3/e,,deep
Russ Brown
Bethlehem,PA
WORKBENCH
!
FEl]RUANV
2OO5
TECHNIQUES
shopvqcuum
ENDS
CLOGS
NOTE:SetshopvocuUm
for "wet" operotion
Frustrated by repeated attempts to
unclog my sink with expensiveliquid
drain cleaners,I resorted to my shop
vacuunl. And what started ahlost as
an act of desperationbecanre n-ryfirst
c h o i c e w h e n i t c o 1 - n e st o f i g h t i n g
clogged drains.
Just fit the nozzle of the vacnunr
hose tightly in the drain opening. Make
sure the vacuunl is set for'"wet" opc.ration, and then switch it on. It sl-ror"rld
remove the obstruction in seconds.
Dauid Cookc
Chattarroo,ga,TN
While installing the handrail on r.rry
newly constructed deck, I found
that the 45o nritersI hrd so carefully
cut didn't fit tightly together.As it
turned out, a variation in the deck
neant that the boards carne together
at an angle slighdy lessthan 90o.
Rather than guessat the angle
and recut the boards on my miter
saw,I clamped the boardsinto position and used a circular saw to cut
across the joint. This created
matching angles- and a perfectfitting miter joint.
Jason Mehon
Calumet,MI
Jointettlsa regige<*lensk0f Jahh'f'nfft.NentpendngM SnilillftDW
Product Information Number 343
woRKBENCH
tr FEBRUAnv
2005
wrNDows
&DooRs
I needto stain andfnish the woodon my ttell windows,u,indow
trim, and doors.Do you haueany good tipsfor applyingstain and
fnish to verticalsurfaceslike thk to preuutt runs atrd drips and
ensured consistent
Iook?
Matt Stodddrd
Ankeny, IA
The first challenge when staining
windows (and sometimes doors)
is the giass.Glasscan actually absorb
stain, so itt a good idea to apply strips of
painter's tape before you begin.And be sure
to remove the tape right after completing
the project to avoid disturbing the finish.
A1so, carefully remove, label, and store
locks,latches,and pulls to decreasethe possibility of leaving runs and drips.
Conditioner - Many woods absorb
stain unevenly,leaving blotches.To prevent
this, first sand and rerrove the dust, and
then apply a liberal coat of pre-stain wood
conditioner with a foam brush (Photo,aboue).
Gel Stain - Let the conditioner sit for
10 to 15 minutes, and then-before
it
dries - apply a coat of stain. I recommend
a gel stain for windows. It's a thick, heavy-
l-
bodied stain that is lesslikely to run or drip
than liquid stain.The use of pre-stain wood
conditioner will lighten the stain color, so
test the conditioner/stair-rcombination or-r
a scrap piece to make sure itt what you
want before applying it to the windows.
Apply the gel stain with a foam brush,
working frorr the top down (Fig 1/. Let the
stain absorb for one to tcn nrinutes,
depending on the darknessyou desire.Then
wipe the suface with a clean rag.
Fast-Drying Poly - The stain should
dry in eight hours, after which you can
apply finish. For protection, durabiliry and
coat, open and close the sasl-r
to ensLtrethe
finish doesn't bond the window shut.
SparVarnish - Tl.re windowsill takes a
lot of abr-rsefrom water and sunlight. For
that reason,use sparvarnish to finish it.This
type of finish l.rasUV inhibitors to r.rrakeit
nrore resistantto peeling and fading (Fig 3)
'When
it dries, the varnish matches so well
that no one will realize you used two different fir-rishesto pl'otect your windows.
easy application, I suggest fast-drying
polyurethane. Apply it in thin, even coats
with a natural-bristle brush, and shine a
worklight on the wood to detect runs before
they dry @ig.2).Twenry minutes after each
Workbenchond BruceJohnson,
M i n w o x f i n i s h i n ge x p e r t , o r e
teomingup to onsweryour quest i o n so b o u tf i n i s h i n g .
Sendyour finishingquesiionsfrc:
Moil: WorkbenchQ&A
2200 GrondAvenue
DesMoines,lA 503 l2
Emqil: editor@workbenrhmoo.com
After puttingon wood
conditioner to prevent
blotches,
opply gel stoin
with o foom brushto minimizerunsond drips.
20
Fostdrying
polyurethone Finishthe windowsill
i s d u r o b l eo n d b r u s h e swith sporvornishto protect
smoothly
on windows. it from sunlightond moisUseo worklight
to detect ture. lt will motchthe rest
runsor drios.
of thefinishfine.
Winners
recerve
o FREE
Minwox
*'
l'. J
Finishing
KitlV
a't
WORKBENCH
!
FEtsIIUAnv
2OO5
GLUESMUDGES
project,an uglygluesmudge
On a recent
appeared
asI appliedthestain.
Is therea goodway remoue
thesmudgewhile thestainis still wet?Or
do I haueto let it dry,sandtheproject,andrestaintheentirething?What
canI do to preuentthisfrom happening
in theJuture?
DauidJohnson
Raymond,ME
If you notice stain not
"taking" in a particularspot,
the key is to addressthe
problemquicklybeforethe stainsets.
Quick Fix - After wiping the
smudgedarea(Fig.1),take a scraper
and rake it gently over the areato
removeglue residue(Fig.2) Ifyou're
working in a tight space,then use a
sharpchiselto scrapethe wood fibers.
Just hold the chiselwith the bevel
facingawayfrom you,andgendypull
it towardyou.
After scraping,use 180-grit sandA driedgluesmudgewon'tollowstoinor finish paperto sandthe area.Then,gently
to penehotethe surfoceof thewood. Fortunotely, sanda smallportion of the stained
there'son eosyfix to thisdilemmoif you oct fost.
wood aroundthat area.Thiscreates
First,removeos muchof the wet stoinfromthe
wood os possiblewith o cleonrog.
a seam]ess
transitionberweenstained
and unstainedwood, so any color
diferenceswon't be noticeable(Flg.
j Finally,carefullywipe awaydust,
).
and continue applying stain(Fig.4).
Prevention - To prevent this
from happeningin the future, try
dry-assembling
the prqect 6rst,and
then taping off any areaswhere
squeeze-out
may occur beforegluing
it up.Anothertip is to rub the project
down with mineralspiritsand check
it with a light beforestainingit.This
will make clear any areaswhere
finish might not take.And finally,
alwaysscrape
glue squeeze-outfirst,
then sand,beforeyou staln.
Next, useo scroperto removethe glue
residue,scropingdown to borewood.
Et
EJ
I
Hond-sond
the spot,ond olso gentlysondthe
stoinedoreo oroundit for o seomless
tronsition.
22
Afterwiping owoy dust,resumeopplyingstoin
to the projectfor o flowless,smudge-free
finish.
woRKBENCH
Et FEBRUARY
2005
EDOE
beilerbitsfor moking
PANET
DOORS
RAISED
A Freud'snew roiseo
ponel bits (ogeeprofile
shown)hove two extro
cuttersfor smoother,
foster
cutson roisedponels.
Ifyou're serious about making raised
panel doors, then give Freud's new
that one bit can cut both sides ofa
panel in one pass.The cut createsa
raisedpanel bits a closer look.These
tongue that fits into grooves in the
door rails and stiles.Thisis a marked
improvement over other raised panel
router bits have some big advantages
over other raisedpanel bits - most
notably in the way they cut.
Most raised panel bits have two
carbide cutting edges on a body
that's 2" to 3" in diameter. The bits
remove so much material that a
seriesof progressivelydeeper passes
bits, which require you to rabbet the
back ofthe panei to fit into grooves.
The Freud bits are designed to
cut 3/4"-thick stock and require a
router table equipped with a fence
and a variable-speedrouter. (The
bits should run at 10-12,000 RPM.)
It takes a few test cuts to get the
depth and fence settingsjust right,
but once in use,these bits cut more
smoothly than any other raised panel
is often necessary to achieve a
smooth surface.
2+2 Technology - Freud has
improved on this situation by adding
r\rvo more cutters to its raised panel
bits. Moreover, the rwo large cutters
bits I've used.
The Freud bits are available with
three different profiles - bevei, cove,
and ogee (shown)- for g1 10 each,
cut upward, and the two small cutters
cut downward to generate a shearing
action that createsflawless,consistent
cuts, even on end gratn (Art,left).
Backcutter - Freud also added
or in a kit with rail and stile bits for
or call
$200.Visit Frer-rdTbrols.conr,
800-47 2-7 307 for more information.
a backcutter to thesebits.This means
q drill bit for
HOLES
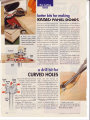
CURVED
Scoring
Boliom The new 3D drill bit fromtend
resemblesa standard Forstner
bit. But it cuts in ways that
j'qqr#iT
V'
il
,{\
LA
and
exits through
the
, Forsrner Dlr can [.
an applicationthat conresin
handy for running cable,stereowire.
or electrical conduit (Photo,right).
How It Cuts - The
bit hassharpcutting edges
on the sldes,
aswell asthe
botto- ofthe bit (Art,lef).
So once the bit entersa
The bit can also create an open
channel along the face of a workpiece
for putting wire below the suface of
the wood.To do this,you simply drill
until the cutterhead is about halfway
hole, pivoting the drill causesthese
side cutting edgesto curve into the
into the board. Then, pivot the drill
sidewaysand cut along the suface. It
wood, creating a curved or widened
channel.The result is a drill bit with
some great DIY applicatrons.
DIY Uses - One of the tasksa
works great asa standarddrill bit, too.
Tiend's 3D bits are available individually in diameters from 1/+" to
71/q",or in four- and eight-bit kits.
For more information, call 859-4852080, or visit Trend-USA.corr
3D bit excels at is cutting a curved
channel that enters the face of a
.A
board
edge-
A Cuttingcurvedholesin wood
is iustoneof monyhomeimprove
menttosksthisnew 3D drill bit
fromTrendcon tockle.
woRKBENCH
U
FEBRUAnv
2005
EDGE
qn eosyqnswerto
HOLE5AA/MISTAKES
How lt'Works - The concept
of the "Oops" arboris fairly simple.
Essentially,
a hole sawthe diameter
are going to be times when you
need to enlarge an existing hole to
of the original hole becomesa "pilot
serve a new purpose. Replacing an saw" for centeringthe larger hole
saw asyou cfi (mp Phont,Ieft).
old lockset is one job that often
This is accomplishedby the
comes to mind.
In the past.your best option was "Oops" arbor itself,which is just a
smallerarbor that'stightenedinto
to expand the hole carefully with
either a jig saw or a keyhole saw. the main hole saw arbor where a
But the folks at Starrett have greatly
rwist bit usuallygoes.First,the larger
hole sawscrewsin placeon the main
process
simplified the tricky
of enlarging a arbor.Then, the "Oops" arbor is
{i un
.:r_i-r:f
_..
r_
hnle wirh their
attached,and the smaller"pilot" hole
' ,t;
""'"
{.I
.,appropriatelysawscrewsonto ir (BottomPhoto,leJt).
named"Oops" The "Oops" arborcostsabout$7
Iat McFeelys.conr
andotherretailers.
arbor.
L
IlT
Home improvement is hardly an
exact science.And inevitably, there
Lorge
Hole Sow
//
"Pilo(
HoleSow
Egt
L00sEP*runs
PatentPending
RETA'L SPECTAL
2 PieceSetfor Only
O D€slgrcd
O Adlwtfiepan€l
q5rls:
llttur&tfun-Irld'
nM(@iltgttffir-7nd'
]zFg
ListPrice
O El|nh&panelra$e
O OrtfiarBsbd<fiom
0 Avdladehhrceprullle
Mmnffirgll
O Eadr$thdude
2pcs'
,rftS;
.
l ! J
-.;5;
I forsf,haB&l
torilbwb&l fornilffl/8,'
fwnilatE, w't,
It;:.t'
?l
O Carblde-tpp€dtrlong
llfe
^-.
F'a-
AntmlnlorElt'
HighPerformance
Cutting
Tools
ForA DealerNe'r]ast
Youhll l4w1tt51n77
PleueWt OurWabslte
www.ammatnl,nm
Product Information Number 172
#
mitersqw
WORKSTATION
'When
cutting a long board on a miter saw,it r-r-rust
be
secured in place to keep it from Lifting off the saw and
retder
causing a potentially dangeroussiruadon. Workberrclt
Dennis Sarrianoof Center Moriches. NewYor-k. solvedthis
problern with the miter saw wor-kstationshown at left. It
provides sllpport for long boards,ph,rsit has rwo holddowns that securethe board during and after the cut.The
hold-downs can be adjusted for different stock thicknesses
by sliding thern up and down a rnetalbar (lrtsctPltorc,lcft).
Though itt designed for r-rsewith a rrriter saw this versadleworkstation isn't necessarilytool-specific.Iti equally
capableof supporfine rnd securingr'videstock during circular saw operations aswell (P/roto,lou,crlcft).
In use,the nriter saw restson rw'o long rails.Attached
to these rails are four stock supports.Tl.renvo nriddle supports are slotted to hold aluminunr bars.l)ir-ectly above the
rniddle sllpports, the rvvo l-rold-downs :rrc llso slotted to
siide up and down on these bars.Wing nuts "lock" tl.re
hold-downs in position.
Sizing Considerations - The nriter saw workst.rtiou
A ThisoortoblemitersowworKstotionprovidesstoblesupport
for cuttinglong boords.Two
hold-downs
odiustto qccommodotestockthickness//nsel
Photo).Tighteningthe knobs
"locks"themin oloce to secure
stockduringond ofterthecut.
shown here is sizedto fit a Makiur I0" nritel sawYou'll probably need to chanqesonre of the din'rensionsshow:r on p4gc
30 to fit yollr particulrr saw (-sccSi.-irg Corr-sirlcrctiorts).
'With
that in nrind, ther-eirrc t}l-ee thing to take into
account.First,the r-ailsneed to be spaccdto acconulod:rte
the sawt mounting holes.The distanceberlveen the outside edgesof the rrils detemrines the length of the sr.rpporus
and hold-downs. Second, tl.rewidth of the sr-rpportsl.r:rsto
n.ratchthe height of the saw bed.A'nc'ltlird, thc rnicldlc sr"rppol'ts nlllst be spaced to allor'v clearancefor the slw
thricughor-rtits full r:rnge of nrovement.
+
to ollow cleoronce
for oll sow operotions
Widthof supporis
motches
height
of sowbed
A Theworkstotionis os hondyon the iobsiteos it
is in the shop.Removing
the mitersow letsyou
performcirculorsow operotions
with eose.
28
wor{KllENcrr
f- FErir\uAny
2005
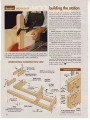
buildi the stqtion
As you can see,the only tricky part to building this cutting aid is sizing the components. That done, all you
need to do is machine the piecesand put them together.
Rails & End Supports - To build this workstation,
start by cutting the rwo rails to size and spacing thern as
explained earlier.Then you can cut the end supports to
length. Remember that the width of the supports needs
to match the height of the saw bed. Miter the corners of
the end supports, and attach them to the rails with glrre
and screws.
Middle Supports - While the middle supports are
the same dimensions as the end supports,they're composed of two pieces rather than one solid piece. The
reasonis simple.Each half is dadoed so that, when glued
together, the dadoes form a mortise to receive the aluminum bar that the hold-downs ride on.
Adjustable Hold-downs - The last components of
this system are the adjustablehold-downs.They re built
A Tocutthe kerfin theend of the holddowns,useo tollouxilioryfence
to guidetheworkpiecethroughthe cut.Clompingtheworkpieceto
o notchedscropblockensureso sofe,controlledcut.
WORKSTATIONCONSTRUCTION
VIEW
z--Aluminum Bor
f/a"xl"x10")
.'-\{
the same way as the middle supports,with only a slight
variation.To lock the hold-down in place,you need to
createa gap behind the mortise that pinches shut around
the aluminum bar when you tighten a knob.This is done
by cutting a kerf in the hold-down after glue-up (sae
Photo,left,and Hold-Down Detail, below).
To finish up, install the aluminum bars in the middle
supports and hold-downs. Raise the assembliesto their
full height, then swing the saw through all its cutting
modes to make sure there's clearance.Then screw the
middle supports in place. ffi
NOTE:Sizeworksiotionto fir
your mitersow {seepoge 28)
AdiusiobleHold-Down
llYz" x2Vz"x12"1
MiddleSupport
(l7z"x3"xl2"l
.\v
lU{
%" Ploslic
WingNut
.\0
.11.'Jr'"'f;r'-qq
%"-dio.
EndSupport
c _F
(172"
x 3" x l2"l
I
7th"wosh.,
\
"f--
-a
\
#8x2Vz"Fh 1
Woodscrew
\l
)
MiddleSupport
NOTE:
Adiustoble
hold-downs
ond
middlesupports
oremodeby gluing
Roil
up twopiecesof 3/4rr
stock
llVz" x2Vz"x 48"1
30
h"-dio. holespossthrough Support
supporl& oluminum
bor
woRKBENcH
ft FEBRUAnv
2005
Reader's
Work
Hondhold
liVz" xlVz",
cenlered
on width
ExbnsionWng
l3/t" pV. x 8" x 40"f
SAFETY
UPGRADE:
MITER
SAM
STAND
l3/q"pV,x 3" x 4"f
In the Readert Workshop department of the December 2004 issue
(page42), we featureda shop-made
miter sawstandthat sitson a mobile
tool chest.Thisstation hasa folding
extension wing with an adjustable
leg that is hinged to the wing. A
magnetic catch keepsthe leg tight
againstthe wing in the closedposition. But when you open (unfold)
the wing, theret a potential for the
Ieg to releasefrom the magnetic
catch,causingit to pinch your fingersagainstthe wing.
To prevent that, we recommend
making the following additions to
the miter saw stand:
l.Attach a U-shapedguardmade
from3/+" plywood to the wing outside of the opened leg, asshown in
rhe Illustrationat left. This protects
your fingers from getting pinched.
2. Ctrt a handhold near the end
of the extensionwing.
3. Remove the magnetic catch
from the leg to avoid the possibility
ofthe leg suddenlyreleasingasyou
raisethe wing.
ffiru$wautoioin
wooil
iustgotmotG
[lGGisG..,
Beforejoiningyour projectwith the simplicityandstrengthof Pocket
HoleJoinery,you mustcut your workpieces
accurately.
Introducing,KREC
Precision
Measuring
Systems.Woodworking
machineaccessories
that helpyou to cross-cutyour workpieces
with
morespeedandrepeatableprecisionthan ever before. perfect
for the miter saw tablesaw.
drilloress.andmore.
ProductInformationNumber220
34
or nrost carpentryjobs, you don't need a
fl*
f;** per{ectly honed chisel.When it conres to,
t
say,cutting a hinge nlortise ir.ra door (-src
just need a sharp chisel.And
Pltotoaboue),you
you need it fast.
So l.row sharp is "sharp"? And how fast is
'We
"fast"?
recently posed these questions to
- with over'
three Workbenrlrprqect desigr-rers
Of course,it goes without saying that one
of the keys to fhst sharpening is having sr"rpplies
that are easilyportable or readily availableat any
jobsite. Our project desigrers'reconmendations
80 yearsofcombined carpentry experience.
Though their r.netl.rodsof getting a sharp
edge differ, their arrswerswere the sanre.The
for these sharpening supplies,and their sharperring shortcr.rts,
start on page 36. But first, lett
look at the anatomy of a sharp edge (pa.qe35).
cl.riselor plane iron has to be sharp enough to
slice clear-rlythrough the grain without chipping the surfice.And no more than 60 seconcls
should bc spent getting that shlrp edge.
WOI\KBENCH
D
FEI]I{UAIIY
!
onotomyof o
CuttlngEdge
SHARPEDGE
The cutting edge of a chisel or plane iron is
formed by the intersection of the bevel and
back. For a sharp edge, the bevel and back
must meet at such a fine point that the line
the bevel is at one consistent angle. (The one
exception to this rule is if you grind a micro-
berrveen the rwo almost disappears(Art, ri.qltt).
Back - One key to this sharp edge rs
having a flat back.This seemslike it should be
a given. But if you were to lay a straightedge
acrossthe brck ofa rypica1off-the-rack chisel,
you d find that the back isn't perfectly flat.
So the first step is to flatter-rthe back.To do
that,"color"the back ofthe chiselwith a nrarker.
Then grind the back asshown in Fig. .l.When
the rrarks disappear,the back is flat.
This may take awhile, but you should only
have to do this once for the life of the chisel.
bevel on the blade. See page 38 for more on
this.) Maintaining the consistent angle of the
bevel is the most important step in the sharpening process,so iti crucial to "find" the bevel
by rocking it on the sharpening suface until
the bevel sits flat (Fig 2).
To "lock" tl.rebevel at this angle, position
your index and middle finger directly over
the bevel,andjust above the sharpeningsurface (Fiq.J).Your other hand should be positioned slightly back on the chisel.Apply firrn
pressure downrvard, and kecp yor"rran-nsfixed
at your sicles,moving only yor,rrbody back and
forth asyou slide the blade acrossthe surface.
Burr - After r few strokes,a snrall"hook."
Orrce it\ flrrt.it staysflar.
Bevel - The bevel is the angled face at the
tip of the chisel.On a well-sharpenedchisel,
or burr. will fon'n on the back of the chisel.
This is easy to renrove :rsshown in Fi,g.1.
9kew ahleelatallghi
angleto edge ol
aharpenlng,tone .
I
''
Holdbaak
To"frnd'thebatel
angle, rock ahlael
up and down
Toflottenthebock,holdthechiselflotogoinstthe
Rockthe chiselup ond down untilyou
shorpening
surfoceond opplydownwordpressure "find"thebevelongle.You'llknowit'scoros you slideit ocrossthe stone.
rectwhenyou feelit sittingfloton thestone.
Loakarme aqalnll
body and allde ahleel
baok and forth
Posiiionyour fingersdirectlyobove the bevel
To removethe burr left ofter honingthe bever,
ond opply pressure
downwordos you slidethe holdthebockof thechiselfloi on thestoneond use
chiselbock ond forthocrossthe stone.
lightpressure
os you slideit bockond forth.
35
TIPS FROMTHE
Wffi DTAMOND
./.-*";
STONES
Workbenchproject designer Ken
Munkel has been remodeling homes
for 40 years.For getting a quick edge
on his chisels and plane irons, he's
come to rely on diamond benchstones (.reePhotos,right).
Diamond Advantage - Like
other sharpening stones,diamond
stones remain stationary while the
tooi slides over the suface (Art on
page 35). But diamond stones offer
several advantagesthat are specific
to thejobsite.
First,diamond stonesare the perfect size to carry around in a tool
box or bucket, and their hard suface
won't get damagedby being banged
around. Unlike oilstones or waterstones,diamond stonesare used dry.
This speeds up the sharpening
processand eliminates the mess.
.tl
Double-Sided
Stones- The new
double-sided
diamond
stones are well-suited to
jobsite sharpening, as they
have a difFerentgrit on each
face of the stone. Ken recommends purchasing a stone
with "fine" (600 grit) on one
side for removing nicks and "extra
fine" (1,200 grit) on the other side
for fine sharpening.The stones are
availablefiorn Eze-Lap (775-8889500, Eze-Lap.corn) and DMT
(800-666-4368, I)MTSharp.conr)
for around $40 to $60 (Plrctos,ri,qlt).
One other note: you'll want to
place a non-skid pad r-rnderr.reath
the
stone before you begin sharpening
(seePltoto aboue).-lhis prevents the
stone from sliding.
Thesedouble-sided
diomond
stonesfrom Eze-Lop/top/ ond
DMf (bottom)hove
o differentgrit
on eoch foce for moreversotility.
SHOP.MADE
BLOCKS
SHARPENING
An MDF blockwith
emoryclothottochedto
thefocemokeso simple
but effectiveshorp
eningblockfor
chiselsond
ploneirons.
The method that Workbencft
prqect
designer Chris Fitch recommends
is these shop-r.nade "sharpening
blocks." They're just MDF blocks
with emory cloth attached to the
surface with either spray adhesive or
double-sided tape.
The rype of emory cloth most
readily available comes in 3/+"-wide
block that he
usesto remove
nicks from the
blades. The
MDF blocks
Chris makes
are only about
2" x 8", so they're
lightweight and easyto tote
aroundin a tool box or bucket.Just
put them in a plasticbag to prevent
side to createa large sharpening sur- them from getting dirry.
face for wide chiselsand plane irons
The sharpeningblocks can be
(seePhoto,left).He usesemory cloth
usedjust like diamond stonesto
rather than self-adhesivesandpaper sharpen a chisel or plane iron
because ofits durable backing.
quickly,but you'll want to use a
Chris carries three blocks around
spritz ofWD-40 to lubricate the
o n t h e j o b s i t e : 1 8 0 - a n d 3 2 0 - g r i t block before you sharpen.As with
blocks for a quick rwo-step sharp- the diamondstones,
a non-skidpad
eningjob, and an additional 80-grit
keepsthe block from sliding.
rolls at automotive supply stores
(ight).Chris puts two strips side by
36
woRKBENCH
tr rsnnUany
2005
BEITSANDE
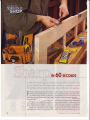
Sharpening a chisel or plane iron
chisel won
with a belt sander may seem a little
tear the
unnerving. But prgect designer Kent
Start w
'Welsh
swears by this technique as belt sander
the fastestway to get a sharp edge.
Then, "find" the
Before letting the sparks fly, just asbefore,and
though, there are a few things to be
asainstthe belt.Thisis i
aware of. First, sparks can causea fire
asthe sander sharpensso
if they land in a pile ofdust and chips, only have one chance to get
so remove the dust bag and set the
Now keep the chisel(or plane
sanderon a clean suface like a conlockedtightly againstthe sanding
crete floor.And second,set the sander and give the trigger a puLL(Fig.1).A
on its side so the belt is on the /cf and few secondsis usually all it takes.
running away from you.This way, the
Then,removethe burr (Fig.2,below).
NOTE:Uae
Eovel"loaked'
al2O-grlt
agalnet
eandlngbelt aandlngbelt
?ull baak along
belt, to remove burr
Holdthebevelflotogoinstthesonding To removethe burr,turnoff the sonder.
belt,get o firmgrip, ond pullthetrigger. Thensetthebockof thechiselflotogoinsf
A few secondsshoulddo the trick.
the beltond pullit ocrossot on onole.
When speedis of the essence,
thesefr,vo
tips will give you a sharp edge in
just a few seconds.
Micro-Bevel - A microbevel is simply a steeper
angle ground onto the
tip of the bevel
where it meets
the back of the
chisel ( eft). Lessmaterial is being removed, so
\
.1-n4..-,-.r
-.----
m,tu-s.;,;a'n|ir*'rr#
the sharpening goes much
more quickly (Photo,near
right).
Drill Bit - Another technique
is to usethe shankofa high-speedsteel
rwist bit like a burnishingrod to "crisp
up" the cutting edge of the chisel,as
shown in the far right Photo.
38
To creoteo micro-bevel,
first
find the bevelos shownin Fig.2
o n p o g e 3 5 . T h e n ,r o i s e t h e
chiseliusto hoir, ond mokeo
few quickpossesoverthestone.
Theshonkof o twistbit con put
o quickedgeon o dullchisel.Rub
the shonkfirmlyogoinstthe cutting edge, slidingit ocrossboth
the bevelond bockof thechisel.
\yoRKBENCH
tr FEBRUARy
2005
D
D
trUNDAMfltr[TTALSKILLS tr@R
o
EtrffitrRW@@ n)\vxv/(
D
n
[(
xperts in any craft know that to
be successfttl,
yon have to pay
attentionto the basics.Whether
it's a pro golfer who still practices his
swing, or a master rvooclworker who
nreasllres
twice and cuts once,they'll tell
you to concentrateon the ftlnd:tnretttals
in orcler to inrprove yrur skills.
Thatisthe purposeof lJcnch llasics.ln
every issne,thesc articleswill help you
build fundanrentalwoodworking skills.
We'lI talk abont technicpres;urd rools in
simple ternrsyou can understand,regarcllessof your expcrience.
I?lus,every installment of Ilench [Jasics
offersmore infonlaticut thrrlr"rghonline
c\trJs.Tlrey diq ciccpcrirrttr intcrestirtt{
insightsthat
subjccts,or offer erclditiorrrrl
will nrake you a tretter r,voodworker-
by
payingattentionto the besics.
40
woRKBENCH
!
FEBRUAnv
2005
lNTHISISSUE:
SETTINGUP SHOPpq+z
If you really want to get into woodworking,you need
a workshop.You might be able to make do with a
cobbled-up space,but you'li have a tough time gerting
the resultsyoll want without extra effort. Unfortunately,
not many of us have accessro a full-blown cabinet shop,
or the nreans to build one. But that doesn't nlean you
can't put together a fully functional shop in a spaceyou
already have.
In this first installnrentof Bench Basics,we'll help you
understand workshop necessities,
such asstorage,power,
ar-rdlighting. Then we'll guide yor-rthrough the pros,
c o n s , a n d c o n s e q l l e n c e so f s e t t i n g u p s h o p i n y o u r
basement,garage,or a separatebr,rildins.
coMINGSOON...
TOOLS& SHOP LAYOUT.i r
t)
LUMBERSELECTION
SECRETS.
rli
I'i,'rl
Iril
il
rl
1
TABLESAW BASICS,
lli,rili,,
CHOOSING& USINGROUTERS.
WWW.
WORKBENCHMACAZINE.COM
41
:f/ft:
*-x\.
s
IES
5I.JNi:FI
RESTRATEG
People trying their hand at woodworking for the first
time often have a lot of questions - and for good
reason.There's a lot to learn. The first questions are
almost always the same:'Which tools should I buy, and
FORSETTING
UPSHOP
i-'lere's
whot you
needto knowto ser
where should I set up shop?
Choosing tools might seem intimidating becauseof
the many choices that exist.But, for the most part, tools
are easy to get your hands on. Manufacturers offer tools
for most every task and budget. (We'll talk about the
specific tools you should have in the next issue.)
Shop space,on the other hand, is tougher to come
by.We a1ldream of having the perfect shop building one that's custom-made for woodworking and big
enough to hold every tool we want. But in the real
world, we usually have to carve out shop space somewhere within the confines of the properry we have.
For most of us, that means setting up shop in either
the basement or garage.The luckiest among us may
up 0 hord-working
w o r k s h o pi n o n y o f
flrreedifferent0reqs
i n y o u rh o m e .
/1 ')
woRKBENCH
ft FEBRUARY
2005
woRKSHot
NECESSITIES
SPACE.
Yourshophasto holdallyourtoolsandsupplies
withfloorspace
forworkareas.
Thinkaboutheadroom,
to spare
getalong.lf
too,because
lowceilings
andlongboards
don'talways
yourshoplack adequate
space,
consider
whetherareasnearby
could,be
for storage
annexed
orjobslikeassembly
andfinishing.
STORAGE.
Shopsquicklyfill with stuffthat takesoveravailgetslost
ablework space.And withoutenclosed
storage.everything
or coveredwith dust.Storagedoesn't,have
to be expensive.
Useold
kitchen'cabinets
or shop-built
versions.
Lumberrequires
solidracks
to keepit flat andavoiddamagefrom moisture.
r!!Fl
7r\
l-rlt
Itdl
lll
WOnfSURFACES.
Youcan'tget muchdonewithoutsturdy
placesto setyourwork.A traditional
cabinetmakerb
benchmightbe
the ideal,but a basicfoldingworkstation
or solid-core
doorlaidon
sawhorses
will work. Buildinga top for the tablesawevenmakesit a
t1!!|. work surface,
anda few clampscan "pinchhit" for a vise.
L.I
ACCESS.
Shopshaveuniqueaccess
needs.Youhaveto get
heavy,bulkytoolsin, aswell as longboardsand plywoodsheets.
A
straightroutein anda largedoorwaysimplifythis.Don'tforget,
you buildwill haveto find theirway out.
either,that thoseprojects
i
lSfl ct-lunrE coNTRot. Heatingandair conditioning
may
soundlikeluxuries,
but withoutoneor both,you'lllosea lot of
potentialshoptime.Plus,wideswingsin temperature
and humidity
causetoolsto rustand lumberto warpandcrack.Coolingproves
easy,but heatingrequires
morecareto guardagainstexplosive
fumesanddustthat mayget to a pilot light.
NZ
VgrunLATlON,
Shopair alsoneedsto be clean.Airborne
dustcanruinwet finishes,
not to mentionyourlungs.And some
giveoff dangerous
fumes.Windowsarethe
commonshopsolvents
easiest
way to ventilate,
or you canaddan exhaustfan.Justmake
sureit hasan explosion-proof
motor.
goodlighting.Fluorescent
-I
LIGHTING.
Qualitywork requires
lampsprovideeconomical
shoplightingthat doesn'tcastharsh
l-l
shadows.
In specific
work areas,add incandescent
ousr co[EcTloN. Thebestwayto createa cleanshopis
or halogentask
lighting.Forsafety5sake,put lightingon itsown circuit.
to capturedustat eachtool,beforeit canescape
to the flooror air.
A shopvacuumworksfor sometools,but largertoolsrequirea dust
lrl
tt tt
Youcanrolla smallcollector
collector.
fromtool to tool.Or,run
hl
POWER.
Woodworking
toolsusea lot of electricity.
Big
ductsto multioletoolsand connectthemto a centralcollector.
Usea
routersmaydrawasmanyas 18 amps,whichwill maxout a 20-amp ckculating
airfilterto get rid of tiny dustparticles
in the air.
circuit.Tablesawscandrawevenmore.lf you haveonlyoneshop
FI
lrl
circuit,you can'trun anothertool, likea dustcollectolat the same
LJ srcuntwlsAFEil n shopneidstitbffer
time.Youneedat leasttwo 20-ampcircuitsfor outlets.Threeis
a safeenvironwhouseit andthetoolsit'iofrilains.
better.lf your big tools(tablesaw etc.)can be rewiredto run on 220 mentforthose
Cutoff powerto
'
yourself(kidsespecially)
volts,do it. They'lldrawhalfthe amps,leavingmorepoweravailable toolsif anyonebesides
canget to them,and
protect.your
to driveothertools,
investment
with sturdylocksandadequateinsurance.
rI
have an outbuilding, or at leastthe spaceto erect one,
that can serve as a dedicated workshop.
Each ofthese spacescomeswith its own advantages.
And, to be honest,there aresome compromises.At qight
you'll find a quick overview ofthe prcs and consof each.
In the next few pages,we'Il talk in detail about specific
considerationsyou'll face when sectingup a shop in a
basement, guage, or dedicated building.
Wherover it'slocated,your shop hasto be equipped
with sornekey necessitiesin order to function well for
woodworking.A list of those appearsabove.Chancesare
that oo prospectiveshop spacewill have all of these
until you make someupgrades.Even a dedicatedbuilding
mey not offer everytling you need, unlessyou've built
it specfically asarnoodworking shop.Andyou'll probably have to buy or build some items designed for the
craft; like storage cabinets and a workbench. But thatt
half the fun of getting started in woodworking.
GARAGE
SHOP
easyaccess,
convenrent requires
electrical
upgrades,
location,isolated,
ample sharedspace,reducedsecurity,climatecontrolissues
space,storageoptions
43
SHOP
Some basementsget finished and used as living space,
but many are left unfinished and underutilized. If yours
fits the latter description,it's filled with untapped potential. So why not tllrn at leastsome of it into a shop?After
ali, a basement comes already equipped with two of the
most important - and most costly - necessities:
climate
control and electrical access.But a basement shop doc-s
pose a few unique challenges.
'",&
Doublcloycrof
dryrvollrcduccs
soundhonsfcr
throughcciling
NOISE
\'
A dust collector can keep chips and
dust under control, but theret still no
device that will suck up shop noise.
Table saws,thickness planers, and
shop vacuums often put out 80 or
more decibels (dB) of sound.
".-\.'
*-,,u."/'"-
--gi-
,,'';
This is a big problem in a basement shop becausethose noises
invade living areas.Stopping them
requires special measures.
To keep sound fronr escaping,
install sound-deadening insulation
in joist and stud bays.Then pad the
Secondwoll loycr
of Tl-l I plywooddeodens
sound ond providessolid
rurfocc for honging obiects
; S o r r n dl r a v e l st l ' r r c l r r rw; farl l sa sv i b r a t i o ntsh a 1r., a nL i r r ls l , r f a r . , ,n. tso c ; t a l t
rs. L.rye
rs and massstop thcsev bratronsf rcrn cicaplr.l.
oLrdspeake
44
studs or floorjoists, or hang the drywall on metal "resilient channel" (see
the Illustration at le;ft).Thesemethods
isolate the dr1'wall to stop vibrations
from transferring through the wall.
To further deaden sound, add a
second layer of wall material. This
adds mass,which reducesvibration.
woRKBENCH
I
FEBRUARY
2005
SHOP
In most honres,,vo11
wo11'tfircl :r better-spotfbr settirrq
up a r,vooclrvolkine shop than the galagc.Thc g:u'rrscls
potential corrrcsfi'onr its lords of open sprcc rncl isolaplcnry of rvrrll
tion fionr living quurtcrs.Gruasesalsol-rrrvc
space on r.vhich you cur build stol'2rqeand u'olksur'frces.Bccar.rsc
thc qlmqc is l nrulti-usc sprrcc,ltou rvill
likely hlve to br-rilclin storlge sp:,rcetbr"non-sho1-rit.'nrs
:urclnr:rketools rrrobile in olclc-rro perk c:rrsinsic'le.
Allow cleoronce
for vehicles
Buildstorogeinto open
oreo below toble sow
I a .,.'
>
\
Porking
spocefor
eoch tool \
,/' .'
MobileBoses
for stotionory tools
& workbenches
--"-'
, , : ; l ' l r , ; , t r t l r l i i ) t : ( j l r L , |i
:,t
VERSATILITY
When woodworking tools move into a ealage,cars,yard equipnlent,
anclbikc'solten get evrcted.Or those items take over and bury the tools.
But puttir.rg a woodworkine shop in the garage doesn't r-rleanyoll
hilvc to cle:rr evelything else out. I've l-rada gar;rgeshop for years that
fr.rnctionsvery well and still allows space for all the other stuff. No, I
clon'! have a huse building. I sirrrply have wheels Lrnder nany of nry
tools, as shown in rhe lllrrstrdtion.
With tl-rese
wheels, I can "park" tools around the perinieter of the
salase,and loll thenr into place when needed.I take over both stalls
for ehbor-ateprojects, or usejust one and keep nry wife'.scar in the other.
How yor.rmobilize is up to you. Comnrelcial nrobile basesare availablc either custonl-sized for particr-rlartools or in "universal" sryles
that you clrstonrize.Yoll can fit a mobile baseto a workbench or other
hlrd-to-ntove shop fixtures, though you may have to modiflr the base.
Shop-built r.nobilebasespr-esentanother great option. Designing your
own baseslets you cr-rstomizethem to neet your needs.When possible,
build in storage to keep related tools and accessoriestogether.
\\ W U . W () ll K ll f \
( I I \r A (, A Z I N f
45
SHOP
Every woodworker dreams of having a stand-alone shop
building where he can work on projects without rnterference. Ifyou're lucky enough to have an extra building
lying around, or ifyour properry offers space for one,
you can build a shop rvith fewer compronrisesthan one
located in the basement or garage.Building a dedicated
shop takesa larger investment,though, becauseit requires
dedicatedsvstenls:rnd more constrllction or finish work.
tr;;ffiil
.Moreways
I
to heatyour I
shopsafely I
andefficiently
I
I
|
I
I
!lr.
HEATING
'Winter
\
Somemodels
drowoir ond
exhouslwoste
through o single
woll opening
Direct-veni,
seporotred-combustion
gos heoter hongs
from ceiling ond heois
with forced oir
Woll-mountedelectric furnoce heotswith
forced oir
In-floor hydronic sysiem
worms floor slob to produce
rodiont heot
46
has long been designated"woodworking season."
So you'll need a heating systerr if you don't live rn a
warr-n climate. A spaceheater may be adequate,or yoll
nray have to install a more powerful system.
I've known many woodworkers who heated their
shop with a wood-burning stove, often stoked with
scrap wood and "r.nistakes."But you have to tend the fire
while using the shop and are left with no heat at all when
the shop isn't in use. Plus, you usually have to increase
insurance coverage ifyou have a wood-burning stove.
Thankfully, gas and electric heating systems wellsuited to workshops are commonly available.Both types
, i i t i l L t . ; ] y r 1 1 1 ; r t ;i t1L , , . r i . I t:{,1, , l i ' ) r l l l ) r . l ' i , ) ' ; l i ] i 'rl; r l , i ! i r l . ;
conre with cornpronrises.
A gas system requires that you run lines or install a
propane tank.This increasesconstruction costs.But gas
heat is efficient and usually cheaper than electric. Electric
heaters cost lrore to run, but cost lessto install. Note:
220-volt heatersare more elficient than 11O-volt units.
Whichevel system you choose, add a thermostat, so
you can heat the shopjust enough to keep the interror
i l [ ] J i . l t . t i i t ; r v r , l, i r i r r : ,i . ) L t r irlr ' l i i t i : , i ) i l t i , r : : r g , f 1 ; r i , , : r ] y
above freezing when the shop isn't in use.
wol\KTJENcH
fl
FEul{uAtr.v
2005
+
I
r
4*
'l
--t]'
$
Tl^d
backdoor[|''(/
BENCH
storage!
siurdy& stylishseating-plus
t's tough to kccp lvet, nit-tcltlyLrootsout of tl're hottse.Bttt yott rart keep
thcnr org:rnizcclrurd otrt oit]rc rv:tvrvith t]iis sturclvbcttch. Not onlv does
it oflcr ;r conilbrtrrblcpl;rccto sit ,rnclchrtltqeyottr shoes,but thc slrtted
shcliunclenre:tthulsolcts vott stol'r boots atrclothet qe:rr.
fittir-rgs
M:rclc cntilc'lv of soliclrrsh.thc betrch ltscskttock-clorvn hrrrc-hvarc
provic'le:r
siurplc
flttirrqs
sl-relf-.Thcsc
to tic the encl fl':urresto thc scat lncl
lock-solicl
conprovicle
a
inipoltantlr'',
tl'rey
u,:r,vto :rsscnrblethc bcnch. Mot'e
nectior.rthlt pr"evcntstl-reLrenc]'rfl'onr rlckirrq.
Althor,rgl.rthis bench is prinr:rrily rt r-rtilit:rrianploject, I rvarrtetlto "cltess"
rvitl'r:rlvood qricl at elch end that'.srlssellrit up r bit.Th:rtls:rccontplishecl
joints.
As rn option, votl rrrry $':lttt to paint the erids
bleci rvith h:rlt-l:rp
:rnclrrdcl:r rn:ttchirtq seat cltshiol.t (Pltoto,ri.qlrt).
M
building
the
ENDFRAMES
The design of this backdoor bench is very straightforward.As you can see in the lllustrationbelow, it consists
of two end frames that support a slatted seat and shelf.
I began by building the end frames. Each frame consistsof rwo rails (A) and rwo stiles (B) that are cut to size
from 3/4"-thick hardwood (End FrameAssembly,page51).
=t+
These frame pieces are assembledwith stub tenon and
groove joints, asshown in the StubTbnon€t GrooueDetail.
Cut the Grooves -The
first order of businessis to
cut a groove in the inside edge ofeach frame piece. I used
a1/+" dado blade in the table saw to do this.The serup is
identical to one used to cut grooves in the seat and shelf
rurIs (referto Fig. 1 on page53). Note how the rip fence rs
.,-' .\.i.:
:-r'
''
'-,.'-jp."'
positioned so the blade is centered on the thickness of the
frame piece.After locking the fence, set the blade height
(1/2"),and then make a single passto cut each groove.
Make the Stub Tenons -'With
the grooves com-
..e-'na;r
AThegrid fitsintoo robbetthot'srouted
in thebockinsideedgeof thefrome.To
creoteo shodowlinebetweenthegrid
ond thefrome,I eosedtheouteredges
of bothossemblies
witho sondingblock
(right),thengluedthe grid in ploce.
pleted, you can turn your attention to the stub tenons
on the ends of the rails.Here again,you'll be using a dado
blade. Only this time, set it up for a 3/4"-wide cut and
"bury" part of it in an auxiliary fence.The Gnce will be
used asa stop to establishthe length ofthe tenon. Since
Consfrucfion Defoils
OverallDimensions:
36" W x 16" D x 191/2"
H
SeotRoil
hos o groove in the
insideedge to occept
stubtenonson the
endso[ the slots
ol
Grid
is formedfrom
horizontol(C)ond
verticol(D)dividers
loinedwith holf lops
FillerBlock
plugsend o{ grooue
SeotSupport
fits into o groove in the bofiom
foce of the roil ond connectsthe
seotossemblyto the end fromes
End Frome
Shelf
is identicolto theleot
ossembly
shownobove
Cross Dowel
for connectorbolt
End Frome
is ossembled
from roils(A) ond stiles(B),
then robbetedto hold the decorotive
ecorotivegrid
50
ry,
t
r G ilo
-A---t
WORKBENCH
T] FEBRUANV
2OO5
the tenons are 1/2" long, leave 1/2" of
the dado blade exposed. (A similar
setup is shown in Fig.2 on page 53.)
After positioning the fence, the
connect the end frames to the seat
and shelf assemblies.
Rout the Rabbets - \611, s6
accept the grid, you'll need to rout
next step is to set the blade height.
The goal is to adjust the blade so that
by making t\,vo passes(one on each
face),it forms a snug-fitting tenon.To
accomplish that, start by raising the
blade co t/q" and make test cuts in a
a rabbet around the back inside edge
of each frame. A handheld router
with a 1/2" rabbet bit makes quick
work of this job (seePhoto at right
and RabbetDetail).The bit removes
the back lip of the groove that was
scrap piece that's the same thickness
asthe rails.Check the fit and "tweak"
the blade height ifneeded.
Once you're satisfied with the
cut earlier.After routing the rabbet,
square the corners with a chisel.
Half-Lapped Grids - At this
point, itt time to focus on the decorative wood grids. Each grid is
made up of five horizontal dividers
(C) and four vertical dividers (D)
nrade from 1/ 2" -thick hardwood. The
setup, go ahead and cut the tenons
in the rails.To do that, butt the end
of each rail against the fence and
use the miter gauge to push it
through the blade. Now flip it over
and make the second passto complete the tenon.
Holes for Connector Bolts Before gluing up the frames,there's
one more thing to do.Thatt to drill
two holes in each stile for a pair of
connector bolts that wili be used to
dividers are assembled with half-lap
joints, a process that's detailed on
page 54.
After cutting the half-laps,glue up
the grid. (Jse a sanding block to
"break" the adjoining edges of the
grid and the frame. Then glue the
grid into place (Photo,page 50).
r
lTo occeptthegrid, routo
robbetin the bock inside
edge of the frome.Note
how the bit removesthe
bocklip of thegroove.
END FRA'I/IEASSEMBTY
]3V2"
%" hole
S
+3u
Roil
(374"x3',xll,'l
t
N
3u
R.oul7z"-wide
robbet,Tz"deep
ofterossembly
-l-
F
3Y2"
\\f)
@
VerticolGrid Divider
l/2" xVz" x14Vz"l
x3n x19Vz"l
1314tt
NOTE:Seepoge 54
for informotionon
cuttingholFlopioints
(/ tv,'
\Y
Horizontol
Grid Divider
l/2" xVz"xll"l
WWW.WORKBENCHMAGAZINE.
COM
51
adda slatted
SEAT& SHELF
The seat and shelf assembliesthat span betr,veenthe end
frames ofthis bench are identical (SeatAssemblyIllustration).
Each assembly consists of nvo long rails connected by a
number of evenly spacedslats.A pair of supports prevents
the assemblyfrom sagging.
Make the Rails - Start by cutting the rails (E) to
size from 3/a"-thick hardwood.Thar done, you'll need
to cut two grooves in each rail: one to accept the slats
and the other to fit over the support.
The groove in the inside edge of the rail is sized to
accept t/4"-thick stub tenons on the slats (Rail Detail).
As with the end frames, cut this groove using a 1/4"
dado blade on the table saw (Frg. 1 and Crooue Detail).
Then glue in short frller blocks (H) to "plug" the exposed
ends ofthe groove.
The second groove, which is centered on the bottom
face of the rail, will fit over the seat/shelf supports.To
cut this groove, ser up a 3/c" dado blade, adjust it for an
l/s"-deep cut, and make a single passover the blade.
Add the Slats - At this point, you can set the rails
aside and turn your attention to the slats (F).There are
20 slatsaltogether (ten each for the seat and shelf).
Start by cutting the slatsto size from 3/4"-thick stock.
l >aDV.lI,T^J
(tt,-r1l{,^,)'fl
EIOCK
SEATASSEA/IBLY
FillerBlock
Seot/Shelf
Roil
x 3" x34Vz',1
1374"
{,r0,
Then cut a stub tenon on both ends of each slat to fit
the grooves in the rails (Fig.2).Routing an 1/6" chamfer
on the top outside edges of each slat finishes them off.
Now you're ready to install the slats.The goal here
NOTE:Slotsore spoced%" oporl
Roulo 7s" chomfer
on bp edgesonly
o
Slor
(%"x3"xll")
dep
h" groove,Vz"
>r
t
@
FillerBlock
l/t" xh" x lVa"l
\conn*to,
Crois Dowel
Bolt
NOTE:Rightend frome
is removedfor clority
52
woRKBENcH
T] FEBRUARY
2005
is to spacethe slatsevenly (1/a" apart). Insertingl/a" hardboard spacersberween the slatsprovides uniform spacing
berr,veenthem (Photo,page52).It's a good idea to dryfit the slats and rails before you apply glue.Then center
a dab ofglue on the top and bottom ofthe tenons, and
fit the slats into place.
Add the Supports - All that's left is to add the
hardwood supports (G).As I mentioned, the supports
help strengthen the seat and shelf, but they also serve
another important purpose. Let me explain.
Housed in both ends of each support is a threaded
crossdowel. Each crossdowel acceptsa connector bolt
that passesthrough the pre-drilled holes in the frames
(seeSidebarat right).Threading the connector bolts into
the crossdowels "locks" the bench together.
To make this work, you'll need to drill a hole in the
face of each support to hold the crossdowel.That's easy
enough to do. But drilling the hole for the connector
bolt is a bit trickier.Thatt becauseit goes into the end
grain of the support.This end grain has a tendency to
make the drill bit veer offcourse.To prevent that, I use
BOLTS
CONNECTOR
Crossdowelsond connecbrbolts
lhol
producethe90'connections
fromes
io
the
seot
fie
end
ioin
ond shelfof thebench.Typicolly,
this hqrdworeis used in the
proiecrs
loineryof "knock-down"
lo moke them eosy to disqssembleond move.In lhis cqse,
though,I wos ofter q slrong,
simplewoy to ioin ports.This
hodworedoesfiot, plusit ollows
melo "snugup" lhe benchif the
conneclions
everloosenuP.
QuickTip:DrillGuideBlock
a shop-made guide block (seeSidebarat right).
After drilling the holes, itt just a matter of gluing and
clamping the supports to the rails.Then insert the cross
dowels, fit the seat and shelf berween the end frames,and
t[
install the connector bolts.
An eosywoy trodrill o stroight
holeintotheendof o boordis b
useo simpleguideblock.lflsiust
o block of wood with o hole
drilledin it fto/s usedto guide
thedrillbir.A pieceof hodboqrd
qttqchedto the block lets you
When
clompit to theworkpiece.
drillingtheholebr theconneclor
bolt in the endof the seot/shelf
support,be surethe holein the
guideblockolignswith thehole
br thecrossdowel.
Seot/ShelfRoil
ACuto groovein theinside
edge of eoch roil to occept
the stubtenonson the slots.
Pqrl
A lromeRoil
B homeSlile
c
G
]|orizonfol
GridDivider
Vertkol
GridDivider
Seot/Shelf
Roil
Slot
Seot/Shelf
Supporl
H
Filler
Block
D
E
F
Glty
4
4
T
w
t
3/l'
3o
I lu
3/l'
3tr
l9V2'
t0
Y2'
8
4
l/2"
Y2"
V2"
3/t"
20
3/t"
4
8
3/,tl
2',
Ul"
h
Conneclor
Bolt \
CrossDowel
WORKBENCHMAGAZINE.
llu
34V2'
lV8"
gfues;'A
Wo*benrhMooozine.com
Dioorom
Noil-onGlides(ltem#18665) ly'l 113/r5t'Dbl.
(4) CrossDowels(ltem#31823)(4) 2" ConnectorBolts(ltem#318491* ltemsovqilobleot 800-233-9359or www.Rockler.com
I Formthestubtenonsof the
slotsby cuttingtwo robbets
on theendsof the oieces.
WWW.
3u
3u
llu
14V2"
34V2"
Mohriol
Ash
Ash
Ash
Ash
Ash
Ash
Ash
Ash
COM
53
Backdoor Boot Bench
®
Issue 287
Volume 61
Number 1
January/February 2005
MATERIALS LIST
MATERIALS & HARDWARE
Part
Qty
T
W
L
Material
4
4
#/4"
#/4"
3"
10
8
4
20
!/2"
!/2"
Ash
Ash
Ash
Vertical Grid Divider
Seat/Shelf Rail
Slat
3"
!/2"
!/2"
11"
19!/2"
11"
Ash
Ash
11"
4
8
3"
3"
2"
14!/2"
34!/2"
Seat/Shelf Support
Filler Block
#/4"
#/4"
#/4"
Ash
Ash
!/4"
!/2"
A
Frame Rail
B
Frame Stile
Horizontal Grid Divider
C
D
E
F
G
H
34!/2"
1!/8"
Ash
Bench
Cutting
WorkbenchMagazine.com Diagram
NLINE
Extras
(4) 1!#/16" Dbl. Nail-on Glides (Item #18665) *
(4) Cross Dowels (Item #31823)*
(4) 2" Connector Bolts (Item #31849) *
* Items available at 800-233-9359 or www.Rockler.com
CUTTING DIAGRAM
A
A
A
A
E
B
B
E
E
B
B
E
#/4" x 10" x 96" Ash
G
G
G
G
F
F
F
F
F
F
F
F
F
F
F
F
#/4" x 12" x 96" Ash
C
D
H
!/2" x 6" x 48" Ash
Page 1 of 1
Copyright 2005, August Home Publishing Company.
All Rights Reserved.
F
F
F
F
F
F
F
F
,
tt
.
r
Ioolesow tecnntoue
Tl f'
ll 6)T.^\
D
Il-:
\-r@LlU
LIAIA J\
ll
JOINERY^
skill
Builder
A half-lapjoint is exactly what the nanre irnplies- a
j o i n t w i t h h a l f t h e t h i c k n e s so f e a c h m a t i n g p i e c e
Tnhil*,1
lr*w $efru,p
removed so that overlappingpiecesfit flush.This provides a strong fice-to-face glue joint that is useful for
building franres,lattices,and grids (like the grids ir.rthe
backdoor bench on page 49, or the entry divider on
page 62).
Sfock Prep & Toble Sqw Setup
There are two requirenrer-rtsfor cuttir-rgperfect-fitting
half-lap joints: unifornr stock thickness and accurate
ICUTAUGNMENT
NOTCH.Tooccurotely
oligntheworkpiece
when cuitingthe dodoesthotformthe holHops,cut o deep
notchin o longouxilioryfenceottochedto the mitergouge.
blade setup.
Stock Thickness - Ulnlessall the piecesthat will be
joined together are exactly the sar.nethickness,it's di{Ecult to createflush-fitting lap joints. So the first step is to
plane all of 1'our blanks to identical thickness.It'.salso a
good idea to make a few blanks for test cuts.
Blade Setup - The quickest way to cut half-laps is
with a dado blade mounted in tl.retable saw.Justset up the
dado blade to match the width of the piecesto be joined
together. (For half-lapjoints on piecesrvider than a fullwidth dado blade,you will have to rnake nrultiple passes.)
A useful aid for cutting half-lapsis a long auxiliary fence
attachedto the miter gauge.I recomr.nendcutting a deep
notch in it, asshown in Fig. 1. The notch will be used ro
f SETBLADE
HEIGHT.
With theblodeheightsetto iustunder
holfthethickness
of theworkpiece,mokeiwo cutsin theend
of o testpiece,flippingit betweencuts(2).Roisethe blode
sl;ghtly
ond repeotihe process
untilthesliveris gone /3i.
'{ TESTFlT. Once the
blodeheightis odlusted,
cut robbetsin two tesr
pieces,ond checkto see
if theyfit flush.
54
accurately align the workpiece along the fence (Fi.q.5).
Once the notch is cllt, you can set the blade height.
Renrember, you have to remove lmlf rhe thickness of
each workpiece.To do that, raisethe blade to just under
half the thicknessof the stock.Then make fwo passesin
a test blank, flipping the piece over between passes(Fig
2).Thts leavesa thin sliver of wood that will be removed
once the final blade height is established.That'saccomplished by raising the bladejust a hair and repeating the
pass-arrd-flipprocessuntil the sliver disappears(Fig.3).Be
aware that any change in blade height is doubled, so
adjustmentsnlust be small.Then, to check the final blade
height, cut rwo test pieces,and fit them to€ietherro make
sure their faces are flush (Fig. 4).
woRKBENCH
!
FEBRUAI{y
2005
Cuffing Holf-lops
Once the setupis completed,you'rereadyto cut the halflap joints. If youte building a half-lappedframe,this is
just a matterof cutting rabbetsin the endsofthe frame
pieces.For pieceswith multiple half-laps(like those
requiredfor the grids on the backdoorbench),you'll
haveto cut a seriesofrabbetsand dadoes.
Now cutting all thoserabbetsand dadoesindividually would be pretry time-consuming, and it would
increasethe potential for misalignedcuts.For a shortcut
that ensures^ccrracy,I cut dadoesin extra-wide blanks
and then rip the blanksinto strips.Each blank should
be wide enough for all the "like" pieces(either horizontal or vertical),plusa little extra to allow for the saw
kerfi betweenpieces.
Cutting the Dadoes - Start by marking the dado
locationson the blank.Then align thesemarks with
the notch in the miter gaugefence,and push the
blank over the dado blade with the miter gauge(Flg,
5). Ifyour project requireshalf-lapsthat are an equal
distancefrom the ends of the workpiece,be sure to
clamp a stop block to the fence for repeatability.
Using the same stop-block setting and flipping the
blank end for end between cuts ensuresa perfect
match-up of horizontal and vertical piecesduring
grid assembly.
Ripping the Strips - With the dadoescut, the
next stepis to rip the stripsto width from the blank (FS.
6). After ripping the first strip, check to make sure it
matchesthe width of the blankt dado(Fig./. Once you
get a snug fit, rip all the remaining pieces. U
Whenmokingholf-lopiointsbr smollgrids(likethose
in fie enhy dividerl,i/s bestlo work with qn exhqwide blonktho/solsoexho long.Thiswill ollowyou
to sofelycutthe lointson theEble saw.
Depending
on thesizeof thegrid,)roumaybeqble
get
pieces
to
br tuo (ormorefgridsfromoneblonk.In
lhol cose,I cul o seriesof dodoes(norobbetslin the
blonk.Then,ofi,errippingthe$ripsfromthe blonlqI
crosrutfie griddMdersobouton inchor solongerthon
needed.
Thismeonslheendsof tnedividerswill di,ckout
whenyou ossemblethegrid, burthe/re eosyb him
ffushwith o hond son (Phoa,rtght).
WWW.WORKBENCHMAGAZINE.
COM
ADEAD-ON
DADOES.
Afterloyingoutthelocotions
of thedodoeson
on exho-wide
blonk,olignthemorkswiththenotchin themitergouge
fence.Thenclompo stopblockto ihefenceond mokethecut.
ARIPSTRIPS.
THEFlT.Onceyou're
Now setthefence ACHECK
to rip o stripthotslipsintothe sotisfiedwith the fit, rip the
dodowitho frictionfit fseeFiS4
remoining
stripsfromtheblonk.
wqeqlfM
INNOVATI
TOOrS
ffiffiffiffi
I i r r , 't i i i l u f - i i i t t o t . ; r t i o l r: , , tt l 1 , - ' i
I { r , : I , ' j , r ' l rt lrri r p1( } I i t t i u l ; r t i tt ' " l *' ' ' i i , ' ' t '
1 r ; i l j ' 1 .n ' i i r c l l
r " L ' p f , " r r c n i i i ,i - r . r : , r
: i r r , : i l ' i l u i i l l " f r l O i r ' ( . ) i t . , t jlJr 't t ' ' , I. i t ,
i ' l r t i c n t [ ) i r ] t ' t i n ; t 1 ls r z r ' r . . : r;tt j j f i ;
BLACK& DECKER
DragsterBeltSander
Black & Deckert radical new Dragster belt sander may
represent the first sigruficant improvement to belt sanders
in the S0-plus years they've been around.
The Dragster features a low-profile front wheel that
TheDrogster's
low profileoffers
moresonding
surfoce,better
delivers 25 percent more sanding suface than prevrous
3' x 27'models and allows the sander to get three rimes
occessto
corners,
ond the
obilityto reoch
intotightspots.
closer to the edge ofadjoining sufaces (floor to baseboard, for instance). Additionally, a retractable hood
exposes the top of the sanding belt for use in a
variety of applications,
including squeezinginto
spaces
wherebelt sanders
couldn'tpossiblyreach
before (Photo,above).Finally,a three-position
adjustablehandle maximizesuser control and comfort.
The Dragster sells for around 970. Visit
BlackAndDecker.com,
or call 800-544-6986for more.
\ffiffif,
o^:
a--\;
HITACHI
'12"DigitalMiter Saw
A new miter saw from Hitachi (Model C12LCH) offers
the latestin power tool technology with a digital liquid
crystal display (LCD) that shows the bevel and miter
angle of the saw.
The LCD readout indicates angle settings in half of
a degree (.5') through most of the range of adjustment.
But it also indicates the specific angles for cutting crown
molding flat (31.6" miter,33.9o bevel).Such precisesetups
are much easierthanks to a microadiusrment knob on the
bevei lock (Photo,below).The saw also
featuresa lasercut line for quick aligr:rment.The CIZLCH sellsfor around
$399.VisitHitachiPowerTbols.con\
or call800-8294752 for rnote
information or to
Iocatea retailerin
your area.
An LCD
disploytokes
theguesswork
out
of compoundmiter
cuts,likesettingup to cut
crownmolding,os shownhere.
A losercut-line
indicotor
fieft/ondo
microodiustoble
bevellock(below)turtherensure
occurote,
repeotoble
setups.
57
filq
DEWALT
i
I
CordlessNailer
"1f
g
/
DeWolt's
new l6gouge
cordless
finishnoilers
ore thefirstsuchtools
thotcon reolisticolly
keep
oocewith the user.
After four yean ofresearchand development, DeWalt has managedto
deliverwhat no other manufacturer
has in the past - a cordlessfinish
nailer that works asfast asthe user.
The four- to five-nails-per-second
cyclerateofthese nailerseclipsesthe
cycle ratesof competitive products
and is more than fastenoughfor even
the most demandingtrim irutallations.
Thesearealsothe only cordlessnailen
that ofFersequentialfiring for precision
nail placementor "bump firing" for
increasedspeed(Photo,above).
Other
featuresinclude an LED worklight,
belt clip,and tool-freejam clearing.
DeWalt oft-ersthe nailer in eight
models,including 72-, 14.4-,and 78volt versions,and with straightor
anf,ed magtzines.Pricesrangefrom
$380 to $400.VisitDeWalt.com,or
call800-433-9258to learnmore.
RYOBI
10" BandSaw
Dust control on benchtop tools in
genenl - andbenchtopband sawsin
particular- haslong consistedofa
token dust port (usuallyin a really
inconvenientspot) and a screaming
shop vacuum.Itt never been very
efective,butat leastit'sincrediblyloud.
Ryobib new benchtop
.*
band saw
(model BS1001SV)offers the first
ef[ectiveand quiet alternative.
The BS1001SVSilentVacincorpofirtesa radialfan in the lower wheel
to createa highly eficient dust collection system.It drawsdustfrom the
tabletopand direcs it into the attached
dust bag. Other featuresinclude an
LED worklight and a quick-release
tensionIever (Photos,
below).
The BS1001SVis availableexclusivelyfrom Home Depot andsellsfor
around $230.VisitRyobiTirols.com,
or call 800-525-2579to learn more.
A high-intensity
LED Ryobi'sblodetensioningsystem
w o r k l i g hi tl l u m i n o t e smokesblode chongeseosyond
a \ thecutlineforgreoter ollowsyou to quicklyreleosethe
^
1r VVVrNrrVttI
I
\
r,
tttuttttttwt9J
preclslon.
lensionwhenthesow is notin use.
woRKBENcH
D
FEBRUARy
2005
TRITON
PlungeDrill
Triton's new 1S-volt cordless
hammer drill features a fully
retractableplunge mechanismthat
guaranteesperpendiculardrilling,
along with severalother benefits.
For example, the face of the
plunge mechanismhasa non-slip pad
for precisiondrilling in tile or other
smooth sufaces.It also acceptsa
coupleof multi-firnction atachments:
one for drilling on corners or in
round stockand anotherfor repecitive
drilling tasks,suchasshelfpin holes.
The PlungeDrill sellsfor around
$290Visit TiitonWoodworking. conr,
or call 888-874-8661for more.
! Triton's
newcordless
perpendiculor
drillensures
drillingwitho retroctoble
plungemechonism.
SKIL
X-5hop
Although Skil didnt invent any new
tools or developany new technology
with their X-Shop, we still have to
laud their ingenuiry in creatingthis
comprehensiveand affordableentrylevel shop system.
The X-Shop is built aroundSkilt
10" benchtoptablesaw.Each wing
of the saw has an opening that
acceptsinsertbasesfor four different
power tools (Skil or other brands).
By simply swappingone insert for
another,you can quickly transform
either wing of the sawinto a router
table,drill press,sandingstation,or
scroll saw.'Whenyou need the full
capacityof the table saw,simply place
blank insertsinto the openings.
The X-Shop sells for around
$380 and includesthe tabie saw
:
t-
tt
tr,
storage cabinet, router fence and
insert, as well as inserts for
a jig saw and belt sander.
The drill pressinsert,power
drill, router, belt sander,and
jig saw are sold separately.
Visit Skil.com,or call 877-7545999 for more information.
ABy chonginginserts,the wings of thisSkiltoble
sowcon quicklybe rurnedintrro drill press,scrollsow,
sondingstotion,or roulertoble.When nol in use,
the insertsond toolsstorein thecobinef.
59
RIDGID
;t n*F
mr,{r'C fr i,ii;i ils$
Ridgid's new cordless handheld power planer (model
R848) is engineered to handle the tough planing jobs
that professionalsface every day and DIY'ers face all too
often. This 31/a", 78-volt planer features spiral cutting
blades that run at 11,000 RPM (or 22,000 cuts per
minute) to produce smooth cuts with lesschipout than
conventional blades.
The spiral blades make a "shearing" cut that is less
likely to damage a workpiece.Anyone who has ever tried
to shave the bottom of a door without tearing apart the
end grain will appreciate this feature (Photo,Ieft).
Another advantage ofthe spiral blades is that they cut
more efficiently, which can increase the run time of a
cordless planer signifi cantly.
The R848 has a 0 co 1/16"depth
adjustment with "micro" settings for
fine depth control. It can also make
rabbet cuts up to 1/2" deep.
The planer kit includes a chip
collection bag, edge guide, one battery, a 3O-minute charger, one extra
set of spiral blades,and a wrench for
Endgroinis no problem
forthespirol
blodes
of Ridgid's
portoble
powerploner.
Theblodesore self-indexing,
so they're
eosyto reploce.A wrenchfor blode
chonging
is included
withtheploner.
changing the blades.The kit comes
packaged in a plastic carrying case.
The complete kit sellsfor around
$200 at Home Depot and other tool
retailenVisit fudtrid.conr. or call 80047 4-3443 for more information.
M
MILESCRAFT
,'- tl.t'+",'"
The Milescraft Orbiter is unlike any
other right-angle drilling attachment
out there.Thatt becauseit's not limited to only right-angle drilling.
attachmentsare limited to a single
perpendicularposition,this attachment from Milescraftcanbe setat at
virtually
any angle.
\
TheMilescroft
This is thanksto rwo half-spheres
Orbitergoeswdl
that rotate independentlyof each
beyondrightongle
other. A unique beveled gearing
drillingwith independently systeminsidethe spheresmakesthis
rotolingspheresthotoffer
dual-axisrotarionpossible,
while sacolmostinfiniteonglesettings. rificing very litde torque or speed.
60
The Orbiter featuresa 3,/s"keyless
chuck and and a soft-grip handle.
The handleis alsothe locking mechanismthat holds the rwo spheresin
the desiredposition.TheOrbiter can
be usedwith any drill 3/s" or larger.
The Milescraft Orbiter sellsfor
approximately$30 at Lowes.Visit
Milescraft.corn,or call 815-874-2400
for more information.
woRKBENcH
tr FEBRUARy
2005
!rlilt/t:'t1/L
i .- ^ ^.,
.^
| - \)J-r
:
DeWalt's new DW304PK reciproc.lting slw fc:rtu|csr fbur-posirion
blacleclamp specificallydesignecllbr
flush cuttins.
The blaclecl:irnp acceptsthe sarv
A four-position
blodeclomp
ond o iooljree blode releose
moke the new DW304PK
from DeWoltone of the most
odoptoblereciprocoting
sows
on the morket.
blade in the two standard vertical
positions (tecth facing up or down)
:rnd also oflers two horizontal positions (teeth ficing rigl.rtor left).
This nrakes tl-resaw aclaptableto
j r r r t . r b o r r tr r ) y c r . r t r i n rs{i t u , r t i o r r .
inclr.rdinscut.-
ffitil'i
18
tinq close
to floors,
walls,or ceilingswhere clearlnce is
linritecl.Thc rcsult is lessuser corrtortion with fewer"brokenblrdes
:rnclcrrant cllts.
Thc DW304PK sells fbr rbout
$100.Visitl)cWrlt.conr, or call iJ(X)+.1.1-()15|{
lor rrror-cirrIbrrrr,rtitrr
r.
o
a
Thisversotilenew sow feotureso
1O-ompmotorthot deliversup to
2 , 8 0 0 s t r o k e sp e r m i n u t ew i t h o
1t/s" blodestroke.
/
With its one-of-a-kind QuikCl-rrngesystenr,l)orter"-Cable\rrew
line of circnlar sawsen:rblesLrsel's
to
elsily chanse thc circular saw blac'le
without :r wlench and still secure
tl're bl:rdejr.rst,rstightly.
o
A pivotingdust
nozzleond lightThe keylessblade-chansesystenr weighimognesium
is a big tirrre sirver.Andit also urakes housing
ore stonit nrore likely that userswill :ictually dord foreon oll
chanse the blade to better nrrtch the
Porter-Coble
work:rt har-rd.
MogSowswith
T h i : i r r q e r r o u sb l : r d c - c h . r r r g i r r u Quik-Chonge.
syster-nis rvailable on severalPorterCable circular saw models,incl-rcling
left- and rirrht-bladc vcrsiorrs.
Of course,the sawsalso include
the featuresthat have been the nrark
of Porter-Cable quality all along,
including Iightweight rrraqrrcsiunr
motor housings and integrated dust
control nozzles.
The sawssellfor $130 and r-rp.Visit
PorterCable.corn,or call 800-,187tH
8665 tor nrore irrfbrnration.
W W W . W O I \ K B E N ' ] I I M A C ] A Z I N E . ( JO M
Instolling
o new blodeis quickerthonever,
ond iustos secureos with o wrench,thonksto
Porter-Coble's
keylessQuik-Chonge
system.
61
6) r7-)+
@!J-LI-LI
_^_n_
C
eru[rv
U
OTI
vll
TTI'AI ATTO
Y J_LUIIUJI
Yorr nevor net n scenn6lchonce
to mokeo firstimpression.
The
s o y i n gi s o d , b u tt r u e ,o n d i t
why so monyhomes
exploins
ore builtwithgrondentrywoys
thnl imnrocc
rricilnrc h' rl tnLo
rrn
o lofof spoce.
Ourentrydivlder,
on theoiher
hond,provesthotlesscon be
more hv nn.,^[innn Ini of "wow
i n t o i r , s ro r i f t l es n o r ^ e l t d e f i n e s
yourentrywoy,ond definitely
mokeso greotfirstimpression.
;>*o
-ti
woRKBENCH
ft FEBr{uAnv
2005
thefinerdetcils
The primary role of this prqect
is to divide a home's entry\rvay
from the rest of the room.But it's
filled with features that make it
beautiful, not just functional.
For starters,there's the display
cabinet. On the side that faces
the room, it has glass-paneidoors
and adjustable glassshelvesinside
(PhotoA). Easy-to-install "puck"
lights illuminate items on display.
On the entr) vay side,those same
lights shine through decorative
grids and mica panels (PhotoB).
WWW.
WO RKB
E NC H MAGAZI
N E. CO M
At one end of the cabinet sits
a pedestal that's wrapped with
"cultured" stone.Ir addsa unique
look to the project, and supports
a squarewood column that connects the cabinet to a bulkhead
above. Mitered trim adds personaliry to the column, as does a
light set behind another ser of
decorative grids (Photo C).
The bulkhead finishesoffthe
divider in high sryle, with panels
that match the display cabinet
and additional display lighting.
63
on eosy,yefelegcnt
DISPIAY
CABINET
Acturlly it'sjust r single piecc.
Decorative kerfs cut around the
perir-neterand near the nriddle rnake
it look like individual panels.The
face frame glr,redaround the panel
With that done, cut dadoesin the
top and bottom for the dividers
(Case Illustration,page 65).
Now bore holes in the casetop for
the lights (CaseTop Vieu, belotu).Then
perimeter cor-npletes
the look.
To create the look of individual
panels,set the table saw blade at 1/s"
cut openings in the caseback for the
decorative wood grids (Photo,page
65), and file the edges smooth.
and cut the decorative kerfs (Casr
Back Detail).
The next step is to rnake the
tongue-and-dado joints. Start by cut-
With this done, glue and screw
the case together. Then drill shelfpin holes in the ends and dividers.
Face IJp to the Frames - With
ting rabbets to fornr a tongue on
each end of the casetop and bottorr-r
(Tbn,qua& Dado Dctail, page 65).
Then, cut dadoes in the case ends
to accept the tongues.
the caseassembled,yoll can turn to
the face franres (BarA Partclnnd Facc
Framelllustrations,page65).The franre
pieces are similar or-r the front and
This displaycabinet startsasa cherry
plywood case built with sinrple
tongue-and-dado joints (Display
CabinetAssembly).A face frame on
one side createsopenings for three
doors.The other side also gets a face
flame that surrounds a plywood back
panel. Inside the case,vertical dividers
and glassshelvesform compartnlents
for display items.
To build the case,start by cutting
the plywood case top and bottor.n
(A), ends (B), dividers (C), bottom
supports (D), and back (E).
You'll notice in the Back Pancl
Ilhtstrationon page 65 that the back
appearsto be three individual panels.
DISPTAYCABINETASSEMBIY
back, but are installed differently.The
@
ToP
(3A"ply.x l 6Vz"x 627/a"l
@
TopEndEdging
xlV2,, xl8,'l
l3/4,,
Ve"ker(,
7e"deep
Doors
feoturesturdymortise-ondlenoniointsbut remoin
eosyto build (seepoge 67)
TopSupporh
l3/n"ply.x
3" x627/s"l
WoodGrids
on thebock
ponelprovideo
decorotiveoccent
(seepoge 66)
Innersfilessitflushwith
insidefocesof dividers
CASETOP VIEW
BqckPonarl
is instolledos on
ossembly
to simplify
construction
Cose
isbuiltof 3/4"
plywoodond
FoceFrome
coversthe cosefront ond
echoestheoppeoronce
of the bockponel
ioinedwith simple
tongue-ond-dodo
ioinis
Innerstilesflushwith
insidefocesof coseends insidefocesof dividers
64
wol{KIIENCH
D
FEBr{UARY
2005
#8 x l7z" Fh
WoodscrewJ
CASE
back frame is glued around the back
panel beJore
installation.The front frame
getsapplied to the casepiece by piece.
Note also that the face frames overhang the caseby t/q" on each end.This
holes,
deep
allows you to sclibe against the wall, if
necessary,
when you install the cabinet.
At the other end, the overhang forms a
recessto receivethe column pedestal.
To nrake tl.refranres,cut the rails (F),
outer stiles (Ci), inner stiles (H), toekick r:rils (l), and door stop (J) from
solid stock (cl.rerry,in oul case).The
toekick rails have a kerf on borlrends and
the top edge to ntiniic the back pane1.
That dorre,glue thc stilesand rails to
Cose
Boilbm
P/a" ply, x
the p11'woodback. Or-rcethe glue dries,
glue this asser-nblyto the case,ntaking
sllre to create the I/.+"overhangs.
Next, glue the fi'ont fi'anrepieces to
the case.Alieneach with the ends and
CoseDivider
l3/q"ply. x
1672"x 30"|
32"dodo
7a"deep
"-*lF+-]r
l6Vz"x 46h"1
CoseEnd
(3A"ply.x l6Vz"x34Vz"l
3/e"dodo,
%" deep)
Bottrom
Support
(3/a"ply.x 3" x 46VN'l
BACKPANET
(F)-t.-..--
R;I
(32"x Iu
x 46Vl'l
Bockedge
of cose
\
Grids
Po:1
Sy4"
[-llr
dividers asshown in the Sti/c,/DoorStop
l)ctail and7bp Vicrl on pase 64.
-lctz,,
Top It OffA rop conrpletes the
cabirret (Display CabirtetAssanbly).Cur
t_
thc nrain top (K) and two top slrpports
(L) fi'onr 3/a" plywood, then slue then'r
l/e'I
lu
tosether.Thc spacebetween the supports provides a channel for tl.rewiring.
Hardwoocl ec'lging (M, N) wraps
arounclthree sidesof the top. Make the
edging pieccsexrra long. rherr cut r
decorativekerfin the bottorn edge of
each one. Now nriter and trim the
edging, and elue it to the top.
nl
NOTE:Assemble
bockos o unit
beforemounting foekfl noil
7e"sowke
Tocose (3A,'x
7e"&ep
3r/q',x 46ll'l
FACEFRAME
Outer
Srile
l3/l' x I
x
l3/t" ply.x
46Vt" x29Vq"l
l+
l(4'+
Toekick
Roil'
e
Door Sfrop
l3/s"xY2" x297/s"l
Roil
l3h"x 1"
x461A"1
T
@
lu
Outer
Stile
)=
tr
13/4t'xI
vs"
I
x34Vz"l
Jisotiot
i" Support
Ioekick
Roil+
*To form the grid openings,drill
storterholes,ond removethe woste
witho iig sow.Topeprevents
chipout.
WWW.
)VORKBENCHMAGAZINE.
COM
Toekick
Roil
l3h x3t/n"
x46h"l
NOTE:Seetoo--
7e"sowker6,7e"deep
65
half-lapped
GRIDS
To createa unique decorativeelement on this project,
we added wood grids to the displaycabinet back and
the column (CridAssembly).Though
the displaycabinet
only has three openings,it hassix grids grids - three
outside and three inside. (The three inside are visible
thrcugh the cabinet'sglassdoors.)The column getsfour
rectangulargrids (one on eachoutside face).
When illuminated from behind, the grids glow with
a warm tone.That'sthanksto sheetsof mica. a mineralbasedproduct that may be best knovrrnto woodworkers
for its useinAre and Craftslamps.Seethe Sldebarbelow
to learn more about this unique material.
The grids in our project are made of mahogany,
which contrastsnicely with the cherry when stained.
Mahogany alsohastight grain that looks great on small
piecesand isnt likely to tear out asit's machined.
Each displaycabinetgrid consisbof eight dividen (O)
joined by half laps.You may think making 48 pieces
with perfectjoints would be tough, but it's not. Seethe
"Skill Builder" on page 54 to learn an easytechnique.
The column grids are rectangularinsteadof square,
asyou can seein the ColutnnAssemblyon page 70. So
you'll have to make three vertical dividers @) and five
horizontal dividers (Q) for each grid. Though these
piecesdifilbr in length from the cabinet grids, the spacing
and construction methods remain exacdy the same,
After you glue up and trim the grids,rabbet eachro
fit the opening (Photo,aboveleft).Then stain them (a
walnut tone looks great) and set them asidefor now.
ATobrm l/s" robbets
onhe grids,
clomponouxiliory
foceftrhe irble
sow fenceond butt the blode
ogoinstit. Settheblodeheightos
shown,thenpossoll bur edgesof
eochgridoverhe blode.
GRIDASSEftIBLY
Beau
the Slice
Peoplefomiliorwith mirnusuollythinkd lt oso mineruf
buti/s octuollyo groupof morcthon30 minercls.All of
thembrm os blo,cks
modeup of flot, fokycrptuls. The
t'onducentfokes
glorflwilh oolorsthotrongefromolmoct
cleorb brcwn.Puremicosheehoresimplysftcedfrom
ilreblocl<s,
butmoctsheet
micocvoihbletouoodurod<en
consists
of individuolfqkes
lominoted
usingresins.
You
concutfhesheetswith
o util'rtyknib. You'llftndmicoot
WooduorkersSupplf www.Wooduorker.com
ColumnGrid
NOTE:Gridsfor
disploycobinashown.
Columngridsshown
on poge20.
66
CABINET
DOORS
The doors of the cabinet feature solid cherry frames
with large glasspanels that let display items show through
(DoorAssembly).Theglass6ts into a rabbet cut in the back
face of each door after assembly,and shop-made stops
hold the glassin place.
Because the glass offers no strength to the door
assemblies,I decided to beef up the frames with
mortise-and-tenon joints (Mortke ETbnon Detail).They
don't take much longer than some "simpler"joints and
ensure strong doors that aren't likely to rack or rvvist.
Start by cutting the door rails (R) and stiles (S) to
width and length. Next, cut the mortises in the stiles.I
drilled out most of the waste using a 1/4" Forstner bit,
t
r
4" Door
Pull
GlossStops
l3/s"x3/g"mibr to
lengthl
Ctloss
(ldla"x
NOTE:Rout%
widerobbets,
3/s"deepin
bockof door
ofterossembly
then squared up the mortises with a chisel.Then, form
the tenons on the rails.You can do this many ways. I used
a table saw set up with a dado blade.
Now you can glue up the doors. I always dry-fit
them first to prevent any surprises, such as ill-fitting
tenons.Then glue them up and check for square.
After the glue sets,dri1l holes to receive the cups of
European-style hinges (Hinge Location Detail).These
hinges really make door mounting easybecausethey can
DoorSfilet-a)\ft,, x29nl
1110,,
95" Full-lnset
Self-Closing
Hinge
DOOR
l3A"x2t/q"xl2"l
be adjusted to fit the door perfectly in its opening.
Now cut the rabbet that will receive the glassin the
back face of each door.You can accomplish this easily
with a 1/4" rabbeting bit in a handheld router.To ensure
a smooth rabbet, make rwo passesto achieve the fuIl 3/8"
depth. Square up the corners using a chisel.Note: Have
the glass cutl/8tt narrower and shorter than the opening.
Finally, make the glassstops (T).The techniques in
the Sidebarbelow make it easy.Miter the completed
stops to length to fit the opening in each door. Then
install them with small wire brads in pre-drilled holes.
2
Smollports,suchos theglosssbps
usedin lhedoors,oreeosierb mqke
I
SECOND:
if youcutfiem fromlorgerblonks.
78\
-r
FIRSI:
Cu > l l < . ' Rip qloss
Sfortwitho longpieceof r/zusbck
sropree
I
h" xl/l".
obout5" wide.Chqmfer
bothcorners
kerf \1ffof onehce ottheroubrbble, Sfepl.
Nowyouconformtherobbasthot
luo"
fit overthe door fromes.Ihis tokes
lonfytwoculs,Step2.tirsl, cutq ke{
osshown,lhenmovethefunceondrip I Usethe fenceos o guide A One posswith the blode
thestopfree.Repeot
fie sbpsb moke ond exposeonly o portion roisedl,/a"formstherobbet.
moresfopsfromthesomeboord.
of thebit for o cleonchomfer. Anotherposscutsthestop.
I
I
,/F
WWW.
WO I{KBE
N C H MAGAZ
I NE.
C O M
t
67
overthetop
BULKHEAD
Mounted to the ceiling, the bulkhead featureslighting
to illuminate items sitting on the display cabinet. This
part of the proJect consistsof a pl1'wood top and bottom
with thick hardwood edging (BulkheadCaseAssembly).
Dividers separatethe top and bottom, except at the end
of the column.There, an open frame and a removable
panel allow accessto the column light (Photo,left, and
PanelA ssembly,p age69). Plywood panels with decorative
kerR enclose the bulkhead.
The idea is to assemblemost of the bulkhead in the
shop.That will allow you to lift it into piace (with help),
then reach inside and attach the bulkhead to the ceiling.
Then you simply glue the side panels in place.
Cut the Plywood - Get underway with the bulkhead by first cutting the plywood top (U) to size.Note:
I made this piece from leftover cherry. Becauseit won't
be seen,though,any 3/4" plywood will do. Next, cut rwo
bottom panels (V,W) to size from 3/4" cherry plywood.
A Thebulkheodhoso removoble
ponelthotollowsyou
to reochin ond chongethebulbin thecolumn.
Toovoid
heotbuild-up,
fluorescent
we usedo compoct
bulb.
The bottom consistsof rwo separatepanelsrather than
a singie long one.That's becausethe grain runs ddorr the
panels,rather than lengthwise.You'll see,once you cut
the side panels,that this ailows the grain to wrap around
the bulkhead.This means that thesebottom panelsneed
to be crosscutfrom the end of a olwvood sheet.
BUTKHEADCASEASSEMBTY
78"sowkerfs,7e"deep
@
TopPonel
l3h" ply,x l SVz"x 623/s"l
xrvz"Fh
!--*g
Woodscrew
DMder
P/a"pV,x lOVz"x l6Vz"l
e
3/+,'robbel,
Vz"dep
t/lcn kerl,
7e" deep
on moling
edges
.)
#8 xlVz"
Woodscrew
End FromeRoil
l3/l' x lth"
x l6Vz"
EndFromeStile
l3/l' xlVt" x7"l
71,,]'".,ltt' rs',sowkerfs,
(3h"ply.x 30%c"x l57z"l
68
" iJH;
""I','*f,T[."
BOTTOMPANETS
woRKBENcH
tr rssnuaR.y
2005
-l
In addition, each piece of side
Notice that the bottom panels
h a v e s l i g h r l y d i f f e r e n td i r r r c n s i o n s . edging gets rwo dadoes sized to hold
This aliows the decorative ker* in all the dividers (Dado Detail, page 58).
Before moving on to assembly,
the p:rrr: to rlign rfter rssenrbly.
Now cut the remaining pll.wood
cut four bulkheadend edging pieces
piecesfor the bulkhead: the dividers (DD) to size as well.
(X), sides(Y), accesspanel (Z), and
Access and Assembly - At the
colunm end of thc bulklcad, a frarttc
light-fixture panel (AA).
Here again,you'11need to bore replacesthe divider. Build the frame
holes in the bottom panelsfor puck
by curting rhe end [r;rrrrcrails (EE)
lights and cut the opening that will
later receive the light fixture panel
(BottomPanels,
page68).Also cut the
decorative kerfs in the bottom, side,
and :rccesspar-rels.
Now notch the corners of each
divider (Notdr Detail, pagt 68).Also
cut a notch for the wiring to pxss
through.Thcn rabbct thc licht-flxture opening arrd panel, and notch
To wrap up bulkhead assembly,
glue two pieces of bulkhead end
edging to the accesspanel.Glue the
other two to the exposed edges of
the divider at the opposite end of
rhe bulkhead. Mounr magnetic
catchesto the end frame, and screw
their strike platesto the accesspanel.
Note:You'll mount the side panels
1ater,after instaliing the bulkhead.
and sdles(FF) to size.Glue and screw
the frame together, and you're ready
to assemblethe bulkhead.
Assembly begins with gluing the
r o p . r n d b o t [ o r r rp r n e l e d g i n g i r r
place.I found it easiestto first miter
the side edging to length (making
sure to not cut offthe dadoed ends).
Thcn nriter the end cdgirrg ro fit.
ancl glue up the bulkhead top and
bottonr assen-rblies.
one corner (FixtrrrcPattclDctnil).
Once the glue dries,set the bulkAdd Edging - The br-rlkhead
side and end edging (BB, CC) start herd top assemblyon your bench
with the inside face up. Glue the
out as extra-long bl:rr-rks.The
dividers in place.Then glue the end
Bulklrcad Edging Dctail shows that
e:rcl.rpiece liets two different size lranre in position on top of the end
edging. Now spread glue on the
rabbets.One rllows the edging to fit
over the top (or bottonr).The other
receivesthe siclcpancls.Cut the rabbets as showrr in the P/roro,nqfit.
exposed edges of the dividers and
accessfi'rne, position the bulkhead
bottor.r-rasser-nbly,
and clamp it tight.
PANETASSEMBTY
c
A Useon ouxilioryfencebuttedogoinsto s/0" dodo
blodewhilerobbeting
theedging.Cutone robbet
withthebloderoisedIo 1/2", ond the otherot3/a,".
*l
lU4u3/4"J*
SidePonel
" x9Vz"l
l3/a"ply. x 3013/e
l{'ker|,
76"deep
W WW. WOI\K
I]E NCH
M AGAZINE.
COM
69
creotethe
COLUMN
createa strong glue joint. Cut the
rabbetsin the column front andback
(ColumnJoint
Detail),and then glue
up the column (Photo,le;ft).
Add the Tiim - Now you can
cut the trim pieces(II,lJ, KK, LL).
Rather than cut them to individual
length,itb bestto machinelong strips
of eachrype.Thenmiter them to fit
when instailingthe column.
One thing to be awareof is that
the beveledtrim at the top and
bottom is identical.It'sjust oriented
di{ferently (Tiim Detaik).
Head For the Finish - At this
point, I sandedall the parts of the
divider and stainedthem (l used
Bartley'sPennsylvania
Cherry).Then
I applieda coatofboiled linseedoil
and three coatsofpolyurethane.
A square column joins the display
cabinet to the bulkhead.The coiumn
has openings with half-lapped grids
to complement those on the display
case.Tiim at the top, bottom, and
)
\\
\
midsection adds visual interest and
coversany gapswhen the column is
installed (Column Assembly).
A The column
goes together
eosily,but the
glueuprequires
the useof quite
o few clomps.lf
you don't hove
enough,iustuse
bondclompsor
moskingtope.
By the way, this column length
fits a standard8-foot ceiling. Ifyour
ceiling height differs, measure from
floor to ceiling, then subtract 4 feet
to determine correct column length.
To build the column, cut the
front and back (GG) and sides(HH)
from 3/a"-rhickhardwood.Then lay
out and cut the grid openings.
The column is assembled with
rabbetjoints on the front and back.
These receive the side oaneis and
coruMN
,2*'
ASSE'VIBtY
ll3/a"
x 13h,,1314rt
miter to lengthl
('D
Bevel
Trim
ColumnFront/Bock
x6n x 481/z"l
1t14tt
j
j
BevelTrim
Ph" xlth -
LowerTrim
(1"x4"miterto fitl
70
lower
Trim
l3/l'x5rA"x48Vz"l
woRKBENcH
ft FEBRUAnv
2005
mokeo sturdy
@
PedeshlSide
l3/t"ply.xl3h" x34h"l
PedestolFroni
l3/n"ply. x l2Va" x34Vz"l
PEDESTAL
The stone-clad pedestal is one of the most interesting
fe:rturesof this prqect.And after all of the careful cutting and precise fitting you've done, you'Il be pleasedthat
the pedestal is simpie. It's just a plywood box clad in
This material bonds
cerrrentboard (PedcstalAssembly,).
well to the mortar that's used to attach the stone.
To build the pedestal,cut the front, back (MM), and
sides (NN) fronr 3/+" plywood.These parts are hidden,
so you crn rnake thenr from scrap plywood.
Assemble the pedestalby br,rtting the sidesbetween
the front and back and then screwing them together.
C)onrplete the pedestalby adding the front cladding
(OO) and side cladding (PP). Cementboard can be
scoredand snappedlike drywall.That meansyour cuts
nrisht not be exact, but it doesn't r.rlatter.Thiscladding
will get buried tinder the stone. Sir.nply screw the
cladding to the pedestal.
The Big PayoffWith the pedestal done, you've
tacklecl the hard parts of this project. Now you can
install the divider in your home, as shown on page 72.
A
I
c
(oseDividers
Supporls
D Botlom
Bock
E (obinet
F
Roik
G 0ulerSliles
H InnerSliles
Roil
I Toekkk
J
DoorStops
K
Iop
t Top
Supporls
M IooSidefdoino
N Toptndtdging
Grids
2
2
2
3/a"
2
3/t"
t
3/a"
4
4
2
3hu
2
3
3/t"
I
2
3/tu
3h"
3u
627/s" fteny Plywood
2
3/t"
IW'
63s/s" Geny
I
3/t"
lY2'
3/t"
r6w
3hu
3
4&/a"
34V2'
30u
46Y4"
ftenyPlywood
ftery Plywood
ftenyPlywood
fteny Plywood
46Vn" 291/a" ftenyPlywood
I
461h" fteny
I
34Y2' fteny
I
2gth" fteny
3r/a" 461/n" fteny
Y2" 297/s" fterry
t6w, 627/s" ftery Phwood
3/a"
3/t"
3/g"
18"
(herry
Eose
GridDividen 48
P (ol.GridVert.Divident 2
Y2"
3/s"
5Y4"
Yz"
3/0"
U/e"
o
Y2'
3/a"
Mohogony
33/a" Mohoqony
3hu
2w
t2'
(heny
3/t"
2Vt"
29u
(heny
3/g"
3/a"
(ol.Grid
Horiz.
Divider
20
Doors
R Door
Roih
6
Door
Sliles
6
s
T Gloss
Stop
I
Bulkheod
U
v
w
WW
TopPonel
lnnerBoltom
Ponel
0ulerBollom
Ponel
I
3h
I
3/{
I
3/q"
W. WO I{K IJEN CH MAGAZ
Mohogony
l8' (tl (heny
15V2" 623/s" fteny Plywood
3 | I3r4o" lSt/z' fteny Plywood
309/ro" lSVz" ftenyPlywood
I NE.
COM
SideClodding
#8 xlVz" (72"cemenlboord
Fhwoodscrew x 14" x34t/z"l
PEDESTAT
ASSEMBtY
Y
z
AA
BB
cc
DD
EE
FF
GG
HH
tl
JJ
KK
tt
o
l l .
r
e9
x
r6w
r6w,
^ l
Llooorng
is mode
fromVz"
cementboord
FrontClodding
fl/2"cemenlboord
x 133h"x341/z"l
PortOtyTWLMoteriol
DisolovCobine
(oseTopl8ollom
(oseEnds
NOTE:
I " cemenlboord
screw
\r'.
PorlOt'rTWLMoieriol
3/tu
2
lOV2'
3/t"
Sides
4
303/re"
3/tu
Aaess
Ponel
16V2"
I
3/{
lightFixfure
Ponel I
5V2"
Bulkheod
Sidetdging 4
l3/q"
2
Bulkheod
tndtdqinq 2
l3/a"
2u
3/t'
tndPonel
Edging
4
l"
3/t"
End
trome
Roih
lt/t"
2
3/t"
EndFrome
Stiles
2
lth"
€olumn
3/{
(olumn
Fronl/Bock 2
6rt
Dividers
16Y2'
9Y2"
9V2'
5V2"
ftenyPlwood
ftenyPlywood
fteny Plywood
ftenyPlyurood
635/e" (heny
l8u
fteny
9V2' $eny
16V2" (heny
7"
$eny
4gh" (heny
48V2" fteny
(olumn
Sides
lowerlrim
2
I
I
4"
36'
(heny
Bevel
Trim
t
3/{
l1/{
fteny
Middh
Trim
I
3/t"
l3/a"
Upper
Trim
I
lu
1V2"
36u
36u
38u
3/{
Sth
(heny
fteny
Pedestol
3/t"
hont/8ock 2
MM Pedeshl
Sides
NN Pedestol
2 3/{
I
oo trontdodding
wl
PP Side0oddinq
2
Y2"
(3,Ll#8 x 1lz" FhWoodscrews
( l l I B"x 36" AmberMicoSheet*
t e r 4"
12h" 34V2"
FkPlywood
13Y2" 34V2" tir Plvwood
133a"
14"
Double-Bor
Knob"
( l l 4" Uriliry
Pull"-Hinoes'*'*
or.)
35mm.95" Full-lnset
'120-uolt,
2O-Wott
PuckLighfi
'lte
n #941-2731ot Woodworker.com
341/2" (emenfboord
34V2" (emenfboord
Pdrult
\fM=
oi"tdrt
cuning
WorkbenthMoqozine.com
Diogrom
: m # O 2 A l8 . 1 0 ;- - . # 0 1 W 3 6 . 1I ; - - . - # 0 0 8 0 3 . 0 ,o1t L e e V o l l e y . c o m
7l
Instqllqtion
Detoils
'-- Bulkheod
@
Bulkheod
ToP
Toggle Bolt
'---3_:1?_1,---
llp
"Puck"
tight
Ailoch the columnby ioenoiling
throughthe columninto $e
cobinetlop. Thenbenoil intro
bulkheodot tropof lhe column.
Nexl, milrerthe kim pieceslro
lengthond noil themb the
cofumn /Colurnn Mounting Denil).
Setthe top on the disploy
cobinetond secureit from
underneothwith #8 x l7a"
Fh woodscrews.
Column
Topof
Disploy
Cobinef
Bevel
Trim
'\
lower Trim
6d Finish
-Noil
(olumn Mounting
Detoil
Posilionthe bulkheodon the
ceiling,then fosbn it by driving
#8 x 3" woodscrewsinlo ot leost
one ioistoverheod.Add toggle
boltsthroughthe ceilinglo ensure
securemouniing (ToggleBoh Denil).
Column
Tempororilyposilionthe column,then
loy out ond bore o hole in the bp so
the wiring con possthroughinto the
pedestrol.
Snokewiring from the
lower iunctionbox up throughthe
.'tolumn ond into the bulkheod.
"Puck"
tight
Disploy
Cobinet
Cut openingsin the disploy
cobinetond the pedestol
for o iunctionbox, then
securelhe pedestolto
$e cobinetusing
#8 x llh" woodscrews.
Align the disploy cobinet
underlhe bulkheod,then
screw fhe cobinet to the
woll ond to o 2x2 cleot
which is fuscned to the
tloor (Floor Clerlt De;toil).
72
w
WoRKIJINCH
]
IEIII\UAI\Y
20(]5
it'stimeforfinol
q
I Enlisro helperonduse 2x4
! "deodmon"to holdthebulkheodogoinstfie ceiling.Screw
throughloistswherepossible,
thenfill in with togglebolk.
'"1 Positionthedisploy
cobinet.
C. Shimit levelondplumb,fien
screwthecobinetb thewollond
floorcleot.
')
ftrew thepedestolb theend
,".)of thebose.Secure
ollwiring
ond routethewire thot runsup
thecolumnbeforeyouottochthe
cobinetlop.
.,.'lFishthe wiring up through
4' thecolumnondinb thebulkheod.Thenplumbthe column
qnd benoil it b thecobinettop
ondbulkheod.
fi Mier thetrimpiecesb length
'J oround lhe column,then
securelhemwith finishnoils.An
oir noilerdoesthiswithoutiorringtheossembly.
f; Dry-stockond trim eoch
Ll courseof culturedsloneto
geto tightfit. Then"builey''eqch
piecewith morbr qnd offix it to
fie pedestol.
Youcqnfind more
inhrmqfionoboutcultured
sbne,
plusfull drep-by-step
instructions
for instolling
thisuniquemoferiol
ot WorkbenchMogozine.com
WWW.WORKBENCHMAGAZINE.
COM
73
®
Issue 287
Volume 61
Elegant Entry Divider
Number 1
January/February 2005
MATERIALS LIST
MATERIALS & HARDWARE
Part
Qty
T
W
L
Material
Part
Display Cabinet
Case Top/Bottom
2
Case Ends
2
Case Dividers
2
#/4"
#/4"
16!/2"
16!/2"
#/4"
16!/2"
30"
Cherry Plywood
Bottom Supports
Cabinet Back
Rails
2
1
4
#/4"
#/4"
#/4"
3
46!/4"
1
46!/4"
29!/4"
46!/4"
Cherry Plywood
Cherry Plywood
Cherry
Outer Stiles
Inner Stiles
#/4"
#/4"
#/4"
#/8"
#/4"
#/4"
1
1
3!/4"
EE
FF
!/2"
16!/2"
3"
34!/2"
29!/4"
46!/4"
29&/8"
62&/8"
62&/8"
Cherry
Cherry
Cherry
Top
Top Supports
4
2
2
3
1
2
Cherry
Cherry Plywood
Cherry Plywood
N
Top Side Edging
Top End Edging
2
1
#/4"
#/4"
1!/2"
1!/2"
63%/8"
18"
Cherry
Cherry
GG
HH
II
JJ
O
P
Q
Grids
Base Grid Dividers
48
Col. Grid Vert. Dividers 12
Col. Grid Horiz. Dividers 20
A
B
C
D
E
F
G
H
I
J
K
L
M
Toekick Rail
Door Stops
46#/4"
34!/2"
Cherry Plywood
Cherry Plywood
!/2"
!/2"
!/2"
#/8"
#/8"
#/8"
5!/4"
6&/8"
3#/8"
Mahogany
Mahogany
Mahogany
2!/4"
12"
29"
Cherry
Cherry
18' (L)
Cherry
Glass Stop
1
#/4"
#/4"
#/8"
U
V
Bulkhead
Top Panel
1
#/4"
15!/2"
62#/8"
Cherry Plywood
Inner Bottom Panel
1
#/4"
31!#/16"
15!/2"
Cherry Plywood
W
Outer Bottom Panel
1
#/4"
30(/16"
15!/2"
Cherry Plywood
2!/4"
#/8"
Sides
Z Access Panel
AA Light Fixture Panel
BB Bulkhead Side Edging
CC Bulkhead End Edging
DD End Panel Edging
End Frame Rails
End Frame Stiles
Column
Column Front/Back
Column Sides
Lower Trim
Pedestal
MM Pedestal Front/Back
NN Pedestal Sides
OO Front Cladding
PP Side Cladding
6
6
S
T
Dividers
Bevel Trim
KK Middle Trim
LL Upper Trim
Doors
Door Rails
Door Stiles
R
X
Y
Qty
T
W
L
2
#/4"
10!/2"
16!/2"
Cherry Plywood
4
1
1
#/4"
#/4"
30!#/16"
16!/2"
9!/2"
9!/2"
Cherry Plywood
Cherry Plywood
4
2
4
#/4"
1#/4"
1#/4"
#/4"
5!/2"
2"
2"
1"
5!/2"
63%/8"
18"
9!/2"
Cherry Plywood
Cherry
Cherry
Cherry
2
2
#/4"
#/4"
1!/4"
1!/4"
16!/2"
7"
Cherry
Cherry
2
2
1
1
1
#/4"
#/4"
1"
#/4"
#/4"
6"
5!/4"
4"
48!/2"
48!/2"
36"
1
1"
1!/4"
1#/4"
1!/2"
36"
36"
38"
Cherry
Cherry
Cherry
Cherry
2
#/4"
#/4"
!/2"
!/2"
12!/4"
13!/2"
34!/2"
2
1
2
(34) #8 x 1!/2" Fh Woodscrews
(1) 18"x 36" Amber Mica Sheet*
(3) 4" Double-Bar Knob**
(1) 4" Utility Pull***
(3 pr.) 35mm, 95° Full-Inset Hinges****
(6) 120-volt, 20-Watt Puck Lights
13#/4"
14"
34!/2"
34!/2"
34!/2"
Material
Cherry
Cherry
Fir Plywood
Fir Plywood
Cementboard
Cementboard
NLINE Divider
Cutting
WorkbenchMagazine.com Diagram
Extras
*Item #941-2731 at Woodworker.com
**Item #02A18.10; ***#01W36.11; ****#00B03.01 at LeeValley.com
Page 1 of 4
Copyright 2005, August Home Publishing Company.
All Rights Reserved.
Elegant Entry Divider
®
Issue 287
Volume 61
Number 1
January/February 2005
CUTTING DIAGRAM
A
A
B
B
W
#/4" x 48" x 96" CHERRY PLYWOOD
K
E
U
L
L
D
D
#/4" x 48" x 96" CHERRY PLYWOOD
Page 2 of 4
Copyright 2005, August Home Publishing Company.
All Rights Reserved.
AA
Elegant Entry Divider
®
Issue 287
Volume 61
Number 1
January/February 2005
CUTTING DIAGRAM
Z
Y
Y
Y
X
X
Y
V
C
C
#/4" x 48" x 96" CHERRY PLYWOOD
F
G
DD
#/4" x 5" x 96" CHERRY @ 3.33 BD. FT.
I
I
T
#/4" x 5" x 96" CHERRY @ 3.33 BD. FT.
M
M
H
J
#/4" x 4" x 96" CHERRY @ 2.7 BD. FT.
R
R
R
R
EE
#/4" x 5" x 96" CHERRY @ 3.33 BD. FT.
S
S
N
KK
JJ
R
R
S
S
S
S
#/4" x 5" x 96" CHERRY @ 3.33 BD. FT.
GG
GG
HH
HH
#/4" x 12" x 108" CHERRY @ 9 BD. FT.
Page 3 of 4
Copyright 2005, August Home Publishing Company.
All Rights Reserved.
FF
®
Issue 287
Volume 61
Elegant Entry Divider
Number 1
January/February 2005
CUTTING DIAGRAM
P
O
Q
!/2" x 3" x 96" MAHOGANY
BB
BB
BB
BB
CC
CC
1#/4" x 9" x 84" CHERRY @ 10.5 BD. FT.
MM
NN
MM
NN
#/4" x 48" x 96" FIR PLYWOOD
OO
II
LL
PP
1" x 6" x 48" CHERRY @ 2.5 BD. FT.
PP
!/2" x 48" x 48" DUROCK
Page 4 of 4
Copyright 2005, August Home Publishing Company.
All Rights Reserved.
TABLE SAWS
The Latest(and Greatest)Choicein TableSaws
for the HomeWoodshop
.
TRUNNIONS:
Most of the sowsin this cotegory
hovecontroctor-style
lrunnions
(mountred
to the tobletop).
TheCroftsmontrunnions
ore morecobinetsow-like.
(lllushotion, poge 75)
BLADE
TIIT:
Thesehybridsows
hoveleh+ilting
blodes,
likecobinet
sows.
MOTOR
LOCATION:
The moiorson
thesesowsore
locotedinside
the boses,
connected
directlyto the
very serious woodworker has, at
one time or another, wrestled with
the question of whether their next
table saw (or perhaps their first table
saw) should be a contractor's saw or a
cabinet saw.
Contractor's sawsare an attractive choice
becausethey are relatively economical while
still being highly capable.But the power,
trunnions,
likeo
cobinetsow.
precision, and dependability ofa cabinet
saw are woflh every dime.It's a touglr choice.
It might seem that adding a third category of table saw - one that bridges
DUSI
Threeof these
4" dustportsin
cobinet.TheGenerol
Internotionol
hosthe
the gap between contractor's saws and
cabinet saws - would only serve to further confound the wavering woodworker.
But I don't think it has to.
On the contrary, after testing four of
these new "hybrid" saws,it's my consid-
connectingo 2%" hose
ihe cobinet.TheDeWolt
sowhosonlyo 21/l'dustport.
BASES:TwosowshovecobineFstyle
boses.Theother hvo hove "porfiol"
74
ered opinion that this is precisely the saw
that most home woodworkers should
have.And choosing from within this new
category is what this test is all about. But
before we get into the specificsofeach saw
and how it performed in our tests, let's
spend a few minutes clearing up just what
makes a table saw a "hybrid."
w o R K B E N c H f t p r s R . u a R . v2 0 0 5
Although each of the table sawsin
this test is considered r "hybrid."
you need only compare the Photos
at the bottom of this page to see
that these saws are hardly cast fronr
a single mold. But a closer look
dampening vibration and noise. In
most cases,manufacturers also use
the cabinet as an irnportant part of
the dust collection system by
building hoppers into the cabinet to
direct dust toward a dust port.The
one exception in this group is the
DeWalt.This particuiar saw has an
open cabinet and usesa shroud
around the blade to direct dust
toward a 2t/4" dust port (seethe
Ccbinel-llke Boses
The first similariry lies in the bases, Photo on page 79).
or cabinets,that support these saws
Molors
and house the inner workings.
Granted, there are r\,vo distinct sryles In terms of power, the motors on
revealsthat these sawsare similar on
nrany important counts (see the
Illusnailon on page 74).
representedhere, but in each case,
the cabinet is an integral part ofthe
saw (and not just a bolt-together
stand like that on a contractor'.ssaw).
This design makes for a sturdier
saw and goes a long way toward
T-=
-."';P.
This allows for shorter belts and
greater power transfer than the contractor design oft-ers.Attaching the
nlotor to a more solid structure further diminishes noise and vibration.
Trunnions
Most of these hybrid saws use the
same trunnions (the assembliesthat
hold the blade arbor in position
under the tabletop and alsoprovide
these saws are comparable to contractor'.ssaws- at or slightly below
the tilting action of the blade) as
their contractor brethren.The trun-
2 hp.And just like contractor'ssaws,
hybrids rypically use a single belt to
transfer power fronr the motor to
the arbor (compared to as rrany as
nions are bolted to the tabletop and
are snrallerthan the trunnions used
on cabinet saws.
Craftsman, however, nudged its
CRAFTSMAN
TRUNNION
saw one step closer to cabinet saw
quality wich a set of rttassivetrunnions that bolt to the cabinet rather
than the tabletop (Illustration, Ieft).
''Trunnion,
bolt
.l
three on a cabinet saw).'[he location
of the motor, however - inside the
cabinet and supported by the trunnions - is pure cabinet saw design.
to cobinet
This
configuration
offers a
couple of advantages,including
better vibration dampening and
easier adjustment. As a result, we'd
expect this saw to maintain an accurate setup more reliably than those
}'rary
with contractor-rype trunnrons.
Blode tilt
The most significantcabinet-saw
characteristic
that thesesawsborrow
is a left-tilting blade.Many woodworkers feel that left-tilting blades
are more user-friendlythan righttilt blades.In the past,left-tilt blades
were availableonJyon cabinetsaws.
lL .\
.l-ltyhrid
Sows Reviewed
Crqftsmon
WWW.WORKBENCHMAGAZINE.COM
Internqfionol
DeWqlt
75
Sow Setup
working speedsmoothly and quietly.The General International, in
particular, impressedme with its
purring, vibration-freeperformance.
Furthermore, I couldn't find a
singlepower switch in the bunch to
complainabout.They'reall mounted
within easyreach and are too large
to be missed.
With tools,just as with people, first
impressions count. And my first
impression of these sawswas good.
Each saw arrived well-packed and
complete with every part the manual
said I should find in the box.All of
the saws went together with relative ease.Only the Craftsman took
a little longer to assemble,but that's
only because this saw comes with
so many extras.
After putting the saws together,
my first test was to simply plug them
in and start them up. Not much of
a test. I know. but think of it as that
A feelergougeond o stroightedge
estoblished
the
flotnessof the tobleond extension
winos.
lesting Priodtles
'With
the introductions behind me,
I set my sights on gauging the reiative strengths and weaknessesof each
of these hybrid saws.
The first order ofbusiness was to
make sure each saw was tuned to the
same tolerances.This was quick
work, since most saws came out of
first handshake.
Without exception, the saws
started softly and powered up to
Crqftsmqn OR35504
-
Rock-solid
peokperconsfru€lion,
formonce,
o greotblode,ondthe
bestfencemoneyconbuy (ollfor
under$1,0001
eornedCroftsmon
the"Editor'sChoiceAword.'
Consider
this:Youcouldspend
oboutonother$ I,000 for o
bonofide cobinetsow ond
oll you'd goin is one more
horsepowen
Hordlyseems
worlh
it. We look for thistrobe o cotegory leoderfor Croftsmon.
*r&:
n.
d Twocost-iron
extension
wings,
,l2"
o
melomine
extension,
ond
o collopsibleoutfeedsupport
give thissow the lorgestworksurfoceof the bunch.
Price:
$950
HP:
13/a
volr:
120/240
Amps:
15/7.5
RPM:
3,450
Mox.Cut@ 90":
33/e'
Mox.Cut@ 45':
21/l'
Mox.Rip,Righfi
30u
Mox. Rip,L,efh
l8u
TobfeDim.:
27" x 56"
Wings:
Costlron
Blode:
40T Corbide
ATheCroftsmon
wostheonlysowin ourtest
group thot offeredo quick-releose
blode
guordond splitter.
76
woRKBENcH
!
FEBRUAnv
2005
the box spot-on. Only the Jet
requireda bit ofrweaking to get the
bladeparallelto the miter gaugeslots,
and the DeWalt fence neededa bit
offine tuning to bring it in line. Both
issueswere correctedin short order.
Next on the list was measuring
Ifa top isnt
the tabletopsfor flatness.
flat, you'll have a bear of a time
making accuratecuts.
Once again,I waspleasedto find
that most topswere indeeddeadflat.
The GeneralInternational,however,
showeda slight dish (.03") on my
first measurement(Photo,page76).
This turned out to be the resultof
the cast-ironextensionwings being
tipped up slighdy at their outside
edges.I was able to remedy the
problem by placing shimsbetween
the wings and the saw table.(I used
smallpiecesof dado bladeshimsfor
this.)After about 10 minutes of fiddling with it, I was ableto bring the
extensionw'ingsinto the sameplane
asthe main table.
After tabletopscame the arbors.
A wobbly arbor will resultin rough
cuts, lost horsepower,and undue
wear on a blade. I measuredfor
runout with a dial indicator and a
calibration disc (Photo,ngftt).None
of the saws exceeded .005" of
runout, which is well within acceptable range. The Craftsman and
DeWalt sawsturned out to be particularly steady,with each showing
only .003" of runout.
Arborrunoutwos meosured
usingo diol indicotor
disc,
on o mogneticboseond o colibrotion
Genercl lniernqfionol 50'220Ml
Thetobleon this sow required
to getthewings
someshimming
in linewith the tuble.And rhe
fenceon thissow left
o littleto be desired. *
Butevenif you spend
$l0O morebr the optionol
Biesemeyer-stylehnce
ondo bw
thisisstillthemost
buclaftr shims,
ofbrdoblesowin thebst. And in
lightof oll ib ofter shongpoinis,it
thehonorof 'TopVolue."
deserves
Price:
$ZSO
HP:
2
110/220
Volts:
Amps:
11.4/5.7
RPM:
3,450
Mox.Cut@ 90':
35/to"
2s/to"
Mqx.Cut@ 45":
Mox. Rip,Right
301/2"
13s/s"
Mox.Rip,lefh
TobleDim.:
27" x 44"
Wngs:
Costlron
Blode:
None
iqhr
3 1 6l b s .
WWW.WORKBENCHMAGAZI
> TheGenerol
lnternotionol
sow offerso
choiceof connectingo 4"
hoseto the cobinet,or o 21/l'
hoseto o shroud
oroundthe blode.
NE. COM
lThe bevellockis in on
unusuollocotionon
thissow, but provides
o solidholdon the
bevelsetting.
Guttlng Pcrlormcnce
I Ripping2"-thickwolnui reveoledthe power of
eochof thesehybridtoblesows.
After a full day of assemblingand
tuning the saws,I was anxious to ger
dornmto the realbusinesoftable saws:
cutting wood. So I sarted sftaight in
ripping 2"-thick walnut boards.
I was primarily interestedin the
power these sawsturned out, but
also wanted to get a senseof cut
qualiry.To ensureI was comparing
sawsand not blades,I equippedeach
sawwith an identical 60-tooth blade.
On the power score,only one
sawdisappointed.
The Jet SuperSaw
was unable to complete a rip cut
without tripping its overload fuse.
The restof the sawsin the testpoweredthrough theserip cutswithout
any trouble whatsoever.
In all fairnessto theJet, ripping
a long, thick board with a 60-tooth
blade is asking a lot. And when I
slvitched to a 24-tooth rip blade,
the saw performed admirably.So
while power may be an issuefor the
Jet, it's not a crippling weakness.
As far ascut quality goes,I didnt
find any clearwinner, asall the saws
producedadequatelysmooth cuts.
]enceg & tlter
Gcugeo
In addition to power ripping, I performed a variery of other cutting
operationsthat were intended to
gaugethe accuracyof the fences,
miter gauges,guards,and splitters.
The fencequestionwasreallyno
contest,astherejust isn't any better
Jet 3301
TheJetSuperSow
is q sbut bble
sow (onlythe Croftsmon
weighs
morclwithsomercolstrrong
poinls,
like superiordustcollecfionond
fit ondftnish.
excellent
Unfortunobly,thesqwprovedo
bit underpowered
during our
testing,ond I hove to odmit to
beingskepicoloboutthedurcbiliry
of the belt"drivenblqdelih (lnset
Phoiol.Inshorl,thissowisn'lmy
firstchoicein thiscolegory.
ATheJetblodeguord hos independentlymovingsidesthotofferexcellent
visibilityond increosedsofety.
Price:
$1,000
HP:
13/a
Vofts:
115/230
Amps:
12/6
RPM:
4,000
Mqx.Cut@ 90':
31/eu
Mox.Cut@45":
21/a"
Mox. Rip,Righ*
323/tu
Mox. Rip,lefh
8u
TobleDim.: 27" x 413/l'
Wings:
Costlron
Blode:
None
Weighr
398 lbs
<A big questionmorkon theJet toble
sow is theirbelt-driven
blode lift.Thisis
one
more
mointenonce
item.
iust
78
woRKBENcH
tr FEBRUARy
2005
The good news is that General
fenceto be had than a Biesemeyer,so
Crafsman getsthe nod on this count. offers a Biesemeyer-stylefence asan
Nonetheless,theJet and DeWalt option on this saw,and it only raises
fencesare pretty good.'While not the price about $100. I highly recquite assmooth or rock-solid asthe ommend this option,since this will
Biesemeyer,they slid reasonablywell, srill cost lessthan the other saws.
Miter gaugeswere a mixed bag.
locked down parallel, and only
deflectedunder significant pressure. Jet and Craftsmaneachincluded an
The General International's aluminum fence with their miter
fence,on the other hand,lefta little gauge.Craftsmanincluded a stock
to be desired.My chief complaint hold-down and movable stop with
is that the front fence rail came in their miter gaugefence.TheJethad
two piecesthat were joined by a setscrewsin the miter bar for snugcoupler. Not surprisingly,the scale ging the fit in the miter slot.
None of the miter gauges,
wasonly accurateon one sideof the
joint.As soonasthe indicatorcrossed including the ordinary versionsfrom
the joint, it was offby about 3/te". GeneralInternationaland DeWalt,
This fencealsohad a tendencyto tip showed any excessplay in their t Eochmitergouge wos checkedfor ploy in the
miterslotond for generolquolity.
offthe rail asI slid it back and forth. resDectivemiter slots.ffi
DeWqlrDW746X
<-
TheDeWoltDw746 is fie sow
fiot stqrtedthe hybridcrqze.ll
nowhoseornd o well-deserved
reputotionos o good sow with
olmostunlimited
expondobility.
In order b remoincompetitve
ogoin$thenewcomers
to thiscoF
€ory, however,DeWoltwillhove
thesbmpedsbelwings
b reploce
withcosFiron
wingsondupgrade
to o fully enclosedcobinetwith
enhonced
dustcollection.
V Theexpondobility
of the DeWolt- wlth
occessories
suchos
thisslidingcutoff
toble- is one reoson
thissow hosgoined
sucho following.
Only theJetoffers
Price:
$900
HP:
13/a
Volts:
120/240
Amps:
15/7.5
RPM:
3,000
Mox.Cut@ 90":
31/au
Mox.Cut@ 45':
21/a"
Mox. Rip,Righft
30u
Mox. Rip,llefh
16
TobleDim.: 27" x 403/l'
Wings:
Stomped
Steel
Blode:
30TCorbide
A DeWoltcould improvethistoble
sow with cost-ironextensionwings
ond on enclosed
cobinet.
WWW.WORKBENCHMAGAZINE.
COM
E
,YIAIERIAUi
ThePressure-Treoted
TRANSITION
A Production
of CCAtreotedlumberstoppedo
yeorogo. By now,everything you will find on
lumberrocksis treoted
wifhnewchemicols.
Preservolive
KEYDIFFERENCES
ABOVE
GROUND
Preservolive
Rebnfion
level
AmericonWoodPreservers'
Associofion
StundordsCodes
Croneqrc the doysof simplyloodingyour cort with pressure-treobd
lumberond knowingit will rcsistdecoywherwer you useit.
Thesedoysthe treotmentlwels wry so you'll needto consultthe
endtog of eochboordto ensurethotit mqkhesyourinbndedusoge.
lhe illutraimobove isoneexompleof on endtog.Ifte designof these
bgs convory widely,butfte criticolinformofionremoinsthesome.
T}e mostimporbntthingto lookfor is theopplicotion.
Eochboord
will berotedfor "GroundConhct" (forboordsthotwillbuch thesoil
or be buriedl,'?bove Groundo(br deckingnotin directconbctwith
soil),"Foundofion,"
somelimes
obbreviohdos"FDN,,or ,,pWF,,for
usein wood foundotions),
or "SoltWolerolfor directcontoctwith
sohwobr, suchqs in piersor docksl.
84
One full year efter the voluntary ban on Chromated
CopperArsenate(CCA) went into effect,it's safeto say
that the surplus of CCA-treated lumber has been
exhausted,and alternative materialsnow fill the racksat
your local lumberyard.That makesit more important
than everthat you understandthe new pressure-treated
lumber and how to use it to your greatestbenefit.
Most of the new "envilonmentally friendly" pressuretreatingchemicalsare copper based,justlike CCA.The
differenceis that thesenew chemicalsdo not contain
inorganic arsenic,which is the ingredient that brought
CCA such fierce criticism.
Currently, products treated with Alkaline Copper
Quatenary (ACQ-C, ACQ-D, or ACQ-D Carbonate)
and CopperAzole (CBA-A or CA-B) comprise most
of the CCA replacementmarket.
Both of theseffeaunentswork like CCA in that they
eliminate wood fibers as a food sourcefor insectsand
fungus,which in turn contributes to wood decay.And
all indications are that theseffeatmentsare as effective
as CCA in preventing decayfor many decades.
Despite the similaritiesbetween new pressureffeaffnenb
and the old CCA, there area few important differences
to take note of.
Cost -The new stuffis going to costyou
about 15 to 20 percentmore.Thisis due to the increased
copper content.The new chemicals,lacking the inorganic arsenicof CCA, rely almostentirely on copper as
the fungicide and pesticide.Copper is expensive,so the
cost of the lumber hasto reflect that.
Varyrng Grades - The second difference is that
not all pressure-treatedlumber is createdequal these
days.In the past,the relatively low cost of the CCA
chemical made it possiblefor manufacturersto pump
every board full of the sruff.
Now, becauseof the higher cost of new chemicals,
manufacturersarea bit more modestwith is application.
The key is to check the end tagsofthe boardsto ensure
they are rated for your intended use(Sidebar
at leJt).
Corrosion Danger - The most important difference,though, is that new chemicalsaremuchmore corrosivethan CCA. So the hardwarethat worked fine in
CCA wont standup to the new chemicals.Thatmeans
hardwareselectionis essentialto the longevity of your
outdoor projecs.To he$ sort that out, we've put together
a guide for selectinghardware to be used with pressure-treatedlumber that begins on page 86.
woRKBENcH
D
FEBRUARy
2005
H
TYIATERIATS
NArrs
& scREws
The treatedwood industry recommendshotStqinless
SreelNoils dip galvanizedor stainless
r1.sl nailsand screws
ore ovoiloblein limitedsizes in pressure-treated
lumber. lJnfortunately, as
ond stylesond ore roughly clear as this guideline seems,trying to find
threetimesos expensiveos this hardware among the racks and racks of
golvonizednoils. nails and screwsin a rypical home center can
be a confusingand frustratingexperience.
Galvanized - One important point I
learnedwhile shoppingfor nailsand screwsis
that "galvanized" and "hot galvanized" are
nol the sameas"hot-dip galvanized."
So unless
the labelspecificallysays"hot-dip galvarnzedl'
HoFDipGolvonized
Noils the hardwaremay not be recommendedfor
oreeosyto findond reosonobly pressure-treated
wood.
priced.Justbe surethelobel
Another way to know if the nailsor screws
reods"hotdipgolvonized"
ond you're looking at areappropriateis to check the
not iust"golvonized"or packagingfor the phrase,"ConformstoASTM
"hotgolvonized." A153."This tellsyou that the zinc coating on
the nails or screwsmeetsthe standardsset by
the AmericanSocietyforTestingandMaterials
for usein pressure-treated
lumber.
Of course,it may be assimple asfinding a
box of nails or screwsthat proudly proclaims
itself,"Recommended for use in ACQ and
HoFDipGolvonizedScrews all other pressure-treatedlumber."
ore hord to find ond oftenof
Ifyou canfind any or all ofthosephraseson
poor quolity.Betterchoices a box of screwsor nails,then you've found the
i ncludeMcFeely'sNo-Co-Rode right hardwareand canbuild with confidence.
screw /shownhere)or polymerStainlessSteel - Stainlesssteelscrews
cootedscrews(shownbelow). areeasyto find, but they areincrediblyexpensive. Stainless
steelnailsarejust asexpensive,
but the choicesaremore limited. Fortunately,
most industry information saysthat stainless
steel hardwareis only necessaryunder the
most severecircumstances.
There is no ASTM standardfor stainless
ore quicklybecomingthe steel,but Type 304 or 376 stainless
steelfasscrewof choicewhen working tenersarerecommendedindustry-wide.Type
with pressure-treoted
lumber. 316 is for the most corrosiveenvironments,
Mony brondsevenoffer such as marine applications.In most other
worrontiesogoinstcorrosion. cases,Type
304 will suftice.
Once again,you'll have to check labels
closely to find the rype of stainlesssteelor a
phrase that specifically saysthe hardware is
intendedfor usein ACQ and other pressuretreatedmaterial.
Other Screw Choices - Hot-dip galvanized screwsare prery rare.And even if you
ore the bestchoicefor find them, you may not want to use them.
fosteningpressuretreoted
moteriol The thick zinc coating that resultsfrom this
in ony environment.
Theirhigh processcommonly clogsthe threadsand the
price,however,mokesthem recesses
in the headsof the screws,so several
improcticolfor mostproiects. screwsin every box will be unusable.
86
A Noils ond screwsintendedfor use in new
pressur+treoted
lumberwill be lobeled"ASTM
Al53" or specificolly
mentionnew chemicols.
200HouRs
Thesephotos
cleorlyshow the
imporlonceof
usingthe right
fostenersin
treotedlumber.
To the left ore
ThickCootnoils
from StonleyBostitch.Notice
how they hove
corrodedfor less
thonthe noilson
the right,which
nove o more
typicolzinc
cooting.
4OOHOURS
600HOURS
Fortunately,there are alternativesbeyond
costly stainlesssteel. For example,McFeely's,
offers its No-Co-Rode screws,which are
mechanicallygalvanizedbut still meetASTM
,\153 for zinc coatings.McFeely'ssellsthese
screwsfor use in all pressure-treatedwood,
but it doesnot warrantagainstcorrosion.
Another popular alternativeis polymercoatedscrews.These are availablefrom several
manufacturersand tend to be priced between
galvanizedand stainless
steelfasteners.
At present,there is no ASTM standardfor
polymer coatings,but severalindependent
testshave confirmed the corrosion-resistant
performanceof thesescrews.Your
bestbet is
to look for screwsthat offer a warranty and
specificallystatethat they canbe usedin pressure-treatedlumber.
woRKBENcH
!
rEnnuanv
2005
E
'YIATERIAlS
CARRIAGE
BOTTS
& tAG SCREWS
.rr,:jii
These larger fastenersare rarely marked as clearly astheir smaller counterparts,
so searching for any reference to standards,fypes, or warranties is a futile
eft-ort.According to an ASTM customer service representative,however, most
of the galvanized and stainlesssteel fastenersyou'll find in hardware stores
will do the trick in all but the most demanding environments. (Marine appli-
log Screws
ore rorelymorkedwith type or ASTMstondords. cations absolutely requireType 316 stainlesssteel.)
Fortunotely,
mostgolvonizedor stoinless
steellog
screwswill hold up well in pressuretreoted CONNECTORS
lumber,occordingto o representotive
hangers,hurricane
hurricaneties,
post anchors,
fromthe Joist
ties, post
anchors,and
and
Joisthangers,
AmericonSocietyfor Testing
ond Moteriols. orhermeraiconnecrorsareevervbrr assusceotibie
to corrosionfrom the new pressure-trearing.n.--
icalsasscrews
andnails.Ardt j::"':l:t'
ore olso poorlylobeled.Butthe golvonizedond
stoinless
steelhordworesold in homecenrers
ond hordworestoresshouldperformwell.
MOREINFORMATIoN
AmericonWood-Preseryers'
Associolion
owpo.com+ 334-874-9800
Southern
PineCouncil
SouthernPine.com
+ 504-443-661
2
Environmentol
Protection
Agency
epo.gov+ |202l'272-0167
FASTENER
SOURCES
McFeely's
McFeelys.com
+ 806443-7937
StonleyBostitch
Bostitch,com
+ 800-5566696
PrimeSource
PrimeSourcebo.com
+ 800-67
6-7777
Senco
Senco.com
+ 800-543-4596
USPShucturolConneclors
USPConneciors.com
+ 800-3
28-5934
SimpsonStrong-Tie
StrongTie.com
+ 800-999-5099
88
2
and screws,hot-dip galvanizing or stainlesssteel offer the solution.
Once again, don't mistake standard galvamzed connectors with hot-dip galvanized.
To be absolutely certain that the connectors
you're using are hot-dip galvanized,look for the
"TZ" line of fasteners fronr USP Structural
Connectors or the "ZMax" line from Simpson
Strong-Tie. Otherwise, look for a label that says
the connectors conform to ASTM A653.
Both USP Structural Connectors and Simpson
Strong-Tie also offer stainlesssteel connectors,bu
these may be a little more dif1icult to find on store
shelves.If you live in a coastalenvironment or are
planning a narine structure,you may need to speciai-order these from a local building supplier.
FTASHING
fhz^
.f
Jr-
,/,{F
:7
t
A Stoinless
steelond
golvonizedconnectorsore ovoiloble
from USPStructurol
Connectors
ond
SimpsonStrong-Tie.
The most difficult piece of hardware to
locate rnay very well be flashing. Standard
aluminum flashing absolutely cannotbe
used in contact with the new pressllretreated lumber. It will start corroding
almost as soon as you attach it.
The aiternatives are flexible membrane flashing, galvanized flashing, or
copper flashing.
None of these three is in ready suppiy
at the home centersin my area,and even
the commercial building supplier I turn
to for hard-to-find materials had to special-order copper flashing (Photo,right).
PLANAHEAD
Clearly some advance planning is in order
if you hope to gather all the hardware
necessaryfor a long-lasting outdoor project
built with new pressure-treated lumber.
The Web sitesand phone numben listed
in the Box at left will be excellent resources
tffifor information and materiak.
A Youmoy hoveto speciolordercopperfloshingfrom
o buildingsupplier.
WORKI]ENCH
tr FEBRUANV
2OO5
ffiTools$frW
ffiPRODUCTS
polm-sized
DRIVER
CORDLESS
The new Skil iXO cordlessdrill/driver is a palm-sized
powerhousethat holds its battery chargeevenafter rwo
yearsofnon-use.
Weighing in at just over 10 ouncesand measuring
about 51/z"square,the iXO is the ideal tool to keep in
a drawer for those occasionalfix-it jobs.
A 3.6-volt Lithium Ion battery providesthe power.
The biggest advantageto a Lithium Ion battery is its
abiliry to hold a chargefor an extendedperiod of rime
when the tool isnt in use.
Other user-friendly featuresinclude a forward and
reverseindicator to keepyou turning in the right direction, and a soft-grip handle for com-fort.
The iXO comes packagedin a carrying casethat
oflersa variety ofstorageoptions.Thecasecan sit openfacedinside a drawer,can be mounted to a wall or any
other flat surface,or can simply be laid down just about
A TheiXO,with its 34
bits,200 fosteners,
ond
o botterythot'sreodyon
demond,is o perfect
odditionto ony "cotcholl" drower.
anylvhere on its non-marring soft-grip feet. The kit
includes a 34-piece bit set with a variery of Phillips,
standard,Torx,andAllen bits, aswell as200 fastenersof
various typesand sizes.
Look for the iXO cordless drill/driver on
Amazon.comor other major retailersfor around$50.To
learn more,visit Skil.comor call 800-754-5999.
lqminote
TRIMMER
Ridgid hasraisedthe bar for laminatetrimmers
with a model that featuresa 6-amp motor (the
second-mostpowerfi.rlin the category)an! variable-speedcapabiliry(the only laminatetrimmer
with this feature).
The R2400 alsoboastsa microadjustablerackand-pinion height adjustment,rwo edgeguides,
and the Ridgrd cord packagethat consistsof a 72foot rubber cord with an illuminated tool icon
on the plug and a hook-and-loop cord wrap.
Look for the Ridgid R2400 laminate trimmer
at F{omeDepot for around$120.
Visit Ridgid.com or call 800-474-3443 for
more information.
<Ridgid'snew lominotetrimmerfeotures
o powerfulmotor,precisionodiustments,
ond vorioble-speed
operotion.
94
SHARPENING
Thiscompoclshorpening
system
turnsony drill
pressinlo o copoblehoningond shorpening
center.TheShopStrop
kit includes
thesonding
plofbrm,sixsondingdiscs,leofierhoningwheel,
honingcompound,
lool resl,ondon inshuciionol
video. The kit sellsfor obout $100. Visit
or coll877-2202699ic leommore.
Bigleg.com
woRKBENcH
tr FEBRUARY 2005
PRODUCTS
coldheqt
SOLDERING
The Cold Heat soldering iron is a cordlesstool that
seemsto def,r the laws of nature.Poweredby four AA
batteries,the Cold Heat tip reaches800o in about one
second.It cools down almostasquickly,sincethe tip is
heated only during active soldering.It's possibleto
solder up to 700joints on a singlebattery pack.
The Cold Heat tool is perfect for electricalprojects
using 18- to 24-gatge wire and other small
projects where precision soldering is
required,such asjewelry repair.It works
with regular,lead-free,or silver-based
solder &om 18 A'WG to 24 A'WG, but
performs best with solder of 18 AWG
(0.040inchesor 1 mm in diameter)to
20 AWG (0.032 inches or 0.8 mm in
diameter).However,you should determine the solderwire gaugebasedon the
A Compoctond cordless,the Cold Heotsoldering
tool heotsond coolsomozinglyfost.FourAA botteriesprovidethe power source.
requirements
of yourproject.TheCold Heatis not recommendedfor solderingoflarge metalliccomponenc that
require a lot of heat transfer.
Expect to pay about $20 for a Cold Heat soldering
tool, alongwith a carryingcaseand one replacementtip.
Visit ColdHeatools.comor call 800-398-8866for more
information or to purchasea tool.
ryobi'sone+
SYSTEM
AA plug-in
lonyordwitho
nyloncorryingstropond o
melolclospfor honging
thetoolis
included
witheveryindividuol
tool
in theRyobiOne+system.
96
Ryobi's new One* system is
designedto offer consumersnew
freedomto createtheir own cordless
tool combinations without purchasingduplicate tools or paying
extra for batteriesthey don't need.
Ifyou alreadyo\^rnany ofRyobi's
18-volt tools,you cannow add individual tools to your assortment
without the additional expenseof
another battery and charger
yet another flashlight.
Of course,Ryobi will still be
olfering severalcordlesscombination kits, including a starterkit that
contains a 1/2" drill, circular saw,
flashlight,two batteries,and a onehour chargerfor $119.
From there you can grow your
tool setby choosingfrom any of
the 22 tools sold individually,
Additional batteriessellfor 925 each
or r'wo for $40.Ryobi tools are available exclusivelyat Home Depot.
bosch
IMPACTOR
Bosch has jumped into the
hottest new category of
cordless tools with the
introduction of three new
impact drivers.The Bosch
Impactorline includes9.6-,
12-, and 14.4-voltmodels.
All three tools boast the
most speedand power availablein their respectiveclasses.
Each alsofeaturesa1/+t' hex
quick-change chuck,
a
trigger-activated LED work
A Boschoffers the
light, and a belt clip. Impactor
highestspeedond
kits come with two NiCad
power currently
batteries,a one-hour charger,
ovoiloblein three
and a carrying case.For more
sizes of cordless
information, call 877 -267impocfdrivers.
2499 or visit BoschTirols.com
woRKBENcH
fl
FEBRUARY
2005