1
s
HiPath 4000
Hicom 300 E/300 H
Operating Instructions
optiset E standard
optiset E advance
optiset E advance plus
optiset E advance conference
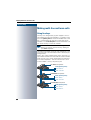
About these Operating Instructions
These Operating Instructions describe the use of the optiset E standard, optiset E advance, optiset E advance plus und optiset E advance conference telephones in conjunction
with the HiPath 4000 Communication Server, Version 1.0 and Hicom 300 E/300 H, all Versions.
How to use these Operating Instructions
Step by Step
Q
W
S
or
The operating procedures are presented in a
logical sequence in the "coloured" column. The
symbols used have the following meanings:
Lift the handset.
Replace the handset.
Enter number or code.
Press the setting keys on the telephone.
Service Menu
Press the key.
Speaker
Press the key which is lit.
Executive
Press the key which is flashing.
Consultation?
The selection option is shown on the display.
Confirm with key
.
Ringer pitch?
Look for the selection option.
Press keys
until the selection option
appears on the display.
Then confirm with key
.
Displays
Callback?
Please dial?
>
Line 1 contains instructions or acknowledgement
messages, depending on the particular situation.
Line 2 contains selection options for functions,
which you can confirm by means of
. If the
character ">" is visible on the right-hand side, there
are further selection options, which can then be
accessed using
.
2
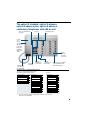
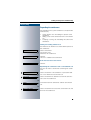
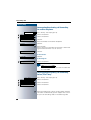
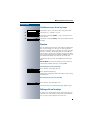
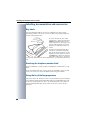
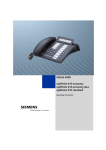
The optiset E standard, optiset E advance,
optiset E advance plus, optiset E advance
conference telephones with add-on unit
Keys for telephone
settings
Display
Fixed function
keys
Handset
Loudspeaker
for open
listening
(only for
optiPoint
500 standard)
"Shift"
key for
second
key level
Dialling
keypad
Key for
confirming
a function
Key for
scrolling to
functions
Handsfree
conversing
microphone
Permanently assigned function keys
for basic, enhanced-convenience,
multi-line and team functions:
Variant:
Service Menu
Call pickup
Call pickup
Redial
Call park
Call park
Mailbox
Disconnect
Disconnect
Speaker
Show used line
Ringer cutoff
Privacy
Hold
Exclusive hold
optiset E key module
with additional programmable keys
*
*
*
*
*
Show used line
Ringer cutoff
[Line] own
[Line] other
[Line] other
* "keyset" configuration (Æ page 66) with line keys on the
optiset E key module.
3
Important Notes
Never operate the telephone in an environment where there is a risk of
explosion.
Only use Siemens accessories (Æ page 89). The use of other manufacturers’ accessories may be dangerous and will render the warranty and
approval null and void.
Never open the telephone set or an add-on unit. If any problems arise,
get in touch with System Support.
The telephone must not come into contact with abrasive liquids or liquids which are liable to discolour it, such as tea, coffee, fruit juices or
soft drinks.
Care of the telephone Æ page 91.
CE label
The CE symbol certifies compliance of this equipment with the EU directives.
Environmental label
This device has been manufactured in accordance with our certified environmental management system (ISO 14001). This process ensures
that energy consumption and the use of primary raw materials are kept
to a minimum, thus reducing waste production.
4
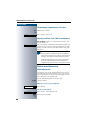
How to activate functions
Step by Step
How to activate functions
... directly
Certain functions can be selected directly in the idle
state, for example:
Make your selection with
with
.
Var. call forw. on?
and confirm it
Other functions can be selected directly in certain
call situations.
You dial a number but the other party is busy:
Confirm with
Callback?
.
or
Make your selection with
and dial another number.
Dial again?
, confirm it with
... via the Service Menu
First press the "Service Menu" key. You are then offered
a number of selection options. Example: suppressing
the number display at the called party (Æ page 22):
Press the key.
Service Menu
OI Use the service code in order to switch to the "Display
suppression" function. The service codes are listed in
the quick-reference operating instructions (annex).
or
Service Menu
Press the key.
Functions?
Make your selection with
with
.
Display suppression?
Select again with
and confirm it
and confirm with
.
... using a function key
You can activate directly a Hicom function which you
have stored on a key (Æ page 47), e.g.
Second call on/off
Press the key. The function is executed.
5
How to activate functions
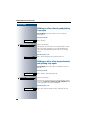
Which functions can be used?
Basic and enhanced-convenience functions
You can use all the basic and enhanced-convenience Hicom 300 H functions which are offered to you on the display, in the Service Menu and on
the function keys.
Additional multi-line and team functions
Æ page 66f.
These are configured by System Support. You can use the multi-line and
team functions in addition to the basic and enhanced-convenience functions. A telephone with line keys is identifiable by the fact that your number
and the numbers of your colleagues have been assigned to line keys. You
have access to all lines and you can also make calls via several lines simultaneously.
The individual telephone can also be configured (as a keyset) for multi-line
operation, e.g. for use by non-team members or by brokers who are in contact with clients on several lines simultaneously.
Additional executive/secretary functions
Æ page 83f.
These are configured by System Support. You can use the executive/secretary functions in addition to the basic and enhanced-convenience functions. A telephone with an executive/secretary configuration is identifiable
by the "executive" or "secretary" line keys for direct calls to the executive or
to the secretary’s office. An executive/secretary telephone also has an "intercept" key, while a secretary’s telephone has a "pickup" and a "deputy"
key.
How to make best use of your telephone
•
•
No doubt you have colleagues or outside business associates to whom
you make frequent calls. You can save a great deal of time and effort by
storing these numbers on keys (Storing a speed dialling number on a
key Æ page 45).
All too often the number you have dialled is engaged. But afterwards
you are extremely busy and completely forget to try ringing it again.
Our advice: make a habit of using the "Callback" facility (Æ page 38).
Basic and enhanced-convenience functions
6
Contents
How to activate functions . . . . . . . . . . . . . . . . . . . . . 5
... directly . . . . . . . . . . . . . . . . . . . . . . . . . . . . . . . . . . . . . . . . . . . . . . . . .
... via the Service Menu. . . . . . . . . . . . . . . . . . . . . . . . . . . . . . . . . . . . . .
... using a function key. . . . . . . . . . . . . . . . . . . . . . . . . . . . . . . . . . . . . . .
Which functions can be used? . . . . . . . . . . . . . . . . . . . . . . . . . . . . . . . .
Basic and enhanced-convenience functions . . . . . . . . . . . . . . . . . . .
Additional multi-line and team functions . . . . . . . . . . . . . . . . . . . . . .
Additional executive/secretary functions . . . . . . . . . . . . . . . . . . . . . .
How to make best use of your telephone . . . . . . . . . . . . . . . . . . . . . . . .
5
5
5
6
6
6
6
6
Ø Basic and enhanced-convenience functions
Taking calls and setting up calls . . . . . . . . . . . . . . 13
Taking a call with the handset . . . . . . . . . . . . . . . . . . . . . . . . . . . . . . . .
Answering a call via the speaker key (speakerphone) . . . . . . . . . . . . . .
Open listening within the room during a call . . . . . . . . . . . . . . . . . . . . .
Switching to speakerphone . . . . . . . . . . . . . . . . . . . . . . . . . . . . . . . . . .
Switching to the handset. . . . . . . . . . . . . . . . . . . . . . . . . . . . . . . . . . . .
Using the "second call" facility . . . . . . . . . . . . . . . . . . . . . . . . . . . . . . . .
Activating/deactivating "second call" . . . . . . . . . . . . . . . . . . . . . . . .
Taking the second call . . . . . . . . . . . . . . . . . . . . . . . . . . . . . . . . . . .
Using the mailbox . . . . . . . . . . . . . . . . . . . . . . . . . . . . . . . . . . . . . . . . .
Retrieval from mailbox . . . . . . . . . . . . . . . . . . . . . . . . . . . . . . . . . . .
Answering a callback request . . . . . . . . . . . . . . . . . . . . . . . . . . . . .
Deleting mailbox entries . . . . . . . . . . . . . . . . . . . . . . . . . . . . . . . . .
Terminating mailbox retrieval: . . . . . . . . . . . . . . . . . . . . . . . . . . . . .
Using the mailbox function (optional) . . . . . . . . . . . . . . . . . . . . . . . . . .
Timed reminders . . . . . . . . . . . . . . . . . . . . . . . . . . . . . . . . . . . . . . . . . .
Incoming call on loudspeaker (voice calling) . . . . . . . . . . . . . . . . . . . . .
Activating/deactivating stop voice calling . . . . . . . . . . . . . . . . . . . . . . .
Taking a call on the headset . . . . . . . . . . . . . . . . . . . . . . . . . . . . . . . . .
Activating/deactivating do not disturb . . . . . . . . . . . . . . . . . . . . . . . . . .
Malicious call holding. . . . . . . . . . . . . . . . . . . . . . . . . . . . . . . . . . . . . . .
13
13
14
14
14
15
15
15
16
16
16
17
17
17
17
17
19
19
19
20
Setting up calls . . . . . . . . . . . . . . . . . . . . . . . . . . . . . 21
Dialling with the handset off-hook . . . . . . . . . . . . . . . . . . . . . . . . . . . . .
Dialling with the handset on-hook . . . . . . . . . . . . . . . . . . . . . . . . . . . . .
Suppressing the number display at the called party . . . . . . . . . . . . . . .
Direct call to a colleague via loudspeaker (voice calling) . . . . . . . . . . . .
Entering commands with tone dialling (DTMF suffix dialling) . . . . . . . .
21
21
22
22
23
7
Contents
Calling several persons simultaneously . . . . . . . . 24
Making a second call (consultation). . . . . . . . . . . . . . . . . . . . . . . . . . . .
Alternating between two calls (toggling) . . . . . . . . . . . . . . . . . . . . . . . .
System-supported conference . . . . . . . . . . . . . . . . . . . . . . . . . . . . . . .
Setting up a conference. . . . . . . . . . . . . . . . . . . . . . . . . . . . . . . . . .
Expanding the conference . . . . . . . . . . . . . . . . . . . . . . . . . . . . . . . .
Transferring the conference. . . . . . . . . . . . . . . . . . . . . . . . . . . . . . .
During the conference . . . . . . . . . . . . . . . . . . . . . . . . . . . . . . . . . . .
Extending a call . . . . . . . . . . . . . . . . . . . . . . . . . . . . . . . . . . . . . . . . . . .
Using the switchover button . . . . . . . . . . . . . . . . . . . . . . . . . . . . . . . . .
24
24
25
26
27
28
29
30
30
Using stored numbers to make calls . . . . . . . . . . . 32
Using a call list (missed calls) . . . . . . . . . . . . . . . . . . . . . . . . . . . . . . . .
Interrogating the call list (call log). . . . . . . . . . . . . . . . . . . . . . . . . . .
Dialling a number in the call list . . . . . . . . . . . . . . . . . . . . . . . . . . . .
Deleting an entry from the call list . . . . . . . . . . . . . . . . . . . . . . . . . .
Saved number redial . . . . . . . . . . . . . . . . . . . . . . . . . . . . . . . . . . . . . . .
Last number redial. . . . . . . . . . . . . . . . . . . . . . . . . . . . . . . . . . . . . . . . .
Dialling with repertory keys . . . . . . . . . . . . . . . . . . . . . . . . . . . . . . . . . .
Dialling with individual speed dialling numbers . . . . . . . . . . . . . . . . . . .
Dialling with system speed dialling numbers . . . . . . . . . . . . . . . . . . . .
32
32
33
33
33
34
34
35
35
Making project calls . . . . . . . . . . . . . . . . . . . . . . . . . 36
Setting up a project call . . . . . . . . . . . . . . . . . . . . . . . . . . . . . . . . . . . . . 36
Call duration display. . . . . . . . . . . . . . . . . . . . . . . . . . . . . . . . . . . . . . . . 37
If you don’t get through... . . . . . . . . . . . . . . . . . . . . . 38
Using the callback facility . . . . . . . . . . . . . . . . . . . . . . . . . . . . . . . . . . .
Storing a callback request . . . . . . . . . . . . . . . . . . . . . . . . . . . . . . . .
Answering a callback request . . . . . . . . . . . . . . . . . . . . . . . . . . . . .
Rejecting a callback request . . . . . . . . . . . . . . . . . . . . . . . . . . . . . .
Checking/cancelling stored callback requests . . . . . . . . . . . . . . . . .
Camping on a colleague’s call . . . . . . . . . . . . . . . . . . . . . . . . . . . . . . . .
Overriding a colleague’s call (intrude) . . . . . . . . . . . . . . . . . . . . . . . . . .
38
38
38
38
39
39
40
Telephone settings . . . . . . . . . . . . . . . . . . . . . . . . . . 41
Adjusting the ringing tone volume. . . . . . . . . . . . . . . . . . . . . . . . . . . . .
Adjusting the ringing tone pitch. . . . . . . . . . . . . . . . . . . . . . . . . . . . . . .
Adapting the handsfree function to the acoustics of your room . . . . . .
Setting the volume of the alerting tone. . . . . . . . . . . . . . . . . . . . . . . . .
Adjusting the angle of the display
(to suit a seated position) . . . . . . . . . . . . . . . . . . . . . . . . . . . . . . . . . . .
8
41
41
42
42
42
Contents
Preventing misuse of the telephone . . . . . . . . . . . . . . . . . . . . . . . . . . . 43
Selecting the language for the user prompts (displays) . . . . . . . . . . . . 44
Storing numbers, system functions
and timed reminders . . . . . . . . . . . . . . . . . . . . . . . . . 45
Storing a repertory dialling number on a key . . . . . . . . . . . . . . . . . . . . .
Storing a number for redialling . . . . . . . . . . . . . . . . . . . . . . . . . . . . . . .
Storing a caller’s number or a number which has been dialled . . . .
Storing any number . . . . . . . . . . . . . . . . . . . . . . . . . . . . . . . . . . . . .
Storing individual speed dialling numbers . . . . . . . . . . . . . . . . . . . . . . .
Saving a function on a key . . . . . . . . . . . . . . . . . . . . . . . . . . . . . . . . . . .
Storing timed reminders . . . . . . . . . . . . . . . . . . . . . . . . . . . . . . . . . . . .
45
46
46
46
46
47
48
Checking the telephone . . . . . . . . . . . . . . . . . . . . . . 49
Checking its functionality. . . . . . . . . . . . . . . . . . . . . . . . . . . . . . . . . . . . 49
Checking the assignment of functions to keys . . . . . . . . . . . . . . . . . . . 50
Forwarding calls . . . . . . . . . . . . . . . . . . . . . . . . . . . . 51
Using call forwarding . . . . . . . . . . . . . . . . . . . . . . . . . . . . . . . . . . . . . . .
Fixed forwarding . . . . . . . . . . . . . . . . . . . . . . . . . . . . . . . . . . . . . . .
Variable forwarding . . . . . . . . . . . . . . . . . . . . . . . . . . . . . . . . . . . . .
Activating and deactivating forwarding using switch. . . . . . . . . . . .
Automatic call forwarding . . . . . . . . . . . . . . . . . . . . . . . . . . . . . . . .
Forwarding calls for a different terminal (pull divert) . . . . . . . . . . . . . . .
Storing a destination for another
telephone/activating call forwarding . . . . . . . . . . . . . . . . . . . . . . . .
Storing a destination for fax, PC or "busy"/
activating call forwarding (pull divert). . . . . . . . . . . . . . . . . . . . . . . .
Interrogating/deactivating call forwarding
for another telephone . . . . . . . . . . . . . . . . . . . . . . . . . . . . . . . . . . .
Interrogating/deactivating call forwarding
for fax, PC or "busy" . . . . . . . . . . . . . . . . . . . . . . . . . . . . . . . . . . . . .
Changing call forwarding for another terminal . . . . . . . . . . . . . . . . .
51
51
54
57
57
58
58
59
60
60
61
Using a different telephone
in the same way as your own . . . . . . . . . . . . . . . . . 62
Logging on to a different telephone . . . . . . . . . . . . . . . . . . . . . . . . . . .
Identifying oneself with PIN and dialling . . . . . . . . . . . . . . . . . . . . .
Identification with the chip card (optiset E advance only) . . . . . . . .
Deactivating identification at the other telephone . . . . . . . . . . . . . . . . .
62
62
64
64
9
Contents
Relocating with the telephone . . . . . . . . . . . . . . . . 65
Disconnecting the telephone from its present station line . . . . . . . . . . 65
Reconnecting the telephone at the new station line . . . . . . . . . . . . . . . 65
Ø Multi-line and team functions
Making multi-line and team calls. . . . . . . . . . . . . . 66
Using line keys . . . . . . . . . . . . . . . . . . . . . . . . . . . . . . . . . . . . . . . . . . .
The different states of line key lamps . . . . . . . . . . . . . . . . . . . . . . .
The lamp is flashing slowly – the call has been placed on hold.. . . . . .
Preview . . . . . . . . . . . . . . . . . . . . . . . . . . . . . . . . . . . . . . . . . . . . . . . . .
Taking calls on line keys . . . . . . . . . . . . . . . . . . . . . . . . . . . . . . . . . . . .
Taking calls in the order offered . . . . . . . . . . . . . . . . . . . . . . . . . . .
Taking calls with priority . . . . . . . . . . . . . . . . . . . . . . . . . . . . . . . . .
Activating/deactivating ringer . . . . . . . . . . . . . . . . . . . . . . . . . . . . . . . .
Dialling with line keys . . . . . . . . . . . . . . . . . . . . . . . . . . . . . . . . . . . . . .
Identifying the line used . . . . . . . . . . . . . . . . . . . . . . . . . . . . . . . . . . . .
Alternating between different lines . . . . . . . . . . . . . . . . . . . . . . . . . . . .
Terminating a connection on a line key . . . . . . . . . . . . . . . . . . . . . .
Entering a call on a line (add-on conference) . . . . . . . . . . . . . . . . . .
Station override security . . . . . . . . . . . . . . . . . . . . . . . . . . . . . . . . . . . .
Allowing override . . . . . . . . . . . . . . . . . . . . . . . . . . . . . . . . . . . . . . .
Preventing override . . . . . . . . . . . . . . . . . . . . . . . . . . . . . . . . . . . . .
Terminating a connection on a line key . . . . . . . . . . . . . . . . . . . . . .
Holding a call on a line key and picking it up again . . . . . . . . . . . . . . . .
Holding a call on a line key exclusively and picking it up again . . . . . . .
Picking up a held call . . . . . . . . . . . . . . . . . . . . . . . . . . . . . . . . . . . . . . .
Forwarding calls for lines. . . . . . . . . . . . . . . . . . . . . . . . . . . . . . . . . . . .
Storing and activating variable call forwarding for a line . . . . . . . . .
Storing and activating a fixed call
forwarding destination for a line . . . . . . . . . . . . . . . . . . . . . . . . . . .
Activating fixed call forwarding for a line (without storing) . . . . . . .
Cancelling the fixed call forwarding destination. . . . . . . . . . . . . . . .
Deactivating call forwarding for a line . . . . . . . . . . . . . . . . . . . . . . .
Taking calls for colleagues in a team . . . . . . . . . . . . . . . . . . . . . . . . . . .
Picking up a specific team call. . . . . . . . . . . . . . . . . . . . . . . . . . . . . . . .
Having the number of the called station displayed . . . . . . . . . . . . .
Taking a call in a hunt group . . . . . . . . . . . . . . . . . . . . . . . . . . . . . . . . .
Removing station from hunt group/adding station to hunt group . . . . .
Automatic parking and resumption of a call . . . . . . . . . . . . . . . . . . . . .
Manual parking and resumption of a call . . . . . . . . . . . . . . . . . . . . . . . .
Picking up a call on hold . . . . . . . . . . . . . . . . . . . . . . . . . . . . . . . . . . . .
Calling a team member directly. . . . . . . . . . . . . . . . . . . . . . . . . . . . . . .
The lamp statuses of direct station selection (DSS) keys . . . . . . . .
10
66
67
67
67
67
68
68
69
70
71
71
72
72
72
72
73
73
74
74
75
75
75
76
76
77
77
78
78
79
79
79
80
80
81
81
81
Contents
Calling a direct station selection (DSS) user . . . . . . . . . . . . . . . . . . 82
Taking a call for a direct station selection (DSS) user . . . . . . . . . . . 82
Ø Executive/secretary functions
Making calls in an "executive/secretary" team . 83
Calling executive or secretary’s office . . . . . . . . . . . . . . . . . . . . . . . . . .
The lamp statuses of direct station selection (DSS) keys . . . . . . . .
Making a call to the executive/secretary . . . . . . . . . . . . . . . . . . . . .
Taking a call for the executive in the secretary’s office. . . . . . . . . . . . .
Taking a call for the executive during a call in progress . . . . . . . . . .
Extending a call to the executive . . . . . . . . . . . . . . . . . . . . . . . . . . . . . .
Switching calls directly to the executive . . . . . . . . . . . . . . . . . . . . . . . .
Taking a call on the executive’s telephone . . . . . . . . . . . . . . . . . . . . . .
Taking calls for other "executive/secretary" teams . . . . . . . . . . . . . . . .
Using second telephone for executive . . . . . . . . . . . . . . . . . . . . . . . . .
Activating/deactivating second call for executive . . . . . . . . . . . . . . . . .
Using the call signal function . . . . . . . . . . . . . . . . . . . . . . . . . . . . . . . . .
Calling a messenger . . . . . . . . . . . . . . . . . . . . . . . . . . . . . . . . . . . . . . .
Designating a deputy for the secretary . . . . . . . . . . . . . . . . . . . . . . . . .
83
83
83
84
84
84
85
85
86
86
86
87
87
87
Øle telephone
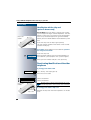
Labelling, documentation and accessories . . . . . 88
Key labels . . . . . . . . . . . . . . . . . . . . . . . . . . . . . . . . . . . . . . . . . . . . . . .
Attaching the telephone number label . . . . . . . . . . . . . . . . . . . . . . . . .
Using the key labelling programme . . . . . . . . . . . . . . . . . . . . . . . . . . . .
Re-ordering the Operating Instructions . . . . . . . . . . . . . . . . . . . . . . . . .
Downloading the Operating Instructions
from the Internet in PDF format . . . . . . . . . . . . . . . . . . . . . . . . . . . . . .
Individual operating instructions . . . . . . . . . . . . . . . . . . . . . . . . . . . . . .
Ordering accessories. . . . . . . . . . . . . . . . . . . . . . . . . . . . . . . . . . . . . . .
88
88
88
89
89
89
89
11
Contents
Advice for users . . . . . . . . . . . . . . . . . . . . . . . . . . . . . 91
Care of the telephone . . . . . . . . . . . . . . . . . . . . . . . . . . . . . . . . . . . . . .
How to deal with malfunctions . . . . . . . . . . . . . . . . . . . . . . . . . . . . . . .
Dealing with error messages on the display . . . . . . . . . . . . . . . . . . . . .
Who to contact if a problem occurs . . . . . . . . . . . . . . . . . . . . . . . . . . .
91
91
92
93
Index. . . . . . . . . . . . . . . . . . . . . . . . . . . . . . . . . . . . . . . 94
Ø Quick-reference operating instructions
(appendix)
12
Taking calls and setting up calls
Step by Step
Taking calls and setting up calls
Taking a call with the handset
The telephone rings. The caller is displayed.
Q Lift the handset.
Terminating a call:
W Replace the handset.
Answering a call via the speaker key
(speakerphone)
The telephone rings. The caller is displayed.
Speaker
Press the key. The lamp lights up.
You are in the handsfree conversing/open listening
mode.
X or Y (Note: optiset E advance has open listening only.)
Increase or decrease the volume. Keep pressing the
keys until the required volume level is set.
Terminating the call:
Speaker
Press the key. The lamp goes out.
Notes for speakerphone mode:
• Tell the called party that you are using speakerphone.
• The handsfree conversing equipment works best at
low volume settings.
• The ideal distance between yourself and the telephone for handsfree conversing is approx. 50 cm.
13
Taking calls and setting up calls
Step by Step
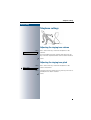
Open listening within the room during
a call
You can allow other persons in the room to listen in on
the call. Always inform the other party that you are
switching on the loudspeaker.
Precondition: You are making a call with the handset.
To activate:
Speaker
Press the key. The lamp lights up.
To deactivate:
Speaker
Press the key. The lamp goes out.
Switching to speakerphone
Precondition: You are making a call with the handset.
Speaker
and W Hold the key down and replace the handset. Then release the key and continue the call.
Switching to the handset
Precondition: You are engaged in a call in the handsfree conversing/open listening mode.
Q Lift the handset. Continue the call.
14
Taking calls and setting up calls
Step by Step
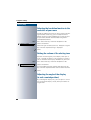
Using the "second call" facility
When you are expecting an important call, you should
activate the second call (call waiting) facility. The arrival
of this second call is signalled to you if you happen to
be engaged in a call. You can then either accept or disregard the second call.
Activating/deactivating "second call"
Press the key. The lamp lights up.
Service Menu
IH Enter the service code.
or
Switches?
Select and confirm.
Camp-on?
Select and confirm.
and
Activate?
or Confirm.
Deactivate?
Taking the second call
Precondition: You are making a call. "Second call" is activated.
Waiting call
The alerting tone is audible. The lamp flashes.
The caller hears ringing tone as though you were free.
Press the key. You are connected to the second caller.
The first party is placed on hold.
Terminating the second call, resuming the first call:
Disconnect
Press the key.
or W Q Replace the handset and lift it again.
15
Taking calls and setting up calls
Step by Step
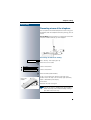
Using the mailbox
Callers who dialled your number during your absence
can leave a callback request in your mailbox.
You will also find mail server voice/fax messages in your
mailbox (if this facility is available).
Retrieval from mailbox
The lamp lights up if the mailbox contains new entries
which have still to be retrieved. Press the key.
The first entry is displayed. Keep pressing the "mailbox"
key in order to see the other messages.
Mailbox
Meaning of the display:
Jones
Call
"Call" = callback request,
e.g. from Mr Jones
Answering a callback request
Jones
Output?
16
Call
The callback request is displayed.
Select and confirm.
The user is called.
Taking calls and setting up calls
Step by Step
Deleting mailbox entries
The required entry is displayed.
Select and confirm.
Delete?
You cannot delete (new) voice messages that you
have not played back entirely. You can jump to the
end of a message by entering 66. This designates the message as "old", thereby making it deletable.
Terminating mailbox retrieval:
Service Menu
Press the key. The lamp goes out.
Entries remain in the mailbox until you delete them.
Using the mailbox function (optional)
Users with a mailbox (HiPath Xpressions) can use it by
calling the messaging extension, for example, set up
call forwarding types and check available messages.
Spoken user prompting directs you to all available functions. If call forwarding is active, the messaging extension is shown on the display. Information on call forwarding can be found in the chapter Forwarding calls
Æ page 51.
Timed reminders
Precondition: You have stored a timed reminder
(Æ page 48). When the stored time has been reached:
Reminder:
The telephone rings.
Q Lift the handset. The time of the reminder is displayed.
W Replace the handset.
If you do not lift the handset, the telephone rings
several more times and "Timed reminder" is displayed before the reminder is cancelled.
Incoming call on loudspeaker
(voice calling)
17
Taking calls and setting up calls
Step by Step
You are addressed directly by a colleague over the loudspeaker. Handsfree conversing and open listening are
activated automatically.
You can answer immediately in the handsfree conversing mode. (Note: optiset E advance has open listening
only.)
or Q Lift the handset and reply.
You can speak to the colleague directly
(Æ page 22).
18
Taking calls and setting up calls
Step by Step
Activating/deactivating stop voice
calling
You can prevent other persons from making direct calls
to you. Any attempt to address you directly via the loudspeaker will be changed to a normal call.
Press the key. The lamp lights up.
Service Menu
IJ Enter the service code.
or
Switches?
Select and confirm.
Voice call protect?
Select and confirm.
and
Activate?
or Confirm.
Deactivate?
Taking a call on the headset
Precondition: Your optiset E telephone is equipped
with the optiset E headset/headset plus adapter. The
headset is connected to the adapter. The "headset" key
has been configured.
Headset
The lamp flashes when a call is received.
Press the key. Make the call.
Terminating the call:
Headset
Press the key. The lamp goes out.
Activating/deactivating do not disturb
If you do not wish to receive incoming calls, you can activate the do not disturb facility. Internal callers then
hear busy tone, while external callers are forwarded to
the attendant.System Support can also set up destinations for forwarding internal and external calls, such as
to your mailbox.
Precondition: System Support has enabled the do not
disturb facility for all HiPath 4000 users in your system.
Service Menu
Press the key. The lamp lights up.
19
Taking calls and setting up calls
Step by Step
II Enter the service code.
or
Switches?
Select and confirm.
Do not disturb?
Select and confirm. The display indicates whether the
do not disturb facility has been activated or deactivated.
and
Activate?
or Confirm.
Deactivate?
If do not disturb is active, you hear an alerting
tone when you lift the handset.
The attendant can override the do not disturb
function in order to speak to you.
If System Support has disabled the do not disturb
facility for the HiPath 4000 system, the option "do
not disturb" does not appear in the Service Menu.
Malicious call holding
You can trace a malicious external caller. The caller’s
number can be registered during the call or for up to 30
seconds after the call. You must not replace the handset.
Press the key. The lamp lights up.
Service Menu
OJ Enter the service code.
or
Additional functions?
Select and confirm.
Additional functions?
Select and confirm.
If malicious call holding was successful, your network carrier will have the stored data. Get in
touch with System Support!
20
Setting up calls
Step by Step
Setting up calls
Dialling with the handset off-hook
Q Lift the handset.
S Internal: Enter the number.
External: Enter the external code and the number.
The called party is busy or does not answer:
W Replace the handset.
Dialling with the handset on-hook
S Internal: Enter the number.
External: Enter the external code and the number.
The called party answers via the loudspeaker:
Q Lift the handset.
or When handset is on-hook: speakerphone.
The called party is busy or does not answer:
Speaker
Press the key. The lamp goes out.
21
Setting up calls
Step by Step
Suppressing the number display at the
called party
Suppression of the number indication only applies to
the next call and is not stored together with the redial
function.
Press the key. The lamp lights up.
Service Menu
OI Enter the service code. Dial tone can be heard.
or
Additional functions?
Select and confirm.
Display suppression?
Confirm. Dial tone can be heard.
and
S Enter the other party’s number. If the call is answered,
your number does not appear on the called party’s display.
Direct call to a colleague via
loudspeaker (voice calling)
You can make a direct call to an internal HiPath 4000 or
Hicom 300 E/H user via the loudspeaker in his telephone.
Precondition: Your telephone has a "voice calling" key.
Voice calling
Press the key.
S Enter the number.
Wait for voice calling tone.
Q Lift the handset and speak to the other party.
or If the handset is on-hook: handsfree conversing.
If the called party has activated the stop voice
calling facility (Æ page 19), he receives voice calling as a normal call.
22
Setting up calls
Step by Step
Entering commands with tone dialling
(DTMF suffix dialling)
This feature is not applicable for UK and other
countries using tone dialling (default).
After dialling a number, you can set tone dialling in order to activate equipment - such as an answering machine or an automatic information or switching system by means of command inputs in DTMF mode
(DTMF = dual-tone multifrequency dialling).
Press the key. The lamp lights up.
Service Menu
OH Enter the service code.
or
Additional functions?
Select and confirm.
DTMF suffix dialing?
Select and confirm.
You can now enter commands with keys 0 to 9, the star
key and the square key.
DTMF mode is deactivated as soon as the connection is cleared down.
The "DTMF suffix dialing" display may appear at
the end of number input, depending on the PBX
configuration. You can then proceed to enter
commands as soon as you have dialled a number.
23
Calling several persons simultaneously
Step by Step
Calling several persons
simultaneously
Making a second call (consultation)
During a call in progress you can set up a second call,
e.g. in order to obtain information. The first party waits.
Consultation?
Confirm.
S Make your call to the second party.
Release the second call – return to the first call:
Release and return?
Confirm.
Alternating between two calls
(toggling)
Precondition: You have either set up a second call (see
above) or taken a second call (Æ page 15) during a call
in progress.
To switch to the waiting party:
Toggle?
Select and confirm.
Release the present call – return to the other call:
Release and return?
24
Select and confirm.
Calling several persons simultaneously
Step by Step
Setting up an add-on conference:
Conference?
Confirm.
An alerting tone indicates that all three users have been
interconnected to form a conference circuit.
System-supported conference
In a system-supported conference you can include up to
8 internal and external users. Users with system telephones can execute or use all of the following functions. ISDN telephones and external users are passive
users - they can only be included in an existing conference.
You can include users and conferences from a distant
system in your conference. The distant users can set up
and extend their own conference. The members of this
conference are included in your conference. But they
cannot execute or use the following functions.
The following functions are supported for all conference
members with a system telephone:
•
•
•
•
•
•
•
•
Setting up a conference when calling a user or receiving a call or making a consultation call or receiving a second call.
Accepting a waiting call and including the caller in
the conference.
Toggling between the conference and a consultation
call or waiting call.
Holding a consultation call during a conference and
adding it to the conference.
Interconnecting conference members from two independent conferences via a distant network.
Putting the conference on hold, if line keys are installed.
Receiving overview of all conference members.
Transferring the conference to a new user.
The functions listed above can be carried out by all conference members at the same time.
25
Calling several persons simultaneously
Step by Step
Setting up a conference
You can set up a conference from any of the following
types of connection:
•
•
•
single call
consultation call
waiting call
Starting a conference from a single call
You want to set up a conference.
You receive a call.
or
S You call another user.
Select and confirm.
Start conference?
S Call the second user.
Announce that a conference is to be set up.
Confirm.
You will receive the message "1 is your position".
Conference?
Conf.
1-2-3
This question will then be displayed.
Add on to conference?
Setting up a conference from a consultation call
You are connected to one user and call a second user.
Consultation?
Confirm.
S Call the second user. The second user answers, you announce the conference.
Conference?
Select and confirm.
You will receive the message "1 is your position".
Setting up a conference from a waiting call
You are connected to one user and receive another call.
Waiting call
Conference?
26
An alerting tone is audible. The lamp flashes. Press the
key. You are connected to the waiting caller. The other
party is placed on hold.
Select and confirm.
You will receive the message "1 is your position". All
members are interconnected in a conference circuit.
Calling several persons simultaneously
Step by Step
Expanding the conference
Any member of the system conference can expand the
conference by
•
•
•
calling another user and adding this person to the
conference
adding a user to the conference from a consultation
call
accepting a waiting call and adding the caller to the
conference.
Calling and adding another user
You intend to call another user and to add this person to
the conference.
Select and confirm.
Add on to conference?
S Call the new user.
Announce the conference.
Confirm.
The user is added to the conference.
Conference?
If the new user does not answer:
Confirm.
Return to conference?
Expanding the conference from a consultation call
You wish to make a consultation call during the conference.
Select and confirm. The conference is placed on hold.
Consultation?
S Call a user. Make the consultation call.
Select and confirm to add the user from the consultation call to the conference.
Conference?
or
Switch between the conference and the consultation
call.
Toggle?
or
Release and return?
Select and confirm to release the consultation call and
return to the conference.
27
Calling several persons simultaneously
Step by Step
Accepting a waiting call and adding it to the conference
If you receive a waiting call during the conference (call
waiting function is activated), you can add this user to
the conference.
An alerting tone is audible. The lamp flashes. Press the
key. You are connected to the waiting caller. The conference is placed on hold.
Waiting call
Select and confirm to add the waiting caller to the conference.
Conference?
or
Switch between the conference and the waiting caller.
Toggle?
or
Select and confirm to release the waiting call and return
to the conference.
Release and return?
Transferring the conference
Any member can transfer the conference to a nonmember called using the consultation or expand conference
functions. The new user is not yet a member of the conference. The conference cannot be transferred to a caller whose call is answered by a member using the Call
Waiting function.
You are taking part in a conference.
Select and confirm. The conference is placed on hold.
Consultation?
S Call a user.
or
Add on to conference?
Select and confirm.
S Call a user.
Announce that you are transferring the conference.
Transfer conference?
Select and confirm.
You are disconnected from the conference.
W Replace the handset.
28
Calling several persons simultaneously
Step by Step
During the conference
You are taking part in a conference with 3 to 8 members
and you wish to know about the other members or to
disconnect a member.
Viewing member information
View members?
No. member No.
Select and confirm.
>
1
Next conference party? >
The display shows the name and call number of the other member with lowest member number.
Next conference party? >
Confirm to display the next member.
or
Stop viewing?
Select and confirm to end the display.
>
or
Release party?
Select and confirm to disconnect this member from the
conference. If there were only three members, the conference is now ended and the call continues as a twoparty call.
>
Disconnecting the last member added
You wish to disconnect the last member added to the
conference.
Remove last party?
Select and confirm. The last member added is disconnected. If there were only three members, the conference is now ended.
>
Putting the conference on hold
If line keys are installed (Æ page 66) you can put the
conference on hold and make a call on another line.
Press line key.
Line
or
Select and confirm.
Hold?
The conference will be put on hold. The following message is displayed: 1st line: "Conference", 2nd line: "On
hold".
Line
Press the line key on which the conference is being held
- you are reconnected to the conference.
29
Calling several persons simultaneously
Step by Step
Extending a call
If the person you are conversing with wishes to be forwarded to one of your colleagues, you can pass on the
connection to this third person.
Extending the call with prior announcement:
Consultation?
Confirm.
S Call the other party and inform him that the waiting user
wishes to be put through to him.
W Replace the handset. The two users are connected to
each other.
Extending the call without prior announcement:
Start transfer?
Select and confirm.
S Enter the number of the wanted party.
W Replace the handset.
If a connection is not set up between the other
two parties within 40 seconds, you are recalled.
You are then connected to the first party again.
Using the switchover button
The switchover button that must be configured by System Support can be used for the following functions:
• consultation (return to the call being held or the conference being held)
• toggling
• accepting a waiting call
• accepting a group call
Waiting call
You hear a call-waiting tone. Information about the call
appears in the display.
Switchover
Press the flashing key to accept the waiting call. The
lamp is on.
Toggling
You are connected to two users. One user is waiting.
The switchover lamp is on
30
Calling several persons simultaneously
Step by Step
Switchover
Press the key to switch over to the other user. The first
user waits.
Consultation
You call a second user. The second user does not answer
Switchover
Press the key to return to the waiting user or the waiting
conference.
Group call
You are connected to a single user. A group call is signalled. Information about the group call appears in the
display.
Switchover
Press the flashing key to accept the group call. The first
user is placed on hold. The lamp is on.
31
Using stored numbers to make calls
Step by Step
Using stored numbers to make
calls
Using a call list (missed calls)
If you are unable to take an external and/or an internal
call, this call request is stored in a call journal. Your telephone can also be configured so that answered calls are
entered in this call list. Your telephone stores the last 6
outgoing and the last 12 incoming calls in chronological
order. Each call is assigned a time stamp. The display
begins with the most recent (unanswered) entry in the
list. If several calls are received from the same user, a
new entry is not made for each call; instead, the last
time stamp is updated for this caller.
Interrogating the call list (call log)
Precondition: System Support has configured a call list
for your telephone.
Press the key. The lamp lights up.
Service Menu
HOH Enter the service code for incoming calls.
or HOI Enter the service code for outgoing calls.
or
Destinations?
Confirm.
Call log?
Select and confirm.
Incoming calls?
Confirm.
or
Outgoing calls?
32
Select and confirm.
Using stored numbers to make calls
Step by Step
The first call in the call list is displayed:
User
32456 Hardy G.
Busy 25.10. 15.30
>
Date and time of the entry and reason for the entry.
The display begins with the most recent (unanswered)
call. In the case of calls from the same party, the number
of calls is displayed.
Displaying further calls from the list:
Next call?
Select and confirm.
Terminating interrogation:
Service Menu
Press the key. The lamp goes out.
Dialling a number in the call list
Precondition: You interrogate the call list; the wanted
call is displayed.
Select and confirm.
Output?
The user is called.
Deleting an entry from the call list
Precondition: You interrogate the call list; the wanted
call is displayed.
Select and confirm.
Delete?
Saved number redial
If your telephone is configured for this type of redialling,
you can store a number and then dial it at a later point
in time (Æ page 46). You can redial the number at the
push of a button.
Redial
Press the key.
The other party answers:
Q Lift the handset.
or With the handset on-hook: handsfree conversing and
open listening.
33
Using stored numbers to make calls
Step by Step
Last number redial
If your telephone is configured for this type of redialling,
each number dialled is stored for possible redialling.
Last no. redial
or S
Enter the code!
Press the key.
Enter your individual code for "Last number redial"
(if necessary, enquire with System Support).
The other party answers:
Q Lift the handset.
or With the handset on-hook: handsfree conversing and
open listening.
Dialling with repertory keys
Precondition: You have stored a number on a repertory
dialling key (Æ page 45).
Press the key with the stored number.
If the number is on the second level, press "Shift" beforehand.
The other party answers:
Q Lift the handset.
or With the handset on-hook: handsfree conversing and
open listening.
34
Using stored numbers to make calls
Step by Step
Dialling with individual speed dialling
numbers
Precondition: You have stored individual speed dialling
numbers (Æ page 46).
Press the key. The lamp lights up.
Service Menu
J Enter the service code.
or
Select and confirm.
Use speed dialing?
and
GïP Enter the speed dialling number.
The other party answers:
Q Lift the handset.
or With the handset on-hook: handsfree conversing and
open listening.
Dialling with system speed dialling
numbers
You will be supplied with a copy of the system (central)
speed dialling directory by System Support (for example) or you will find it in the inhouse telephone directory
or your PC.
After selecting a speed dialling number which is the
stored destination for another telecommunications system, you can immediately suffix-dial the station number
you require.
35
Making project calls
Step by Step
Making project calls
External calls can be assigned to specific projects.
Precondition: Project numbers (from 1 to 5) have been
configured for specific projects and you have a code for
the project in question.
Setting up a project call
Press the key. The lamp lights up.
Service Menu
S Enter a service code between 61 (for project number 1)
and 65 (for project number 5).
S Enter the PIN.
or
Press the key. The lamp lights up.
Service Menu
PIN / COS?
Select and confirm.
PIN 1?
Confirm.
or/possibly
Select and confirm PIN2 - PIN5.
and
S Enter the external number.
Make your call in the usual way (Æ page 21).
Project call mode is subject to a time limit. It is
deactivated automatically if you do not use your
telephone over a 5-minute period (for example).
36
Making project calls
Step by Step
Call duration display
The call duration display is configured by System Support. The display shows either the duration of the call or
the cost of the call. The display can be switched off.
The call duration is shown in the first line on the right
with format HH:MM:SS and 24-hour system. The display appears ten seconds after the call has begun.
The cost display feature must be applied for from the
network operator and configured by System Support.
37
If you don’t get through...
Step by Step
If you don’t get through...
Using the callback facility
If the telephone which you have called is busy or there
is no answer, you can place a request for callback. This
also applies to external calls via ISDN switching centres.
This saves you having to dial the number repeatedly.
You are then called back
• as soon as the other party terminates his call
• as soon as the other party makes a further call
• as soon as the other party checks his mailbox and
responds to your callback request (Æ page 16).
Storing a callback request
Precondition: The internal called party is busy or there
is no answer.
Confirm.
Callback?
or
Callback?
Select and confirm (if the other party has programmed
call forwarding, you will be called back from the call
forwarding destination).
Answering a callback request
Precondition: A callback request has been stored.
The telephone rings. The "Cancel callback" message informs you that this is a callback.
Q Lift the handset. You hear ringing tone.
or
Speaker
Press the key. The lamp lights up. You hear ringing tone.
You are in the handsfree conversing/open listening
mode.
Rejecting a callback request
The telephone rings. The "Cancel callback" message informs you that this is a callback.
Cancel callback?
Confirm.
or Let the telephone ring four times; do not answer the
call.
38
If you don’t get through...
Step by Step
Checking/cancelling stored
callback requests
Precondition: You have stored callback requests.
Display callback?
Select and confirm.
The "oldest" entry is displayed first.
Next callback?
Select and confirm, in order to view further entries.
Cancelling an entry which is displayed:
Select and confirm.
Delete?
Terminating interrogation:
Service Menu
Press the key. The lamp goes out.
Camping on a colleague’s call
Precondition: The internal station user whom you have
called is busy. You need to contact this person urgently.
Camp-on?
Select, confirm and wait briefly.
The colleague hears camp-on tone in the course of his
call. The "call pickup" key flashes on his telephone. If his
telephone has a display, your name and/or number is indicated.
In order to camp on, you must have the appropriate class of service.
Camp-on is not possible if the called party is protected by the camp-on security function.
39
If you don’t get through...
Step by Step
Overriding a colleague’s call (intrude)
Precondition: The station user whom you have called
is busy. You need to contact this colleague urgently.
Override?
Select and confirm.
Both the colleague and the other party hear an alerting
tone.
You can speak immediately.
In order to override, you must have the appropriate class of service.
Override is not possible if the called party is protected by the override security function.
40
Telephone settings
Step by Step
Telephone settings
Adjusting the ringing tone volume
X or Y Press one of the keys when the telephone is idle.
Ringer volume?
Confirm.
X or Y To increase/decrease the volume: keep pressing the
keys until the required volume level has been reached.
Store.
Adjusting the ringing tone pitch
X or Y Press one of the keys when the telephone is idle.
Ringer pitch?
Select and confirm.
X or Y Changing the pitch: keep pressing the keys until the required pitch has been reached.
Store.
41
Telephone settings
Step by Step
Adapting the handsfree function to the
acoustics of your room
In order to improve the clarity of voice transmission during handsfree conversing, you can adapt the microphone sensitivity of your telephone to suit the acoustics
of your room ("normal room"/"reverberating room"/
"sound-proofed room").
X or Y Press one of the keys when the telephone is idle.
Hands-free mode?
Select and confirm.
X or Y Select the type of room (acoustics). Keep pressing the
keys until the required setting is displayed.
Store.
Setting the volume of the alerting tone
You hear the alerting tone, for example, when you receive a second call during a call in progress or when a
call has not been taken by any members of your team.
X or Y Press one of the keys when the telephone is idle.
Warning tone?
Select and confirm.
X or Y To increase/decrease the volume: keep pressing the
keys until the required volume level has been reached.
Store.
Adjusting the angle of the display
(to suit a seated position)
By swivelling the display unit, you can adjust it so that
you can read the displays clearly from your normal sitting position.
42
Telephone settings
Step by Step
Preventing misuse of the telephone
You can prevent unauthorised persons from using your
telephone (and the telephone directory) during your absence.
Precondition: You have been assigned a personal identification number (PIN) by System Support.
Preventing unauthorised dialling:
Press the key. The lamp lights up.
Service Menu
MN Enter the service code.
or
PIN / COS?
Select and confirm.
Change COS?
Select and confirm.
and
S Enter the PIN (code number).
or In the case of optiset E advance with chip card
reader: Insert the chip card. All lamps light up briefly.
Chip card
reader:
Input is followed by the display:
"Executed".
Insert
chip card
Remove the chip card again.
When the telephone is disabled in this way, a
special dial tone is audible when the handset is
lifted. Internally (within HiPath 4000), dialling is
possible in the usual way.
43
Telephone settings
Step by Step
Enabling the telephone again:
Press the key. The lamp lights up.
Service Menu
MN Enter the service code.
or
PIN / COS?
Select and confirm.
Change COS?
Select and confirm.
and
S Enter the PIN (code number).
Input is followed by the display:
"Executed".
Selecting the language for the user
prompts (displays)
Your HiPath 4000 or Hicom 300 E/H system can be configured for up to five different languages. The first language programmed is the default. If your telephone has
a "language" key, you can program a different language.
The period of time for which the other language remains
active is dependent on the language option which has
been configured. There are two possibilities:
• Static language option
The language remains programmed until you
select a different language.
• Temporary language option
The language remains programmed until the end of
the next call, after which the system reverts to the
default language.
Selecting a language:
Language
Press the key. The language selected appears on the
display for five seconds and is then set. Keep pressing
the key if you wish to select a different language.
These Operating Instructions can be ordered in
other languages Æ page 89.
44
Storing numbers, system functions and timed reminders
Step by Step
Storing numbers, system functions and timed reminders
You can store a frequently required number or a frequently used function on any key which has not been
preprogrammed by System Support. The keys on the
optiset E key module add-on unit can be assigned on
two levels. Before storing, you can check the key assignment (Æ page 50).
Storing a repertory dialling number on
a key
Service Menu
Press the key. The lamp lights up.
Press the programmable key (with appropriate feature).
In order to use the second level on the optiset E key
module, press "Shift" beforehand.
The current key assignment configuration is displayed.
New entry?
Confirm.
S Enter the number.
In the case of external numbers, enter the external code
and then the telephone number.
Save?
Confirm.
or If you made a mistake during input:
Dial again?
Select and confirm.
Enter the number again.
Keys which have been assigned functions should
be labelled (Æ page 88).
45
Storing numbers, system functions and timed reminders
Step by Step
Storing a number for redialling
Precondition: Your telephone is programmed for
"Saved number redial" not "Last number redial".
Storing a caller’s number or a number
which has been dialled
You have set up a call and are still engaged in this call.
Or you have been called by - and are still conversing
with - a user whose number has also been communicated to you.
Redial
Press the key. "Stored" is displayed.
Speaker
Press the key. The lamp goes out.
or W Replace the handset.
Storing any number
Precondition: Your telephone is in the idle state or you
are conducting a call and the other party informs you of
a number which you would like to store.
Service Menu
Press the key.
Redial
Press the key.
New entry?
Confirm.
S Enter the number.
Confirm.
Save?
You can dial the stored telephone number at the
push of a button (Æ page 33).
Storing individual speed dialling
numbers
You can store a number on each of digit keys 0 to 9 and
then dial these numbers at the push of a button
(Æ page 35).
Service Menu
46
Press the key. The lamp lights up.
Destinations?
Confirm.
Speed dialing?
Select and confirm.
Storing numbers, system functions and timed reminders
Step by Step
S Enter a specific speed dialling number (0 to 9).
If this digit has already been assigned a telephone number, this number is shown on the display.
Confirm.
New entry?
S Enter the number.
In the case of external numbers, enter the external code
and then the telephone number.
Confirm.
Save?
Saving a function on a key
Press the key. The lamp lights up.
Service Menu
K Enter the service code.
or
Key function?
and
Select and confirm.
Press the programmable function key. Keyset-configuration is displayed.
Change?
Confirm.
New function:
Select and confirm one of the system functions prompted.
Save?
Confirm.
Keys which have been preprogrammed by System Support cannot be changed. Then "Return?"
is shown.
You can now activate the function directly by
pressing the key. In the case of functions, such as
"second call", which can be alternately activated/
deactivated, you activate the function when you
press the key and subsequently deactivate it
when you press the key again. The key’s lamp is
lit when the function is active.
47
Storing numbers, system functions and timed reminders
Step by Step
Storing timed reminders
You can program a "timed reminder" on your telephone
to remind yourself of an important meeting or appointment, for example (Æ page 17). You must store the exact time at which you wish to receive the reminder. Reminders can be set for the next 24-hour period.
Press the key. The lamp lights up.
Service Menu
N Enter the service code.
or
Reminder?
Select and confirm.
The display indicates whether or not a timed reminder
has already been programmed.
New reminder?
First timed reminder: Confirm.
Further timed reminder: Select and confirm.
and S Enter the time with either 3 or 4 digits as appropriate,
e.g. 845 for 8.45 hours or 1500 for 15.00 hours.
Confirm.
Save?
Cancelling a stored reminder:
Press the key. The lamp lights up.
Service Menu
N Enter the service code.
or
Reminder?
Select and confirm. A stored timed reminder is displayed.
Next reminder?
Confirm (if you have stored several timed reminders).
and
Select and confirm.
Delete?
Service Menu
48
Press the key. The lamp goes out.
Checking the telephone
Step by Step
Checking the telephone
Checking its functionality
You can test the functionality of your telephone. This includes the following checks:
• Are all the key lamps operating properly?
• Is the display operating properly?
• Do all the keys function?
• Are there any problems with the loudspeaker, handset, ringing tone volume, ringing tone pitch, alerting
tone or handsfree conversing facility?
Otherwise, if necessary, for servicing:
• the terminal ID (identity) of the telephone
• the software version of the optiset E telephone
• the power feeding range of the line.
Precondition: The telephone is in the idle state.
Press the key. The lamp lights up.
Service Menu
P Enter the service code.
or
Select and confirm.
Phone test?
and
Select and confirm the required test function. Follow
the user prompts on the display.
Service Menu
Press the key. The lamp goes out. The test is terminated.
49
Checking the telephone
Step by Step
Checking the assignment of functions
to keys
You can carry out a check to determine which functions
have been pre-assigned to which keys on your telephone. You can also check what you have stored on individual keys yourself. The following types of key assignment are possible:
• Repertory dialling (Æ page 45)
• Direct station selection (Æ page 81 and Æ page 83)
• Function (Æ page 47)
Precondition: The telephone is in the idle state.
Press the key. The lamp lights up.
Service Menu
K Enter the service code.
or
Select and confirm.
Key function?
and
Press the required key.
The key assignment is displayed.
Confirm and then press another key to check the function assigned to it.
Return?
or
Service Menu
50
Press the key. The lamp goes out.
Forwarding calls
Step by Step
Forwarding calls
Using call forwarding
You can program two types of call forwarding:
• fixed forwarding, and
• variable forwarding
With fixed forwarding you can program a forwarding
destination that will remain valid until you change or delete it. This forwarding function can be switched on and
off.
With variable forwarding you can choose between 6 different types of forwarding:
• Variable forwarding (unconditional forwarding)
• Forwarding for internal
• Forwarding for external
• Forwarding for busy
• Forwarding after time
• Forwarding for busy/after timeout
Call forwarding is activated when a forwarding destination is programmed. When the variable forwarding function is switched off, the forwarding destination is automatically deleted
When forwarding is activated you can see the following
display in the idle menu:
Forwarding type
Display message
Fixed forwarding
Variable forwarding
Forwarding to e.g. 222 Klaus
Meier (own number)
Forwarding for internal/ Forwarding is on
external
Forwarding for busy
No display message
Forwarding after time
No display message
Forwarding for busy/af- No display message
ter timeout
Fixed forwarding
If you have programmed a forwarding destination for
fixed forwarding, you can activate and deactivate the
forwarding facility either in the Service Menu or with a
51
Forwarding calls
Step by Step
forwarding key configured by System Support. The programmed forwarding destination remains valid until you
change or delete it.
Programming/changing a forwarding destination
Press the key. The lamp lights up.
Service Menu
Destinations?
Confirm.
Call forwarding?
Confirm. Display shows "Variable forwarding".
Next forwarding type? >
Confirm. Display shows "Fixed forwarding". If forwarding has been programmed the destination is displayed
Next forwarding type? >
Start "Fixed forwarding".
Enter destination:
>
S Enter the number of the forwarding destination. Any
destination previously saved will be overwritten.
Confirm when the complete number has been entered.
Save?
Activating/deactivating fixed forwarding
You can only activate fixed forwarding if a destination
number has been programmed.
Press the key. The lamp lights up.
Service Menu
Destinations?
Confirm.
Call forwarding?
Confirm. Display shows "Variable forwarding".
Next forwarding type? >
Confirm. Display shows "Fixed forwarding". If forwarding has been programmed the destination is displayed,
whether forwarding is switched on or off.
22805 Harald Meier
Start "Fixed forwarding".
>
Activate?
Select and confirm. Fixed forwarding is activated.
Fixed forwarding on
Output in first line. The following display message appears in the idle menu:
Forward to
for example, 2223 Klaus Meier (own number)
or
Deactivate?
Select and confirm. Fixed forwarding is deactivated
Fixed forwarding off
Output on first line.
If variable forwarding was previously programmed and
activated, it is deactivated and the forwarding destination is deleted.
52
Forwarding calls
Step by Step
Deactivating fixed forwarding in the idle menu
You can also deactivate fixed forwarding in the idle
menu.
Select and confirm. Fixed forwarding is deactivated.
The destination number is retained
Call forwarding off?
Activating and deactivating with call forwarding
key
Activating
Press the key. The lamp lights up.
Call forwarding
Deactivating
Press the key. The lamp goes out.
Call forwarding
Deleting the destination for fixed forwarding
You can delete the destination for fixed forwarding.
Press the key. The lamp lights up.
Service Menu
Destinations?
Confirm.
Call forwarding?
Confirm. Display shows "Variable forwarding".
Next forwarding type? >
Confirm. Display shows "Fixed forwarding" and the forwarding destination.
22805 Harald Meier
Delete?
>
Open "Fixed forwarding".
Select and confirm. The forwarding destination is deleted. If fixed forwarding was activated it is now switched
off. If a forwarding key has been configured it is deactivated.
53
Forwarding calls
Step by Step
Variable forwarding
With variable forwarding you can choose between 6 different types of call forwarding:
• Variable forwarding (unconditional forwarding)
• Forwarding for internal
• Forwarding for external
• Forwarding for busy
• Forwarding after timeout
• Forwarding for busy/after timeout
The forwarding types are mutually exclusive except for
forwarding for internal and forwarding for external. You
can program a forwarding destination for both of the
two exceptions and thus activate them both.
Example:
You had activated variable forwarding. You now program
and thus activate forwarding after timeout. Variable forwarding is automatically deactivated and its forwarding
destination is deleted.
Selection of a variable forwarding type
Select the items Destinations and Forwarding in the
Service Menu.
Press the key. The lamp lights up.
Service Menu
Destinations?
Confirm.
Call forwarding?
Confirm.
"Variable forwarding" will be offered first.
Variable Umleitung
AUS
Output on first line.
Output on second line.
Next forwarding type? >
Confirm to select the next forwarding type.
Fixed forwarding off
Output on first line.
Next forwarding type? >
Output on second line.
or if you have already programmed a fixed forwarding destination
Output on first line.
Fixed forwarding off
22805 Harald Meier
>
Output on second line.
Confirm to select the next variable forwarding type
FWD-ALL-INT off
54
Output on first line.
Forwarding calls
Step by Step
Output on second line.
Next forwarding type? >
To select the next variable forwarding type.
FWD-ALL-EXT off
Output on first line.
Next forwarding type? >
Output on second line.
or
To edit the current variable forwarding type.
Output on first line.
FWD-ALL-INT off
Enter destination:
>
Output on second line.
Programming/changing the forwarding destination
Service Menu
Press the key. The lamp lights up.
Destinations?
Confirm.
Call forwarding?
Confirm. Display shows "Variable forwarding".
Next forwarding type? >
Confirm. Display shows "Fixed forwarding".
Next forwarding type? >
Confirm. Display shows "Forwarding for internal".
Next forwarding type? >
Open a forwarding type, for example, "Forwarding for internal".
Enter destination:
>
S Enter the number of the forwarding destination. Any
destination previously saved will be overwritten
Save?
Confirm when the complete number has been entered.
To select a different forwarding type, proceed as described on Æ page 54.
If variable forwarding was previously programmed and
activated, it is deactivated and the forwarding destination is deleted (for exception, see Æ page 54). Fixed forwarding is deactivated.
Deleting a forwarding destination
A variable forwarding destination is automatically deleted when the forwarding type is switched off.
Activating variable forwarding
Variable forwarding is automatically activated when the
forwarding destination is programmed.
55
Forwarding calls
Step by Step
Unconditional variable programming can also be activated in the idle menu.
Var. call forw. on?
Select and confirm while the phone is idle.
S Enter the number of the destination.
If you enter a cross-system number, you must
press U after entering the number.
Confirm. This also activates the forwarding facility.
Save?
Deactivating variable forwarding
You can deactivate all variable forwarding types in the
Service Menu.
Service Menu
Press the key. The lamp lights up.
Destinations?
Confirm.
Call forwarding?
Confirm. Display shows "Variable forwarding".
Next forwarding type? >
Confirm. Display shows "Fixed forwarding".
Next forwarding type? >
Confirm. Display shows "Forwarding for internal".
Next forwarding type? >
Open a forwarding type, for example, "Forwarding for internal".
Deactivate?
Select and confirm. Variable forwarding is deactivated
and the forwarding destination is deleted.
FWD-ALL-INT off
Output on first line, for example, for "Forwarding for internal".
To select another variable forwarding type, proceed as
described on Æ page 54.
Checking forwarding
To check up on the status of the forwarding types, proceed as described on Æ page 54. The status "ON" or
"OFF" is shown in the first line. The forwarding destination is shown in the second line if this variable forwarding type is activated.
56
Forwarding calls
Step by Step
Deactivating variable forwarding in the idle menu
You can also deactivate the following variable forwarding types in the idle menu:
• Variable forwarding
• Forwarding for internal and for external
Select and confirm while the phone is idle. Forwarding
is deactivated and the forwarding destination is deleted.
Call forwarding off?
Activating and deactivating forwarding using
switch
If a forwarding destination has been programmed for
fixed forwarding, you can use the switch to activate and
deactivate the forwarding facility. If variable forwarding
is activated, it can only be deactivated with the switch.
Press the key. The lamp lights up.
Service Menu
Switches?
Select and confirm.
Call forwarding?
Select and confirm.
Activate?
Confirm.
or
Deactivate?
Confirm. This deletes any destination number programmed for variable forwarding.
Automatic call forwarding
Forwarding of internal and external calls in the system
can be configured and activated for your line by System
Support. Calls can be rerouted:
•
•
•
unconditionally
when the line is busy
when the call is not answered
Unconditional call forwarding should only be used if the
line is for outgoing calls only (for example, on an elevator).
If you have set up fixed or variable call forwarding, and
if the manually programmed forwarding destinations
are not obtainable (for example, because they are busy),
then calls are automatically forwarded to the system forwarding destinations.
57
Forwarding calls
Step by Step
Forwarding calls for a different
terminal (pull divert)
You can store, activate, check and deactivate call forwarding for another telephone, fax machine or PC from
your own telephone. To do so, you need to know the
PIN for this terminal or you must have the "Call forwarding for remote terminal" class of service.Your System
Support can help you in both cases.
Storing a destination for another
telephone/activating call forwarding
Service Menu
Press the key. The lamp lights up.
Destinations?
Confirm.
Forward station no.?
Select and confirm.
Variable call forw.?
Confirm.
S Enter the number of the other telephone.
Finished?
Confirm.
S Enter the PIN
(only if your own station does not have the "Call forwarding for remote terminal" class of service).
Finished?
Confirm.
S Enter the number of the destination.
Save?
Confirm.
Call forwarding is activated immediately.
If you enter a number belonging to a networked
Hicom system, you must conclude number input
with U.
58
Forwarding calls
Step by Step
Storing a destination for fax, PC or "busy"/
activating call forwarding (pull divert)
Service Menu
Press the key. The lamp lights up.
Destinations?
Confirm.
Forward station no.?
Select and confirm.
Forward other?
Select and confirm.
S Enter the code for the type of call forwarding required.
The codes are defined by System Support. You can enter your call forwarding codes in the following table:
"Call forwarding for fax":
*43
"Call forwarding for PC":
*42
"Call forwarding for busy":
*49
S Enter the number of the other terminal.
Finished?
Confirm.
S Enter the PIN
(only if your own station does not have the "Call forwarding for remote terminal" class of service).
Finished?
Confirm.
S Enter the number of the destination.
Save?
Confirm.
Call forwarding is activated.
59
Forwarding calls
Step by Step
Interrogating/deactivating call forwarding
for another telephone
Service Menu
Press the key. The lamp lights up.
Switches?
Select and confirm.
Forward station no.?
Select and confirm.
Variable call forw.?
Confirm.
S Enter the number of the other telephone.
Finished?
Confirm.
S Enter the PIN
(only if your own station does not have the "Call forwarding for remote terminal" class of service).
Finished?
Confirm.
To deactivate:
Deactivate?
Confirm.
or To interrogate:
Interrogate?
Select and confirm.
Example of display:
3428----------------------->8968
This means: calls for station 3428 are redirected
to station 8968.
Interrogating/deactivating call forwarding
for fax, PC or "busy"
Service Menu
Press the key. The lamp lights up.
Switches?
Select and confirm.
Forward station no.?
Select and confirm.
Forward other?
Select and confirm.
S Enter the code for the type of call forwarding required.
The codes are defined by System Support. You can enter your call forwarding codes in the following table:
60
Forwarding calls
Step by Step
"Interrogating forwarding for fax":
"Interrogating forwarding for PC":
"Interrogating forwarding for
busy":
"Deactivating forwarding for fax":
#43
"Deactivating forwarding for PC":
#42
"Deactivating forwarding for busy":
#49
S Enter the number of the other terminal.
Finished?
Confirm.
S Enter the PIN
(only if your own station does not have the "Call forwarding for remote terminal" class of service).
Finished?
Confirm.
To deactivate:
Deactivate?
Confirm.
or To check:
Interrogate?
Select and confirm.
(Example of display Æ page 60).
Changing call forwarding for another
terminal
The procedure is exactly the same as for Store/Activate:
for another telephone (Æ page 58),
for fax, PC or busy: (Æ page 59).
61
Using a different telephone in the same way as your own
Step by Step
Using a different telephone
in the same way as your own
You can log on to another telephone belonging to the
HiPath 4000 or Hicom 300 E/H system by means of a
personal identification number (PIN) (as of software status Hicom 300, Version 3.5/Hicom 300 H Version 1.0,
and also telephones of networked HiPath 4000 or Hicom 300 E/H systems, e.g. at other branches of your
company). At the other other telephone you can then:
• make calls and assign the charges to cost centres
• make calls and assign the charges to specific
projects
• retrieve messages from your mailbox
• use your individual speed dialling numbers and also
a number which has been stored at your own telephone for the purpose of redialling
• use repertory dialling keys, provided that they are
configured in the same way as at your own telephone
• enter timed reminders.
Using an internal PIN, you can have your calls diverted
to a telephone in the office or department where you
will be for a temporary period ("call forwarding - follow
me").
Logging on to a different telephone
Identifying oneself with PIN and dialling
Precondition: You have been assigned a PIN by System Support. You require an internal PIN for calls within
your own HiPath 4000 or Hicom 300 E/H system, while
for calls involving other HiPath 4000 or Hicom 300 E/H
systems in the integrated network you require a "network-wide" PIN.
Press the key. The lamp lights up.
Service Menu
MH Enter the service code
(61 for PIN 1, 62 for PIN 2, etc.).
or
PIN / COS?
62
Select and confirm.
Using a different telephone in the same way as your own
Step by Step
Select and confirm.
If you have several PINs and wish to use another one,
select the other PIN.
PIN 1?
With the display "Enter station no." or "Enter ID", you are
requested to enter the PIN.
Entering the PIN for your own HiPath 4000 or Hicom
300 E/H system area:
S Enter internal PIN.
or Entering the PIN for another HiPath 4000 or Hicom
300 E/H system area within the integrated network:
S
Enter the code!
Enter the 2-digit node code for your own HiPath 4000 or
Hicom 300 E/H system (enquire with System Support).
SU Enter your own number and press the square key.
SU Enter the network-wide PIN and press the square key.
Dialling after (successful) identification:
You hear dial tone. The following appears on the display:
"Please dial".
Speaker
Press the key. The lamp goes out.
or S Enter a number immediately.
Call forwarding - follow me after successful
identification
Variable call forw.?
Select and confirm.
Save?
Confirm. Call forwarding has been activated.
63
Using a different telephone in the same way as your own
Step by Step
Identification with the chip card
(optiset E advance only)
Precondition: You have been assigned a chip card by
System Support for logon at other telephones. The telephone at which you wish to log on must be equipped
with a chip card reader (optiset E signature module).
Chip card
reader:
Within your own HiPath 4000 or Hicom 300 E/H system
area:
Insert the chip card. All lamps light up briefly.
"ID card" and the number of the home station are indicated on the display.
Insert
chip card
or At another HiPath 4000 or Hicom 300 E/H system in
the integrated network:
Insert the chip card.
S
Enter the node code for your own HiPath 4000 or Hicom 300 E/H system (enquire with System Support).
Enter the code!
SU Enter your own number and press the square key.
Deactivating identification at the other
telephone
If you logged on with a PIN:
Press the key. The lamp lights up.
Service Menu
MM Enter the service code.
or
PIN / COS?
Select and confirm.
Deactivate PIN?
Select and confirm.
Identification is deactivated automatically if the
far-end telephone is not used for several minutes.
Chip card
reader:
If you logged on with a chip card:
Remove
chip card
64
Remove the chip card when the telephone is in the idle
state.
Relocating with the telephone
Step by Step
Relocating with the telephone
Enquire with System Support whether this is possible
with your telephone system.
After consulting with System Support, you can deregister your telephone from its present station line and
then re-register it at the new station line. Note that the
settings on your telephone (programmed keys) are not
affected by the move.
Disconnecting the telephone from its
present station line
S
Enter the code!
Enter the code for de-registration. If you are not sure of
the code, enquire with System Support.
S Enter PIN.
Remove the telephone plug from the socket.
Reconnecting the telephone at the
new station line
Insert the the telephone plug in the socket.
S
Enter the code!
Enter the code for registration. If you are not sure of the
code, enquire with System Support.
S Enter PIN.
If you relocate with both a first and a second telephone (e.g. executive/secretary configuration),
you must first de-register the second telephone,
then the first telephone. At the new location, you
log on the first telephone first, then the second
telephone.
Multi-line and team functions
65
Making multi-line and team calls
Step by Step
Making multi-line and team calls
Using line keys
Line keys are configured by System Support. The station number of each team member is assigned to a line
and is the primary line of that team member. The same
line is configured on the line keys of the other team
members as a secondary line. Each team member can
use all the line keys which are available.
Numbers which have been stored on your telephone can only be used for line key dialling on
your own telephone.
The following example illustrates how telephones with
several line keys are interrelated within a team (keyset
configuration).
3234 is the station number of Mr Jones, 3235 the station number of Mr Brown and 3236 the station number
of Mr Jackson. Calls can be conducted on all three keys
on all three telephones. The line with the user’s own
station number is always the primary line.
Mr Jones’ telephone
3234 (primary line)
3235 "Brown"
3236 "Jackson"
Mr Brown’s telephone
3235 (primary line)
3234 "Jones"
3236 "Jackson"
Mr Jackson’s telephone
3236 (primary line)
3234 "Jones"
3235 "Brown"
66
Making multi-line and team calls
Step by Step
The different states of line key lamps
Line
The lamp is not lit – the line is free and can be used.
or
Line
The lamp is lit – the line is in use.
or
Line
The lamp is flashing rapidly – a call is on the line: answer the call.
or
Line
The lamp is flashing slowly – the call has been placed
on hold.
Preview
You are speaking on one line. The lamp on another line
key starts flashing fast. You can use the call preview
function to find out who is calling on this line. The information is shown in the display. You can also find out
which caller is waiting on a line key that you have previously put on hold or exclusive hold. In addition, you can
see information about the caller on the active line.
The preview key must be configured by System Support.
Precondition: You have accepted a call on a line key.
The lamp on another line key is flashing fast.
Activating the preview function
Service Menu
Press the key. The lamp lights up.
Line
Press the desired line key.
Information is displayed about the caller or the waiting
or parked user.
Deactivating the preview function
Line
Press the key. The lamp goes out.
The menu line and call duration display appear again.
Taking calls on line keys
If several calls are received at the same time, you can
take the calls in the order in which they are offered to
you - or you can give priority to certain calls.
67
Making multi-line and team calls
Step by Step
Precondition: System Support has specified the sequence in which incoming calls are to be routed to line
keys.
Taking calls in the order offered
Your telephone rings (ringing signal). The caller is displayed, e.g. "3235 Brown". The lamp at the relevant line
key flashes rapidly.
Q Lift the handset.
or
Speaker
Press the key. You are in handsfree conversation/open
listening mode (optiset E advance does not have handsfree working).
Taking calls with priority
Your telephone rings (ringing signal). The caller is displayed, e.g. "3235 Brown". The lamp at the relevant line
key flashes rapidly. The lamps at other line keys also
flash rapidly.
Line
Press the line key to which you are giving priority. The
name of the other caller (e.g. "3236 Jackson") is displayed briefly.
Q Lift the handset.
or
68
Speaker
Press the key. You are in the handsfree conversing/open
listening mode.
Making multi-line and team calls
Step by Step
Activating/deactivating ringer
When you are making a call on a line, you may be disturbed by the ringing signals for other incoming calls. If
"ringer cutoff" has been configured, your telephone
does not ring. Incoming calls are then signalled by the
flashing of the line keys.
With the "ringer" key configured:
Ringer cutoff
To deactivate ringing:
Press the key. The lamp lights up.
The telephone does not ring for incoming calls.
Ringer cutoff
To activate ringing:
Press the key. The lamp goes out.
The telephone rings for incoming calls.
Via the Service Menu:
Press the key. The lamp lights up.
Service Menu
IN Enter the service code.
or
Switches?
Select and confirm.
Ringer cutoff?
Select and confirm.
and
Deactivate?
or Confirm.
Activate?
69
Making multi-line and team calls
Step by Step
Dialling with line keys
Your telephone can be configured with either automatic or selectable line seizure. System Support specifies
whether a line (and which line) is seized automatically
when the handset is lifted or when handsfree conversing and open listening are activated.
The display "Please select a line"
which you receive after lifting the handset or
pressing the loudspeaker key instructs you to
seize a line.
Dialling with automatic line seizure:
Q Lift the handset.
or
Speaker
Press the key.
The display briefly indicates the line number and the line
status and then requests you to dial.
A display such as "3235 active" means:
a line (3235) has been selected automatically.
The lamp of the selected key lights up.
S Enter the number.
Dialling with selectable line seizure:
Q Lift the handset.
or
Speaker
Press the key.
You are requested to press a free line key:
"Please dial".
Line
Press the free line key. The lamp lights up.
The display briefly indicates the line number and the line
status and then requests you to dial.
A display such as "3236" means:
the selected line (3236) has been seized.
S Enter the number.
70
Making multi-line and team calls
Step by Step
Identifying the line used
If several lines are seized at the same time, you can find
out which line you are conversing on.
With the "display line" key configured:
Press the key.
Show used line
Via the Service Menu:
Press the key. The lamp lights up.
Service Menu
OM Enter the service code.
or
Additional functions?
Select and confirm.
Show used line?
Select and confirm.
The number and status of the line currently in use are
displayed.
A display such as "3235 active" means:
line (3235) is being used.
Alternating between different lines
Precondition 1: System Support has specified that
when the user switches between lines, the lines are
placed on hold and can only be cleared again by replacing the handset or by actuating the "Disconnect" key.
Precondition 2: You are connected to various other parties by way of two or more lines. These can be either
calling parties (Æ page 67) or called parties
(Æ page 70).
You are conducting a call on line 1, for example. The line
key of the party on hold flashes slowly.
Line 2
Press the slowly flashing line key. The first party waits
on line 1.
Line 1
Press the slowly flashing line key. The second party
waits on line 2.
You can alternate between the parties as often as you
wish.
71
Making multi-line and team calls
Step by Step
Terminating a connection on a line key
W Replace the handset.
or
Press the key which is lit.
Speaker
Entering a call on a line (add-on conference)
Precondition: There is a call on one of the lines. The
line key lamp is lit.
Press the line key. Conference tone can be heard by you
and by the users who are already connected. All three
parties can now converse with one another. The lamp
remains lit.
Line
Call entering is not possible if the "Privacy" function has been activated for the line in question.
If one of the three parties replaces the handset,
the other two remain connected to each other.
If the remaining parties are yourself (having entered the call) and the person who originally
seized the line, consultation is no longer possible.
Station override security
Allowing override
Your primary line can be programmed so that no one
can enter the line when it is busy. In this case you can
allow override, but this permission only applies to the
call in progress or to the next call.
You are already engaged in a call on a line.
or Q Lift the handset.
With the "privacy" key configured:
Press the key.
Privacy
Via the Service Menu:
Press the key. The lamp lights up.
Service Menu
OO Enter the service code.
or
72
Making multi-line and team calls
Step by Step
Additional functions?
Select and confirm.
Privacy is off?
Select and confirm.
Call entering is now permitted.
Preventing override
Even if station override security has not been programmed, you can still prevent call entering.
The station override security applies to the call in
progress or to the next call.
You are already engaged in a call on a line.
or Q Lift the handset.
With the "privacy" key configured:
Press the key.
Privacy
Via the Service Menu:
Press the key. The lamp lights up.
Service Menu
ON Enter the service code.
or
Additional functions?
Select and confirm.
Privacy is on?
Select and confirm.
Call entering is not possible.
Terminating a connection on a line key
W Replace the handset.
or
Speaker
Press the key which is lit.
73
Making multi-line and team calls
Step by Step
Holding a call on a line key and picking
it up again
Precondition: You have taken a call on a line key
(Æ page 67).
Placing on hold:
Press the key.
Hold
or
Select and confirm.
Hold?
The line key on which the call is parked flashes slowly.
The call can be resumed at any team telephone on
which the lamp belonging to this line key is flashing
slowly.
Resuming the call:
Press the flashing line key. Continue the call.
Line
Holding a call on a line key exclusively
and picking it up again
Precondition: You have taken a confidential call on a
line key.
Placing on hold:
Press the key. The lamp lights up.
Exklusive hold
or
Private hold?
Select and confirm.
The line key on which the call is parked flashes slowly.
The call can only be resumed at your telephone and
is not signalled at any other telephone.
Resuming the call:
Line
74
Press the slowly flashing line key. Continue the call.
Making multi-line and team calls
Step by Step
Picking up a held call
A colleague in an open-plan office has parked a call on a
line key and requests you (verbally) to take over the call.
You have no access to this line.
Q Lift the handset.
Direct call pickup?
Select and confirm.
S Enter the station number of the telephone at which the
call was parked. You automatically pick up this call.
Forwarding calls for lines
If you activate call forwarding for a line which can also
be accessed at other telephones, the call forwarding
function applies to all line keys belonging to this line.
Storing and activating variable
call forwarding for a line
Line
Press the line key, e.g. for line 3235.
With the "call forwarding" key:
Service Menu
Press the key. The lamp lights up.
Call forwarding
Press the key.
or Via the menu:
Service Menu
Press the key. The lamp lights up.
The available types of variable call forwarding for every
line are identical with the call forwarding types described above. Therefore, for all further steps see
Æ page 54..
75
Making multi-line and team calls
Step by Step
Storing and activating a fixed call
forwarding destination for a line
Line
Press the line key for the required line. The lamp lights
up.
Service Menu
Press the key. The lamp lights up.
The settings for fixed forwarding for every line are identical with the call forwarding function described above.
Therefore, for all further steps see Æ page 51.
Activating fixed call forwarding for a line
(without storing)
Press the line key for the required line. The lamp lights
up.
Line
With the "call forwarding" key:
Press the key. The lamp lights up.
Call forwarding
Via the Service Menu:
Press the key. The lamp lights up.
Service Menu
IL Enter the service code.
or
Switches?
Select and confirm.
Call forwarding?
Select and confirm.
Activate?
Confirm.
For further information see Æ page 52.
76
Making multi-line and team calls
Step by Step
Cancelling the fixed call forwarding
destination
Precondition: The telephone is in the idle state. A fixed
forwarding destination has been stored (Æ page 76).
Line
Only if it is not your primary line:
Press the line key for the required line.
Service Menu
Press the key. The lamp lights up.
The settings for fixed forwarding for every line are identical with the call forwarding function described above.
Therefore, for all further steps see Æ page 53.
Deactivating call forwarding for a line
Precondition: The telephone is in the idle state. After a
line key has been pressed, an activated call forwarding
function is indicated on the display.
Only if it is not your primary line:
Press the line key for the required line.
Line
With the "call forwarding" key:
Press the key. The lamp goes out.
Call forwarding
Via the Service Menu:
Press the key. The lamp lights up.
Service Menu
IL Enter the service code.
or
Switches?
Select and confirm.
Call forwarding?
Select and confirm.
Deactivate?
Confirm.
For further information see Æ page 53
77
Making multi-line and team calls
Step by Step
Taking calls for colleagues in a team
If a member of a team does not answer a call within 15
seconds (depending on the system), the other members of the team hear an alerting tone.
Telephone in the idle state:
The telephone rings. The display shows: "Call for...".
Q and
Waiting call
Lift the handset and press the flashing key. You have
now taken over the call.
or
Waiting call
Press the flashing key only.
You are in the handsfree conversing/open listening
mode.
In the course of a call:
Waiting call
Press the flashing key.
The first party waits while you are connected to the second party (Æ page 71).
Terminating the second call – back to the first:
Disconnect
Press the key.
Picking up a specific team call
You hear another telephone ring and you know its station number or a colleague requests you (verbally) to
pick up a call for a specific telephone.
If you do not know the number, you can have it displayed (Æ page 79).
Q Lift the handset.
Direct call pickup?
Select and confirm.
S Enter the station number of the telephone for which
you wish to (or have been requested to) pick up the call.
In this way you pick up the call.
78
Making multi-line and team calls
Step by Step
Having the number of the called station
displayed
If the number of the station for which you (as a member
of a call pickup group) wish to pick up a call does not appear on the display, you can enter the code for "Display
on request" after lifting the handset. If you are not sure
of this code, enquire with System Support:
Q Lift the handset.
After the code has been entered, the station number of
the telephone which has been called is displayed.
Enter the code!
Taking a call in a hunt group
All the members of the team can be accessed simultaneously by way of a hunt group number.
Your telephone rings.
Q Lift the handset.
Removing station from hunt group/
adding station to hunt group
Precondition: A hunt group has been configured in the
team.
You can disconnect yourself from the hunt group at any
time, e.g. when you leave the office. You can rejoin the
hunt group as soon as you return to the office.
You can still be contacted via your own number
when you have been disconnected from the hunt
group.
Press the key. The lamp lights up.
Service Menu
IK Enter the service code.
or
Switches?
Select and confirm.
Hunting group?
Select and confirm.
and
79
Making multi-line and team calls
Step by Step
Deactivate?
or Confirm.
Activate?
Automatic parking and resumption of a
call
You can park a call on a telephone within a call pickup
group and then resume it at a different telephone.
Parking the call:
Call park
Press the key. The "call park" key lamp flashes at all telephones in the call pickup group.
W Replace the handset.
Resuming the call:
Call park
Press the flashing key. Continue the call.
Manual parking and resumption of a
call
You can park up to ten internal and/or external calls and
resume them at another telephone.
Parking:
System park
Press the key. The parking key lamp flashes on all
phones in the call pickup group.
H ... P Enter and remember a parking position number 0-9. If
the parking position number you have entered is not
displayed, this means that it is busy; enter another number.
W Replace the handset.
80
Making multi-line and team calls
Step by Step
Picking up a call on hold
Pick up call on hold?
Press the flashing key.
H ... P If necessary, enter corresponding parking position number.
Continue the call.
After a certain time, calls on hold return to where
they were held (recall).
Calling a team member directly
Precondition: DSS keys have been configured at your
telephone (Æ page 50).
The lamp statuses of direct station selection
(DSS) keys
Jones
The lamp is not lit – the user is not making a call.
or
Jones
The lamp is lit – the user is making a call.
or
Jones
The lamp is flashing – there is an incoming call for the
user; the user has not answered it yet.
81
Making multi-line and team calls
Step by Step
Calling a direct station selection (DSS) user
Note the lamp status of the DSS key!
The lamp is not lit – the user is not making a call:
Jones
Press the DSS key, e.g. "Jones".
Q Lift the handset.
or With the handset on-hook: you are in the handsfree
conversing/open listening mode.
The lamp is lit – the user is making a call:
Jones
Press the DSS key.
You are camped on to the other party’s call. He hears a
tone, the "call pickup" key flashes at his telephone and
your name and number are displayed.
Q When the other party answers: lift the handset.
or With the handset on-hook: you are in the handsfree
conversing/open listening mode.
Taking a call for a direct station selection
(DSS) user
The called team member is not at his normal workplace,
for example.
Q Lift the handset.
Jones
Press the flashing key, e.g. "Jones".
Executive/secretary functions
82
Making calls in an "executive/secretary" team
Step by Step
Making calls in an "executive/
secretary" team
Each "executive/secretary" team is configured by System Support.
An "executive/secretary" team can consist of a maximum of 4 executive telephones and 2 secretarial telephones.
Calling executive or secretary’s office
The lamp statuses of direct station selection
(DSS) keys
An "executive" DSS key is configured on the secretary’s
telephone and a "secretary" DSS key on the executive’s
telephone. The meaning of the lamp statuses is the
same for both keys. Here is an example for the "executive" key on the secretary’s telephone:
Executive
The lamp is not lit – the executive is not making a call.
or
Executive
The lamp is lit – the executive is making a call.
or
Executive
The lamp is flashing – there is an incoming call for the
executive; the executive has not answered it yet.
Making a call to the executive/secretary
Example of a call from the executive to the secretary:
Lamp is not lit – the secretary is not making a call:
Secretary
Press the key.
Q Lift the handset.
or Handset on-hook: handsfree conversing/open listening.
83
Making calls in an "executive/secretary" team
Step by Step
Lamp is lit – the secretary is making a call:
Secretary
Press the key.
You are camped on to the secretary’s call. The secretary
hears an alerting tone; the "call pickup" key flashes.
Q If the secretary’s office accepts the call:
Lift the handset.
or Handset on-hook: handsfree conversing/open listening.
The procedure is the same for a direct call from
the secretary’s office to the executive – with the
"executive" DSS key.
Taking a call for the executive in the
secretary’s office
When a call is received for the executive, the telephone
rings in the secretary’s office.
Q Lift the handset.
or
Speaker
Press the key. The lamp lights up.
Handsfree conversing and open listening.
Taking a call for the executive during a call in
progress
You are making a call.
A call is received for the executive.
Exec. Call pickup
Request the other party to wait, then press the flashing
key. Answer the call.
Terminating the call – returning to the first call:
Disconnect
Press the key.
Continue your original call.
Extending a call to the executive
Precondition: You have taken a call for the executive in
the secretary’s office.
Executive
84
Press the DSS key for the executive. You are connected
to the executive.
Making calls in an "executive/secretary" team
Step by Step
Extending the call with prior announcement:
Inform the executive that a call is waiting.
W Replace the handset.
Extending the call without prior announcement:
W Replace the handset immediately.
Switching calls directly to the
executive
When the secretary’s office is unattended, calls for the
executive can be diverted immediately to the executive’s telephone. The forwarding function can be activated at the secretary’s telephone and at the executive’s
telephone.
To activate:
Intercept
Press the key. The lamp lights up.
To deactivate:
Intercept
Press the key. The lamp goes out.
Calls for the secretary are not redirected - only
calls for the executive.
Taking a call on the executive’s
telephone
A call for the executive is not answered in the secretary’s office. After 15 seconds (depending on the system), you hear an alerting tone on the executive telephone. The display indicates who is calling.
Q Lift the handset.
Waiting call
Press the flashing key.
85
Making calls in an "executive/secretary" team
Step by Step
Taking calls for other "executive/
secretary" teams
If several "executive/secretary" teams have been configured, you can pick up calls for other teams.
Q Lift the handset.
Press the flashing DSS key, for example "Executive 3".
Executive 3
Call pickup is also possible during a call in
progress. Please request the other party to wait
briefly before you press the flashing key.
Using second telephone for executive
Precondition: A second telephone has been configured for the executive. The executive’s first and second
telephones each have a "call park" key.
Parking a call at the first telephone:
Press the key. The lamp lights up.
Call park
Resuming a call at the second telephone:
Q Lift the handset.
Press the flashing key.
Call park
Activating/deactivating second call for
executive
As the executive, you can specify whether your calls are
to be received in the secretary’s office while you are
conducting a call. If you are making a call and at the
same time expecting an important call, it is advisable to
activate the "second call" function, for example.
Press the key. The lamp lights up.
Service Menu
IH Enter the service code.
or
86
Switches?
Select and confirm.
Camp-on?
Confirm.
Making calls in an "executive/secretary" team
Step by Step
and
Activate?
or Confirm.
Deactivate?
Using the call signal function
If a call signal key has been configured on your executive telephone you can generate a call signal on a particular destination telephone (for example, in the secretary's office) by pressing this key. When a call signal is
received the number of the calling telephone is displayed briefly on the destination telephone.
The key can be pressed (once or several times) when
the phone is idle or while a call is in progress.
If the Call Signal function has not been configured, you
can generate a call signal at a destination telephone by
lifting the handset and entering the call-signal code
number.
Calling a messenger
You can call a messenger at the push of a "Messenger"
key if the appropriate function has been configured on
the executive telephone. The procedure is the same as
described in the section "Storing a repertory dialling
number on a key" (Æ page 45) - in this case for a messenger.
Designating a deputy for the secretary
The calls for the executive which are normally received
in the secretary’s office can be diverted to a different
telephone. A "Function transfer" key must be configured
for this purpose. The procedure is the same as described in the section "Storing a repertory dialling number on a key" (Æ page 45) - in this case for a deputy.
To activate deputy:
Deputy
Press the key. The lamp lights up.
To deactivate deputy:
Deputy
Press the key. The lamp goes out.
le telephone
87
Labelling, documentation and accessories
Labelling, documentation and accessories
Key labels
For each telephone/add-on unit you are supplied with sheets of prepunched key labels, which you can use to label your programmable keys
and the fixed function keys.
To insert the label for your fixed
function keys, simply lift one of the
small pre-punched labels off the
sheet and attach it, covering it with
the foil supplied (matt surface uppermost), as indicated in the illustration.
To label your programmable keys
(soft keys), write the stored numbers or the Hicom functions in the
appropriate white boxes on one of
the large labels, detach it from the
label sheet and insert it, covering it
with the foil supplied (matt surface uppermost), as indicated in the illustration.
Attaching the telephone number label
For each telephone a sheet of adhesive telephone number labels is supplied.
Fill in the number label (fire service, police, own number), peel it off and
attach it to the recess on the telephone (after lifting the handset).
Using the key labelling programme
The insert sheets for all optiset E units can be lettered by System Support
using labelling programme WINTASBE (order no. P31003-E80-T101-∗-19).
In the case of many optiset E units, we recommend the use of DIN A4
sheets (A31003-E80-T100-∗-19) on which all the insert strips are prepunched.
88
Labelling, documentation and accessories
Re-ordering the Operating Instructions
These Operating Instructions can be re-ordered in a documentation package from the Siemens Sales Organisation. The order number is A31003G3000-B312-8-7619.
To obtain further information or to place an order, please get in touch
with System Support.
Downloading the Operating Instructions
from the Internet in PDF format
You can download these Operating Instructions from the Internet in the
form of a file:
http://www.siemens.com/communication/manuals
The Operating Instructions are in PDF format. You therefore require a computer on which the Adobe software product Acrobat Reader is installed.
To download from the Internet, you need a computer with Internet access
and a WWW browser, such as Netscape Communicator or Microsoft Internet Explorer.
Individual operating instructions
You can obtain the data files for these operating instructions in order to
modify them to suit your own purposes.
Ordering accessories
The optiset E adapters are slide-in modules which can be inserted in the
mounting positions beneath optiset E advance. Their use is dependent
on the specific requirements of the workstation.
optiset E key module:
Add-on unit with programmable keys. Up to four of these add-on units can
be connected to your telephone.
optiset E signature module:
Add-on unit for personal identification (PIN) with a chip card.
optiset E data adapter:
For the connection of a PC via a V.24 interface.
optiset E ISDN adapter:
For the connection of an ISDN terminal, such as an ISDN fax machine, a
video unit or a PC with an S0 interface.
optiset E teleworking adapter:
For the transfer of all your telephone settings to the telephone at your teleworking workplace.
89
Labelling, documentation and accessories
optiset E privacy module:
Add-on unit for the voice encryption of calls.
optiset E headset/headset plus adapter:
For the connection of a headset/tape recorder.
optiset E contact adapter:
For additional call signalling, e.g. in the form of a second ringer in a noisy
environment or an illuminated display outside an office (e.g. "Do not enter").
optiset E control adapter:
For the connection of a headset to a telephone linked to a PC.
optiset E phone adapter:
For the connection of a second optiset E telephone. The second optiset E
telephone can be called via its own number.
optiset E analog adapter:
For the connection of an additional analog telephone, a fax machine or a
PC with a modem card.
optiset E acoustic adapter:
For the connection of a desktop microphone, a loudspeaker box or a second handset.
optiset E distance adapter:
For extending the range.
Headset:
For users with high calling rates.
Desktop microphone:
For handsfree conversing in difficult acoustic conditions.
Active loudspeaker box:
For enhanced acoustic quality during handsfree conversing.
Second handset:
To counteract the effects of loud ambient noise.
For details of the products listed above, please refer to the Data
Sheet for optiset E telephones.
90
Advice for users
Advice for users
Care of the telephone
•
•
•
Use either a damp cloth or an antistatic cloth to clean the telephone
set. Never use a dry cloth!
If the telephone set needs to be cleaned thoroughly, use a neutral, diluted, surface-active cleaning agent. Take care that all traces of the
cleaning agent are removed with a damp cloth (using water only!).
Never apply a cleaning agent which contains alcohol or which is liable
to harm plastic surfaces; never use an abrasive cleaning powder.
How to deal with malfunctions
There is no response after a key has been pressed:
Check whether the key has become stuck.
No ringing tone when an incoming call is received:
Check whether you have disabled the telephone (Æ page 19). If you have,
cancel this function in order to receive calls again.
You cannot dial a number:
Check whether you have locked the telephone (Æ page 43). If you have,
unlock the telephone in order to make calls again.
The time shown on the display is not correct:
After 24 hours at the latest, the time is corrected automatically (overnight).
All other faults:
First get in touch with System Support. If the fault cannot be
eliminated, Customer Service must be called in.
91
Advice for users
Step by step
Dealing with error messages on the
display
Time exceeded
Possible cause:
Maximum input time exceeded.
Handset not replaced.
Possible response:
Enter more quickly; avoid lengthy pauses between key
actuations.
Please try later
Possible cause:
System is overloaded, no
lines free, queue is full.
Possible response:
Wait and then try again later.
Currently not accessible
Possible cause:
a) The function is not available at this point in time.
b) The number you dialled does not exist.
Possible response:
a) Wait and then try again later.
b) Enter the number correctly or call the attendant.
Not possible
or
Incorrect input
or
Nothing stored
Possible cause:
Speed dialling number does not exist, timed reminder
entered incorrectly, barred or inadmissible input, precondition not met (e.g. attempt to toggle without a second party), incomplete dialling.
Possible response:
Correct your input, select a permissible option, enter
the number in full.
92
Advice for users
Step by step
Not authorized
or
Not allowed
Possible cause:
a) Attempt to use a barred function.
b) PIN entered incorrectly.
Possible response:
a) Apply to System Support for authorisation to activate
this function.
b) Enter the PIN correctly.
Not available
Possible cause:
Number not entered completely, star or square key not
pressed.
Possible response:
Enter the number or code correctly
(or as instructed).
Protected
Possible cause:
Data transmission in progress.
Possible response:
Wait and then try again later.
Who to contact if a problem occurs
In the case of faults which last longer than 5 minutes,
for example, please get in touch with System Support.
93
Index
Index
A
Add-on conference .................................... 72
Angle of display .......................................... 42
Automatic call forwarding ......................... 57
C
Call list .......................................................... 32
interrogating ............................................ 32
Call pickup (team) ...................................... 78
Call signal function ..................................... 87
Callback ....................................................... 38
accepting ................................................. 38
storing ...................................................... 38
Callback request ......................................... 16
Camp-on ...................................................... 39
CE label .......................................................... 4
Checking functionality ............................... 49
Conference
managing ................................................. 29
Consultation ................................................ 24
D
Deactivating ................................................ 64
Deputy (secretary’s office) ....................... 87
Do not disturb facility ................................ 19
DSS keys (team) ........................................ 81
E
Executive/secretary functions ................. 83
Extending a call .......................................... 30
F
Fixed call forwarding ................................. 76
Forwarding calls ......................................... 51
for lines .................................................... 75
H
Handsfree conversing function ............... 42
Hunt group .................................................. 79
94
I
Identification at another telephone
deactivating ............................................. 64
with chip card ......................................... 64
Individual speed dialling numbers
storing ...................................................... 46
Internet service .......................................... 89
Interrogating mailbox ................................. 16
K
Key labelling programme .......................... 88
L
Last number redial ..................................... 34
Line keys ..................................................... 66
lamp statuses ......................................... 67
primary line .............................................. 66
secondary line ......................................... 66
M
Mailbox ........................................................ 16
callback request ...................................... 16
cancelling entries ................................... 17
Making a call ............................................... 21
Making a second call ................................. 24
Messenger call ........................................... 87
N
Number label .............................................. 88
Number suppression ................................. 22
O
Open listening ............................................ 14
Operating instructions ............................... 89
Override security ........................................ 72
P
Parking
manual ...................................................... 80
Parking a call ............................................... 80
Index
Primary line (line keys) .............................. 66
R
Relocating .................................................... 65
Repertory dialling ....................................... 45
Ringing tone pitch ...................................... 41
Ringing tone volume ................................. 41
S
Saved number redial ................................. 33
Second call .................................................. 15
Second call (executive) ............................. 86
Second telephone (executive) ................. 86
Selection with keys ..................................... 5
Service Menu ............................................... 5
Speaker ........................................................ 13
Speakerphone ............................................. 13
switching to ............................................. 14
Speakerphone mode ................................. 13
T
Taking over a call
(executive/secretary) ............................. 84
V
Variable call forwarding ............................. 75
95
1P A31003-H8400-C104-1-7619
The information in this document contains general descriptions of the technical options
available, which do not always have to be present in individual cases.
The required features should therefore be specified in each individual case at the time of
closing the contract.
Reference No.: A31003-H8400-C104-1-7619 • Printed in the Federal Republic of Germany
BA 30.03.2002 HiPath 4000, Hicom 300 E/300 H
Subject to availability. Right of modification reserved.
-43$643360+;7330&437040:94<-
© Siemens AG 2002 • Information and Communication Networks • Hofmannstr. 51 • D-81359 Munich •
s
HiPath 4000
Hicom 300 E/300 H
Quick-Reference Operating Instructions
optiset E standard
optiset E advance
optiset E advance plus
optiset E advance conference
Quick-reference operating instructions
(appendix)
Important functions at a glance
Making a call:
Either: Q + S
Or: S + when the other party answers Q or handsfree conversing and open listening.
Saved number redial:
Store:
Either: The connection has been set up.
Or: Any number:
+S+
New entry?
Redial: Q +
+
Service Menu
.
+
.
Save?
.
Redial
Last number redial:
Q + Last no. redial
Redial
Redial
.
Switching between the handset and handsfree conversing/open listening during a call:
From handset to handsfree conversing/open listening: hold down
+W.
Speaker
From handsfree conversing/open listening to handset: Q.
Information during a call in progress (consultation):
Consultation?
+ second party S.
To terminate:
.
Release and return?
Alternating between parties (toggling):
Toggle?
.
Extending a call:
With prior announcement:
Consultation?
%
Without prior announcement:
Start transfer?
+ S + announce call, + W.
+ S + W.
Setting up a conference call:
First call +
+
+S+
Start conference?
Conference?
+ S.
Add on to conference?
Storing/activating variable call forwarding:
Variable call forw.?
+ S(destination) +
.
Save?
Interrogating call list:
Service Menu
+
+
Destinations?
or
Incoming calls?
Terminating interrogation:
Dialling displayed call:
Call log?
+
.
Outgoing calls?
.
Service Menu
.
Output?
Storing individual speed dialling numbers:
Service Menu
S (0..9) +
+
+
Destinations?
Speed dialing?
+ S (destination) +
New entry?
+
.
Save?
Dialling with individual speed dialling numbers:
Service Menu
+
+ S (0..9).
Use speed dialing?
Switching telephone off/on again to make a call:
Service Menu
+
+
PIN / COS?
+
Change COS?
S(PIN).
Storing/changing a number on a key for repertory dialling:
Service Menu
tion) +
+
+
+ S (destina-
New entry?
.
Save?
Storing a timed reminder:
Service Menu
+
Reminder?
S (time with 3 or 4 digits) +
Save?
+
New reminder?
.
+
Maximum Service Menu functions available
Press the "Service Menu" key. Use
and
in order
to select functions. Or use the service codes, e.g. 2 1 for "second call on/off".
1 Destinations
1
12
13
14
15
16
17
18
Storing variable call forwarding
Storing fixed call forwarding
Storing speed dialling number
Storing redial
Storing repertory dialling number
Storing DSS number
Storing call forwarding for number
Using call list
1 Variable call forwarding
2 Other type of call forwarding
1 Incoming calls
2 Outgoing calls
2 Switches
1
2
3
4
5
6
7
Second call on/off
Do not disturb on/off
Stop voice calling on/off
Hunt group remove/add
Call forwarding on/off
Forwarding for number enquire/off
Ringer cutoff off/on *
1 Variable call forwarding
2 Other type of call forwarding
3 Using speed dialling
4 Displaying key assignment
5 Voice mail service
1 Own voice mailbox
2 Remote voice mailbox
6 PIN and class of service
(COS)
1 PIN 1 (option: network-wide)
2
3
4
5
6
7
PIN 2
PIN 3
PIN 4
PIN 5
PIN off
Changing class of service
8 Additional functions
1
2
3
4
5
6
7
8
DTMF suffix-dialling on **
Display suppression on
Display suppression off
Malicious call holding
Using paging facility
Show used line*
Privacy on *
Privacy off *
9 Terminal test
1
2
3
4
5
6
7
Lamp test (LED)
Display test
Key test
Acoustic test
Terminal identity (ID)
Software version
Power feeding range
7 Storing timed reminder
* Telephone with line keys and multi-line access (keyset)
1
2
3
4
5
6
Loudspeaker
Handset
Ringing tone volume
Ringing tone pitch
Alerting tone
Handsfree conversing
**not for UK