1
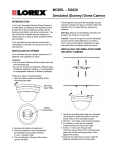
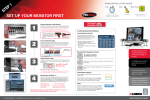
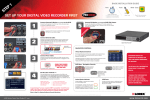
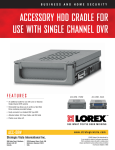
MODEL: ACC-HDB / ACC-HDB80
EXTERNAL IDE HDD BAY
THIS PACKAGE CONTAINS:
NOTE::
1 - HDD (Hard Disk Drive) Bay
Model ACC-HDB does not
include a HDD
1 - 12V DC Power supply
1 - 2 keys for cartridge
1 - 40 pin interface cable
Model ACC-HDB80
includes a 80 GB HDD
1 - Owner’s Manual
INTRODUCTION:
Congratulations on purchasing the External IDE HDD Bay. This external hard drive bay facilitates recording to
a Slave HDD from a DVR system with an IDE Sub input. The system has a 12V DC power supply, power
switch, a 40 pin cable interface input and a removable cartridge casing to easily install or remove your hard
disk drive.
This external hard drive bay, when equipped with a correctly set hard disk drive, can be used as a slave backup drive for a DVR system when the master drive is full.
To learn more about this External IDE HDD Bay and other HDD units, please visit our website at:
www.strategicvista.com
CAUTIONS:
1. All the warnings and instructions of this manual should be followed
2. Remove the plug from the outlet before cleaning. Do not use liquid aerosol detergents. Use water
damped cloth for cleaning
3. Do not use this unit in very humid and wet places
4. Keep enough space around the unit for ventilation. Slots and openings of the cabinet should not be
blocked.
5. During flashes of lightning or cracks of thunder, or when the system is not used for a long time, unplug
the system power supply and disconnect the antenna and cables to protect the unit from lightening or
power surges.
FEATURES:
•
•
•
•
Easily connects to any DVR or DVR combo unit with a 40 pin IDE Sub input
Comes with its own power supply for easy connection to your DVR
2 keys to lock cartridge
Supports 20 to 250 GB HDD
INSTALLATION:
Back of Unit
IDE Sub Output
(40 pin)
12V DC Power
Adapter Connection
Power Switch
1. Connect the 40 pin interface cable to the IDE Sub output on the External IDE Bay Unit. Connect the
other end of this cable to the IDE Sub input on the back of the DVR or DVR combo unit
2. Follow the procedure in the DVR or DVR Combo owner’s manual for installing the HDD unit.
Important Note: If you are using your own HDD, please set the jumper to SLAVE. Refer to the
instructions included with your HDD for more information. Depending on the
model purchased, an HDD may or may not be included.
3. Plug in the 12V DC power adapter into an AC outlet, and turn the power switch ON
4. When you start-up your DVR or DVR Combo the system will automatically detect the MASTER drive
only. For the system to detect both the MASTER and SLAVE, you will need to go into the MAIN MENU
CONTROL and select the HDD/REC SET and set the parameters to activate the HDD slave.
Note: These steps are outlined in the MAIN MENU CONTROL section of the DVR or DVR Combo’s
Owner’s Manual
When the MASTER HDD becomes FULL during recording, the SLAVE HDD becomes the active drive,
receiving the earliest recorded data from the MASTER HDD. Therefore, data is not lost, as it gets
transferred to the SLAVE HDD.
TYPICAL CONFIGURATION:
40 pin Interface cable
Back of a 21” DVR Combo
CH1
CH3
CH2
CH4
USB
RS-232
SENSOR INPUT
SENSOR
OUTPUT
POWER
MAIN S/W
+ -
+ -
+ -
+ -
+ -
VIDEO INPUT
CH2
CH4
SLAVE
OUT
AUDIO INPUT
MONITOR
OUT
AC INPUT
1
2
3
IDE-SUB
CH3
VIDEO
CH1
4
AUDIO
AC100-240V,50/60Hz
Back of HDD Bay
TROUBLESHOOTING:
If the system does not function properly, please check the following points:
PROBLEM
SOLUTION
Slave HDD not readable
Check the jumper PIN connection.
Activate the Slave HDD in the DVR or DVR Combo’s Menu
options.
(See the Owner’s Manual for the DVR or DVR Combo).
HDD not found
Re-insert HDD as per instructions on “Installing the HDD”.
Make sure that the HDD cartridge is locked.
Check the jumper setting, it must be set to SLAVE.
Keypad doesn’t work
Remove the Key Lock
Recording stopped
The HDD is Full, and Overwrite is not
enabled
SPECIFICATIONS
HDD capacity:
Interface Cable:
Outer Case:
Power Supply:
Dimensions:
250GB (Max.)
40 pin IDE (30 cm, 11.8 i nches)
Steel Construction
12V DC, 1.0A
5.9”(W) x 3.8”(H) x 8.9”(D)
Distributed By:
STRATEGIC VISTA CORP.
300 Alden Road, Markham, Ontario, Canada L3R 4C1
For more information:
www.strategicvista.com
As our products are subject to continuous improvement, SVII and its subsidiaries reserve the right to modify product
design, specifications and prices, without notice and without incurring any obligation. E&OE