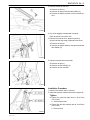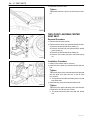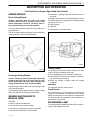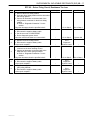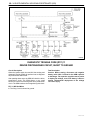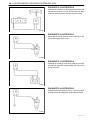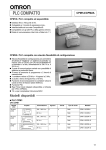
1
SECTION 8A
SEAT BELTS
CAUTION: Disconnect the negative battery cable before removing or installing any electrical unit or when a
tool or equipment could easily come in contact with exposed electrical terminals. Disconnecting this cable
will help prevent personal injury and damage to the vehicle. The ignition must also be in B unless otherwise
noted.
TABLE OF CONTENTS
Description and Operation . . . . . . . . . . . . . . . . . .
Driver Seat Belt Warning . . . . . . . . . . . . . . . . . . .
Three-Point Pretensioner Front Seat Belt
(W/EUROPE Only) . . . . . . . . . . . . . . . . . . . . . .
Three-Point WLR Front Seat Belt . . . . . . . . . . . .
8A-2
8A-2
8A-2
8A-2
Repair Instructions . . . . . . . . . . . . . . . . . . . . . . . . .
On-Vehicle Service . . . . . . . . . . . . . . . . . . . . . . . . . .
Three-Point WLR/ELR Front Seat Belt . . . . . . .
Three-Point Pretensioner Front Seat Belt
(W/EUROPE Only) . . . . . . . . . . . . . . . . . . . . . .
Three-Point ELR Front Seat Belt . . . . . . . . . . . .
Three-Point ELR Rear Outboard Seat Belt . . . .
Two-Point Lap Rear Center Seat Belt . . . . . . . .
Operational and Functional Checks . . . . . . . . . .
8A-2
8A-2
8A-2
8A-2
Front Seat Belt Buckle . . . . . . . . . . . . . . . . . . . . . 8A-8
Three–Point ELR Rear Outboard Seat Belt . . . 8A-8
Two-Point Lap Rear Center Seat Belt . . . . . . . 8A-10
Specifications . . . . . . . . . . . . . . . . . . . . . . . . . . . . 8A-11
Component Locator . . . . . . . . . . . . . . . . . . . . . . . .
Front and Rear Seat Belt . . . . . . . . . . . . . . . . . . .
Diagnostic Information and Procedures . . . . .
Seat Belt Warning Lamp is Inoperative . . . . . . .
8A-3
8A-3
8A-4
8A-4
Fastener Tightening Specifications . . . . . . . . . . 8A-11
Schematic and Routing Diagrams . . . . . . . . . . 8A-12
Driver Seat Belt Warning . . . . . . . . . . . . . . . . . . 8A-12
DAEWOO M-150 BL2
8A-5
8A-5
8A-5
8A-6
8A – 2 SEAT BELTS
DESCRIPTION AND OPERATION
DRIVER SEAT BELT WARNING
The driver’s safety belt incorporates a safety belt reminder light in the instrument cluster to remind the driver
if the safety belt is not fastened when the ignition is
turned ON.
THREE-POINT PRETENSIONER
FRONT SEAT BELT (W/EUROPE
ONLY)
The pretensioner front seat belt is optional. It contains a
electrically-controlled pyrotechnical retractor, which reduces seat belt slack when it is activated in a head-on or
angled front collision. The pretensioner front seat belt
must be replaced after an accident that causes its activation.
THREE-POINT WLR FRONT SEAT
BELT
The three-point web locking retractor (WLR) seat belt
will limit the movement of the driver and offer better
protection in an accident.
THREE-POINT ELR FRONT SEAT
BELT
The three-point emergency locking retractor (ELR) front
seat belt is always unlocked, allowing the passenger
freedom of movement, except in emergencies (rapid deceleration, rapid acceleration, or hard cornering maneuvers).
THREE-POINT ELR REAR
OUTBOARD SEAT BELT
The rear outboard seating positions use the three-point
emergency locking retractor (ELR) seat belts. The
three-point emergency locking retractor (ELR) seat belt
is always unlocked, allowing the passenger freedom of
movement, except in emergencies (rapid deceleration,
rapid acceleration, or hard cornering maneuvers).
TWO-POINT LAP REAR CENTER
SEAT BELT
The two-point lap rear center seat belt is a single continuous length of webbing. The webbing is routed from the
anchor through a latch plate and into a single retractor.
OPERATIONAL AND FUNCTIONAL
CHECKS
Caution:
D Keep sharp objects and potentially damaging objects away from the seat belts.
D Avoid bending or damaging any portion of the
buckle or the latch plate.
D Do not bleach or dye the belt webbing. Use only
mild soap and water in order to clean the belts.
D When installing the seat belt anchor bolts and
the screws, start the bolts and the screws by
hand in order to prevent crossthreading.
D Do not attempt any repairs on the retractor mechanisms or the covers. Replace any defective assemblies with new assemblies.
D Replace any belts that are cut or damaged in any
way.
1. Inspect all seat belt anchor bolts and the screws in order to verify that they are secure.
2. Inspect the seat belt buckle. The buckle must lock
and unlock easily.
3. After inserting the latch into the buckle, tug sharply on
the belt. The buckle must remain locked.
4. Fully extend the shoulder belt portion to make sure
that there is no twisting or tears in the belt.
5. Let the shoulder belt retract fully. The belt should retract easily.
DAEWOO M-150 BL2
SEAT BELTS 8A – 3
COMPONENT LOCATOR
FRONT AND REAR SEAT BELT
D1AA401B
1.
2.
3.
4.
5.
Front Seat Belt
Front Seat Belt Buckle
Rear Seat Belt (Three–Point)
Rear Seat Belt (Two–Point) / Buckle (Three–Point)
Rear Seat Belt Buckle (Three–Point/Two–Point)
DAEWOO M-150 BL2
8A – 4 SEAT BELTS
DIAGNOSTIC INFORMATION AND PROCEDURES
SEAT BELT WARNING LAMP IS INOPERATIVE
Condition
Seat Belt Warning
Lamp is Inoperative
Probable Cause
Correction
D Fuse F1 is blown.
D Replace the fuse F1.
D Seat belt warning lamp wiring harness is
open circuit or a short circuit.
D Repair the wiring harness.
D The continuity between the two terminals at
the switch side of the connector is fail.
D Replace the seat belt switch.
D The continuity between the terminal for the
BLK wire and ground is fail.
D Repair the open ground.
D The warning lamp bulb in the instrument
cluster is blown.
D Replace the warning lamp bulb.
DAEWOO M-150 BL2
SEAT BELTS 8A – 5
REPAIR INSTRUCTIONS
ON–VEHICLE SERVICE
THREE–POINT WLR/ELR FRONT
SEAT BELT
Removal Procedure
1. Slide the front seat forward and fold the seatback.
2. Remove the bolt on the lower B–pillar.
D Remove the bolt (1).
D Remove the spacer and the fiber washer (2).
D Remove the plastic protector on the seat belt anchor.
D110A501
3. Remove the lower B–pillar trim panel. Refer to Section 9G, Interior Trim.
4. Remove the bolt on the upper B–pillar.
D Using a flathead screwdriver, open the bolt cap (1).
D Remove the bolt (2).
D Remove the spacer and the fiber washer (3).
D11A502A
5. Remove the seat belt retractor bolt.
D Remove the floor carpet to be seen the retractor.
D Remove the bolt (1).
D Remove the fiber washer (2).
D Remove the seat belt retractor.
D110A503
DAEWOO M-150 BL2
8A – 6 SEAT BELTS
Installation Procedure
Notice: Dissimilar metals in direct contact with each
other may corrode rapidly. Make sure to use the correct
fasteners to prevent premature corrosion.
1. Install in the reverse order of removal.
2. Install the bolt on the upper B–pillar.
Tighten
Tighten the seat belt upper bolt to 30–45 NSm (22–33
lb-ft).
a. Seat belt upper bolt.
D1AA504D
3. Install the seat belt retractor with the bolt.
Tighten
Tighten the seat belt retractor bolt to 30–45 NSm
(22–33 lb-ft).
b. Seat belt retractor bolt.
4. Install the bolt on the lower B–pillar.
D Install the bolt.
Tighten
Tighten the lower B–pillar bolt to 30–45 NSm (22–33
lb-ft).
D Install the spacers and the spring washer.
D Install the plastic protector on the seat belt anchor.
5. Relocate the seatback.
D1AA505B
THREE–POINT PRETENSIONER
FRONT SEAT BELT (W/EUROPE
ONLY)
Removal Procedure
1. Slide the front seat forward and fold the seatback.
2. Remove the bolt on the lower B–pillar.
D Remove the bolt (1).
D Remove the spacer and the fiber washer (2).
D Remove the plastic protector on the seat belt anchor.
D110A501
DAEWOO M-150 BL2
SEAT BELTS 8A – 7
3. Remove the lower B–pillar trim panel. Refer to Section 9G, Interior Trim.
4. Remove the bolt on the upper B–pillar.
D Using a flathead screwdriver, open the bolt cap (1).
D Remove the bolt (2).
D Remove the spacer and the fiber washer (3).
D11A502A
5. Remove the seat belt retractor bolts.
D Remove the floor carpet to be seen the retractor.
D Disconnect the pretensioner front seat belt connector (1).
D Remove the lower retractor bolt (2).
D Remove the fiber washer (3).
D Remove the seat belt retractor.
D28A001A
Installation Procedure
Notice: Dissimilar metals in direct contact with each
other may corrode rapidly. Make sure to use the correct
fasteners to prevent premature corrosion.
1. Install in the reverse order of removal.
2. Install the bolt on the upper B–pillar.
Tighten
Tighten the seat belt upper bolt to 30–45 NSm (22–33
lb-ft).
a. Seat belt upper bolt.
D1AA504C
3. Install the seat belt retractor with the bolt.
Tighten
D Tighten the lower retractor bolt to 30–45 NSm
(22–33 lb-ft).
a. Lower retractor bolt.
b. Connect the pretensioner front seat belt connector.
D28A002A
DAEWOO M-150 BL2
8A – 8 SEAT BELTS
4. Install the bolt on the lower B–pillar.
D Install the bolt.
Tighten
Tighten the lower B–pillar bolt to 30–45 NSm (22–33
lb-ft).
D Install the spacers and the fiber washer.
D Install the plastic protector on the seat belt anchor.
5. Relocate the seatback.
D1AA505B
FRONT SEAT BELT BUCKLE
Removal Procedure
1. Remove the front seat belt buckle
D Remove the bolt (1).
D Remove the buckle (2).
D Remove the patch (3).
D Before removing the driver seat belt buckle, disconnect the reminder light connector.
D11A506A
Installation Procedure
1. Install the front seat belt buckle.
D Connect the reminder light connector.
D Install the patch.
D Install the buckle.
D Install the bolt.
Tighten
Tighten the seat belt buckle bolt to 30–45 NSm
(22–33 lb-ft).
D1AA507B
THREE–POINT ELR REAR
OUTBOARD SEAT BELT
Removal Procedure
1. Remove the rear seat cushion and the rear seatback.
2. Pry off the rear interior trim panel. Refer to Section
9G, Interior Trim.
D Pry off the backshelf trim panel.
D Pry off the luggage compartment side load trim
panel.
D109E566
DAEWOO M-150 BL2
SEAT BELTS 8A – 9
3. Remove the bolt on the floor.
D Remove the bolt (1).
D Remove the spacer and the fiber washer (2).
D Remove the plastic protector on the seat belt anchor.
D110A508
4. Pry off the luggage compartment trim panel.
Refer to section 9G, Interior Trim.
5. Remover the bolt on the C–pillar trim panel (1).
D Open the bolt cap using a flathead screw driver.
D Remove the bolt (2).
D Remove the plastic washers, the spacers and the
fiber washer (3).
D110A509
6. Remove the seat belt retractor bolt.
D Remove the bolt (1).
D Remove the fiber washer (2).
D Remove the rear seat belt.
D110A510
Installation Procedure
1. Install in the reverse order of removal.
2. Install the seat belt retractor bolt and the upper bolt.
Tighten
D Tighten the seat belt upper bolt to 30–45 NSm
(22–33 lb-ft).
a. Seat belt upper bolt.
D Tighten the seat belt retractor bolt to 30–45 NSm
(22–33 lb-ft).
b. Retractor bolt.
D1AA511B
DAEWOO M-150 BL2
8A – 10 SEAT BELTS
3. Install the bolt on the floor.
Tighten
Tighten the bolt on the floor to 30–45 NSm (22–33 lbft).
D1AA512B
TWO–POINT LAB REAR CENTER
SEAT BELT
Removal Procedure
1. Remove the rear seat cushion.
2. Remove the two–point rear seat belt and the buckle.
D Remove the bolt and the fiber washer (1).
D Remove the seat belt (two–point) and the buckle
(three–point) (2).
D Remove the bolt and the fiber washer (3).
D110A513
D Remove the buckle (two–point and three–point)
(4).
Installation Procedure
1. Install in the reverse order of removal.
2. Install the three–point rear seat belt buckle with the
bolt.
Tighten
Tighten the three–point rear seat belt buckle bolt and
the two–point rear seat belt bolt to 30–45 NSm
(22–33 lb-ft).
a. Two–point rear seat belt and three–point rear seat
belt buckle bolt.
3. Install the two–point rear seat belt with the bolt.
D1AA514B
Tighten
Tighten the two–point and three–point rear seat belt
buckle bolt to 30–45 NSm (22–33 lb-ft).
b. Two–point and three–point rear seat belt buckle
bolt.
DAEWOO M-150 BL2
SEAT BELTS 8A – 11
SPECIFICATIONS
FASTENER TIGHTENING SPECIFICATIONS
ÁÁÁÁÁÁÁÁÁÁÁÁÁÁÁÁÁÁ
ÁÁÁÁÁÁÁ
ÁÁÁÁÁÁ
ÁÁÁÁÁÁÁ
ÁÁÁÁÁÁÁÁÁÁÁÁÁÁÁÁÁÁ
ÁÁÁÁÁÁÁ
ÁÁÁÁÁÁ
ÁÁÁÁÁÁÁ
ÁÁÁÁÁÁÁÁÁÁÁÁÁÁÁÁÁÁ
ÁÁÁÁÁÁÁ
ÁÁÁÁÁÁ
ÁÁÁÁÁÁÁ
ÁÁÁÁÁÁÁÁÁÁÁÁÁÁÁÁÁÁ
ÁÁÁÁÁÁÁ
ÁÁÁÁÁÁ
ÁÁÁÁÁÁÁ
ÁÁÁÁÁÁÁÁÁÁÁÁÁÁÁÁÁÁ
ÁÁÁÁÁÁÁ
ÁÁÁÁÁÁ
ÁÁÁÁÁÁÁ
ÁÁÁÁÁÁÁÁÁÁÁÁÁÁÁÁÁÁ
ÁÁÁÁÁÁÁ
ÁÁÁÁÁÁ
ÁÁÁÁÁÁÁ
ÁÁÁÁÁÁÁÁÁÁÁÁÁÁÁÁÁÁ
ÁÁÁÁÁÁÁ
ÁÁÁÁÁÁ
ÁÁÁÁÁÁÁ
ÁÁÁÁÁÁÁÁÁÁÁÁÁÁÁÁÁÁ
ÁÁÁÁÁÁÁ
ÁÁÁÁÁÁ
ÁÁÁÁÁÁÁ
Application
NSm
Lb-Ft
Lb-In
Seat Belt Upper Bolt
30 – 45
22 – 33
–
Seat Belt Lower Bolt
30 – 45
22 – 33
–
Seat Belt Retractor Bolt
30 – 45
22 – 33
–
Seat Belt Buckle Bolt
30 – 45
22 – 33
–
Rear Seat Belt Buckle Bolt
30 – 45
22 – 33
–
DAEWOO M-150 BL2
8A – 12 SEAT BELTS
SCHEMATIC AND ROUTING DIAGRAMS
DRIVER SEAT BELT WARNING
D1AA201A
DAEWOO M-150 BL2
SECTION 8B
SUPPLEMENTAL INFLATABLE RESTRAINTS (SIR)
CAUTION: Disconnect the negative battery cable before removing or installing any electrical unit or when a
tool or equipment could easily come in contact with exposed electrical terminals. Disconnecting this cable
will help prevent personal injury and damage to the vehicle. The ignition must also be in B unless otherwise
noted.
TABLE OF CONTENTS
Description and Operation . . . . . . . . . . . . . . . . . .
Airbag Module . . . . . . . . . . . . . . . . . . . . . . . . . . . .
Sensing and Diagnostic Module (SDM) . . . . . . .
SIR Warning Lamp . . . . . . . . . . . . . . . . . . . . . . . .
8B-3
8B-3
8B-3
8B-3
Clock Spring . . . . . . . . . . . . . . . . . . . . . . . . . . . . . .
Wiring Harness/Connectors . . . . . . . . . . . . . . . . .
SIR System . . . . . . . . . . . . . . . . . . . . . . . . . . . . . .
General Precautions . . . . . . . . . . . . . . . . . . . . . . .
8B-4
8B-4
8B-4
8B-5
DTC 10 Driver Pretensioner Circuit,
Resistance Too Low . . . . . . . . . . . . . . . . . . . . 8B-32
Clearing Fault Codes . . . . . . . . . . . . . . . . . . . . . . 8B-8
Microprocessor – Independent Lamp
Activation . . . . . . . . . . . . . . . . . . . . . . . . . . . . . . 8B-8
System Check . . . . . . . . . . . . . . . . . . . . . . . . . . . 8B-10
Fault Codes . . . . . . . . . . . . . . . . . . . . . . . . . . . . . 8B-12
DTC 11 Driver Pretensioner Circuit,
Short to Ground . . . . . . . . . . . . . . . . . . . . . . . . 8B-34
DTC 12 Driver Pretensioner Circuit,
Short to Battery Voltage . . . . . . . . . . . . . . . . . 8B-36
DTC 13 Passenger Pretensioner Circuit,
Resistance Too High . . . . . . . . . . . . . . . . . . . . 8B-38
DTC 14 Passenger Pretensioner Circuit,
Resistance Too Low . . . . . . . . . . . . . . . . . . . . 8B-40
DTC 15 Passenger Pretensioner Circuit,
Short to Ground . . . . . . . . . . . . . . . . . . . . . . . . 8B-42
DTC 16 Passenger Pretensioner Circuit,
Short to Battery Voltage . . . . . . . . . . . . . . . . . 8B-44
DTC 18 Connection Between Driver Firing
Circuit and Driver Pretensioner Circuit . . . . . 8B-46
DTC 19 Connection Between Driver Firing
Circuit and Passenger Pretensioner Circuit 8B-48
DTC 20 Connection Between Passenger Firing
Circuit and Driver Pretensioner Circuit . . . . . 8B-50
DTC 21 Connection Between Passenger Firing
Circuit and Passenger Pretensioner Circuit 8B-52
DTC 01 Driver Firing Circuit,
Resistance Too High . . . . . . . . . . . . . . . . . . . . 8B-14
DTC 22 Connection Between Driver Pretensioner
Circuit and Passenger Pretensioner Circuit 8B-54
DTC 02 Driver Firing Circuit,
Resistance Too Low . . . . . . . . . . . . . . . . . . . . 8B-16
DTC 23 Ignition Input Circuit, Voltage
Too High . . . . . . . . . . . . . . . . . . . . . . . . . . . . . . 8B-56
DTC 03 Driver Firing Circuit,
Short To Ground . . . . . . . . . . . . . . . . . . . . . . . 8B-18
DTC 24 Ignition Input Circuit, Voltage
Too Low . . . . . . . . . . . . . . . . . . . . . . . . . . . . . . . 8B-58
DTC 04 Driver Firing Circuit,
Short To Battery Voltage . . . . . . . . . . . . . . . .
DTC 05 Passenger Firing Circuit,
Resistance Too High . . . . . . . . . . . . . . . . . . . .
DTC 06 Passenger Firing Circuit,
Resistance Too Low . . . . . . . . . . . . . . . . . . . .
DTC 07 Passenger Firing Circuit,
Short To Ground . . . . . . . . . . . . . . . . . . . . . . .
DTC 08 Passenger Firing Circuit,
Short To Battery Voltage . . . . . . . . . . . . . . . .
DTC 09 Driver Pretensioner Circuit,
Resistance Too High . . . . . . . . . . . . . . . . . . . .
DTC 25 Warning Lamp Failure . . . . . . . . . . . . . 8B-60
DTC 31 SDM Internal Fault . . . . . . . . . . . . . . . . 8B-63
DTC 32 SDM Crash Recorded . . . . . . . . . . . . . 8B-63
Airbag Deployment Condition . . . . . . . . . . . . . . . 8B-5
Airbag Deployment Procedure . . . . . . . . . . . . . . 8B-6
Component Locator . . . . . . . . . . . . . . . . . . . . . . . . 8B-7
SIR Component . . . . . . . . . . . . . . . . . . . . . . . . . . .
Diagnostic Information and Procedures . . . . .
Bulb Check . . . . . . . . . . . . . . . . . . . . . . . . . . . . . . .
Fault Indication . . . . . . . . . . . . . . . . . . . . . . . . . . . .
DAEWOO M-150 BL2
8B-7
8B-8
8B-8
8B-8
8B-20
8B-22
8B-24
8B-26
8B-28
8B-30
Diagnostic Illustration 1
Diagnostic Illustration 2
Diagnostic Illustration 3
Diagnostic Illustration 4
...................
...................
...................
...................
8B-63
8B-64
8B-64
8B-64
Diagnostic Illustration 5 . . . . . . . . . . . . . . . . . . . 8B-64
Diagnostic Illustration 6 . . . . . . . . . . . . . . . . . . . 8B-65
Diagnostic Illustration 7 . . . . . . . . . . . . . . . . . . . 8B-65
8B – 2 SUPPLEMENTAL INFLATABLE RESTRAINTS (SIR)
Diagnostic Illustration 8 . . . . . . . . . . . . . . . . . . .
Diagnostic Illustration 9 . . . . . . . . . . . . . . . . . . .
Diagnostic Illustration 10 . . . . . . . . . . . . . . . . . .
Diagnostic Illustration 11 . . . . . . . . . . . . . . . . . . .
8B-65
8B-65
8B-66
8B-66
Driver Airbag Module . . . . . . . . . . . . . . . . . . . . .
Clock Spring . . . . . . . . . . . . . . . . . . . . . . . . . . . . .
Passenger Airbag Module . . . . . . . . . . . . . . . . .
Sensing and Diagnostic Module (SDM) . . . . . .
8B-69
8B-70
8B-71
8B-72
Diagnostic Illustration 12
Diagnostic Illustration 13
Diagnostic Illustration 14
Diagnostic Illustration 15
8B-66
8B-66
8B-67
8B-67
Airbag Module Deployment (In Vehicle) . . . . . .
Airbag Module Deployment (Outside
of Vehicle) . . . . . . . . . . . . . . . . . . . . . . . . . . . . .
Deployed Airbag Module Disposal Procedure
Specifications . . . . . . . . . . . . . . . . . . . . . . . . . . . .
8B-74
8B-76
8B-76
8B-78
Fastener Tightening Specifications . . . . . . . . . .
Special Tools and Equipment . . . . . . . . . . . . . .
Special Tools Table . . . . . . . . . . . . . . . . . . . . . . .
Schematic and Routing Diagrams . . . . . . . . . .
8B-78
8B-78
8B-78
8B-79
..................
..................
..................
..................
Diagnostic Illustration 16 . . . . . . . . . . . . . . . . . . 8B-67
Diagnostic Illustration 17 . . . . . . . . . . . . . . . . . . 8B-67
Diagnostic Illustration 18 . . . . . . . . . . . . . . . . . . 8B-68
Diagnostic Illustration 19 . . . . . . . . . . . . . . . . . .
Diagnostic Illustration 20 . . . . . . . . . . . . . . . . . .
Diagnostic Illustration 21 . . . . . . . . . . . . . . . . . .
Repair Instructions . . . . . . . . . . . . . . . . . . . . . . . .
8B-68
8B-68
8B-68
8B-69
Supplemental Inflatable Restraints (SIR)
Electrical Schematic . . . . . . . . . . . . . . . . . . . . 8B-79
On-Vehicle Service . . . . . . . . . . . . . . . . . . . . . . . . . 8B-69
DAEWOO M-150 BL2
SUPPLEMENTAL INFLATABLE RESTRAINTS (SIR) 8B – 3
DESCRIPTION AND OPERATION
(Left–Hand Drive Shown, Right–Hand Drive Similar)
D Illuminates a warning lamp that alerts the driver to
any faults.
AIRBAG MODULE
Driver Airbag Module
Caution: Tampering with the driver side airbag
module creates the risk of an injury from an unexpected deployment. Therefore, the driver side airbag module should never be disassembled.
The driver airbag module is under the center pad on the
steering wheel.
D Allows the fault codes to be retrieved with a scan tool.
The SDM controls the deployment of the airbag system
through the use of the
D Arming sensor.
D Capacitor.
D Crash sensor, or accelerometer.
The driver airbag module contains an ignitor charge and
a gas generator to inflate the folded airbag.
D110B007
Arming Sensor
D110B006
Passenger Airbag Module
Caution: Tampering with the passenger side airbag
module creates the risk of an injury from an unexpected deployment. Therefore, the passenger side
airbag module should never be disassembled.
The passenger airbag module is on the passenger side
of the instrument panel.
The passenger airbag module contains an ignitor charge
and a gas generator to inflate the folded airbag.
SENSING AND DIAGNOSTIC
MODULE (SDM)
The SDM
D
D
D
D
Has no user-serviceable parts.
Is under the front console assembly.
Continuously monitors the system components.
Records any faults which are discovered.
DAEWOO M-150 BL2
The arming sensor is safety device made up of a dualcontact, electro-mechanical switch that:
D Acts independently of the electronic components.
D Keeps the firing circuits for the airbags unarmed under normal driving conditions.
D Allows the airbags to deploy under the required
conditions.
Capacitor
The capacitor provides reserve power.
Crash Sensor
The crash sensor, or accelerometer, electronically represents the acceleration or deceleration of the vehicle
during a frontal impact. In this electronic representation,
the electrical signal is proportional to the acceleration or
deceleration of the vehicle.
SIR WARNING LAMP
The supplemental inflatable restraints (SIR) system includes a self-diagnostic function.
8B – 4 SUPPLEMENTAL INFLATABLE RESTRAINTS (SIR)
If there is a failure of the sensing and diagnostic module
or the external circuits, the SIR warning lamp in the instrument cluster turns ON.
The clock spring should never be disassembled.
The clock spring must be replaced if the airbags have
been deployed.
As a system check, the SIR warning lamp also turns ON
when the ignition is first switched to the ON position.
Correct Functioning
The system is working properly if:
D The SIR warning lamp turns OFF after approximately
four seconds.
Faulty Functioning
The system is not working properly, meaning one of the
SIR components or the wiring connector is faulty, if:
D The SIR warning lamp fails to turn ON when the
ignition is first switched ON.
D The SIR warning lamp remains ON.
D110B008A
WIRING HARNESS/CONNECTORS
The connector for the sensing and diagnostic module
(SDM) has a built-in shorting bar that will turn ON the
warning lamp if there is a poor connection at the SDM.
As an anti-deployment mechanism, additional shorting
bars are in the
D Connector for the clock spring at the lower steering
column.
D Passenger airbag module connector.
D110B009A
CLOCK SPRING
D SDM connector.
When these connectors are separated, the shorting
bars will short circuit any current which is applied, preventing the current from reaching the airbag modules.
The clock spring:
D Is on the steering column.
D Contains a coil that is the electrical contact between
the steering column wiring harness and the driver
side airbag module.
D Is part of the circuit for the horn.
Notice: Turning the steering wheel more than three and
one-quarter turns may damage the clock spring.
Turning the steering wheel:
D In one direction tightens the coil.
D In the opposite direction loosens the coil.
D More than three and one-quarter turns may damage
the clock spring.
Caution: Disassembling the clock spring can cause
injury and vehicle damage.
SIR SYSTEM
The supplemental inflatable restraints (SIR) system is a
safety device used in conjunction with the seat belts.
The airbag does not replace the function of the seat belt.
The driver and the passengers must always fasten their
seat belts and adjust them for a proper fit.
The SIR is designed to protect the driver and the front
seat passenger in the event of a significant frontal impact to the vehicle. The airbags deploy if the force is applied from a direction within 30 degrees of the vehicle’s
centerline and above 25 km/h (15 mph) speed.
The SIR consists of a
D Driver airbag module.
D Passenger airbag module.
DAEWOO M-150 BL2
SUPPLEMENTAL INFLATABLE RESTRAINTS (SIR) 8B – 5
D
D
D
D
If the warning lamp indicates there is a fault in the airbag
system, assume that the SIR system may not be
functional.
Sensing and diagnostic module.
Steering column clock spring.
Wiring harness.
SIR malfunction warning lamp.
Caution: Failure to follow all service procedures in
the correct sequence can cause the airbag system to
deploy unexpectedly and possibly cause a serious
injury.
Only trained personnel at franchised Daewoo dealers
and authorized Daewoo service dealerships may service
the airbag system.
Never attempt to disassemble, repair, or reuse the
D Airbag modules.
D Clock spring.
D Sensing and diagnostic module.
D Wiring harness.
When making SIR repairs,
D
D
D
D
D110B001
GENERAL PRECAUTIONS
The supplemental inflatable restraints (SIR) warning
lamp must illuminate when the ignition is switched ON,
and then turn OFF after approximately 4 seconds.
There is a fault in the airbag system if
D The warning lamp does not turn OFF.
D The warning lamp illuminates while the vehicle is in
operation.
DAEWOO M-150 BL2
Inspect any SIR part before it is installed.
Use only new parts.
Do not install used SIR parts from other vehicles.
Do not install any part that has been dropped or that
has dents, cracks, or other defects.
AIRBAG DEPLOYMENT CONDITION
Airbag is designed to deploy under 30_ left/right angle
barrier and above 25 km/h (15 mph) speed.
Concrete Barrier Deployment Condition
In case of the 0_ frontal concrete battier, airbag may
deploy above 25 km/h (15 mph) speed.
8B – 6 SUPPLEMENTAL INFLATABLE RESTRAINTS (SIR)
AIRBAG DEPLOYMENT PROCEDURE
1. Non–Deployment condition
a.
b.
c.
d.
Initiator
Piston
Safety disc
Compressed Ar gas
D110B002
2. When crashing, firing current flows from the SDM to
the initiator.
3. Initiator is burning and the inside pressure is increasing and the piston hits the safety disc.
D110B003
4. Safety disc is broken and the compressed Ar gas is
spouted out.
D110B004
5. Compressed Ar gas and the burned initiator are carbureted. And the airbag is deployed.
D110B005
DAEWOO M-150 BL2
SUPPLEMENTAL INFLATABLE RESTRAINTS (SIR) 8B – 7
COMPONENT LOCATOR
SIR COMPONENT
(Left–Hand Drive Shown, Right–Hand Drive Similar)
D110B401
1. Driver Airbag Module
2. Passenger Airbag Module
3. Clock Spring
DAEWOO M-150 BL2
4. Sensing and Diagnostic Module (SDM)
5. Wiring Harness
8B – 8 SUPPLEMENTAL INFLATABLE RESTRAINTS (SIR)
DIAGNOSTIC INFORMATION AND PROCEDURES
A scan tool connected to the data link connector (DLC):
D Reveals the fault codes.
D Receives serial data transmission through the terminal J (13) of the DLC.
D Receives ground through the terminal A (4) of the
DLC.
CLEARING FAULT CODES
When the sensing and diagnostic module (SDM) receives the CODE ERASE command from the scan tool,
the SDM:
D Clears the entire fault memory.
D Turns OFF the warning lamp.
D Resets for fault detection.
D110B009A
External Fault
Service personnel can reset the SDM and turn OFF the
warning lamp if the fault is an external fault.
BULB CHECK
Internal Fault
As soon as the operating voltage is applied to the sensing and diagnostic module (SDM) ignition input, the
SDM activates the warning lamp for a bulb check.
The SDM turns the lamp ON for 4 seconds, and then the
SDM turns the lamp OFF.
During the bulb check, the SDM is not ready to detect a
crash or deploy the supplemental inflatable restraints.
An internal fault of the SDM or a CRASH RECORDED
fault code cannot be reset.
In the case of an internal fault of the SDM or a CRASH
RECORDED fault code, the SDM must be replaced.
FAULT INDICATION
MICROPROCESSOR –
INDEPENDENT LAMP ACTIVATION
The sensing and diagnostic module records the system’s faults in two categories:
D Current faults and the fault code appears “Axx” on the
scan tool display.
D Historic faults, which are those that were detected in
the past, but are no longer active. And the fault code
appears “Sxx” on the scan tool display.
The warning lamp:
Voltage-Low Fault
The SDM will turn OFF the VOLTAGE LOW fault as
soon as the voltage recovers.
If the sensing and diagnostic module (SDM) electrical
connector is not properly attached, the SDM cannot
function and cannot control the warning lamp.
If this fault is present, the warning lamp will operate independently from the SDM through the use of shorting
bars that are built into the SDM connector.
D Indicates a fault as soon as it occurs.
D Stays ON, even if a fault is no longer active.
DAEWOO M-150 BL2
SUPPLEMENTAL INFLATABLE RESTRAINTS (SIR) 8B – 9
BLANK
DAEWOO M-150 BL2
8B – 10 SUPPLEMENTAL INFLATABLE RESTRAINTS (SIR)
SYSTEM CHECK
D1AB301B
Caution: Use only the scan tool to check the airbag
modules and the sensing and diagnostic module
(SDM). Never measure the resistance of an airbag
module with an ohmmeter. An ohmmeter’s battery
can deploy the airbag and cause injury.
Caution: Do not attempt to repair the supplemental
inflatable restraints (SIR) wiring harness. An SIR repair can create a high-resistance connection which
can keep the airbags from deploying when needed,
resulting in injury.
Caution: Before testing, disconnect the negative
battery cable. Wait 1 minute for the SDM capacitor
to discharge. The capacitor supplies reserve power
to deploy the airbags, even if the battery is disconnected. Unintentional deployment of the airbags
can cause injury.
Circuit Description
When the ignition switch is turned ON, the SDM is able
to send serial data from the terminal 9 of the SDM to the
terminal J (13) of the assembly line diagnostic link.
Diagnostic System Check
ÁÁÁÁ
ÁÁÁÁÁÁÁÁÁÁÁÁÁÁÁÁÁ
ÁÁÁÁÁ
ÁÁÁÁÁÁÁ
ÁÁÁÁÁÁ
ÁÁÁÁ
ÁÁÁÁÁÁÁÁÁÁÁÁÁÁÁÁÁ
ÁÁÁÁÁ
ÁÁÁÁÁÁÁ
ÁÁÁÁÁÁ
ÁÁÁÁ
ÁÁÁÁÁÁÁÁÁÁÁÁÁÁÁÁÁ
ÁÁÁÁÁ
ÁÁÁÁÁÁÁ
ÁÁÁÁÁÁ
ÁÁÁÁ
ÁÁÁÁÁÁÁÁÁÁÁÁÁÁÁÁÁ
ÁÁÁÁÁ
ÁÁÁÁÁÁÁ
ÁÁÁÁÁÁ
ÁÁÁÁÁÁÁÁÁÁÁÁÁÁÁÁÁÁÁÁÁ
ÁÁÁÁÁ
ÁÁÁÁÁÁÁ
ÁÁÁÁÁÁ
ÁÁÁÁ
ÁÁÁÁÁÁÁÁÁÁÁÁÁÁÁÁÁ
ÁÁÁÁÁ
ÁÁÁÁÁÁÁ
ÁÁÁÁÁÁ
ÁÁÁÁ
ÁÁÁÁÁÁÁÁÁÁÁÁÁÁÁÁÁÁÁÁÁÁÁÁÁÁÁÁÁ
ÁÁÁÁÁÁ
ÁÁÁÁ
ÁÁÁÁÁÁÁÁÁÁÁÁÁÁÁÁÁ
ÁÁÁÁÁ
ÁÁÁÁÁÁÁ
ÁÁÁÁÁÁ
ÁÁÁÁ
ÁÁÁÁÁÁÁÁÁÁÁÁÁÁÁÁÁÁÁÁÁÁÁÁÁÁÁÁÁ
ÁÁÁÁÁÁ
ÁÁÁÁ
ÁÁÁÁÁÁÁÁÁÁÁÁÁÁÁÁÁ
ÁÁÁÁÁ
ÁÁÁÁÁÁÁ
ÁÁÁÁÁÁ
ÁÁÁÁ
ÁÁÁÁÁÁÁÁÁÁÁÁÁÁÁÁÁ
ÁÁÁÁÁÁÁÁÁÁÁÁ
ÁÁÁÁÁÁ
Step
1
2
Action
1. Turn the ignition ON.
2. Check the warning lamp.
Does the warning lamp turn off after 4 seconds?
1. Connect the scan tool cable to the DLC.
2. Connect the scan tool power cable to the cigar
lighter socket.
3. Select the airbag main menu on the scan tool.
4. Select “Fail Code View & Clear “ from the
displayed menu of the diagnostic test codes
(DTC).
Are there any active fault codes?
Value(s)
Yes
No
–
System OK
Go to Step 2
–
Go to the DTC
table for the
fault indicated
Go to Step 3
DAEWOO M-150 BL2
SUPPLEMENTAL INFLATABLE RESTRAINTS (SIR) 8B – 11
Diagnostic System Check (Cont’d)
ÁÁÁÁÁÁÁÁÁÁÁÁÁÁÁÁÁÁÁÁÁ
ÁÁÁÁÁ
ÁÁÁÁÁÁÁ
ÁÁÁÁÁÁ
ÁÁÁÁÁÁÁÁÁÁÁÁÁÁÁÁÁÁÁÁÁ
ÁÁÁÁÁ
ÁÁÁÁÁÁÁ
ÁÁÁÁÁÁ
ÁÁÁÁ
ÁÁÁÁÁÁÁÁÁÁÁÁÁÁÁÁÁ
ÁÁÁÁÁ
ÁÁÁÁÁÁÁ
ÁÁÁÁÁÁ
ÁÁÁÁ
ÁÁÁÁÁÁÁÁÁÁÁÁÁÁÁÁÁ
ÁÁÁÁÁ
ÁÁÁÁÁÁÁ
ÁÁÁÁÁÁ
ÁÁÁÁ
ÁÁÁÁÁÁÁÁÁÁÁÁÁÁÁÁÁ
ÁÁÁÁÁ
ÁÁÁÁÁÁÁ
ÁÁÁÁÁÁ
ÁÁÁÁÁÁÁÁÁÁÁÁÁÁÁÁÁÁÁÁÁ
ÁÁÁÁÁ
ÁÁÁÁÁÁÁ
ÁÁÁÁÁÁ
ÁÁÁÁ
ÁÁÁÁÁÁÁÁÁÁÁÁÁÁÁÁÁ
ÁÁÁÁÁ
ÁÁÁÁÁÁÁ
ÁÁÁÁÁÁ
ÁÁÁÁ
ÁÁÁÁÁÁÁÁÁÁÁÁÁÁÁÁÁ
ÁÁÁÁÁ
ÁÁÁÁÁÁÁ
ÁÁÁÁÁÁ
ÁÁÁÁ
ÁÁÁÁÁÁÁÁÁÁÁÁÁÁÁÁÁ
ÁÁÁÁÁÁ
ÁÁÁÁÁ
ÁÁÁÁÁÁÁ
ÁÁÁÁ
ÁÁÁÁÁÁÁÁÁÁÁÁÁÁÁÁÁ
ÁÁÁÁÁ
ÁÁÁÁÁÁÁ
ÁÁÁÁÁÁ
ÁÁÁÁÁ
ÁÁÁÁÁÁÁ
ÁÁÁÁ
ÁÁÁÁÁÁÁÁÁÁÁÁÁÁÁÁÁ
ÁÁÁÁÁÁ
ÁÁÁÁ
ÁÁÁÁÁÁÁÁÁÁÁÁÁÁÁÁÁ
ÁÁÁÁÁ
ÁÁÁÁÁÁÁ
ÁÁÁÁÁÁ
ÁÁÁÁ
ÁÁÁÁÁÁÁÁÁÁÁÁÁÁÁÁÁÁÁÁÁÁÁÁÁÁÁÁÁ
ÁÁÁÁÁÁ
ÁÁÁÁ
ÁÁÁÁÁÁÁÁÁÁÁÁÁÁÁÁÁ
ÁÁÁÁÁ
ÁÁÁÁÁÁÁ
ÁÁÁÁÁÁ
ÁÁÁÁ
ÁÁÁÁÁÁÁÁÁÁÁÁÁÁÁÁÁ
ÁÁÁÁÁ
ÁÁÁÁÁÁÁ
ÁÁÁÁÁÁ
ÁÁÁÁ
ÁÁÁÁÁÁÁÁÁÁÁÁÁÁÁÁÁ
ÁÁÁÁÁ
ÁÁÁÁÁÁÁ
ÁÁÁÁÁÁ
ÁÁÁÁ
ÁÁÁÁÁÁÁÁÁÁÁÁÁÁÁÁÁ
ÁÁÁÁÁ
ÁÁÁÁÁÁÁ
ÁÁÁÁÁÁ
ÁÁÁÁÁÁÁÁÁÁÁÁÁÁÁÁÁÁÁÁÁ
ÁÁÁÁÁ
ÁÁÁÁÁÁÁ
ÁÁÁÁÁÁ
ÁÁÁÁÁ
ÁÁÁÁÁÁÁ
ÁÁÁÁ
ÁÁÁÁÁÁÁÁÁÁÁÁÁÁÁÁÁ
ÁÁÁÁÁÁ
ÁÁÁÁ
ÁÁÁÁÁÁÁÁÁÁÁÁÁÁÁÁÁ
ÁÁÁÁÁ
ÁÁÁÁÁÁÁ
ÁÁÁÁÁÁ
ÁÁÁÁ
ÁÁÁÁÁÁÁÁÁÁÁÁÁÁÁÁÁ
ÁÁÁÁÁ
ÁÁÁÁÁÁÁ
ÁÁÁÁÁÁ
ÁÁÁÁÁ
ÁÁÁÁÁÁÁ
ÁÁÁÁ
ÁÁÁÁÁÁÁÁÁÁÁÁÁÁÁÁÁ
ÁÁÁÁÁÁ
ÁÁÁÁÁÁÁÁÁÁÁÁÁÁÁÁÁÁÁÁÁ
ÁÁÁÁÁ
ÁÁÁÁÁÁÁ
ÁÁÁÁÁÁ
ÁÁÁÁ
ÁÁÁÁÁÁÁÁÁÁÁÁÁÁÁÁÁ
ÁÁÁÁÁ
ÁÁÁÁÁÁÁ
ÁÁÁÁÁÁ
ÁÁÁÁ
ÁÁÁÁÁÁÁÁÁÁÁÁÁÁÁÁÁ
ÁÁÁÁÁ
ÁÁÁÁÁÁÁ
ÁÁÁÁÁÁ
ÁÁÁÁ
ÁÁÁÁÁÁÁÁÁÁÁÁÁÁÁÁÁÁÁÁÁÁÁÁÁÁÁÁÁ
ÁÁÁÁÁÁ
ÁÁÁÁÁ
ÁÁÁÁÁÁÁ
ÁÁÁÁ
ÁÁÁÁÁÁÁÁÁÁÁÁÁÁÁÁÁ
ÁÁÁÁÁÁ
ÁÁÁÁ
ÁÁÁÁÁÁÁÁÁÁÁÁÁÁÁÁÁ
ÁÁÁÁÁ
ÁÁÁÁÁÁÁ
ÁÁÁÁÁÁ
ÁÁÁÁ
ÁÁÁÁÁÁÁÁÁÁÁÁÁÁÁÁÁÁÁÁÁÁÁÁÁÁÁÁÁ
ÁÁÁÁÁÁ
ÁÁÁÁÁ
ÁÁÁÁÁÁÁ
ÁÁÁÁ
ÁÁÁÁÁÁÁÁÁÁÁÁÁÁÁÁÁ
ÁÁÁÁÁÁ
ÁÁÁÁÁÁÁÁÁÁÁÁÁÁÁÁÁÁÁÁÁ
ÁÁÁÁÁ
ÁÁÁÁÁÁÁ
ÁÁÁÁÁÁ
ÁÁÁÁ
ÁÁÁÁÁÁÁÁÁÁÁÁÁÁÁÁÁ
ÁÁÁÁÁ
ÁÁÁÁÁÁÁ
ÁÁÁÁÁÁ
ÁÁÁÁ
ÁÁÁÁÁÁÁÁÁÁÁÁÁÁÁÁÁ
ÁÁÁÁÁ
ÁÁÁÁÁÁÁ
ÁÁÁÁÁÁ
ÁÁÁÁÁ
ÁÁÁÁÁÁÁ
ÁÁÁÁ
ÁÁÁÁÁÁÁÁÁÁÁÁÁÁÁÁÁ
ÁÁÁÁÁÁ
ÁÁÁÁ
ÁÁÁÁÁÁÁÁÁÁÁÁÁÁÁÁÁ
ÁÁÁÁÁ
ÁÁÁÁÁÁÁ
ÁÁÁÁÁÁ
ÁÁÁÁ
ÁÁÁÁÁÁÁÁÁÁÁÁÁÁÁÁÁ
ÁÁÁÁÁ
ÁÁÁÁÁÁÁ
ÁÁÁÁÁÁ
ÁÁÁÁ
ÁÁÁÁÁÁÁÁÁÁÁÁÁÁÁÁÁ
ÁÁÁÁÁÁÁÁÁÁÁÁ
ÁÁÁÁÁÁ
Step
Action
Value(s)
Yes
No
3
1. Check fuse F2.
Is the fuse F2 blown?
–
Go to Step 4
Go to Step 5
4
1. Replace fuse F2.
Is the repair complete?
–
System OK
–
5
1. Disconnect the electrical connector C208.
2. Check for a short to ground between fuse F2 and
terminal 2 of connector C208.
Is wiring harness shorted to ground?
–
Go to Step 6
Go to Step 7
Repair a short to ground between fuse F2 and
terminal 2 of connector C208.
Is the repair complete?
–
System OK
–
7
1. Disconnect the SDM electrical connector.
2. Check for a short to ground between terminal 2
and terminal 5 of SDM connector.
Is wiring harness shorted to ground?
–
Go to Step 15
Go to Step 8
8
Use an ohmmeter to check for continuity between
terminal A (4) of the DLC and ground G201.
Does the ohmmeter show the specified value?
≈0 W
Go to Step 9
Go to Step 10
–
System OK
–
6
9
Repair the open DLC ground circuit.
Is the repair complete?
10
1. Turn the ignition ON.
2. Check the voltage at the cigar lighter positive
terminal.
Does the voltmeter show the specified value?
11–14V
Go to Step 12
Go to Step 11
11
Repair the power supply for the cigar lighter socket.
Is the repair complete?
–
System OK
–
12
Check for a short to ground of open circuit between
terminal J (13) of the DLC and terminal 4 of
connector 208.
Is wiring harness shorted to ground or open?
–
Go to Step 13
Go to Step 14
Repair a short to ground or open circuit between
terminal J (13) of the DLC and terminal 4 of
connector C208.
Is the repair complete?
–
System OK
–
Check for a short to ground or open between
terminal 4 of connector C208 and terminal 9 of the
SDM connector.
Is wiring harness shorted to ground or open?
–
Go to Step 15
Go to Step 16
15
Replace the SDM waring harness.
Is the repair complete?
–
System OK
–
16
Replace the SDM.
Is the repair complete?
–
System OK
–
13
14
DAEWOO M-150 BL2
8B – 12 SUPPLEMENTAL INFLATABLE RESTRAINTS (SIR)
FAULT CODES
ÁÁÁÁÁÁ
ÁÁÁÁÁÁÁÁÁÁÁÁÁÁÁÁÁÁÁÁÁÁÁÁÁÁÁÁÁÁ
ÁÁÁÁÁÁ
ÁÁÁÁÁÁÁÁÁÁÁÁÁÁÁÁÁÁÁÁÁÁÁÁÁÁÁÁÁÁ
ÁÁÁÁÁÁ
ÁÁÁÁÁÁÁÁÁÁÁÁÁÁÁÁÁÁÁÁÁÁÁÁÁÁÁÁÁÁ
ÁÁÁÁÁÁ
ÁÁÁÁÁÁÁÁÁÁÁÁÁÁÁÁÁÁÁÁÁÁÁÁÁÁÁÁÁÁ
ÁÁÁÁÁÁ
ÁÁÁÁÁÁÁÁÁÁÁÁÁÁÁÁÁÁÁÁÁÁÁÁÁÁÁÁÁÁ
ÁÁÁÁÁÁ
ÁÁÁÁÁÁÁÁÁÁÁÁÁÁÁÁÁÁÁÁÁÁÁÁÁÁÁÁÁÁ
ÁÁÁÁÁÁ
ÁÁÁÁÁÁÁÁÁÁÁÁÁÁÁÁÁÁÁÁÁÁÁÁÁÁÁÁÁÁ
ÁÁÁÁÁÁ
ÁÁÁÁÁÁÁÁÁÁÁÁÁÁÁÁÁÁÁÁÁÁÁÁÁÁÁÁÁÁ
ÁÁÁÁÁÁ
ÁÁÁÁÁÁÁÁÁÁÁÁÁÁÁÁÁÁÁÁÁÁÁÁÁÁÁÁÁÁ
ÁÁÁÁÁÁ
ÁÁÁÁÁÁÁÁÁÁÁÁÁÁÁÁÁÁÁÁÁÁÁÁÁÁÁÁÁÁ
ÁÁÁÁÁÁ
ÁÁÁÁÁÁÁÁÁÁÁÁÁÁÁÁÁÁÁÁÁÁÁÁÁÁÁÁÁÁ
ÁÁÁÁÁÁ
ÁÁÁÁÁÁÁÁÁÁÁÁÁÁÁÁÁÁÁÁÁÁÁÁÁÁÁÁÁÁ
ÁÁÁÁÁÁ
ÁÁÁÁÁÁÁÁÁÁÁÁÁÁÁÁÁÁÁÁÁÁÁÁÁÁÁÁÁÁ
ÁÁÁÁÁÁ
ÁÁÁÁÁÁÁÁÁÁÁÁÁÁÁÁÁÁÁÁÁÁÁÁÁÁÁÁÁÁ
ÁÁÁÁÁÁ
ÁÁÁÁÁÁÁÁÁÁÁÁÁÁÁÁÁÁÁÁÁÁÁÁÁÁÁÁÁÁ
ÁÁÁÁÁÁ
ÁÁÁÁÁÁÁÁÁÁÁÁÁÁÁÁÁÁÁÁÁÁÁÁÁÁÁÁÁÁ
ÁÁÁÁÁÁ
ÁÁÁÁÁÁÁÁÁÁÁÁÁÁÁÁÁÁÁÁÁÁÁÁÁÁÁÁÁÁ
ÁÁÁÁÁÁ
ÁÁÁÁÁÁÁÁÁÁÁÁÁÁÁÁÁÁÁÁÁÁÁÁÁÁÁÁÁÁ
ÁÁÁÁÁÁ
ÁÁÁÁÁÁÁÁÁÁÁÁÁÁÁÁÁÁÁÁÁÁÁÁÁÁÁÁÁÁ
ÁÁÁÁÁÁ
ÁÁÁÁÁÁÁÁÁÁÁÁÁÁÁÁÁÁÁÁÁÁÁÁÁÁÁÁÁÁ
ÁÁÁÁÁÁ
ÁÁÁÁÁÁÁÁÁÁÁÁÁÁÁÁÁÁÁÁÁÁÁÁÁÁÁÁÁÁ
ÁÁÁÁÁÁ
ÁÁÁÁÁÁÁÁÁÁÁÁÁÁÁÁÁÁÁÁÁÁÁÁÁÁÁÁÁÁ
ÁÁÁÁÁÁ
ÁÁÁÁÁÁÁÁÁÁÁÁÁÁÁÁÁÁÁÁÁÁÁÁÁÁÁÁÁÁ
ÁÁÁÁÁÁ
ÁÁÁÁÁÁÁÁÁÁÁÁÁÁÁÁÁÁÁÁÁÁÁÁÁÁÁÁÁÁ
ÁÁÁÁÁÁ
ÁÁÁÁÁÁÁÁÁÁÁÁÁÁÁÁÁÁÁÁÁÁÁÁÁÁÁÁÁÁ
ÁÁÁÁÁÁ
ÁÁÁÁÁÁÁÁÁÁÁÁÁÁÁÁÁÁÁÁÁÁÁÁÁÁÁÁÁÁ
ÁÁÁÁÁÁ
ÁÁÁÁÁÁÁÁÁÁÁÁÁÁÁÁÁÁÁÁÁÁÁÁÁÁÁÁÁÁ
ÁÁÁÁÁÁ
ÁÁÁÁÁÁÁÁÁÁÁÁÁÁÁÁÁÁÁÁÁÁÁÁÁÁÁÁÁÁ
ÁÁÁÁÁÁ
ÁÁÁÁÁÁÁÁÁÁÁÁÁÁÁÁÁÁÁÁÁÁÁÁÁÁÁÁÁÁ
ÁÁÁÁÁÁ
ÁÁÁÁÁÁÁÁÁÁÁÁÁÁÁÁÁÁÁÁÁÁÁÁÁÁÁÁÁÁ
ÁÁÁÁÁÁ
ÁÁÁÁÁÁÁÁÁÁÁÁÁÁÁÁÁÁÁÁÁÁÁÁÁÁÁÁÁÁ
ÁÁÁÁÁÁ
ÁÁÁÁÁÁÁÁÁÁÁÁÁÁÁÁÁÁÁÁÁÁÁÁÁÁÁÁÁÁ
ÁÁÁÁÁÁ
ÁÁÁÁÁÁÁÁÁÁÁÁÁÁÁÁÁÁÁÁÁÁÁÁÁÁÁÁÁÁ
ÁÁÁÁÁÁ
ÁÁÁÁÁÁÁÁÁÁÁÁÁÁÁÁÁÁÁÁÁÁÁÁÁÁÁÁÁÁ
ÁÁÁÁÁÁ
ÁÁÁÁÁÁÁÁÁÁÁÁÁÁÁÁÁÁÁÁÁÁÁÁÁÁÁÁÁÁ
ÁÁÁÁÁÁ
ÁÁÁÁÁÁÁÁÁÁÁÁÁÁÁÁÁÁÁÁÁÁÁÁÁÁÁÁÁÁ
Fault Codes
Fault Contents
01
Driver Firing Circuit, Resistance Too High
02
Driver Firing Circuit, Resistance Too Low
03
Driver Firing Circuit, Short to Ground
04
Driver Firing Circuit, Short to Battery Ground
05
Passenger Firing Circuit, Resistance Too High
06
Passenger Firing Circuit, Resistance Too Low
07
Passenger Firing Circuit, Short to Ground
08
Passenger Firing Circuit, Short to Battery Voltage
09
Driver Pretensioner Circuit, Resistance Too High
10
Driver Pretensioner Circuit, Resistance Too Low
11
Driver Pretensioner Circuit, Short to Ground
12
Driver Pretensioner Circuit, Short to Battery Voltage
13
Passenger Pretensioner Circuit, Resistance Too High
14
Passenger Pretensioner Circuit, Resistance Too Low
15
Passenger Pretensioner Circuit, Short to Ground
16
Passenger Pretensioner Circuit, Short to Battery Voltage
17
Connection Between Driver Firing Circuit and Passenger Firing Circuit
18
Connection Between Driver Firing Circuit and Driver Pretensioner Circuit
19
Connection Between Driver Firing Circuit and Passenger Pretensioner Circuit
20
Connection Between Passenger Firing Circuit and Driver Pretensioner Circuit
21
Connection Between Passenger Firing Circuit and Passenger Pretensioner Circuit
22
Connection Between Driver Pretensioner Circuit and Passenger Pretensioner Circuit
23
Ignition Input Circuit, Voltage Too High
24
Ignition Input Circuit, Voltage Too Low
25
Warning Lamp Failure
31
SDM Internal Fault
32
SDM Crash Recorded
DAEWOO M-150 BL2
SUPPLEMENTAL INFLATABLE RESTRAINTS (SIR) 8B – 13
BLANK
DAEWOO M-150 BL2
8B – 14 SUPPLEMENTAL INFLATABLE RESTRAINTS (SIR)
D1AB302B
DIAGNOSTIC TROUBLE CODE (DTC) 01
DRIVER FIRING CIRCUIT, RESISTANCE TOO HIGH
Open Circuit
Circuit Description
When the ignition switch is turned ON, the sensing and
diagnostic module (SDM) will perform tests to diagnose
any malfunctions within itself.
After passing these tests, the SDM will check the driver
airbag module firing circuit. The SDM allows a very
small amount of current to flow through the driver airbag
module firing circuit. The SDM monitors the circuit resistance during this check.
DTC 01 Will Set When
D The combined resistance of the driver airbag module,
the harness wiring, and the connector contacts is
above a specified value, as with an open circuit.
Test Description
Caution: Before testing, disconnect the negative
battery cable. Wait 1 minute for the SDM capacitor
to discharge. The capacitor supplies reserve power
to deploy the airbags, even if the battery is disconnected. Unintentional deployment of the airbags
can cause injury.
Caution: Never measure the resistance of an airbag
module with an ohmmeter. An ohmmeter’s battery
can deploy the airbag and cause injury.
Caution: Do not attempt to repair the supplemental
inflatable restraints (SIR) wiring harness. A repair
can create a high-resistance connection which can
keep the airbags from deploying when needed, resulting in injury.
DAEWOO M-150 BL2
SUPPLEMENTAL INFLATABLE RESTRAINTS (SIR) 8B – 15
DTC 01 – Driver Firing Circuit, Resistance Too High
ÁÁÁÁÁÁÁÁÁÁÁÁÁÁÁÁÁÁÁÁÁ
ÁÁÁÁÁ
ÁÁÁÁÁÁÁ
ÁÁÁÁÁÁ
ÁÁÁÁÁÁÁÁÁÁÁÁÁÁÁÁÁÁÁÁÁ
ÁÁÁÁÁ
ÁÁÁÁÁÁÁ
ÁÁÁÁÁÁ
ÁÁÁÁ
ÁÁÁÁÁÁÁÁÁÁÁÁÁÁÁÁÁ
ÁÁÁÁÁ
ÁÁÁÁÁÁÁ
ÁÁÁÁÁÁ
ÁÁÁÁ
ÁÁÁÁÁÁÁÁÁÁÁÁÁÁÁÁÁ
ÁÁÁÁÁ
ÁÁÁÁÁÁÁ
ÁÁÁÁÁÁ
ÁÁÁÁÁÁÁÁÁÁÁÁÁÁÁÁÁÁÁÁÁ
ÁÁÁÁÁ
ÁÁÁÁÁÁÁ
ÁÁÁÁÁÁ
ÁÁÁÁ
ÁÁÁÁÁÁÁÁÁÁÁÁÁÁÁÁÁÁÁÁÁÁÁÁÁÁÁÁÁ
ÁÁÁÁÁÁ
ÁÁÁÁ
ÁÁÁÁÁÁÁÁÁÁÁÁÁÁÁÁÁ
ÁÁÁÁÁ
ÁÁÁÁÁÁÁ
ÁÁÁÁÁÁ
ÁÁÁÁ
ÁÁÁÁÁÁÁÁÁÁÁÁÁÁÁÁÁ
ÁÁÁÁÁ
ÁÁÁÁÁÁÁ
ÁÁÁÁÁÁ
ÁÁÁÁ
ÁÁÁÁÁÁÁÁÁÁÁÁÁÁÁÁÁ
ÁÁÁÁÁÁ
ÁÁÁÁÁ
ÁÁÁÁÁÁÁ
ÁÁÁÁ
ÁÁÁÁÁÁÁÁÁÁÁÁÁÁÁÁÁ
ÁÁÁÁÁ
ÁÁÁÁÁÁÁ
ÁÁÁÁÁÁ
ÁÁÁÁ
ÁÁÁÁÁÁÁÁÁÁÁÁÁÁÁÁÁ
ÁÁÁÁÁ
ÁÁÁÁÁÁÁ
ÁÁÁÁÁÁ
ÁÁÁÁ
ÁÁÁÁÁÁÁÁÁÁÁÁÁÁÁÁÁ
ÁÁÁÁÁ
ÁÁÁÁÁÁÁ
ÁÁÁÁÁÁ
ÁÁÁÁ
ÁÁÁÁÁÁÁÁÁÁÁÁÁÁÁÁÁÁÁÁÁÁÁÁÁÁÁÁÁ
ÁÁÁÁÁÁ
ÁÁÁÁ
ÁÁÁÁÁÁÁÁÁÁÁÁÁÁÁÁÁ
ÁÁÁÁÁÁ
ÁÁÁÁ
ÁÁÁÁÁÁÁÁÁÁÁÁÁÁÁÁÁÁÁÁÁÁ
ÁÁÁÁÁÁÁÁÁÁÁÁ
ÁÁÁÁÁÁÁ
ÁÁÁÁÁÁ
ÁÁÁÁ
ÁÁÁÁÁÁÁÁÁÁÁÁÁÁÁÁÁ
ÁÁÁÁÁ
ÁÁÁÁÁÁÁ
ÁÁÁÁÁÁ
ÁÁÁÁ
ÁÁÁÁÁÁÁÁÁÁÁÁÁÁÁÁÁ
ÁÁÁÁÁ
ÁÁÁÁÁÁÁ
ÁÁÁÁÁÁ
ÁÁÁÁ
ÁÁÁÁÁÁÁÁÁÁÁÁÁÁÁÁÁÁÁÁÁÁÁÁÁÁÁÁÁ
ÁÁÁÁÁÁ
ÁÁÁÁ
ÁÁÁÁÁÁÁÁÁÁÁÁÁÁÁÁÁ
ÁÁÁÁÁ
ÁÁÁÁÁÁÁ
ÁÁÁÁÁÁ
ÁÁÁÁ
ÁÁÁÁÁÁÁÁÁÁÁÁÁÁÁÁÁ
ÁÁÁÁÁ
ÁÁÁÁÁÁÁ
ÁÁÁÁÁÁ
ÁÁÁÁ
ÁÁÁÁÁÁÁÁÁÁÁÁÁÁÁÁÁ
ÁÁÁÁÁ
ÁÁÁÁÁÁÁ
ÁÁÁÁÁÁ
ÁÁÁÁ
ÁÁÁÁÁÁÁÁÁÁÁÁÁÁÁÁÁ
ÁÁÁÁÁ
ÁÁÁÁÁÁÁ
ÁÁÁÁÁÁ
ÁÁÁÁ
ÁÁÁÁÁÁÁÁÁÁÁÁÁÁÁÁÁÁÁÁÁÁÁÁÁÁÁÁÁ
ÁÁÁÁÁÁ
ÁÁÁÁ
ÁÁÁÁÁÁÁÁÁÁÁÁÁÁÁÁÁ
ÁÁÁÁÁ
ÁÁÁÁÁÁÁ
ÁÁÁÁÁÁ
ÁÁÁÁÁ
ÁÁÁÁÁÁÁ
ÁÁÁÁ
ÁÁÁÁÁÁÁÁÁÁÁÁÁÁÁÁÁ
ÁÁÁÁÁÁ
ÁÁÁÁÁÁÁÁÁÁÁÁÁÁÁÁÁÁÁÁÁ
ÁÁÁÁÁ
ÁÁÁÁÁÁÁ
ÁÁÁÁÁÁ
ÁÁÁÁ
ÁÁÁÁÁÁÁÁÁÁÁÁÁÁÁÁÁ
ÁÁÁÁÁ
ÁÁÁÁÁÁÁ
ÁÁÁÁÁÁ
ÁÁÁÁ
ÁÁÁÁÁÁÁÁÁÁÁÁÁÁÁÁÁ
ÁÁÁÁÁÁ
ÁÁÁÁÁ
ÁÁÁÁÁÁÁ
ÁÁÁÁÁÁÁÁÁÁÁÁÁÁÁÁÁÁÁÁÁ
ÁÁÁÁÁ
ÁÁÁÁÁÁÁ
ÁÁÁÁÁÁ
ÁÁÁÁ
ÁÁÁÁÁÁÁÁÁÁÁÁÁÁÁÁÁ
ÁÁÁÁÁ
ÁÁÁÁÁÁÁ
ÁÁÁÁÁÁ
ÁÁÁÁ
ÁÁÁÁÁÁÁÁÁÁÁÁÁÁÁÁÁÁÁÁÁÁÁÁÁÁÁÁÁ
ÁÁÁÁÁÁ
ÁÁÁÁ
ÁÁÁÁÁÁÁÁÁÁÁÁÁÁÁÁÁ
ÁÁÁÁÁ
ÁÁÁÁÁÁÁ
ÁÁÁÁÁÁ
ÁÁÁÁ
ÁÁÁÁÁÁÁÁÁÁÁÁÁÁÁÁÁ
ÁÁÁÁÁ
ÁÁÁÁÁÁÁ
ÁÁÁÁÁÁ
ÁÁÁÁ
ÁÁÁÁÁÁÁÁÁÁÁÁÁÁÁÁÁ
ÁÁÁÁÁ
ÁÁÁÁÁÁÁ
ÁÁÁÁÁÁ
ÁÁÁÁ
ÁÁÁÁÁÁÁÁÁÁÁÁÁÁÁÁÁ
ÁÁÁÁÁ
ÁÁÁÁÁÁÁ
ÁÁÁÁÁÁ
ÁÁÁÁ
ÁÁÁÁÁÁÁÁÁÁÁÁÁÁÁÁÁ
ÁÁÁÁÁ
ÁÁÁÁÁÁÁ
ÁÁÁÁÁÁ
ÁÁÁÁ
ÁÁÁÁÁÁÁÁÁÁÁÁÁÁÁÁÁ
ÁÁÁÁÁ
ÁÁÁÁÁÁÁ
ÁÁÁÁÁÁ
ÁÁÁÁ
ÁÁÁÁÁÁÁÁÁÁÁÁÁÁÁÁÁ
ÁÁÁÁÁ
ÁÁÁÁÁÁÁ
ÁÁÁÁÁÁ
ÁÁÁÁÁÁÁÁÁÁÁÁÁÁÁÁÁÁÁÁÁ
ÁÁÁÁÁ
ÁÁÁÁÁÁÁ
ÁÁÁÁÁÁ
ÁÁÁÁ
ÁÁÁÁÁÁÁÁÁÁÁÁÁÁÁÁÁ
ÁÁÁÁÁ
ÁÁÁÁÁÁÁ
ÁÁÁÁÁÁ
ÁÁÁÁ
ÁÁÁÁÁÁÁÁÁÁÁÁÁÁÁÁÁ
ÁÁÁÁÁÁÁÁÁÁÁÁ
ÁÁÁÁÁÁ
Step
Action
Value(s)
Yes
No
1
Examine the wiring and the connector at the driver
airbag module.
Is the connector disconnected?
–
Go to Step 2
Go to Step 3
1. Reconnect the driver airbag module connector.
2. Reinstall the driver airbag module in the steering
wheel.
3. Reconnect the negative battery terminal.
Is the repair complete?
–
Go to
Diagnostic
System Check
–
3
1. Remove the driver airbag module.
2. Place the driver airbag module in a secure
position with the decorative surface facing
upward.
3. Disconnect the electrical connector at the SDM.
D The shorting bar at the disconnected SDM
connector will create a complete circuit
between the wires from the driver airbag
module.
4. Connect an ohmmeter to the terminals of the
wiring harness connector for the driver airbag
module.
D Refer to ‘‘Diagnostic Illustration 3’’ in this
section.
Does the ohmmeter indicate the specified value?
≈0W
Go to Step 4
Go to Step 6
4
1. Replace the SDM.
2. Reconnect the negative battery cable.
3. Set the scan tool for CODE ERASE.
4. Do the diagnostic system check.
Does the code 01 still show as a current fault?
–
Go to Step 5
System OK
–
Go to
Diagnostic
System Check
–
≈0W
Go to Step 7
Go to Step 8
–
Go to
Diagnostic
System Check
–
–
Go to
Diagnostic
System Check
–
2
5
6
1. Replace the driver airbag module.
2. Reconnect the negative battery terminal.
Is the repair complete?
1. Disconnect the clock spring wiring harness
connector at the lower steering column.
D The shorting bar at the disconnected SDM
connector will create a complete circuit
between the wires from the clock spring.
2. Connect an ohmmeter to the terminals at the
SDM side of the clock spring connector.
D Refer to ‘‘Diagnostic Illustration 4’’ in this
section.
Does the ohmmeter show the specified value?
7
1. Replace the clock spring.
2. Reconnect the negative battery terminal.
Is the repair complete?
8
1. Replace the SIR wiring harness.
2. Reconnect the negative battery cable.
Is the repair complete?
DAEWOO M-150 BL2
8B – 16 SUPPLEMENTAL INFLATABLE RESTRAINTS (SIR)
D1AB302B
DIAGNOSTIC TROUBLE CODE (DTC) 02
DRIVER FIRING CIRCUIT, RESISTANCE TOO LOW
Short Circuit
Circuit Description
When the ignition switch is turned ON, the sensing and
diagnostic module (SDM) will perform tests to diagnose
any malfunctions within itself.
After passing these tests, the SDM will check the driver
airbag module firing circuit. The SDM allows a very
small amount of current to flow through the airbag
module firing circuit. The SDM monitors the circuit resistance during this check.
DTC 02 Will Set When
D The combined resistance of the driver airbag module,
the harness wiring, and the connector contacts is below a specified value, as with a short circuit between
the wires to the driver airbag module.
Test Description
Caution: Before testing, disconnect the negative
battery cable. Wait 1 minute for the SDM capacitor
to discharge. The capacitor supplies reserve power
to deploy the airbags, even if the battery is disconnected. Unintentional deployment of the airbags
can cause injury.
Caution: Never measure the resistance of an airbag
module with an ohmmeter. An ohmmeter’s battery
can deploy the airbag and cause injury.
DAEWOO M-150 BL2
SUPPLEMENTAL INFLATABLE RESTRAINTS (SIR) 8B – 17
DTC 02 – Driver Firing Circuit, Resistance Too Low
ÁÁÁÁÁÁÁÁÁÁÁÁÁÁÁÁÁÁÁÁÁ
ÁÁÁÁÁ
ÁÁÁÁÁÁÁ
ÁÁÁÁÁÁ
ÁÁÁÁÁÁÁÁÁÁÁÁÁÁÁÁÁÁÁÁÁ
ÁÁÁÁÁ
ÁÁÁÁÁÁÁ
ÁÁÁÁÁÁ
ÁÁÁÁ
ÁÁÁÁÁÁÁÁÁÁÁÁÁÁÁÁÁ
ÁÁÁÁÁ
ÁÁÁÁÁÁÁ
ÁÁÁÁÁÁ
ÁÁÁÁ
ÁÁÁÁÁÁÁÁÁÁÁÁÁÁÁÁÁ
ÁÁÁÁÁ
ÁÁÁÁÁÁÁ
ÁÁÁÁÁÁ
ÁÁÁÁ
ÁÁÁÁÁÁÁÁÁÁÁÁÁÁÁÁÁÁÁÁÁÁÁÁÁÁÁÁÁ
ÁÁÁÁÁÁ
ÁÁÁÁ
ÁÁÁÁÁÁÁÁÁÁÁÁÁÁÁÁÁÁÁÁÁÁÁÁÁÁÁÁÁ
ÁÁÁÁÁÁ
ÁÁÁÁ
ÁÁÁÁÁÁÁÁÁÁÁÁÁÁÁÁÁ
ÁÁÁÁÁ
ÁÁÁÁÁÁÁ
ÁÁÁÁÁÁ
ÁÁÁÁ
ÁÁÁÁÁÁÁÁÁÁÁÁÁÁÁÁÁ
ÁÁÁÁÁ
ÁÁÁÁÁÁÁ
ÁÁÁÁÁÁ
ÁÁÁÁ
ÁÁÁÁÁÁÁÁÁÁÁÁÁÁÁÁÁ
ÁÁÁÁÁÁ
ÁÁÁÁÁ
ÁÁÁÁÁÁÁ
ÁÁÁÁ
ÁÁÁÁÁÁÁÁÁÁÁÁÁÁÁÁÁ
ÁÁÁÁÁ
ÁÁÁÁÁÁÁ
ÁÁÁÁÁÁ
ÁÁÁÁ
ÁÁÁÁÁÁÁÁÁÁÁÁÁÁÁÁÁ
ÁÁÁÁÁ
ÁÁÁÁÁÁÁ
ÁÁÁÁÁÁ
ÁÁÁÁ
ÁÁÁÁÁÁÁÁÁÁÁÁÁÁÁÁÁ
ÁÁÁÁÁ
ÁÁÁÁÁÁÁ
ÁÁÁÁÁÁ
ÁÁÁÁ
ÁÁÁÁÁÁÁÁÁÁÁÁÁÁÁÁÁ
ÁÁÁÁÁÁ
ÁÁÁÁÁ
ÁÁÁÁÁÁÁ
ÁÁÁÁ
ÁÁÁÁÁÁÁÁÁÁÁÁÁÁÁÁÁ
ÁÁÁÁÁ
ÁÁÁÁÁÁÁ
ÁÁÁÁÁÁ
ÁÁÁÁ
ÁÁÁÁÁÁÁÁÁÁÁÁÁÁÁÁÁ
ÁÁÁÁÁ
ÁÁÁÁÁÁÁ
ÁÁÁÁÁÁ
ÁÁÁÁÁ
ÁÁÁÁÁÁÁ
ÁÁÁÁ
ÁÁÁÁÁÁÁÁÁÁÁÁÁÁÁÁÁ
ÁÁÁÁÁÁ
ÁÁÁÁ
ÁÁÁÁÁÁÁÁÁÁÁÁÁÁÁÁÁ
ÁÁÁÁÁ
ÁÁÁÁÁÁÁ
ÁÁÁÁÁÁ
ÁÁÁÁ
ÁÁÁÁÁÁÁÁÁÁÁÁÁÁÁÁÁÁÁÁÁÁÁÁÁÁÁÁÁ
ÁÁÁÁÁÁ
ÁÁÁÁ
ÁÁÁÁÁÁÁÁÁÁÁÁÁÁÁÁÁ
ÁÁÁÁÁ
ÁÁÁÁÁÁÁ
ÁÁÁÁÁÁ
ÁÁÁÁ
ÁÁÁÁÁÁÁÁÁÁÁÁÁÁÁÁÁ
ÁÁÁÁÁ
ÁÁÁÁÁÁÁ
ÁÁÁÁÁÁ
ÁÁÁÁ
ÁÁÁÁÁÁÁÁÁÁÁÁÁÁÁÁÁ
ÁÁÁÁÁ
ÁÁÁÁÁÁÁ
ÁÁÁÁÁÁ
ÁÁÁÁÁ
ÁÁÁÁÁÁÁ
ÁÁÁÁ
ÁÁÁÁÁÁÁÁÁÁÁÁÁÁÁÁÁ
ÁÁÁÁÁÁ
ÁÁÁÁÁÁÁÁÁÁÁÁÁÁÁÁÁÁÁÁÁ
ÁÁÁÁÁ
ÁÁÁÁÁÁÁ
ÁÁÁÁÁÁ
ÁÁÁÁ
ÁÁÁÁÁÁÁÁÁÁÁÁÁÁÁÁÁ
ÁÁÁÁÁ
ÁÁÁÁÁÁÁ
ÁÁÁÁÁÁ
ÁÁÁÁÁ
ÁÁÁÁÁÁÁ
ÁÁÁÁ
ÁÁÁÁÁÁÁÁÁÁÁÁÁÁÁÁÁ
ÁÁÁÁÁÁ
ÁÁÁÁÁÁÁÁÁÁÁÁÁÁÁÁÁÁÁÁÁ
ÁÁÁÁÁ
ÁÁÁÁÁÁÁ
ÁÁÁÁÁÁ
ÁÁÁÁ
ÁÁÁÁÁÁÁÁÁÁÁÁÁÁÁÁÁ
ÁÁÁÁÁ
ÁÁÁÁÁÁ
ÁÁÁÁ
ÁÁÁÁÁÁÁÁÁÁÁÁÁÁÁÁÁ
ÁÁÁÁÁÁÁÁÁÁÁÁ
ÁÁÁÁÁÁÁ
ÁÁÁÁÁÁ
Step
Action
Value(s)
Yes
No
1
1. Remove the driver airbag module.
2. Store the driver airbag module with the decorative
side facing upward.
3. Connect an ohmmeter to the terminals of the
wiring harness connector for the driver airbag
module.
D Refer to ‘‘Diagnostic Illustration 3’’ in this
section.
Does the ohmmeter show the specified value?
∞
Go to Step 2
Go to Step 4
2
1. Replace the SDM.
2. Reconnect the negative battery cable.
3. Set the scan tool to CODE ERASE.
4. Do the diagnostic system check.
Does the code 02 still show as a current fault?
–
Go to Step 3
System OK
3
1. Replace the driver airbag module.
2. Reconnect the negative battery cable.
Is the repair complete?
–
Go to
Diagnostic
System Check
–
1. Disconnect the clock spring wiring harness
connector at the lower steering column.
2. Connect an ohmmeter to the terminals at the
SDM side of the clock spring connector.
D Refer to ‘‘Diagnostic Illustration 4’’ in this
section.
Does the ohmmeter show the specified value?
∞
Go to Step 5
Go to Step 6
–
Go to
Diagnostic
System Check
–
–
Go to
Diagnostic
System Check
–
4
5
6
DAEWOO M-150 BL2
1. Replace the clock spring.
2. Reconnect the negative battery cable.
Is the repair complete?
1. Replace the supplemental inflatable restraints
(SIR) wiring harness.
2. Reconnect the negative battery cable.
Is the repair complete?
8B – 18 SUPPLEMENTAL INFLATABLE RESTRAINTS (SIR)
D1AB302B
DIAGNOSTIC TROUBLE CODE (DTC) 03
DRIVER FIRING CIRCUIT, SHORT TO GROUND
Circuit Description
When the ignition switch is turned ON, the sensing and
diagnostic module (SDM) will perform tests to diagnose
any malfunctions within itself.
After passing these tests, the SDM will check the driver
airbag module firing circuit. The SDM allows a very
small amount of current to flow through the driver airbag
module firing circuit. The SDM monitors the voltage
during this check.
Test Description
Caution: Before testing, disconnect the negative
battery cable. Wait 1 minute for the SDM capacitor
to discharge. The capacitor supplies reserve power
to deploy the airbags, even if the battery is disconnected. Unintentional deployment of the airbags
can cause injury.
DTC 03 Will Set When
D The firing circuit is shorted to ground.
DAEWOO M-150 BL2
SUPPLEMENTAL INFLATABLE RESTRAINTS (SIR) 8B – 19
DTC 03 – Driver Firing Circuit, Short To Ground
ÁÁÁÁÁÁÁÁÁÁÁÁÁÁÁÁÁÁÁÁÁ
ÁÁÁÁÁ
ÁÁÁÁÁÁÁ
ÁÁÁÁÁÁ
ÁÁÁÁÁÁÁÁÁÁÁÁÁÁÁÁÁÁÁÁÁ
ÁÁÁÁÁ
ÁÁÁÁÁÁÁ
ÁÁÁÁÁÁ
ÁÁÁÁ
ÁÁÁÁÁÁÁÁÁÁÁÁÁÁÁÁÁ
ÁÁÁÁÁ
ÁÁÁÁÁÁÁ
ÁÁÁÁÁÁ
ÁÁÁÁ
ÁÁÁÁÁÁÁÁÁÁÁÁÁÁÁÁÁ
ÁÁÁÁÁ
ÁÁÁÁÁÁÁ
ÁÁÁÁÁÁ
ÁÁÁÁÁÁÁÁÁÁÁÁÁÁÁÁÁÁÁÁÁ
ÁÁÁÁÁ
ÁÁÁÁÁÁÁ
ÁÁÁÁÁÁ
ÁÁÁÁ
ÁÁÁÁÁÁÁÁÁÁÁÁÁÁÁÁÁ
ÁÁÁÁÁ
ÁÁÁÁÁÁÁ
ÁÁÁÁÁÁ
ÁÁÁÁÁ
ÁÁÁÁÁÁÁ
ÁÁÁÁ
ÁÁÁÁÁÁÁÁÁÁÁÁÁÁÁÁÁ
ÁÁÁÁÁÁ
ÁÁÁÁ
ÁÁÁÁÁÁÁÁÁÁÁÁÁÁÁÁÁ
ÁÁÁÁÁ
ÁÁÁÁÁÁÁ
ÁÁÁÁÁÁ
ÁÁÁÁ
ÁÁÁÁÁÁÁÁÁÁÁÁÁÁÁÁÁ
ÁÁÁÁÁ
ÁÁÁÁÁÁÁ
ÁÁÁÁÁÁ
ÁÁÁÁ
ÁÁÁÁÁÁÁÁÁÁÁÁÁÁÁÁÁ
ÁÁÁÁÁ
ÁÁÁÁÁÁÁ
ÁÁÁÁÁÁ
ÁÁÁÁ
ÁÁÁÁÁÁÁÁÁÁÁÁÁÁÁÁÁ
ÁÁÁÁÁ
ÁÁÁÁÁÁÁ
ÁÁÁÁÁÁ
ÁÁÁÁ
ÁÁÁÁÁÁÁÁÁÁÁÁÁÁÁÁÁ
ÁÁÁÁÁ
ÁÁÁÁÁÁÁ
ÁÁÁÁÁÁ
ÁÁÁÁ
ÁÁÁÁÁÁÁÁÁÁÁÁÁÁÁÁÁÁÁÁÁÁÁÁÁÁÁÁÁ
ÁÁÁÁÁÁ
ÁÁÁÁ
ÁÁÁÁÁÁÁÁÁÁÁÁÁÁÁÁÁ
ÁÁÁÁÁÁ
ÁÁÁÁ
ÁÁÁÁÁÁÁÁÁÁÁÁÁÁÁÁÁÁÁÁÁÁ
ÁÁÁÁÁÁÁÁÁÁÁÁ
ÁÁÁÁÁÁÁ
ÁÁÁÁÁÁ
ÁÁÁÁ
ÁÁÁÁÁÁÁÁÁÁÁÁÁÁÁÁÁ
ÁÁÁÁÁ
ÁÁÁÁÁÁÁ
ÁÁÁÁÁÁ
ÁÁÁÁ
ÁÁÁÁÁÁÁÁÁÁÁÁÁÁÁÁÁ
ÁÁÁÁÁ
ÁÁÁÁÁÁÁ
ÁÁÁÁÁÁ
ÁÁÁÁ
ÁÁÁÁÁÁÁÁÁÁÁÁÁÁÁÁÁÁÁÁÁÁÁÁÁÁÁÁÁ
ÁÁÁÁÁÁ
ÁÁÁÁ
ÁÁÁÁÁÁÁÁÁÁÁÁÁÁÁÁÁ
ÁÁÁÁÁ
ÁÁÁÁÁÁÁ
ÁÁÁÁÁÁ
ÁÁÁÁÁ
ÁÁÁÁÁÁÁ
ÁÁÁÁ
ÁÁÁÁÁÁÁÁÁÁÁÁÁÁÁÁÁ
ÁÁÁÁÁÁ
ÁÁÁÁ
ÁÁÁÁÁÁÁÁÁÁÁÁÁÁÁÁÁ
ÁÁÁÁÁ
ÁÁÁÁÁÁÁ
ÁÁÁÁÁÁ
ÁÁÁÁ
ÁÁÁÁÁÁÁÁÁÁÁÁÁÁÁÁÁ
ÁÁÁÁÁ
ÁÁÁÁÁÁÁ
ÁÁÁÁÁÁ
ÁÁÁÁ
ÁÁÁÁÁÁÁÁÁÁÁÁÁÁÁÁÁÁÁÁÁÁÁÁÁÁÁÁÁ
ÁÁÁÁÁÁ
ÁÁÁÁ
ÁÁÁÁÁÁÁÁÁÁÁÁÁÁÁÁÁ
ÁÁÁÁÁ
ÁÁÁÁÁÁÁ
ÁÁÁÁÁÁ
ÁÁÁÁ
ÁÁÁÁÁÁÁÁÁÁÁÁÁÁÁÁÁ
ÁÁÁÁÁ
ÁÁÁÁÁÁÁ
ÁÁÁÁÁÁ
ÁÁÁÁ
ÁÁÁÁÁÁÁÁÁÁÁÁÁÁÁÁÁ
ÁÁÁÁÁÁ
ÁÁÁÁÁ
ÁÁÁÁÁÁÁ
ÁÁÁÁ
ÁÁÁÁÁÁÁÁÁÁÁÁÁÁÁÁÁ
ÁÁÁÁÁ
ÁÁÁÁÁÁÁ
ÁÁÁÁÁÁ
ÁÁÁÁ
ÁÁÁÁÁÁÁÁÁÁÁÁÁÁÁÁÁ
ÁÁÁÁÁÁ
ÁÁÁÁÁ
ÁÁÁÁÁÁÁ
ÁÁÁÁÁÁÁÁÁÁÁÁÁÁÁÁÁÁÁÁÁ
ÁÁÁÁÁ
ÁÁÁÁÁÁÁ
ÁÁÁÁÁÁ
ÁÁÁÁ
ÁÁÁÁÁÁÁÁÁÁÁÁÁÁÁÁÁ
ÁÁÁÁÁ
ÁÁÁÁÁÁÁ
ÁÁÁÁÁÁ
ÁÁÁÁ
ÁÁÁÁÁÁÁÁÁÁÁÁÁÁÁÁÁÁÁÁÁÁÁÁÁÁÁÁÁ
ÁÁÁÁÁÁ
ÁÁÁÁ
ÁÁÁÁÁÁÁÁÁÁÁÁÁÁÁÁÁ
ÁÁÁÁÁ
ÁÁÁÁÁÁÁ
ÁÁÁÁÁÁ
ÁÁÁÁ
ÁÁÁÁÁÁÁÁÁÁÁÁÁÁÁÁÁ
ÁÁÁÁÁ
ÁÁÁÁÁÁÁ
ÁÁÁÁÁÁ
ÁÁÁÁ
ÁÁÁÁÁÁÁÁÁÁÁÁÁÁÁÁÁ
ÁÁÁÁÁ
ÁÁÁÁÁÁÁ
ÁÁÁÁÁÁ
ÁÁÁÁ
ÁÁÁÁÁÁÁÁÁÁÁÁÁÁÁÁÁ
ÁÁÁÁÁ
ÁÁÁÁÁÁÁ
ÁÁÁÁÁÁ
ÁÁÁÁ
ÁÁÁÁÁÁÁÁÁÁÁÁÁÁÁÁÁ
ÁÁÁÁÁ
ÁÁÁÁÁÁÁ
ÁÁÁÁÁÁ
ÁÁÁÁ
ÁÁÁÁÁÁÁÁÁÁÁÁÁÁÁÁÁ
ÁÁÁÁÁ
ÁÁÁÁÁÁÁ
ÁÁÁÁÁÁ
ÁÁÁÁ
ÁÁÁÁÁÁÁÁÁÁÁÁÁÁÁÁÁ
ÁÁÁÁÁÁÁÁÁÁÁÁ
ÁÁÁÁÁÁ
Step
1
2
3
4
5
6
7
DAEWOO M-150 BL2
Action
Value(s)
Yes
No
–
Go to Step 2
Go to Step 3
1. Replace the SIR wiring harness.
2. Reconnect the negative battery cable.
Is the repair complete?
–
Go to
Diagnostic
System Check
–
1. Remove the driver airbag module.
2. Place the driver airbag module in a secure
position with the decorative surface facing
upward.
3. Disconnect the electrical connector at the SDM.
D The shorting bar at the disconnected SDM
connector will create a complete circuit between the wires from the driver airbag
module.
4. Use an ohmmeter to check the continuity
between ground and one of the terminals on the
wiring harness connector for the driver airbag
module.
D Refer to ‘‘Diagnostic Illustration 5’’ in this
section.
Is the resistance less than the specified value?
∞
Go to Step 6
Go to Step 4
–
Go to Step 5
System OK
1. Replace the driver airbag module.
2. Reconnect the negative battery cable.
Is the repair complete?
–
Go to
Diagnostic
System Check
–
1. Disconnect the clock spring wiring harness
connector at the lower steering column.
D The shorting bar at the disconnected SDM
connector will create a complete circuit between the wires from the clock spring.
2. Using an ohmmeter, check for continuity between
ground and one of the terminals on the SDM side
of the clock spring connector.
Is the resistance less than the specified value?
∞
Go to Step 2
Go to Step 7
–
Go to
Diagnostic
System Check
–
Visually inspect the supplemental inflatable
restraints (SIR) wiring harness for damage.
Is there any visible damage to the SIR harness?
1.
2.
3.
4.
Replace the SDM.
Reconnect the negative battery cable.
Set the scan tool for CODE ERASE.
Do the diagnostic system check.
D Refer to the “Diagnostic System Check” in this
section.
Does the code 03 still show as a current fault?
1. Replace the clock spring.
2. Reconnect the negative battery terminal.
Is the repair complete?
8B – 20 SUPPLEMENTAL INFLATABLE RESTRAINTS (SIR)
D1AB302B
DIAGNOSTIC TROUBLE CODE (DTC) 04
DRIVER FIRING CIRCUIT, SHORT TO BATTERY VOLTAGE
Circuit Description
When the ignition switch is turned ON, the sensing and
diagnostic module (SDM) will perform tests to diagnose
any malfunctions within itself.
After passing these tests, the SDM will check the driver
airbag module firing circuit. The SDM allows a very
small amount of current to flow through the circuit. The
SDM monitors voltage during this check.
Test Description
Caution: Before testing, disconnect the negative
battery cable. Wait 1 minute for the SDM capacitor
to discharge. The capacitor supplies reserve power
to deploy the airbags, even if the battery is disconnected. Unintentional deployment of the airbags
can cause injury.
DTC 04 Will Set When
D The firing circuit is shorted to voltage.
DAEWOO M-150 BL2
SUPPLEMENTAL INFLATABLE RESTRAINTS (SIR) 8B – 21
DTC 04 – Driver Firing Circuit, Short To Battery Voltage
ÁÁÁÁÁÁÁÁÁÁÁÁÁÁÁÁÁÁÁÁÁ
ÁÁÁÁÁ
ÁÁÁÁÁÁÁ
ÁÁÁÁÁÁ
ÁÁÁÁÁÁÁÁÁÁÁÁÁÁÁÁÁÁÁÁÁ
ÁÁÁÁÁ
ÁÁÁÁÁÁÁ
ÁÁÁÁÁÁ
ÁÁÁÁ
ÁÁÁÁÁÁÁÁÁÁÁÁÁÁÁÁÁ
ÁÁÁÁÁ
ÁÁÁÁÁÁÁ
ÁÁÁÁÁÁ
ÁÁÁÁ
ÁÁÁÁÁÁÁÁÁÁÁÁÁÁÁÁÁ
ÁÁÁÁÁ
ÁÁÁÁÁÁÁ
ÁÁÁÁÁÁ
ÁÁÁÁÁÁÁÁÁÁÁÁÁÁÁÁÁÁÁÁÁ
ÁÁÁÁÁ
ÁÁÁÁÁÁÁ
ÁÁÁÁÁÁ
ÁÁÁÁ
ÁÁÁÁÁÁÁÁÁÁÁÁÁÁÁÁÁ
ÁÁÁÁÁ
ÁÁÁÁÁÁÁ
ÁÁÁÁÁÁ
ÁÁÁÁÁ
ÁÁÁÁÁÁÁ
ÁÁÁÁ
ÁÁÁÁÁÁÁÁÁÁÁÁÁÁÁÁÁ
ÁÁÁÁÁÁ
ÁÁÁÁ
ÁÁÁÁÁÁÁÁÁÁÁÁÁÁÁÁÁ
ÁÁÁÁÁ
ÁÁÁÁÁÁÁ
ÁÁÁÁÁÁ
ÁÁÁÁ
ÁÁÁÁÁÁÁÁÁÁÁÁÁÁÁÁÁ
ÁÁÁÁÁ
ÁÁÁÁÁÁÁ
ÁÁÁÁÁÁ
ÁÁÁÁ
ÁÁÁÁÁÁÁÁÁÁÁÁÁÁÁÁÁ
ÁÁÁÁÁ
ÁÁÁÁÁÁÁ
ÁÁÁÁÁÁ
ÁÁÁÁ
ÁÁÁÁÁÁÁÁÁÁÁÁÁÁÁÁÁ
ÁÁÁÁÁ
ÁÁÁÁÁÁÁ
ÁÁÁÁÁÁ
ÁÁÁÁ
ÁÁÁÁÁÁÁÁÁÁÁÁÁÁÁÁÁ
ÁÁÁÁÁ
ÁÁÁÁÁÁÁ
ÁÁÁÁÁÁ
ÁÁÁÁ
ÁÁÁÁÁÁÁÁÁÁÁÁÁÁÁÁÁÁÁÁÁÁÁÁÁÁÁÁÁ
ÁÁÁÁÁÁ
ÁÁÁÁ
ÁÁÁÁÁÁÁÁÁÁÁÁÁÁÁÁÁ
ÁÁÁÁÁÁ
ÁÁÁÁ
ÁÁÁÁÁÁÁÁÁÁÁÁÁÁÁÁÁÁÁÁÁÁ
ÁÁÁÁÁÁÁÁÁÁÁÁ
ÁÁÁÁÁÁÁ
ÁÁÁÁÁÁ
ÁÁÁÁ
ÁÁÁÁÁÁÁÁÁÁÁÁÁÁÁÁÁ
ÁÁÁÁÁ
ÁÁÁÁÁÁÁ
ÁÁÁÁÁÁ
ÁÁÁÁ
ÁÁÁÁÁÁÁÁÁÁÁÁÁÁÁÁÁ
ÁÁÁÁÁ
ÁÁÁÁÁÁÁ
ÁÁÁÁÁÁ
ÁÁÁÁ
ÁÁÁÁÁÁÁÁÁÁÁÁÁÁÁÁÁÁÁÁÁÁÁÁÁÁÁÁÁ
ÁÁÁÁÁÁ
ÁÁÁÁÁ
ÁÁÁÁÁÁÁ
ÁÁÁÁ
ÁÁÁÁÁÁÁÁÁÁÁÁÁÁÁÁÁ
ÁÁÁÁÁÁ
ÁÁÁÁ
ÁÁÁÁÁÁÁÁÁÁÁÁÁÁÁÁÁ
ÁÁÁÁÁ
ÁÁÁÁÁÁÁ
ÁÁÁÁÁÁ
ÁÁÁÁ
ÁÁÁÁÁÁÁÁÁÁÁÁÁÁÁÁÁ
ÁÁÁÁÁ
ÁÁÁÁÁÁÁ
ÁÁÁÁÁÁ
ÁÁÁÁ
ÁÁÁÁÁÁÁÁÁÁÁÁÁÁÁÁÁ
ÁÁÁÁÁ
ÁÁÁÁÁÁÁ
ÁÁÁÁÁÁ
ÁÁÁÁ
ÁÁÁÁÁÁÁÁÁÁÁÁÁÁÁÁÁ
ÁÁÁÁÁÁ
ÁÁÁÁÁ
ÁÁÁÁÁÁÁ
ÁÁÁÁ
ÁÁÁÁÁÁÁÁÁÁÁÁÁÁÁÁÁ
ÁÁÁÁÁ
ÁÁÁÁÁÁÁ
ÁÁÁÁÁÁ
ÁÁÁÁ
ÁÁÁÁÁÁÁÁÁÁÁÁÁÁÁÁÁ
ÁÁÁÁÁ
ÁÁÁÁÁÁÁ
ÁÁÁÁÁÁ
ÁÁÁÁ
ÁÁÁÁÁÁÁÁÁÁÁÁÁÁÁÁÁ
ÁÁÁÁÁÁ
ÁÁÁÁÁ
ÁÁÁÁÁÁÁ
ÁÁÁÁ
ÁÁÁÁÁÁÁÁÁÁÁÁÁÁÁÁÁ
ÁÁÁÁÁ
ÁÁÁÁÁÁÁ
ÁÁÁÁÁÁ
ÁÁÁÁ
ÁÁÁÁÁÁÁÁÁÁÁÁÁÁÁÁÁ
ÁÁÁÁÁ
ÁÁÁÁÁÁÁ
ÁÁÁÁÁÁ
ÁÁÁÁ
ÁÁÁÁÁÁÁÁÁÁÁÁÁÁÁÁÁÁÁÁÁÁÁÁÁÁÁÁÁ
ÁÁÁÁÁÁ
ÁÁÁÁ
ÁÁÁÁÁÁÁÁÁÁÁÁÁÁÁÁÁ
ÁÁÁÁÁ
ÁÁÁÁÁÁÁ
ÁÁÁÁÁÁ
ÁÁÁÁ
ÁÁÁÁÁÁÁÁÁÁÁÁÁÁÁÁÁÁÁÁÁÁÁÁÁÁÁÁÁ
ÁÁÁÁÁÁ
ÁÁÁÁ
ÁÁÁÁÁÁÁÁÁÁÁÁÁÁÁÁÁ
ÁÁÁÁÁ
ÁÁÁÁÁÁÁ
ÁÁÁÁÁÁ
ÁÁÁÁ
ÁÁÁÁÁÁÁÁÁÁÁÁÁÁÁÁÁ
ÁÁÁÁÁ
ÁÁÁÁÁÁÁ
ÁÁÁÁÁÁ
ÁÁÁÁ
ÁÁÁÁÁÁÁÁÁÁÁÁÁÁÁÁÁ
ÁÁÁÁÁ
ÁÁÁÁÁÁÁ
ÁÁÁÁÁÁ
ÁÁÁÁ
ÁÁÁÁÁÁÁÁÁÁÁÁÁÁÁÁÁ
ÁÁÁÁÁ
ÁÁÁÁÁÁÁ
ÁÁÁÁÁÁ
ÁÁÁÁ
ÁÁÁÁÁÁÁÁÁÁÁÁÁÁÁÁÁ
ÁÁÁÁÁ
ÁÁÁÁÁÁÁ
ÁÁÁÁÁÁ
ÁÁÁÁ
ÁÁÁÁÁÁÁÁÁÁÁÁÁÁÁÁÁ
ÁÁÁÁÁ
ÁÁÁÁÁÁÁ
ÁÁÁÁÁÁ
ÁÁÁÁ
ÁÁÁÁÁÁÁÁÁÁÁÁÁÁÁÁÁ
ÁÁÁÁÁÁÁÁÁÁÁÁ
ÁÁÁÁÁÁ
Step
1
2
3
4
5
6
7
DAEWOO M-150 BL2
Action
Visually inspect the supplemental inflatable
restraints (SIR) harness for damage.
Is there any visible damage to the SIR harness?
1. Replace the SIR wiring harness.
2. Reconnect the negative battery cable.
Is your repair complete?
1. Remove the driver airbag module.
2. Place the driver airbag module in a secure
position with the decorative surface facing
upward.
3. Disconnect the electrical connector at the SDM.
D The shorting bar at the disconnected SDM
connector will create a complete circuit between the wires from the driver airbag
module.
4. Use a multimeter to check the voltage at one of
the terminals on the wiring harness connector for
the driver airbag module.
D Refer to ‘‘Diagnostic Illustration 6’’ in this
section.
Is the voltage greater than the specified value?
1. Replace the SDM.
2. Reconnect the negative battery cable.
3. Set the scan tool for CODE ERASE.
4. Do the diagnostic system check.
Does the code 04 still show as a current fault?
1. Replace the driver airbag module.
2. Reconnect the negative battery cable.
Is the repair complete?
1. Disconnect the clock spring wiring harness at the
lower steering column.
D The shorting bar at the disconnected SDM
connector will create a complete circuit between the wires from the clock spring
connector.
2. Using a multimeter, check the voltage at one of
the terminals on the SDM side of the clock spring
connector.
D Refer to ‘‘Diagnostic Illustration 7’’ in this
section.
Did the voltmeter indicate the specified value?
1. Replace the clock spring.
2. Reconnect the negative battery cable.
Is the repair complete?
Value(s)
Yes
No
–
Go to Step 2
Go to Step 3
–
Go to
Diagnostic
System Check
–
0v
Go to Step 6
Go to Step 4
–
Go to Step 5
System OK
–
Go to
Diagnostic
System Check
–
0v
Go to Step 7
Go to Step 2
–
Go to
Diagnostic
System Check
–
8B – 22 SUPPLEMENTAL INFLATABLE RESTRAINTS (SIR)
D1AB302B
DIAGNOSTIC TROUBLE CODE (DTC) 05
PASSENGER FIRING CIRCUIT, RESISTANCE TOO HIGH
Open Circuit
Circuit Description
When the ignition switch is turned ON, the sensing and
diagnostic module (SDM) will perform tests to diagnose
any malfunctions within itself.
After passing these tests, the SDM will check the
passenger airbag firing circuit. The SDM allows a very
small amount of current to flow through the circuit. The
SDM monitors the circuit resistance during this check.
DTC 05 Will Set When
D The combined resistance of the passenger airbag
module, the harness wiring, and the connector contacts is above a specified value, as in an open circuit.
Test Description
Caution: Before testing, disconnect the negative
battery cable. Wait 1 minute for the SDM capacitor
to discharge. The capacitor supplies reserve power
to deploy the airbags, even if the battery is disconnected. Unintentional deployment of the airbags
can cause injury.
Caution: Never measure the resistance of an airbag
module. If the anti-deployment shorting bar on the
module-side of the connector is not working properly, the meter’s battery can deploy the airbag and
cause injury.
DAEWOO M-150 BL2
SUPPLEMENTAL INFLATABLE RESTRAINTS (SIR) 8B – 23
DTC 05 – Passenger Firing Circuit, Resistance Too High
ÁÁÁÁÁÁÁÁÁÁÁÁÁÁÁÁÁÁÁÁÁ
ÁÁÁÁÁ
ÁÁÁÁÁÁÁ
ÁÁÁÁÁÁ
ÁÁÁÁÁÁÁÁÁÁÁÁÁÁÁÁÁÁÁÁÁ
ÁÁÁÁÁ
ÁÁÁÁÁÁÁ
ÁÁÁÁÁÁ
ÁÁÁÁ
ÁÁÁÁÁÁÁÁÁÁÁÁÁÁÁÁÁ
ÁÁÁÁÁ
ÁÁÁÁÁÁÁ
ÁÁÁÁÁÁ
ÁÁÁÁ
ÁÁÁÁÁÁÁÁÁÁÁÁÁÁÁÁÁ
ÁÁÁÁÁ
ÁÁÁÁÁÁÁ
ÁÁÁÁÁÁ
ÁÁÁÁ
ÁÁÁÁÁÁÁÁÁÁÁÁÁÁÁÁÁÁÁÁÁÁÁÁÁÁÁÁÁ
ÁÁÁÁÁÁ
ÁÁÁÁ
ÁÁÁÁÁÁÁÁÁÁÁÁÁÁÁÁÁ
ÁÁÁÁÁ
ÁÁÁÁÁÁÁ
ÁÁÁÁÁÁ
ÁÁÁÁ
ÁÁÁÁÁÁÁÁÁÁÁÁÁÁÁÁÁ
ÁÁÁÁÁ
ÁÁÁÁÁÁÁ
ÁÁÁÁÁÁ
ÁÁÁÁ
ÁÁÁÁÁÁÁÁÁÁÁÁÁÁÁÁÁ
ÁÁÁÁÁ
ÁÁÁÁÁÁÁ
ÁÁÁÁÁÁ
ÁÁÁÁ
ÁÁÁÁÁÁÁÁÁÁÁÁÁÁÁÁÁ
ÁÁÁÁÁÁ
ÁÁÁÁÁ
ÁÁÁÁÁÁÁ
ÁÁÁÁ
ÁÁÁÁÁÁÁÁÁÁÁÁÁÁÁÁÁ
ÁÁÁÁÁ
ÁÁÁÁÁÁÁ
ÁÁÁÁÁÁ
ÁÁÁÁ
ÁÁÁÁÁÁÁÁÁÁÁÁÁÁÁÁÁ
ÁÁÁÁÁ
ÁÁÁÁÁÁÁ
ÁÁÁÁÁÁ
ÁÁÁÁ
ÁÁÁÁÁÁÁÁÁÁÁÁÁÁÁÁÁ
ÁÁÁÁÁ
ÁÁÁÁÁÁÁ
ÁÁÁÁÁÁ
ÁÁÁÁ
ÁÁÁÁÁÁÁÁÁÁÁÁÁÁÁÁÁÁÁÁÁÁÁÁÁÁÁÁÁ
ÁÁÁÁÁÁ
ÁÁÁÁ
ÁÁÁÁÁÁÁÁÁÁÁÁÁÁÁÁÁ
ÁÁÁÁÁÁ
ÁÁÁÁ
ÁÁÁÁÁÁÁÁÁÁÁÁÁÁÁÁÁÁÁÁÁÁ
ÁÁÁÁÁÁÁÁÁÁÁÁ
ÁÁÁÁÁÁÁ
ÁÁÁÁÁÁ
ÁÁÁÁ
ÁÁÁÁÁÁÁÁÁÁÁÁÁÁÁÁÁ
ÁÁÁÁÁ
ÁÁÁÁÁÁÁ
ÁÁÁÁÁÁ
ÁÁÁÁ
ÁÁÁÁÁÁÁÁÁÁÁÁÁÁÁÁÁ
ÁÁÁÁÁ
ÁÁÁÁÁÁÁ
ÁÁÁÁÁÁ
ÁÁÁÁ
ÁÁÁÁÁÁÁÁÁÁÁÁÁÁÁÁÁÁÁÁÁÁÁÁÁÁÁÁÁ
ÁÁÁÁÁÁ
ÁÁÁÁ
ÁÁÁÁÁÁÁÁÁÁÁÁÁÁÁÁÁ
ÁÁÁÁÁ
ÁÁÁÁÁÁÁ
ÁÁÁÁÁÁ
ÁÁÁÁÁ
ÁÁÁÁÁÁÁ
ÁÁÁÁ
ÁÁÁÁÁÁÁÁÁÁÁÁÁÁÁÁÁ
ÁÁÁÁÁÁ
ÁÁÁÁ
ÁÁÁÁÁÁÁÁÁÁÁÁÁÁÁÁÁ
ÁÁÁÁÁ
ÁÁÁÁÁÁÁ
ÁÁÁÁÁÁ
ÁÁÁÁ
ÁÁÁÁÁÁÁÁÁÁÁÁÁÁÁÁÁ
ÁÁÁÁÁ
ÁÁÁÁÁÁÁ
ÁÁÁÁÁÁ
ÁÁÁÁ
ÁÁÁÁÁÁÁÁÁÁÁÁÁÁÁÁÁÁÁÁÁÁÁÁÁÁÁÁÁ
ÁÁÁÁÁÁ
ÁÁÁÁ
ÁÁÁÁÁÁÁÁÁÁÁÁÁÁÁÁÁ
ÁÁÁÁÁ
ÁÁÁÁÁÁÁ
ÁÁÁÁÁÁ
ÁÁÁÁ
ÁÁÁÁÁÁÁÁÁÁÁÁÁÁÁÁÁ
ÁÁÁÁÁ
ÁÁÁÁÁÁÁ
ÁÁÁÁÁÁ
ÁÁÁÁ
ÁÁÁÁÁÁÁÁÁÁÁÁÁÁÁÁÁÁÁÁÁÁÁÁÁÁÁÁÁ
ÁÁÁÁÁÁ
ÁÁÁÁÁ
ÁÁÁÁÁÁÁ
ÁÁÁÁ
ÁÁÁÁÁÁÁÁÁÁÁÁÁÁÁÁÁ
ÁÁÁÁÁÁ
ÁÁÁÁ
ÁÁÁÁÁÁÁÁÁÁÁÁÁÁÁÁÁ
ÁÁÁÁÁ
ÁÁÁÁÁÁÁ
ÁÁÁÁÁÁ
ÁÁÁÁ
ÁÁÁÁÁÁÁÁÁÁÁÁÁÁÁÁÁÁÁÁÁÁÁÁÁÁÁÁÁ
ÁÁÁÁÁÁ
ÁÁÁÁ
ÁÁÁÁÁÁÁÁÁÁÁÁÁÁÁÁÁ
ÁÁÁÁÁÁÁÁÁÁÁÁ
ÁÁÁÁÁÁ
Step
Action
Value(s)
Yes
No
1
1. Disconnect the negative battery cable.
2. Wait 1 minute for the SDM capacitor to discharge.
3. Examine the wiring and the connector at the
passenger side airbag module.
Is the connector disconnected?
–
Go to Step 2
Go to Step 3
2
1. Reconnect the passenger side airbag module
connector.
2. Reconnect the negative battery cable.
Is the repair complete?
–
Go to
Diagnostic
System Check
–
≈0W
Go to Step 4
Go to Step 6
–
Go to Step 5
System OK
–
Go to
Diagnostic
System Check
–
–
Go to
Diagnostic
System Check
–
3
4
5
6
DAEWOO M-150 BL2
1. Disconnect the electrical connector for the
passenger side airbag module.
2. Disconnect the electrical connector at the SDM.
D The shorting bar at the disconnected SDM
connector will create a complete circuit between the wires from the passenger airbag
module.
3. Connect an ohmmeter to the terminals on the
SDM side of the wiring harness connector for the
passenger side airbag module.
D Refer to ‘‘Diagnostic Illustration 8’’ in this
section.
Does the ohmmeter show the specified value?
1. Replace the SDM.
2. Reconnect the negative battery cable.
3. Set the scan tool for CODE ERASE.
4. Do the diagnostic system check.
Does the code 05 still show as a current fault?
1. Replace the passenger side airbag module.
2. Reconnect the negative battery cable.
Is the repair complete?
1. Replace the supplemental inflatable restraints
(SIR) wiring harness.
2. Reconnect the negative battery cable.
Is the repair complete?
8B – 24 SUPPLEMENTAL INFLATABLE RESTRAINTS (SIR)
D1AB302B
DIAGNOSTIC TROUBLE CODE (DTC) 06
PASSENGER FIRING CIRCUIT, RESISTANCE TOO LOW
Short Circuit
Circuit Description
When the ignition switch is turned ON, the sensing and
diagnostic module (SDM) will perform tests to diagnose
any malfunctions within itself.
After passing these tests, the SDM will check the
passenger airbag firing circuit. The SDM allows a very
small amount of current to flow through the circuit. The
SDM monitors the circuit resistance during this check.
DTC 06 Will Set When
D The combined resistance of the passenger airbag
module, the harness wiring, and the connector contacts is below a specified value, as in a short circuit
between the wires to the passenger airbag module.
Test Description
Caution: Before testing, disconnect the negative
battery cable. Wait 1 minute for the SDM capacitor
to discharge. The capacitor supplies reserve power
to deploy the airbags, even if the battery is disconnected. Unintentional deployment of the airbags
can cause injury.
Caution: Never measure the resistance of an airbag
module. If the anti-deployment shorting bar on the
module side of the connector is not working properly, the meter’s battery could deploy the airbag and
cause injury.
DAEWOO M-150 BL2
SUPPLEMENTAL INFLATABLE RESTRAINTS (SIR) 8B – 25
DTC 06 – Passenger Firing Circuit, Resistance Too Low
ÁÁÁÁÁÁÁÁÁÁÁÁÁÁÁÁÁÁÁÁÁ
ÁÁÁÁÁ
ÁÁÁÁÁÁÁ
ÁÁÁÁÁÁ
ÁÁÁÁÁÁÁÁÁÁÁÁÁÁÁÁÁÁÁÁÁ
ÁÁÁÁÁ
ÁÁÁÁÁÁÁ
ÁÁÁÁÁÁ
ÁÁÁÁ
ÁÁÁÁÁÁÁÁÁÁÁÁÁÁÁÁÁ
ÁÁÁÁÁ
ÁÁÁÁÁÁÁ
ÁÁÁÁÁÁ
ÁÁÁÁ
ÁÁÁÁÁÁÁÁÁÁÁÁÁÁÁÁÁ
ÁÁÁÁÁ
ÁÁÁÁÁÁÁ
ÁÁÁÁÁÁ
ÁÁÁÁ
ÁÁÁÁÁÁÁÁÁÁÁÁÁÁÁÁÁÁÁÁÁÁÁÁÁÁÁÁÁ
ÁÁÁÁÁÁ
ÁÁÁÁ
ÁÁÁÁÁÁÁÁÁÁÁÁÁÁÁÁÁ
ÁÁÁÁÁ
ÁÁÁÁÁÁÁ
ÁÁÁÁÁÁ
ÁÁÁÁÁ
ÁÁÁÁÁÁÁ
ÁÁÁÁ
ÁÁÁÁÁÁÁÁÁÁÁÁÁÁÁÁÁ
ÁÁÁÁÁÁ
ÁÁÁÁ
ÁÁÁÁÁÁÁÁÁÁÁÁÁÁÁÁÁ
ÁÁÁÁÁ
ÁÁÁÁÁÁÁ
ÁÁÁÁÁÁ
ÁÁÁÁ
ÁÁÁÁÁÁÁÁÁÁÁÁÁÁÁÁÁ
ÁÁÁÁÁ
ÁÁÁÁÁÁÁ
ÁÁÁÁÁÁ
ÁÁÁÁ
ÁÁÁÁÁÁÁÁÁÁÁÁÁÁÁÁÁ
ÁÁÁÁÁ
ÁÁÁÁÁÁÁ
ÁÁÁÁÁÁ
ÁÁÁÁ
ÁÁÁÁÁÁÁÁÁÁÁÁÁÁÁÁÁ
ÁÁÁÁÁ
ÁÁÁÁÁÁÁ
ÁÁÁÁÁÁ
ÁÁÁÁ
ÁÁÁÁÁÁÁÁÁÁÁÁÁÁÁÁÁ
ÁÁÁÁÁ
ÁÁÁÁÁÁÁ
ÁÁÁÁÁÁ
ÁÁÁÁÁÁÁÁÁÁÁÁÁÁÁÁÁÁÁÁÁ
ÁÁÁÁÁ
ÁÁÁÁÁÁÁ
ÁÁÁÁÁÁ
ÁÁÁÁ
ÁÁÁÁÁÁÁÁÁÁÁÁÁÁÁÁÁ
ÁÁÁÁÁ
ÁÁÁÁÁÁÁ
ÁÁÁÁÁÁ
ÁÁÁÁ
ÁÁÁÁÁÁÁÁÁÁÁÁÁÁÁÁÁ
ÁÁÁÁÁ
ÁÁÁÁÁÁÁ
ÁÁÁÁÁÁ
ÁÁÁÁ
ÁÁÁÁÁÁÁÁÁÁÁÁÁÁÁÁÁ
ÁÁÁÁÁ
ÁÁÁÁÁÁÁ
ÁÁÁÁÁÁ
ÁÁÁÁ
ÁÁÁÁÁÁÁÁÁÁÁÁÁÁÁÁÁ
ÁÁÁÁÁ
ÁÁÁÁÁÁÁ
ÁÁÁÁÁÁ
ÁÁÁÁ
ÁÁÁÁÁÁÁÁÁÁÁÁÁÁÁÁÁ
ÁÁÁÁÁÁÁÁÁÁÁÁ
ÁÁÁÁÁÁ
Step
Action
Value(s)
Yes
No
1
1. Disconnect the negative battery cable.
2. Connect an ohmmeter to the terminals of the
wiring harness connector for the passenger
airbag module on the SDM side of the connector.
D Refer to ‘‘Diagnostic Illustration 8’’ in this
section.
Does the ohmmeter show the specified value?
∞
Go to Step 2
Go to Step 4
1. Replace the SDM.
2. Reconnect the negative battery cable.
3. Set the scan tool to CODE ERASE.
4. Do the diagnostic system check.
Does the code 06 still show as a current fault?
–
Go to Step 3
System OK
–
Go to
Diagnostic
System Check
–
–
Go to
Diagnostic
System Check
–
2
3
4
DAEWOO M-150 BL2
1. Replace the passenger airbag module.
2. Reconnect the negative battery cable.
Is the repair complete?
1. Replace the supplemental inflatable restraints
(SIR) wiring harness.
2. Reconnect the negative battery cable.
Is the repair complete?
8B – 26 SUPPLEMENTAL INFLATABLE RESTRAINTS (SIR)
D1AB302B
DIAGNOSTIC TROUBLE CODE (DTC) 07
PASSENGER FIRING CIRCUIT, SHORT TO GROUND
Circuit Description
When the ignition switch is turned ON, the sensing and
diagnostic module (SDM) will diagnose any malfunctions within itself.
After passing these tests, the SDM will check the
passenger airbag firing circuit. The SDM allows a very
small amount of current to flow through the circuit. The
SDM monitors the voltage during this check.
Test Description
Caution: Before testing, disconnect the negative
battery cable. Wait 1 minute for the SDM capacitor
to discharge. The capacitor supplies reserve power
to deploy the airbags, even if the battery is disconnected. Unintentional deployment of the airbags
can cause injury.
DTC 07 Will Set When
D The firing circuit is shorted to ground.
DAEWOO M-150 BL2
SUPPLEMENTAL INFLATABLE RESTRAINTS (SIR) 8B – 27
DTC 07 Passenger Firing Circuit, Short To Ground
ÁÁÁÁÁÁÁÁÁÁÁÁÁÁÁÁÁÁÁÁÁ
ÁÁÁÁÁ
ÁÁÁÁÁÁÁ
ÁÁÁÁÁÁ
ÁÁÁÁÁÁÁÁÁÁÁÁÁÁÁÁÁÁÁÁÁ
ÁÁÁÁÁ
ÁÁÁÁÁÁÁ
ÁÁÁÁÁÁ
ÁÁÁÁ
ÁÁÁÁÁÁÁÁÁÁÁÁÁÁÁÁÁ
ÁÁÁÁÁ
ÁÁÁÁÁÁÁ
ÁÁÁÁÁÁ
ÁÁÁÁ
ÁÁÁÁÁÁÁÁÁÁÁÁÁÁÁÁÁ
ÁÁÁÁÁ
ÁÁÁÁÁÁÁ
ÁÁÁÁÁÁ
ÁÁÁÁ
ÁÁÁÁÁÁÁÁÁÁÁÁÁÁÁÁÁÁÁÁÁÁÁÁÁÁÁÁÁ
ÁÁÁÁÁÁ
ÁÁÁÁ
ÁÁÁÁÁÁÁÁÁÁÁÁÁÁÁÁÁ
ÁÁÁÁÁ
ÁÁÁÁÁÁÁ
ÁÁÁÁÁÁ
ÁÁÁÁ
ÁÁÁÁÁÁÁÁÁÁÁÁÁÁÁÁÁ
ÁÁÁÁÁ
ÁÁÁÁÁÁÁ
ÁÁÁÁÁÁ
ÁÁÁÁ
ÁÁÁÁÁÁÁÁÁÁÁÁÁÁÁÁÁ
ÁÁÁÁÁ
ÁÁÁÁÁÁÁ
ÁÁÁÁÁÁ
ÁÁÁÁ
ÁÁÁÁÁÁÁÁÁÁÁÁÁÁÁÁÁ
ÁÁÁÁÁÁ
ÁÁÁÁÁ
ÁÁÁÁÁÁÁ
ÁÁÁÁ
ÁÁÁÁÁÁÁÁÁÁÁÁÁÁÁÁÁ
ÁÁÁÁÁ
ÁÁÁÁÁÁÁ
ÁÁÁÁÁÁ
ÁÁÁÁ
ÁÁÁÁÁÁÁÁÁÁÁÁÁÁÁÁÁ
ÁÁÁÁÁ
ÁÁÁÁÁÁÁ
ÁÁÁÁÁÁ
ÁÁÁÁ
ÁÁÁÁÁÁÁÁÁÁÁÁÁÁÁÁÁ
ÁÁÁÁÁ
ÁÁÁÁÁÁÁ
ÁÁÁÁÁÁ
ÁÁÁÁ
ÁÁÁÁÁÁÁÁÁÁÁÁÁÁÁÁÁÁÁÁÁÁÁÁÁÁÁÁÁ
ÁÁÁÁÁÁ
ÁÁÁÁ
ÁÁÁÁÁÁÁÁÁÁÁÁÁÁÁÁÁ
ÁÁÁÁÁÁ
ÁÁÁÁ
ÁÁÁÁÁÁÁÁÁÁÁÁÁÁÁÁÁÁÁÁÁÁ
ÁÁÁÁÁÁÁÁÁÁÁÁ
ÁÁÁÁÁÁÁ
ÁÁÁÁÁÁ
ÁÁÁÁ
ÁÁÁÁÁÁÁÁÁÁÁÁÁÁÁÁÁ
ÁÁÁÁÁ
ÁÁÁÁÁÁÁ
ÁÁÁÁÁÁ
ÁÁÁÁ
ÁÁÁÁÁÁÁÁÁÁÁÁÁÁÁÁÁ
ÁÁÁÁÁ
ÁÁÁÁÁÁÁ
ÁÁÁÁÁÁ
ÁÁÁÁ
ÁÁÁÁÁÁÁÁÁÁÁÁÁÁÁÁÁÁÁÁÁÁÁÁÁÁÁÁÁ
ÁÁÁÁÁÁ
ÁÁÁÁ
ÁÁÁÁÁÁÁÁÁÁÁÁÁÁÁÁÁ
ÁÁÁÁÁ
ÁÁÁÁÁÁÁ
ÁÁÁÁÁÁ
ÁÁÁÁÁ
ÁÁÁÁÁÁÁ
ÁÁÁÁ
ÁÁÁÁÁÁÁÁÁÁÁÁÁÁÁÁÁ
ÁÁÁÁÁÁ
ÁÁÁÁ
ÁÁÁÁÁÁÁÁÁÁÁÁÁÁÁÁÁ
ÁÁÁÁÁ
ÁÁÁÁÁÁÁ
ÁÁÁÁÁÁ
ÁÁÁÁ
ÁÁÁÁÁÁÁÁÁÁÁÁÁÁÁÁÁ
ÁÁÁÁÁ
ÁÁÁÁÁÁÁ
ÁÁÁÁÁÁ
ÁÁÁÁ
ÁÁÁÁÁÁÁÁÁÁÁÁÁÁÁÁÁÁÁÁÁÁÁÁÁÁÁÁÁ
ÁÁÁÁÁÁ
ÁÁÁÁ
ÁÁÁÁÁÁÁÁÁÁÁÁÁÁÁÁÁ
ÁÁÁÁÁ
ÁÁÁÁÁÁÁ
ÁÁÁÁÁÁ
ÁÁÁÁ
ÁÁÁÁÁÁÁÁÁÁÁÁÁÁÁÁÁ
ÁÁÁÁÁ
ÁÁÁÁÁÁÁ
ÁÁÁÁÁÁ
ÁÁÁÁ
ÁÁÁÁÁÁÁÁÁÁÁÁÁÁÁÁÁ
ÁÁÁÁÁÁÁÁÁÁÁÁ
ÁÁÁÁÁÁ
Step
Action
Value(s)
Yes
No
1
1. Disconnect the negative battery cable.
2. Wait 1 minute for the SDM capacitor to discharge.
3. Visually inspect the supplemental inflatable
restraints (SIR) wiring harness.
Is there any visible damage to the SIR harness?
–
Go to Step 2
Go to Step 3
1. Replace the SIR wiring harness.
2. Reconnect the negative battery cable.
Is the repair complete?
–
Go to
Diagnostic
System Check
–
1. Disconnect the electrical connector from the
passenger airbag module.
2. Disconnect the electrical connector at the SDM.
D The shorting bar at the disconnected SDM
connector will create a complete circuit between the wires from the passenger side airbag module.
3. Use an ohmmeter to check the continuity
between ground and one of the terminals at the
SDM side of the wiring harness connector for the
passenger side airbag module.
D Refer to ‘‘Diagnostic Illustration 9’’ in this
section.
Is the resistance less than the specified value?
∞
Go to Step 2
Go to Step 4
1. Replace the SDM.
2. Reconnect the negative battery cable.
3. Set the scan tool to CODE ERASE.
4. Do the diagnostic system check.
Does the code 07 still show as a current fault?
–
Go to Step 5
System OK
–
Go to
Diagnostic
System Check
–
2
3
4
5
DAEWOO M-150 BL2
1. Replace the passenger side airbag module.
2. Reconnect the negative battery cable.
Is the repair complete?
8B – 28 SUPPLEMENTAL INFLATABLE RESTRAINTS (SIR)
D1AB302B
DIAGNOSTIC TROUBLE CODE (DTC) 08
PASSENGER FIRING CIRCUIT, SHORT TO BATTERY VOLTAGE
Circuit Description
When the ignition switch is turned ON, the sensing and
diagnostic module (SDM) will perform tests to diagnose
any malfunctions within itself.
After passing these tests, the SDM will check the
passenger airbag firing circuit. The SDM allows a very
small amount of current to flow through the circuit. The
SDM monitors the voltage during this check.
Test Description
Caution: Before testing, disconnect the negative
battery cable. Wait 1 minute for the SDM capacitor
to discharge. The capacitor supplies the reserve
power to deploy the airbags, even if the battery is
disconnected. Unintentional deployment of the airbags can cause injury.
DTC 08 Will Set When
D The firing circuit is shorted to the voltage.
DAEWOO M-150 BL2
SUPPLEMENTAL INFLATABLE RESTRAINTS (SIR) 8B – 29
DTC 08 – Passenger Firing Circuit, Short To Battery Voltage
ÁÁÁÁÁÁÁÁÁÁÁÁÁÁÁÁÁÁÁÁÁ
ÁÁÁÁÁ
ÁÁÁÁÁÁÁ
ÁÁÁÁÁÁ
ÁÁÁÁÁÁÁÁÁÁÁÁÁÁÁÁÁÁÁÁÁ
ÁÁÁÁÁ
ÁÁÁÁÁÁÁ
ÁÁÁÁÁÁ
ÁÁÁÁ
ÁÁÁÁÁÁÁÁÁÁÁÁÁÁÁÁÁ
ÁÁÁÁÁ
ÁÁÁÁÁÁÁ
ÁÁÁÁÁÁ
ÁÁÁÁ
ÁÁÁÁÁÁÁÁÁÁÁÁÁÁÁÁÁ
ÁÁÁÁÁ
ÁÁÁÁÁÁÁ
ÁÁÁÁÁÁ
ÁÁÁÁ
ÁÁÁÁÁÁÁÁÁÁÁÁÁÁÁÁÁÁÁÁÁÁÁÁÁÁÁÁÁ
ÁÁÁÁÁÁ
ÁÁÁÁ
ÁÁÁÁÁÁÁÁÁÁÁÁÁÁÁÁÁÁÁÁÁÁÁÁÁÁÁÁÁ
ÁÁÁÁÁÁ
ÁÁÁÁ
ÁÁÁÁÁÁÁÁÁÁÁÁÁÁÁÁÁ
ÁÁÁÁÁ
ÁÁÁÁÁÁÁ
ÁÁÁÁÁÁ
ÁÁÁÁ
ÁÁÁÁÁÁÁÁÁÁÁÁÁÁÁÁÁ
ÁÁÁÁÁ
ÁÁÁÁÁÁÁ
ÁÁÁÁÁÁ
ÁÁÁÁ
ÁÁÁÁÁÁÁÁÁÁÁÁÁÁÁÁÁ
ÁÁÁÁÁÁ
ÁÁÁÁÁ
ÁÁÁÁÁÁÁ
ÁÁÁÁ
ÁÁÁÁÁÁÁÁÁÁÁÁÁÁÁÁÁ
ÁÁÁÁÁ
ÁÁÁÁÁÁÁ
ÁÁÁÁÁÁ
ÁÁÁÁ
ÁÁÁÁÁÁÁÁÁÁÁÁÁÁÁÁÁ
ÁÁÁÁÁ
ÁÁÁÁÁÁÁ
ÁÁÁÁÁÁ
ÁÁÁÁ
ÁÁÁÁÁÁÁÁÁÁÁÁÁÁÁÁÁ
ÁÁÁÁÁ
ÁÁÁÁÁÁÁ
ÁÁÁÁÁÁ
ÁÁÁÁÁÁÁÁÁÁÁÁÁÁÁÁÁÁÁÁÁ
ÁÁÁÁÁ
ÁÁÁÁÁÁÁ
ÁÁÁÁÁÁ
ÁÁÁÁ
ÁÁÁÁÁÁÁÁÁÁÁÁÁÁÁÁÁ
ÁÁÁÁÁÁ
ÁÁÁÁ
ÁÁÁÁÁÁÁÁÁÁÁÁÁÁÁÁÁÁÁÁÁÁ
ÁÁÁÁÁÁÁÁÁÁÁÁ
ÁÁÁÁÁÁÁ
ÁÁÁÁÁÁ
ÁÁÁÁ
ÁÁÁÁÁÁÁÁÁÁÁÁÁÁÁÁÁ
ÁÁÁÁÁ
ÁÁÁÁÁÁÁ
ÁÁÁÁÁÁ
ÁÁÁÁ
ÁÁÁÁÁÁÁÁÁÁÁÁÁÁÁÁÁ
ÁÁÁÁÁ
ÁÁÁÁÁÁÁ
ÁÁÁÁÁÁ
ÁÁÁÁ
ÁÁÁÁÁÁÁÁÁÁÁÁÁÁÁÁÁÁÁÁÁÁÁÁÁÁÁÁÁ
ÁÁÁÁÁÁ
ÁÁÁÁ
ÁÁÁÁÁÁÁÁÁÁÁÁÁÁÁÁÁ
ÁÁÁÁÁ
ÁÁÁÁÁÁÁ
ÁÁÁÁÁÁ
ÁÁÁÁ
ÁÁÁÁÁÁÁÁÁÁÁÁÁÁÁÁÁ
ÁÁÁÁÁ
ÁÁÁÁÁÁÁ
ÁÁÁÁÁÁ
ÁÁÁÁ
ÁÁÁÁÁÁÁÁÁÁÁÁÁÁÁÁÁ
ÁÁÁÁÁ
ÁÁÁÁÁÁÁ
ÁÁÁÁÁÁ
ÁÁÁÁ
ÁÁÁÁÁÁÁÁÁÁÁÁÁÁÁÁÁ
ÁÁÁÁÁ
ÁÁÁÁÁÁÁ
ÁÁÁÁÁÁ
ÁÁÁÁ
ÁÁÁÁÁÁÁÁÁÁÁÁÁÁÁÁÁ
ÁÁÁÁÁÁ
ÁÁÁÁÁ
ÁÁÁÁÁÁÁ
ÁÁÁÁ
ÁÁÁÁÁÁÁÁÁÁÁÁÁÁÁÁÁ
ÁÁÁÁÁ
ÁÁÁÁÁÁÁ
ÁÁÁÁÁÁ
ÁÁÁÁ
ÁÁÁÁÁÁÁÁÁÁÁÁÁÁÁÁÁ
ÁÁÁÁÁ
ÁÁÁÁÁÁÁ
ÁÁÁÁÁÁ
ÁÁÁÁ
ÁÁÁÁÁÁÁÁÁÁÁÁÁÁÁÁÁÁÁÁÁÁÁÁÁÁÁÁÁ
ÁÁÁÁÁÁ
ÁÁÁÁÁ
ÁÁÁÁÁÁÁ
ÁÁÁÁ
ÁÁÁÁÁÁÁÁÁÁÁÁÁÁÁÁÁ
ÁÁÁÁÁÁ
ÁÁÁÁ
ÁÁÁÁÁÁÁÁÁÁÁÁÁÁÁÁÁ
ÁÁÁÁÁ
ÁÁÁÁÁÁÁ
ÁÁÁÁÁÁ
ÁÁÁÁ
ÁÁÁÁÁÁÁÁÁÁÁÁÁÁÁÁÁÁÁÁÁÁÁÁÁÁÁÁÁ
ÁÁÁÁÁÁ
ÁÁÁÁ
ÁÁÁÁÁÁÁÁÁÁÁÁÁÁÁÁÁ
ÁÁÁÁÁÁÁÁÁÁÁÁ
ÁÁÁÁÁÁ
Step
Action
Value(s)
Yes
No
1
1. Disconnect the battery negative cable.
2. Wait 1 minute for the SDM capacitor to discharge.
D The capacitor supplies reserve power to deploy
the passenger side airbag even if the battery
has been disconnected.
3. Visually inspect the supplemental inflatable
restraints (SIR) wiring harness.
Is there any visible damage to the SIR wiring
harness?
–
Go to Step 2
Go to Step 3
–
Go to
Diagnostic
System Check
–
0v
Go to Step 2
Go to Step 4
–
Go to Step 5
System OK
–
Go to
Diagnostic
System Check
–
2
3
4
5
DAEWOO M-150 BL2
1. Replace the SIR wiring harness.
2. Reconnect the negative battery cable.
Is the repair complete?
1. Disconnect the electrical connector for the
passenger airbag module.
2. Disconnect the electrical connector at the SDM.
D The shorting bar at the disconnected SDM
connector will create a complete circuit between the wires from the passenger airbag
module.
3. Use a multimeter to check the voltage at one of
the terminals on the SDM side of the SIR wiring
harness connector for the passenger airbag
module.
D Refer to ‘‘Diagnostic Illustration 10’’ in this
section.
Is the voltage greater than the specified value?
1. Replace the SDM.
2. Reconnect the negative battery cable.
3. Set the scan tool to CODE ERASE.
4.Do the diagnostic system check.
Does the code 08 still show as a current fault?
1. Replace the passenger side airbag module.
2. Reconnect the negative battery cable.
Is the repair complete?
8B – 30 SUPPLEMENTAL INFLATABLE RESTRAINTS (SIR)
D1AB302B
DIAGNOSTIC TROUBLE CODE (DTC) 09
DRIVER PRETENSIONER CIRCUIT, RESISTANCE TOO HIGH
Open Circuit
Circuit Description
When the ignition switch is turned ON, the sensing and
diagnostic module (SDM) will perform tests to diagnose
any malfunctions within itself.
After passing these tests, the SDM will check the
driver pretensioner circuit. The SDM allows a very small
amount of current to flow through the circuit. The SDM
monitors the circuit resistance during this check.
DTC 09 Will Set When
D The combined resistance of the driver pretensioner
module, the harness wiring, and the connector contacts is above a specified value, as in an open circuit.
Test Description
Caution: Before testing, disconnect the negative
battery cable. Wait 1 minute for the SDM capacitor
to discharge. The capacitor supplies reserve power
to deploy the airbags, even if the battery is disconnected. Unintentional deployment of the airbags
can cause injury.
Caution: Never measure the resistance of an airbag
module. If the anti-deployment shorting bar on the
module-side of the connector is not working properly, the meter’s battery can deploy the airbag and
cause injury.
DAEWOO M-150 BL2
SUPPLEMENTAL INFLATABLE RESTRAINTS (SIR) 8B – 31
DTC 09 – Driver Pretensioner Circuit, Resistance Too High
ÁÁÁÁÁÁÁÁÁÁÁÁÁÁÁÁÁÁÁÁÁ
ÁÁÁÁÁ
ÁÁÁÁÁÁÁ
ÁÁÁÁÁÁ
ÁÁÁÁÁÁÁÁÁÁÁÁÁÁÁÁÁÁÁÁÁ
ÁÁÁÁÁ
ÁÁÁÁÁÁÁ
ÁÁÁÁÁÁ
ÁÁÁÁ
ÁÁÁÁÁÁÁÁÁÁÁÁÁÁÁÁÁ
ÁÁÁÁÁ
ÁÁÁÁÁÁÁ
ÁÁÁÁÁÁ
ÁÁÁÁ
ÁÁÁÁÁÁÁÁÁÁÁÁÁÁÁÁÁ
ÁÁÁÁÁ
ÁÁÁÁÁÁÁ
ÁÁÁÁÁÁ
ÁÁÁÁ
ÁÁÁÁÁÁÁÁÁÁÁÁÁÁÁÁÁÁÁÁÁÁÁÁÁÁÁÁÁ
ÁÁÁÁÁÁ
ÁÁÁÁ
ÁÁÁÁÁÁÁÁÁÁÁÁÁÁÁÁÁ
ÁÁÁÁÁ
ÁÁÁÁÁÁÁ
ÁÁÁÁÁÁ
ÁÁÁÁ
ÁÁÁÁÁÁÁÁÁÁÁÁÁÁÁÁÁ
ÁÁÁÁÁ
ÁÁÁÁÁÁÁ
ÁÁÁÁÁÁ
ÁÁÁÁ
ÁÁÁÁÁÁÁÁÁÁÁÁÁÁÁÁÁ
ÁÁÁÁÁ
ÁÁÁÁÁÁÁ
ÁÁÁÁÁÁ
ÁÁÁÁ
ÁÁÁÁÁÁÁÁÁÁÁÁÁÁÁÁÁ
ÁÁÁÁÁÁ
ÁÁÁÁÁ
ÁÁÁÁÁÁÁ
ÁÁÁÁ
ÁÁÁÁÁÁÁÁÁÁÁÁÁÁÁÁÁ
ÁÁÁÁÁ
ÁÁÁÁÁÁÁ
ÁÁÁÁÁÁ
ÁÁÁÁ
ÁÁÁÁÁÁÁÁÁÁÁÁÁÁÁÁÁ
ÁÁÁÁÁ
ÁÁÁÁÁÁÁ
ÁÁÁÁÁÁ
ÁÁÁÁ
ÁÁÁÁÁÁÁÁÁÁÁÁÁÁÁÁÁ
ÁÁÁÁÁ
ÁÁÁÁÁÁÁ
ÁÁÁÁÁÁ
ÁÁÁÁ
ÁÁÁÁÁÁÁÁÁÁÁÁÁÁÁÁÁÁÁÁÁÁÁÁÁÁÁÁÁ
ÁÁÁÁÁÁ
ÁÁÁÁ
ÁÁÁÁÁÁÁÁÁÁÁÁÁÁÁÁÁ
ÁÁÁÁÁÁ
ÁÁÁÁ
ÁÁÁÁÁÁÁÁÁÁÁÁÁÁÁÁÁÁÁÁÁÁ
ÁÁÁÁÁÁÁÁÁÁÁÁ
ÁÁÁÁÁÁÁ
ÁÁÁÁÁÁ
ÁÁÁÁ
ÁÁÁÁÁÁÁÁÁÁÁÁÁÁÁÁÁ
ÁÁÁÁÁ
ÁÁÁÁÁÁÁ
ÁÁÁÁÁÁ
ÁÁÁÁ
ÁÁÁÁÁÁÁÁÁÁÁÁÁÁÁÁÁ
ÁÁÁÁÁ
ÁÁÁÁÁÁÁ
ÁÁÁÁÁÁ
ÁÁÁÁ
ÁÁÁÁÁÁÁÁÁÁÁÁÁÁÁÁÁÁÁÁÁÁÁÁÁÁÁÁÁ
ÁÁÁÁÁÁ
ÁÁÁÁ
ÁÁÁÁÁÁÁÁÁÁÁÁÁÁÁÁÁ
ÁÁÁÁÁ
ÁÁÁÁÁÁÁ
ÁÁÁÁÁÁ
ÁÁÁÁÁ
ÁÁÁÁÁÁÁ
ÁÁÁÁ
ÁÁÁÁÁÁÁÁÁÁÁÁÁÁÁÁÁ
ÁÁÁÁÁÁ
ÁÁÁÁ
ÁÁÁÁÁÁÁÁÁÁÁÁÁÁÁÁÁ
ÁÁÁÁÁ
ÁÁÁÁÁÁÁ
ÁÁÁÁÁÁ
ÁÁÁÁ
ÁÁÁÁÁÁÁÁÁÁÁÁÁÁÁÁÁ
ÁÁÁÁÁ
ÁÁÁÁÁÁÁ
ÁÁÁÁÁÁ
ÁÁÁÁ
ÁÁÁÁÁÁÁÁÁÁÁÁÁÁÁÁÁÁÁÁÁÁÁÁÁÁÁÁÁ
ÁÁÁÁÁÁ
ÁÁÁÁ
ÁÁÁÁÁÁÁÁÁÁÁÁÁÁÁÁÁ
ÁÁÁÁÁ
ÁÁÁÁÁÁÁ
ÁÁÁÁÁÁ
ÁÁÁÁ
ÁÁÁÁÁÁÁÁÁÁÁÁÁÁÁÁÁ
ÁÁÁÁÁ
ÁÁÁÁÁÁÁ
ÁÁÁÁÁÁ
ÁÁÁÁ
ÁÁÁÁÁÁÁÁÁÁÁÁÁÁÁÁÁÁÁÁÁÁÁÁÁÁÁÁÁ
ÁÁÁÁÁÁ
ÁÁÁÁÁ
ÁÁÁÁÁÁÁ
ÁÁÁÁ
ÁÁÁÁÁÁÁÁÁÁÁÁÁÁÁÁÁ
ÁÁÁÁÁÁ
ÁÁÁÁ
ÁÁÁÁÁÁÁÁÁÁÁÁÁÁÁÁÁ
ÁÁÁÁÁ
ÁÁÁÁÁÁÁ
ÁÁÁÁÁÁ
ÁÁÁÁ
ÁÁÁÁÁÁÁÁÁÁÁÁÁÁÁÁÁÁÁÁÁÁÁÁÁÁÁÁÁ
ÁÁÁÁÁÁ
ÁÁÁÁ
ÁÁÁÁÁÁÁÁÁÁÁÁÁÁÁÁÁ
ÁÁÁÁÁÁÁÁÁÁÁÁ
ÁÁÁÁÁÁ
Step
Action
Value(s)
Yes
No
1
1. Disconnect the negative battery cable.
2. Wait 1 minute for the SDM capacitor to discharge.
3. Examine the wiring and the connector at the
driver seat belt pretensioner module.
Is the connector disconnected?
–
Go to Step 2
Go to Step 3
2
1. Reconnect the driver seat belt pretensioner
module connector.
2. Reconnect the negative battery cable.
Is the repair complete?
–
Go to
Diagnostic
System Check
–
≈0W
Go to Step 4
Go to Step 6
–
Go to Step 5
System OK
–
Go to
Diagnostic
System Check
–
–
Go to
Diagnostic
System Check
–
3
4
5
6
DAEWOO M-150 BL2
1. Disconnect the electrical connector for the driver
seat belt pretensioner module.
2. Disconnect the electrical connector at the SDM.
D The shorting bar at the disconnected SDM
connector will create a complete circuit between the wires from the driver seat belt pretensioner module.
3. Connect an ohmmeter to the terminals on the
SDM side of the wiring harness connector for the
driver seat belt pretensioner module.
D Refer to ‘‘Diagnostic Illustration 16’’ in this
section.
Does the ohmmeter show the specified value?
1. Replace the SDM.
2. Reconnect the negative battery cable.
3. Set the scan tool for CODE ERASE.
4. Do the diagnostic system check.
Does the code 09 still show as a current fault?
1. Replace the driver seat belt pretensioner module.
2. Reconnect the negative battery cable.
Is the repair complete?
1. Replace the supplemental inflatable restraints
(SIR) wiring harness.
2. Reconnect the negative battery cable.
Is the repair complete?
8B – 32 SUPPLEMENTAL INFLATABLE RESTRAINTS (SIR)
D1AB302B
DIAGNOSTIC TROUBLE CODE (DTC) 10
DRIVER PRETENSIONER CIRCUIT, RESISTANCE TOO LOW
Short Circuit
Circuit Description
When the ignition switch is turned ON, the sensing and
diagnostic module (SDM) will perform tests to diagnose
any malfunctions within itself.
After passing these tests, the SDM will check the driver
pretensioner circuit. The SDM allows a very small
amount of current to flow through the pretensioner circuit. The SDM monitors the circuit resistance during this
check.
DTC 10 Will Set When
D The combined resistance of the driver pretensioner
the harness wiring, and the connector contacts is below a specified value, as with a short circuit between
the wires to the driver airbag module.
Test Description
Caution: Before testing, disconnect the negative
battery cable. Wait 1 minute for the SDM capacitor
to discharge. The capacitor supplies reserve power
to deploy the airbags, even if the battery is disconnected. Unintentional deployment of the airbags
can cause injury.
Caution: Never measure the resistance of an airbag
module with an ohmmeter. An ohmmeter’s battery
can deploy the airbag and cause injury.
DAEWOO M-150 BL2
SUPPLEMENTAL INFLATABLE RESTRAINTS (SIR) 8B – 33
DTC 10 – Driver Pretensioner Circuit, Resistance Too Low
ÁÁÁÁÁÁÁÁÁÁÁÁÁÁÁÁÁÁÁÁÁ
ÁÁÁÁÁ
ÁÁÁÁÁÁÁ
ÁÁÁÁÁÁ
ÁÁÁÁÁÁÁÁÁÁÁÁÁÁÁÁÁÁÁÁÁ
ÁÁÁÁÁ
ÁÁÁÁÁÁÁ
ÁÁÁÁÁÁ
ÁÁÁÁ
ÁÁÁÁÁÁÁÁÁÁÁÁÁÁÁÁÁ
ÁÁÁÁÁ
ÁÁÁÁÁÁÁ
ÁÁÁÁÁÁ
ÁÁÁÁ
ÁÁÁÁÁÁÁÁÁÁÁÁÁÁÁÁÁ
ÁÁÁÁÁ
ÁÁÁÁÁÁÁ
ÁÁÁÁÁÁ
ÁÁÁÁ
ÁÁÁÁÁÁÁÁÁÁÁÁÁÁÁÁÁÁÁÁÁÁÁÁÁÁÁÁÁ
ÁÁÁÁÁÁ
ÁÁÁÁ
ÁÁÁÁÁÁÁÁÁÁÁÁÁÁÁÁÁÁÁÁÁÁÁÁÁÁÁÁÁ
ÁÁÁÁÁÁ
ÁÁÁÁ
ÁÁÁÁÁÁÁÁÁÁÁÁÁÁÁÁÁ
ÁÁÁÁÁ
ÁÁÁÁÁÁÁ
ÁÁÁÁÁÁ
ÁÁÁÁÁ
ÁÁÁÁÁÁÁ
ÁÁÁÁ
ÁÁÁÁÁÁÁÁÁÁÁÁÁÁÁÁÁ
ÁÁÁÁÁÁ
ÁÁÁÁ
ÁÁÁÁÁÁÁÁÁÁÁÁÁÁÁÁÁ
ÁÁÁÁÁ
ÁÁÁÁÁÁÁ
ÁÁÁÁÁÁ
ÁÁÁÁ
ÁÁÁÁÁÁÁÁÁÁÁÁÁÁÁÁÁ
ÁÁÁÁÁ
ÁÁÁÁÁÁÁ
ÁÁÁÁÁÁ
ÁÁÁÁ
ÁÁÁÁÁÁÁÁÁÁÁÁÁÁÁÁÁ
ÁÁÁÁÁ
ÁÁÁÁÁÁÁ
ÁÁÁÁÁÁ
ÁÁÁÁ
ÁÁÁÁÁÁÁÁÁÁÁÁÁÁÁÁÁ
ÁÁÁÁÁ
ÁÁÁÁÁÁÁ
ÁÁÁÁÁÁ
ÁÁÁÁ
ÁÁÁÁÁÁÁÁÁÁÁÁÁÁÁÁÁ
ÁÁÁÁÁ
ÁÁÁÁÁÁÁ
ÁÁÁÁÁÁ
ÁÁÁÁ
ÁÁÁÁÁÁÁÁÁÁÁÁÁÁÁÁÁ
ÁÁÁÁÁ
ÁÁÁÁÁÁÁ
ÁÁÁÁÁÁ
ÁÁÁÁÁ
ÁÁÁÁÁÁÁ
ÁÁÁÁ
ÁÁÁÁÁÁÁÁÁÁÁÁÁÁÁÁÁ
ÁÁÁÁÁÁ
ÁÁÁÁ
ÁÁÁÁÁÁÁÁÁÁÁÁÁÁÁÁÁ
ÁÁÁÁÁ
ÁÁÁÁÁÁÁ
ÁÁÁÁÁÁ
ÁÁÁÁ
ÁÁÁÁÁÁÁÁÁÁÁÁÁÁÁÁÁ
ÁÁÁÁÁ
ÁÁÁÁÁÁÁ
ÁÁÁÁÁÁ
ÁÁÁÁ
ÁÁÁÁÁÁÁÁÁÁÁÁÁÁÁÁÁ
ÁÁÁÁÁÁÁÁÁÁÁÁ
ÁÁÁÁÁÁ
Step
Action
Value(s)
Yes
No
1
1. Disconnect the negative battery cable.
2. Connect an ohmmeter to the terminals of the
wiring harness connector for the driver seat belt
pretensioner module on the SDM side of the
connector.
D Refer to ‘‘Diagnostic Illustration 16’’ in this
section.
Does the ohmmeter show the specified value?
∞
Go to Step 2
Go to Step 4
1. Replace the SDM.
2. Reconnect the negative battery cable.
3. Set the scan tool to CODE ERASE.
4. Do the diagnostic system check.
Does the code 10 still show as a current fault?
–
Go to Step 3
System OK
–
Go to
Diagnostic
System Check
–
–
Go to
Diagnostic
System Check
–
2
3
4
DAEWOO M-150 BL2
1. Replace the driver seat belt pretensioner module.
2. Reconnect the negative battery cable.
Is the repair complete?
1. Replace the supplemental inflatable restraints
(SIR) wiring harness.
2. Reconnect the negative battery cable.
Is the repair complete?
8B – 34 SUPPLEMENTAL INFLATABLE RESTRAINTS (SIR)
D1AB302B
DIAGNOSTIC TROUBLE CODE (DTC) 11
DRIVER PRETENSIONER CIRCUIT, SHORT TO GROUND
Circuit Description
When the ignition switch is turned ON, the sensing and
diagnostic module (SDM) will perform tests to diagnose
any malfunctions within itself.
After passing these tests, the SDM will check the driver
pretensioner circuit. The SDM allows a very small
amount of current to flow through the driver pretensioner
circuit. The SDM monitors the voltage during this check.
Test Description
Caution: Before testing, disconnect the negative
battery cable. Wait 1 minute for the SDM capacitor
to discharge. The capacitor supplies reserve power
to deploy the airbags, even if the battery is disconnected. Unintentional deployment of the airbags
can cause injury.
DTC 11 Will Set When
D The firing circuit is shorted to ground.
DAEWOO M-150 BL2
SUPPLEMENTAL INFLATABLE RESTRAINTS (SIR) 8B – 35
DTC 11 Driver Pretensioner Circuit, Short To Ground
ÁÁÁÁÁÁÁÁÁÁÁÁÁÁÁÁÁÁÁÁÁ
ÁÁÁÁÁ
ÁÁÁÁÁÁÁ
ÁÁÁÁÁÁ
ÁÁÁÁÁÁÁÁÁÁÁÁÁÁÁÁÁÁÁÁÁ
ÁÁÁÁÁ
ÁÁÁÁÁÁÁ
ÁÁÁÁÁÁ
ÁÁÁÁ
ÁÁÁÁÁÁÁÁÁÁÁÁÁÁÁÁÁ
ÁÁÁÁÁ
ÁÁÁÁÁÁÁ
ÁÁÁÁÁÁ
ÁÁÁÁ
ÁÁÁÁÁÁÁÁÁÁÁÁÁÁÁÁÁ
ÁÁÁÁÁ
ÁÁÁÁÁÁÁ
ÁÁÁÁÁÁ
ÁÁÁÁ
ÁÁÁÁÁÁÁÁÁÁÁÁÁÁÁÁÁÁÁÁÁÁÁÁÁÁÁÁÁ
ÁÁÁÁÁÁ
ÁÁÁÁ
ÁÁÁÁÁÁÁÁÁÁÁÁÁÁÁÁÁ
ÁÁÁÁÁ
ÁÁÁÁÁÁÁ
ÁÁÁÁÁÁ
ÁÁÁÁ
ÁÁÁÁÁÁÁÁÁÁÁÁÁÁÁÁÁ
ÁÁÁÁÁ
ÁÁÁÁÁÁÁ
ÁÁÁÁÁÁ
ÁÁÁÁ
ÁÁÁÁÁÁÁÁÁÁÁÁÁÁÁÁÁ
ÁÁÁÁÁ
ÁÁÁÁÁÁÁ
ÁÁÁÁÁÁ
ÁÁÁÁ
ÁÁÁÁÁÁÁÁÁÁÁÁÁÁÁÁÁ
ÁÁÁÁÁÁ
ÁÁÁÁÁ
ÁÁÁÁÁÁÁ
ÁÁÁÁ
ÁÁÁÁÁÁÁÁÁÁÁÁÁÁÁÁÁ
ÁÁÁÁÁ
ÁÁÁÁÁÁÁ
ÁÁÁÁÁÁ
ÁÁÁÁ
ÁÁÁÁÁÁÁÁÁÁÁÁÁÁÁÁÁ
ÁÁÁÁÁ
ÁÁÁÁÁÁÁ
ÁÁÁÁÁÁ
ÁÁÁÁ
ÁÁÁÁÁÁÁÁÁÁÁÁÁÁÁÁÁ
ÁÁÁÁÁ
ÁÁÁÁÁÁÁ
ÁÁÁÁÁÁ
ÁÁÁÁ
ÁÁÁÁÁÁÁÁÁÁÁÁÁÁÁÁÁÁÁÁÁÁÁÁÁÁÁÁÁ
ÁÁÁÁÁÁ
ÁÁÁÁ
ÁÁÁÁÁÁÁÁÁÁÁÁÁÁÁÁÁ
ÁÁÁÁÁÁ
ÁÁÁÁ
ÁÁÁÁÁÁÁÁÁÁÁÁÁÁÁÁÁÁÁÁÁÁ
ÁÁÁÁÁÁÁÁÁÁÁÁ
ÁÁÁÁÁÁÁ
ÁÁÁÁÁÁ
ÁÁÁÁ
ÁÁÁÁÁÁÁÁÁÁÁÁÁÁÁÁÁ
ÁÁÁÁÁ
ÁÁÁÁÁÁÁ
ÁÁÁÁÁÁ
ÁÁÁÁ
ÁÁÁÁÁÁÁÁÁÁÁÁÁÁÁÁÁ
ÁÁÁÁÁ
ÁÁÁÁÁÁÁ
ÁÁÁÁÁÁ
ÁÁÁÁ
ÁÁÁÁÁÁÁÁÁÁÁÁÁÁÁÁÁÁÁÁÁÁÁÁÁÁÁÁÁ
ÁÁÁÁÁÁ
ÁÁÁÁ
ÁÁÁÁÁÁÁÁÁÁÁÁÁÁÁÁÁ
ÁÁÁÁÁ
ÁÁÁÁÁÁÁ
ÁÁÁÁÁÁ
ÁÁÁÁÁ
ÁÁÁÁÁÁÁ
ÁÁÁÁ
ÁÁÁÁÁÁÁÁÁÁÁÁÁÁÁÁÁ
ÁÁÁÁÁÁ
ÁÁÁÁ
ÁÁÁÁÁÁÁÁÁÁÁÁÁÁÁÁÁ
ÁÁÁÁÁ
ÁÁÁÁÁÁÁ
ÁÁÁÁÁÁ
ÁÁÁÁ
ÁÁÁÁÁÁÁÁÁÁÁÁÁÁÁÁÁ
ÁÁÁÁÁ
ÁÁÁÁÁÁÁ
ÁÁÁÁÁÁ
ÁÁÁÁ
ÁÁÁÁÁÁÁÁÁÁÁÁÁÁÁÁÁÁÁÁÁÁÁÁÁÁÁÁÁ
ÁÁÁÁÁÁ
ÁÁÁÁ
ÁÁÁÁÁÁÁÁÁÁÁÁÁÁÁÁÁ
ÁÁÁÁÁ
ÁÁÁÁÁÁÁ
ÁÁÁÁÁÁ
ÁÁÁÁ
ÁÁÁÁÁÁÁÁÁÁÁÁÁÁÁÁÁ
ÁÁÁÁÁ
ÁÁÁÁÁÁÁ
ÁÁÁÁÁÁ
ÁÁÁÁ
ÁÁÁÁÁÁÁÁÁÁÁÁÁÁÁÁÁ
ÁÁÁÁÁÁÁÁÁÁÁÁ
ÁÁÁÁÁÁ
Step
Action
Value(s)
Yes
No
1
1. Disconnect the negative battery cable.
2. Wait 1 minute for the SDM capacitor to discharge.
3. Visually inspect the supplemental inflatable
restraints (SIR) wiring harness.
Is there any visible damage to the SIR harness?
–
Go to Step 2
Go to Step 3
1. Replace the SIR wiring harness.
2. Reconnect the negative battery cable.
Is the repair complete?
–
Go to
Diagnostic
System Check
–
1. Disconnect the electrical connector from the
driver seat belt pretensioner module.
2. Disconnect the electrical connector at the SDM.
D The shorting bar at the disconnected SDM
connector will create a complete circuit between the wires from the driver seat belt pretensioner module.
3. Use an ohmmeter to check the continuity
between ground and one of the terminals at the
SDM side of the wiring harness connector for the
driver seat belt pretensioner module.
D Refer to ‘‘Diagnostic Illustration 17’’ in this
section.
Is the resistance less than the specified value?
∞
Go to Step 2
Go to Step 4
1. Replace the SDM.
2. Reconnect the negative battery cable.
3. Set the scan tool to CODE ERASE.
4. Do the diagnostic system check.
Does the code 11 still show as a current fault?
–
Go to Step 5
System OK
–
Go to
Diagnostic
System Check
–
2
3
4
5
DAEWOO M-150 BL2
1. Replace the driver seat belt pretensioner module.
2. Reconnect the negative battery cable.
Is the repair complete?
8B – 36 SUPPLEMENTAL INFLATABLE RESTRAINTS (SIR)
D1AB302B
DIAGNOSTIC TROUBLE CODE (DTC) 12
DRIVER PRETENSIONER CIRCUIT, SHORT TO BATTERY VOLTAGE
Circuit Description
When the ignition switch is turned ON, the sensing and
diagnostic module (SDM) will perform tests to diagnose
any malfunctions within itself.
After passing these tests, the SDM will check the driver
pretensioner circuit. The SDM allows a very small
amount of current to flow through the circuit. The SDM
monitors voltage during this check.
Test Description
Caution: Before testing, disconnect the negative
battery cable. Wait 1 minute for the SDM capacitor
to discharge. The capacitor supplies reserve power
to deploy the airbags, even if the battery is disconnected. Unintentional deployment of the airbags
can cause injury.
DTC 12 Will Set When
D The firing circuit is shorted to voltage.
DAEWOO M-150 BL2
SUPPLEMENTAL INFLATABLE RESTRAINTS (SIR) 8B – 37
DTC 12 – Driver Pretensioner Circuit, Short To Battery Voltage
ÁÁÁÁÁÁÁÁÁÁÁÁÁÁÁÁÁÁÁÁÁ
ÁÁÁÁÁ
ÁÁÁÁÁÁÁ
ÁÁÁÁÁÁ
ÁÁÁÁÁÁÁÁÁÁÁÁÁÁÁÁÁÁÁÁÁ
ÁÁÁÁÁ
ÁÁÁÁÁÁÁ
ÁÁÁÁÁÁ
ÁÁÁÁ
ÁÁÁÁÁÁÁÁÁÁÁÁÁÁÁÁÁ
ÁÁÁÁÁ
ÁÁÁÁÁÁÁ
ÁÁÁÁÁÁ
ÁÁÁÁ
ÁÁÁÁÁÁÁÁÁÁÁÁÁÁÁÁÁ
ÁÁÁÁÁ
ÁÁÁÁÁÁÁ
ÁÁÁÁÁÁ
ÁÁÁÁ
ÁÁÁÁÁÁÁÁÁÁÁÁÁÁÁÁÁÁÁÁÁÁÁÁÁÁÁÁÁ
ÁÁÁÁÁÁ
ÁÁÁÁ
ÁÁÁÁÁÁÁÁÁÁÁÁÁÁÁÁÁÁÁÁÁÁÁÁÁÁÁÁÁ
ÁÁÁÁÁÁ
ÁÁÁÁ
ÁÁÁÁÁÁÁÁÁÁÁÁÁÁÁÁÁ
ÁÁÁÁÁ
ÁÁÁÁÁÁÁ
ÁÁÁÁÁÁ
ÁÁÁÁ
ÁÁÁÁÁÁÁÁÁÁÁÁÁÁÁÁÁ
ÁÁÁÁÁ
ÁÁÁÁÁÁÁ
ÁÁÁÁÁÁ
ÁÁÁÁ
ÁÁÁÁÁÁÁÁÁÁÁÁÁÁÁÁÁ
ÁÁÁÁÁÁ
ÁÁÁÁÁ
ÁÁÁÁÁÁÁ
ÁÁÁÁ
ÁÁÁÁÁÁÁÁÁÁÁÁÁÁÁÁÁ
ÁÁÁÁÁ
ÁÁÁÁÁÁÁ
ÁÁÁÁÁÁ
ÁÁÁÁ
ÁÁÁÁÁÁÁÁÁÁÁÁÁÁÁÁÁ
ÁÁÁÁÁ
ÁÁÁÁÁÁÁ
ÁÁÁÁÁÁ
ÁÁÁÁ
ÁÁÁÁÁÁÁÁÁÁÁÁÁÁÁÁÁ
ÁÁÁÁÁ
ÁÁÁÁÁÁÁ
ÁÁÁÁÁÁ
ÁÁÁÁÁÁÁÁÁÁÁÁÁÁÁÁÁÁÁÁÁ
ÁÁÁÁÁ
ÁÁÁÁÁÁÁ
ÁÁÁÁÁÁ
ÁÁÁÁ
ÁÁÁÁÁÁÁÁÁÁÁÁÁÁÁÁÁ
ÁÁÁÁÁÁ
ÁÁÁÁ
ÁÁÁÁÁÁÁÁÁÁÁÁÁÁÁÁÁÁÁÁÁÁ
ÁÁÁÁÁÁÁÁÁÁÁÁ
ÁÁÁÁÁÁÁ
ÁÁÁÁÁÁ
ÁÁÁÁ
ÁÁÁÁÁÁÁÁÁÁÁÁÁÁÁÁÁ
ÁÁÁÁÁ
ÁÁÁÁÁÁÁ
ÁÁÁÁÁÁ
ÁÁÁÁ
ÁÁÁÁÁÁÁÁÁÁÁÁÁÁÁÁÁ
ÁÁÁÁÁ
ÁÁÁÁÁÁÁ
ÁÁÁÁÁÁ
ÁÁÁÁ
ÁÁÁÁÁÁÁÁÁÁÁÁÁÁÁÁÁÁÁÁÁÁÁÁÁÁÁÁÁ
ÁÁÁÁÁÁ
ÁÁÁÁ
ÁÁÁÁÁÁÁÁÁÁÁÁÁÁÁÁÁ
ÁÁÁÁÁ
ÁÁÁÁÁÁÁ
ÁÁÁÁÁÁ
ÁÁÁÁ
ÁÁÁÁÁÁÁÁÁÁÁÁÁÁÁÁÁ
ÁÁÁÁÁ
ÁÁÁÁÁÁÁ
ÁÁÁÁÁÁ
ÁÁÁÁ
ÁÁÁÁÁÁÁÁÁÁÁÁÁÁÁÁÁ
ÁÁÁÁÁ
ÁÁÁÁÁÁÁ
ÁÁÁÁÁÁ
ÁÁÁÁ
ÁÁÁÁÁÁÁÁÁÁÁÁÁÁÁÁÁ
ÁÁÁÁÁ
ÁÁÁÁÁÁÁ
ÁÁÁÁÁÁ
ÁÁÁÁ
ÁÁÁÁÁÁÁÁÁÁÁÁÁÁÁÁÁ
ÁÁÁÁÁÁ
ÁÁÁÁÁ
ÁÁÁÁÁÁÁ
ÁÁÁÁ
ÁÁÁÁÁÁÁÁÁÁÁÁÁÁÁÁÁ
ÁÁÁÁÁ
ÁÁÁÁÁÁÁ
ÁÁÁÁÁÁ
ÁÁÁÁ
ÁÁÁÁÁÁÁÁÁÁÁÁÁÁÁÁÁ
ÁÁÁÁÁ
ÁÁÁÁÁÁÁ
ÁÁÁÁÁÁ
ÁÁÁÁ
ÁÁÁÁÁÁÁÁÁÁÁÁÁÁÁÁÁÁÁÁÁÁÁÁÁÁÁÁÁ
ÁÁÁÁÁÁ
ÁÁÁÁÁ
ÁÁÁÁÁÁÁ
ÁÁÁÁ
ÁÁÁÁÁÁÁÁÁÁÁÁÁÁÁÁÁ
ÁÁÁÁÁÁ
ÁÁÁÁ
ÁÁÁÁÁÁÁÁÁÁÁÁÁÁÁÁÁ
ÁÁÁÁÁ
ÁÁÁÁÁÁÁ
ÁÁÁÁÁÁ
ÁÁÁÁ
ÁÁÁÁÁÁÁÁÁÁÁÁÁÁÁÁÁÁÁÁÁÁÁÁÁÁÁÁÁ
ÁÁÁÁÁÁ
ÁÁÁÁ
ÁÁÁÁÁÁÁÁÁÁÁÁÁÁÁÁÁ
ÁÁÁÁÁÁÁÁÁÁÁÁ
ÁÁÁÁÁÁ
Step
Action
Value(s)
Yes
No
1
1. Disconnect the battery negative cable.
2. Wait 1 minute for the SDM capacitor to discharge.
D The capacitor supplies reserve power to deploy
the driver seat belt pretensioner even if the
battery has been disconnected.
3. Visually inspect the supplemental inflatable
restraints (SIR) wiring harness.
Is there any visible damage to the SIR wiring
harness?
–
Go to Step 2
Go to Step 3
–
Go to
Diagnostic
System Check
–
0v
Go to Step 2
Go to Step 4
–
Go to Step 5
System OK
–
Go to
Diagnostic
System Check
–
2
3
4
5
DAEWOO M-150 BL2
1. Replace the SIR wiring harness.
2. Reconnect the negative battery cable.
Is the repair complete?
1. Disconnect the electrical connector for the driver
seat belt pretensioner module.
2. Disconnect the electrical connector at the SDM.
D The shorting bar at the disconnected SDM
connector will create a complete circuit between the wires from the driver seat belt pretensioner module.
3. Use a multimeter to check the voltage at one of
the terminals on the SDM side of the SIR wiring
harness connector for the driver seat belt
pretensioner module.
D Refer to ‘‘Diagnostic Illustration 18’’ in this
section.
Is the voltage greater than the specified value?
1. Replace the SDM.
2. Reconnect the negative battery cable.
3. Set the scan tool to CODE ERASE.
4.Do the diagnostic system check.
Does the code 12 still show as a current fault?
1. Replace the driver seat belt pretensioner module.
2. Reconnect the negative battery cable.
Is the repair complete?
8B – 38 SUPPLEMENTAL INFLATABLE RESTRAINTS (SIR)
D1AB302B
DIAGNOSTIC TROUBLE CODE (DTC) 13
PASSENGER PRETENSIONER CIRCUIT, RESISTANCE TOO HIGH
Open Circuit
Circuit Description
When the ignition switch is turned ON, the sensing and
diagnostic module (SDM) will perform tests to diagnose
any malfunctions within itself.
After passing these tests, the SDM will check the
passenger pretensioner circuit. The SDM allows a very
small amount of current to flow through the circuit. The
SDM monitors the circuit resistance during this check.
DTC 13 Will Set When
D The combined resistance of the passenger pretensioner module, the harness wiring, and the connector
contacts is above a specified value, as in an open circuit.
Test Description
Caution: Before testing, disconnect the negative
battery cable. Wait 1 minute for the SDM capacitor
to discharge. The capacitor supplies reserve power
to deploy the airbags, even if the battery is disconnected. Unintentional deployment of the airbags
can cause injury.
Caution: Never measure the resistance of an airbag
module. If the anti-deployment shorting bar on the
module-side of the connector is not working properly, the meter’s battery can deploy the airbag and
cause injury.
DAEWOO M-150 BL2
SUPPLEMENTAL INFLATABLE RESTRAINTS (SIR) 8B – 39
DTC 13 – Passenger Pretensioner Circuit, Resistance Too High
ÁÁÁÁÁÁÁÁÁÁÁÁÁÁÁÁÁÁÁÁÁ
ÁÁÁÁÁ
ÁÁÁÁÁÁÁ
ÁÁÁÁÁÁ
ÁÁÁÁÁÁÁÁÁÁÁÁÁÁÁÁÁÁÁÁÁ
ÁÁÁÁÁ
ÁÁÁÁÁÁÁ
ÁÁÁÁÁÁ
ÁÁÁÁ
ÁÁÁÁÁÁÁÁÁÁÁÁÁÁÁÁÁ
ÁÁÁÁÁ
ÁÁÁÁÁÁÁ
ÁÁÁÁÁÁ
ÁÁÁÁ
ÁÁÁÁÁÁÁÁÁÁÁÁÁÁÁÁÁ
ÁÁÁÁÁ
ÁÁÁÁÁÁÁ
ÁÁÁÁÁÁ
ÁÁÁÁ
ÁÁÁÁÁÁÁÁÁÁÁÁÁÁÁÁÁÁÁÁÁÁÁÁÁÁÁÁÁ
ÁÁÁÁÁÁ
ÁÁÁÁ
ÁÁÁÁÁÁÁÁÁÁÁÁÁÁÁÁÁ
ÁÁÁÁÁ
ÁÁÁÁÁÁÁ
ÁÁÁÁÁÁ
ÁÁÁÁ
ÁÁÁÁÁÁÁÁÁÁÁÁÁÁÁÁÁ
ÁÁÁÁÁ
ÁÁÁÁÁÁÁ
ÁÁÁÁÁÁ
ÁÁÁÁ
ÁÁÁÁÁÁÁÁÁÁÁÁÁÁÁÁÁ
ÁÁÁÁÁ
ÁÁÁÁÁÁÁ
ÁÁÁÁÁÁ
ÁÁÁÁ
ÁÁÁÁÁÁÁÁÁÁÁÁÁÁÁÁÁ
ÁÁÁÁÁÁ
ÁÁÁÁÁ
ÁÁÁÁÁÁÁ
ÁÁÁÁ
ÁÁÁÁÁÁÁÁÁÁÁÁÁÁÁÁÁ
ÁÁÁÁÁ
ÁÁÁÁÁÁÁ
ÁÁÁÁÁÁ
ÁÁÁÁ
ÁÁÁÁÁÁÁÁÁÁÁÁÁÁÁÁÁ
ÁÁÁÁÁ
ÁÁÁÁÁÁÁ
ÁÁÁÁÁÁ
ÁÁÁÁ
ÁÁÁÁÁÁÁÁÁÁÁÁÁÁÁÁÁ
ÁÁÁÁÁ
ÁÁÁÁÁÁÁ
ÁÁÁÁÁÁ
ÁÁÁÁ
ÁÁÁÁÁÁÁÁÁÁÁÁÁÁÁÁÁÁÁÁÁÁÁÁÁÁÁÁÁ
ÁÁÁÁÁÁ
ÁÁÁÁ
ÁÁÁÁÁÁÁÁÁÁÁÁÁÁÁÁÁ
ÁÁÁÁÁÁ
ÁÁÁÁ
ÁÁÁÁÁÁÁÁÁÁÁÁÁÁÁÁÁÁÁÁÁÁ
ÁÁÁÁÁÁÁÁÁÁÁÁ
ÁÁÁÁÁÁÁ
ÁÁÁÁÁÁ
ÁÁÁÁ
ÁÁÁÁÁÁÁÁÁÁÁÁÁÁÁÁÁ
ÁÁÁÁÁ
ÁÁÁÁÁÁÁ
ÁÁÁÁÁÁ
ÁÁÁÁ
ÁÁÁÁÁÁÁÁÁÁÁÁÁÁÁÁÁ
ÁÁÁÁÁ
ÁÁÁÁÁÁÁ
ÁÁÁÁÁÁ
ÁÁÁÁ
ÁÁÁÁÁÁÁÁÁÁÁÁÁÁÁÁÁÁÁÁÁÁÁÁÁÁÁÁÁ
ÁÁÁÁÁÁ
ÁÁÁÁ
ÁÁÁÁÁÁÁÁÁÁÁÁÁÁÁÁÁ
ÁÁÁÁÁ
ÁÁÁÁÁÁÁ
ÁÁÁÁÁÁ
ÁÁÁÁÁ
ÁÁÁÁÁÁÁ
ÁÁÁÁ
ÁÁÁÁÁÁÁÁÁÁÁÁÁÁÁÁÁ
ÁÁÁÁÁÁ
ÁÁÁÁ
ÁÁÁÁÁÁÁÁÁÁÁÁÁÁÁÁÁ
ÁÁÁÁÁ
ÁÁÁÁÁÁÁ
ÁÁÁÁÁÁ
ÁÁÁÁ
ÁÁÁÁÁÁÁÁÁÁÁÁÁÁÁÁÁ
ÁÁÁÁÁ
ÁÁÁÁÁÁÁ
ÁÁÁÁÁÁ
ÁÁÁÁ
ÁÁÁÁÁÁÁÁÁÁÁÁÁÁÁÁÁÁÁÁÁÁÁÁÁÁÁÁÁ
ÁÁÁÁÁÁ
ÁÁÁÁ
ÁÁÁÁÁÁÁÁÁÁÁÁÁÁÁÁÁ
ÁÁÁÁÁ
ÁÁÁÁÁÁÁ
ÁÁÁÁÁÁ
ÁÁÁÁ
ÁÁÁÁÁÁÁÁÁÁÁÁÁÁÁÁÁ
ÁÁÁÁÁ
ÁÁÁÁÁÁÁ
ÁÁÁÁÁÁ
ÁÁÁÁ
ÁÁÁÁÁÁÁÁÁÁÁÁÁÁÁÁÁÁÁÁÁÁÁÁÁÁÁÁÁ
ÁÁÁÁÁÁ
ÁÁÁÁÁ
ÁÁÁÁÁÁÁ
ÁÁÁÁ
ÁÁÁÁÁÁÁÁÁÁÁÁÁÁÁÁÁ
ÁÁÁÁÁÁ
ÁÁÁÁ
ÁÁÁÁÁÁÁÁÁÁÁÁÁÁÁÁÁ
ÁÁÁÁÁ
ÁÁÁÁÁÁÁ
ÁÁÁÁÁÁ
ÁÁÁÁ
ÁÁÁÁÁÁÁÁÁÁÁÁÁÁÁÁÁÁÁÁÁÁÁÁÁÁÁÁÁ
ÁÁÁÁÁÁ
ÁÁÁÁ
ÁÁÁÁÁÁÁÁÁÁÁÁÁÁÁÁÁ
ÁÁÁÁÁ
ÁÁÁÁÁÁÁ
ÁÁÁÁÁÁ
ÁÁÁÁ
ÁÁÁÁÁÁÁÁÁÁÁÁÁÁÁÁÁ
ÁÁÁÁÁÁÁÁÁÁÁÁ
ÁÁÁÁÁÁ
Step
Action
Value(s)
Yes
No
1
1. Disconnect the negative battery cable.
2. Wait 1 minute for the SDM capacitor to discharge.
3. Examine the wiring and the connector at the
passenger seat belt pretensioner module.
Is the connector disconnected?
–
Go to Step 2
Go to Step 3
2
1. Reconnect the passenger seat belt pretensioner
module connector.
2. Reconnect the negative battery cable.
Is the repair complete?
–
Go to
Diagnostic
System Check
–
1. Disconnect the electrical connector for the
passenger seat belt pretensioner module.
2. Disconnect the electrical connector at the SDM.
D The shorting bar at the disconnected SDM
connector will create a complete circuit between the wires from the passenger seat belt
pretensioner module.
3. Connect an ohmmeter to the terminals on the
SDM side of the wiring harness connector for the
passenger seat belt pretensioner module.
D Refer to ‘‘Diagnostic Illustration 19’’ in this
section.
Does the ohmmeter show the specified value?
≈0W
Go to Step 4
Go to Step 6
–
Go to Step 5
System OK
–
Go to
Diagnostic
System Check
–
–
Go to
Diagnostic
System Check
–
3
4
5
6
DAEWOO M-150 BL2
1. Replace the SDM.
2. Reconnect the negative battery cable.
3. Set the scan tool for CODE ERASE.
4. Do the diagnostic system check.
Does the code 13 still show as a current fault?
1. Replace the passenger seat belt pretensioner
module.
2. Reconnect the negative battery cable.
Is the repair complete?
1. Replace the supplemental inflatable restraints
(SIR) wiring harness.
2. Reconnect the negative battery cable.
Is the repair complete?
8B – 40 SUPPLEMENTAL INFLATABLE RESTRAINTS (SIR)
D1AB302B
DIAGNOSTIC TROUBLE CODE (DTC) 14
PASSENGER PRETENSIONER CIRCUIT, RESISTANCE TOO LOW
Short Circuit
Circuit Description
When the ignition switch is turned ON, the sensing and
diagnostic module (SDM) will perform tests to diagnose
any malfunctions within itself.
After passing these tests, the SDM will check the
passenger pretensioner circuit. The SDM allows a very
small amount of current to flow through the circuit. The
SDM monitors the circuit resistance during this check.
DTC 14 Will Set When
D The combined resistance of the passenger pretensioner module, the harness wiring, and the connector
contacts is below a specified value, as in a short circuit between the wires to the passenger airbag module.
Test Description
Caution: Before testing, disconnect the negative
battery cable. Wait 1 minute for the SDM capacitor
to discharge. The capacitor supplies reserve power
to deploy the airbags, even if the battery is disconnected. Unintentional deployment of the airbags
can cause injury.
Caution: Never measure the resistance of an airbag
module. If the anti-deployment shorting bar on the
module side of the connector is not working properly, the meter’s battery could deploy the airbag and
cause injury.
DAEWOO M-150 BL2
SUPPLEMENTAL INFLATABLE RESTRAINTS (SIR) 8B – 41
DTC 14 – Passenger Pretensioner Circuit, Resistance Too Low
ÁÁÁÁÁÁÁÁÁÁÁÁÁÁÁÁÁÁÁÁÁ
ÁÁÁÁÁ
ÁÁÁÁÁÁÁ
ÁÁÁÁÁÁ
ÁÁÁÁÁÁÁÁÁÁÁÁÁÁÁÁÁÁÁÁÁ
ÁÁÁÁÁ
ÁÁÁÁÁÁÁ
ÁÁÁÁÁÁ
ÁÁÁÁ
ÁÁÁÁÁÁÁÁÁÁÁÁÁÁÁÁÁ
ÁÁÁÁÁ
ÁÁÁÁÁÁÁ
ÁÁÁÁÁÁ
ÁÁÁÁ
ÁÁÁÁÁÁÁÁÁÁÁÁÁÁÁÁÁ
ÁÁÁÁÁ
ÁÁÁÁÁÁÁ
ÁÁÁÁÁÁ
ÁÁÁÁ
ÁÁÁÁÁÁÁÁÁÁÁÁÁÁÁÁÁÁÁÁÁÁÁÁÁÁÁÁÁ
ÁÁÁÁÁÁ
ÁÁÁÁ
ÁÁÁÁÁÁÁÁÁÁÁÁÁÁÁÁÁÁÁÁÁÁÁÁÁÁÁÁÁ
ÁÁÁÁÁÁ
ÁÁÁÁ
ÁÁÁÁÁÁÁÁÁÁÁÁÁÁÁÁÁ
ÁÁÁÁÁ
ÁÁÁÁÁÁÁ
ÁÁÁÁÁÁ
ÁÁÁÁÁ
ÁÁÁÁÁÁÁ
ÁÁÁÁ
ÁÁÁÁÁÁÁÁÁÁÁÁÁÁÁÁÁ
ÁÁÁÁÁÁ
ÁÁÁÁ
ÁÁÁÁÁÁÁÁÁÁÁÁÁÁÁÁÁ
ÁÁÁÁÁ
ÁÁÁÁÁÁÁ
ÁÁÁÁÁÁ
ÁÁÁÁ
ÁÁÁÁÁÁÁÁÁÁÁÁÁÁÁÁÁ
ÁÁÁÁÁ
ÁÁÁÁÁÁÁ
ÁÁÁÁÁÁ
ÁÁÁÁ
ÁÁÁÁÁÁÁÁÁÁÁÁÁÁÁÁÁ
ÁÁÁÁÁ
ÁÁÁÁÁÁÁ
ÁÁÁÁÁÁ
ÁÁÁÁ
ÁÁÁÁÁÁÁÁÁÁÁÁÁÁÁÁÁ
ÁÁÁÁÁ
ÁÁÁÁÁÁÁ
ÁÁÁÁÁÁ
ÁÁÁÁ
ÁÁÁÁÁÁÁÁÁÁÁÁÁÁÁÁÁ
ÁÁÁÁÁ
ÁÁÁÁÁÁÁ
ÁÁÁÁÁÁ
ÁÁÁÁ
ÁÁÁÁÁÁÁÁÁÁÁÁÁÁÁÁÁ
ÁÁÁÁÁ
ÁÁÁÁÁÁÁ
ÁÁÁÁÁÁ
ÁÁÁÁ
ÁÁÁÁÁÁÁÁÁÁÁÁÁÁÁÁÁ
ÁÁÁÁÁ
ÁÁÁÁÁÁÁ
ÁÁÁÁÁÁ
ÁÁÁÁÁ
ÁÁÁÁÁÁÁ
ÁÁÁÁ
ÁÁÁÁÁÁÁÁÁÁÁÁÁÁÁÁÁ
ÁÁÁÁÁÁ
ÁÁÁÁ
ÁÁÁÁÁÁÁÁÁÁÁÁÁÁÁÁÁ
ÁÁÁÁÁ
ÁÁÁÁÁÁÁ
ÁÁÁÁÁÁ
ÁÁÁÁ
ÁÁÁÁÁÁÁÁÁÁÁÁÁÁÁÁÁÁÁÁÁÁÁÁÁÁÁÁÁ
ÁÁÁÁÁÁ
ÁÁÁÁ
ÁÁÁÁÁÁÁÁÁÁÁÁÁÁÁÁÁ
ÁÁÁÁÁÁÁÁÁÁÁÁ
ÁÁÁÁÁÁ
Step
Action
Value(s)
Yes
No
1
1. Disconnect the negative battery cable.
2. Connect an ohmmeter to the terminals of the
wiring harness connector for the passenger seat
belt pretensioner module on the SDM side of the
connector.
D Refer to ‘‘Diagnostic Illustration 19’’ in this
section.
Does the ohmmeter show the specified value?
∞
Go to Step 2
Go to Step 4
1. Replace the SDM.
2. Reconnect the negative battery cable.
3. Set the scan tool to CODE ERASE.
4. Do the diagnostic system check.
Does the code 14 still show as a current fault?
–
Go to Step 3
System OK
–
Go to
Diagnostic
System Check
–
–
Go to
Diagnostic
System Check
–
2
3
4
DAEWOO M-150 BL2
1. Replace the passenger seat belt pretensioner
module.
2. Reconnect the negative battery cable.
Is the repair complete?
1. Replace the supplemental inflatable restraints
(SIR) wiring harness.
2. Reconnect the negative battery cable.
Is the repair complete?
8B – 42 SUPPLEMENTAL INFLATABLE RESTRAINTS (SIR)
D1AB302B
DIAGNOSTIC TROUBLE CODE (DTC) 15
PASSENGER PRETENSIONER CIRCUIT, SHORT TO GROUND
Circuit Description
When the ignition switch is turned ON, the sensing and
diagnostic module (SDM) will diagnose any malfunctions within itself.
After passing these tests, the SDM will check the
passenger pretensioner circuit. The SDM allows a very
small amount of current to flow through the circuit. The
SDM monitors the voltage during this check.
Test Description
Caution: Before testing, disconnect the negative
battery cable. Wait 1 minute for the SDM capacitor
to discharge. The capacitor supplies reserve power
to deploy the airbags, even if the battery is disconnected. Unintentional deployment of the airbags
can cause injury.
DTC 15 Will Set When
D The firing circuit is shorted to ground.
DAEWOO M-150 BL2
SUPPLEMENTAL INFLATABLE RESTRAINTS (SIR) 8B – 43
DTC 15 Passenger Pretensioner Circuit, Short To Ground
ÁÁÁÁÁÁÁÁÁÁÁÁÁÁÁÁÁÁÁÁÁ
ÁÁÁÁÁ
ÁÁÁÁÁÁÁ
ÁÁÁÁÁÁ
ÁÁÁÁÁÁÁÁÁÁÁÁÁÁÁÁÁÁÁÁÁ
ÁÁÁÁÁ
ÁÁÁÁÁÁÁ
ÁÁÁÁÁÁ
ÁÁÁÁ
ÁÁÁÁÁÁÁÁÁÁÁÁÁÁÁÁÁ
ÁÁÁÁÁ
ÁÁÁÁÁÁÁ
ÁÁÁÁÁÁ
ÁÁÁÁ
ÁÁÁÁÁÁÁÁÁÁÁÁÁÁÁÁÁ
ÁÁÁÁÁ
ÁÁÁÁÁÁÁ
ÁÁÁÁÁÁ
ÁÁÁÁ
ÁÁÁÁÁÁÁÁÁÁÁÁÁÁÁÁÁÁÁÁÁÁÁÁÁÁÁÁÁ
ÁÁÁÁÁÁ
ÁÁÁÁ
ÁÁÁÁÁÁÁÁÁÁÁÁÁÁÁÁÁ
ÁÁÁÁÁ
ÁÁÁÁÁÁÁ
ÁÁÁÁÁÁ
ÁÁÁÁ
ÁÁÁÁÁÁÁÁÁÁÁÁÁÁÁÁÁ
ÁÁÁÁÁ
ÁÁÁÁÁÁÁ
ÁÁÁÁÁÁ
ÁÁÁÁ
ÁÁÁÁÁÁÁÁÁÁÁÁÁÁÁÁÁ
ÁÁÁÁÁ
ÁÁÁÁÁÁÁ
ÁÁÁÁÁÁ
ÁÁÁÁ
ÁÁÁÁÁÁÁÁÁÁÁÁÁÁÁÁÁ
ÁÁÁÁÁÁ
ÁÁÁÁÁ
ÁÁÁÁÁÁÁ
ÁÁÁÁ
ÁÁÁÁÁÁÁÁÁÁÁÁÁÁÁÁÁ
ÁÁÁÁÁ
ÁÁÁÁÁÁÁ
ÁÁÁÁÁÁ
ÁÁÁÁ
ÁÁÁÁÁÁÁÁÁÁÁÁÁÁÁÁÁ
ÁÁÁÁÁ
ÁÁÁÁÁÁÁ
ÁÁÁÁÁÁ
ÁÁÁÁ
ÁÁÁÁÁÁÁÁÁÁÁÁÁÁÁÁÁ
ÁÁÁÁÁ
ÁÁÁÁÁÁÁ
ÁÁÁÁÁÁ
ÁÁÁÁ
ÁÁÁÁÁÁÁÁÁÁÁÁÁÁÁÁÁÁÁÁÁÁÁÁÁÁÁÁÁ
ÁÁÁÁÁÁ
ÁÁÁÁ
ÁÁÁÁÁÁÁÁÁÁÁÁÁÁÁÁÁ
ÁÁÁÁÁÁ
ÁÁÁÁ
ÁÁÁÁÁÁÁÁÁÁÁÁÁÁÁÁÁÁÁÁÁÁ
ÁÁÁÁÁÁÁÁÁÁÁÁ
ÁÁÁÁÁÁÁ
ÁÁÁÁÁÁ
ÁÁÁÁ
ÁÁÁÁÁÁÁÁÁÁÁÁÁÁÁÁÁ
ÁÁÁÁÁ
ÁÁÁÁÁÁÁ
ÁÁÁÁÁÁ
ÁÁÁÁ
ÁÁÁÁÁÁÁÁÁÁÁÁÁÁÁÁÁ
ÁÁÁÁÁ
ÁÁÁÁÁÁÁ
ÁÁÁÁÁÁ
ÁÁÁÁ
ÁÁÁÁÁÁÁÁÁÁÁÁÁÁÁÁÁÁÁÁÁÁÁÁÁÁÁÁÁ
ÁÁÁÁÁÁ
ÁÁÁÁ
ÁÁÁÁÁÁÁÁÁÁÁÁÁÁÁÁÁ
ÁÁÁÁÁ
ÁÁÁÁÁÁÁ
ÁÁÁÁÁÁ
ÁÁÁÁÁ
ÁÁÁÁÁÁÁ
ÁÁÁÁ
ÁÁÁÁÁÁÁÁÁÁÁÁÁÁÁÁÁ
ÁÁÁÁÁÁ
ÁÁÁÁ
ÁÁÁÁÁÁÁÁÁÁÁÁÁÁÁÁÁ
ÁÁÁÁÁ
ÁÁÁÁÁÁÁ
ÁÁÁÁÁÁ
ÁÁÁÁ
ÁÁÁÁÁÁÁÁÁÁÁÁÁÁÁÁÁ
ÁÁÁÁÁ
ÁÁÁÁÁÁÁ
ÁÁÁÁÁÁ
ÁÁÁÁ
ÁÁÁÁÁÁÁÁÁÁÁÁÁÁÁÁÁÁÁÁÁÁÁÁÁÁÁÁÁ
ÁÁÁÁÁÁ
ÁÁÁÁ
ÁÁÁÁÁÁÁÁÁÁÁÁÁÁÁÁÁ
ÁÁÁÁÁ
ÁÁÁÁÁÁÁ
ÁÁÁÁÁÁ
ÁÁÁÁ
ÁÁÁÁÁÁÁÁÁÁÁÁÁÁÁÁÁ
ÁÁÁÁÁ
ÁÁÁÁÁÁÁ
ÁÁÁÁÁÁ
ÁÁÁÁ
ÁÁÁÁÁÁÁÁÁÁÁÁÁÁÁÁÁÁÁÁÁÁÁÁÁÁÁÁÁ
ÁÁÁÁÁÁ
ÁÁÁÁ
ÁÁÁÁÁÁÁÁÁÁÁÁÁÁÁÁÁ
ÁÁÁÁÁÁÁÁÁÁÁÁ
ÁÁÁÁÁÁ
Step
Action
Value(s)
Yes
No
1
1. Disconnect the negative battery cable.
2. Wait 1 minute for the SDM capacitor to discharge.
3. Visually inspect the supplemental inflatable
restraints (SIR) wiring harness.
Is there any visible damage to the SIR harness?
–
Go to Step 2
Go to Step 3
1. Replace the SIR wiring harness.
2. Reconnect the negative battery cable.
Is the repair complete?
–
Go to
Diagnostic
System Check
–
1. Disconnect the electrical connector from the
passenger seat belt pretensioner module.
2. Disconnect the electrical connector at the SDM.
D The shorting bar at the disconnected SDM
connector will create a complete circuit between the wires from the passenger seat belt
pretensioner module.
3. Use an ohmmeter to check the continuity
between ground and one of the terminals at the
SDM side of the wiring harness connector for the
passenger seat belt pretensioner module.
D Refer to ‘‘Diagnostic Illustration 20’’ in this
section.
Is the resistance less than the specified value?
∞
Go to Step 2
Go to Step 4
1. Replace the SDM.
2. Reconnect the negative battery cable.
3. Set the scan tool to CODE ERASE.
4. Do the diagnostic system check.
Does the code 15 still show as a current fault?
–
Go to Step 5
System OK
–
Go to
Diagnostic
System Check
–
2
3
4
5
DAEWOO M-150 BL2
1. Replace the passenger seat belt pretensioner
module.
2. Reconnect the negative battery cable.
Is the repair complete?
8B – 44 SUPPLEMENTAL INFLATABLE RESTRAINTS (SIR)
D1AB302B
DIAGNOSTIC TROUBLE CODE (DTC) 16
PASSENGER PRETENSIONER CIRCUIT, SHORT TO BATTERY VOLTAGE
Circuit Description
When the ignition switch is turned ON, the sensing and
diagnostic module (SDM) will perform tests to diagnose
any malfunctions within itself.
After passing these tests, the SDM will check the
passenger pretensioner circuit. The SDM allows a very
small amount of current to flow through the circuit. The
SDM monitors the voltage during this check.
Test Description
Caution: Before testing, disconnect the negative
battery cable. Wait 1 minute for the SDM capacitor
to discharge. The capacitor supplies the reserve
power to deploy the airbags, even if the battery is
disconnected. Unintentional deployment of the airbags can cause injury.
DTC 16 Will Set When
D The firing circuit is shorted to the voltage.
DAEWOO M-150 BL2
SUPPLEMENTAL INFLATABLE RESTRAINTS (SIR) 8B – 45
DTC 16 – Passenger Pretensioner Circuit, Short To Battery Voltage
ÁÁÁÁÁÁÁÁÁÁÁÁÁÁÁÁÁÁÁÁÁ
ÁÁÁÁÁ
ÁÁÁÁÁÁÁ
ÁÁÁÁÁÁ
ÁÁÁÁÁÁÁÁÁÁÁÁÁÁÁÁÁÁÁÁÁ
ÁÁÁÁÁ
ÁÁÁÁÁÁÁ
ÁÁÁÁÁÁ
ÁÁÁÁ
ÁÁÁÁÁÁÁÁÁÁÁÁÁÁÁÁÁ
ÁÁÁÁÁ
ÁÁÁÁÁÁÁ
ÁÁÁÁÁÁ
ÁÁÁÁ
ÁÁÁÁÁÁÁÁÁÁÁÁÁÁÁÁÁ
ÁÁÁÁÁ
ÁÁÁÁÁÁÁ
ÁÁÁÁÁÁ
ÁÁÁÁ
ÁÁÁÁÁÁÁÁÁÁÁÁÁÁÁÁÁÁÁÁÁÁÁÁÁÁÁÁÁ
ÁÁÁÁÁÁ
ÁÁÁÁ
ÁÁÁÁÁÁÁÁÁÁÁÁÁÁÁÁÁÁÁÁÁÁÁÁÁÁÁÁÁ
ÁÁÁÁÁÁ
ÁÁÁÁ
ÁÁÁÁÁÁÁÁÁÁÁÁÁÁÁÁÁ
ÁÁÁÁÁ
ÁÁÁÁÁÁÁ
ÁÁÁÁÁÁ
ÁÁÁÁ
ÁÁÁÁÁÁÁÁÁÁÁÁÁÁÁÁÁ
ÁÁÁÁÁ
ÁÁÁÁÁÁÁ
ÁÁÁÁÁÁ
ÁÁÁÁ
ÁÁÁÁÁÁÁÁÁÁÁÁÁÁÁÁÁ
ÁÁÁÁÁÁ
ÁÁÁÁÁ
ÁÁÁÁÁÁÁ
ÁÁÁÁ
ÁÁÁÁÁÁÁÁÁÁÁÁÁÁÁÁÁ
ÁÁÁÁÁ
ÁÁÁÁÁÁÁ
ÁÁÁÁÁÁ
ÁÁÁÁ
ÁÁÁÁÁÁÁÁÁÁÁÁÁÁÁÁÁ
ÁÁÁÁÁ
ÁÁÁÁÁÁÁ
ÁÁÁÁÁÁ
ÁÁÁÁ
ÁÁÁÁÁÁÁÁÁÁÁÁÁÁÁÁÁ
ÁÁÁÁÁ
ÁÁÁÁÁÁÁ
ÁÁÁÁÁÁ
ÁÁÁÁÁÁÁÁÁÁÁÁÁÁÁÁÁÁÁÁÁ
ÁÁÁÁÁ
ÁÁÁÁÁÁÁ
ÁÁÁÁÁÁ
ÁÁÁÁ
ÁÁÁÁÁÁÁÁÁÁÁÁÁÁÁÁÁ
ÁÁÁÁÁÁ
ÁÁÁÁ
ÁÁÁÁÁÁÁÁÁÁÁÁÁÁÁÁÁÁÁÁÁÁ
ÁÁÁÁÁÁÁÁÁÁÁÁ
ÁÁÁÁÁÁÁ
ÁÁÁÁÁÁ
ÁÁÁÁ
ÁÁÁÁÁÁÁÁÁÁÁÁÁÁÁÁÁ
ÁÁÁÁÁ
ÁÁÁÁÁÁÁ
ÁÁÁÁÁÁ
ÁÁÁÁ
ÁÁÁÁÁÁÁÁÁÁÁÁÁÁÁÁÁ
ÁÁÁÁÁ
ÁÁÁÁÁÁÁ
ÁÁÁÁÁÁ
ÁÁÁÁ
ÁÁÁÁÁÁÁÁÁÁÁÁÁÁÁÁÁÁÁÁÁÁÁÁÁÁÁÁÁ
ÁÁÁÁÁÁ
ÁÁÁÁ
ÁÁÁÁÁÁÁÁÁÁÁÁÁÁÁÁÁ
ÁÁÁÁÁ
ÁÁÁÁÁÁÁ
ÁÁÁÁÁÁ
ÁÁÁÁ
ÁÁÁÁÁÁÁÁÁÁÁÁÁÁÁÁÁ
ÁÁÁÁÁ
ÁÁÁÁÁÁÁ
ÁÁÁÁÁÁ
ÁÁÁÁ
ÁÁÁÁÁÁÁÁÁÁÁÁÁÁÁÁÁ
ÁÁÁÁÁ
ÁÁÁÁÁÁÁ
ÁÁÁÁÁÁ
ÁÁÁÁ
ÁÁÁÁÁÁÁÁÁÁÁÁÁÁÁÁÁ
ÁÁÁÁÁ
ÁÁÁÁÁÁÁ
ÁÁÁÁÁÁ
ÁÁÁÁ
ÁÁÁÁÁÁÁÁÁÁÁÁÁÁÁÁÁ
ÁÁÁÁÁÁ
ÁÁÁÁÁ
ÁÁÁÁÁÁÁ
ÁÁÁÁ
ÁÁÁÁÁÁÁÁÁÁÁÁÁÁÁÁÁ
ÁÁÁÁÁ
ÁÁÁÁÁÁÁ
ÁÁÁÁÁÁ
ÁÁÁÁ
ÁÁÁÁÁÁÁÁÁÁÁÁÁÁÁÁÁ
ÁÁÁÁÁ
ÁÁÁÁÁÁÁ
ÁÁÁÁÁÁ
ÁÁÁÁ
ÁÁÁÁÁÁÁÁÁÁÁÁÁÁÁÁÁÁÁÁÁÁÁÁÁÁÁÁÁ
ÁÁÁÁÁÁ
ÁÁÁÁÁ
ÁÁÁÁÁÁÁ
ÁÁÁÁ
ÁÁÁÁÁÁÁÁÁÁÁÁÁÁÁÁÁ
ÁÁÁÁÁÁ
ÁÁÁÁ
ÁÁÁÁÁÁÁÁÁÁÁÁÁÁÁÁÁ
ÁÁÁÁÁ
ÁÁÁÁÁÁÁ
ÁÁÁÁÁÁ
ÁÁÁÁ
ÁÁÁÁÁÁÁÁÁÁÁÁÁÁÁÁÁÁÁÁÁÁÁÁÁÁÁÁÁ
ÁÁÁÁÁÁ
ÁÁÁÁ
ÁÁÁÁÁÁÁÁÁÁÁÁÁÁÁÁÁ
ÁÁÁÁÁÁÁÁÁÁÁÁ
ÁÁÁÁÁÁ
Step
Action
Value(s)
Yes
No
1
1. Disconnect the battery negative cable.
2. Wait 1 minute for the SDM capacitor to discharge.
D The capacitor supplies reserve power to deploy
the passenger seat belt pretensioner even if
the battery has been disconnected.
3. Visually inspect the supplemental inflatable
restraints (SIR) wiring harness.
Is there any visible damage to the SIR wiring
harness?
–
Go to Step 2
Go to Step 3
–
Go to
Diagnostic
System Check
–
0v
Go to Step 2
Go to Step 4
–
Go to Step 5
System OK
–
Go to
Diagnostic
System Check
–
2
3
4
5
DAEWOO M-150 BL2
1. Replace the SIR wiring harness.
2. Reconnect the negative battery cable.
Is the repair complete?
1. Disconnect the electrical connector for the
passenger seat belt pretensioner module.
2. Disconnect the electrical connector at the SDM.
D The shorting bar at the disconnected SDM
connector will create a complete circuit between the wires from the passenger seat belt
pretensioner module.
3. Use a multimeter to check the voltage at one of
the terminals on the SDM side of the SIR wiring
harness connector for the passenger seat belt
pretensioner module.
D Refer to ‘‘Diagnostic Illustration 21’’ in this
section.
Is the voltage greater than the specified value?
1. Replace the SDM.
2. Reconnect the negative battery cable.
3. Set the scan tool to CODE ERASE.
4.Do the diagnostic system check.
Does the code 16 still show as a current fault?
1. Replace the passenger seat belt pretensioner
module.
2. Reconnect the negative battery cable.
Is the repair complete?
8B – 46 SUPPLEMENTAL INFLATABLE RESTRAINTS (SIR)
D1AB302B
DIAGNOSTIC TROUBLE CODE (DTC) 18
CONNECTION BETWEEN DRIVER FIRING CIRCUIT AND DRIVER
PRETENSIONER CIRCUIT
Open Circuit
Circuit Description
When the ignition switch is turned ON, the sensing and
diagnostic module (SDM) will perform tests to diagnose
any malfunctions within itself.
After passing these tests, the SDM will check the driver
airbag and the driver pretensioner circuit. The SDM allows a very small amount of current to flow through the
circuit. The SDM monitors the circuit resistance during
this check.
DTC 18 Will Set When
D Connection between the driver firing circuit and the
driver pretensioner circuit or the SDM internal connection problem may exist.
Test Description
Caution: Before testing, disconnect the negative
battery cable. Wait 1 minute for the SDM capacitor
to discharge. The capacitor supplies reserve power
to deploy the airbags, even if the battery is disconnected. Unintentional deployment of the airbags
can cause injury.
Caution: Never measure the resistance of an airbag
module. If the anti-deployment shorting bar on the
module-side of the connector is not working properly, the meter’s battery can deploy the airbag and
cause injury.
DAEWOO M-150 BL2
SUPPLEMENTAL INFLATABLE RESTRAINTS (SIR) 8B – 47
DTC 18 – Connection Between Driver Firing Circuit and Driver Pretensioner Circuit
ÁÁÁÁÁÁÁÁÁÁÁÁÁÁÁÁÁÁÁÁÁ
ÁÁÁÁÁ
ÁÁÁÁÁÁÁ
ÁÁÁÁÁÁ
ÁÁÁÁÁÁÁÁÁÁÁÁÁÁÁÁÁÁÁÁÁ
ÁÁÁÁÁ
ÁÁÁÁÁÁÁ
ÁÁÁÁÁÁ
ÁÁÁÁ
ÁÁÁÁÁÁÁÁÁÁÁÁÁÁÁÁÁ
ÁÁÁÁÁ
ÁÁÁÁÁÁÁ
ÁÁÁÁÁÁ
ÁÁÁÁ
ÁÁÁÁÁÁÁÁÁÁÁÁÁÁÁÁÁ
ÁÁÁÁÁ
ÁÁÁÁÁÁÁ
ÁÁÁÁÁÁ
ÁÁÁÁ
ÁÁÁÁÁÁÁÁÁÁÁÁÁÁÁÁÁÁÁÁÁÁÁÁÁÁÁÁÁ
ÁÁÁÁÁÁ
ÁÁÁÁ
ÁÁÁÁÁÁÁÁÁÁÁÁÁÁÁÁÁ
ÁÁÁÁÁ
ÁÁÁÁÁÁÁ
ÁÁÁÁÁÁ
ÁÁÁÁÁ
ÁÁÁÁÁÁÁ
ÁÁÁÁ
ÁÁÁÁÁÁÁÁÁÁÁÁÁÁÁÁÁ
ÁÁÁÁÁÁ
ÁÁÁÁ
ÁÁÁÁÁÁÁÁÁÁÁÁÁÁÁÁÁ
ÁÁÁÁÁ
ÁÁÁÁÁÁÁ
ÁÁÁÁÁÁ
ÁÁÁÁ
ÁÁÁÁÁÁÁÁÁÁÁÁÁÁÁÁÁ
ÁÁÁÁÁ
ÁÁÁÁÁÁÁ
ÁÁÁÁÁÁ
ÁÁÁÁÁ
ÁÁÁÁÁÁÁ
ÁÁÁÁ
ÁÁÁÁÁÁÁÁÁÁÁÁÁÁÁÁÁ
ÁÁÁÁÁÁ
ÁÁÁÁ
ÁÁÁÁÁÁÁÁÁÁÁÁÁÁÁÁÁ
ÁÁÁÁÁ
ÁÁÁÁÁÁÁ
ÁÁÁÁÁÁ
ÁÁÁÁ
ÁÁÁÁÁÁÁÁÁÁÁÁÁÁÁÁÁ
ÁÁÁÁÁ
ÁÁÁÁÁÁÁ
ÁÁÁÁÁÁ
ÁÁÁÁ
ÁÁÁÁÁÁÁÁÁÁÁÁÁÁÁÁÁÁÁÁÁÁÁÁÁÁÁÁÁ
ÁÁÁÁÁÁ
ÁÁÁÁ
ÁÁÁÁÁÁÁÁÁÁÁÁÁÁÁÁÁ
ÁÁÁÁÁÁ
ÁÁÁÁ
ÁÁÁÁÁÁÁÁÁÁÁÁÁÁÁÁÁÁÁÁÁÁ
ÁÁÁÁÁÁÁÁÁÁÁÁ
ÁÁÁÁÁÁÁ
ÁÁÁÁÁÁ
ÁÁÁÁ
ÁÁÁÁÁÁÁÁÁÁÁÁÁÁÁÁÁ
ÁÁÁÁÁ
ÁÁÁÁÁÁÁ
ÁÁÁÁÁÁ
ÁÁÁÁ
ÁÁÁÁÁÁÁÁÁÁÁÁÁÁÁÁÁ
ÁÁÁÁÁ
ÁÁÁÁÁÁÁ
ÁÁÁÁÁÁ
ÁÁÁÁ
ÁÁÁÁÁÁÁÁÁÁÁÁÁÁÁÁÁÁÁÁÁÁÁÁÁÁÁÁÁ
ÁÁÁÁÁÁ
ÁÁÁÁ
ÁÁÁÁÁÁÁÁÁÁÁÁÁÁÁÁÁ
ÁÁÁÁÁ
ÁÁÁÁÁÁÁ
ÁÁÁÁÁÁ
ÁÁÁÁ
ÁÁÁÁÁÁÁÁÁÁÁÁÁÁÁÁÁ
ÁÁÁÁÁ
ÁÁÁÁÁÁÁ
ÁÁÁÁÁÁ
ÁÁÁÁ
ÁÁÁÁÁÁÁÁÁÁÁÁÁÁÁÁÁ
ÁÁÁÁÁ
ÁÁÁÁÁÁÁ
ÁÁÁÁÁÁ
ÁÁÁÁ
ÁÁÁÁÁÁÁÁÁÁÁÁÁÁÁÁÁ
ÁÁÁÁÁ
ÁÁÁÁÁÁÁ
ÁÁÁÁÁÁ
ÁÁÁÁ
ÁÁÁÁÁÁÁÁÁÁÁÁÁÁÁÁÁÁÁÁÁÁÁÁÁÁÁÁÁ
ÁÁÁÁÁÁ
ÁÁÁÁ
ÁÁÁÁÁÁÁÁÁÁÁÁÁÁÁÁÁ
ÁÁÁÁÁ
ÁÁÁÁÁÁÁ
ÁÁÁÁÁÁ
ÁÁÁÁÁ
ÁÁÁÁÁÁÁ
ÁÁÁÁ
ÁÁÁÁÁÁÁÁÁÁÁÁÁÁÁÁÁ
ÁÁÁÁÁÁ
ÁÁÁÁÁÁÁÁÁÁÁÁÁÁÁÁÁÁÁÁÁ
ÁÁÁÁÁ
ÁÁÁÁÁÁÁ
ÁÁÁÁÁÁ
ÁÁÁÁ
ÁÁÁÁÁÁÁÁÁÁÁÁÁÁÁÁÁ
ÁÁÁÁÁ
ÁÁÁÁÁÁÁ
ÁÁÁÁÁÁ
ÁÁÁÁ
ÁÁÁÁÁÁÁÁÁÁÁÁÁÁÁÁÁ
ÁÁÁÁÁÁ
ÁÁÁÁÁ
ÁÁÁÁÁÁÁ
ÁÁÁÁÁÁÁÁÁÁÁÁÁÁÁÁÁÁÁÁÁ
ÁÁÁÁÁ
ÁÁÁÁÁÁÁ
ÁÁÁÁÁÁ
ÁÁÁÁ
ÁÁÁÁÁÁÁÁÁÁÁÁÁÁÁÁÁ
ÁÁÁÁÁ
ÁÁÁÁÁÁÁ
ÁÁÁÁÁÁ
ÁÁÁÁ
ÁÁÁÁÁÁÁÁÁÁÁÁÁÁÁÁÁ
ÁÁÁÁÁÁÁÁÁÁÁÁ
ÁÁÁÁÁÁ
Step
Action
Value(s)
Yes
No
1
1. Disconnect the negative battery cable.
2. Wait 1 minute for the SDM capacitor to discharge.
3. Examine the wiring and the connector at the
driver side airbag module and the driver
pretensioner module.
Is the connector disconnected?
–
Go to Step 2
Go to Step 3
1. Reconnect the driver side airbag module and the
driver pretensioner module.
2. Reconnect the negative battery cable.
Is the repair complete?
–
Go to
Diagnostic
System Check
–
1. Disconnect the electrical connector for the driver
side airbag module and the driver pretensioner
module.
2. Disconnect the electrical connector at the SDM.
D The shorting bar at the disconnected SDM
connector will create a complete circuit between the wires from the driver airbag module
and the driver pretensioner module.
3. Connect an ohmmeter to the terminals on the
SDM side of the wiring harness connector for the
driver pretensioner module.
D Refer to ‘‘Diagnostic Illustration 16’’ in this
section.
Does the ohmmeter show the specified value?
≈0W
Go to Step 4
Go to Step 6
–
Go to Step 5
System OK
–
Go to
Diagnostic
System Check
–
–
Go to
Diagnostic
System Check
–
2
3
4
5
6
DAEWOO M-150 BL2
1. Replace the SDM.
2. Reconnect the negative battery cable.
3. Set the scan tool for CODE ERASE.
4. Do the diagnostic system check.
Does the code 18 still show as a current fault?
1. Replace the driver pretensioner module.
2. Reconnect the negative battery cable.
Is the repair complete?
1. Replace the supplemental inflatable restraints
(SIR) wiring harness.
2. Reconnect the negative battery cable.
Is the repair complete?
8B – 48 SUPPLEMENTAL INFLATABLE RESTRAINTS (SIR)
D1AB302B
DIAGNOSTIC TROUBLE CODE (DTC) 19
CONNECTION BETWEEN DRIVER FIRING CIRCUIT AND PASSENGER
PRETENSIONER CIRCUIT
Open Circuit
Circuit Description
When the ignition switch is turned ON, the sensing and
diagnostic module (SDM) will perform tests to diagnose
any malfunctions within itself.
After passing these tests, the SDM will check the driver
airbag and the passenger pretensioner circuit. The SDM
allows a very small amount of current to flow through the
circuit. The SDM monitors the circuit resistance during
this check.
DTC 19 Will Set When
D Connection between the drive firing circuit and the
passenger pretensioner circuit or SDM internal connection problem may exist.
Test Description
Caution: Before testing, disconnect the negative
battery cable. Wait 1 minute for the SDM capacitor
to discharge. The capacitor supplies reserve power
to deploy the airbags, even if the battery is disconnected. Unintentional deployment of the airbags
can cause injury.
Caution: Never measure the resistance of an airbag
module. If the anti-deployment shorting bar on the
module-side of the connector is not working properly, the meter’s battery can deploy the airbag and
cause injury.
DAEWOO M-150 BL2
SUPPLEMENTAL INFLATABLE RESTRAINTS (SIR) 8B – 49
DTC 19 – Connection Between Driver Firing Circuit and Passenger Pretensioner Circuit
ÁÁÁÁÁÁÁÁÁÁÁÁÁÁÁÁÁÁÁÁÁ
ÁÁÁÁÁ
ÁÁÁÁÁÁÁ
ÁÁÁÁÁÁ
ÁÁÁÁÁÁÁÁÁÁÁÁÁÁÁÁÁÁÁÁÁ
ÁÁÁÁÁ
ÁÁÁÁÁÁÁ
ÁÁÁÁÁÁ
ÁÁÁÁ
ÁÁÁÁÁÁÁÁÁÁÁÁÁÁÁÁÁ
ÁÁÁÁÁ
ÁÁÁÁÁÁÁ
ÁÁÁÁÁÁ
ÁÁÁÁ
ÁÁÁÁÁÁÁÁÁÁÁÁÁÁÁÁÁ
ÁÁÁÁÁ
ÁÁÁÁÁÁÁ
ÁÁÁÁÁÁ
ÁÁÁÁ
ÁÁÁÁÁÁÁÁÁÁÁÁÁÁÁÁÁÁÁÁÁÁÁÁÁÁÁÁÁ
ÁÁÁÁÁÁ
ÁÁÁÁ
ÁÁÁÁÁÁÁÁÁÁÁÁÁÁÁÁÁ
ÁÁÁÁÁ
ÁÁÁÁÁÁÁ
ÁÁÁÁÁÁ
ÁÁÁÁÁ
ÁÁÁÁÁÁÁ
ÁÁÁÁ
ÁÁÁÁÁÁÁÁÁÁÁÁÁÁÁÁÁ
ÁÁÁÁÁÁ
ÁÁÁÁ
ÁÁÁÁÁÁÁÁÁÁÁÁÁÁÁÁÁ
ÁÁÁÁÁ
ÁÁÁÁÁÁÁ
ÁÁÁÁÁÁ
ÁÁÁÁ
ÁÁÁÁÁÁÁÁÁÁÁÁÁÁÁÁÁ
ÁÁÁÁÁ
ÁÁÁÁÁÁÁ
ÁÁÁÁÁÁ
ÁÁÁÁÁ
ÁÁÁÁÁÁÁ
ÁÁÁÁ
ÁÁÁÁÁÁÁÁÁÁÁÁÁÁÁÁÁ
ÁÁÁÁÁÁ
ÁÁÁÁ
ÁÁÁÁÁÁÁÁÁÁÁÁÁÁÁÁÁ
ÁÁÁÁÁ
ÁÁÁÁÁÁÁ
ÁÁÁÁÁÁ
ÁÁÁÁ
ÁÁÁÁÁÁÁÁÁÁÁÁÁÁÁÁÁ
ÁÁÁÁÁ
ÁÁÁÁÁÁÁ
ÁÁÁÁÁÁ
ÁÁÁÁ
ÁÁÁÁÁÁÁÁÁÁÁÁÁÁÁÁÁÁÁÁÁÁÁÁÁÁÁÁÁ
ÁÁÁÁÁÁ
ÁÁÁÁ
ÁÁÁÁÁÁÁÁÁÁÁÁÁÁÁÁÁ
ÁÁÁÁÁÁ
ÁÁÁÁ
ÁÁÁÁÁÁÁÁÁÁÁÁÁÁÁÁÁÁÁÁÁÁ
ÁÁÁÁÁÁÁÁÁÁÁÁ
ÁÁÁÁÁÁÁ
ÁÁÁÁÁÁ
ÁÁÁÁ
ÁÁÁÁÁÁÁÁÁÁÁÁÁÁÁÁÁ
ÁÁÁÁÁ
ÁÁÁÁÁÁÁ
ÁÁÁÁÁÁ
ÁÁÁÁ
ÁÁÁÁÁÁÁÁÁÁÁÁÁÁÁÁÁ
ÁÁÁÁÁ
ÁÁÁÁÁÁÁ
ÁÁÁÁÁÁ
ÁÁÁÁ
ÁÁÁÁÁÁÁÁÁÁÁÁÁÁÁÁÁÁÁÁÁÁÁÁÁÁÁÁÁ
ÁÁÁÁÁÁ
ÁÁÁÁ
ÁÁÁÁÁÁÁÁÁÁÁÁÁÁÁÁÁ
ÁÁÁÁÁ
ÁÁÁÁÁÁÁ
ÁÁÁÁÁÁ
ÁÁÁÁ
ÁÁÁÁÁÁÁÁÁÁÁÁÁÁÁÁÁ
ÁÁÁÁÁ
ÁÁÁÁÁÁÁ
ÁÁÁÁÁÁ
ÁÁÁÁ
ÁÁÁÁÁÁÁÁÁÁÁÁÁÁÁÁÁ
ÁÁÁÁÁ
ÁÁÁÁÁÁÁ
ÁÁÁÁÁÁ
ÁÁÁÁ
ÁÁÁÁÁÁÁÁÁÁÁÁÁÁÁÁÁ
ÁÁÁÁÁ
ÁÁÁÁÁÁÁ
ÁÁÁÁÁÁ
ÁÁÁÁ
ÁÁÁÁÁÁÁÁÁÁÁÁÁÁÁÁÁÁÁÁÁÁÁÁÁÁÁÁÁ
ÁÁÁÁÁÁ
ÁÁÁÁ
ÁÁÁÁÁÁÁÁÁÁÁÁÁÁÁÁÁ
ÁÁÁÁÁ
ÁÁÁÁÁÁÁ
ÁÁÁÁÁÁ
ÁÁÁÁÁ
ÁÁÁÁÁÁÁ
ÁÁÁÁ
ÁÁÁÁÁÁÁÁÁÁÁÁÁÁÁÁÁ
ÁÁÁÁÁÁ
ÁÁÁÁÁÁÁÁÁÁÁÁÁÁÁÁÁÁÁÁÁ
ÁÁÁÁÁ
ÁÁÁÁÁÁÁ
ÁÁÁÁÁÁ
ÁÁÁÁ
ÁÁÁÁÁÁÁÁÁÁÁÁÁÁÁÁÁ
ÁÁÁÁÁ
ÁÁÁÁÁÁÁ
ÁÁÁÁÁÁ
ÁÁÁÁ
ÁÁÁÁÁÁÁÁÁÁÁÁÁÁÁÁÁ
ÁÁÁÁÁÁ
ÁÁÁÁÁ
ÁÁÁÁÁÁÁ
ÁÁÁÁÁÁÁÁÁÁÁÁÁÁÁÁÁÁÁÁÁ
ÁÁÁÁÁ
ÁÁÁÁÁÁÁ
ÁÁÁÁÁÁ
ÁÁÁÁ
ÁÁÁÁÁÁÁÁÁÁÁÁÁÁÁÁÁ
ÁÁÁÁÁ
ÁÁÁÁÁÁÁ
ÁÁÁÁÁÁ
ÁÁÁÁ
ÁÁÁÁÁÁÁÁÁÁÁÁÁÁÁÁÁ
ÁÁÁÁÁÁÁÁÁÁÁÁ
ÁÁÁÁÁÁ
Step
Action
Value(s)
Yes
No
1
1. Disconnect the negative battery cable.
2. Wait 1 minute for the SDM capacitor to discharge.
3. Examine the wiring and the connector at the
driver side airbag module and the passenger
pretensioner module.
Is the connector disconnected?
–
Go to Step 2
Go to Step 3
1. Reconnect the driver side airbag module and the
passenger pretensioner module connector.
2. Reconnect the negative battery cable.
Is the repair complete?
–
Go to
Diagnostic
System Check
–
1. Disconnect the electrical connector for the driver
side airbag module and the passenger
pretensioner module.
2. Disconnect the electrical connector at the SDM.
D The shorting bar at the disconnected SDM
connector will create a complete circuit between the wires from the driver airbag module
and the passenger pretensioner module.
3. Connect an ohmmeter to the terminals on the
SDM side of the wiring harness connector for the
passenger pretensioner module.
D Refer to ‘‘Diagnostic Illustration 19’’ in this
section.
Does the ohmmeter show the specified value?
≈0W
Go to Step 4
Go to Step 6
–
Go to Step 5
System OK
–
Go to
Diagnostic
System Check
–
–
Go to
Diagnostic
System Check
–
2
3
4
5
6
DAEWOO M-150 BL2
1. Replace the SDM.
2. Reconnect the negative battery cable.
3. Set the scan tool for CODE ERASE.
4. Do the diagnostic system check.
Does the code 19 still show as a current fault?
1. Replace the passenger pretensioner module.
2. Reconnect the negative battery cable.
Is the repair complete?
1. Replace the supplemental inflatable restraints
(SIR) wiring harness.
2. Reconnect the negative battery cable.
Is the repair complete?
8B – 50 SUPPLEMENTAL INFLATABLE RESTRAINTS (SIR)
D1AB302B
DIAGNOSTIC TROUBLE CODE (DTC) 20
CONNECTION BETWEEN PASSENGER FIRING CIRCUIT AND DRIVER
PRETENSIONER CIRCUIT
Open Circuit
Circuit Description
When the ignition switch is turned ON, the sensing and
diagnostic module (SDM) will perform tests to diagnose
any malfunctions within itself.
After passing these tests, the SDM will check the
passenger airbag and the driver pretensioner circuit.
The SDM allows a very small amount of current to flow
through the circuit. The SDM monitors the circuit resistance during this check.
DTC 20 Will Set When
D Connection between the passenger firing circuit and
the driver pretensioner circuit or SDM internal connection problem may exist.
Test Description
Caution: Before testing, disconnect the negative
battery cable. Wait 1 minute for the SDM capacitor
to discharge. The capacitor supplies reserve power
to deploy the airbags, even if the battery is disconnected. Unintentional deployment of the airbags
can cause injury.
Caution: Never measure the resistance of an airbag
module. If the anti-deployment shorting bar on the
module-side of the connector is not working properly, the meter’s battery can deploy the airbag and
cause injury.
DAEWOO M-150 BL2
SUPPLEMENTAL INFLATABLE RESTRAINTS (SIR) 8B – 51
DTC 20 – Connection Between Passenger Firing Circuit and Driver Pretensioner Circuit
ÁÁÁÁÁÁÁÁÁÁÁÁÁÁÁÁÁÁÁÁÁ
ÁÁÁÁÁ
ÁÁÁÁÁÁÁ
ÁÁÁÁÁÁ
ÁÁÁÁÁÁÁÁÁÁÁÁÁÁÁÁÁÁÁÁÁ
ÁÁÁÁÁ
ÁÁÁÁÁÁÁ
ÁÁÁÁÁÁ
ÁÁÁÁ
ÁÁÁÁÁÁÁÁÁÁÁÁÁÁÁÁÁ
ÁÁÁÁÁ
ÁÁÁÁÁÁÁ
ÁÁÁÁÁÁ
ÁÁÁÁ
ÁÁÁÁÁÁÁÁÁÁÁÁÁÁÁÁÁ
ÁÁÁÁÁ
ÁÁÁÁÁÁÁ
ÁÁÁÁÁÁ
ÁÁÁÁ
ÁÁÁÁÁÁÁÁÁÁÁÁÁÁÁÁÁÁÁÁÁÁÁÁÁÁÁÁÁ
ÁÁÁÁÁÁ
ÁÁÁÁ
ÁÁÁÁÁÁÁÁÁÁÁÁÁÁÁÁÁ
ÁÁÁÁÁ
ÁÁÁÁÁÁÁ
ÁÁÁÁÁÁ
ÁÁÁÁÁ
ÁÁÁÁÁÁÁ
ÁÁÁÁ
ÁÁÁÁÁÁÁÁÁÁÁÁÁÁÁÁÁ
ÁÁÁÁÁÁ
ÁÁÁÁ
ÁÁÁÁÁÁÁÁÁÁÁÁÁÁÁÁÁ
ÁÁÁÁÁ
ÁÁÁÁÁÁÁ
ÁÁÁÁÁÁ
ÁÁÁÁ
ÁÁÁÁÁÁÁÁÁÁÁÁÁÁÁÁÁ
ÁÁÁÁÁ
ÁÁÁÁÁÁÁ
ÁÁÁÁÁÁ
ÁÁÁÁÁ
ÁÁÁÁÁÁÁ
ÁÁÁÁ
ÁÁÁÁÁÁÁÁÁÁÁÁÁÁÁÁÁ
ÁÁÁÁÁÁ
ÁÁÁÁ
ÁÁÁÁÁÁÁÁÁÁÁÁÁÁÁÁÁ
ÁÁÁÁÁ
ÁÁÁÁÁÁÁ
ÁÁÁÁÁÁ
ÁÁÁÁ
ÁÁÁÁÁÁÁÁÁÁÁÁÁÁÁÁÁ
ÁÁÁÁÁ
ÁÁÁÁÁÁÁ
ÁÁÁÁÁÁ
ÁÁÁÁ
ÁÁÁÁÁÁÁÁÁÁÁÁÁÁÁÁÁÁÁÁÁÁÁÁÁÁÁÁÁ
ÁÁÁÁÁÁ
ÁÁÁÁ
ÁÁÁÁÁÁÁÁÁÁÁÁÁÁÁÁÁ
ÁÁÁÁÁÁ
ÁÁÁÁ
ÁÁÁÁÁÁÁÁÁÁÁÁÁÁÁÁÁÁÁÁÁÁ
ÁÁÁÁÁÁÁÁÁÁÁÁ
ÁÁÁÁÁÁÁ
ÁÁÁÁÁÁ
ÁÁÁÁ
ÁÁÁÁÁÁÁÁÁÁÁÁÁÁÁÁÁ
ÁÁÁÁÁ
ÁÁÁÁÁÁÁ
ÁÁÁÁÁÁ
ÁÁÁÁ
ÁÁÁÁÁÁÁÁÁÁÁÁÁÁÁÁÁ
ÁÁÁÁÁ
ÁÁÁÁÁÁÁ
ÁÁÁÁÁÁ
ÁÁÁÁ
ÁÁÁÁÁÁÁÁÁÁÁÁÁÁÁÁÁÁÁÁÁÁÁÁÁÁÁÁÁ
ÁÁÁÁÁÁ
ÁÁÁÁ
ÁÁÁÁÁÁÁÁÁÁÁÁÁÁÁÁÁ
ÁÁÁÁÁ
ÁÁÁÁÁÁÁ
ÁÁÁÁÁÁ
ÁÁÁÁ
ÁÁÁÁÁÁÁÁÁÁÁÁÁÁÁÁÁ
ÁÁÁÁÁ
ÁÁÁÁÁÁÁ
ÁÁÁÁÁÁ
ÁÁÁÁ
ÁÁÁÁÁÁÁÁÁÁÁÁÁÁÁÁÁ
ÁÁÁÁÁ
ÁÁÁÁÁÁÁ
ÁÁÁÁÁÁ
ÁÁÁÁ
ÁÁÁÁÁÁÁÁÁÁÁÁÁÁÁÁÁ
ÁÁÁÁÁ
ÁÁÁÁÁÁÁ
ÁÁÁÁÁÁ
ÁÁÁÁ
ÁÁÁÁÁÁÁÁÁÁÁÁÁÁÁÁÁÁÁÁÁÁÁÁÁÁÁÁÁ
ÁÁÁÁÁÁ
ÁÁÁÁ
ÁÁÁÁÁÁÁÁÁÁÁÁÁÁÁÁÁ
ÁÁÁÁÁ
ÁÁÁÁÁÁÁ
ÁÁÁÁÁÁ
ÁÁÁÁÁ
ÁÁÁÁÁÁÁ
ÁÁÁÁ
ÁÁÁÁÁÁÁÁÁÁÁÁÁÁÁÁÁ
ÁÁÁÁÁÁ
ÁÁÁÁÁÁÁÁÁÁÁÁÁÁÁÁÁÁÁÁÁ
ÁÁÁÁÁ
ÁÁÁÁÁÁÁ
ÁÁÁÁÁÁ
ÁÁÁÁ
ÁÁÁÁÁÁÁÁÁÁÁÁÁÁÁÁÁ
ÁÁÁÁÁ
ÁÁÁÁÁÁÁ
ÁÁÁÁÁÁ
ÁÁÁÁ
ÁÁÁÁÁÁÁÁÁÁÁÁÁÁÁÁÁ
ÁÁÁÁÁÁ
ÁÁÁÁÁ
ÁÁÁÁÁÁÁ
ÁÁÁÁÁÁÁÁÁÁÁÁÁÁÁÁÁÁÁÁÁ
ÁÁÁÁÁ
ÁÁÁÁÁÁÁ
ÁÁÁÁÁÁ
ÁÁÁÁ
ÁÁÁÁÁÁÁÁÁÁÁÁÁÁÁÁÁ
ÁÁÁÁÁ
ÁÁÁÁÁÁÁ
ÁÁÁÁÁÁ
ÁÁÁÁ
ÁÁÁÁÁÁÁÁÁÁÁÁÁÁÁÁÁ
ÁÁÁÁÁÁÁÁÁÁÁÁ
ÁÁÁÁÁÁ
Step
Action
Value(s)
Yes
No
1
1. Disconnect the negative battery cable.
2. Wait 1 minute for the SDM capacitor to discharge.
3. Examine the wiring and the connector at the
passenger side airbag module and the driver
pretensioner module.
Is the connector disconnected?
–
Go to Step 2
Go to Step 3
1. Reconnect the passenger side airbag module and
the driver pretensioner module connector.
2. Reconnect the negative battery cable.
Is the repair complete?
–
Go to
Diagnostic
System Check
–
1. Disconnect the electrical connector for the
passenger side airbag module and the driver
pretensioner module.
2. Disconnect the electrical connector at the SDM.
D The shorting bar at the disconnected SDM
connector will create a complete circuit between the wires from the passenger airbag
module and the driver pretensioner module.
3. Connect an ohmmeter to the terminals on the
SDM side of the wiring harness connector for the
driver pretensioner module.
D Refer to ‘‘Diagnostic Illustration 16’’ in this
section.
Does the ohmmeter show the specified value?
≈0W
Go to Step 4
Go to Step 6
–
Go to Step 5
System OK
–
Go to
Diagnostic
System Check
–
–
Go to
Diagnostic
System Check
–
2
3
4
5
6
DAEWOO M-150 BL2
1. Replace the SDM.
2. Reconnect the negative battery cable.
3. Set the scan tool for CODE ERASE.
4. Do the diagnostic system check.
Does the code 20 still show as a current fault?
1. Replace the driver pretensioner module.
2. Reconnect the negative battery cable.
Is the repair complete?
1. Replace the supplemental inflatable restraints
(SIR) wiring harness.
2. Reconnect the negative battery cable.
Is the repair complete?
8B – 52 SUPPLEMENTAL INFLATABLE RESTRAINTS (SIR)
D1AB302B
DIAGNOSTIC TROUBLE CODE (DTC) 21
CONNECTION BETWEEN PASSENGER FIRING CIRCUIT AND PASSENGER
PRETENSIONER CIRCUIT
Open Circuit
Circuit Description
When the ignition switch is turned ON, the sensing and
diagnostic module (SDM) will perform tests to diagnose
any malfunctions within itself.
After passing these tests, the SDM will check the
passenger airbag and the passenger circuit. The SDM
allows a very small amount of current to flow through the
circuit. The SDM monitors the circuit resistance during
this check.
DTC 21 Will Set When
D Connection between the passenger firing circuit and
the passenger pretensioner circuit or SDM internal
connection problem may exist.
Test Description
Caution: Before testing, disconnect the negative
battery cable. Wait 1 minute for the SDM capacitor
to discharge. The capacitor supplies reserve power
to deploy the airbags, even if the battery is disconnected. Unintentional deployment of the airbags
can cause injury.
Caution: Never measure the resistance of an airbag
module. If the anti-deployment shorting bar on the
module-side of the connector is not working properly, the meter’s battery can deploy the airbag and
cause injury.
DAEWOO M-150 BL2
SUPPLEMENTAL INFLATABLE RESTRAINTS (SIR) 8B – 53
DTC 21 – Connection Between Passenger Firing Circuit and Passenger Pretensioner
Circuit
ÁÁÁÁ
ÁÁÁÁÁ
ÁÁÁÁÁÁÁ
ÁÁÁÁÁÁ
ÁÁÁÁÁÁÁÁÁÁÁÁÁÁÁÁÁÁÁÁÁ
ÁÁÁÁÁÁÁÁÁÁÁÁÁÁÁÁÁ
ÁÁÁÁÁ
ÁÁÁÁÁÁÁ
ÁÁÁÁÁÁ
ÁÁÁÁ
ÁÁÁÁÁÁÁÁÁÁÁÁÁÁÁÁÁ
ÁÁÁÁÁ
ÁÁÁÁÁÁÁ
ÁÁÁÁÁÁ
ÁÁÁÁ
ÁÁÁÁÁÁÁÁÁÁÁÁÁÁÁÁÁÁÁÁÁÁÁÁÁÁÁÁÁ
ÁÁÁÁÁÁ
ÁÁÁÁ
ÁÁÁÁÁÁÁÁÁÁÁÁÁÁÁÁÁÁÁÁÁÁÁÁÁÁÁÁÁ
ÁÁÁÁÁÁ
ÁÁÁÁ
ÁÁÁÁÁÁÁÁÁÁÁÁÁÁÁÁÁ
ÁÁÁÁÁ
ÁÁÁÁÁÁÁ
ÁÁÁÁÁÁ
ÁÁÁÁÁ
ÁÁÁÁÁÁÁ
ÁÁÁÁ
ÁÁÁÁÁÁÁÁÁÁÁÁÁÁÁÁÁ
ÁÁÁÁÁÁ
ÁÁÁÁ
ÁÁÁÁÁÁÁÁÁÁÁÁÁÁÁÁÁ
ÁÁÁÁÁ
ÁÁÁÁÁÁÁ
ÁÁÁÁÁÁ
ÁÁÁÁ
ÁÁÁÁÁÁÁÁÁÁÁÁÁÁÁÁÁ
ÁÁÁÁÁ
ÁÁÁÁÁÁÁ
ÁÁÁÁÁÁ
ÁÁÁÁÁ
ÁÁÁÁÁÁÁ
ÁÁÁÁ
ÁÁÁÁÁÁÁÁÁÁÁÁÁÁÁÁÁ
ÁÁÁÁÁÁ
ÁÁÁÁ
ÁÁÁÁÁÁÁÁÁÁÁÁÁÁÁÁÁ
ÁÁÁÁÁ
ÁÁÁÁÁÁÁ
ÁÁÁÁÁÁ
ÁÁÁÁ
ÁÁÁÁÁÁÁÁÁÁÁÁÁÁÁÁÁÁÁÁÁÁÁÁÁÁÁÁÁ
ÁÁÁÁÁÁ
ÁÁÁÁ
ÁÁÁÁÁÁÁÁÁÁÁÁÁÁÁÁÁ
ÁÁÁÁÁÁ
ÁÁÁÁ
ÁÁÁÁÁÁÁÁÁÁÁÁÁÁÁÁÁÁÁÁÁÁ
ÁÁÁÁÁÁÁÁÁÁÁÁ
ÁÁÁÁÁÁÁ
ÁÁÁÁÁÁ
ÁÁÁÁ
ÁÁÁÁÁÁÁÁÁÁÁÁÁÁÁÁÁ
ÁÁÁÁÁ
ÁÁÁÁÁÁÁ
ÁÁÁÁÁÁ
ÁÁÁÁ
ÁÁÁÁÁÁÁÁÁÁÁÁÁÁÁÁÁ
ÁÁÁÁÁ
ÁÁÁÁÁÁÁ
ÁÁÁÁÁÁ
ÁÁÁÁ
ÁÁÁÁÁÁÁÁÁÁÁÁÁÁÁÁÁÁÁÁÁÁÁÁÁÁÁÁÁ
ÁÁÁÁÁÁ
ÁÁÁÁ
ÁÁÁÁÁÁÁÁÁÁÁÁÁÁÁÁÁ
ÁÁÁÁÁ
ÁÁÁÁÁÁÁ
ÁÁÁÁÁÁ
ÁÁÁÁ
ÁÁÁÁÁÁÁÁÁÁÁÁÁÁÁÁÁ
ÁÁÁÁÁ
ÁÁÁÁÁÁÁ
ÁÁÁÁÁÁ
ÁÁÁÁ
ÁÁÁÁÁÁÁÁÁÁÁÁÁÁÁÁÁ
ÁÁÁÁÁ
ÁÁÁÁÁÁÁ
ÁÁÁÁÁÁ
ÁÁÁÁ
ÁÁÁÁÁÁÁÁÁÁÁÁÁÁÁÁÁ
ÁÁÁÁÁ
ÁÁÁÁÁÁÁ
ÁÁÁÁÁÁ
ÁÁÁÁ
ÁÁÁÁÁÁÁÁÁÁÁÁÁÁÁÁÁ
ÁÁÁÁÁÁ
ÁÁÁÁÁ
ÁÁÁÁÁÁÁ
ÁÁÁÁ
ÁÁÁÁÁÁÁÁÁÁÁÁÁÁÁÁÁ
ÁÁÁÁÁ
ÁÁÁÁÁÁÁ
ÁÁÁÁÁÁ
ÁÁÁÁ
ÁÁÁÁÁÁÁÁÁÁÁÁÁÁÁÁÁ
ÁÁÁÁÁ
ÁÁÁÁÁÁÁ
ÁÁÁÁÁÁ
ÁÁÁÁ
ÁÁÁÁÁÁÁÁÁÁÁÁÁÁÁÁÁÁÁÁÁÁÁÁÁÁÁÁÁ
ÁÁÁÁÁÁ
ÁÁÁÁÁ
ÁÁÁÁÁÁÁ
ÁÁÁÁ
ÁÁÁÁÁÁÁÁÁÁÁÁÁÁÁÁÁ
ÁÁÁÁÁÁ
ÁÁÁÁ
ÁÁÁÁÁÁÁÁÁÁÁÁÁÁÁÁÁ
ÁÁÁÁÁ
ÁÁÁÁÁÁÁ
ÁÁÁÁÁÁ
ÁÁÁÁ
ÁÁÁÁÁÁÁÁÁÁÁÁÁÁÁÁÁÁÁÁÁÁÁÁÁÁÁÁÁ
ÁÁÁÁÁÁ
ÁÁÁÁÁ
ÁÁÁÁÁÁÁ
ÁÁÁÁ
ÁÁÁÁÁÁÁÁÁÁÁÁÁÁÁÁÁ
ÁÁÁÁÁÁ
ÁÁÁÁÁÁÁÁÁÁÁÁÁÁÁÁÁÁÁÁÁ
ÁÁÁÁÁ
ÁÁÁÁÁÁÁ
ÁÁÁÁÁÁ
ÁÁÁÁ
ÁÁÁÁÁÁÁÁÁÁÁÁÁÁÁÁÁ
ÁÁÁÁÁ
ÁÁÁÁÁÁÁ
ÁÁÁÁÁÁ
ÁÁÁÁ
ÁÁÁÁÁÁÁÁÁÁÁÁÁÁÁÁÁ
ÁÁÁÁÁÁÁÁÁÁÁÁ
ÁÁÁÁÁÁ
Step
Action
Value(s)
Yes
No
1
1. Disconnect the negative battery cable.
2. Wait 1 minute for the SDM capacitor to discharge.
3. Examine the wiring and the connector at the
passenger side airbag module and the passenger
pretensioner module.
Is the connector disconnected?
–
Go to Step 2
Go to Step 3
2
1. Reconnect the passenger side airbag module and
the passenger pretensioner module connector.
2. Reconnect the negative battery cable.
Is the repair complete?
–
Go to
Diagnostic
System Check
–
3
1. Disconnect the electrical connector for the
passenger side airbag module and the passenger
pretensioner module.
2. Disconnect the electrical connector at the SDM.
D The shorting bar at the disconnected SDM
connector will create a complete circuit between the wires from the passenger airbag
module and the passenger pretensioner module.
3. Connect an ohmmeter to the terminals on the
SDM side of the wiring harness connector for the
passenger pretensioner module.
D Refer to ‘‘Diagnostic Illustration 19’’ in this
section.
Does the ohmmeter show the specified value?
≈0W
Go to Step 4
Go to Step 6
–
Go to Step 5
System OK
–
Go to
Diagnostic
System Check
–
–
Go to
Diagnostic
System Check
–
4
5
6
DAEWOO M-150 BL2
1. Replace the SDM.
2. Reconnect the negative battery cable.
3. Set the scan tool for CODE ERASE.
4. Do the diagnostic system check.
Does the code 21 still show as a current fault?
1. Replace the passenger pretensioner module.
2. Reconnect the negative battery cable.
Is the repair complete?
1. Replace the supplemental inflatable restraints
(SIR) wiring harness.
2. Reconnect the negative battery cable.
Is the repair complete?
8B – 54 SUPPLEMENTAL INFLATABLE RESTRAINTS (SIR)
D1AB302B
DIAGNOSTIC TROUBLE CODE (DTC) 22
CONNECTION BETWEEN DRIVER PRETENSIONER CIRCUIT AND PASSENGER
PRETENSIONER CIRCUIT
Open Circuit
Circuit Description
When the ignition switch is turned ON, the sensing and
diagnostic module (SDM) will perform tests to diagnose
any malfunctions within itself.
After passing these tests, the SDM will check the driver
pretensioner and the passenger pretensioner circuit.
The SDM allows a very small amount of current to flow
through the circuit. The SDM monitors the circuit resistance during this check.
DTC 22 Will Set When
D Connection between the driver pretensioner circuit
and the passenger pretensioner circuit or SDM internal connection problem may exist.
Test Description
Caution: Before testing, disconnect the negative
battery cable. Wait 1 minute for the SDM capacitor
to discharge. The capacitor supplies reserve power
to deploy the airbags, even if the battery is disconnected. Unintentional deployment of the airbags
can cause injury.
Caution: Never measure the resistance of an airbag
module. If the anti-deployment shorting bar on the
module-side of the connector is not working properly, the meter’s battery can deploy the airbag and
cause injury.
DAEWOO M-150 BL2
SUPPLEMENTAL INFLATABLE RESTRAINTS (SIR) 8B – 55
DTC 22 – Connection Between Driver Pretensioner Circuit and Passenger Pretensioner
Circuit
ÁÁÁÁ
ÁÁÁÁÁ
ÁÁÁÁÁÁÁ
ÁÁÁÁÁÁ
ÁÁÁÁÁÁÁÁÁÁÁÁÁÁÁÁÁÁÁÁÁ
ÁÁÁÁÁÁÁÁÁÁÁÁÁÁÁÁÁ
ÁÁÁÁÁ
ÁÁÁÁÁÁÁ
ÁÁÁÁÁÁ
ÁÁÁÁ
ÁÁÁÁÁÁÁÁÁÁÁÁÁÁÁÁÁ
ÁÁÁÁÁ
ÁÁÁÁÁÁÁ
ÁÁÁÁÁÁ
ÁÁÁÁ
ÁÁÁÁÁÁÁÁÁÁÁÁÁÁÁÁÁÁÁÁÁÁÁÁÁÁÁÁÁ
ÁÁÁÁÁÁ
ÁÁÁÁ
ÁÁÁÁÁÁÁÁÁÁÁÁÁÁÁÁÁÁÁÁÁÁÁÁÁÁÁÁÁ
ÁÁÁÁÁÁ
ÁÁÁÁ
ÁÁÁÁÁÁÁÁÁÁÁÁÁÁÁÁÁ
ÁÁÁÁÁ
ÁÁÁÁÁÁÁ
ÁÁÁÁÁÁ
ÁÁÁÁÁ
ÁÁÁÁÁÁÁ
ÁÁÁÁ
ÁÁÁÁÁÁÁÁÁÁÁÁÁÁÁÁÁ
ÁÁÁÁÁÁ
ÁÁÁÁ
ÁÁÁÁÁÁÁÁÁÁÁÁÁÁÁÁÁ
ÁÁÁÁÁ
ÁÁÁÁÁÁÁ
ÁÁÁÁÁÁ
ÁÁÁÁ
ÁÁÁÁÁÁÁÁÁÁÁÁÁÁÁÁÁ
ÁÁÁÁÁ
ÁÁÁÁÁÁÁ
ÁÁÁÁÁÁ
ÁÁÁÁÁ
ÁÁÁÁÁÁÁ
ÁÁÁÁ
ÁÁÁÁÁÁÁÁÁÁÁÁÁÁÁÁÁ
ÁÁÁÁÁÁ
ÁÁÁÁ
ÁÁÁÁÁÁÁÁÁÁÁÁÁÁÁÁÁ
ÁÁÁÁÁ
ÁÁÁÁÁÁÁ
ÁÁÁÁÁÁ
ÁÁÁÁ
ÁÁÁÁÁÁÁÁÁÁÁÁÁÁÁÁÁÁÁÁÁÁÁÁÁÁÁÁÁ
ÁÁÁÁÁÁ
ÁÁÁÁ
ÁÁÁÁÁÁÁÁÁÁÁÁÁÁÁÁÁ
ÁÁÁÁÁÁ
ÁÁÁÁ
ÁÁÁÁÁÁÁÁÁÁÁÁÁÁÁÁÁÁÁÁÁÁ
ÁÁÁÁÁÁÁÁÁÁÁÁ
ÁÁÁÁÁÁÁ
ÁÁÁÁÁÁ
ÁÁÁÁ
ÁÁÁÁÁÁÁÁÁÁÁÁÁÁÁÁÁ
ÁÁÁÁÁ
ÁÁÁÁÁÁÁ
ÁÁÁÁÁÁ
ÁÁÁÁ
ÁÁÁÁÁÁÁÁÁÁÁÁÁÁÁÁÁ
ÁÁÁÁÁ
ÁÁÁÁÁÁÁ
ÁÁÁÁÁÁ
ÁÁÁÁ
ÁÁÁÁÁÁÁÁÁÁÁÁÁÁÁÁÁÁÁÁÁÁÁÁÁÁÁÁÁ
ÁÁÁÁÁÁ
ÁÁÁÁ
ÁÁÁÁÁÁÁÁÁÁÁÁÁÁÁÁÁ
ÁÁÁÁÁ
ÁÁÁÁÁÁÁ
ÁÁÁÁÁÁ
ÁÁÁÁ
ÁÁÁÁÁÁÁÁÁÁÁÁÁÁÁÁÁ
ÁÁÁÁÁ
ÁÁÁÁÁÁÁ
ÁÁÁÁÁÁ
ÁÁÁÁ
ÁÁÁÁÁÁÁÁÁÁÁÁÁÁÁÁÁ
ÁÁÁÁÁ
ÁÁÁÁÁÁÁ
ÁÁÁÁÁÁ
ÁÁÁÁ
ÁÁÁÁÁÁÁÁÁÁÁÁÁÁÁÁÁ
ÁÁÁÁÁ
ÁÁÁÁÁÁÁ
ÁÁÁÁÁÁ
ÁÁÁÁ
ÁÁÁÁÁÁÁÁÁÁÁÁÁÁÁÁÁ
ÁÁÁÁÁÁ
ÁÁÁÁÁ
ÁÁÁÁÁÁÁ
ÁÁÁÁ
ÁÁÁÁÁÁÁÁÁÁÁÁÁÁÁÁÁ
ÁÁÁÁÁ
ÁÁÁÁÁÁÁ
ÁÁÁÁÁÁ
ÁÁÁÁ
ÁÁÁÁÁÁÁÁÁÁÁÁÁÁÁÁÁ
ÁÁÁÁÁ
ÁÁÁÁÁÁÁ
ÁÁÁÁÁÁ
ÁÁÁÁ
ÁÁÁÁÁÁÁÁÁÁÁÁÁÁÁÁÁÁÁÁÁÁÁÁÁÁÁÁÁ
ÁÁÁÁÁÁ
ÁÁÁÁ
ÁÁÁÁÁÁÁÁÁÁÁÁÁÁÁÁÁ
ÁÁÁÁÁ
ÁÁÁÁÁÁÁ
ÁÁÁÁÁÁ
ÁÁÁÁ
ÁÁÁÁÁÁÁÁÁÁÁÁÁÁÁÁÁ
ÁÁÁÁÁ
ÁÁÁÁÁÁÁ
ÁÁÁÁÁÁ
ÁÁÁÁ
ÁÁÁÁÁÁÁÁÁÁÁÁÁÁÁÁÁÁÁÁÁÁÁÁÁÁÁÁÁ
ÁÁÁÁÁÁ
ÁÁÁÁ
ÁÁÁÁÁÁÁÁÁÁÁÁÁÁÁÁÁ
ÁÁÁÁÁ
ÁÁÁÁÁÁÁ
ÁÁÁÁÁÁ
ÁÁÁÁ
ÁÁÁÁÁÁÁÁÁÁÁÁÁÁÁÁÁÁÁÁÁÁÁÁÁÁÁÁÁ
ÁÁÁÁÁÁ
ÁÁÁÁ
ÁÁÁÁÁÁÁÁÁÁÁÁÁÁÁÁÁ
ÁÁÁÁÁ
ÁÁÁÁÁÁÁ
ÁÁÁÁÁÁ
ÁÁÁÁ
ÁÁÁÁÁÁÁÁÁÁÁÁÁÁÁÁÁ
ÁÁÁÁÁ
ÁÁÁÁÁÁÁ
ÁÁÁÁÁÁ
ÁÁÁÁÁ
ÁÁÁÁÁÁÁ
ÁÁÁÁ
ÁÁÁÁÁÁÁÁÁÁÁÁÁÁÁÁÁ
ÁÁÁÁÁÁ
ÁÁÁÁ
ÁÁÁÁÁÁÁÁÁÁÁÁÁÁÁÁÁ
ÁÁÁÁÁ
ÁÁÁÁÁÁÁ
ÁÁÁÁÁÁ
ÁÁÁÁ
ÁÁÁÁÁÁÁÁÁÁÁÁÁÁÁÁÁ
ÁÁÁÁÁ
ÁÁÁÁÁÁÁ
ÁÁÁÁÁÁ
ÁÁÁÁ
ÁÁÁÁÁÁÁÁÁÁÁÁÁÁÁÁÁ
ÁÁÁÁÁ
ÁÁÁÁÁÁÁ
ÁÁÁÁÁÁ
ÁÁÁÁ
ÁÁÁÁÁÁÁÁÁÁÁÁÁÁÁÁÁ
ÁÁÁÁÁ
ÁÁÁÁÁÁÁ
ÁÁÁÁÁÁ
ÁÁÁÁ
ÁÁÁÁÁÁÁÁÁÁÁÁÁÁÁÁÁ
ÁÁÁÁÁ
ÁÁÁÁÁÁÁ
ÁÁÁÁÁÁ
ÁÁÁÁ
ÁÁÁÁÁÁÁÁÁÁÁÁÁÁÁÁÁ
ÁÁÁÁÁ
ÁÁÁÁÁÁÁ
ÁÁÁÁÁÁ
ÁÁÁÁ
ÁÁÁÁÁÁÁÁÁÁÁÁÁÁÁÁÁ
ÁÁÁÁÁÁ
ÁÁÁÁÁ
ÁÁÁÁÁÁÁ
ÁÁÁÁ
ÁÁÁÁÁÁÁÁÁÁÁÁÁÁÁÁÁ
ÁÁÁÁÁ
ÁÁÁÁÁÁÁ
ÁÁÁÁÁÁ
ÁÁÁÁ
ÁÁÁÁÁÁÁÁÁÁÁÁÁÁÁÁÁÁÁÁÁÁÁÁÁÁÁÁÁ
ÁÁÁÁÁÁ
ÁÁÁÁ
ÁÁÁÁÁÁÁÁÁÁÁÁÁÁÁÁÁ
ÁÁÁÁÁ
ÁÁÁÁÁÁÁ
ÁÁÁÁÁÁ
ÁÁÁÁ
ÁÁÁÁÁÁÁÁÁÁÁÁÁÁÁÁÁ
ÁÁÁÁÁÁÁÁÁÁÁÁ
ÁÁÁÁÁÁ
Step
Action
Value(s)
Yes
No
1
1. Disconnect the negative battery cable.
2. Wait 1 minute for the SDM capacitor to discharge.
3. Examine the wiring and the connector at the
driver pretensioner module and the passenger
pretensioner module.
Is the connector disconnected?
–
Go to Step 2
Go to Step 3
–
2
1. Reconnect the driver pretensioner module and
the passenger pretensioner module connector.
2. Reconnect the negative battery cable.
Is the repair complete?
–
Go to
Diagnostic
System Check
3
1. Disconnect the electrical connector for the driver
pretensioner module and the passenger
passenger module.
2. Disconnect the electrical connector at the SDM.
D The shorting bar at the disconnected SDM
connector will create a complete circuit between the wires from the driver pretensioner
module and the passenger pretensioner module.
3. Connect an ohmmeter to the terminals on the
SDM side of the wiring harness connector for the
driver pretensioner module.
D Refer to ‘‘Diagnostic Illustration 16’’ in this
section.
Does the ohmmeter show the specified value?
≈0W
Go to Step 4
Go to Step 7
4
1. Disconnect the electrical connector for the driver
pretensioner module and the passenger
passenger module.
2. Disconnect the electrical connector at the SDM.
D The shorting bar at the disconnected SDM
connector will create a complete circuit between the wires from the driver pretensioner
module and the passenger pretensioner module.
3. Connect an ohmmeter to the terminals on the
SDM side of the wiring harness connector for the
passenger pretensioner module.
D Refer to ‘‘Diagnostic Illustration 19’’ in this
section.
Does the ohmmeter show the specified value?
≈0W
Go to Step 5
Go to Step 7
5
1. Replace the SDM.
2. Reconnect the negative battery cable.
3. Set the scan tool for CODE ERASE.
4. Do the diagnostic system check.
Does the code 22 still show as a current fault?
–
Go to Step 6
System OK
–
Go to
Diagnostic
System Check
–
–
Go to
Diagnostic
System Check
–
6
7
DAEWOO M-150 BL2
1. Replace the passenger side airbag module.
2. Reconnect the negative battery cable.
Is the repair complete?
1. Replace the supplemental inflatable restraints
(SIR) wiring harness.
2. Reconnect the negative battery cable.
Is the repair complete?
8B – 56 SUPPLEMENTAL INFLATABLE RESTRAINTS (SIR)
D1AB302B
DIAGNOSTIC TROUBLE CODE (DTC) 23
IGNITION INPUT CIRCUIT, VOLTAGE TOO HIGH
Circuit Description
When the ignition switch is turned ON, the sensing and
diagnostic module (SDM) will perform tests to diagnose
any malfunctions within itself.
After completing the internal tests, the SDM will check
its voltage supply. If the voltage supply is too high or too
low, the SDM may not receive the proper information
when it attempts to use a known current to test the
airbag module circuits.
Test Description
Caution: Before testing, disconnect the negative
battery cable. Wait 1 minute for the SDM capacitor
to discharge. The capacitor supplies reserve power
to deploy the airbags, even if the battery is disconnected. Unintentional deployment of the airbags
can cause injury.
DTC 23 Will Set When
D The SDM receives voltage higher than a specified
value.
DAEWOO M-150 BL2
SUPPLEMENTAL INFLATABLE RESTRAINTS (SIR) 8B – 57
DTC 23 – Ignition Input Circuit, Voltage Too High
ÁÁÁÁÁÁÁÁÁÁÁÁÁÁÁÁÁÁÁÁÁ
ÁÁÁÁÁ
ÁÁÁÁÁÁÁ
ÁÁÁÁÁÁ
ÁÁÁÁÁÁÁÁÁÁÁÁÁÁÁÁÁÁÁÁÁ
ÁÁÁÁÁ
ÁÁÁÁÁÁÁ
ÁÁÁÁÁÁ
ÁÁÁÁ
ÁÁÁÁÁÁÁÁÁÁÁÁÁÁÁÁÁ
ÁÁÁÁÁ
ÁÁÁÁÁÁÁ
ÁÁÁÁÁÁ
ÁÁÁÁ
ÁÁÁÁÁÁÁÁÁÁÁÁÁÁÁÁÁ
ÁÁÁÁÁ
ÁÁÁÁÁÁÁ
ÁÁÁÁÁÁ
ÁÁÁÁÁÁÁÁÁÁÁÁÁÁÁÁÁÁÁÁÁ
ÁÁÁÁÁ
ÁÁÁÁÁÁÁ
ÁÁÁÁÁÁ
ÁÁÁÁ
ÁÁÁÁÁÁÁÁÁÁÁÁÁÁÁÁÁ
ÁÁÁÁÁ
ÁÁÁÁÁÁÁ
ÁÁÁÁÁÁ
ÁÁÁÁÁ
ÁÁÁÁÁÁÁ
ÁÁÁÁ
ÁÁÁÁÁÁÁÁÁÁÁÁÁÁÁÁÁ
ÁÁÁÁÁÁ
ÁÁÁÁ
ÁÁÁÁÁÁÁÁÁÁÁÁÁÁÁÁÁ
ÁÁÁÁÁ
ÁÁÁÁÁÁÁ
ÁÁÁÁÁÁ
ÁÁÁÁ
ÁÁÁÁÁÁÁÁÁÁÁÁÁÁÁÁÁ
ÁÁÁÁÁ
ÁÁÁÁÁÁÁ
ÁÁÁÁÁÁ
Step
1
2
3
DAEWOO M-150 BL2
Action
Check the vehicle’s charging system.
Refer to Section 1E, Engine Electrical.
Is the charging system OK?
Value(s)
Yes
No
–
Go to Step 3
Go to Step 2
–
Go to
Diagnostic
System Check
–
–
Go to
Diagnostic
System Check
–
Repair the charging system.
Is the repair complete?
1. Disconnect the negative battery cable.
2. Replace the SDM.
Is the repair complete?
8B – 58 SUPPLEMENTAL INFLATABLE RESTRAINTS (SIR)
D1AB301B
DIAGNOSTIC TROUBLE CODE (DTC) 24
IGNITION INPUT CIRCUIT, VOLTAGE TOO LOW
Circuit Description
When the ignition switch is turned ON, the sensing and
diagnostic module (SDM) will perform tests to diagnose
any malfunctions within itself.
After completing the internal tests, the SDM will check
its voltage supply. If the voltage supply is too high or too
low, the SDM may not receive the proper information
when it attempts to use a known current to test the
airbag module circuits.
DTC 24 Will Set When
D The SDM receives the voltage lower than a specified
value.
Test Description
Caution: Before testing, disconnect the negative
battery cable. Wait 1 minute for the SDM capacitor
to discharge. The capacitor supplies reserve power
to deploy the airbags, even if the battery is disconnected. Unintentional deployment of the airbags
can cause injury.
Caution: As a safety precaution, disconnect the connector for the passenger airbag module. Unintentional deployment of the airbags can cause injury.
DAEWOO M-150 BL2
SUPPLEMENTAL INFLATABLE RESTRAINTS (SIR) 8B – 59
DTC 24 – Ignition Input Circuit, Voltage Too Low
ÁÁÁÁÁÁÁÁÁÁÁÁÁÁÁÁÁÁÁÁÁ
ÁÁÁÁÁ
ÁÁÁÁÁÁÁ
ÁÁÁÁÁÁ
ÁÁÁÁÁÁÁÁÁÁÁÁÁÁÁÁÁÁÁÁÁ
ÁÁÁÁÁ
ÁÁÁÁÁÁÁ
ÁÁÁÁÁÁ
ÁÁÁÁ
ÁÁÁÁÁÁÁÁÁÁÁÁÁÁÁÁÁ
ÁÁÁÁÁ
ÁÁÁÁÁÁÁ
ÁÁÁÁÁÁ
ÁÁÁÁ
ÁÁÁÁÁÁÁÁÁÁÁÁÁÁÁÁÁ
ÁÁÁÁÁ
ÁÁÁÁÁÁÁ
ÁÁÁÁÁÁ
ÁÁÁÁÁÁÁÁÁÁÁÁÁÁÁÁÁÁÁÁÁ
ÁÁÁÁÁ
ÁÁÁÁÁÁÁ
ÁÁÁÁÁÁ
ÁÁÁÁ
ÁÁÁÁÁÁÁÁÁÁÁÁÁÁÁÁÁ
ÁÁÁÁÁ
ÁÁÁÁÁÁÁ
ÁÁÁÁÁÁ
ÁÁÁÁÁ
ÁÁÁÁÁÁÁ
ÁÁÁÁ
ÁÁÁÁÁÁÁÁÁÁÁÁÁÁÁÁÁ
ÁÁÁÁÁÁ
ÁÁÁÁ
ÁÁÁÁÁÁÁÁÁÁÁÁÁÁÁÁÁ
ÁÁÁÁÁ
ÁÁÁÁÁÁÁ
ÁÁÁÁÁÁ
ÁÁÁÁ
ÁÁÁÁÁÁÁÁÁÁÁÁÁÁÁÁÁ
ÁÁÁÁÁ
ÁÁÁÁÁÁÁ
ÁÁÁÁÁÁ
ÁÁÁÁÁ
ÁÁÁÁÁÁÁ
ÁÁÁÁ
ÁÁÁÁÁÁÁÁÁÁÁÁÁÁÁÁÁ
ÁÁÁÁÁÁ
ÁÁÁÁ
ÁÁÁÁÁÁÁÁÁÁÁÁÁÁÁÁÁ
ÁÁÁÁÁ
ÁÁÁÁÁÁÁ
ÁÁÁÁÁÁ
ÁÁÁÁ
ÁÁÁÁÁÁÁÁÁÁÁÁÁÁÁÁÁ
ÁÁÁÁÁ
ÁÁÁÁÁÁÁ
ÁÁÁÁÁÁ
ÁÁÁÁ
ÁÁÁÁÁÁÁÁÁÁÁÁÁÁÁÁÁ
ÁÁÁÁÁÁ
ÁÁÁÁÁ
ÁÁÁÁÁÁÁ
ÁÁÁÁ
ÁÁÁÁÁÁÁÁÁÁÁÁÁÁÁÁÁ
ÁÁÁÁÁ
ÁÁÁÁÁÁÁ
ÁÁÁÁÁÁ
ÁÁÁÁ
ÁÁÁÁÁÁÁÁÁÁÁÁÁÁÁÁÁ
ÁÁÁÁÁ
ÁÁÁÁÁÁÁ
ÁÁÁÁÁÁ
ÁÁÁÁ
ÁÁÁÁÁÁÁÁÁÁÁÁÁÁÁÁÁ
ÁÁÁÁÁ
ÁÁÁÁÁÁÁ
ÁÁÁÁÁÁ
ÁÁÁÁ
ÁÁÁÁÁÁÁÁÁÁÁÁÁÁÁÁÁ
ÁÁÁÁÁ
ÁÁÁÁÁÁÁ
ÁÁÁÁÁÁ
ÁÁÁÁ
ÁÁÁÁÁÁÁÁÁÁÁÁÁÁÁÁÁÁÁÁÁÁÁÁÁÁÁÁÁ
ÁÁÁÁÁÁ
ÁÁÁÁ
ÁÁÁÁÁÁÁÁÁÁÁÁÁÁÁÁÁ
ÁÁÁÁÁ
ÁÁÁÁÁÁÁ
ÁÁÁÁÁÁ
ÁÁÁÁ
ÁÁÁÁÁÁÁÁÁÁÁÁÁÁÁÁÁ
ÁÁÁÁÁ
ÁÁÁÁÁÁÁ
ÁÁÁÁÁÁ
ÁÁÁÁ
ÁÁÁÁÁÁÁÁÁÁÁÁÁÁÁÁÁ
ÁÁÁÁÁ
ÁÁÁÁÁÁÁ
ÁÁÁÁÁÁ
ÁÁÁÁ
ÁÁÁÁÁÁÁÁÁÁÁÁÁÁÁÁÁ
ÁÁÁÁÁ
ÁÁÁÁÁÁÁ
ÁÁÁÁÁÁ
ÁÁÁÁ
ÁÁÁÁÁÁÁÁÁÁÁÁÁÁÁÁÁÁÁÁÁÁÁÁÁÁÁÁÁ
ÁÁÁÁÁÁ
ÁÁÁÁ
ÁÁÁÁÁÁÁÁÁÁÁÁÁÁÁÁÁ
ÁÁÁÁÁ
ÁÁÁÁÁÁÁ
ÁÁÁÁÁÁ
ÁÁÁÁ
ÁÁÁÁÁÁÁÁÁÁÁÁÁÁÁÁÁ
ÁÁÁÁÁ
ÁÁÁÁÁÁÁ
ÁÁÁÁÁÁ
ÁÁÁÁ
ÁÁÁÁÁÁÁÁÁÁÁÁÁÁÁÁÁÁÁÁÁÁÁÁÁÁÁÁÁ
ÁÁÁÁÁÁ
ÁÁÁÁ
ÁÁÁÁÁÁÁÁÁÁÁÁÁÁÁÁÁ
ÁÁÁÁÁ
ÁÁÁÁÁÁÁ
ÁÁÁÁÁÁ
ÁÁÁÁ
ÁÁÁÁÁÁÁÁÁÁÁÁÁÁÁÁÁ
ÁÁÁÁÁ
ÁÁÁÁÁÁÁ
ÁÁÁÁÁÁ
ÁÁÁÁ
ÁÁÁÁÁÁÁÁÁÁÁÁÁÁÁÁÁÁÁÁÁÁÁÁÁÁÁÁÁ
ÁÁÁÁÁÁ
ÁÁÁÁ
ÁÁÁÁÁÁÁÁÁÁÁÁÁÁÁÁÁ
ÁÁÁÁÁ
ÁÁÁÁÁÁÁ
ÁÁÁÁÁÁ
ÁÁÁÁ
ÁÁÁÁÁÁÁÁÁÁÁÁÁÁÁÁÁÁÁÁÁÁÁÁÁÁÁÁÁ
ÁÁÁÁÁÁ
ÁÁÁÁÁ
ÁÁÁÁÁÁÁ
ÁÁÁÁ
ÁÁÁÁÁÁÁÁÁÁÁÁÁÁÁÁÁ
ÁÁÁÁÁÁ
ÁÁÁÁ
ÁÁÁÁÁÁÁÁÁÁÁÁÁÁÁÁÁ
ÁÁÁÁÁ
ÁÁÁÁÁÁÁ
ÁÁÁÁÁÁ
ÁÁÁÁ
ÁÁÁÁÁÁÁÁÁÁÁÁÁÁÁÁÁ
ÁÁÁÁÁ
ÁÁÁÁÁÁÁ
ÁÁÁÁÁÁ
ÁÁÁÁ
ÁÁÁÁÁÁÁÁÁÁÁÁÁÁÁÁÁ
ÁÁÁÁÁ
ÁÁÁÁÁÁÁ
ÁÁÁÁÁÁ
ÁÁÁÁ
ÁÁÁÁÁÁÁÁÁÁÁÁÁÁÁÁÁ
ÁÁÁÁÁ
ÁÁÁÁÁÁÁ
ÁÁÁÁÁÁ
ÁÁÁÁ
ÁÁÁÁÁÁÁÁÁÁÁÁÁÁÁÁÁ
ÁÁÁÁÁ
ÁÁÁÁÁÁÁ
ÁÁÁÁÁÁ
ÁÁÁÁ
ÁÁÁÁÁÁÁÁÁÁÁÁÁÁÁÁÁ
ÁÁÁÁÁÁÁÁÁÁÁÁ
ÁÁÁÁÁÁ
Step
Action
1
Check the fuse F2.
Is the fuse blown?
2
1. Check for a short circuit.
2. Repair if needed.
3. Replace the fuse.
Is the repair complete?
3
4
5
6
7
8
9
DAEWOO M-150 BL2
1. Turn the ignition ON.
2. Using a multimeter, check the voltage at the fuse
F2.
Is the battery voltage available at the fuse F2?
Value(s)
Yes
No
–
Go to Step 2
Go to Step 3
–
Go to
Diagnostic
System Check
–
11–14 v
Go to Step 5
Go to Step 4
–
Go to
Diagnostic
System Check
–
11–14 v
Go to Step 6
Go to Step 7
–
Go to
Diagnostic
System Check
–
11–14 v
Go to Step 8
Go to Step 9
–
Go to
Diagnostic
System Check
–
–
Go to
Diagnostic
System Check
–
Repair the power supply to the fuse F2.
Is the repair complete?
1.
2.
3.
4.
5.
6.
Disconnect the negative battery cable.
Wait one minute before proceeding.
Disconnect the connector at the SDM.
Reconnect the battery.
Turn the ignition key ON.
Measure the voltage at the terminal 5 of the SDM
Connector.
D Refer to ‘‘Diagnostic Illustration 11’’ in this
section.
Is the voltage equal to the specified value?
1. Replace the SDM.
2. Reconnect the electrical connectors.
Is the repair complete?
1. Disconnect the connector C208.
D The connector C208 is the connector between
the instrument harness and the supplemental
inflatable restraints (SIR) harness.
2. Turn the ignition ON.
3. Using a multimeter, check the voltage on the
instrument harness side at the terminal 2 of the
connector C208.
D Refer to ‘‘Diagnostic Illustration 12’’ in this
section.
Is the voltage equal to the specified value?
1. Replace the SIR wiring harness.
2. Reconnect the battery.
Is the repair complete?
Repair the open circuit between the fuse F2 and the
connector C208.
Is the repair complete?
8B – 60 SUPPLEMENTAL INFLATABLE RESTRAINTS (SIR)
D1AB301B
DIAGNOSTIC TROUBLE CODE (DTC) 25
WARNING LAMP FAILURE
Circuit Description
When the ignition switch is turned ON, the sensing and
diagnostic module (SDM) will perform tests to diagnose
any malfunctions within itself.
After passing these tests, the SDM will check the warning lamp circuit. The SDM constantly measures the voltage at the warning lamp output in order to determine if
the lamp is ON or OFF at the correct time.
DTC 25 Will Set When
D The lamp is ON when it should be OFF.
D The lamp is OFF when it should be ON.
Diagnostic Aids
When the warning lamp operates correctly, the warning
lamp turns ON for approximately four seconds after the
ignition is first switched ON, and then The warning lamp
turns OFF.
When the warning lamp operates incorrectly, the warning lamp continues to blink four times per second,
demonstrating that the SDM is faulty and must be replaced.
Test Description
Caution: Before testing, disconnect the negative
battery cable. Wait 1 minute for the SDM capacitor
to discharge. The capacitor supplies reserve power
to deploy the airbags, even if the battery is disconnected. Unintentional deployment of the airbags
can cause injury.
Caution: If the short is in the supplemental inflatable
restraints (SIR) wiring harness, do not attempt to repair it. The repair might create a high-resistance
connection which can keep the airbags from deploying when needed, resulting in injury. Replace the
SIR wiring harness if it is damaged.
DAEWOO M-150 BL2
SUPPLEMENTAL INFLATABLE RESTRAINTS (SIR) 8B – 61
DTC 25 – Warning Lamp Failure
ÁÁÁÁÁÁÁÁÁÁÁÁÁÁÁÁÁÁÁÁÁ
ÁÁÁÁÁ
ÁÁÁÁÁÁÁ
ÁÁÁÁÁÁ
ÁÁÁÁÁÁÁÁÁÁÁÁÁÁÁÁÁÁÁÁÁ
ÁÁÁÁÁ
ÁÁÁÁÁÁÁ
ÁÁÁÁÁÁ
ÁÁÁÁ
ÁÁÁÁÁÁÁÁÁÁÁÁÁÁÁÁÁ
ÁÁÁÁÁ
ÁÁÁÁÁÁÁ
ÁÁÁÁÁÁ
ÁÁÁÁ
ÁÁÁÁÁÁÁÁÁÁÁÁÁÁÁÁÁ
ÁÁÁÁÁ
ÁÁÁÁÁÁÁ
ÁÁÁÁÁÁ
ÁÁÁÁÁÁÁÁÁÁÁÁÁÁÁÁÁÁÁÁÁ
ÁÁÁÁÁ
ÁÁÁÁÁÁÁ
ÁÁÁÁÁÁ
ÁÁÁÁ
ÁÁÁÁÁÁÁÁÁÁÁÁÁÁÁÁÁ
ÁÁÁÁÁ
ÁÁÁÁÁÁÁ
ÁÁÁÁÁÁ
ÁÁÁÁ
ÁÁÁÁÁÁÁÁÁÁÁÁÁÁÁÁÁ
ÁÁÁÁÁ
ÁÁÁÁÁÁÁ
ÁÁÁÁÁÁ
ÁÁÁÁ
ÁÁÁÁÁÁÁÁÁÁÁÁÁÁÁÁÁ
ÁÁÁÁÁÁ
ÁÁÁÁ
ÁÁÁÁÁÁÁÁÁÁÁÁÁÁÁÁÁÁÁÁÁÁ
ÁÁÁÁÁÁÁÁÁÁÁÁ
ÁÁÁÁÁÁÁ
ÁÁÁÁÁÁ
ÁÁÁÁ
ÁÁÁÁÁÁÁÁÁÁÁÁÁÁÁÁÁ
ÁÁÁÁÁ
ÁÁÁÁÁÁÁ
ÁÁÁÁÁÁ
ÁÁÁÁÁ
ÁÁÁÁÁÁÁ
ÁÁÁÁ
ÁÁÁÁÁÁÁÁÁÁÁÁÁÁÁÁÁ
ÁÁÁÁÁÁ
ÁÁÁÁ
ÁÁÁÁÁÁÁÁÁÁÁÁÁÁÁÁÁ
ÁÁÁÁÁ
ÁÁÁÁÁÁÁ
ÁÁÁÁÁÁ
ÁÁÁÁ
ÁÁÁÁÁÁÁÁÁÁÁÁÁÁÁÁÁÁÁÁÁÁÁÁÁÁÁÁÁ
ÁÁÁÁÁÁ
ÁÁÁÁ
ÁÁÁÁÁÁÁÁÁÁÁÁÁÁÁÁÁ
ÁÁÁÁÁÁ
ÁÁÁÁ
ÁÁÁÁÁÁÁÁÁÁÁÁÁÁÁÁÁÁÁÁÁÁ
ÁÁÁÁÁÁÁÁÁÁÁÁ
ÁÁÁÁÁÁÁ
ÁÁÁÁÁÁ
ÁÁÁÁ
ÁÁÁÁÁÁÁÁÁÁÁÁÁÁÁÁÁ
ÁÁÁÁÁ
ÁÁÁÁÁÁÁ
ÁÁÁÁÁÁ
ÁÁÁÁ
ÁÁÁÁÁÁÁÁÁÁÁÁÁÁÁÁÁ
ÁÁÁÁÁ
ÁÁÁÁÁÁÁ
ÁÁÁÁÁÁ
ÁÁÁÁ
ÁÁÁÁÁÁÁÁÁÁÁÁÁÁÁÁÁÁÁÁÁÁÁÁÁÁÁÁÁ
ÁÁÁÁÁÁ
ÁÁÁÁ
ÁÁÁÁÁÁÁÁÁÁÁÁÁÁÁÁÁ
ÁÁÁÁÁ
ÁÁÁÁÁÁÁ
ÁÁÁÁÁÁ
ÁÁÁÁÁ
ÁÁÁÁÁÁÁ
ÁÁÁÁ
ÁÁÁÁÁÁÁÁÁÁÁÁÁÁÁÁÁ
ÁÁÁÁÁÁ
ÁÁÁÁ
ÁÁÁÁÁÁÁÁÁÁÁÁÁÁÁÁÁ
ÁÁÁÁÁ
ÁÁÁÁÁÁÁ
ÁÁÁÁÁÁ
ÁÁÁÁ
ÁÁÁÁÁÁÁÁÁÁÁÁÁÁÁÁÁ
ÁÁÁÁÁ
ÁÁÁÁÁÁÁ
ÁÁÁÁÁÁ
ÁÁÁÁ
ÁÁÁÁÁÁÁÁÁÁÁÁÁÁÁÁÁ
ÁÁÁÁÁÁ
ÁÁÁÁÁ
ÁÁÁÁÁÁÁ
ÁÁÁÁ
ÁÁÁÁÁÁÁÁÁÁÁÁÁÁÁÁÁ
ÁÁÁÁÁ
ÁÁÁÁÁÁÁ
ÁÁÁÁÁÁ
ÁÁÁÁ
ÁÁÁÁÁÁÁÁÁÁÁÁÁÁÁÁÁ
ÁÁÁÁÁ
ÁÁÁÁÁÁÁ
ÁÁÁÁÁÁ
ÁÁÁÁ
ÁÁÁÁÁÁÁÁÁÁÁÁÁÁÁÁÁÁÁÁÁÁÁÁÁÁÁÁÁ
ÁÁÁÁÁÁ
ÁÁÁÁ
ÁÁÁÁÁÁÁÁÁÁÁÁÁÁÁÁÁ
ÁÁÁÁÁ
ÁÁÁÁÁÁÁ
ÁÁÁÁÁÁ
ÁÁÁÁ
ÁÁÁÁÁÁÁÁÁÁÁÁÁÁÁÁÁ
ÁÁÁÁÁ
ÁÁÁÁÁÁÁ
ÁÁÁÁÁÁ
ÁÁÁÁ
ÁÁÁÁÁÁÁÁÁÁÁÁÁÁÁÁÁ
ÁÁÁÁÁÁ
ÁÁÁÁÁ
ÁÁÁÁÁÁÁ
ÁÁÁÁ
ÁÁÁÁÁÁÁÁÁÁÁÁÁÁÁÁÁ
ÁÁÁÁÁ
ÁÁÁÁÁÁÁ
ÁÁÁÁÁÁ
ÁÁÁÁ
ÁÁÁÁÁÁÁÁÁÁÁÁÁÁÁÁÁ
ÁÁÁÁÁÁ
ÁÁÁÁÁ
ÁÁÁÁÁÁÁ
ÁÁÁÁ
ÁÁÁÁÁÁÁÁÁÁÁÁÁÁÁÁÁ
ÁÁÁÁÁ
ÁÁÁÁÁÁÁ
ÁÁÁÁÁÁ
ÁÁÁÁ
ÁÁÁÁÁÁÁÁÁÁÁÁÁÁÁÁÁ
ÁÁÁÁÁ
ÁÁÁÁÁÁÁ
ÁÁÁÁÁÁ
ÁÁÁÁ
ÁÁÁÁÁÁÁÁÁÁÁÁÁÁÁÁÁ
ÁÁÁÁÁ
ÁÁÁÁÁÁÁ
ÁÁÁÁÁÁ
ÁÁÁÁ
ÁÁÁÁÁÁÁÁÁÁÁÁÁÁÁÁÁ
ÁÁÁÁÁ
ÁÁÁÁÁÁÁ
ÁÁÁÁÁÁ
ÁÁÁÁ
ÁÁÁÁÁÁÁÁÁÁÁÁÁÁÁÁÁ
ÁÁÁÁÁ
ÁÁÁÁÁÁÁ
ÁÁÁÁÁÁ
ÁÁÁÁ
ÁÁÁÁÁÁÁÁÁÁÁÁÁÁÁÁÁ
ÁÁÁÁÁ
ÁÁÁÁÁÁÁ
ÁÁÁÁÁÁ
ÁÁÁÁ
ÁÁÁÁÁÁÁÁÁÁÁÁÁÁÁÁÁ
ÁÁÁÁÁ
ÁÁÁÁÁÁÁ
ÁÁÁÁÁÁ
ÁÁÁÁ
ÁÁÁÁÁÁÁÁÁÁÁÁÁÁÁÁÁÁÁÁÁÁÁÁÁÁÁÁÁ
ÁÁÁÁÁÁ
ÁÁÁÁ
ÁÁÁÁÁÁÁÁÁÁÁÁÁÁÁÁÁ
ÁÁÁÁÁ
ÁÁÁÁÁÁÁ
ÁÁÁÁÁÁ
ÁÁÁÁ
ÁÁÁÁÁÁÁÁÁÁÁÁÁÁÁÁÁÁÁÁÁÁÁÁÁÁÁÁÁ
ÁÁÁÁÁÁ
ÁÁÁÁ
ÁÁÁÁÁÁÁÁÁÁÁÁÁÁÁÁÁ
ÁÁÁÁÁÁÁÁÁÁÁÁ
ÁÁÁÁÁÁ
Step
1
2
3
4
Action
Value(s)
Yes
No
–
Go to Step 2
Go to Step 9
–
Go to
Diagnostic
System Check
Go to Step 3
1. Check for indications of the diagnostic trouble
code (DTC) other than the code 25.
2. Go to the appropriate DTC charts and repair each
additional problem.
3. Do the diagnostic system check.
Does the scan tool still indicate the code 25?
–
Go to Step 4
System OK
Check for a short to ground between the SDM and
the warning lamp using the following method:
1. Turn the ignition OFF.
2. Disconnect the connector C208.
3. Connect one ohmmeter lead to ground.
4. Touch the other ohmmeter lead to the terminal 3
of the connector C208 on the instrument harness
side.
D Refer to ‘‘Diagnostic Illustration 14’’ in this
section.
Does the ohmmeter indicate the specified value?
∞
Go to Step 6
Go to Step 5
–
Turn the ignition ON.
Is the warning lamp constantly ON?
Make sure the SDM connector is attached correctly.
Does the warning lamp turn OFF?
5
Repair the short to ground in the instrument
harness.
Is the repair complete?
–
Go to
Diagnostic
System Check
6
1. The connector C208 remains disconnected.
2. One lead of the ohmmeter remains connected to
ground.
3. Move the ohmmeter lead at the connector C208
to the SDM side of the connector.
D Refer to ‘‘Diagnostic Illustration 13’’ in this
section.
Does the ohmmeter indicate the specified value?
∞
Go to Step 7
Go to Step 8
–
Go to
Diagnostic
System Check
–
–
Go to Step 5
System OK
–
Go to Step 10
Go to Step 11
–
Go to
Diagnostic
System Check
–
7
8
9
10
DAEWOO M-150 BL2
Replace the SDM.
Is the repair complete?
1. Disconnect the negative battery cable.
2. Replace the SIR wiring harness.
3. Do the diagnostic system check.
Does the code 25 still show?
Check the fuse F1.
Is the fuse F1 blown?
1. With the connector C208 temporarily
disconnected, check for a short to ground
between the fuse F1 and the warning lamp.
2. Make a repair, if needed.
3. Replace the fuse F1.
Is the repair complete?
8B – 62 SUPPLEMENTAL INFLATABLE RESTRAINTS (SIR)
DTC 25 – Warning Lamp Failure (Cont’d)
ÁÁÁÁÁÁÁÁÁÁÁÁÁÁÁÁÁÁÁÁÁ
ÁÁÁÁÁ
ÁÁÁÁÁÁÁ
ÁÁÁÁÁÁ
ÁÁÁÁÁÁÁÁÁÁÁÁÁÁÁÁÁÁÁÁÁ
ÁÁÁÁÁ
ÁÁÁÁÁÁÁ
ÁÁÁÁÁÁ
ÁÁÁÁ
ÁÁÁÁÁÁÁÁÁÁÁÁÁÁÁÁÁ
ÁÁÁÁÁ
ÁÁÁÁÁÁÁ
ÁÁÁÁÁÁ
ÁÁÁÁ
ÁÁÁÁÁÁÁÁÁÁÁÁÁÁÁÁÁ
ÁÁÁÁÁ
ÁÁÁÁÁÁÁ
ÁÁÁÁÁÁ
ÁÁÁÁ
ÁÁÁÁÁÁÁÁÁÁÁÁÁÁÁÁÁ
ÁÁÁÁÁÁ
ÁÁÁÁÁ
ÁÁÁÁÁÁÁ
ÁÁÁÁÁÁÁÁÁÁÁÁÁÁÁÁÁÁÁÁÁ
ÁÁÁÁÁ
ÁÁÁÁÁÁÁ
ÁÁÁÁÁÁ
ÁÁÁÁ
ÁÁÁÁÁÁÁÁÁÁÁÁÁÁÁÁÁ
ÁÁÁÁÁ
ÁÁÁÁÁÁÁ
ÁÁÁÁÁÁ
ÁÁÁÁÁ
ÁÁÁÁÁÁÁ
ÁÁÁÁ
ÁÁÁÁÁÁÁÁÁÁÁÁÁÁÁÁÁ
ÁÁÁÁÁÁ
ÁÁÁÁ
ÁÁÁÁÁÁÁÁÁÁÁÁÁÁÁÁÁ
ÁÁÁÁÁ
ÁÁÁÁÁÁÁ
ÁÁÁÁÁÁ
ÁÁÁÁ
ÁÁÁÁÁÁÁÁÁÁÁÁÁÁÁÁÁ
ÁÁÁÁÁ
ÁÁÁÁÁÁÁ
ÁÁÁÁÁÁ
ÁÁÁÁ
ÁÁÁÁÁÁÁÁÁÁÁÁÁÁÁÁÁ
ÁÁÁÁÁ
ÁÁÁÁÁÁÁ
ÁÁÁÁÁÁ
ÁÁÁÁ
ÁÁÁÁÁÁÁÁÁÁÁÁÁÁÁÁÁ
ÁÁÁÁÁ
ÁÁÁÁÁÁÁ
ÁÁÁÁÁÁ
ÁÁÁÁÁÁÁÁÁÁÁÁÁÁÁÁÁÁÁÁÁ
ÁÁÁÁÁ
ÁÁÁÁÁÁÁ
ÁÁÁÁÁÁ
ÁÁÁÁ
ÁÁÁÁÁÁÁÁÁÁÁÁÁÁÁÁÁ
ÁÁÁÁÁÁ
ÁÁÁÁ
ÁÁÁÁÁÁÁÁÁÁÁÁÁÁÁÁÁÁÁÁÁÁ
ÁÁÁÁÁÁÁÁÁÁÁÁ
ÁÁÁÁÁÁÁ
ÁÁÁÁÁÁ
ÁÁÁÁ
ÁÁÁÁÁÁÁÁÁÁÁÁÁÁÁÁÁ
ÁÁÁÁÁ
ÁÁÁÁÁÁÁ
ÁÁÁÁÁÁ
ÁÁÁÁ
ÁÁÁÁÁÁÁÁÁÁÁÁÁÁÁÁÁ
ÁÁÁÁÁ
ÁÁÁÁÁÁÁ
ÁÁÁÁÁÁ
ÁÁÁÁÁÁÁÁÁÁÁÁÁÁÁÁÁÁÁÁÁ
ÁÁÁÁÁ
ÁÁÁÁÁÁÁ
ÁÁÁÁÁÁ
ÁÁÁÁ
ÁÁÁÁÁÁÁÁÁÁÁÁÁÁÁÁÁ
ÁÁÁÁÁ
ÁÁÁÁÁÁÁ
ÁÁÁÁÁÁ
ÁÁÁÁ
ÁÁÁÁÁÁÁÁÁÁÁÁÁÁÁÁÁ
ÁÁÁÁÁ
ÁÁÁÁÁÁÁ
ÁÁÁÁÁÁ
ÁÁÁÁ
ÁÁÁÁÁÁÁÁÁÁÁÁÁÁÁÁÁ
ÁÁÁÁÁÁÁÁÁÁÁÁ
ÁÁÁÁÁÁ
Step
Action
Value(s)
Yes
No
11
1. Turn the ignition ON.
2. Using a multimeter, check the voltage at the fuse
F1.
Does the multimeter show the specified value?
11–14 v
Go to Step 13
Go to Step 12
–
Go to
Diagnostic
System Check
–
11–14 v
Go to Step 15
Go to Step 14
14
1. Check the warning lamp bulb.
2. Replace the warning lamp bulb, if needed.
3. If the bulb is good, repair the open circuit between
the fuse F1 and the terminal 3 of the connector
C208.
Is the repair complete?
–
Go to
Diagnostic
System Check
–
15
1. Disconnect the negative battery terminal.
2. Wait at least 1 minute before proceeding.
3. Replace the SIR wiring harness.
Is the repair complete?
–
System OK
–
12
13
Repair the open power supply circuit for the fuse F1.
Is the repair complete?
1. Disconnect the connector C208.
2. Turn the ignition ON.
3. Using a multimeter, check the voltage on the
instrument harness side of the terminal 3 of the
connector C208.
Does the multimeter show the specified value?
DAEWOO M-150 BL2
SUPPLEMENTAL INFLATABLE RESTRAINTS (SIR) 8B – 63
DIAGNOSTIC TROUBLE CODE (DTC) 31
SDM INTERNAL FAULT
Circuit Description
When the ignition switch is turned ON, the sensing and
diagnostic module (SDM) will perform tests to diagnose
malfunctions within itself.
DTC 31 Will Set When
D The SDM does not pass the internal tests.
Test Description
Caution: Before testing, disconnect the negative
battery cable. Wait 1 minute for the SDM capacitor
to discharge. The capacitor supplies reserve power
to deploy the airbags, even if the battery is disconnected. Unintentional deployment of the airbags
can cause injury.
ÁÁÁÁ
ÁÁÁÁÁÁÁÁÁÁÁÁÁÁÁÁÁ
ÁÁÁÁÁ
ÁÁÁÁÁÁÁ
ÁÁÁÁÁÁ
ÁÁÁÁ
ÁÁÁÁÁÁÁÁÁÁÁÁÁÁÁÁÁ
ÁÁÁÁÁ
ÁÁÁÁÁÁÁ
ÁÁÁÁÁÁ
ÁÁÁÁ
ÁÁÁÁÁÁÁÁÁÁÁÁÁÁÁÁÁ
ÁÁÁÁÁ
ÁÁÁÁÁÁÁ
ÁÁÁÁÁÁ
ÁÁÁÁ
ÁÁÁÁÁÁÁÁÁÁÁÁÁÁÁÁÁ
ÁÁÁÁÁ
ÁÁÁÁÁÁÁ
ÁÁÁÁÁÁ
ÁÁÁÁ
ÁÁÁÁÁÁÁÁÁÁÁÁÁÁÁÁÁ
ÁÁÁÁÁÁÁÁÁÁÁÁ
ÁÁÁÁÁÁ
DTC 31 – SDM Internal Fault
Step
1
Action
1. Disconnect the negative battery cable.
2. Replace the SDM.
Is the repair complete?
Value(s)
Yes
No
–
Go to
Diagnostic
System Check
–
DIAGNOSTIC TROUBLE CODE (DTC) 32
SDM CRASH RECORDED
Circuit Description
When the ignition switch is turned ON, the sensing and
diagnostic module (SDM) will perform tests to diagnose
any malfunctions within itself.
DTC 32 Will Set When
D The SDM has previously detected a crash.
Test Description
Caution: Before testing, disconnect the negative
battery cable. Wait 1 minute for the SDM capacitor
to discharge. The capacitor supplies reserve power
to deploy the airbags, even if the battery is disconnected. Unintentional deployment of the airbags
can cause injury.
ÁÁÁÁ
ÁÁÁÁÁÁÁÁÁÁÁÁÁÁÁÁÁ
ÁÁÁÁÁ
ÁÁÁÁÁÁÁ
ÁÁÁÁÁÁ
ÁÁÁÁ
ÁÁÁÁÁÁÁÁÁÁÁÁÁÁÁÁÁ
ÁÁÁÁÁ
ÁÁÁÁÁÁÁ
ÁÁÁÁÁÁ
ÁÁÁÁÁÁÁÁÁÁÁÁÁÁÁÁÁÁÁÁÁ
ÁÁÁÁÁ
ÁÁÁÁÁÁÁ
ÁÁÁÁÁÁ
ÁÁÁÁ
ÁÁÁÁÁÁÁÁÁÁÁÁÁÁÁÁÁ
ÁÁÁÁÁ
ÁÁÁÁÁÁ
ÁÁÁÁ
ÁÁÁÁÁÁÁÁÁÁÁÁÁÁÁÁÁ
ÁÁÁÁÁÁÁÁÁÁÁÁ
ÁÁÁÁÁÁÁ
ÁÁÁÁÁÁ
DTC 32 – SDM Crash Recorded
Step
1
Action
1. Disconnect the negative battery cable.
2. Replace the SDM.
Is the repair complete?
Value(s)
Yes
No
–
Go to
Diagnostic
System Check
–
Caution: Do not use these illustrations to troubleshoot without consulting the diagnostic trouble
code (DTC) charts. The DTC charts give additional
safety precautions and detailed instructions for
each test. Failure to follow the proper precautions
can result in injury from unintended airbag deployment.
DIAGNOSTIC ILLUSTRATION 1
Checking the continuity between the terminal 9 of the
sensing and diagnostic module and the terminal J (13) of
the assembly line diagnostic link.
D110B303
DAEWOO M-150 BL2
8B – 64 SUPPLEMENTAL INFLATABLE RESTRAINTS (SIR)
DIAGNOSTIC ILLUSTRATION 2
Checking the continuity on the instrument harness side
between the terminal J (13) of the assembly line diagnostic link and the terminal 4 of the connector C208.
D110B304
DIAGNOSTIC ILLUSTRATION 3
Measuring the wiring harness for the continuity of the
driver side airbag module circuit.
D110B305
DIAGNOSTIC ILLUSTRATION 4
Checking the continuity of the driver airbag circuit on the
sensing and diagnostic module (SDM) side of the clock
spring connector.
D110B306
DIAGNOSTIC ILLUSTRATION 5
Checking the driver airbag circuit for a short to ground
with the sensing and diagnostic module disconnected.
D110B307
DAEWOO M-150 BL2
SUPPLEMENTAL INFLATABLE RESTRAINTS (SIR) 8B – 65
DIAGNOSTIC ILLUSTRATION 6
Checking the driver airbag circuit for a short to voltage.
D110B308
DIAGNOSTIC ILLUSTRATION 7
Checking the clock spring connector for a short to voltage on the sensing and diagnostic module side.
D110B309
DIAGNOSTIC ILLUSTRATION 8
Checking the passenger airbag circuit continuity on the
sensing and diagnostic module side of the connector.
.
D110B310
DIAGNOSTIC ILLUSTRATION 9
Checking the passenger airbag circuit for a short to
ground.
D110B311
DAEWOO M-150 BL2
8B – 66 SUPPLEMENTAL INFLATABLE RESTRAINTS (SIR)
DIAGNOSTIC ILLUSTRATION 10
Checking the passenger airbag circuit for a short to
voltage.
D110B311
DIAGNOSTIC ILLUSTRATION 11
Checking the sensing and diagnostic module voltage
supply at the terminal 5.
D110B312
DIAGNOSTIC ILLUSTRATION 12
Checking the voltage supply on the instrument harness
side at the terminal 2 of the connector C208.
D110B313
DIAGNOSTIC ILLUSTRATION 13
Checking for a short to ground on the sensing and diagnostic module side of the supplemental inflatable restraints harness at the terminal 3 of the connector C208.
D110B314
DAEWOO M-150 BL2
SUPPLEMENTAL INFLATABLE RESTRAINTS (SIR) 8B – 67
DIAGNOSTIC ILLUSTRATION 14
Checking for a short to ground in the instrument harness
on the instrument harness side at the terminal 3 of the
connector C208.
D110B315
DIAGNOSTIC ILLUSTRATION 15
Checking the voltage of the warning lamp circuit on the
instrument harness side at the terminal 3 of the connector C208.
D110B316
DIAGNOSTIC ILLUSTRATION 16
Checking the driver seat belt pretensioner circuit continuity on the sensing and driagnostic module side of the
connector.
.
D110B310
DIAGNOSTIC ILLUSTRATION 17
Checking the driver seat belt pretensioner circuit for a
short to ground.
D110B311
DAEWOO M-150 BL2
8B – 68 SUPPLEMENTAL INFLATABLE RESTRAINTS (SIR)
DIAGNOSTIC ILLUSTRATION 18
Checking the driver seat belt pretensioner circuit for a
short to voltage.
D110B311
DIAGNOSTIC ILLUSTRATION 19
Checking the passenger seat belt pretensioner circuit
continuity on the sensing and driagnostic module side of
the connector.
.
D110B310
DIAGNOSTIC ILLUSTRATION 20
Checking the passenger seat belt pretensioner circuit
for a short to ground.
D110B311
DIAGNOSTIC ILLUSTRATION 21
Checking the passenger seat belt pretensioner circuit
for a short to voltage.
D110B311
DAEWOO M-150 BL2
SUPPLEMENTAL INFLATABLE RESTRAINTS (SIR) 8B – 69
REPAIR INSTRUCTIONS
ON–VEHICLE SERVICE
DRIVER AIRBAG MODULE
(Left–Hand Drive Shown, Right–Hand
Drive Similar)
Tool Required
DS 401 Torx Bolt Wrench
Removal Procedure
D110B501
1. Disconnect the negative battery cable.
2. Position the steering wheel straight ahead.
3. Remove the driver airbag module mounting bolts.
D Remove the airbag module bolt cover (1).
D Remove the airbag module torx bolt using a torx
bolt wrench DS 401.
a. Airbag module torx bolt.
Caution: When handling an airbag module, always
keep the top of the unit facing upward. This leaves
room for the module to expand if the module unexpectedly deploys. Without room for expansion, a
module suddenly propelled toward a person or object can cause injury or vehicle damage.
4.Remove the driver airbag module.
D Disconnect the driver airbag module connector (1).
D Disconnect the horn terminal connector (2).
D Remove the driver airbag module (3).
D110B502
Installation Procedure
Caution: When removing an airbag module or handling a new airbag module, always keep the top of
the unit facing upward. This leaves room for the
module to expand if the module unexpectedly deploys. Without room for expansion, a module suddenly propelled toward a person or object can
cause injury or vehicle damage.
1. Install the driver airbag module.
2. Connect the connectors to the horn terminal and the
driver airbag module.
15 NSm
D1AB503A
3. Install the driver airbag module torx bolt using a torx
bolt wrench DS 401.
Tighten
Tighten the torx bolt to 15 NSm (11 lb-ft)
4. Connect the negative battery cable.
DAEWOO M-150 BL2
8B – 70 SUPPLEMENTAL INFLATABLE RESTRAINTS (SIR)
CLOCK SPRING
(Left–Hand Drive Shown, Right–Hand
Drive Similar)
Removal Procedure
D110B504
1. Disconnect the negative battery cable. Wait 1 minute
until the capacitor inside the sensing and diagnostic
module has discharged.
2. Remove the driver airbag module. Refer to “Driver
Airbag Module” in this section.
3. Remove the steering wheel. Refer to Section 6E,
Steering Wheel and Column.
4. Remove the lower/upper steering column cover.
D Remove the screws (1).
D Remove the lower/upper steering column cover(2).
5. Disconnect the clock spring and the horn terminal
connector.
6. Disconnect the clock spring and the horn terminal
connector which are banded on the steering column.
7. Remove the clock spring.
D Remove the screws (1).
D Remove the clock spring (2).
D110B505
Installation Procedure
Caution: If the clock spring is not properly aligned,
the steering wheel may not be able to rotate completely during a turn. Restricted turning ability can
cause the vehicle to crash. Improper alignment of
the clock spring also may make the supplemental
inflatable restraints (SIR) system inoperative, preventing the airbags from deploying during a crash.
Both of these outcomes can result in injury.
3 NSm
Notice: Turning the clock spring more than three turns
clockwise or more than three turns counterclockwise
can damage the spring.
D1AB506A
1. Turn the front wheels straight ahead.
2. Install the clock spring with the screws.
Tighten
Tighten the clock spring mounting screws to 3 NSm
(27 lb-in)
Important: The clock spring may come packed in material used to prevent damage to the spring during shipping or storage. Avoid installing any of the packing
material with the clock spring.
3. Turn the label of the clock spring clockwise to lock.
D110B507
4. Turn the label of the clock spring counterclockwise
approximately three turns to the neutral positions with
the front wheels ahead.
DAEWOO M-150 BL2
SUPPLEMENTAL INFLATABLE RESTRAINTS (SIR) 8B – 71
5. Properly align the pointed marks (
) on the components of the clock spring.
6. Connect the electrical connectors on the lower
spring steering column.
7. Install the lower/upper steering column cover.
8. Install the steering wheel. Refer to Section 6E,
Steering Wheel and Column.
9. Connect the driver airbag module and the horn connectors.
10. Install the driver airbag module. Refer to “Driver airbag module” in this section.
11. Connect the negative battery cable.
PASSENGER AIRBAG MODULE
(Left–Hand Drive Shown, Right–Hand
Drive Similar)
Tool Required
DS 401 Torx Bolt Wrench.
Removal Procedure
1. Disconnect the negative battery cable.
2. Remove the glove box. Refer to Section 9E, Instrument/Driver Information.
3. Disconnect the passenger airbag module connector.
D110B508
4. Remove the passenger airbag module.
D Remove the nuts (1).
D Remove the airbag module torx bolts using a torx
bolt wrench DS 401.
a. Passenger airbag module torx bolt.
D Remove the passenger airbag module (2).
D110B509
Installation Procedure
10 NSm
1. Install the passenger airbag module.
2. Install the passenger airbag module mounting torx
bolts and the nuts using a torx bolt wrench DS 401.
Tighten
15 NSm
D1AB510A
DAEWOO M-150 BL2
D Tighten the passenger airbag module torx bolts to
15 NSm (11 lb-ft).
a. Passenger airbag module torx bolt.
D Tighten the passenger airbag module nuts to 10
NSm (89 lb-in).
b. Passenger airbag module nut.
Notice : Do not reuse the removed torx bolts.
Replace the torx bolts with the new ones.
8B – 72 SUPPLEMENTAL INFLATABLE RESTRAINTS (SIR)
3. Connect the passenger airbag module connector.
4. Install the glove box. Refer to Section 9E, Instrument/
Driver Information.
5. Connect the negative battery cable.
D1AB508A
SENSING AND DIAGNOSTIC
MODULE (SDM)
Tool Required
DS 401 Torx Bolt Wrench.
Removal Procedure
1. Disconnect the negative battery cable.
2. Remove the floor console. Refer to Section 9G, Interior Trim.
D19E573A
3. Remove the SDM.
D Disconnect the SDM electrical connector (1).
D Remove the torx bolts using a torx bolt wrench DS
401 (2).
D Remove the SDM (3).
D110B511
Installation Procedure
Notice: Do not install an SDM that has been dropped or
has water damage, dents, cracks, or other visible defects. Attempted use of a defective SDM can result in
vehicle damage.
1. Install the SDM with the mounting torx bolts so that
the arrow on the SDM label points toward the front of
the vehicle.
Notice : Ground the wiring harness to the mounting torx
bolt (1).
Tighten
D1AB512A
Tighten the SDM mounting torx bolts to 15 NSm (11
lb-ft).
2. Connect the SDM electrical connector.
DAEWOO M-150 BL2
SUPPLEMENTAL INFLATABLE RESTRAINTS (SIR) 8B – 73
3. Install the floor console. Refer to Section 9G, Interior
Trim.
4. Connect the negative battery cable.
5. Check for proper operation of the system.
D Turn the ignition ON while watching the supplemental inflatable restraints warning lamp.
D The warning lamp should turn ON for about 4 seconds, and then turn OFF.
D110B009A
DAEWOO M-150 BL2
8B – 74 SUPPLEMENTAL INFLATABLE RESTRAINTS (SIR)
AIRBAG MODULE DEPLOYMENT
(IN VEHICLE)
(Left–Hand Drive Shown, Right–Hand
Drive Similar)
Deploy the airbags before disposing of them. This includes those in a whole vehicle being scrapped.
If the vehicle is still within the warranty period, contact
the Daewoo regional service manager for approval or
special instructions before deploying the airbag modules.
Caution: Before deploying the airbags, remove all
loose objects from the airbags expansion area.
Caution: Deploy the airbags with the vehicle doors
closed and the side windows open.
Caution: Deploy the airbags only in an evacuated
area. Service personnel who must be present during the deployment should be at least 10 meters
(33 feet) in front of the vehicle.
Caution: Do not connect the voltage source until after having completed all other preparations for the
deployment of the airbags.
Caution: Allow a deployed airbag module to cool
for at least 30 minutes before handling.
Caution: Wear the gloves and the eye protectors
during the disposal process.
Caution: If the deployment fails, disconnect the voltage source and wait 5 minutes before approaching
the vehicle.
Deployment Procedure
1. Disconnect both battery cables and place the battery
at least 10 meters (32.8 feet) from the vehicle.
Caution: Wait 1 minute after disconnecting both
battery cables to allow the capacitor inside the
sensing and diagnostic module (SDM) to discharge
before taking any other action. The capacitor supplies the reserve power to deploy the airbags, even
if the battery is disconnected. Unintentional deployment of the airbags can cause injury.
2. Remove the lower cover from the steering column.
3. At the lower steering column, cut the two wires leading from the supplemental inflatable restraint (SIR)
harness to the clock spring.
4. Strip 13 mm (0.5 inch) of insulation from the ends of
the wires leading to the clock spring.
5. Use two additional wires, each at least 10 meters
(33 feet) long, to reach from the deployment battery
to the airbag module.
6. Strip 13 mm (0.5 inch) of insulation from the ends of
these two additional wires.
7. Twist the two wires together at one end.
D110B010
DAEWOO M-150 BL2
SUPPLEMENTAL INFLATABLE RESTRAINTS (SIR) 8B – 75
8. Place the twisted ends of the two wires near the deployment battery. Do not connect the wires to the
battery at this time.
9. Using the free ends of the 10 meters (33 feet) wires
leading to the clock spring, make two splices, one at
each wire from the airbag module.
10. Wrap the splices with insulating tape.
D110B011A
11. Now that the free ends of the 10 meters (33 feet)
wires are spliced to the airbag module wires, and the
ends that are twisted together are near the deployment battery, clear the area.
12. Untwist the wires that are near the deployment
battery.
13. Touch one wire to the positive battery terminal and
touch the other wire to the negative battery terminal.
The airbag will deploy.
14. Repeat the procedure for the passenger airbag,
cutting the wires to the passenger airbag module
instead of the wires leading to the clock spring.
15. Strip 13 mm (0.5 inch) of insulation from the ends of
the wires leading to the passenger airbag module.
16. Use two additional wires, each at least 10 meters
(33 feet) long, to reach from the deployment battery
to the passenger airbag module.
17. Strip 13 mm (0.5 inch) of insulation from the ends of
these two additional wires.
18. Twist the two wires together at one end.
19. Place the twisted ends of the two wires near the deployment battery. Do not connect the wires to the
battery at this time.
20. Using the free ends of the 10 meter (33 feet) wires to
the passenger airbag module, make two splices,
one at each wire from the airbag module.
21. Wrap the splices with insulating tape.
22. Now that the free ends of the 10 meters (33 feet)
wires are spliced to the passenger airbag module
wires, and the ends that are twisted together are
near the deployment battery, clear the area.
23. Untwist the wires that are near the deployment
battery.
24. Touch one wire to the positive battery terminal and
touch the other wire to the negative battery terminal.
The passenger airbag will deploy.
25. Using the proper precautions, dispose of the
deployed airbag. Refer to “Deployed Airbag Module
Disposal Procedure” in this section.
DAEWOO M-150 BL2
8B – 76 SUPPLEMENTAL INFLATABLE RESTRAINTS (SIR)
AIRBAG MODULE DEPLOYMENT
(OUTSIDE OF VEHICLE)
Deploy all intact airbag modules that have been
D Removed from a scrapped vehicle.
D Found to be defective.
D Found to have been damaged during transit, storage,
or service.
Caution: Deploy the airbags only in an evacuated
area. Service personnel who must be present during the deployment should be at least 10 meters
(33 feet) in front of the vehicle.
Caution: Do not connect the voltage source until
completing all other preparations for the deployment of the airbags.
Caution: Allow a deployed airbag module to cool
for at least 30 minutes before removing it from the
vehicle.
Caution: Wear gloves and eye protection during the
disposal process.
Caution: If the deployment fails, disconnect the voltage source and wait 5 minutes before approaching
the vehicle.
1. Position the airbag module face up, on flat ground
outdoors, at least 10 meters (33 feet) from any obstacles or people.
2. Place a vehicle battery at least 10 meters (33 feet)
away from the airbag module.
3. Deploy the airbag module using the deployment tool.
4. Using the proper precautions, dispose of the
deployed airbag. Refer to “Deployed Airbag Module
Disposal Procedure” in this section.
DEPLOYED AIRBAG MODULE
DISPOSAL PROCEDURE
Caution: After an airbag module has been
deployed, the surface of the airbag may contain a
powdery residue. The powder lubricates the airbag
as it inflates. The dust that is produced as a byproduct of the deployment is unlikely to be harmful,
but use the gloves and the safety glasses in order to
prevent any possible irritation of the skin and the
eyes.
Caution: After deployment, the metal surfaces of
the airbag module will be hot. In order to avoid the
risk of an injury or a fire, do not place the deployed
airbag modules near any flammable objects, and allow the airbag modules to cool for 30 minutes before handling them.
Deploy an airbag before disposing of it. This includes
those in a whole vehicle being scrapped.
DAEWOO M-150 BL2
SUPPLEMENTAL INFLATABLE RESTRAINTS (SIR) 8B – 77
If the vehicle is still within the warranty period, contact
the Daewoo regional service manager for approval or
special instructions before deploying an airbag module.
Deployed airbag modules should be disposed of in the
same manner as any other scrap parts, with the addition
of the following steps:
1. Place the deployed airbag in a sturdy plastic bag.
2. Seal the plastic bag securely.
3. Wash your hands and rinse them with water after
handling a deployed airbag.
D110B012
DAEWOO M-150 BL2
8B – 78 SUPPLEMENTAL INFLATABLE RESTRAINTS (SIR)
SPECIFICATIONS
FASTENER TIGHTENING SPECIFICATIONS
ÁÁÁÁÁÁÁÁÁÁÁÁÁÁÁÁÁÁ
ÁÁÁÁÁÁÁ
ÁÁÁÁÁÁ
ÁÁÁÁÁÁÁ
ÁÁÁÁÁÁÁÁÁÁÁÁÁÁÁÁÁÁ
ÁÁÁÁÁÁÁ
ÁÁÁÁÁÁ
ÁÁÁÁÁÁÁ
ÁÁÁÁÁÁÁÁÁÁÁÁÁÁÁÁÁÁ
ÁÁÁÁÁÁÁ
ÁÁÁÁÁÁ
ÁÁÁÁÁÁÁ
ÁÁÁÁÁÁÁÁÁÁÁÁÁÁÁÁÁÁ
ÁÁÁÁÁÁÁ
ÁÁÁÁÁÁ
ÁÁÁÁÁÁÁ
ÁÁÁÁÁÁÁÁÁÁÁÁÁÁÁÁÁÁ
ÁÁÁÁÁÁÁ
ÁÁÁÁÁÁ
ÁÁÁÁÁÁÁ
ÁÁÁÁÁÁÁÁÁÁÁÁÁÁÁÁÁÁ
ÁÁÁÁÁÁÁ
ÁÁÁÁÁÁÁ
ÁÁÁÁÁÁ
ÁÁÁÁÁÁÁÁÁÁÁÁÁÁÁÁÁÁ
ÁÁÁÁÁÁÁ
ÁÁÁÁÁÁ
ÁÁÁÁÁÁÁ
ÁÁÁÁÁÁÁÁÁÁÁÁÁÁÁÁÁÁ
ÁÁÁÁÁÁÁ
ÁÁÁÁÁÁ
ÁÁÁÁÁÁÁ
Application
NSm
Lb-Ft
Lb-In
Clock Spring Mounting Screws
3
–
27
Driver Airbag Module Mounting Bolts
15
11
–
Passenger Airbag Module Mounting Nuts
10
–
89
Passenger Airbag Module Mounting Bolts
15
11
–
Sensing and Diagnostic Module Mounting Bolts
15
11
–
SPECIAL TOOLS AND EQUIPMENT
SPECIAL TOOLS TABLE
DS 401
Torx Bolt Wrench
Scan Tool
D102F101
D110B101
DAEWOO M-150 BL2
SUPPLEMENTAL INFLATABLE RESTRAINTS (SIR) 8B – 79
SCHEMATIC AND ROUTING DIAGRAMS
SUPPLEMENTAL INFLATABLE RESTRAINTS (SIR)
ELECTRICAL SCHEMATIC
D1AB201B
DAEWOO M-150 BL2