1
se _
Care
318 200 937 (0411) Rev. A
O ui
e
MAKEA RECORDFOBIIFUTURE
USE
m
[]
m
[]
[]
m
[]
m
[]
m
[]
[]
m
[]
[]
m
[]
[]
[]
m
m
[]
[]
m
[]
m
[]
m
[]
[]
m
[]
[]
m
[]
[]
[]
m
m
[]
Brand
Purchase
Date
ModeU Number
Serial Number
m
[]
m
[]
For toHofree tebphone
1o877-4ELECTROLUX
support in the U.S. and Canada:
(1-877-435-3287)
For online support and internet product information:
www.electrolux°com
@2004 Electrolux Home Products, Inc.
Post Office Box 212378, Augusta, Georgia 30917, USA
All rights reserved. Printed in the USA
T£BL£ OF OON N
m
[]
[]
[]
[]
m
[]
m
m
[]
m
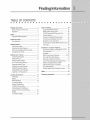
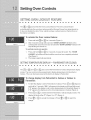
Finding Information ...........................................
2
Makea Recordfor Futureuse ..........................2
Questions?........................................................
2
Safety ...................................................................
4
ImportantSafety'Instructions..............................4
FeatureOverview ................................................
7
YourWallOven .................................................
7
Getting Started ...................................................
8
OvenVentLocation...........................................
8
BstallingOvenRackSupports...........................8
Removingand ReplacingOvenRacks..............8
ArrangingOvenRacks......................................
8
Setting oven controls ........................................
9
ControlPadsFunctions.....................................
9
SettingtheClock..............................................
10
SettingContinuousBake
or 12 hours EnergySaving..............................
11
SettingtheKitchenTimer ..................................
11
SettingOvenLockoutFeature.........................12
SettingTemperatureDisplay............................12
SettingSilentControlOperation.......................13
AdiustingOvenTemperature...........................13
Cooking Instructions .......................................
14
Preheating......................................................
14
Baking.............................................................
15
BakingProbbms .............................................
16
ConvectionBaking..........................................
17
SettingTimedBakeor
TimedConvectionBake...................................19
SetingDelayedTimedBakeor
DelayedTimedConvectionBake ....................20
Broi%g............................................................
21
ConvectionRoasting.......................................
23
[]
[]
m
[]
m
[]
m
m
[]
m
Care & Cleaning ................................................
24
UsingtheSelf-CleanFeature...........................24
StartingSelf-CleaningCycle............................25
ToStart DelayedSeBCleaningCycle..............26
GeneralCleaning............................................
27
CareandCleaningof StainlessSteel...............28
To Removeand ReplaceOvertDoor..............28
SpecialDoorCareInstructions........................28
To Removethe"HiddenBake"ElementCover 29
OvenLight ......................................................
29
Solutions to Common Problems.....................30
OvenControlsBeepsand DisplayF1to FIO ,, 30
F8 Is Displayed...............................................
30
Installation.......................................................
30
EntireOvenDoesNotOperate...................30-31
OvenLightDoesNotOperate.........................31
Self-CleanCycb DoesNotWork .....................31
OvertSmokesExcessivelyDuringBroiling...... 31
SoilNotCompletelyRemovedAfter
Self-CleaningCycleIsCompleted....................32
PoorBakingResults........................................
32
FlamesInsideOvenOr SmokeFromVent.......32
Notes ..................................................................
33
Warranty Information .......................................
36
[]
IIIMPO ANT SAFEW IIINS U
[]
[]
m
[]
[]
m
[]
m
[]
m
[]
[]
©NS
m
[]
[]
m
[]
[]
[]
[]
[]
[]
PUease read aH safety instructions before using your new EbctroUux wall oven,
Remove aHtape and packaging wrap before using the appliance, Destroy the carton and
pUastb bags after unpacking the appfiance, Never allow children to pUaywith packaging
material, Do not remove the wiring UabeU
and other fiterature attached to the back of the wall
oven, Do not remove modeU/serial number plate,
P roper Installation--Be sure you r appfiance is properly installed and grounded by a qualified
electrician or installer in accordance with the National Electrical Code ANSI/NFPA No, 70
(U,S,A,)orCSAC22,1,
PART1 (Canada)--Iatest editionsand local code requirements, Install
only per installation instructions provided in the literature package for this appliance,
Ask your deabr to recommend a qualified technician and an authorized repai r sewice, Know how
to disconnect the electrical power to the appliance at the circuit breaker or fuse box in case of
an emergency,
Electronic controllers can be damaged by cold temperatures, When you use
your appliance for the first time, or if it has not been used for a long period of time, make sure
that it has been exposed to a temperatu re above 0°C/32 °F for at bast 3 hours before conn ecting
it to the power supply,
User Servicing--Do
not repair or replace any part of the appliance unless specifically
recommended in the manuals, All oth er servicing should be done only by a qualified technician
to reduce the risk of personal injury and damage to the appliance,
Never modify or alter the construction of the appliance by removing panels, wi re covers, orany
other part of the product,
,_ Remove the oven door from any unused appliance if it is to be stored or discarded,
Stepping, leaning, sitting or pulling down on the door of this appliance can
result in serious injuries and may also cause damage to the appliance, Do not allow children
to climb or play around the appliance,
o Storage in or on Apptianee--FlarnmabJe
materials shoutd not be stored in an oven.
This includes paper, plastic and cloth items, such as cookbooks, plasticware and towels, as
well as flammable liquids, Do not store explosives, such as aerosol cans, in or near the
appliance,
Do not use the oven for storage.
Do not store items of interest to chiJdren in the cabinets
appliance.
Children
climbing
on the oven can be seriously
injured.
above an
_To
reducetheriskoftippingoftheappliance,
Theappliancemustbe
securedbyproperlyinstallantitipdevice,Tocheckifdevicesareinstalled
properlyopenthe
ovendoorandverifythattheanti-tipdeviceareengagedseeinstallation
instructions,
o Donothavechildrenabne--ChHdren
shouUd
notbebft abneor unattended
inthearea
whereanapplianceisinuse,TheyshouUd
neverbeallowedtositorstandonanypartof
theappliance,
o DONOTTOUCH
iNTERiOR
OVENELEMENTS
ORiNTERiOR
SURFACES
OFTHEWALL
OVENUNTU
LTHEYHAVECOOLED,Theovenheatingebmentsmaybehoteventhoughthe
ebmentsaredarkincobr,Areasneartheebmentsmaybecomehotenoughtocauseburns,
Duringandafteruse,donottouch,or bt cbthingorotherflammable
materialstouchthese
areasuntiltheyhavehadsufficienttimeto cool,Amongtheseareasaretheovenvent
openings,
thesurfacesneartheseopenings,
ovendoorandwindow,
WearProper
Apparel--Loose-fitting
orhanging
garments
shouldneverbewornwhibusingthe
appliance,Donotletclothingorotherflammable
materialscontacthotsurfaces,
o DoNotUseWateror FlouronGreaseFires--Smother
thefirewitha panlid,orusebaking
soda,a drychemicalorfoam-type
extinguisher,
o Whenheatingfatorgrease,watchitclosely,Fatorgreasemaycatchfireifallowedtobecome
toohot,
UseOnlyDryPotholders--Moist
ordamppotholderson hotsurfacesmayresultinburns
fromsteam,Donotletthepotholderstouchthehotheatingelements,
Donotusea towelor
otherbulkyclothinsteadofa potholder,
DoNotHeatUnopened
FoodContainers--Build-up
ofpressuremaycausethecontainerto
burstandresultininjury,
IMPORTANT
INSTRUCTIONS
FORUSINGYOUROVEN
, Use Care When Opening an Oven Door--Stand to the side of the appliance when opening the
door of a hot oven, Let hot air or steam escape befo re you remove or replace food in the oven,
Keep Oven Vent Ducts Unobstructed, The wall oven is vented at the upper control panel or at
the center trim depending of the model, Touching the surfaces in this area when the wall oven
is operating may cause severe burns, Also, do not place plastic or heat-sensitive items near
the oven vent, These items could melt or ignite,
o Placement of Oven Racks, Always place oven racks in desired location while oven is cook
Remove all utensils from the rack before removing rack, if rack must be moved while oven is
hot, use extreme caution, Use pot holders and grasp the rack with both hands to reposition,
Do not let pot holders contact the hot oven element or interior of the oven,
Do not use the broiler pan without its insert. The broiler pan and grid allow dripping fat to
drain and be kept away from the high heat of the broiler,
iMPORTANTSAFEW IIINSTRUCT ONS
[]
[]
[]
[]
[]
[]
[]
[]
[]
[]
[]
[]
[]
[]
[]
[]
[]
[]
[]
[]
[]
[]
Do not cover the broiler grid or oven bottom with a)uminum foil. Exposed fat and g rease
could ignite,
, Do not touch a hot oven light bu(b with a damp c(oth. Doing so could cause the bulb to
break, Disconnect the appfiance or shut off the power to the appUance before removing and
replacing the bulb,
iMPORTANTiNSTRUCTiONSFOR CLEANINGYOUR
Cban the appliance regulaHy to keep aUparts free of grease that could catch fire, Exhaust
fan ventilation hoods and grease filters should be kept clean, Do not allow grease to
accumulate, Greasy deposits in the fan could catch fire, Refer to the hood manufacturer's
SELF CLEAN(NG
OVENS
Clean in the selfocleaning cycle only the parts of the appliance listed in this Owner's Guide,
Before using the seifocieaning cycle of the appliance, remove the broiler pan, oven racks and
any utensils stored in the appliance, Also the side rails of the oven racks must be removed for
the seifociean function to operate,
Do not clean the oven door gasket, The door gasket is essential for a good seal, Care should
be taken not to rub, damage or move the gasket,
Do not use oven cleaners, No oven cleaner oroven finer protective coating of any kind should
be used in or around any part of the appliance
The health of some birds is extremely sensitive to the fumes given off during
the self-clean cycle of any wall oven, Move birds to another well ventilated room,
Peal:ure
uverview
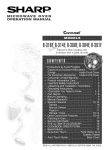
YOURW£LIILOVEN
[]
m
m
[]
[]
[]
m
[]
[]
m
[]
[]
m
[]
m
[]
m
[]
[]
m
[]
m
CONVECTIONFAN
l
OVENVENT
OVENDOORLATCH
BROILING ELEMENT
OVENRACK SUPPORT
OVENRACKS
ELEMENTCOVER
GLASS OVENDOOR
BROILER PANCOVER --
'_'iiiiiiiii!]iiJ!/iiiiii]i////_ii
BEI/O
[]
[]
[]
$E ING OVEN CONOILS
[]
[]
[]
[]
[]
[]
[]
[]
[]
[]
[]
[]
[]
[]
[]
[]
[]
[]
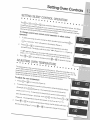
Oven Vent Location
installingOven Rack Supports
Removing and Replacing Oven
The oven is vented under
upper controJ panel,
When the oven is on, warm
air is released through the
vent, This venting is
necessary for proper air
circulation in the oven and
good baking results,
ALWAYS/h/STALL OVEN RACK
SUPPOR T BEFORE TURNING ON
THE OVEN (WHEN THE OVEN IS
Rac ks AL WAYS A RRA NGE OVEN
COOL).
To install oven rack support, insert
the support tabs in the hobs iocated
on the oven inside side as shown
below. To remove the oven rack
support for a self-clean cycle, pull up
the support to disengage the tabs
from the oven. if the rack supports are
not removed, the self-clean cycle
won't start. Always remove the left
[]
RACKS WHEN THE OVEIV IS COOL
(PRIOR TO OPERA TING THE OVEN).
Always use oven mitts when using the
oven,
To remove an oven rack, pull the rack
forward. Lift up the rack off the oven rack
slider. To reptace an oven rack, place
the rack on the slider and fit the sliders
pin into the pinhole located at the 2 front
corner of the rack.
sliders
from
sliders
Pull oven rack forward and lift it
sliders
up of the oven rack slider.
Arranging Oven Racks ALWAYSARRANGEOVEN
RACKS _,.tAHEN
THE OVEIV IS COOL (PRIOR TO OPERA TING
THE OVEN).
To bake on a single rack, place the rack in position 3. To bake
on 2 racks, place the racks in position 2 and 7. To bake on 3 racks,
place the racks in position 1,3 and 7.
RECOMMENDED
RACK POSiTiONS FOR BROiLiNG, BAKING
& ROASTING
Food
Rack Position
Broiling meats, chicken or fish
6 or 7
Cookies, cakes, pies & muffins
5 or6
Frozen pies, angel food cake, yeast, bread,
casseroles, small cuts of meat or poultry
2
Turkey, roast or ham
1
Note: Always use caution when removing food,
Oven
CON
m
[]
[]
IIPAD
IFUNCTIIIONS
[]
[]
m
[]
m
m
[]
m
[]
[]
m
[]
m
[]
m
m
[]
m
[]
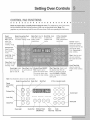
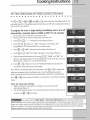
Read the instructions carefully before using the oven. For satisfactory use of your oven,
become familiar with the various functions of the oven as described below. Note: The
graphics on your timer may look like one of those shown. Both are operating the same way.
Bake Convection PadRoast
Used to select the
Convection
Pad- Used to
convection baking mode.
select the
convection
roasting mode.
Bake Pad- Used to
enter the normaI
Broil Pad- Used
to seiect the
baking mode
temperature,
variable
mode.
broil
0 Thru 9 number
pads- Used to
enter temperature
and times.
Preheat PadUsed to select
the preheat
mode.
Lock Pad- Used
to disable all
oven function.
Cancel- Used to
cancel any function
previously entered
except the time of day
and minute timer.
Push Cancel pad to
stop cooking.
Start- Used to start
alI oven functions.
Not used with Oven
Light.
/
Clean Pad- Used
to select the selfcleaning mode.
Oven Light- Used
to turn the oven
light on and off.
Note: See illustration
Clock Pad- Used
to set the time of
day.
\
Start Time Pad- Used to set
the desired start time for
baking or cleaning, Can be
used with BAKE or CLEAN
cycles to program a delayed
bake cycle.
KitchenTimerON/OFF
Pad- Used to set or
cancel the minute timeh
The minute timer does
not start or stop cooking.
PadUsed to enter the
length of the cooking
time.
above for pad description.
Bake Convection
Pad
Bake Pad
0 Thru 9 number
pads
Roast
Convection
Pad
Preheat
000
Pad
Cancel
Lock Pad
?o,
\
Clean Pad
Oven Light
Clock Pad
Kitchen Timer
ON/OFF Pad
Start
Time Pad
pad
Start pad
Cook
Time Pad
:Eiiiiiiiiiiiiiii
:Eiiiiiiiiiiiiiii
SE NG THE CLOCK
[]
[]
[]
[]
[]
[]
[]
[]
[]
[]
[]
[]
[]
[]
[]
[]
[]
[]
[]
[]
[]
[]
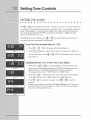
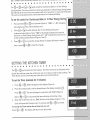
The _£_) or (.J_} pad is used to set the chock. The chock may be set for 12 or 24 hour time of
day operation. The chock has been preset at the factory for the 12 hour operation. When the
range is first plugged in, or when the power supply to the range has been interrupted, the
timer in the display wiil flash with "PF" (power failure, See Figure 1). Note: The chock
cannot be set when the oven is on.
When PF appears in the display, press (_)_A,0,
or _.
No sound wiil be heard, but after 10
seconds a beep wiil sounds and PF wiil disappear.
To set the clock (example below for 1:30):
Figure 1
1.
Press 0
or _.
2.
Press Q
(_) Q
"CLO" wiil appear in the display (Figure 2).
pads to set the time of day to 1:30 <Figure 3). "CLO" wiil
appear in the display. Press (_) or _.
"CLO" wiil disappear and the chock wiil
start (Figure 4).
Figure 2
Changing between 12 or 24 hour time of day display:
Press and hold _
2.
down the current time of day wiil remain and "CLO" wiil disappear from the
display (Figure 4). CONTINUE holding the pad until a beep is heard.
The display wiil show either "12Hc" (Figure 5) or "24Hr" (Fig.6).
3.
Press _
Figure 3
4.
5.
Figure 6
or _,}
to switch between the 12 and 24 hour time of day display.
The display wiil show either "12Hc" (Figure 5) or "24Hr" (Figure 6).
Figure 4
Figure 5
or _Q.,_for 8 seconds (Figure 3). While holding the pad
1.
Press
or (_,)to
accept the change or press _
or _
to reject the
change.
Reset the correct time as described in To set the Clock above. Please note
that if the 24 hour time of day mode was chosen, the chock wiil now display
time from 0:00 through 23:59 hours.
m
The
[]
[]
[]
[]
l
[]
m
m
[]
m
[]
[]
m
[]
m
[]
m
m
[]
m
U
......
or
and
or
pads control the Continuous Bake or 12 Hour Energy
Saving features, The oven contron has a factory preset buJJt-Jn12 Hour Energy Saving feature
that wiHishut off the oven if the oven controi is Hefton for more than 11 hours and 59 minutes,
The oven can be programmed to override this feature for Continuous Baking,
To set the control for Continuous Bake or 12 Hour Energy Saving
1,
Press and hoid _
or
for 8 seconds (Figure1), "12Hr" or "- -Hr" wHi appear
in the dispiay and the controi wHi beep once,
2,
Press @
or _)
Figure 1
to switch between the 12 Hour Energy Saving and
continuous bake features, Note: "12Hr" in the display indicates the control is
set for the 12 Hour Energy Saving mode and "- -Hr" indicates the controi is set
for the Continuous Bake feature (Figures 2 and 3),
3,
Press _
Figure 2
or {(_ to accept the change (Figure 4; dispiay wili return to time of
day) or press (_) or {_) to reject the change,
Figure 3
Figure 4
S£ ING T
B
[]
[]
The ...... or
[]
[]
KITC N TIM££
B
[]
B
B
[]
B
@pad controls the Timer feature,
[]
[]
W
J
J
a
J
J
m
if
The Timer serves as an extra timer in the
kitchen that will beep when the set time has run out, It does not start or stop cooking, The
Timer feature can be used during any of the other oven control functions,
To set the Timer (example for 5 minutes):
_tche_
@o "0:00" will appear in the display (Figure 5).
1,
Pless _......or
2,
Press the number pads to set the desired time in the display (example @),
Press (_) or @,
The time will begin to count down with "5:00" (Figure 6),
Note: if (_) or (_@ is not pressed the timer will return to the time of day,
3,
When the set time has run out, "E_d" wi{{ show in the display (Figure 7}, The
clock wili sound with 3 beeps every 15 seconds unti{ @ or @
Figure 6
is pressed,
To ca_ce_ the Timer before the set time has run out:
Figure 7
Press _
or
, The dispHay wiii return to the time of day,
SE NG OVEN IIII,,,,,,,,,,OGKOUT
IIFEATU
[]
[]
[]
[]
[]
[]
[]
[]
[]
[]
[]
[]
[]
[]
[]
[]
[]
[]
[]
[]
[]
[]
The ( I=1)or (..Q9pad controls the Oven Lockout feature. The Oven Lockout feature
automatically locks the oven door and prevents the Warmer Drawer from being turned on.
it does not disable the clock, Timer, electric and gas surface burners, Warmer Zone or
the interior oven lights.
To activate the Oven Lockout feature:
Figure
1
1.
Press and hold @
or _}
for 3 seconds (Figure 1).
2.
After 3 seconds a beep will sound and "DOOR LOCKED" will flash on the
control panel Once the oven door is bcked the "DOOR LOCKED" indicator will
stop flashing and remain on.
To reactivate normal oven operation:
1.
Press and hoUd@
or @
for 3 seconds. A beep wHUsound. The "DOOR
2.
LOCKED" wHUcontinue to flash until the oven door has compbtely unlocked
(See Figure 1).
The range is again fully operational.
SE"'/°""/_HG
"'/°'EMPER£TUBE
D_SPLAY--FAHBENHEI"'/°'
ORCELSIUS:
[]
[]
[]
[]
[]
[]
[]
[]
[]
[]
[]
[]
[]
[]
[]
[]
[]
[]
[]
[]
[]
[]
The
or (,_ and (_ or (,_) pads control the Fahrenheit or Celsius temperature display
modes, The oven control can be programmed to display temperatures in Fahrenheit or
Celsius, The oven has been preset at the factory to display in Fahrenheit,
To change display from Fahrenheit to Celsius or Celsius to
Fahrenheit:
1.
Figure 2
Figure 3
To tell if the display is set for Fahrenheit or Celsius. Press @
or _}
(figure 2)
and hold for 7 seconds; "550 °'' will appear in the display and a beep will sound.
If "F" appears, the display is set to show temperatures in Fahrenheit (Figure 3).
If "C" appears, the display is set to show temperatures in Celsius (Figure 4).
2.
Press @
or _)
to switch between Fahrenheit or Celsius display modes. The
display will show either "F" (Figure 3) or "C" (Figure 4).
3.
Press (_),T,o,
or d@ to accept the change or Press (_)_,,_0,
or @
change.
Figure 4
to reject the
Setting Oven Controls
SE NG SILENTCONTROLOPERATION
II
II
The _
II
II
II
I
i
m
R
18
Im
B
[]
D
m
U
I
a
M
II
n
or "_'(,_'-,_
and f'_0_or _-"(."_)
pads control the Silent Control operation feature. The Silent
Control operation feature allows the oven control to be operated without sounds or beeps
whenever necessary. If desired the control can be programmed for silent operation and later
returned to operating with all the normal sounds and beeps,
To change control from normal sound operation to silent control
operation:
1.
_'_ for 7 seconds.
2,
or
To tell if your range is set for normal or silent operation press and hold
HO_O0
li
will
FigureI
appear in the dispUay (Figure 1).
or _'_.bto switch between normal sound operation and silent
Press _
operation mode. The display will show either ":SP" (Figure 2) or "'-*" (Figure 3).
Figure 2
If ":SP" appears (Figure 2), the control will operate with normal sounds and
beeps. If .....
.-- appears (Figure 3), the contro is in the silent operation mode.
3.
Press
or_
to accept the change or press (_. or @
to re}ect the change.
Figure 3
ADJUSTINGOVENTEMPERATURE
Ill
U
II
II
II
III
!
D
Im
II
Im
m
m
B
N
II
M
m
U
M
II
M
il;!_;:!;i;!iil
The temperature in the oven has been pro-set at the factory. When first using the oven, be
sure to follow recipe times and temperatures. If you think the oven is too hot or too cool, the
temperature in the oven can be adjusted. Before adjusting, test a recipe by using a
temperature setting that is higher or lower than the recommended temperature, The bakinq
results should help you to decide how much of an adjustment is needed.
To adjust the oven temperature:
1.
2.
Press G
or @
for 8 seconds (Figure 4),
Figure 4
To increase the temperature use the number pads to enter the desired change.
(Example 30°F) Q
Q
(Figure 5), The temperature may be increased as
much as 35°F (17°C). To decrease the temperature use the number pads to
enter the desired change, (Example -30°F) (_) C)
and then Press @
Figure 5
or
(Figure 6). The temperature may be decreased as much as 35°F (17°C),
3.
Press _
the time
or _.)
of
to accept the temperature change and the display will return to
Figure 6
day (Figure 7). Press @ or _d_ to reject the change if necessary,
Figure 7
m
[]
[]
[]
[]
[]
[]
[]
[]
[]
[]
[]
[]
[]
[]
[]
[]
[]
[]
[]
[]
The _;_ or (,)lt!_)pad controUs the Preheat feature. The Preheat feature wHUbring the oven
[]
up
to temperature and then indicate when to pUacethe food in the oven. Use this feature in
combination with the Bake pad when recipes call for preheating. Preheating is not
necessary when roasting or cooking casseroUes. The oven can be programmed to preheat at
any temperature between 170°F to 550°F.
To set the Preheat temperature for 350°F:
1.
Arrangetheintefioroven
2.
Press _
3.
Press (_), (_), C)" "350°" will appear in the display (Figure 2).
4.
Press (_)
or @.
8TART
or _.
racks.
"- - - °" wHUappear in the dispUay (Figure 1).
Figure 1
"PRE" wHUappear in the dispUay as the oven heats and
reaches 350°F (Figure 3).
Figure 2
Figure 3
Note: After the oven has reached the desired temperature (this exampUe, 350°F) the
control will beep and the "PRE" light will turn off and oven temperature will be
displayed (Figure 4). If the beep was missed, a quick glance at the display with
oven temperature showing in the oven display is a good way to check that the oven
has already reached the preheat temperature. Once the oven has preheated,
PLACE FOOD IN THE OVEN,
Press @ or (_
when baking is complete or to cancel the preheat feature.
Figure 4
To change Preheat temperature while oven is preheating
(example changing from 350 to 425°F):
Figure 5
If it is necessary to change the preheat temperature while the oven is preheating to
1.
Figure 6
2.
While preheating, press _
or (9"
"- - -°'' will appear in the display (Figure 5).
Enter the new preheat temperature. Press (_), (_),
C:). "425 °" will appear in
the display (Figure 6).
3.
"PRE" will appear in the display as the oven heats and to
425°F (Figure 7). A beep will sound once the oven temperature reaches 425°F
and the display will show "425 °" (Figure 8).
Figure 7
4.
Figure 8
Press (_),,,,
or C_"
When baking is complete press @ or (9"
Fto550° F(ThesampleshownbeUow
isfor350°F),
To set the Bake Temperatureto 350°F:
1,
Arrange interior oven racks and place food in oven,
2,
Press (_
3,
Press (_), Q,
4,
Press @ or _,
or (_@, "- - - °" will appear in the display (Figure 1 ),
Q
Figure I
(Figure 2), "350 °'' wiMM
appear in the dispMay,
A beep will sound once the oven temperature reaches 350 °
F and the display will show "350 °'' (Figure 3),
Pressing @ or _
will cancel the Bake feature at any time,
To change the Bake Temperature
1,
(example changing
Figure 2
from 3500 to 425°F}:
After the oven has already been set to bake at 350°F and the oven temperature
needs to be changed to 425°F, press _
or (_
(Figure 4) and "* - -
o
ii
Figure 3
will
show in the display,
2,
Press (_,
Q,
3,
Press (_) or
Q
(Figure 5), "425 °`' wi]] appear in the display.
Figure 4
"425 °" wJJlappear in the display (Figure 6),
S1AR_
L4ote:If the oven was recently heated from prior cooking and has remaining
heat, the bake dement symbol may not show in the display immediately,
Figure 5
Figure 6
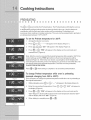
Air Circulation in the Oven
For good air circulation in the oven and best baking results, center pans as much as possib}e.
Allow 5,1 to 10.2cm (2" to 4") around the utensil(s) for proper air circulation and be sure pans do
not touch each other, the door, sides or back of oven, The hot air must circulate around the pans
in the oven for even heat to reach all par_s of the oven,
if using
if using
multiple pans_ stagger as shown.
one pan, place in center of oven.
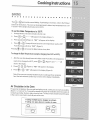
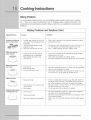
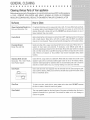
Baking Problems
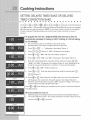
For best cooking resuUts heat the even when baking cookies, breads, cakes, pies or pastries,
etc,,, There is no need to preheat the oven for roasting meats or baking casseroUes, The
cooking times and temperatures
needed to bake a product may vary sHghtUyfrom your previous
appliance,
Baking Problems and Solutions Chart
BakingProblems
Causes
Cookies and biscuits
burn on the bottom,
®
o
Cakes too dark on
top or bottom.
o
the center.
®
®
Cookies and biscuits put into the
oven before the preheating time is
completed.
Oven rack overcrowded or rack
position too Iow.
Dark pan absorbs heat too fast.
Cakes put into the oven before
preheating time is completed.
Rack position too high or low.
Oven too hot.
Oven too hot.
Incorrect pan size.
Pan not centered in oven.
Somutions
Allow oven to preheat to the selected temperature before
placing food in oven.
,
Choose pan sizes that will permit 5.1 cm to 10.2 cm (2" to
4") of air space on all sides when placed in the oven.
Use a medium-weight aluminum baking sheet.
o
Allow oven to preheat to the selected temperature before
placing food in the oven.
Use proper rack position for baking needs.
Set oven temperature 25°F/12°C lower than recommended.
o
Set oven temperature 25°F/12_C lower than recommended.
Use pan size suggested in recipe.
Use proper rack position and ptace pan so there is 5.1 cm
to 10.2 cm (2" to 4") of space on aII sides of pan.
Cakes not level
®
Range not level.
o
Pan too close to oven wall or rack
overcrowded.
Pan warped.
®
cooking
time is up.
,
Oven too cool.
®
Oven overcrowded.
Oven door opened too frequently.
o
Place a marked glass measuring cup filled with water on
the center of the oven rack. If the water Ievel is uneven, refer to the installation instructions for Ieveling the range.
Be sure to aIIow 5.1 cm to 10.2 cm (2" to 4") of clearance on
aII sides of each pan in the oven.
Do not use pans that are dented or warped.
Set oven temperature 25_F/12_C higher than suggested
and bake for the recommended time.
Be sure to remove alI pans from the oven except the ones
to be used for baking.
Open oven door only after shortest recommended baking
time.
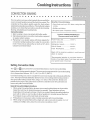
Cookin
CONVECTION
BAKING
m
[]
[]
[]
[]
[]
[]
[]
[]
[]
[]
[]
[]
[]
The convection oven uses a fan located in the rear wall of the
oven to ci rcuUateheated air around the food to be cooked, The
controlled air flow pattern qubHy seaUs the food surface
retaining the naturaUjuices and fiavour, This method of cooking
enabbs you to obtain the best culinary resuUtswhen baking,
thawing, dehydrating and roasting foods,
Convection notes:
1, Batch cooking is more convenient with better resuUts,
2, Defrosting is quicker in convection mode when compared
to regular radiant cooking,
3, Remember to use tested recipes with times adjusted for
convection baking/roasting when using the convection
mode, Times may be reduced by as much as 30% when
using the convection feature,
[]
[]
[]
Benefits
[]
[]
[]
of Convection
[]
[]
Bake:
--Some foods cook up to 30% faster, saving time and
energy.
--Multiple
--No
rack baking.
speciaI pans or bakeware
needed.
Foods for CONVECTION BAKE pad
*Decrease normal cook time by:
Begin with the maximum
adiust as needed.
reduction
in cook times and
*Recommended reduction in cook times based on
brands of food items tested. Cook times may vary with
your specific brand of food item.
Setting Convection Bake
The c.........
',a3/ or
pad controls the Convection Bake feature, Use the Convection Bake
feature when cooking speed is desired, The oven can be programmed for Convection baking
at any temperature between 300 ° F (149 ° C) to 550 ° F (288 ° C),
Convection baking uses a fan to circulate the oven's heat evenly and continuously within the
oven, This improved heat distribution allows for fast, even cooking and browning results, it
also gives better baking results when using 2 or 3 racks at the same time, Breads and
pastries brown more evenly, Most foods cooked in a standard oven will cook faster and
more evenlywith Convection Bake,
General Convection Bake instructions
1,
2,
3,
When using Convection Bake, decrease your normal cooking times as shown aside,
Adjust the cook time for desired doneness as needed, Time reductions will vary
depending on the amount and type of food to be cooked, Biscuits should be baked on
pans with no sides or very low sides to allow heated air to circulate around the food,
Food baked on pans with a dark finish will cook faster,
Preheating is not necessary when cooking casseroles with Convection Bake,
When using Convection Bake with a single rack, place oven rack in position 2 or 3, if
cooking on multiple racks, place the oven racks in positions 2 and 7,
To set the oven for Convection Bake and temperature to 350°F:
Figure 1
1.
Arrange interior oven racks and pUacefood in oven.
2.
Press c_,, or
3.
Press (Z)' G'
. "- - -°" wHUappear in the display (Figure 1).
Q
"350°" wiUUappear in the dispUay <Figure 21.
4. Press
@or_). "PRE"
andthefanicon
wiUU
appear
inthedispUay (Figure
Figure 2
Figure 3
until the oven reaches 350 ° F. A beep wHUsound once the oven temperature
reaches 350 ° F and the dispUay will show "350°"and the fan icon (Figure 4).
Note: The convection fan will start AS SOON AS the oven is set for Convection
Bake. The oven icon will show a rotating fan within the square. This rotating fan icon
indicates when the Convection Fan is operating (See rotating fan in Figure 4).
Press (_) or _
cA_c_
Figure 4
3)
to stop Convection Bake or cancel Convection Bake at any time.
$E_NG E_IED BAKEOBEMED CONVECEONBAKE
m
[]
[]
[]
[]
[]
[]
[]
[]
[]
[]
[]
[]
[]
[]
[]
[]
[]
[]
[]
N
[]
The
@<or
@>or°@or@>and
@<or
@>pads
contro,
the
Tmed
, Bake
feature.
The
automatic timer of the Timed Bake feature wiii turn the oven OFF after cooking for the desired
amount of time you selected.
To program the oven to begin baking immediately and to shut off
automatically: (exampb below to BAKE at 350°F for 30 minutes}:
1.
2.
Be sure the clock is set for the correct time of day.
Arrange interior oven rack(s) and place the food in the oven.
3.
Press @
4.
Press @, @, @ (Figure 2). "350 °" wHnappearin the disphy. Min.
temperature is 170°F bake and 300°F for convection bake.
or @,
"- - - °" will appear in the display (Figure 1).
5.
Press @ or @."350
6.
Press @
7.
Enter the desired baking time by Pressing (_,
or _.
Figure 1
Figure 2
°" wii"
appear in the display (See Figure 3).
"0:00" and "350 °'' will appear in the display (Figure 4).
Figure 3
@.
"30:00"
and "350 °'' will
appear in the display (Figure 5). Note: Baking time can be set for any amount of
time between 1 minute to 11 hours and 59 minutes.
8.
Press (_)
or @.
stA_l
(Figure 6). Once the Timed Bake feature has started, the
Figure 4
current time of day will appear in the display.
Note: After the Timed Bake feature has activated, press @
or _
to display the
bake time remaining in the Timed Bake mode. Once Timed Bake has started
baking, a beep will sound when the oven temperature reaches the set temperature.
Press (_)o,,o_,
or @
Figure 5
when baking has finished or at any time to cancel the Timed Bake
feature.
When
the timed
bake finishes:
1.
"End" and the time of day will show in display, The oven will shut off
2.
The control wiii beep 3 times. The control wiii continue to beep 3 times eveG/ 30
seconds until @ or @
is pressed.
Figure 6
Figure 7
SE NG BELAYEDTIMEDBAKE OR BEIIL,,AYEB
T MEBCONVE
BAKE
[]
[]
[]
[]
[]
The @ (or @)or
[]
[]
[]
[]
_@" (or @),
[]
[]
[]
@ (or @)and
[]
[]
[]
[]
[]
@ (or @)pads
[]
[]
[]
[]
[]
contro, the De,ayed
Time Bake feature, The automatic timer of the Delayed Time Bake will turn the oven on and
off at the time you select in advance, NOTE: if your clock is set for normal 12 hour display
mode the Delayed Time Bake feature can never be set to start more than 12 hours in
advance,
To program the oven for a delayed BAKE start time and to shut off
automatically (example for baking at 350°F, starting at 5:30 and baking
for 30 minutes):
Figure
!
Figure
2
1,
2,
Be sure that the clock is set with the correct time of day,
Arrange interioroven rack(s) and place the food in the oven,
3,
Press @
4,
Press (Z)' (_'
or @.
"- - -°" will appear in the display (Figure 1),
(_ (Figure 2), "350 °" will
appear in the display,
5. Press @ or (_). "350°" will
stay in the display, (Figure 3),
Figure
3
or (_,). "0:00" and "350 °" will appear in the display (Figure 4),
6,
Press @
7,
Enter the desired baking time using the number pads by Pressing @,
@,
"30:00" and "350 °'' will appear in the display (Figure 5), Note: Baking time can
be set for any amount of time from 1 minute to 11 hours and 59 minutes,
8
Press @ or 60'
9,
Press @
"350°" will
show (Figure 6),
Figure 4
@,
Enter the desired start time using the number pads
or _),
®,
@ (Figure7),
10, Press @ or _,),
When Delayed Time Bake starts, the set
oven
temperature
Figure 5
will disappear, the current time of day will appear in the display (Figure 8),
11, When the desired start time is reached, "350 °" appears in display, Oven starts
to bake at the previously selected temperature,
Figure 6
Press
@or @
when baking has completed or at any time to cancel the Delayed
Time Bake feature,
CAnceL
When the set bake time runs out:
Figure 7
1.
2.
"End" will appear in the display and the oven will shut off automatically (Figure 9).
The control will beep 3 times. The control will continue to beep 3 times every 30
seconds until (_)_,,o0,
or _D
Figure 8
Figure 9
is pressed.
m
[]
[]
[]
[]
[]
[]
[]
[]
[]
[]
[]
[]
[]
[]
[]
[]
[]
[]
[]
[]
[]
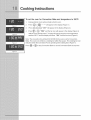
Broiling is a method of cooking tender cuts of meat by direct heat under the
broil element of the oven.
Preheating
Preheating is suggested when searing rare steaks. (Remove the broiler pan
before preheating. Foods will stick if placed on hot metal.) To preheat, set the
control(s) to BROIL as instructed in this manual. Wait for the element to
become red=hot, usually about 2 minutes. Preheating is not necessary when
broiling meats well=done.
To Broil
Broil one side until the food is browned; turn and cook on the second side.
Season and serve. Always pull the rack out to the "stop" position before turning
or removing food.
Broiling Tips
The broiler pan and it grid allow dripping grease to drain and be kept away from
the high heat of the broiler.
Broiling Times
Use the following table for approximate broiling times, increase or decrease
broiling times, or move the broiling pan to a different rack position to suit for
doneness, if the food you are broiling is not listed in the table, follow the
instructions provided in your cookbook and watch the item closely.
Etectric Range Broiling
Food
item
TabJe Recommendations
Rack
Position
Temp
Setting
Steak 1" thick
5 or 6
5 or 6
550° F
550° F
6:00
7:00
4:00
5:00
Rare
Medium
Pork Chops 3/4" thick
Chicken - Bone in
Chicken - Boneless
Fish
5 or 6
4
5 or 6
5 or 6
550 ° F
450°F
450 ° F
500 ° F
8:00
20:00
8:00
13:00
6:00
10:00
6:00
n/a
Well
Well
WelI
WelI
Shrimp
Hamburger
4
5 or 6
4
550 ° F
550 ° F
550 ° F
5:00
9:00
10:00
n/a
7:00
8:00
Well
Medium
Well
1" thick
Cook Time
1st side
2nd side
Doneness
Should an oven fire occur, close the oven door and turn off the oven, if the fire
continues, throw baking soda on the fire or use fire extinguisher, DO NOT put water or flour on
the fire, Flour may be explosive,
Setting Broil
The _
oF_
pad controHs the BFoHfeature. When broiling, heat
radiates downward from the oven broiler for even coverage. The BroH
feature is preset to start broiling at 550°F however, the Broil feature
temperature may be set between 400°F and 550°F.
The broil pan and broil pan insert used together aHHow
dripping grease to
drain and be kept away from the high heat of the oven broiler. DO NOT use
the broil pan without the insert (See Figure 5). DO NOT cover the broil
pan insert with foit. The exposed grease couHdignite.
ShouHdan oven fife occur, Heavethe oven door cHosedand
turn off the oven. Hfthe fife continues, throw baking soda on the fife oFuse
a fife extinguisher. DO NOT put water oFflour on the fire. FHourmay be
expHosive and water can cause a grease fife to spread and cause personaH
injuG/.
Figure 1
To set the oven to broil at the default setting (550°F}:
1.
Figure 2
2.
Figure 3
PHacethe broiHer pan insert on the broiHerpan. Then pHacethe food on the broiHer
pan insert. DO NOT use the broiHerpan without the insert. DO NOT cover the
broiHerinsert with foil The exposed grease couHd ignite.
Arrange the interior oven rack and pHacethe broiHerpan on the rack. Be sure to
center the broiHerpan directHy under the broiHer eHement. Make sure the oven
door is in the broil stop position (See Figure 1).
3.
Press Q
4.
Hfa HewerbroiHtemperature is desired (minimum broiHtemperature setting is
400°F), press the desired temperature before continuing to step 5.
5.
Press (_),,.,,
oF _.
Figure 4
6.
oF_.
"550 °" wiHH
appear (Figure 2).
The oven wiHHbegin to broil "550 °'' wiHHstay in the dispHay
(Figure3).
BroiHon one side untiHfood is browned; turn and cook on the second side.
Season and serve. Note: AHways puHH
the rack out to the stop position before
tu ming oFremoving food.
7, To
cancen
broiHing
oF iffinished
broiHing
press_
oF _
(Figure4),
Note:To change temperatureafter
theoven has begun,canceHHedthecontroH
and
resetitatthedesiredtemperaturefoHHowing
steps3 to5,
Broiler CleanoUpTips:
Grid
\
Broiler Pan
Figure 5
To make cHeaning easier, Hinethe bottom of the broiHerpan with aHuminum foil
DO NOT cover the broiHergrid with foil
To prevent grease from baking on, remove the broiHerpan from the oven as soon
as cooking is compHeted. Use hot pads because the broiHer pan is extremeHy
hot. Pour off grease. Soak the pan in HOT, soapy water.
CHean the broiHer pan as soon as possibHe after each use. Hfnecessary, use
soapofiHHedsteeHwooHpads. Heavy scouring may scratch the grid.
B
CONV£CT ONROASTING
B
[]
[]
[]
[]
[]
[]
[]
B
[]
[]
[]
[]
[]
[]
[]
[]
[]
[]
[]
B
[]
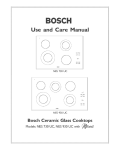
When convection roasting, use the broiler pan and grid, and the roasting rack, The broiler pan
wiii catch grease spills and the grid wiii help prevent spatters, The roasting rack wiii hold the
meat.
To prevent food from contacting the broil element and to prevent grease
spattering, DO NOT use the roasting rack when broiling.
1. Place oven rack on next-bottom rack position.
2. Place the grid in the broiler pan. The roasting rack fits on the grid allowing the
heated air circulate under the food for even cooking and helps to increase
browning on the underside. Make sure the roasting rack is securely seated
on the grid Jnthe broiler pan. DO NOT use the broiler pan without the grid or
cover the grid with aluminum foil.
3. Position food (fat side up) on the roasting rack.
4. Place the broiler pan on the oven rack. Note: Always pull the rack out to the
stop position before removing food.
Roasting
Rack
\
!
Broiler
Pan
NOTE: For best convection roasting results, always use the broiler pan, grid and
roasting rack,
Setting Convection Roast
The
°°°_°°'°°
©or@pad controls the Convection
Roast feature. The oven can be programmed
to Convection Roast at any temperature between 300°F (149°C) to 550°F (288°C) (The
example below is for 350°F).
To Set the Convection
Roast and temperature
1.
Arrange interior oven racks and place food in oven.
2,
Press °@" or @,
3,
Press C)'
4.
Press (_) or
to 350°F:
"---°" will appear in the display ( Figure 1),
Figure 1
(_), C)'
"350°" wH,appear in the display (Figure 2).
"350 °" will remain on and the convection fan icon will show in
ST_T
the display (Figure 3).
Figure 2
5.
Press@o_o_or_)tostopConvection
time.
RoastingorcanceUconvection
-
roastatany
Figure 3
Care &
USINGTHE IIIL,,,,,IFsCIIIL,,,£AN
IIFEATU
.............................................................................................................
m
[]
[]
[]
[]
[]
[]
[]
[]
[]
Adhere
[]
[]
to
[]
the
[]
[]
[]
[]
[]
[]
[]
[]
[]
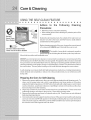
Cleaning
Precautions:
Do Hand
Ctean
Frame
Do Hand Clean Door Area
which out of the Door Gasket
, AHow the oven to cooUbefore denning,
o Wear rubber gbves when cbaning any exterior parts of the
oven manually,
During the seUfocbaning cycb, the outside of the wall oven can
become very hot to the touch, DO NOT have a small children
unattended near theappHance,
Before cleaning any part of the oven, be sure the oven is turned
off or else push CANCEL pad, Wait until the oven is cook
The health of some birds is extremely sensitive
to the fumes given off d u ring the selfoclean cycle of any wall oven,
Move birds to another well ventilated room,
DO NOT use commercial oven cleaners or oven protective coatings in or around any part of the
selfocleaning oven, DO NOTclean theoven doorgasket, The gasket on theoven dooris essential
for a good seal, Care should be taken not to rub, damage or move the gasket, DO NOT use any
cleaning materials on the gasket, Doing so could damage it, DO NOT use aluminum foil to line
the oven bottom, This may affect cooking or foil could melt and damage the oven surface,
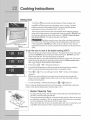
A selfocleaning oven cleans itself with high temperatures (well above cooking temperatures)
which eliminate soil completely or reduce it to a fine powdered ash you can whisk away with
Preparing the Oven for SelfoCbaning
1, Remove any excess spHbvers in the oven cavity before starting the seUfocbaning cycb, To
clean, use hot soapy water and a cloth, Large spillovers can cause smoke or a fire when
subjected to high temperatures, DO NOT allow food spills with a high sugaror acid content
(such as tomatoes, sauerkraut, fruit juices or pie filling) to remain on the surface as they may
leave a dull spot even after cleaning,
2, Clean any soil from the oven frame and the door liner (see illustration), These areas heat
sufficiently during a self-dean to burn soil on, Clean with hot soapy water,
3, Remove the broiler pan and insert, all utensils and any foil, These items can not withstand
high cleaning temperatures,
4, Oven racks and oven rack supports must be removed, If they are not removed the self-cbaning
cycle can not start and RR will appears in the display indicating that you must remove the
racks and racks supports, When the cycle has finished and the door can be opened replace
the oven the oven rack supports and oven racks,
{_ver_
aoo[tuunlocK,_n_sr_ormaHy
takesa_u[ onenour,2otoselr-cRean
for_hOUrS
wl_
actually
takeabout4 hourstocompnete,
*It is recommend to use a 2 hour self-clean cycle for light soils, a 3 hour cycle for averag,
soils, and a 4 hour cycle for heavy soils (to assure satisfac_:oryresults),
During the self-cleaning cycle, the outside of the range can become very hot
to the touch. DO NOT leave small children unattended near the appliance; they may be
burned if they touch the hot oven door surfaces.
DO NOT force the oven door open, This can damage the automatic door
locking system. Use care when opening the oven door after timeself-cleaning cycle. Stand to
the side of the oven when opening the door to allow hot air or steam to escape, The oven
may still be VERY HOT,
To set the controlsfor a 3 hour Self-Cleaningcycleto start
immediatelyand shutoff autornatically:
1= Be sure the clock is set with the correct time of day and the oven door is
closed.
2.
Press _'_or
_.
"CLr_" will flash a_d "3:00" HR will show in the display
(Figure 1). Timecontrol will automatically clean for a 3 hour period (default selfcleaning cycle time), Note: If a 2 or 4 hour clean time is desired press Q
Figure
for 2
hour or press (_) for a 4 hour clean time, Set the cleaning time based on the
amount of soil; light, medium or heavy (* See above),
3,
Press _or
_<_.').The "DOOR LOCKED" icon will flash; and the letters "CLn"
will remain on in the display (Figure 2),
As soon as the control is set, the motor driven oven door lock will begin to
close automatically, Once the door has been locked the "DOOR LOCKED"
indicator light will stop flashing and remain on. Also, the oven iconwill appear in
the display (Figure 3),
Note: Allow about 15 seconds for the oven door lock to close.
Figure 2
4,
Figure 3
Whenthe Self-CleanCycleis Completed:
1,
2.
The time of day and "DOOR LOCKED" will remain on (Figure 4),
Once the oven has cooled down for 1 HOUR, and the "DOOR LOCKED" icon is
no longer displayed, the oven door can then be opened (Figure 5)=
Ffgu[e4
Stopping or interrupting a Self-Cleaning Cycle:
If it becomes necessary to stop or interrupla self-cleaning cycle due to excessive
smoke or fire in the oven:
1,
Press,_2or
@,
2,
Once the oven has cooled down for approximately 1 HOUR and the "DOOR
LOCKED icon is no longer displayed,the oven door can then be open_t (Figure 5),
Ffgu_e 5
Care &
m
[]
m
The _
[]
[]
m
or _'_ and _
v
[]
[]
or _)
[]
m
[]
[]
m
[]
[]
m
[]
[]
[]
m
m
[]
pads and bngth of dean cycb, controUs the DeUayed SeUfo
y
Cban operation, The automatic timer wHUturn the oven on and off at the time you sebct in
advance, Be sure to review TO START THE SELFoCLEAN CYCLE for recommended dean
times, NOTE: if your cbck is set for normaU 12 hour dispUay mode the DeUayed Time SeP
Cban feature can never be set to start more than 12 hours in advance,
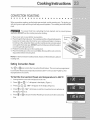
To set the control for the Self-Cleaning Cycle to start at a delayed
time and shut off automatically: (example 3 hour self-clean cycle to
start at 4:3@
Figure
1
1,
Be sure the dock is set with the correct time of day and the oven door is
closed,
2,
Press @
or _},
"CLn" and "3:00" HR will show in the display (Figure 1),
The control will automatically clean for a 3 hour period (default self-cleaning
Figure
2
cycle time), Note: If a 2 or 4 hour clean time is desired, press (_ for 2 hour
or press @ for a 4 hour clean time, Set the cleaning time based on the
amount of soil--light, medium or heavy (*See previous page),
Figure
3
3,
Press @ or GO}, The "DOOR LOCKED"
icon will flash; and the letters
"CLn" will remain on in the display (Figure 2),
4,
Figure
4
Press @
or @,
Enter the desired start time using the number pads
®,
Q, Q (Figure
S),
The "CLn" icon will turn off (Figure 4),
5,
Press @ or _),
6,
As soon as the control is set, the motor driven oven door lock will begin to
close automatically and once the door has been locked the "DOOR
LOCKED" indicator light will quit flashing and remain on,
The control will start the self-cbaning at the setted start time, for the period of
time previously selected, "CLn" and oven icon will appear in the display
(FigureS),
Figure
5
7,
Figure
6
When the Self-Cban Cycle is Completed:
Figure
7
1,
2,
The time of day, the "DOOR LOCKED" will remain in the display (Figure 6),
Oncetheovenhascoobddownforapproximatelyl
HOUR, and the "DOOR
LOCKED" icon is no longer displayed, the oven door can then be opened
(Figure7),
GENERALCIIII,,,,,,,,,,EAN
IIING
[]
[]
[]
[]
[]
[]
[]
[]
[]
[]
[]
[]
[]
[]
[]
[]
[]
[]
[]
[]
[]
[]
Cleaning Various Parts of Your appliance
Before cUeaning any part of the appliance, be sure aH controUs are turned OFF and the appliance
is COOL, REMOVE
SPULLOVERS
AND HEAVY SOUMNG AS SOON AS POSSUBLE,
REGULAR CLEANUNGS WULL REDUCE THE NUMBER OF MAJOR CLEANUNGS LATER
Surfaces
How to Clean
Glass, Painted and Plastic Body
Parts and Decorative Trim
For genera/ cleaning, usehot, soapy water and a cloth. Formoredifficdtsoitsandbufltup grease, apply a liquid detergent directly onto the soil. Leave on soil for 30 to 60
minutes. Rinse with a damp cloth and dry. DO NOT use abrasive cleaners on any of
these materials; they can scratch.
Control
Before cleaning the contro/pane!, turn all controis to OFF. Lightly spray the control panel
with a liquid cleaner. Wipe with a soft cloth or paper towel. DO NOT use abrasive
cleaners or scouring pads. These can permanently damage the control panel surface.
Panel
Porcelain Enamel
Broiler Pan and Grid
Gentle scouring with a soapy scouring pad will remove most spots. Rinse with a 1:1
solution of clear water and ammonia. If necessary, cover difficult spots with an
ammonia-soaked paper towel for 30 to 40 minutes. Rinse with clean water and a damp
cloth, and then scrub with a soap-filled scouring pad. Rinse and wipe dry with a clean
cloth. Remove all cleaners or the porcelain may become damaged during future
heating.
Stainless Steel, Chrome
Decorative Trim, Oven Racks,
Oven Racks Support
Clean with hot, soapy water and a dishcloth. Rinse with clean water and a cloth. Cover
stubborn spots with an ammonia-soaked
paper towei for 30 to 40 minutes. Rinse.
Cleaners made especially for stainless steel are recommended. Be sure to rinse the
cleaners as bluish stains may occur during heating and cannot be removed.
Oven Racks
Oven racks and oven rack supports must be removed from the oven during the selfclean cycle for cleaning. If they are not removed, the self-clean cycle will not start. Clean
them as described above.
Oven Door
To clean oven door, wash with hot, soapy water and a clean cloth, DO NOT immerse
the door in water or clean the oven door gasket.
Oven Gasket
The oven gasket located on the front frame of the oven and visible when the door is
opened is essential for a good seal. Care should be taken not to rub, damage or
remove the gasket.
Care &
CARE AND CIIIL,,,,£AN_N@
OF STAIIN_,,,,,,,,,,ESS
STEE_
..........
[]
[]
[]
[]
[]
[]
[]
[]
[]
[]
[]
[]
[]
[]
[]
[]
[]
[]
[]
[]
[]
[]
SpeciaU care and cbaning are required for maintaining the appearance of stainbss parts,
Phase refer to the tame provided at the beginning of the General Care & Cteaning section
in this Use & Care Manuak
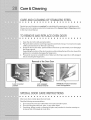
TO REMOVEAND R
[]
[]
1,
2,
[]
[]
[]
[]
[]
[]
[]
LACEOVENBOOR
[]
[]
[]
[]
[]
[]
[]
[]
[]
[]
[]
[]
[]
Open the door to the fully opened position,
Pull up the lock located on each hinge support toward front of range, You may have to apply
a little upward pressure on the lock to pull it up,
Grasp the door by the sides, pull the bottom of the door up and toward you to disengage
the hinge supports,
Keep pulling the bottom of the door toward you while rotating the top of the door toward the
appliance to completely disengage the hinge levers,
Proceed in reverse to re-install the door, Make sure the hinge supports are fully engaged
before unlocking the hinge levers,
3,
4,
Removal of the Oven Door
Lock in normaJ
position
HINGE SLOT - Door removed
from the appliance
Lock engaged
for door removaJ
SPECIIIA_,,,,,,,,,,
DOORCARE IINS U
[]
[]
[]
[]
[]
[]
[]
[]
[]
[]
[]
[]
[]
IIIONS
[]
[]
[]
[]
[]
[]
[]
[]
Most oven doors contain glass that can break,
Read the following recommendations:
1,
2,
3,
Do not close the oven door until all the oven racks are fully in place,
Do not hit the glass with pots, pans, or any other object,
Scratching, hitting, jarring or stressing the glass may weaken its structure causing an
increased risk of breakage at a later time,
[]
m
1,
2,
[]
[]
[]
[]
[]
[]
[]
[]
[]
[]
[]
[]
[]
[]
[]
[]
[]
[]
[]
[]
[]
[]
[]
[]
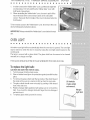
in order to remove the"hidden bake" cover, pull the back edge with
one hand about 1/2" inch and lift up the "hidden bake" cover with
both hands, (See picture)
When reinstalling the "hidden bake" cover, be sure to put it all the
way to the back of the oven and lay it down on the 2 shoulder
screws, Then push the front edge of the cover in its place below the
front bracket,
To have easier access to the "hidden bake" cover, first remove the oven
door by following the instructions above,
/MPORTANT: Always reinstall the "hidden bake" cover before the next
use,
OVEN III,,,,,,,,,,IIIGNT
[]
[]
[]
[]
[]
[]
[]
[]
[]
[]
[]
[]
[]
[]
[]
[]
[]
[]
An interior oven light wiii turn automatically when the oven door is opened, The oven light
may be turned on when the door is closed by using the oven light switch located on the
control panel,
The lamp is covered with a glass shield, The glass shield can be remove to be cleaned
manually or to change oven light,
THiS GLASS SHIELD MUST BE iN PLACE WHENEVER THE OVEN iS iN USE,
To replace the mightbumb:
CAUTION: BE SURE THE OVEN IS COOL.
1,
2,
3,
4,
5,
6,
Turn the power off at the main source,
Wear a bather-faced glove for protection against possible broken
glass,
To remove the glass shield, pull the back side of the shield toward
the inside of the oven in a manner to lift it up from the oven side,
The glass shield should come out easily by pushing a little toward
front of the wall oven,
Replace halogen light appliance bulb taking care to not touch the
bulb, if you touch the halogen bulb with finger that can damage it
and also burn it,
To replace glass shield, proceed in reverse,
Lift backside
of gtass ehiemd
and remove it.
Halogen
Light Bulb
toCommon
OVEII COM=BOL BEEPS AID DISPLAYS FI THROUGH FSO
[]
[]
[]
[]
[]
[]
[]
[]
[]
[]
[]
[]
[]
[]
[]
[]
[]
[]
[]
[]
[]
[]
Electronic control has detected a fault condition. Push CANCEL pad to clear the
display and stop the display from beeping. Reprogram the oven. If a fault reoccurs,
record the fault number, push the CANCEL pad and contact an authorized sen,,icer.
IB IllsDISP/AVED
m
[]
m
[]
[]
m
[]
m
[]
m
[]
[]
m
[]
[]
m
[]
[]
[]
m
m
[]
The door was left open and controls set for self-cleaning cycle. Close the door and
push both upper and lower oven CANCEL pads.
[]
[]
[]
[]
[]
[]
[]
[]
[]
[]
[]
[]
[]
[]
[]
[]
[]
[]
[]
[]
[]
[]
Place oven rack in center of oven. Place a level on the oven rack. Contact installing
agent if rack and cabinet cutout flooring are not level.
Kitchen cabinet misalignment may make oven appear to be not level. Be sure cabinets
are square and level. Contact cabinet maker to correct problem.
ENTIRE OVEN DOES NOT OPERATE
[]
[]
[]
[]
[]
[]
[]
[]
[]
[]
[]
[]
[]
[]
[]
[]
[]
[]
[]
[]
[]
When the oven is first plugged in, or when the power supply to the oven has been
interrupted, the display wiii flash. The oven cannot be programmed until the clock is
set.
Be sure electrical cord is securely connected into the electrical junction box.
Cord/plug is not installed and/or connected. Cord is not suppled with oven. Contact
your dealer, installing agent or authorized servicer.
Service wiring not complete. Contact your dealer, installing agent or authorized
sewicer.
Power outage. Check house lights to be sure. Call your local electric company.
Short in cord/plug. Replace cord/plug.
[]
tO
Controls are not set properly, See instructions to set the controls,
o House fuse has blown orcircuit breaker has tripped immediately following installation,
o House fuse may not be fully engaged, Check fuse and screw or engage circuit breaker
securely,
OVENIIIF,,,,,,,,,,IIIIGHT
DOESNOTWORK
[]
[]
[]
[]
[]
[]
[]
[]
[]
[]
[]
[]
[]
[]
[]
[]
[]
[]
[]
[]
[]
[]
o Burnedoout or loose bulb, Follow the instructions under Oven L(ght to replace or
S
[]
F OIII(,,,,,,,,,,EANING
CYClII(,,,,,,,,,,E
DOESNOTWORK
[]
[]
[]
[]
[]
[]
[]
[]
[]
[]
[]
[]
[]
[]
[]
[]
[]
[]
[]
[]
o Make sure the oven door is closed,
o Controls not set properly, Follow instructions under"Using the SelfoClean Feature",
o Selfocleaning cycle was interrupted, Stop time must be set 2°4 hours past the start
time, Follow steps under "To Stop or interrupt a SelfoCleaning Cycle,
OVENSMOKESEXC
[]
[]
[]
[]
[]
[]
[]
[]
[]
©URIHGBROIIIII(,,,,,,,,,,IIING
[]
[]
[]
[]
[]
[]
[]
[]
[]
[]
[]
[]
Oven door is closed, Door should be open during broiling,
Meat too close to the broiler element, Reposition the rack to provide more clearance
between the meat and the broiler, Preheat broil element for quick searing operation,
Meat not properly prepared, Remove excess fat from meat, Cut remaining fatty edges
to prevent curling, but do not cut into the lean,
Grid on broiler pan wrong sideoup, Grease does not drain into broiler pan, Always place
the grid on the broiler pan with the ribs up and the slots down to allow grease to drip
into the pan,
Broiler pan used without grid or grid cover with aluminum foil, DO NOT use the broiler
pan without the grid or cover the grid with aluminum foil,
Oven needs to be cleaned, Grease has built up on oven surfaces, Regular cleaning is
necessary when broiling frequently, Grease or food spatters cause excessive smoking,
[]
toCommon
901U,,,,,,,,,,
NOT COMPL BIIL,,,Y
REMOVEDAI
ClL,,,,,EAN)NG
CYCLElib COMPIL
[]
[]
,
[]
[]
[]
[]
[]
[]
[]
[]
[]
[]
[]
[]
[]
[]
SEII),,,,,,,,,,IFS
[]
[]
[]
[]
[]
[]
Failure to clean bottom, from top of oven, frame of oven or door area outside oven seal,
These areas are not in the self-cleaning area, but get not enough to burn on residue,
Clean these areas before the self-cleaning cycle is started, Burned on residue can be
cleaned with a stiff nylon brush and water or a nylon scrubber, Be careful not to
damage the oven gasket,
o Excessive spillovers in oven. Set the self-clean cycle for Iongercieaning time,
POORB£KIIING
RESU),,,,,,,,TS
[]
[]
[]
[]
[]
[]
[]
[]
[]
[]
[]
[]
[]
[]
[]
[]
[]
[]
[]
[]
[]
[]
o Many factors affect baking results, See Baking for hints, causes and corrections, See
Adjust)rig Oven Temperature,
IIr'IIIL,,,,AM
IIINSDE
OVENOR SMOKEII:'':'ROM
VENT
[]
[]
[]
[]
[]
[]
[]
[]
[]
[]
[]
[]
[]
[]
[]
[]
[]
[]
[]
[]
[]
[]
° Excessive spillovers in oven, This is normal, especially for high oven temperatures, pie
spillovers orfor large amounts of grease on bottom of oven, Wipe up excessive
spillovers.
y'
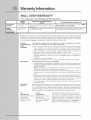
WALL 0 VEN WARRANTY
Your wall oven is protected by this warranty
WARRANTY
PERIOD
THROUGH OUR AUTHORIZED SERVICERS,
WE WILL:
FULL ONE-YEAR
WARRANTY
One year from original
purchase date
LIMITED
WARRANTY
(Applicable to the
State of Alaska)
Time periods listed
above.
Pay all costs for repairing or replacing any parts of this
appliance wNch prove to be defective in materials or
workmanship.
All of the provisions of the full warranties above and the
exclusions listed below apply.
THE CONSUMER WILL RE RESPONSIBLE FOR:
Costs of service calls that
are Isted
RESPONSIBILITIES OF THE CONSUMER. *
under
Costs of the technician's travel to the home and any costs for pick
up and delivery of the appliance required because of service.
mr_
the N.S.A., your appliance is warranted by Electrolux Home Products North America, a division of White Consolidated
Industries, Inc. We authorize no person to change or add to any of our obligations under this warranty. Our obligations
for sen/ice and parts under this warranty must be performed by us or an authorized Electrolux Home Products North
America servicer. In Canada, your appliance is warranted by Electrolux Canada Corp.
*NORMAL
RESPONSIBILITIES
OFTHE
CONSUMER
This warranty
applies
only to products
in ordinary
consumer
is responsible
for the items misted below:
EXCLUSIONS
This warranty
does not cover the following:
1. CONSEQUENTIAL
OR INCIDENTAL DAMAGES SUCH AS PROPERTY DAMAGE AND
INCIDENTAL EXPENSES RESULTING FROM ANY BREACH OF THIS WRITTEN OR ANY
IMPLIED WARRANTY.
household
use,
and
the
1= Proper use of the appliance in accordance with instructions provided with the product.
2= Proper insta!lation by an authorized servicer in accordance with instructions provided
with the appliance and in accordance with all local plumbing, electrical and/or gas codes.
3= Proper connection to a grounded power supply of sufficient voltage, replacement of
blown fuses, repair of loose connections or defects in house wiring.
4. Expenses for making the appliance accessible for servicing, such as removal of trim,
cupboards, shelves,etc, which are not a part of the appliance when it was shipped from
the factory.
8= Damages to finish after insta!lation.
8= Replacement of light bulbs and/or fluorescent tubes (on models with these features).
NOTE: Some states do not allow the exclusion or limitation of incidental or consequential
damages, so this limitation or exclusion may not apply to you.
2. Service calls which do not involve malfunction or defects in workmanship or materia!, or
for appliances not in ordinary household use. The consumer shall pay for such service
calls.
3. Damages caused by services performed by servicers other than Electrolux Home Products
North America or its authorized servicers; use of parts other than genuine Electrolux
Home Products parts; obtained from persons other than such servicers; or external
causes such as abuse, misuse, inadequate power supply or acts of God.
4. Products with original serial numbers that have been removed or altered and cannot be
readily determined.
mFYOU NEED
SERVICE
Keep your bill of sale, delivery slip, or some other appropriate payment record. The date on
the bill establishes the warranty period should service be required. If service is performed,
it is in your best interest to obtain and keep all receipts. This written warranty gives you
specific legal rights. You may also have other rights that vary from state to state. Service
under this warranty must be obtained by contacting Electrolux Home Products:
USA
1,800_944,9044
Electrolux Home Products
North America
RO. Box 212378
Augusta, GA 30917
Canada
1.888.294_9911
Electrolux Home Products
North America
802, bouL Uange-Gardien
L'Assomption, Quebec
JSW 1T8
NORMAL
This warranty only applies in the 50 states of the U.S.A,
Puerto Rico, and Canada.
Product
features
or
specifications as described or illustrated are subject to
change without notice. All warranties are made by
Electrolux Home Products North America, a division of
White Consolidated Industries, Inc. mr_Canada, your
appliance is warranted by Electrolux Canada Corp.


![PLAS A O ]-OR](http://vs1.manualzilla.com/store/data/005852706_1-5db0b7ed584537f0e62af161fb124638-150x150.png)