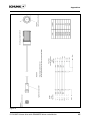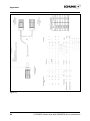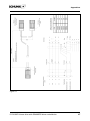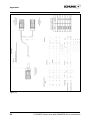
1
Translation of the original Manual SIEMENS SINAMICS CONVERTER Commissioning MLD Linear drive with SINAMICS drive controller 01.01/MLD Linear drive with SINAMICS drive controller/en Translation of the original Manual Imprint: Copyright: This manual remains the copyrighted property of SCHUNK GmbH & Co. KG. It is delivered only to our customers and the operators of our products and is an integral part of the module. These documents may not be reproduced or made available to third parties, especially not to our competitors, without our express permission. Technical modifications: We reserve the right to make changes in the interest of technical improvements. Edition: 01.01 / 2012/02/06 / en © SCHUNK GmbH & Co. KG, Lauffen/Neckar All rights reserved Dear Customer Congratulations on choosing a SCHUNK product. You have opted for maximum precision, excellent quality and optimum service. SCHUNK will increase the reliability of your production process for optimum machining results – to the complete satisfaction of your customers. SCHUNK products are inspiring. Our detailed assembly and operating instructions provide you with the necessary support. Any further questions? Feel free to contact us for after sales support. You can contact us at the addresses listed in the last chapter of this manual. Kind regards Your SCHUNK GmbH & Co. KG Spann- und Greiftechnik Bahnhofstr. 106 – 134 D-74348 Lauffen/Neckar Tel. +49-7133-103-2503 Fax +49-7133-103-2189 automation@de.schunk.com www.de.schunk.com 2 01.01/MLD Linear drive with SINAMICS drive controller/en Table of contents Table of contents 1 2 3 About this manual................................................................................................. 4 1.1 Purpose/Applicability .................................................................................. 4 1.2 Target groups ............................................................................................. 4 1.3 Supporting documents ............................................................................... 4 1.4 Symbols used in this manual...................................................................... 5 Basic safety instructions ..................................................................................... 5 2.1 Intended use .............................................................................................. 5 2.2 Environmental and operating conditions .................................................... 6 2.3 Product safety ............................................................................................ 6 Safety devices ............................................................................... 6 2.3.2 Design changes, additions or modifications .................................. 7 2.4 Personnel qualifications ............................................................................. 7 2.5 Safety-conscious work procedures ............................................................ 7 Commissioning ..................................................................................................... 8 3.1 Description of system ................................................................................. 8 3.1.1 MLD axes ...................................................................................... 8 3.1.2 Sinamics S120............................................................................... 9 3.2 Required auxiliary equipment ..................................................................... 9 3.3 Preparation for commissioning ................................................................. 10 3.4 Commissioning work ................................................................................ 12 3.5 4 2.3.1 3.4.1 Creating a new drive project ........................................................ 12 3.4.2 Create project .............................................................................. 12 3.4.3 Parameterization ......................................................................... 20 Controlling the axes in inching mode ....................................................... 37 Appendixes ......................................................................................................... 39 4.1 SINAMICS connection diagram ................................................................ 39 4.2 Identification key of files for linear motors ................................................ 40 4.3 Parameter lists ......................................................................................... 40 4.4 Assignment of motors and drives to the axes........................................... 43 4.5 Overview of motor types and their parameters ......................................... 43 01.01/MLD Linear drive with SINAMICS drive controller/en 3 About this manual 1 About this manual 1.1 Purpose/Applicability This manual is part of the linear direct axis; it describes the safe and correct commissioning of the linear drive with a Siemens SINAMICS converter. This manual applies only to the product stated on the cover. 1.2 Target groups Target group Task Manufacturer, owner/operator Keep this manual accessible for personnel at all times. Require personnel to read and comply with this manual and the supporting documents, especially the safety instructions and warning information. Specialized personnel, mechanic Read, observe and comply with this manual and the supporting documents, especially the safety instructions and warning information. Table 1 1.3 Supporting documents The following documents can be found on our website: Document Purpose Catalog Technical data and application parameters of the module and information on accessories. The most recent version applies. Assembly and operating manuals for linear drives Additional information on installation, adjustment and repair of the linear drives. Manual and references for the Sinamics S120 converter. Additional information on installation, adjustment and repair of the Sinamics S120 converters. (by the manufacturer) General terms and conditions Includes information on the warranty, for example. Table 2 4 01.01/MLD Linear drive with SINAMICS drive controller/en Basic safety instructions 1.4 Symbols used in this manual To enable fast access to information, the following symbols are used in this manual: Symbol DANGER Explanation Dangers for personnel. Failure to observe will result in death or severe injuries. WARNING Dangers for personnel. Failure to observe can result in death or severe injuries. IMPORTANT Information for preventing property damage, for understanding or optimizing work processes. Instructions for action, also measures in a warning or note. 1. Step-by-step instructions for action. 2. Observe the sequence. 3. ... < > Menus and menu items Table 3 2 2.1 Basic safety instructions Intended use The module is intended for installation in a machine. The requirements of the applicable directives must be observed and complied with. The linear motor axis is used only for the transmission of linear motions. The driving force is transmitted directly, without mechanical transmission elements. The axis is especially suitable for applications in which a very high level of dynamics is required. The module may be used only within the range of its defined application parameters. Any other use beyond this definition is deemed improper and unintended use. The manufacturer will not be liable for any resulting damages. 01.01/MLD Linear drive with SINAMICS drive controller/en 5 Basic safety instructions 2.2 Environmental and operating conditions For trouble-free operation, certain ambient and operating conditions must be complied with. Ambient temperature: 10°C to 40°C The drive must be protected against: – direct exposure to sunlight and heat – contamination by chips and dust – aggressive gases – vibrations – shock – moisture – oily and acidic environments The module may be used only within its defined application parameters (see catalog and supporting documents). Ensure that the environment is free of splashing water and vapors, and also of abrasive dust and process dust. This does not apply to modules designed especially for unclean environments. 2.3 Product safety The module conforms to the state of the art and the recognized technical safety regulations at the time of delivery. However, there are potential risks associated with the module, for example if: • the module is not used for the intended purpose; 2.3.1 • the module is improperly installed or serviced; • the EC Machine Directive, the VDE regulations, the applicable safety and accident prevention regulations and the safety and installation instructions are not complied with. Safety devices Safety devices must be provided in accordance with the EC Machine Directive. 6 01.01/MLD Linear drive with SINAMICS drive controller/en Basic safety instructions 2.3.2 Design changes, additions or modifications Additional bore holes, threads or attachments not offered by SCHUNK as accessories may be mounted only after obtaining the approval of SCHUNK. 2.4 Personnel qualifications The installation, commissioning, maintenance and repair of the converter may be carried out only by trained specialists. Every person who is assigned by the owner/operator to work on the module must have read and understood the entire installation and operating manual, especially the chapter 2 "Basic safety instructions". This applies in particular to personnel who work on the module only occasionally, e.g. maintenance personnel. 2.5 Safety-conscious work procedures Hazardous motions can occur if drives are controlled incorrectly. The drive components are monitored so that malfunctions can practically be ruled out. However, due to reasons of personal safety, the danger of injury and also the danger of property damage, you should always be prepared for the possibility of a malfunction. Incorrect drive motions can be expected until installed monitoring functions are in effect. Causes for incorrect controlling can include: – faulty cables and wiring – defective components – software errors – operator errors – removal of safety devices – errors in sensors and signal transmitters – input of incorrect parameters prior to commissioning Refrain from all work procedures that impair the proper functioning and safe operation of the converter. The applicable safety regulations and accident prevention regulations must be observed. 01.01/MLD Linear drive with SINAMICS drive controller/en 7 Commissioning 3 3.1 3.1.1 Commissioning Description of system MLD axes MLD axes are direct driven drive modules. The driving force is transmitted directly to the slide, without mechanical transmission elements. The axes are ideal for applications with high requirements for dynamics, speed and accuracy. A distinguishing feature of the concept is the high degree of compatibility. The drive meets these high requirements due to the well-designed guide for the slide and the lightweight construction. The winding (primary part) is embedded in iron and is part of the rotor. The magnets (secondary part) are integrated in the supporting aluminum profile. The pole interval is 28.1 mm. The axes are equipped with a linear measuring system. Axes are available with an incremental sensor or an absolute sensor. The incremental sensor delivers Sin/Cos signals with a period of 1 mm and a zero impulse every 20 mm. The Sin/Cos signals are resolved in the SME component with 2048 bits. This results in a path resolution of about 0.001 mm in the drive controller. The repeat accuracy of the axis is on the order of 0.01 mm. For commutation detection, the principle of saturation commutation is used. The temperature of the rotor is monitored by means of a triple bimetal sensor and KTY84-130 (connected in series). 8 01.01/MLD Linear drive with SINAMICS drive controller/en Commissioning 3.1.2 Sinamics S120 The drive controllers of the Sinamics series read in all motorrelated information via DRIVE-CLiQ, a proprietary Ethernet-based interface. The conversion of the motor information (measuring system, motor temperature) from conventional signals to DRIVE-CLiQ takes place in the SME-120 component. Picture 1 3.2 Required auxiliary equipment The following equipment and conditions are necessary for commissioning a drive with a SINAMICS converter: Drive must be completely installed with SINAMICS converter (for connection diagrams, see Chapter “Appendixes” Figure 1, page 39) Firmware SINAMICS min. V2.6 PC / PG with Profibus interface Control software STARTER 4.12 installed on PC / PG Profibus connection cable PC / PG - SINAMICS Commissioning CD with the motor parameters and the files for the parameter selection 01.01/MLD Linear drive with SINAMICS drive controller/en 9 Commissioning 3.3 Preparation for commissioning DANGER Danger to life and limb due to electric shock! Contact with live parts can result in death. All work on electrical systems or equipment must be performed by trained electricians in accordance with electrical engineering regulations. All work on the axes, drive controllers and control units may be performed only after the system/machine have been shut down! The drive control devices of the Sinamics S120 series may be operated only by trained specialists in compliance with this manual. The software for the Sinamics S120 drive controller is equipped with safety devices for your protection. Nevertheless, these drive devices can pose dangers if they are operated by insufficiently trained personnel or if they are used for non-approved tasks. Install sensor cables so they are separate from the power cables. Assembly and disassembly tasks may be carried out only after the MLD axes have cooled. Observe the technical data for the modules during installation and commissioning! This information is contained in the operating manuals for the MLD axes. Familiarity with PLC controllers and components of the Sinamics S120 family is a prerequisite for commissioning of the MLD axes. IMPORTANT Damage to the slide guide and slide support is possible! Never activate an automatic control circuit setting for linear motors. 10 01.01/MLD Linear drive with SINAMICS drive controller/en Commissioning 1. Wiring Wire SINAMICS and higher level controller according to the connection diagrams. (see Chapter 4, page 39) 2. Establish connection between PC and controller. 3. Start STARTER software on PC. 4. Configure the PROFIBUS address Behind the lower, petroleum green removable cover of the CU320 there is a PROFIBUS switch that can be used to configure the PROFIBUS of the drive device. Configure the PROFIBUS address, e.g. 5 (S1 + S3 = ON). Picture 2 Value of the PROFIBUS switch Example: PROFIBUS address via PROFIBUS switch on control unit 5. Compact flash card: Insert compact flash card with SINAMICS S120 firmware in the control unit CU320. 6. 24V power supply: Switch on 24V power supply. 7. PC/PG PROFIBUS interface: Establish connection via the PROFIBUS interface of the PC/PG to the CU320 with a PROFIBUS cable. 01.01/MLD Linear drive with SINAMICS drive controller/en 11 Commissioning 3.4 3.4.1 Commissioning work Creating a new drive project This chapter describes how to create the sample project in STARTER in 4 steps Create a new project. Define an interface. Establish online connection. Configure drive device with its components. 3.4.2 Create project 1. Click STARTER button, or select menu item Start > Sinamic > STEP 7 > STARTER in Windows start menu, to launch the commissioning tool STARTER. 2. To create a new project, first open the project assistant via the menu Project > New with project assistant. 3. Close online help and follow the STARTER project assistant. Picture 3 4. The picture shows how to establish an online connection with the button Search drive devices online. 12 01.01/MLD Linear drive with SINAMICS drive controller/en Commissioning Picture 4 Select Profibus interface 5. To do this, select the Profibus interface in the project assistant. You can then create a project name and path. Click the button Continue > to set up a PROFIBUS interface in the PC/PG. If the required interface is not configured, the desired interface can be configured via the button Change and test.... 6. Click continue > Picture 5 The STARTER now displays the Profibus modules found online and the CU units of the converters. 01.01/MLD Linear drive with SINAMICS drive controller/en 13 Commissioning Picture 6 7. Click Continue. The unit displays a summary of the available devices, the interface and the project path. 8. Click FINISH. The window closes. Picture 7 Main window of the STARTER in Offline mode. 14 01.01/MLD Linear drive with SINAMICS drive controller/en Commissioning Picture 8 9. Click button Connect with target system The available devices are listed. 10. The required single drive devices can be selected here. 11. Click OK The unit switches from Offline mode to Online mode. Picture 9 The lower third of the main window in Online mode displays a diagnosis overview with the operating states. 01.01/MLD Linear drive with SINAMICS drive controller/en 15 Commissioning Picture 10 12. In the project explorer on the left side of the monitor, the CU units marked with a cross can be expanded to show additional folders with details. Picture 11 13. Select folder Automatic configuration A window opens in which the drive devices can be configured automatically. 14. Click Configure. Another window opens. 16 01.01/MLD Linear drive with SINAMICS drive controller/en Commissioning After the data is read into the STARTER the factory settings are restored. Picture 12 15. Click OK The factory settings are restored. Picture 13 16. In the window Automatic commissioning, assign the drives the drive object type SERVO. Confirm by clicking Create 01.01/MLD Linear drive with SINAMICS drive controller/en 17 Commissioning Picture 14 17. Click Go OFFLINE The connection to the drive control devices is closed. The automatic configuration is ended. Picture 15 After clicking Go OFFLINE the offline comparison generates a message that shows for which target system data were changed. 18. The data can be copied from RAM to ROM, or saved offline by clicking Load changes to PG/PC. Both of these actions can only be carried out after completion of the commissioning. Close the window by clicking OK. 18 01.01/MLD Linear drive with SINAMICS drive controller/en Commissioning Picture 16 Picture 16 shows the main screen of the STARTER after the settings have been configured. 01.01/MLD Linear drive with SINAMICS drive controller/en 19 Commissioning 3.4.3 Parameterization Picture 17 Select the folder Drives/Servo…/ and the sub-folder CONFIGURATION in the left monitor path of the respective SERVO drive to configure the individual CU units. The actual parameterization is then selected by clicking the button Configure DDS. The new window shows all Sinamics modules that have to be parameterized at this point. They are processed one after the other. IMPORTANT The following settings are standard settings. Customized solutions can require other parameter settings. 20 01.01/MLD Linear drive with SINAMICS drive controller/en Commissioning 1. Regulation structure 1. In the regulation structure, set the input of the function modules to SINGLE POSITION. Picture 18 2. Set the control type [21] to speed regulation (with sensor) 3. Click CONTINUE. 01.01/MLD Linear drive with SINAMICS drive controller/en 21 Commissioning 2. Power component: Picture 19 4. Give the power component a name and then define the connected voltage, the heating type and the model. This depends on the power components used by the customer. The STARTER offers a selection of the available power components that can be selected. 5. Click CONTINUE. 22 01.01/MLD Linear drive with SINAMICS drive controller/en Commissioning 3. Additional power component data: Picture 20 6. If necessary, select the required control unit CU in the additional power component data. 7. Click CONTINUE. 01.01/MLD Linear drive with SINAMICS drive controller/en 23 Commissioning 4. Motor: Picture 21 8. In the motor configuration, give the motor a name. – Select the option field Enter motor data. – In the dropdown field, select motor type, (4) synchronous motor (linear permanent excited). 9. Click CONTINUE. 24 01.01/MLD Linear drive with SINAMICS drive controller/en Commissioning 5. Motor data: The motor data, which have to be entered next, are on the commissioning DVD (included with the linear axis). The folder structure is based on the - Drive controller type - Open the folder Motor parameters there - Axis type - Axis version On this level you will find the XML files with the parameters, which can be opened with the explorer and which have the following appearance Picture 22 10. Under Name in the first column there is a list of the PARAMETERS that are also used in the STARTER. Take the value from column 2 and the unit from column 4. 01.01/MLD Linear drive with SINAMICS drive controller/en 25 Commissioning Picture 23 11. In the white fields, enter all parameters with the values from the parameter file (not the values from this documentation!). 12. In addition, further motor data must be entered, which are also saved in the parameter file. To make the selection, check the option DO YOU WANT TO ENTER OPTIONAL DATA (Picture 23). Parameters that do not exist in the parameter file but can be entered in the STARTER must be left at the default values. 13. Click CONTINUE. 26 01.01/MLD Linear drive with SINAMICS drive controller/en Commissioning 6. Optional motor data and equivalent circuit diagram data Picture 24 14. Enter the additional parameters according to the parameter file. Parameters that do not exist in the parameter file but can be entered in the STARTER must be left at the default values. 15. Click CONTINUE. 01.01/MLD Linear drive with SINAMICS drive controller/en 27 Commissioning 7. Calculation of the motor/controller data Picture 25 16. In this window select the option Complete calculation without equivalent circuit diagram data, which conducts a calculation of basic settings on the basis of previously entered data. 17. Click CONTINUE. 28 01.01/MLD Linear drive with SINAMICS drive controller/en Commissioning 8. Motor holding brake Picture 26 18. Corresponding to the actual use of a brake and its integration in the controller, select the option motor holding brake. IMPORTANT Never operate the axis with the holding brake engaged. This is essential and must be ensured by corresponding controls and wiring. 19. Click CONTINUE. 01.01/MLD Linear drive with SINAMICS drive controller/en 29 Commissioning 9. Sensor Picture 27 20. The sensor 1 must be entered according to the following information and refers to the LE100 position measuring system, which is standard. To access the sensor data, use the option Enter data and the button Sensor data. 30 01.01/MLD Linear drive with SINAMICS drive controller/en Commissioning 10. Sensor data Alternatively, two variants of the sensor data configuration are possible, depending on the hardware. There are systems with and without hall effect sensors. Hall effect sensors used with the linear direct axis execute a commutation when the axis is switched on, to optimize impressing of the current during operation. Accordingly there are two types of commutation: • - Commutation via hall effect sensors • - Commutation via pole position identification Picture28 21. For commutation via hall effect sensors, the settings apply as in picture 28 at the left. 22. Alternatively, for commutation via pole position identification, the settings apply as in picture 28 at the right: 23. Click CONTINUE. 01.01/MLD Linear drive with SINAMICS drive controller/en 31 Commissioning 11. Measuring system Picture 29 24. To define the sensor system for position control set the sensor defined previously as Sensor1. Generally, the default value is retained. 25. Click CONTINUE. 32 01.01/MLD Linear drive with SINAMICS drive controller/en Commissioning 12. Mechanical properties Picture 30 26. For standardization of the axis, set the sensor resolution. Enter the value shown in the picture for the linear units (LU) per 10 mm, if the system used is an LE100 position measuring system. Other position measuring systems may require a different standardization. 27. Enter position actual/target value, at which this has the value 0 again. Generally, this value should be so high that it is not reached. 28. Click CONTINUE. 01.01/MLD Linear drive with SINAMICS drive controller/en 33 Commissioning 13. Process data exchange Picture 31 29. Based on the system communication, select the telegram type of the Profidrive telegram, as well as its input and output data. 30. Click CONTINUE. 34 01.01/MLD Linear drive with SINAMICS drive controller/en Commissioning 14. Summary Picture 32 At the end, a summary of the input data is displayed and can be saved via an export function. In addition, further parameters for temperature monitoring must be set in the expert list. 31. In the project explorer under DRIVE, select SERVO. and open the sub-menu with the right mouse button. Select EXPERT and EXPERT LIST there. For temperature monitoring of the motor, set the parameters p601, p604, p605, p606 and p4601 as follows: • p604=85°C • p605=90°C • p606=5s 01.01/MLD Linear drive with SINAMICS drive controller/en 35 Commissioning Picture 33 Picture 34 36 01.01/MLD Linear drive with SINAMICS drive controller/en Commissioning 3.5 Controlling the axes in inching mode Proceed as follows to operate the axis in inching mode: 1. Save the project on the computer. 2. Click Connect with target system to switch to ONLINE MODE. Picture 35 3. In the window ONLINE/OFFLINE comparison, click the button LOAD TO TARGET DEVICE. 4. Confirm the prompt START LOADING with YES. After download: 5. Click CLOSE. 6. In the project navigator under Drive_1 > Commissioning double click the function control panel. 01.01/MLD Linear drive with SINAMICS drive controller/en 37 Commissioning Picture 36 7. The control panel appears in the STARTER. The control panel can be used to control the drive directly via the PC/PG. If there are no errors, the LEDs are green with the exception of “OFF 1 Release”. 8. Click Get master control to connect the control panel with the interface to the drive. 9. Click Accept. 10. Check Release. 11. Enter speed 0 m/min 12. Confirm with GREEN BUTTON “I”. Axis is controlled 13. Enter very low speed (e.g. 1 m/min or –1 m/min) 14. Click red-green inch button. The axis moves slowly. 15. In case of an error, you can open the alarm window at the bottom left via the ALARM tab, where you can reset errors with the buttons RESET or RESET ALL. 16. The CONTROL PANEL tab takes you back to the control panel. 38 01.01/MLD Linear drive with SINAMICS drive controller/en Appendixes 4 4.1 Appendixes SINAMICS connection diagram Figure 1 Sinamics connection diagram 01.01/MLD Linear drive with SINAMICS drive controller/en 39 Appendixes 4.2 Identification key of files for linear motors Available from Schunk on request. 4.3 Parameter lists Figure 2 Parameter lists 40 01.01/MLD Linear drive with SINAMICS drive controller/en Appendixes Figure 3 Parameter lists Figure 4 Parameter lists 01.01/MLD Linear drive with SINAMICS drive controller/en 41 Appendixes Figure 5 Parameter lists 42 01.01/MLD Linear drive with SINAMICS drive controller/en Appendixes 4.4 Assignment of motors and drives to the axes Figure 6 Assignment of motors and drives to the axes 4.5 Overview of motor types and their parameters Figure 7 Overview of motor types and parameters 01.01/MLD Linear drive with SINAMICS drive controller/en 43 Appendixes Figure 8 44 01.01/MLD Linear drive with SINAMICS drive controller/en Appendixes Figure 9 01.01/MLD Linear drive with SINAMICS drive controller/en 45 Appendixes Figure 10 46 01.01/MLD Linear drive with SINAMICS drive controller/en Appendixes Figure 11 01.01/MLD Linear drive with SINAMICS drive controller/en 47 Appendixes Figure 12 48 01.01/MLD Linear drive with SINAMICS drive controller/en