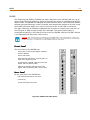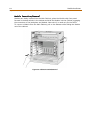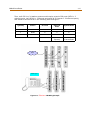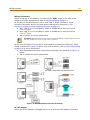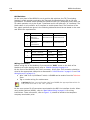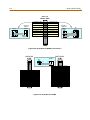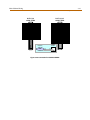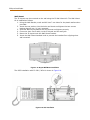
1
Telenium
Installation
IP
Issue
Release Date
1
xx-02
Changes
Initial release
LIFE SUPPORT APPLICATIONS POLICY
VODAVI Technology, Inc. products are not authorized for and should not be used
within Life Support applications. Life Support systems are equipment intended to
support or sustain life and whose failure to perform when properly used in
accordance with instructions provided can be reasonably expected to result in
significant personal injury or death.
VODAVI Technology, Inc. warranty is limited to replacement of defective
components and does not cover injury to persons or property or other consequential
damages.
Copyright © 2002 VODAVI Technology, Inc.
All Rights Reserved
This material is copyrighted by VODAVI Technology, Inc., and may be duplicated by Authorized Dealers only. Any
unauthorized reproductions, use or disclosure of this material, or any part thereof, is strictly prohibited and is a
violation of the Copyright Laws of the United States (17 U.S.C. Section 101 et. seq.).
VODAVI reserves the right to make changes in specifications at any time and without notice. The information
furnished by VODAVI in this material is believed to be accurate and reliable, but is not warranted to be true in all
cases.
mlj/2002
Regulatory Information (U.S.A.)
The Federal Communications Commission (FCC)
established rules to allow the direct connection of the
TeleniumIP to a telephone network. Certain actions
must be undertaken or understood before the
connection of customer provided equipment is
completed.
Telephone Company Notification
Before connecting the TeleniumIP to the telephone
network, the local serving telephone company must
be given advance notice of intention to use customer
provided equipment, and must be provided with the
following information:
Telephone Numbers
The PSTN line telephone numbers to be connected to
the system.
System Information
Ringer Equivalence - 0.7B
Registered Jack RJ-11 with Desk Holder/Wall Mount
RJ-21X with Main Cabinet install
FCC Registration Numbers
US : 5JYKFO7BLIK-70
US : 5JYMFO7BLIK-70
Incidence of Harm
If the telephone company determines that the
customer provided equipment is faulty and possibly
causing harm or interruption to the telephone
network, it should be disconnected until repairs can
be made. If this is not done, the telephone company
may temporarily disconnect service.
Changes in Service
The local telephone company may make changes in
its communications facilities or procedures. If these
changes affect the use of the TeleniumIP or
compatibility with the network, the telephone
company must give written notice to the user to allow
uninterrupted service.
Maintenance Limitations
Maintenance on the TeleniumIP System must be
performed only by the manufacturer or its authorized
agent. The user may not make any changes and/or
repairs except as specifically noted in this manual. If
unauthorized alterations or repairs are made, any
remaining warranty and the software license for the
system will be voided.
Hearing Aid Compatibility
All TeleniumIP Digital Terminals are Hearing Aid
Compatible, as defined in Section 68.316 of Part 68
FCC Rules and Regulations.
UL/CSA Safety Compliance
The TeleniumIP System has met all safety
requirements and was found in compliance with the
Underwriters Laboratories (UL) 1459. This system is
authorized to bear the “NRTL/C” marking.
Notice of Compliance
This device complies with Part 15 of the FCC rules.
Operation is subject to the following two conditions:
(1) This device may not cause harmful interference,
and (2) this device must accept any interference
received, including interference that may cause
undesired operation. In accordance with FCC
Standard 15 (Subpart J), the following information is
supplied to the end user:
“This equipment generates and uses RF
energy and if not installed and used in
accordance with the Instruction Manual, may
cause interference to Radio Communications.
It has been tested and found to comply with the limits
for a Class A computing device, pursuant to Subpart J
of Part 15 of the FCC Rules, which are designed to
provide
reasonable
protection
against
such
interference, when operated in a commercial
environment. Operation of this equipment in a
residential area is likely to cause interference, in
which case the user, at his own expense, will be
required to take whatever measures may be required
to correct the interference.”
Toll Fraud and DISA Disclaimer
“While this device is designed to be reasonably secure
against intrusions from fraudulent callers, it is by no
means invulnerable to fraud. Therefore, no express or
implied warranty is made against such fraud including
interconnection to the long distance network.”
“While this device is designed to be reasonably secure
against invasion of privacy, it is by no means
invulnerable to such invasions. Therefore, no express
or implied warranty is made against unlawful or
unauthorized utilization which results in the invasion
of one’s right of privacy.”
Vodavi has made every reasonable effort to ensure
that this product works in most business
environments. However, there may be some
environments (RFI and EFI) in which this product
may not work properly. In such cases, it is the
responsibility of the installer to take the necessary
actions to correct the situation.
Contents
1
Introduction
Product Description .............................................................................1-3
Computer Requirements .......................................................................1-4
System Diagram .................................................................................1-4
Network Configuration Example ........................................................1-4
Equipment Part Numbers ......................................................................1-5
System Specifications ..........................................................................1-6
System Capacity .............................................................................1-6
Dimensions and Weights ..................................................................1-7
Electrical Specifications ....................................................................1-7
Environmental Specifications ............................................................1-8
Maximum Station Distance from Gateway Module ...............................1-8
CO Loop Specification ......................................................................1-8
2
System Components
IP Modules .........................................................................................2-3
MFIM ............................................................................................2-3
LGCM4 ..........................................................................................2-5
DIDM2 & DIDU2 .............................................................................2-6
SLTM2 & SLTU2 ..............................................................................2-7
BRIM2 ...........................................................................................2-8
SHUB8 ..........................................................................................2-9
IP Module - AC/DC Adapter ..............................................................2-10
IP Keysets ..........................................................................................2-10
IP Keyset AC/DC Adapter .................................................................2-13
Module Mounting Hardware ..................................................................2-14
Desk Mount Holder .........................................................................2-14
Wall Mount Holder ..........................................................................2-14
Main Cabinet ......................................................................................2-15
Cabinet Mounting Options ................................................................2-15
Power Box .....................................................................................2-17
3
Installation
Introduction .......................................................................................3-3
Site Preparation ..................................................................................3-3
General Site Considerations .............................................................3-3
Verify Equipment On-site .................................................................3-4
Module Mounting Hardware Installation ..................................................3-4
Main Cabinet Installation .................................................................3-4
Power Box Installation .....................................................................3-7
Main Cabinet and Power Box Grounding .............................................3-8
Module Desk Mount Holder Kit ..........................................................3-9
Module Wall Mount Holder Kit ...........................................................3-10
Device Installation Guidelines ...............................................................3-10
Module Installation ..............................................................................3-11
ii
MFIM Installation ............................................................................3-20
LGCM4 Installation ..........................................................................3-22
DIDM2 Installation ..........................................................................3-22
DIDU2 Installation ..........................................................................3-23
SLTM2 Installation ..........................................................................3-24
SLTU2 Installation ..........................................................................3-25
BRIM2 Installation ..........................................................................3-25
SHUB8 Installation ..........................................................................3-27
Main Cabinet Wiring .............................................................................3-29
IP Keyset Installation ...........................................................................3-34
TeleniumIP Quick Setup .......................................................................3-36
Install and connect the main module (MFIM) ......................................3-36
Install additional SHUB8 Modules (optional) ........................................3-37
Install IP Keysets ............................................................................3-37
Gateway Port Discovery Process .......................................................3-37
Install SLTM Gateway (optional) .......................................................3-38
Install CO Lines ..............................................................................3-38
SHUB8 Connection Diagram .............................................................3-38
4
Maintenance and Troubleshooting
Uses for Gateway RS-232 port ..............................................................4-3
Monitoring/Diagnostic/Maintenance .......................................................4-3
Connection ....................................................................................4-3
Monitor .........................................................................................4-5
Diagnostic/Maintenance ...................................................................4-8
Software Upgrade Process ....................................................................4-10
1
Introduction
This chapter provides introductory information regarding installation of the TeleniumIP
system. It also provides a listing of the part numbers for the system’s components,
technical specifications, and regulatory information.
Product Description
1-3
Chapter 1 - Introduction
Product Description
The TeleniumIP is an Internet Protocol (IP) based Key Telephone System designed to
meet the telecommunication needs of the small to medium sized business. The
TeleniumIP uses advanced packet voice and IP switching technology, which is combined
with a rich feature content, to set a new standard in converged Voice over IP (VoIP)
systems.
The TeleniumIP consists of a family of intelligent modules, which are interconnected over
a 10/100 Base-T Ethernet LAN, easing the installation process and eliminating the need
for an expensive back plane. A variety of modules are available including analog and
digital network access gateways, which connect to the Public Switched Telephone
Network (PSTN), ISDN, or public and private VoIP networks. The Switching Hub, which
provides connection to individual IP Keysets, incorporates circuitry for “power-feed”
over the LAN. IP Keysets provide the user with simple access to the many features and
functions of the TeleniumIP.
Adaptable Mounts -- The modules that make up the TeleniumIP can be shelf-mounted
(book-end), or installed in the TeleniumIP Main Cabinet. The Cabinet can be placed on a
desktop, in a 19” rack, or mounted to a wall to best fit the user needs and their
telephone equipment room.
Telephone Compatibility -- The TeleniumIP supports a variety of TeleniumIP Keysets
and analog single line devices. With the IP Keyset, commonly used features are
activated by selecting a single button. Additionally, most functions can be accessed
from any telephone by dialing specific codes. For IP Keyset users, these “dial codes”
may be assigned to Flexible buttons for easy access. In addition to the IP Keysets, an
optional DSS Console is available.
Enhanced Features -- The TeleniumIP provides an environment rich in features and is
comparable to today’s traditional circuit switched telephone systems. In addition to a
fully featured voice intercom, the TeleniumIP incorporates enhanced messaging, basic
Auto Attendant/Voice Mail, Least Cost Routing, and Automatic Call Distribution, as well
as Web-based administration, and VoIP network interface.
System Benefits -- By employing packet voice and IP switching, the TeleniumIP
infrastructure can be employed for or can share the business’s data network. Since all
modules and terminals have a unique IP address, they can be moved anywhere on the
TeleniumIP LAN and function without the need for “re-programming” the switch. The use
of the single common infrastructure and ability to easily install or relocate modules and
telephones results in significant savings at installation and over the life of the system.
The reliability, extensive feature content, and the capability to use an array of modules
and instruments, permit the TeleniumIP to be tailored to meet the short and long term
needs of the most demanding customer requirements.
1-4
Computer Requirements
Chapter 1 - Introduction
Computer Requirements
Recommended computer-related requirements for use with the TeleniumIP system are:
CPU: Pentium III and above
RAM: 128M SDRAM and above
OS: Windows 98 (2nd Ed), Windows 2000, Windows XP (excludes Windows ME)
Internet Explorer 5.5 or higher
System Diagram
Network Configuration Example
The following diagram shows how the TeleniumIP system can be configured to work with
a varitey of modules and terminals.
Internet
Router
PSTN
ISDN
Ethernet
(Switch Hub)
PRIM Gateway
(1PRI)
BRIM2 Gateway
(2BRI)
SLTM2/SLTU2 Gateway (4 SLT in total)
*
LGCM4 Gateway
(4 Loop/GND)
*
*
DIDM2/DIDU2
Gateway
(4 DID in total)
*
SLT
FAX
10/100 Base-T Ethernet
LAN Segment
SHUB8 (98 port switch)
*
LIP-24D
*
LIP-DSS
*
Feature Server
LIP-24DH
AA/VM
UMS
CTI
MFIM
Gateway
*
Music Source (2)
*
VMU
Miscellaneous
interfaces
Paging Equipment (2)
Alarm Detector (2)
Loud Bell (2 Relay Contacts)
PFT (4 Power Failure Transfer circuits)
* = Components of Telenium IP system
Figure 1-1: Network Configuration Diagram
Equipment Part Numbers
1-5
Chapter 1 - Introduction
Equipment Part Numbers
The following table lists the basic and optional parts used with the TeleniumIP system.
A detailed description of each part is provided in Chapter 2.
Description
Part Number
Short Title
GATEWAYS AND MODULES
3830-00
IP Multifunction Internet Protocol Gateway Module
MFIM
3830-30
DID Gateway Module (2 port)
DIDM2
3830-31
DID Gateway Module Upgrade (2 port)
DIDU2
3830-40
PSTN Gateway Module (4 Loop Start)
LGCM4
3831-41
ISDN Gateway Module (2 BRI)
BRIM2
3832-01
Power Switch (8 port) – network switch (provides power to IP phones)
SHUB8
3833-00
SLT Gateway Module (2 port)
SLTM2
3833-02
SLT Gateway Module Upgrade (2 port)
SLTU2
CABINET MOUNTING HARDWARE
3800-00
IP Main Cabinet Kit (includes P/N 3800-01, 3800-02, and 3800-03)
MCAB KIT
3800-01
IP Main Cabinet
MCAB
3800-02
IP Main Cabinet Window (clear acrylic door)
MCAB WIN
3800-03
IP Power Box
PWBX
3800-40
IP Data Rack Bracket Kit
RBRK KIT
3800-41
IP Main Cabinet Data Rack Bracket
RBRKM
3800-42
IP Powerbox Data Rack Bracket
RBRKP
3800-20
Pedestal Base Kit with Foot
FOOT KIT
3800-21
Pedestal Foot
FOOT
3800-30
Wall Mount Bracket
WBRKM
GATEWAY MOUNTING HARDWARE
3801-00
IP Desktop Mount
DHLD
3801-01
IP Desktop Mount Extender
DHE
3815-00
Single-Device Gateway Wall Mount
WHLD
KEYSETS
3810-00
IP 48-Button DSS/BLF Console
IP-DSS
3813-00
IP Phone Wall Mount
3813-01
24-Button LCD Key Telephone Unit (KTU) (1 port)
IP-24D
3813-02
24-Button LCD Key Telephone Unit (KTU) (2 port)
IP-24DH
POWER ADAPTERS
3871-00
IP Gateway Power Adapter
GW PWR
3871-01
IP Phone Power Adapter
IPPHONE PWR
1-6
System Specifications
Chapter 1 - Introduction
System Specifications
System Capacity
Description
Capacity
Alarm/Door Bell Inputs
2
Attendants
4
Authorization Codes
CO Line Groups
200
20
DSS Consoles per Station
2
Executive/Secretary Pairs
10
External Control Relays
2
External Page Zones
2
Hunt Group Members
70
Hunt Groups
40
Internal Page Zones
10
Last Number Redial Bins per Station
Main Cabinet Slots
10 (48 digits/bin)
10
Music Source Inputs
2
Power Fail Circuits
4
PSTN Circuits *
Save Number Redial
Serial Port (RS-232C)
SMDR Buffer
Station Speed Dial Bins per Station
Stations *
System Speed Dial Bins
System Speed Dial Groups
42
1 (48 digits)
2
20000
20 (48 digits/bin)
70
800 (48 digits/bin)
10
* The station and CO Line maximums are not simultaneously achievable. Cumulative maximum
Sta and CO Lines = 96 ports.
Dimensions and Weights
1-7
Chapter 1 - Introduction
Dimensions and Weights
Item
Height
(mm/in)
Width
(mm/in)
Depth
(mm/in)
Weight
(kg/lbs)
DHLD
146/5.7
111.5/4.4*
128/5
0.4/0.8
FOOT
101.1/4.0
436.6/17.2
310/12.2
1.0/2.2
Gateway Module
230/9.1
194.5/7.6
38.8/1.5
1.5/3.3
IP Keyset (IP-24D, IP-24DH)
86.4/3.4
269/10.6
196/7.7
0.92/2.0
IP-DSS Console
162/6.4
98/3.9
86.4/3.4
0.3/0.65
MCAB
308.4/12.1
436.6/17.2
310/12.2
9.0/19.8
PWXB
124.7/4.9
436.6/17.2
310/12.2
6.0/13.2
WBRK
45.0/1.8
458.6/18.1
312.6/12.3
1.7/3.7
WHLD
280/11.0
60/2.4
188.3/7.4
0.2/0.4
* Width of Desk Mount does not include approximately 40mm/3.2inches for each installed module.
Electrical Specifications
Item
Specification
External Paging Port
0dBm @600ohm
External Relay Contact
2amp @ 30 VDC
Gateway Power Adapter (AC/DC)
AC Power
100-240VAC, +/- 10% @50/60Hz
AC Voltage Input
1.0 amps
DC Output Voltage
48 VDC @ 0.8 amps
IP Phone Power Adapter (AC/DC)
AC Voltage Input
100-240 VAC, +/- 10% @50/60Hz
AC Power
0.2 amps
DC Output Voltage
48 VDC @ 0.1 amps
LAN Power Feed
48VDC @ 0.3 amps max
Music Source Input
0dBm @600ohm
Power Box
AC Voltage Input
100-240VAC, +/- 10% @50/60Hz
AC Power
10 Amp circuit
Fuse
T10A, AC250V
1-8
Environmental Specifications
Chapter 1 - Introduction
Environmental Specifications
Item
Degrees (C)
Degrees (F)
Operation Temperature
0-40
32-104
Optimum Operation Temperature
20-26
68-78
Storage Temperature
10-70
32-158
Relative Humidity
0-80% non-condensing
Maximum Station Distance from Gateway Module
Item
AWG 22
(m/ft)
AWG 24
(m/ft)
H.323 VoIP Telephone
100 / 328*
IP Keyset
100 / 328*
Single Line Telephone
6,000 / 20,000
4,000 / 13,000
* = UTP Category 5 Cables
CO Loop Specification
Item
Specification
DTMF Dialing
Frequency Deviation
Less than +/- 1.5 %
Signal Rise Time
Max. 5ms
Tone Duration, on time
Min. 50ms
Inter-digit Time
Min. 45ms
Pulse Dialing
Pulse Rate
10 pps
Break/Make Ratio
60/40% or 67/33%
Ring Detect Sensitivity
40Vrms @ 16-30Hz
30Vrms @ 30-37Hz
2
System Components
This chapter provides the following detailed information relating to the TeleniumIP system
hardware components:
System Module Descriptions
Switch and Connector Positions
IP Keyset Capabilities and Functions
IP Modules
2-3
Chapter 2 - System Components
IP Modules
MFIM
The "Multi-Function & Internet Protocol gateway Module" (MFIM) is the main controller for
the TeleniumIP. The MFIM contains two processors to support complex features. A main
processor manages and controls all the functions of the TeleniumIP, such as module
handling, IP Keyset handling and call processing. The sub-processor handles the
miscellaneous features of the system, such as external paging, internal and external
background music, alarm sensing, relay control and power fail transfer. The MFIM,
employing the IP Key Telephone System protocol, extends its telephony resources and
call processing to the TeleniumIP modules and terminals connected to the TeleniumIP Zone
(LAN).
A Telenium IP Zone is a concept identified as a set of Telenium IP devices on a network
that make up one particular Telenium IP system. Multiple zones can exist on a single
network without conflicting with each other.
The MFIM incorporates miscellaneous interfaces for Music-On-Hold (MOH), Background
Music (BGM), contact monitors for Alarm and Doorbell inputs, Loud Bell Contacts, and
Power Fail Transfer (PFT) relays.
The MFIM comes with a voice storage medium used by the Automated Attendant and
Voice Mail services available in the TeleniumIP software. The MFIM has a voice storage
capacity of approximately 200 minutes.
The MFIM incorporates an IP Gateway for access to standards based (H.323 v2) Voice
over IP (VoIP) communications networks. The MFIM supports up to 6 simultaneous full
duplex packet voice channels employing G.711 voice encoding.
The MFIM includes two Ethernet ports and two MACs for the 10/100 Base-T Ethernet
interface as well as packet voice processing functions. One Ethernet port is dedicated to
the master processor, and the other is dedicated to the sub-processor for miscellaneous
features.
The MFIM includes battery back-up circuitry using a long-life Lithium battery to prevent
system database loss during power fail. For more details, refer to “MFIM Installation” on
page 3-20.
2-4
MFIM
Chapter 2 - System Components
Front Panel
The front panel of the MFIM has:
Power jack for the AC/DC adapter supplied with the
MFIM
Power status LED
RCA jack for one music (audio) source -BGM1
One RJ-45 Female LAN connector for master processor
with Speed and Link/Activity LEDs
One RJ-45 Female LAN connector for sub-processor with
Speed and Link/Activity LEDs
Four-position DIP-switch for mode selections
Ten LEDs:
Five red LEDs display the operating status of the main
processor
Five green LEDs display the operating status of MISC
functions
Reset Switch
Two DB-9 RS-232 connectors
Rear Panel
On the rear panel, the MFIM has:
Eight RJ-11 female connectors: for Alarm, BGM/MOH,
Control Relay inputs, External Page outputs, and Power
Fail Transfer circuits.
Ground Lug
64-pin back plane connector. All signals on RJ-11
connectors are matched on the 64-pin back plane
connector.
Figure 2-1: MFIM Front & Rear Panels
LGCM4
2-5
Chapter 2 - System Components
LGCM4
The four port Loop/Ground CO gateway Module (LGCM4) provides four CO/PBX Loop/
Ground Start Line interfaces. These interfaces support pulse or DTMF dial signals. Each
Interface contains ring and loop current detection circuits, speech codec and compression
functions, and loop and ground signaling circuits. The circuitry and software support “Call
Progress Tone” and DTMF tone detection to support features such as Call Metering,
Automatic Redial, etc.
The LGCM4 includes the Ethernet port and MAC for the 10/100 Base-T Ethernet interface
as well as packet voice processing functions.
Front Panel
The front panel of the LGCM4 has:
Power jack for the AC/DC adapter supplied with the
LGCM4
Power status LED
Normal/Service Switch – in the Service mode, circuits in
use are busied as they return to idle
RJ-45 Female LAN connector with Speed and Link/
Activity LEDs
Four LEDs, one for status of each CO line
DB-9 RS-232 connector
Reset Switch
Rear Panel
On the rear panel, the LGCM4 has:
Four RJ-11 female connectors, one for each CO Line
Ground Lug
50-pin back plane connector. All signals on RJ-11
connectors are matched on the 50-pin back plane
connector.
Figure 2-2: LGCM4 Front & Rear Panels
2-6
DIDM2 & DIDU2
Chapter 2 - System Components
DIDM2 & DIDU2
The two port Direct-In-Dial gateway Module (DIDM2) provides interfaces to PSTN
Direct-In-Dial Lines, supporting wink or immediate start signaling. These lines are
incoming only and send the last few digits of the dialed number to identify a particular
extension/user in the system.
The DIDM2 provides interface circuitry for two DID Lines. The DIDM2 can be expanded
with the DIDU2 to provide four interface circuits in total. Each interface is equipped with
appropriate speech codec and compression functions, pulse and DTMF dial signal
detection.
The DIDM2 includes the Ethernet port and MAC for the 10/100 Base-T Ethernet interface
as well as packet voice processing functions.
Front Panel
The front panel of the DIDM2 has:
Power jack for the AC/DC adapter supplied
with the DIDM2
Power status LED
Normal/Service switch – in the Service
mode, circuits in use are busied as they
return to idle
D
ID
U
2
RJ-45 Female LAN connector with Speed
and Link/Activity LEDs
with DIDU2
Four DID LEDs, one for status of each DID
Line
One DIDU LED, indicating the two-port
expansion module (DIDU2) is installed
DB-9 RS-232 connector
Reset Switch
Rear Panel
On the rear panel, the DIDM2 has:
Four RJ-11 female connectors, one for
each DID Line (w/DIDU2 installed)
Ground Lug
50-pin back plane connector. All signals on
RJ-11 connectors are matched on the
50-pin back plane connector.
Figure 2-3: DIDM2 Front & Rear Panels
w/o DIDU2
with DIDU2
SLTM2 & SLTU2
2-7
Chapter 2 - System Components
SLTM2 & SLTU2
The two-port Single Line Telephone Module (SLTM2) allows standard analog Single Line
Telephone (SLT) devices access to CO Lines, other stations, and most features of the
system through the use of “dial codes”.
The SLTM2 provides interface circuitry for two SLTs. The SLTM2 can be expanded with
the two-port Single Line Telephone Unit (SLTU2) to provide four interface circuits in total.
Each interface is equipped with appropriate speech codec and compression functions, 48
volt DC feed circuit, pulse and DTMF dial signal detection. A ring generator and message
wait source are integrated in the SLTM2.
The SLTM2 includes the Ethernet port and MAC for the 10/100 Base-T Ethernet interface
as well as packet voice processing functions.
Front Panel
The front panel of the SLTM2 has:
Power jack for the AC/DC adapter supplied
with the SLTM2
Power status LED
Normal/Service switch – in the Service
mode, circuits in use are busied as they
return to idle
SL
TU
2
RJ-45 Female LAN connector with Speed
and Link/Activity LEDs
with SLTU2
Four SLT LEDs, one for status of each SLT
Four MSG LEDs, one each for Message
status to each SLT
One SLTU LED, indicating the two-port
expansion unit, SLTU2, is installed
DB-9 RS-232 connector
Reset Switch
Rear Panel
On the rear panel, the SLTM2 has:
Four RJ-11 female connectors, one for each
SLT (shown w/SLTU2 installed)
Ground Lug
50-pin back plane connector. All signals on
RJ-11 connectors are matched on the
50-pin back plane connector.
Figure 2-4: SLTM2 Front & Rear Panels
w/o SLTU2
withSLTU2
2-8
BRIM2
Chapter 2 - System Components
BRIM2
The Basic Rate Interface gateway Module (BRIM2) has two ISDN Basic Rate Interface
ports (2B+D). This Gateway Module supports the ‘S/T interface’ as described by ETSI
300.012 based on the ITU-T Recommendations I.430, and can be installed in the NT
(Network Termination) or TE (Terminal Equipment) mode.
The BRIM2 includes the Ethernet port and MAC for the 10/100 Base-T Ethernet interface
as well as packet voice processing functions.
Front Panel
The front panel of the BRIM2 has:
Power jack for the AC/DC adapter supplied with the Module 2
Power status LED
Normal/Service switch – in the Service mode, circuits in use
are busied as they return to idle
RJ-45 Female LAN connector with Speed and Link/Activity
LEDs
Ten LEDs, various status LEDs - five for each BRI Line
DB-9 RS-232 connector
Reset Switch
Rear Panel
On the rear panel, the BRIM2 has:
Two RJ-11 female connectors, one for each BRI Line
Two, four- position DIP-switches for setting termination mode
and power feed options for each BRI Line
Ground Lug
50-pin back plane connector. All signals on RJ-11 connectors
are matched on the 50-pin back plane connector.
Figure 2-5: BRIM2 Front & Rear Panels
SHUB8
2-9
Chapter 2 - System Components
SHUB8
The Switching Hub Module (SHUB8) has eight LAN ports and an UPLINK LAN port, all of
which employ Ethernet switching. All ports support Auto-sense 10/100Mbps and half/full
duplex mode. The SHUB8 is a standard nine-port Ethernet switch, which switches packets
between two specified ports. Unlike a repeater that repeats each packet to all ports, using
the SHUB8 minimizes traffic over each port as well as the overall LAN environment.
The eight LAN ports of SHUB8 are equipped with circuitry to provide power (48 VDC) to
the IP Keyset or DSS console through the LAN cable. The power-feed circuitry is
controlled manually by a DIP-switch on the front of the SHUB8. Note the UPLINK LAN port
is not equipped with the power feed circuitry.
Caution: The power feed provided by the SHUB8 will cause damage to other LAN
devices. Prior to switching any of the DIP-switches “ON”, assure that only an IP Keyset
or DSS console is connected to the SHUB8 switched LAN port.
Front Panel
The front panel of the SHUB8 has:
Power jack for the AC/DC adapter supplied
with the SHUB8
Power status LED
Eight-position DIP-switch, controls power to
each of the eight hub ports
RJ-45 Female “UPLINK” LAN connector with
Speed and Link/Activity LEDs
Eight RJ-45 Female LAN connectors with
Speed and Link/Activity LEDs, one per port
Rear Panel
On the rear panel, the SHUB8 has:
DB-9 RS-232 Serial port connector
Ground Lug
50-pin back plane connector.
Figure 2-6: SHUB8 Front & Rear Panels
2-10
IP Module - AC/DC Adapter
Chapter 2 - System Components
IP Module - AC/DC Adapter
Each module is packaged with an AC/DC adapter. The adapter is supplied with a
two-meter (six-foot) AC cord terminated with the nationally relevant AC blade type. The
adapter supports AC input power systems with rated voltage range of 100-240 VAC @
50/60 Hz. The adapter provides 48 VDC at 0.8 amps. The DC output connector is cabled
to the adapter with a two-meter (six-foot) cable as shown in the following illustration.
Figure 2-7: AC/DC Adapterfor IP Module
IP Keysets
The TeleniumIP will work with a number of telephone types including standard SLTs via
SLTM2 and the IP Keysets. The IP Keyset is available in the following configurations:
Table 2-8: IP Keyset Models
Model
Description
IP-24D
IP Phone 24BTN Display
IP-24DH
IP Phone 24BTN Display w/Switched Hub port
IP-DSS
IP Phone Direct Station Selection
LAN Ports
There are two IP Keyset models (IP-24D and IP-24DH) and a DSS console.
The IP-24D has a single LAN port for connecting to the external 10/100 Base-T LAN.
The IP-24DH model has two LAN ports and thus two RJ-45 connectors. One port is for
connecting to the LAN. The other can be connected to the network-ready PC. The ports
are connected to an intelligent 10/100Base-T switch, which gives LAN access to the data
device while giving priority to voice packets.
DSS Console
IP-DSS, which is used to expand the number of Flexible buttons available to a user by
48 buttons, has a single LAN port. When the console is locally powered with the AC/DC
Adapter, the IP DSS can be connected to the 2nd LAN port of the IP-24DH.
IP Keysets
2-11
Chapter 2 - System Components
Fixed/Flexible Buttons
Each IP Keyset has a standard 12-button dial-pad, color coordinated handset, an array of
24 “Flexible buttons”, and 16 Fixed Feature Access keys. All of the Flexible and Fixed
buttons, except the Volume controls, incorporate a long-life, super-bright LED to indicate
the circuit or feature status.
The fixed feature access keys are the same for all IP Keysets and include the following:
TRANS – transfer
ICM – Intercom
REDIAL
PGM – Program
FWD – Call Forward
SPEED – Speed Dial
CONF - Conference
SAVE
DND – Do-Not-Disturb
SPEAKER
CALL BK – Call back
HOLD
MUTE
VOLUME up
FLASH/MSG – CO Line Flash and
Message Wait
VOLUME down
Features
The IP Keyset circuitry includes Digital Signal Processing to implement packet voice
encoding and decoding, and echo cancellation as well as tone generation and
speakerphone operation. The Volume controls, which consist of separate volume up down
buttons, adjust the level of the handset as well as the speaker.
The IP Keyset includes a 2-line, 48-character (24 characters per line), Liquid Crystal
Display (LCD). The LCD provides an alphanumeric display to assist the user in operation
of features. In the idle mode, the display will show the station name or number on the
top line and the time and date on the 2nd line. The LCD is employed to support features
such as Dial-By-Name (Directory Dial) using the Volume control to scroll through name
displays to find a telephone number in the directory.
The IP Keyset may be powered locally with the Keyset AC/DC Adapter, refer to page 2-10,
or powered over the LAN with the SHUB8. If both the AC/DC Adapter and powered LAN
port are connected to the IP Keyset, the Adapter will provide the required power.
2-12
IP Keysets
Chapter 2 - System Components
Using the available Wall Mount Kit, the IP Keysets can be mounted on a wall as shown in
the following keyset illustrations. NOTE: the IP-DSS is not wall-mountable.
Figure 2-9: IP-24D Keyset
Figure 2-10: IP-24DH Keyset
Figure 2-11: IP-24DH Keyset with DSS Console
IP Keyset AC/DC Adapter
2-13
Chapter 2 - System Components
Figure 2-12: Wall Mount for IP Keysets
IP Keyset AC/DC Adapter
When an IP Keyset or DSS is to be powered from local AC (not provided power over the
LAN), a separate AC/DC adapter must be used for power. The adapter is supplied with a
ten-foot AC cord terminated with the nationally relevant AC blade type. The adapter
supports AC input power systems with rated voltage range of 100-240 VAC @ 50/60 Hz.
The adapter provides 48 VDC at 0.1 amps. The DC output connector is cabled to the
adapter with a ten-foot cable.
Figure 2-13: AC/DC Adapter for Keyset
2-14
Module Mounting Hardware
Chapter 2 - System Components
Module Mounting Hardware
The TeleniumIP modules and Cabinet can be installed in a variety ways:
Desk mounted using the Desk Mount Holder,
-or-
Wall mounted individually using the Wall Mount Holder,
-or-
Cabinet installed using the Main Cabinet, which can be 19” Rack-, Desk-, or Wall-mounted.
Desk Mount Holder
The Module Desk Mount Holder (DHLD) consists of a pair of “bookends” and Desk Mount
Holder Extender (DHE). One Extender is installed between the bookends for each module,
and the module is mounted between the bookends.
Figure 2-14: Desk Mount Holder & Extenders
Wall Mount Holder
The TeleniumIP modules can be wall-mounted using the Wall Mount Holder (WHLD). The
WHLD provides wall mounting for a single module.
Figure 2-15: Module Wall Mount Holder
Main Cabinet
2-15
Chapter 2 - System Components
Main Cabinet
The TeleniumIP Main Cabinet (MCAB) has ten slots for modules. The front panel of the
Cabinet is made of a translucent plastic to permit easy viewing of the various status LEDs
on the installed modules. The “window” front panel is hinged to open freely and
incorporates a turnkey, which can be locked to minimize unauthorized access.
Any module can be installed in any of the first nine slots; slot ten is reserved for the MFIM
only. The back plane distributes the telephony terminations to the appropriate RJ-21x
connectors mounted on the back plane. LAN connections are made along with power on
the front of each module.
Cabinet Mounting Options
There are three types of mounting hardware available that allows the Cabinet to be
mounted in a 19” rack, on a desk top, or on a wall. With the Rack or Desk mount
installation; removing the rear panel of the Main Cabinet accesses the RJ-21X connectors
on the back plane. In the Wall mount installation, the Cabinet is connected to the Wall
Mount using a hinge, which allows the Cabinet to swing open for removal of the rear
panel allowing access to the RJ-21X connectors on the back plane.
The 19” Rack, Desk and Wall Mount hardware are shown in the respective illustrations.
Rack Mount
Figure 2-16: 19” Rack Mount Installation
2-16
Cabinet Mounting Options
Chapter 2 - System Components
Desk Mount
Figure 2-17: Desk Mount Installation
Wall Mount
Figure 2-18: Wall Mount Installation
Power Box
2-17
Chapter 2 - System Components
Power Box
A Power Box (PWBX) may be installed to house the AC/DC adapters for the TeleniumIP
Modules. The Power Box is attached to the Main Cabinet with small brackets. The Power
Box design incorporates ten slots for module AC/DC adapters.
An AC power strip with ten short AC cables for connection to individual modules, a
thermostat controlled cooling fan, a 15-amp 250 V time-lag fuse (T10A, AC250V), and a
two-meter (six-foot) power cord for connection to local AC power are all included in the
power box.
Figure 2-19: Power Box
2-18
Chapter 2 - System Components
Power Box
3
Installation
This chapter provides information regarding installation of modules and other related
equipment.
Introduction
3-3
Chapter 3 - Installation
Introduction
Recommended installation proceeds in six major steps:
Site preparation
Equipment verification
Cabinet/Desk/Wall Mount Holder installation, as required
Module installation and wiring
IP Keyset and other terminal installation
System programming and verification
Directions for system programming and verification are provided in the TeleniumIP System
Programming Manual.
Site Preparation
General Site Considerations
The first step is to locate an acceptable site for the Module mounting hardware (Desk
Mount Holder, Wall Mount Holder or Main Cabinet). When locating the mounting site, the
following points must be considered:
The Main Cabinet can be Desk-, 19” Rack-, or Wall-mounted. When desk
mounting, assure that the desk has ample strength to support the Main Cabinet
and other hardware to be installed.
When wall mounting is desired, the Cabinet MUST NOT be mounted directly to a
masonry or plasterboard wall. A 1/2-inch plywood backboard should be firmly
attached to the wall, and the Cabinet should be mounted to the backboard.
The location must have access to an appropriate 100-240 VAC @ 50-60 Hz power
source with a circuit breaker or fuse rated at 10 amps and must be surge
protected. An appropriate grounded outlet should be within approximately 2
meters (6 feet) of the equipment location. When employing the Module Desk
Mount Holder, an outlet will be required for each Module; a multi-outlet extension
cord or the TeleniumIP Power Cabinet may be used.
The location must have access to a good earth ground, such as a metallic cold
water pipe with no non-metallic joints. The ground source should be located as
close as possible to the equipment.
The system should be located in a well-ventilated area with a temperature of
approximately 200C (680F) and a relative humidity of 0-80% (non-condensing).
The equipment should be located within 8 meters (25 feet) of the telephone
company's termination point. If the system is to share the LAN with data devices
or be connected to an external VoIP network the system must be within 100
meters (328 feet) of the WAN connection. Also, the location should be within the
prescribed station loop lengths for all IP Keysets and terminals (100 meters/328
feet). If existing cabling is to be employed, the location of existing cabling and
conduits should be considered.
The location should have adequate accessibility, space and lighting for future
servicing and should consider the need for future expansion.
The site should be away from radio transmitting equipment, arc-welding devices,
copy machines, and other electrical equipment capable of generating high levels
of electrical interference. The system should be protected from flooding and heavy
machinery as well as excessive dust and vibration.
3-4
Verify Equipment On-site
Chapter 3 - Installation
Verify Equipment On-site
Once the equipment installation site has been identified and a dedicated AC outlet, earth
ground, lighting and ventilation are available, verify that all equipment and tools required
are on-site and the equipment has not been damaged during shipment. Check that the
type and quantity of Modules and terminals received are correct. Also assure optional
equipment and a Power Line Surge Protector are on-site.
Module Mounting Hardware Installation
Main Cabinet Installation
The TeleniumIP Main Cabinet can be desk, 19” rack or wall mounted. The following
paragraphs provide directions for each of the mounting options.
Cabinet Pedestal Kit Installation
An optional Pedestal kit is available for the Main Cabinet. This kit must be installed when
the Main Cabinet is to be floor mounted to assure adequate ventilation. The four Pedestal
feet are mounted to each bottom corner of the Cabinet. A wiring tray is mounted on the
lower front of the Main Cabinet.
To desk mount the Cabinet:
1. Insert the Foot into the foot-hole at each bottom corner of the Cabinet and rotate
each Foot clockwise until locked securely.
2. Loosen the two screws at both sides of the Cabinet.
3. Slide the Wiring tray over the two screws and re-tighten securely.
Figure 3-1: Cabinet Pedestal Kit
Main Cabinet Installation
3-5
Chapter 3 - Installation
Cabinet 19” Rack Installation
Rack mount brackets are provided as standard equipment with the Main Cabinet. These
brackets attach to the front sides of the Main Cabinet.
To rack mount the Main Cabinet:
1. Bolt the Rack mount brackets securely onto the sides of the Cabinet with the four
supplied M4 x 6 mm machine screws, nuts, and washers.
2. Connect the brackets securely to a standard 19” rack with four appropriate
machine screws, nuts, and lock-washers.
Figure 3-2: Rack 19" Installation
Cabinet Wall Mount Kit Installation
If the Main Cabinet is to be wall mounted, a wooden backboard MUST be installed when
the location has masonry or plasterboard walls. This backboard is recommended for all
wall mount installations. A 1/2-inch plywood material is sufficient for most installations.
The backboard should be mounted at a convenient height, about one meter above the
floor, and be bolted to wall-studs in a number of places to distribute the weight of the
system.
Space should be available on the backboard for separate Telephone and LAN wiring main
distribution frames and for optional equipment such as music sources, etc.
The optional Cabinet Wall Mount kit mounts to the wall then the Main Cabinet is attached
to the Wall Mount kit. The Wall Mount kit permits the cabinet to swing on a Hinge for
access to the backplane telephony cabling. The Hinge may be placed on either side of the
Cabinet prior to installation. Select the Hinge side so as to obtain maximum clearance
and lighting.
3-6
Main Cabinet Installation
Chapter 3 - Installation
Follow the steps below for installation.
1. Remove the Hinge pin from the Hinge plates.
2. Mount the separated Hinge plates, one to the Wall Mount bracket and one to the
Main Cabinet using the M6 x 8 mm machine screws, nuts and washers (four for
each Hinge plate) provided.
3. Use the Wall Mount kit to mark the location of four mounting holes for the Wall
Mount kit.
4. Drill four pilot holes for 7 mm x 38 mm (#10x1.5 inch) or larger screws.
5. Insert the screws in all four pilot holes and tighten, leaving about 12 mm (1/2
inch) exposed.
6. Place the Wall Mount kit on the four screws and tighten the screws securely.
7. Mount the Main Cabinet to the Wall Mount kit by aligning the Hinge plates and
inserting the Hinge pin.
Figure 3-3: Cabinet Wall Mount Kit Installation
Power Box Installation
3-7
Chapter 3 - Installation
Power Box Installation
The Power Box is designed for Desk or Main Cabinet mounting. To mount the Power Box
to the Main Cabinet, install two brackets with the four self-tapping M4 x 6 mm screws.
These screws must be tightened securely as they also provide for grounding of the
cabinet.
AC/DC Adapters are held in place with a hold-down bracket inside the Power Cabinet.
To install an Adapter:
1. Remove the cover from the Power Box.
2. Loosen the hold-down bracket screws.
3. Insert Adapter in the appropriate slot, assure the DC feed cable is free and at the
front of the Cabinet.
4. Connect the short AC cord to the adapter and Power Box outlet.
5. While applying a slight downward force on the hold-down bracket, tighten the
screws.
6. Replace the Power Cabinet cover.
Figure 3-4: Power Box Installation
3-8
Main Cabinet and Power Box Grounding
Chapter 3 - Installation
Main Cabinet and Power Box Grounding
Before connection to AC power, the Cabinet must be connected to an Earth Ground in
conformance with the appropriate IEEE recommendations. An Earth Ground is required
for user safety and to minimize EMC interference.
To ensure proper system operation and for safety purposes, a good earth ground is
required. A metallic COLD water pipe usually provides a reliable ground. Carefully check
that the pipe does not contain insulated joints that could isolate the ground path. If
insulated joints exist, another earth ground source must be used or, if allowed, the joints
may be bridged.
An 18 AWG UL type 1015 or larger copper wire is recommended as the ground wire.
However, check the appropriate national or local codes for proper conductor type and
size. The wire should be kept as short as possible, it is recommended that the wire be no
longer than 1 meter (about 3.3 feet).
When the Power Box is installed with the Main Cabinet, the Ground wire should be
connected to the GND terminal located on the rear side of Power Box. Loosen the GND
terminal sufficiently to insert the Ground wire and re-tighten the terminal securely. Also
assure the Main Cabinet and Power Box fasteners are securely tightened.
When the Main Cabinet is installed without the Power Box, the Ground wire should be
connected to the GND terminal located on rear bottom left side of the Cabinet. Loosen
the terminal sufficiently to insert the Ground wire and re-tighten securely.
: Safety Earth Point
: Functional Earth Point
Figure 3-5: MCAB and Power Box Grounding
Module Desk Mount Holder Kit
3-9
Chapter 3 - Installation
Module Desk Mount Holder Kit
To assemble the Desk Mount Holder, refer to the instructions below. Note a Desk Holder
Extender is required for each Module.
1. Place the key-hole slot on the side of the Extender over the key on the side of the
bookend.
2. Slide the Extender and bookend to the locked position.
3. Repeat for additional Extenders and the other bookend.
Once assembled, Modules are simply placed in the Desk Holder "slots". The front of all
Modules should be placed on the same side of the Desk Holder.
Figure 3-6: Module Desk Mount Holder Kit
3-10
Module Wall Mount Holder Kit
Chapter 3 - Installation
Module Wall Mount Holder Kit
The Module Wall Mount Holder will house a single Module.
To install:
1. Place the Wall Mount Holder in position and mark two holes over a wall stud. If a
wall stud is not found, a wall fastener such as a toggle bolt must be used.
2. Drill pilot holes for the 7 mm x 38 mm (#10 x 1½ inch) or larger screws, if a stud
location cannot be found, wall fasteners such as toggle bolts should be used.
3. Insert the two screws into the pilot holes, leaving about 6 mm (¼ inch) exposed.
4. Place (hang) the Wall Mount Holder on the screws and tighten securely.
5. Slide the Module into the Wall Mount Holder until it locks.
6. Connect all wiring to the Module as appropriate.
Figure 3-7: Module Wall Mount Holder Kit
Device Installation Guidelines
Station numbers are assigned consecutively based on the order of connection to the
system. Since the first IP Keyset is assigned as the Attendant (station number 100), it is
recommended that the IP Keyset for station 100 be connected to the system prior to
installing any SLT gateway Module.
Module Installation
3-11
Chapter 3 - Installation
The system does not differentiate between the types of PSTN Modules during
initialization. Thus, an MFIM is always assigned SEQUENCE NUMBER 01 with CO Line ports
1-6 for the VoIP function. A LGCM4 that is the first Module connected to the MFIM (under
power) is assigned SEQUENCE NUMBERS 02 and 03 with corresponding CO Line ports 7-8
and 9-10, a DIDM2 with DIDU2 that is the second Module connected is assigned
SEQUENCE NUMBERS 04 and 05 with CO Line ports 11-12 and 13-14, and another LGCM4
connected third is assigned SEQUENCE NUMBERS 06 and 07 with CO Line ports 15-16 and
17-18.
Although the Module sequence order can be changed in administrative programming,
connecting the gateway Modules to the TeleniumIP Zone in the desired sequence based on
type of Module is recommended. The Module SEQUENCE NUMBER is easily established at
installation by controlling the connection order of the Module’s LAN port to the system
(hub connected to the MFIM’s LAN 1 and LAN 2 ports) and resetting the system through
the MFIM.
Module Installation
The following paragraphs provide general and common installation and wiring practices
and procedures for all Modules. Procedures such as LAN wiring are common for all Module
LAN ports and are discussed here. Prior to installation of any Module, it is recommended
that the installer be thoroughly familiar with the information in this section.
Modules must be installed in a Wall Mount Holder, Desk Holder, or the Main Cabinet for
proper ventilation. Do not stack Modules or limit airflow, as this may cause overheating
which can lead to premature failure of the equipment.
Module Installation Sequence
As the system initializes, a SEQUENCE NUMBER is assigned to all gateway Modules based on
the order of registration with the system through the MFIM. Refer to the TeleniumIP
System Programming Manual for further details. This SEQUENCE NUMBER determines the
logical CO Line and SLT station numbers assigned in the system database.
When the TeleniumIP Modules are
connected to the MFIM in a TeleniumIP
Cabinet, a logical port number is
associated with the Sequence Number.
The adjacent Table provides the Sequence
Number-to-logical-CO Line port
relationship.
Do not confuse the logical CO Line port
numbers (software) with the physical port
numbers (hardware). Physical ports from
the modules connect to devices. Refer to
Figure 3-21: MB Wiring Diagram for
Champ Connectors on page 3-30
SEQUENCE
NUMBER
CO LINE PORT
1
1-6
2
7-8
3
9-10
4
11-12
5
13-14
::
::
18
40-41
19
41-42
3-12
Module Installation
Chapter 3 - Installation
Module Insertion/Removal
Modules are easily inserted into the Main Cabinet; place the Module with front panel
forward in the desired slot in the cabinet and slide the Module into the Cabinet, engaging
the connectors of the backplane and Module. Note slot 10 is used only for the MFIM.
To remove a Module from the Main Cabinet, pull on the Release while sliding the Module
out of the cabinet.
Figure 3-8: Cabinet Insertion/Removal
Module Installation
3-13
Chapter 3 - Installation
Common Module Switches
With the exception of the SHUB8, all Modules have a recessed Reset and a Normal/
Service switch. These switches are employed for maintenance purposes. The Reset switch
will restart the Module firmware, resetting only scratch-pad memory. The Normal/Service
switch activates a graceful shutdown of the Module. As busy circuits go idle they are
marked as Out-of-Service.
Figure 3-9: Common Module Switches
3-14
Module Installation
Chapter 3 - Installation
Module Grounding
A "GND" screw is located on the rear panel of each Module. For proper operation and
code compliance, the grounding screw MUST be connected to a known earth ground
using a #18 AWG or larger UL-1015 type copper wire. Note that when using the Main
Cabinet, a separate ground connection to the individual Modules is not required.
rear panel
Plan washer
Toothed lock
washer
Wire position
Figure 3-10: Module Grounding
Telephony Connections
In general, PSTN and SLT (telephony) connections are available on the rear of each
Module. LAN, power, and RS-232 connections are on the front of each Module.
Telephony connections are via RJ-11 type jacks wired as in Figure 3-11. These telephony
jacks are also employed for the miscellaneous functions of the MFIM Module. Details for
the terminations of the miscellaneous function jacks are given in “MFIM Installation” on
page 3-20.
All telephone wiring should use standard two twisted pair 24 AWG wiring.
Figure 3-11: Telephony (RJ-11) Connector Pin Assignment
Module Installation
3-15
Chapter 3 - Installation
LAN Connections
LAN connections are made by way of RJ-45 connectors on the front panel of each Module.
These connectors are shown in Figure 3-12. Each connector has a green Link/Activity LED
and a yellow LAN speed LED (ON for 100 Base-T).
The gateway Module "LAN" ports and the SHUB8 "UPLINK" ports as well as the IP Keyset
LAN are terminated in the standard Media Dependent Interface (MDI) configuration
shown in Figure 3-12. The SHUB8 "X" LAN ports are terminated in the mating MDIX
(crossover) configuration as shown in the figure. The SHUB8 can provide power over the
LAN with 48 VDC across pin pairs 4 & 5 and 7 & 8. This mates with the IP Keyset as
shown. The IP LCD 2P Keyset is equipped with a second LAN port to connect a PC or
similar device to a share LAN infrastructure. This connector is terminated in the MDIX
configuration mating to a typical PC with the straight cable.
All LAN wiring must use Category 5 Unshielded Twisted Pair (CAT 5 UTP) cable. No single
run of LAN cable should exceed 100 meters (about 328 feet).
RX+
TX+
TXRX+
RX-
RXTX+
TXDC+
DC-
12345678
Yellow LED
On = 100 Mbs
12345678
Green LED
On = Link+ACT
Flash = Activity
Gateway & Hub UPLINK
EIA 568B (MDI)
SHUB8 1x~8x PORT
EIA 568A (MDIX) w/Pwr
TX+
RX+
TXRX+
RXDC+
RXTX+
TX-
DC-
12345678
LIP Keyset LAN port
EIA 568B (MDI) w/Pwr
12345678
LIP Keyset PC port
EIA 568A (MDIX)
Figure 3-12: LAN Connector (RJ-45) Pin Assignment
3-16
Module Installation
Chapter 3 - Installation
LAN Wiring Structures
The LAN wiring architecture used for connecting TeleniumIP Modules to form a TeleniumIP
Zone is dependent upon several factors including:
Shared or TeleniumIP-only LAN infrastructure
External VoIP calling requirements
New or existing voice and/or data installation
Remote LAN power or local AC power for IP Keysets
For a shared environment, the desktop PC is connected to the IP LCD 2P Keyset, which is
connected with a standard LAN cable to an RJ-45 LAN jack. The LAN jack is wired to a
hub, which is connected to the MFIM and other IP KTS Modules and IP Keysets. This last
connection can be through a connection to the same hub or by an indirect connection
through multiple hubs.
For a new installation, or where LAN power to the IP Keyset is required, the SHUB8 can
be employed for the corporate LAN. For existing installations, it will be necessary to
replace existing hubs in a shared environment in order to provide remote power to the IP
Keysets.
In the shared environment, both data and voice will have access to the WAN, which also
permits external VoIP calling. In the non-shared LAN environment, the system must be
connected to the WAN to support external VoIP connections.
Due to the advantages of the shared environment, support for remote LAN power, and
external VoIP calling, the SHUB8, which is a standard switching hub, should be employed.
The recommended structure, called a "hierarchal" wiring, employs all "straight" LAN
cables (MDI to MDIX) and is shown in Figure 3-13. Additional SHUB8 Modules are
connected using the UPLINK port to the switched ports of the primary SHUB8. A sufficient
number of SHUB8 modules are connected to provide the total number of ports required.
Each Module, IP Keyset, and IP DSS requires a single port and the MFIM will require two
ports.
Module Installation
3-17
Chapter 3 - Installation
Thus, an 8 CO Line, 24 station system would require a total of 28 ports (MFIM = 2
ethernet ports, two LGCM4 = 2 ethernet ports and 24 IP Keysets = 24 ethernet ports),
and would be structured as in the following table and figure.
Quantity
Device
CO Lines
Ethernet
Ports
System Ports
2
LGCM4
8
2
8
1
MFIM
6
2
6
24
IP 24D
0
24
24
14
28 (4 SHUB8s
required)
38 total ports
of 96 available
WAN
LIP Keysets
Figure 3-13: TeleniumIP LAN Wiring Example
3-18
Module Installation
Chapter 3 - Installation
Cascading
When the station loop limit is beyond the 100 meter (330 feet) limit, hubs may be
cascaded to extend the range. For the SHUB8, simply connect the extension hubs with
their UPLINK port to a LAN 1X-8X port of the previous SHUB8 in the cascade.
The SHUB8 does not support spanning tree. Do not create a loop when connecting these
hubs to each other or other network components.
Figure 3-14: Erroneous Loop Wiring
RS-232 Connections
The DB-9 connectors located on the front panel of gateway Modules are RS-232 serial
ports. These connectors are employed to provide system trace and diagnostic routines for
the individual Modules. The MFIM has two such ports, which may be assigned for the
desired function (SMDR, ACD, etc.). Refer to the TeleniumIP System Programming Manual.
As a default, the serial ports of MFIM are set-up for 8 bits, no parity, and one stop bit
running at 38,400 bps. All other Modules are set-up for 7bits, no parity, and two stop bits
running at 38,400 bps. To modify these settings, refer to the TeleniumIP System
Programming Manual.
Module Installation
3-19
Chapter 3 - Installation
The RS-232 connectors are terminated as displayed in Figure 3-15. Use a cable
pre-terminated with DB-9 connectors to connect an appropriate device (terminal, printer,
etc.) to the Module.
Designation
Function
TD
RD
RTS
CTS
DTR
DSR
Transmitted Data
Received Data
Request To Send
Clear To Send
Data Terminal Ready
Data Set Ready
Figure 3-15: RS-232 DB-9 Pin-Outs
Module Power Adapter
Each Module is shipped with an AC/DC Adapter, which converts local AC to 48 VDC for
Module power. One side of the adapter has a three-prong parallel blade male termination
and mates with the supplied power cord. The supplied AC power cord is plugged into the
adapter and into the local AC power source.
The other end of the adapter is terminated in a DC power cord with a plug at the end.
This DC power plug is inserted into the power input jack on the upper front panel area of
each Module. The Power LED on the Module front panel will illuminate when power is
applied.
3-20
MFIM Installation
Chapter 3 - Installation
MFIM Installation
The MFIM Module must be installed only in slot ten of the Main Cabinet. This slot is
dedicated to the MFIM. When Desk mounting Modules, the MFIM may be inserted
anywhere in the Desk Mount Holder.
LEDs
In addition to the Power and LAN LEDs, the MFIM has ten LEDs for status and diagnostic
information as described in the following table.
LED DESIGNATION
LED STATUS FUNCTION - ON
S1
Serial/TCP debug active
S2
Call Processing active
S3
Active data communication with Modules and IP keysets
S4
LCD control active
S5
Clock alive (flashing)
BGM
BGM or internal MOH is active
PAGE
Ext. Page 1 or Ext. Page 2 is active
RECORD
VSF Record active
PLAY
VSF Play-back active
VMU
Voice Storage Memory Unit installed
MODE Switch & Settings
The MFIM has a four-position dip switch identified as the "MODE" switch. The function of
each switch position is given in the following table.
Switch
Function
OFF
ON
Unprotect
Protect
1
Database write protect
2
Service Switch
Service
Normal
3
Registration Authorization
Disallow
Allow
4
Initialization
Initialize on reset
Read stored DB on reset
To enter data in the system’s database, the Write Protect switch must be in the OFF
position. In the ON position, the database cannot be modified. Thus, placing the switch in
the ON position eliminates the potential for remote database modification. If remote data
entry is not desired, after all installation and database entries are complete, place the
switch in the ON position.
The system database is initialized based on switch position 4. In the ON position the
system will load default values in the system database and conduct a general Module
registration when power is applied to the MFIM. Note that if the system loses power for
any reason with the switch in the ON position, the database will be initialized. Place the
switch in the OFF position to maintain the database in the case of power loss or reset. For
a description of the initialization process refer to the TeleniumIP System Programming
Manual.
MFIM Installation
3-21
Chapter 3 - Installation
Wiring Connectors
Before wiring any of the Modules, first connect the "GND" screw on the back of the
Module to a known earth ground. Refer to “Module Grounding” on page 3-14.
On the front of the MFIM are the "LAN 1" and "LAN 2" RJ-45 connectors. These
connectors should be wired to the appropriate LAN points as discussed in “LAN
Connections” on page 3-15 and “LAN Wiring Structures” on page 3-16.
V
V
V
Wire "LAN 1" to a 10/100 Base-T switch. A SHUB8 can be used to form the
TeleniumIP Zone.
Wire "LAN 2" to a 10/100 Base-T switch. A SHUB8 can be used to form the
TeleniumIP Zone.
Tag or number wiring for maintenance.
CAUTION : Before connecting the LAN from SHUB8, the appropriate switch
for DTE power must be in the "OFF" position.
On the rear are eight RJ-11 connectors terminated for miscellaneous functions, which
should be wired as in Figure 3-16. When using a Main Cabinet, refer to “Main Cabinet Wiring”
on page 3-29 for wiring instructions.
V
V
Wire Miscellaneous function connectors as depicted in the sketches of Figure 3-16
below.
Tag or number wiring for maintenance.
Figure 3-16: MFIM Miscellaneous Function Connections
AC/DC Adapter
Assure the AC/DC Adapter is plugged into a live AC outlet and the Module Power jack.
3-22
LGCM4 Installation
Chapter 3 - Installation
LGCM4 Installation
The LGCM4 may be installed in any slot of the Main Cabinet, except for slot ten, or may
be installed anywhere in the Desk Mount Holder. The LGCM4 provides a gateway between
standard PSTN Loop/Ground Start Lines and the TeleniumIP KTS. The LGCM4 can support
four PSTN Lines.
LEDs
In addition to the Power and LAN LEDs, the LGCM4 has four status LEDs. These LEDs
indicate that the individual PSTN Lines are busy (LED on), idle (LED off) or ringing (LED
flashing).
Wiring Connectors
Before wiring any of the Modules, connect the "GND" screw on the back of the Module to a known
earth ground. Refer to “Module Grounding” on page 3-14.
On the front of the LGCM4 is the RJ-45 type "LAN" connector. This connector should be
wired to the appropriate LAN points.
Wire "LAN" to a 10/100 Base-T switch. A SHUB8 can be used to form the TeleniumIP
Zone.
Tag or number wiring for maintenance.
CAUTION : Before connecting the LAN from SHUB8, the appropriate switch
for DTE power must be in the "OFF" position.
On the rear are four RJ-11 connectors terminated which should be wired to the telephone
company termination point. When using a Main Cabinet, refer to “Main Cabinet Wiring” on
page 3-29 for wiring instructions.
Wire each RJ-11 to a CO Line at the PSTN termination point/MDF.
Tag or number wiring for maintenance.
AC/DC Adapter
Assure the AC/DC Adapter is plugged into a live AC outlet and the Module Power jack.
DIDM2 Installation
The DIDM2 may be installed in any slot of the Main Cabinet, except for slot ten, or may
be installed anywhere in the Desk Mount Holder. The DIDM2 provides a gateway between
standard telephone company DID Lines and the TeleniumIP KTS.
The basic DIDM2 can support two DID Lines and can be expanded with the DIDU2 by an
additional two Lines for a total of four DID Lines. If required, install the optional DIDU2
expansion unit before installing or wiring the DIDM2.
LEDs
In addition to the Power and LAN LEDs, the DIDM2 has four status LEDs for each DID
Line. These LEDs indicate that the DID Line is in-use (LED on), signaling (LED flashing),
or idle (LED off). Note that the LEDs for circuits 3 and 4 will only function if the DIDU2 is
installed.
DIDU2 Installation
3-23
Chapter 3 - Installation
Wiring Connectors
Before wiring any of the Modules, connect the "GND" screw on the back of the Module to a known
earth ground, refer to “Module Grounding” on page 3-14.
On the front of the DIDM2 is the RJ 45 type "LAN" connector. This connector should be
wired to the appropriate LAN points as discussed in “LAN Connections” on page 3-15 and “LAN
Wiring Structures” on page 3-16.
V
V
Wire "LAN" to a 10/100 Base-T switch. A SHUB8 can be used to form the TeleniumIP Zone.
Tag or number wiring for maintenance.
CAUTION : Before connecting the LAN from SHUB8, the appropriate switch
for DTE power must be in the "OFF" position.
On the rear are two or four RJ-11 connectors terminated as described in “Telephony
Connections” on page 3-14, which should be wired to the telephone company termination
point. When using a Main Cabinet, refer to “Main Cabinet Wiring” on page 3-29 for wiring
instructions.
Wire each RJ-11 to a DID Line at the PSTN termination point/MDF.
Tag or number wiring for maintenance.
AC/DC Adapter
Assure the AC/DC Adapter is plugged into a live AC outlet and the Module Power jack.
V
V
DIDU2 Installation
The basic DIDM2 is equipped with circuitry to support two DID Lines and can be
expanded with the DIDU2 to support four DID Lines. The DIDU2 is installed in the DIDM2
as described below and shown in Figure 3-17.
V
V
V
Remove the Option Cover plate on the rear of the Module by pulling away from the
Module.
Insert the DIDU2 option board and slide into the Module engaging the Module
connector fully.
To remove the DIDU2, press up on the release latch and pull the DIDU2 out of the
module as shown in Figure 3-17.
Insert
Remove
Figure 3-17: DIDU2 Installation
3-24
SLTM2 Installation
Chapter 3 - Installation
SLTM2 Installation
The SLTM2 may be installed in any slot of the Main Cabinet, except for slot ten, or may be
installed anywhere in the Desk Mount Holder. The SLTM2 provides a gateway between
standard Single Line Telephone devices and the TeleniumIP system.
The basic SLTM2 can support two SLT devices and can be expanded with the SLTU2 by an
additional two SLT devices for a total of four devices. If required, install the optional
SLTU2 port expansion unit before installing or wiring the SLTM2, refer to “SLTU2
Installation” on page 3-25.
LEDs
In addition to the Power and LAN LEDs, the SLTM2 has eight status LEDs, two for each
respective SLT port 1-4. The left bank of four LEDs indicates the status of the associated
SLT port: in-use (LED on), ringing (LED flashing), or idle (LED off). The right bank of four
LEDs indicates Message Wait status for the associated SLT port; message active, LED on.
The LEDs for circuits 3 and 4 function only when the SLTU2 is installed.
Wiring Connectors
Before wiring any of the Modules, first connect the "GND" screw on the back of the
Module to a known earth ground, refer to “Module Grounding” on page 3-14.
On the front of the SLTM2 is the RJ 45 type "LAN" connector. This connector should be
wired to the appropriate LAN points as discussed in “LAN Connections” on page 3-15 and “LAN
Wiring Structures” on page 3-16.
Wire "LAN" to a 10/100 Base-T switch. A SHUB8 can be used to form the TeleniumIP
Zone.
Tag or number wiring for maintenance.
CAUTION : Before connecting the LAN from SHUB8, the appropriate switch
for DTE power must be in the "OFF" position.
On the rear are four RJ-11 connectors which should be wired to the SLT termination
point. When using a Main Cabinet, refer to “Main Cabinet Wiring” on page 3-29 for wiring
instructions.
Wire each RJ-11 to an SLT device/MDF.
Tag or number wiring for maintenance.
AC/DC Adapter
Assure the AC/DC Adapter is plugged into a live AC outlet and the Module Power jack.
SLTU2 Installation
3-25
Chapter 3 - Installation
SLTU2 Installation
The basic SLTU2 is equipped with circuitry to support two SLT devices and can be
expanded with the SLTU2 to support four SLT devices. The SLTU2 is installed in the
SLTU2 as described below and shown in Figure 3-18.
Remove the Option Cover plate on the rear of the Module by pulling away from the
Module.
Insert the SLTU2 option board and slide into the Module engaging the Module
connector fully.
Figure 3-18: SLTU2 Installation
BRIM2 Installation
The BRIM2 may be installed in any slot of the Main Cabinet, except for slot ten, or may be
installed in any slot in the Desk Mount Holder. The BRIM2 provides a gateway between
ISDN Basic Rate Interface (BRI) lines and the TeleniumIP System.
The BRIM2 can support two BRI lines with either an "S" or "T" interface.
LEDs
In addition to the Power and LAN LEDs, there are ten LEDs, five for each BRI circuit,
which provide the status information as described in the following table.
LED Designation
ON
OFF
Remark
ACT
Line Active
Idle
ERR
Line Error
Normal
S Mode
S Mode
T Mode
S/T interface only
PWR
Power feed on
Power feed off
S/T interface, S mode only
UIU
UIU installed
UIU not installed
3-26
BRIM2 Installation
Chapter 3 - Installation
BRI Switches
On the rear panel of the BRIM2 is two 4-position dip switches; the TR (Terminating
Resistor) switch permits terminating the Transmit and Receive pairs with a 100 ohm
termination. The MODE switch selects the interface mode (S/T) and power feed. Note, the
TR switch pertains only to the S and T interfaces and is not used with "U" interfaces. The
Mode switch is only used for an S interface to enable power feed. The functions of the
four switch positions are given in the following table and should be set based on the user
and ISDN Line requirements.
Switch
4
3
2
1
Switch
Function
ON
OFF
BRI Line 1
Terminations
Terminations on
Terminations off
BRI Line 2
Terminations
Terminations on
Terminations off
Function
ON
OFF
4
BRI Line 1 ST Mode
T Mode
S Mode
3
Power Feed for Line 1
No Feeding
Feeding
2
BRI Line 2 ST Mode
T Mode
S Mode
1
Power Feed for Line 2
No Feeding
Feeding
Wiring Connectors
Before wiring any of the Modules, first connect the "GND" screw on the back of the
Module to a known earth ground, refer to “Module Grounding” on page 3-14.
On the front of the BRIM2 is the "LAN" connector, RJ-45 type. This connector should be
wired to the appropriate LAN point as discussed in “LAN Connections” on page 3-15 and “LAN
Wiring Structures” on page 3-16.
Wire "LAN" to a 10/100 Base-T switch. A SHUB8 can be used to form the TeleniumIP
Zone.
Tag or number wiring for maintenance.
CAUTION : Before connecting the LAN from SHUB8, the appropriate switch for
DTE power must be in the "OFF" position.
On the rear are two RJ-45 connectors terminated to the BRI Line interface circuits. When
using a Main Cabinet (MCAB), refer to “Main Cabinet Wiring” on page 3-29 for wiring
instructions. These connectors, refer to Figure 3-19, should be wired to the telephone
company termination point.
SHUB8 Installation
3-27
Chapter 3 - Installation
The connector pin assignments for the RJ-45 type jack on BRIM2 are as shown:
Wire each RJ-45 to a BRI line at the ISDN termination point/MDF.
Tag or number wiring for maintenance.
Figure 3-19: BRIM2 BRI Line Connector Configuration
AC/DC Adapter
Assure the AC/DC Adapter is plugged into a live AC outlet and the Module Power jack.
SHUB8 Installation
The SHUB8 may be installed in any slot of the Main Cabinet, except for slot ten, or may
be installed anywhere in the Desk Mount Holder. The SHUB8 is employed to connect IP
Keysets, standard VoIP phones and other IP Modules to the TeleniumIP Zone. The SHUB8
has eight switched 10/100 Base-T Ethernet ports and an "UPLINK" port for a total of nine
switched ports. The eight switched ports can provide DC power of 48 Volts over the LAN
to remotely power the IP Keysets and DSS consoles based on the dip switch settings.
Figure 3-20: SHUB8 Switch Close-up
3-28
SHUB8 Installation
Chapter 3 - Installation
LEDs
The SHUB8 has a Power LED and LAN connector LEDs. Each LAN connector has a green
LED indicating Link and activity and a yellow LED indicating Link speed (ON for 100Mbs,
OFF for 10Mbs).
Remote Power Switch
Each switch port of the SHUB8, except the "UPLINK" port can provide a 48VDC feed over
the LAN employing pin pairs 4 & 5 (+) and 7 & 8 (-) of the RJ-45 connector. Power feed is
controlled by the eight-position DTE POWER FEED dip switch; in the ON position power is
supplied. These switches should be placed in the OFF position until all system wiring is
complete. Once complete, the individual ports serving an IP Keyset can be turned ON
using the corresponding switch position (1-8), refer to Figure 3-20.
Caution: The power feed provided by the SHUB8 will cause damage to other LAN
devices. Prior to switching any of the dip switch positions ON, assure that only an IP
keyset or a DSS console is connected to the SHUB8 switched LAN port.
Wiring Connectors
Before wiring any of the Modules, first connect the screw on the back of the Module to a
known earth ground, refer to “Module Grounding” on page 3-14.
On the front of the SHUB8 are the "UPLINK" and eight switched "1X-8X" connectors, each
an RJ 45 type. These connectors should be wired to the appropriate LAN points as
discussed in “LAN Connections” on page 3-15 and “LAN Wiring Structures” on page 3-16. If
cascading is necessary, refer to “LAN Wiring Structures” on page 3-16.
Wire the "UPLINK" port to the corporate LAN router or switch. A SHUB8 can be
used to form the TeleniumIP Zone.
Wire each "X" port to an RJ-45 wall/floor jack at an IP Keyset or VoIP terminal
location, or to the "LAN" port of another IP KTS Module.
Tag or number wiring for maintenance.
AC/DC Adapter
Assure the AC/DC Adapter is plugged into a live AC outlet and the Module Power jack.
Main Cabinet Wiring
3-29
Chapter 3 - Installation
Main Cabinet Wiring
When using the Main Cabinet, complete the installation of each Module as in “Module
Installation” on page 3-11 with the exception of the telephony (Miscellaneous, PSTN, ISDN
and SLT) connections. With the Main Cabinet, these connections are made through
RJ-21X 25-pair connectors mounted on the backplane. The PSTN and ISDN interface
circuits are terminated in female RJ-21X connectors. The SLT and Miscellaneous interface
circuits are terminated in male RJ-21X connectors. This assures separation of the PSTN
MDF terminations from other telephony-like terminations.
Modules terminate the telephony interfaces at the appropriate type of connector through
the backplane, using connector pairs (circuit locations) based on the Module location in
the Cabinet. Modules such as LGCM4 and DIDM2 are terminated on the PSTN connectors.
The SLTM2 Module and the Miscellaneous connections of the MFIM are terminated on the
male RJ-21X connectors.
Complete all telephony wiring by making cross-connects between the RJ-21X and the
appropriate connection type, referring to the following:
PSTN and ISDN Connections
Figure 3-23: Connection for BRIM2 in slots 1 thru 5
Figure 3-24: Connection for BRIM2 in slots 6 thru 9
Figure 3-26: Connection for LGCM4 & DIDM2
SLT Connections - Figure 3-25: Connection for SLTM2
Miscellaneous Connections - Figure 3-22: Connection for MFIM in slot 10
Complete all the telephony wiring for the Module prior to applying power to the Module.
Note also, to consider the slot and sequence assignments when installing Modules, refer
to “Module Installation Sequence” on page 3-11.
3-30
Main Cabinet Wiring
Chapter 3 - Installation
SLOT 10
SL OT 6,7, 8,9
MFIM
PF T-CO4R
PF T-SLT4R
PF T-TE L4R
PF T-CO3R
PF T-SLT3R
PF T-TE L3R
PF T-CO2R
PF T-SLT2R
PF T-TE L2R
PF T-CO1R
PF T-SLT1R
PF T-TE L1R
RELAY2 R
RELAY1 R
PA GE2 R
PA GE1 R
MOH2R
MOH1R
ALARM2 R
ALARM1 R
50
49
48
47
46
45
44
43
42
41
40
39
38
37
36
35
34
33
32
31
30
29
28
27
26
25
24
23
22
21
20
19
18
17
16
15
14
13
12
11
10
9
8
7
6
5
4
3
2
1
BRIM2
P FT-CO4T
P FT-S LT 4T
P FT-T EL4T
P FT-CO3T
P FT-S LT 3T
P FT-T EL3T
P FT-CO2T
P FT-S LT 2T
P FT-T EL2T
P FT-CO1T
P FT-S LT 1T
P FT-T EL1T
RELAY2 T
RELAY1 T
P AGE 2T
P AGE 1T
MOH2T
MOH1T
A LA RM2 T
A LA RM1 T
6-1TX U1R,6 -1RX 6-2TX U2R,6 -2RX 7-1TX U1R,7 -1RX 7-2TX U2R,7 -2RX 8-1TX U1R,8 -1RX 8-2TX U2R,8 -2RX 9-1TX U1R,9 -1RX 9-2TX U2R,9 -2RX -
26
27
28
29
30
31
32
33
34
35
36
37
38
39
40
41
42
43
44
45
46
47
48
49
50
1
2
3
4
5
6
7
8
9
10
11
12
13
14
15
16
17
18
19
20
21
22
23
24
25
SLOT 1,2,3,4,5
LGCM4
DIDM2
SL TM2
6-1TX+
6-1RX+,U1T
6-2TX+
6-2RX+,U2T
7-1TX+
7-1RX+,U1T
7-2TX+
7-2RX+,U2T
8-1TX+
8-1RX+,U1T
8-2TX+
8-2RX+,U2T
9-1TX+
9-1RX+,U1T
9-2TX+
9-2RX+,U2T
-
9-4 R
9-3 R
9-2 R
9-1 R
8-4 R
8-3 R
8-2 R
8-1 R
7-4 R
7-3 R
7-2 R
7-1 R
6-4 R
6-3 R
6-2 R
6-1 R
50
49
48
47
46
45
44
43
42
41
40
39
38
37
36
35
34
33
32
31
30
29
28
27
26
25
24
23
22
21
20
19
18
17
16
15
14
13
12
11
10
9
8
7
6
5
4
3
2
1
9-4 T
9-3 T
9-2 T
9-1 T
8-4 T
8-3 T
8-2 T
8-1 T
7-4 T
7-3 T
7-2 T
7-1 T
6-4 T
6-3 T
6-2 T
6-1 T
6-1R
6-2R
6-3R
6-4R
7-1R
7-2R
7-3R
7-4R
8-1R
8-2R
8-3R
8-4R
9-1R
9-2R
9-3R
9-4R
-
26
27
28
29
30
31
32
33
34
35
36
37
38
39
40
41
42
43
44
45
46
47
48
49
50
1
2
3
4
5
6
7
8
9
10
11
12
13
14
15
16
17
18
19
20
21
22
23
24
25
BRIM2
6-1T
6-2T
6-3T
6-4T
7-1T
7-2T
7-3T
7-4T
8-1T
8-2T
8-3T
8-4T
9-1T
9-2T
9-3T
9-4T
-
1-1TXU1R,1-1RX1-2TXU2R,1-2RX2-1TXU1R,2-1RX2-2TXU2R,2-2RX3-1TXU1R,3-1RX3-2TXU2R,3-2RX4-1TXU1R,4-1RX4-2TXU2R,4-2RX5-1TXU1R,5-1RX5-2TXU2R,5-2RX-
26
27
28
29
30
31
32
33
34
35
36
37
38
39
40
41
42
43
44
45
46
47
48
49
50
1
2
3
4
5
6
7
8
9
10
11
12
13
14
15
16
17
18
19
20
21
22
23
24
25
LGCM4
DI DM2
SLTM2
1-1 TX+
1-1 RX+,U1T
1-2 TX+
1-2 RX+,U2T
2-1 TX+
2-1 RX+,U1T
2-2 TX+
2-2 RX+,U2T
3-1 TX+
3-1 RX+,U1T
3-2 TX+
3-2 RX+,U2T
4-1 TX+
4-1 RX+,U1T
4-2 TX+
4-2 RX+,U2T
5-1 TX+
5-1 RX+,U1T
5-2 TX+
5-2 RX+,U2T
-
5-4 R
5-3 R
5-2 R
5-1 R
4-4 R
4-3 R
4-2 R
4-1 R
3-4 R
3-3 R
3-2 R
3-1 R
2-4 R
2-3 R
2-2 R
2-1 R
1-4 R
1-3 R
1-2 R
1-1 R
50
49
48
47
46
45
44
43
42
41
40
39
38
37
36
35
34
33
32
31
30
29
28
27
26
25
24
23
22
21
20
19
18
17
16
15
14
13
12
11
10
9
8
7
6
5
4
3
2
1
5-4 T
5-3 T
5-2 T
5-1 T
4-4 T
4-3 T
4-2 T
4-1 T
3-4 T
3-3 T
3-2 T
3-1 T
2-4 T
2-3 T
2-2 T
2-1 T
1-4 T
1-3 T
1-2 T
1-1 T
1-1R
1-2R
1-3R
1-4R
2-1R
2-2R
2-3R
2-4R
3-1R
3-2R
3-3R
3-4R
4-1R
4-2R
4-3R
4-4R
5-1R
5-2R
5-3R
5-4R
-
26
27
28
29
30
31
32
33
34
35
36
37
38
39
40
41
42
43
44
45
46
47
48
49
50
1
2
3
4
5
6
7
8
9
10
11
12
13
14
15
16
17
18
19
20
21
22
23
24
25
1-1T
1-2T
1-3T
1-4T
2-1T
2-2T
2-3T
2-4T
3-1T
3-2T
3-3T
3-4T
4-1T
4-2T
4-3T
4-4T
5-1T
5-2T
5-3T
5-4T
-
Note :
Legend
Example:
th e meanin g of x-y T/R
Note: The slot used and the order of Module connection determines the physical port and resulting pin connections
6-1
R 26 1 6-1 T =
that the system uses for a Module. For example, an LGCM4 is installed in slot 1 and connected to the MFIM. It is
x: Slot No
6th Slot, Port
1,
Ring
pin
26
y: Port No
assigned to slot 1 and its physical ports 1, 2 , 3, and 4 are associated with pins 26-1, 27-2, 28-3, and 29-4.
6th Slot, Port
1,
Transmit
pin
1
T: Ti p
R: Ring
A BRIM2 module is then installed in slot 2 and connected. It is assigned to slot 2 and its physical ports 1 and 2 are associated
with pins 30-5, 31-6, 32-7, and 33-8.
If a second LGCM4 is installed in slot 3 and connected, it is assigned to slot 3 and its physical ports 1, 2, 3, and 4 are associated
with pins 34-9, 35-10, 36-11, and 37-12.
This example is provided only to illustrate connections. An administrator will most likely use like modules in a consecutive
sequence for contiguity of numbering assignments.
Figure 3-21: MB Wiring Diagram for Champ Connectors
Main Cabinet Wiring
3-31
Chapter 3 - Installation
SLOT 10
MFIM
36 11
Ext. Amp
PWR Contacts /
Another Contacts
50
49
48
47
46
45
44
43
42
41
40
39
38
37
36
35
34
33
32
31
30
29
28
27
26
35 10
Ext. Page
AMP2
33 8
32 7
Ext.Page
AMP1
27 2
Music Source
2
26 1
Music Source
1
25
24
23
22
21
20
19
18
17
16
15
14
13
12
11
10
9
8
7
6
5
4
3
2
1
PFT4
LGCM4
ACO
PFT4
PFT3
PFT2
49
24
48
23
46
47
22
45
PSTN
ACO
PFT2
LGCM4
PSTN
ACO
43
PFT1
LGCM4
21
20
SLTM2
44 19
PFT1
Relay
PFT3
LGCM4
PSTN
ACO
18
40
42
17
SLTM2
41 16
15
39
14
SLTM2
38 13
SLT
SLTM2
SLT
PAGE
PSTN
SLT
Alarm
30 5
MOH
29 4
SLT
Alarm2
Alarm1
Figure 3-22: Connection for MFIM in slot 10
SLOT 1,2,3,4,5
BRIM2-U / BRIM2
SLOT1 BRIM2-U PORT1
SLOT1 BRIM2-U PORT2
Example for
BRIM2-U
BRIM2-U
PX(LT)
1
2
3
4
5
6
26 1
Tip
Ring
Tip
Ring
27 2
SLOT2 BRIM2-U PORT1
SLOT2 BRIM2-U PORT2
SLOT3 BRIM2-U PORT1
SLOT3 BRIM2-U PORT2
SLOT4 BRIM2-U PORT1
SLOT4 BRIM2-U PORT2
SLOT5 BRIM2-U PORT1
SLOT5 BRIM2-U PORT2
26
27
28
29
30
31
32
33
34
35
36
37
38
39
40
41
42
43
44
45
46
47
48
49
50
1
2
3
4
5
6
7
8
9
10
11
12
13
14
15
16
17
18
19
20
21
22
23
24
25
SLOT1 BRIM2 PORT1
SLOT1 BRIM2 PORT2
SLOT2 BRIM2 PORT1
SLOT2 BRIM2 PORT2
SLOT3 BRIM2 PORT1
SLOT3 BRIM2 PORT2
Example for
BRIM2 S/T
BRIM2
T-mode
26 1
SLOT4 BRIM2 PORT1
SLOT4 BRIM2 PORT2
SLOT5 BRIM2 PORT1
SLOT5 BRIM2 PORT2
Figure 3-23: Connection for BRIM2 in slots 1 thru 5
TX+
27 2
TXRX+
RX-
NT
S-mode
RX+
TX+
TXRX-
1
2
3
4
5
6
7
8
3-32
Main Cabinet Wiring
Chapter 3 - Installation
SLOT 6,7,8,9
BRIM2-U / BRIM2
26
27
28
29
30
31
32
33
34
35
36
37
38
39
40
41
42
43
44
45
46
47
48
49
50
SLOT6 BRIM2-U PORT1
SLOT6 BRIM2-U PORT2
Example for
BRIM2-U
BRIM2-U
PX(LT)
1
2
3
4
5
6
SLOT7 BRIM2-U PORT1
SLOT7 BRIM2-U PORT2
SLOT8 BRIM2-U PORT1
26 1
SLOT8 BRIM2-U PORT2
Tip
Ring
Tip
SLOT9 BRIM2-U PORT1
27 2
SLOT9 BRIM2-U PORT2
Ring
1
2
3
4
5
6
7
8
9
10
11
12
13
14
15
16
17
18
19
20
21
22
23
24
25
SLOT6 BRIM2 PORT1
SLOT6 BRIM2 PORT2
Example for
BRIM2 S/T
BRIM2
T-mode
26 1
SLOT7 BRIM2 PORT1
SLOT7 BRIM2 PORT2
SLOT8 BRIM2 PORT1
SLOT8 BRIM2 PORT2
TX+
SLOT9 BRIM2 PORT1
27 2
SLOT9 BRIM2 PORT2
TXRX+
RX-
Figure 3-24: Connection for BRIM2 in slots 6 thru 9
SLOT 6,7,8,9
SLTM2
SLOT9
SLOT9
SLOT9
SLOT9
SLOT8
SLOT8
SLOT8
SLOT8
SLOT7
SLOT7
SLOT7
SLOT7
SLOT6
SLOT6
SLOT6
SLOT6
Ring
Ring
Ring
Ring
Ring
Ring
Ring
Ring
Ring
Ring
Ring
Ring
Ring
Ring
Ring
Ring
50
49
48
47
46
45
44
43
42
41
40
39
38
37
36
35
34
32
31
30
29
28
27
26
25
25
24
23
22
21
20
19
18
17
16
15
14
13
12
11
10
9
8
7
6
5
4
3
2
1
SLTM2
SLT
Tip
Tip
Tip
Tip
Tip
Tip
Tip
Tip
Tip
Tip
Tip
Tip
Tip
Tip
Tip
Tip
PORT 4
PORT 3
PORT 2
PORT 1
PORT 4
PORT 3
PORT 2
PORT 1
PORT 4
PORT 3
PORT 2
PORT 1
PORT 4
PORT 3
PORT 2
PORT 1
Ring
Ring
Tip
Tip
SLOT 1,2,3,4,5
SLTM2
45 20
SLOT5
SLOT5
SLOT5
SLOT5
SLOT4
SLOT4
SLOT4
SLOT4
SLOT3
SLOT3
SLOT3
SLOT3
SLOT2
SLOT2
SLOT2
SLOT2
SLOT1
SLOT1
SLOT1
SLOT1
Ring
Ring
Ring
Ring
Ring
Ring
Ring
Ring
Ring
Ring
Ring
Ring
Ring
Ring
Ring
Ring
Ring
Ring
Ring
Ring
Figure 3-25: Connection for SLTM2
50
49
48
47
46
45
44
43
42
41
40
39
38
37
36
35
34
32
31
30
29
28
27
26
25
25
24
23
22
21
20
19
18
17
16
15
14
13
12
11
10
9
8
7
6
5
4
3
2
1
Tip
Tip
Tip
Tip
Tip
Tip
Tip
Tip
Tip
Tip
Tip
Tip
Tip
Tip
Tip
Tip
Tip
Tip
Tip
Tip
PORT 4
PORT 3
PORT 2
PORT 1
PORT 4
PORT 3
PORT 2
PORT 1
PORT 4
PORT 3
PORT 2
PORT 1
PORT 4
PORT 3
PORT 2
PORT 1
PORT 4
PORT 3
PORT 2
PORT 1
NT
S-mode
RX+
TX+
TXRX-
1
2
3
4
5
6
7
8
Main Cabinet Wiring
3-33
Chapter 3 - Installation
SLOT 1,2,3,4,5
LGCM4 / DIDM2
SLOT 6,7,8,9
LGCM4 / DIDM2
SLOT6
SLOT6
SLOT6
SLOT6
SLOT7
SLOT7
SLOT7
SLOT7
SLOT8
SLOT8
SLOT8
SLOT8
SLOT9
SLOT9
SLOT9
SLOT9
Ring
Ring
Ring
Ring
Ring
Ring
Ring
Ring
Ring
Ring
Ring
Ring
Ring
Ring
Ring
Ring
26
27
28
29
30
31
32
33
34
35
36
37
38
39
40
41
42
43
44
45
46
47
48
49
50
1
2
3
4
5
6
7
8
9
10
11
12
13
14
15
16
17
18
19
20
21
22
23
24
25
Tip
Tip
Tip
Tip
Tip
Tip
Tip
Tip
Tip
Tip
Tip
Tip
Tip
Tip
Tip
Tip
SLOT1
SLOT1
SLOT1
SLOT1
SLOT2
SLOT2
SLOT2
SLOT2
SLOT3
SLOT3
SLOT3
SLOT3
SLOT4
SLOT4
SLOT4
SLOT4
SLOT5
SLOT5
SLOT5
SLOT5
PORT 1
PORT 2
PORT 3
PORT 4
PORT 1
PORT 2
PORT 3
PORT 4
PORT 1
PORT 2
PORT 3
PORT 4
PORT 1
PORT 2
PORT 3
PORT 4
LGCM4
DIDM2
PX(ACO)
PSTN
Ring
Ring
Tip
Tip
26 1
Ring
Ring
Ring
Ring
Ring
Ring
Ring
Ring
Ring
Ring
Ring
Ring
Ring
Ring
Ring
Ring
Ring
Ring
Ring
Ring
26
27
28
29
30
31
32
33
34
35
36
37
38
39
40
41
42
43
44
45
46
47
48
49
50
Figure 3-26: Connection for LGCM4 & DIDM2
1
2
3
4
5
6
7
8
9
10
11
12
13
14
15
16
17
18
19
20
21
22
23
24
25
Tip
Tip
Tip
Tip
Tip
Tip
Tip
Tip
Tip
Tip
Tip
Tip
Tip
Tip
Tip
Tip
Tip
Tip
Tip
Tip
PORT 1
PORT 2
PORT 3
PORT 4
PORT 1
PORT 2
PORT 3
PORT 4
PORT 1
PORT 2
PORT 3
PORT 4
PORT 1
PORT 2
PORT 3
PORT 4
PORT 1
PORT 2
PORT 3
PORT 4
3-34
IP Keyset Installation
Chapter 3 - Installation
IP Keyset Installation
The IP Keyset and IP DSS can be connected to any standard 10/100 Base-T Ethernet hub
port, such as the IP KTS SHUB8, which is connected to the TeleniumIP Zone. Each button
of the IP Keyset and IP DSS, with the exception of the volume control, has a long-life,
super-bright, dual-color LED. The LEDs provide indication of the status for the feature or
circuit associated with the button.
Wiring Connectors
The IP Keyset is available in two models, IP-24D and IP-24DH. The IP-24D has a single
Ethernet port that is connected to the TeleniumIP Zone using an RJ-45 plug terminated
category 5 cable supplied with the IP Keyset. A three-meter (nine-foot) cable is provided
for desk mount installation. Using the cable, one RJ-45 plug is inserted into the IP Keyset
"LAN" jack. The other RJ-45 plug is inserted into the RJ-45 jack previously wired to an
SHUB8 or other standard hub port in the TeleniumIP Zone.
The IP-24DH has two 10/100 Base-T Ethernet ports, a "LAN" port and a "PC" port. An
intelligent switch, which implements 802.1p protocol for voice packet priority, connects
the two ports. This permits the LAN to be shared between the IP Keyset and the desktop
PC or other Ethernet terminal without significant affect on the voice or data traffic. The
"LAN" port is connected to the TeleniumIP Zone as described above for the single port
IP-24D Keyset. The "PC" port is connected to a desktop device using any standard
straight-through category 5 cable.
Power
All IP Keysets and DSS consoles can be powered by the AC/DC Adapter-K- (48 VDC @
0.1A) at the IP terminal location or over the LAN cable using the SHUB8.
Using the AC/DC Adapter, after connecting the IP terminal to the LAN, the Adapter’s DC
voltage plug is inserted into the power-input jack on the IP terminal. One end of the AC
power cord is inserted into the mating receptacle of the AC Adapter; the other end is
inserted into the AC power outlet.
When it is desired to power the IP Keyset or DSS over the LAN, an SHUB8 must be
employed. After completion of all wiring, assure that only an IP terminal is connected to
the SHUB8 port. Move the appropriate switch position of the DTE POWER FEED dip
switch of the SHUB8 to the ON position to apply power to the IP terminal.
The power feed provided by the SHUB8 will cause damage to other LAN devices. Prior to
switching any of the dip switch positions ON, assure that only an IP keyset or IP DSS
console is connected to the SHUB8 LAN port.
IP Keyset Installation
3-35
Chapter 3 - Installation
Wall Mount
The IP Keysets can be mounted on the wall using the IP Wall Mount Kit. The Wall Mount
Kit is installed as follows:
1. Using the Wall Bracket, mark and drill two 7 mm holes for the plastic wall anchors
provided.
2. Insert the two anchors into the holes and insert and tighten the two screws
leaving about 6 mm (¼ inch) exposed.
3. Slide the Wall Mount bracket over the screws and tighten securely.
4. Connect a short Cat 5 cable, to the IP Keyset and the wall jack.
5. Mount the IP Keyset onto the Wall Mount bracket.
6. Insert the Wall Mount handset hook to prevent the handset from slipping when
wall mounted.
Figure 3-27: Keyset Wall Mount Installation
The DSS installation with IP-24D / 24DH is shown in Figure 3-28.
Figure 3-28: DSS Installation
3-36
TeleniumIP Quick Setup
Chapter 3 - Installation
TeleniumIP Quick Setup
The following instructions include slot locations for cabinet installation. When installing
without a cabinet, power and network connection procedures should still be accomplished
in the order described.
Install and connect the main module (MFIM)
1. Connect all power supplies in the power distribution case and tidy up the cords.
2. Leave the power in the "off" position.
3. Open the main door and slide the MFIM into the slot marked "MFIM" (on the far
right side of the Telenium case when viewed from the front).
All modules are installed from the front of the chassis.
When aligned and seated properly, each module will click into place.
4. Connect the power cord to the MFIM.
5. Slide the first SHUB8 module into place.
It is recommended that this module be installed in Slot 9, next to the MFIM. This
helps to make connection of the patch cables follow the flow of communications
more closely.
6. Connect the power cord to the SHUB8.
7. Ensure that all dip switches on the front of the SHUB8 are in the "off" position.
These dip switches control whether current for powering keysets is delivered
through each port.
8. Set the dip switches on the MFIM to the following:
Switch 1, "off".
Switches 2, 3 and 4, "on".
9. Using a short patch cord, patch the port labeled "LAN1" on the MFIM into a port on
the SHUB8. Select any port except the uplink port.
10. Using another patch cord, patch the port labeled "LAN2" on the MFIM into a port
on the SHUB8. Select any port except the uplink port.
Note that the pass-through slots in the bottom inside of the chassis can be
used to tuck any excess patch cord length under the chassis.
11. Double-check to make sure that MFIM LAN1 and LAN2 ports are patched into the
SHUB8 module, and that no other cords are plugged into any module ports.
12. Turn on power using the switch at the side of the power box.
13. Count 10 seconds, then flip dip switch 4 on the MFIM to "off."
Install additional SHUB8 Modules (optional)
3-37
Chapter 3 - Installation
Install additional SHUB8 Modules (optional)
14. Additional SHUB8 modules can be installed in any available slot besides the MFIM
slot. For clarity when connecting devices, it is recommended that you place
additional SHUB8s next to the first SHUB8.
15. The second SHUB8 can be connected by plugging a patch cord from the uplink
port on the first SHUB8 into a numbered port on the second SHUB8. Leave the dip
switch for the numbered port in the "off" position. Refer to Figure 3-29: SHUB8
Connection Diagram on page 3-38.
16. Connect any subsequent SHUB8s the same way; by patching port 1 into the uplink
port of the previous SHUB8.
17. Connect power cords to the SHUB8 modules.
Install IP Keysets
18. Determine which keyset will be the attendant station, and connect it to the
network with the supplied patch cord.
Keysets should be installed one at a time because station numbers are
automatically assigned by the order in which they are discovered by the
MFIM.
19. At the Telenium chassis, plug the RJ-45 connector corresponding to the keyset’s
location into a port on a SHUB8.
20. Flip the dip switch corresponding to the selected SHUB8 port to the "on" position.
21. Wait 10 seconds for the station to be discovered and assigned station ID 100.
22. Repeat the above steps for each additional keyset.
When moving IP phones from one port to another, it is not necessary to flip
the dip switches on the SHUB8 on/off to disconnect or reconnect. Simply
ensure that no devices except keysets are plugged into ports with dip switches
in the "on" position.
Gateway Port Discovery Process
The discovery process for gateways works the same way as the process for keysets;
when a gateway is connected and powered on, the MFIM discovers it and assigns it a port
ID.
When connecting a gateway with the optional upgrade module (SLTM2 with SLTU2), it is
possible for the second pair of ports to be discovered by the MFIM before the first pair. If
this happens, the assigned numbers may not be in the expected order. These port
assignments can be changed in the KSU’s software if desired. This also applies to other
gateway module options, such as DIDM2 with DIDU2 upgrade.
3-38
Install SLTM Gateway (optional)
Chapter 3 - Installation
Install SLTM Gateway (optional)
1. Install the SLTM2 module in an available slot. Connect the power cord.
2. Patch the LAN port on the SLTM2 module into a port on a SHUB8.
3. Connect the line cords for the SLT stations to the SLT ports on the back of the
SLTM2.
SLT station assignment is the same as for IP keysets; stations will be discovered
and assigned an ID that is one greater than the previous keyset.
Install CO Lines
It is recommended that you install the same line types together (LGCM, DIDM, BRIM) to
maintain order. These lines should also be installed one at a time.
SHUB8 Connection Diagram
SHUB8
SHUB8
Patch the port
marked "1x" to
the UPLINK port
of the first SHUB8
SHUB8
Identify the port
marked "UPLINK"
SHUB8
should be
connected to
MFIM before
connecting
additional
SHUB8s
Third SHUB8
module
Second SHUB8
module
Figure 3-29: SHUB8 Connection Diagram
First connected
SHUB8 module
4
Maintenance and
Troubleshooting
This chapter provides information regarding maintenance and troubleshooting
procedures for the TeleniumIP system.
Uses for Gateway RS-232 port
4-3
Chapter 4 - Maintenance and Troubleshooting
Uses for Gateway RS-232 port
After connecting a serial cable to the RS-232 port on the front of a gateway other than
the MFIM, at password prompt enter, IPKTS.
Main > status = gets user to the status prompt
Main : Status > sicofi sr slave (or master) = switches between master or slave
processors
Monitoring/Diagnostic/Maintenance
Description
The Monitoring/Diagnostic/Maintenance feature provides monitoring, diagnostic, and
maintenance functions. The user can access the IP KTS system and maintain the system
remotely and locally. The system can be accessed via Internet or local RS-232C serial
interface.
Connection
The following sections describe two methods to access the Monitoring/Diagnostic/
Maintenance feature.
Access Via RS-232 Serial Interface
First, connect one end of an RS-232C serial cable to the RS-232C connector on the
MFIM and the other end to the desired Comm Port on the PC.
Use a straight-through DB-9 to DB-9 (female to female) cable.
(DB-9)
Connection
PC Side (DB-9)
1
1
2
2
3
3
4
4
5
5
6
6
7
7
8
8
9
9
Figure 4-1: MFIM to PC Connection Configuration
4-4
Connection
Chapter 4 - Maintenance and Troubleshooting
Then load a communication software package (e.g., HyperTerminal) into the PC.
After opening HyperTerminal and the New Connection screen displays, complete the
following steps:
1. Type a connection name, select the appropriate icon, then click <OK>.
2. When the Phone Number screen displays, change the setting in the "Connect Using"
box to: COM1, and then click <OK>.
3. After the COM1 Properties screen displays, change the settings as shown in the
following bullets, and then click <OK>.
Bits per second = 38400
Data bits = 8
Parity = None
Stop bits = 1
Flow Control = None
4. Type the password (mainjob = the password), then press [Enter].
5. Type the desired password, then press [Enter] to access either the Monitoring or
Maintenance area.
Monitoring Password = jennie (lowercase letters)
Maintenance Password = brandy (lowercase letters)
Access Via IP Network
Load a communication software package (e.g., HyperTerminal) into any PC within the
TeleniumIP Zone.
After opening HyperTerminal and the New Connection screen displays, complete the
following steps:
1. Type a connection name, select the appropriate icon, then click <OK>.
2. When the Phone Number screen displays, change the setting in the "Connect Using"
box to: TCP/IP (Winsock).
3. Enter the IP address of the MFIM in the box provided for "Host address", enter 5003
in the box provided for "Port number", then click <OK>.
4. Press [Enter] on the keyboard.
5. Type the password (mainjob = the password), then press [Enter].
6. Type the desired password, then press [Enter] to access either the Monitoring or
Maintenance area.
Monitoring Password = jennie (lowercase letters)
Maintenance Password = brandy (lowercase letters)
Monitor
4-5
Chapter 4 - Maintenance and Troubleshooting
Monitor
Description
Monitor commands provide information on boards, devices, CO line status, station status,
memory information, etc.
Monitor Commands
After accessing the TeleniumIP system with HyperTerminal, type the monitor password
(jennie) and press [Enter]. A "mon >" prompt appears. Monitor commands are used by
typing in the desired command after the "mon >" prompt and then pressing [Enter].
The following are monitor commands and their descriptions.
Monitor Commands
Descriptions
t b xx (xx = board slot #)
sets board trace
td
deletes all current trace commands & reverts to idle condition
t s call
sets (turns on) virtual dip-switch for call trace
t s voip
sets (turns on) virtual dip-switch for VOIP Gateway trace
t s http
sets (turns on) virtual dip-switch for Web-Server trace
t s poll
sets (turns on) virtual dip-switch for device polling process
t s smdi
sets (turns on) virtual dip-switch for SMDI trace
t s callid
sets (turns on) virtual dip-switch for Multicast ID trace
t s all
sets (turns on) virtual dip-switch for all traces
t r call
resets (turns off) virtual dip-switch for call trace
t r voip
resets (turns off) virtual dip-switch for VOIP Gateway trace
t r http
resets (turns off) virtual dip-switch for Web-Server trace
t r poll
resets (turns off) virtual dip-switch for device polling process
t r smdi
resets (turns off) virtual dip-switch for SMDI trace
t r callid
resets (turns off) virtual dip-switch for Multicast ID trace
t r all
resets (turns off) virtual dip-switch for all traces
t c s xxx (xxx = Sta #)
sets device command trace for a station (Refer to Table 4-1,
“Command Event Trace Explanation,” on page 4-7)
t e s xxx (xxx = Sta #)
sets event trace for a station
t a s xxx (xxx = Sta #)
sets trace mode, full or brief (toggle)
t p s xxx (xxx = Sta #)
displays trace option configurations
t c c xxx (xxx = CO line #)
sets device command trace for a CO line (Refer to Table 4-1,
“Command Event Trace Explanation,” on page 4-7)
t e c xxx (xxx = CO line #)
sets event trace for a CO line
t a c xxx (xxx = CO line #)
sets trace mode, full or brief (toggle)
t p c xxx (xxx = CO line #)
displays trace option configurations
4-6
Monitor
Chapter 4 - Maintenance and Troubleshooting
Monitor Commands
Descriptions
vlog hh (hh = bit)
sets trace options for H.323
07 - LOG_DEBUG
06 - LOG_INFO
05 - LOG_NOTICE
04 - LOG_WARNING
protocol stack log. Bit values are:
03 - LOG_ERR
02 - LOG_CRIT
01 - LOG_ALERT
00 - LOG_EMERG
d xxx (xxx = address 1) xxx
(xxx = address 2)
dumps memory between the two addresses, which are in hexdecimal form. If only a single address is entered, the one page
memory area (composed of 320 bytes) will be dumped.
m xxx (xxx = address)
modifies the value of specified memory area
dc
displays registered device configurations
c xxx (xxx = CO line #)
displays CO line status
c xxx [d] (xxx = CO line #)
displays CO line structure format data
s xxx (xxx = Sta #)
displays station status
s xxx [d] (xxx = Sta #)
displays station structure format data
x
exits the Monitor Commands area
?
displays the monitor command list and descriptions
You can also set virtual dip-switch via IP Keyset using PGM 452, Btns 1-7.
Btn
Btn
Btn
Btn
Btn
Btn
Btn
1 = Call Trace
2 = VOIP Trace
3 = http Trace
4 = SMDI/in-band for voice mail Trace
5 = Device Polling. MFIM checks if devices are still connected. By default, this is turned on.
6 = Multicast Trace
7 = Multicast LED
Monitor
4-7
Chapter 4 - Maintenance and Troubleshooting
Table 4-1: Command Event Trace Explanation
Raw event trace format:
789392 E>14 01 10, A0 02-8229
789392 : serial number
E>
: event
14
: slot (gateway) number
01
: device type (eg, 01 = IPKTU, 40 = LGCM)
Device types:
01 = IP phone
03 = SLTM
40 = LGCM
42 = DIDM
61 = BRIM
70 = VOIP
D0 = VSF
E0 = MISC
10
: device sequence number (eg, 01 = STA100, 02 = STA101 ...)
Device sequence number types:
Station sequence numbers = 1-70 (same source and port # as in PGM 105)
CO Line sequence numbers = 1-42
A0
: event number
02- : length of the event
8229 : parameter(data) of the event
Analysis raw event trace format:
789392 STN:01 10 St:IDLE
(00) Ev-I:CO KEY
P1: A P2:0 EVT: 48
789392
: serial number
STN:01 10
: Station type 01 and number 10
st:IDLE
: station state is IDLE
EVT-I:CO KEY : event type is internal event, event name is CO KEY event
P1: A P2:0 : Parameter 1 is A, parameter 2 is 0
EVT: 48
: The event call module number 48 in source
Raw command trace format:
789392 C>14 01 10, A0 05-0103600000
789392
: serial number
C>
: Command
14
: Slot number
01
: device type (e.g., 01 = IPKTU, 40 = LGCM)
Device types:
01 = IP phone
03 = SLTM
40 = LGCM
42 = DIDM
61 = BRIM
70 = VOIP
D0 = VSF
E0 = MISC
10
: device sequence number (e.g., 10 = Station port number 10)
Device sequence number types:
Station sequence numbers = 1-70 (same source and port # as in PGM 105)
CO Line sequence numbers = 1-42
A0
: Command number
05: length of the command
0103600000 : parameter(data) of the command
4-8
Diagnostic/Maintenance
Chapter 4 - Maintenance and Troubleshooting
Diagnostic/Maintenance
Description
The systems Diagnostic and Maintenance function permits on-demand testing to assist in
diagnosis of the system.
Diagnostic/Maintenance Commands
After accessing TeleniumIP system with HyperTerminal, type the diagnostic/maintenance
password (brandy) and press [Enter]. A "maint >" prompt appears. Maintenance
commands are used by typing the desired command after the "maint >" prompt and
then pressing [Enter].
The following are diagnostic/maintenance commands and their descriptions.
Diagnostic/Maintenance Commands
Descriptions
chkdsk c: /c
*scans disk
chkdsk c: /f
*scans disk and fixes disk
chr xxx.xxx.xxx.xxx (start address)
xxx.xxx.xxx.xxx (end address)
NVRAM test - checks to validate non-volitile RAM
data and displays results. Reads previous check
conditions and computes CRC-32 data.
chw xxx.xxx.xxx.xxx (start address)
xxx.xxx.xxx.xxx (end address)
NVRAM test - checks to validate non-volitile RAM
data and displays results. Computes CRC-32
data for specified area and saves its results to
disk file.
dc
displays device configuration table
dir c:
*displays all files in the NAND flash disk
dir d:
displays all files on the RAM disk
ds
displays status of all devices
dt xxx (xxx = device number)
displays the diagnostic test result from the
specified device system
ds xxx (xxx = device number)
displays status of a specified device
fio c: r [cluster-num sector-num offset-num
read-bytes]
maintains disk in/out control for low-level
operation - read block (use after cluster/sector/
offset info displayed with chkdsk command(s)
fio c: w [cluster-num sector-num offsetnum write-hex-string]
maintains disk in/out control for low-level
operation - write data (use after cluster/sector/
offset info displayed with chkdsk command(s)
fio c: r d [cluster-num]
maintains disk in/out control for low-level
operation - erase a cluster (use after cluster info
displayed with chkdsk command(s)
fio c: w
maintains disk in/out control for low-level
operation - write data
fio c: d
maintains disk in/out control for low-level
operation - erase a cluster
format c:
*formats disk
del C:xxxxxx (xxxxxx = file name)
*deletes specific file from flash
lf
displays the number of line faults that occur
Diagnostic/Maintenance
4-9
Chapter 4 - Maintenance and Troubleshooting
Diagnostic/Maintenance Commands
Descriptions
log gw clear
clears previous gateway logs
log gw view
displays specific gateway logs
log mfim clear
clears previous MFIM logs
log mfim view
displays the system reset logs held in the MFIM
nr
displays networking resources table (IP
addresses and subnet addresses)
ns xx (xx = code) xxx.xxx.xxx.xxx
Codes:
hi = setting MFIM address
hm = setting MFIM subnet mask value
hg = setting gateway IP address
cs = setting start address for clients
ce = setting end address for clients
cm = setting network mask for clients
changes network settings
p xxx.xxx.xxx.xxx
pings (test) to determine if IP line to MFIM (or
other specified device) is operational. Use a
space after "p" in the command.
ren c: xxxx (old name) xxxx (new name)
*renames file
reset 0
resets system
reset all
reassigns all IP addresses
reset ip
used when replacing MFIM, if user wants to keep
addresses of all system devices
reset mac
resets MAC address
reset xxx (xxx = slot number)
resets a slot
ta all xx (xx = time code)
Time Codes:
lh = last hour
tp = today peak
tt = today total
yp = yesterday peak
yt = yesterday total
prints all traffic report
ta atd xx (xx = time code)
Time Codes:
lh = last hour
tp = today peak
tt = today total
yp = yesterday peak
yt = yesterday total
prints attendant traffic
ta callhour
prints call hourly report
ta callsum
prints call summary report
ta cohour (cogrp#)
prints CO traffic hourly report
ta cosum xx (xx = time code)
Time Codes:
lh = last hour
tp = today peak
tt = today total
yp = yesterday peak
yt = yesterday total
prints CO traffic summary report
4-10
Software Upgrade Process
Chapter 4 - Maintenance and Troubleshooting
Diagnostic/Maintenance Commands
Descriptions
ta hw xx (xx = time code)
Time Codes:
lh = last hour
tp = today peak
tt = today total
yp = yesterday peak
yt = yesterday total
prints hardware usage summary report
ta period (hhmm) xx (xx = time code)
Time Codes:
lh = last hour
tp = today peak
tt = today total
yp = yesterday peak
yt = yesterday total
prints traffic report periodically
ta period_abort
cancels periodic report
x
exits the maintenance function (To regain the
password prompt, press [Enter].
?
displays the maintenance command list and
descriptions
Warning: Diagnostic / Maintenance Commands in the preceeding table that are marked
with an asterick are not to be used unless specifically instructed to do so by Technical
Support personnel. Unauthorized use of these commands will create fatal errors in
programming that will require lengthy reconstructive efforts.
Software Upgrade Process
Occasionally there may be system software improvements to either fix problems or to
add enhancements.
For information pertaining to software upgrade procedures, refer to Chapter 13, Upgrades
/ Uploads / Downloads in the TeleniumIP System Programming Manual.
Index
i
Index
A
F
AC/DC Adapter (IP Keyset) [2-13]
AC/DC Adapter (IP Module) [2-10]
File Formats for Upgrades [4-10]
Fixed/Flexible Buttons [2-11]
B
G
Basic Rate Interface gateway Module (BRIM2)
[2-8]
BRI Switches [3-26]
BRIM2 [2-8]
BRIM2 Installation [3-25]
Grounding [3-8]
Grounding (modules) [3-14]
C
Cabinet 19" Rack Installation [3-5]
Cabinet Mounting Options [2-15]
Cabinet Pedestal Kit Installation [3-4]
Cabinet Wall Mount Kit Installation [3-5]
Cascading [3-18]
CO Loop Specification [1-8]
Common Module Switches [3-13]
Computer Requirements [1-4]
Connections
LAN [3-15]
Telephony [3-14]
D
Desk Mount [2-16]
Desk Mount Holder [2-14]
Desk Mount Holder Kit [3-9]
Device Installation Guidelines [3-10]
Diagnostic/Maintenance Commands [4-8]
Diagnostic/Monitoring/Maintenance [4-3]
DIDM2 & DIDU2 [2-6]
DIDM2 Installation [3-22]
DIDU2 Installation [3-23]
Dimensions and Weights [1-7]
Direct-In-Dial gateway Module (DIDM2) [2-6]
DSS Console [2-10]
DSS Installation [3-35]
E
Electrical Specifications [1-7]
Environmental Specifications [1-8]
Equipment Part Numbers [1-5]
H
Hardware Installation [3-4]
I
Insertion/Removal of Modules [3-12]
Installation
BRIM2 [3-25]
DIDM2 [3-22]
DIDU2 [3-23]
DSS [3-35]
IP Keyset [3-34]
LGCM4 [3-22]
SHUB8 [3-27]
SLTM2 [3-24]
SLTU2 [3-25]
IP Keyset AC/DC Adapter [2-13]
IP Keyset Installation [3-34]
IP Keyset Models [2-10]
IP Module - AC/DC Adapter [2-10]
L
LAN Connections [3-15]
LAN Wiring Structures [3-16]
LGCM4 [2-5]
LGCM4 Installation [3-22]
Loop/Ground CO gateway Module (LGCM4) [2-5]
M
Main Cabinet [2-15]
Main Cabinet and Power Box Grounding [3-8]
Main Cabinet Installation [3-4]
Maintenance Monitor Commands [4-5]
Maintenance/Diagnostic/Monitoring [4-3]
Maximum Station Distance from Gateway Module [1-8]
MFIM
Multi-Funtion & Internet Protocol gateway
ii
Module (MFIM) [2-3]
Module Desk Mount Holder Kit [3-9]
Module Grounding [3-14]
Module Insertion/Removal [3-12]
Module Installation [3-11]
Module Installation Sequence
Installation Sequence (modules) [3-11]
Module Mounting Hardware [2-14]
Module Mounting Hardware Installation [3-4]
Module Power Adapter [3-19]
Module Wall Mount Holder Kit [3-10]
Monitor Commands for Maintenance [4-5]
Monitoring/Diagnostic/Maintenance [4-3]
P
Part Numbers [1-5]
Power Adapter (module) [3-19]
Power Box [2-17]
Power Box Installation [3-7]
Product Description [1-3]
R
Rack Installation [3-5]
Rack Mount [2-15]
Regulatory Information [3]
Remote Power Switch [3-28]
RS-232 Connections [3-18]
S
SHUB8 [2-9]
SHUB8 Installation [3-27]
Single Line Telephone Module (SLTM2) [2-7]
Site Preparation [3-3]
SLTM2 & SLTU2 [2-7]
SLTM2 Installation [3-24]
SLTU2 Installation [3-25]
Software Upgrade Process [4-10]
Switch Hub Module (SHUB8) [2-9]
System Capacity [1-6]
System Diagram [1-4]
System Specifications [1-6]
T
Telephony Connections [3-14]
U
Upgrades File Format [4-10]
Index
W
Wall Mount [2-16]
Wall Mount - IP Keyset [3-35]
Wall Mount Holder [2-14]
Wall Mount Holder Kit [3-10]
Wall Mount Kit Installation [3-5]
Wiring Connectors [3-21]