1
ATCOM® IPPBX IP4G
Product Guide
Version: 1.0
2010-11-04
Content
CONTACT ATCOM ............................................................................................................................... 3
CHAPTER 1 THE INTRODUCTION OF IP4G ........................................................................................... 4
CHAPTER 2 ACCESS TO THE IP4G ........................................................................................................ 6
2.1 WEBPAGE ACCESS BY BROWSER ............................................................................................................. 6
2.2 SUPPORT SSH PROTOCAL ...................................................................................................................... 7
2.3 CONSOLE PORT ACCESS TO IP4G ............................................................................................................ 7
CHAPTER3 GENERAL OPERATION OF IP4G .......................................................................................... 8
CHAPTER 4 CONFIGURE IP4G BY WEB GUI........................................................................................ 10
4.1 SYSTEM STATUS ............................................................................................................................ 10
4.2 CONFIGURE HARDWARE.............................................................................................................. 10
4.3 TRUNKS ........................................................................................................................................... 11
4.3.1 Create Analog Trunks ............................................................................................................ 12
4.3.2 VoIP Trunks ............................................................................................................................ 13
4.4 OUTGOING CALLING RULES ................................................................................................................. 13
4.5 DIAL PLANS ...................................................................................................................................... 15
4.6 USERS ............................................................................................................................................. 15
4.7 RING GROUPS ................................................................................................................................... 17
4.8 MUSIC ON HOLD................................................................................................................................ 17
4.9 CALL QUEUES ................................................................................................................................... 18
4.10 VOICE MENUS .............................................................................................................................. 19
4.11 TIME INTERVALS .............................................................................................................................. 21
4.12 INCOMING CALLING RULES ................................................................................................................ 21
4.13 VOICEMAIL ..................................................................................................................................... 22
4.14 CONFERENCING ............................................................................................................................... 24
4.15 FOLLOW ME ................................................................................................................................... 26
4.16 DIRECTORY ..................................................................................................................................... 27
4.17 CALL FEATURES ............................................................................................................................... 27
4.18 VOICEMAIL GROUPS ........................................................................................................................ 28
4.19 VOICE MENU PROMPTS .................................................................................................................... 28
4.20 SYSTEM INFO .................................................................................................................................. 28
4.21 BACKUP ......................................................................................................................................... 29
4.22 ACTIVE CHANNELS ........................................................................................................................... 29
4.23 OPTIONS........................................................................................................................................ 29
CHAPTER 5 AN APPLICATION CASE OF IP4G...................................................................................... 31
5.1 HOW TO MAKE INTERNAL CALLS THROUGH IP4G .................................................................................... 32
5.1.1 Access to the Web Page of IP4G by Browser ......................................................................... 32
5.1.2 Add up Users from Web Page of IP4G ................................................................................... 32
5.1.3 Register a SIP user 6001 in AT-620 ........................................................................................ 33
www.atcom.cn
1
5.2 HOW TO COMMUNICATE WITH OUTSIDE ................................................................................................ 34
5.2.1 Create an Analog Trunk ......................................................................................................... 34
5.2.2 Create an Outgoing Calling Rule ........................................................................................... 35
5.2.3 Selected the Outgoing Calling Rules in a Dial Plan ................................................................ 36
5.2.4 Create a User ......................................................................................................................... 36
5.2.5 Create Incoming Calling Rules ............................................................................................... 37
5.3 HOW TO CALL THROUGH VOIP TRUNK ................................................................................................... 37
5.3.1 Call from IP4G to IP04 ........................................................................................................... 37
5.3.2 Call from IP04 to IP4G ........................................................................................................... 39
5.4 HOW TO CALL EACH OTHER DIRECTLY FROM DIFFERENT NETWORK SEGMENT. .............................................. 40
5.5 VOICEMAIL ....................................................................................................................................... 42
5.6 HOW TO REALIZE THE IVR ................................................................................................................... 43
5.6.1 Upload Voice Menu Prompts ................................................................................................. 43
5.6.2 Create Voice Menu ................................................................................................................ 44
5.6.3 Add Incoming Calling Rules ................................................................................................... 46
5.7 CONFERENCE .................................................................................................................................... 47
5.8 RING GROUPS ................................................................................................................................... 47
5.9 AGENTS ........................................................................................................................................... 48
5.9.1 Create Users as Agents .......................................................................................................... 48
5.9.2 Create a Call Queue ............................................................................................................... 49
5.10 FOLLOW ME ................................................................................................................................... 50
5.11 GROUP CALL PICKUP ........................................................................................................................ 51
ACRONYMS ...................................................................................................................................... 53
GLOSSARY ........................................................................................................................................ 55
REFERENCE....................................................................................................................................... 56
www.atcom.cn
2
Contact ATCOM
The Introduction of ATCOM
Founded in 1998, ATCOM technology has been always endeavoring in the R&D and
manufacturing of the internet communication terminals. The product line of ATCOM includes IP
Phone, USB Phone, IP PBX, VoIP gateway and Asterisk card.
Contact Sales:
Address
District C, east of 2nd floor, #3, Crown industry buildings, Chegongmiao
Industry area, Futian district, Shenzhen, China
Tel
+(86)755-23487618
Fax
+(86)755-23485319
E-mail
sales@atcomemail.com
Contact Technical Support:
Tel
+(86)755-23481119
E-mail
Support@atcomemail.com
Website Address:
http://www.atcom.cn/
ATCOM Wiki Website: http://www.openippbx.org/index.php?title=Main_Page
Download Center: http://www.atcom.cn/download.html
www.atcom.cn
3
Chapter 1 the Introduction of IP4G
1. Overview of the IP4G
The IP4G is a complete Asterisk Appliance with combination of GSM and Ananlog channels. It is
an embedded open source Linux system with built-in SIP/IAX2 proxy server and NAT functions.
It provides a solid, uniform platform for Mobile and VoIP communications.
Targeting for SOHO user and SMB market with an easy to use graphical interface, ATCOM GSM
IP PBX provides a cost-saving solution on their telecommunication/data needs. With these devices,
company with branch offices in different countries can be easily combined together to work like a
virtual single office through internet, GSM and PSTN network.
2.Hardware
CPU: 400MHz Blackfin 532 Chip
2 x GSM ports and four analog ports
NAND flash 256 M
SDRAM 64M
3.System
Open Source uClinux
4. Function features
GSM, ISDN
Support g711/g729/gsm codec
Voicemail
Voicemail groups
3-way Calling
Conferencing
Follow Me
Call Feature
In directory
Call Waiting
Call Queues
Pickup Group
Ring Group
Is Agent
Music On Hold
Voice Menus
Voice menus Prompts
Time intervals
Backup
Update
www.atcom.cn
4
5.Applications
SOHO/SMB telephony system
Hosted service
IVR system
6. Interface
1 X RJ45 port.
1 X Power port.
1 X RS232 port.
4 X GSM channels.
www.atcom.cn
5
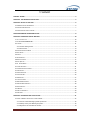
For the usage of IP4G in VoIP field, users can refer to the following network topology.
Chapter 2 Access to the IP4G
You need a PC to access to the IP4G, there are four ways for you to access the IP4G:
1. Web page access by browser
2. SSH access by putty
3. Access by browser with Fallback IP Address
4. Console port access by RS232 console cable
In order to access to IP4G by the first three ways, Users have to check that if your network
connection between IP4G and PC is OK. If it does not connect between IP4G and PC, users can
try to use the last way to access to IP4G and change the IP address for IP4G.
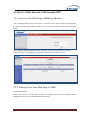
2.1 WebPage Access by Browser
It is the most convenient and common way to access the IP4G, users just need to open their
browsers and input the IP address of IP4G WAN port (the default IP address is 192.168.1.100).
Then input the default Username: admin; Password: atcom .
www.atcom.cn
6
2.2 Support SSH protocal
Logging into IP4G by SSH, users can configure IP4G by Linux command.
2.3 Console Port Access to IP4G
If it does not connect between IP4G and PC, users can try to access to IP4G by console port.
Please try to do as the following steps:
1. Connect the console port of IP4G to your PC’s console port with RS232 console cable.
2. Run the HyperTerminal, and set up the console port like the following:
Bits per second: 115200
Data bits : 8
Parity: None
Stop bits: 1
Flow control: None
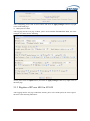
3. Change the IP Address by HyperTerminal
The default IP address of IP4G is 192.168.1.100. Users may have a different IP address segment
such as 192.168.10.xx. In this situation, users cann’t access to IP4G by putty and browser unless
change the IP4G IP address. Users can change the IP address for IP4G by HyperTerminal to make
it in the same network segment as their LAN.
After users have accessed to IP4G by HyperTerminal, please use the following command to
change the IP address for IP4G.
root:~> ifconfig eth0 192.168.1.151(the IP address what users want to set for IP4G)
By this way, the IP address users set for IP4G is temporary, it will recover to the original default IP
address after rebooting. If users want to give a static and permanent IP address for IP4G, users can
try to set it in web GUI, for detail steps please refer to chapter 3.
www.atcom.cn
7
Chapter3 General Operation of IP4G
1. Backup
When users log in the web of IP4G, Click on Backup Create New Backup, then they can
Backup the current system.
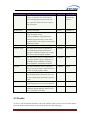
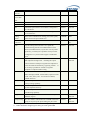
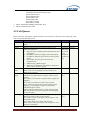
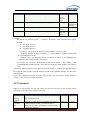
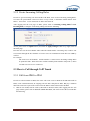
2. System Update
When users log in the web of IP4G, click on Options Advanced Options Show
Advansed Options , After click on Show Advanced Options in the web, users can see the
advanced options in the vertical menu on the left of the main page. Click on Firmware
update , users can see the following parameters in the table.
Parameter Name
HTTP URL
Description
The http path of the firmware file
Type
Textbox
Default
Null
TFTP Server
The IP address of TFTP Server where the
Textbox
Null
Textbox
Null
Selected
Not selected
firmware file in.
File Name
Specify the name of your uImage-md5
firmware file, make sure to use md5 version
only
Reset Configs
Select this box if you wish to reset to factory
defaults. This will ensure a clean update, and is
highly recommended
If users want to upload sound file, upload backup files and so on, they can refer to the link:
http://www.atcom.cn/downloads/IPPBX/ATCOM%20IPPBX%20Series%20Product%20Upgr
ade%20Guide-V1.0-EN.pdf
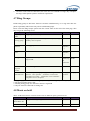
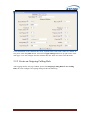
3. Network
After click on OptionsAdvanced OptionsShow Advanced Options, please select
Network Settings option from the vertical menu on the left of main page. Users can set IP
address, Subnet mask, Gateway, DNS what they want like the following:
www.atcom.cn
8
Please click save button in the page to save the setting and reboot the IP4G.
Attention: users need configure the IP address, Subnet mask, Gateway and DNS at WAN
Interface so that the network connects successfully. The option of LAN Interface is used for
Routing functions, here users needn’t configure it.
www.atcom.cn
9
Chapter 4 Configure IP4G by Web GUI
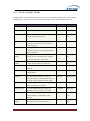
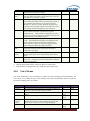
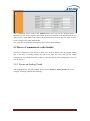
4.1 System Status
In the system status screen, it displays the functions users configured, such as: trunks, extensions,
conference and so on. The following table is the options description of trunks.
Name
Status
Description
The register status of trunks
Trunk
The name of trunks
Type
The type of trunks
Username
The username of SIP/IAX trunk
Port/Hostname/IP
IP Address/port
1.The register status of trunks include three kinds: Unregistered, Request Sent, Registered.
2.The type of trunks : VoIP trunk including SIP and IAX; Analog trunk; Service Provider.
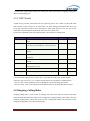
The parameter of extensions in the following table:
Name
Extension
Description
The status of users
Name/label
The name of users
Status
Display voice message
Type
SIP users/IAX users/Analog users
1. There are four kinds status of users, when the light of “Extension” list displays gray , means the
user does not register that is Unavailable; when the light of “Extension” list displays green ,
means the user is Free; when the light of “Extension” list displays orange , means the user is
Ringing; when the light of “Extension” list displays red , means the user is Busy.
2. Status: This parameter displays if other users leave messages, Messages : 0/0, the figure front of
“ / ” displays the new messages amount; the figure behind of displays the old messages
amount.
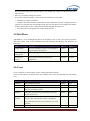
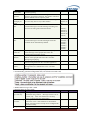
4.2 Configure Hardware
In the configure hardware page, it includes the following components: analog hardware, tone
region, advanced settings. Pay attention that some browsers do not display the configure, it is
unimportant.
Analog Hardware
When users boot the IP4G, which will detect the FXO and FXS modules automatically, the analog
hardware component displays the modules which are detected correctly.
www.atcom.cn
10
Name
Tone Region
Description
Select the tone region according to your
Type
ComboBox
Default
United
country, if it does not have your country’s
Status/North
name in the dropdown list, please ask your
America
service operator which kind of tone region is
used in your area
Module Name
The name of Module
Textbox
wctdm24xxp
Opermode
Specifies On Hook Speed, Ringer Impedance,
ComboBox
USA
Ringer Threshold, current
Limiting ,TIP/RING voltage adjustment,
minimum Operational Look Current and so
on. Please choose your country or your nearest
neighboring country
a-law override
Specifies the codec to be used for analog line.
ComboBox
ulaw
fxs honor mode
This option allows the user to determine if
ComboBox
FXO modules
ComboBox
nomal
ComboBox
nomal
ComboBox
nomal
ComboBox
standard
ComboBox
none
they would like opermode characteristics
applied to trunk(FXO) modules only, or both
trunk (FXO) and station(FXS) modules.
boostringer
This option allows the user to define whether
they require normal ringing voltage(40v) or
maximum ringing voltage(89v) or analog
phones attached to station(FXS) modoules
fastringer
This option sometimes used in conjunction
with the Low Power Option ,allows the user to
increase the ringing speed to 25HZ
lowpower
This option generally used in conjunction with
the Fast Ringer Option ,allows the user to set
the peak voltage during Fast Ringer Operation
to 50V.
ring detect
This option allows the user to choose from
normal ring detection or a full wave detection
MWI mode
This option allows the user to specify the type
of Message Waiting indicator detection to be
done on trunk(FXO) interfaces
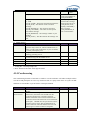
4.3 Trunks
To receive calls from PSTN and make calls to the outside world, users have to use trunks. Please
select the Trunks option from the vertical menu on the left of the main page.
www.atcom.cn
11
4.3.1 Create Analog Trunks
Analog trunk is associated with FXO port, and it will call outside by PSTN line. Click on New
Analog Trunk , then users can see the parameters which are in the following table in the web.
Name
Channels
Description
Display the FXO or GSM modules
Type
selected
Default
no select
Trunk Name
The name you want to set for the trunk
Textbox
null
Busy Detection
Busy detection is used to detect far end hang
Boolean
up or for detecting busy signal.
busycount
If Busy Detection is enabled,it is also possible
Yes
Int
3
Int
8000
to specify how many busy tones to wait for
before hanging up.
Ring Timeout
Thrunk(FXO) devices must have a timeout
to determine if there was a hangup before the
line was answered.
answeronpolarit
If this option is enabled, the reception of a
yswitch
polarity reversal will mark when a outgoing
Boolean
no
call is answered by the remote party.
hanguponpolarit
In some countries ,a polarity reversal is used
yswitch
to single the disconnect of a phone line.
Use CallerID
Enabling this option enabled CallerId
Boolean
no
Boolean
yes
ComboBox
Ring
select box
As Received
Boolean
No
ComboBox
Bell-USA
detection.
Caller ID Start
This option allows one to define the start of a
CallerID Signal.
CallerID
This option allows the lines to report the
Caller ID string as received from the telco, or
as a fixed value by using the custom option.
Pulse Dial
If this option is enabled ,pulse mode dialing
instead of DTMF,wil be enable.
CID Signalling
This option defines the type of caller ID
signaling to use :bell,v23,v23_jp,or dtmf.
Flash Timing
Flash Time defines the time ,in
Textbox
millseconds,that is generated for a flash
750
operation.
Receive Flash
Flash Time defines the time,in milliseconds,
Timing
that is generated for a flash operation.
www.atcom.cn
Textbox
1250
12
1.Trunk name: unique label to help users identify the trunk when listed in outgoing calling rules
and incoming calling rules.
4.3.2 VoIP Trunks
A VoIP service provider (VSP) that users have signed up with is also a trunk. Via the VoIP trunk
users can dial via the VoIP service to reduce their cost when making international calls. Users can
set up the VoIP trunk to make calls to the PSTN or other VoIP network. Users also can use the
VoIP trunk to link headquarter and branch offices for free internal calls.
Click on New SIP/IAX Trunk, the following table is the parameter of VoIP trunk:
Name
Type
Description
You can select SIP or IAX type to meet your
Type
ComboBox
Default
SIP
Textbox
Null
Textbox
Null
Textbox
Null
Textbox
Null
Textbox
Null
Textbox
s
ComboBox
very
need.
Provider Name
A unique label to help you identify this trunk
when listed in outbound rules, incoming rules etc.
Hostname
The IP Address of the server which you want to
connect
Username
the username that your service provider
configured
Fromdomain
The domain of the server which you want to
connect
Password
the password that your service provider
configured for the user.
Contact Ext.
Insecure Type
The insecure type of the trunk transferring data.
1.Notice Provider Name must be unique label , especially do not the same with Username .
2.Insecure Type: insecure=very ; To allow registered hosts to call without re-authenticating
insecure=port ; Allow matching of peer by IP address without matching port number.
insecure=invite; removes the requirement for authentication of incoming INVITE messages.
4.4 Outgoing Calling Rules
Outgoing calling rules is used to route an outgoing call, when users make an external call, which
trunk and what dial-pattern the call used are configured in outgoing calling rules. Please select the
Outgoing Calling Rules option, then Click on New Calling Rule button, the parameters of the
Outgoing Calling Rules are in the following table:
www.atcom.cn
13
Name
Calling Rule Name
Description
The name of the Calling rule
Type
Textbox
Default
Null
Pattern
The dialing rule
Textbox
Null
Send to Local
If this option is checked and Destination is
selected
no select
Destination
defined, calls matching the specified pattern
ComboBox
Null
ComboBox
Null
Textbox
Null
Textbox
Null
selected
no select
ComboBox
ComboBox
may be sent to a local extension."
Destination
Choose the Local
Destionation:User/VoiceMenu/Hungup…
Use trunk
Defines the Trunk that calls, matching the
specified pattern, will be placed through.
Strip
Allows the user to specify the number of digits
that will be stripped from the front of the
dialing string before the call is placed via the
trunk selected in \"Use Trunk.\"
One might.
Prepend these
Allows the user to specify digits that are
digits
prepended before the call is placed via the
trunk.
If a user's trunk required 10 digit
dialing, but users were more comfortable
performing 7 digit dialing, this field could be
used to prepend a 3 digit area code to all 7 digit
strings before they are placed to the trunk. User
may also prepend a 'w' character for analog
trunks to provide a slight delay before dialing
Use Failover
Failover trunks can be used to make sure that a
Trunk
call goes through an alternate route, when the
primary trunk is busy or down If "Use Failover
Trunk" is checked and "Failover trunk" is
defined, then calls that cannot be placed via the
regular trunk may have a secondary trunk
defined.
If a user's primary trunk is a VoIP
trunk, but one wants calls to use the PSTN
when the VoIP trunk isn't available, this option
is a good idea.
Fail over trunk
Choose the trunk
1. Pattern: X ... Any Digit from 0-9; Z ... Any Digit from 1-9; N ... Any Digit from 2-9;
[12345-9] ... Any Digit in the brackets (in this example, 1,2,3,4,5,6,7,8,9); .... Wildcard, matches
anything remaining; i.e. _9011. Matches anything starting with 9011 (excluding 9011 itself); ! ...
Wildcard, causes the matching process to complete as soon as it can unambiguously determine
that no other matches are possible. For example, the extension _NXXXXXX would match
normal 7 digit dialings, while _1NXXNXXXXX would represent a three digit area code plus
phone number, proceeded by a one.
2. Strip: Allows the user to specify the number of digits that will be stripped from the front of the
dialing string before the call is placed via the trunk selected in Use Trunk. For example, want
users to dial 9 before their long distance calls; however one does not dial 9 before those calls
www.atcom.cn
14
are placed onto analog lines and the PSTN, so one should strip 1 digit from the front before the
call is placed.
3. The way of outgoing calling rules works:
Every time you dial a number, asterisk will do the following in strict order:
• Examine the number you dialed.
• Compare the number with the pattern that you have defined in your first outgoing rule and if
matches, it will initiate the call using that trunk. If it does not match, it will compare the number
with the pattern that you have defined in the second outgoing rule and so on.
• Pass the number to the appropriate trunk to make the call.
4.5 Dial Plans
A DialPlan is a set of Calling Rules that can be assigned to one or more users. Please select the
Dial Plans option, Click on New DialPlan button, the following table displays the parameters of
Dial Plans .
Name
DialPlan Name
Description
The name of DialPlan, which is a unique label to
Type
Textbox
Default
DialPlan1
Select outgoing call rule which you use
selected
Not seclect
Include Local
Local context is used for general using
check box
Select all
Contexts
configuration.
help you identify the dial plan
Include Outgoing
Calling Rules
4.6 Users
Users component is used to add or remove Analog, SIP, IAX extension.
Click on Create New User button in the web of IP4G, users can create SIP/IAX User and Analog
User.
Name
Extension
Description
The numbered extension
Type
Textbox
Default
6001
Name
A character-based name for this user
Textbox
Null
DialPlan
DialPlans are sets of calling rules and can be managed
ComboBo
Null
form the \"Dial Plans\" panel
x
The Caller ID (CID) string used when this user calls
Textbox
Null
Textbox
Null
Selected
Not
CallerID
another internal user.
OutBound
Caller ID that would be applied for out bound calls
CallerID
from this user. Note that your ability to manipulate
your outbound Caller ID may be limited by your VoIP
provider.
Enable
www.atcom.cn
Check this box if the user should have a voicemail
15
Voicemail for
account
selected
this User
VoiceMail
Voicemail Password for this user
Textbox
Null
Mailbox
Voicemail Mailbox for this user
Textbox
Null
Email Address
The e-mail address for this user
Textbox
Null
SIP
Check this option if the User or Phone is using SIP or
selected
selected
selected
selected
Null
Access PIN
code
is a SIP device
IAX
Check this option if the User or Phone is using IAX or
is an IAX device
Analog
If this user is attached to an analog port on the system,
ComboBo
Station
please choose the port number here
x
Codec
Choose priority codec
ComboBo
u-law/GS
x
M
selected
selected
selected
Not
Preference
NAT
Try this setting when Asterisk is on a public IP,
communicating with devices hidden behind a NAT
device (broadband router). If you have one-way audio
problems, you usually have problems with your NAT
configuration or your firewall's support of SIP+RTP
ports.
Can Reinvite
By default, Asterisk will route the media steams from
SIP endpoints through itself.
Enabling this option
selected
causes asterisk to attempt to negotiate the endpoints to
route the media stream directly, bypassing asterisk.
It
is not always possible for asterisk to negotiate
endpoint-to-endpoint media routing.
DTMF Mode
Set default dtmfmode for sending DTMF. info : SIP
ComboBo
INFO messages;inband : Inband audio (requires 64 kbit
x
rfc2833
codec -alaw, ulaw); auto : Use rfc2833 if offered,
inband otherwise.
3-Way Calling
Check this option if the User or Phone should have
selected
Not select
selected
Not select
selected
Not select
selected
Not
3-Way Calling capability.
In Directory
Check this option if the user is to be listed in the
system telephone directory.
Call Waiting
Check this option if the User or Phone should have
Call-Waiting capability
Is Agent
Check this option if this User or Phone is a Call Queue
Member (Agent)
Pickup Group
If a user called A and another user called B in the same
group,A can pick up the phone taking the place of B.
selected
selected
Not
selected
1. Analog Station: When users want to create Analog Users, please choose the FXS ports.
2. Codec Preference: Support g711u-law/g711a-law/g729/GSM
www.atcom.cn
16
3. Attension: in the textbox of Extension, the value users set is limited to a range, they can adjust
the range in the Options option to meet their requirement.
4.7 Ring Groups
Define Ring groups to dial more than one extension simultaneously, or to ring more than one
phone sequentially. This feature may also be called Hunt groups.
Please select the Ring Groups option from the vertical menu on the left of the main page, then
they can get the following screen:
Name
Ring Group
Name
Description
Ring group name use in pbx
Type
Str*
default
Extension for
this ring group
Ring group No.,dial the No. if you want to join , change
boundary value in options
Int
6400
Ring Group
Members
The ring group of numbers
{EXT1,EX
T2,EXT3,
…}
Available
Users
The entire Users
{EXT1,EX
T2,EXT3,
…}
Strategy
Ring all simultaneously:
{ Ring in
Order ,ting
all
Extensions
}
Ring in
Order
Ring in order
Seconds to
ring each
member
Seconds to ring each member
Time
20
If not
answered Goto
If not answered go to, hang up: hang up the calling channel。
{Hang-up,
Operator…
.}
Hang up
Operator:Go to operator 。Extension: a call to user.
Voicemail: Go to IVR 。Conference: join a conference.
Call queue: Go to a call queue.
1. ring group application: Dial(channel type/${EXTEN}| channel type/${EXTEN}|20|i)
2. ring group up after please a call
3. non-ring if ring group user off hook or non-user registered
4. only one man can connected in coming call
4.8 Music on hold
'Music On Hold' need users customize audio tracks for different queues, parked calls etc.
Name
Description
Type
Upload an 8 KHz
Support codec: g711a/g711u
Upload
Mono Music file
New music on hold
default
Add a new music on hold
1. Music on hold Dir: /persistent/sounds/moh/
www.atcom.cn
17
2. Sounds : LICENSE-asterisk-moh-freeplay-ulaw
LICENSE-asterisk-moh-freeplay-ulaw
fpm-world-mix.ulaw
fpm-world-mix.alaw
fpm-sunshine.ulaw
fpm-sunshine.alaw
fpm-calm-river.ulaw
fpm-calm-river.ulaw
3. Music on hold after holding status Status: busy
4. Music on hold non-rtp stream
4.9 Call Queues
Please select the Call Queues option from the vertical menu on the left of the main page, then
users can get the following screen:
Name
Extension
Name
Strategy
Music On
Hold
LeaveWhen
Empty
JoinEmpty
www.atcom.cn
Description
Extension for call queue: may be dialed to reach the call
queue
Name for call queue
Strategy: this option sets the ringing strategy for this
queue, the options are
1. Ring all: ring all available agents simultaneously until
one answers.
2. RoundRbin: Take turns ringing each available agent.
3. LeastRecent: Ring the agent which was least recently
called
4. FewestCalls: Ring the agent with the fewest
completed calls
5. Random: Ring a Random agent
6. RRmemory: RoundRobin with Memoryn Remember
where it left in the last ring pass
Select the 'Music on Hold' Class for this Queue. 'Music on
Hold' classes can be managed from the the 'Music On
Hold' panel on the left
This option controls whether callers already on hold are
forced out of a queue that has no agents. There are three
options.
Yes: Callers are forced out of a queue when no agents are
logged in.
No: Callers will remain in a queue with no agents.
Strict: Callers are forced out of a queue with no agents
logged in, or if all logged in agents are unavailable.
The default option is Strict.
After a caller has left the queue, a caller will hear a busy
tone and advance to the next calling rule after attempting
to enter the queue
This option controls whether callers can join a call queue
that has no agents. There are three options,
Yes: Callers can join a call queue with no agents or only
unavailable agents
No: Callers cannot join a queue with no agents
Strict: Callers cannot join a queue with no agents or if all
agents are unavailable.
Type
Int
Str*
{ringall,Ro
undrobin,le
astrecent,F
ewest
calls,Rand
om,Rrmom
ery}
default
6500
ring all
Choice
default
{yes,strict,
No,}
strict
{yes,strict,
No,}
no
18
TimeOut
Wrapup
Time
Max Len
Auto full
Auto pause
Report Hold
Time
KeyPress
Events
Agent
How many seconds an Agent's phone will ring before the
Queue tries to ring the next Agent
How many seconds after the completion of a call an Agent
will have before the Queue can ring them with a new call.
The default is 0, which is no delay
How many calls can be queued at once. This count does
not include calls that have been connected with Agents, it
only includes calls that have not yet been connected.
Default is 0, which is no limit. When the limit has been
reached, a caller will hear a busy tone and advance to the
next calling rule after attempting to enter the queue
Defining this option causes the Queue, when multiple calls
are in it at the same time, to push them to Agents
simultaneously. Thus, instead of completing one call to
an Agent at a time, the Queue will complete as many calls
simultaneously to the available Agents
Enabling this option pauses an agent if they fail to answer
a call. This means that the agent is still logged into the
queue, but they will not receive calls from the queue.
Once paused, an agent can unpause by logging into the
queue using the regular agent login extension
Enabling this option causes Asterisk to report, to the
Agent, the hold time of the caller before the caller is
connected to the Agent.
If a caller presses a key while waiting in the queue, this
setting selects which voice menu should process the key
press
This selection shows all Users defined as Agents in their
User conf. Checking a User here makes them a member
of the current Queue
Time
15
Time
0
Int
0
checkbox
checkbox
checkbox
choice
checkbox
1. Call queue application: Queue(${EXTEN})
2. Change agents status:Login / Login out agents in System Info
3. Hear the music if all agents are busy, until non-conversation busy.
4.10
Voice Menus
Like most organization, users would like to redirect all of the incoming calls automatically. The
voice menu is very handy for these sorts of things. The system should allow callers to make the
selection according to the voice menu.
Name
Name
Extension
Add new Step
Description
A name for the voice menus
If you want this Voicemenu to be accessible by dialing an
extension, then enter that extension number
A sequence of actions performed when a call enters the
menu
Add additional steps performed during the menu
Allow
KeyPress
Events
Advance edit
Allow key press events will cause the system to listen for
DTMF input from the caller and define the actions that
occur when a user presses the corresponding digit
Advance edit for the voice menu
Actions
www.atcom.cn
Type
Str*
No.
default
7001
Dial plan
script
Dial plan
script
checkbox
Dial plan
script
19
1.
2.
3.
4.
Menus allow for more efficient routing of calls from incoming callers. Also known as IVR
(Interactive Voice Response) menus or Digital Receptionist.
Step :
a) Answer: Answer a channel if ringing
b) Authenticate: This application asks the caller to enter a given password in order to
continue dialplan execution.
c) Background: Play an audio file while waiting for digits of an extension to go to.
d) Busy Tone: Indicate the Busy condition
e) Congestion: Indicate the congestion condition to the calling channel.
f) Digit Timeout: set digit timeout
g) DISA Password: Allow someone from outside the telephone switch (PBX) to obtain an
internal system dialtone and to place calls from it as if they were placing a call from
within the switch.
h) Response Timeout: set response timeout
i) Macro: macroname|arg1|arg2 .... Executes a macro using the context
'macro-<macroname>'
j) Play Sound: Plays back given file
k) Ringing: Indicate ringing tone
l) Set MusicOhHold Class: select a music on hold
m) SayAlpha: Say each character in the string including letters, numbers and other
characters, one by one
n) SayDigits: Say the digits, one by one
o) SayNumber: Say a number (e.g. 'six thousand, five hundred and seventy two')
p) Wait: Pause dialplan execution for a specified number of seconds
q) WaitExten: Wait for the user to enter a new extension for a specified number of seconds
r) To Destination: go to destination
s) Set Language: set language (English/Spanish/French)
t) To Directory: go to directory
u) Dial an external Number: Place a call outside the pbx using the selected trunk
v) AGI: Executes an AGI compliant application
w) User Event: Send an arbitrary event to the manager interface
x) Hangup: Hang up the calling channel
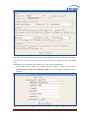
Allow keypress events:
Must be voice menus have application: Background(file)
e.x
Background a music when keypress events
Advance edit
Change dialplan for voice menus
e.x.
include = default
exten = s,1,NoOp(Incoming DID)
exten = s,2,Answer()
exten = s,3,Background(record/GreetingNew)
exten = s,4,Background(record/MakeYourSelection)
exten = s,5,Background(fpm-sunshine)
exten = s,8,Voicemail(6002,u)
exten = 1,1,Goto(voicemenu-custom-2|s|1)
exten = 2,1,Voicemail(6002,u)
exten = 5,1,Goto(voicemenu-custom-3|s|1)
Want to control music on hold play time
www.atcom.cn
20
include = default
exten = s,1,NoOp(Incoming DID)
exten = s,2,Answer()
exten = s,3,Background(record/GreetingNew)
exten = s,4,Background(record/MakeYourSelection)
exten = s,5,Set(TIMEOUT(absolute)=8)
exten = s,6,Background(fpm-sunshine)
exten = s,7,Set(TIMEOUT(absolute)=60)
exten = s,8,Voicemail(6002,u)
exten = 1,1,Goto(voicemenu-custom-2|s|1)
exten = 2,1,Voicemail(6002,u)
exten = 5,1,Goto(voicemenu-custom-3|s|1)
4.11 Time Intervals
Time Intervals defines ranges of working time that will be used by call routing features. Please
select the Time Intervals option from the vertical menu on the left of the main page,
Name
Description
Type
Time
Interval
Name
By day of
week
A name for the time interval
Str*
Choice an available day of week for the time interval
By Days of
a Month
Choice some available days of month for the time
interval
Time
Choice an available time slot for the time interval
{Mon,Tue,
Wed,Thu,Fri
,Sat,Sun }
{Dateof
January/Febr
uary/March/
April/May/J
une/july/Aug
ust/Septemb
er/October/n
ovember/De
cember/all}
{00:00-24:0
0}
default
1. Time intervals using in incoming call
2. Time intervals application rule:
00:00-24:00|mon-sum|1-31|January/February/March/April/May/June/july/August/September/October/
november/December/all
time intervals:
timeinterval_date = *|mon-tue|*|*
Monday to Tuesday of weekly
4.12 Incoming Calling Rules
This is where the behavior of incoming calls from all trunks is being handled. When an incoming
call from PSTN or VoIP trunk is received, asterisk needs to know where to direct it. It can be
directed to a ring group, an extension, digital receptionist, voice menu or queue. For this purpose,
Incoming Calling Rules need to be set up.
www.atcom.cn
21
Name
Description
Type
Trunk
Choice the trunk for the incoming rule
Time Interval
Choice the time interval for the incoming rule
{analog,
server
provider,
voip}
Choice
Pattern
Pattern of the incoming rule
Destination
Incoming to destination
Dialplan
matched
{users, voice
mail, ring
group…}
default
Non
timeinterval
matched
S
IVR
1. A trunk support a number of this time intervals, to support a number of Destination
2. Pattern:
All patterns are prefixed by the "_" character. In patterns, some characters have special
meanings:
X ... Any Digit from 0-9
Z ... Any Digit from 1-9
N ... Any Digit from 2-9
[12345-9] ... Any Digit in the brackets (in this example, 1,2,3,4,5,6,7,8,9)
.
Wildcard, matches anything remaining; i.e. _9011. Matches anything starting with
9011 (excluding 9011 itself)
! ... Wildcard, causes the matching process to complete as soon as it can unambiguously
determine that no other matches are possible.
For example, the extension _NXXXXXX would match normal 7 digit dialings, while
_1NXXNXXXXX would represent a three digit area code plus phone number, proceeded by
a one.
3.Note:users will most likely need to add a rule with the pattern "s" (without the quotation marks)
for each trunk. This signifies 'catch all', meaning all calls with a DID not matching any other rules
will match this.
If users have multiple SIP trunks from the same provider, they will want to set this pattern to
whatever you specified as Contact Extension.
4.13 Voicemail
When users call someone who does not answer the call, users can leave a voice message for the
called party if the called party supports voice mail.
Name
Description
Type
Default
Extension for
checking
messages
Direct
Voicemail
Dial
defines the extension that Users call in order to access
their voicemail accounts
NO.
6750
Check this to enable direct voicemail dial. For instance,
if John's extension is 6001, you would be able to
directly dial into John's voicemailbox by dialing #6001
to leave him a message
Check box
unCheck
www.atcom.cn
22
Max greeting
(in seconds)
Dial '0' for
Operator
Maximum
messages per
folder
Max message
time
Set the maximum number of seconds for a User's
voicemail greeting
Enable Callers to exit the voicemail application and
connect to an operator extension. The operator extension
must be defined from the 'Options' panel
This select box sets the maximum number of messages
that a user may have in any of their folders
This select box sets the maximum duration of a
voicemail message in seconds. Message recording will
not occur for times greater than this amount
Min message
time
This select box sets the minimum duration of a
voicemail message in seconds. Messages below this
threshold will be automatically deleted.
Say message
Caller-ID
If this option is enabled, the Caller ID of the party that
left the message will be played back before the
voicemail message begins playing.
If this option is set, the duration of the message in
mintues will be played back before the voicemail
message begins playing
Turn on/off playing introductions about each message
when accessing them from the voicemail application.
Checking this option allows the caller to review their
message before it is submitted as a new voicemail
message
Say message
duration
Play envelope
Allow users to
review
No.
30
Check box
Check
{10,25,100,
200,500,10
00}
{1 minute
,2
minutes,5
minutes,15
minutes,30
minutes,um
limited}
25
{no
minimum,1
seconds,2
seconds,3
seconds,4
seconds,5
seconds}
Check box
1 seconds
Check box
unCheck
Check box
unCheck
Check box
Check
2 minutes
Check
1. Voice mail application:
,Voicemail(${ARG},u)
2. Automatically generated configuration file (/etc/asterisk/voicemail.conf)
3. IPPBX Max messages data: 150M
a) Email Settings for Voice mails
Name
Send messages
by e-mail only
Attach recordings
to e-mail
Template for
www.atcom.cn
Description
If this option is set, then voicemails will not be
checkable using a Phone. Messages will be sent via
e-mail, only. Note: You need to have an smtp
server configured for this functionality
This option defines whether or not voicemails are
sent to the Users' e-mail addresses as attachments.
Note: You need to have an smtp server configured for
this functionality
From
Type
Check box
default
unCheck
Check box
Check
Str*
asterisk@y
23
Voicemail Emails
Subject
Template Variables:
\t : TAB
${VM_NAME} : Recipient's firstname and lastname
${VM_DUR} : The duration of the voicemail
message
${VM_MAILBOX} : The recipient's extension
${VM_CALLERID} : The caller id of the person
who left the message
${VM_MSGNUM} : The message number in your
mailbox
${VM_DATE} : The date and time the message was
left
ourcompan
y.null
New voicemail from
${VM_CALLERID} for
${VM_MAILBOX}
Hello ${VM_NAME},
you received a message
lasting ${VM_DUR} at
${VM_DATE} from,
(${VM_CALLERID}).
This is message
${VM_MSGNUM} in
your voicemail Inbox.
b) SMTP Settings
Name
STMP server
Port
Use TLS?
Authentication?
Username
Password
Description
The IP address or hostname of an SMTP server that
your box may connect to, without authentication, in
order to send e-mail notifications of your voicemails;
i.e. mail.yourcompany.com
The port number on which the SMTP server is
running; generally port 25
Use TLS(Transport Layer Security) when
communicating with the SMTP server?
Does the SMTP Server requite authentication?
The username of a valid account on the STMP server
The password of a valid account on the STMP server
Type
Str*
default
Str*
Check box
unCheck
Check box
Str*
Str*
unCheck
1. Config file: /etc/ssmtp/ssmtp.conf
2. Note: Firmware after that starts support Gmail
4.14 Conferencing
The conferencing function of Asterisk is similar to a Tele-conference call where multiple callers
can call in and participate in a two-way conference like in a party room where everyone can talk
and listen to one another or just to listen to a Tele-presentation.
Name
Extension
Marked/Admin
user Extension
www.atcom.cn
Description
This is the number dialed to reach this Conference
Bridge
If the conference bridge is to have marked users or
admin users, then those users should enter the
conference bridge using a separate extension.
Admin conference users can lock and unlock the
conference and can kick the most recent conference
participant. Marked users are special users whose
entrance and exit, if the Wait for Marked user or
Close conference when last marked user exits can
either begin or end the conference altogether
Type
Int
default
6300
Int
24
Pin Code
Admin PinCode
Play music for
the first caller
set an optional pin code, Ex: "1234" that must be
entered in order to access the Conference Bridge
Defining this option sets a PIN for Conference
Administrators
Checking this option causes Asterisk to play Hold
Music to the first user in a conference, until another
user has joined the same conference
Close the conference bridge when the last marked
user logs out of the conference call
Str*
Str*
Check box
unCheck
Check box
unCheck
Checking this option allows a user to access the
Conference Bridge menu by pressing the *
"Asterisk" key on their dialpad
Check box
unCheck
Announces
callers
Checking this option announces, to all Bridge
participants, the joining of any other participants
Check box
unCheck
Quiet mode
Wait for marked
user
Do not play enter/leave sounds
Prevent conference participants from hearing each
other until the marked user has joined
Check box
Check box
unCheck
unCheck
Close conference
for the list caller
exit
Enable call menu
1.Conferencing application:
MeetMe([confno][,[options][,pin]]): Enters the user into a specified MeetMe conference
ex.: MeetMe(${EXTEN}|MsIqwxaA)
'1' — disable "you are currently the only person in this conference" message for first member
' a' — set admin mode
'A' — set marked mode
'b ' — run AGI script specified in ${MEETME_AGI_BACKGROUND}
'c' — announce user(s) count on joining a conference
'd' — dynamically add conference
'D' — dynamically add conference, prompting for a PIN
At the pin prompt, if the user does NOT want a pin assigned to the conference, they should
hit the # key.
'e' — select an empty conference
'E' — select an empty pinless conference
'F' — Pass DTMF through the conference.
'i' — announce user join/leave with review
'I' --announce user join/leave without review
'M' — enable music on hold when the conference has a single caller
'm' — set monitor only mode (Listen only, no talking)
'p' — allow user to exit the conference by pressing '#'
'P' — always prompt for the pin even if it is specified
'q' — quiet mode (don't play enter/leave sounds)
'r' — Record conference (records as ${MEETME_RECORDINGFILE} using format
${MEETME_RECORDINGFORMAT}).
's' — Present menu (user or admin) when '*' is received ('send' to menu)
't' — set talk only mode. (Talk only, no listening)
'T' — set talker detectio
'v' — video mode
www.atcom.cn
25
'w' — wait until the marked user enters the conference (plays music on hold until marked
user enters if M is used)
All other connected users will hear MusicOnHold until the marked user enters.
'X' — allow user to exit the conference by entering a valid single digit extension of the
context specified in ${MEETME_EXIT_CONTEXT} or the current context if that variable is
not defined.
'x' — close the conference when last marked user exits
4.15 Follow Me
If A calls B, B does not answer, the call will be transferred to C who is set up in follow me.
Name
Status
Description
Enable/Disable FollowMe for this user
Type
Choice
default
Disable
'Music On Hold'
Class
Music On Hold class that the caller would hear while
tracking the user
Choice
Default
DialPlan
DialPlan that would be used for dialing the
FollowMe numbers. By default this would be the
same dialplan as that of the user
Choice
Destinations
List of extensions/numbers that would be dialed to
reach the user during FollowMe
Destinations
New FollowMe
Number
Add a new FollowMe number which could be a
'Local Extension' or an 'Outside Number'. The
selected dialplan should have permissions to dial any
outside numbers defined
{Dial Local
Extension, Dial
Outside
Number
Dial Order
This is the order in which the FollowMe destinations
are dialed to reach the user
{Ring after
Trying
previous
extension/num
ber , Ring
along with
previous
extension/num
ber}
Ring after
Trying
previous
extension/nu
mbe
Follow
me Option
Playback the unreachable status message if we've run
out of steps to reach the or the callee has elected not
to be reachable
Check box
Uncheck
Playback the unreachable status message if we've run
out of steps to reach the or the callee has elected not
to be reachable
Check box
Uncheck
Playback the unreachable status message if we've run
out of steps to reach the or the callee has elected not
to be reachable
Check box
Uncheck
1.General config file : /etc/asterisk/followme.conf
www.atcom.cn
26
4.16 Directory
Dialing the 'Directory Extension' would present to the caller, a directory of users listed in the
system telephone directory - from which they can search by First or Last Name. To add or remove
a user from the system telephone directory, edit the 'In Directory' field of the user. Preferences for
'Dialing by Name Directory’.
Directory setting:
Name
Directory
Extension
Description
Extension to dial for accessing the Name Directory
Type
Int
default
Also read the
extension
number
In addition to the name, also read the extension
number to the caller before presenting dialing options
Check box
Uncheck
Use first name
instead of last
name
Allow the caller to enter the first name of a user in the
directory instead of using the last name
Check box
Uncheck
Type
Check
box&&Int
Check
box&&Int
Check
box&&Int
Check
box&&Int
default
#
Description
Extension to Dial to Park a call
Type
Int
default
700
What extensions to park calls on
Int
701-720
Number of seconds a call can be parked for
Time
Description
Add an application for PBX
Type
1.Directory application: Directory(default|default|ef)
4.17 Call Features
Feature Codes and Call parking preferences
Features Codes
Name
Features Codes
Description
Blind Transfer (default is #)
Disconnect (default is *)
Attended transfer
Call Parking (Packing a call)
*
Call Parking Preferences
Name
Call Parking
Preferences
Application Map
Name
Application Map
default
Dial Options
www.atcom.cn
27
Name
Dial Options
Description
Type
Check box
default
Uncheck
(T-Option) Allow the calling party to transfer the called party
by sending the DTMF sequence defined on the Feature Codes
page.
(h-Option) Allow the called party to hang up by sending the
DTMF sequence defined on the Feature Codes page.
Check box
Uncheck
Check box
Uncheck
(H-Option) Allow the calling party to hang up by sending the
DTMF sequence defined on the Feature Codes page.
Check box
Uncheck
(k-Option) Allow the called party to enable parking of the call
by sending the DTMF sequence defined on the Feature Codes
page.
(K-Option) Allow the calling party to enable parking of the call
by sending the DTMF sequence defined on the Feature Codes
page.
Check box
Uncheck
Check box
Uncheck
(t-Option) Allow the called party to transfer the calling party by
sending the DTMF sequence defined on the Feature Codes page
4.18 VoiceMail Groups
Define VoiceMail Groups to leave a voicemail message for a group of users by dialing an
extension.
Name
Description
Type
default
VoiceMail
Group's
Extension
Label
Default Voicemail Group's Extension
Int
6601
The label of Voicemail Group's Extension
Str*
User MailBoxes
The entire user Mailboxes
Check
boxs
4.19 Voice Menu Prompts
This component is used for recording custom voice menu.
Name
Description
Type
default
Voice menu
prompts
File Name
dial this User Extension to record a new voice prompt
Upload a Voice menu prompt
Str*
Choice
Choice
6001
4.20 System Info
From this component, you can easily get the basic system information, it includes:
a) General
OS Version: Linux version
Uptime: uptime for PBX
www.atcom.cn
for PBX
28
Version Details: asterisk/GUI/Firmware version for PBX
Server Date & TimeZone: time now for PBX
Hostname:name for PBX
b)
c)
Network: network message for PBX
Eth0:9----- fill back IP for PBX(vlan IP)
Disk Usage
Filesystem: File system of PBX
1k-blocks:A total of system modules
Used :Used of system modules
Available :Available of system modules
Use% :Percentage
Mounted on:The specified directory
d)
Memory Usage
Total:Memory quantity
Used: Used of Memory
Free: Free of Memory
Shared:Shared of Memory
Buffers:Buffers quantity
4.21 Backup
Backup and Restore are two of the mandatory functions of any application. IP4G is no exception.
Customers can backup all the files under the /etc/asterisk/ directory and restore them.
Name
Description
Backup
Create new backup
Download from Unit
Restore Previous config
Type
default
4.22 Active Channels
The channels which are in communication status will be displayed in this component.
Refresh Now
Description
Status
Upload message for asterisk channels
Hangup:hang-up channel
Transfer:transfer channel
4.23 Options
This component is used for administrator to manage the system, it includes the following modules:
General Preferences
Name
Description
Global OutBound
CID
This is default global CallerID that is used for all outgoing calls
when no other CallerID is defined that has a higher priority.
www.atcom.cn
Type
Int
default
29
When making outgoing calls the following rules are used to
determine which CallerID will be used, if they exist:
The first CallerID used is a CallerID set for the user making the
call defined in the 'Users' tab.
The second CallerID is the one that is set in the 'VoIP Trunks'
configuration, if applicable
The last CallerID used for outgoing calls is the Global CID
defined in the 'Options' tab.
Operator
Extension
Ring Timeout
Call Record Dir
Call Record
Format
Extension
preferences
The Operator Extension is the extension which will be dialed
when a caller presses '0' to exit Voicemail. It is also available as
a Voice Menu option
Number of seconds to ring a device before sending to the user's
Voicemail Box
Call Record Dir
Call Record Format
Chioce
Time
20
Str*
Choice
/tmp
gsm
User Extensions
Int
Conference Extensions
Int
VoiceMenu Extensions
Int
RingGroup Extensions
Int
Queue Extensions
Int
VoiceMail Group Extensions
Int
6001-629
9
6300-639
9
7001-710
0
6400-649
9
6500-659
9
6600-669
9
Resert to default
Languages
Name
Languages
Description
The Language setting allows the user to specify the default
prompts language for phone to phone, inbound, and outbound
calls. If a soundpack selection is made but not already
installed, then the pack will be downloaded from Digium
Type
Chioce
default
English
Type
Str*
Str*
default
Change Password
Name
Change
Password
Description
Enter New Password
Retype New Password
Factory reset
Name
Description
Factory reset
Reset to defaults include network settings
Reset to defaults but keep network settings
www.atcom.cn
30
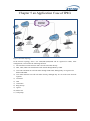
Chapter 5 an Application Case of IP4G
Figure: Network Topology
In the network topology above: user 6020,6001,6002,6008 will be registered to IP4G, After
configuration, it will realize the following function:
1) The internal user 6002 and user 6001 can call each other directly.
2) 6001, 6002, 6008 can communicate with outside through IP4G by GSM.
3) User 6001 and 6030 can call each other through VoIP trunk, although they are registered to
different IP PBX.
4) User 6020 and 6001 can call each other directly, although they are not in the same network
segment.
5) Voicemail
6) IVR
7) Conference
8) Ring Groups
9) Agents
10) Follow me
11) Call pickup
www.atcom.cn
31
5.1 How to Make Internal Calls through IP4G
5.1.1 Access to the Web Page of IP4G by Browser
After connecting IP4G to LAN, please open your browser of PC with windows OS and input the
IP Address of IP4G (the default IP address is 192.168.1.100), then users can get the following
screen:
Please input the default Username: admin; Password: atcom in the presented screen above.
When users login successfully, they can get the configuration web page as below:
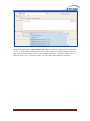
5.1.2 Add up Users from Web Page of IP4G
1) Add up a DialPlan
Before users add up user, they have to add up a DialPlan, please click on Dial PlansNew
DialPlan, the writer creates a DialPlan like the following:
www.atcom.cn
32
After configuring, please click on Save button, and click on Apply Changes button in up right
corner of the main page.
2) Add up SIP user 6001
After logging into the web page of IP4G, please click on Users Create New User, the writer
configure user 6001 like the following:
At last, please click on Update button, and click on Apply Changes button in up right corner of
the main page.
5.1.3 Register a SIP user 6001 in AT-620
After logging into the web page of IP Phone AT-620, please select VOIP option, the writer register
the 6001 as the following illustration:
www.atcom.cn
33
After configuring, please click on the APPLY button. Users can see the “Register status” is
Registered, if user do not register successfully, please pay attention to the Password in the red
ellipse frame , which must be the same with the SIP/IAX Password of the user 6001 in IP4G.
Users can register the 6002, 6008 like this.
Now users can call each other directly between user 6001, 6002 and 6008.
5.2 How to Communicate with Outside
In order to communicate with outside by IP4G, users need an analog trunk, an outgoing calling
rule, a dial plan, a incoming calling rule and a user. Here the writer will give the simple
configuration steps which show how to make a call to outside, for detail configuration, users can
refer to chapter 3.
5.2.1 Create an Analog Trunk
After logging into the web page of IP4G, please click on Trunks Analog Trunks, the writer
configure an analog trunk like the following:
www.atcom.cn
34
Users should hook on the Channels their need , input the name of the trunk. Others are default. At
last, please click on Update button, and click on Apply Changes button in up right corner of the
main page. Users can configure the other channels like this. Then users must restart the IP4G.
5.2.2 Create an Outgoing Calling Rule
After logging into the web page of IP4G, please click Outgoing Calling Rules New Calling
Rule, the writer configure an outgoing calling rule like the following:
www.atcom.cn
35
At last, please click on Save button, and click on Apply Changes button in up right corner of the
main page.
5.2.3 Selected the Outgoing Calling Rules in a Dial Plan
After logging into the web page of IP4G, please click on Dial PlansEdit DialPlan1, then
selected the name of the outgoing calling rules like the following:
At last, please click on Save button, and click on Apply Changes button in up right corner of the
main page.
5.2.4 Create a User
The writer will use the user 6001 which be created before. Now the writer can call out with prefix
1, if the caller number is 10086, then the writer will dial 110086.
www.atcom.cn
36
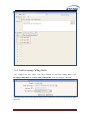
5.2.5 Create Incoming Calling Rules
In order to get an incoming call from outside with IP4G, users need set Incoming Calling Rules.
Of course the precondition is that users have set up a trunk, a destination which include Voice
Menu、Voice mail、a User Extension etc and a Time Interval.
After logging into the web page of IP4G, please click on Incoming Calling Rules New
Incoming Rule, I configure an incoming calling rule like the following:
At last, please click on Update button, and click on Apply Changes button in up right corner of
the main page.
Here the users use the first channel. Then when the outside makes a incoming call, it will be sent
to user 6001 through the first channel. Of course users can communicate with other use GSM by
wireless.
For example:
The writer uses the channel 1 and the number is 158xxxxxxx2. Incoming Calling Rules
be pointed to 6001. Then The writer can dial a mobile phone number with prefix 5, others
can dial 158 xxxxxxx 2 to connect us.
5.3 How to Call through VoIP Trunk
5.3.1 Call from IP4G to IP04
In order to call from IP4G to IP04, The writer will create a user in IP04 for the SIP/IAX trunk in
IP4G, create a SIP/IAX trunk, an outgoing call rule and a dial plan in IP4G. But pay a attention
that at the same time a port of the router where the IP04 in must be directed to the IP04.
1) Add an user 6200(it will be used as SIP trunk in IP4G) in IP04, after logging into the web
page of IP04, please click on Users Create New User, The writer creates the user 6200 like
the following:
www.atcom.cn
37
At last, please click on Update button, and click on Apply Changes button in up right corner of the
main page. Please pay attention to the “Name” and “OutBound CallerID” in the red ellipse frame,
if the user uses for a trunk, the two options are null so that the caller ID on the phone is the calling
party.
Then Add a user 6030 in IP04 for AT-620, the way is the same as adding 6001.
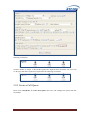
2) Add a VoIP trunk in IP4G, after logging into the webpage of IP4G, please click on
TrunksVOIP TrunksNew SIP/IAX Trunk, the writer configure a SIPtrunk1 like the
following:
Please pay attention to the red ellipse frame, the Hostname is the public IP address where the IP04
www.atcom.cn
38
is. After configuring, please click on Add button, and click on Apply Changes button in up right
corner of the main page. Attention : the option of Fromuser : default is null.
3) Create an outgoing calling rule in IP4G, after logging into the webpage of IP4G, please click
on Outgoing Calling RulesNew Calling Rule, the writer configures an outgoing call rule
like the following:
After configuring, please click on Save button, and click on Apply Changes button in up right
corner of the main page.
4) Hook on the outgoing calling rules in dial plan in IP4G, after logging into the webpage of
IP4G, please click on Dial PlansEdit DialPlan, and then hook on the outgoing calling rules:
After configuring, please click on Save button, and click on Apply Changes button in up right
corner of the main page.
Now users can call from 6001 to 6030 by dialing 86030.
5.3.2 Call from IP04 to IP4G
In order to call from IP04 to IP4G, I will create a SIP user in IP4G for the SIP trunk in IP04 like
4.5.1, and then create a SIP trunk, an outgoing call rule and a dial plan in IP04.
1) Add a user 6008 in IP4G like 5.1.2.
www.atcom.cn
39
2) Create a SIP trunk in IP04 named out .
3) Configure the router.
4) Create an outgoing calling rule in IP04 named toIP4G. Here I use Pattern: _4. .
5) Hook on the “toIP4G” option in DialPlan.
After configuring, please click on Save button, and click on Apply Changes button in up right
corner of the main page. Now users can call from 6030 to 6001 by dialing with prefix 4. Users can
communication between IP04 and IP4G.
5.4 How to Call Each Other Directly from Different Network
Segment.
Take the user 6020 and 6001 for example, the writer will configure router, users and IP4G, then
the two users can call each other directly.
1) Set up router
Please configure the router IP address, subnet mask and default gateway of WAN port, the
writer configured a static IP Address 172.16.1.1; Subnet Mask: 255.255.0.0; Default Gateway:
172.16.1.254. ; DHCP option and so on. Configure Port Range Forwarding, users can use
IAX2 , then configure Port Range Forwarding as 4569. IP address is 192.168.1.130(the IP
Address of IP4G). Here the writer use IAX2 and create a IAX2 user named 6020.
2) Add an IAX user 6020 in IP4G
After logging into the web page of IP4G, please click on Users Create New User, the
writer configures 6020 like the following:
www.atcom.cn
40
At last, please click on Update button, and click on Apply Changes button in up right corner of
the main page.
3) Set up AT-610 and register an IAX2 user 6020
Please select the VOIP option, then select the IAX2 option, the writer registers the IAX2 user
6020 as the following illustration:
www.atcom.cn
41
Please pay attention to the red ellipse frame in the screenshot above, it is the IP address of the
router. After configuring, please click on the APPLY button.
Attention: here user must register IAX2 user instead of SIP user, because the user 6020 is not in
the same network segment as IP4G. If users use SIP user, you need configure the SIP Setting ,
where is in Options Adance Options Show Advance Options, they can configure the two
options in the red ellipse frame in the screenshot like this:
Now users can call each other among between 6020 and 6001 directly.
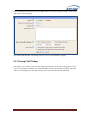
5.5 Voicemail
Users can configure Voicemail in the option of Users, for example 6005 which the writer has
configured in 4.1.2. Please click on UsersEdit on 6001, users can see the configuration in the
following picture, especially pay attention to the configuration in the red ellipse frame. Then when
users want to listen to a message, they can dial 6750 or the Mailbox 6001.
www.atcom.cn
42
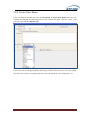
5.6 How to realize the IVR
IVR is Interactive Voice Response. Voice Menus allow for more efficient routing of calls from
incoming callers. Also known as IVR menus or Digital Receptionist.
5.6.1 Upload Voice Menu Prompts
If users want to configure the IVR which they need, they must upload their voice prompt. Users
can click on Voice Menu Prompts, users can see the screen like this screenshots:
Users can click the button of “Record a new Voice Menu prompt” to record a voice prompt, or
users can click the button of “Upload a Voice Menu prompt” to upload their voice prompt.
www.atcom.cn
43
5.6.2 Create Voice Menu
Users can configure IVR like this: click on Voice Menus Create Voice Menus, then users can
configure the IVR like the following pictures. First, selected the option “Answer” on the “Add
new step” then click the Add new step .
Second, selected the option “Background” on the “Add new step” then click the Add new step.
Users can see the screen display like the following screenshots, then select their own voice prompt.
Here the writer use the voice prompt named 04. Users can upload the voice prompt like 5.6.1.
www.atcom.cn
44
Third, hook on the option : Allow KeyPress Envents, then users can configure the operation from
“0” to “*”, which their need. Please click on save button, and click on Apply Changes button in up
right corner of the main page. Here the writer configures that press “0” then call “6001”, press “1”
then call “6002”, press “2” then call “6008”. Of course 6001, 6002, 6008 have registered.
www.atcom.cn
45
5.6.3 Add Incoming Calling Rules
After configure the Voice Menu, users must configure the Incoming Calling Rules. Click
Incoming Calling Rules New Incoming Calling Rules, users can configure it like this:
Then when others call you through the analog1, they can here the IVR and do the operation which
they need.
www.atcom.cn
46
5.7 Conference
In order to realize the conference option, the users which will attend to the conference must have
registered. Here the writer uses 6001, 6002, 6008. Now please click Conferencing New
conference Bridge, users can see the screen like the following screenshots:
Then please click on Update button, and click on Apply Changes button in up right corner of the
main page. Here the writer configures it like the screenshots above. Then 6001 dial 6300, and
input Pin Code. Users can hear a voice promt and wait others, then you can hear the music. 6002
does the same operation. 6008 dial 6322 and input Admin PinCode. Now all the users are in the
conference. You refer to the detail in 4.14 and configure it as your need.
5.8 Ring Groups
Define Ring groups to dial more than one extension simultaneously, or to ring more than one
phone sequentially. This feature may also be called Hunt groups. Users can click Ring Groups
New Ring Group, then users can configure it like the following screenshots. Of course 6001,
6002, 6008 have registered. Then 6008 dial 6400, you can hear 6001, 6002 are ringing
simultaneously. If users want the phones are ringing sequentially, they can configure the strategy
as Ring in Order.
www.atcom.cn
47
5.9 Agents
You need complete the following two steps when you need the function of Agents .
5.9.1 Create Users as Agents
Users can create phone users like 5.1.2, but hook on the option of “ Is Agent” like the following
screenshots: please pay attention to the red ellipse frame.
www.atcom.cn
48
Like this I have also created 6002, 6008.Then you must click System Status, then you can see the
following screenshots:
Click the button of “Login” so that all the Agents have logined. Then refresh the web, users can
see the page that all the agents have logined like the following screenshots:
5.9.2 Create a Call Queue
Please click Call Queues Create New Queue, then users can configure the options like this
screenshots:
www.atcom.cn
49
Then 6008(have registered) can call 6500, then 6001, 6002 are all ringing together. Of course
you can refer to 4.9 in detail.
5.10 Follow Me
Here 6001, 6002, 6008 have already registered and they can communicate with each other. First
please click Follow Me Edit on 6001, users can configure the options like the following
screenshots:
Then click the button of “Add FollowMe Number”, users can see the screen like the following,
and configure it like this, here the writer selected the Dial Local Extension number is 6005. Then
www.atcom.cn
50
click on Add button, then please click on Update button, and click on Apply Changes button in up
right corner of the main page.
Now when 6008 dial 6001, but nobody pick up it, after 30 seconds 6002 is ringing.
5.11 Group Call Pickup
This allows you to collect a call from any ringing phone that is in the same pickup group as you.
There are two kinds of methods, one is that the phone itself has the function of pickup. The other
is that we can configure it in the GUI of IP4G. Users can create users like the following:
www.atcom.cn
51
please pay attention to the red ellipse frame, all the users must in the same group. Here the writer
haves created 6001, 6002 which are both in the group 1. 6008 can be in group1, also can not. Then
6008 dial 6001, but we do not answer it, at the same time 6002 dial *8 then 6002 can connect with
6008. Now the writer completes the Group Call pickup function.
www.atcom.cn
52
Acronyms
VoIP: Voice over Internet Protocol
FXO: Foreign eXchange Office interface is the port that receives the analog line.
FXS: Foreign eXchange Subscriber interface is the port that actually delivers the analog line to
the subscriber.
SIP: Session Initiation Protocol, SIP is a signalling protocol used for establishing sessions in an IP
network.
IAX: Inter-Asterisk Exchange Protocol, is a communications protocol for setting up interactive
user sessions. IAX is similar to SIP.
RTP: Real-Time Transport Protocol, RTP is used to encapsulate VoIP data packets inside UDP
packets. RTP provides end-to-end network transport functions suitable for applications
transmitting real-time data, such as audio, video or simulation data, over multicast or unicast
network services.
UDP: User Datagram Protocol, UDP is a communications protocol that offers a limited amount of
service when messages are exchanged between computers in a network that uses the Internet
Protocol (IP).
TCP: Transmission Control Protocol , TCP is a set of rules (protocol) used along with the Internet
Protocol (IP) to send data in the form of message units between computers over the Internet.
SMTP: Simple Mail Transfer Protocol, SMTP is the de facto standard for electronic mail transport
across the Internet.
TOS: Terms of service, the “ToS” or “TOS” are rules by which one must agree to abide by in
order to use a service. Unless in violation of consumer protection laws, such terms are usually
legally binding.
DTMF: Dual-tone multi-frequency, DTMF signaling is used for telephone signaling over the line
in the voice-frequency band to the call switching center. The version of DTMF used for telephone
tone dialing is known by the trademarked term Touch-Tone, and is standardised by ITU-T
Recommendation Q.23. Other multi-frequency systems are used for signaling internal to the
telephone network.
DHCP: Dynamic Host Configuration Protocol, DHCP is an auto configuration protocol used on
IP networks. DHCP allows a computer to be configured automatically, eliminating the need for
intervention by a network administrator. It also provides a central database for keeping track of
computers that have been connected to the network. This prevents two computers from
accidentally being configured with the same IP address.
NTP: Network Time Procotol, NTP is a protocol for synchronizing the clocks of computer
systems over packet-switched, variable-latency data networks. It is designed particularly to resist
the effects of variable latency by using a jitter buffer.
Vlan: Virtual Local Area Network, is a group of hosts with a common set of requirements that
communicate as if they were attached to the same broadcast domain, regardless of their physical
location. A VLAN has the same attributes as a physical LAN, but it allows for end stations to be
grouped together even if they are not located on the same network switch. Network
reconfiguration can be done through software instead of physically relocating devices.
www.atcom.cn
53
HTTP: Hypertext Transfer Protocol, The HTTP is a networking protocol for distributed,
collaborative, hypermedia information systems. HTTP is the foundation of data communication
for the World Wide Web. HTTP functions as a request-response protocol in the client-server
computing model. TFTP: Trivial File Transfer Protocol, TFTP is a file transfer protocol, with the
functionality of a very basic form of File Transfer Protocol (FTP). TFTP could be implemented
using a very small amount of memory. It was therefore useful for booting computers such as
routers which did not have any data storage devices. It is still used to transfer small amounts of
data between hosts on a network, such as IP phone firmware or operating system images when a
remote X Window System terminal or any other thin client boots from a network host or server.
DNS: Domain Name System, The DNS is a distributed hierarchical naming system for computers,
services, or any resource connected to the Internet or a private network. It associates various
information with domain names assigned to each of the participants. Most importantly, it
translates domain names meaningful to humans into the numerical (binary) identifiers associated
with networking equipment for the purpose of locating and addressing these devices worldwide.
MAC: Media Access Control address, The MAC is a unique identifier assigned to network
adapters or network interface cards (NICs) usually by the manufacturer for identification. If
assigned by the manufacturer, a MAC address usually encodes the manufacturer's registered
identification number.
IPv4: Internet Protocol version 4, The IPv4 is the fourth revision in the development of the
Internet Protocol (IP) and it is the first version of the protocol to be widely deployed.
NAT: Network Address Translation
DTMF: Dual Tone Multi Frequency
GSM: Global System for Mobile Communications
www.atcom.cn
54
Glossary
Zaptel: Zaptel refers to Jim Dixon's open computer telephony hardware driver API. Zaptel drivers
were first released for BSD and Jim's Tormenta series of DIY T1 interface cards. Digium later
produced interface cards from Jim's designs and improved the Zaptel drivers on the Linux
platform. Digium then added further drivers also following the Zaptel API for other telephony
hardware.
Asterisk: Asterisk is a software implementation of a telephone private branch exchange (PBX)
originally created in 1999 by Mark Spencer of Digium. Like any PBX, it allows attached
telephones to make calls to one another, and to connect to other telephone services including the
public switched telephone network (PSTN) and Voice over Internet Protocol (VoIP) services.
Voice Codec:
G.711 is a high bit rate (64 Kbps) ITU standard codec. It is the native language of the modern
digital telephone network. There are two versions: A-law and U-law.
G.711 A-law is indigenous to the E1 standard used in the rest of the world. G.711 U-law is
indigenous to the T1 standard used in North America and Japan. The difference is in the method
the analog signal being sampled. In both schemes, the signal is not sampled linearly, but in a
logarithmic fashion. A-law provides more dynamic range as opposed to U-law. The result is a less
'fuzzy' sound as sampling artifacts are better supressed.
Pick up: the ability to pull a ringing call to the phone you are currently on.
There are two main types:a.Group call pickup, this allows you to collect a call from any ringing phone that is in the same
pickup group as you, if there were more than one phone ringing then you would have no control
over which call you collected.
b.Directed pickup, this allows you to pickup a call at a specific extension, maybe you're in another
office and you hear a phone ringing and wonder if it's yours. You dial the pickup number and your
extension, and the call will only transfer if it is your extension.
Group call pickup is typically invoked by dialing *8# or *8 from another phone in the call pickup
group.
Syslog: Syslog is a standard for logging program messages. It allows separation of the software
that generates messages from the system that stores them and the software that reports and
analyzes them. It also provides devices, which would otherwise be unable to communicate, a
means to notify administrators of problems or performance.
Time Zone: A Time Zone is a region on Earth, more or less bounded by lines of longitude, that has
a uniform, legally mandated standard time, usually referred to as the local time.
www.atcom.cn
55
Reference
http://atcom.cn/download.html
http://www.asteriskguru.com/
http://www.openippbx.org/index.php?title=Main_Page
http://www.atcom.cn/
www.atcom.cn
56