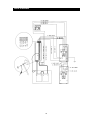
1
Owner’s Manual
Series 2000
Inverter / Power Backup Systems
DoorKing, Inc.
120 Glasgow Avenue
Inglewood, California 90301
U.S.A.
Phone: 310-645-0023
Fax: 310-641-1586
www.doorking.com
P/N 2000-065 REV B, 2/01
Copyright 2001 DoorKing, Inc. All rights reserved.
2
Use this manual with the following models only.
Model 2000-080, 2000-081, 2000-082 with circuit board 2352-010.
DoorKing, Inc. reserves the right to make changes in the products described in this manual
without notice and without obligation of DoorKing, Inc. to notify any persons of any such revisions
or changes. Additionally, DoorKing, Inc. makes no representations or warranties with respect to
this manual. This manual is copyrighted, all rights reserved. No portion of this manual may be
copied, reproduced, translated, or reduced to any electronic medium without prior written consent
from DoorKing, Inc.
3
4
TABLE OF CONTENTS
Section 1 - Preface
Introduction.......................................................................................................................................................... 7
General Precautions ............................................................................................................................................ 8
Personal Precautions........................................................................................................................................... 9
Batteries ............................................................................................................................................................ 10
Sizing the System ................................................................................................................................................ 11
Section 2 – Inverter Operation
2.1
Inverter Control Panel .......................................................................................................................... 13
2.1.1
Power On/Off ....................................................................................................................... 13
2.1.2
Inverter Mode LED ............................................................................................................... 13
2.1.3
Search Mode Watts.............................................................................................................. 14
2.1.4
Over-temp / Overload........................................................................................................... 14
2.1.5
Battery Hi / Battery Low........................................................................................................ 14
2.1.6
Charger LED ........................................................................................................................ 15
2.1.7
Battery Type......................................................................................................................... 15
2.1.8
Battery Charge Rate............................................................................................................. 15
2.1.9
Over Discharge Protection ................................................................................................... 16
2.1.10
Battery Bank Capacity.......................................................................................................... 16
Section 3 – Installation
Dimensions.......................................................................................................................................................... 17
3.1
3.2
Location ............................................................................................................................................... 18
3.1.1
Typical Layout ...................................................................................................................... 19
3.1.2
Typical Layout ...................................................................................................................... 20
Mounting
3.2.1
Conduits............................................................................................................................... 21
3.2.2
Concrete Pad ....................................................................................................................... 21
3.2.3
Mounting the Unit ................................................................................................................. 22
Section 4 – Wiring
Component Identification ..................................................................................................................................... 23
4.1
AC Input Wiring.................................................................................................................................... 24
4.2
AC Output Wiring ................................................................................................................................. 25
4.3
Battery Wiring ...................................................................................................................................... 26
Section 5 – Controls and Adjustments
Inverter Panel Identification.................................................................................................................................. 27
5.1
Control Board
5.1.1
Normal Operation ................................................................................................................. 28
5.1.2
Quick Open Operation.......................................................................................................... 28
5.1.3
Terminal Description ............................................................................................................ 28
5.1.4
Control Board Wiring ............................................................................................................ 29
5.1.5
Operation Test ..................................................................................................................... 30
5
Section 6 – Maintenance and Trouble Shooting
Monthly Maintenance............................................................................................................................................31
Trouble Shooting Guide ........................................................................................................................................31
Wiring Diagram.....................................................................................................................................................33
6.1
RMS Values, Meters and Measurement................................................................................................34
5.2
Battery Cable Inductance......................................................................................................................35
5.3
Ground vs. Lightning .............................................................................................................................36
Warranty .............................................................................................................................................................37
Life Support Policy................................................................................................................................................38
6
INTRODUCTION
What is the Model 2000 Inverter?
The DKS Series of Inverter / Power Backup systems are a unique style of battery backup devices.
They are designed to provide an access control system with 120 volt AC power when the primary AC
supply voltage source has failed. The Model 2000 will allow the access control system to maintain
normal operation for an extended period of time.
Most vehicular gate operator battery backup systems are designed to provide a one time open
function for the gate operator. These systems employ a controller, DC motor and batteries. They
monitor the supply voltage and simply run the gate to the open position using the DC motor upon loss
of AC power – a convenience device really. In addition, all access system components (telephone
entry system, card readers, RF controls, loop detectors, entrapment prevention devices, etc.) do not
function during this open cycle. These type battery backup systems are incapable of maintaining
normal gate and access system operation during power outages.
The DKS Series 2000 is dramatically different than most gate operator battery backup systems. This
is a true backup system designed to maintain power for all components of the access control system.
During a loss of primary supply voltage, the Series 2000 converts DC battery power and provides 120
VAC operating power to multiple (up to six) gate operators and all other access system components
such as the loop detectors, telephone entry system, card access system, RF controls, etc. This
capability provides normal access control system operation during a power outage. All access
system devices remain operational and all gate operator safety related and entrapment prevention
devices continue to function normally.
How does the system work?
The DKS Model 2000 monitors the AC supply voltage and acts as a battery charger when AC power
is present. This allows the system to maintain proper battery voltage without over-charging the
batteries through its three-stage battery charging system. Upon a loss of AC power, the Model 2000
switches to inverter mode (32 milliseconds) converting the DC battery power to AC power to maintain
operating voltage to the entire access control system. The Model 2000 will continue to provide AC
operating power for an extended period of time. The length of time that the system can provide
power is dependent on many factors including the number of devices connected to the system,
access system usage, battery size, wire size, wire run distance, temperature, etc., but it is not
unusual to receive 1-2 hours of continuous operation for a typical vehicular access control system.
While the system is in inverter mode, battery power is continuously monitored. When the Model 2000
determines that battery power is reaching critical levels, the system will sequentially open up to six
gate operators in 30-second intervals, and will hold the gates open until primary power is restored.
This prevents the vehicular access gates from blocking the roadway when battery power is depleted.
Upon return of AC power, the model 2000 will initialize the gate operators to return the gate access
system to normal operation.
Primary AC supply voltage is routed directly into the Model 2000. The system provides six 20-amp
circuit breakers for high voltage power distribution and in fact acts as a power distribution sub-panel.
There are three different models available to meet the access control system requirements:
•
1500 Watt, 12.5 amp maximum output
•
2400 Watt, 20 amp maximum output
•
2600 Watt, 30 amp maximum output
7
GENERAL PRECAUTIONS
This manual contains important safety and operating instructions and specifications for all models of
the DKS Inverter / Backup Power Systems. This manual is the property of the owner of the equipment
and must be left in their possession after the installation of the product is complete.
•
Before installing, connecting any wiring, or using the backup power supply, read all
instructions and cautionary markings on (1) the inverter/charger, (2) the batteries and (3) all
appropriate sections of this instruction manual.
•
CAUTION - Do not install or connect batteries to this unit until instructed to do so. Failure to
comply with this instruction can cause damage or complete failure of the inverter unit.
•
CAUTION - To reduce risk of injury, use only deep-cycle lead acid batteries.
•
Do not expose the inverter/charger to rain, snow or liquids of any type.
Do not disassemble
the inverter/charger; take it to a qualified service center when service or repair is required.
Incorrect re-assembly may result in a risk of electric shock or fire.
•
To reduce risk of electric shock, disconnect all wiring from the inverter/charger before
attempting any maintenance or cleaning. Turning off the inverter will not reduce this risk.
•
WARNING - WORKING IN VICINITY OF A LEAD ACID BATTERY IS DANGEROUS.
BATTERIES GENERATE EXPLOSIVE GASES DURING NORMAL OPERATION.
•
Never charge a frozen battery.
•
Be extra cautious when working with metal tools on, or around batteries. The potential exist
to drop a tool and short-circuit the batteries or other electrical parts resulting in sparks that
could cause an explosion.
•
This backup power system is to be used with batteries that supply a nominal voltage of 24
VDC. This is provided by connecting two, 12-volt batteries in series.
•
GROUNDING INSTRUCTIONS - This backup power supply must be connected to a
grounded, permanent wiring system. All installations should comply with all national and local
codes and ordinances.
8
PERSONAL PRECAUTIONS
•
Someone should be within range of your voice to come to your aid when you work near
batteries.
•
Have plenty of fresh water and soap nearby in case battery acid contacts skin, clothing, or
eyes.
•
Wear complete eye protection and clothing protection. Avoid touching eyes while working
near batteries. Wash hands when done.
•
If battery acid contacts skin or clothing, wash immediately with soap and water. If acid enters
eyes, immediately flood eyes with running cool water for at least 15 minutes and get medical
attention immediately.
•
Baking soda neutralizes lead acid battery electrolyte. Keep a supply on hand in the area near
the batteries.
•
NEVER smoke or allow a spark or flame in vicinity of the batteries.
•
Be extra cautious when working with metal tools on and around batteries. The potential exists
to short-circuit the batteries or other electrical parts that may result in a spark that could
cause an explosion.
•
Remove personal metal items such as rings, bracelets, necklaces, and watches when
working with electrical circuits. These items can cause a short-circuit current high enough to
weld a ring, or the like, to metal causing severe burns.
•
If a remote or automatic start system is used, disable the automatic starting circuit and/or
disconnect the system from the backup power supply while servicing to prevent accidental
starting during servicing.
9
BATTERIES
Batteries come in different sizes, types, amp hours, voltages and chemistries. Standard automobile
batteries, called starting batteries, are designed to provide high starting current for short periods of
time. These batteries will quickly drain under continuous loads and their life span is greatly reduced
when the battery is discharged on a repetitive cycle.
Deep cycle batteries are designed to handle continuous or repetitive loads for an extended period of
time. They will operate with repeating cycles (discharge/charge) and can provide sufficient power
when discharge is as low as 80%. This makes these type batteries best suited for use with the
Model 2000 inverter. These batteries are rated in AMP HOURS, which indicates how long the
battery can supply power under a continuous load. For example, 1 amp hour means the battery can
supply 1 amp for 1 hour, or 4 amps for 15 minutes. A 100-amp hour battery can supply 1 amp for 100
hours.
The most common deep cycle battery is referred to as a MARINE BATTERY. These are typically
used with boats and motor homes and are called "Group 27" batteries. They are 12-volt batteries
rated at 80 to 100 amp-hours (20 hour rating), are economical and readily available. The Model 2000
requires two batteries connected in series to supply 24 volt DC power to the inverter.
BATTERIES MUST HAVE SCREW TYPE TERMINALS. DO NOT USE BATTERIES WITH CLAMP
TYPE TERMIANLS.
Batteries are the backup power system's fuel tank. The larger the batteries, the longer the system can
operate before recharging is necessary. An undersized battery bank results in reduced battery life
and disappointing system performance.
Battery Terminology
•
Electrolyte - Typically a mixture of water and sulfuric acid, it is commonly referred to as
battery acid.
•
Plates - Originally made of lead, they are now made of lead oxide. Plates are the part of the
battery that collect current and are connected to the battery terminals. There are several
plates in each cell, each insulated from the others by separators.
•
Sulfating - As a battery discharges, its plates are progressively covered with lead sulfate.
During recharging, the lead sulfate is removed from the plates and recombined with the
electrolyte. If the lead sulfate remains on the plates for an extended period of time (over two
months), it hardens, and recharging will not remove it. This reduces effective plate area and
the battery capacity is diminished.
•
Stratification - Over time the batteries' electrolyte (liquid) tends to separate. The electrolyte at
the top of the battery becomes watery while at the bottom it becomes more acidic. This effect
is corrosive to the plates and reduces battery life.
•
Deep Cycle - A deep cycle occurs when a battery has been discharged such that less than
20% of its capacity remains (80% discharge).
•
Temperature Compensation - The optimum full charge voltage is temperature dependent. As
temperature decreases the proper voltage for each charge stage needs to be increased. The
temperature probe in the Model 2000 automatically re-scales charge voltage settings for
ambient temperature. The compensation slope based on cell voltage is -2.17mv per degree
F. per cell. This also decreases the charge voltage when the battery is hot to reduce gassing.
10
SIZING THE SYSTEM
The loads on the backup power system are seldom constant. Typically, large loads are operated for
only short periods of time, such as when a gate operator motor first starts. The Model 2000 has
circuitry that allows the system to operate at power levels that exceed the continuous power rating of
the inverter for these short periods.
In order to select the proper model of
the backup power system to use, you
need to know the amount of power
that the vehicular gate operator(s)
draws during its run cycle. If more
than one operator is connected to the
backup power system, add the power
of all the gate operators in the system
together. The table shows the
maximum run power required for
DoorKing vehicular gate operators. If
other operator brands are to be
connected to the system, power
consumption is determined by the
formula WATTS=VOLTS X AMPS.
Use the ratings on the nameplate of
the motor.
MODEL
MAX RUN
AMPS
RUN
WATTS
610, 615, 620, 630 (1/2 hp)
907, 910, 915 (1/2 hp)
6100, 6300 (1/2 hp)
9070, 9100, 9150 (1/2 hp), 9300
5.4 @ 115 V
621
605,905, 6050, 9050
4.3 @ 115 V
495
1601, 1100
4.4 @ 115 V
506
625, 630 (1 hp), 915 (1 hp)
6300 (1 hp), 9150 (1 hp)
7.0 @ 115 V
840
1602
9.2 @ 115 V
1058
920, 9200
14 @ 115 V
1610
Even though their power consumption is minimal, accessory items and other access control system
components should also be considered when calculating the Model 2000 power requirements. For
example, a DoorKing model 1815 telephone entry system draws 250 ma at 16 volts, which equals a
power consumption of 4 watts (.25 x 16).
Once you determine the watts that will
be required to run the vehicular
MODEL
MAX
MAX
access control system, select the
POWER
AMPS
backup power system model that
2000-080, 1500 Watt
1500
12.5
exceeds the amount of power required
2000-081, 2400 Watt
2400
20.0
for the system. For example, if two
6100 operators are connected to the
2000-082, 3600 Watt
3600
30.0
system, they will draw 1242 watts of
power (621 + 621). The model 2000080 (1500 Watt) would be suitable for
this application. If four 6100 operators are connected to the system, the model 2000-082 (3600 Watt)
would be required because the total power consumption is 2484 watts (621 x 4) and the four
operators will draw up to 21.6 amps (5.4 x 4). The table shows the maximum continuous (1 hour)
output power and current that the system is capable of delivering when in inverter mode. These
factors must be considered when determining which model of power backup system to use.
11
12
SECTION 2 – INVERTER OPERATION
Shown below are the controls and indicator lights on the front panel of the inverter/charger. These
control and provide information when the system is in either inverter or battery charging mode of
operation.
NOTE: ALL SETTINGS ON THE INVERTER CONTROL PANEL HAVE BEEN PRESET AT THE
FACTORY. DO NOT CHANGE THEM. The information provided in sections 1.1.1 through 1.1.10
is for reference only.
2.1 INVERTER CONTROL PANEL
Battery Type Selector
DEEP CYCLE LEAD ACID 7
8
PbCa-MAINTENANCE FREE 6
9
GEL CELL 5
0 EQUALIZE 1
4
1 EQUALIZE 2
3
2
CHARGER: GRN=FLOAT, ORN BLINK=ABSORP, ORN=BULK
BATTERY HI=RED, BATTERY LOW=GRN
OVER TEMP=RED, OVERLOAD=GRN
SEARCH MODE WATTS
INVERTER MODE
POWER ON/OFF
BATTERY CHARGER RATE
OVER-DISCHARGE PROTECTION
(AC TRANSFER VOLTAGE)
BATTERY CAPACITY
(MIN)
DEFEAT
(MAX)
250
125
.37K
(MIN)
.5K
(MAX)
(MAX) OFF
(MIN)
ON
(MIN)
50
1K
2.1.1 Power On/Off
Located on the left of the panel is the momentary POWER ON/OFF button. Once the power backup
system has been properly installed and the batteries connected, this button must be pressed to
initiate the inverter. Pressing this button momentarily will alternately turn the inverter on and off. Each
time it is pressed the inverter will sound and audible chirp.
Note: When first connected to batteries, the inverter will run through a self-test, and go to
an off state. Pressing the on/off button can then activate the inverter.
Note: The self-test consist of the control panel lights lighting up in sequence, the internal
cooling fan will automatically run momentarily, and the transfer relay will click three times.
2.1.2 Inverter Mode LED
This green LED indicator lights when the unit is in the inverter mode (not charging batteries)
delivering full output voltage. When the inverter is in its search mode, the green LED will blink about
2-3 times per second.
13
2.1.3 Search Mode Watts
This control is used for adjusting the sensitivity of the search mode circuit. Since the Model 2000
Power Backup System is being used as an Uninterruptible Power Supply (UPS), the search mode
function should be defeated by turning the control completely to the left (counter clockwise).
Protection Circuitry
The inverter will automatically restart itself from the following overload conditions: low
battery, high battery, shorted output, over current and over temperature.
The inverter will turn itself off and require a manual restart if it encounters an overload for
approximately 10 seconds (a prolonged short circuit), or if AC output is directly connected
to an AC power source.
Two LED's are provided to report on error conditions - OVERTEMP (2.1.4) and BATTERY
CONDITION (2.1.5).
2.1.4 Over-temp Red / Overload Grn
This LED lights RED when the inverter's temperature is too high for safe operation and is GREEN if
the load is too large for the inverter to safely operate. When the temperature returns to a safe level,
the inverter restarts. The inverter will restart automatically if the overload condition lasts for less than
10 seconds.
If the green overload LED is on when the unit is in the charger mode, then there is a charger fault.
This means that the charger is charging even though the regulation system is trying to turn it off. The
unit will turn this LED on when a fault is detected, and will continue for up to one hour if the condition
persists. After this period the charger will shutdown, disconnect the relay and continue to display the
green overload LED. The unit may be reset manually by pressing the power on/off button, and will
continue to operate for another one-hour period if the condition has not been corrected. The inverter
portion will continue to work normally throughout this type of fault.
The green overload LED will also come on in the event of a "back feed" condition. This condition
could occur if AC power is applied to the inverter's output. The LED will light from 1-10 seconds when
the condition is detected, after which the inverter will shutdown. To correct this condition, remove the
AC input power from the inverter's output. The unit must be reset by pressing the on/off power button.
CAUTION: Repeated connection of an AC source directly to the AC output may cause damage to the
inverter.
2.1.5 Battery Hi Red / Battery Low Grn
This LED lights RED when battery voltage is too high for safe operation, and is GREEN when voltage
is too low for safe operation. When the voltage returns to a safe level, the inverter restarts
automatically.
14
2.1.6 Charger LED
The battery charger in this inverter charges the batteries in three stages - BULK, ABSORPTION and
FLOAT - to provide rapid and complete charge cycles without undue battery gassing.
Stage One - Constant Current (Bulk Charge)
This stage is initiated when AC is applied to the AC input of the inverter, and is terminated
when the batteries reach the BULK CHARGE VOLTAGE. During this stage, the charger
LED glows STEADY ORANGE.
Stage Two - Constant Voltage (Absorption Charge)
Absorption is initiated when the bulk voltage setting is reached. At this point the charge
current begins to taper off at whatever rate is required to hold the voltage constant. During
this stage, the charger LED blinks ORANGE. The absorption charge phase is terminated
in one of two ways.
1. Normally, as the charge cycle progresses, the current required to hold the battery
voltage constant gradually reduces. When this current equals the programmed return
amps setting, the voltage is allowed to fall to the FLOAT (float voltage) setting - stage
three.
2. If there are DC loads on the batteries, the current may never fall to a level low enough
to initiate the float voltage stage. A timer is used to ensure that the battery voltage
does not remain indefinitely at the Bulk Charge Voltage. The timing circuit is activated
by the onset of stage two; it terminates stage two if the charge current does not reach
the return amps value setting within 12 hours.
Stage Three - Maintenance (Float Charge)
The charger remains in the float stage until the unit is turned off or loses AC input power.
During this stage the charger LED glows steady GREEN. The purpose of stage three is to
maintain the batteries at a voltage that will hold full charge but not gas the batteries.
2.1.7 Battery Type Selector
This control automatically sets the correct bulk and charge voltages according to the type of battery
selected. This control should be set to position 7; Deep Cycle Lead Acid.
2.1.8 Battery Charger Rate
This control sets the maximum charge rate in amps. The highest charge rate recommended is
determined by dividing the battery bank's total amp hour capacity by a factor between 3 and 5 (3 for
gel cell - 5 for lead acid). Setting the BATTERY CHARGER RATE at the highest recommended level
is best when the objective is to charge the batteries as quickly as possible. A lower setting is typically
used in installations where AC power is available for extended periods of time. For example: there is
more than sufficient time for a 200 amp/hr battery bank to be recharged in 12 hours at a 25 amp
setting: 25 amps x 12 hours = 300 amp-hours.
CAUTION: Excessively high charge rates can overheat a battery. Typically, a small battery bank will
be used with this system (two - 100 amp hour batteries), therefore set the battery charger rate to
minimum.
15
2.1.9 Over Discharge Protection
The over discharge protection control enables or disables the over discharge protection system
(ODP) and allows adjustment of the AC transfer voltage. The purpose of the ODP system is to protect
the batteries from being over-discharged. The over discharge protection control is turned clockwise to
activate the circuit. It is defeated by turning the control fully counterclockwise. If the over discharge
circuit is defeated, the inverter itself is protected from low battery voltage conditions by an additional
low battery protection circuit which has a threshold of 8.2 volts DC.
2.1.10 Battery Bank Capacity
The battery capacity control is used to inform the inverters microprocessor about the size of the
battery bank being used. The microprocessor uses the formula of "battery capacity/40" to determine
what current level the bulk/absorption charge terminates (a maximum time of 12 hours is allotted for
bulk/absorption charge) and the float charge begins. This allows the inverter to make better "over
discharge protection" and battery charging decisions. Battery bank size is adjustable from 50 to 1000
(1K) amp hours. Set this adjustment to the setting closest to the size of your battery bank (in amp
hours).
Note: .37K = 370 amp-hours, .5K = 500 amp-hours, 1K = 1000 amp-hours.
16
SECTION 3 – INSTALLATION
WARNING!!
DO NOT CONNECT BATTERIES TO THE BACKUP POWER SYSTEM UNTIL INSTALLATION
AND WIRING OF THE SYSTEM IS COMPLETE. THE BATTERIES WILL BE THE LAST
COMPONENT TO BE CONNECTED PRIOR TO POWERING THE SYSTEM FOR THE FIRST TIME.
Front
Side
Control
Board
Inverter
41.25
Battery
Compartment
16.5
15
17
3.1 LOCATION
Prior to installing the backup power system, careful thought must be given as to where the unit will be
installed. The system operates best when it can be installed as physically close as possible to the
equipment that it is intended to operate during power outages. This reduces line loss. The backup
power system also acts as a power distribution panel. Main AC power enters the backup power
system and is distributed through the unit to up to six branch circuits to power the access control
system. Each branch circuit is protected with a 20-amp circuit breaker.
When planning your system and laying out conduit runs, primary AC input power is run directly from
the main electrical panel to the backup power system. From the backup power system, separate
conduit runs will be made to each vehicular gate operator that the system is backing up. Because of
this, the primary AC power wires may be quite large depending on the number of gate operators
being backed up and the wire run distance. Branch conduits (from the backup power system to the
individual operators) should be a minimum ¾-inch. Conduits may need to be larger depending on the
size and number of wires being run, and on local electrical codes.
AC
OUTPUT
(Load)
AC
INPUT
(Source)
DC
INPUT
12 V
Battery
12 V
Battery
The layouts on the next pages show possible methods of routing conduits in a typical two-lane gate
system that uses both barrier gate operators and a slide or swing gate operator on each traffic lane.
The access control system may be powered from a transformer box (which is powered from the
Model 2000) or from convenience outlets in the gate operators. Plug-in loop detectors are powered
directly from the gate operators.
The effective capacity of a battery is reduced when cold. This phenomenon is more significant with
lead-acid type batteries than with other batteries. When the internal temperature of a lead-acid
battery is 32°F (0°C), the capacity can be reduced by as much as 50%. This effectively reduces the
size of the systems “gas tank.” This should be considered when designing the access system. If
extremely cold temperatures are expected, you should consider installing the backup system in a
heated equipment room.
The Model 2000 should be protected from high temperatures as well. High battery temperatures will
result in short battery life. Install the backup system in a shaded area or inside an air-conditioned
equipment room if extremely high temperatures are the norm.
18
3.1.1
In this layout, the Model 2000 is installed close to the vehicular gate system. Note that incoming AC
power is routed into the Model 2000, and is then distributed to the various devices to be powered.
With this type of layout, it is critical that the AC wires that provide power to the Model 2000
must be of a sufficient size to handle the power required by ALL the operators powered from
the Model 2000. This may require a fairly large wire size, such as 8, 6 or 4 AWG depending on the
number of operators and wire run distances involved. It is best to have a licensed electrician
determine the proper wire size required.
ENTER
EXIT
Incoming AC Power
Incoming AC power is distributed through the Model 2000 to each of the gate operators. Access
control devices are powered from accessory transformers plugged into the transformer box (DoorKing
Model 1200), which is also powered from the Model 2000. Refer to the gate operator installation
instructions or consult a licensed electrician to determine the proper wire size required to supply
adequate power to the gate operators.
Barrier
Operator
Model
2000
Gate
Operator
Gate
Operator
Transformer
Box
Barrier
Operator
Access
Control
19
3.1.2
In this layout, the Model 2000 has been positioned close to the AC power distribution panel rather
than being installed at the gate site. AC power is routed into the Model 2000 from the distribution
panel and is then distributed to the various devices to be powered. It is critical that the AC wires
that provide power to the Model 2000 be of a sufficient size to handle the power required by
ALL the operators powered from the Model 2000. This may require a fairly large wire size, such as
8, 6 or 4 AWG depending on the number of operators and wire run distances involved. It is best to
have a licensed electrician determine the proper wire size required.
ENTER
OFFICE
EXIT
Model
2000
AC POWER
DISTRIBUTION PANEL
Power is distributed from the Model 2000 to each of the gate operators. Refer to the gate operator
installation instructions or consult a licensed electrician to determine the proper wire size required to
supply adequate power to the gate operators.
Barrier
Operator
Gate
Operator
Gate
Operator
Barrier
Operator
Access
Control
20
3.2 MOUNTING
3.2.1 Conduits
All wiring into and out of the backup power
system enters the unit through the concrete
mounting pad and is routed up behind the
battery compartment into the circuit breaker
panels. Conduits should be located so that
they are in a straight line running along the
back of the unit. However, there is 3.5 inches
of clearance from the bottom of the battery
shelf to the top of the mounting pad. Conduits
can be stubbed up into this space, and then
the wires can be routed as needed. The space
between the back of the battery compartment
and the back of the backup power system is
1.5 inches.
1.5
3.5
Depth as required
by local code and
soil conditions.
CONDUITS
3.2.2 Concrete Pad
The backup power system must be mounted on a concrete pad. Be sure to check with local building
codes to determine the depth of the pad. Be sure that all conduits are in place.
1. Construct a form for the mounting pad
according to the figures shown below.
Be sure to level the top edge of the
form. The depth of the pad is
determined by soil conditions and
local building codes. The top surface
of the pad must be a minimum of four
(4) inches above ground level. The
size of the pad allows 4 inches of
clearance around the Model 2000.
2. Set conduits and reinforcing bars
and/or wire mesh.
3. Mix the concrete according to the
manufacturers instructions. Pour the
mixture into the form and tamp. Level
and finish the surface after pouring is
complete. Do not set anchor bolts in
the concrete. Sleeve anchors are
used to secure the backup power
system to the pad.
4. Allow the pad to cure for 48 hours
before removing the forms or
mounting the backup power system.
FRONT
23
4 3/4
21
24.5
3.2.3 MOUNTING THE UNIT
These steps require two people to perform them. The Backup Power Unit is heavy and will require
lifting. Attempting to lift this unit by yourself can result in serious injury. A hammer drill will be required
in these steps to drill the mounting holes in the concrete pad for the sleeve anchors. Mounting of the
Backup Power Unit to the concrete pad requires five (5) 3/8 x 3 sleeve anchors, which are not
supplied with the unit.
1. Remove the shipping carton from the Backup Power Unit. Unlock the cabinet door (the
keys are taped to the back of the unit) and set it aside.
2. Remove the wood shelve from the bottom of the unit. Do not discard this shelf; it will be
replaced after mounting is complete.
3. Remove the four bolts that secure the Backup Power Unit to the shipping pallet, and then
lift the unit off of the pallet. CAUTION: The Backup Power Unit is heavy! Do not
attempt to lift it off the shipping pallet, or place it on the mounting pad yourself.
Placement of this unit requires two people.
4. Place the Backup Power Unit onto the concrete pad being careful not to damage conduits
or wiring already installed. Do not drop the Backup Power Unit. Position the unit on the
pad so that the conduits are located inside the cabinet. If the pad was formed to the
dimensions shown in section 3.2.2, there will be four (4) inches of clearance around the
cabinet to the edge of the concrete pad.
5. Position the Backup Power Unit on the pad in the location desired. Mark the location of
the five (5) mounting holes on the concrete pad. All mounting holes are on the inside of
the cabinet. There are two mounting holes on each side of the cabinet, and one in the
front of the cabinet.
6. After the holes are marked, remove the unit from the pad. Use a hammer drill to drill the
mounting holes. Drill the hole to the required depth and diameter for the sleeve anchor
being used. After drilling all the holes, be sure to clean out the holes to remove the
concrete dust.
7. Position the Backup Power Unit onto the concrete pad being sure that the mounting holes
in the cabinet are positioned over the holes that were drilled in the mounting pad. Route
any wiring that may be in place up the back of the cabinet and into the top electrical
compartment.
8. Place the sleeve anchors through the cabinet and into the concrete. Tap the sleeve
anchors into the holes so that they are firmly seated. Be sure that the nuts and washers
are in place on the sleeve anchor before tapping into the mounting holes.
9. Tighten the bolts two or three turns from the finger tight position to achieve the proper
anchor setting.
10. Clean out any debris from the bottom of the Backup Power Unit. Re-install the wood
shelving removed in step 2.
22
SECTION 4 – WIRING
WIRING OF THE MODEL 2000 INVERTER / POWER BACKUP SYSTEM SHOULD BE
PERFORMED BY A QUALIFIED, LICENSED ELECTRICIAN. CONSULT LOCAL CODE FOR
PROPER WIRE SIZE, CONNECTORS AND CONDUIT REQUIRMENTS.
The Model 2000 is protected with a 30 Amp circuit breaker on the AC input power line. Each of the
six branch circuits is protected with a 20 Amp circuit breaker.
2353 Control Board
20 Amp AC Output Circuit Breakers
30 Amp AC Input Circuit Breaker
Inverter
20 Amp AC Output Circuit Breakers
Batteries - User Supplied
23
4.1 AC INPUT WIRING
Be sure that the AC source power is disconnected or
shut-off before attempting to connect the AC input
wiring to the Backup Power System. Since the Backup
Power System acts as a distribution panel, the AC
input wiring must be sized large enough to power the
load(s) connected to the Backup Power System.
Under no circumstances should the AC input wiring be
sized less than 10 AWG.
Minimum Wire Size
Model
AC Input
2000-080
10 AWG
2000-081
6 AWG
2000-082
6 AWG
Be sure that the batteries ARE NOT CONNECTED at this time.
1.
2.
3.
4.
5.
6.
7.
8.
Remove the circuit breaker panel cover
from the top breaker panel box.
Confirm that the AC source power is
disconnected or that the circuit breaker
protecting this line is in the OFF position.
Feed the wires through the appropriate
openings. Use fittings or strain relief’s
(consult local and national codes).
Connect the ground (GREEN) wire to the
ground buss bar.
Connect the neutral (WHITE) wire to the
neutral buss bar. Torque neutral and
ground buss bar to (small terminals) 20 lbin for 14-10 AWG, 25 lb-in for 8 AWG, and
35 lb-in for 6 AWG. Torque large terminals
to 35 lb-in for 14-10 AWG, 40 lb-in for 8
AWG, and 45 lb-in for 6 AWG and larger.
Connect the hot (BLACK) wire to the AC
input circuit breaker.
Torque main
terminal to 35 lb-in for 14-10 AWG, 40 lbin for 8 AWG, and 45 lb-in for 6 AWG and
larger.
Place the 30 AMP AC input circuit breaker
to the OFF position.
DO NOT APPLY POWER AT THIS TIME.
24
GROUND (GREEN)
HOT (BLACK)
NEUTRAL (WHITE)
4.2 AC OUTPUT WIRING
The Backup Power System provides six (6) output circuits, each of which is protected by a 20-amp
circuit breaker. When using this system to provide backup power for vehicular gate operators, each
gate operator should be connected to its own circuit breaker. In this manner, the system will provide
power for up to six (6) gate operators. The access control system (telephone entry, card readers, etc.)
and other peripheral devices (loop detectors) are normally powered from the gate operator. However,
it is possible to power these devices (a telephone entry system, for example) from one of the six
circuit breakers if extra circuits are available in your application. The Model 1200 Transformer Box is
ideal for this application and can hold up to four (4) 20 VA accessory transformers.
IMPORTANT! The output of the Backup Power System should at no time be
connected to public power or a generator. This condition is far worse than a
short circuit and can destroy the inverter unit. IF the unit survives this
condition, it will shut down until corrections are made. Review the installation
diagrams before making any connections.
UPPER BREAKER PANEL
1.
2.
3.
4.
5.
6.
7.
8.
Remove the circuit breaker panel covers.
Feed wiring through the appropriate openings. Consult local
codes for proper wire size (See minimum recommended wire
size chart on previous page). Use fittings or strain relief’s
(consult local and national codes).
Connect HOT load wires to circuit breakers as shown. We
suggest that you color-code the different load wires.
Connect NEUTRAL (WHITE) load wires to neutral bar as
shown.
All load equipment must be grounded (GREEN WIRE).
Torque main terminal to 35 lb-in for 14-10 AWG, 40 lb-in for 8
AWG, and 45 lb-in for 6 AWG and larger. Torque neutral bar
(small terminals) to 20 lb-in for 14-10 AWG, 25 lb-in for 8 AWG,
and 35 lb-in for 6 AWG. Torque large terminals to 35 lb-in for
14-10 AWG, 40 lb-in for 8 AWG, and 45 lb-in for 6 AWG and
larger.
Replace circuit breaker panel covers.
Place all circuit breakers in the OFF position.
Ground Buss
Neutral
Buss
Load
Load
LOWER BREAKER PANEL
Load
Load
25
4.3 BATTERY WIRING
WARNING!! THE INVERTER IN THIS BACKUP POWER SYSTEM IS NOT
REVERSE-POLARITY PROTECTED!!
If the positive terminal of the battery is connected to the negative terminal of the inverter and
vice versa, the probable result is failure of every power FET in the inverter. To compound your
misfortune, this type of failure is very obvious AND IS NOT COVERED UNDER THE
WARRANTY. Pay close attention and double check when making the battery connections.
The Backup Power System's maximum peak current requirements are very high. If battery cables are
too small and/or connections are loose, efficiency and maximum output power are degraded. Small
cables or loose connections can cause dangerous overheating of the wire and/or terminals.
After the batteries are connected, tape the cables together every few inches with electrical
tape. This reduces the inductance of the wire resulting in a better waveform and less current in the
inverter's filter capacitors. This directly relates to efficiency. Refer to page 8 of this manual for
information on the type of batteries that should be used with the Backup Power System.
NOTE: CONNECTING THE BATTERY CABLES WILL CAUSE AN ARC
ACCOMPANIED BY A "SNAP". THIS IS NORMAL - DON'T LET IT SCARE YOU.
USUALLY
WARNING!! Never disconnect the batteries while the system is delivering power or the battery
charger is operating. Always turn the system OFF first.
1. Check to be sure that all circuit breakers in the Backup Power System are in the OFF
position.
2. Locate the RED and BLACK battery cables in the battery compartment of the Backup
Power System. DO NOT DISCONNECT these cables from the inverter. The red and
black cables have been connected at the factory and have been properly torque to
10-12 ft lbs.
3. Place the batteries near the battery compartment so that connections to them can be
made. Locate the black jumper cable that was included with the unit. Connect on end of
this cable to the NEGATIVE terminal of one battery, and connect the other end to the
POSITIVE terminal of the other battery. This connects the two 12 volt batteries in series
to provide 24-volt DC power to the inverter.
4. OBSERVE BATTERY POLARITY!! Connect
the RED battery cable to the POSITIVE (+)
RED (+)
BLACK (-)
terminal. Connect the BLACK battery cable
to the NEGATIVE (-) terminal. When you
connect the last cable to the battery, this
will cause an arc usually accompanied by a
"snap." This is normal.
5. Place the batteries in the battery compartment
being careful not to short the battery terminals
to the top of the battery compartment.
6. A temperature sensor is mounted on the top of
the battery compartment. Be careful of this
sensor when placing the batteries in the
battery compartment.
Jumper Cable
26
SECTION 5 – CONTROLS AND ADJUSTMENTS
The inverter / charger has its own control panel and indicator lights. These control and provide
information when the system is in either inverter or battery charging mode.
NOTE: All settings on the inverter control panel have been preset at the factory – do not
change them. The information below is provided for reference only.
Battery Type Selector
DEEP CYCLE LEAD ACID 7
8
PbCa-MAINTENANCE FREE 6
9
GEL CELL 5
0 EQUALIZE 1
4
1 EQUALIZE 2
3
2
CHARGER: GRN=FLOAT, ORN BLINK=ABSORP, ORN=BULK
BATTERY HI=RED, BATTERY LOW=GRN
OVER TEMP=RED, OVERLOAD=GRN
SEARCH MODE WATTS
INVERTER MODE
POWER ON/OFF
BATTERY CHARGER RATE
OVER-DISCHARGE PROTECTION
(AC TRANSFER VOLTAGE)
BATTERY CAPACITY
(MIN)
DEFEAT
(MAX)
250
125
.37K
(MIN)
.5K
(MAX)
(MAX) OFF
(MIN)
ON
(MIN)
50
1K
•
The Inverter Mode LED will be green when the system is in the inverter mode (not charging
batteries) and is delivering full output voltage to the load. When the inverter is in the charging
mode (AC power is available), the LED will be red.
•
Search Mode potentiometer is set to the full counter clockwise position.
•
Battery Type is set to 7: deep cycle lead acid.
•
Battery Charge Rate is set to 25% of maximum. If this is set too high, the batteries can boil.
The maximum charging current should not exceed 20 amps.
•
Over Discharge potentiometer is set to the full counter clockwise position.
•
Battery Capacity is set to 125.
•
Battery Temp Sensor is preinstalled at the factory and is located in the top of the battery
compartment.
27
5.1 CONTROL BOARD
The Backup Power System uses a battery control board that monitors the charge condition of the
battery bank. This control board will command each of the gate operators connected to the system to
open sequentially thirty (30) seconds apart when the batteries reach a critical level and can no longer
maintain system operation. This assures that the vehicular gates will not remain in a closed position if
the battery power is depleted.
5.1.1 NORMAL OPERATION
The 2352 circuit board monitors AC power during normal operation and DC battery voltage during
inverter operation. When AC power fails, the system automatically switches from charger mode to
inverter mode. As the inverter draws DC power to operate the access control system, the 2352
monitors the DC battery voltage. When the battery voltage reaches a critical level and access system
operation can no longer be maintained, the 2352 board will begin to command each of the gate
operators powered by the system to open sequentially in 30-second intervals, and will hold the gate
operators in the open position.
5.1.2 QUICK OPEN OPERATION
The 2352 board can be set to immediately open the gate operators upon AC power loss if this type of
operation is desired. Simply set programming switch 1 to the ON position. (Note: Programming
switches 2-3-4 are not used and should be left in the OFF position).
When AC power is restored, the 2352 control board will release each of the hold open relays one at a
time, and will then re-activate each relay for one (1) second. This resets the gate operator control
board so that the operators will return to normal operation.
5.1.3 TERMINAL DESCRIPTION
P1: 1
P1: 2
P2:
P3: 1
P3: 2
P4: 1-2
P4: 3-4
P4: 4-6
P4: 7-8
P4: 9-10
P4: 11-12
P4: 13-14
24 VDC Input – Positive
24 VDC Input – Negative
Ground
120 VAC Input
120 VAC Input
Operator 1 Control Relay
Operator 2 Control Relay
Operator 3 Control Relay
Operator 4 Control Relay
Operator 5 Control Relay
Operator 6 Control Relay
Not Used
Relay Cont
Jumpers
N.O / N.C.
P3
P4
24 VDC Input
14
13
12
11
10
9
8
7
P1
6
Ground
5
4
120 VAC Input
3
2
1
2352-010
Programming
Switches
28
Operator
Control Rel
5.1.4 CONTROL BOARD WIRING
Terminals P1, P2 and P3 are factory wired.
The relay contacts on terminals P4, 1-14 are factory set for Normally Open (N.O.) operation. If
Normally Closed (N.C.) relay contacts are required, move the contact jumper for the desired relay
from the N.O. pins to the N.C. pins.
Connect the respective control relay contacts to the open input on the gate operators to be backed up
by this system. Use 18 AWG (minimum) wire for control relay connections.
The block diagram shows how the Model 2000 can supply backup power to each of the gate
operators and supplies power to an access control system to maintain complete and normal operation
during power outages.
120 VAC
RELAY
120 VAC
RELAY
Model 2000
Inverter
120 VAC
RELAY
120 VAC
RELAY
120 VAC
Gate
Operator
Gate
Operator
Gate
Operator
Gate
Operator
Transformer
Box
16 VAC
12 VDC
120 VC
16 VAC
Telephone
Entry
System
Magnetic
Lock
Tracker
Quad Box
Access
Controller
29
RF
Receiver
Card
Reader
Card
Reader
Card
Reader
Card
Reader
Card
Reader
5.1.5 OPERATION TEST
BEFORE TESTING THE BACKUP POWER SYSTEM, BE SURE THAT ALL WIRING IS
COMPLETE AND THAT THE BATTERIES ARE PROPERLY CONNECTED AND FULLY
CHARGED.
1. Place the main AC input circuit breaker to the ON position. Place each of the branch
circuit breakers that are being used to the ON position.
2. Operate the access system to assure that all components of the system function normally
from the AC power source.
3. NORMAL OPERATION - Place the main AC input circuit breaker to the OFF position to
simulate a power interruption. The access system should remain in normal operation with
no disruption in service. Operate the access system to assure that all components are
operating normally. This includes the vehicular gate operator(s), loop detectors,
telephone entry system, card readers, keypads, RF access control, emergency vehicle
entry devices, etc.
4. QUICK OPEN OPERATION - Place the main AC input circuit breaker to the OFF position
to simulate a power interruption. Each of the gate operators connected to the Backup
Power System will sequentially open in 30-second intervals and should remain open.
5. Place the main AC input circuit breaker to the ON position. After approximately 40
seconds, the system will return to operating from the main AC power source. (If quick
open operation was selected, each gate operator will be given a reset command so that it
can resume normal operation).
30
SECTION 6 – MAINTENANCE AND TROUBLE SHOOTING
MONTHLY MAINTENANCE
At the minimum, check the level of the electrolyte in each battery cell once a month after the batteries
have been charged, not before. It should be about ½-inch above the top of the plates, but not
completely full. Most batteries have a plastic cup, which the electrolyte should just touch when full.
Don’t overfill the batteries or the electrolyte will spill out of the batteries during charging. Only refill
the batteries with distilled water – spring water and regular tap water may have a high mineral
levels which can poison the battery chemistry and reduce battery life.
Check the battery interconnections for tightness and corrosion. If any corrosion is found, disconnect
the cables and carefully clean with a mild solution of baking soda and water. DO NOT ALLOW THE
SOLUTION TO ENTER THE BATTERY. Rinse the top of the battery with clean water when finished.
To reduce the amount of corrosion on the battery terminals, coat them with a thin layer of petroleum
jelly or anti-corrosion grease available from automotive parts stores or battery suppliers. Do not
apply any material between the terminal and the cable lugs – the connection should be metal to
metal. Apply the protective material after the screws have been tightened.
TROUBLE SHOOTING GUIDE
TROUBLE INDICATION
POSSIBLE CAUSE
POSSIBLE SOLUTION
BATTERY HI - RED (LED) is on and
a buzzer is heard.
Battery voltage is above the high
battery voltage input tolerance.
Check for the correct battery voltage
at the inverter’s DC input terminals.
Ensure the DC source is regulated
below the High battery cutout voltage.
BATTERY LOW – GREEN (LED) is
on and a buzzer is heard.
Battery OVER-DISCHARGE
PROTECTION circuit is on.
Charge battery or disable the OVERDISCHARGE PROTECTION setting
(turn adjustment to OFF).
Battery voltage is below the low
battery voltage input tolerance.
Check for the correct battery voltage
at the inverter’s DC input terminals.
Check for an external DC load on the
batteries. Check condition of
batteries and recharge if possible.
Check AC INPUT circuit breaker on
the side of the inverter.
AC input voltage may be too high.
Check for high AC voltage, turn
charge rate down.
Operating too large of a load.
Remove excessive loads.
Ambient temperature may be high or
inverter-cooling fan may have failed
or the airflow thru the inverter is
blocked.
Let inverter cool down before
restarting and check inverter-cooling
fans, or check for anything preventing
airflow.
OVERTEMP – RED (LED) is on and
a buzzer is heard.
31
TROUBLE INDICATION
POSSIBLE CAUSE
POSSIBLE SOLUTION
OVERLOAD – GREEN (LED):
•
Comes on after the inverter was
running loads.
Excessive load on the AC output.
Remove excessive AC loads and
restart the inverter.
•
Comes on with the inverter off.
Indicates that an AC source was
wired directly to the AC output.
Check for proper AC input and output
wiring.
•
Comes on after flickering 5-10
seconds of loud humming when
the AC source is connected to
the inverter.
Indicates that the AC source was
connected to the inverter AC output.
Check for proper AC input and output
wiring.
•
Comes on and inverter clicks on
and off every 40 seconds.
Indicates that the AC output of
inverter is wired back to its own AC
input.
Check for proper AC input and output
wiring (Output of inverter wired back
to its own input).
•
Comes on while charging.
Charger circuit may be damaged.
Have the inverter serviced.
If good AC voltage on inverter AC
terminal block.
Check for open AC output breakers
or fuses and AC wiring connections.
No AC voltage on inverter AC
terminal block.
Have inverter unit serviced.
Load is too small for search mode
circuit to detect.
Reduce search mode watts setting;
increase AC load or defeat search
mode setting.
No power output and no warning
LED’s are on.
Battery voltage at the inverter
terminals is too high or too low.
Check battery voltage and cable
connections.
Power output is low and inverter
turns loads on and off.
Low battery.
Check batteries and recharge or
replace.
Power output is low.
Loose or corroded battery and/or AC
output connections.
Check and clean all connections.
Surge power is low.
Weak batteries, battery cables too
small or too long.
Recharge or replace batteries.
Replace battery cables.
AC output voltage is low. Meter
displays 80-100 VAC with no load
running.
Measuring AC output with the wrong
type of voltmeter.
Must use a TRUE RMS reading
meter (most meters are average
reading, not True RMS reading).
AC voltage on the output measured
with a True RMS meter is low.
Have inverter unit serviced.
Circuit breaker on side of inverter is
open.
Engage ‘AC INPUT’ circuit breaker on
side of inverter.
No AC voltage on inverter AC
terminal block.
Check ‘AC PASS-THRU’ circuit
breaker on side on inverter.
Good AC voltage on inverter AC
terminal block.
Check for open AC output breakers
and AC wiring connections.
AC voltage has dropped out of
tolerance.
Check AC voltage for proper voltage
and frequency.
Charge control improperly set.
Adjust charge rate.
AC current output too small to handle
the load.
Reduce charge amps setting or
reduce pass through loads.
Loose or corroded battery cables.
Check and clean all battery
connections.
Loose AC output connections.
Check all AC wiring connections.
INVERTER MODE (LED):
•
•
Is on and no power output.
Is flashing and no power output.
CHARGER LED:
•
Indicates charging, but
charge is occurring to
batteries.
•
Is on, but no output power.
no
the
Charger is inoperative or giving a
low charge rate.
32
WIRE DIAGRAM
33
6.1 RMS VALUES, METERS and MEASUREMENT
RMS, or Root Mean Square, is the measurement used for any time varying signal’s effective value: it
is not an “Average” voltage and its mathematical relationship to peak voltage varies depending on the
type of waveform. By definition, RMS Value, also called the effective or heating value of AC, is
equivalent to a DC voltage that would provide the same amount of heat generation in a resistor as the
AC voltage would applied to the same resistor.
Since an AC signal’s voltage rises and falls with time, it takes more AC voltage to produce a given
RMS voltage. In other words, the grid must produce about 169 volts peak AC that turns out to be 120
volts RMS (.707 x 169). The heating value of the voltage available is equivalent to a 120 volt DC
source. (This is for example only. This does not mean that AC and DC are interchangeable!).
The typical multi-meter is not a True RMS reading meter. As a result it will only produce misleading
voltage readings when trying to measure anything other than a DC signal or sine wave. Several
types of multi-meters exist, and the owner’s manual or the manufacturer should tell you which type
you have. Each handles AC signals differently.
A rectifier type multi-meter indicates RMS values for sine waves only. It does this by
measuring average voltage and multiplying by 1.11 to find RMS. Trying to use this type of
meter with any waveform other than a sine wave will result in erroneous RMS readings.
Average reading digital voltmeters are just that, they measure average voltage for an AC
signal. Using the equations for a sine wave (see below), average voltage (Vavg) can be
converted to Volts RMS (Vrms), and doing this allows the meter to display an RMS reading
for a sine wave.
A True RMS meter uses a complex RMS converter to read RMS for any type of AC
waveform.
When taking reading with a non-True RMS reading meter, a 120 Volt RMS sine wave will still
measure about 120 Volts RMS. This is because the meter uses the mathematical relationships
shown below to give a proper RMS reading for a sine wave. However, if used with a modified sine
wave or square wave, these meters will only read about 90-105 volts. Don’t be mislead, there is
nothing wrong with the inverter or the meter. To prove this, try the following test. Connect a normal
light bulb to the AC output and allow the inverter to power the bulb (AC source power turned off). If
there is only 90-105 volts RMS available, the bulb will glow orange as it would during a brown out. If
it appears normal, the voltage is approximately 120 VAC RMS. You can see that improper
measurement can easily lead someone to believe that the inverter is not putting out its rated power.
Normally, True RMS reading meters are very expensive, such as the Fluke 87 series meters.
However, there are now models of True RMS reading meters available on the market for under
$100.00. Check with Radio Shack for information on the True RMS meters that they carry.
A few things to keep in mind about RMS values that apply when dealing with a sine wave are as
follows:
Peak Volts AC x .707 = Vrms
Vrms = 1.11 x Vavg
1.414 x Vrms = Peak Volts AC
Vavg = .637 x Peak Volts AC
For a modified sine wave or square wave these equations do not apply and the easiest way to deal
with this is to invest in a True RMS reading meter. (For a square wave, Vavg, Vrms and Vpeak are all
equal).
34
6.2 BATTERY CABLE INDUCTANCE
What is Inductance?
When current passes through a conductor a magnetic field is set up around the conductor. As this
magnetic field builds, it induces voltage in any conductor that is close by, and it induces voltage in the
original conductor. The voltage induced in the original conductor is called self-inductance, and tends
to oppose the current that produced it.
The magnitude of the self-induced voltage is proportional to the size of the loop formed by a wire.
The larger the loop, the larger the self-induced voltage. The positive and negative battery cables in a
system are in reality only a single circuit (wire), and so the inductance of the battery circuit depends
on how the cables are physically positioned or arranged with respect to one another.
Tape Battery Cables Together to Reduce Inductance!
If battery cables are separated by a distance, they have much more inductance than if they are close
together. If the two battery cables were coaxial there would be virtually no induced current flow since
the magnetic fields would cancel one another. However, we don’t have coaxial battery cables, but we
can approximate them by taping the cables together every four to six inches. When the cables are
taped together the magnetic fields around each battery cable tend to cancel each other. When
cables are separated the magnetic fields add together and increase the inductance of the battery
cables.
The table shows that with only a foot of
distance between the battery cables the
inductance almost doubles, and at four feet
between cables the inductance is almost three
times the inductance of cables taped together.
Distance Between
Cables
Inductance in
micro-henries
Taped Together
3.3
12” Separation
6.0
48” Separation
8-9
Since induced voltage in a conductor varies as
the inductance times the rate of change of current in the inductor, the induced voltage may be three
times greater than it would be if cables were not taped together. For more advanced readers,
consider flyback effects and the induced voltage spikes can get into the thousands of volts range if
the battery were suddenly removed from the circuit (worst case).
These induced voltage changes cause ripple in the battery cables and must be absorbed or filtered
by the filter capacitors in the inverter. The ripple will lead to eventual premature breakdown of the
filter capacitors and performance loss in the inverter. In addition to the problems mentioned, the
induced current opposes the applied current (battery current), which directly causes a loss of inverter
performance as greatly reduced efficiency.
Hopefully, this discussion gives you a better understanding of why battery cables should be kept short
and close together. Maximum performance is the goal of any well-designed power system and the
detail items such as this will help achieve this goal.
35
6.3 GROUNDING vs. LIGHTNING
If an electrical system has components
grounded at different points in the earth
(detail A), large voltage differences will
exist between these grounds during a
lightning strike. If this voltage appears
between the AC and DC side of the
inverter, it could fail. Likewise, if this
voltage appears between the different
components of an access control system,
the components can fail.
Lightning Strike
Gate Operator
Voltage Difference
Voltage Difference
Multi Point Ground System
The first step in protection is to make
sure that all equipment in the system is
physically grounded at the same location
(detail B). This assures that there is no
voltage potential between grounds in the
system, which means there is no current
flow through the system.
All equipment involved in the system
should physically be located as close as
possible to one another. This reduces
the potential that is developed between
the ground site and the individual
components of the system during a
lightning strike.
This single point
grounding (detail C) greatly reduces the
potential for lightning damage to
electrical equipment.
Backup Power
System
Telephone Entry
DETAIL A
Lightning Strike
Gate Operator
Backup Power
System
Telephone Entry
0 Volts
0 Volts
Single Point Ground System
DETAIL B
Single Point Ground Bus System
NEMA Enclosure
Minimum #6 AWG
Ground Bus
Minimum #12 AWG
AC Supply GND
Gate Operator
Telephone Entry
DETAIL C
36
Backup Power
System
LIMITED WARRANTY
DoorKing Inc. (DoorKing) warrants the Model 2000 Inverter / Power Backup System to be free from
defects in material and workmanship under normal use and service for a period of two-years after the
date of purchase by the original customer.
DoorKing's sole obligation under this warranty is limited to repairing or replacing, at our option, any
parts which shall be determined by DoorKing to be defective, and is conditioned upon the original
customer giving notice of any such defect to DoorKing within the warranty period. DoorKing reserves
the sole right to make the final decision whether there is a defect in materials and/or workmanship,
and whether or not the product is within the warranty period. DoorKing does not warrant its products
from any and all defects: (1) arising out of material or workmanship not provided by DoorKing, or (2)
resulting from abnormal use of the product or use in violation of the instruction manual, or (3) in
products repaired or serviced by other than DoorKing repair facilities, or (4) in components, parts, or
products expressly warranted by another manufacturer. DoorKing is not responsible for any
damages or other cost proximately caused by, or which may result from installation, handling, nonrecommended operation abuse, or modifications not authorized by DoorKing or for any damages
which may arise out of use of the Goods.
This warranty shall not apply to any DoorKing product that has been subject to misuse, neglect,
accident, improper installation or connection to an improper voltage source, or to products damaged
by Acts of God (lightning strikes, power surges, floods, fire, natural disaster).
This warranty covers bench repairs only, and any repairs must be made at the factory or place
designated in writing by DoorKing. Any product or parts must be returned to DoorKing, 120 Glasgow
Avenue, Inglewood, CA. 90301, freight prepaid. DoorKing will pay freight on our return of repaired or
replaced items in warranty. DoorKing will not be responsible for any costs incurred involving on site
service calls, or for any labor charges incurred in the removal or replacement of defective parts.
THIS WARRANTY IS MADE EXPRESSLY IN LIEU OF ALL OTHER WARRANTIES, EXPRESSED
OR IMPLIED, INCLUDING BUT NOT LIMITED TO WARRANTIES OF MERCHANTABLE QUALITY,
MERCHANTABILITY OR FITNESS FOR A PARTICULAR PURPOSE, OR THOSE ARISING BY
LAW, STATUTE, USAGE OF TRADE OR COURSE OF DEALING, AND IN LIEU OF ANY OTHER
OBLIGATIONS OR LIABILITIES ON THE PART OF DOORKING. ACCORDINGLY, DOORKING
ASSUMES NO LIABILITY OR OBLIGATION WHATSOEVER IN THE SALE OF THIS PRODUCT
INCLUDING ANY LIABILITY FOR INCIDENTAL, CONSEQUENTIAL OR SPECIAL DAMAGES TO
YOU OR ANY OTHER PERSON, PROPERTY OR ENTITY RESULTING FROM THE USE OR
POSSESSION THEREOF. OUR MAXIMUM AGGREGATE LIABILITY TO YOU SHALL NOT
EXCEED THE AMOUNT PAID BY YOU FOR THE PRODUCT. THE LIMITATIONS IN THIS
SECTION SHALL APPLY WHETHER OR NOT THE ALLEGED BREACH OR DEFAULT IS A
BREACH OF A FUNDAMENTAL CONDITION OR TERM, OR A FUNDAMENTAL BREACH.
WARRANTIES IMPLIED BY LAW ARE LIMITED IN DURATION TO THE TWO-YEAR PERIOD
DESCRIBED ABOVE.
This warranty gives you specific legal rights, and you may have other rights which vary from state to
state. Some states do not allow limitations on how long an implied warranty lasts, and some states do
not allow the exclusion or limitation of incidental or consequential damages, so the above limitations
or exclusions may not apply to you.
37
LIFE SUPPORT POLICY
As a general policy, DoorKing, Inc. does not recommend the use of the Model 2000 Inverter / Power
Backup System in life support applications where failure or malfunction of the DoorKing product can
be reasonably expected to cause failure of the life support device or to significantly affect its safety or
effectiveness. DoorKing, Inc. does not recommend the use of any of its products in direct patient
care. DoorKing, Inc. will not knowingly sell its products for use in such applications.
Examples of devices considered to be life support devices are neonatal oxygen analyzers, nerve
stimulators (whether used for anesthesia, pain relief, or other purposes), autotransfusion devices,
blood pumps, defibrillators, arrhythia detectors and alarms, pacemakers, hemodialysis systems,
peritoneal dialysis systems, neonatal ventilator incubators, ventilators for both adults and infants,
anesthesia ventilators, and infusion pumps as well as any other devices designated as “critical” by the
U.S. FDA.
38
39