1
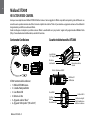
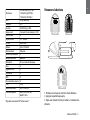
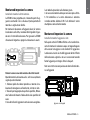
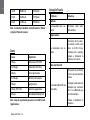
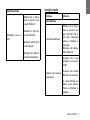
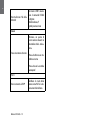
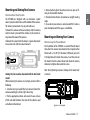
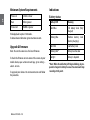
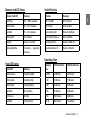
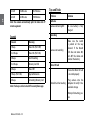
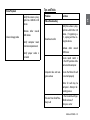
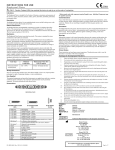
M AN U ALE D ’ U SO
IN ST R U C T I O N G U I D E
B E D IEN U N G SAN LEI T U N G
M A N U A L D E I N ST R U C C I O N ES
G U I D E D ’ U T I LI SAT I O N
M anual de I nstruç õ es
Οδηγίες Χρήσης
G ebrui kers H andleiding
Р У К О В О Д С Т ВО П О Л ЬЗ О ВАТ ЕЛ Я
I
Sommario
Contenuto Confezione ............................................................................................................................................................. 2
Caratteristiche tecniche XTC400............................................................................................................................................... 2
Rimuovere la batteria............................................................................................................................................................... 3
Formattare la Micro SD card..................................................................................................................................................... 4
Lente rotante........................................................................................................................................................................... 4
Microfono esterno.................................................................................................................................................................... 4
HDMI........................................................................................................................................................................................ 4
Batteria.................................................................................................................................................................................... 4
Montare ed impostare la camera.............................................................................................................................................. 5
Funzione “Low Light”............................................................................................................................................................... 6
Scaricare i video....................................................................................................................................................................... 6
Wi-Fi........................................................................................................................................................................................ 7
Applicazione per Smartphone.................................................................................................................................................. 7
Guarda..................................................................................................................................................................................... 7
Condividi.................................................................................................................................................................................. 7
Sistemi compatibili.................................................................................................................................................................. 7
Requisiti minimi di sistema...................................................................................................................................................... 8
Aggiornamenti & Firmware...................................................................................................................................................... 8
Indicazioni............................................................................................................................................................................... 8
Midland XTC400 - 1
I
Midland XTC400
HD ACTION VIDEO CAMERA
Grazie per aver acquistato una Midland XTC400 HD Action Camera. Siamo orgogliosi di offrirle un prodotto completo in grado di filmare le sue
avventure senza perdere nemmeno un attimo. Grazie al semplicissimo sistema “Slide on” per accendere e spegnere la camera ed una batteria di
lunga durata le possibilità sono davvero infinite.
Facile da collegare al computer è possibile scaricare i filmati e condividerli con i propri amici. Seguici sulla pagina facebook Midland Italia
(https://www.facebook.com/midlandcom)e condividi i tuoi video.
Contenuto Confezione
Caratteristiche tecniche XTC400
Lente Rotante
170° Angolo visuale
Microfono
Led Frontale
Slitta aggancio
accessori
Presa jack microfono
esterno
Tasto di attivazione ON/OFF
XTC400 contenuto della confezione:
›› 1. Midland XTC400 Camera
›› 2. Custodia Waterproof 85m
›› 3. Cavo Micro USB
›› 4. Batteria al Litio
›› 5. Aggancio adesivo “Basic”
›› 6. Aggancio “Mini Spider” (10° and 45°)
Midland XTC400 - 2
LED Micro SD
LED Batteria
Presa HDMI
Slot Micro SD
Batteria
Presa Micro USB
Selettore Wi-Fi
Selettore Low Light
Tasto formattazione
Selettore risoluzione
*Disponibile solo tramite APP “Action Connect”
Rimuovere la batteria
I
H 1920x1080p (30/25*fps)
L 1280x720p (60/50*fps)
* 848x480 (120/100fps)
Foto*
12 Mp/5Mp/3Mp
Rapporto
16:9
Formato
H.264 File Type - MP4
Gruppo Lenti
7 elementi (6 vetro temprato, 1 IRF)
Lente rotante
Sì
Angolo visuale
170° Variabili*
SD Card
Fino a 32 GB
Batteria
Li-Ion 1700 mAH
Durata batteria
5 Ore circa
Accensione immediata Si
Modalità silenziosa*
Opzionale
Waterproof
85 m con custodia subacquea
Foto
Sì
Aggancio a vite
Sì
Presa HDMI
Sì
WiFi
Sì
Presa microfono esterno Sì
Peso
140 g
Dimensioni (HxLxP)
52 x 95 x 35 mm
Sistemi compatibili
Win XP, SP2, Vista 7&8,
Mac OSX 10.4+
Risoluzione
1. Premere e trascinare verso sinistra il tasto di blocco .
2. Spingere lo sportelllo per aprire.
3. Dopo aver ruotato il fermo, la batteria si rimuoverà facilmente.
Midland XTC400 - 3
I
Formattare la Micro SD card
lettore mp3 per registrare musica direttamente al video.
Nota: Al primo utilizzo formattare la Micro SD card
seguendo la procedura qui di seguito.
HDMI
La Micro SD Card può essere formattata direttamente dentro la Camera. Questo permette di cancellare tutti i file in
una volta sola. Segui questi punti:
1. Premi e tieni premuto il tasto di formattazione
2. Spostare il tasto in avanti in posizione On.
3. La camera emetterà 4 Beep di conferma e l’icona della
memoria lampeggerà alternativamente Rosso/Blu
Una volta terminato, la camera emetterà due Beep di conferma per poi spegnersi.
Lente rotante
Per mantenere l’obbiettivo sempre orientato correttamente
una volta che la camera è stata montata, la XTC400 permette di ruotare l’obbiettivo di 180° in una direzione e 90° in
quella opposta.
Microfono esterno
Per connettere un microfono esterno alla telecamera aprire
il tappo di protezione ed inserire il jack da 3,5 mm. Se si sta
usando una cuffia auricolare, lo speaker sinistro deve essere
utilizzato come microfono. Inoltre è possibile collegare un
Midland XTC400 - 4
Connetti il cavo Micro HDMI (non incluso) ad entrambi i dispositivi - Camera/Tv monitor. Una volta connessi, accendi
la camera spostando il tasto in avanti. Questo darà inizio
allo streaming ma non registrerà alcun video sulla scheda
Micro SD.
Quando il tasto è in posizione Off, inizierà la riproduzione video direttamente dalla microSD. Per passare al file
successivo, spostare il selettore in posizione ON. Per il file
successivo spostare il selettore in posizione OFF. Continua
in questa maniera per scorrere i tuoi file. Puoi solo scorrere
i file in avanti e non puoi tornare indietro. Se vuoi tornare
all’inizio dell’ elenco file disconnetti il cavo Micro HDMI e
riconnetti ancora, oppure continua a scorrere i file.
Batteria
La batteria contenuta all’interno della confezione è parzialmente carica. Per caricarla connettere l’estremità del cavo
micro USB alla telecamera e l’altra ad una presa di ricarica
USB come quella di un computer, ad un caricatore da muro
o un caricatore da auto. La batteria non subirà danni se utilizzata prima della fine della carica. Guardare a Pag. 8 il capitolo sulle indicazioni luminose sullo stato della batteria.
Installarla tramite la slitta laterale.
La XTC400 è stata progettata con 3 innovativi punti di aggancio su entrambi i lati e sulla base. Questo permette di
montarla su ogni lato con facilità.
Per montare la telecamera sull’aggancio basic, far scorrere
la telecamera sulla slitta, mantenendo le linguette di sgancio verso il retro della telecamera. Per sganciare la XTC400
schiacciare le linguette e spingere la telecamera in avanti.
Puntare la camera una volta montata sulle slitte laterali:
Quando montate la telecamera ad es. su di un casco, dovete
seguire queste indicazioni:
1. Valutate quello che volete riprendere e montate la telecamera di conseguenza sul lato destro, sinistro o in alto.
2. Trovare il punto appropriato e pulite la superficie, Rimuovete l’adesivo dal mount e fatelo aderire alla superficie del
casco.
3. Una volta fissato l’aggancio inserite la camera e regolate-
la in modo da riprendere nella direzione giusta.
4. Se necessario ruotate la lente per avere una ripresa dritta.
5. Per controllare se la vostra telecamera è orientata
in modo corretto abilitate il Wi-Fi ed utilizzate il vostro
smartphone come schermo remoto.
Montare ed impostare la camera
Installarla tramite l’aggancio a vite
Nella parte sotto la XTC400 un filetto a vite standard consente di montare la telecamera sopra un treppiedi oppure
altri accessori con agganci a vite standard. Per agganciare
la telecamera inserire la vite dell’aggancio dentro il filetto
della telecamera e girate la stessa in senso orario tenendo
fermo l’aggancio per stringere forte le due parti.
Nota: una stretta eccessiva può causare danni alla telecamera e all’aggancio
Aggancio a vite treppiedi
Midland XTC400 - 5
I
Montare ed impostare la camera
I
Impostare la camera una volta montata sul treppiedi:
Quando montate la telecamera su di un treppiedi seguite
queste indicazioni:
1. Valutate quello che volete riprendere e montate la telecamera di conseguenza.
2. Assicuratevi, una volta montata, che la camera sia stretta
forte e che non punti troppo verso il cielo o verso la terra.
3. Se necessario ruotate la lente per avere sempre una ripresa
corretta.
4. Per verificare che la telecamera inquadri il punto giusto,
abilitate il Wi-Fi e tramite il vostro smartphone controllate
l’inquadratura.
Funzione “Low Light”
La funzione luce bassa permette di riprendere anche in condizione scarsa luminosità. Per attivare la funzione spostate
il selettore nella posizone “L”. Per disattivarlo spostate il
selettore nella posizione “N”.
Scaricare i video
Non è necessario installare nessun software per la XTC400.
É un dispositivo “plug and play” che viene riconosciuto in
automatico dal Computer. Per scaricare i video segui le
istruzioni qui di seguito a seconda che tu abbia un PC o un
MAC.
Midland XTC400 - 6
Scaricare i filmati su di un PC con sistema operativo Windows
1. Connettere la camera al computer utilizzando il cavo
MicroUSB/USB.
2. Assicurarsi che il tasto a slitta sia in posizione OFF
3. Doppio click su “risorse del computer” e cercate il disco
removibile.
4. PC:
a. Se il Disco removibile non viene mostrato chiudere la
finestra e ripetere l’operazione. L’icona del disco rimovibile
dovrebbe apparire.
b. Aprite il disco removibile.
5. MAC
a. MAC dovrebbe riconoscere in automatico la telecame
ra come disco esterno.
b. Clicca l’icona sul desktop.
6. Aprire l’icona “DCIM”.
7. Aprire l’icona “100MEDIA”.
8. I video registrati saranno dentro a questa cartella.
Note: La telecamera creerà due clip per ogni singolo video,
una nella risoluzione prescelta ed una in bassa risoluzione
(.tmb)
Riprendi
Nota: il Wi-Fi non si accenderà senza una microSD inserita
nella telecamera.
Il Wi-Fi integrato della XTC400 permette di collegare e
controllare tramite uno smartphone o tablet la telecamera.
1. Spostare il selettore Wi-Fi nella posizione ON.
2. Sposta il tasto a slitta centrale in avanti per accendere
la telecamera.
3. Attendere pochi secondi per inizializzare il Wi-Fi.
a. La telecamera emetterà due volte un doppio Beep e l’indicatore luminoso diventerà Blu.
b. Quando il Wi-Fi è pronto, la camera emetterà un Beep e l’indicatore luminoso sarà verde fisso.
Attenzione: Wi-Fi TIME OUT
Se la telecamera viene accesa con con il Wi-Fi attivo e nessun dispositivo viene connesso per circa 60 sec. la telecamera inizierà a registrare automaticamente.
• Anteprima
• Start and stop
• Impostazioni video
• Zoom (angolo visuale)
• Foto
• Timelapse (Burst mode)
Molte funzioni e opzioni sono disponibili tramite App. per
smartphone e tablet.
Sistemi compatibili
Applicazione per Smartphone
Per poter controllare la telecamera dovrete scaricare l’applicazione “Action Connect”.
Disponibile sull’“Apple store” e “Google Play”.
Con questa applicazione è possibile:
I
Wi-Fi
• Autoscatto
• Impostazioni Wi-Fi
• Impostazioni Data e ora
• Molto altro ancora
Guarda
• Guarda direttamente dal tuo smartphone i video e le foto
salvate sulla XTC400
• Gestisci i tuoi file
Condividi
• Scarica i video sul tuo telefonino
• Condividili attraverso i social network, e-mail e messaggi.
La XTC400 può essere usata sia tramite PC che tramite MAC.
Di seguito i sistemi operativi compatibili:
Windows XP SP2, Vista, 7, 8
Macintosh OSX 10.4 e superiori
Per rivedere i video raccomandiamoWindows Media Player,
Quick Time or VLC Media Player.
Midland XTC400 - 7
I
Requisiti minimi di sistema
Indicazioni
Processore
3.2GHz o superiore
Ram
1GB o superiore
LED Batteria
Significato
Video Card
256MB o superiore
Blu Fisso
Riproduttore video necessità il codec H.264 codec.
Per avere maggiori informazioni visita actioncamxtc.com
Batteria carica Carica
completa)
Blu lampeggiante
Livello batteria medio
(batteria in carica)
Aggiornamenti & Firmware
Rosso Fisso
Livello batteria basso
Rosso Lampeggiante*
Livello batteria molto
basso
Nessuna luce
Batteria esaurita
Nota: assicuratevi di avere l’ultima versione di firmware.
Per verificare se si tratta dell’ultima versione di firmware
connettere la telecamera allo smartphone e tramite l’applicazione entrare in “settings” - “about” - “version”.
Per aggiornare la tua telecamera visita actioncamxtc.com
e segui la procedura.
Midland XTC400 - 8
Stato della batteria
*Nota: quando il LED della batteria inizia a lampeggiare, la batteria necessita di essere caricata perchè sta per
esaurirsi.
Posizione Selettori
I
LED Stato memory card
LED Memory Card
Significato
Posizione
Significato
Blu Fisso
66% - 100% Disponibile
Wi-Fi su (ON)
Wi-Fi Abilitato
Blu lampeggiante
33% - 66% Disponibile
Wi-Fi Giù
Wi-Fi Disabilitato
Rosso Fisso
0% - 33% Disponibile
Low Light su (N)
Luce normale
Rosso Lampeggiante
0% Disponibile
Low Light giù (L)
Modalità luce scarsa
Nessuna luce
Nessuna memory card /
Errore memory card
Risoluzione su (H)
Registrazione a 1080p 30
Risoluzione giù (L)
Registrazione a 720p 60
Rosso/Blu lampeggiante
Formattazione - Aggiornamento Firmware
Capacità memory card
LED Frontale Status
LED Frontale
Significato
Verde Lampegginte
Registrazione a 1080p
Blu Lampeggiante
Registrazione a 720p
Rosso Lampeggiante
Registrazione a WVGA
Blu Fisso
Wi.Fi Abilitato
Verde Fisso
Wi-Fi On
Rosso Fisso
USB Connesso
Dimensione
memoria
Capacità a 720p
Capacità a 1080p
512MB
6.5 Minuti
5.5 Minuti
1 GB
13 Minuti
11 Minuti
2 GB
26 Minuti
22 Minuti
4 GB
52 Minuti
44 Minuti
8 GB
104 Minuti
88 Minuti
Midland XTC400 - 9
I
Consigli e Trucchi
16 GB
208 Minuti
176 Minuti
32 GB
416 Minuti
352 Minuti
Problema
704 Minuti
Batterie
64 GB
832 Minuti
Note: la telecamera dividerà automaticamente i filmati
in clip da 29 minuti ciascuna
Soluzione
La telecamera non si ac- Assicurarsi della carica
cende
della batteria
Registrazione
La telecamera non registra
Suoni
Suoni
Significato
1 Beep
Accensione (Wi-Fi Off)
2 x 2 Beeps
Accensione (Wi-Fi On)
3 Beeps
Inizio registrazione
5 x 3 Beeps
Memory Card esaurita
2 Beeps
Spegnimento
1 Beep (Wi-Fi On)
Conferma applicazione
4 Beeps
Formattazione Memory Card
Note: i beep di segnalazione possono essere tolti tramite
l’applicazione.
Midland XTC400 - 10
Assicurarsi che il pulsante centrale si trovi a fine
corsa. Se il LED di registrazione non si accende,
provare a rimuovere la
batteria e re inserirla.
Memoria Micro SD
Assicurarsi che la Memry
Card sia inserita correttamente.
La memoria MicroSD non
viene letta
Collegare la telecamera al
computer per assicurarsi
che ci sia sufficiente spazio sulla memoria.
Provare a formattare la
memoria
Verificare che la telecamera sia inserita in una
presa USB 2.0 o 3.0
Rimuovere le altre conRiproduzione lenta o a nessioni USB inutili
scatti
Verificare i requisiti minimi del computer
Verificare che il codec sia
installato correttamente
Problema
I
Consigli e trucchi
Riproduzione Video
Soluzione
Download Video
Trasferimento dati lento
Verificare che la telecamera sia inserita in una
presa USB 2.0 o 3.0. Se
non viene riconosciuta
provare a ricollegare la
telecamera.
Rimuovere altri collegamenti USB inutili
Assicurarsi che il tasto
principale sia in posizione OFF.
Assicurarsi che la scheda
Computer non riconosce
Micro SD sia inserita bene.
la telecamera
La scheda MicroSD potrebbe essere rovinata.
Provare a formattare la
memoria.
Midland XTC400 - 11
I
Non trasferisce i file dalla
MicroSD
Dal menù START selezionare il comando ESEGUI
e digitare:
chkdsk volume:/f
quindi premere invio
Souni
Posiziona un pezzo di
nastro adesivo davanti al
micorofono della telecamera.
Eccessivo rumore di vento
Prova ad utilizzare un microfono esterno
Prova ad usare la custodia
waterproof.
Wi-Fi
Non si connette all’APP
Midland XTC400 - 12
Verificare lo stato della
connessione Wi-Fi e le impostazioni del telefono.
Midland XTC400 - 13
UK
What’s in the Box................................................................................................................................................................... 14
Features and Controls............................................................................................................................................................. 14
Removing the Battery............................................................................................................................................................ 15
Reformatting the Micro SD card............................................................................................................................................. 16
Rotating Lens......................................................................................................................................................................... 16
External Microphone.............................................................................................................................................................. 16
HDMI...................................................................................................................................................................................... 16
Battery................................................................................................................................................................................... 16
Mounting and Aiming Your Camera....................................................................................................................................... 17
Low Light Function................................................................................................................................................................ 18
Downloading Videos.............................................................................................................................................................. 18
Wi-Fi...................................................................................................................................................................................... 18
Smartphone Application........................................................................................................................................................ 19
Shoot..................................................................................................................................................................................... 19
Share...................................................................................................................................................................................... 19
Compatible Systems............................................................................................................................................................... 19
Minimum System Requirements............................................................................................................................................ 20
Upgrade & Firmware.............................................................................................................................................................. 20
Indications............................................................................................................................................................................. 20
Midland XTC400
UK
HD ACTION VIDEO CAMERA
Thank you for purchasing the XTC400 action video camera. We are proud to offer you an exciting tool to record your life’s adventures. With an
easy slide-on switch, wi-fi capability, and long battery life, you’ll never miss a moment. Easily connect to your computer and upload to share
with your friends.
See what other people are doing with their XTC cameras at facebook.com/midlandcom, and post your own video too. Enjoy!
What’s in the Box
Features and Controls
Rotating Lense
170° Lens
Track for mounting
accessories
Microphone
Record LED
External Microphone Jack
on the underside
Record Switch
Back OFF / Stop
Micro SD Card LED
Battery LED
XTC400VP Package Includes:
›› 1. Midland XTC400 Camera
›› 2. Submersible Case 85m
›› 3. Micro USB Cable
›› 4. Lithium-Ion Battery Pack
›› 5. Basic Adhesive Mount
›› 6. Mini Spider Mount (10° and 45°)
Midland XTC400 - 14
Record Switch
Forward On / Record
Presa HDMI
Slot Micro SD
Batteria
Presa Micro USB
Selettore Wi-Fi
Selettore Low Light
Tasto formattazione
Selettore risoluzione
H 1920x1080p (30/25*fps)
L 1280x720p (60/50*fps)
* 848x480 (120/100fps)
12 Mp/5Mp/3Mp
16:9
H.264 File Type - MP4
7 elements (6 tempered glass, 1 IRF)
Yes
170° Variable*
Up to 32 GB
Li-Ion 1700 mAH
Up to 5 Hours
Yes
Optional
85 m
Yes
Yes
Yes
Yes
Yes
140 g
52 x 95 x 35 mm
Win XP, SP2, Vista 7&8,
Mac OSX 10.4+
*Available only with the APP “Action Connect”
Removing the Battery
UK
Resolution
Photo*
Aspect Ratio
Format
Lens
Rotating lens
Angle lens
SD Card
Battery
Battery last
Instant Recording
Stealth mode*
Waterproof
Photo
Tripod mount
HDMI jack
WiFi
External mike jack
Weight
Dimension (HxLxD)
Compatible System
1. Press and hold the lock release to the left. Slide the door
upwards.
2. Pull the door to open.
3. After rotating the latch counter-clockwise, the battery
can easily be removed.
Midland XTC400 - 15
UK
Reformatting the Micro SD card
Note: Before the first usage Format the microSD card
following this procedure
The micro SD card can be reformatted while in the camera. This allows you to completely delete all the files at one
time. Follow these steps:
1. Press and hold the format button
2. Move the RECORD switch to the forward/ON position.
3. The camera will beep 4 times and the icon will alternate
blinking red and blue
When complete, the camera will beep twice, then turn off.
Rotating Lens
To maintain upright orientation for your video when the
camera is mounted at an angle, the XTC400’s lens can rotate 180° in one direction and -90° in the other. There are
indentations every 90° to enable you to twist the lens into
place at commonly used angles.
External Microphone
To connect your camera to an external microphone, first
open the rubber cover and then insert the 3.5mm microphone jack into the plug. If you are using a headset, the left
speaker will be used as the microphone. In addition, you
Midland XTC400 - 16
may also connect an mp3 player to directly record music
to your video.
HDMI
Connect your micro HDMI cable (not included) to both devices –camera and tv/monitor. Once connected, switch the
camera to the ON (forward) position. This will enable live
streaming, but will not record.
When the switch is moved back to the OFF position, video
playback will start from the micro SD card. To skip to the
next file, toggle the switch ON. For the next file, toggle the
switch OFF. Continue in this manner to flip through your
files. You can always skip forward to the following file, but
cannot move backward to previous files. If you would like to
return to a previous file, you must either unplug the device
from the HDMI cable and plug it in again, or loop through
all of your files.
Battery
The included lithium-ion battery comes partially charged.
To charge, connect the included micro USB cable to camera
and connect the other end of the cable to a power source
such as a computer, wall charger or vehicle charger. No damage will occur to the camera or battery if used prior to a
full charge. See page 20 for battery status indications.
Mount on Dual Track System
The XTC400 was designed with an innovative 3 point
mount system on both sides and the bottom of the camera.
This allows you to mount it on any side with ease.
To mount the camera on the basic mount, slide the camera
onto the track system with the notches on the mount facing toward the back of the camera.
To detach the camera from the mount, squeeze the mount
release tabs and slide the camera forward.
Aiming the Camera when mounted with the dual track
mount:
When mounting the camera on a helmet, you must do the
following:
1. Consider what you would like to shoot and mount the
camera accordingly- left side, right side or top.
2. Find an appropriate surface and ensure the area is clean
of dirt and debris.Remove the cover of the adhesive pad
and adhere to the helmet.
3. Once attached, adjust the camera to be sure you are filming in the intended direction
4. If needed, rotate the lens to maintain an upright viewing
angle
5. To see where your camera is aimed, enable Wi-Fi and use
your smartphone with the app as a viewfinder.
Mounting and Aiming Your Camera
Mount using the Thread Mount
On the bottom of the XTC400 is a standard thread mount
that allows the camera to be mounted to a tripod or other
fixture with a 1/4-20 (1/4” diameter, 20 threads per inch)
5/16 deep thread. To attach the camera, insert the screw on
the mount into the camera thread and rotate the camera
clockwise to tighten down onto the screw.
Note: Over tightening may cause damage to the mount and/
or camera
Aggancio a vite treppiedi
Midland XTC400 - 17
UK
Mounting and Aiming Your Camera
UK
Aiming the Camera when mounted with the thread
mount:
When mounting the camera on a thread mount, follow these
steps:
1. Consider what you would like to shoot and mount accordingly.
2. Ensure, once attached, that the camera is aimed straight
and not toward the ground or at the sky.
3. If needed, rotate the lens to maintain an upright viewing
angle
4. To see where your camera is aimed, enable Wi-Fi and use
your smartphone with the app as a viewfinder.
Low Light Function
The low light function allow the user to take video also in
low light conditions.
To activate the function move the related switch to the L
position. To deactivate the function move the switch to the
N position.
Downloading Videos
There is no need to install any software with the XTC400.
It is a plug and play device. To download video, follow the
instructions below depending upon whether you have a PC
or a MAC. Downloading Videos on a PC with a WINDOWS
Midland XTC400 - 18
Operating System
1. Connect the camera to the computer using included
micro USB cable.
2. Ensure the record switch is in the OFF position
3. Double click “My Computer” and locate “Removable Disk.”
4. PC:
a. If “Removable Disk” is not showing, close “My Computer” folder and reopen it. The “Removable Disk” icon should
appear.
b. Open the “Removable Disk” icon.
5. MAC
a. MAC should automatically recognize the camera external hard drive.
b. Click on the icon on the desktop.
6. Open the “DCIM” folder icon.
7. Open the “100MEDIA” icon.
8. Your videos will be in this folder.
Note: the camera will generate two clips for each video, one
in the selected resolution and the other in low res. (.tmb)
Wi-Fi
Note: The Wi-Fi doesn’t turn ON if the MicroSD isn’t inserted.
The XTC400’s built in Wi-Fi allows you to connect and control the camera using a smartphone or tablet.
1. Toggle the Wi-Fi switch inside the back cover to the ON
Attention: Wi-Fi TIME OUT: If the camera is turned on in
Wi-Fi mode and no devices are connected for 60 sec. the
camera will automatically start recording.
Many features and options are avialiable with the
smartphone app:
Smartphone Application
In order to control the camera you have to download “Action Connect” app.
Available from the “Apple store” and “Google Play”. With
this application is possible to:
Shoot
• Live Preview
• Start and stop recording
• Customize Video Settings
• Zoom (Change angle of view)
• Pictures
• Timelapse (Burst mode)
• Time Delayed Pictures
• Wi-Fi Settings
• Time and data setting
• Any many more
UK
position.
2. Slide the record switch forward.
3. Allow a few seconds for the camera to power on and
initiate the Wi-Fi
a. The camera will double beep twice and the front indicator will be blue.
b. When the Wi-Fi is ready, the camera will beep once
and the front indicator will be solid green
Show
• Watch directly from your mobile device the video and pictures saved on the XTC400.
• Manage your files
Share
• Downlaod video on your mobile
• Share them with your world through Social Networks,
e-mail and messages.
Compatible Systems
The XTC400 can be used on both a PC or MAC. Below are the
compatible operating systems:
Windows XP SP2, Vista, 7, 8
Macintosh OSX 10.4 and higher
For video playback, we recommend Windows Media Player,
Quick Time or VLC Media Player.
Midland XTC400 - 19
UK
Minimum System Requirements
Indications
Processor
3.2GHz or faster
Ram
1GB or greater
Battery LED
Meaning
Video Card
256MB or greater
Solid Blue
Video playback requires H.264 codec.
To obtain more information go to xtcactioncam.com
Full battery level (fully
charged)
Blinking Blue
Medium battery level
(battery charging)
Upgrade & Firmware
Solid Red
Low Battery level
Blinking Red*
Battery level too low
No light
Battery is depleted
Note: Be sure the camera has the latest firmware
To check the firmware version connect the camera to your
mobile device, open action connect App. go to settings about - version.
To upgrade your device visit actioncamxtc.com and follow
the procedure.
Midland XTC400 - 20
Battery status
*Note: When the red battery LED begins blinking, be prepared to charge the battery because the camera will stop
recording at this point.
Switch Position
Memory Card LED
Meaning
Position
Meaning
Solid Blue
66% - 100% available
Wi-Fi Up (ON)
Wi-Fi Enabled
Blinking Blue
33% - 66% Available
Wi.Fi Down
Wi-Fi Disabled
Solid Red
0% - 33% Available
Light Settin Up (N)
Normal Light Mode
Blinking Red
0% Available
Light Setting Down (L)
Low Light Mode
No light
No card / Card error
Resolution UP (H)
Record at 1080p 30
Blinking Red/Blue
Formatting - Upgrading
Firmware
Resolution Downn (L)
Record at 720p 60
Recording Time
Front LED Status
1080 Record Time
Meaning
Memory
size
720 Record Time
Front LED
Blinking Green
Recording 1080p
512MB
6.5 Minutes
5.5 Minutes
Blinking Blue
Recording 720p
1 GB
13 Minutes
11 Minutes
Blinking Red
Recording WVGA
2 GB
26 Minutes
22 Minutes
Solid Blue
Wi.Fi Enabling
4 GB
52 Minutes
44 Minutes
Solid Green
Wi-Fi On
8 GB
104 Minutes
88 Minutes
Solid Red
USB Connected
16 GB
208 Minutes
176 Minutes
Midland XTC400 - 21
UK
Memory card LED Status
UK
32 GB
416 Minutes
352 Minutes
64 GB
832 Minutes
704 Minutes
Note: the camera automatically splits the video into 29
minute segments
Tips and Tricks
Problem
Solution
Batteries
Camera not turning ON
Be sure battery is fully
charged
Recording
Sounds
Sounds
Meaning
1 Beep
Power On (Wi-Fi Off)
2 x 2 Beeps
Power On (Wi-Fi On)
3 Beeps
Start Recording
5 x 3 Beeps
Memory Card Full
2 Beeps
Power Off
1 Beep (Wi-Fi On)
App Confirmation
4 Beeps
Formatting Memory Card
Note: the beeps can be turned off via smartphone app.
Camera not recording
Make sure the switch
is pushed all the way
forward. If the Record
LED does not come ON,
turn OFF the device and
reinstall the battery
Micro SD Card
Ensure the Micro SD Card
is inserted properly.
MicroSD Card not reading
Plug camera into the
computer to verify it has
available storage.
Attempt formatting process
Midland XTC400 - 22
Tips and Tricks
Verify the camera is plugged into a USB2.0 or 3.0
device
Slow or choppy video
Problem
Video Downloading
Remove other unused
USB devices
Verify computer meets
minimum requirements
Solution
UK
Video Playback
Slow data transfer
Verify the camera is plugged into a USB 2.0 or 3.0
device. If registering as
1.1, unplug and than replug the device
Remove other unused
USB device
Verify proper codec is
installed
Ensure record switch is
in the OFF position while
connected to computer.
Computer does not recognize camera
Ensure the Micro SD card
is inserted properly.
Micro SD card may be
corrupted. Attempt formatting process
File won’t transfer off memory card
In the run command type:
chkdsk volume:/f
then press enter
Midland XTC400 - 23
Sound
UK
Place piece of tape over
microphone hole.
Excessive Wind Noise
Try using an external microphone
Try using the submersible
case
Wi-Fi
Can’t connect to App
Midland XTC400 - 24
Verify the device’s Wi-Fi
setting and ensure it is
connected to the XTC400’s
Wi-Fi.
• INFORMAZIONE AGLI UTENTI
Ai sensi dell’art. 13 del decreto legislativo 25 luglio 2005, n.151 “Attuazione delle
Direttive 2002/95/CE, 2002/96/CE e 2003/108/CE, relative alla riduzione dell’uso
di sostanze pericolose nelle apparecchiature elettriche ed elettroniche, nonché allo
smaltimento dei rifiuti”.
• Il simbolo del cassonetto barrato riportato sull’apparecchiatura indica che il prodotto
alla fine della propria vita utile deve essere raccolto separatamente dagli altri
rifiuti. L’utente dovrà, pertanto, conferire l’apparecchiatura giunta a fine vita agli
idonei centri di raccolta differenziata dei rifiuti elettronici ed elettrotecnici, oppure
riconsegnarla al rivenditore al momento dell’acquisto di una nuova apparecchiatura
di tipo equivalente, in ragione di uno a uno. L’adeguata raccolta differenziata per
l’avvio successivo dell’apparecchiatura dismessa al riciclaggio, al trattamento
e allo smaltimento ambientalmente compatibile contribuisce ad evitare possibili
effetti negativi sull’ambiente e sulla salute e favorisce il riciclo dei materiali di
cui è composta l’apparecchiatura. Lo smaltimento abusivo del prodotto da parte
dell’utente comporta l’applicazione delle sanzioni amministrative di cui al dlgs.
n.22/1997 (articolo 50 e seguenti del dlgs. n.22/1997).
• All articles displaying this symbol on the body, packaging or instruction manual of
same, must not be thrown away into normal disposal bins but brought to specialised
waste disposal centres. Here, the various materials will be divided by characteristics
and recycles, thus making an important contribution to environmental protection.
• Alle Artikel, die auf der Verpackung oder der Gebrauchanweisung dieses Symbol
tragen, dürfen nicht in den normalen Mülltonnen entsorgt werden, sondern müssen
an gesonderten Sammelstellen abgegeben werden. Dort werden die Materialien
entsprechend ihrer Eigenschaften getrennt und, um einen Beitrag zum Umweltschutz
zu liefern, wiederverwertet.
• Todos los artículos que exhiban este símbolo en el cuerpo del producto, en el
embalaje o en el manual de instrucciones del mismo, no deben ser desechados junto
a los residuos urbanos normales sino que deben ser depositados en los centros de
recogida especializados. En estos centros, los materiales se dividirán en base a sus
características y serán reciclados, para así poder contribuir de manera importante a la
protección y conservación del medio ambiente.
• Tous les articles présentant ce symbole sur le corps, l'emballage ou le manuel
d'utilisation de celui-ci ne doivent pas être jetés dans des poubelles normales mais
être amenés dans des centres de traitement spécialisés. Là, les différents matériaux
seront séparés par caractéristiques et recyclés, permettant ainsi de contribuer à la
protection de l'environnement.
• Todos os artigos que apresentem este símbolo no seu corpo, embalagem ou manual
de instruções, não devem ser eliminados juntamente com o lixo normal mas sim
conduzidos para contentores de eliminação de resíduos especializados. Aqui, os
diversos materiais serão divididos por características e reciclados, realizando assim
uma importante contribuição para a protecção ambiental.
• Όλα τα προϊόντα στα οποία εμφανίζεται το ακόλουθο σύμβολο στο σώμα, τη συσκευασία
ή το εγχειρίδιο χρήσης τους, δεν πρέπει να εναποθέτονται στους κοινούς κάδους
απορριμάτων αλλά να προσκομίζονται στα ειδικά κέντρα αποκομιδής. Εκεί, τα διάφορα
υλικά θα πρέπει να διαχωρίζονται ανάλογα με τα χαρακτηριστικά και τα ανακυκλούμενα
υκλικά, συμμετέχοντας έτσι ουσιαστικά στην προστασία του περιβάλλοντος.
• Alle artikels die dit symbool weergeven op de behuizing, verpakking of
instructiehandleiding ervan, mogen niet weggegooid worden in normale
vuilnisemmers maar moeten naar speciale afvalverwerkingscentra gebracht
worden. Hier worden de verschillende materialen verdeeld volgens eigenschappen
en recyclage waardoor een belangrijke bijdrage aan de milieubescherming wordt
geleverd.
CE/Informazioni generali
Questo prodotto é conforme alla direttiva 99/05/CE e può essere liberamente utilizzato
nei paesi dell’UE.
European CE Notice Certification
This product is CE marked according to the RTTE Directive (99/5/EC) and is free use
in all the EU countries.
Europaische CE Erklarung
Dieses Produkt tragt das CE Zeichen nach der R&TTE Direktive (99/5/EC). Es ist
gultig fur alle EU Staaten.
Certificaciones Europeas CE
Este producto cumple la normativa CE de acuerdo con la Directiva RTTE (99/5/EC) y
es de uso libre en todos los paises del UE.
CTE International SRL, declara, bajo su responsabilidad, que este aparato cumple
con lo dispuesto en la Directiva 99/05/CE, del Parlamento Europeo y del Consejo de
9 de marzo de 1999, transpuesta a la legislacion espanola mediante el Real Decreto
1890/2000, de 20 de noviembre.
Certification de notice europeenne CE
Ce produit porte le marquage CE conformément a la directive RTTE (99/5/CE) et peut
être librement utilise dans tous les pays de l’UE.
Πιστοποίηση CE και Έγκριση Ασφαλούς Χρήσης
Αυτό το προϊόν είναι πιστοποιημένο κατά CE σύμφωνα με την επιτροπή RTTE (99/5/
EC) και είναι ελεύθερης χρήσης σε όλες τις χώρες της Ευρωπαϊκής Ένωσης.
Informacao de certificacao de aviso CE europeu
Este produto esta assinalado com o simbolo CE em conformidade com a directiva
RTTE (99/5/EC) e e de utilizacao livre em todos os paises da Uniao Europeia.
A CTE INTERNATIONAL declara que este aparelho cumpre com o disposto na
Directiva 1999/5/CE do Parlamento Europeu e do Conselho de 9 de Marco de 1999,
transposta para a legislacao nacional pelo Decreto-Lei n.o 192/2000, de 18 de Agosto.
Europese EC Mededeling Certificering
Dit product heeft een EC-markering volgens de RTTE Richtlijn (99/5/EC) en kan in alle
EU-landen gebruikt worden.
EC Certificate of Conformity
(to EC Directive 99/5 -2004/108- 2006/95/EC)
DO:
7.1.4.4
Rev:
5
Authorised on: 02/02/2010
By :
S. Peterlini
Signature
DECLARATION OF CONFORMITY N°2013062701
Manufacturer:
Address:
Products Name:
C.T.E INTERNATIONAL S.rl.
VIA SEVARDI, 7 – ZONA INDUSTRIALE MANCASALE – 42124 REGGIO EMILIA
Product Type:
Brand :
Wi-Fi Camera Video Recorder
MIDLAND
XTC400
The product described above is in conformity with the following Specifications based on sample testing:
Item of
Standard
99/05/CE
3.1a
EN 60950-1
3.1b
EN 301 489-01
3.1b
EN 301 489-17
3.2
EN 300 328
Title
Information technology equipment - Safety - Part 1:
General requirements
Electromagnetic compatibility and Radio spectrum Matters
(ERM); ElectroMagnetic Compatibility (EMC) standard for
radio equipment and services; Part 1: Common technical
requirements
Electromagnetic compatibility and Radio spectrum Matters
(ERM); ElectroMagnetic Compatibility (EMC) standard for
radio equipment; Part 17: Specific conditions for
Broadband Data Transmission Systems
Electromagnetic compatibility and Radio spectrum Matters
(ERM); Wideband transmission systems; Data
transmission equipment operating in the 2,4 GHz ISM
band and using wide band modulation techniques;
Harmonized EN covering the essential requirements of
article 3.2 of the R&TTE Directive
Edition
or date of issue
EN 60950-1 : 2006
+A11:2009+A1:2010
+A12 :2011
V1.9.2
V2.2.1
V1.8.1
Supplementary information to the conformity assessment result on which the declaration is based:
Conformity assessment procedures are referred to art. 10(4) linked with Annex III of Directive 1999/5/ec.
The test sample fullfils the requirements specified above, on the basis of test result and their evaluation.
The product herewith complies with the essential requirements of EC Directive 99/05/EC, 2004/108/EC and
following implements and modifications, 2006/95/EC and following implements and modifications, 93/97/EC.
Reference to any marking or other indication (e.g. on the product) is exhibited in attachment to this
declaration.
Reggio Emilia, 27/06/2013
CTE International srl
Quality Assurance Manager
Peterlini Stefano
This document is owned by Cte International srl. It is forbiddeen to reproduce or diffuse it without the authorisation of the Quality
Assurance Manager of CTE International srl.
Vertrieb durch:
Prodotto o importato da:
CTE INTERNATIONAL s.r.l.
Via. R.Sevardi 7- 42124 Reggio Emilia Italia
www.cte.it - www.midlandradio.eu
ALAN ELECTRONICS GmbH
Daimlerstraße 1K - D-63303 Dreieich Deutschland
www.alan-electronics.de
Prima dell’uso leggere attentamente le istruzioni. Se il prodotto contiene
batterie: non gettare nel fuoco, non disperdere nell’ambiente dopo l’uso,
usare gli appositi contenitori per la raccolta.
Vor Benutzung Bedienungsanleitung beachten. Bei Verwendung von
Batterien beachten Sie bitte die Umweltbestimmungen. Batterien niemals
ins offene Feuer werfen, und nur in dafür vorgesehene Sammelbehälter
entsorgen.
Produced or imported by:
CTE INTERNATIONAL s.r.l.
Via. R.Sevardi 7 42124 Mancasale Reggio Emilia Italy
Импортер в России:
ЗАО “Алан-Связь”
Москва, 105187, Фортунатовская, д.31 А, стр.2
www.midland.ru
Importado por:
ALAN COMMUNICATIONS, SA
C/Cobalt, 48 - 08940 Cornellà de Llobregat - España
Tel: +34 902 384878 Fax: +34 933 779155
www.midland.es
Lea atentamente las instrucciones antes de usar el equipo. si el producto
contiene pilas o baterías no las tire al fuego ni las disperse en el ambiente
después de su uso, utilice los contenedores apropiados para su reciclaje.
AC T I O N C A MX TC. CO M
|
Compliant