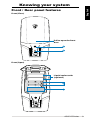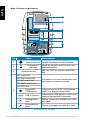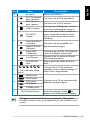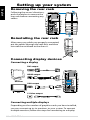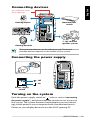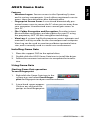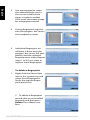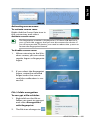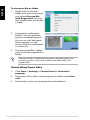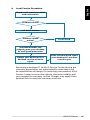
1
ASUS CG Series
Gaming PC
User Manual
E3754
First Edition V1
July 2008
Copyright © 2008 ASUSTeK COMPUTER INC. All Rights Reserved.
No part of this manual, including the products and software described in it, may
be reproduced, transmitted, transcribed, stored in a retrieval system, or
translated into any language in any form or by any means, except
documentation kept by the purchaser for backup purposes, without the express
written permission of ASUSTeK COMPUTER, INC. (“ASUS”).
Products and corporate names mentioned in this manual may or may not be
registered trademarks or copyrights of their respective companies, and are used
for identification purposes only. All trademarks are the property of their
respective owners.
Every effort has been made to ensure that the contents of this manual are
correct and up to date. However, the manufacturer makes no guarantee
regarding the accuracy of its contents, and reserves the right to make changes
without prior notice.
English
Contents
Contents..................................................................................................3
Notices.....................................................................................................4
Safety information...............................................................................6
Notes for this manual.........................................................................7
Welcome.................................................................. 8
Package contents.................................................................................8
Knowing your system............................................. 9
Front / Rear panel features...............................................................9
Setting up your system........................................ 12
Removing the rear rack................................................................... 12
Reinstalling the rear rack................................................................ 12
Connecting display devices.......................................................... 12
Connecting devices.......................................................................... 13
Connecting the power supply...................................................... 13
Turning on the system.................................................................... 13
Using your system................................................ 14
Using the optical drive.................................................................... 14
Using the card reader...................................................................... 14
Configuring audio setup................................................................ 15
Configuring audio output settings............................................. 16
Using the Gaming Mouse (optional).......................................... 17
Using the Gaming Mouse Pad (optional)................................. 20
Using the Gaming Keyboard (optional).................................... 21
Using the Gaming Headset (optional)....................................... 24
Introducing the utilities....................................... 25
ASUS AI Manager.............................................................................. 25
ASUS Express Gate (For some models only)............................ 29
ASUS Game Gate............................................................................... 35
Recovering your system....................................... 39
Using the recovery DVD................................................................. 39
Using ASUS Recovery...................................................................... 40
Troubleshooting................................................... 41
Warranty Policy..................................................... 42
ASUS CG Series
Notices
English
Federal Communications Commission Statement
This device complies with Part 15 of the FCC Rules. Operation is
subject to the following two conditions:
• This device may not cause harmful interference, and
• This device must accept any interference received including
interference that may cause undesired operation.
This equipment has been tested and found to comply with the
limits for a Class B digital device, pursuant to Part 15 of the FCC
Rules. These limits are designed to provide reasonable protection against harmful interference in a residential installation.
This equipment generates, uses and can radiate radio frequency
energy and, if not installed and used in accordance with manufacturer’s instructions, may cause harmful interference to radio
communications. However, there is no guarantee that interference will not occur in a particular installation. If this equipment
does cause harmful interference to radio or television reception,
which can be determined by turning the equipment off and on,
the user is encouraged to try to correct the interference by one
or more of the following measures:
• Reorient or relocate the receiving antenna.
• Increase the separation between the equipment and receiver.
• Connect the equipment to an outlet on a circuit different from
that to which the receiver is connected.
• Consult the dealer or an experienced radio/TV technician for
help.
The use of shielded cables for connection of the monitor to
the graphics card is required to assure compliance with FCC
regulations. Changes or modifications to this unit not expressly
approved by the party responsible for compliance could void
the user’s authority to operate this equipment.
Canadian Department of Communications Statement
This digital apparatus does not exceed the Class B limits for
radio noise emissions from digital apparatus set out in the Radio
Interference Regulations of the Canadian Department of Communications.
This class B digital apparatus complies with Canadian ICES-003.
ASUS CG Series
English
Macrovision Corporation Product Notice
This product incorporates copyright protection technology that
is protected by method claims of certain U.S. patents and other
intellectual property rights owned by Macrovision Corporation
and other rights owners. Use of this copyright protection technology must be authorized by Macrovision Corporation, and is
intended for home and other limited viewing uses only unless
otherwise authorized by Macrovision Corporation. Reverse
engineering or disassembly is prohibited.
ASUS CG Series
Safety information
English
Your ASUS CG Series is designed and tested to meet the latest standards of safety for information technology equipment.
However, to ensure your safety, it is important that you read the
following safety instructions.
Setting up your system
• Read and follow all instructions in the documentation before
you operate your system.
• Do not use this product near water or a heated source such as
a radiator.
• Set up the system on a stable surface.
• Openings on the chassis are for ventilation. Do not block or
cover these openings. Make sure you leave plenty of space
around the system for ventilation. Never insert objects of any
kind into the ventilation openings.
• Use this product in environments with ambient temperatures
between 0˚C and 40˚C.
• If you use an extension cord, make sure that the total ampere
rating of the devices plugged into the extension cord does
not exceed its ampere rating.
Care during use
• Do not walk on the power cord or allow anything to rest on it.
• Do not spill water or any other liquids on your system.
• When the system is turned off, a small amount of electrical current still flows. Always unplug all power, modem, and
network cables from the power outlets before cleaning the
system.
• If you encounter the following technical problems with the
product, unplug the power cord and contact a qualified service technician or your retailer.
• The power cord or plug is damaged.
• Liquid has been spilled into the system.
• The system does not function properly even if you follow
the operating instructions.
• The system was dropped or the cabinet is damaged.
• The system performance changes.
ASUS CG Series
English
LASER PRODUCT WARNING
CLASS 1 LASER PRODUCT
NO DISASSEMBLY
The warranty does not apply to the products that
have been disassembled by users
This symbol of the crossed out wheeled bin indicates that
the product (electrical, electronic equipment, and mercurycontaining button cell battery) should not be placed in
municipal waste. Check local regulations for disposal of
electronic products.
Notes for this manual
To make sure that you perform certain tasks properly, take note
of the following symbols used throughout this manual.
WARNING: Vital information that you MUST follow to prevent
injury to yourself.
IMPORTANT: Instructions that you MUST follow to complete a
task.
TIP: Tips and useful information that help you complete a task.
NOTE: Additional information for special situations.
ASUS CG Series
Welcome
English
Congratulations on your purchase of the ASUS CG Series. The
package contents of your new system are listed below but may
vary with models. ASUS reserves the right to replace components
or accessories to provide optimum serviceability.
Contact your retailer if any item is damaged or missing.
Package contents
•
•
•
•
•
•
•
•
•
ASUS CG Gaming PC x1
Gaming keyboard (optional) x1
Gaming mouse (optional) x1
Gaming mouse pad (optional) x1
Gaming headset (optional) x1
Power cord x2
Support DVD x1
Recovery DVD x1
User manual x1
Visit the ASUS website at http://support.asus.com for any
updates.
ASUS CG Series
Knowing your system
English
Front / Rear panel features
Front (Close)
Pull to open the front
door
1
2
Front (Open)
Liquid cooler tanks
(optional)
3
4
ASUS CG Series
English
Rear I/O ports and features
5
6
7
8
9
No.
Item
1.
Power sensor Touch to power on the system.
Fingerprint
scanner
2.
3.
Description
Optical drives
MS card slot
MS Duo card slot
CF/MD card slot
4.
SD/MMC card slot
miniSD slot
6-pin IEEE
1394a port
USB 2.0 ports
Headphone
jack
Microphone
jack
Used for instant and secure user
authentication.
Blu-ray DVD or Super-multi DVDRW
Functions as a card reader for various types of memory card
Connects to an IEEE 1394 device
such as a digital camcorder.
Connect to USB devices such as a
mouse, keyboard, or camera.
Plug a stereo or headphones into
this jack.
Plug a microphone into this jack.
(Continued on the next page)
10 ASUS CG Series
5.
Item
Air vents
PS/2 keyboard
port (purple)
PS/2 mouse
port (green)
USB 2.0 ports
Clr CMOS
switch
6.
Coaxial S/PDIF
Out port
Optical S/PDIF
Out port
6-pin IEEE
1394a port
E-SATA port
LAN (RJ-45)
port
7.
7.1(8)-channel audio
ports
HDMI port
English
No.
Description
Allows ventilation.
Connects to a PS/2 keyboard.
Connects to a PS/2 mouse.
Connect to USB devices such as
a mouse, keyboard, or camera.
Press the clear CMOS switch to
clear setup information when
the system hangs due to overclocking.
Connects to an amplifier for
digital audio output.
Connects to an IEEE 1394 device
such as a digital camcorder.
Connects to an external Serial
ATA hard disk drive.
Plug a network cable into this
port.
Connect to a 7.1(8)-channel
speaker system. Refer to page 15
and 16 for setup details.
DVI-D port
8.
DVI-I port
VGA port
Connect to a TV or monitor with
different video output.
S-Video port
9.
ASUS Dual Power
Push the power switch to
power on/off the power supply.
*�����������������������������������������������������������
The gray areas contain front/rear panel ports. These ports
and their locations may vary, depending on the model of your
system.
ASUS CG Series
11
Setting up your system
English
Removing the rear rack
Following the arrows’ directions,
push the latches to remove the
rear rack before connecting any
cables.
Reinstalling the rear rack
After necessary cables are properly connected,
put the cables through the rack first, and then
reinstall the rack back to the chassis.
Connecting display devices
Connecting a display
DVI output
DVI cable
HDMI output
HDMI cable
Monitor
DVI-to-HDMI
adapter
VGA output
VGA cable
TV
DVI-to-VGA
adapter
S-Video output
S-Video cable
Connecting multiple displays
Depending on the number of graphics cards you have installed,
you can connect up to six monitors to your system. To connect
multiple monitors, follow the steps for connecting to a display.
12 ASUS CG Series
English
Connecting devices
Do not block or cover
these openings.
Gaming mouse
Network hub/
switch
Gaming keyboard
7.1(8)-channel
speaker system
Gaming headset
The connected devices are for reference only. The actual
bundled devices depend on the model of your system.
Connecting the power supply
– Off
– On
Power supply
switch
Turning on the system
Push the power supply switch to “ ” (refer to section “connecting
the power supply”), and then touch the power sensor to turn on
the system. The system features the fingerprint sensor technology, which protects your computer from unauthorized access.
Power on your display device to use the ASUS gaming PC.
ASUS CG Series
13
Using your system
English
Using the optical drive
Inserting a disc
1. Place the disc to the optical drive with the label side facing
up.
2. Slide the disc into the drive.
Ejecting a disc
1. While the system power is on, press the eject button.
2. Remove the disc from the disc tray.
Using the card reader
Digital cameras and other digital imaging devices use memory
cards to store digital picture or media files. The built-in memory
card reader on the front panel of your system allows you to read
and write to a variety of memory cards drives.
You can place media in one or more of the card slots and use
each media independently. Place only one memory card in a
slot at one time. Each card slot has its own driver letter and icon
which are displayed on the My Computer screen.
14 ASUS CG Series
Configuring audio setup
English
ASUS CG Series comes with six audio jacks on the rear panel that
support up to 7.1 channel audio configurations.
Speaker configurations
You may set up your system with the following speaker
configurations:
Audio jack
Speaker layout
Headphones
2 (stereo)
2.1
4.1
5.1(6)
7.1(8)
Left speaker, right speaker.
Left speaker, right speaker, and a
subwoofer.
Two front speakers, two rear
speakers, and a subwoofer.
Two front speakers, two rear
speakers, a center speaker, and a
subwoofer.
Two front speakers, two rear
speakers, two side speakers, a
center speaker, and a subwoofer.
Speaker types
A stereo speaker set is a left-right, two channel speaker system.
A multi-channel audio speaker has a left-right front and leftright rear channel, and it may include a subwoofer and a center
speaker. Side speakers are included in a more advanced system. A
subwoofer provides enhanced bass sounds.
“.1” indicates a subwoofer. For instance, 7.1 channels refers to an
eight-speaker mode and uses two front speakers (left-right), two
rear speakers (left-right), two side speakers (left-right), a center
speaker, and a subwoofer.
ASUS CG Series
15
English
Connecting to speakers
Refer to the table below for the audio jacks on the rear panel and
their functions.
Audio jack Description
Line In (light blue) connects to an analog audio
source like a CD/DVD player.
Line Out (lime) connects to a headset or front
speakers.
Microphone (pink) connects to a microphone.
Center/Subwoofer (orange) connects to a
center speaker or a subwoofer.
Rear Out (black) connects to rear speakers.
Side Out (gray) connects to side speakers.
Configuring audio output settings
After connecting a speaker system to your Gaming PC, follow the
steps below to configure audio output:
1. Right-click the volume icon
on the Windows® Vista™
taskbar and select Playback
Devices.
2. Under the Playback window, select an audio device and click
Set Default.
3. Click OK and you will see a check beside the device you
select.
4. Relaunch your media player, such as Windows® Media Player
or Power DVD, and the device you set will serve as the default audio output device.
•
•
•
You must relaunch your media player for the audio
output device settings.
If you want to set up a recording device, select Recording
Devices in Step 1 and do what resembles Step 2 and 3.
If you use an HDMI display with S/PDIF audio output, set
Realtek Digital Output as the default in Step 2.
16 ASUS CG Series
Using the Gaming Mouse (optional)
English
The ASUS®-Logitech® G9 Laser Mouse is a full-speed, USB device
which features an onboard memory with five profiles, weight
tuning system, interchangable grips, MicroGear™ Precision Scroll
Wheel technology, and Custom-Color LED display.
G9 Laser Mouse Features
Front view
1
4
5
2
6
3
No. Item/button
1.
In-game sensitivity (dpi) and profile switching buttons
2.
Back and forward buttons
3.
Spring-leaded weight catridge (hidden under grip)
4.
MicroGear™ scroll wheel with hyperfast scrolling
5.
Custom-color LED display indicating dpi and profile
settings
6.
Wide Load grip with soft satin feel
ASUS CG Series
17
English
Back view
1
5
2
3
4
No. Item/button
1.
MicroGear™ scroll wheel mode switch button
2.
Mouse profile selection button for onboard memory
3.
3200 dpi, full speed USB laser engine
4.
Grip release button
5.
Super-slick polytetrafluoroethylene gaming feet
Setup and installation
Plug the mouse USB cable into your system’s USB port. The G9
mouse is ready to go with full functionality already optimized for
game play.
Interchangeable grips
The G9 Laser Mouse offers two interchangeable grips: Wide Load
Grip and Precision Grip. You can change the grip based on your
needs.
To change the grip
1. Press the release button on
the back of the mouse to
remove the grip.
2. Install the replacement grip
to your G9 mouse.
18 ASUS CG Series
English
Weight tuning system
The weight tuning system is a weight tin containing eight mixand-match metal weights of 7g and 4g. You can control the
weight of your G9 mouse anytime by adding up to 28g of additional weight.
To change the weight
1. Remove the grip off, and
then you can see the
spring-loaded inset weight
cartridge.
2. Push in the cartridge, and
the cartridge pops out.
3. Insert the needed weights
for a customized mouse
weight.
4. Install back the grip to your G9 mouse.
MicroGear™ Precision Scroll Wheel technology
This exclusive advanced scroll wheel technology offers dual
modes. In Ratchet mode, you get distinct click-to-click ratcheted
scrolling, which is perfect for precise weapon selection and is
preferred in games. In Hyper-Fast mode, the wheel instantly delivers frictionless inertia scrolling through long documents.
To switch between the two scrolling modes
Simply push the wheel mode switch button on the bottom of
your mouse. Your scroll wheel also has a programmable middle
button, as well as a programmable tilt wheel for extra button
functionality.
ASUS CG Series
19
English
Using the Gaming Mouse Pad
(optional)
The ASUS dual-sided gaming mouse pad is suitable for gaming
or normal use. The rough side helps an optical mouse perform
better, while the smooth side is more suitable for a laser mouse.
The mouse cord clip also reduces cable tangles, keeping your
desk in order.
Gaming mouse pad features
Mouse cord clip
Unique surface
Using the mouse pad
Place the mouse cord to into the mouse cord clip.
To change the surface mat, simply push up the mat from the bottom hole of the plastic base and turn over the mat to the other
side.
20 ASUS CG Series
English
Using the Gaming Keyboard
(optional)
The ASUS gaming keyboard is specially designed for playing
games on the gaming PC. The rotatable Game-Wheel makes
game playing more comfortable, and the hotkeys on the top of
the keyboard allow instant control of every movement while in
games. The multi-colored backlight changes with the status of
the keyboard.
Gaming keyboard features
1
2
3
4
5
8
7
6
9
10 11
No. Item/port/button Description
1.
2.
Adjustable to A mode, B mode , or
Office mode.
Hold this button to rotate the
Button for rotating
Game-Wheel 30 degrees clockwise/
the Game-Wheel
anti-clockwise for ergonomic needs.
Game-Wheel
(Continued on the next page)
ASUS CG Series
21
English
A/B Profile
Press to switch between A mode
and B mode.
Office key
Press to switch the Game-Wheel to
office mode.
A/B Profile / Office key LED definition
3.
4.
5.
6.
7.
8.
9.
10.
11.
Mode
A/B Profile LED
Office key LED
A Mode
Red
Off
B Mode
Office
Blue
Blue / Red
Off
Green
Backlight
on/off
Press to toggle on/off the backlight
of the Game-Wheel and the main
keyboard.
Play / Pause
Press to play or pause the currently
played audio/video file.
Stop
Press to stop the currently played
audio/video file.
Volume
down
Press to decrease the volume of the
audio output from your speakers.
Volume up
Press to increase the volume of the
audio output from your speakers.
Mute
Press to mute or resume the volume of the audio output from your
speakers.
LED indicator
Num Lock / Caps Lock / Scroll Lock
Main keyboard
Used to type in texts.
ASUS Gaming logo
LED
(LED)
Disabled in A/B mode through
Windows
the software to prevent accidental
logo key
pressing in games; always enabled
in Office mode.
A frequently used shortcut key
Spacebar
while playing games.
Connects to USB devices, such as
USB 2.0 ports
USB flash disks.
HeadphoneConnects to your headphone set.
out jack
MicrophoneConnects to a microphone.
in jack
22 ASUS CG Series
English
Connecting to the system
Connect the two USB cables, headphone cable, and microphone
cable of the ASUS gaming keyboard to the system.
We strongly suggest that both the USB cables are connected to
the system for sufficient power supply.
Headphone USB
Microphone
cable (green) cables cable (pink)
Configuring the keyboard software
The ASUS gaming keyboard software allows you to configure
keyboard settings from the CG Gaming PC. Install the keyboard
driver to the system first.
Game-Wheel Interface
The Game-Wheel defaults to A mode. You can click on the
keyboard interface to switch between A mode and B mode. Click
to switch to Office mode.
A mode
B mode
Office mode
Setting the Game-Wheel key combination
Under each mode, you can configure the key combination of the
Game-Wheel to easily and effetively play games.
To change a key position under A mode:
1. Click a key (e.g. M) on the main keyboard.
2. Click a key (e.g. D)on the
Game-Wheel. Then M will
replace the position of D
on the Game-Wheel.
ASUS CG Series
23
English
Using the Gaming Headset
(optional)
The ASUS gaming headset is suitable for long gaming sessions.
Gaming headset features
1
3
on
2
off
4
No. Item
1.
Volume regulator with built-in 3.5mm mini jack
2.
Dynamic microphone, for attaching directly on the
screen, or on the shirt.
3.
Open type headphones
4.
Headphone and microphone cables
Connecting to the system
1. Connect the cable attached to the headphone to the 3.5mm
mini jack on the volume regulator.
2. Connect the headphone and microphone cables to the CG
system.
on
off
24 ASUS CG Series
Introducing the utilities
English
ASUS AI Manager
ASUS AI Manager is a utility which gives you quick and easy access to frequently-used applications.
Installing AI Manager
To install AI Manager on your computer:
1. Place the support DVD in the optical drive. If Autorun is enabled, the Drivers installation wizard appears.
If Autorun is not enabled in your computer, locate the setup.
exe file from the ASUS AI Manager folder in the support DVD.
Double-click the setup.exe file to start installation.
2. Click the Utilities tab, then click ASUS AI Manager.
3. Follow the screen instructions to complete the installation.
Launching AI Manager
To launch the AI Manager from the Windows® desktop, click
Start > All Programs > ASUS > AI Manager 1.xx.xx > AI
Manager. The AI Manager quick bar appears on the desktop.
After launching the application, the AI Manager icon appears in the Windows® taskbar.
Right-click this icon to switch
between quick bar and main
window, and to launch the AI
Manager either from the quick bar
or taskbar.
ASUS CG Series
25
English
AI Manager quick bar
The AI Manager quick bar saves the desktop space and allows
you to launch the ASUS utilities or display system information
easily. Click any of the Main, My Favorites, Support or Information
tab to display the menu’s contents.
Close button
Maximize /
restore button
Minimize button
Main
Support
My Favorites
Information
Click the Maximize/restore button to switch between full
window and quick bar. Click the Minimize button to keep the
AI Manager on the taskbar. Click the Close button to quit the
AI Manager.
Main
The Main menu contains five utilities: AI Disk, AI Security, AI
Boosting, and AI Probe. Click the arrow on the Main menu icon
to browse through the utilities in the main menu.
Click to extend or
restore
Click to display
items on the left
Click to
display items
on the right
AI Disk
AI Disk allows you to easily clear temporary IE files, IE cookies, IE
URLs, IE history, or the Recycle Bin. Click the AI Disk icon on the
quick bar to display the full AI Disk window and select the items
you want to clear. Click Apply when done.
AI Security
AI Security enables you to set a password to secure your devices,
such as USB flash disks and CD/DVD disks, from unauthorized access.
To lock a device:
1. When using AI Security for the first time, you are asked to set
a password. Enter a password with at most 20 alphanumeric
characters.
2. Confirm the password.
26 ASUS CG Series
English
3.
4.
5.
6.
Key in the password hint (recommended).
When done, click Ok.
Select the device you want to lock, then click Apply.
Key in the password you have set previously, then click Ok. The
selected device is locked and not accessible.
To unlock the selected device:
1. Uncheck the checkbox of the selected device, then click Apply.
2. Key in the password you have set previously, then click Ok. The
selected device is unlocked.
To change password:
Click Change Password, then follow the onscreen instructions to
change password.
AI Booting
AI Booting allows you to specify the boot device priority sequence.
To specify the boot sequence:
1. Select a device, then click on the left/right button to specify
the boot sequence.
2. When done, press Apply.
AI Probe
AI Probe automatically detects and displays the motherboard and
CPU temperatures, CPU fan speed, and the voltage output. You can
adjust the values as you need.
Click the Temperature, Voltage, or Fan Speed tab, then select an
item to enable and change the value by dragging the bar.
ASUS CG Series
27
English
My Favorites
My Favorites allows you to add applications that you frequently
use, saving you from searching for the applications throughout
your computer.
To add an application:
1. Click Add, then locate the application you want to add to My
Favorites.
2. Click Open on the file location window. The application is
added to My Favorites list.
Right click on the application icon to launch, delete, or rename
the selected application. You can also double click to launch the
selected application.
Support
Click any links on the Support window to go to the ASUS website, technical support website, download support website, or
contact information.
Information
Click the tab on the Information window to see the detailed
information about your system, motherboard, CPU, BIOS, installed
devices, and memory.
28 ASUS CG Series
English
ASUS Express Gate
(For some models only)
ASUS Express Gate is an instant-on environment that gives you
quick access to web and Skype. Within a few seconds of powering on your computer, you will be at the Express Gate menu
where you can start the web browser, Skype, or other Express
Gate applications.
The First Screen
Express Gate’s first screen appears within a few seconds after you
power on. From here, you can immediately start the web browser
or Skype.
You can also choose to continue booting normally (e.g. to your
installed OS such as Windows), enter BIOS setup, or power off.
If you don’t make any selection, Express Gate will automatically
exit and boot to your normal OS after a certain amount of time.
The timer countdown is shown
on-screen inside the “boot to OS” button. As you move the mouse
or type a key, the countdown stops and the timer disappears, so
you can take your time to make a selection.
The Express Gate Environment
The very first time you enter the Express Gate environment (by
launching either web or Skype from the first screen), a first time
wizard will guide you through basic Express Gate configurations.
Basic configurations include language, date and time and screen
resolution.
Once inside the Express Gate environment, click on the icons
on the LaunchBar, by default at bottom of the screen, to launch
or switch between applications. You can re-arrange, re-size and
move windows. Bring a window to the foreground by clicking
within it or by clicking on its corresponding application icon. Resize a window by dragging any of its four corners. Move a window by dragging its title bar.
Besides using the LaunchBar, you can also switch between applications by pressing <Alt> +<Tab> on the keyboard. You can
also right-click anywhere on the desktop to bring up a menu of
applications.
The red triangle on an application icon in the LaunchBar denotes
that the application is already running. This means that you can
switch to it without any delay. In the rare case where an application stops responding, right-click on its icon to force close it.
ASUS CG Series
29
English
Configuration Panel
Use the configuration panel to change various Express Gate settings.
Click on an icon to open a particular configuration tool. The following tools are available:
Date and Time: set current date and time as well as time zone.
Input Method: choose your preferred input language and
method.
Language and Keyboard: choose your language and keyboard
preferences.
LaunchBar Setting: customize your LaunchBar (where it docks,
whether it auto-hides, etc.)
Network Configuration
Specify how your computer connects to the Internet. Enable all
the network ports that you may use (LAN1, LAN2, and/or wireless
[optional]). LAN1 and LAN2 refer to the two RJ-45 network ports
on your computer.
• The number of the LAN ports may differ from
motherboards.
• You can connect the LAN cable to either port, and Express
Gate SSD will automatically use the connected port.
Also specify whether each port uses DHCP (most common) or
static IP. For PPPoE and wireless (optional), set the login credentials (user name, password, SSID, etc.) as well.
Environment Settings: This function allows you to clear the
Express Gate SSD settings, as well as any personal information
stored by the web browser (Bookmarks, Cookies, History, etc.).
The user data will be reset to the original default configuration.
After you click Restore System, a confirmation dialog box will
open. If you click “Yes” in the confirmation dialog box, your system will immediately restart and then re-enter Express Gate SSD
to finish clearing the settings. This is also useful in the rare case
where settings might become corrupted.
The first-time Wizard will run again when you enter the Express
Gate SSD environment after clearing its settings.
30 ASUS CG Series
English
• Screen Settings: Choose the most optimal screen resolution
for your display.
• Volume Control: Control the volume for your speaker output,
microphone input, etc.
Using the LaunchBar
The actual screen may vary according to different models.
The LaunchBar has several system icons that show you various
system statuses and let you configure individual Express Gate
SSD settings. The LaunchBar can be configured to auto-hide,
if you want more screen space for the softwares. It can also be
configured to dock on any of the four sides of the screen.
Starts the Web Browser for quick access to the World Wide Web.
Starts the Photo Manager album / organizer tool.
Starts the Chat instant messaging tool.
Start the Skype software, which lets you call other people
on Skype for free, as well as offering affordable, high
quality voice communications to phones all over the
world.
Opens Configuration Panel, which lets you specify network settings and other preferences.
In the rare case that one of the above softwares stops responding,
you can right-click on its icon and then select Close to force it to
close.
The smaller icons on the right side of the LaunchBar are:
Click on this icon to open the File Manager window,
which lets you conveniently access the files on a USB drive. If a USB device is detected, the icon contains a green arrow.
ASUS Express Gate supports file uploading from SATA HDDs,
ODDs and USB drive and downloading to USB drives only.
Shows network status; click to configure network.
Shows mute status; click to change volume.
ASUS CG Series
31
English
Click to choose input language and method as well as keyboard shortcuts (Ctrl-Space by default).
Click to change LaunchBar options (auto-hide, docking position, etc).
Click to show the “ASUS Utility” panel.
Click to show “About Express Gate SSD”.
Click to open Express Gate SSD Help.
Click to bring up power options window to boot to OS, restart or power down. This window is also shown when you press Ctrl-Alt-Del on the keyboard.
Power off
Enter OS
Restart
Check to save user
profile
Cancel and return to
Express Gate SSD
How Do I Get on to the Internet
If Internet doesn’t seem to be working in the Express Gate SSD
environment, check the following:
1. Open the Configuration Panel
2. Open Network
.
.
3. Make the proper network configurations.
Each network interface is enabled immediately when you check
the box next to it.
• If you use a network cable connected to a home router (which
is then connected to your DSL/cable modem), enable both
LAN1 and LAN2. Express Gate SSD will automatically use
whichever port (LAN1 or LAN2) is connected.
If you plug the network cable into a different port while Express
Gate SSD is running (e.g. move the cable from LAN1 to LAN2),
you may need to press the “Refresh” button to detect the
change.
• The most common scenario is for your computer to automatically obtain network settings (i.e. DHCP). If this is the case, you
don’t need to click Setup for any LAN port. If this is not the
case, click Setup to configure the static IP settings manually.
32 ASUS CG Series
English
• If you have wireless network, click Setup for the WiFi option.
In the WiFi tab of the Advanced Network Settings box, enter
the name of your wireless access point in the SSID field. If
your wireless access point has security enabled, select the corresponding security algorithm from the drop-down list (e.g.
WEPAUTO) in the Encryption Type field, and enter the password.
Click OK to enable WiFi and establish the wireless connection.
• If you use a network cable connected directly to your DSL/
cable modem (no router in between), click Setup for xDSL/
cable dial-up. This method is also referred to as PPPoE. Choose
whether the DSL/cable modem is connected to your computer’s LAN port. Then enter the username and password for your
dial-up account.
Click OK to enable xDSL/cable dial-up and establish the PPPoE connection. When PPPoE is enabled, the port it uses will
automatically be unchecked and grayed out.
Using the Photo Manager
Express Gate provides a easy-to-use Photo Manager that allows
you to view pictures stored in your hard drive or external storage
devices (such as USB dongles, card readers, or optical disks). You
can view pictures in thumbnail view; in an enlarged view individually; in a filename/data list view; or play them in a slideshow
with background music and fancy transition effects. JPEG, GIF,
BMP, and PNG formats are supported. Refer to the on-line Help
for detailed software operation.
ASUS Express Gate supports HDDs connected to motherboard
chipset-controlled onboard SATA ports only. All onboard
extended SATA ports and external SATA ports are NOT
supported.
Using ASUS Drive Xpert
Without drivers or BIOS setups, the ASUS exclusive Drive Xpert is
ideal for anyone who needs to secure data on their hard drives or
enhance hard drive performances without the hassles of complicated configurations.
To start ASUS Drive Xpert application
1. Click .
to open the ASUS Utility panel.
2. Launch Drive Xpert from the ASUS Utility Panel
3. Select EZ Backup
need.
or Super Speed
.
according to your
ASUS CG Series
33
Configuring Express Gate in BIOS Setup
English
Enter BIOS setup by pressing DEL key after powering on or by
clicking on the BIOS setup icon on Express Gate’s first screen.
Express Gate configuration options are under Tools configuration
menu page.
Express Gate
34 ASUS CG Series
[Enabled]
English
ASUS Game Gate
Features
• Windows Logon: Secures access to the Operating System
and its various components. It only allows registered users to
access these functionalities after authentication.
• Fingerprint Screen Saver: A user timed biometrically protected screen saver to secure the PC when you are away from
your computer. Unauthorized users cannot gain access to
your PC.
• File / Folder Encryption and Decryption: Provides instant
file and folder encryption and decryption for your PC using
the proprietary AES 192-bits encryption technology.
• View Log: A system log file that captures access attempts and
maintains activity records for the secured personal computer.
View Log can be used to monitor and detect potential intrusion, and is normally used in a multi-user environment.
Installing Game Gate
1. Place the support DVD to the optical drive.
2. Double click the ASUS Game Gate icon to install the driver.
3. Follow the onscreen instructions to complete the installation.
Using Game Gate
Starting Game Gate operation
To enroll fingerprint
1. Right click the Game Gate icon in the
system tray, and select Enroll fingerprint for fingerprint and password enrollment.
2. A two-hand screen appears.
Click on any of the ten fingertips to enroll fingerprint.
ASUS CG Series
35
English
3. You are required to swipe
the selected finger across
the sensor at least three
times, in order to collect
ONE set of consistent image
for a fingerprint record.
4. During fingerprint registration, the progress bar shows
the completion status.
5. Individual fingerprint enrollment is done once the
progress bar shows full completion, and the selected
fingertip turns white. Repeat
steps 1 to 4 if you want to
register more fingerprints.
To delete a fingerprint
1. Right click the Game Gate
icon in the system tray, and
select Enroll fingerprint.
Verify the register fingerprint previously.
2. To delete a fingerprint
record, click on an enrolled
fingertip, and then press
Delete. Press Yes to confirm.
36 ASUS CG Series
English
Activating screen saver
To activate screen saver
Right click the Game Gate icon in
the system tray, and select
Activate screen saver.
The fingerprint module is displayed as FP Token USB device in
your system. We suggest that you not disconnect the device. If
you disconnect the FP device, you need to reboot the system to
restore the fingerprint feature.
To disable screen saver
1. When returning to the Windows screen, you can select
regular logon or fingerprint
logon.
2. If you select the fingerprint
logon, swipe the enrolled
finger across the sensor
until the verification is successful.
File / folder encryption
To encrypt a file or folder:
1. Right click on the file or
folder you want to encrypt
and select Encrypt files
with fingerprint.
2. The file icon changes to
.
ASUS CG Series
37
English
To decrypt a file or folder
1. Right click on the file /
folder you want to decrypt
and select Decrypt file
with fingerprint. You can
also double click on the file
/ folder.
2. Fingerprint verification
follows. You are asked to
put the enrolled finger to
the sensor until the green
check appears on the
screen, and the verification
is successful.
3. The encrypted file / folder
will turn to the original file /
folder.
The type of files suitable for encryption and decryption are
those commonly used such as Microsoft Office files, and
graphic files.
Uninstalling Game Gate
1. Click Start > Settings > Control Panel > Uninstall a
program.
2. Select the ASUS Game Gate program, and then click Uninstall.
3. Restart the system to compete the uninstallation.
38 ASUS CG Series
Recovering your system
English
Using the recovery DVD
The recovery DVD includes the operating system installed on
your system at the factory. The recovery DVD, working with the
support DVD, provides a comprehensive recovery solution that
quickly restores your system to its original working state, provided that your hard disk drive is in good working order. Before
using the recovery DVD, copy your data files, such as Outlook PST
files, to a USB device or to a network drive and make note of any
customized configuration settings (such as network settings).
1. Turn on your system and the ASUS logo appears. Press F8 to
enter the Please select boot device menu.
2. Insert the recovery DVD into the optical drive and select the
optical drive (“CDROM:XXX”) as the boot device. Press Enter
and then press any key to continue.
3. The Windows Boot Manager window appears. Select Windows Setup [EMS Enabled] and press Enter. Wait when the
Windows is loading files message appears.
4. Select where to install a new system. Options are:
Recover system to a partition
This option deletes only the partition you selected, allows
you to keep other partitions, and creates a new system partition as drive “C.” Select a partition and click NEXT.
Recover system to entire HD
This option deletes all partitions from your hard disk drive
and create a new system partition as drive “C.” Select and
click Yes.
5. Follow the onscreen instructions to complete the recovery
process.
You will lose all your data during the system recovery. Ensure
that you back up all your data before recovering the system.
6. After the system recovery is completed, you are asked to
insert the support DVD into the optical drive. Click OK and
the system reboots.
7. After the system reboots, Windows® Vista™ begins system
configurations. Follow the on-screen instructions to complete the process, and then restart the computer.
This recovery DVD is for ASUS CG Series only. DO NOT use it on
other computers. Visit the ASUS website www.asus.com for any
updates.
ASUS CG Series
39
Using ASUS Recovery
English
1. Turn on your system and the ASUS logo appears. Press F9 to
enter the System Recovery.
2. The message “Windows is loading files” is displayed. Wait
until the Recovery CD/DVD window appears.
3. Follow the onscreen instructions to complete the recovery
process. After the system reboots, system settings are restored to the default values.
40 ASUS CG Series
Troubleshooting
English
Read the following Q&As for troubleshooting guide. If these do
not give you answers, you may contact us directly at the contact
information provided in the support DVD.
What can I do if my system cannot be powered on?
Check if the power LED on the front panel lights up. It does not
light up if no power is supplied to the system.
• Find out if the power cord is plugged in.
• When you use an extension cord or a voltage regulator,
ensure that you have plugged it into the wall socket and
switched it on.
What can I do if my system cannot enter the operating
system?
• Ensure that you use memory modules that the system supports and that you install them properly on the sockets.
• Check if your peripheral devices are compatible with the
system. Some USB storage devices, for example, are with
different disk drive structure and enter sleep mode easily.
If the above steps do not solve the problem, contact your retailer
or perform system recovery using the supplied recovery DVD.
You will lose all your data during the system recovery. Ensure
that you back up all your data before recovering the system.
Why is it that I cannot hear anything from my speakers/
headphones?
Check the volume icon on the Windows® taskbar to see if it is set
to mute
. If so, double-click this icon to display the volume bar,
and then click the mute icon under the bar to cancel the muted
mode
.
Why is it that a CD/DVD cannot be read from or written to?
• Ensure that you use a disc compatible with the optical drive.
• Check if you inserted the disc properly or if there is any
scratch on the disc.
• Find out if the disc is write-protected.
ASUS CG Series
41
Warranty Policy
English
The ASUS VIP Member Notice
Dearest Customer, thank you for purchasing an ASUS product!
Register online now to complete the VIP Membership and gain
these benefits today!
(1) Immediately become an exclusive ASUS VIP Member
(2) Receive exclusive VIP Member privileges like:
• The latest ASUS product news, promotional activities,
benefits and discounts exclusive to VIP Members only.
For more inquiries and details regarding guarantee and warranty
matters, please visit the official website at http://vip.asus.com.
ASUS LIMITED WARRANTY SERVICE
1. General
ASUSTeK Computer Inc warrants this ASUS desktop PC to be
free from defects in workmanship and materials for the period defined on the label sticker on the last page of the user
manual, for example: 12M means 12 months and 24M means
24 months from the date of purchase. This warranty applies only to products that are new on the date of purchase.
Please keep the original purchase invoice and warranty card
for future service request.
The warranty does not cover monitor, batteries, free or
special bundled accessories, which were delivered together
with the desktop PC. For monitors – please refer the monitor
warranty card.
If the product fails during normal and proper use within the
warranty period, ASUS will, at its discretion, repair or replace
the defective parts within the product, or the product itself,
with items that are functionally equivalent to that as originally supplied, or better, during the warranty period defined
for the model, using new or refurbished parts or units. If the
desktop PC is under warranty, the ownership of the replaced
defective parts will automatically be transferred to ASUS.
All components repaired or replaced by ASUS desktop PC
Service Centre will be under warranty for the remaining
period of warranty or for no less than 3 months.
Please keep the original packaging, in case your desktop PC
needs to be returned for repair. Original packaging provides
a better protection for your desktop during transportation. If
the product is not packaged in its original box, ASUS will not
be liable for any damages occurred during transit and we reserve the right to charge the cost of new packaging required
in return. After repair, ASUS Service Centre could return the
42 ASUS CG Series
2
English
desktop PC to you in new generic packing (non-original
packaging).
ASUS will recover the originally configured operation system bundled with the product if the Hard Drive is replaced.
ASUS will not be liable to restore or transfer the user’s data,
programs from the original Hard Disk
Software Support
Your ASUS desktop PC is supplied with pre-installed software. If you have any related technical problems when using
ASUS desktop PC, we suggest you check the manual or ASUS
web site to carry out preliminary trouble shooting. ASUS will
be limited to support your PC if the Operating system has
been altered. Third party software may require support from
such vendors.
3. Exclusions from the Limited Warranty Service
The warranty excludes the following conditions:
• Accessories or components that are external to the system unit(other than keyboard and mouse)
• The product has been tampered, repaired and/or
modified by non authorized personnel.
• The serial number of the desktop PC, components or
accessories has been altered, cancelled or removed.
• The warranty seals has been broken or altered.
• There is damage caused by an external electrical fault,
accident, natural disaster, intentional or accidental
misuse, abuse, neglect or improper maintenance, or use under abnormal conditions.
• There is damage caused by improper installation or improper connection to a peripheral device (printer,
optical drive, etc).
• There is damage from usage outside of the operation or storage parameters or environment detailed in the User’s Manual.
• There is damage from use of parts not manufactured or sold by ASUS.
• There is damage to or loss of any program, data or
removable storage media, or if there is costs from
recovering any program or data.
• There is damage from third party software or from any virus.
• Support and costs involved to install or configure the product for any third party software application or
hardware device, or network/wireless configuration .
ASUS CG Series
43
English
•
Due to technology limitations, some devices(ex. DVD ROM and software player may not play certain titles)
may be limited or not compatible with the ASUS
desktop PC. These limitations are common to defined standards within the IT industry and are not specific to ASUS desktop PC.
4. Before Contacting ASUS Service Center
•
•
•
•
•
•
•
Back up all your personal data and remove any
confidential, proprietary information on the hard drive. ASUS and its Service Center will not be responsible for any loss of your own programs, data or information.
If you received an error message, write it down with the fault description and include it with desktop PC
Retrieve from your ASUS desktop PC its operating system and the BIOS version
Ensure you have ready your ASUS desktop PC’s model name, serial number, sales invoice/receipt with date of
purchase and warranty card. You will be required to provide proof of purchase before warranty service can be performed.
Make sure you are in front of your ASUS desktop PC and have your desktop PC turned on (if it’s feasible) when you call.
If the product is eligible for the courier pickup and return service, you are required to contact ASUS to arrange this
service using ASUS’s designated freight carrier if the product is under warranty. An RMA number will be
provided by ASUS helpdesk as your return authorization.
If the RMA number is not visible upon receiving the
product, the product will be returned without further notice and ASUS will not be liable for any loss or damage of the product.
5. Additional Information to Take Care of Your Product:
•
•
Carefully read and follow all instruction and safety
precautions included in the product user manual.
When placing your desktop PC in the carton, remove all cable/adaptor connected and avoid over packing your
carton which may apply excessive pressure to the
desktop PC causing damage to the desktop PC.
44 ASUS CG Series
English
6. Local Service Procedure
Check user’s manual or ASUS
web information.
Problem solved?
Call ASUS Hotline.
Problem solved
online?
Case Closed
Get RMA Number and
properly pack your desktop
PC with good protection.
Return your desktop PC to
ASUStek service center to
repair.
ASUS will check and repair
your desktop PC and then
return to you.
Returning a desktop PC to ASUS Service Center during the
warranty period does not automatically mean that it will
be repaired free of charge. On receiving your product, ASUS
Service Center reserves the right to check the validity and
your request for warranty service. Charges may apply if the
product fails to meet the warranty inclusion.
ASUS CG Series
45
English
Model Name
Serial Number
Warranty Period
Dealer’s Name
Dealer’s Address/Stamp
Dealer’s Tel.
Purchase Date
46 ASUS CG Series
/
/
(DD/MM/YYYY)