1
PORTABLE DIGITAL AUDIO PLAYER
Basic Model : YP-T9
* Application : YP-T9BZB/ZS[1GB]
YP-T9BQB/QS[2GB]
YP-T9BAB/AS[4GB]
SERVICE
PORTABLE DIGITAL AUDIO PLAYER
Manual
Features
- High-tech Multimedia Player!
- Expansion & Compatibility!
- Easy File Browser!
- Longer Play Time and Shorter
Downloading!
- 3D Surround Sound!
High-Definition Quality!
- Ergonomic Design!
Model : YP-T9
- Confidential -
ELECTRONICS
© Samsung Electronics Co.,Ltd. August. 2006
Printed in Korea
Code no. AH68-01819S
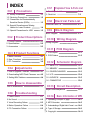
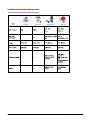
INDEX
Ch1
Ch7
Precautions
1-1. Safety Precautions
1-2. Servicing Precautions
1-3. Precautions for Electrostatically
Sensitive Device (ESDs)
1-4. Special Precations and Waring
Lables for Laser Products
1-5. Special Precautions for HDD
1-1
1-2
1-3
1-4
1-5
Exploded View & Parts List
1. Total Exploded View
2. Parts List
Ch8
Electrical Parts List
Electrical Parts List
Ch9
Product Descriptions
1. Product Feature
2. Specifications
3. Accessories
2-1
2-2
2-3
Ch10
Product Functions
1. Basic Functions
2. New Functions
3. PC Connection
Ch4
3-1
3-7
3-9
Adjustments
9-1
Wiring Diagram
Wiring Diagram
Ch11
Ch3
8-1
Block Diagram
Block Diagram
Ch2
7-1
7-2
10-1
PCB Diagram
1. PCB Layout
11-1
2. PCB Pattern
11-2
Ch12
Schematic Diagram
1-1. MAIN CPU
12-1
1-2. MEMORY
12-2
1. How to upgrade Firmware
4-1
1-3. POWER/CHARGER
12-3
2. Downloading NOR Flash Firmware
4-2
1-4. LCD
12-4
3. Setting MAC Address
4-4
1-5. AUDIO/FM
12-5
1-6. CONNECTOR
12-6
Ch5
How to disassemble
How to disassemble
5-1
Ch13
Circuit Description
MajorFunctionsbyBlocks
Ch6
13-1
Troubleshooting
Ch14
Basic Information of MP3
1. Power Failure
6-1
2. No Sound
6-2
1. Operating Principle of yepp
14-1
3. Voice Recording Failure
6-3
2. MP3 Overview
14-5
4. Button Operation Failure
6-4
3. Understanding of Digital Audio Format
14-6
5. PC Connection Failure
6-5
4. Type of Storage
14-9
5. Copyright
14-11
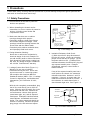
1. Precautions
Follow these safety, servicing and ESD precautions to prevent damage and protect against potential hazards such as electrical shock and X-rays.
1-1 Safety Precautions
1. Be sure that all of the built-in protective
devices are replaced.
2. When reinstalling the chassis and its
assemblies, be sure to restore all protective
devices, including control knobs and
compartment covers.
3. Make sure that there are no cabinet
openings through which people-particularly children--might insert fingers
and contact dangerous voltages. Such
openings include the spacing between the
picture tube and the cabinet mask,
excessively wide cabinet ventilation slots,
and improperly fitted back covers.
4. Design Alteration Warning:
Never alter or add to the mechanical or
electrical design of the unit. Example: Do
not add auxiliary audio or video connectors.
Such alterations might create a safety hazard. Also, any design changes or additions
will void the manufacturer's warranty.
5. Leakage Current Hot Check (Figure 1-1):
Warning: Do not use an isolation
transformer during this test. Use a leakage-current tester or a metering system
that complies with American National
Standards Institute (ANSI C101.1, Leakage
Current for Appliances), and Underwriters
Laboratories (UL Publication UL1410,
59.7).
With the unit completely reassembled, plug
the AC line cord directly into a 120V AC
outlet. With the unit's AC switch first in the
ON position and then OFF, measure the
current between a known earth ground
(metal water pipe, etc.) and all exposed
metal parts. Examples: Handle brackets,
metal cabinets, screwheads and control
shafts. The current measured should not
exceed 0.5 milliamp. Reverse the powerplug prongs in the AC outlet and repeat.
(Reading should
not be above
0.5mA)
Device
Under
Test
Leakage
Currant
Tester
Test all
exposed metal
surfaces
2-Wire Cord
Also test with
plug reversed
(using AC adapter
plug as required)
Earth
Ground
Fig. 1-1 AC Leakage Test
6. Insulation Resistance Cold Check:
(1) With the unit's AC plug disconnected
from the AC source, connect an electrical
jumper across the two AC prongs. (2) Set
the power switch to ON. (3) Measure the
resistance between the shorted AC plug and
any exposed metallic parts. Example:
Screwheads, antenna, control shafts or
handle brackets.
If any of the exposed metallic parts has a
return path to the chassis, the measured
resistance should be between 1 and 5.2
megohms. If there is no return path, the
measured resistance should be "infinite." If
the resistance is outside these limits, a
shock hazard might exist. See Figure 1-2
Antenna
Terminal
Exposed
Metal Part
ohm
Ohmmeter
Fig. 1-2 Insulation Resistance Test
1-1
Samsung Electronics
Precautions
1-1 Safety Precautions (Continued)
7. Components, parts and wiring that appear
to have overheated or that are otherwise
damaged should be replaced with parts
that meet the original specifications.
Always determine the cause of damage or
overheating, and correct any potential
hazards
8. Observe the original lead dress, especially
near the following areas: Antenna
wiring, sharp edges, and especially the
AC and high voltage power supplies.
Always inspect for pinched, out-of-place,
or frayed wiring. Do not change the
spacing between components and the
printed circuit board. Check the AC
power cord for damage. Make sure that
no wires or components touch thermally
hot parts.
9. Product Safety Notice:
Some electrical and mechanical parts
have special safety-related characteristics
which might not be obvious from visual
inspection. These safety features and the
protection they give might be lost if the
replacement component differs from the
original--even if the replacement is rated
for higher voltage, wattage, etc.
10 Components that are critical for safety are
indicated in the circuit diagram by
shading,
or
. Use replacement
components that have the same ratings,
especially for flame resistance and
dielectric strength specifications. A
replacement part that does not have the
same safety characteristics as the original
might create shock, fire or other hazards.
1-2 Servicing Precautions
Warning1: First read the "Safety Precautions" section of this manual. If some unforeseen circumstance
creates a conflict between the servicing and safety precautions, always follow the safety precautions.
1. Servicing precautions are printed on the
cabinet. Follow them.
2. Always unplug the unit's AC power cord from
the AC power source before
attempting to: (a) Remove or reinstall any
component or assembly, (b) Disconnect an
electrical plug or connector, (c) Connect a
test component in parallel with an
electrolytic capacitor.
3. Some components are raised above the
printed circuit board for safety. An
insulation tube or tape is sometimes used.
The internal wiring may be clamped to
prevent contact with thermally hot
components. Reinstall all such elements to
their original position.
4. After servicing, always check that the
screws, components and wiring have been
correctly reinstalled. Make sure that the
portion around the serviced part has not
been damaged.
Samsung Electronics
5. Check the insulation between the blades of
the AC plug and accessible conductive parts
(examples: metal panels, input terminals
and earphone jacks).
6. Insulation Checking Procedure: Disconnect
the power cord from the AC source and
turn the power switch ON. Connect an
insulation resistance meter (500V) to the
blades of the AC plug.
The insulation resistance between each
blade of the AC plug and accessible
conductive parts (see above) should be
greater than 1 megohm.
7. Never defeat any of the B+ voltage
interlocks. Do not apply AC power to the
unit (or any of its assemblies) unless all
solid-state heat sinks are correctly installed.
8. Always connect a test instrument's ground
lead to the instrument chassis ground
before connecting the positive lead; always
remove the instrument's ground lead last.
1-2
Precautions
1-3 Precautions for Electrostatically Sensitive Devices (ESDs)
5. Use only a grounded-tip soldering iron
when soldering or unsoldering ESDs.
1. Some semiconductor ("solid state") devices
are easily damaged by static electricity.
Such components are called Electrostatically
Sensitive Devices (ESDs). Examples
include integrated circuits and some fieldeffect
transistors. The following techniques will
reduce the occurrence of component
damage caused by static electricity.
6. Use only an anti-static solder removal
device. Many solder removal devices are
not rated as "anti-static" (these can
accumulate sufficient electrical charge to
damage ESDs).
7. Do not remove a replacement ESD from its
protective package until you are ready to
install it. Most replacement ESDs are
packaged with leads that are electrically
shorted together by conductive foam,
aluminum foil or other conductive
materials.
2. Immediately before handling any
semiconductor components or assemblies,
drain the electrostatic charge from your
body by touching a known earth ground.
Alternatively, wear a discharging
wrist-strap device. (Be sure to remove it
prior to applying power--this is an electric
shock precaution.)
8. Immediately before removing the protective
material from the leads of a replacement
ESD, touch the protective material to the
chassis or circuit assembly into which the
device will be installed.
3. After removing an ESD-equipped assembly,
place it on a conductive surface such as
aluminum foil to prevent accumulation of
electrostatic charge.
9. Minimize body motions when handing
unpackaged replacement ESDs. Motions
such as brushing clothes together, or lifting
a foot from a carpeted floor can generate
enough static electricity to damage an ESD.
4. Do not use freon-propelled chemicals.
These can generate electrical charges that
damage ESDs.
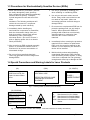
1-4 Special Precautions and Warning Labels for Laser Products
(UL)
(CSA)
This Product Complies with
DHHS Rules 21CFR, Sub
chapter J.At date of Manufacture
(UL,CSA,EU)
CERTIFIED ONLY TO CANADIAN
ELECTRICAL CODE.
CLASS 1
LASER PRODUCT
CERTIFIE EN VERTU DU CODE
CANADIAN DE LELETRICITE
SEULEMENT
Fig. 1-3 Warning Labels (Location: Enclosure Block)
(UL,CSA,SCAN)
CAUTION : INVISIBLE LASER RADIATION WHEN OPEN
AND INTERLOCKS DEFEATEO AVOIDEXPOSURE TO BEAM
ADVARSEL: USYNLIG LASERSTRÅLING VED ABNING
NÅR SIKKERHEDSAFBRYDERE ER UDE AF FUNKTION
UNDGA UDSAETTELSE FOR STRALING
VARO:AVATTAESSA JA SUOJALUKITUS OHITETTAESSA
OLET ALTTINA NAKYMATTÖMALLE LASERSATEILYLLE ALA
KATSO SATEESEEN!
VARNING:OSYNLIG LASERSTRÅLNING NAR DENNA DEL
(EU)
UL
CSA
EU
SCAN
: Manufactured for U.S.A. Market.
: Manufactured for Canadian Market.
: Manufactured for European Market.
: Manufactured for Scandinavian
Market.
AR OPPNAD OCH SPARREN AR URKOPPLAD BETRAKTA
EJSTRÅLEN!
Fig. 1-4 Warning Labels (Location: Disc Clamper, Inner Side of Unit Door or Nearby Unit Chassis )
1-3
Samsung Electronics
Precautions
1-4 Special Precautions and Warning Labels for Laser Products (Continued)
1-4-1 Warnings
1. When servicing, do not approach the
LASER exit with the eye too closely. In
case it is
necessary to confirm LASER beam emission, be sure to observe from a distance of
more than 30 cm from the surface of the
objective lens on the optical pick-up block.
2. Do not attempt to handle the objective lens
when the DISC is not on the tray.
1-4-2 Laser Diode Specifications
Material: GaAs+ GaAlAs
Wavelength: 760-800 nm
Emission Duration: Continuous
1-4-3 Handling the Optical Pick-up
1. Static electricity from clothing or the body
may cause electrostatic breakdown of the
laser diode in the Optical Pickup. Follow
this procedure:
2. Place a conductive sheet on the work bench
(i.e., the black sheet used for wrapping
repair parts.) Note: The surface of the work
bench should be covered by a copper
ground plane, which is grounded.
3. The repair technician must wear a wrist
strap which is grounded to the copper
sheet.
4. To remove the Optical Pickup block:
Place the set on the conductive sheet, and
momentarily touch the conductive sheet
with both hands. (While working, do not
allow any electrostatic sources--such as
clothes--to touch the unit.)
Laser Output: 0.2 mw (measured at a
1.6 mm distance from the objective lens
surface on the optical pick-up block.)
5. Ground the "Short Terminal" (located on the
PCB, inside the Pickup Assembly) before
replacing the Pickup. This terminal should
be shorted whenever the Pickup Assembly
is lifted or moved.
short
terminal
SOH91VI(LDP)
short terminal
SOH91CI(CAR,walkman)
6. After replacing the Pickup, reopen the Short
See diagrams below:
1M
THE UNIT
(1) WRIST-STRAP
FOR GROUNDING
short
terminal
SOH-A1
(CMS-V10,CMS-V30)
CONDUCTIVE SHEET
1M
short
terminal
SOH94T4N
(CMS-V10,CMS-V30)
1-5 Special Precautions for HDD
* HDD Data Maintenance Step
1. Since the data on the HDD is weak to mechanical shock, place the HDD in a safe
location that is free from mechanical shock once it is removed from the main unit.
2. In order to safe keep the data on the HDD, back up the data before the repair or
make sure not to place the HDD near any electrical appliance that generates a
strong magnetic field.
Samsung Electronics
1-4
2. Product Descriptions
1. Product Feature
Product Feature
High-tech Multimedia
■
Player!
Expansion &
The player is a top-notch multimedia player featuring photo/text
view, movie playback, FM radio, voice recording and Bluetooth.
■
Supports various file formats including MP3, WMAand Ogg.
■
With user-friendly file browser, it allows you to navigate through the
Compatibility!
Easy File Browser!
folders without exiting your music experience.
■
Longer Play Time and
Afully charged player can play up to 30 hours of music, or 6 hours of
movie.
Shorter Downloading!
■
The player supports USB 2.0 capability, much faster than USB 1.1 to
enable faster communication with the PC.
3D Surround Sound!
■
Samsung’s unique sound technology for richer sound.
High-Definition Quality!
Ergonomic Design!
2-1
The player has built-in DNSe (Digital Natural Sound engine),
■
Experience the good sense of grip and easy operation.
Samsung Electronics
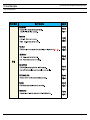
2. Specifications
Model Name
Power
Built-in Battery Power
YP-T9
3.7V (Li-Polymer Rechargeable)
740 mAh
AUDIO: MPEG1/2/2.5 Layer3(8kbps~320kbps, 8kHz~48kHz),
WMA(5kbps~320kbps,8kHz~48kHz)
File
Compatibility
Video: SVI (Video: MPEG4, Audio: MP3 (44.1kHZ, 128kbps),
Resolution: 208X176, Frame Rate: 15fps)
Image: JPG (Progressive, Sequential Scanning, File Size: less than 3MB)
Supported Number of folders and Files Folder: Max. 500, File: Max. 5000(Include folder)
Earphone Output
20mW (16Ω)
Output Frequency Range
20Hz~20KHz
Noise Ratio
85 dB with 20kHz LPF(based on 1KHz 0 dB)
Maximum of 30 hours for music playback (based on: MP3 128kbps,
Play Time
Volume: 20, Normal Mode), Maximum of 6 hours for video playback
Temperature Range for Operation
-5~35 °C (23~95°F)
Case
Plastics
Weight
1.73 oz
Dimension (WxHxD)
1.67 X 3.27 X 0.43 inches
FM
FM Frequency
Radio FM Signal to Noise Ratio
87.5~108.0MHz
FM T.H.D
1%
55dB
FM Useable Sensitiivity
10dBµ
● The contents of this Manual are subject to change without prior notice for further
improvement.
Samsung Electronics
2-2
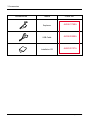
3. Accessories
Accessories
2-3
Name
Code No.
Earphones
AH59-01748A
USB Cable
AH39-00899A
Installation CD
AH80-00137A
Samsung Electronics
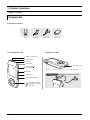
3. Product Functions
1. Basic Functions
Components
Checking the Accessories
Player
Earphones
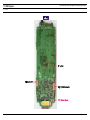
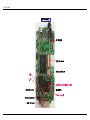
Front, Right Side and Top
USB Cable
Installation CD
Bottom and Left Side
Earphone Connection Jack
Neck String Hole
Microphone
Screen Display
USB Connection Port
Section Repeat(A B)/
Recording Button
Hold Switch
Back Button
MENU Button
Earphone Connection
√ Top
Power & Play/Pause Button
Earphones
Move/File Browser Button
Move/Volume Control Button
Select Button
Samsung Electronics
3-1
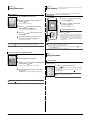
2. New Functions
Screen Display Information
Music
Video
Video
1
2
3
4
8
9
1 Current Time Display
2 Playback Display
3 Play Mode Display
Before you start!
Connect the earphones, then turn on the player, and check the battery.
4 Sound Mode Display
1 Press the [
5 Music Title Display
6
5
6
] button to select <Video> and
then press the [
Play Status Bar
] button.
Audio Track 1
00:01:42
00:05:06
10
7
7 Play Time Display
8 Battery Status Display
2 Press the [
9 Current Track Playing/
■
Total Number of Tracks Display
Press the [
FM Radio
2
1 Mono/Stereo Display
2 Frequency Display
3 Frequency Location Display
4
3
1,2
Battery Display
5 Preset/Manual/Add
] button in Video mode.
Each time you press the [
] button, the player stops
playing the video file or resumes playback.
■
4
5
] button.
The selected video file starts to play.
To stop playing the video file
10 Total Play Time Display
1
] button to select the desired
video clip and then press the [
■
NOTE
■
Preset/Remove Preset Display
When transferring a video file to the player using <Media Studio>, it is automatically converted into
SVI format before transfer. The file size is automatically adjusted, too.
Press and hold the [BACK] button to move to the main menu.
Video Information Display
Press the [
■
Basic Information
] button in Video mode.
Information on the current video appears. Press the [
disappear.
] button again to make the information
Button Functions
1 Play/Pause Indicator
2 File Name
3 Play Position Indicator
1
Buttons
Functions and Use
4 Current Play Time Indicator
2
■
Press and hold for power on/off.
Press for play/pause.
■
Press to display the menu screen.
■
Press and hold to move to the main menu.
Press to return to the previous stage.
■
■
■
Press and hold to start recording.
Press to set section repetition, stop recording and add to/delete from the playlist.
■
Press to move to the selected menu/confirm and save your selection.
■
Press and hold to quickly scan tracks.
Press to move to the previous track or play the current track from the
beginning.
■
■
■
Press and hold to quickly scan tracks.
Press to move to next track.
■
Press to increase the volume or move to an upper item/menu.
■
Press to reduce the volume or move to a lower item/menu.
■
Push in the direction of the arrow to lock the button functions.
■
3-2
5
6
any story 1
3
4
5 Volume Level Indicator
6 Full play time for the current video
To move to a certain position of the current video file
1 In a horizontal view, press and hold the [
■
any story 1
] button.
This enables you to scroll through the current video file.
the button when you have moved to the desired
2 Release
position.
■
The video starts playing from the position.
Samsung Electronics
Video
Photo Viewing
Video (Continued)
Photo Viewing
To play the previous/next video file
Before you start!
Connect the earphones, then turn on the player, and check the battery.
Press the [ ] button within 5 seconds after the current
video started playing.
■
1 Press the [
■
Press the [
] button.
This will move to the next video.
] button.
The photo preview window appears.
2 Press the [
any story 2
■
] button to select <Photo> and
then press the [
This will return to the previous video.
] button to select the desired
photo and then press the [
■
] button.
The selected photo is displayed.
To move to the previous/next photo
To set a bookmark
Press the [
] button while viewing a photo or
press the [
] button in preview mode to display the previous or next photo.
Once you bookmark a specific scene that you want to see again, you can enjoy it at
any time you want.
Press the [A
■
B/ ] button at the desired scene.
Photo
A bookmark is created at the currently played/stopped point.
1,2
■
You can set a maximum of 20 bookmarks.
NOTE
test0
Photo Viewing mode
■
NOTE
■
■
■
1/20
Preview mode
When transferring a photo file to the player using <Media Studio>, it is automatically converted into
JPG format before transfer. The file size is automatically adjusted, too.
You can also use the <File Browser> to search for a photo file. √ Page 14
You can keep listening to music even if you select <Photo> to view a photo.
Press and hold the [BACK] button to move to the main menu.
Video
Using Video menu
Photo Display Window
To Move to the bookmark
Go to
Delete
1 Press the [MENU] button in Video mode.
2 Press the [ ] button.
3 Press the [ ] button to select <Go to> and press
■
the [
] button.
4 Press [
Delete
] button.
test0
4
1/20
Slideshow Viewing
1 Press the [MENU] while viewing a photo
Zoom
] button.
4 Press [
press the [
Samsung Electronics
2
As Music Backgr..
2 Press the [
then press the [
The Bookmark menu appears.
the [
■
4 The current file number/total number of photos
Start Slideshow
1 Press the [MENU] button in Video mode.
2 Press the [ ] button.
3 Press the [ ] button to select <Delete> and press
■
3
Playback will start from the selected bookmark.
To Remove to the bookmark
Go to
1
] to select the desired bookmark and
press the [
■
1 Preview Pane
2 File Name
3 Thumbnails
Photo
The Bookmark menu appears.
] to select the removed bookmark and
] button.
■
] button to select <Start Slideshow> and
] button.
The slideshow will start.
To stop the slideshow
Press the [
■
] button in Slideshow mode.
This will stop the slideshow.
It will remove the selected bookmark.
3-3
Photo Viewing
Text View
Using Photo menu
Text Viewing
Photo Enlarging
Before you start!
You can read a novel or see the manuscript text of a news story or soap
opera while listening to music.
For instructions on transferring a text file to the player, refer to page 20-21.
Turn on the player, and check the battery.
1 Press the [MENU] while viewing a photo
2 Press the [ ] button to select <Zoom> and then
100%
200%
press the [
400%
■
1 Press the [
] button to select <Text> and
then press the [
] button.
2 Press the [
The Zoom Setting menu appears.
] button to select Text and
then press the [
3 Press the [
] button to select the desired scale
factor and then press the [
■
■
To scroll the text by the line
Press the [
] to move to the portion of the
photo to magnify.
■
cancel the magnification, select <100%> from the
5 ToZoom
options and then press the [ ] button.
■
This returns to the original size.
■
1,2
■
■
Press the [
] button.
You will see the text on the screen.
] button.
You can select either <100%> <200%> or <400%>.
4 Press the [
] button.
] button in the Photo Viewing mode to display the Zoom Setting menu.
NOTE
■
NOTE
■
■
■
] button.
Once you set <Scroll By> → <Page> in Text menu, you can
move to the previous / next page of the text file. √ page 47
Once you set <Scroll By> → <Line> in Text menu, you can
move to the previous / next line of the text file. √ page 47
Press and hold the [
] button to move up or down faster
through the file.
You can also use the <File Browser> to search for a text file. √ page 14
This product supports the TXT file format in Text mode.
You can keep listening to music even if you select <Text>.
Press the [
] button if you want to play a music while viewing text. Press the [
again to stop playing the music.
Press and hold the [BACK] button to move to the main menu.
] button
To set a photo as a music background image
1 Select a photo file to set as a background image.
Text View
Using Text menu
2 Press the [MENU] while viewing the photo.
3 Press the [
Audio Track 1
00:01:42
00:05:06
To set a bookmark
] button to select <As Music Background>
and then press the [
■
] button.
The Music Background Image Setting menu appears.
4 Press the [
the [
■
] button to select <Yes> and then press
] button.
Once you bookmark a specific part of text that you want to read again, you can enjoy it
at any time you want.
Press the [A
■
■
B/ ] button while viewing a text.
The current text screen is set to a bookmark with the † symbol displayed
on the top left corner.
The bookmark can be deleted by pressing the [A
bookmarked page.
B/ ] button in the
The selected photo file is set to a background image for music.
■
You can set a maximum of 20 bookmarks.
NOTE
■
Press the [A
B/ ] button while viewing a photo to display the Music Background Setting menu.
NOTE
3-4
Samsung Electronics
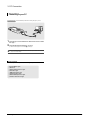
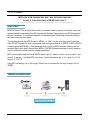
3. PC Connection
Loading Your Desired File
Connecting to your PC
Before you start!
Use the USB Cable provided when connecting the player to your PC.
1
2
the larger end of the USB cable to the USB Connection Port on the bottom
1 Connect
of the player.
2 Connect the USB cable to the USB port (
■
■
CAUTION
) on your PC.
<USB Connected> appears on the screen display of the player.
If you connect the player through a USB hub, the connection may be unstable. Please connect the
player to the computer directly.
PC Requirements
For use in conjunction with your PC, the following is required:
■
■
■
■
■
■
■
■
Pentium 300MHz or higher
USB Port 2.0
Windows XP Service Pack 2 or higher
DirectX 9.0 or higher
100MB of free hard disc space
CD Rom Drive (2X or higher)
Windows Media Player 10.0 or higher
Resolution 1024 X 768 or higher
Samsung Electronics
3-5
4. Adjustments
1. How to upgrade Firmware
2. Downloading Bootloader
4-1
Samsung Electronics
3. Setting MAC Address
Samsung Electronics
4-2
5. How to disassemble
Order(Description)
Picture
1. Remove the 4 Cover- Screws- B.
2. Remove the 4 screws .
3. Separate the Back Casing with your
thumbnail as shown in the figure below.
4. Separate the Battery Terminal with
tweezers.
5-1
Samsung Electronics
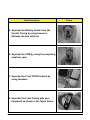
Order(Description)
Picture
5. Separate the Battery Holder from the
Central Casing by using tweezers.
(Release the two catches.)
6. Separate the PCB by using the projecting
earphone jack.
7. Separate the Front FPCB terminal by
using tweezers.
8. Separate the Front Casing with your
thumbnail as shown in the figure below.
Samsung Electronics
5-2
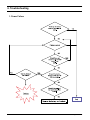
6. Troubleshooting
1. Power Failure
6-1
Samsung Electronics
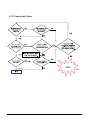
2. No Sound
Samsung Electronics
6-2
3. Voice Recording Failure
6-3
Samsung Electronics
4. Button Operation Failure
Samsung Electronics
6-4
5. PC Connection Failure
6-5
Samsung Electronics
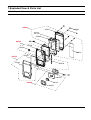
7.Exploded View & Parts List
1. Total Exploded View
AA001
AC000
AC299
AH085
AA053
AC040
AK200
AS074
AA130
AC357
AC010
AK240
AC410
AA098
AK140
AK327
Samsung Electronics
7-1
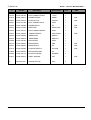
2. Parts List
Location
No
- S.N.A : Ser vice Not Av
Av ailable
ailable Part No.
Description
AA130
AH97-01676A
ASSY-CABINET-FRONT
AC010
AH64-04061A
AC357
Specification
Q’TY
SNA
ASSY
1
CABINET-FRONT
PMMA
1
SNA
AH63-01207A
CUSHION-LCD
PORON
1
SNA
AA001
AH97-01775B
ASSY CABINET-BACK
ASSY
1
AC000
AH64-04062B
CABINET-BACK
PC
1
SNA
AS074
AH63-01194D
SHEET-EMI
SHEET EMI
1
SNA
AA053
AH97-01677A
ASSY-CABINET-MIDDLE
ASSY
1
AC040
AH64-04063A
CABINET-MIDDLE
PPA+GF50%
1
AK200
AH64-04066A
KNOB-HOLD
ABS/PC
1
AK240
AH64-04067A
KNOB-MENU
ABS/TPU
1
AA098
AH97-01678A
ASSY-ENTER
ASSY
1
AK140
AH64-04064A
KNOB-ENTER
ABS
1
SNA
AK327
AH64-04065A
KNOB-SELECT
PC
1
SNA
AC410
AH63-01208A
CUSHION-SELECT
SILICON
1
SNA
AH085
AH61-02203A
HOLDER-BATTERY
PC
1
AC299
AH63-01211A
COVER-SCREW-B
RUBBER
4
AL004
AH68-01881A
LABEL-WINDOW
PET
1
A
6003-001166
SCREW-TAPTITE
SUS
4
7-2
SNA
SNA
Samsung Electronics
8. Electrical Parts List
Location no.
Code no.
Description & Specification Remarks
D601
D304
D501
Q101
Q302
0401-000164
0404-001089
0406-001239
0504-001170
0504-001193
DIODE-SWITCHING;KDS121V,80V,100MA,VSM,TP
DIODE-SCHOTTKY;RB551V-30,20V,500MA,SOD-3
DIODE-TVS;RClamp0502B,6V,125W,SOT-523
TR-DIGITAL;KRA304V,PNP,100MW,47K/47KOHM,
TR-DIGITAL;KRC408V,NPN,100MW,22K/47KOHM,
U502
Q501
U102
U401
U503
0505-001893
0505-001930
0902-001905
0909-001041
1001-001298
FET-SILICON;Si1024X,N,20V,515mA,0.7ohm,0
FET-SILICON;MCH3319,P,-12V,-2.6A,MAX255m
IC-MICROPROCESSOR;SA58700X,24MHz,32Bit,F
IC-REAL TIME CLOCK;RX-8564LC,VSOJ-12,12P
IC-ANALOG SWITCH;-,-,L10X,10P,2.1x1.6,1,
U203
U101
U301
U302
U402
1105-001672
1203-002213
1203-003549
1203-003663
1203-003708
IC-DRAM;EM48AM1684,16Mx16Bit,TFBGA,54P
IC-VOL. DETECTOR;XC61CC2502,SSOT-24,4P,IC-POSI.FIXED REG.;XC6206P152MR,SOT-23,3
IC-BATTERY;ISL6294IRZ-T,DFN,8P,2x3mm,PLA
IC-DC/DC CONVERTER;AAT3151,DFN,12P,3x3mm
U303
U501
VD102
R710
R520
1203-004064
1204-002581
1405-001093
2007-000137
2007-000138
IC-DC/DC CONVERTER;AAT2512,TDFN,12P,3x3m
IC-TUNER;Si4701-A14-GM,QFN,24P,4x4mm,PL
VARISTOR;14V,20A,1x0.5x0.6mm,TP
R-CHIP;2KOHM,5%,1/16W,TP,1005
R-CHIP;100ohm,5%,1/16W,TP,1005
R506
R510
R607
R704
R716
2007-000139
2007-000140
2007-000143
2007-000144
2007-000148
R-CHIP;220ohm,5%,1/16W,TP,1005
R-CHIP;1Kohm,5%,1/16W,TP,1005
R-CHIP;4.7Kohm,5%,1/16W,TP,1005
R-CHIP;5.1KOHM,5%,1/16W,TP,1005
R-CHIP;10Kohm,5%,1/16W,TP,1005
R518
R701
R118
R512
R105
2007-000155
2007-000157
2007-000162
2007-000170
2007-000171
R-CHIP;27Kohm,5%,1/16W,TP,1005
R-CHIP;47Kohm,5%,1/16W,TP,1005
R-CHIP;100Kohm,5%,1/16W,TP,1005
R-CHIP;1Mohm,5%,1/16W,TP,1005
R-CHIP;0ohm,5%,1/16W,TP,1005
R303
R112
R401
R501
R708
2007-000636
2007-000982
2007-001292
2007-001298
2007-001323
R-CHIP;270KOHM,5%,1/16W,TP,1005
R-CHIP;5.6Kohm,5%,1/16W,TP,1005
R-CHIP;33ohm,5%,1/16W,TP,1005
R-CHIP;51ohm,5%,1/16W,TP,1005
R-CHIP;3KOHM,5%,1/16W,TP,1005
R114
R319
R405
R706
R108
2007-001325
2007-001333
2007-001335
2007-007001
2007-007100
R-CHIP;3.3Kohm,5%,1/16W,TP,1005
R-CHIP;18KOHM,5%,1/16W,TP,1005
R-CHIP;36KOHM,5%,1/16W,TP,1005
R-CHIP;3.9KOHM,5%,1/16W,TP,1005
R-CHIP;10Mohm,5%,1/16W,TP,1005
R318
R712
R604
R314
R309
2007-007107
2007-007148
2007-007199
2007-007942
2007-008517
R-CHIP;100Kohm,1%,1/16W,TP,1005
R-CHIP;3.6KOHM,5%,1/16W,TP,1005
R-CHIP;2.7OHM,5%,1/16W,DA,TP,1005
R-CHIP;1Mohm,1%,1/16W,TP,1005
R-CHIP;240Kohm,1%,1/16W,TP,1005
C502
C132
C112
C116
C122
2203-000233
2203-000254
2203-000330
2203-000854
2203-000885
C-CER,CHIP;0.1nF,5%,50V,C0G,1005
C-CER,CHIP;10nF,10%,16V,X7R,1005
C-CER,CHIP;0.012nF,5%,50V,C0G,1005
C-CER,CHIP;0.039nF,5%,50V,C0G,1005
C-CER,CHIP;4.7nF,10%,25V,X7R,1005
C519
C109
C117
C302
C121
2203-001405
2203-002709
2203-005383
2203-005900
2203-005993
C-CER,CHIP;22nF,+80-20%,25V,Y5V,1005
C-CER,CHIP;100nF,+80-20%,16V,Y5V,1005
C-CER,CHIP;0.0070nF,0.1pF,50V,-,1005
C-CER,CHIP;1000NF,+80-20%,10V,Y5V,1005
C-CER,CHIP;68NF,10%,16V,X7R,TP,1005
C601
C101
C120
C515
L501
2203-006093
2404-001064
2404-001348
2404-001407
2703-001167
C-CER,CHIP;1000nF,+80-20%,6.3V,Y5V,1005
C-TA,CHIP;10UF,20%,6.3V,WT,TP,2012
C-TA,CHIP;100UF,20%,6.3V,-,TP,3.2X1.6X1.
C-TA,CHIP;330uF,20%,2.5V,-,REEL,3528
INDUCTOR-SMD;8.2nH,5%,1608
L703
L302
L301
X102
X101
2703-002203
2703-002653
2703-002829
2801-003856
2801-004318
INDUCTOR-SMD;15nH,5%,1005
INDUCTOR-SMD;4.7UH,20%,2828
INDUCTOR-SMD;10uH,20%,2828
CRYSTAL-SMD;0.032768MHz,20ppm,28-ACP,7pF
CRYSTAL-SMD;12MHz,20ppm,-,12PF,80ohm,TP
Samsung Electronics
Location no.
Code no.
Description & Specification Remarks
MIC50
B503
B302
B501
SW704
3003-001108
3301-001105
3301-001148
3301-001345
3404-001152
MIC-CONDENSOR;5.5V,0.100~0.350 mA,-22 dB
BEAD-SMD;1.6x0.8x0.8mm,-,BEAD-SMD;60ohm,1608,TP,-,BEAD-SMD;600ohm,2012,300mA,TP,679ohm/11
SWITCH-TACT;12V DC,20mA,160gf,4.5x4.0x2.
SW702
CON70
CON40
BAT30
CON60
3408-001038
3708-001912
3708-001971
3710-001436
3710-002276
SWITCH-SLIDE;4V,300mA,SPST,ON-ON,CONNECTOR-FPC/FFC/PIC;9P,0.5mm,SMD-A,AU,
CONNECTOR-FPC/FFC/PIC;31P,0.3mm,SMD-A,AU
SOCKET-BOARD TO BOARD;2P,1R,1.27mm,SMD-A
CONNECTOR-INTERFACE;24P,1R,0.5mm,SMD-A,A
J501
ANT1
U504
P601
AB035
3722-001605
4202-001164
4709-001374
AH63-01273A
4302-001205
JACK-PHONE;3P,AG,BLK,SMD-A
ANTENNA-CHIP;2400-2490MHz,-,-5dB,5:1,50o
BLUETOOTH MODULE;BTTZ0502SA,3.6V,2400-24
GASKET;YP-T9,SUS,0.5mm,1.5mm,3mm,GOLD
BATTERY-POLYMER;3.7V,740mAH,-,-,4.2V,360
AH07-00191A
AH30-00087D
AH39-00899A
AH61-02031B
AH68-00908H
LCD-DISPLAY;HTT18QC3,YP-T9,-,34x47.8x0.2
PHONE-EAR(EP-370);BLACK,EP-370,16ohm,NOR
CBF CABLE;USB CABLE,49338-0001,YP-T9,24,
NECK-LACE;-,-,-,-,-,LABEL-SERIAL;YP-T9,ALL,art paper,-,W21,L
AH92-02637A
AH92-02637B
AH92-02637C
ASSY PCB;YP-T9BZ,MLC 1GB, Bluetooth YP-T9BZ Series
ASSY PCB;YP-T9BQ,MLC 2GB, Bluetooth YP-T9BQ Series
ASSY PCB;YP-T9BA,MLC 4GB, Bluetooth YP-T9BA Series
8-1
- This Document can be used without Samsung’s authorization -
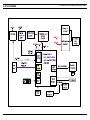
9. BLOCK DIAGRAM
1-1. MAIN
Samsung Electronics
9-1
- This Document can be used without Samsung’s authorization -
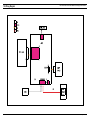
10. Wiring Diagram
1-1. MAIN
10-1
Samsung Electronics
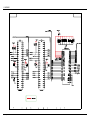
11. PCB Diagram
- This Document can be used without Samsung’s authorization -
11-1. TOP
Samsung Electronics
11-1
11-2. BUTTOM
11-2
Samsung Electronics
- This Document can not be used without Samsung’s authorization -
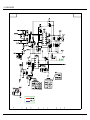
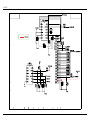
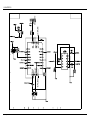
12. Schematic Diagram
1-1. BLOCKDIAGRAM
1-1. MAIN
Samsung Electronics
12-1
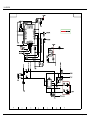
1-2. MAIN CPU
12-2
Samsung Electronics
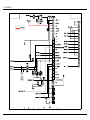
1-3. MEMORY
Samsung Electronics
12-3
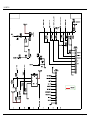
1-4. POWER/CHARGER
12-4
Samsung Electronics
1-5. LCD
Samsung Electronics
12-5
1-6. AUDIO/FM
12-6
Samsung Electronics
1-7. CONNECTOR
Samsung Electronics
12-7
1-8. SWITCH
12-8
Samsung Electronics
1-9. BLUETOOTH
Samsung Electronics
12-9
13. Circuit Description
- This Document can be used without Samsung’s authorization -
1. Major Functions by Blocks
Samsung Electronics
13-1
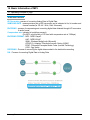
14. Basic Information of MP3
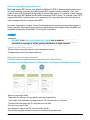
1-1. Operating Principle of yepp
Terms and Overview
AV Conversion: process of converting Analog Data to Digital Data
SAMPLING RATE : means precision rate of A/D conversion and is indicated in Hz, bit number and
channel number(for CD: 44.1 KHz, 16bit, 2channels)
ENCODING : process of compressing and converting digital data obtained through A/D conversion
to audio format
Compression rate: indicated in bps(bit per second)
(For MP3: sound quality of CD level with compression rate of 128kbps)
ENCODING FORMAT : MP3 : MPEG Layer3
AAC : MPEG-2 AAC
WMA : Windows Media Audio (Microsoft)
ATRAC(3) : Adaptive TRansform Acoustic Coding (SONY)
EPAC : Enhanced Perceptual Audio Coder (Luscent Technology)
OGG : Ogg Vorbis
DECODING : Process of recovering the digital data encoded to the data before encoding
D/A : Process of converting Digital Data to Analog Data
Samsung Electronics
14-1
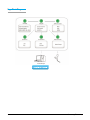
Yepp Block Diagram
14-2
Samsung Electronics
Yepp Vocabulary
Yepp (Young Energetic Personal Passinate)
MP3 player that enables you to enjoy audio data like music file in existing CD in high quality by
compressing it to 1/12 level without loss of quality using MPEG1 Layer3(audio compression
technology of animation and sound compression technique). You can also use it for learning foreign
language and Internet broadcasting.
MPEG
MPEG is an abbreviation of Moving Picture Expert Group and means specification defining the
compression and de-compression type of animation by MPEG established in 1988.
MP3
MP3 means MPEG1 Layer3 and compression rate can be up to 96:1(phone) to 12:1(CD) depending
on sound quality with compression coding technique of audio of MPEG technology.
(file extension: "mp3") That is, up to 150 pieces of songs can be recorded in one copy of CD with
MP3 compression.
FLASH Memory
Flash memory is the memory chip where entered information will not be deleted even if the power is
turned off while data is entered, and data can be freely entered or deleted.
Smart Media Card
Compact and light semiconductor media card in dimension of 45.1 x 37.1 x 0.76mm and weight of
2.0g. It is used as a storage of portable device and high quality media storage device of digital
camera and music MP3 player.
Flash memory is embedded to store the data even if the power is turned off and it is a super-high
speed product that can record up to 250 characters per second.(mass production of 8MB, 16MB,
32MB currently at Samsung Electronics)
OTP (Once Time Programmable)
OTP is one type of micro controller(MCU) and is the customer-oriented semi-conductor on which
the customers can directly record the program. OTP type MCU is rapidly growing as its life cycle of
set product and multi-kind/small quantity production system is introduced.
Since existing type of micro controller uses Mask ROM which cannot be played or recorded again, it
requires over 5 months to develop set products, and it is not suitable for products with rapid change
of product model.
Firmware
It is a program that controls and manages hardware. Firmware is distinguished from hardware in
that it is a program but is distinguished from general applications in that it is closely related to
hardware. In general, firmware is saved in ROM.
Samsung Electronics
14-3
IP (Information Provider)
Company that provides information that users want through communication system with certain fee.
SecuMAX
As multimedia digital contents distributions become active in networks such as Internet and PC
communication, copyright issue has appeared as an important topic. It is a system that can protect
the right of copyright holders and enables the user to conveniently use contents. To receive service,
member registration is required at digital contents service site adopting SecuMAX.
When completing member registration, customer ID, password and resident registration number will
be registered at SecuMAX server and utilized as a basic data for performing user certification role.
After registration, download the dedicated player and decryption key to use service.
Music drive developed by Samsung Electronics is embedded with SecuMAX decryption module.
Decryption key will be registered during installation of music drive. Music file downloaded from digital contents music service site with SecuMAX can be played back.
Yepp Explorer
This software controls yepp player in PC. You can move or delete music list or voice saved in yepp
card or embedded memory. This software is required to use yepp.
Music Drive
Software audio player for PC embedded with MPEG II AAC Decoder first in Korea. It supports not
only playback of MPEG audio format as well as SecuMAX, encryption protection system.
CD Ripper
MP3 compression software that converts CD music in PC to MP3 file.
OGG (Ogg Vorbis)
OGG(Ogg Vorbis) is featured to have "higher compression rate than MP3', 'higher quality than
MP3', 'no limit in use, distribution and development due to open source type. The biggest feature of
Ogg Vorbis is that it has no limit in use of format itself.
The biggest feature that distinguishes Ogg Vorbis from existing music file is that it supports
VBR(Variable Bit Rate) by default.
Of course, MP3 also supports VBR format, but has effect of reducing capacity due to VBR based on
existing MP3. Ogg Vorbis file supports VBR by default and helps you enjoy high quality music
without loss due to big width of bit rate.
14-4
Samsung Electronics
1-2. MP3 Overview
MP3 is one of file extension like .hwp, .wav, .txt used in computer.
Exactly, it is the abbreviation of MPEG Audio Layer-3.
Origin of MP3
MPEG is Motion Pictures Expert Group and is a standard made by experts in this area under international standard organization like ISO(International Standard Organization) and IEC(International
Electric Committee). It is technical standard of compressing and transmitting video and audio signals and recovering them again.
The first specification that MPEG made is MPEG-1 in 1988. It is the technology used to produce
video CD. MP3 means the audio compression part among specification of MPEG-1(1995). MPEG-2
is used together with MPEG-1. AAC(Advanced Audio Coding or MP4) receives attention with its
excellent digital audio and is derived from MPEG-2. MPEG-4(lastests standard on movie compression for conference communication) is being established.
MP3 is most widely used and called "MPEG Audio Layer-3", which is version up from Layer-1 and
Layer-2. In general, it is called MP3 since Layer-1 has compression rate of 1:4, Layer-2 of 1:61:8,
Layer-3 of 1:101:12.
Using MP3 technology, up to 100 songs(7 hours) can be contained in one copy of empty CD of
650MB.
Transition of Portable Player
Samsung Electronics
14-5
1-3. Understanding of Digital Audio Format
MP3
MP3 is most widely used and called "MPEG Audio Layer-3", which is version up from Layer-1 and
Layer-2. In general, it is called MP3 since Layer-1 has compression rate of 1:4, Layer-2 of 1:61:8,
Layer-3 of 1:101:12.
AAC
MP3 is most widely used and called "MPEG Audio Layer-3", which is version up
from Layer-1 and Layer-2. In general, it is called MP3 since Layer-1 has
compression rate of 1:4, Layer-2 of 1:61:8, Layer-3 of 1:101:12.
WMA (Windows Media Audio)
Multimedia compression type of Microsoft. Only music data is compressed from
“WMT”. Streaming and file format also support this data. In a same quality as MP3,
it is about 1/2 size and contains Windows Media Rights Manager with copyright
protection technology. It can be played back with [Media Player] provided in
Windows98.
ATRAC3
Sound compression type of MD and latest specification of [ATRAC (Adaptive
TRansform Acoustic Coding)] developed by SONY. Has about 2 compression rate
than existing ATRAC.
Real Audio G2
Format type developed by Real Network. High quality can be obtained at low transmission speed of 16Kbps-32Kbps using [RealAUDIO G2 Music Codec] as compression type. Since streaming play in Internet radio is the main purpose, file does
not contain copyright protection technology. “Real Player G2” supports MP3 playback and “Real Juke Box” supports encoding from CD to MP3.
14-6
Samsung Electronics
Tips
How MP3 can produce same quality as CD?
Ears of human can listen to signal in the range of 20Hz~20KHz. It is called "audible frequency". To
convey the audible sound in digital type CD, sampling frequency of 44.1KHz, about 2 times of audible frequency, should be used. It is the task of dividing sound signal to 44,100 pieces per second
and making the signal to digital format of 0 and 1. How delicately the sample can be expressed will
be determined by number of bit per sample. Audio CD is 16 bit. It means that 1 sample can be
expressed in 65,536(16 square of 2) stage.
When converting CD music to WAV file, the capacity is about 40MB(for 4 minutes). By converting it
to MP3, it reduces to 4MB since "loss compression", the feature of MP3, is used. Loss compression
type removes the sound beyond the range of audible frequency(20Hz~20KHz). It uses the features
that small sound cannot be heard after very strong sound. <Figure 1> is the sound wave before
loss compression. It can be regarded as the sound wave of music CD or cassette tape containing
sound people cannot listen. When it is made into MP3, it is as shown in <Fig.2>.
Volume Control
Capacity can be reduced much by adjusting the degree
of loss. However, it causes deterioration of sound quality. Music CD contains sound made with 16 bit
44.1KHz of stereo sampling. Stereo is the type of dividing the sound into left and right. CD should change
analog
sound to digital.
Digital information is cut between sections and location information is saved in each section.
"Sampling rate" is the standard of how many sub-section it will divide 1section. Divided frequency
part is called 8 bit and 16 bit. 8 bit sampling means that frequency is divided into 2 stage, that is,
sound pitch of 256 stage. 16 bit sampling divides into 65,536 sound pitch. In addition, 44.1KHz
means sampling of 44,100 times per second. To reduce the amount of information made at digital,
sampling bit number and frequency should be set low, but it will cause deterioration of sound quality. There is no difference in sound quality between MP3 and CD since encoding(converting CD
track to MP3) is done with 44.1KHz at 16 bit. Better CD sound quality cannot be obtained by lowering the sampling rate, but the capacity can be reduced.
Samsung Electronics
14-7
OGG(Ogg Vorbis)
OGG(Ogg Vorbis) is featured to have "higher compression rate than MP3', 'higher quality than
MP3', 'no limit in use, distribution and development due to open source type. The biggest feature of
Ogg Vorbis is that it has no limit in use of format itself.
The biggest feature that distinguishes Ogg Vorbis from existing music file is that it supports
VBR( Variable Bit Rate) by default.
Of course, MP3 also supports VBR format, but has effect of reducing capacity due to VBR based on
existing MP3. Ogg Vorbis file supports VBR by default and helps you enjoy high quality music without loss due to big width of bit rate.
14-8
Samsung Electronics
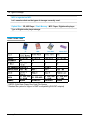
1-4. Type of Storage
MP3 is regarded as MP3.
Let's examine what are the types of storages currently used.
Optical Disc : CD, MD Player / Flash Memory : MP3 Player, Digital audio player
Type of Digital audio player storage.
Audio Format Table
* SSFDC (Solid State Floppy Disc Card) File System
* Standard file system for support of SMC's compatibility(DOS/FAT adopted)
Samsung Electronics
14-9
Small Form - factor Cards Comparison
14-10
Samsung Electronics
1-5. Copyright
Various kinds of methods are combined to unify technical
specification to prevent digital music data from illegal reproduction.
Let's examine groups and vocabularies related to copyright.
SDMI (Secure Digital Music Initiative)
Internet music record company consortium to pursue development of digital music file format.
World-class music makers and related groups are formed to protect copyright of music and to prevent illegal reproduction.
-PD : Portable Device
-PM : Portable Media (SMC,MMC,MS,SD Card)
-UID : All PD, PM should have unique ID.
-Binding : All Digital Audio should be bounded to PD or PM.
DRM (Digital Rights Management)
Manage interests of persons related to copyright that occurs due to use of digital contents protected
from illegal use of digital contents through various channels.
WaterMarking
Technology of inserting the specific data to claim copyright of multimedia contents so that eyes and
ears of human cannot be distinguished.
SecuMAX
Digital Security Total Solution adopting Snake encoding algorithm.
Version1.0 contents in service in Korea (M4you.com, etc.)
SDMI compliant vrsion2.0 development completed
Reproduction Prevention System
Reopening of MP3 music service.
Lots of dispute have occurred in network due to copyright.
However, as online MP3 sales have resolved, the number of legal Internet site has increased.
However, reproduction prevention system is required for legal sales. All Internet sites serving
Korean song in MP3 are introducing reproduction prevention system.
Samsung Electronics
14-11
Meaning of SecuMAX System Application
Most legal Internet MP3 service sites adopt SecuMAX and YEPP of Samsung and several companies have hardware supporting SecuMAX among MP3 players currently distributed. Then, user
needs to receive MP3 applied with SecuMAX to receive legal service. It is required to have program
that can play back MP3 applied with SecuMAX technology in MP3 player. For example, since YEPP
supports SecuMAX, it can play back, but it means that you cannot play back this at the players of
other companies that do not support SecuMAX.
At present, organization has been formed for standardization of reproduction prevention system in
foreign countries. Samsung Electronics has also participated in this standard using SecuMAX and
completed development of SecuMAX 2.0 with world compatibility.
SecuMAX
SecuMAX is the reproduction prevention system that is made for
protection of copyright in rapidly growing distribution of digital contents.
Reopening of MP3 Music Service
-Digital contents copyright protection and management service.
-Fundamentally prevent the illegal distribution
Only legal users can play back music
Dedicated software required(ex.Samsung Electronics, Music Dreve)
Prevention of usual illegal use such as file transfer, CD-R Copy and hardware reproduction.
-Report for copyright holder
Basic data for collection of copyright fee and near copyright fee
Track sales of all publications through Internet, PC communication or 3rd path.
Provide sales information per IP, song and hour real time.
-Can serve any type of files
-Can applied to Internet and PC communication equally
-Can provide copyright protection service for hardware at the same time.
14-12
Samsung Electronics