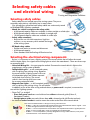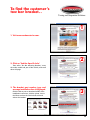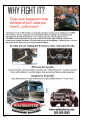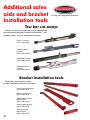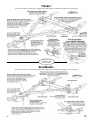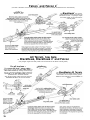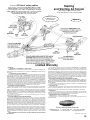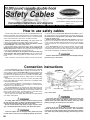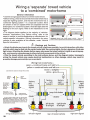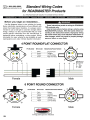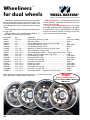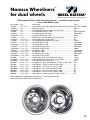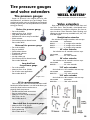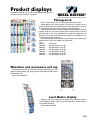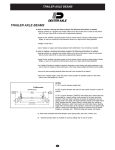
1
A guide to ROADMASTER towing, braking and suspension products We get your towed car there… while stopping safely along the way. ROADMASTER, Inc. 6110 NE 127th Avenue • Vancouver, WA 98682 • 800-669-9690 • fax 360-735-9300 • roadmasterinc.com © Copyright 2009-2012 ROADMASTER, Inc. All rights reserved. 254056-09 12/12 About us… Towing and Suspension Solutions If your version of the RV lifestyle includes the flexibility of a towed vehicle, we design, develop and manufacture everything to “get your towed car there, while stopping safely along the way” — tow bars, tow bar brackets, supplemental braking systems and towing accessories. And whether or not a towed vehicle is part of your next journey, an RSS anti-sway bar — for trucks, vans and SUVs, as well as motorhomes — will improve stability and cornering control. These products, and every ROADMASTER product, come with a host of safety and convenience features unavailable anywhere else, built to the ROADMASTER standard — unsurpassed quality in design, testing, material and workmanship. The ROADMASTER Difference... •‘Hands-on’ design and manufacturing ROADMASTER doesn’t outsource. All of our core products are designed, engineered and manufactured at our plant in Vancouver, Washington, with virtually every process done under the same roof. The reason for ‘hands-on’ manufacturing is simple: quality. “Quality starts on the inside, and when you control the process, you control the quality,” as Jerry A. Edwards, who founded ROADMASTER in 1974, is fond of saying. To our way of thinking, “quality first” is the reason more ROADMASTER towing products are on the road today than any other brand — by nearly a two-to-one margin. •The most stringent testing in the industry ROADMASTER was the first towing products company to use computerized testing — as well as “real world” physical testing — to ensure structural integrity, longevity, and the safety of our customers. The software program we use is called “FEA,” which stands for “finite elemental analysis.” FEA is the same program NASA scientists use to test their designs. Contents Towing and Suspension Solutions Company description......... inside front cover Contact information................................... 3 Dealer web resources................................. 4 Sell a system Why ROADMASTER?................................... 5 Selecting a tow bar and a mounting bracket.......................... 6 Selecting safety cables and electrical wiring................................ 7 Selecting a supplemental braking system.... 8 Tow bars and tow dollies Sterling All-Terrain features........................ 9 All-Terrain series features......................... 10 Falcon 2 features..................................... 11 StowMaster features................................. 12 Tracker features....................................... 12 Combo Kits.............................................. 13 Adjustable tow dollies......................... 14-16 Tow bar mounting brackets Why our brackets are rated #1, ‘Hidden’ mounting brackets, and description of FEA testing........................................ 17 Why are there three ‘hidden’ bracket styles?......................... 18 Why the crossbar?.................................... 18 Comparison of bracket installation times — ROADMASTER vs Blue Ox......... 19 Tow bar adaptors..................................... 20 Using the ROADMASTER web site to find a customer’s tow bar bracket.......... 21 Example of tow bar bracket installation instructions (‘09-’10 Honda Fit)........ 22-24 Supplemental braking systems Why do towed vehicles need supplemental brakes?.................. 25 Braking weights map................................ 26 Even Brake features.................................. 27 9700 features.......................................... 28 InvisiBrake features.................................. 29 Crossover................................................. 29 BrakeMaster features............................... 30 Braking system accessories applications chart............................ 31-32 Brake-Lite Relay and stop light switch applications.......... 33 Using the ROADMASTER web site to find required or optional accessories..... 34 The 9700 and Even Brake comparison...... 35 The 9700 vs Brake Buddy.................... 36-37 Even Brake vs Vantage Select............... 38-39 Frequently Asked Questions — BrakeMaster......................................... 40 Even Brake........................................... 41 The 9700.............................................. 42 InvisiBrake............................................ 43 Qualifying the customer for a supplemental braking system................ 44 Accessories Guardian rock guard and Tow Defender tow shield................ 45 Safety cables............................................ 46 Electrical............................................. 47-48 Towing accessories................................... 49 Hitch accessories — Hitch accessories for height adjustment.............................. 50 Other hitch accessories......................... 51 Maintenance accessories.......................... 51 Care and cleaning................................... 52 Suspension products Overview................................................. 53 Anti-sway bars RSS anti-sway bars................................ 54 Sell sheet.............................................. 55 ‘Why fight it?’ trade journal ad.............. 56 Reflex steering stabilizers.......................... 57 Davis TruTrac bars.................................... 58 continued on next page 1 continued from preceding page Merchandising Braking system literature and displays...... 59 Towing and suspension literature and displays........................... 60 Miscellaneous literature and POP materials................................ 61 #095D double-sided product display... 62-63 #095S single-sided product display..... 64-65 #100 triple-sided product display........ 66-67 #089 small demo product display............ 68 #079 RSS product display........................ 69 Additional sales aids and bracket installation tools................ 70 Wheel Masters Dual tire inflators..................................... 95 Wheeliners for dual wheels — Wheel Masters...................................... 96 Namsco................................................ 97 Stainless steel wheel covers...................... 98 Tire pressure gauges and valve extenders.............................. 99 ‘Spare Air’ tire inflation system and hose parts kit............................... 100 ‘Level Master’ trailer levels, ‘Vision Plus’ side view mirrors and rubber valve stem support............ 101 Accessories............................................ 102 Product displays..................................... 103 Technical information Vehicle-Specific Applications..................... 71 Tow bar brackets — supplemental instructions................. 72-75 Safety cable connection instructions and diagrams — 6,000-pound capacity...................... 76-79 8,000-pound capacity...................... 80-81 10,000-pound capacity.................... 82-83 BrakeMaster top 10 installer tips............... 84 Even Brake diagnostic flow charts............. 85 InvisiBrake FAQs................................. 86-87 Wiring diagrams — ‘Combined’ towed vehicle to ‘combined’ motorhome..................... 88 ‘Combined’ towed vehicle to ‘separate’ motorhome....................... 89 ‘Separate’ towed vehicle to ‘combined’ motorhome..................... 90 ‘Separate’ towed vehicle to ‘separate’ motorhome....................... 91 Standard wiring codes for ROADMASTER products.................... 92-94 All illustrations and specifications contained in this guide are based on the latest information available at the time of publication. ROADMASTER, Inc. reserves the right to make changes at any time, without notice, in material, specifications and models, or to discontinue models. 2 Contact information Towing and Suspension Solutions Hours of operation — Monday through Friday, 7:00 a.m. to 5:00 p.m., Pacific Standard Time Management contacts Name Title Phone Ext. E-Mail Eric Jason................... National Sales Manager................. 800-669-9690.......117...... ejason@roadmasterinc.com Barry Redman............ National Sales Coordinator............. 800-669-9690.......171...... bredman@roadmasterinc.com David Robinson.......... Director of Marketing...................... 800-669-9690.......195...... drobinson@roadmasterinc.com Wayne Wells.............. RSS suspension support.................. 800-669-9690.......169...... wwells@roadmasterinc.com Customer Service contacts Nancy Wright............. Customer Service Manager............. 800-669-9690.......164...... nwright@roadmasterinc.com Ann Bohna................. Office Manager.............................. 800-669-9690.......133...... abohna@roadmasterinc.com Linda Isaman............. Customer Service Representative..... 800-669-9690.......112...... lindai@roadmasterinc.com Kelsye Anderson......... Customer Service Representative..... 800-669-9690.......154...... kanderson@roadmasterinc.com Leslie Stief.................. Customer Service Representative..... 800-669-9690.......106...... lstief@roadmasterinc.com Melissa Davenport..... Customer Service Representative..... 800-669-9690.......105...... mdavenport@roadmasterinc.com Meredith Babitzke...... Customer Service Representative..... 800-669-9690.......139...... mbabitzke@roadmasterinc.com Technical contacts James Linnebur.......... All Products.................................... 800-669-9690.......155...... jlinnebur@roadmasterinc.com Benny Asanoma......... All Products.................................... 800-669-9690.......157...... basanoma@roadmasterinc.com R & D - New Bracket Design Glenda Apple............. New vehicle research...................... 360-896-0407.......104...... gapple@roadmasterinc.com Literature All product literature........................................................ 800-669-9690.......127...... lit@roadmasterinc.com Factory Representatives Territory Phone E-Mail Barnes & Associates Rick Barnes (principal)......................... Oregon, Montana,......... 503-804-2112..... barnes@sterlink.net Washington, Idaho, Utah Van Dyke Enterprises Jerry Van Dyke (principal).................... southern California........ 626-893-0350..... jerry@vandykeenterprises.com Marv Flak southern California,....... 909-215-6563..... marv@vandykeenterprises.com Nevada (Las Vegas), Arizona Richard Jackson.................................. northern California,........ 530-676-0168..... richard@vandykeenterprises.com Nevada (Reno) Evan Mecham & Associates Evan Mecham (principal)..................... Wyoming, Colorado,...... 303-589-4510..... emecham@evanmecham.com New Mexico, west Texas Cody LaDuke...................................... Wyoming, Colorado,...... 720-519-3033..... claduke@evanmecham.com New Mexico, west Texas Marla LaDuke..................................... Wyoming, Colorado,...... 303-887-8660..... mladuke@evanmecham.com New Mexico, west Texas Royce Flynn............................................. east Texas, Oklahoma,... 501-690-8510..... cmsraf@sbcglobal.net Louisiana, Arkansas 3 Dealer web resources Towing and Suspension Solutions Close to 40 years of towing experience is just a click away! Every qualified ROADMASTER dealer has access to training seminars, dealer referrals and marketing literature at www.roadmasterinc.com. How do you become a qualified dealer? Click on the “Dealer Section” on the web site, scroll down to “Become a Dealer,” and fill out a simple form — which could be the most profitable five minutes you’ll ever spend. Training seminars… …are scheduled about once every fiscal quarter. There are two training tracks — sales and technical, where you and your staff will learn about our products in two focusedgroup sessions, visit our production facilities, and learn to use our web site to full advantage. Dealer referrals… …bring ROADMASTER customers to you, through the “Locators” tab on our web site. Our top 100 mounting brackets… …are also listed in this section, for your reference. This information is constantly updated to give you a heads-up on customer towed vehicle preferences. Staying current with this list is the logical way to stock mounting brackets. Order product literature… …by clicking the link to our literature department. All current product brochures, as well as other sales aids and technical information, are available through this link. 4 Sell a System 1. tow bar 2. mounting brackets 3. accessories 4. supplemental brakes 3. accessories 1. tow bar 2. mounting brackets 4. supplemental brakes Towing and Suspension Solutions Why ROADMASTER? Towing and Suspension Solutions Before you can begin to sell a customer a towing system, you first have to sell them ROADMASTER. If you’re lucky, they’ve already heard about our great products and it will be an easy sale. If they haven’t heard about ROADMASTER, or are asking about a competitor, share with them some of the points below and sell them ROADMASTER. Having the customer sold on ROADMASTER and then sold on the individual product helps ensure customer satisfaction and generates customer loyalty. • ROADMASTER doesn’t outsource. All of our core products are designed, engi neered, built and tested at our manufacturing facilities in Vancouver, Washing ton. This company does it all in-house, controlling the process from start to finish, to ensure quality and customer satisfaction. • ROADMASTER double-tests — both “real world” physical testing, and FEA (Finite Elemental Analysis) computer testing — we find out what abuse a prod uct can take long before we ever sell it. • Finite Elemental Analysis — this is computer-based design and testing where every engineered product is tested in the virtual world for strength, wear and failure point. FEA is the same system used by NASA on their designs. The automotive and biomedical industries, among others, also use finite elemental analysis. Qualify the customer! Qualify the vehicle! Now that your customer knows that ROADMASTER is the manufacturer of the finest towing products on the market, and your customer wants the best, you need to find out what they REALLY want and need. Qualifying the customer makes sure you find the ROADMASTER product that will satisfy their wants and needs. Ask the customer questions such as: how often will they be towing their vehicle; do they wish to tow more than one vehicle; how long do they plan to keep their current towed vehicle; and how long do they plan to keep their current towing vehicle. These questions will become relevant as this process continues. The most important aspect of qualifying the customer is qualifying the vehicle they wish to tow. Not all vehicles can be towed the same way. • Can this vehicle be ‘dingy’ or ‘flat’ towed ‘as is?’ • Can the vehicle be towed with all four wheels on the ground (‘flat’ towed) without transmission damage? See the owner’s manual or contact the dealership. This process may take some effort on your part! • If the vehicle has front-wheel drive, is the customer willing to install a transmission lube pump system in the vehicle? • Is the customer interested in a tow dolly system? Tow dollies are ideal for customers who want to tow multiple vehicles, and for those who do not want to modify their towed vehicle in any way. • How much does the vehicle weigh? • Refer to the owner’s manual or contact the dealership to determine the weight of the vehicle. • Most standard-size passenger cars can be towed with a 5,000- or 6,000-pound capacity tow bar. Use a 10,000-pound capacity tow bar (BlackHawk 2 All-Terrain) for larger vehicles. • The RoadMaster Tow Dolly (part number 2000-1) can tow a vehicle weighing up to 4,380 pounds; the RM3477 tow dolly can tow a vehicle weighing up to 4,250 pounds. 5 Selecting a tow bar and a mounting bracket Selecting a tow bar Towing and Suspension Solutions • Car-mounted or motorhome-mounted? • Car-mounted tow bars are mounted and stored on the front of the towed vehicle, and can be easily removed. • Tracker (rigid ‘A-frame,’ 5,000-pound towing capacity) • StowMaster (collapsible, 6,000-pound towing capacity) • StowMaster All-Terrain (premium collapsible, 6,000-pound towing capacity) • Motorhome-mounted tow bars are attached to the motorhome, and can be stored on the back of the motorhome or removed when not in use. All ROADMASTER motorhome-mounted Sterling All-Terrain tow bars are collapsible. • Falcon 2 (6,000-pound towing capacity) • Falcon All-Terrain (premium, 6,000-pound towing capacity) • BlackHawk 2 All-Terrain (premium, 10,000-pound towing capacity) • Sterling All-Terrain (aluminum premium, 6,000-pound towing capacity) Selecting a tow bar mounting bracket • The bracket must match the make, model and year of the vehicle to be towed. • Check the ROADMASTER Bracket Guide, or better yet — check online at www.roadmasterinc.com. (Under ‘Vehicle-Specific Info,’ select ‘Tow Bar Mounting Brackets’ and enter the ve hicle’s make, model and year, then scroll down the page. In addition to the bracket, the web site has the bracket type and estimated installation time. You can also print or download the installation instructions from the web site.) • ‘Hidden’ brackets — XL, MX or EZ Twistlock • All have detachable front extensions which are removed when the vehicle is not being towed. • Available for virtually all vehicles manufactured after 2000 (also available for many vehicles manufactured before 2000 — check the Bracket Guide or the web site). • Classic brackets • Primarily for vehicles manufactured before 2000. ‘Hidden’ mounting brackets Now you see ‘em… 6 …now you don’t! ROADMASTER mounting brackets have the widest stance in the industry, which means the most stable towing ratio. Adaptor bars — Adapt other manufacturers’ tow bars to ROADMASTER brackets, or adapt a ROADMASTER tow bar to other manufacturers’ brackets. See page 20 or the ROADMASTER product catalog for specifics. Classic mounting brackets Selecting safety cables and electrical wiring Towing and Suspension Solutions Selecting safety cables Safety cables are an integral part of the towing system. They are a secondary safety device, required by law in many states. Our aircraft-type, galvanized steel safety cables are continuously tested to ROADMASTER’s relentless standards. • Match the vehicle’s weight to the safety cable. • 6,000-pound capacity cables are available in either straight or coiled styles • 8,000-pound capacity cables are available in straight style • 10,000-pound capacity cables are available in coiled style coiled safety cable • Safety cable extensions • Required for use with hitch extensions, high-low receivers, or any accessory which extends the length of the towing system • EZ Hook safety cables • Quicker and easier to connect and disconnect • 6,000-pound capacity straight safety cable • Come standard with the Sterling All-Terrain tow bar Selecting the electrical wiring components By law, it is necessary to have a lighting system in the towed vehicle that will allow the towed vehicle’s brake lights, turn signals and running lights to mimic the motorhome’s. There are three ways to accomplish that: • Universal Wiring Kit — the most popular method. Connects the towed vehicle’s lights to the motorhome’s with a system of diodes. • Taillight Wiring Kit — a self-contained system, with no splicing into existing wiring. Bypasses the towed vehicle’s lighting system with a set of independent plugs and sockets mounted inside each lens housing. (The towed vehicle’s lens housing must have room for an extra socket and bulb.) • Magnetic Tow Lights — a self-contained system, with no splicing into existing wiring. Fits all vehicles. In addition to one of the three wiring methods above, a power cord is required, to connect the two vehicles’ lighting systems. • Flexo-Coil™ or straight? • Flexo-Coil power cords are used with tow bars without a channel guide (Falcon 2, StowMaster, Tracker). • Straight power cords are used with tow bars with a channel guide (All-Terrain tow bars). • An electrical socket bracket is used to mount the socket to the front of the towed vehicle. One of the first determinations is the type of wiring. There are three: • 4-wire — a four-wire component fits towed vehicles with combined brake and turn signals — that is, the brake light also does the flashing for the turn signal. • 6-wire — a 6-wire component fits towed vehicles with separate brake and turn signals (there are amber or red turn signal lights, which are separate from the brake lights. • 7-wire — a 7-wire component is primarily designed for towing a trailer. However, many newer motorhomes have 7-wire electrical systems. 7 Selecting a supplemental braking system Towing and Suspension Solutions A ‘direct’ system? BrakeMaster is recommended if your customers don’t frequently change motorhomes or towed vehicles. Because it connects directly to the motorhome’s braking system, the initial installation is longer than a portable system. But once installed, it’s a truly trouble-free and easy-to-use braking system. A ‘progressive’ system? — InvisiBrake is recommended if your customers like convenience above all else and plan on keeping their towed vehicles for the foreseeable future. InvisiBrake is not a portable system, but the major components can be easily removed and installed in a new towed vehicle. Initial installation time is approximately five hours. Or a portable? — Even Brake and the 9700 are recommended if your customers change towed vehicles or motorhomes often. Both are portable systems, with no installed components in the motorhome except for a dashboard monitor. Initial installation time is approximately one hour, depending on the vehicles. Even Brake is a sophisticated system with proportional braking; the 9700 is a basic system which applies a pre-set braking pressure. BrakeMaster™ InvisiBrake® proportional braking system progressive braking system activated by — brake line activated by — motorhome pressure in the motorhome brake light signal Even Brake® 9700 portable proportional braking system activated by — motorhome deceleration portable braking system activated by — motorhome brake light signal All systems… •…will bring your customer’s towed vehicle into compliance with U.S. and Canadian requirements. •…include an emergency break away system, to stop the towed vehicle should it ever separate from the motor home. •…work in virtually any towed vehicle with power brakes. •…work in virtually any motorhome. •…greatly decrease your customer’s stopping distance, helping your customer avoid the danger and hassle of accidents. 8 ROADMASTER tow bars and tow dollies “I swerved to avoid a collision with a truck in the wrong lane, and veered off the road into the brush. I could see my Ford Explorer in the motorhome’s rear view camera, whipping back and forth. I know a little about physics, and I was amazed that your Falcon 2 tow bar held it in place. You folks make a damn good product.” — Walt Leutwyler Dallas, TX 75252 Towing and Suspension Solutions TM NON-BINDING TOW BAR U.S. Patent Nos. 5,915,715 6,168,182 6,619,686 7,004,490 7,461,855 Towing and Suspension Solutions World’s strongest aluminum tow bar! Includes cables and wiring 6,000-pound rated EZ Hook safety cables and the power cord are included. The Sterling All-Terrain was designed, tested and manufactured to the highest standards…yours. The Sterling All-Terrain weighs just 35 pounds, yet pulls up to three tons. Steel and stainless steel at every critical point ensure superior strength and structural integrity. The Sterling All-Terrain is easy to connect and its stainless steel inner arms telescope, center and automatically lock as you pull away. Once you’ve reached your destination, a unique storage lock secures the Sterling All-Terrain in its stored position. The Sterling All-Terrain comes complete with safety cables and a power cord. Both are routed through a center channel for added safety, convenience and a clean, uncluttered appearance. Beyond its many performance features, the Sterling All-Terrain is aesthetically pleasing — its silver, powdercoated finish and sleek design complement your coach and your car. As well they should — the Sterling All-Terrain exemplifies ROADMASTER’s highest standards, as well as yours. •Freedom Latch™ — disconnects first time, every time •Includes safety cables and power cord •Shock-absorbing urethane bushings for a smoother ride •Stainless steel inner arms — for smooth, trouble-free operation •Built-in cable guides — protect safety cables and power cord •Storage latch — fold the tow bar and it automatically locks in place Sterling All-Terrain tow bar — 35 lbs. 6,000-pound weight capacity motorhome-mounted tow bar 576 Sterling All-Terrain tow bar with safety cables and a six-wire electric cord with one 6-wire plug (attached) and one 7-wire plug 9 NON-BINDING TOW BARS Made in the U.S.A. Our premium line of tow bars, with the exclusive Freedom Latch™, patented storage latch and built-in cable guides. Towing and Suspension Solutions No more binding! Releasing your towed vehicle is easy with ROADMASTER’s All-Terrain tow bars…even when the tow bar is at a hard angle or the towed vehicle is out of level. Four familiar, classic ROADMASTER tow bars — StowMaster, Falcon, BlackHawk and Sterling — are available in the All-Terrain series. Each is upgraded with ROADMASTER’s exclusive Freedom Latch, which releases the tow bar at any angle, level or bind — first time, every time. After all, who’s on vacation here — you, or your tow bar? U.S. Patent No. 6,957,824 Freedom Latch™ A patented cam design inside the Freedom Latch transforms linear motion into rotary motion at a 400-to-one ratio — five pounds of force against the latch equals 2,000 pounds of force against the lock. So you’ll never have to straighten and align your towed vehicle and motorhome to release the tow bar. Falcon 6,000-lb weight capacity motorhome-mounted tow bar — 38 lbs 522 Falcon All-Terrain tow bar 10,000-pound rated! Quick-Disconnect System Allows “one-person” fast and easy mounting or removal of your Sterling, Falcon or BlackHawk 2 AllTerrain tow bar. U.S. Patent No. 6,619,686 BlackHawk™ 2 10,000-lb weight capacity motorhome-mounted tow bar — 42 lbs 422 BlackHawk 2 All-Terrain tow bar Patented Storage Latch The patented Storage Latch makes storing the AllTerrain tow bar a snap! Simply fold the tow bar toward the motorhome and it will “click,” automatically locking in place. U.S. Patent No. 6,168,182 StowMaster 6,000-lb weight capacity car-mounted tow bar — 52 lbs 502 StowMaster All-Terrain tow bar 10 Built-in Cable Guides The built-in Cable Guides enhance appearance and help keep the safety cables and power cord from being crushed or damaged. U.S. Patent No. 6,619,686 Towing and Suspension Solutions 6,000-pound weight capacity motorhome-mounted tow bar •The use of stainless steel in virtually every moving component allows for smooth, trouble-free operation, and prevents corrosion that binds. •Autowlok™ locking mechanism — allows both tow bar arms to extend or retract for a quick connection. Then, as you drive away, the arms self-center and automatically lock. •A patented latching mechanism ensures secure, easy storage on the back of your motorhome. •One-person quick connect and disconnect — thanks to ROADMASTER’s self-supporting “quick-disconnects,” one person can easily connect or disconnect the Falcon 2 in seconds. •Full-length steel crossbar reinforced for maximum support and safety. •A lustrous, high-tech powder coat finish for maximum durability. U.S. Patent No. 6,619,686 Patented Storage Latch The patented Storage Latch makes storing the Falcon 2 tow bar a snap! Simply fold the tow bar toward the motorhome and it will “click,” automatically locking in place. Falcon 2 stowed Made in the U.S.A. In the folded position, the Falcon 2 conveniently stores out of the way on the back of your motorhome. A tow bar cover (sold separately, part number 055) keeps your tow bar clean. Quick-disconnects One person can easily connect or disconnect the Falcon 2 in seconds. Falcon 2 — 37 lbs. 6,000-pound weight capacity motorhome-mounted tow bar 520 Falcon 2 tow bar 525 Falcon tow bar (fits Blue Ox brackets) 055 Falcon 2 tow bar cover 9240 Falcon 2 Combo Kit (coiled wiring) 9241 Falcon 2 Combo Kit (straight wiring) 066 Release tool Autowlok™ System Stainless steel arms and Autowlok System for smoother and easier hook ups and disconnects. 11 America’s best-selling car-mounted tow bar Towing and Suspension Solutions •Stainless steel in virtually every moving component for smooth, trouble-free operation. •Autowlok™ locking mechanism — allows both tow bar arms to extend or retract for a quick connection. Then, as you drive away, the arms self-center and automatically lock. •Full-length safety crossbar — a full-length angle iron brace is integrated into the rear of the bar for maximum support. •Self-lubricating nylon bushings eliminate friction between the inner and outer arms. Other tow bars use steel on steel. •Plug-welded arms — steel plugs seal both ends of the tow bar, preventing corrosion from moisture and debris. •A lustrous, high-tech powder coat finish for maximum durability. StowMaster mounts on the towed vehicle and can be easily removed in seconds! Note: MX brackets will not accommodate the StowMaster tow bar. Full-length Safety Strap Autowlok™ System Stainless steel arms and Autowlok System for smoother and easier hook ups and disconnects. Although you may never need it, it’s nice to know that ROADMASTER has built a safety strap into StowMaster that will prevent the separation of the tow bar in the unlikely event the primary lock should not function. Peace of mind built right in. Made in the U.S.A. StowMaster 501 581 504 9254 052 — 6,000-pound weight capacity car-mounted tow bar — 48 lbs. StowMaster tow bar StowMaster tow bar with pintle hook StowMaster tow bar with 2-5/16” coupler (special order only) StowMaster Combo Kit StowMaster pintle hook StowMaster tow bar cover (2½-inch pintle ring) •ROADMASTER’s entry-level tow bar •Full-length safety crossbar for maximum strength •5,000-pound towing capacity •A lustrous, high-tech powder coat finish for maximum durability. •Easily folds for storage — no tools needed! •Sealed tow bar arms keep moisture and road debris out •For all two-inch ball-mount motorhome receivers Tracker — 20 lbs. 5,000-pound weight capacity car-mounted tow bar 020 Tracker tow bar 12 Note: an optional set of quick-disconnects (part number 201) is necessary to remove the front extensions on XL or EZ Twistlock brackets. Combo Kits Each kit contains all the necessary accessories for your vehicle, matched to your ROADMASTER tow bar. Combo Kits for Falcon 2™ and StowMaster™ Towing and Suspension Solutions Both combo kits include: •Electrical components — •A wiring kit with four Hy-Power diodes (If necessary, additional diodes may be purchased separately.) •A straight or ‘Flexo-Coil’ power cord, with a 7-way plug (attached) and socket •A bracket to mount the power cord socket •6,000-pound capacity safety cables •Case-hardened steel padlocks (keyed alike) — two (Falcon 2) or three (StowMaster) •A marine-grade vinyl tow bar cover with distinctive logo •A marine-grade vinyl storage bag to store accessories 9240 Falcon 2 Combo Kit 9241 Falcon 2 Combo Kit 9254 StowMaster Combo Kit 6,000-pound capacity — with coiled safety cables and Flexo-Coil™ 4-wire power cord 6,000-pound capacity — with straight safety cables and straight 4-wire power cord 6,000-pound capacity — with coiled safety cables and Flexo-Coil 4-wire power cord Combo Kits For the ROADMASTER All-Terrain series of tow bars. Each kit contains: •Electrical components — •A wiring kit with four Hy-Power diodes •A power cord to connect the vehicles, with a 7-way plug (attached) and socket (except the Sterling All-Terrain tow bar, which comes with a power cord) •A bracket to mount the power cord socket •A pair of safety cables rated at 6,000 or 8,000-pound capacity, depending on the model you choose — see below (except the Sterling All-Terrain tow bar, which comes with safety cables) •Two case-hardened steel padlocks (keyed alike) — for added security •A marine-grade vinyl tow bar cover to protect your tow bar •A marine-grade vinyl storage bag for all your towing accessories 9284-2 Sterling All-Terrain Combo Kit 6,000-pound capacity — does not include safety cables or 6-wire power cord 9241-2 Falcon All-Terrain Combo Kit 6,000-pound capacity — with straight safety cables and straight 6-wire power cord 9240-2 Falcon All-Terrain Combo Kit 6,000-pound capacity — with coiled safety cables and Flexo-Coil 6-wire power cord 9254-1 StowMaster All-Terrain Combo Kit 6,000-pound capacity — with straight safety cables and Flexo-Coil 4-wire power cord 9294-2 BlackHawk 2 All-Terrain Combo Kit 8,000-pound capacity — with straight safety cables and straight 4-wire power cord ROADMASTER tow bag Keep your towing accessories in one place, and keep dirt and grime out of your car or motorhome. A great way to store safety cables, the power cord and other small accessories. Made from marine-grade vinyl, with a Velcro® closure. 056 Tow bag (approx. size 10” W x 14” H) 13 Adjustable tow dollies Tow almost any vehicle with an adjustable tow dolly. Towing and Suspension Solutions Tow virtually any vehicle, from an ultra-compact car to a full-size pickup or SUV, on a rugged, adjustable tow dolly with built-in ROADMASTER quality, value and safety features Both dollies are ideal for anyone who wants to tow multiple vehicles without having to buy a tow bar or install a tow bar mounting bracket. And a transmission lube pump is not necessary for vehicles with front wheel drive transmissions, since the front wheels are off the ground. The RoadMaster tow dolly (part number 2000-1, page 16) is ROADMASTER’s premium dolly; the RM3477 (part number 2050-1, below and page 15) is the economical alternative. Part number 2050-1 the economical adjustable Specifications Minimum tire width................34" inside to inside Maximum tire width............77" outside to outside Overall length..............................................121" Overall width...............................................102" Height at fenders...........................................29" Weight - empty...................................... 545 lbs. Tires ................................ radials ST 205/75 R14 14 Adjustable TieDown straps........... Fit 12"-16" tires Coupler information...... 2" 5,000-pound capacity Optimum ball height......................................19" Max. weight of towed vehicle.............. 4,250 lbs. Actual cargo capacity.......................... 2,550 lbs. Required trailer ball size and capacity.............. 2" 5,000-pound capacity Features •Slideable ‘Easy-load’ ramps — •Slideable ramps quickly adjust your dolly to tow vehicles ranging from ultra compact cars all the way up to full size trucks •Unique TrueGrip™ laser-cut pattern on ramps provides positive traction in both directions for safe loading and unloading •Accu-Lube™ hubs — easily repack the wheel bearings with a grease gun •Built-in electric brakes for safer stops •Deck swivels 9º for easy cornering and maneuvering •Ramps, axle and deck are powder coated for maximum durability •Complete with adjustable TieDown™ straps (fit most tires from 12 to 16 inches) and ratchets •High-density polyethylene fenders eliminate metal fatigue prob lems frequently associated with metal fenders, and they will not rust. •Easy assembly (average assembly time: one to two hours) •One year limited warranty Built-in electric brakes for safer stops Adjustable TieDown straps One size adjusts to fit tires from 12 to 16 inches. The ramps can be adjusted in to a minimum 34” inside tread width or out to a maximum 77” outside tread width. Heavy-duty trailer tires increase safety when towing heavier vehicles. Accu-Lube™ hubs Easily repack the bearings through the grease fitting Accessories for both tow dollies 2000-1 RoadMaster tow dolly 2050-1 ROADMASTER RM3477 tow dolly 2000-7 Spare tire carrier for both tow dollies 2000-8 Guardian carrier for both tow dollies 2000-9 Spare tire and wheel for RoadMaster 2000-1 tow dolly 200330-80 Spare tire and wheel for RM3477 tow dolly 2100 Deluxe magnetic tow lights 2120 Standard magnetic tow lights 2110 Tie down ratchet (one) 2114 TieDown strap (one) — fits 14" tires 2115 TieDown strap (one) — fits 15" tires 2150 Adjustable TieDown strap (one) — fits 12" to 16" tires Add functionality and protection to your towed vehicle with these two mounting brackets! These all-steel, powder-coated brackets bolt on or off in seconds, and can be attached anywhere on the tow dolly arm. Spare tire carrier (spare tire not included) Mount your spare tire and wheel on your tow dolly using this heavy-duty steel, powdercoated mounting bracket. Guardian mounting bracket (Guardian not included) Using this mounting bracket, you can add the protection of the Guardian to your tow dolly. Helps protect your towed vehicle against damage from rocks and road debris. 15 U.S. Patent No. 6,164,897 2000-1 — our premium adjustable tow dolly RoadMaster 2001 Specifications Overall length....................................................... 136" Overall width — narrow axle position......................................... 93½" wide axle position.......................................... 101½" Weight.............................................................620 lbs. Maximum vehicle weight...............................4,380 lbs. The axles can be adjusted from 93½" to 101½". Self-steering wheels with stabilizers allow the dolly to track the motorhome without cutting corners. Tires.............................................ST215-75 R14 radial Maximum tread width — narrow ramp position.......................................... 68" wide ramp position............................................. 76" Trailer ball size.......................................................... 2" TruGrip™ ramps are easily adjusted from 40" to 76". Electric brakes are standard The RoadMaster 2000-1 comes complete with… Conveniently located bed tilt release — eliminates having to crawl under the car to tilt the bed. 16 Dual pin bed latch — The bed cannot tilt, even if one pin fails. Heavy-duty radial trailer tires — increase safety when towing heavier vehicles. Adjustable TieDowns and ratchets — TieDown straps adjust to fit tires from 12" to 16". Locking storage trays — for TieDown straps and miscellaneous equipment. Accu-Lube™ hubs — allow you to easily repack the bearings through the grease fitting. ROADMASTER tow bar mounting brackets A screen capture image of one facet of FEA (Finite Elemental Analysis) computerized testing for a tow bar bracket. “I have just finished installing a set of your mounting brackets on my Jeep Grand Cherokee. I found your directions to be clearly written, concise and very easy to follow. All of the pre-drilled holes in the brackets lined up exactly with the existing holes in the Jeep frame for a perfect fit — your engineering is commendable.” — Hal Inman Millbrook, Alabama Towing and Suspension Solutions Why are our brackets rated #1? Towing and Suspension Solutions •Every bracket design is subjected to computer-simulated “Finite Elemental Analysis” to ensure structural integrity. •Every mounting bracket is custom-made to fit a specific vehicle or range of vehicles, and to attach at logical points along the frame or undercarriage, for maximum strength and a quick, easy installation. •Every new bracket (not just a few) in the ROADMASTER XL, MX and EZ Twistlock series comes with detachable extensions, which are easily removed when the car isn’t being towed — no unsightly steel hanging off the front of your car! •Every bracket is powder coated. In this process, charged particles of pigment are baked into the surface of the bracket. The particles fuse to the metal and form a lustrous, uniform and extremely durable finish. •ROADMASTER is quick to market brackets for new vehicles, and has the widest selection — currently, more than 1,000 different mounting brackets (far more than any other company) — which fit more than 2,000 different years, makes and models. ‘Hidden’ mounting brackets ROADMASTER XL, MX and EZ Twistlock series mounting brackets have detachable extensions which are easily removed when the vehicle is not being towed. NO UNSIGHTLY STEEL HANGING OFF THE FRONT OF YOUR CAR! •They’re virtually invisible — improved aesthetics. •Easy to install — ROADMASTER brack- Now you see ‘em… ets use existing attachment points on the vehicle’s undercarriage. •Through-the-grille installation — no scraping brackets in dips or curbs. •Easy to remove — converts from towed car to road car in seconds! …now you don’t! What is “FEA?” ROADMASTER was the first towing products manufacturer to use computerized stress testing on mounting brackets. The testing method is called “FEA,” which stands for “Finite Elemental Analysis.” If that sounds complicated, that’s because it is — FEA is the same method that NASA scientists use to test their new designs. The automotive and biomedical industries, among others, also use finite elemental analysis. Every FEA design is displayed as a full-scale, three-dimensional object, which engineers can rotate and study on the screen as they apply thousands of pounds of force across the load-bearing components. Stress in the steel is pinpointed, and the design is A screen capture image of one facet of FEA manipulated to remove it. The result is an optimized design, in testing for a tow bar mounting bracket. both materials and components, which has been tested and verified at maximum linear strain. ROADMASTER uses computerized stress testing to ensure the structural integrity and longevity of our brackets — and to ensure the safety of your customers. 17 Underneath the vehicle, every ROADMASTER bracket is a custom design, fitted to a specific frame and undercarriage. At the front of the vehicle, there may be one of three removable extensions. Which extension is used is determined by: 1) the structural integrity of the frame; and 2) the vehicle’s styling. If our Bracket Guide lists only an XL™ or an EZ Twistlock™ bracket for a particular vehicle, that means our designers have determined that the vehicle’s frame must be supported by a crossbar for towing. The crossbar disperses the load across the length of the tow bar, and the front of the vehicle — what our engineers call an ‘area load’ — a design which supports the towed vehicle. The determination between an XL or an EZ Twistlock is the available clearance at the front end of the vehicle — at the fascia and the grille. The alternative to an ‘area load’ design is ‘point load’ design — the front of the vehicle’s two frame rails act as the ‘points.’ If an MX™ design is available, that means our designers have determined that the vehicle’s frame is sufficient to support the vehicle during towing, and that a crossbar is not necessary. Some customers prefer the ‘cleaner’ MX design; however, there are tradeoffs that sales representatives and service writers should be aware of — four of our tow bar-mounted accessories (the Guardian, Stowaway, the 4700 Tow Defender and Nixtopper™) cannot be used with an MX bracket — which is why we offer a choice of both MX and XL brackets for many vehicles. XL bracket Insert extension and secure with pin and clip. Towing and Suspension Solutions Why are there three ‘hidden’ bracket styles? Why the crossbar? The crossbar compensates for the structural integrity which has been lost in the transition to lighter, more fuel-efficient vehicles. Most passenger cars built after the turn of the century fall into that category. They must be supported for towing, for a simple reason — heavy gauge steel has been replaced with sheet metal. The crossbar is there to support the car, not the tow bar. XL brackets For both car- and motorhome-mounted tow bars. XL brackets are the most universal — most vehicles have enough clearance at the grille or fascia to allow the receivers to be hidden, and also enough for the linch pin, which attaches each removable front extension to the bracket. All four ROADMASTER tow bar-mounted accessories (Guardian, Stowaway, Tow Defender and Nixtopper) will fit on an XL bracket. EZ Twistlock brackets For both car- and motorhome-mounted tow bars. EZ Twistlock extensions and receivers are designed for smaller vehicles, with a limited amount of clearance between the frame and the fascia — the Twistlock design eliminates the linch pin (which attaches the removable front extension to the bracket) so the receivers do not have to extend past the front end of the vehicle. All four ROADMASTER tow bar-mounted accessories (Guardian, Stowaway, Tow Defender and Nixtopper) will fit on an EZ Twistlock bracket. EZ bracket Insert extension and twist to lock in place. MX brackets For motorhome-mounted tow bars only. MX bracket Insert extension and secure with pin and clip. 18 MX style extensions and receivers are designed for trucks, SUVs and other large vehicles with frames of sufficient size and strength to replace the crossbar. Therefore, the crossbar is not required. Because the crossbar (and quick-disconnect system) is not used, three ROADMASTER tow bar-mounted accessories (Guardian, Stowaway and Nixtopper) cannot be used with an MX bracket. Also, the standard ‘EZ Hook’ safety cables for Sterling All-Terrain tow bars must be replaced (with either #645 or #645-76 single hook straight cables) — without the quick-disconnect system, there are no mounting points for the EZ Hook anchor plates. Comparison of bracket installation times — ROADMASTER vs Blue Ox Towing and Suspension Solutions Time is money. ROADMASTER mounting brackets are custom-made to fit a specific vehicle or range of vehicles, and to attach at logical points along the frame or undercarriage, for maximum strength and a quick, easy installation. ROADMASTER is also quick to design and develop new brackets — almost every 2012 model year bracket was done in March 2012 — far ahead of Blue Ox. ROADMASTER ‘12 Honda CR-V (1 hour) & ‘12 Jeep Liberty (1 hour) 2 hours a 3-hour time savings Blue Ox ‘12 Honda CR-V (2 hours) & ‘12 Jeep Liberty (3 hours) 5 hours 19 Tow bar adaptors To adapt other manufacturer’s tow bars to ROADMASTER brackets… 025 — adapts Reese, Valley, Eaz-Lift, DrawTite and Husky carmounted tow bars to ROADMASTER brackets (see notes 1 and 2). 025 Towing and Suspension Solutions To adapt ROADMASTER tow bars to other manufacturer’s brackets… 031 033 031 — adapts ROADMASTER Falcon, BlackHawk, BlackHawk All-Terrain and Falcon All-Terrain tow bars to Blue Ox brackets. Also adapts Sterling tow bars (with serial numbers up to 14,500) to Blue Ox brackets. 032 032 and 033 — adapt motorhome-mounted Blue Ox tow bars (Aventa, Aventa LX, Aventa II, Kar Bar, Aladdin, Alexxa, Acclaim), as well as Blue Ox ‘A frame’ tow bars (with one- or three-pronged attachments) to ROADMASTER brackets. Also adapt Demco Commander, Dominator, Aluminator, Excalibar and Kwik-Tow tow bars to ROADMASTER brackets. 032 — allows you to disconnect the adaptor bar and the removable front bracket arms (see note 2). The Guardian rock guard and Nixtopper crossbar cover will work with this adaptor. 033 — the adaptor is permanently bolted to the mounting bracket (see notes 1 and 2). 037 — adapts Blue Ox Rangefinder II or Rangefinder III to ROADMASTER brackets (see note 2). The Guardian rock guard and Nixtopper crossbar cover will work with this adaptor. 037 038 — adapts Duncan Towmatic II, Karbar and EazAligner 2000 car-mounted tow bars to ROADMASTER brackets (see notes 1 and 2). 20 038 031-5 031-5 — adapts all ROADMASTER Sterling tow bars (with serial numbers above 14,501) to Blue Ox brackets. 034 034 — adapts ROADMASTER Falcon, BlackHawk, BlackHawk All-Terrain and Falcon AllTerrain tow bars to Demco brackets. Also adapts Sterling tow bars (with serial numbers up to 14,500) to Demco brackets. 034-5 034-5 — adapts the ROADMASTER Sterling tow bar (with serial numbers above 14,501) to Demco brackets. Note 1: if you plan to use ROADMASTER brackets with removable front arms (XL or EZ series), you will need quickdisconnects in addition to the adaptor. Note 2: this adaptor does not fit MX or MS series brackets. To find the customer’s tow bar bracket… Towing and Suspension Solutions 1 1. Visit www.roadmasterinc.com. 2 2. Click on ‘Vehicle-Specific Info.’ Then select ‘Tow Bar Mounting Brackets,’ enter the make, model and year of the vehicle, and scroll down the page. 3. The bracket part number, type and average installation time is displayed. 3 Click the link to print or download a PDF of the installation instructions; click the ‘photo’ icon to the left to see how the vehicle looks with and without the bracket. 21 MOUNTING BRACKET KIT INSTALLATION INSTRUCTIONS ROADMASTER, Inc. 6110 NE 127th Ave. Vancouver, WA 98682 1-800-669-9690 KIT# 521190-1 fax 360-735-9300 05/03/10 KS www.roadmasterinc.com Fig.C Fig.D 1. Important: please use all supplied bolts and parts and read all instructions carefully before beginning this installation. The majority of questions you may have can be answered within the text, and proper installation will ensure safe and secure travel. Now, begin the installation. Remove five plastic fasteners attaching the top of the fascia to the core support (Fig.C). Fig.E Fig.F 2. On each side, remove a Phillips head screw attaching the corner of the fascia to the fender (Fig.D). 3. Remove five plastic fasteners and four Phillips head screws attaching the bottom of the fascia to the splash shield (Fig.E). 4. Disconnect the fog lights, if the vehicle is so equipped. Pull out and forward to remove the fascia (Fig.F). Fig.G 5. On each side, remove four 12mm (head) bolts attaching the bumper core to the end of the frame rail. Note: only three bolts are shown in Figure G. The fourth is to the inside of the bumper core. Note: the bumper core will not be replaced. Retain the bumper core and attachment hardware so that it can be replaced if the bracket is ever removed. All illustrations and specifications contained herein are based on the latest information available at the time of publication approval. ROADMASTER, INC. reserves the right to make changes at any time without notice in material, specification and models or to discontinue models. 22 MOUNTING BRACKET KIT INSTALLATION INSTRUCTIONS ROADMASTER, Inc. 6110 NE 127th Ave. Vancouver, WA 98682 1-800-669-9690 KIT# 521190-1 fax 360-735-9300 05/03/10 KS www.roadmasterinc.com Fig.H Fig.I 6. Place the main receiver brace over the ends of the frame rails. On each side, replace the four bolts removed in the previous step. Note: Figure H only shows three bolts. The fourth is below the brace. Note: use thread lock on the bolts. Torque the bolts to the bolt torque requirements found at the end of this document. Fig.J Fig.K 7. Locate the existing hole on the inside edge of the frame rail on each side (Fig.I — passenger side). Place a ½" lock washer and ½" clipped plate washer over one of the ½" x 1¾" bolts. Bolt through the existing hole on the inside edge of the frame rail and into the rear mounting point of the main receiver brace (Fig.J — passenger side). 8. Reassemble the fascia, reversing steps 1 through 4. 9. Trim the fascia using the red lines in Figure K as a Fig.L guide for trimming. Figure L shows the completed trimming. All illustrations and specifications contained herein are based on the latest information available at the time of publication approval. ROADMASTER, INC. reserves the right to make changes at any time without notice in material, specification and models or to discontinue models. 23 MOUNTING BRACKET KIT INSTALLATION INSTRUCTIONS ROADMASTER, Inc. 6110 NE 127th Ave. Vancouver, WA 98682 1-800-669-9690 KIT# 521190-1 05/03/10 KS fax 360-735-9300 www.roadmasterinc.com 10. Insert the removable front bracket arms into the front receiver braces, and twist each one 90 degrees to lock. 11. Attach the 8" safety cables with the cable connectors (Q-Links) to the front of the receiver braces (Fig.M). 12. Attach the ends of the safety cables to the tow vehicle's safety cables. 13. Install the tow bar to the mounting bracket according to the manufacturer's instructions. Fig.M BOLT TORQUE REQUIREMENTS Note: The torque values represented below are intended as general guidelines. Torque requirements for specific applications may vary. Roadmaster does not warrant this information to be accurate for all applications and disclaims all liability for any claims or damages which may result from its use. stANDArD Bolts Thread Size Grade Metric Bolts Torque 5/16..................... 5 ........................... 13 ft./lb. 3/8....................... 5 ........................... 23 ft./lb. 7/16..................... 5 ........................... 37 ft./lb. 1/2....................... 5 ........................... 56 ft./lb. 5/8....................... 5 ......................... 150 ft./lb. Thread Size Grade Plated / Unplated 8mm-1.0 ............8.8 ............20 ft./lb. 18 ft./lb. 8mm-1.25 .........8.8 ............19 ft./lb. 18 ft./lb. 10mm-1.25 ........8.8 ...........38 ft./lb. 36 ft./lb. 10mm-1.5 ..........8.8 ...........37 ft./lb. 35 ft./lb. Metric Bolts Thread Size Grade All illustrations and specifications contained herein are based on the latest information available at the time of publication approval. ROADMASTER, INC. reserves the right to make changes at any time without notice in material, specification and models or to discontinue models. 24 Plated / Unplated 12mm-1.25 ........8.8 ............70 ft./lb. 65 ft./lb. 12mm-1.5 ..........8.8 ............66 ft./lb. 61 ft./lb. 12mm-1.75 ........8.8 ...........65 ft./lb. 60 ft./lb. 14mm-2.0 ..........8.8 .........104 ft./lb. 97 ft./lb. ROADMASTER supplemental braking systems Towing and Suspension Solutions Why do Towing and Suspension Solutions towed vehicles need supplemental brakes? Safety Safety is the number one reason most people add supplemental brakes to their towed vehicles. In an emergency, stopping distance is the critical factor between a close call and a tow truck — or worse. Supplemental brakes take the load off the motorhome, and the motorhome and the towed vehicle brake in tandem, taking significantly less time and distance to come to a controlled stop — about 33% less distance, in a study by ROADMASTER (see the chart to the right). It’s required According to the American Automobile Association, most states — plus many Canadian provinces — now require supplemental brakes if the towed weight exceeds 3,000 pounds (see the map on the next page). Motorhome chassis warranty Workhorse will void your chassis warranty if you tow more than 1,000 pounds without supplemental brakes; Ford stipulates 1,500 pounds. Test data — motorhome: 34-foot 1996 Winnebago Adventurer, Ford Superduty chassis with a 460 gas engine; GVWR: 17,000 pounds; brakes: hydraulic four-wheel disc. Towed vehicle: 1995 Oldsmobile Aurora; GVWR: 4,690 pounds (actual test weight: 4,110 pounds). Braking pressure: 80 pounds of force directed to the brake pedal representing a “hard stop.” Safety First! Supplemental brakes take the load off the motorhome, and the motorhome and the towed vehicle brake in tandem. Wear and tear Because they aren’t braking for two vehicles, your motorhome’s brakes last longer. 25 Braking weights map Towing and Suspension Solutions 26 Portable proportional braking Towing and Suspension Solutions Portable Proportional Braking System Even Brake…Even Safer. Exclusive features… •Full-time proportional braking — proportional braking is even braking — your towed vehicle’s brakes respond to your motorhome’s brakes, at the same time and at the same intensity. •Constant self-diagnostic testing — Even Brake monitors its own performance constantly, and any change in system status is transmitted to the motorhome monitor. •‘Power Save’ low battery protection — Even Brake warns you of a low battery in the towed vehicle with LED and LCD alerts at the motorhome monitor. If the battery’s voltage drops too low, Even Brake goes into sleep mode, while retaining emergency braking power. •‘Terrain-Sensing Logic’ — Even Brake adjusts to uphill or downhill grades, and to rough terrain, by automatically leveling itself. Because it’s always level, Even Brake always brakes with maximum efficiency. part# 9400 Additional features… • • • • Automatically delivers maximum braking pressure in an emergency • Automatic brake protection Easily adjusts to individual braking preferences • On-board memory • Completely portable Small and lightweight • High-capacity air compressor • Adjustable brake pedal clamp Adjustable monitor light • Four independently-adjustable feet Made in the U.S.A. Even Brake’s monitor gives you complete, continuous braking information…at a glance. Even Brake stays in constant communication with the motorhome, and with you. It reports any braking activity, or a change in system status, to a wireless monitor in the motorhome. 27 Portable pre-set braking Towing and Suspension Solutions Efficient, effective…and easy! Push-button control — the 9700 is a preset system with three braking preferences: light, medium or heavy braking. Or, the 9700 may be set to activate only in an emergency break away. Made in the U.S.A. Choose from four settings: light, medium or heavy braking… or, break away condition only. Features… •Activates only when the motorhome’s brake lights illuminate — no false braking! •Includes an LED motorhome monitor for a visual reference of braking activity. •Automatically protects the towed vehicle’s brakes — •The 9700 releases braking pressure after an extended period of braking, then activates the next time the motorhome’s brakes are applied. •An audible alert at the motorhome indicates extended braking. •Easily transfers from one towed vehicle to another, without expensive labor fees. (Initial installation is typically an hour, depending on the vehicles.) •Recovers quicker — the 9700 is ready for the next stop nearly twice as fast as other systems with smaller air compressors. •Adjustable brake pedal clamp — fits brake pedals other systems can’t. •Does not accumulate water in the reservoir tank, unlike other systems — no puddles on the carpet! •Four independently-adjustable feet — for a stable platform in vehicles with uneven floors. •Meets U.S. and Canadian braking requirements. 28 Progressive braking A revolutionary innovation in supplemental braking — nothing. Towing and Suspension Solutions Zip. Zero. Zilch. Nothing. Nada. Nil. That’s what you have to do to connect and disconnect InvisiBrake. There’s nothing to take in and out of your towed vehicle and there’s nothing to push, pull, set, adjust, activate or deactivate. What could be easier than nothing at all? patent pending What is InvisiBrake®? InvisiBrake is a fully-automatic, progressive supplemental braking system that uses the electrical connections already in place on your towed vehicle (the towed vehicle’s electrical harness) to brake when you brake the motorhome — the same electrical signal that activates the towed vehicle’s brake lights also activates InvisiBrake. Features • Completely out of sight InvisiBrake is so small (8¾” x 8¾” x 2¾”) it can usually be mounted under the driver’s seat, under the rear seat, behind interior panels or in the trunk, without sacrificing any of the vehicle’s usable space. • Progressive braking When you apply more braking force, so does InvisiBrake — the longer you apply the brakes in the motorhome, the harder your towed vehicle will brake. (InvisiBrake will not skid your tires.) • Bypasses the 12-volt outlet InvisiBrake connects directly to the towed vehicle’s battery and constantly charges the battery during towing — InvisiBrake will never drain the battery. • Two-stage motorhome monitor InvisiBrake includes an LED monitor for a visual reference of braking activity; an audible alert at the motorhome will warn you if the brakes have been on for too long. • Activates only when the motorhome’s brake lights illuminate — no false braking! • Works in virtually any towed vehicle with vacuum-powered brakes — including hybrids and those with ‘active’ braking systems • Includes a break away system • Easily adjusts to individual braking preferences — braking pressure is adjustable from five to 80 psi. • Meets U.S. and Canadian braking requirements •Average installation time — 5 hours Part number 8700 Made in the U.S.A. How does InvisiBrake work? 1. The controller receives a braking signal from the motorhome. 2. The vacuum created by the controller activates the power brakes. 3. The air cylinder pulls a cable that activates the brakes. InvisiBrake Crossover The InvisiBrake Crossover can be used on any vehicle but it’s specifically designed for diesel pickup trucks or any other vehicle that uses the power steering pump to activate the power brakes. The Crossover has the same features as InvisiBrake, with the exception of a lightweight air cylinder which is connected to the brake pedal for towing and disconnected once you’ve reached your destination. Average installation time is 3½ hours. Part number 8760 29 ‘Direct’ proportional braking Towing and Suspension Solutions What is BrakeMaster? BrakeMaster is ROADMASTER’s ‘direct’ proportional braking system. It connects directly to the motorhome’s air or hydraulic braking system, for rock-solid, reliable braking — brake line pressure in the motorhome controls the brakes in the towed vehicle. Because it connects directly to what powers your motorhome’s brakes, BrakeMaster is a truly proportional, truly synchronized braking system — however you brake the motorhome, BrakeMaster automatically applies BrakeMaster LED the same pressure. Every time. LED in the motorhome provides a Connects and disconnects from the towed vehicle in An visual reference of braking activity. under a minute, without any tools, adjustments or settings — attach the brake pedal clamp, secure to the floor or seat adaptor, quick-connect the air hose, and you’re ready to tow. Weighs just 3¾ pounds and measures 17 inches in length — stores almost anywhere. U.S. Patent No. 5,915,798 part# 9060 — for motorhomes with hydraulic brakes, with a BrakeAway™ part# 9160 — for motorhomes with air or air over hydraulic brakes, with a BrakeAway part# 9100 — same as 9160, without a BrakeAway •Works in most motorhomes. •Works in virtually any towed vehicle with power brakes. •Motorhome monitor provides a visual reference of braking activity. •Easily disconnects from the brake pedal — from towed car to road car in seconds! •Includes a break away emergency braking system. •Meets U.S. and Canadian braking requirements. Optional seat adaptors Made in the U.S.A. Seat adaptors are required in some vehicles, and simplify the installation in others. Visit www.roadmasterinc.com for vehicle-specific information. BrakeMaster reliability for your hybrid or Hummer! With the Brake Pressure Reducer, you can install BrakeMaster in a Ford Escape hybrid, a Mercury Mariner hybrid, a Hummer H3, or in any vehicle with an ‘active’ (or, ‘continuous power assist’) braking system. By working in conjunction with these braking systems, the Brake Pressure Reducer delivers a correspondingly reduced braking pressure that eliminates over-braking issues associated with these hybrids and Hummers. Connects to the BrakeMaster air line in just a few minutes; turn the variable control to set and lock in the precise braking pressure. 30 part# 900002 31 So the towed vehicle’s brake lights and If the towed vehicle’s brake lights override turn signals both illuminate with the the turn signals. motorhome’s, as required by law. No other supplemental braking system manufacturer provides this accessory. As a consequence, Brake-Lite Relay many of their customers end up with traffic tickets — or worse. Brake-Lite Relay To eliminate the necessity of pulling a fuse If a fuse must be pulled for towing. before towing, then reinserting it before driving the vehicle. continued on next page Second vehicle To equip a new or additional vehicle for If you trade in your towed vehicle, or tow kit supplemental braking. more than one vehicle. FuseMaster Note: to see which vehicles can use the Automatic Battery Disconnect, visit www.roadmasterinc.com. Automatic Battery Disconnect Automatic To prevent supplemental braking systems or If an aftermarket accessory is powered by the Battery other aftermarket accessories from draining towed vehicle’s battery, or if the battery Disconnect the towed vehicle’s battery, and to eliminate cable must be pulled for towing. the necessity to pull the battery cable before towing. For your customers’ peace of mind — we If the brake lights do not work with the tap into the brake light switch so the towed vehicle’s ignition key turned to the motorhome monitor activates when the “tow” position. brake pedal is depressed. Other systems, such as Brake Buddy®, have monitors that only indicate that the air cylinder is extended. If the customer positions the system incorrectly and the brake pedal is depressed, the motorhome monitor will not alert him that Stop light switch kit the brakes are being damaged or destroyed. Stop light switch kit When Why for all systems Braking system accessories applications chart Tow multiple or new vehicles without having to buy the entire supplemental braking system. Convenience — customer simply flips a switch. Provides: 1) a constant charged current to the battery while the vehicle is being towed; and 2) a positive current source for break away systems or other accessories which must be connected to the battery. Eliminates the necessity to pull the battery cable before towing. Allows the towed vehicle’s turn signals and brake lights to work in tandem with the motorhome’s. The brake lights work in tandem with the motorhome’s; the motorhome monitor transmits accurate braking information. Benefit Towing and Suspension Solutions 32 To connect more than one 12-volt. accessory to a single 12-volt 12-volt outlet. ‘Y’ adaptor To extend the If the supplemental braking system’s power reach of the cord will not reach the 12-volt outlet. supplemental braking system by six feet. 12-volt extension cord 12-volt ‘Y’ adaptor 12-volt extension cord Foot extension If the motorhome has a single 12-volt outlet, which must be used for an electrical acces- sory and a monitor while towing a vehicle. If the floor of the towed vehicle is uneven (Obstructions such as duct work, a door jamb or a center console jut into the available space.) To elevate the supplemental braking system over obstructions on the floorboard. Foot extension Air cylinder shaft extension If the distance between the driver’s seat and the brake pedal is too far to maintain a secure anchor point between the seat and the adjustable seat pad. To extend the reach of the air cylinder shaft. 12-volt outlet kit If the towed vehicle has no power to the 12- volt outlet with the ignition key turned to the “tow” position, or if the outlet is corroded, or if the outlet provides less than 15 amps. Air cylinder shaft extension 12-volt outlet kit To provide electricity to the supplemental braking system. Why for portable systems only When To equip a new motorhome with the If you purchase a new motorhome. components necessary for supplemental braking. Second motorhome kit continued from preceding page Braking system accessories applications chart Provides electrical power to the supplemental braking system. Provides electrical power to the accessory and the motorhome monitor. To level the supplemental braking system, so that it applies the correct braking pressure. To ensure a secure and stable fit. Provides operating power to the supplemental braking system. Benefit Equip the motorhome for supplemental braking without having to buy the entire supplemental braking system. Towing and Suspension Solutions Brake-Lite Relay and stop light switch applications Towing and Suspension Solutions What does the Brake-Lite Relay do? It stops the brake lights from functioning until the vehicle is started. This prvents the towed vehicle’s brake signal from overriding the motorhome’s turn signal. When you tow without the Brake-Lite Relay, your towed vehicle’s brake lights alone will work fine. Your turn signals alone will work fine. But if you’re braking and turning, the brake light from the towed vehicle will override the turn signal from the motorhome and drivers behind you will be unaware you’re about to turn. Do you need a Brake-Lite Relay? You only need a Brake-Lite Relay if you’re installing a supplemental towed vehicle braking system that pushes or pulls the brake pedal. Exceptions – •With the engine off step on your brakes. If the brake lights do not illumi nate, you do not need a Brake-Lite Relay. •If you’re using magnetic tow lights or a bulb and socket wiring kit, you do not need a Brake-Lite Relay. •If both your motorhome and towed vehicle are wired for separate brake and turn signals, you do not need a Brake-Lite Relay. 88400 Brake-Lite Relay Comes standard with Even Brake®. •Wiring and components included •Easy to follow instructions Why do I need a stop light switch? For two very important reasons: •A stop light switch and 10-amp fuse must be installed in some towed vehicles to enable the brake lights to illuminate with the ignition key turned to the “tow” position, which is required by law. •What does the motorhome monitor actually monitor? Most indicate when the supplemental braking system is activated. ROADMASTER uses a stop light switch to connect BrakeMaster, Even Brake, InvisiBrake and 9700 monitors to the towed vehicle’s brake light, so you always know when the brake pedal is depressed and released. That’s an important distinction. Say you position the braking system too far forward, so it’s riding on the brake pedal. Most monitors will indicate nothing. ROADMASTER monitors accurately indicate continuous braking, which notifies you of a problem before you even drive away. Systems that monitor the supplemental braking system only would not indicate braking activity, which would likely result in brake damage. If the supplemental braking system is positioned too far back and doesn’t reach the brake pedal, most monitors will indicate braking when the supplemental braking system activates, even though the brake pedal isn’t being depressed. Every ROADMASTER monitor accurately indicates no braking, giving you the opportunity to reposition your supplemental braking system — before you head down that six percent grade in the mountains. ROADMASTER manufactures stop light switch kits for most popular towed vehicles; check online at www.roadmasterinc.com for the most current list. Stop light switch kits — 751XXX 33 To find required or optional accessories… Towing and Suspension Solutions 1 1. Visit www.roadmasterinc.com. 2 2. Click on ‘Vehicle-Specific Info.’ Select ‘Supplemental Braking Systems.’ Then, enter the make, model and year of the vehicle. 3. Scroll down the page. 34 For this vehicle, both a stop light switch and a BrakeMaster seat adaptor are required. Click the links to print or download a PDF of the installation instructions. 3 the 9700 and Even Brake portable braking systems — a comparison Sell-Up Features proportional braking continuous self-diagnostic testing continuous multi-mode communications maximum braking pressure in a “panic stop” automatic towed vehicle battery protection includes Brake-Lite Relay Shared Features includes break away system monitor indicates braking activity automatic towed vehicle brake protection adjustable feet and adjustable seat pad maximum braking pressure in a break away high-volume air compressor Top 6 Differences Braking method the Towing and Suspension Solutions 9700 no no no no no no 9700 yes yes Even Brake yes yes yes yes yes yes Even Brake yes yes yes yes yes yes yes yes yes yes 9700 preset (one response) — set braking force to one of three choices — light, medium or heavy Good 9700 Even Brake Better Even Brake proportional (infinite range of responses) — brakes the towedvehicle at the same time and at the same intensity as the motorhome “Break away only” mode may be set to activate ONLY in a break away Activation method brake light signal from motorhome — electrical signal that activates the towed vehicle’s brake lights also activates the 9700 (response time: 2 seconds) applies maximum braking pressure in a break away, but cannot be set to activate ONLY in a break away System communications “on-or-off” dash light indicates braking activity; audio alert at the motorhome indicates extended braking three-tiered (LED, LCD and audio) monitor indicates system status continuously; braking activity, extended braking protection mode and 16 additional braking or system conditions immediately communicated through a combination of LEDs, LCD text messages and audio alerts Towed vehicle one — extended braking protection protection modes three — extended braking protection, low battery protection and maximum brake pressure override Size 12¼ H x 13½ W x 16 L — fits in most towed vehicles 12 H x 11¼ W x 16 L — fits in virtually any towed vehicle, with plenty of “elbow room” under the steering wheel and dash decelerometer — microprocessor senses motorhome’s deceleration and signals magnetic valve to release a proportional amount of air pressure against the brake pedal, providing a quicker response (0.2 seconds) 35 Towing and Suspension Solutions the 9700 versus Brake Buddy Key Points the 9700 Brake Buddy® ® Description Does the system ....... Yes ........... No . ......... The 9700 activates only when the motorhome’s only brake when brake lights illuminate — no false braking! the motorhome Brake Buddy’s inertia-activated mechanism can brakes? engage the system on bumpy roads, bridges or railroad tracks. Does it brake ............ Yes ........... No . ......... The 9700 automatically delivers maximum braking at maximum pressure in a break away. pressure in Brake Buddy will only brake at its preset level, no a break away? matter how hard you brake the motorhome. Is there ...................... Yes ........... No . ......... The 9700 releases braking pressure after 14 automatic brake seconds of continuous braking, avoiding excessive protection? wear on the towed vehicle’s brakes, then activates the next time the motorhome’s brakes are applied. An audible alert at the motorhome indicates extended braking. Brake Buddy does not protect the towed vehicle’s brakes by releasing braking pressure after continuous braking. Is there ...................... Yes ........... No . ......... The motorhome monitor will transmit a visual and continuous audible alert if the customer positions the 9700 positioning too far forward — the customer always knows protection? when the brake pedal is depressed. The customer never knows when Brake Buddy is depressing the brake pedal — the monitor only indicates that the air cylinder has been extended. If Brake Buddy is incorrectly positioned, it will burn up the towed vehicle’s brakes. Can the system ........ Yes ........... No .......... The 9700 is ideal for customers who only want be set to activate break away protection. only in a break away? Brake Buddy does not have this feature. continued on the next page 36 Key Points continued from preceding page the 9700 Brake Buddy® Description Is there a . .................Yes ........... No . ......... The 9700’s high-performance air compressor high-performance takes less time to charge the air reservoir — the air compressor? 9700 is ready for the next stop nearly twice as fast. Brake Buddy’s reservoir will run out of air after braking repeatedly, due to its smaller compressor. This problem is aggravated when traveling over the mountains, where the air is thinner. Does the ....................Yes ........... No . ......... The 9700’s air cylinder angles more energy into air cylinder the floor, for greater stability. angle energy Brake Buddy’s air cylinder angles energy directly into the floor? into the seat, lifting the housing up and out of position — less braking force is applied to the brake pedal. Every time Brake Buddy is activated, it shifts further out of position. Are the air . ...............Yes ........... No . ......... The 9700 has DOT-approved air lines and Legris lines and double-seal air fittings. fittings the Brake Buddy’s lesser-grade air lines and fittings best available? are susceptible to leaks — air pressure will be lost. The compressor will burn out if it runs constantly to maintain air pressure (air compressors are a common Brake Buddy replacement item) which will also drain the towed vehicle’s battery in a matter of hours. Does the pedal .........Yes ........... No . ......... The 9700’s adjustable pedal clamp fits brake clamp fit a wider pedals that Brake Buddy cannot. range of vehicles? Does the .....................Yes ........... No . ......... The 9700 has height-adjustable feet for a secure housing have and stable platform on vehicles with uneven adjustable feet? floors. Brake Buddy is not adjustable. For some vehicles, the customer must improvise a set of blocks. Does the system ....... No .......... Yes .......... The 9700’s self-cleansing reservoir tank does not accumulate water accumulate water. in the reservoir tank? Brake Buddy will spill water from the reservoir tank onto the customer’s carpeting. 37 Towing and Suspension Solutions Evenversus Brake ® Brake Buddy ™ Vantage Select ® Key Points Even Brake® Vantage Select® Description Is the system ............. Yes ........... Yes .......... Even Brake automatically slows the towed vehicle proportional? and in direct proportion to the motorhome — a No same-time, same-pressure response. Vantage Select must be set to either fixed or proportional. Then braking pressure must be selected and locked in. •Fixed — always applies the same braking pressure • Proportional — applies proportional braking only to the braking pressure selected by the customer Does it brake ............ Yes ........... No . ......... Even Brake automatically delivers maximum at maximum pressure braking pressure in a panic stop or a break away. in a ‘panic stop’ or Vantage Select will only brake at its preset level, a break away? no matter how hard you brake. Is there ...................... Yes ........... No . ......... Even Brake releases braking pressure after 14 automatic brake seconds of continuous braking. Visual and audible protection? alerts at the motorhome monitor indicate extended braking. Vantage Select does not protect the towed vehicle’s brakes by releasing braking pressure after extended braking. Is there ...................... Yes ........... No . ......... The motorhome monitor will transmit a visual and continuous audible alert if the customer positions Even Brake positioning too far forward — the customer always knows protection? when the brake pedal is depressed. The customer never knows when Vantage Select is depressing the brake pedal — the monitor only indicates that the air cylinder has been extended. If Vantage Select is incorrectly positioned, it will burn up the towed vehicle’s brakes. continued on the next page 38 Key Points continued from preceding page Even Brake® Vantage Select® Description Does the ................... Yes ........... No .......... Even Brake’s three-tiered monitor indicates motorhome system status continuously; braking activity and monitor continuously 17 additional braking or system conditions are report braking immediately communicated through a combinainformation and tion of LEDs, LCD text messages and audio alerts. system status? A light will illuminate on the Vantage Select remote to indicate power to the unit and four error alerts. Is there a . .................Yes ........... No . ......... Even Brake’s high-performance air compressor high-performance takes less time to charge the air reservoir — Even air compressor? Brake is ready for the next stop nearly twice as fast. The Vantage Select reservoir will run out of air after braking repeatedly, due to its smaller compressor. This problem is aggravated when traveling over the mountains, where the air is thinner. Does the ....................Yes ........... No . ......... Even Brake’s air cylinder angles more energy into air cylinder the floor, for greater stability. angle energy The Vantage Select air cylinder angles energy into the floor? directly into the seat, lifting the housing up and out of position — less braking force is applied to the brake pedal. Every time Vantage Select is activated, it shifts further out of position. Are the air . ...............Yes ........... No . ......... Even Brake has DOT-approved air lines and Legris lines and double-seal air fittings. fittings the Vantage Select has lesser-grade air lines and best available? fittings, which are susceptible to leaks — air pressure will be lost. The compressor will burn out if it runs constantly to maintain air pressure (air compressors are a common Brake Buddy replacement item) which will also drain the towed vehicle’s battery in a matter of hours. Does the pedal .........Yes ........... No . ......... Even Brake’s adjustable pedal clamp fits brake clamp fit a wider pedals that Vantage Select cannot. range of vehicles? Does the .....................Yes ........... No . ......... Even Brake has height-adjustable feet for a secure housing have and stable platform on vehicles with uneven adjustable feet? floors. Vantage Select is not adjustable. For some vehicles, the customer must improvise a set of blocks. Does the system ....... No .......... Yes .......... Even Brake’s self-cleansing reservoir tank does accumulate water not accumulate water. in the reservoir tank? The Vantage Select will spill water from the reservoir tank onto the customer’s carpeting. 39 Frequently Asked Questions Towing and Suspension Solutions BrakeMaster What is BrakeMaster? BrakeMaster connects directly to the motorhome’s air or hydraulic brake system, so that brake line pressure in the motorhome controls the brakes in the towed vehicle. Because it connects directly to what powers your motorhome’s brakes, BrakeMaster is a truly synchronized, proportional braking system. Can I switch it between towed vehicles? Yes. Second vehicle kits are available. These allow you to have a braking system for both (or more) towed vehicles without the expense of another complete system. What does ‘proportional braking’ mean? Proportional braking is even braking — your towed vehicle’s brakes respond to your motorhome’s brakes, at the same time and at the same intensity. How long does it take to install? Depending on the type of brakes in your motorhome, the initial installation takes from six to eight hours. After the initial installation, it only takes a minute or two to connect or disconnect from the towed vehicle. How does BrakeMaster work? BrakeMaster uses air pressure to proportionately activate an air cylinder that applies the brakes in the towed vehicle just as if you were pressing on them yourself. Where does BrakeMaster get its air supply? If your motorhome has air brakes, BrakeMaster is connected to the existing braking system. If your motorhome has hydraulic brakes, there’s a BrakeMaster system that includes a compressor to supply air to the BrakeMaster air cylinder. My vehicle has power brakes, but when the engine is turned off, the power brakes do not function. Will BrakeMaster work on my vehicle? Yes. BrakeMaster is designed to work with vehicles that have a power brake system, but the engine (and the power brakes) are turned off while the vehicle is being towed. Is the motorhome’s brake line, or the brake line pressure, compromised in any way? No. Typically, one pre-existing fitting is removed, and replaced with another. This replacement fitting (as well as all hardware used to install BrakeMaster) meets or exceeds the automotive manufacturing standards established by both the Department of Transportation and the American National Standards Institute. Will it work in my motorhome and towed vehicle? Yes. The BrakeMaster air cylinder is universal, and works in virtually any towed vehicle with power brakes. The type of braking system in your motorhome determines which BrakeMaster is right for you — kits are available for motorhomes with air brakes, air over hydraulic brakes, or hydraulic brakes. 40 Does it fit in my car? BrakeMaster fits in virtually all vehicles. Can I install it myself? We recommend that you have BrakeMaster installed by a competent mechanic, with experience in motorhome installations. How do I know it’s working? A monitor light in the motorhome dash illuminates when the towed vehicle’s brakes are applied. I have an anti-lock braking system on my car. Will BrakeMaster interfere with it? No. Anti-lock braking only works when the car’s power is on. Since the power will be turned off when you tow your vehicle, BrakeMaster will not interfere with your anti-lock braking system. Why is BrakeMaster better? •Rock-solid, reliable braking — because it connects directly to what powers your motorhome’s brakes, BrakeMaster is a truly proportional, truly synchronized braking system — however you brake the motorhome, BrakeMaster automatically applies the same pressure. Every time. •Very easy to use — once the system is installed, BrakeMaster connects and disconnects from the towed vehicle in under a minute, without any tools, adjustments or settings. •Weighs just 3¾ pounds and measures 17 inches in length — stores almost anywhere. •The towed vehicle’s brakes are not altered in any way, so the factory warranty is not affected. •It’s made by ROADMASTER, the acknowledged leader in RV towing products. More people put their trust in ROADMASTER towing systems than in any other brand. Frequently Asked Questions Towing and Suspension Solutions Even Brake What is Even Brake? It’s a self-contained, portable braking system that sits in front of the driver’s seat. It attaches to the brake pedal and does all the braking for your towed car proportionately to your motorhome. What does ‘proportional braking’ mean? Proportional braking is even braking — your towed vehicle’s brakes respond to your motorhome’s brakes, at the same time and at the same intensity. How does Even Brake work? When you brake the motorhome, a microprocessor inside Even Brake signals a magnetic valve to release a compensating amount of air pressure against the towed vehicle’s brake pedal, slowing the towed vehicle in direct proportion to the motorhome. Does it brake on bumpy roads or over speed bumps? No. Even Brake’s ‘Terrain Sensing’ circuitry will not respond to an abrupt, up-and-down motion caused by a speed bump, pot hole or similar jolt or dip. In other words, it knows the difference between a bounce and a brake, and reacts accordingly. Can I switch it between vehicles? Yes. Even Brake is completely portable, and after the initial installation, it only takes a minute or two to transfer it to another vehicle. The brake pedal clamp is easy to attach and remove, and Even Brake plugs into the towed vehicle’s 12-volt outlet for its power. Will my battery go dead? No. Even Brake’s exclusive ‘Power Save’ mode automatically protects against a dead battery — Even Brake warns you of a low battery in the towed vehicle with LED and LCD alerts at the motorhome monitor, giving you time to recharge the battery. If the battery’s current drops too low, Even Brake cuts power to the system (while retaining emergency braking power). Other systems allow the battery to drain completely, forcing you to break out the jumper cables. But first, you have another problem — nobody makes 80-foot jumper cables. So you have to disengage your towed car and jockey your motorhome around to face it. Good luck! How long does it take to install? Installation, along with a brief overview given by your dealer, typically takes an hour. After the initial installation, it only takes a minute or two to connect or disconnect. Does it fit in my car? Even Brake fits in virtually all vehicles. How do I know it’s working? Even Brake’s monitor gives you complete, continuous braking information — a glance at the monitor assures you that Even Brake is fully operational. What if I think it’s braking too hard, or not hard enough? You can change braking force and sensitivity to fit your driving style. And no matter what setting you choose for everyday braking, Even Brake will always respond with full pressure during an emergency stop. This is a critical advantage over ‘on-or-off’ systems, which only brake at their pre-set level, no matter how hard you brake the motorhome. I have an anti-lock braking system on my car. Will Even Brake interfere with it? No. Anti-lock braking only works when the car’s power is on. Since the power will be turned off when you tow your vehicle, Even Brake will not interfere with your anti-lock braking system. Why is Even Brake better? Even Brake is the only ‘brake in a box’ with full-time proportional braking. It’s a better way to brake — better for your towed car and motorhome, your safety, and your peace of mind. Even Brake comes with a host of exclusive safety and convenience features — continuous self-diagnostic testing, automatic low battery and brake protection, and constant braking information and system status, reported to you via a three-tiered motorhome monitor, are three exclusive features. Terrain-sensing logic and smoother, more responsive braking are two more. It’s completely portable — you can set it up in a matter of minutes, and with a second vehicle kit, you can transfer it from vehicle to vehicle just as fast. It’s designed better — its feet are set wide apart, to form a stable, solid platform, and its air cylinder is angled to the floor, for the same reason. A high-performance air compressor takes less time to charge — Even Brake is ready for the next stop nearly twice as fast as the leading competitor. It’s made by ROADMASTER, the acknowledged leader in RV towing products. More people put their trust in ROADMASTER towing systems than in any other brand. 41 Frequently Asked Questions Towing and Suspension Solutions the 9700 What is the 9700? It’s a portable supplemental braking system that applies a pre-set pressure to the towed vehicle’s brake pedal each time the motorhome’s brake lights are illuminated — simply push a button to select light, medium or heavy braking. Or, just as easily, the 9700 can be set to activate only in an emergency break away. How does the 9700 work? The 9700 uses the electrical connections already in place on your towed vehicle (the towed vehicle’s electrical harness) to brake when you brake the motorhome — the same electrical signal that activates the towed vehicle’s brake lights also activates the 9700. Is the 9700 a ‘proportional’ braking system? No. Unlike BrakeMaster and Even Brake, the 9700 always applies the same braking pressure — either light, medium or heavy — which you select by pushing a button. (Regardless of which pressure you select, the 9700 will always apply maximum braking pressure in an emergency ‘break away.’) Will it brake when I don’t want it to? No. The 9700 will only brake when the motorhome brakes are applied — it works in tandem with you. Can I switch it between vehicles? Yes. The 9700 is completely portable, and after the initial installation, it only takes a minute or two to transfer it to another vehicle. The brake pedal clamp is easy to attach and remove, and the 9700 plugs into the towed vehicle’s 12-volt outlet for its power. Will my battery go dead? The 9700 draws power from the towed vehicle’s battery, and if the battery is not charged after towing (by driving the vehicle, running the engine, or with a battery charger) the 9700 will eventually drain it completely. Typically, this will take several days of towing, depending on the age and condition of the battery. We recommend charging the towed vehicle’s battery at the end of every day, once you’ve reached your destination. Does it fit in my car? The 9700 fits in virtually all vehicles. 42 How long does it take to install? Installation, along with a brief overview given by your dealer, typically takes an hour. After the initial installation, it only takes a minute or two to connect or disconnect. How do I know it’s working? An LED monitor in the motorhome will illuminate each time the 9700 is activated. What if I think it’s braking too hard, or not hard enough? You can adjust the braking pressure from “heavy” to “light” or “medium,” or conversely, from “light” to “medium” or “heavy.” Or, if you prefer to use the 9700 as an emergency device only, you can set it to activate only in a break away. I have an anti-lock braking system on my car. Will the 9700 interfere with it? No. Anti-lock braking only works when the car’s power is on. Since the power will be turned off when you tow your vehicle, the 9700 will not interfere with your anti-lock braking system. Why is the 9700 a better pre-set system? The 9700 is an economical alternative to systems with proportional braking, such as Even Brake and BrakeMaster. Within its category, the 9700 is unique in features such as extended braking protection, automatically applying maximum brake pressure in a break away, and its ‘break away only’ mode. It’s completely portable — you can set it up in a matter of minutes, and with a second vehicle kit, you can transfer it from vehicle to vehicle just as fast. It’s designed better — its feet are set wide apart, to form a stable, solid platform, and its air cylinder is angled to the floor, for the same reason. The 9700 has adjustable feet and an adjustable pedal clamp, for a quick, secure and stable fit. A high-performance air compressor takes less time to charge — the 9700 is ready for the next stop nearly twice as fast as the leading competitor. It’s made by ROADMASTER, the acknowledged leader in RV towing products. More people put their trust in ROADMASTER towing systems than in any other brand. Frequently Asked Questions Towing and Suspension Solutions InvisiBrake What is InvisiBrake? InvisiBrake is a fully-automatic, progressive supplemental towed vehicle braking system. How do I know it’s working? An LED monitor in the motorhome will illuminate each time InvisiBrake is activated. How does InvisiBrake work? InvisiBrake uses the electrical connections already in place on your towed vehicle to brake when you brake the motorhome — the same electrical signal that activates the towed vehicle’s brake lights also activates InvisiBrake. Is InvisiBrake a ‘proportional’ braking system? No, it is progressive. When braking is called for, InvisiBrake imediately engages the brake pedal and rapidly ramps up the braking to the setting you have selected. Will it brake when I’m driving my car? No. InvisiBrake only works when your car is being towed by your motorhome. What is ‘progressive’ braking? When you apply braking force, so does InvisiBrake — as you continue to apply the brakes in the motorhome, InvisiBrake applies a progressively harder pressure to the towed vehicle’s brakes, up to the setting you have selected. What do I have to do to prepare InvisiBrake for towing? Nothing. InvisiBrake works automatically when you connect your towed vehicle to your motorhome. There’s a motorhome monitor cord and a break away cable to connect between the two vehicles and that’s all. Can I switch it between vehicles? Yes. If you sell your towed vehicle, the major components can be removed and installed in the new towed vehicle. But InvisiBrake is not intended to be quickly swapped between towed vehicles, like Even Brake. Will InvisiBrake drain the battery? No. InvisiBrake constantly charges the towed vehicle during towing. What if I think it’s braking too hard, or not hard enough? You can easily adjust the braking pressure to a lighter or heavier setting. I have an anti-lock braking system on my car. Will InvisiBrake work with it? Yes. InvisiBrake will not interfere with your anti-lock braking system. My motorhome has an exhaust brake. Will it cause the InvisiBrake to come on? Only if the exhaust brake makes your brake lights turn on. In this event, InvisiBrake protects the towed vehicle by automatically releasing after 15 seconds of continuous braking. InvisiBrake will work normally with your next braking activity. Why is InvisiBrake a better system? InvisiBrake is an economical alternative to systems with proportional braking, such as Even Brake and BrakeMaster. InvisiBrake is unique in features such as automatic connection and disconnection, progressive braking and automatic battery protection. It’s made by ROADMASTER, the acknowledged leader in RV towing products. More people put their trust in ROADMASTER towing systems than in any other brand. Will it work in my car? InvisiBrake fits in nearly all vehicles, including those with full-time (‘active’) power braking systems. How long does it take to install? Installation, along with a brief overview given by your dealer, typically takes three to five hours. After the initial installation, InvisiBrake is always ready to tow, with no adjustments necessary. 43 44 ROADMASTER accessories Towing and Suspension Solutions Guardian rock guard and Tow Defender tow shield Towing and Suspension Solutions For maximum protection, use a Tow Defender and a Guardian. Made in the U.S.A. Motorhomes kick up rocks, gravel and road debris, but so does oncoming traffic. A Tow Defender/Guardian combination protects your towed vehicle’s finish, headlights and windshield against damage from both lanes. pictured: 4700 Tow Defender patent pending A bumper-to-bumper blanket of protection! Protect your towed vehicle and RV against dings and rock chips! The Guardian is crafted from rotationally-molded, high-impact polyethylene to absorb the impact of rocks, gravel and road debris — instead of ricocheting it back at the motorhome. The Guardian can be attached and removed in seconds, and fits all ROADMASTER tow bars equipped with quick-disconnects. (Note: MX brackets will not accommodate the Guardian.) The Guardian can also be used with a tow dolly to help protect your towed vehicle by using the Guardian bracket (part number 2000-8). If you tow more than one vehicle, the second vehicle kit has all the mounting hardware necessary to swap the Guardian from one vehicle to another. Guardian 4000 Guardian rock shield 2000-8 Guardian adaptor for tow dollies 4000-1 Second vehicle kit The Tow Defender's all-weather, heavy-duty screen deflects rocks, gravel and road debris down and away, protecting your towed vehicle's finish, headlights and windshield against chips and dings. The vinyl-coated mesh lets air through, keeping it low and over the road. Fully extended, both Tow Defenders offer 20 square feet of protection, and are held in place with shockabsorbing gas struts. Once you've reached your destination, roll up the Tow Defender, snap the elastic straps around each end, and store it against the motorhome. •Quick installation and release •Lightweight and compact — weighs just 14.5 pounds, and rolls up to four inches in diameter •Powder-coated steel supports and heavy-duty gas struts for maximum durability, support and corner ing flexibility Tow Defender 4700 fits all ROADMASTER tow bars with quick-disconnect release systems 4750 fits Blue Ox tow bars with Blue Ox brackets, Demco tow bars with Demco brackets and all motorhome-mounted ROADMASTER tow bars Note: does not fit MX brackets 45 Safety cables Vinyl coated — to prevent the cables from scratching or chipping the tow bar. The vinyl coating also makes the cables very easy to clean. Drop-forged steel hooks provide greater strength and safety than “S” hooks. 6,000-pound rated Spring-loaded clasps — for quick, easy and secure attachment — the clasps automatically close, preventing the hooks from bouncing or twisting off. Straight style shown; also available in coiled Standard safety cables Our aircraft type, galvanized steel safety cables are continuously tested to ROADMASTER’s exacting standards. Each comes fitted with heavy-duty, drop-forged steel hooks with spring-loaded latches. Vinyl coating prevents the safety cables from scratching or chipping the tow bar. Each kit contains two cables, snap hooks, and two quick links.Rated at either 6,000-, 8,000- or 10,000-pound carrying capacity, depending on the model you choose. Standard safety cables 643 68” 6,000-pound capacity single hook coiled — one pair This length fits most towing combinations. 643-2 645-76 68” 6,000-pound capacity double hook coiled — one pair 76” 6,000-pound capacity single hook straight — one pair This length is for towing combinations with accessories which extend the distance between the motorhome and the towed vehicle 645 646 649 648 653 64” 6,000-pound capacity single hook straight — one pair 64” 6,000-pound capacity double hook straight — one pair 64” 8,000-pound capacity single hook straight — one pair 64” 8,000-pound capacity double hook straight — one pair 80” 10,000-pound capacity double hook coiled — one pair Safety cable extensions Extensions (or longer safety cables, see above) are required with hitch extensions, high-low receiver extensions or any accessory which extends the length of the towing system. Also used as bracket safety cables. Each pair includes a pair of quick links. 6,000-pound capacity — available in multiple lengths, from eight to 22 inches. ROADMASTER part 46 EZ Hook™ safety cables EZ Hook safety cables are faster to connect and disconnect than other cables. They have all the features of our standard cables (left) with the addition of a unique attachment system — a stainless steel ball at the end of the cable latches into a slotted anchor plate. Only for ROADMASTER mounting brackets with quickdisconnect systems. 655 655-68 655Cable 655-64 EZ Hook safety cables 910650 655-76 One replacement EZ Hook 64” safety cable (cable only) 1 pair EZ Hook 76” safety cables (without anchor plates) 1 pair EZ Hook 68" safety cables with anchor plates This length fits most towing combinations. 1 pair EZ Hook 68” safety cables without anchor plates 1 replacement EZ Hook 68” safety cable (cable only) 1 pair EZ Hook 64” safety cables (without anchor plates) This length is for towing combinations with a shorter distance between the motorhome and the towed vehicle. This length is for towing combinations with accessories which extend the distance between the motorhome and the towed vehicle 655Cablelong 1 replacement EZ Hook 76” safety cable (cable only) 910653 1 pair EZ Hook anchor plates numbers 910646-8 through 910646-22. 8,000-pound capacity — available in multiple lengths, from eight to 22 inches. ROADMASTER part numbers 910648-8 through 910648-22. shown: 8” 8,000-pound capacity Electrical By law, a towed vehicle’s turn signals, running lights and brake lights must mimic the motorhome’s. There are three ways to accomplish that: 1. installing a wiring kit with diodes 2. installing a wiring kit with bulbs and sockets 3. adding a magnetic tow light kit to the towed vehicle Each method has its advantages. Whichever one you choose, ROADMASTER has a kit with all the necessary components, and step-by-step instructions. 1. Universal Wiring Kit This kit uses a system of diodes to connect the towed vehicle’s turn signals to the motorhome’s. Diodes prevent electrical feedback and protect both vehicles’ electrical systems. The kit comes complete with: •four ‘Hy-Power’ diodes (more diodes may be purchased separately) •a 30-foot strand of 4-wire elec trical cord •three feet of split wire loom •a six-foot power cord (connects electricity between the two vehicles) •a ring terminal •wire connectors •cable ties •step-by-step instructions 154 2. Taillight Wiring Kit Towing and Suspension Solutions 3. Magnetic tow lights A self-contained wiring system that bypasses the towed vehicle’s lighting with a set of independent plugs and sockets mounted inside the taillights. The wiring is routed from the taillights to the grille area. Since the towed vehicle’s electrical system is bypassed, this kit eliminates the concern of voiding the vehicle manufacturer’s warranty. Important: the towed vehicle’s taillight must have room for an extra socket and bulb inside the lens housing. ROADMASTER’s magnetic tow lights are the quick and easy way to connect your towed vehicle’s electrical system to your motorhome’s. The system is self-contained, and requires no splicing into the towed vehicle’s electrical system. •fits all vehicles •magnets hold lights securely •eliminates electrical damage to the towed vehicle •heavy-duty vinyl casing for maximum wire protection •includes plugs, sockets and the wire harness 155 Taillight Wiring Kit with bulbs 155-1010-pack of bulbs and sockets only (bulk pack) 2100 2120 Universal Wiring Kit with four ‘Hy-Power’ diodes Deluxe magnetic tow lights includes case and antiscratch pads Standard magnetic tow lights Brake-Lite Relay kit If you’re installing a supplemental braking system, chances are you’ll need a Brake-Lite Relay. It must be installed in the majority of towed vehicles, to enable the towed vehicle’s brake lights and turn signals to illuminate in tandem with the motorhome’s, as required by law. Comes standard with Even Brake®. •all wires and components included When should you •includes easy-to-follow instructions install a Brake-Lite 88400 Brake-Lite Relay kit Relay? See page 33. 47 ‘Flexo-Coil’ and straight power cords Whatever electrical system your customers choose, they must have a cord to connect electricity between the towed vehi164-7 cle and the motorhome. ROADMASTER’s are the best — the wires are water-, oiland chemicalresistant, and the 98164-7 plugs are injected with silicone to prevent corrosion. ‘Flexo-Coil’ cords expand to over eight feet, and conveniently contract for storage; use a straight cord for All-Terrain tow bars. ‘Flexo-Coil’ wiring kits for tow bars without cable channel guides 164 four-wire cord with plugs and sockets 1644 four-wire cord with plugs, sockets and socket bracket 146 six-wire cord with plugs and sockets 1466 six-wire cord with plugs, sockets and socket bracket 164-7 seven- to four-wire cord with plugs, sockets and socket bracket 146-7 seven- to six-wire cord with plugs, sockets and socket bracket Straight cord wiring kits for tow bars with cable channel guides (All-Terrain) 98164 four-wire kit 98146 six-wire kit 98146-7 seven- to six-wire kit with plugs, socket and socket bracket 98164-7 seven- to four-wire kit with plugs, socket and socket bracket Wiring components 1064-B blue 4-wire cord, without plugs 1046-R red 6-wire cord, without plugs 1064-B2 4-wire Flexo-Coil cord with two 4-way plugs 1047-B2 4-wire Flexo-Coil cord with one 4-way plug and one 7-way plug 1046-R2 6-wire Flexo-Coil cord with two 6-way plugs 1067-R2 6-wire Flexo-Coil cord with one 6-way plug and one 7-way plug 9338-70 7-way socket 9338-77 7-way plug Hy-Power™ diodes Diodes are used to tie into the towed vehicle’s brake light, running light and turn signal wiring, and connect it to the motorhome. Diodes permit electrical current to flow in only one direction — from the motorhome to the towed vehicle — preventing electrical feedback and the damage it can cause to both vehicles’ electronics. If you’re using a diode, why not use the best? HyPower diodes have a heavy-duty, powder-coated aluminum heat sink, and each diode is protected against the elements — all components are housed inside an epoxy-sealed, powder-coated aluminum case. Four-pack required for most vehicles. Includes detailed wiring instructions. Hy-Power diodes 790 single diode 792 two diodes 793 three diodes 794 four diodes 790-25 25 diodes (bulk pack) Brite-Lite™ 3-to-2 wiring converter If you have this — the motorhome has separate brake and turn signal lights; the towed vehicle has combined brake and turn signal lights. Then you need this — the Brite-Lite wiring converter connects a vehicle with a separate brake and turn signal system to a vehicle with a combined brake and turn system, while delivering more current to the towed vehicle’s brake and turn signal lights for brighter illumination. 732 Brite-Lite 3-to-2 wiring converter Electrical socket brackets These brackets hold the towed vehicle’s electrical socket firmly in place, making it easy to plug and unplug the power cord. ROADMASTER’s socket brackets are made of 1/8" thick steel — not lightweight sheet metal. Both straight and angled brackets fit most electrical sockets, and can be either welded or bolted in place. Black powder coat finish. 910030 Straight socket bracket 910030-5 Socket bracket with 90° bend 48 Towing accessories Padlocks Towing and Suspension Solutions Don’t spend your time worrying about a stranger or kids unlatching or removing your safety pins. Replace them with padlocks and peace of mind. Padlocks discourage theft and tampering, and protect against accidental release. Hardened steel shackle with solid brass tumblers and components. 301 302 303 308 304 305 315 316 Safety cable guide Quick-disconnect padlock Two quick-disconnect padlocks — keyed alike Two quick-disconnect padlocks and one coupler padlock — keyed alike Four quick-disconnect padlocks — keyed alike One receiver hitch lock and two quick-disconnect locks Coupler padlock Receiver hitch lock Two receiver hitch locks (keyed alike) Quick-disconnects These replacement packs are available in full and half sets; a replacement set of quick-disconnect base assembly components is also available. Part number 221 is also a retrofit for older StowMaster and Tracker tow bars; purchase part number 222 for a second towed vehicle. #222 #221 201 One complete set (part numbers 221 and 222) 221 Half set (attaches to the tow bar) 222 Half set (attaches to the tow bar bracket) 067 Quick-disconnect crossbar 910021-00 Quick-disconnect base (includes both 221 and 222 quick-disconnects, crossbar, linch pins and base pins) Quick-disconnect covers Give your towed vehicle that finished look, and protect your knees. These covers fit over all quick-disconnect bracket attachments, when not towing. Made of rotationally-molded plastic that is fade and crack resistant. 202 Quick-disconnect covers (one pair) Helps prevent the safety cables and power cord from being crushed or damaged, either between the coupler and the ball, or between the ball mount and the road. Nickel plated; mounts directly underneath the trailer ball. For car-mounted tow bars (StowMaster, Tracker) or for any towing application that uses a ball mount. 669 Safety cable guide Quick-disconnect safety cable anchors A quick and secure connection point at your towed vehicle, the safety cable anchors are manufactured from ¼" laser-cut steel plate and come with a powder-coated, gloss black finish. The anchors bolt onto all mounting brackets with ROADMASTER quick-disconnects. Two safety cable anchors per set. 910648 Quick-disconnect safety cable anchors XL™ bracket receiver inserts These heavy-gauge steel caps help keep out dirt, gravel and grime when your XL brackets are removed. Each insert is stamped with the ROADMASTER name and will give your towed vehicle that finished look. Fit all 1½" inner diameter tubes. 200 Chrome inserts (one pair) 200-5 Black inserts (one pair) EZ Twistlock™ bracket receiver inserts These heavy-duty rubber caps help keep out dirt, gravel and grime when your EZ Twistlock brackets are removed. Each insert is stamped with the ROADMASTER name and will give your towed vehicle that finished look. 210 212 Inserts for 1½" inner diameter tubes (one pair) Inserts for 1¼" inner diameter tubes (one pair — for EZ2 style brackets) 49 Hitch accessories for height adjustment Towing and Suspension Solutions Is your towing system in the ‘Safe Zone’? T he leading cause of tow system failure is an “outof-level” tow bar — when the tow bar is at an upward or downward slope. Three inches above or below level is the Safe Zone for motorhome-mounted tow bars. Car-mounted tow bars must be approximately level. Use the accessories in this section to bring an outof-level tow bar within the Safe Zone. Hi-Low Hitches Use a Hi-Low Hitch to level the RV hitch to the tow bar. The shanks can be turned up or down, for lowor high-ground clearance. The 07 series hitches have a 6,000-pound GVWR and a 100-pound maximum tongue weight. The 048 series hitches have a solid-steel shank, allowing a 10,000-pound capacity and 400-pound tongue weight. Fit nearly all two-inch receiver hitches. Available in two-, four-, six-, eight- and 10-inch sizes. Only for towing a car behind a motorhome — not for use with any type of trailer. 048-2 2" 10,000-pound capacity 072 2" 6,000-pound capacity 048-4 4" 10,000-pound capacity 070 4" 6,000-pound capacity 048-6 6" 10,000-pound capacity 076 6" 6,000-pound capacity 048-8 8" 10,000-pound capacity 048-10 10" 10,000-pound capacity Dual Hitch Receivers Double your towing capacity while using a tow bar — add a bike carrier or other hitch accessory to the rear of your motorhome. •For car and boat owners alike •Fits 2" hitch receivers •Solid steel construction U.S. Patent No. 5,884,930 •Computer-designed and -tested •Powder coated for maximum durability •10,000-pound capacity; 400-pound tongue weight maximum 077-2 Both receivers offset by two inches 077-4 One receiver offset by two inches, the other by four inches 50 Longer safety cables or extensions are required… …with any accessory which extends the length of the towing system. 12" safety cable extensions (see page 46) are available from ROADMASTER. Adjustable Ball Mount An adjustable ball mount that spans 16 inches of vertical height in one-inch increments. The shank can be turned up or down, for low or high ground clearance. The maximum rise is seven inches; the maximum drop is nine inches. Only for towing a vehicle behind a motorhome — not for use with any type of trailer. Rated at 6,000 pounds carrying capacity; 100-pound tongue weight maximum. 880 Adjustable Ball Mount Roller Hitches A drop extension for car-mounted tow bars. Use a Roller Hitch in 4" through 10" drops to level the motorhome hitch to the tow bar. 5,000-pound GVWR capacity; 200-pound tongue weight maximum •The solid-steel roller prevents scraping and drag ging. •Fits all square tube hitch receivers with two-inch inner diameters 051-4 4" Roller 051-6 6" Roller 051-8 8" Roller 051-10 10" Roller U.S. Patent No. 5,695,204 Hitch Hitch Hitch Hitch Other hitch accessories 7½" and 12" hitch receiver extensions Extends the hitch receiver by 7½ or 12 inches. Only for towing a vehicle behind a motorhome — not for use with any type of trailer. 6,000-pound GVWR capacity; 100-pound tongue weight maximum. 071-75 7½" Extension 071 12" Extension Rollaway™ Prevents the hitch from digging and dragging on the pavement. Made for heavy-duty applications. Front-load design accommodates hitches that other rollers won’t fit. Solid steel roller won’t fail like plastic or rubber rollers. Fits most 2" hitch receivHitch pin and clip included ers. Works with or without a ball mount. 050 Rollaway Towing and Suspension Solutions Quiet Hitch™ Quiet Hitch stops sway and wander before it begins. Tighten two bolts and eliminate any free play between the receiver and the tow bar (or bike rack, ball mount or whatever you insert) for a solid, seamless connection. Consistent pressure keeps your towing combination tracking straight through crosswinds, curves and sudden maneuvers — all with considerably less effort on your part. 061 •Bolts on in seconds •The 061 works on 2" hitch receivers; the 062 works on 2½" hitch receivers 061 Quiet Hitch for 2" hitch receivers 062 Quiet Hitch for 2½" hitch receivers Bracket safety cables/ safety cable extensions wk Tracker pin and clip • Pin for Tracker • 2-pack 3" pin with lanyard and linch pin for 034 and 034-5 adaptors Large pin with cable and linch pin (bulk) • • • • • • • • 2-pack storage hairpin • 2-pack QD linch pins • • • • • • • • • 2-pack safety pin with clasp • Hitch pin and clip for 2" receiver • • • • • • • • 2-pack clip only for receiver pin • 2-pack base pin with cable and linch pin • • • • • • • • Coupler pin • • Hitch pin and clip for 2½" receiver (tow bar requires 2½" adaptor) Tow bar parts 910003-00 910003-10 910003-15 910003-32 910003-35 910003-50 910003-52 910003-65 910003-80 910003-85 910652 Button and glue kit • • • Autowlok™ bushing kit • Shoulder bolt kit • Shoulder bolt and yoke bolt • • Handle kit • • Autowlok bushing kit Shoulder bolt, bushings and end plug kit Shoulder bolt, bushings and end plug kit • Autowlok repair kit • • Shoulder bolt, bushings and end plug kit • • Handle springs and caps • • * also fits 031 adaptor on lc Fa g Ha in ck Bla er ck rl Bla Ste g on rl Ste lc in 910006* 910006-00* 910007 910008-00 910023 910024 910026 910027 910028 910029 910032 910034 Fa Pins and clips 6,000-pound rated Available in multiple lengths, from eight inches to 22 inches (part numbers 650646-8 through 650646-22). Sold one each; quick links sold separately. r It’s bound to happen: a part gets lost or misplaced. Here’s a partial list of the parts and accessories we have available. If it’s not listed here, call us at 800-6699690, tell us what you’re missing, and we’ll find what you want. All T All errai n ck Ha Terr ai Sto wk wM All n as Ter Fa te lc r on All rain 2 Sto Ter wM ra in Tra aste Maintenance accessories • 8,000-pound rated Available in multiple lengths, from eight inches to 22 inches (part numbers 650648-8 through 650648-22). Sold one each; quick links sold separately. Snap hooks and quick links 910031 Snap hook for safety cable 9100222-pack quick links for safety cables • • • 910022 910031 51 Care and cleaning Towing and Suspension Solutions Voom RV Top to bottom, front to rear, inside and out…Voom RV is the solution to all your cleaning needs. Spray on…wipe off. It’s THAT simple! The newest cleaning technology in Voom RV allows you to use only one cleaner for all of your RV’s cleaning and maintenance. From top to bottom, front to rear, inside and out, Voom RV is the only cleaner you will ever need. Voom RV is an all-purpose concentrated cleaner that can be used full strength or diluted with water. Safe for all surfaces not harmed by water. And safe for the planet — Voom RV is biodegradable and contains no petroleum distillates. Great for around the home, too! Exterior uses: aluminum; awnings; black streaks; chrome; bug stains; painted surfaces; rubber; rubber roofs; screens; tar; wheels and more! Interior uses: appliances; carpets; counter tops; fiberglass; grease; hard water stains; mold and mildew; pet stains; spot cleaning; tubs; toilets; upholstery. 9911 Voom RV 32-ounce spray 9910 Voom RV one gallon 9955 Voom RV 55-gallon drum A beautiful shine and great UV protection! Voom RV Gold Effortless showroom shine and UV protection in seconds — uniquely formulated Voom Gold produces a microfine UV- and chemical-resistant film, creating a deep, rich luster that will deepen with each application, protecting surfaces from further oxidation or deterioration. Spray on, wipe off — it’s that simple! Perfect for both smooth and textured surfaces, vinyl, rubber, plastic and fiberglass. Renews and protects all exterior surfaces from further oxidation and deterioration. Contains no acrylic polymers that yellow and crack. Shine lasts for months and deepens with every application. 9941 Voom Gold 22-ounce spray 9940 Voom RV one gallon LubeMaster™ silicone spray LubeMaster is the ideal lubricant for tow bars, awning arms, window tracks, folding steps, or for hundreds of other applications around the home and motorhome. It’s a dry silicone, which doesn’t attract dirt or road grime that can cause binding. Meets Volatile Organic Compound (VOC) standards. Tow Bar Cleaner A fast-acting, environmentally-friendly solution that sticks to your tow bar, making it a breeze to clean. Removes dirt and grime build-up, penetrating into blind holes and between adjacent surfaces. Melts away road film, diesel exhaust, bugs, tar, grease and grime, dirt and debris. Biodegradable, non-toxic, contains no phosphates or petroleum distillates. Designed for tow bars, but works wonders on any surface that’s hard to clean. 747 9932 Tow Bar Cleaner 22 oz. spray 52 LubeMaster silicone spray ROADMASTER suspension products “I had a set of anti-sway bars installed and the results were dramatic. The notorious Texas high plain winds couldn’t unhook us from the highway and hard curves at 60 mph became routine. I seemed to have glass walls between myself and passing trucks. I was nothing less than thrilled with the sway bars at road speeds.” — S. Thornton Bellevue, Washington Towing and Suspension Solutions We’re the suspension experts V ery few people would say they bought their motorhome (or truck, van or SUV) for the suspension. For most of us, the suspension is out of sight and out of mind — even though your driving performance, safety and comfort are all riding on those components. Unequal weight distribution, worn or inadequate components, excessive axle side play or a higher center of gravity can quickly overpower a stock suspension, even in everyday driving. Unfortunately, finding a solution can be as frustrating as dealing with the consequences. Do you need a custom suspension component? Every “yes” to the following questions is a “yes” for an antisway bar, a steering stabilizer and/or a trac bar… • Does the vehicle “roll” when cornering? • Does driving for an extended period of time leave you physically exhausted? • Is your rig all over the road — can’t keep it between the lines? • Would you lose control if one of the front tires blew out? • Does the steering wheel have a mind of its own? • Do passing 18-wheelers and crosswinds rock your vehicle back and forth? • Is driving a ‘white knuckle’ experience? The primary benefits of ROADMASTER suspension components are… • Anti-sway bars — virtually eliminate ‘body roll’ (the vehicle rolls from side to side, especially during cornering). Anti-sway bars stabilize the vehicle, which keeps it level through crosswinds, as well as dramatically improving overall handling. • Steering stabilizers — front tire blow out protection. Stabilizers also automatically compensate for oversteer caused by pot holes, rut tracks and other unfavorable road conditions. • Trac bars — drastically reduce ‘wander’ (the steering feels loose, making it difficult — and physically exhausting — to keep the vehicle in a straight line). Each of these components will protect your vehicle (improved tire life, reduced suspension wear, reduced maintenance costs and improved vehicle performance) and protect your family (better driving control, reduced driver fatigue, more control in evasive maneuvers, and improved driver confidence). Every ROADMASTER suspension component… • …is designed as a custom fit, for a specific chassis. ROADMASTER engineering designs take into consideration chassis and axle manufacturers’ specifications (your warranty will not be affected). Which component is right for you? ROADMASTER designs, engineers and manufactures antisway bars, trac bars, and steering stabilizers for both original equipment manufacturers and the aftermarket. Anti-sway bars, trac bars and steering stabilizers work in concert with the other components of your suspension system to add stability and control. Each of these components has a specific role to play. The graph on this page identifies the primary benefits of aftermarket suspension products. Each one has value — for a specific application. It’s important to understand and identify what you’re experiencing, so you can select the correct product solution. There are several components that make up a good vehicle suspension system: shocks provide comfort; air bags support weight; antisway bars control left-to-right sway; trac bars reduce ‘wander;’ and steering stabilizers provide blow out protection. Use this chart to make an informed decision about what aftermarket suspension product(s) will enhance your vehicle’s stability, handling and maneuverability. 53 Anti-sway bars D oes your motorhome handle like the Queen Mary? Does it pitch and roll with every gust of wind or passing semi, or list to port or starboard on the curves, or waddle over speed bumps, railroad tracks and driveways? Well, it shouldn’t. As a matter of fact, motorhomes (as well as SUVs, pickup trucks and vans) can be made to handle just like what they are — motor vehicles — with two aftermarket upgrades. Upgrading your shock absorbers will control up and down motion. But the best shocks in the world won’t affect side to side motion (the “Queen Mary effect,” commonly called “body roll” or “sway”) by one iota. molybdenum alloy), which is considerably more durable than the standard spring steel (a 1020 grade) used in many stock sway bars. • A better pivot point — all anti-sway bars pivot and rotate, in response to pressure shifts on the chassis. The bushings (one at each connecting point) are the pivot points, and also the points most vulnerable to abrasion. Stock bushing are made of rubber, which hardens over time, making it more susceptible to abrasion. Rubber is also subject to corrosion, and additional wear, The solution to sway is in the suspension. from petroleum products such as gasoline or oil, and Adding a set of custom anti-sway bars to your susfrom ozone in the atmosphere. pension system will have the The more a stock bushing stock same effect on sway as a wears, the more the sway good set of shocks has on up bar ‘gives.’ Over time, the and down motion — there’s motorhome leans farther an immediate improvement and farther out of line, in in stability and tracking, esresponse to the same load pecially on the curves. weights. That’s what causes RSS For many motorhome driver fatigue on big rigs — owners, this is an empowconstantly correcting for Bigger is better — the RSS anti-sway bar (to the ering experience. What was excessive sway. left) has a larger diameter, a better grade of steel and beyond their control, just yes RSS bushings, on the othpolyurethane bushings, making it much more resistant terday, is suddenly within it her hand, are made of polyto sway than a stock anti-sway bar (right). — cornering with confidence, urethane, which has many quicker maneuvering, and a remarkably level ride over advantages over rubber — polyurethane is impervious to uneven terrain — all without launching the dishes out gas, oil and ozone corrosion, is more resistant to abraof the cupboard. And even after eight or 10 hours at sion, and doesn’t buckle under heavier load weights. the wheel, they arrive fresh, instead of fatigued. Which means they can start enjoying the Grand Canyon, the RSS anti-sway bar benefits Grand Tetons, or the grandkids right away. •improved handling •increased stability How could one component •reduced body roll have such a dramatic effect? •a safer and smoother ride Both stock and custom anti-sway bars are designed •combats crosswinds as a link between the suspension and the frame, and •corner with confidence both use the weight of the axle as a brace against the •less driver fatigue chassis, so that pressure to one side of the motorhome •improvement over factory standard equipment (by weight shift, crosswinds or passing trucks) is countered by the bar. Designed to fit specific… A custom anti-sway bar, however, is built to offer • Class A and C motorhomes • SUVs • Trucks • Vans significantly more resistance to sway… • Bigger is better — custom anti-sway bars have What do our customers say? a thicker diameter than stock bars. Often, a quarter “I noticed a difference as soon as I stepped into the to three-eighths of an inch more. Each incremental motorhome — there was no rocking movement. increase in diameter has an exponential effect on During a recent trip we encountered substantial crossperformance — on average, torsional roll stiffness is winds. With the RSS anti-sway bar, I estimate our motorhome’s sway was reduced by 90 percent. increased by 30 percent with every 1/8” increase in We don’t feel anything now when a tractor trailer blows diameter. by us. In plain English, the bar offers 30% more resistance I’m 100 percent satisfied — everyone should experience to sway. the benefit of this product.” • A high-grade alloy — custom anti-sway bars — Johnny Singleton, Myrtle Beach, South Carolina are made of 4140 “chromoly” steel (a chrome and 54 Sell sheet — anti-sway bars What is ‘sway?’ When you turn (or when crosswinds or passing 18-wheelers rock the vehicle), the body of the vehicle rolls to one side. This side-to-side weight shift, which causes you to fight the steering wheel, is called “sway” (or, “body roll”). How does an anti-sway bar work? Anti-sway bars appear to be quite simple (a typical bar resembles an elongated “U”), but the physics behind their function is anything but simple — the bar is a torsional spring, which rotates on leverage arms in response to pressure shifts at either end of the axle. In this manner, force is displaced from one side of the vehicle to the other. In simple terms, an RSS anti-sway bar anchors the frame to the axle, so that the pressure shifts caused by crosswinds or cornering are virtually eliminated. What are the benefits? • Safety — body roll forces more weight to the outside tires, reducing traction. An anti-sway bar distributes the weight evenly over all four wheels. With more rubber on the road, the vehicle is more stable and responsive. Sway can force the driver into a series of oversteer reactions, especially during cornering. Compensating for sway at the steering wheel is dangerous at any speed. • Comfort — constantly having to correct for sway is not only dangerous, it’s also exhausting. (See ‘Why Fight It?’ on the other side.) RSS anti-sway bars virtually eliminate sway caused by crosswinds and weight shift. So even after hours at the wheel, the driver arrives fresh, instead of fatigued. How do I know if I need one? Every “yes” to the following questions is a “yes” for an RSS anti-sway bar: • Does the vehicle “roll” when cornering? • Do crosswinds or passing 18-wheelers rock the vehicle back and forth? • Does driving for an extended period of time leave you fatigued? • Is driving a “white knuckle” experience? How does it install? The bar is bolted on (usually, eight bolts) to the frame and the axle. On average, 60% require no drilling — the attachment bolts use existing hole patterns. Is there one for my vehicle? RSS anti-sway bar kits are available for motorhomes, trucks, vans, and SUVs. Each one is customdesigned specifically for your vehicle’s chassis. What if I have stock bars? Compared to stock bars, RSS anti-sway bars offer significantly more resistance to sway… • RSS anti-sway bars have a thicker diameter than stock bars. Often, a quarter to three-eights of an inch more. Every 1/8" increase in diameter results in a 30 percent increase in sway resistance. • RSS anti-sway bars are made from 4140 “chromoly” spring steel (a chrome and molybdenum alloy), which is considerably stronger and more durable than the standard carbon steel (a 1020 grade) used in many stock anti-sway bars. • Stock anti-sway bar bushings (the pivot points) are made of rubber, which hardens over time, making it more susceptible to abrasion. Rubber is also subject to corrosion, and additional wear, from petroleum products like gasoline or oil, and from ozone in the atmosphere. The more a stock bushing wears, the more the sway bar ‘gives.’ Over time, the vehicle leans farther and farther out of line, in response to the same load weights. RSS bushings are made of polyurethane, which is impervious to gas, oil and ozone corrosion, is more resistant to abrasion, and doesn’t buckle under heavier load weights. 55 56 Reflex™ steering stabilizers The ‘return-to-center’ concept and how it works… Take the spring from a ballpoint pen. Hold each end with a thumb and index finger and squeeze it toward the middle. Feel the pressure pushing your fingers apart? wheel centered — not you. Now, gently extend the spring. Feel the pressure of the • Rut tracking — ruts cause you to oversteer. With spring pulling your fingers back to the neutral position? the Reflex Steering Stabilizer on board, your reactions That’s what physicists call ‘memory,’ or the ability of a become easier, eliminating overcompensation when material to return to its original state. steering out of a rut. Reflex Steering Stabilizers have a tempered steel • Road edging — when your tire drops off the edge spring secured at both ends to a specially designed of the pavement, it can startle and valved steering damper. One end of the stabilizer is atThis is not the time to buy a even the most careful driver. The Reflex Steering Stabilizer keeps tached to the tie rod, and the Reflex Steering Stabilizer. you going straight — helping other end is securely fastened to you control the RV until you’re the chassis undercarriage. back on the road. When the steering stabilizer • Pot holes and debris — with is compressed, the spring pushthe Reflex Steering Stabilizer in es back to the neutral position. place, the motorhome will stay When extended, the spring pulls straight and go in the direcback to the neutral position. tion you want, even when you bounce through a pot hole or Benefits Reflex provides… Your best insurance against the catastrophic other dangerous road condition. • Front tire blow out — when consequences of a front tire blow out is a Reflex you blow out a front tire, your Steering Stabilizer. vehicle will make an abrupt turn toward that tire, causing you to veer into oncoming trafWhat do our customers say? “After installing the (Reflex) stabilizer bars, the truck fic or off the road. The stabilizer reacts instantaneously handles like a Ferrari! Unbelievable how this has changed to bring the vehicle back to center. the unfavorable handling characteristics into a finely-tuned, • Crosswinds and passing traffic — works to keep very user-friendly vehicle with exceptional road manners. your steering centered, and prevents oversteering to After the installation, I test-drove doing hard swerves… help control your vehicle more effectively. like being on rails! I highly recommend adding these to your • Road fatigue — helps you stop fighting the steerchassis.” ing wheel for control. The stabilizer keeps the steering — Carl Sommer, Fort Wayne, Indiana Times St. Petersburg Jury awards Pasco family $5.6 million in Goodyear tire crash By Molly Moorhead, St. Petersburg Times staff writer Published Tuesday, June 29, 2010 NEW PORT RICHEY — John Schalmo was driving with his family to his son’s graduation from boot camp in August 2004 when he felt a vibration, then a tire blow underneath his RV. The motorhome slid down an embankment, across an interstate on-ramp and into some trees. Schalmo suffered multiple broken bones. His mother-inlaw’s face was shattered. His father-in-law lost both his legs. The family sued Goodyear Tire & Rubber Co., alleging its G159 tire was defective — prone to overheat and separate at high rates of speed — and that Goodyear knew it. Their case, filed in 2006, went to trial this month in New Port Richey. After two weeks of testimony, a jury on Friday returned a $5.6 million award for Schalmo and his family. continued on next page The Interstate 10 crash near Chipley in the Panhandle destroyed John Schalmo’s motorhome and injured family members in 2004. He sued Goodyear Tire Co. “It was simply to make Goodyear admit that they’ve got a tire out there that’s a problem,” he says. 57 Jury awards $5.6 million continued from preceding page “We’re trying to stop something like this crazy mess that we went through from happening to somebody else,” Schalmo, 57, said Monday. Goodyear spokesman Rob Whitehouse said the company plans to appeal the verdict. “This was an unfortunate accident and our thoughts and prayers are with those injured,” Whitehouse said in a statement. “However, Mr. Schalmo ignored a number of safety issues with his vehicle that led to the accident, including: failing to hook-up the supplemental brakes on the vehicle he was towing, ignoring a vibration in his steering wheel for more than five minutes and getting out of the driver’s seat while the vehicle was traveling at highway speeds. “Also, Goodyear tire experts determined the vehicle’s front tire had been punctured in two locations.” The crash occurred on Interstate 10, near Chipley, in the Panhandle. Schalmo, his wife, Kelly, daughter Chelsea Decker and Kelly’s parents, Bill and Ruth McClintock, were bound for Houston for son Jim Decker’s graduation in the Air Force. Instead, they spent weeks in a hospital in Dothan, Ala. Hugh Smith, one of Schalmo’s attorneys, said he showed jurors internal Goodyear documents, including speed- and heat-testing results that demonstrated that the tire was improperly approved by Goodyear for continuous 75-mph highway use on Class A motorhomes. Smith said Goodyear is fighting to keep those documents confidential, and Circuit Judge Stanley Mills gave the company 45 days to make its case for sealing them. John and Kelly, 49, are back home in New Port Richey, where they own a site contracting business. Ruth McClintock lives with them. Her husband, who lived for a time with two prosthetic legs, died two years ago at age 81. “His heart just finally gave up,” Schalmo said. Smith said this case was the first involving this style of Goodyear tire to reach a verdict. Others have been filed but they settled out of court, Smith said. Schalmo wanted a trial. “It was simply to make Goodyear admit that they’ve got a tire out there that’s a problem,” he said. n Davis TruTrac™ bars If your customer’s motorhome has one of these chassis… •Ford F53 (V8: ’88-’98 or V10: ’98-’05) •Workhorse (W16 through W24, ’00-’09) •Freightliner front engine diesel (FRED) — ’07-’09 •Kodiak 45/5500 (’03-’09) …he needs a Davis TruTrac™ bar! D oes your motorhome vibrate from side to side? Are “wandering,” “rut tracking” and “lazy steering” a problem? Tired and fatigued trying to keep in line going down the road? Davis TruTrac bars link the chassis to the front axle, eliminating excessive axle side play, without affecting normal up-and-down suspension travel. The result is precise, predictable handling. The benefits are an immediate improvement in both vehicle performance and safety, as well as increased driver comfort — more positive control means less driver fatigue. Each TruTrac bar comes complete with all mounting hardware, and installs using pre-drilled factory holes — no drilling or welding required. They will not interfere with any factory original equipment, or affect any factory warranty. Davis TruTrac bars are available for Ford F53 (V8 and V10), and all Workhorse motorhome chassis (W16, W18, W20, W22 and W24), Freightliner front engine 58 diesel chassis (FRED), as well as Kodiak 45/5500 chassis. Davis TruTrac bars are zinc-plated and come with polyurethane bushings for maximum stability and longevity. What do our customers say? “My F53 chassis would vibrate so bad that it shook the whole motorhome. The only way to stop the vibration was to slow down to 20 mph — which almost got me rear-ended twice. Finally my wife told me, ‘I’m not riding in that motorhome any more.’ A mechanic told me about Davis TruTrac bars. I had one installed and the vibrations stopped immediately. I drove that motorhome for another 150,000 miles (with my wife back on board) and it was solid as a rock. Buying that Davis TruTrac bar was the best move I ever made.” — John Kielty, Reno, Nevada ROADMASTER product literature and displays Towing and Suspension Solutions Braking system literature and displays Towing and Suspension Solutions 59 Towing and suspension literature and displays 60 Towing and Suspension Solutions Miscellaneous literature and POP materials Towing and Suspension Solutions 61 #095 doublesided display Towing and Suspension Solutions This 7-foot x 4-foot all-metal display is FREE to dealers who purchase the products to stock it! front 62 back #095D (double-sided) stocking products Description Towing and Suspension Solutions Part number Fill/Stock Quantity Tow Bars StowMaster (optional)............................................................... 501.............................2 BlackHawk 2 All-Terrain............................................................ 422.............................2 Falcon 2................................................................................... 520.............................2 Falcon All-Terrain..................................................................... 522.............................2 Sterling All-Terrain.................................................................... 576.............................1 Tow Bar Covers Falcon 2 cover......................................................................... 055.............................4 BlackHawk and Falcon All-Terrain cover.................................... 055-2..........................4 Sterling All-Terrain cover........................................................... 057-2..........................4 Safety Cables Coiled cable, 6,000-pound capacity, with 1 hook...................... 643.............................4 64” cable, 6,000-pound capacity, with 2 hooks......................... 646.............................4 64” cable, 8,000-pound capacity, with 1 hook.......................... 649.............................2 Padlocks QD Padlock, 2-pack, keyed alike.............................................. 302.............................4 2 QD padlocks and 1 receiver hitch lock................................... 304.............................4 1 receiver hitch lock................................................................. 315.............................4 Wiring 6-wire Flexo-Coil kit, with bracket............................................ 1466...........................4 7- to 6-wire Flexo-Coil kit........................................................ 146-7..........................4 4-wire Flexo-Coil kit................................................................. 164.............................4 7- to 4-wire Flexo-Coil kit........................................................ 164-7..........................4 Universal Wiring Kit.................................................................. 154.............................4 Taillight Wiring Kit with bulbs.................................................... 155.............................4 Brite-Lite 3- to-2 converter....................................................... 732.............................4 Diode, Hy-Power, 2-pack.......................................................... 792.............................4 Diode, Hy-Power, 3-pack.......................................................... 793.............................4 Diode, Hy-Power, 4-pack.......................................................... 794.............................4 Power cord, 6-wire straight....................................................... 98146.........................4 Power cord, 7-wire to 4-wire, straight....................................... 98164-7......................4 Accessories Quiet Hitch, for 2-inch hitch receivers....................................... 061.............................4 XL receiver inserts, black, set of 2............................................. 200-5..........................4 EZ receiver inserts, black, set of 2............................................. 210.............................4 LubeMaster silicone spray......................................................... 747............................12 Cables and Quick Links Quick Link 2-pack.................................................................... 910022.......................2 Pins and Clips Linch pin, 2-pack...................................................................... 910024.......................4 Safety pin, 2-pack.................................................................... 910026.......................4 Receiver pin and clip, single pack............................................. 910027.......................4 Base pin with cable and linch pin, 2-pack................................. 910029.......................4 Coupler pin, single................................................................... 910032.......................4 Braking System Brake-Lite Relay Kit.................................................................. 88400.........................4 63 #095 singlesided display Towing and Suspension Solutions This 7-foot x 4-foot all-metal display is FREE to dealers who purchase the products to stock it! 64 #095S (single-sided) stocking products Description Towing and Suspension Solutions Part number Fill/Stock Quantity Tow Bars Falcon All-Terrain..................................................................... 522.............................2 Sterling All-Terrain.................................................................... 576.............................1 Tow Bar Covers Falcon 2 cover......................................................................... 055.............................4 BlackHawk and Falcon All-Terrain cover.................................... 055-2..........................4 Sterling All-Terrain cover........................................................... 057-2..........................4 Safety Cables Coiled cable, 6,000-pound capacity, with 1 hook...................... 643.............................4 64” cable, 6,000-pound capacity, with 2 hooks......................... 646.............................4 Padlocks 2 QD padlocks and 1 receiver hitch lock................................... 304.............................4 1 receiver hitch lock................................................................. 315.............................4 Wiring 7- to 6-wire Flexo-Coil kit........................................................ 146-7..........................4 Universal Wiring Kit.................................................................. 154.............................4 Brite-Lite 3- to-2 converter....................................................... 732.............................4 Diode, Hy-Power, 4-pack.......................................................... 794.............................4 Power cord, 6-wire straight....................................................... 98146.........................4 Accessories Quiet Hitch, for 2-inch hitch receivers....................................... 061.............................4 Pins and Clips Base pin with cable and linch pin, 2-pack................................. 910029.......................4 65 #100 triple-sided product display Towing and Suspension Solutions This all-metal display is FREE to dealers who purchase the products to stock it! side 1 side 2 66 side 3 #100 (triple-sided) stocking products Description Towing and Suspension Solutions Part Fill/Stock number Quantity Side One Brite-Lite 3-to-2 converter..........................................................................732...........2 Brake-Lite Relay kit.....................................................................................88400.......2 Hy-Power diodes, 2-pack............................................................................792...........3 Hy-Power diodes, 4-pack............................................................................794...........3 Universal Wiring Kit....................................................................................154...........2 Taillight Wiring Kit......................................................................................155...........2 6-wire straight power cord.........................................................................98146.......2 4-wire Flexo-Coil power cord.....................................................................164...........2 4-wire straight power cord.........................................................................98164.......2 7-to-4 wire Flexo-Coil power cord..............................................................164-7........2 Quick-disconnect covers, one pair..............................................................202...........2 StowMaster tow bar...................................................................................501...........2 Side Two Sterling All-Terrain tow bar with 4-wire power cord.....................................575...........2 Tracker tow bar..........................................................................................020...........2 Falcon 2 tow bar cover...............................................................................055...........2 Sterling All-Terrain tow bar cover................................................................057-2........2 Falcon, BlackHawk, BlackHawk 2 All-Terrain tow bar cover..........................055-2........2 Quick links, 2-pack....................................................................................910022.....6 Receiver pin and clip (1 each).....................................................................910027.....6 Quick-disconnect linch pins, 2-pack............................................................910024.....6 Safety pin with clasp, 2-pack......................................................................910026.....6 Base pin with cable and linch pin, 2-pack...................................................910029.....2 EZ Twistlock receiver inserts for 1½" inner diameter tubes, 1 pair................210...........2 XL receiver inserts for 1½" inner diameter tubes, black, 1 pair.....................200-5........2 Quiet Hitch for Class 3 receivers.................................................................049...........2 Side Three Falcon 2 tow bar........................................................................................520...........2 Falcon All-Terrain tow bar...........................................................................522...........2 Quick-disconnect padlocks, keyed alike, 2-pack..........................................302...........2 Quick-disconnect padlocks (2) and coupler padlock (1), keyed alike............303...........2 Quick-disconnect padlocks (2) and receiver hitch lock (1)............................304...........2 LubeMaster silicone spray...........................................................................747...........2 64" safety cables, 6,000 pound capacity, double hook straight, pair............646...........2 68" safety cables, 6,000 pound capacity, single hook coiled, pair................643...........2 68" EZ Hook safety cables with anchor plates, 6,000 pound capacity, pair... 655...........1 64" safety cables, 8,000 pound capacity, single hook straight, pair..............649...........2 64" safety cables, 8,000 pound capacity, double hook straight, pair............648...........1 Hi-Low receiver drop, 4".............................................................................070...........2 Roller hitch, 4" drop....................................................................................051-4........1 Literature ROADMASTER catalog.............................................................. 853079-08.................50 RSS suspension products brochure............................................ 854083-03.................25 Voom brochure........................................................................ 852328-03.................25 2001 and RM3477 tow dolly flyer............................................. 854407-00.................25 Even Brake brochure................................................................ 853708-03.................25 BrakeMaster brochure.............................................................. 853614-01.................25 67 #089 small demo display Towing and Suspension Solutions This all-metal display is FREE to dealers who purchase the products to stock it! #089 stocking products Description Part number Fill/Stock Quantity Guardian rock guard................................................................ 4000...........................1 Any four of the following tow bars StowMaster tow bar................................................................. 501 Falcon 2 tow bar...................................................................... 520 Sterling All-Terrain tow bar....................................................... 576 68 #079 RSS display Towing and Suspension Solutions This all-metal display is FREE to dealers who purchase any 10 RSS products! 69 Additional sales aids and bracket installation tools Towing and Suspension Solutions Tow bar cut-aways Tow bar cut-aways are the ideal way to demonstrate the advanced technology in both the Autowlock™ and Freedom Latch™ tow bar release mechanisms. Falcon 2 cut-away (part number 005-1 Falcon All-Terrain cut-away (part number 005-2 StowMaster cut-away (part number 005-3 Sterling All-Terrain cut-away (part number 005-5 Bracket installation tools Save time, save money on every bracket installation with these five tools. 017 Fascia trimming template (part number 014) Bracket centering bar (part number 016) 016 QD/Guardian bracket alignment bar (part number 016-1) Receiver alignment bar (part number 018) Quick-disconnect alignment bar (part number 017) 70 016-1 018 014 Technical Information Contents pages Vehicle-specific applications for braking systems.................71 Tow bar brackets — supplemental instructions......................................... 72-75 Safety cables — connection instructions and diagrams 6,000-pound capacity safety cables.......................... 76-79 8,000-pound capacity safety cables.......................... 80-81 BrakeMaster top 10 installer tips.........................................82 Even Brake diagnostic flow charts.......................................83 Wiring diagrams ‘Combined’ towed vehicle to ‘combined’ motorhome......84 ‘Combined’ towed vehicle to ‘separate’ motorhome........85 ‘Separate’ towed vehicle to ‘combined’ motorhome........86 ‘Separate’ towed vehicle to ‘separate’ motorhome..............87 Standard wiring codes for ROADMASTER products........ 88-90 Towing and Suspension Solutions 71 or installation service writers — we suggest that you refer to this form on the ROADMASTER web site whenever you schedule an appointment to install a ROADMASTER braking system. The form is a list of many popular towed vehicles, with specific vehicle criteria and either required or recommended products for a successful installation. This form will be updated as new vehicles become available for us to research. The form is located in the “Dealer Section” at www.roadmasterinc.com — click the “Dealer Section” button at the bottom of the home page. F Specifications subject to change without notice ROADMASTER, Inc. 6110 NE 127th Ave. Vancouver, Washington 98682 WARNING Attach all components as described in these instructions. If any part of the bracket, tow bar or safety cables are attached incorrectly, the towing system may fail and the towed vehicle may separate from the motorhome. Failure to follow these instructions may cause property damage, personal injury or even death. XL™ bracket attachments To attach the removable arms (Figure 1) to the bracket — the arms are not interchangeable; refer to the exploded view in the bracket installation instructions to identify the driver’s side and passenger’s side arms. Slide each arm into the appropriate receiver brace (Figure 1). A lock tab on the side of each removable arm will Figure 1 stop it at the point where the pre-drilled holes in the arm align to the pre-drilled holes in the brace. (For anti-theft protection, a padlock with a 3/8" or narrower diameter shank can be attached through the lock tab and removable arm.) Insert the receiver pin (Figure 1) through both sides of the brace and the arm; secure it in place with one of the spring pins (Figure 1). Note: in some vehicles where clearance at the fascia or the grille is tight, the receiver and spring pins can be inserted from only one side of the bracket. Refer to the owner’s manual and/or the installation instructions to attach the quick-disconnects (‘QDs,’ Figure 1) to the removable arms, and to attach the tow bar to the QDs. (Owner’s manuals and installation instructions are available at www.roadmasterinc.com. continued on next page 72 800-669-9690 www.roadmasterinc.com EZ Twistlock™ bracket attachments There are three basic EZ Twistlock styles (Figure 2): • The quick link is attached at the front of the receiver brace; • The quick link is attached on the bracket cross brace; or • The quick link is locked on the receiver brace. (Within each style, the location of the quick link attachments for any specific bracket can vary.) For the first two styles, attach the removable arms to continued on next page Figure 2 XL bracket attachments EZ Twistlock bracket attachments continued from preceding page Or, call ROADMASTER customer service at 800-669-9690 to request a copy.) The short (or, ‘bracket’) safety cables that are included in the XL bracket kit must be connected between the receiver braces and the QDs, as shown in Figure 1. Pre-drilled holes are provided near the front of the receiver braces and the bottom of the QDs for this purpose. (The attachment point at the receiver brace may be on the bracket cross brace, or to one side of the brace, or directly below it, as shown in Figure 1.) Attach the short safety cables at both points with the quick links (Figure 1). Use the quick links at the bottom of the QDs as attachment points for the long safety cables (Figure 1). Refer to “Attaching the safety cables” for additional information. MX™ bracket attachments To attach the removable arms (Figure 4) to the bracket — the arms are not interchangeable; refer to the exploded view in the bracket installation instructions to identify the driver’s side and passenger’s side arms. Slide each arm into the appropriate receiver brace (Figure 4). A lock tab on the side of each removable arm will stop it at the point where the pre-drilled holes in the arm align to the pre-drilled holes in the brace. (For anti-theft protection, a padlock with a 3/8" or narrower diameter shank can be attached through the lock tab and removable arm.) Insert the receiver pin (Figure 4) through both sides of the brace and the arm; secure it in place with one of the spring pins. Note: in some vehicles where clearance at the fascia or the grille is tight, the receiver and spring pins can be inserted from only one side of the bracket. Refer to the owner’s manual and/or the installation instructions to attach the tow bar to the bracket. (Owner’s manuals and installation instructions are available at www.roadmasterinc.com. Or, call ROADMASTER customer service at 800-669-9690 to request a copy.) Attach the long safety cables to the bracket with the quick links (Figure 4). Pre-drilled holes are provided on the receiver braces for this purpose. Refer to “Attaching the safety cables” for additional information. Figure 4 continued from preceding page the bracket first. For the third style, attach the quick links first. Refer to Figure 2 to identify the attachment point for the quick links and quick-disconnects (‘QDs'). (Figure 3 shows the quick links attached to the front of the receiver brace.) To attach the removable arms (Figure 3) to the bracket — the arms are not interchangeable; refer to the exploded view in the bracket installation instructions to identify the driver’s side and passenger’s side arms. The exploded view shows the removable arms in a horizontal position; orient them to a vertical position, then slide the arms into the appropriate receiver brace (Figure 3). Twist the arms 90 degrees to lock them in place. Depending on the specific model, the removable arm may be locked to the receiver brace with: a ‘D' clip; a spring-loaded pin; a quick link (see Figure 2); or an internal cam lock. Refer to the exploded view in the installation instructions. Refer to the owner’s manual and/or the installation instructions to attach the QDs to the removable arms, and to attach the tow bar to the QDs. (Owner’s manuals and installation instructions are available at www.roadmasterinc.com. Or, call ROADMASTER customer service at 800-669-9690 to request a copy.) The short (or, ‘bracket’) safety cables that are included in the EZ Twistlock bracket kit must be connected between the receiver braces and the QDs, as shown in Figure 3. Pre-drilled holes are provided at both attachment points for this purpose. Attach the short safety cables at both points with the quick links (Figure 3). Use the quick links at the bottom of the QDs as attachment points for the long safety cables (Figure 3). Refer to “Attaching the safety cables” for additional information. Figure 3 Standard and MS™ bracket attachments The front extensions for both standard and MS style brackets are permanently bolted to the bracket. Standard brackets accept quick-disconnects (QDs); MS brackets do not. For MS brackets — with the exception of the removable arm, receiver brace and lock tab, use the MX bracket attachment instructions for MS brackets. For standard brackets — to attach the QDs to the front continued on next page 73 Attaching the safety cables S ome ROADMASTER tow bar mounting brackets with removable arms, such as the ones shown in Figures 1, 3 and 6, use both a long safety cable and a short (or, ‘bracket’) safety cable on each side. Each long safety cable runs from the motorhome to a quick link attaching it to one of the quick-disconnects. This quick link is also an attachment point for one of the short safety cables; another quick link attaches the short safety cable to the receiver brace on the mounting bracket. Unscrew the nuts on each quick link to connect the safety cable loops. Finger-tighten the nuts firmly, until the loop is completely closed, to secure the attachment. Do not substitute carabiners or other devices for the quick links — the quick links are designed to hold the weight of a towed vehicle; carabiners or other devices are not. Only ROADMASTER tow bar brackets with removable arms have this three-point attachment system (with the exception of MX brackets). Other brackets, such as ROADMASTER standard and MS brackets, and those of other manufacturers, are bolted directly to the frame of the towed vehicle and do not require short safety cables. Figure 1 shows the short safety cable attachment for a typical XL single-hook safety cable system; Figure 3 shows an EZ Twistlock safety cable system. (For doublehook safety cables, use the quick links at the bottom of the QDs as attachment points for the hooks.) If the towed vehicle is equipped with Standard, MX or MS brackets — the short (‘bracket') safety cables are not used with these brackets (except, if necessary, to extend the length of the long cables). For MX and MS Standard and MS bracket attachments continued from preceding page extensions, and to attach the tow bar to the QDs, refer to the owner’s manual and/or the installation instructions. (Owner’s manuals and installation instructions are available at www.roadmasterinc.com. Or, call ROADMASTER customer service at 800-669-9690 to request a copy.) Attach the long safety cables (Figure 5) to the QDs with the quick links (Figure 5). Pre-drilled holes are provided at the bottom of the QDs for this purpose. Refer to “Attaching the safety cables” for additional information. Figure 5 To connect EZ Hook™ safety cables… At the tow bar, connect each long safety cable to a cable anchor bracket by inserting the ball through the top of the slot and dragging it down. Attach the quick link for the short safety cable through the pre-drilled hole in the anchor bracket. Note: EZ Hook safety cables cannot be used with ROADMASTER MX or MS tow bar brackets. Figure 6 brackets, the connection point at the towed vehicle varies; it may be located on the receiver brace (as shown in Figure 4) or on another part of the tow bar bracket which is not removable. WARNING The safety cables must be carefully routed so that they cannot become pinched, frayed, scraped or otherwise damaged, and so they will not drag when going over dips or low spots. Do not use the cables if they show any signs of wear or damage — immediately discontinue towing and replace the cables. Failure to replace worn or damaged safety cables will result in cable failure, which may cause property damage, personal injury or even death. WARNING If the quick links are not completely tightened, with the loop closed, the safety cables may detach. In the event of a towing system failure, the towed vehicle will detach, which may cause property damage, personal injury or even death. WARNING If your towing system requires two sets of safety cables, always use both the long and the short safety cables. Connect them as shown in Figures 1, 3 and 6. Otherwise, in the event of a towing system failure, the towed vehicle will detach, which may cause property damage, personal injury or even death. WARNING The weight of the towed vehicle, including all its contents, cannot exceed the weight capacity of the safety cables, or the safety cables will fail, which may cause property damage, personal injury or even death. 74 ‘Fishwiring' a bolt F ishwiring is a technique used to install many automotive aftermarket accessories. If the available space is too small to position an attachment bolt by hand, a length of wire is threaded onto the bolt, and the bolt is maneuvered into position using the wire, which is then removed. Two bolts are used. Both bolts must have the same thread pitch, but different diameters — the wire is first wound around the thread of a bolt which is 1/16" smaller in diameter than the bolt to be positioned (refer to the Sizing Chart below). Then, the wire is threaded off the smaller bolt, and onto the larger bolt. 1. First, position a sufficient length of 0.025" to 0.035" wire (welding wire was used in this example) along the base of the smaller bolt (inset, Figure A). 2. Wrap the wire along the thread grooves of the bolt, as shown in Figure A, for at least five complete revolutions. 3. Hold the wire in one hand and turn the bolt with the other, until the wire is free (Figure B). 4. Trim the wire with a pair of side cutters (Figure C). 5. Thread the larger bolt onto the wire (Figure D). Then, center the wire to the bolt — with a pair of pliers, twist the wire at the end of the bolt so that it extends away from the bolt in a straight line (Figure D). 6. Maneuver the free end of the wire through the closest available space, and through the attachment point. In this example — Figure E — a carriage bolt and backing plate, which will be used to attach a tow bar mounting bracket, is fishwired through an existing opening in the frame rail, and into position. 7. Once the attachment bolt is in position, pull on the wire to remove the wire from the bolt (inset, Figure E). Figure A Figure B Figure E Figure C Sizing Chart Figure D size of bolt size of bolt to be fishwired used to make the fishwire ¾" ............................................................................... 9/16" 9/16" ............................................................................... ½" ½" ............................................................................... 7/16" 7/16" .............................................................................. 3/8" 3/8" .............................................................................. 5/16" 5/16" ............................................................................... ¼" ¼" ................................................................................. 10 Towing and Suspension Solutions ROADMASTER, Inc. • 6110 NE 127th Ave. • Vancouver, WA 98682 • 800-669-9690 • roadmasterinc.com 85-1677-00 rev. 03 12/07 75 All specifications subject to change without notice S Using your safety cables afety cables are an integral part of your towing system. They are a secondary safety device, required by law in many states. These instructions will acquaint you with their proper use. If you will use these safety cables with a ROADMASTER tow bar and tow bar brackets, these instructions and the accompanying diagrams apply in their entirety. If you will use them with another manufacturer’s tow bar and/or tow bar brackets, refer to the manufacturer’s instructions, in addition to these, for specific connection instructions. To ensure your safety and that of your passengers, as well as the safety of others on the road, follow these safe towing practices at all times: • Always use safety cables when towing. The safety cables must connect the motorhome to the towed vehicle, frame to frame. • The weight of the towed vehicle, including all its contents, cannot exceed the weight capacity of the safety cables, or the safety cables will fail. (Similarly, the weight of the towed vehicle cannot exceed the weight capacity of the tow bar, or any other component of your towing system.) • Pull the safety cables so that all the slack is at the motorhome. Be certain there is enough slack in the cables at the motorhome to allow for sharp turns — if there is not enough slack, the towing system will be severely damaged when the motorhome turns. • The safety cables must be the correct length… • Make certain the cables are not too short — if you use a receiver hitch extension or other equipment that extends the distance between the towed vehicle and the motorhome, the standard cables may be too S • Always cross the cables under the hitch receiver, as shown in the diagrams on pages two, three and four. In the unlikely event the tow bar separates from the motorhome, crossing the cables will help prevent the tow bar from dragging on the ground, which can cause the tow bar to “pole vault” the towed vehicle. • Some ROADMASTER tow bar mounting kits with removable arms use two safety cables on each side. If two sets of safety cables are required, both must be used. This is required by law. Refer to the following instructions and diagrams for additional information. WARNING Failure to follow these instructions may cause property damage, personal injury or even death. Connection instructions ome ROADMASTER tow bar mounting brackets with removable arms, such as the ones shown on the following pages, use both a long safety cable and a short safety cable on each side. Each long safety cable runs from the motorhome to a quick link attaching it to one of the quick-disconnects. This quick link is also an attachment point for one of the short safety cables; another quick link attaches the short safety cable to the mounting bracket. Unscrew the nuts on each quick link to connect the safety cable loops. Finger-tighten the nuts firmly, until the loop is completely closed, to secure the attachment. Do not substitute carabiners or other devices for the quick links — the quick links are designed to hold the weight of a towed vehicle; carabiners or other devices are not. Only ROADMASTER tow bar brackets with removable arms have this three-point attachment system (with the exception of MX brackets). Other brackets, such as ROADMASTER standard and MS brackets, and those of other manufacturers, are bolted directly to the frame of the towed vehicle and do not require short safety cables. Figure 1 shows the short safety cable attachment for a typical singlehook safety cable system; double-hook attachment is shown in the diagrams for each applicable ROADMASTER tow bar. WARNING The safety cables must be carefully routed so that they cannot become pinched, frayed, scraped or otherwise damaged, and so they will not drag when going over dips or low spots. Do not use the cables if they show any signs of wear or dam- 76 short. If the cables are too short, the towing system will be severely damaged when the motorhome turns a sharp corner. (Twelve-inch safety cable extensions, part number 910648-12, are available from ROADMASTER.) • Make certain the cables are not too long — the cables should not hang down to the extent they may catch on obstructions, or drag on the ground. This much slack could cause damage to the towing system, the towed vehicle, or the motorhome. If the cables are too long, wrap the excess cable around the tow bar to take up the slack. The last pass must be to the inside, to allow the towed vehicle to track in line behind the motorhome (Refer to the accompanying diagrams.). Be certain there is enough slack in the cables at the motorhome to allow for sharp turns. Figure 1 age — immediately discontinue towing and replace the cables. Failure to replace worn or damaged safety cables will result in cable failure, which may cause property damage, personal injury or even death. WARNING If the quick links are not completely tightened, with the loop closed, the safety cables may detach. In the event of a towing system failure, the towed vehicle will detach, which may cause property damage, personal injury or even death. WARNING If your towing system requires two sets of safety cables, always use both the long and the short safety cables. Connect them as shown in Figure 1, and on the following pages. Otherwise, in the event of a towing system failure, the towed vehicle will detach, which may cause property damage, personal injury or even death. 1 Tracker ™ (For ease of illustration we have shown straight safety cables; Flexo-Coil cables are attached in the same manner.) Figure 2 See page one for detailed connection information. StowMaster ™ (For ease of illustration we have shown straight safety cables; Flexo-Coil cables are attached in the same manner.) Figure 3 2 77 Falcon and Falcon 2 (For ease of illustration we have shown straight safety cables; Flexo-Coil cables are attached in the same manner.) ™ ™ Figure 4 BlackHawk™ The has channel guides identical to those shown below for All Terrain tow bars — only straight, singlehook safety cables can be used with the channel guides. All Terrain tow bars —(Only BlackHawk, BlackHawk 2 and Falcon straight, single-hook safety cables can be used with the All Terrain channel guides.) ™ ™ For all tow bars — To connect EZ Hook™ safety cables… At the tow bar, connect each long safety cable to a cable anchor bracket by inserting the ball through the top of the slot and dragging it down. Attach the quick link for the short safety cable through the pre-drilled hole in the anchor bracket. Note: EZ Hook safety cables cannot be used with ROADMASTER MX or MS tow bar brackets. 78 Figure 5 StowMaster All Terrain The has cable guides and release latches like those shown below, with a coupler mounting system identical to the illustration for the StowMaster on page 2. 3 Sterling and Sterling All Terrain To attach the EZ Hook safety cables… At the tow bar, connect each long safety cable to a cable anchor bracket by inserting the ball through the top of the slot and dragging it down. Attach the quick link for the short safety cable through the pre-drilled hole in the anchor bracket. Note: EZ Hook safety cables cannot be used with ROADMASTER MX or MS tow bar brackets. ™ ™ ™ (Only straight, single-hook safety cables can be used with the tow bar channel guides.) See page one for detailed connection information. Figure 6 Limited Warranty 1. WARRANTY 1a. WARRANTY OF CONFORMITY AT TIME OF SALE ROADMASTER, Inc. warrants that at the time of sale of this product it will be free from defects in material and manufacture and will conform to ROADMASTER’S specifications for the product. 1b. CONDITIONAL ONE-YEAR WARRANTY In addition to the preceding time-of-sale warranty, if the product registration card is completely and accurately filled out and mailed to ROADMASTER within thirty (30) days of purchase, ROADMASTER will provide an additional warranty that for a period of one year after sale the product will remain in good working order, PROVIDED THAT the product is installed and maintained in accordance with ROADMASTER’S instructions and is not subjected to: (a) alteration or unauthorized repairs or repairs by anyone other than ROADMASTER or a ROADMASTERauthorized service center, (b) misuse, abuse, commercial use, or improper maintenance, (c) Acts of God (including without limitation hurricanes, tornadoes, floods, or other severe weather or natural phenomena), (d) failures due to products not supplied by ROADMASTER, or (e) other treatments, uses, or installations for which the product was not intended. This warranty extends only to the first retail purchaser-consumer of the product and is not transferable. 2. DISCLAIMER OF OTHER WARRANTIES The preceding warranties are the exclusive and sole express warranties given by ROADMASTER. They supersede any prior, contrary or additional representations, whether oral or written. No agent, representative, dealer or employee has the authority to alter or increase the obligations or limitations of this warranty. Any implied warranties, including the WARRANTY OF MERCHANTABILITY and any WARRANTY OF FITNESS FOR A PARTICULAR PURPOSE, are limited in duration to thirty days or the term of the applicable express warranty provided above, whichever is longer. Some states do not allow limitations on how long an implied warranty lasts, so the above limitation may not apply to you. 3. EXCLUSIVE REMEDY FOR ANY NONCONFORMITIES If during the applicable Warranty Period, the product does not conform to the preceding Warranties, notify ROADMASTER as provided below, and within a reasonable time ROADMASTER will provide, at its option, one of the following: (1) replacement components for any nonconforming or defective product or components or (2) the percentage of the purchase price for the nonconforming product equal to the percentage of the Warranty Period remaining when ROADMASTER is notified of the nonconformity. ROADMASTER will, at its option, (a) use new and/or reconditioned parts in performing warranty repairs and making replacement products, (b) use parts or products of original or improved design in the repair or replacement. If ROADMASTER repairs or replaces a product, its warranty continues for the remaining portion of the original Warranty Period or 60 days from the date of the return shipment to the customer, whichever is greater. All replaced products and all parts removed from repaired products become the property of ROADMASTER. ROADMASTER will not provide, and will not be liable for, labor, costs of removal or reinstallation of components, disposal, shipping, freight, taxes, or other incidental charges. THESE REMEDIES ARE THE EXCLUSIVE AND SOLE REMEDIES FOR ANY BREACH OF WARRANTY. 4 For any breach of warranty, the Owner must telephone ROADMASTER at 1-800-669-9690 within thirty (30) days after discovering the nonconformity. Do not return any product without first calling ROADMASTER and getting a return authorization number. Returned products must include the return authorization number and a copy of the original invoice, bill or other proof of the date of purchase. ROADMASTER will authorize (a) shipment of the product to ROADMASTER or (b) repair or replacement at the nearest warranty service center—in both cases with shipping at your expense. Do not purchase replacement parts or pay for repair labor—you will not be reimbursed. Compliance with the requirements of this paragraph is a condition to coverage under the Warranty: if these requirements are not complied with, ROADMASTER will have no obligation to provide any remedy for any breach of warranty. 4. DISCLAIMER OF INCIDENTAL AND CONSEQUENTIAL DAMAGES IN NO EVENT SHALL ROADMASTER BE LIABLE FOR ANY INCIDENTAL, SPECIAL, INDIRECT OR CONSEQUENTIAL DAMAGES, WHETHER RESULTING FROM NONDELIVERY OR FROM THE USE, MISUSE OR INABILITY TO USE THE PRODUCT OR FROM DEFECTS IN THE PRODUCT. Some states do not allow the exclusion or limitation of incidental or consequential damages, so the above limitation may not apply to you. 5. APPLICABLE LAW This Warranty will be interpreted, construed, and enforced in all respects in accordance with the laws of the State of Washington, without reference to its choice of law rules. The U.N. Convention on Contracts for the International Sale of Goods will not apply to this Warranty. 6. SEVERABILITY If any provision of this warranty is found to be invalid or unenforceable, then the remainder shall have full force and effect, and the invalid provision shall be partially enforced to the maximum extent permitted by law to effectuate the purpose of the agreement. 7. ADDRESS FOR NOTICES TO ROADMASTER ROADMASTER, Inc., 6110 N.E. 127th Ave., Vancouver, WA 98682 This warranty gives you specific legal rights, and you may also have other rights which vary from State to State. Towing and Suspension Solutions ROADMASTER, Inc. • 6110 NE 127th Ave. • Vancouver, WA 98682 • 800-669-9690 • Fax 360-735-9300 • www.roadmasterinc.com 85-2715-00 rev. 04 10-08 79 All specifications subject to change without notice S afety cables are an integral part of your towing system. They are a secondary safety device, required by law in many states. These instructions will acquaint you with their proper use. If you will use these safety cables with a ROADMASTER tow bar and tow bar brackets, these instructions and the accompanying diagrams apply in their entirety. If you will use them with another manufacturer’s tow bar and/or tow bar brackets, refer to the manufacturer’s instructions, in addition to these, for specific connection instructions. To ensure your safety and that of your passengers, as well as the safety of others on the road, follow these safe towing practices at all times: • Always use safety cables when towing. The safety cables must connect the motorhome to the towed vehicle, frame to frame. • The weight of the towed vehicle, including all its contents, cannot exceed the weight capacity of the safety cables, or the safety cables will fail. (Similarly, the weight of the towed vehicle cannot exceed the weight capacity of the tow bar, or any other component of your towing system.) • Pull the safety cables so that all the slack is at the motorhome. Be certain there is enough slack in the cables at the motorhome to allow for sharp turns — if there is not enough slack, the towing system will be severely damaged when the motorhome turns. • The safety cables must be the correct length… • Make certain the cables are not too short — if you use a receiver hitch extension or other equipment that extends the distance between the towed vehicle and the motorhome, the standard cables may be too S WARNING Failure to follow these instructions may cause property damage, personal injury or even death. Connection instructions ome ROADMASTER tow bar mounting brackets with removable arms, such as the ones shown on the following pages, use both a long safety cable and a short safety cable on each side. Each long safety cable runs from the motorhome to a quick link attaching it to one of the quick-disconnects. This quick link is also an attachment point for one of the short safety cables; another quick link attaches the short safety cable to the mounting bracket. Unscrew the nuts on each quick link to connect the safety cable loops. Finger-tighten the nuts firmly, until the loop is completely closed, to secure the attachment. Do not substitute carabiners or other devices for the quick links — the quick links are designed to hold the weight of a towed vehicle; carabiners or other devices are not. Only ROADMASTER tow bar brackets with removable arms have this three-point attachment system (with the exception of MX brackets). Other brackets, such as ROADMASTER standard and MS brackets, and those of other manufacturers, are bolted directly to the frame of the towed vehicle and do not require short safety cables. Figure 1 shows the short safety cable attachment for a typical singlehook safety cable system; double-hook attachment is shown in the diagrams for each applicable ROADMASTER tow bar. WARNING The safety cables must be carefully routed so that they cannot become pinched, frayed, scraped or otherwise damaged, and so they will not drag when going over dips or low spots. Do not use the cables if they show any signs of wear or dam- 80 short. If the cables are too short, the towing system will be severely damaged when the motorhome turns a sharp corner. (Twelve-inch safety cable extensions, part number 910648-12, are available from ROADMASTER.) • Make certain the cables are not too long — the cables should not hang down to the extent they may catch on obstructions, or drag on the ground. This much slack could cause damage to the towing system, the towed vehicle, or the motorhome. If the cables are too long, wrap the excess cable around the tow bar to take up the slack. The last pass must be to the inside, to allow the towed vehicle to track in line behind the motorhome (Refer to the accompanying diagrams.). Be certain there is enough slack in the cables at the motorhome to allow for sharp turns. • Always cross the cables under the hitch receiver, as shown in the diagrams on pages two, three and four. In the unlikely event the tow bar separates from the motorhome, crossing the cables will help prevent the tow bar from dragging on the ground, which can cause the tow bar to “pole vault” the towed vehicle. • Some ROADMASTER tow bar mounting kits with removable arms use two safety cables on each side. If two sets of safety cables are required, both must be used. This is required by law. Refer to the following instructions and diagrams for additional information. Figure 1 age — immediately discontinue towing and replace the cables. Failure to replace worn or damaged safety cables will result in cable failure, which may cause property damage, personal injury or even death. WARNING If the quick links are not completely tightened, with the loop closed, the safety cables may detach. In the event of a towing system failure, the towed vehicle will detach, which may cause property damage, personal injury or even death. WARNING If your towing system requires two sets of safety cables, always use both the long and the short safety cables. Connect them as shown in Figure 1, and on the following pages. Otherwise, in the event of a towing system failure, the towed vehicle will detach, which may cause property damage, personal injury or even death. BlackHawk , BlackHawk All Terrain , and BlackHawk 2 All Terrain ™ ™ ™ (Only straight, single-hook safety cables can be used with the tow bar channel guides; 8000-pound capacity double hook safety cables are made for other manufacturers’ tow bars.) Figure 2 See page one for detailed connection information. Limited Warranty 1. WARRANTY 1a. WARRANTY OF CONFORMITY AT TIME OF SALE ROADMASTER, Inc. warrants that at the time of sale of this product it will be free from defects in material and manufacture and will conform to ROADMASTER’S specifications for the product. 1b. CONDITIONAL ONE-YEAR WARRANTY In addition to the preceding time-of-sale warranty, if the product registration card is completely and accurately filled out and mailed to ROADMASTER within thirty (30) days of purchase, ROADMASTER will provide an additional warranty that for a period of one year after sale the product will remain in good working order, PROVIDED THAT the product is installed and maintained in accordance with ROADMASTER’S instructions and is not subjected to: (a) alteration or unauthorized repairs or repairs by anyone other than ROADMASTER or a ROADMASTERauthorized service center, (b) misuse, abuse, commercial use, or improper maintenance, (c) Acts of God (including without limitation hurricanes, tornadoes, floods, or other severe weather or natural phenomena), (d) failures due to products not supplied by ROADMASTER, or (e) other treatments, uses, or installations for which the product was not intended. This warranty extends only to the first retail purchaser-consumer of the product and is not transferable. 2. DISCLAIMER OF OTHER WARRANTIES The preceding warranties are the exclusive and sole express warranties given by ROADMASTER. They supersede any prior, contrary or additional representations, whether oral or written. No agent, representative, dealer or employee has the authority to alter or increase the obligations or limitations of this warranty. Any implied warranties, including the WARRANTY OF MERCHANTABILITY and any WARRANTY OF FITNESS FOR A PARTICULAR PURPOSE, are limited in duration to thirty days or the term of the applicable express warranty provided above, whichever is longer. Some states do not allow limitations on how long an implied warranty lasts, so the above limitation may not apply to you. 3. EXCLUSIVE REMEDY FOR ANY NONCONFORMITIES If during the applicable Warranty Period, the product does not conform to the preceding Warranties, notify ROADMASTER as provided below, and within a reasonable time ROADMASTER will provide, at its option, one of the following: (1) replacement components for any nonconforming or defective product or components or (2) the percentage of the purchase price for the nonconforming product equal to the percentage of the Warranty Period remaining when ROADMASTER is notified of the nonconformity. ROADMASTER will, at its option, (a) use new and/or reconditioned parts in performing warranty repairs and making replacement products, (b) use parts or products of original or improved design in the repair or replacement. If ROADMASTER repairs or replaces a product, its warranty continues for the remaining portion of the original Warranty Period or 60 days from the date of the return shipment to the customer, whichever is greater. All replaced products and all parts removed from repaired products become the property of ROADMASTER. ROADMASTER will not provide, and will not be liable for, labor, costs of removal or reinstallation of components, disposal, shipping, freight, taxes, or other incidental charges. THESE REMEDIES ARE THE EXCLUSIVE AND SOLE REMEDIES FOR ANY BREACH OF WARRANTY. For any breach of warranty, the Owner must telephone ROADMASTER at 1-800-669-9690 within thirty (30) days after discovering the nonconformity. Do not return any product without first calling ROADMASTER and getting a return authorization number. Returned products must include the return authorization number and a copy of the original invoice, bill or other proof of the date of purchase. ROADMASTER will authorize (a) shipment of the product to ROADMASTER or (b) repair or replacement at the nearest warranty service center—in both cases with shipping at your expense. Do not purchase replacement parts or pay for repair labor—you will not be reimbursed. Compliance with the requirements of this paragraph is a condition to coverage under the Warranty: if these requirements are not complied with, ROADMASTER will have no obligation to provide any remedy for any breach of warranty. 4. DISCLAIMER OF INCIDENTAL AND CONSEQUENTIAL DAMAGES IN NO EVENT SHALL ROADMASTER BE LIABLE FOR ANY INCIDENTAL, SPECIAL, INDIRECT OR CONSEQUENTIAL DAMAGES, WHETHER RESULTING FROM NONDELIVERY OR FROM THE USE, MISUSE OR INABILITY TO USE THE PRODUCT OR FROM DEFECTS IN THE PRODUCT. Some states do not allow the exclusion or limitation of incidental or consequential damages, so the above limitation may not apply to you. 5. APPLICABLE LAW This Warranty will be interpreted, construed, and enforced in all respects in accordance with the laws of the State of Washington, without reference to its choice of law rules. The U.N. Convention on Contracts for the International Sale of Goods will not apply to this Warranty. 6. SEVERABILITY If any provision of this warranty is found to be invalid or unenforceable, then the remainder shall have full force and effect, and the invalid provision shall be partially enforced to the maximum extent permitted by law to effectuate the purpose of the agreement. 7. ADDRESS FOR NOTICES TO ROADMASTER ROADMASTER, Inc., 6110 NE 127th Ave., Vancouver, WA 98682 This warranty gives you specific legal rights, and you may also have other rights which vary from State to State. Towing and Suspension Solutions ROADMASTER, Inc. • 6110 NE 127th Ave. • Vancouver, WA 98682 800-669-9690 • www.roadmasterinc.com 85-1313-00 revision 06 12-07 81 ROADMASTER, Inc. 6110 N.E. 127th Avenue Vancouver, WA 98682 800-669-9690 Fax 360-735-9300 www.roadmasterinc.com How to use safety cables If these safety cables are to be used with a ROADMASTER tow bar and tow bar brackets, follow these instructions in their entirety. If they are to be used with another manufacturer’s tow bar or tow bar brackets, refer to the manufacturer’s instructions, in addition to these. • Always use safety cables when towing. The safety cables must connect the motorhome to the towed vehicle, frame to frame. • The weight capacity of the safety cables must meet or exceed the towed weight, or the safety cables will fail. • Pull the safety cables so that all the slack is at the motorhome. Be certain there is enough slack in the cables at the motorhome to allow for sharp turns — if there is not enough slack, the towing system will be severely damaged when the motorhome turns. • Thesafetycablesmustnothangdowntotheextenttheydrag on the ground or may catch on obstructions. This much slack could cause damage to the towing system, the towed vehicle or the motorhome. If this is the case, wrap the excess cable around the tow bar arms to take up the slack. The last pass must be to the inside, to allow the towed vehicle to track in line behind the motorhome (see Figure 2). Be certain there is enough slack in the cables at the motorhome to allow for sharp turns. • Always cross the cables under the hitch receiver, as shown in Figure 2. In the unlikely event the tow bar separates from the motorhome, crossing the cables will help prevent the tow bar from dragging on the ground, which can cause the tow bar to “pole vault” the towed vehicle. • Some ROADMASTER tow bar mounting brackets with removable arms use two safety cables on each side. If two sets of safety cables are required, both must be used. This is required by law. Refer to these instructions and diagrams for additional information. Failure to follow these instructions may cause property damage, personal injury or even death. Connection instructions Some ROADMASTER tow bar mounting brackets with removable arms include a short safety cable to bypass the removable arm, as shown in Figure 1. Each long safety cable runs from the motorhome to a quick link attaching it to one of the quick-disconnects. This quick link is also an attachment point for one of the short safety cables; another quick link attaches the short safety cable to the mounting bracket. Unscrew the nuts on each quick link to connect the safety cable loops. Finger-tighten the nuts firmly, until the loop is completely closed, to secure the attachment. Do not substitute carabiners or other devices for the quick links — the quick links are designed to hold the weight of a towed vehicle; carabiners or other devices are not. Only ROADMASTER tow bar brackets with removable arms have this three-point attachment system (with the exception of MX brackets). Other brackets, such as ROADMASTER classic and MS brackets, and those of other manufacturers, are bolted directly to the frame of the towed vehicle and do not require short safety cables. Figure 1 shows the short safety cable attachment for a typical double hook safety cable system. The safety cables must be carefully routed so that they cannot become pinched, frayed, scraped or otherwise damaged and so they will not drag when going over dips or low spots. Do not use the cables if they show any signs of wear or damage — immediately discontinue towing and replace the cables. Failure to replace worn or damaged safety cables will result in cable failure, which may cause property damage, personal in- 82 Figure 1 jury or even death. If the quick links are not completely tightened, with the loop closed, the safety cables may detach. In the event of a towing system failure, the towed vehicle will detach, which may cause property damage, personal injury or even death. Always use all the safety cables included with your towing system. Connect them as shown in Figures 1 and 2. Otherwise, in the event of a towing system failure, the towed vehicle will detach, which may cause property damage, personal injury or even death. BlackHawk 2 All Terrain ™ Figure 2 See page one for detailed connection information. Limited Warranty 1. WARRANTY 1a. WARRANTY OF CONFORMITY AT TIME OF SALE ROADMASTER, Inc. warrants that at the time of sale of this product it will be free from defects in material and manufacture and will conform to ROADMASTER’S specifications for the product. 1b. CONDITIONAL ONE-YEAR WARRANTY In addition to the preceding time-of-sale warranty, if the product registration card is completely and accurately filled out and mailed to ROADMASTER within thirty (30) days of purchase, ROADMASTER will provide an additional warranty that for a period of one year after sale the product will remain in good working order, PROVIDED THAT the product is installed and maintained in accordance with ROADMASTER’S instructions and is not subjected to: (a) alteration or unauthorized repairs or repairs by anyone other than ROADMASTER or a ROADMASTER-authorized service center, (b) misuse, abuse, commercial use, or improper maintenance, (c) Acts of God (including without limitation hurricanes, tornadoes, floods, or other severe weather or natural phenomena), (d) failures due to products not supplied by ROADMASTER, or (e) other treatments, uses, or installations for which the product was not intended. This warranty extends only to the first retail purchaser-consumer of the product and is not transferable. 2. DISCLAIMER OF OTHER WARRANTIES The preceding warranties are the exclusive and sole express warranties given by ROADMASTER. They supersede any prior, contrary or additional representations, whether oral or written. No agent, representative, dealer or employee has the authority to alter or increase the obligations or limitations of this warranty. Any implied warranties, including the WARRANTY OF MERCHANTABILITY and any WARRANTY OF FITNESS FOR A PARTICULAR PURPOSE, are limited in duration to thirty days or the term of the applicable express warranty provided above, whichever is longer. Some states do not allow limitations on how long an implied warranty lasts, so the above limitation may not apply to you. 3. EXCLUSIVE REMEDY FOR ANY NONCONFORMITIES If during the applicable Warranty Period, the product does not conform to the preceding Warranties, notify ROADMASTER as provided below, and within a reasonable time ROADMASTER will provide, at its option, one of the following: (1) replacement components for any nonconforming or defective product or components or (2) the percentage of the purchase price for the nonconforming product equal to the percentage of the Warranty Period remaining when ROADMASTER is notified of the nonconformity. ROADMASTER will, at its option, (a) use new and/or reconditioned parts in performing warranty repairs and making replacement products, (b) use parts or products of original or improved design in the repair or replacement. If ROADMASTER repairs or replaces a product, its warranty continues for the remaining portion of the original Warranty Period or 60 days from the date of the return shipment to the customer, whichever is greater. All replaced products and all parts removed from repaired products become the property of ROADMASTER. ROADMASTER will not provide, and will not be liable for, labor, costs of removal or reinstallation of components, disposal, shipping, freight, taxes, or other incidental charges. THESE REMEDIES ARE THE EXCLUSIVE AND SOLE REMEDIES FOR ANY BREACH OF WARRANTY. For any breach of warranty, the Owner must telephone ROADMASTER at 1-800669-9690 within thirty (30) days after discovering the nonconformity. Do not return any product without first calling ROADMASTER and getting a return authorization number. Returned products must include the return authorization number and a copy of the original invoice, bill or other proof of the date of purchase. ROADMASTER will authorize (a) shipment of the product to ROADMASTER or (b) repair or replacement at the nearest warranty service center—in both cases with shipping at your expense. Do not purchase replacement parts or pay for repair labor—you will not be reimbursed. Compliance with the requirements of this paragraph is a condition to coverage under the Warranty: if these requirements are not complied with, ROADMASTER will have no obligation to provide any remedy for any breach of warranty. 4. DISCLAIMER OF INCIDENTAL AND CONSEQUENTIAL DAMAGES IN NO EVENT SHALL ROADMASTER BE LIABLE FOR ANY INCIDENTAL, SPECIAL, INDIRECT OR CONSEQUENTIAL DAMAGES, WHETHER RESULTING FROM NONDELIVERY OR FROM THE USE, MISUSE OR INABILITY TO USE THE PRODUCT OR FROM DEFECTS IN THE PRODUCT. Some states do not allow the exclusion or limitation of incidental or consequential damages, so the above limitation may not apply to you. 5. APPLICABLE LAW This Warranty will be interpreted, construed, and enforced in all respects in accordance with the laws of the State of Washington, without reference to its choice of law rules. The U.N. Convention on Contracts for the International Sale of Goods will not apply to this Warranty. 6. SEVERABILITY If any provision of this warranty is found to be invalid or unenforceable, then the remainder shall have full force and effect, and the invalid provision shall be partially enforced to the maximum extent permitted by law to effectuate the purpose of the agreement. 7. ADDRESS FOR NOTICES TO ROADMASTER ROADMASTER, Inc., 6110 NE 127th Ave, Vancouver, WA 98682 This warranty gives you specific legal rights, and you may also have other rights which vary from State to State. 83 25-4012-01 03-10 Top 10 Installer Tips ALL SPECIFICATIONS ARE SUBJECT TO CHANGE WITHOUT NOTICE ROADMASTER, Inc. 6110 N.E. 127th Ave. Vancouver, WA 98682 1. The port on the proportioning valve (Figure 1) can be rotated up to one full turn counterclockwise for easier connection to the brake line — hold the bottom blue section of the valve (Figure 1) in place with adjustable pliers. With another pair of pliers, turn the top blue section (Figure 1) until the port is at the correct position. Although it has been unthreaded, the top section of the proportioning valve will be held in place by the brake line. 2. When scheduling a BrakeMaster installation, check to see if the customer’s vehicle requires a seat adaptor bracket and/ or a stop light switch — select “Vehicle-Specific Info” on this website, then “Supplemental Braking Systems.” Enter the vehicle make, model and year, then scroll down the page to see if a stop light switch kit and/or a seat adaptor is available. If a stop light switch is available, it is required; if the seat adaptor bracket is “required,” it will say so under “Comments.” 3. After the installation, check all the brake line fittings in the motorhome for leaks. (Figure 1 identifies the six points to check near the proportioning valve.) Wipe away any residual brake fluid. Otherwise, it will drip later on, raising possible customer concerns that the system is leaking. 4. Keep a stock of 1/2" and 3/8" brake line tees in stock for BrakeMaster installations in motorhomes with air or air over hydraulic brakes. Also keep a stock of metric-to-standard brake line tees (ROADMASTER part number 7921) for motorhomes with hydraulic brakes and metric brake line fittings. 5. On the initial installation, it may be necessary to adjust the tabs (Figure 2) on the pedal clamp (Figure 2) — use pliers to bend any or all of the tabs so that they hook around and under the towed vehicle's brake pedal. 6. Route the air lines so that they are no closer than two feet from any “hot” components such as the engine or the exhaust system. Otherwise, the heat will soften the plastic, causing the air line to rupture. Also, use wire ties to secure the air lines away from moving parts and/or sharp edges. Do not kink the air lines, or bend them to the extent that they crimp or crease — air pressure will be substantially reduced, or blocked entirely, at any kink in the air lines. 7. Many manufacturers have one or more auxiliary wires prestrung from the dash to the rear of the motorhome, which you can use to install the motorhome monitor. Call the manufacturer to locate the auxiliary wires. 8. The quick exhaust valve (Figure 2) on the air cylinder can be rotated for easier connection to the air line. (Rotate the valve so that the air line is not kinked.) 9. Install the mounting post (Figure 2) so that the air cylinder must be pulled back in order to insert the safety pin and 84 800-669-9690 Fax 360-735-9300 www.roadmasterinc.com Figure 1 Figure 2 hasp (Figure 2). This creates spring tension, which keeps the weight of the cylinder off the brake pedal. If the cylinder is not pulled back when it is connected, the weight of the cylinder will cause the pedal clamp to depress the towed vehicle’s brakes continuously. 10. After the installation is complete… •…checkthemonitorlightforproperoperation. •…explaintheoperationoftheBrakeMastersystem to the customer, until he/she understands how to operate and maintain it. Towing and Suspension Solutions 85 EVEN BRAKE DIAGNOSTIC FLOW CHARTS 4. If the voltmeter registers above 10.5 amps, call the technical support department at 800-669-9690. 4. If the voltmeter registers below 10.5 amps, charge the battery, then test the condition of the battery. 3. If you have 12 VDC+, verify that the voltage is above 10.5 amps. Using a voltmeter, test the vehicle’s battery, the 12-volt outlet, and the red wire coming from the fuse to the ICX transmitter. 2. Check to see if the vehicle has an ‘automatic shut down’ feature, or if fuses must be removed prior to towing, both of which may cut power to the connection(s) you have chosen — refer to the owner’s manual, or to the manufacturer. 4. If the positioning is correct, call the technical support department at 800-669-9690. 3. Check the positioning — with the ignition key in the “tow” position, push the “Test” button. The air cylinder will extend and retract three times. Verify that there is no current at the #1 terminal on the ICX transmitter when the air cylinder is retracted, and 12 VDC+ when the air cylinder is extended. 3. Verify that there is 12 VDC+ at the terminal marked “1” on the ICX transmitter, when the towed vehicle’s brake pedal is depressed. 4. If you have 12 VDC + at terminal 1, call the technical support department at 800-669-9690. 2. If the second message is “Brake pedal is depressed …” 1. Push the button with the right-hand arrow on the motorhome monitor, to scroll to the second message. 1. With the ignition key in the ‘tow’ position, test the ICX power connection for 12 volts — first, ground a test light at the same point as the ICX transmitter (i.e., at the white wire). Then, test for 12 VDC+ at the red wire (the power connection) coming from the fuse to the ICX transmitter. 2. If the second message is “No brake light switch detected …” MOTORHOME MONITOR READS “NOT OPERATIONAL …” LOW BATTERY INDICATION AT THE MOTORHOME MONITOR 4. Program the motorhome monitor to the ICX transmitter. Refer to “Program the monitor” in the Even Brake owner’s manual. 3. The LCD text message at the monitor is “Even Brake.” 4. Call the technical support department at 800-669-9690. 3. The LCD text message at the monitor is “Test is good — System ready.” 2. With Even Brake plugged in and ready to be tested, press the “Test” button. 1. If the monitor does not function at the motorhome, move the monitor to the towed vehicle for a short range test. If the towed vehicle does not have two 12-volt outlets, use another 12-volt power source, such as a jumper box. MOTORHOME MONITOR DOES NOT FUNCTION After the initial installation, the motorhome monitor text message may indicate a low battery, or it may read “Not operational …,” or the motorhome monitor may not function. A component may be mis-wired, or the monitor may not be programmed to the ICX transmitter. Use the three flow charts below to identify and correct the cause of the monitor messages, or to program the motorhome monitor. (Before beginning an installation, always follow the installer’s checklist in the owner’s manual (on page three). The checklist identifies vehicle-specific components, features or towing procedures which may disrupt power to Even Brake, and the devices/methods to restore it. The most recent manual is available at www.roadmasterinc.com, under ‘Support.’) FOR SERVICE TECHNICIANS InvisiBrake FAQs Concern Can I cut the cable to shorten it? Clarification No. The cable length is already adjustable in numerous ways without cutting it: • The location of the cable anchor bracket (on the cable) determines how much cable is left over at the end by the brake pedal. Often you can get all excess slack removed here. Sometimes you can’t. • You can wrap the cable around the pulley one time. This takes up three inches of slack. • Mounting the cable to the passenger side of the brake arm, instead of the driver’s side, eats up one inch of slack. • The “L-shaped” brake pedal clamp that attaches to the brake pedal arm is reversible. Facing the bracket toward the driver consumes two inches of slack. So there are lots of ways to take up excess slack. As an aside, the installation manual goes to great extent to talk about how important it is to plan out where the pulley, cable anchor bracket and brake pedal clamp will be located before drilling any holes. Most of the cable length concerns are solved by properly positioning the cable assembly. Mounting the cable in the wrong location will cause issues with having too much cable left over. But sometimes, on some cars, there just isn’t any option and that’s when wrapping the cable around the pulley (only once!), reversing the brake pedal mounting brackets and mounting the brake pedal brackets to the other side can take up to seven inches of play out of the cable. Concern If I wrap the cable once around the pulley it looks like the cable will come off. I’m concerned that wrapping the excess cable around the pulley only works until the brake is activated. It looks to me like the cable would come off the pulley after that. This would cause the cable to bind and then the system won’t activate or may even cause the brake pedal to stay depressed, which might damage the brakes. Clarification This was a potential problem that concerned us as well during the design phase. For this reason we chose a pulley that had a very narrow gap between the pulley wheel and the pulley bracket. No matter how loose the cable gets, it can’t bind because it’s too large and can’t get caught between the pulley and the pulley bracket. Once the brake pedal is released the tension will 86 self-center the cable back on the pulley, because there’s nowhere else it can go. Concern There’s not enough room for the brake pedal clamp and pulley. In some cars, it looks like there’s not room enough to mount the brake pedal clamp to ensure enough clearance for the clamp and pulley. Or, the angle that I would use to install the clamp and pulley is too severe for the system to activate properly. Clarification On those occasions where there is very little room between the firewall and the brake pedal arm, you can: a.Use a grinder to cut off the excess bracket that bolts to the brake pedal arm. The bracket is longer than necessary to allow it to be used on a wide variety of vehicles. Mount it as far forward as you can and then trim off the excess bracket. This means the bracket will protrude about 3/8 of an inch from the back of the brake pedal. b.If necessary you can offset the pulley just enough to make sure the pedal has full and complete movement. It doesn’t take much movement to gain clearance. Concern I just installed an InvisiBrake on a new Honda Fit. The brake pressure had to be set to 100 psi for the brake to activate. I’m concerned that the cable anchor bracket (which is attached with self-tapping screws) will pull through the floor. Clarification One hundred psi is an awful lot. Our averages have been running around 60 to 70. From our installations we know that there’s a direct correlation between how high you attach the brake pedal clamp on the continued on the next page continued from preceding page brake pedal arm and how much pressure is required to brake properly. The brake arm is a lever. The closer to the fulcrum point, the harder you must pull to get the same braking. If you have the brake pedal clamp attached high on the arm it may require twice the psi as you’d get by attaching the clamp just above the brake pad. Always try to locate the brake pedal clamp as low as it can go on the arm so you can reduce the pressure. If it’s already mounted low on the arm, there’s a good chance you’re not getting enough vacuum. Check the following: a.Is there good vacuum coming out of the controller? If not. the compressor may not be producing vacuum properly and the factory will replace it. b.Is there good vacuum at the tee under the hood? If not, the vacuum line may be pinched (like in a seat track from the seat being moved back). Or it may have been cut, which would prevent most of the vacuum from reaching the brake booster. Remember it’s the vacuum that energizes the power brakes on the car. Without it you’d have to step on the brakes very hard to get braking. One hundred psi will give you lots of braking if you have good vacuum and the clamp is attached low on the arm. So long as all four mounting screws are used to secure the pulley to the firewall, you should never have an issue with it pulling loose (barring any older cars with rusted-out firewalls). One hundred psi sounds like a lot, but you can literally grab the end of the cable and hold it, preventing any movement created by 100 psi vacuum in the air cylinder — we know because we’ve done it. The pull is purposely not too hard because the power brake system does the work for you. Concern The charge line isn’t heavy enough — InvisiBrake is draining the battery. Clarification The wire in question only trickle charges the battery. Charging the battery too fast can “boil” the battery, hence the two-amp trickle charge. So the wire is plenty big for its purpose. InvisiBrake only draws from the battery during braking. The vast majority of the time you’re not braking and this is when the trickle charger keeps the battery topped off. It’s likely that one of the following scenarios is causing battery drain: • The fuses must be pulled on many cars in order to tow them. If the fuses aren’t pulled there’s a continual drain of eight to 12 amps. Some installers see a “charge line” and assume it will make up for whatever draw the car has. This is not the case — you must still pull the fuses according to the manufacturer’s recommendations. • In cars with sophisticated computer controls, the battery will be drained after just two or three hours of towing — the wheels going round and round “wake up” the computer, which turns on a number of electronic devices that drain the battery in short order. It is for these select vehicles — which must be towed with the battery disconnected — that we made the Automatic Battery Disconnect. Always check the owner’s manual to see what it says about towing. Our trickle charger will not overpower this high rate of discharge so you must still disconnect the battery. • Ignition switch position — it’s very common for customers to accidentally leave the ignition switch in the wrong location. This will drain the battery in short order. Again, the trickle charger will not compensate for this. • The motorhome park lights aren’t on. The charge circuit is the motorhomes park lights. If the customer doesn’t turn them on, the battery won’t be charged. • The charge circuit may be loose, not connected or there may be a poor ground between the vehicles. Obviously this would prevent the charge circuit from working. Even so, InvisiBrake has such a low electrical draw you’d still get two or three days of towing before the battery was completely discharged, if that was the only drain. Assuming there’s no other drain, you can tow indefinitely with InvisiBrake and you’d never have to stop to charge the battery. If the customer’s battery is draining, there’s something else draining it. Concern It takes an hour and a half to install the motorhome components and run the wiring to the rear of the motorhome. That’s a lot of time, especially on top of the car components. Clarification The biggest time-consumer is stringing a wire from the front to the rear of the motorhome. Here are some tips that can help in many installations: • Many vehicles are pre wired for a supplemental braking system. There are wires pre-strung from the front to the rear already and one of them can be used for our monitor wire. The following vehicles are pre wired: • Freightliners built after December of 2002 are pre wired. • Monaco year models 2006 and newer are pre wired. • Winnebego year models 2007 and newer are pre wired. • Most new motorhomes have a seven-way plug. Check to see if the blue brake wire is connected at the rear of the socket. This is the wire that would normally be used to install an electronic brake control in the dash of the motorhome (if the owner was towing a boat or tow dolly). Verify with the owner that he won’t be using a brake controller for a boat or dolly. If not, use the blue wire for the monitor system — it’s already running to the dash. 87 88 89 90 91 92 93 94 WHEEL MASTERS ® America’s Leader in Wheel Cover Systems and Tire Accessories Don’t settle for less! At Wheel Masters, we place our priorities high, selecting only the finest quality materials, insisting on the best workmanship and providing the most dependable customer service. Our goal is to be America’s first choice for innovative solutions to our customers’ needs for wheel and tire performance, safety and beauty. We won’t settle for less. Neither should you. Towing and Suspension Solutions Dual tire inflators Dual tires out of reach? Out of sight? Out of air? Dual tire inflators are the answer! WHEEL MASTERS® America’s Leader in Wheel Cover Systems and Tire Accessories S afe travel begins with safe tires, which means regularly checking tire pressure. Properly-inflated tires improve gas mileage, increase safety, increase tire life and improve vehicle handling. Wheel Master’s dual tire inflators are easy to install — there are no special tools required, and each kit comes complete with everything you need for the specific wheel application. The hoses attach to your existing valve stem (no need to remove the valve core), allowing proper inflation and pressure checks in seconds. These inflators are available in three hose styles: 1) a high quality two-ply rubber tubing reinforced with a tough nylon braiding; 2)a stainless steel braided hose wrap is available to withstand the elements and road hazards; and 3)airless stainless steel braided hoses contain zero internal pressure (so they can’t leak even if cut or damaged), until the adjustable core actuator within the hose is engaged when checking pressure and inflating the tires. Checking and inflating tires is as easy as 1, 2, 3! 1)Determine your mounting system: hub-mount; hand-hole mount; or wheel cover mount. 2)Determine which style fits your budget: rubber twoply; stainless steel; or airless stainless steel. 3)Determine how many hoses you need: two-hose kit (inner dual wheels only); or four-hose kit (both inner and outer wheels). Hub-mount (HM) — for stainless steel wheels and axle covers Hub-mount stainless steel PART NUMBER 8001...............................................4-hose 8002...............................................2-hose 8004...............................................4-hose 8005...............................................2-hose 8110A............................................4-hose APPLICATION kit kit kit kit kit for for for for for 16" to 19½" wheels 16" to 19½" inner dual wheels 22½" wheels 22½" inner dual wheels 22½" aluminum wheels Hub-mount airless 80012.............................................4-hose kit for 16" to 19½" wheels 80022.............................................2-hose kit for 16" to 19½" inner dual wheels Hub-mount two-ply rubber 8003...............................................4-hose kit for 16" to 19½" wheels 8006...............................................2-hose kit for 16" to 19½" inner dual wheels Hand hole-mount (HHM) — for steel wheels Hand hole-mount stainless steel 8009...............................................2-hose kit for 16" to 19½" inner dual wheels Hand hole-mount airless 80092.............................................2-hose kit for 16" to 19½" inner dual wheels Hand hole-mount two-ply rubber 8007...............................................2-hose kit for 16" to 19½" inner dual wheels Wheel cover-mount (WCM) — for wheel covers only Wheel cover-mount stainless steel 8208............ 4-hose kit for 16" to 19½" dual wheels, with 45° extenders for front tires Wheel cover-mount airless 82082.......... 4-hose kit for 16" to 19½" dual wheels, with 45° extenders for front tires Wheel cover-mount two-ply rubber 8008............ 4-hose kit for 16" to 19½" dual wheels, with 45° extenders for front tires 95 Wheeliners™ for dual wheels Great looks, durability and the finest warranty make these a smart choice to dress up your RV. They carry the Wheel Masters brand because they ‘master’ the art of adding beauty and functionality to your existing wheels. Most installations require no jacks or tampering with the lug nuts! Although others may resemble Wheel Masters, no other design has these exclusive features: PART NUMBER SIZE WHEEL MASTERS® America’s Leader in Wheel Cover Systems and Tire Accessories • 304L stainless steel — polished 304L stainless steel for lasting beauty. Laboratory-tested and proven over years of use in the field. • Five-year unconditional guarantee — no matter how badly a Wheel Masters Wheeliner is damaged, no matter how or where, Wheel Masters will replace it within five years of purchase. The only warranty that covers both rust and road damage. APPLICATION YEARS 160U0............... 16"/16½".............. Ford, Dodge, GM 8-lug, 4-HH...........................................all (1976 to 2000) 160U0J.............. 16"........................ GM 8-lug, 4-HH................................................................2001+ 168E0JC............ 16"........................ Ford E-350/E450 jam nut version, 8-lug, 8-HH..................all 160F0J.............. 16"........................ Ford Superduty 8-lug, 4-HH..............................................2000-2002 160F0JM............ 16"........................ Ford Superduty 8-lug, 4-HH..............................................2003+ 4195G0............. 19½" x 6".............. GM/Chevy, P-30 5-lug front/10-lug rear, 5-HH..................all 195W0J............. 19½" x 6".............. Chevy Workhorse 10-lug, 5-HH.........................................all 195L80.............. 19½" x 6¾"........... Chevy Kodiak/GM Topkick — 20mm studs, 8-lug, 4-HH.....1989+ 195D0............... 19½" x 6".............. Dodge, John Deere, Osh Kosh 6-lug, 6-HH.......................1981+ 196F0J.............. 19½" x 6".............. Ford F450 8-lug, 5-HH......................................................1999-2002 196F0JM............ 19½" x 6".............. Ford F450 8-lug, 5-HH......................................................2003-2004 1965F0J............ 19½" x 6".............. Ford F450 10-lug, 5-HH....................................................2005-2007 1965F0JM.......... 19½” x 6”............. Ford F450 10-lug, 5-HH....................................................2008+ 195F0J.............. 19½" x 6¾"........... Ford 8-lug, 5-HH...............................................................1999-2002 195F0JM............ 19½" x 6¾"........... Ford 8-lug, 5-HH...............................................................2003-2004 1955F0J............ 19½" x 6¾"........... Ford F550 10-lug, 5-HH....................................................2005-2007 1955F0JM.......... 19½” x 6¾”.......... Ford F550 10-lug, 5-HH....................................................2008+ 195N80............. 19½" x 6¾"........... International/other — 22mm studs, 8-lug, 4-HH................1989+ Note: Wheeliners are packaged as four pieces — two front and two rear. Note: above part numbers do not fit Budd rims. 96 Free! Dual tire inflation hose kit with purchase of Wheel Masters Wheeliners. Namsco Wheeliners™ for dual wheels WHEEL MASTERS® America’s Leader in Wheel Cover Systems and Tire Accessories With patented Posi-Lock mounting system — stainless steel quality at an affordable price! PART NUMBER SIZE APPLICATION YEARS 7160U0.......... 16"/16½"............ fits all Ford E-series/Chevy/Dodge 4-hand hole 8-lug wheels.. all (1976 to 2000) 7160U0J......... 16"...................... GM 8-lug, 4-HH.....................................................................2001+ 7168E0JC....... 16"...................... Ford E350/E450 jam nut version, 8-lug, 8-HH........................all 716NE0.......... 16"...................... Ford Superduty 10-lug, 4-HH.................................................1999 and earlier 7160F0J......... 16"...................... Ford Superduty 8-lug, 4-HH...................................................2000-2002 7160F0JM....... 16"...................... Ford Superduty 8-lug, 4-HH...................................................2003+ 7195G0.......... 19½"................... GM/Chevy, P-30 5-lug front/10-lug rear, 5-HH.......................all 7195W0J........ 19½" x 6"............ Chevy Workhorse 10-lug, 5-HH..............................................all 7195L80......... 19½" x 6¾"......... Chevy Kodiak/GM Topkick 8-lug, 4-HH...................................1989+ 7196F0J......... 19½" x 6"............ Ford F450 8-lug, 5-HH...........................................................1999-2002 7196F0JM....... 19½" x 6"............ Ford F450 8-lug, 5-HH...........................................................2003-2004 71965F0J....... 19½" x 6"............ Ford F450 10-lug, 5-HH.........................................................2005-2007 71965F0JM..... 19½” x 6”........... Ford F450 10-lug, 5-HH.........................................................2008+ 7195F0J......... 19½" x 6¾"......... Ford 8-lug, 5-HH....................................................................1999-2000 7195F0JM....... 19½" x 6¾"......... Ford 8-lug, 5-HH....................................................................2003-2004 71955F0J....... 19½" x 6¾"......... Ford F550 10-lug, 5-HH.........................................................2005-2007 71955F0JM..... 19½” x 6¾”........ Ford F550 10-lug, 5-HH.........................................................2008 7195D0.......... 19½"................... Dodge, John Deere, Osh Kosh 6-lug, 6-HH............................1981+ 7195N80........ 19½" x 6¾"......... International/other 22mm studs, 8-lug, 4-HH.........................1989+ 226H40N....... 22½" x 6¾"......... Chevy Workhorse 8-lug, 4-HH................................................all 227B20J......... 22½" x 7½.......... stud-piloted — three stud extenders, 3 LNC, 10-lug, 2-HH......all 227H40.......... 22½" x 7½"......... hub-piloted — under-lug mount 8-lug, 4-HH..........................all 227H50J......... 22½" x 7½"......... hub-piloted — jam nut mount 10-lug, 5-HH...........................all 228H40N....... 22½" x 8¼"......... hub-piloted — jam nut mount 8-lug, 4-HH.............................all 228H20J......... 22½" x 8¼"......... hub-piloted — jam nut mount 10-lug, 2-HH...........................all 228H52J......... 22½" x 8¼"......... hub-piloted — jam nut mount 10-lug, 5-HH...........................all 228EM0.......... 22½" x 8¼"......... hub-piloted — under-lug mount 10-lug, 10-HH......................all Note: Wheeliners are packaged as four pieces — two front and two rear. Note: above part numbers do not fit Budd rims. 97 Stainless steel wheel covers WHEEL MASTERS® America’s Leader in Wheel Cover Systems and Tire Accessories These low-profile, aerodynamically-designed covers stay looking great for years thanks to their stainless steel construction. Easy to install, the 16" and 16½" models have a snap-in retention system that holds tight! The 19½" models include a retention system that firmly holds the wheel cover centered on your wheel, preventing wobble. Wheel Masters stainless steel wheel covers — one-year limited warranty — PART NUMBER SIZE APPLICATION Free! 3160B0.............. 16"........................ all (no Budd or split rim 8-lug) 3165B0.............. 16½"..................... all (no Budd or split rim 8-lug) Dual tire inflation hose kit 3165BB0............ 16½"..................... all chassis Budd rims/hardware with purchase of Wheel Masters included, 8-lug wheel covers. 3165SPO........... 16"........................ Sprinter 8-lug/hardware included 319580............. 19½"..................... Ford 8-lug (no split rims)/hardware included 3195B0.............. 19½"..................... all (no 8-lug or split rim)/hardware included, 10-lug Note: covers are packaged as four pieces. Namsco stainless steel wheel covers PART NUMBER SIZE APPLICATION QUANTITY 7160B0.............. 16"........................ all (no Budd or split rims)/hardware not required, 8-lug...................4 7160B1.............. 16"........................ all (no Budd or split rims)/hardware not required, 8-lug...................1 7165B0.............. 16½"..................... all (no Budd or split rims)/hardware not required, 8-lug...................4 7165B1.............. 16½"..................... all (no Budd or split rims)/hardware not required, 8-lug...................1 7165BB0............ 16½"..................... Budd rims all chassis/hardware included, 8-lug................................4 7165SP0............ 16½"..................... Sprinter vehicles/hardware included, 8-lug......................................4 719580............. 19½"..................... Ford 8-lug (no split rims)/hardware included....................................4 719581............. 19½"..................... One single front — Ford 8-lug front (no split rims)/hardware included............................1 719583............. 19½"..................... One single rear — Ford 8-lug rear (no split rims)/hardware included.............................1 7195B0.............. 19½"..................... all (no 8-lug or split rims)/hardware included, 10-lug.......................4 7195B1.............. 19½"..................... One single front — all — front (no 8-lug or split rims)/hardware included, 10-lug..........1 7195B3.............. 19½"..................... One single rear — all — rear (no 8-lug or split rims)/hardware included, 10-lug...........1 7140.............................................. hardware kit for 7165BB0 and 7195B0............................................1 7142.............................................. hardware kit for 7165SP0................................................................1 7140F............................................. hardware kit for 719580..................................................................1 9130.............................................. 3-prong center cap for all Namsco wheel covers..............................1 9003-4........................................... 4-prong snap-in lug nut cover for wheel covers................................4 98 Tire pressure gauges and valve extenders Tire pressure gauges Proper air pressure is an integral part of a safe road adventure, and boosts your gas mileage. These professional-quality, easy-to-read gauges are designed to help you get to your next stop safe and sound, while saving you money. Deluxe tire pressure gauge • • • • • • For trucks and RVs Measures from 10 to 160 lbs. High ANSI grade B accuracy Portable case with an easy-to-read dial Shock resistant Convenient pressure release button Part number 8216 • • • • • • • For trucks and RVs Easy-to-read dial Quick-release button Tread depth indicator Protective case No-slip rubber grip Convenient pressure release button Part number 8200-00 • • • WHEEL MASTERS® America’s Leader in Wheel Cover Systems and Tire Accessories Valve extenders Enjoy easy access to your hard-to-reach front and rear valve stems. These durable, nickel-plated brass valve extenders are angled to lengthen your front or rear tire valves. These extenders make checking and inflating your dual tires easy. Available in 45°, 90°, 135° and 180° angles. Straight valve extenders Sets include two straight extenders and two caps. PART NUMBER Universal tire pressure gauge DESCRIPTION 80292..................... 2" straight valve extender 80293..................... 3" straight valve extender 80294..................... 4" straight valve extender 45° valve extender Set includes two 45° extenders and two caps. PART NUMBER DESCRIPTION 8029....................... 45° valve extender 90° valve extender Set includes two 90° extenders and two caps. PART NUMBER Long dual foot tire pressure gauge DESCRIPTION 802990................... 90° valve extender 135° valve extender For trucks and RVs Measures from 10 to 150 lbs. For all valve stem applications Part number 8216-4 Set includes two 135° extenders and two caps. PART NUMBER DESCRIPTION 8029135................. 135° valve extender length: 11½” 180° valve extender Set includes two 180° extenders and two caps. PART NUMBER DESCRIPTION 8029180................. 180° valve extender 90° tire pressure gauge Can’t reach your valve stem because of those small hand holes? Wheel Masters’ new 90° bend allows you access for those hard-to-reach areas to properly check tire pressure. • Durable stainless steel construction • Easy-to-read indicator • Measures in two-pound increments from 10 to 160 psi. length: 11½” Part number 8216-5 • • • Short dual foot tire pressure gauge Measures from 10 to 120 psi. For all valve stem applications Spring pocket clip Part number 8216-6 length: 6” 99 ‘Spare Air’ tire inflation system and hose parts kit America’s Leader in Wheel Cover Systems and Tire Accessories ‘Spare Air’ tire inflation system When you need your spare tire wouldn’t it be nice if it were fully-inflated and ready to get you on the road? With the Spare Air tire inflation system you can easily check your pressure and inflate the air in your spare tire. Our under-chassis system includes a 36" stainless steel A Spare Air counter display hose that attaches to under- (part number 82286DSP) is chassis spare tires found in yours FREE with an order of any 10 Spare Air systems. trucks, vans or SUVs. An easyto-install bracket attaches your hose to the bumper, providing easy access. In our trunk-mounted system, a 36" rubber hose attaches to your tire and can be fed under the trunk lining to a position that’s easy and quick to check. Included is a bracket to attach the end of the hose to your trunk wall, if you so choose. All mounting hardware is included, in addition to a 90° valve extension to get into tough-toreach spots. Under-chassis system — part number 82286-S WHEEL MASTERS® Hose parts kit Everything you need for those special service jobs when working with our Wheel Master products, such as valve extenders, dual tire inflators and valve stems. All items and quantities are included in a handy organizer for hub-mount, hand hole-mount and wheel covermount applications. Re-stock by ordering specific replacement items. The kit contains: PART NUMBER DESCRIPTION Trunk-mounted system — part number 82286-R Hose parts kit part number 8000PK 100 QUANTITY 9024-10...... hardware ‘L’ bracket with a 90° angle............................ 10 9025-10...... hardware bracket, flat................... 10 9032-6........ hardware bracket,.......................... 6 wheel cover mount 9037-10...... hardware bracket,......................... 10 hand hole-mount 9023-20...... valve cap, nickel-plated................. 20 9022-20...... hardware, 5/16-32 nut,................ 20 nickel-plated 9026-40...... hardware, aluminum..................... 40 rivets, 1/8" 9014-4........ hose, 7" stainless steel straight....... 4 9020-5........ hose, 13" stainless steel straight..... 5 9021-5........ hose, 9½" stainless steel................. 5 with a 90° valve extender 9019-4........ hose, 15" stainless steel straight..... 4 Level Master™ trailer levels, Vision Plus™ side view mirrors, rubber valve stem support WHEEL MASTERS® America’s Leader in Wheel Cover Systems and Tire Accessories Level Master trailer levels These giant all-in-one RV levels provide visual sideto-side and front-to-rear leveling assistance for trailers, fifth wheels and motorhomes. Both can be viewed from the driver’s seat to help locate the best level location for parking your RV. Each mark on the side-to-side scale indicates one inch of blocking. The front-to-rear scale is adjustable and can be easily viewed while operating your tongue jack. The leveling bars are encased in UV-resistant plastic — no leaking or rusting sometimes associated with other levels. Both levels come with easy-to-install instructions on your trailer or motorhome. The Level Master bracket (part number 6700BK; see below) can be used with either level. PART NUMBER DESCRIPTION 6700........... Level Master — 11" x 2¾" all-in-one level — metal housing 6780........... Level Master with 6700BK bracket 67200......... Level Master 2 — 10¾" x 2-7/8" all-in one level — UV-resistant plastic housing Level Master with bracket Vision Plus portable side view mirrors Mount these portable mirrors quickly and easily on the door or fender of your tow vehicle. Each mirror extends up to 17" so you can see to back up and monitor how your trailer is tracking. The mirrors are black powder-coated. Adjustable-length nylon strap and nonscratch hooks at the top and bottom of the door or fender hold the 9½" L x 6¾" W x 2½" D stainless steel mirror heads securely in place. Rubber padding helps control vibration and prevent scratching. One-year unconditional warranty. PART NUMBER DESCRIPTION 6500........... Vision Plus mirror (shown), two-pack 6510........... Vision Plus 5" round convex wide angle mirror 6600........... Eagle Vision 7" square mirror 6800........... Wide angle spot mirror, 3¼" x 3¼" Rubber valve stem support Level Master 2 without bracket Level Master bracket Adds flexibility to the installation of the Level Master on pin box surfaces that are 25° to 90°. • Heavy-duty plas tic • Mounting hard ware included • Easy to mount Fits most fifth wheel pin boxes • Adjustable to fit For both Level Masters (above) your needs • Fits most fifth wheel pin boxes Part number 6700BK. Does your 16" wheel have a rubber valve stem? Rubber may be insufficient to support an aftermarket air extension hose or extender. Easy to install, the rubber valve stem support clips to the wheel and attaches to the factory valve stem — no tools required. The bracket supports and strengthens the valve stem against the extra weight and rotation force while in motion. For all 16" wheels with rubber valve stems. Part number 8029VS. 101 Accessories Stainless steel custom lug nut covers Wheel Masters lug nut covers snap over your existing lug nuts. Made of 304L stainless steel that stays rustand corrosion-free. Easily removed for wheel servicing; stay on even under the toughest conditions. PART NUMBER DESCRIPTION 8010........... GM/Chevy 1”, eight-pack 8011........... Ford 1-1/16”, eight-pack 8019........... Ford 7/8”, eight-pack 8012........... 1½” truck, six-pack 9005-6........ 33mm for 22½” hub piloted wheels, six pack ABS lug nut covers Quality chrome-plated ABS plastic lug nut covers from Wheel Masters — made to last! PART NUMBER DESCRIPTION 9003-4........ snap-in lug nut covers for wheel covers, four-pack Valve stem end caps Keep dirt and mud off your valve stems! These sturdy valve stem caps from Wheel Masters look great, plus they don’t rust, providing you with years of detailed beauty. They also assist with maintaining proper tire air pressure. PART NUMBER DESCRIPTION 8030........... valve stem end caps, six-pack 102 WHEEL MASTERS® America’s Leader in Wheel Cover Systems and Tire Accessories Stainless steel custom axle covers Polished 304L stainless steel for beauty that lasts! (for 22½-inch wheels only) PART NUMBER DESCRIPTION 22582............. snap-in five-notch smooth top front axle cover* 22582I............. snap-in five-notch indented top front axle cover* 22584............. snap-in smooth top rear axle cover* 22584 thin....... snap in smooth top rear axle cover (measures 8¼” across)* 22584I............. snap-in indented top rear axle cover (measures 8" across)* 22584I thin...... snap in indented top rear axle cover (measures 8¼" across)* 22582-4.......... snap-in four-notch smooth top front axle cover* 22582-4I......... snap-in four-notch indented top front axle cover* 22582-6.......... snap-in six-notch smooth top front axle cover* 22582 6msig... snap-in six-notch indented top front axle cover* * one piece; does not include lug nut covers • • • • • Universal lug nut cover pliers For quick and easy lug nut cover removal. Rubber-coated handles for a non-slip grip. Over 9 inches long for reaching down into deep dish wheels with ease. Heavy-gauge steel for long-lasting strength. Fits all size lug nut covers. Part number 8211 Product displays Promotional signage is your silent sales representative, always around to answer customers’ questions. WHEEL MASTERS® America’s Leader in Wheel Cover Systems and Tire Accessories Planogram A Short on floor space? No more end caps? Need more sales? Wheel Masters has just the solution. Educate your customers on tire pressure safety and how to determine the correct application in an easyto-understand promotional sign to fit your existing gondola. Three sizes to select from: 48" wide (signage part numbers 85-2790-02 and 85-2792-03), 35" wide (signage part numbers 85-2791-00 and 85-2793-04) or 26" wide (signage part numbers 85-2835-02 and 85-3061-02). Each is seven feet high. A planogram is provided for each, maximizing your sales potential. The 48" planogram accommodates the complete product offering for stainless steel, airless and rubber hose extensions. PART NUMBER DESCRIPTION WMIN4S......... 48" WMIN4L......... 48" WMIN3S......... 35" WMIN3L......... 35" WMIN2S......... 26" WMIN2L......... 26" planogram, planogram, planogram, planogram, planogram, planogram, short fill long fill short fill long fill short fill long fill Wheeliner and accessories end cap This display attaches to the end of any double-sided island unit. The display includes header sign, large grid rack, display hooks and product identification tags. Part number WMAC6P. Level Master display Maximize your sales potential with the power of impulse purchases. The Level Master display requires very little floor space, while contributing big sales potential. Part number 6700DSP. 103 104 Notes Towing and Suspension Solutions © 2009-2012 ROADMASTER, Inc. All rights reserved. Copying any items in this document in any way or manner, including photocopying, is strictly prohibited by law. This document and its contents are confidential and proprietary, and are intended for the exclusive use of ROADMASTER dealers, distributors and other authorized individuals and organizations. Any dissemination of this document or the information herein for any purpose beyond that of training is strictly prohibited and is subject to civil penalty.