1
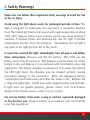
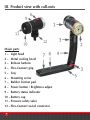
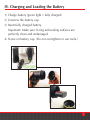
Contents:
I. Safety Warnings........................................................3-4
II. Check What You Got ...................................................5
III. Product view with call-outs .........................................6
IV. Charging and Loading the Battery ...............................7
V. Operating the light ......................................................8
VI. Battery Status Indicator................................................8
VI. Maintaining a waterproof seal (Before your dive) ........9
VII. Care and maintenance (After your dive) ....................10
VIII. Replacing the O-rings................................................11
IX.
Attaching light to underwater camera........................12
X. Expanding your Flex-Connect™ Lighting System ....13-14
XI. Recommended Camera Settings ................................15
XII. Great pictures made easy .....................................16-19
XIII. Advanced Settings .....................................................20
XV. Troubleshooting Guide ..............................................21
XVI. Specifications ...........................................................22
XVII. Parts and Service .......................................................23
www.sealife-cameras.com/service/manuals.html
Español - Deutsch - Français - Italiano - Nederlands
2
I. Safety Warnings
Make sure you follow these important safety warnings to avoid the risk
of fire or injury.
Avoid using the light above water for prolonged periods of time. The
light is designed for underwater use and water is needed to displace
heat. The metal light head at full power will reach temperature of about
140F (60C) degrees within a few minutes, which may cause burning if
touched. A thermal sensor will automatically dim the light if internal
temperatures reaches 150F (65C) degrees. Immediately turn off light if
any parts of the light become hot to the touch.
If water has entered the light, immediately turn off power and follow
these instructions: Remove and dry the battery. DO NOT use the
battery once it has become wet. Wet batteries must be replaced. Allow
battery to dry and dispose it in accordance with local battery recycling
regulations. The battery chamber is waterproof. If no water has entered
the LED light head, the chamber may be cleaned without causing
permanent damage to the electronics. Rinse the waterproof battery
compartment with fresh water and allow the inside to dry. Replace the
o-rings and apply lube. Install new, fully-charged battery and test light.
If light does not operate properly, please contact your local SeaLife
dealer or the SeaLife service center in your country.
Do not use battery if the outer casing is cracked, separated, damaged
or has become wet. Dispose battery in accordance with local battery
recycling regulations.
3
I. Safety Warnings
Never expose battery to fire or intense heat. Do not expose light to
direct sunlight for prolonged periods of time.
Airlines impose strict safety regulations for handling and shipping
lithium ion batteries. Spare lithium batteries may not be packed in your
checked baggage but may be packed in your carry-on baggage. It is
important to pack spare batteries in such a way as to prevent metal
objects from touching the contacts and potentially short-circuiting the
battery. Always use protective battery cover included when the battery
is not inside the light or charging tray to prevent accidental shortcircuiting the battery contacts.
Remove batteries from light before transporting, traveling or long
periods of storage. Remember to use the protective battery cover
included when the battery is not inside the light or charging tray to
prevent accidental short-circuiting the battery contacts.
Only use the specified battery and battery charger approved by SeaLife.
Using any other battery or charger may cause fire, injury and
permanently damage the light.
Observe all SCUBA dive safety rules and control your buoyancy at all
times. Consult your dive instructor for dive safety questions.
Visit www.sealife-cameras.com for updates to this manual and
underwater photography tips.
4
II. Check What You Got
Sea Dragon 2000 Light
(with grip and standard tray)
-ORSea Dragon 1200 Light
(with grip and micro tray)
Li-ion Battery (SL9831)
w/protective cover
O-ring Lube (SL9807)
Charging tray (SL98311)
Sea Dragon Case
(Small SL941 or Large SL942)
O-ring remover (SL9808)
AC Power Adapter (SL98312)
Spare O-rings
Int'l Plug Inserts (SL98306)
(SL98303)
Adapter for GoPro
camera (SL9813)
5
III. Product view with call-outs
Major parts
1 – Light head
2 – Metal cooling bezel
3 – Release buttons
4 – Flex-Connect grip
5 – Tray
6 – Mounting screw
7 – Rubber friction pad
8 – Power button / Brightness adjust
9 – Battery status indicator
10 – Battery cap
11 – Pressure safety valve
12 – Flex-Connect swivel connector
6
IV. Charging and Loading the Battery
1) Charge battery (green light = fully charged)
2) Unscrew the battery cap
3) Insert fully charged battery.
Important: Make sure O-ring and sealing surfaces are
perfectly clean and undamaged.
4) Screw on battery cap. (Do not overtighten or use tools.)
7
V. Operating the light
1) Push and hold the power
button for 1 second to
power ON the light.
2) Push the power button
to change between the
following light modes:
100% § 50% § 25%
§ 100%........
3) Push and hold the mode
button for 2 seconds to
power OFF the light.
VI. Battery Status Indicator
3 status lights indicate remaining battery power:
Status lights
3 solid
2 solid
1 solid
1 blinking
8
Battery power
100%
75%
50%
25%
VII. Maintaining a waterproof seal (Before your dive)
1) The light uses two O-rings to maintain a waterproof seal.
2) Every time you open the battery cap make sure the O-rings and
sealing surfaces are clean, undamaged and lubricated.
3) Dampen a clean cotton cloth and wipe it around the o-ring
and o-ring contact surfaces to remove any hair, sand or debris.
4) Carefully inspect the o-ring for cuts, tears or other damage.
Replace o-rings if damaged.
5) Lube O-rings regularly. Apply a small amount of silicone lube on
your finger tip and wipe it around the O-rings. Wipe off excess
lubricant. The o-ring surface should have shiny, wet appearance.
Important:
Replace O-rings every year if damaged or not. Visit your local SeaLife dealer
or www.sealife-cameras.com for information on ordering spare o-rings.
9
VIII. Care and maintenance (After your dive)
1) After each dive, soak the sealed light in fresh water for about
15 minutes to remove any residual salt, sand and dirt. Never
allow the saltwater to dry on the light.
2) Push the power button about 10 times to clean any saltwater
or sand trapped under the button.
3) Let the water drain out of the small holes located at the bottom
of flex arm. (If using Flex Arms - see page 13 for optional
accessories).
4) Dry off the light with a towel. Make sure you and the light are
dry before opening the waterproof battery cap.
5) Remove battery before storing the light.
6) Allow light to thoroughly dry before storage.
7) Never use any detergents, cleaners, solvents or chemicals to
clean the light.
8) Insert a fresh Moisture-Muncher capsule (item #SL911) inside
the battery compartment during storage to help keep the inside
dry and free of corrosion or mildew during storage.
10
IX. Replacing the O-rings
Replace the two O-rings if damaged or at least once per year.
1) Use the O-ring Remover tool
provided to lift and remove
the O-rings.
2) Carefully clean O-ring grooves and O-rings before installation
3) Install O-rings by stretching
and lifting O-ring into the
groove. Do not roll the
O-ring or allow it to twist.
4) Apply a small amount of silicone lube on your finger tip and
wipe it around the O-rings. Wipe off excess lubricant. The o-ring
surface should have shiny, wet appearance.
11
X. Attaching light to underwater camera
Important:
Only attach the light to cameras/housings with minimum thread depth of
0.28" and using standard 1/4-20 tripod type thread. Don’t over-tighten screw
or you may damage the housing and threads.
Align the underwater camera to the light’s mounting screw and
hand-tighten.
12
XI. Expanding your Flex-Connect™ Lighting System
Get brighter, more colorful results by expanding your Sea Dragon
underwater camera system. The modular Flex-Connect arms, grips
and trays easily clicks together to create these popular configurations:
Pro Set
Pro Duo
Maxx Duo
w/ single flash
w/ light, flash and
dual tray
w/ light, flash, 2 flex
arms and dual tray
Flex Arm - “Click” on the Flex Arm for
more creative lighting and easy aiming.
Reduces backscatter by positioning the
flash or light farther away from the camera.
Add up to two arms per side. Each arm
features 100° bending motion and adds 7”
length in addition to the 5” grip (SL9901)
Grip – Rubberized grip for a comfortable
hold. Built-in channel to hide and secure
optical cable. (SL9905)
13
Expanding your Flex-Connect™ Lighting System (continued)
Select from three universal mounting trays:
Dual Tray - Add another
flash or light with the dual
tray to double brightness,
reduce shadowing and
stabilized aiming control.
Sold separately (SL9904)
Micro Tray – This tiny tray is
the perfect fit for compact cameras. Included with Sea Dragon
1200 Light or sold separately (SL9902)
Single Tray – The standard single tray is ideal for medium size
underwater cameras. Included with Sea Dragon 2000 Light and
Digital Flash or sold separately (SL9903).
Cold Shoe – Mount a light or flash over the camera for the most
compact lighting solution available. Or use it to add a third light
when using a dual tray. Easily slides on to cold shoe of SeaLife
and most other underwater housings. (SL991).
14
XII. Recommended Camera Settings
For SeaLife camera with external light accessory (No external flash):
1) Set the camera’s scene mode to Sea mode or Snorkel mode
2) Change camera’s PHOTO and VIDEO White Balance
settings to DAYLIGHT.
For SeaLife camera with external light and flash accessories:
1) Set the scene mode to Ext. Flash mode
2) Change the VIDEO White Balance setting to DAYLIGHT.
Note:
The white balance settings for Photo and Video modes
function independently of each other.
For other underwater camera brands:
1) Set the Scene mode to “Auto” or “Underwater” scene
mode, as recommended by the camera manufacturer.
2) You may also need to change the White Balance setting to
DAYLIGHT depending on the camera’s underwater color
correction or if pictures/video turns out red.
15
XIII. Great pictures made easy
There are plenty of challenges that photographers face in the
underwater world. Please take some time to review SeaLife’s
online guide called Great Pictures Made Easy by visiting
www.sealife-cameras.com. The guide is located under the
Technical Support menu. The following information summarizes
the basic principles of underwater photography.
Crystal clear water
Clear water is essential for
good underwater pictures.
Low visibility, caused by
fine particles suspended
in the water, will diminish
the picture and video
quality. As a general rule,
limit
your
shooting
distance to 1/10 of the
water visibility.
For
example, if the visibility is
20 ft, limit your shooting
distance to 2 ft. Try to
keep the light as far away from the camera lens as possible to
minimize backscatter.
16
Limit your shooting distance
Water is 800 times denser than air and quickly absorbs light. The
Sea Dragon 1200 and 2000 lights have an effective range of
about 3ft (90cm) to 4ft(120cm) depending on visibility and
ambient light conditions. The SeaLife external flash accessory
has an effective range of 6ft (1.8m) to 8ft (2.4m). If you are using
the SeaLife underwater light in combination with the SeaLife
flash, limit your shooting distance to 6 ft (1.8m). 4 ft (1.2m) is
ideal. If you are using the SeaLife light only, limit your shooting
distance to 2 ft (60cm) to 3ft . Closer shooting distances result in
better pictures and video. Consider purchasing the SeaLife Wide
Angle Lens accessory, which allows you to keep a closer shooting
distance and fit everything into the picture.
17
Control your buoyancy
Get your buoyancy under
control and set yourself up in
the ideal position before taking
a picture or shooting video.
This allows you to hold the
camera steady and control your
shooting
distance.
Good
buoyancy control will help you
avoid stirring up the sandy
bottom which will cloud-up the water and cause backscatter.
Controlling your buoyancy is very important for your diving safety
so don’t start shooting until your buoyancy is under control.
Practice makes perfect
There is no better way to learn
than from your mistakes.
Become familiar with your
camera controls so you can
make
quick
adjustments
depending on the conditions.
Take the time to practice and
experiment with different
settings. Review your pictures
and learn from your mistakes.
18
Compose a good picture
Avoid shooting down on the subject from above. Shooting down
usually results in a poor contrast because the subject blends into
the background. Try and shoot upwards from below the subject
so you get a blue water background and better contrast. Get the
entire subject into your picture frame. Don’t cutoff the hands, fins
or head of your subject. You can always crop you image later on
your computer if you want.
Video tips
Hold the camera as steady as possible and move (pan) very
slowly. A jumpy, fast-moving video is hard for anyone to watch
and can actually cause motion sickness
Avoid shooting video clips more than 1 minute. It is difficult to
edit a lengthy video clips because the large file size. You can
always patch together short video scene into a longer movie
using video editing software, like Microsoft Movie Maker.
Always observe dive safety rules and Never Touch Marine Life
Do not let photography distract you from diving safely. Observe
marine life - Never touch marine life. Be aware of your
surroundings to avoid contacting anything. Keep your dive gear
close to your body.
19
XIV. Advanced Settings
Auto Flash Detect
The light includes a flash sensor that will turn off the light for 2 seconds
if it detects an external flash firing. This feature helps reduce
backscatter. You may disable the auto flash detect as follows:
1) With light in the OFF state, push and hold the power button for 3 seconds.
2) Release the power button when the indicator lights begin blinking and light
turns off.
3) Two quick blinks per second indicates Flash Detect is enabled. One blink
per second means the Flash Detect is disabled.
4) Push and release power button to switch modes.
5) Push and hold the power button to save and exit the Flash Detect setting.
Performance and Economy modes
The light is set to "Performance" mode, which means it maintains
constant brightness (lumens) even as the battery charge is depleted. The
light can also be set to "Economy" mode, so the brightness gradually
reduces as the battery charge drops, which doubles the battery life (burn
time). To select between these two modes:
1) With light in the OFF state, push and hold the power button for 7 seconds.
2) Release the power button when the middle indicator light begins blinking.
3) Two quick blinks per second means the light is set to Performance mode.
One blink per second means the light is set to Economy mode.
4) Push and release power button to switch between the two modes.
5) Push and hold the power button to save and exit the mode setting.
20
XV. Troubleshooting Guide
Light does not power ON
Make sure battery is fully charged and contacts are clean.
Replace battery if it has become wet or is damaged..
Blue or dark pictures/videos
Keep your shooting distance inside of 2ft to 3ft, depending on
visibility and ambient light.
If you are using only one light, considering adding another light
(dual lights) or/and external flash accessory. The ideal
set-up is a combination of a light plus flash.
Consider purchasing the SeaLife Wide Angle Lens (SL975). The
fisheye lens allows you to get closer to the subject and fit more
into to picture frame.
Pictures or Videos too red
The camera’s white balance setting is not set correctly. Refer to
page 15 of this manual for information on camera settings.
For updated information and advice, please refer to the SeaLife
website at www.sealife-cameras.com or contact your local
SeaLife dealer or service center for help.
21
XVI. Specifications
Sea Dragon 1200 (item SL983)
Light source/ Bulb type:
Brightness:
Effective Range:
Run [Burn] time:
6 x 3W LED Light (CREE XPG LEDs)
1200 lumens
3 ft / 1m (depend on camera model, water visibility
and battery condition)
75 minutes at full power/150 min at half power/300
min at quarter power
Sea Dragon 2000
(item SL984)
Light source/ Bulb type:
6 x 3W LED Light (CREE XPL LEDs)
Brightness:
2000 lumens
Effective Range:
4 ft / 1.2m (depend on camera model, water visibility
and battery condition)
Run [Burn] time:
60 minutes at full power/120 min at half power/240
min at quarter power
Shared specifications
Body material:
Brightness control:
Color temperature:
Beam angle:
Battery:
Depth:
Light modes:
Dimensions:
Weight:
Bulb life:
O-ring:
Buoyancy:
22
Anodized aluminum light head with fiber-reinforced
polycarbonate body
100%, 50% and 25% power
5300 ~ 5700K
100 degrees
Lithium Ion 7.4V, 3100 mAh, 23 Wh (included)
Tested to 200 ft (60m)
Full power (100%), half power (50%) Quarter Power (25%)
8.5” x 9.5” x 2.3” (22cmx24cmx6cm) fully assembled
light head w/battery, grip and tray
23 ounces (652 grams) light head w/battery, grip and tray
35,000 hours
Dual NBR o-rings (lube included)
Negative
XVII. Parts and Service
SeaLife guarantees the original purchaser of this product, for a
period of one (1) year from the date of purchase, that the product
is free from defects in workmanship and materials. For a detailed
warranty statement, please refer to the warranty information
included with the product. In the event the original purchaser
believes there is a defect in a product, it is recommended that the
purchaser first visit www.sealife-cameras.com for product
updates and technical advice. The SeaLife website also includes
detailed information on how to get repair service.
Happy Diving!
SeaLife
www.sealife-cameras.com
23