1
PShop
™
Users Guide
PShop enables the
highest-quality PostScript
and image printing for a
variety of color and
monochrome printers.
For version 5.1
Copyright Notices
Copyright © 1992 - 2003 Vividata, Inc. All Rights Reserved Worldwide.
This manual, as well as the software described in it, is furnished under license and may only be used or copied in accordance with the
terms of the Vividata End-User License Agreement license.
Except as permitted by such license, no part of this publication may be reproduced, transmitted, transcribed, stored in a retrieval system, or
translated into any language, human or computer, in any form or by any means, electronic, mechanical, recording, or otherwise, without
the prior written permission of Vividata, Inc.
The information in this manual is furnished for informational use only, is subject to change without notice, and should not be construed as
a commitment by Vividata, Inc. Vividata, Inc. assumes no responsibility or liability for any errors or inaccuracies that may appear in this
manual.
PShop is a trademark of Vividata, Inc. All other names are the marks of their respective holders.
The gsc driver for AI/X is Copyright © 1997 by Matthew Jacob, mjacob@feral.com, http://www.feral.com, and is provided under the
terms the GNU Public License. Its source code is available from the URL above for no fee.
Portions of the code and documentation are copyrighted works of ScanSoft Corp.
Portions of this code use the “libtiff” public domain TIFF support software which has the following copyrights:
Copyright © 1988-1996 Sam Leffler
Copyright © 1991-1996 Silicon Graphics, Inc.
Portions Copyright © 1988-1999 Aladdin Enterprises, Menlo Park, California. All Rights Reserved.
Portions Copyright © 1993 Soft Horizons.
This software is based in part on the work of the Independent JPEG Group.
If this product’s marketing or other materials include the IBM “AIX Ready” mark, IBM Corporation does not warrant and is not responsible for the operation of this Software, which carries the AIX READY trademark of the IBM Corporation used under license.
X Window System is a trademark of The Massachusetts Institute of Technology. UNIX is a registered trademark of AT&T Bell Laboratories. DEC and DECWindows are trademarks of Digital Equipment Corporation. Postscript is a trademark of Adobe Systems. The appearance of the 3-D widget set shown in these documents and manuals is copyrighted by the Hewlett-Packard Company. Motif is a trademark
of the Open Software Foundation. SunOS, OpenWindows, and ToolTalk are trademarks of Sun Microsystems, Inc. Ultrix and DECstation
are registered trademarks of Digital Equipment Corporation.
The following statement appears in M.I.T.’s X documents:
Copyright 1985, 1986, 1987, 1989 Massachusetts Institute of Technology, Cambridge, Massachusetts, and Digital Equipment
Corporation, Maynard, Massachusetts.
Permission to use, copy, modify, and distribute this documentation for any purpose and without fee is hereby granted, provided
that the above copyright notice appears in all copies and that both that copyright notice and this permission notice appear in
supporting documentation, and that the name of M.I.T. nor Digital not be used in advertising or publicity pertaining to distribution of the software without specific, written, or prior permissions.
M.I.T. and Digital make no representations about the suitability of the software described herein for any purpose. It is provided
“as is” without express or implied warranty.
PShop User’s Guide - iii
Copyright Notices
U.S. Government Provision
If this Software is acquired by or on behalf of a unit or agency of the United States Government this provision applies. This Software:
a) Was developed at private expense, and no part of it was developed with government funds,
b) Is a trade secret of Vividata, Inc. for all purposes of the Freedom of Information Act,
c) Is “commercial computer software” subject to limited utilization as provided in the contract between the vendor and the governmental
entity, and
d) In all respects is proprietary data belonging solely to Vividata, Inc.
For units of the Department of Defense (DoD), this Software is sold only with “Restricted Rights” as that term is defined in the DoD Supplement to the Federal Acquisition Regulations, 52.227-7013 (c)(1)(ii) and:
Use, duplication or disclosure is subject to restrictions as set forth in subdivision (c)(1)(ii) of the Rights in Technical Data and Computer
Software clause at FAR 52.227-7013. Manufacturer:
Vividata, Inc.
1300 66TH Street
Emeryville, CA 94608
U.S.A.
If this Software was acquired under a GSA Schedule, the U.S. Government has agreed to refrain from changing or removing any insignia
or lettering from the Software or the accompanying written materials that are provided or from producing copies of manuals or disks
(except for backup copies) and:
(e) Title to and ownership of this Software and documentation and any reproductions thereof shall remain with Vividata, Inc.,
(f) Use of the Software and documentation shall be limited to the facility for which it was acquired except under special contract, and:
(g) If use of the Software is discontinued to the installation specified in the purchase/delivery order and the U.S. Government desires to use
it at another location (except under special contract), it may do so giving prior written notice to Vividata, Inc., specifying the type of computer and the new site. U.S. Government personnel using this Software, other than under DoD contract or GSA Schedule, are herby on
notice that use of this Software is subject to restrictions which are the same as or similar to those specified above.
Request for Comments
In our effort to provide you with the best documentation possible, we welcome
any comments and suggestions you may have about our products. Please direct
communications to us at:
Vividata, Inc.
1300 66TH Street
Emeryville, CA 94608
U.S.A.
Phone: (510) 658-6587
Fax: (510) 658-6597
Toll-free Sales: (800) 704-2640
E-mail: http://www.vividata.com/support_contact.html
World Wide Web: http://www.vividata.com
iv - PShop User’s Guide
Table of Contents
Table of Contents
Chapter 1: Before You Begin ....................................................................... ix
Type Conventions........................................................................... ix
System Requirements .................................................................... ix
Memory Requirements ....................................................................x
Customer Support .......................................................................... xi
Chapter 2: Software and Hardware Installation......................................xiii
Overview...................................................................................... xiii
Installation Summary................................................................... xiii
SCSI Printer Installation Details.................................................. xiii
Installing PShop .............................................................................xv
Configuring the Environment .....................................................xxiv
Chapter 3: Introduction................................................................................. 1
Overview..........................................................................................1
PShop Components..........................................................................3
PShop Highlights .............................................................................5
PShop System Diagrams..................................................................6
Chapter 4: Using PShop................................................................................. 9
Overview..........................................................................................9
Using PShop on BSD Style Print Systems (SunOS 4.x, Linux and
Digital UNIX) ..........................................................................10
Using PShop on System 5 Style Print Systems (Solaris 2.x, HP-UX,
IRIX, and AIX) ........................................................................11
Enabling Banner Pages ..................................................................11
Printing to Remote Workstations ...................................................12
Monitoring Print Job Status ...........................................................13
Default Printing Behavior ..............................................................13
PShop User’s Guide - v
Table of Contents
Chapter 5: PShop Graphical User Interface..............................................15
Overview........................................................................................15
Basic Operations ............................................................................16
User Interface.................................................................................17
Appendix A: vvprint/vvlpr Commands & Parameters.............................21
Usage Synopsis ..............................................................................22
IFS Files .........................................................................................23
PostScript versus Bitmap Image Printing ......................................24
Parameter Table..............................................................................26
Appendix B: Device Driver Configuration.................................................37
Overview........................................................................................38
ID File Field definitions.................................................................41
Ghostscript .....................................................................................42
Using PostScript Printer Description (PPD) Files with PShop......45
Appendix C: Accessing Network Printers..................................................47
Background ....................................................................................48
How PShop is Configured for Network Printing ...........................49
Networked Printer Installation Instructions ...................................50
Appendix D: Troubleshooting .....................................................................51
Overview........................................................................................51
Getting Help...................................................................................51
Identifying the Problem .................................................................51
How to Get a License.....................................................................62
Patches ...........................................................................................63
vi - PShop User’s Guide
Table of Contents
Appendix E: License Manager Commands ............................................... 65
Overview........................................................................................65
License Manager Utilities ..............................................................65
The License Daemon .....................................................................65
License File Format .......................................................................65
Obtaining your lmhostid ................................................................66
Command Reference......................................................................68
vvlmstat..........................................................................................68
vvlmstop.........................................................................................69
vvlmhostid .....................................................................................70
vvlmreread .....................................................................................71
Key Read program .........................................................................72
Appendix F: Software Look Up Tables ..................................................... 73
Overview........................................................................................73
Getting New LUTs.........................................................................75
Appendix G: Glossary.................................................................................. 77
Index ............................................................................................................... 81
PShop User’s Guide - vii
Table of Contents
viii - PShop User’s Guide
Chapter 1: Before You Begin
Type Conventions
Different kinds of typefaces used throughout this manual indicate text that will
appear on the screen or need to be entered by the user.
Type:
Indicates text is:
courier
courier bold
<brackets>
text generated by the computer
text typed in by user
text to be replaced by user
When asked to enter commands preceded by a pound sign (‘#’), the user should
be in super-user mode or ‘root’ first. (The command to be entered does not
include the pound sign itself.)
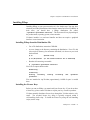
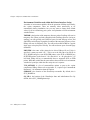
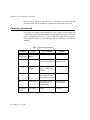
System Requirements
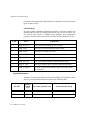
PShop is available for a variety of Unix-based workstations. The following
platforms are currently supported:
Manufacturer
Operating System / CPU
Sun
Solaris SPARC (Solaris 2.7+)
HP
HP-UX PA-RISC
Linux: RedHat, Mandrake, etc.
Linux x86 (Kernel 2.0 and higher)
Table 1: Supported Platforms
PShop User’s Guide - ix
Chapter 1:Before You Begin
If your platform is not listed above, you can contact Vividata, Inc. to see if your
platform has been added since this printing of the manual.
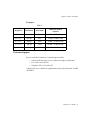
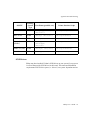
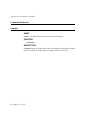
Memory Requirements
- Minimum 128 MB RAM, depending on workstation configuration
- An additional RAM or swap space of approximately twice the output size of the
image you are printing (output size = bits per pixel * width in inches * height in
inches * printer resolution (dpi) / 8). For better performance, the ratio of swap
space to RAM should not exceed 2:1.
- When printing a PostScript file you will need additional space in your
temporary directory equal to the output size of your image.
x - PShop User’s Guide
Chapter 1:Before You Begin
Examples:
Table 2:
Image Size
Resolution
Pixel depth
Additional memory
required
8.5" x 11"
300 dpi
1 bit
3 MB + 2 MB in /tmp
8.5" x 11"
300 dpi
8 bit
18 MB + 9 MB in /tmp
8.5" x 11"
300 dpi
24 bit
50 MB + 25 MB in /tmp
8.5" x 14"
300 dpi
24 bit
64 MB + 32 MB in /tmp
8.5" x 11"
400 dpi
24 bit
88 MB + 44 MB in /tmp
Customer Support
You can reach the Vividata, Inc. technical support staff by:
•
Online email form: http://www.vividata.com/support_contact.html
•
Fax: USA (510) 658-6597
•
Telephone: USA (510) 658-6587
Customer Service is available on regular business days from 8:00 AM to 5:00 PM
(PST/PDT).
PShop User’s Guide - xi
Chapter 1:Before You Begin
xii - PShop User’s Guide
Chapter 2: Software and
Hardware Installation
Overview
This section describes the installation procedures for PShop, including the
License Manager and printer hardware. Please consult the release notes supplied
with the product for any last-minute information relevant to your particular
system.
Installation Summary
There are two aspects to installing PShop software and your printer hardware:
•
Hardware installation
•
Software installation
SCSI Printer Installation Details
The following sections discuss the requirements and procedure for connecting
your printer to the SCSI bus
SCSI ID's
You must select a SCSI ID for your printer(s) that does not conflict with any other
SCSI devices that are already on your system. Possible ID's range from 0 to 7
(some SCSI buses may support more, but our SCSI drivers only support this
range). Typically, ID 7 is reserved for the computer's own SCSI host adapter.
Other ID's are frequently taken by disk, CD-ROM, and tape drives. On most
platforms, you will see a list of occupied SCSI ID's on the system console during
boot up, or listed in a system-specific command display of device ID's. After you
determine what ID's are not being used, consult your printer or scanner manual
for setting its SCSI ID.
PShop User’s Guide - xiii
Chapter 2:Software and Hardware Installation
SCSI Cable Lengths
If you have a SCSI bus with SCSI-1 and SCSI-2 devices that do not operate in
fast SCSI mode, the bus's total physical cable length should not exceed 6 meters
(19.6 feet). On a bus with fast SCSI devices, the length should not exceed 3
meters (9.8 feet). On a bus with Ultra SCSI (SCSI-3) devices, the length should
not exceed 1.5 meters (4.9 feet). At longer lengths, data integrity and
transmission speed can be degraded significantly. The total cable length must
take into account all external cabling as well as internal cabling in the system
chassis or expansion boxes. Substandard cables will also affect the quality of
transmission at longer lengths. If your cable configuration exceeds the lengths
suggested above, you should either remove a device from your SCSI bus, use
shorter cables to interconnect the components on the bus, or add another SCSI
host adapter to your system. If you have a mixture of devices with different SCSI
transfer speeds on a single bus, the cable length may be different from those listed
above.
Termination
The last device at each end of each SCSI chain must have proper SCSI
termination. An active terminator can be helpful in making a marginal SCSI
configuration more reliable.
General Procedure for Attaching a SCSI Device
You need to power down your system and all attached SCSI peripherals
completely before attaching any SCSI devices.
After you set the printer's ID as described above, re-cable the peripherals on the
SCSI chain to include the printer. Make sure this chain is properly terminated.
Power on all SCSI peripherals, then power on the system. If necessary, take the
appropriate steps to boot your system.
On Solaris 2.x systems, you may need to indicate that the /devices directory links
should be rebuilt at boot time with “boot -r” from the monitor prompt (“ok”) on
SPARC platforms, “b -r” from the secondary OS loader on x86 platforms, or with
a “reboot -- -r” command from the Unix shell. On other systems, the new device
will be recognized automatically by the operating system.
If your system does not boot, power down the system and all SCSI peripherals,
and re-check the cabling, termination, and SCSI ID settings
xiv - PShop User’s Guide
Chapter 2:Software and Hardware Installation
Installing PShop
Installing PShop on your system consists of a few simple steps. You may have
obtained your PShop distribution either from the internet or from a CD-ROM. In
both cases, you should have a PShop distribution file called,
“<product>-<platform>-<version>”. The file name will vary depending on
the product name, operating system, release number.
Vividata’s installer is a text-based installer and does not require a graphical
interface or user interaction.
Installing PShop from the Distribution File
•
For a CD distribution, mount the CD-ROM.
•
As root, change to the directory containing the distribution. For a CD, this
is the top level directory; for an internet download, it is whereever you saved
the download.
•
# su
(become root)
# cd /mnt/cdrom
(or the saved location for a download)
Run the self-extracting executable:
# ./<product>-<platform>-<version>
You will see output similar to this:
Extracting...
Installing...
Killing
currently
processes...
running
licensing
and
<product>
Files are installed in /opt/Vividata, approximately 16 MB of space is needed
there.
Installing the License Keys
Before you can use PShop, you must install your license key. If you do not have
a license key, please contact Vividata to request your key or make a purchase.
Vividata normally distributes license keys through the Vividata website or by
email. The encoded license key string is typically wrapped within a
self-installing shell script. To install the license key using the self-installing
script, run the script:
PShop User’s Guide - xv
Chapter 2:Software and Hardware Installation
# sh vvkey.sh
The filename of the script may vary.
The license key will be installed in /opt/Vividata/config/vvlicense.dat. If you
received a license key on paper, you must manually install it in this file.
Once the software and keys have been installed, run the printer installation
program, ps_install, to configure your printer.
xvi - PShop User’s Guide
Chapter 2:Software and Hardware Installation
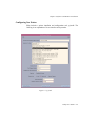
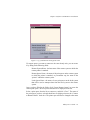
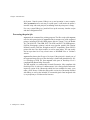
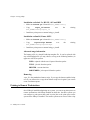
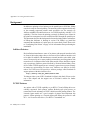
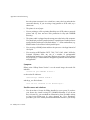
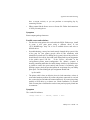
Configuring Your Printer
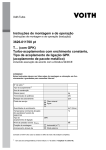
PShop includes a printer installation and configuration tool, ps_install. The
following is an explanation of its user interface and operation.
Figure 2-1 ps_install
PShop User’s Guide - xvii
Chapter 2:Software and Hardware Installation
PShop Installation Directory
This field specifies the location of the PShop installation. By default it will use
the directory where PShop is installed (usually /opt/Vividata for Solaris 2.x and
/usr/vividata for other platforms).
“Select a Printer” - the printer selection list
This scrolling list shows the printers supported by PShop. If your printer is not
one of the models listed, choose the printer that seems most like yours. When you
install a printer, ps_install will create a customized copy of the ID file in the
$VV_HOME/config directory.
The list of printers is built dynamically by ps_install. Each time it starts, it scans
the $VV_HOME/id directory to find the template ID files. If you think that more
up to date files could be useful for you, please check Vividata's web site
(http://www.vividata.com/SupportShop) for the latest information and updates.
ps_install will fill in the printer-specific fields with appropriate values from
the ID file. In most cases, you will not need to make any changes and can simply
click “Install Printer” after you have selected a printer. Should any changes be
necessary, however, simply make the changes in the appropriate text field.
Note: If you pick a printer which has already been installed on the system
with the default print queue name, the information for that printer will be
displayed, and you will be able to edit the printer's interface script and ID file
via the File menu. If you want to install a new printer using the same ID file
template as an existing printer, or if the ID file has the same default print
queue name as an existing printer, simply change its name in the “Print
Queue Name” field.
Printer Port
The Printer Port field contains the name of the port the printer is attached to, or
the name of an output file.
If you have a parallel interface printer, this is the port's device name, i.e.
/dev/bpp0 for the first parallel port on a Solaris SPARC system, /dev/ecpp0 for
the first parallel port on an PCI bus SPARC system (such as the Ultra 5, 10, 30
or 60 models), /dev/lp1 for the first parallel port on a Solaris x86 system, etc.
If you have a Sun SPARC Printer, this will be /dev/lpvi0 for the first printer. The
Sun lpvi driver and the special SBUS interface card are required, and should
xviii - PShop User’s Guide
Chapter 2:Software and Hardware Installation
already be installed and configured on your system. Vividata's website has
additional support information for the lpvi driver if you need it, including
information on how to get the latest version in a patch from Sun. This can be
found at http://www.vividata.com/sparcprinter/.
If you have a network printer, this is the temporary file used to store PShop's
rasterized output (in the printer's protocol) for transmission to a remote print
queue. If you are setting up multiple PShop print queues, make sure this file
path/name is unique for each network print queue).
If you have a SCSI or GPIB printer, this field is blank by default, but can be
set to the specific SCSI or GPIB device location. If only one SCSI or GPIB
printer is attached, nothing needs be filled in - PShop will determine the printer's
location automatically. If more than one printer is attached, fill in the printer's bus
type, bus number, and target id, separated by colons. For example,
s:0:3 for SCSI bus 0, target 3
or
g:0:4 for GPIB bus 0, device 4.
Print Queue Name
The Print Queue Name refers to the name of the PShop print queue on the system.
This will be the name known to users on the system, and the printer they print to
using PShop's user-level printing utilities (vvlpr, PShop), and lp, lpr, or PrintTool.
Its name must be unique on the system; it may not contain any spaces or other
characters prohibited by the system's print queue naming conventions, and must
be of a length permitted on the system.
Temporary File Directory
This option specifies the directory where temporary files created by PShop will
be stored. When printing an image file on any printer or a multipage document
on a SCSI/GPIB printer, the temporary files can be very large, in some cases 60
to 600 megabytes or more (refer to the appropriate section Memory
Requirements on page x), so it is important to make sure that this directory has
sufficient space.
Spool Directory (only in SunOS 4.x, OSF/1, AIX)
This is the directory where queued print jobs will be stored, usually
/var/spool/printer_name. Like the temporary file directory, the spool directory
PShop User’s Guide - xix
Chapter 2:Software and Hardware Installation
may need to handle jobs with sizes in the sixty-plus megabytes (Please refer to
the appropriate “Memory Requirements” on page x) so, once again, it important
to make sure that the referenced directory has sufficient space.
Default Printer
This option allows you to set the printer you are installing as the system default
printer. This allows easier access to the designated PShop print queue from
applications and lp and lpr commands.
Connect to a Network Printer
PShop now includes two ways of printing to a networked printer. This option
allows you to connect a local PShop print queues to remote system print queues
and to remote TCP/IP printers on the network.
Network Printer
The first way to connect, is to choose Network as the Connection (As seen in
Figure 2-1 on page xvii). With this chosen you simply need to enter the name of
the Remote Queue and the name of the host on which it resides. If the printer is
a standalone printer with its own network card, simply put the name of the printer
in the Remote Host location.
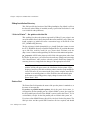
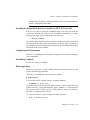
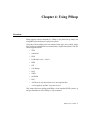
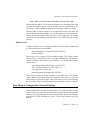
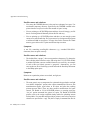
Remote Printer
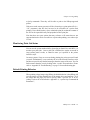
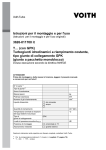
If this option is selected, you will be presented with a dialog (see Figure 2-2) that
contains a list of available remote print queues.
xx - PShop User’s Guide
Chapter 2:Software and Hardware Installation
Figure 2-2 ps_install Remote Print Queues GUI
If a remote queue you want to connect to does not already exist, you can create
it by filling in the following fields:
Remote System Name - the host name of the remote system to which the
remote printer is attached.
Remote Queue Name - the name of the print queue on the remote system
to which the printer is attached, or put another way, the name of the
“printer” within the remote system.
Local Queue Name - the name of a new print queue on the local system
that will be used to transport data from the local system to the remote
system.
Once you have filled in the fields, click “Create Remote Queue” to create the
remote print queue. The new queue should now be displayed in the list.
Select a print queue from the list to connect to, and click “Close”. The name of
the print queue you have selected should now be displayed next to the “Connect
to Remote Printer” check box. The printer port will also be changed to the name
PShop User’s Guide - xxi
Chapter 2:Software and Hardware Installation
of a temporary file used to cache the rasterized image for transport to the remote
queue. You can change this file name if necessary.
Please refer to Appendix C, “Accessing Network Printers”, for more details
network printing,
Install Printer
After you have selected a printer and elected any desired installation options
click “Install Printer” to install the printer onto your system. After you install the
printer, the “Edit Printer...” options in the File menu, the “Remove Printer”
button, and the “Test Printer” button should be enabled.
Remove Printer
If the name displayed in the Print Queue Name field is the name of an existing
printer on your system, the “Remove Printer” button should be active. You can
click this button to permanently remove the selected print queue from your
system.
Test Printer
This will send a PostScript test page to the PShop or PostScript printer indicated
in the Print Queue Name field. Note: If you are not licensed to use a PShop
printer, the test page will not be printed.
File Menu
This pull-down menu contains:
Edit Printer Interface Script - This option will be available when the
name displayed in the Print Queue Name field references an installed
PShop printer. You can edit the interface script of the current printer with
this option.
Edit Printer ID File - This option will be available when the name
displayed in the Print Queue Name field references an installed PShop
printer. You can edit the ID file of the current printer with this option.
Exit - Quits ps_install.
Note: If ps_install is unable to locate the printer administration utilities on
your system, you will need to update your PATH environment variable to
xxii - PShop User’s Guide
Chapter 2:Software and Hardware Installation
include them.Edit Printer Configuration File: Pops up a text editor with the
printer’s configuration file loaded.
Installing the Kernel SCSI Driver for SunOS 4.x, HP-UX 10.x & AIX
Now you are ready to invoke the installation script. This script will lead you
step-by-step through the kernel driver installation, prompting you where
necessary. To begin, go to the PShop directory and enter:
# ./bin/vv_install
The install script installs device drivers into the current kernel of the system. This
system must be the one to which your scanner your printer will be connected. If
the installation is NOT running from the target host, exit the installation program
and install on the correct machine.
Configuring the Environment
Please see “Configuring the Environment” on page xxiv for details on setting up
your environment.
Installation Complete
You are now ready to use PShop.
Removing PShop
Should it be necessary to remove PShop from your system, become root and
execute the following commands:
On Solaris, you should also remove the driver package:
# pkgrm VVvvsc
If you need to remove a printer, use the -x option to lpadmin:
# lpadmin -x printer_name
If you have used the printer, the print script will have created a results file in the
printer’s directory, /etc/lp/printers/printer_name. “lpadmin -x” will not remove
this directory, and will print an error. If this happens, remove the directory
manually to complete printer removal.
To remove the software, switch to super-user mode and enter:
# rm -r Vividata_directory
PShop User’s Guide - xxiii
Chapter 2:Software and Hardware Installation
Configuring the Environment
Environment Variables
A number of environment variables affect the operation of PShop (and the
applications that may use PShop). These are normally either unnecessary or set
automatically during installation, but you may want to change their default
values if you are customizing your system. If you would like to check on their
settings, you can inspect the wrapper script(s) in $VV_HOME/bin. An
explanation of each environment variable follows:
VV_HOME is the location where PShop is installed. By default,
/opt/Vividata on Solaris 2.x, and /usr/vividata on all other systems. It is
set by default when the program is executed and need only be changed if
there is some specific reason for doing so.
VVP_FILTER provides a way for PShop to read file formats through a
filter the user provides, thus extending the built-in set of file formats that
are recognized. If a file fails to read through a built-in file reader, then
the input is passed through the designated external filter to be converted
to a recognized format. The value set should be the path to an external
filter and any command-line options it requires. The filter must take stdin
and output the results via stdout. The default filter is the mpage utility,
which converts ASCII text to PostScript. Refer to any available
references or help files for information regarding the usage of mpage and
other common filters.
VVPRE_FILTER is similar to the VVP_FILTER, but different in that
it is applied before any of the usual file format readers (or VVP_FILTER
for that matter) are applied. Any designated filter needs to either process
or pass-through any data intended to be read by PShop. The value set
should be the path to an external filter and any command-line options it
requires. The filter must take stdin and output the results via stdout. The
default setting is “none”.
Setting the Environment Variables
You can set the appropriate environment variable(s) in your .cshrc or .profile file.
When the next C or Bourne shell is started, its environment will be automatically
configured for Vividata's environment variables.
xxiv - PShop User’s Guide
Chapter 2:Software and Hardware Installation
You can also add the name of the directory that contains PShop to the PATH
environment variable assignment in your .cshrc or .profile file. This will allow
you to launch the user-level vvlpr and PShop gui application from any directory.
After modifying your .cshrc or .profile file, logout from the system and then login
again to start your session with the modified initialization files.
If you are running in a networked environment and you want to have only one
license manager daemon running, make sure that each user's shell environment
assigns the name of the host running the license server to the variable Printer
Interface Script
Once you have configured PShop to work with the Unix lp system, each print job
you submit via PShop, vvlpr, lp, or lpr, will cause the Unix lp system to execute
the appropriate printer interface script to properly configure the environment for
calling PShop's vvprint command-line driver. If you used ps_install to configure
your printer, the interface script should already be configured properly. However,
there may be instances where you need to customize a particular setting. You will
find the printer interface script in one of the following directories:
Operating System
Directory
SunSolaris 2.x
/etc/lp/interfaces
SunOS 4.x
OSF/1, AIX
/usr/vividata/config
HP-UX 10.x
/etc/lp/interface
HP-UX 9.x
/usr/spool/lp/interface
IRIX 5 & 6
/var/spool/lp/interface
The name of the script is identical to the name of the printer, except that on some
systems, an “.if” extension is added.
The following section describes user configurable environment variables in the
printer interface script.
PShop User’s Guide - xxv
Chapter 2:Software and Hardware Installation
Environment Variables used within the Printer Interface Script
A number of environment variables affect the operation of PShop (specifically,
the vvprint component). These are normally either unnecessary or set
automatically during installation, but you may want to change their default
values if you are customizing your system. An explanation of each environment
variable follows:
TMPDIR is the location of the temporary directory where FaxShop will store its
temporary files. When you load a document in the FaxShop client for viewing or
sending, you will typically need 50 KB of space for each full page of text, and
500 KB for each full page of graphics.Location of the temporary directory where
PShop will store its temporary files. You will need around 50 MB for a typical
single page color print job at 300 dip. You will need more space for multi-page
documents.
PRINTER is the name of the printer device driver PShop will use. If this is
specified, it must start with “-id=”. This is set to the full path of an ID file in
$VV_HOME/config for a non-SCSI/GPIB printer, or the SCSI or GPIB ID for a
SCSI/GPIB printer (in the form of “-id=s:bus:device” or “-id=g:bus:device”). If
left blank, PShop will try to automatically detect a supported SCSI or GPIB
printer. While this variable has the same name as the user shell-level environment
variable for lp and lpr, within the filter script its use is separate.
VVP_OPTIONS is a list of command-line options to pass to the vvprint
component of PShop. Please refer to Appendix A, “vvprint/vvlpr Commands &
Parameters”, for information about the options.
GSHOME is the location of the GhostScript executable. By default, this is
$VV_HOME/bin.
GS_LIB is the location of the GhostScript fonts and initialization files. By
default, this is $VV_HOME/ghostscript.
xxvi - PShop User’s Guide
Chapter 3: Introduction
Overview
The growth in the popularity of UNIX for business, scientific, web-based and
other specialized applications has its origins in the mid 1980’s. It was at this time
that the first RISC processors appeared and inexpensive, powerful workstations
were “invented.” The introduction of the first Adobe PostScript laser printers
took place about the same time. Before PostScript was available, the popular
applications that produced formatted output had to provide a great many drivers,
one for each of the many printer protocols that existed at the time. Developers of
UNIX applications were quickly convinced of the efficacy of PostScript because
its advantage is essentially in embedding the printer-specific driver within the
printer. A UNIX application could then generate either plain ASCII text or
PostScript output and have truly universal printer applicability.
In the years since its introduction, PostScript has become widely accepted.
Almost without exception, it is the only kind of formatted printer output that
virtually all UNIX applications support. UNIX applications are generally
insensitive to the cost premium arising from having PostScript in their printers
but there are many applications today for which the printer-resident PostScript
capability is either prohibitively expensive, or simply not available. These
instances tend to occur at the lowest and highest ends of the printer capability and
cost spectrum.
Vividata’s solution is PShop, an integrated UNIX printing facility. Providing a
host-based PostScript Raster Image Processor (i.e. “software RIP”), it includes
everything else needed to get a user’s applications output printed with the
greatest ease, speed, and quality to the supported printers.
Ease of use is facilitated by PShop’s automatic recognition of the print job type.
The print job types can be mixed and matched in any order with no special action
by the user. PShop automatically detects ASCII text, PostScript print jobs and
image files of numerous popular formats.
High Speed is achieved by PShop in several ways. The RIP is host-resident, and
therefore runs PostScript on the workstation’s CPU which is much faster than the
PShop User’s Guide - 1
Chapter 3:Introduction
PostScript-capable CPU’s built into printers. Also, RIP operation is interleaved
with the action of the printing mechanism so that in the midst of printing jobs,
pages can be “rasterized ahead.” In the use of imaging applications with
PostScript controllers, an image must be completely transmitted to the printer
before the printer actually starts printing. PShop instead relies on its host-resident
fonts to remedy the printing delays and network bandwidth consumption that are
typical of printer-resident PostScript controllers.
Media waste is avoided and greater throughput is achieved by a unique feature in
PShop that automatically restarts interrupted jobs at the page where they left off.
In summary, the Vividata PShop printing eases printer installation and enhances
user productivity. PShop also provides UNIX printing integration for stand-alone
and networked printing support. The PShop package includes a software RIP
with its complement of 35 premium fonts, UNIX network printing support files,
device drivers, special scripts and other support files. Procedures for installation,
use, administration and Vividata support are also included with PShop.
2 - PShop User’s Guide
Chapter 3:Introduction
PShop Components
The PShop package is made up of various components that fit together to
comprise a whole system. In effect, these components coordinate an entire
printing operation from the point at which a print job is submitted via the user
GUI or a command line invocation all the way through to delivering the proper
data in a printer’s required protocol.
Submitting print jobs to the system print queue(s)
lpr (BSD), lp (System 5), or vvlpr (all operating systems) can be entered on
the user’s command line or submitted via a system call from another program.
These commands enter a job into the printer’s queue.
vvlpr is a useful front end for lpr and lp, offering much more control of the
print job’s appearance and treatment. The vvlpr parameters are the same as
vvprint’s parameters and are embedded within each print job when it is sent to
the print queue. A full description of the vvlpr/vvprint options are provided
elsewhere in this manual. Please refer to the appropriate section “Appendix A:
vvprint/vvlpr Commands & Parameters” on page 21. If you use lpr or lp, you
will only have their options available to control your print job.
The supported file types that can be processed with any of the above methods
include TIFF, EPSI, Sun Raster, GIF, JPEG, X11 bitmaps, EPSF, PDF, PostScript
jobs, as well as ASCII plain text files or other user-defined types.
Monitoring the print queue(s)
Many methods are provided by the operating system to monitor and control the
print queues’ status. Examples are Sun’s printtool command, the lpq and lpc
commands on BSD style print systems, and lpstat and lpadmin commands on
System 5 based print systems.
On BSD style systems, a daemon (program) called lpd supervises the system
print queues and processes the print jobs according to the /etc/printcap file (found
in the SunOS and DEC Alpha systems, for example). This file defines the queues
and specifies the name of the printer and the “if” filter script that is called to print
each job as it comes out of the queue. Such filters are an integral part of PShop.
For extra background, you may refer to any of the various system administration
reference guides on creating and managing printers in the UNIX environment.
PShop User’s Guide - 3
Chapter 3:Introduction
On System 5 based systems, PShop’s set up and operation is more complex.
When lpsched detects a new entry in a print queue, it will invoke the printer’s
interface script with each print job, terminating when the print queue is empty.
For every system PShop’s ps_install will set up the necessary interface scripts
and other configuration files.
Processing the print job
vvprint is the command line printing program. The filter script calls vvprint
once for each queued print job. vvprint sends its output to any of the supported
printers, including SCSI and GPIB printers (like the Canon CJ-10, the Kodak
XL-7700 SCSI, XL-7700 GPIB, XLT-7720 SCSI, and XLT-7720 GPIB printers,
FujiFilm Pictrography printers) and the most popular parallel (like Hewlett
Packard LaserJets, DeskJets, DesignJets and PCL compatibles, Epson ESC/P2
printers like the Color Stylus models) as well as many others. You can usually
find an up-to-date list in any release notes or README files or Vividata’s
website.
vvprint first detects the file type of its input. If the print job is already one of
the supported image file types, then the image is loaded and printed directly. If it
is a PostScript or PDF job, then vvprint calls upon its PostScript Level 2
compliant RIP (Raster Image Processor).
The RIP supplied is a commercially licensed Ghostscript, fully compliant with
PostScript Level 2 (with level 3 enhancements). It is a more powerful and muchimproved version of the Ghostscript which has been available for many years
under a GNU license. Unlike the older public version, the Ghostscript included
with PShop, as well as the included 35 commercial-grade fonts integrated with
it, are proprietary to Vividata and its licensors.
4 - PShop User’s Guide
Chapter 3:Introduction
PShop Highlights
PShop adds many valuable enhancements to the UNIX printing environment.
PShop can run on the most popular UNIX platforms and supports every
application (such as FrameMaker, Netscape, etc.) that prints PostScript to named
print queues. Many image file formats and document types are automatically
recognized and printed correctly by PShop. Over 2,000 printers, both
PostScript-compatible and non-PostScript printers are supported, including dye
sublimation, thermal wax, laser and ink jet. The following is a brief synopsis of
PShop’s capabilities and features:
•
Automated Installation
•
Supports all PostScript printers and their options
•
Ability to print PostScript levels 1, 2 and 3 to non-PostScript printers
•
Image enables and PDF enables all supported printers. PShop’s automatic
file format detection (TIFF, GIF, Sun Raster, EPSI, PostScript, JPEG, PBM,
X11 bitmap, XWD, PNG, SGI RGB, PDF, ASCII text, etc.) allows for batch
printing of documents of multiple formats.
•
Capable of printing directly from applications such as Netscape,
Applixware, WABI, Interleaf, FrameMaker, WordPerfect and any other
UNIX application that assumes that you are printing to a PostScript printer.
•
Capacity to print screen shots from the X windows system
•
Ready for Users and administrator to add headers and footers to any print job
•
PShop’s PostScript RIP “rasterizes ahead” for faster printing output
•
Enhancement of Print control parameters for adjusting image brightness,
resolution, color balance, size, orientation, etc.
•
Ability to control line art, gray scale, indexed color and indexed gray images
•
Comes with License manager software to generate reports on peak usage
times, histogram reports and license usage levels, in addition to printer
accounting and log files
•
Is certified for Year-2000 compliance. Contact Vividata for details.
For further information on using PShop and its options, please refer to the
appropriate sections: “Chapter 4: Using PShop” on page 9 and “Appendix A:
vvprint/vvlpr Commands & Parameters” on page 21.
PShop User’s Guide - 5
Chapter 3:Introduction
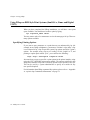
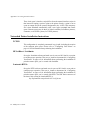
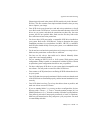
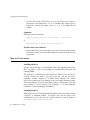
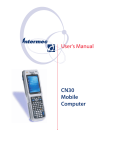
PShop System Diagrams
The following diagrams illustrate schematically the flow of information within
and between the components of PShop and the UNIX lp system. The diagrams
that follow depict PShop installations for use with:
6 - PShop User’s Guide
•
GhostScript (GS) printers on parallel or network interfaces, and
PostScript printers which are being host-RIP accelerated
•
PostScript printers on parallel ports or network interfaces
•
SCSI or GPIB printers.
Chapter 3:Introduction
PShop User’s Guide - 7
Chapter 3:Introduction
8 - PShop User’s Guide
Chapter 4: Using PShop
Overview
PShop supports various commands (i.e., PShop, vvlpr, print tools, lp, and lpr) for
using BSD style and System 5 style print systems.
Using any of these utilities users can submit of many types to be printed. Image
files, PostScript, and PDF files are automatically recognized and printed. The file
format support includes:
•
TIFF
•
Sun Raster
•
EPSI
•
PostScript Levels 1, 2 and 3
•
JPEG
•
GIF
•
X11 Bitmap
•
PNG
•
XWD
•
SGI RGB
•
PDF
•
ASCII text or any other format via a user-supplied filter
•
A user-supplied “prefilter” may also be used
This chapter discusses printing with PShop via the standard UNIX systems’ lp
and lpr commands as well as PShop’s vvlpr command.
PShop User’s Guide - 9
Chapter 4:Using PShop
Using PShop on BSD Style Print Systems (SunOS 4.x, Linux and Digital
UNIX)
When you have completed the PShop installation, you will have a new print
queue available. You should now be able to print by typing:
lpr -P<printer_name> <file>
You may want to take a few moments to review the man pages for lpr. There are
many options available.
Specifiying Printing Options
If you want to pass parameters to vvprint that are not understood by lpr (for
example, to set scaling or brightness), you must use Vividata’s vvlpr utility. vvlpr
is used instead of lpr. vvlpr accepts the system’s lpr options and all of vvprint’s
options. For example, using vvlpr to set “scaling” to 100, “bright” to 75, and
printing to a print queue named “cj10”, you would use the following:
vvlpr -Pcj10 -scaling=100 -bright=75 <file>
Also note that you can set specific vvprint options in the printer interface script
using the VVP_OPTIONS environment variable. The options speicified in this
string in the interface script will override any options a user specifies with vvlpr.
This can be used by a system administrator to specify an override for any
user-specified options.
For information about PShop command-line options, please refer to “Appendix
A: vvprint/vvlpr Commands & Parameters” on page 21.
10 - PShop User’s Guide
Chapter 4:Using PShop
Using PShop on System 5 Style Print Systems (Solaris 2.x, HP-UX, IRIX,
and AIX)
When you have completed the PShop installation, you will have a new print
queue available. You should now be able to print by entering:
lp -d <printer_name> <file> (Solaris 2.x, HP-UX)
lp -d<printer_name> <file> (IRIX, AIX)
You may want to take a few moments to review the man pages for lp. There are
many options available.
Specifiying Printing Options
If you want to pass parameters to vvprint that are not defined by lp (for example,
to set scaling), two methods are available. You can use Vividata’s vvlpr command
or the “-o” option of the system lp command. vvlpr accepts standard lp options
in addition to all vvprint options.
For example, using vvlpr to set “scaling” to 100, “bright” to 75, and printing to
a print queue named “cj10”, you would use the following command-line:
vvlpr -d cj10 -scaling=100 -bright=75 <file> (Solaris 2.x,
HP-UX)
vvlpr -dcj10 -scaling=100 -bright=75 <file> (IRIX, AIX)
An equivalent command using lp would be:
lp -d cj10 -o "-scaling=100 -bright=75" <file> (Solaris
2.x, HP-UX)
lp -dcj10 -o "-scaling=100 -bright=75" <file> (IRIX, AIX)
Also note that you can set specific vvprint options in the printer interface script
using the VVP_OPTIONS environment variable, whose values will override any
options specified with vvlpr.
For more information about PShop command-line options, please refer to
“Appendix A: vvprint/vvlpr Commands & Parameters” on page 21.
Enabling Banner Pages
New to PShop in version 4.0 is banner page printing. This is a feature that can be
either turned on or off.
PShop User’s Guide - 11
Chapter 4:Using PShop
Installation on Solaris 2.x, HP-UX, AIX and IRIX
•
Make sure banner.ps is located in $VV_HOME/config.
•
Copy
vvprt_if.banner
$VV_HOME/config/vvprt_if
•
Install new print queues as normal using ps_install.
over
the
existing
Installation on SunOS, Linux, OSF/1
•
Make sure banner.ps is located in $VV_HOME/config.
•
Copy
vvprtscript.banner
$VV_HOME/config/vvprtscript
•
Install new print queues as normal using ps_install.
over
the
existing
Advanced usage information
The banner.ps file is a simple PostScript template file. It can be replaced with
any valid PostScript file you may choose, as long as the following markers (in
uppercase ASCII) are present:
USER - replaced with the user id passed from the spooler
TITLE - job title from the spooler
PRINTED - current date/time
JOBNUMBER - job request id from the spooler
Removing
vvprt_if is the standard no-banner script, if you copy the banner-enabled script
over it, you will need to re-copy the no-banner script over it again if you want to
create a no-banner queue.
Printing to Remote Workstations
Once PShop is installed and printing on a system, you can set up print queues on
remote workstations with PShop installed on them also. On these systems you
can configure a print queue that sends its print jobs to the print queue on the
system where PShop is installed. The remote systems users can use either vvlpr
12 - PShop User’s Guide
Chapter 4:Using PShop
or lpr/lp commands. Then they will be able to print to the PShop-supported
printer.
If the users on the remote system(s) will be referencing a vvprint options file (i.e.,
“-ifs” parameter), that file does not need to be accessible for vvprint when
printing. Users should invoke vvlpr to submit the print job so that the contents of
the file can be expanded locally and prepended to their print jobs.
Note that there are some options that may reference a file name that are not
supported unless the file is acccessible to vvprint when printing, even when vvlpr
is used.
Monitoring Print Job Status
You can use the system standard utility, lpstat (lpq on SunOS 4.x and OSF/1), to
monitor your print jobs. Once a print job is finished, the results are stored in
/tmp/<printer_name>.results, or whatever name you specified in the printer
interface script.
On some systems, if any error occurs during printing, the print system will send
you mail. Unfortunately, it can send only the exit code from the interface script
and does not provide any detailed messages about the nature of the error. You can
find out more about the error by looking in the “.results” file noted above. Please
refer to “Appendix D: Troubleshooting” on page 51 for troubleshooting tips.
Default Printing Behavior
When printing a large image using PShop, the default behavior is that PShop will
crop the image to fit the printable area of the output device and medium. To fit
the image onto the page you need to specify either a specific size or to use
scaling="scale to fit" as described in .Appendix A, “vvprint/vvlpr Commands &
Parameters”,
PShop User’s Guide - 13
Chapter 4:Using PShop
14 - PShop User’s Guide
Chapter 5: PShop Graphical
User Interface
Overview
While all printing to PShop printers can be done through lp/lpr or vvlpr, the
PShop Graphical User Interface (GUI) provides an easy way for users to specify
printing parameters. This chapter discusses the operations of the PShop GUI in
detail.
PShop User’s Guide - 15
Chapter 5:PShop Graphical User Interface
Basic Operations
To launch the PShop GUI, go to the $VV_HOME/bin directory, or if it is in your
path, run:
PShop
This will launch the PShop GUI with no file name filled in. Alternatively, you
can specify a file name in the command line, and it will be used automatically
when the program is launched:
PShop <filename>
At the most basic level, you will only need to specify a file name via the “File...”
button or in the text field, select a printer via the “Printer” pull-down menu, and
click the “Print” button. For detailed information on these and other options, refer
to the “User Interface” section below.
16 - PShop User’s Guide
Chapter 5:PShop Graphical User Interface
User Interface
The user interface consists of a main panel that contains basic controls, three
collapsible panels that contain advanced controls, and a row of push buttons to
print a job and close the program. Note that while all system printers will appear
in the Printer pull-down menu, only PShop printers will have access to the full
range of options. Options that have no value selected (certain radio buttons and
text fields) will default to reasonable values. The following is a detailed
description of each of these controls.
Main Panel
File...
If you provided a filename on the PShop command line, then its name will be
shown. If you did not, you may either enter the file path and name of the file you
wish to print, or click the button to open a file selection box that you can use to
navigate through the filesystem to find a file.
Print Command
This is the command you want to use to submit your print job. The PShop GUI
will encapsulate all of the options you select and submit them with your file to
the print command via stdio. The first occurrence of “$printer” in the print
PShop User’s Guide - 17
Chapter 5:PShop Graphical User Interface
command will be substituted with the name of the printer that appears in the
Printer pull-down menu.
Printer
This pull-down menu lists all the print queues found on your local system. Using
the PShop GUI, it is only possible to submit a job to a printer with a system print
queue. If you configured a PShop printer using ps_install, it should appear in this
list.
Pages
You can choose to print all pages by selecting “All”, or print a range of pages by
selecting “From” and specifying the page range in the text fields.
Copies
You can choose the number of copies to print by typing in the number in the text
field or clicking on the up or down arrows.
Print Button
Pressing this button submits a print job for the file selected to the specified printer
along with the selected options, as applicable.
Close Button
Pressing this button exits the program.
18 - PShop User’s Guide
Chapter 5:PShop Graphical User Interface
Image Size and Position Panel
Clicking on the triangle next to “Image Size and Position” will expand the GUI
to reveal more controls.
PShop User’s Guide - 19
Chapter 5:PShop Graphical User Interface
Orientation
You can choose to print your file in a portrait (no rotation) or landscape (rotate
90 degrees) orientation. If you leave this field blank, PShop will automatically
choose the best fit.
Scaling
You can choose to print your file to fit the page margins, or scale to a certain
percentage of the page or image size. Refer to Appendix A, “vvprint/vvlpr
Commands & Parameters”, for more information on scaling.
Offset, Size, Unit
These options allow you to affect the output image's offset (position) and
dimensions. The value selected in the “Unit” radio box will be applied to values
in Offset and Size. Refer to Appendix A, “vvprint/vvlpr Commands &
Parameters”, for more information on these parameters.
Headers and Footers Panel
You can enter up to three lines of headers and three lines of footers, one in each
text field. Note that lines must be filled top to bottom, i.e., there can be no blank
lines preceding a header line, and none preceding a footer line. Headers and
footers are treated independently.
Printer-Specific Controls Panel
Any options that work for a specific printer appear here. Appendix A,
“vvprint/vvlpr Commands & Parameters”, includes information on such
parameters for printers such as the CJ-10; Kodak XL-7700, 7720, 8600, and
8650, 8670, and LED-20 and LED-20 II ("Pegasus"); and the FujiFilm
Pictrography PG-3000 and PG-4000.
ID file tags may also be selectable at this point to select non-default settings of
such things as page sizes, imaging modes, etc. For a full explanation of tags,
please see “ID file Tags” on page 39
20 - PShop User’s Guide
Appendix A: vvprint/vvlpr
Commands & Parameters
PShop User’s Guide - 21
Appendix A:vvprint/vvlpr Commands & Parameters
Usage Synopsis
vvprint [options] filename [filename...]
vvlpr [options] filename [filename...]
Typing:
vvprint -help
or
vvlpr -help
will print out all of the command line parameters that are supported in vvprint
and vvlpr. This command line assumes one printer on the system, to switch
between printers please see the section on ids on page 26. What follows is a brief
description of the parameters.
Description
“vvprint” provides a command-line interface for printing. It is normally called by
the system from lp or lpr via a printer interface script. It accepts TIFF, Sun Raster,
EPSI, PostScript, JPEG, GIF, X11 Bitmap, PNG, XWD, ASCII text, and other
file formats via a user-supplied filter.
“vvlpr” accepts all of the command line interface parameters (and files) that
vvprint does, then submits the job to the named print queue via lp or lpr. Options
for lp and lpr are passed through.
Options
“vvprint” options and parameters may be specified in any order on the command
line, in a settings file, or both. The values assigned to options are either numbers,
filenames, or dimensions. Native units for dimensions are “twelfths” (1/1200
inch), but a suffix beginning with letter m, i, t, or p may be used to indicate
millimeters, inches, twelfths or pixels respectively.
“vvprint” options may be specified in any of the following (in decreasing order
of precedence):
•
on the command line
•
in the interface script
•
in an ifs settings file
22 - PShop User’s Guide
Appendix A:vvprint/vvlpr Commands & Parameters
•
in the user's .vvprintrc file
•
in the printer’s ID file.
IFS Files
An IFS contains all the varaibles specific to each printer. A complete list of these
is available below starting at page 23. If you are using two or more SCSI printers,
you will need to uncomment the id line and enter the SCSI id for each printer.
Additionaly, if you would like to use a Software Look Up Table, this is where you
would specify the location. For more on Look Up Tables, please see Appendix
F, “Software Look Up Tables”, for more information .
Sample IFS file for the FUJI 3000 printer:
#
# VVPRINT "ofs" settings file for Fuji 3000 printer.
# Created: Thu Feb 11 19:31:00 1999
#
# If you have more than one SCSI printer
# you will need to set the ID for each
#id
SCSI:0:0
# printer index
pdpi
72
# default input file dpi
scaling
100
# print scaling
xres
300
# X resolution in DPI
yres
300
# Y resolution in DPI
orientation 0
# image orientation: 0=auto, 1=portrait,
2=landscape
bright
colormatch
contrast
invert
density
hue
papertray
mirror
redbal
-256 to 256
greenbal
-256 to 256
bluebal
-256 to 256
#swlut
0
0
0
0
0
0
1
0
0
# brightness -9 to 9
# turn on 1 or off 0 colormatch
# contrast -50 to 50
# 0 = non inverted 1 = inverted
# density/saturation -100 to 50
# set the hue balance -70 to 70
# 1 full size, 2 half size
# horizontal mirror: 1=on, 0=off
# set the color balance for channel
0
# set the color balance for channel
0
# set the color balance for channel
/opt/Vividata/lut/fu3000.lut
# swlut
PShop User’s Guide - 23
Appendix A:vvprint/vvlpr Commands & Parameters
Using vvprint/vvlpr options from lp
In order to pass options on to vvprint from the lp command you need to use
the -o option with double quotes arround the options.
For example to print to a print queue named stylus with the scaling=scale and
copies=2 options you would simply enter the following:
# lp -d stylus -o "scaling=scale copies=2" filename
This same command can also be executed as:
#$VV_HOME/bin/./vvprint -scaling=scale -copies=2 filename
ASCII Text Printing Capability
ASCII file recognition is controlled by the command line option “ascii”. It can
be set to “yes”, “1”, “no” or “0”. If not specified, the feature is enabled. You can
disable ascii printing through vvprint if you know that you are always going to
be printing image or PostScript files and would like to protect your system from
illicit print jobs.
When you print a file with vvprint, the program tests for each known filetype
in turn. If none matches and ASCII recognition is enabled, the print job data will
be piped through a filter and the file input routine will be called on the output
from the filter. The program expects the filter to read from stdin and write to
stdout, and redirects the filter’s stdout to a temporary file.
The “ASCII recognition” can also be used to convert numerous image formats
into one that vvprint can recognize. In short, the filter takes a file of an unknown
type and converts it into a recognized type.
PShop includes the ASCII filter “mpage”. Refer to the man page included with
PShop on options available for mpage. This is set as the default filter in the
printer interface script, under the variable “VVP_FILTER”. You can use an
alternate filter (for ASCII or any other unrecognized file formats) by setting
VVP_FILTER accordingly.
PostScript versus Bitmap Image Printing
PShop handles PostScript and PDF documents differently from bitmap image
files (except for EPSI "Encapsulated PostScript Interchange" files which PShop
regards as bitmap image files). This is because PostScript and PDF documents
generally contain specific page layout information. In contrast, bitmap images
24 - PShop User’s Guide
Appendix A:vvprint/vvlpr Commands & Parameters
usually do not include such information. As a result, certain PShop parameters
will not have any effect on PostScript files, and some have different semantics
when applied to PostScript or PDF.
For example, since paper size or output area is specified within a PostScript file,
and PostScript coordinates can extend beyond the printable area, parameters such
as scale-to-fit, width, and length have no meaning. In addition, parameters that
affect image placement and orientation often result in a clipped output when
printing PostScript because the actual document dimensions are not changed.
This also means that if you compose a PostScript document for a particular
printer or particular paper size, it may not print correctly on another printer or a
different paper size, especially if the document uses fixed coordinates. In this
situation, it is recommended you specify margins and the correct paper size from
your PostScript-producing application.
PShop User’s Guide - 25
Appendix A:vvprint/vvlpr Commands & Parameters
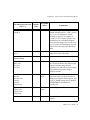
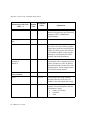
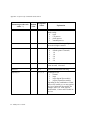
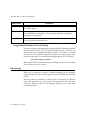
Parameter Table
Parameter(precede each
with a '-')
Default
Value
Acceptable
Values
Explanation
General Controls
id=<s|g>:bus:id
id=bus:id
id=id
id=path
-
bus = 0 to 3
id = 0 to 7
path
Set the output device to a SCSI or GPIB
bus:id or a PShop ID file. If the value is
not set, PShop will print to the first supported printer found which is not already
in use. Note that any referenced id file
must reside in $VV_HOME/config.
ifs=path
-
path
Read command line options in the file
given by “path”. Parameters given on the
command line override those specified in
the ifs file.
swlut=path
-
path
Read color managment look up table settings from the specified file. For more on
this please see Appendix F.
lpg=n
-
n>0
Set last page to print.
rfs=path
-
path
Write the exit status to the file given by
“path”.
fpg=n
1
n>0
Set first page to print.
lpg=n
-
n>0
Set last page to print. By default
copies=n
1
n>0
Set number of copies to print.
help
-
none
Print all available command line options.
v
-
none
Print version information.
debug=n
0
0 to 9
Set debug output level
deltmp=n
1
0, 1
Turn on/off the deletion of temporary
files generated by PShop.
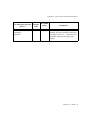
26 - PShop User’s Guide
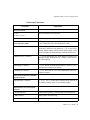
Appendix A:vvprint/vvlpr Commands & Parameters
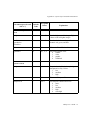
Acceptable
Values
Parameter(precede each
with a '-')
Default
Value
savepaper
0
0, 1
Limit the printable area of the coordinate space to exclude any excess
whitespace. If the value is set to 1,
Pshop will print only the image area
contained within the BoundingBox
region of the page as set by the Postscript code of the input file. According to the Postscript specification, this
region should include all of the viewable imagery of the page. This setting
has the effect of reducing the amount
of blank paper output and was specifically implemented for use with the
HP Designjet plotters as a means to
save paper when only a small section
of the page's coordinate space is utilized. If the value is set to 0, the full
page area will be printed including
the unused whitespace regions. Note
that the use of this parameter in conjuction with a non-Postscript input
file has no effect.
smethod
fast
fast
triangle
mitchell
bell
bspline
hermite
lancosz3
Select an image scaling/resampling
algorithm.
fast is like “nearest neighbor”
triangle is like “bilinear”
mitchell is like “bicubic”
Others can be very CPU intensive!
Explanation
Printing Area Controls
PShop User’s Guide - 27
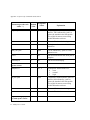
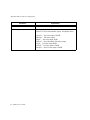
Appendix A:vvprint/vvlpr Commands & Parameters
Acceptable
Values
Parameter(precede each
with a '-')
Default
Value
orientation
-
portrait,
landscape,
automatic
Set image orientation. Default is “automatic”.
scaling=n
100
n > 0,
scale,
none
Set the image scale factor (percent) relative to the image size. A value greater
than 0 will scale the image by a factor of
“n” percent, while “scale” will scale the
image to fit the printable area and “none”
will cause the image not to be rescaled.
An bitmap image's size is determined by
its dpi in conjunction with the pdpi
parameter. A PostScript image's size is
defined within the PostScript data.
pdpi=n
72
n>0
Set the image's resolution in dots per
inch. Used for determining an image's
size if the image file does not define the
dpi explicitly. This value will apply to
xres and yres if they are not explicitly set.
This parameter is ignored when printing
PostScript/PDF.
xres=n
yres=n
-
n>0
Set the image's x and y resolution in dots
per inch. Used for determining an
image's size if the image file does not
define the dpi explicitly. These take the
value of pdpi by default. These values are
ignored for PostScript data.
28 - PShop User’s Guide
Explanation
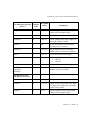
Appendix A:vvprint/vvlpr Commands & Parameters
Acceptable
Values
Parameter(precede each
with a '-')
Default
Value
width=n
length=n
-
n>0
Width and height of the image. The
height=n default unit is 1/1200”. Specify
m, i, t, or p for millimeters, inches,
twelfths, or pixels. For example, set
“width=2i” for a width of 2 inches. By
default, these are calculated automatically from the image's dpi (or pdpi, xres,
or yres values) and dimensions in pixels.
These values are ignored for PostScript
data.
ulx=n
uly=n
0
number
x and y offsets of the origin from the
upper-left corner of the paper.
hdr1, hdr2,
hdr3=text
ftr1, ftr2,
ftr3=text
-
text
Set up to three lines of headers and footers. Header and footer text will be superimposed with the image onto the
printable area, and will cause the remaining printable area for the image to
become reduced.
h1color,
h2color,
h3color=text
f1color,
f2color,
f3color=text
black
X RGB
color
Set the text color of headers and footers.
The color names are taken from the X
RGB color database named “rgb.txt” first
in $VV_HOME/config, then in $OPENWINHOME/lib, then finally in
/usr/X11/lib.
h1just, h2just,
h3just=text,
f1just, f2just,
f3just=text
right
left, right,
center
Set the alignment of headers and footers.
hsize=n
12
n>0
Set the font size in points of headers and
footers.
Explanation
Header and
Footer Controls
PShop User’s Guide - 29
Appendix A:vvprint/vvlpr Commands & Parameters
Acceptable
Values
Parameter(precede each
with a '-')
Default
Value
hfont=text
times
font name
Set the font used in headers and footers.
Must be a font present in the Ghostscript
fontmap (see $VV_HOME/ghostscript/Fontmap).
bright=n
0
-100 to 100
Set the color transfer curve of an image.
The value is inversely related to gamma.
Higher values generally result in brighter
images The value set here will affect all
color channels (CMYK) unless specific
channels are overridden by the redbal,
greenbal, and bluebal parameters.
redbal=n
greenbal=n
bluebal=n
-
-100 to 100
Set the color transfer curve of a specific
color channel: red (or magenta), green (or
yellow), and blue (or cyan). By default,
these parameters take on the value of the
bright parameter. Use the bright parameter to affect the black channel.
bits=n
-
1, 8, 24
Set the output color depth explicitly.
Only the Canon CJ-10 can use 1 bit.
Defaults to the color depth of the image.
mode=n
-
0, 2, 5
Set the output image composition mode
explicitly. Used in conjunction with the
bits parameter. Values
0
binary (CJ-10 only)
2
grayscale
5
color
Explanation
Ghostscript Printer Controls
SCSI/GPIB Printer
General Controls
30 - PShop User’s Guide
Appendix A:vvprint/vvlpr Commands & Parameters
Parameter(precede each
with a '-')
Default
Value
Acceptable
Values
Explanation
Canon CJ-10 specific controls
bright=n
0
-50 to 50
Set the brightness of the image. Higher
values result in brighter images
redbal=n
greenbal=n
bluebal=n
0
-50 to 50
Set the color balance of a specific color
channel: red, green, and blue.
filter=n
1
0, 1
Turn on/off the “Blacktext” mode.
gamma=n
2
0, 1, 2, 4
Set printer gamma value:
0
scanner
1
video
2
graphic
4
combined
bright=n
-
1, 2, 3
Set print density. Used when printing on
transparencies only. Values:
1
low
2
medium
3
high
filter=n
-
0, 1
Turn on/off low-pass filter.
sharpness=n
-
0 to 4
Set sharpness enhancement level:
0
none
1
low
2
medium
3
high
4
extra high
Kodak XL-7700/XLT-7720
specific controls
PShop User’s Guide - 31
Appendix A:vvprint/vvlpr Commands & Parameters
Acceptable
Values
Parameter(precede each
with a '-')
Default
Value
ptf_file=path
-
path
Load Kodak's standard Printer Table Format file (.TBL) indicated by “path” to
replace the standard color lookup table.
Files of this format are created using
Kodak Tablemaker software.
mirror=n
0
0, 1
Turn on/off horizontal mirroring.
annotation=text
-
text
Set single word annotation. Default is no
annotation.
anno_file=path
-
path
Use file indicated by “path” to set the
annotation text.
bell=n
0
0, 1
Turn on/off notification bell when print is
complete.
timestamp=n
0
0, 1
Turn on/off timestamping.
sharpness=n
-
0, 1, 2
Set sharpness enhancement level:
0
none
1
normal
2
high
ptf_file=path
-
path
Load Kodak's standard Printer Table Format file (.tbl) indicated by “path” to
replace the standard color lookup table.
Files of this format are created using
Kodak Tablemaker software.
mirror=n
0
0, 1
Turn on/off horizontal mirroring.
laminate=n
0
0, 1
Turn on/off lamination.
Explanation
Kodak XLS-8600/8650
specific controls
FujiFilm Pictrography
PG-3000 specific controls
32 - PShop User’s Guide
Appendix A:vvprint/vvlpr Commands & Parameters
Acceptable
Values
Parameter(precede each
with a '-')
Default
Value
bright=n
0
-9 to 9
Set the brightness of the image Higher
values result in brighter images.
colormatch=n
0
0, 1
Turn off / on colormatch mode
contrast=n
0
-50 to 50
Set the contrast of the image. Higher values result in higher contrast.
invert=n
0
0 or 1
Select noninverted or inverted image:
0=not inverted, 1=inverted
density=n
0
-100 to 50
Set the saturation level of the image
Higher values result in more saturation.
hue=n
0
-70 to 70
Set the hue balance of the image.
papertray=n
1
1, 2
Set the paper size:
1
full size
2
half size
mirror=n
0
0, 1
Turn on/off horizontal mirroring.
redbal=n
greenbal=n
bluebal=n
0
-256 to 256
Set the color balance of a specific color
channel: red, green, and blue.
bfill=n
0
0, 1
Background fill color: 0=white, 1=black.
border=n
0
0, 3 to 10
Border in mm. 0=no border. Note: When
315 mm paper is loaded, the “no border”
option is not possible.
bright=n
0
-9 to 9
Set the brightness of the image Higher
values result in brighter images.
Explanation
FujiFilm Pictrography
PG-4000 specific controls
PShop User’s Guide - 33
Appendix A:vvprint/vvlpr Commands & Parameters
Acceptable
Values
Parameter(precede each
with a '-')
Default
Value
colormatch=n
0
0 to 3
Select the PG-4000’s internal colormatch setting:
0
none
1
CG process
2
photo process
3
standard process
contrast=n
0
-9 to 9
Set the contrast of the image. Higher values result in higher contrast.
gamma=n
0
0 to 5
Select the PG’s internal gamma setting:
0
default (printer’s internal)
1
1.0
2
1.8
3
2.0
4
2.2
5
2.4
invert=n
0
0 or 1
Select noninverted or inverted image:
0=not inverted, 1=inverted
mirror=n
0
0, 1
Turn on/off horizontal mirroring.
papertray=n
1
1, 2, 3, 4
Set the paper size:
1
normal
2
large
3
larger (Japan/Euro models)
4
largest (Japan/Euro models)
Depending on the combination of donor
and receiver loaded, two or more particular sizes of prints will be possible. For
example, in the U.S. with “Special”
media loaded, 1=letter and 2=double letter sizes.
34 - PShop User’s Guide
Explanation
Appendix A:vvprint/vvlpr Commands & Parameters
Parameter(precede each
with a '-')
Default
Value
redbal=n
greenbal=n
bluebal=n
0
Acceptable
Values
-9 to 9
Explanation
Set the color balance of a specific color
channel: red, green, and blue. Some early
PG-4000’s need -9, -1, -7 respectively to
neutralize a purple cast in gray scale
images.
PShop User’s Guide - 35
Appendix A:vvprint/vvlpr Commands & Parameters
36 - PShop User’s Guide
Appendix B:Device Driver Configuration
Appendix B: Device Driver Configuration
PShop User’s Guide - 37
Appendix B:Device Driver Configuration
Overview
The first part of this section describes the format of the ID files which are used
by PShop to define printer configurations. The second part describes ID file
extensions, particularly the use of Ghostscript and PostScript Printer Description
(PPD) files
ID Files
PShop uses ID files to determine configurations for different printers. The ID file
includes information such as printer port, device driver, paper size, resolution,
multiple configurations, and so forth. It is a plain ASCII text file so
administrators can easily change the default settings and add customizations to
suit their environments.
Usage
PShop provides many ID file templates in the directory $VV_HOME/id. When
you install a printer using ps_install, ps_install writes a customized version of the
ID file into the $VV_HOME/config directory. These files have the values
appropriate to your printer configuration. You may subsequently edit the file
manually to adjust the default paper size, margin settings, or to simply add
additional functionality.
Format
Here is a sample ID file (template from $VV_HOME/id) for a Hewlett Packard
DeskJet printer with two cartridges, such as the DeskJet 660C:
# Printer configuration file for Vividata's Vividrivers
# @(#)deskjet_dual.id
1.2 12/01/97
#
# NOTE: These printers use both a color and a black cartridge.
#
This configuration file assumes you want to print your
color
#
images in color (the "cdj550" Device_driver); to print
#
black only, either set "-tag=mono" in vvprint's command
line
#
options, or change the default Device_driver value to
"cdjmono".
Name:
Scanner_port:
38 - PShop User’s Guide
HP DeskJet Series (Generic Dual-Cartridge)
none
Appendix B:Device Driver Configuration
Fax_port:
Printer_port:
Print_queue:
none
parallel
deskjet
Device_driver:
DPI:
Paper_width:
Paper_height:
Left_margin:
Right_margin:
Top_margin:
Bottom_margin:
VVP_Opts:
cdj550
300
10200
13200
300
300
48
708
bright=75
Tag:
Device_driver:
VVP_Opts:
mono
cdjmono
bright=25
Tag:
DPI:
VVP_Opts:
draft
75
-r75x75
Tag:
DPI:
GS_Opts:
hires
600
-r600x600
The first line of the file must match exactly as it appears above, as this identifies
the file as an ID file. The general format is any number of lines with one field per
line represented as an “option: value” pair.
ID file Tags
There are two main sections of the file (some ID files may have only one section).
The “default section” goes up to the first “Tag” field. All the values in this section
will be applied whenever the ID file is used. The second section is the optional
section, and is subdivided by one or more “Tag” fields. Values set here can be
called upon to override those set in the default section. If you specify the “tag”
command line option, the corresponding subsection beginning with the “Tag”
field up to the next “Tag” field or the end of the ID file will be processed.
For example, to use the “mono” subsection, which redefines the fields
“Device_driver” and “VVP_Opts”, use the command line:
vvprint -id=deskjet_dual -tag=mono <file>
PShop User’s Guide - 39
Appendix B:Device Driver Configuration
For a complete list of the default tags included with PShop, please check our
website: http://www.vividata.com/SupportShop/tagref.html
40 - PShop User’s Guide
Appendix B:Device Driver Configuration
ID File Field definitions
Fields:
Option Name
Explanation
Name
The printer's name. Displayed in ps_install or ScanShop's printer selection
menu.
Scanner_port
For a multi-function peripheral, the scanner port. Default value is “none”.
Fax_port
For a multi-function peripheral, the faxmodem port. Default value is “none”.
Printer_port
The port which your printer is connected to. Specify either “scsi”, “gpib”, the
name of a parallel port, or a file name (for printing to file or network printing).
Print_queue
The name of the printer's Unix system print queue, used by ScanShop to submit
print jobs.
Device_driver
The name of a SCSI printer driver, a Ghostscript device driver, or “ps” for a
PostScript printer. To get a list of Ghostscript supported devices, typ
gs -help
in the $VV_HOME/bin directory.
Ppd_file
The name of a PostScript Printer Description file. Used by PostScript and certain Ghostscript printers only.
DPI
Output resolution in dots per inch. For SCSI/GPIB printers, used to set the
actual output resolution and scaling information. For Ghostscript and PostScript printers, used only to scale bitmap images. To set the actual output resolution for Ghostscript printers, use the “GS_Opts” field. For PostScript printers,
use the “Ppd_file” field.
Paper_width
Paper_height
The dimensions of the paper in 1/1200”.
Left_margin
Right_margin
Top_margin
Bottom_margin
The margins of the paper in 1/1200”.
PShop User’s Guide - 41
Appendix B:Device Driver Configuration
Option Name
Explanation
VVP_Opts
A vvprint command line option to use by default. Refer to Appendix A for a list
of available options.
GS_Opts
Option(s) to pass to Ghostscript, only used by Ghostscript printers (i.e.
non-SCSI/GPIB, non-PostScript). You can specify more than one option by
separating each with a space
Tag
Name of an optional subsection. Use the vvprint command line option “tag” to
specify an optional subsection to use.
Using Kodak Tablemaker Files with PShop
You can use custom color lookup tables created by Kodak's Tablemaker software
with the Kodak XL-7700, XL-7720, 8600, and 8650 printers. To do this, you
must use the vvprint command line option “ptf_file”. For example, if you want
the printer to use a particular lookup table by default, you can specify it in the
printer interface script. You can add the following option to VVP_OPTIONS:
“-ptf_file=<TBL_filename>”
Make sure the TBL file permissions permit reading by the “lp” user or any other
user who directly accesses vvprint.
Ghostscript
PShop uses a proprietary version of Aladdin Ghostscript as the PostScript
interpreter and print engine for most supported non-SCSI/GPIB, non-PostScript
printers.
There are numerous parameters vvprint can pass to Ghostscript to affect the
output. The parameters you want to pass to Ghostscript must be listed in the
“GS_Opts” field in the ID file. The following table lists some of the more
common parameters.
42 - PShop User’s Guide
Appendix B:Device Driver Configuration
Ghostscript Parameters
Parameter
Explanation
General Controls
-r<res>
-r<xres>x<yres>
Device resolution in dots per inch.
@<file>
A Ghostscript command line file to use.
HP DeskJet 300, 400, 500, 600, 800
Series Specific Controls
(All Deskjets are supported except the “PPA” printers such
as the 720 and 820 series and the DeskJet 1000.)
-dBitsPerPixel=<bits>
1, 3, 8, 16, 24, or 32. The output color depth. Monochrome
modes are 1 and 8-bit Color modes are 3, 16, 24, and 32-bit.
Usually, higher number of bits result in better output. 32-bit
mode is intended for dual cartridge (CMYK) models only.
-dBlackCorrect=<number>
0 - 9. Color correction to give better blacks for single color
cartridge models. Default value is 4. Higher values increase
correction applied.
-dShingling=<number>
0, 1, or 2. Interlaced, multi-pass printing. A value of 2 provides the best results, but is slowest.
-dDepletion=<number>
0, 1, or 2. Dot removal. Use 0 for transparencies, and 2 for
graphics on paper.
HP PaintJet and DeskJet 1200/1600
Specific Controls
-dPrintQuality=<number>
-1, 0, or 1. Use -1 for fast mode, which uses the least ink, 0
for normal printing, and 1 for presentation quality.
Epson Stylus Color Series Specific
Controls
-dUnidirectional
Unidirectional printing, recommended for transparencies.
-dMicroweave
Enable printer microweaving.
-dnoWeave
Disable any weaving.
PShop User’s Guide - 43
Appendix B:Device Driver Configuration
Parameter
Explanation
-dSoftweave
Enable software weaving.
-sDithering=<name>
Dithering algorithm. Use this option with “gsmono” or
“fsmono” to force monochrome output. Acceptable values:
“gscmyk”: fast color output, CMYK
“gsmono”: fast mono output
“gsrgb”: fast color output, RGB
“fsmono”: Floyd-Steinberg (FS) mono output
“fsrgb”: FS color output, RGB
“fscmyk”: FS color output, CMYK
“hscmyk”: fast FS color output, CMYK
44 - PShop User’s Guide
Appendix B:Device Driver Configuration
Using PostScript Printer Description (PPD) Files with PShop
A PPD file contains sections of PostScript code that control particular features of
a PostScript printer. Each section is identified by a keyword and often options
associated with the keyword. For example, there may be the keyword
“*ManualFeed” that corresponds to the printer's manual feed feature. It may have
the options “True” and “False” to tell the printer whether or not to use manual
feed. There are usually other keywords that correspond to a printer’s offered
variations of resolution, page size, color settings, etc.
PShop parses PPD files and identifies their keywords, options, and associated
PostScript codes. You only need to tell PShop which options to activate, and
PShop will translate those options into codes that it sends to the printer.
Configuring an ID File for Using a PPD File
Some of PShop's ID files are pre-configured to use particular PPD files. If,
however, you are using an ID file that does not have a PPD file entry and you need
to access special features of the printer, you need to add your own PPD file entry.
PPD files are normally available for all PostScript printers, and they are also used
for certain options such as color controls for Ghostscript-driven printers like the
Stylus color (in stcolor.id) for color correction.
First, you need to obtain a PPD file for your printer from the printer
manufacturer. Copy it to a directory where users can access it easily, such as
$VV_HOME/id. The file must be readable by all users. Be sure to have already
set up your print queue from within ps_install, and look for the ID file
corresponding to your printer in the $VV_HOME/config directory.
For example, if you have installed the “Generic PostScript Printer” driver, your
ID file would be $VV_HOME/config/postscript.id. The contents will look like
the following if you have specified a PPD file:
#
Printer
configuration
file
for
Vividata's
Vividrivers
# @(#)postscript.id 1.1 02/27/97
Name:
Generic PostScript Printer
Scanner_port:
none
Fax_port:
none
Printer_port:
parallel
Print_queue:
ps
Device_driver: ps
DPI:
300
PShop User’s Guide - 45
Appendix B:Device Driver Configuration
Paper_width:
Paper_height:
Left_margin:
Right_margin:
Top_margin:
Bottom_margin:
Ppd_file:
10200
13200
300
300
300
300
$VV_HOME/id/ppdfile.ppd
The “Ppd_file” field contains information about the full path (or a path relative
to $VV_HOME) of your PPD file.
Specifying PPD File Options
To tell PShop what features to activate in the printer, you need to specify PPD
keyword/option pairs on the command line. The correct command line syntax is:
-ps=“keyword[=option][:keyword2[=option2]]...”
For example, using lp on SVR4 systems you might type:
lp -d <printer> -o “-ps=\*PageSize=A4:\*ManualFeed=True”
<file>
to tell the printer to use the “A4” option for paper size, and to use manual feed.
All keywords begin with *, and need to be escaped by a backslash (\) in most
shells.
Note: To use the “ps” option within an ID file you do not need to use the ’-’ before
the “ps” and do not need to escape the ’*’ character. Used in an ID file the
example above would read:
VVP_Opts:
46 - PShop User’s Guide
ps=*PageSize=A4:*ManualFeed=True
Appendix C:Accessing Network Printers
Appendix C: Accessing Network Printers
PShop User’s Guide - 47
Appendix C:Accessing Network Printers
Background
In addition to printing to local printers on the parallel port or SCSI bus, PShop
can also be used for network printing. The network printers supported can be any
of the normally supported printers made accessible over the network via
JetDirect with HP's JetAdmin software or via TCP/IP (implicitly with RFC 1179
capability). The idea of network printing put simply is that the bytes of data for
the printer are transported over the network instead of through the parallel port.
This document describes the background of network printing and the architecture
of PShop that facilitates it. Starting in version 3.40, PShop’s ps_install has
automated the installation of a print queue for a networked printer. Please refer
to “Configuring Your Printer” on page xvii for information about performing the
installation.
JetDirect Printers:
Hewlett Packard manufactures some of its printers with network interfaces built
in. Some of their other printers have a slot reserved for a JetDirect interface card
to be added. In addition, HP manufactures external interface units called “print
servers” that provide one or more parallel port interfaces providing printers with
network access via Ethernet. Most of the older models of these interfaces support
only a proprietary JetDirect protocol defined by Hewlett Packard Many newer
devices claim TCP/IP support but are variously reported to not operate robustly
in intense-use environments. For these uses, JetDirect was found to be fully
robust. For UNIX users, HP provides a software package called JetAdmin to
support printers with these interfaces. See:
http://www.hp.com/jet_admin/dsunix.html
Vividata provides a port of HP’s JetAdmin for Solaris x86 (Intel). Please see the
rest of this chapter and the support area of Vividata’s website for further
information.
TCP/IP Printers:
Any printer with a TCP/IP capability as per RFC-1179 and a PShop driver are
currently supported. Such printers emulate Berkeley-style print queues on
remote hosts to take advantage of UNIX’s built in network printing features. The
Lexmark Optra models are a good example of printers that implement this
protocol. (When printing to a Lexmark Optra with PShop, the protocol is still
PCL - via a LaserJet class driver.). For RFC-1179 standards see:
48 - PShop User’s Guide
Appendix C:Accessing Network Printers
http://www.cis.ohio-state.edu/htbin/rfc/rfc1179.html
Printers with the built-in TCP/IP protocol capability vary somewhat in the name
each uses for its logical printer - each is named as if it were a print queue on the
“local host”. Please consult the support area of Vividata’s website for details.
Whatever kind of network printer is to be supported, the idea is the same: the
bytes of data that would normally be sent to the parallel port for the printer are
instead spooled into another UNIX print queue. These print queues are in turn
serviced by either JetAdmin for JetDirect devices or by UNIX's lp for the TCP/IP
printers.
Print Servers:
A number of print servers are supported. Makes and representative models that
we and customers have tested include:
Hewlett Packard (e.g. JetDirect EX Plus, EX Plus3)
Lantronix (EPS2)
These devices do not support TCP/IP printing robustly. They require special
network drivers, available from their respective manufacturers. HP JetDirect
requires JetAdmin, and Lantronix requires RTEL - see the HP and Lantronix
sections below.
Epson Ethernet/EtherTalk interface card #C823572
(for Color Stylus 800 series, 1520, 3000, etc.)
(“remote printer” must be “lpb”)
Extended Systems (ExtendNet DX, ESI-2812)
These devices support a TCP/IP capability as per RFC-1179. Such printers
emulate Berkeley-style print queues on remote host. These devices vary in the
name each uses for its port or ports - each is named as if it were a print queue on
the “local host”. Please consult the support area of Vividata’s website for details.
How PShop is Configured for Network Printing
In order to RIP locally and print remotely, PShop’s ps_install makes the two print
queues on the local system: one for applications to print to and a second for actual
transport of the data (in-protocol) to the network printer. In the case of printers
with built in TCP/IP capability, the “host” is the printer listening on its IP
address.
PShop User’s Guide - 49
Appendix C:Accessing Network Printers
These local queue’s interface script differs from the normal interface scripts in
that instead of running vvprint to print to the printer directly, vvprint is run to
create an output file (in the protocol designated in the .id file). This temporary
file is then submitted automatically with a new lp/lpr command into remote
queue. Remote queues may be those of either JetAdmin (for JetDirect printers),
Lantronix, or the UNIX system (for TCP/IP printers).
Networked Printer Installation Instructions
TCP/IP:
This configuration is completely automated in ps_install, including the creation
of the transport print queue. Please refer to “Configuring Your Printer” on
page xvii for information about performing the installation.
HP JetDirect / JetAdmin:
Set up the JetAdmin software and make sure it tests out OK. Send it a test print
to confirm proper operation. Then use ps_install as documented in “Configuring
Your Printer” on page xvii for information about performing the installation to
print the remote queue you’ve created with JetAdmin.
Lantronix RTEL:
Set up the RTEL software and make sure it tests out OK. Send it a test print to
confirm proper operation. Then use ps_install as documented in “Configuring
Your Printer” on page xvii for information about performing the installation to
print the remote queue you’ve created with RTEL. The URL that is current as of
the time of this writing to download RTEL is:
ftp://ftp.lantronix.com/pub/rtel/v4.2.2/sol_bin.tar
50 - PShop User’s Guide
Appendix D: Troubleshooting
Overview
This chapter offers some troubleshooting hints as well as brief pointers to
maximize operation efficiency.
Getting Help
Read this section of the manual
This section of the manual contains useful information on common problems and
troubleshooting. If you do not find an answer please go to our website’s support
section.
Submitting a Question to the Support Department
At the Vividata Website http://www.vividata.com you will see a link “Contact
Support”. Go to this page to fill out information and submit a support request.
Identifying the Problem
There are several status files and options you can set in PShop to help you
identify the cause of your problem
Step 1: Verify Licensing is Working
Run vvlmstatus to check if the license manager daemon is running:
$VV_HOME/bin/vvlmstatus
This command will display a list of the license keys you have installed and
number of licenses available for each key. It also displays the license manager
process id and process name, if it is running.
PShop User’s Guide - 51
Appendix D:Troubleshooting
If you have never run Vividata software before, the license manager will not be
running. This is normal. The license manager is started automatically the first
time you run PShop.
Try running PShop to start the license manager, then run vvlmstatus again. If the
license manager is still not running or shows errors, verify that a license key is
installed on your system. The file $VV_HOME/config/license.dat
contains your license key(s). It should be an ASCII text file with 644
permissions. If it is not there, then your license key has not been installed. Install
the license key via the distributed shell script, or contact Vividata if you can not
find your key or have questions.
If something still seems wrong with the license manager, set an environment
variable called VV_DEBUG to 1000 and then run PShop. A large amount of
debug information will print to the console, including any error messages
regarding licensing. For PShop, you should run vvprint directly to see the debug
output.
If the license manager seems to be in a bad state, stop it by running the command
$VV_HOME/bin/vvlmstop. Then verify that the license manager process is
no longer running using the ps command. The license manager will start again
the next time you run PShop.
You may also need to restart the license manager. For details, see “License
Manager Commands” on page 65.
Step 2: Verify Connections
Verify that all your cables are connected properly, all equipment is turned on and
working properly. If you have one or more SCSI busses, please check that all of
your connections are plugged in and operating properly.
Step 3: Check Log Files
Vividata software generates various log files that can be useful for determining
the cause of many problems.
vividata.log
When your system reboots, a file called vividata.log is created in the /tmp
directory. This file contains information from the license manager used with our
products. This log is useful in determining if licensing is starting at boot time
correctly.
52 - PShop User’s Guide
Appendix D:Troubleshooting
vvdrv.rc
The vvdrv.rc file located in the /tmp directory will display what SCSI devices our
software found at boot and is able to communicate with. Those devices supported
by our software will be listed as supported. We also include a utility called
vvshowdevs that will rescan your SCSI bus for devices that may not have been
ready or available at boot. This utility is run from the command line and will
display its results for you. Another way of forcing a SCSI rescan is to delete the
vvdrc.rc file from the /tmp directory.
.results file
If lp, lpr, or vvlpr is able to call vvprint successfully, vvprint produces a
<printer>.results file in the /tmp directory, or another directory you specify using
the TMPDIR variable. This file contains information about the last attempted
print job and possible causes for a failed job. If this file does not exist, then PShop
exited abnormally either in the printer interface script or in vvprint. If the file
indicates “Ghostscript command failed.”, it is helpful to look at the gs_errs file.
gs_errs file
If you are printing a PostScript file to a SCSI/GPIB printer, or are printing to a
Ghostscript printer (non-SCSI/GPIB, non-PostScript), there will be a gs_errs file
in /tmp (the TMPDIR directory) if there is a problem with the PostScript
interpreter. The first 2-3 lines are usually the most helpful, and sometimes the last
few lines. The rest of this file contains stack information that is not helpful to
most users.
DEBUG variable and .out file
In the printer interface script, the DEBUG shell variable is defined and set to 0
by default. If you edit the script to set DEBUG’s value to 1, the script will
generate a <printer>.out file in /tmp. This file will contain information about
important environment variables that are set before printing, and the actual
command line used to launch vvprint.
deltmp option
By setting “-deltmp=no” in the vvprint command line (generally by editing the
interface script's VVP_OPTIONS value, by passing it via lp with a “-o” option,
or by passing it via vvlpr directly), temporary files used by PShop will not be
deleted after a print job. This is useful for determining whether correct
PShop User’s Guide - 53
Appendix D:Troubleshooting
parameters are being passed to GhostScript and whether the file sent to the print
queue is sent correctly.
e-mail from lp
On some systems (particularly SVR4-based systems), lp will send e-mail to you
describing the exit code of a PShop print job if the job was not successful. The
exit code is more useful in detecting usage problems than configuration
problems. The table below lists possible exit codes and an explanation of each.
Code
Error
Explanation
1
ERR_HANGUP
The script received a hang-up (HUP) signal.
2
ERR_INTR
The script received an interrupt (INTR) signal.
3
ERR_ARGS
The script was called incorrectly.
4
ERR_VVP_HOME
The script could not find the vvprint executable.
5
ERR_GSHOME
The script could not find the gs executable.
6
ERR_GS_LIB
The script could not find the initialization files for gs.
7
ERR_X_LIB
The script could not find X libraries (Sun platforms only).
8
ERR_VVPRINT
An error occurred while running vvprint. Check the.results
file for details.
System References
A number of system-related files are referenced by PShop. The locations of these
files are system dependent and are described in the following table
Printing
System
Type
Port Names (parallel; scsi)
AIX
AIX
/dev/lp0; /dev/scsi*
$VV_HOME/config
IRIX
SVR4
/dev/plp; /dev/scsi/*
/var/spool/lp/interface
OS/CPU
54 - PShop User’s Guide
Printer Interface Script
Appendix D:Troubleshooting
Printing
System
Type
OS/CPU
Port Names (parallel; scsi)
Printer Interface Script
HP-UX 9.x
SVR4
/dev/plt_parallel;
/dev/scsi/*
/usr/spool/lp/interface
HP-UX 10.x
SVR4
/dev/lp; /dev/scsi/*
/etc/lp/interface
OSF/1
BSD
/dev/lp0; /dev/cam
$VV_HOME/config
Solaris 2.x
(SPARC)
SVR4
/dev/bpp0 or
/dev/ecpp0;
/dev/vvsc*
/etc/lp/interfaces
Solaris 2.x (x86)
SVR4
/dev/lp1; /dev/vvsc*
/etc/lp/interfaces
SunOS 4.x
BSD
/dev/bpp0; /dev/vvsc*
$VV_HOME/config
SCSI Drivers
PShop may have installed Vividata’s SCSI drivers on your system if your system
is not one that provide SCSI drivers in the kernel. The names and installation
requirements of SCSI device ports (i.e. “drivers”) are system- dependent and are
PShop User’s Guide - 55
Appendix D:Troubleshooting
described in the following table:
OS/CPU
SCSI Port Names
Installation Requirement
AIX
/dev/scsi*
vv_install
IRIX
/dev/scsi/*
none
HP-UX 9.x
/dev/scsi/*
none
HP-UX 10.x
/dev/scsi/*
vv_install
OSF/1
/dev/cam
none
Solaris 2.x
/dev/vvsc*
automatic by Installer
SunOS 4.x
/dev/vvsc*
vv_install
Problems and Solutions
This section lists some common problems in configuring and using PShop and
presents possible solutions to them. Before consulting this list, try to narrow
down the problem by referring to the files described in “Identifying the Problem”
above.
Any mention of $VV_HOME refers to the directory where PShop is installed,
which is by default /usr/vividata (or /opt/Vividata on Solaris 2.x platforms).
Symptom:
A job sent to the print queue disappears with no signs of heading to the printer,
and there is no .results file.
Possible causes and solutions:
•
One or more required PShop executables may be missing from your
$VV_HOME/bin directory. The minimum required files are “vvprint” and
“gs”. If these files are missing, reinstall PShop.
•
Permissions may not be set correctly on files that are accessed by lp and
PShop. Check that the “lp” user has read/execute permissions for the
following files:
printer interface script
56 - PShop User’s Guide
Appendix D:Troubleshooting
$VV_HOME
$VV_HOME/bin
$VV_HOME/bin/vvprint
$VV_HOME/bin/gs
$VV_HOME/config
/tmp (the TMPDIR directory) (read/write/execute)
Symptom:
The.results file indicates:
“No write access to specified port or port open fail.”
Possible causes and solutions:
•
The incorrect “Printer_port” value is set in the ID file, or the value is simply
“parallel”. Make sure the correct value is set.
•
The parallel port, lpvi port, or SCSI device ports on your system do not have
adequate read/write permissions.
•
You are using a SPARCprinter but have the port set to /dev/bpp0 or
/dev/ecpp0 instead of /dev/lpvi0.
•
You are using a SPARCprinter and do not have the lpvi driver installed on
your system. For SPARCprinter driver installation instructions.refer to:
http://www.vividata.com/sparcprinter
Symptom:
The .results file indicates:
“Ghostscript command failed.”
and the gs_errs file indicates:
“Error: /ioerror in --.outputpage--”
Possible causes and solutions:
•
The printer is turned off.
•
The printer cable is loose or defective, or there is a bad connection. If you
PShop User’s Guide - 57
Appendix D:Troubleshooting
have the printer connected via a switch box, remove the box and make the
connection directly. If you are using a long parallel or SCSI cable, try a
shorter one.
•
The printer is out of paper.
•
You are printing to a file or printing PostScript to a SCSI printer or network
printer, and “lp” does not have write permission in /tmp (the TMPDIR
directory).
•
The printer cable is plugged into the wrong port at the back of the computer.
You should only connect a parallel printer to a parallel port. Parallel ports are
usually labelled with a pair of forward slashes: “//”. Some workstations (e.g.
SPARCstation 2) do not have built-in parallel ports.
•
You are using a SPARCprinter and have the port set to /dev/bpp0 instead of
/dev/lpvi0.
•
You are using an HP DeskJet 670TV, 720C, 722C, 820C, 1000C, OfficeJet,
Lexmark Jetprinter 2050, any one of a number of unsupportable
multifunction machines, or some other Windows-only printer. These printers
use proprietary (i.e. undocumented/ unsupported) protocols and are therefore
unsupportable.
Symptom:
PShop prints “PShop Demo Version” over the actual image, the.results file
indicates:
“Could not get VVPRINT license.”
or the.results file indicates:
“Ghostscript command failed.”
and the gs_errs file indicates:
“You are not licensed to run Ghostscript.”
Possible causes and solutions:
•
58 - PShop User’s Guide
You do not have a license for PShop installed on your system. If you have
your license key, install it using $VV_HOME/bin/installer. If you do not
have a license key, you can obtain an evaluation key from Vividata's website
at http://www.vividata.com by going through the “Free Download”
procedure (you won’t actually need to download the software if you already
Appendix D:Troubleshooting
have a current version), or you can purchase a non-expiring key by
contacting Vividata.
•
PShop cannot find the license server or license file. Follow the instructions
in Verify Licensing above.
Symptom:
Printer outputs garbage characters.
Possible causes and solutions:
•
You have the wrong printer driver selected in the ID file. Either run ps_install
to create a new print queue using a different driver, or run
“$VV_HOME/bin/gs -help” for a list of available drivers and select a
different driver.
•
In troubleshooting, you may have inadvertently changed the lp system’s idea
of the port for your printer (people often do this mistakenly with
AdminTool’s printer tool). For PShop, the lp system’s idea of the port device
should always /dev/null (or /dev/null0) since PShop finds its port designation
in the printer queue’s ID file.
If the “Device: /dev/null0” in the
/etc/lp/printers/<printer_name>/configuration file (Solaris systems) is
showing something other than /dev/null0, change it back to /dev/null0 or use
ps_install to remove the queue entirely and recreate it. In Berkeley style
printing systems, check the port designation in /etc/printcap for your PShop
print queue. The line defining the port assignment should read:
lp=/dev/null0
•
The printer cable is loose or defective, there is a bad connection, or there is
some other hardware problem. If you have the printer connected via a switch
box, remove the box and make the connection directly. If you are using a long
parallel or SCSI cable, try a shorter one. Check termination. Try another
cable. You may have a bad interface card or it may not be properly seated into
its connector.
Symptom:
The .results file indicates:
“Image read of ... failed, status = 700”
PShop User’s Guide - 59
Appendix D:Troubleshooting
Possible causes and solutions:
•
Your /tmp (the TMPDIR directory) does not have adequate free space. Use
an alternate temporary directory (specified by the TMPDIR variable in the
printer interface script) or increase the amount of space in /tmp.
•
You are printing to a SCSI/GPIB printer and there is an old /tmp/gs_errs file
that is not being deleted. Manually delete this file and retry.
•
You are printing to a SCSI/GPIB printer and there are not enough system
resources to start GhostScript. Free up resources by closing unused programs
or add more RAM or swap space. You may also need to increase the virtual
memory space allowed for vvprint and Ghostscript execution.
Symptom:
A text file containing non-English characters (e.g. extended ISO-8859-1
characters) does not print correctly.
Possible causes and solutions:
•
The default filter, “mpage”, does not support these characters. To change the
filter, edit the printer interface script, and assign the VVP_FILTER variable
to another filter that converts extended character sets correctly. An example
of such a filter on Solaris systems is “postprint”. Alternatively, you can
convert the text file to PostScript yourself and send the PostScript document
to the PShop print queue.
Symptom:
Printouts on a particular printer are too dark, too light, etc.
Possible causes and solutions:
•
60 - PShop User’s Guide
The most generic way to compensate for a printout being too dark or too light
is to add the “brightness” option to the vvprint command line. However, this
transformation applies equal values to all colors and often the resulting
printout appears faded. There are other possible modifications for better
control. For Kodak or CJ-10 SCSI/GPIB printers, try turning on/off the
“cio_lut” option command line option in vvprint. For Kodak SCSI/GPIB
printers, refer to the section on Kodak lookup tables for uploading custom
lookup tables. For some HP and Epson inkjet printers, some color correction
schemes are specified in a “upp” file (this is simply a command line file for
Appendix D:Troubleshooting
Ghostscript) referenced in the printer's ID file (mainly only in the “alternate”
ID files). This file contains some simple transform matrices that you may
alter to improve your image.
•
Your SCSI device ports do not have read and write permissions set for all
users. Refer to the “SCSI Drivers” section to determine the name of the SCSI
drivers on you system, and check the permissions on those files. On some
systems, the files are symbolic links; make sure the files they link to also
have sufficient read and write permissions.
•
You do not have SCSI ports and/or a compatible SCSI driver installed on
your system. Refer to the “SCSI Drivers” section to determine the correct
installation procedure for your platform. On OSF/1, HP-UX 9.x, and IRIX,
the SCSI ports should already exist on your system, so no additional drivers
are necessary.
•
You do not have read and write permissions set for /tmp or on /tmp/vvdrv.rc.
Make sure the permissions on these files are sufficient.
•
You have an old vvdrv.rc that could not be deleted. Manually delete
/tmp/vvdrv.rc and restart ScanShop.
•
You are running an HP-UX 10.10 or 10.20 system. With certain system
configurations, PShop is unable to communicate with the SCSI bus. Details
on particular system configurations that fail are not yet qualified.
•
You have a third party SCSI driver on your system that is incompatible with
our software. You may need to remove the other SCSI drivers.
•
Your scanner (or SCSI printer) has a conflicting SCSI ID with another device
on your system.
•
Your SCSI chain is not properly terminated. Check to make sure that the ends
of the SCSI chain are terminated properly, and the internal termination is set
correctly.
•
Your SCSI chain is too long. Try to keep the chain as short as possible, and
make sure it does not exceed 5 meters.
•
If you are running Solaris 2.x, you may not have reconfigured the /devices
directory with a “reboot -- -r”, “boot -r” from the monitor prompt (“ok”) on
SPARC platforms, or “b -r” from the secondary OS loader on x86 platforms.
•
Your printer is powered off, not properly connected, or “stuck” in a bad state.
Make sure all connections are okay, and power cycle your printer. You need
to restart PShop after this.
PShop User’s Guide - 61
Appendix D:Troubleshooting
•
You have more than 4 SCSI buses on your system and your scanner is
connected to a bus other than 0, 1, 2, or 3. ScanShop only supports up to 4
SCSI buses. Connect the scanner to bus 0, 1, 2, or 3, or reassign the bus
number.
Symptom:
PShop gives the error message:
“Error opening printer. Device model is unlicensed.”
or
“Warning: Not licensed for this printer.”
Possible causes and solutions:
•
You do not have the correct licensing level to use a particular printer model.
You need to obtain a license key that contains the correct licensing level for
your printer.
How to Get a License
Installing the Keys
To enter your license keys, use the Installer. Please see “Installing the License
Keys” on page xv. Then, try generating the Vividata PShop test print and
restarting PShop.
You must have a valid license before you can use PShop. If you haven’t yet
received a license key from us, you need to get one. You can get one by
contacting Vividata Support or Vividata Sales through our website
http://www.vividata.com, or by telephone or fax (see contact information at the
front of this manual). If you are certain that you have a valid license, verify that
your licensing is set up correctly (See Appendix E, “License Manager
Commands”, for license manager information.)
Installing the Keys
PShop license keys are normally distributed within a shell script installer, named
“vvkey.sh” or something similar. To install a key, run the script on the
command-line as root, “sh vvkey.sh”, and the license key will be placed in
$VV_HOME/config/vvlicense.dat.
62 - PShop User’s Guide
Appendix D:Troubleshooting
Patches
It is suggested that the operating system be maintained by installing the most
current patches available from the platform vendor, as certain (possibly known)
bugs can affect the operation of PShop. Check Vividata’s release notes and the
support areas of our website for mention of any specific known problems which
can be fixed with certain patches.
PShop User’s Guide - 63
Appendix D:Troubleshooting
64 - PShop User’s Guide
Appendix E: License
Manager Commands
Overview
Publicly distributed versions of Vividata products use a proprietary license
manager. This section will describe the usage of the license manager as it pertains
to Vividata products, including determining the lmhostid necessary for license
keys to be issued, diagnosing the license keys and license server, and additional
configuration information.
License Manager Utilities
You will find the various license manager utilities discussed below in the
$VV_HOME/bin directory after you have installed a Vividata product containing
the license manager. This set of utilities currently includes lmutil and six links to
this file: lmdiag, lmdown, lmhostid, lmremove, lmreread, and lmstat. The license
daemons, found in the same directory, are lmgrd and vv_d2.
The License Daemon
A license daemon runs in the background in order for the license manager to
operate properly. The daemon is started automatically by the Vividata software
and the process is named either “vvlicense” or has the same name as the software
binary, depending on the system. The user never starts the license manager or
daemon by hand. If for some reason the license daemon needs to be stopped, the
“vvlmstop” utility (described below) should be used to stop the program
gracefully.
License File Format
The license file is plain text and contains a long encrypted string that encodes the
license(s). Usually a short text string is concatentated to the right of the license
string, along with the serial number(s). More than one license for the same
PShop User’s Guide - 65
Appendix E:License Manager Commands
product may be stored in one license key. License keys for more than one
Vividata product may be included on separate lines in the same license file.
Obtaining your lmhostid
If you have a Vividata product installed on your system, you can simply run
“vvlmhostid” to determine the lmhostid on your system. If you need the lmhostid
prior to installing the software, or if the “vvlmhostid” utility does not return a
valid lmhostid, please see the following table to determine your lmhostid
manually.
Table 1: lmhostid derivations
Platform
Source
User command
Example
OSF/1
Digital Unix
ethernet
address
netstat -i
080020005532
HP-UX
32-bit hostid
uname -i and convert
to hex or prepend with
#
778DA450 or
#2005771344
Linux
ethernet
address
/sbin/ifconfig eth0 and
remove colons from
HWaddr
00400516E525
AIX
32-bit hostid
uname -m then remove
last 2 digits, and use
remaining last 8 digits
02765131
IRIX
32-bit hostid
/etc/sysinfo -s and
convert to hex, or
prepend with #
69064C3C or
#1762020412
SunOS and
Solaris
32-bit hostif
hostid
170a3472
66 - PShop User’s Guide
Appendix E:License Manager Commands
Table 1: lmhostid derivations
Platform
Windows NT
Source
ethernet
address
User command
Example
Programs: Administrative Tools (common):
Windows NT Diagnostics: Network:
Transports:Address
Programs:
Administrative
Tools (common):
Windows NT
Diagnostics
PShop User’s Guide - 67
Appendix E:License Manager Commands
Command Reference
vvlmstat
NAME
vvlmstat – Displays the current status of the license manager.
SYNOPSIS
vvlmstatus
DESCRIPTION
vvlmstatus checks the current state of the license manager and reports how many
keys are available for each product for which you have a license key.
68 - PShop User’s Guide
Appendix E:License Manager Commands
vvlmstop
NAME
vvlmstop – Shuts down the license daemon
SYNOPSIS
vvlmstop
DESCRIPTION
vvlmstop shuts down the license manager process if it is running.
PShop User’s Guide - 69
Appendix E:License Manager Commands
vvlmhostid
NAME
vvlmhostid – Prints the lmhostid of the system
SYNOPSIS
vvlmhostid
DESCRIPTION
vvlmhostid prints the machine id (lmhostid) of the system, usually used for
generating license keys.
70 - PShop User’s Guide
Appendix E:License Manager Commands
vvlmreread
NAME
vvlmreread – Forces the license daemon to reread the license file
SYNOPSIS
vvlmreread
DESCRIPTION
vvlmreread causes the vendor daemon to reread the license file and update itself
on any new feature licensing information.
PShop User’s Guide - 71
Appendix E:License Manager Commands
Key Read program
NAME
<product>KeyRead – Utility that decodes the features from a license key; the
name varies with the product.
SYNOPSIS
<product>KeyRead -k [key string]
DESCRIPTION
The key read program permits you to view what options and licenses are encoded within
the license key string. Pass the key string listed in your license file to the key read
program to verify the features, number of licenses, and product enabled by that key
string.
72 - PShop User’s Guide
Appendix F: Software Look Up Tables
Overview
New in PShop version 5.1 is the facility for software look up tables for color
management. This chapter provides a brief introduction to creating and using
software Look Up Tables (LUTs).
Included with this release are the following LUTs:
•
RGB to RGB 1 to 1 Linear LUT
•
RGB to RGB Reverse LUT
•
Canon CJ10 CIO LUT
•
Kodak 8600 Series CIO LUT
•
Kodak XL7700 Series CIO LUT
Introduction
This is a new vvprint command line option for a user supplied lookup table that
is applied by the vvprint software.
The file specified by <filespec> must be a Vividata version 1 format file.
This version defines a LUT file as containing three sets of LUTs:
1) RGB to RGB
2) Gray to gray
3) Gray to RGB
The beginning of a lookup table is identified by a line beginning with a comment
indicator, '#', and having one of the three following headings:
# VVLUT version 1: RGB to RGB
# VVLUT version 1: Gray to Gray
# VVLUT version 1: Gray to RGB
PShop User’s Guide - 73
Appendix F:Software Look Up Tables
The heading is case insensitive and is followed by lines with a single data value
per line. The lookup tables can appear in any order but all three must be present
and must have the correct number of entries and valid data.
RGB to RGB:
This is a 768 entry table used to map the value of a 24-bit RGB pixel into another
RGB pixel. Each line contains a decimal value in the range of 0 through 255. The
first 256 entries map the red component of the source pixel into the destination
pixel's red component, the next 256 entries map the green component of the
source pixel into the destination pixel's green component, and the last 256 entries
map the blue component of the source pixel into the destination pixel's blue
component.
Gray to Gray:
This is a 256 entry table used to map the value of an 8-bit gray pixel into another
8-bit gray pixel. Each line contains a decimal value in the range of 0 through 255
into a destination value of 0 through 255.
Gray to RGB:
This is a 768 entry table used to map the value of an 8-bit gray pixel into an RGB
pixel. Each line contains a decimal value in the range of 0 through 255. The first
256 entries map gray values 0 through 255, into red, the next 256 entries map
gray value into its green component, and the last 256 entries map the gray value
into its blue component.
Comment lines:
Lines that begin with '#' are comment lines and are ignored, except for the version
line at the head of the file.
Formatting errors:
If the table does not contain the required number of entries or the entry is out of
range an error is reported and the image will not print.
Miscellaneous:
Note that some printers have the ability for hardware calibration. Their internal
state can be calibrated by specialized procedures.
74 - PShop User’s Guide
Appendix F:Software Look Up Tables
If the swlut command line option is not specified, the input data are passed to the
printer unmodified. The printer will then print the data based upon its internal
settings. If the printer is a Kodak printer and the command line option ptf_file is
specified a Kodak .TBL (“Tablemaker”) file will be downloaded to the printer.
The command line options swlut and ptf_file are not mutually exclusive for the
Kodak printers. Care must be taken when applying these options to get the
desired results.
Getting New LUTs
As more LUTs are created they will be made available for download at Vividata’s
SupportShop site. We will be creating many LUTs and hope to meet whatever
needs you have. As an example, we are making LUTs for the Kodak LED 20 I/II
printers “Pegasus” as this manual is going to press. If you find that you need a
LUT for a specific function or Gamma value, please contact Vividata Technical
Support.
PShop User’s Guide - 75
Appendix F:Software Look Up Tables
76 - PShop User’s Guide
Appendix G: Glossary
Glossary term
Term definition
ADF
Automatic document feeder
ASCII
An acronym for American Standard Code for Information Interchange. A code in which the numbers from 0
to 127 stand for text characters. ASCII code is used for
representing text inside a computer and for transmitting
text between computers or between a computer and a
peripheral device.
bit-mapped image
A collection of bits (dots) in memory that represent the
scanned image. The display on the screen is a visible
bit-mapped image.
conversion
filter
A program that translates one file format into another.
For example, the ‘mpage’ conversion filter can translate
an ASCII file into a PostScript file.
device driver
A program that manages the transfer of information
between the computer and a peripheral device such as a
scanner.
dithering
A method of representing an image using fewer colors
than the image actually has.
dpi
An abbreviation for dots per inch. This is the number of
dots per linear inch that a printer can print or a scanner
can produce. See also resolution.
driver
See device driver
PShop User’s Guide - 77
Appendix G:Glossary
Glossary term
Term definition
monospaced font
Any font in which all characters have the same width.
For example, in Courier New (a monospaced font), the
letter “M” is the same width as the letter “l”. Thus,
“MMMMM” is the same width as “lllll”.
peripheral
At or outside the boundaries of the computer itself,
either physically (as a peripheral device) or logically
(as a peripheral card).
pixel
Pixel is short for picture element. A point (dot) on the
graphics screen. It is the smallest definable unit of a
digital image. Each pixel represents a single point in
the image. The number of pixels per unit distance
(dot-per-inch or DPI for instance) within a digital
image is referred to as the resolution of the image. A
pixel can be binary, gray, or color, or can be an index
into a palette. Binary pixels require only one binary
digit or bit of computer memory to store; gray, color
and indexed pixels use more bits with 4, 8, and 24
being common values for the number of bits used.
point
A typographic unit of measurement equal to 1/72 inch,
measured vertically. Points are used to describe font
size.
proportional font
Any font in which characters differ in width. For example, in the proportional font used here, the letter “M” is
wider than the letter “l”. Thus, “MMMMM” is wider
than “lllll.”
resolution
The fineness with which a scanner, printer, or other
device produces information. It is expressed in dots per
inch (dpi). A higher dpi produces a sharper image.
swap file
An area of the hard disk that is used for temporary data
storage when RAM is low or used up. This is also
known as virtual memory. A swap file lets you run
more programs than you could with actual memory, but
it is slower than using regular memory.
78 - PShop User’s Guide
Appendix G:Glossary
Glossary term
Term definition
text file
A file containing information in text form; its contents
are interpreted as characters encoded using the ASCII
(or comparable) format.
TIFF
An abbreviation for tagged image file format. This is a
standard graphic file format for grayscale and high-resolution bit-mapped images.
PShop User’s Guide - 79
Appendix G:Glossary
80 - PShop User’s Guide
Index
bilinear 27
bitmap image 24
bit-mapped image 77
brightness option 60
BSD style print 3
bspline 27
Symbols
"Install Printer" xviii
.results file 13, 53
/dev/bpp0 xviii, 55, 57
/dev/cam 55
/dev/ecpp0 xviii, 55, 57
/dev/lp 55
/dev/lp0 54, 55
/dev/lp1 xviii, 55
/dev/lpvi0 57
/dev/null 59
/dev/plp 54
/dev/plt_parallel 55
/dev/scsi 54
/dev/vvsc 55
/etc/lp/interface 55
/etc/lp/interfaces 55
/usr/spool/lp/interface 55
/var/spool/lp/interface 54
“-ifs” parameter 13
C
Canon CJ-10
specific controls 31
troubleshooting 60
color management 73
command-line interface options
postshop gui 16
vvlpr 22
vvprint 22
Contacting Customer Support xi
conversion 77
conversion filter 77
crop, default behavior for images
A
D
ADF. see Automatic document feeder
AIX 11, 54
ASCII 77
file recognition 24
mpage 24
Printing 24
ASCII text 5
B
banner page feature
bell 27
bicubic 27
13
77
Default Printer xx
Default Printing Behavior
deltmp option 53
device driver 38, 41, 77
dithering 77
dpi 77
driver 77
13
E
11
e-mail from lp 54
Environment Variables
in general xxiv
PShop User’s Guide - 81
EPSI 5
Epson 60
Epson Ethernet/EtherTalk interface card
Ethernet 48
exit codes 54
Extended Systems 49
troubleshooting
49
I
F
file
swap 78
text 79
font
monospaced 78
proportional 78
FujiFilm Pictrography PG-3000 and PG-4000
FujiFilm Pictrography PG-3000 controls 32
FujiFilm Pictrography PG-4000 controls 33
G
garbage characters 59
Generic PostScript Printer 45
Getting Help 51
GhostScript 6, 38, 42, 60
Ghostscript
command failed 57
printer 53
Ghostscript options
GS_Opts 42
GIF 5, 22
GNU 4
GPIB 6
gs_errs file 53
GS_Opts. See Ghostscript options
H
help option
vvlpr 22
vvprint 22
hermite 27
Hewlett Packard DeskJet
HP printers 60
HP-UX 11, 55
82 - PShop User’s Guide
61
20
ID file 38, 57
Field definitions 41
port designation 59
sample 38
tag 39
vvlpr and vvprint command line option to
invoke tag(s) 39
IFS Files 23
image file formats
ASCII plain text 3
EPSF 3
EPSI 3
GIF 3
JPEG 3
PDF 3
PostScript 3
Sun Raster 3
TIFF 3
X11 bitmaps 3
image output
size x
Installation xv
Kernel SCSI Driver xxiii
See Chapter 2 xiii
IRIX 11, 54
J
JetAdmin 48, 50
JetDirect 48, 50
JetDirect EX Plus 49
JetDirect interface cards
JPEG 5, 22
48
K
38
Kernel SCSI Driver xxiii
Kodak 60
Kodak LED 20 75
Kodak LED-20 printer 20
Kodak Pegasus 75
Kodak printers
command line options, PTF files 42
Tablemaker 42
Kodak XL-7700/XLT-7720 specific controls
Kodak XLS-8600/8650 controls 32
P
mitchell 27
mpage 60
paper size 38
parallel interface printer xviii
parallel ports 6
Parameter Table 26
patches 63
PBM 5
PDF 5
Pegasus 20
peripheral 78
PG-3000. See FujiFilm Pictrography PG-3000
PG-4000. See FujiFilm Pictrography PG-4000
pixel 78
PNG 5
point 78
PostScript 1, 5, 22, 45
postshop GUI 16
PPD 38, 45
file keywords 45
ID files 45
keyword/option pairs 46
manual feed 45
Print queue 10
Berkeley style 48
job disappears 56
monitoring 3
Print Servers 49
print servers 48
printer interface script
DEBUG 53
printer port 38
printtool 3
ps_install xvi, xvii, 4, 49
ptf_file 75
N
R
L
lancosz3 27
Lantronix 49, 50
Lexmark Optra 48
licensing
level 62
problems 62
troubleshooting 58
Look up Tables - LUTS 73
lp 3, 6
-o 24
lpd
daemon 3
queue 3
lpr 3, 10
lpsched 4
lpstat 13
lpvi xviii, 57
LUTS
Gray to Gray 74
Gray to RGB 74
RGB to RGB 74
M
nearest neighbor
network 6
printing 48
27
O
OSF/1
55
83 - PShop User’s Guide
31
RAM space x
remote system print queues xx
remote TCP/IP printers xx
remote workstation 12
Remove Printer (button in ps_install)
Removing OCR Shop xxiii
resampling 27
resolution 38, 78
xxii
RFC 1179. See network printing
RGB file format for SGI. See SGI RGB
RIP 1, 4
RISC 1
RTEL 50
S
scaling 27
ScanSoft iii
SCSI 6, 57
conflicting ID 61
device ports 55
termination 61
SCSI/GPIB 60
SCSI/GPIB printer 60
SGI RGB 5
software look up tables
look up tables 73
Solaris 2.x 55
SPARC Printer xviii
SPARCprinter 57
doesn’t print 57
SPARCstation 2 58
stcolor.id 45
Sun Raster 5
SunOS 4.x 55
swlut 75
System 5 4, 11
system requirements ix
T
type conventions
ix
U
Ultra 5, 10, 30 or 60
xviii
V
vividata.log 52
vvdrv.rc 53
vvlpr 3, 10, 22
VVP_FILTER 24
VVP_OPTIONS 10, 11
vvprint 4, 10, 22, 24
Description 22
Options 22
vvprint/vvlpr options from lp
vvshowdevs 53
24
X
X11 bitmap 5
XL-7700/XLT-7720. See Kodak XL-7700/XLT-7720
XLS-8600/8650. See Kodak XLS-8600/8650
controls
XWD 5
Y
Year-2000
5
Tag. See ID File
tags
tags 20
TCP/IP 48
tech support.See Contacting customer support
Test Printer (button in ps_install) xxii
TIFF 5, 22, 79
TMPDIR variable 53, 57, 58, 60
triangle 27
troubleshooting hints 51
troubleshooting SCSI 55
two or more SCSI printers 23
PShop User’s Guide - 84