1
Milwaukee Tool
Heavy Duty Sanders/Grinders
Model Nos.
(Sanders): 6065, 6066, 6095, 6096
(Grinders): 6067, 6068, 6069, 6070, 6098
Safety Instructions
GENERAL SAFETY RULES
WARNING!
READ AND UNDERSTAND ALL INSTRUCTIONS
Failure to follow all instructions listed below may result in
electric shock, fire and/or personal injury.
WORK AREA
1. Keep your work area clean and well lit. Cluttered benches and dark areas invite accidents.
2. Do not operate power tools in explosive atmospheres, such as in the presence of flammable liquids, gases, or dust. Power tools create sparks which may ignite the dust or fumes.
3. Keep bystanders, children, and visitors away while operating a power tool. Distractions
can cause you to lose control. Protect others in the work area from debris such as chips and
sparks. Provide barriers or shields as needed.
4. Grounded tools must be plugged into an outlet properly installed and grounded in
ELECTRICAL SAFETY
accordance with all codes and ordinances. Never remove the grounding prong or modify
the plug in any way. Do not use any adapter plugs. Check with a qualified electrician if
you are in doubt as to whether the outlet is properly grounded. If the tools should electrically malfunction or break down, grounding provides a low resistance path to carry electricity
away from the user.
5. Double Insulated tools are equipped with a polarized plug (one blade is wider than the
other). This plug will fit in a polarized outlet only one way. If the plug does not fit fully in
the outlet, reverse the plug. If it still does not fit, contact a qualified electrician to install a
polarized outlet. Do not change the plug in any way. Double insulation
eliminates the
need for the three wire grounded power cord and grounded power supply system.
6. Avoid body contact with grounded surfaces such as pipes, radiators, ranges and refrigRenTrain INC
Page 1
RenTrain INC
erators. There is an increased risk of electric shock if your body is grounded.
7. Don't expose power tools to rain or wet conditions. Water entering a power tool will
increase the risk of electric shock.
8. Do not abuse the cord. Never use the cord to carry the tools or pull the plug from an
outlet. Keep cord away from heat, oil, sharp edges or moving parts. Replace damaged
cords immediately. Damaged cords increase the risk of electric shock.
9. When operating a power tool outside, use an outdoor extension cord marked "W-A" or
"W". These cords are rated for outdoor use and reduce the risk of electric shock.
10. Stay alert, watch what you are doing, and use common sense when operating a power
PERSONAL SAFETY
tool. Do not use tool while tired or under the influence of drugs, alcohol, or medication. A
moment of inattention while operating power tools may result in serious personal injury.
11. Dress properly. Do not wear loose clothing or jewelry. Contain long hair. Keep your
hair, clothing, and gloves away from moving parts. Loose clothes, jewelry, or long hair can
be caught in moving parts.
12. Avoid accidental starting. Be sure switch is off before plugging in. Carrying tools with
your finger on the switch or plugging in tools with the switch on invites accidents.
13. Remove adjusting keys or wrenches before turning the tool on. A wrench or a key that
is left attached to a rotating part of the tool may result in personal injury.
14. Do not overreach. Keep proper footing and balance at all times. Proper footing and balance enables better control of the tool in unexpected situations.
15. Use safety equipment. Always wear eye protection. Dust mask, nonskid safety shoes,
hard hat, or hearing protection must be used for appropriate conditions.
16. Use clamps or other practical way to secure and support the workpiece to a stable
TOOL USE AND CARE
platform. Holding the work by hand or against your body is unstable and may lead to loss of
control.
17. Do not force tool. Use the correct tool for your application. The correct tool will do the
job better and safer at the rate for which it is designed.
18. Do not use tool if switch does not turn it on or off. Any tool that cannot be controlled
RenTrain INC
Page 2
RenTrain INC
with the switch is dangerous and must be repaired.
19. Disconnect the plug from the power source before making any adjustments, changing
accessories, or storing the tool. Such preventive safety measures reduce the risk of starting the
tool accidentally.
20. Store idle tools out of reach of children and other untrained persons. Tools are dangerous in the hands of untrained users.
21. Maintain tools with care. Keep cutting tools sharp and clean. Properly maintained tools
with sharp cutting edge are less likely to bind and are easier to control. Do not use a damaged
tool. Tag damaged tools "Do not use" until repaired.
22. Check for misalignment or binding of moving parts, breakage of parts, and any other
condition that may affect the tool's operation. If damaged, have the tool serviced before
using. Many accidents are caused by poorly maintained tools.
23. Use only accessories that are recommended by the manufacturer for your model.
Accessories that may be suitable for one tool, may become hazardous when used on another
tool.
24. Tool service must be performed only by qualified repair personnel. Service or mainteSERVICE
nance performed by unqualified personnel could result in a risk of injury.
25. When servicing a tool, use only identical replacement parts. Follow instructions in the
Maintenance section of this manual. Use of unauthorized parts or failure to follow
Maintenance Instructions may create a risk of electric shock or injury.
SPECIFIC SAFETY RULES
1. Hold tool by insulated gripping surfaces when performing an operation where the cutting tool may contact hidden wiring or its own cord. Contact with a "live" wire will make
exposed metal parts of tool "live" and shock the operator.
2. Keep hands away from all cutting edges and moving parts.
3. Maintain labels and nameplates. These carry important information. If unreadable or missing, contact a MILWAUKEE Service facility for a free replacement.
4. Warning! Some dust created by power sanding, sawing, grinding, drilling and other costruction activities contains chemicals known to cause cancer, birth defects or other reproductive
RenTrain INC
Page 3
RenTrain INC
harm. Some examples of these chemcals are:
w lead from lead-based paint
w crystalline silica from bricks and cement and other masonry products
w aresenic and chromium from chemically-treated lumber.
Your risk from these exposures varies, depending on how often you do this type of work. To
reduce your exposure to these chemcals: Work in a well-ventilated area, and work with
approved safety equipment such as dust masks that are specifically designed to filter out microscopic particles.
Symbology
Double Insulated
No Load RPM
Canadian Standards Association
Amps
Underwriters Laboratories, Inc.
Hz
Hertz
Volts Alternating Current
SPECIFICATIONS
Catalog
Number
Minimum
Accessory
RPM
Rating
6065
5500
5/8” - 11
9”
9”
6”
5”
6066
6500
5/8” - 11
9”
9”
6”
5”
6067
5500
5/8” - 11
9”
9”
6”
5”
6068
6500
5/8” - 11
9”
7”
4”
5”
6069
6500
5/8” - 11
9”
7”
4”
5”
6070
8500
5/8” - 11
N/A
7”
4”
4”
6095
5500
5/8” - 11
9”
9”
6”
5”
6096
6500
5/8” - 11
9”
9”
4”
5”
6098
8500
5/8” - 11
N/A
7”
4”
4”
RenTrain INC
Max.
Spindle Size
Max.
Grinding Max. Wire
Max. Cup
Diameter,
Sanding
Wheel Brush Size** Wheel Size**
Threads
Disc Size**
Size*
Page 4
Grounded
* Grinding wheel limited to guard
size provided with the tool.
** Do not exceed maximum acessory speed.
RenTrain INC
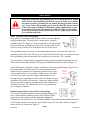
GROUNDING
Improperly connecting the grounding wire can result in the risk of electric
shock. Check with a qualified electrician if you are in doubt as to whether
the outlet is properly grounded. Do not modify the plug provided with the
tool. Never remove the grounding prong from the plug. Do not use the tool
if the cord or plug is damaged. If damaged, return it immediately to your
WARNING! local rental center to have it repaired by a MILWAUKEE service facility
before use. If the plug will not fit the outlet, have a proper outlet installed
by a qualified electrician.
Tools: Tools with Three-Prong Plugs
Tools marked "Grounding Required" have a three wire cord and three
prong grounding plug. The plug must be connected to a properly
grounded outlet (See Figure A). If the tool should electrically malfunction or break down, grounding provides allow resistance path to carry
electricity away from the user, reducing the risk of electric shock.
Fig. A
The grounding prong in the plug is connected through the green wire inside the cord to the
grounding system in the tool. The green wire in the cord must be the only wire connected to the
tool's grounding system and must never be attached to an electrically "live" terminal.
Your tool must be plugged into an appropriate outlet, properly installed and grounded in accordance with all codes and ordinances. The plug and outlet should look like those in Figure A.
Figure B illustrates a temporary adapter available for connecting grounded plugs (Figure A) to
two prong outlets. The green rigid ear or lug extending from the
Cover of
adapter must be connected to a permanent ground such as a propgrounded
outlet box
erly grounded outlet box or receptacle. Simply remove the center
screw from the outlet, insert the adapter and reattach the screw
screw
temporary
through the green grounding ear to the outlet. If in doubt of proper
adapter
grounding, call a qualified electrician. A temporary adapter should
green
only be used until a properly grounded outlet can be installed by a
grounding ear
Fig. B
qualified electrician. The Canadian Electrical Code prohibits the
use of temporary adapters.
Double Insulated Tools: Tools with Two Prong Plugs
Tools marked "Double Insulated" do not require grounding. They
have a special double insulation system which satisfies OSHA
Fig. C Fig. D
Fig. E
requirements and complies with the applicable standards of
Underwriters' Laboratories, Inc., the Canadian Standard Association and the National Electrical
Code. Double Insulated tools may be used in either of the 120 volt outlets shown in Figures C
and D or 240 volt as shown in Figure E.
RenTrain INC
Page 5
RenTrain INC
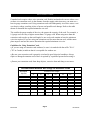
EXTENSION CORDS
Grounded tools require a three wire extension cord. Double insulated tools can use either a two
or three wire extension cord. As the distance from the supply outlet increases, you must use a
heavier gauge extension cord. Using extension cords with inadequately sized wire causes a serious drop in voltage, resulting in loss of power and possible tool damage. Refer to the table
shown to determine the required minimum wire size.
The smaller the gauge number of the wire, the greater the capacity of the cord. For example, a
14 gauge cord can carry a higher current than a 16 gauge cord. When using more than one
extension cord to make up the total length, be sure each cord contains at least the minimum
wire size required. If you are using one extension cord for more than one tool, add the nameplate amperes and use the sum to determine the required minimum wire size.
Guidelines for Using Extension Cords
q If you are using an extension cord outdoors, be sure it is marked with the suffix "W-A"
("W" in Canada) to indicate that it is acceptable for outdoor use.
q Be sure your extension cord is properly wired and in good electrical condition. Always
replace a damaged extension cord or have it repaired by a qualified person before using it.
q Protect your extension cords from sharp objects, excessive heat and damp or wet areas.
Recommended Minimum Wire Gauge for Extension Cords
Extension Cord Length
Nameplate
Amperes
25’
50’
75’
100’
150’
200’
0-5
16
16
16
14
12
12
5.1 - 8
16
16
14
12
10
--
8.1 - 12
14
14
12
10
--
--
12.1 - 15
12
12
10
10
--
--
15.1 - 20
10
10
10
10
--
--
READ AND SAVE ALL INSTRUCTIONS FOR FUTURE USE.
RenTrain INC
Page 6
RenTrain INC
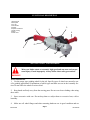
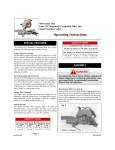
FUNCTIONAL DESCRIPTION
1. Back Handle
2. Nameplate
3. Too rest
4. Side Handle
5. Spindle
6. Spindle Lock Button
7. Motor Housing
8.Trigger
9. Power Cord
3
1
2
4
8
9
7
6
5
SPECIAL SAFETY FOR GRINDERS
Miter saw blades rotate at extremely high speed and can cause serious personal injury if used improperly. Always follow these safety precautions.
WARNING!
Wheel Instructions
1. Use the proper type grinding wheel for the job. Specific types of wheels are meant for specific grinding applications. Explanations of wheel types and their uses are in the Assembly section. Do not allow the wheel to twist or bind.
2. Keep hands and body away from the moving parts. Do not wear loose clothing when using
these tools.
3. Store accessories with care. Do not drop them or subject them to excessive heat, cold or
humidity.
4.
Make sure all wheel flanges and other mounting hardware are in good condition and are
RenTrain INC
Page 7
RenTrain INC
always used properly. Defective or missing parts may damage the wheels and other accessories.
Always use mounting flanges supplied with the tool.
5. Using a damaged wheel is very hazardous. After installing a new wheel, leave the tool
unplugged and rotate the wheel by hand to see if it is uneven, warped or cracked. If so, discard
the wheel and replace it with a new one. Do not use a wheel that has been dropped; impact may
break wheel.
6. Before installing a wheel, always inspect it for cracks. Visually check resinoid and rubber-bonded wheels for cracks.
7.
Before grinding, test the wheel by running the wheel at the no load RPM for one minute.
8. Use only accessories having maximum operating speeds at least as high as the RPM marked
in the warning section of the tool’s nameplate.
9. Do not force the wheel onto the machine or alter the arbor hole. Don’t use a wheel that
fits too loosely on the arbor. If the wheel doesn’t fit the arbor, get one that does.
Machine Instructions
1. Start sanding or grinding only after the motor has reached full speed.
2. Release switch immediately if the wheel stops rotating or if the motor sounds like it is
straining.
3. Keep flammable and fragile objects away from this tool. Do not allow sparks to contact
operator’s hands, face, or feet.
4.
Always use the tool with proper voltage specified on the tool’s nameplate.
5.
Never touch the workpiece until it cools.
6.
Always keep guards in place.
7. Always start grinding gently. Do not bump or bang a wheel into workpiece when you
begin grinding.
RenTrain INC
Page 8
RenTrain INC