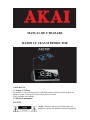
1
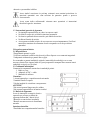
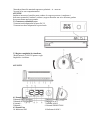
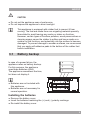
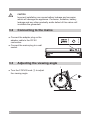
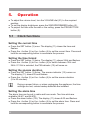
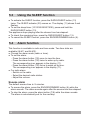
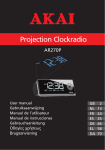
MANUAL DE UTILIZARE RADIO CU CEAS SI PROIECTOR 1.SIGURANTA 1.1 Inainte de Utilizare Acest radio cu ceas reda muzica de la radio.Functionarea ceasului include program de alarma si somn. Ceasul poate fi proiectat pe perete sau tavan. Cititi cu atentie acest manual. 1.2 Etichetele manualului. ATENTIE Atentie ! Pentru a reduce riscul electrocutarii, nu indepartati carcasa, nu umblati in interiorul aparatului, adresati-va personalului calificat. Acest simbol avertizeaza in privinta existentei unor tensiuni periculoase in interiorul aparatului care sunt suficient de puternice pentru a provoca electrocutarea. Acest semn indica utilizatorului existenta unor operatiuni si instructioni deosebite legate de intretinere. 1.3 Instructiuni generale de siguranta Nu impingeti aparatul.Poate sa cada si sa cauzeze raniri. Nu lasati sa curga nici un lichid in interiorul aparatului. Nu lasati sa patrunda obiecte metalice prin fantele de aerisire. Nu blocati fantele de aerisire. Acest aparat are dubla izolatie :de aceea nu este necesar impamantarea.Verificati numai daca tensiunea de alimentare locala corespunde cu cea de pe eticheta aparatului. 2.Pregatirea pentru folosire 2.1 Despachetarea *Despachetati aparatul cu grija *Verificati continutul conform celor de mai jos.Daca lipseste ceva contactati magazinul. * Indepartati etichetaa de pe panoul fata cu grija. Se recomanda sa pastrati ambalajul original si materialele de ambalaj in caz ca sunt necesare ulterior.Este singurul mod de a proteja aparatul la transport.Daca aruncati totusi ambalajul aveti grija sa-l reciclati. 2.2 Continutul ambalajului Urmatoarele componente sunt incluse in ambalajul primit: 1. Radio cu ceas 2. Adaptoul AC/DC + cablu 3. Manualul de utilizare. 3.Instalare * Asezati aparatul pe o suprafata neteda orizontala * Instalati baterile in aparat. * Reglati unghiul de vizualizare corespunzator. ATENTIE! *Nu asezati aparatul langa surse de caldura, *Nu expuneti aparatul direct in lumina soarelui. 3.1 Bateria de Siguranta In caz de intrerupere a energiei electrice aparatul este prevazut cu baterii de siguranta.formata din 3 baterii AAA *Bateriile nu sunt incluse in ambalaj *Baterile nu sunt necesare in functionare normala. Instalarea bateriilor *Deschideti usa compartimentului bateriilor *Introduceti bateriile urmarind respectarea polaritati + si – marcate. *Asezati la loc usa compartimentului. ATENTIE! Instalarea incorecta a bateriilor poate conduce la curgerea acestora si corodarea si defectarea aparatului.Corodarea ,oxidarea ,curgerea bateriilor sau orice defectare gradata de aceasta natura anuleaza garantia. 3.2 Conectarea cablului de retea *Conectati mufa adaptorului la borna DC 9V *Conectati steckerul adaptorului la priza locala. 3.3 Reglarea unghiului de vizualizare. *Rotiti butonul (1) FOCUS pentru a regla Unghiul de vizualizare. 4.FUNCTII 4.1 Panoul Superior 2.Butonul RESET(stergere) 3.Butonul SET(programare) 4. butonul – 5.Butonul + 4.2 Panoul Fata 10. Indicatorul PM 5.Butonul SNOOZE/DIMMER 6.Butonul ALM 1 7. Butonul ALM 2 9. Butonul PROJECTION 16.Indicatorul ALM 2 11.Afisajul 17.Indicatorul banda Radio 12 Indicatorul sonerie 18.Indicatorul Programare Posturi 13. Butonul RADIO/SLEEP 19.Indicatorul SLEEP 14. Butoanele sageti 20. Indicatorul ALM 1 15. Butonul MEMORY 4.3 Panoul Lateral 21. Butonul VOLUME 5. FUNCTIONAREA *Pentru a regla nivelul volumului ,rotiti butonul VOLUME(21) la pozitia dorita *Pentru a fixa stralucirea afisajului ,apasati butonul SNOOZE/DIMMER(6) *Pentru a proiecta ora pe perete sau tavan ,apasati butonul PROJECTION (9) 5.1 Functiile ceasului. Programarea orei curente. Apasati o data butonul SET(3). Afisajul (11) arata ora si palpaie. Apasati butoanele + (5) sau – (4) pentru a programa ora.Apasati si mentineti apasat butonul corespunzator pentrua a accelera procesul. Programarea formatului orei Apasati de doua ori butonul SET .Afisajul (11) va arata 24 H si palpaie. Apasati butonul + (5) sau butonul – (4) pentru a comuta sistemul intre 12H si 24H.Daca selectati 12H ,indicatorul PM(10) se aprinde. Programarea duratei soneriei Apsati de trei ori butonul SET.Indicatorul sonerie (12) se apride.Afisajul (11) arata 05 si palpaie. Apasati butonul +(5) sau – (4) pentru programarea duratei soneriei.(5 la 60 minute) In cazul unei caderi de tensiune ,sau la decuplarea aparatului ,programarea timpului se pierde,daca nu ati instalat bateriile de siguranta. Programarea timpului de alarma. Timpul de alarma poate fi programat in modul radio sau modul tone.Sunt posibile doua alarme (ALM 1 si ALM 2). Apasati butonul alarma (7/8) .Afisajul arata 6:00 si palpaie. Apasati butonul + (5) sau butonul – (4) pentru programarea orei de alarma.Apasati si mentineti apasate butoanele corespunzatoare pentru accelerarea procesului. Apasati butonul alarma (7/8) din nou pentru confirmare.Indicatorul alarma (20/16) se aprinde. 5.2 Functiile radio Pentru a comuta pe radio ,apasati butonul RADIO/SLEEP (13) o data.Afisajul (11) arata ON(pornit) si palpaie. Apasati butoanele sageti (sus sau jos) (14) pentru a alege frecventa sau postul dorit.Apasati si mentineti butoanele corespunzatoare pentru a accelera procesul. Pentru a regla nivelul volumului ,rotiti butonul VOLUME(21) la pozitia dorita. Pentru a opri radio ,apasati butonul RADIO/SLEP (13) din nou. Functia MEMORY poate fi folosita pentru a selecta un post programat. Pentru a imbunatati receptia FM extindeti firul antenei. Folosirea functiei MEMORY(memorie) Functia MEMORY poate fi utilizata pentru a programa maxim 5 posturi radio. Pentru a porni radio,apasati o data butonul RADIO/SLEEP. Apasati butoanele sageti (sus sau jos) (14) pentru a alege postul dorit. Apasati si mentineti apasat butonul MEMORY (15) pana cand afisajul (11) arata MEM si 01 palpaie. Apasati butonul MEMORY (15) din nou ,pentru a memora postul de radio. Repetati ultimii 3 pasi pentru a memora un alt post. Pentru a afisa un post memorat ,apasati butoanele sageti (sus sau jos) (14) pentru a selecta postul dorit.Repetati pasii anteriori pentru a memora posturile radio. Pentru a asculta un post de radio memorat,apasati butonul MEORY(15) pentru a selecta postul in timp ce radio este pornit. 5.3 Folosirea functiei SLEEP Pentru a activa functia SLEEP ,apasati butonul RADIO/SLEEP (13) de doua ori. Indicatorul SLEEP (20 ) se aprinde.Afisajul (11) arata 5 si palpaie. Pentru a programa timerul sleep (somn) (10/15/30/45/60/75/90) ,apasati si mentineti butonul RADIO/SLEEP (13).Aparatul se opreste din redare dupa trecerea timpului programat. Pentru a verifica timpul ramas pana la oprire ,apasati butonul RADIO/SLEEP (13). Pentru a anula functia SLEEP ,apasati butonul SNOOZE/DIMMER (6) 5.4 Functia alarma Aceasta functie este activa pe radio si mod ton. Sunt posibile doua prgramari (ALM 1 si ALM 2). Alegeti modul alarma (radio sau ton) Programati alarma: - Apasati butonul alarma (7/8) o data pentru a vizualiza timpul. - Apasati butonul alarma (7/8) de doua ori pentru trezirea pe radio. Semnul corespunzator apare pe afisaj (11) - Apasati butonul alarma (7/8) de trei ori pentru trezirea pe ton. Semnul corespunzator apare pe afisaj (11). Pentru alarma radio - Comutati pe radio - Alegeti postul dorit - Reglati volumul. Oprirea alarmei Din fabricatie timpul de functionare al alarmei este de 9 minute. Pentru a anula alarma ,apasati butonul SNOOZE/DIMMER (6) in timp ce alarma suna.Alarma va suna din nou dupa ce timpul de anulare a trecut. Pentru a opri alarma ,apsati butonul alarma (7/8) in timp ce alarma suna. Alarma este fixata automat pentru ziua urmatoare. 6.Curatarea si intretinerea Atentie! Inainte de orice curatare sau operatie de intretinere ,opriti si decuplati de la retea aparatul. Curatati exteriorul aparatului cu o carpa moale.Daca aparatul este foarte murdar ,muiati carpa in apa cu solutie neutrala. 7.Probleme ________________________________________________________________________ Problema Fara afisaj Actiunea Conectati aparatul la retea Apasati butonul SET folosind un obiect subtire si programati timpul din nou. Fara sunet Conectati corect aparatul la retea. Reglati volumul Reglati butonul tuning ________________________________________________________________________ 8.Date Tehnice Parametrii Value Tensiune 230 Vac~50Hz Tensiune baterii 9V Putere consumata < 1,5W Putere consumata in 0,6+/- 0,2W Standby Putere max de iesire 1,1+/-0,2W Benzi radio FM ________________________________________________________________________ Frecventa radio FM 87,5 – 108 Mhz 9. Reciclarea ecipamentelor electrice si electronice uzate Acest simbol prezent pe produs sau pe ambalaj semnifica faptul ca produsul respectiv nu trebuie tratat ca un deseu menajer obisnuit .Nu aruncati aparatul la gunoiul menajer la sfarsitul duratei de functionare ,ci duceti-l la un centru de colectare autorizat pentru reciclare .In acest fel veti ajuta la protejarea mediului inconjurator si veti putea impidica eventualele consecinte negative pe care le-ar avea asupra mediului si sanatatii umane. Pentru a afla adresa celui mai apropiat centru de colectare : - Contactati autoritatile locale ; - Accesati pagina de internet :www.mmediu.ro - Solicitati informatii suplimentare de la magazinul de unde ati achizitionat produsul Projection Clockradio AR270P User manual Gebruiksaanwijzing Manuel de l’utilisateur Manual de instrucciones Gebrauchsanleitung Οδηγίες χρήσεως Brugsanvisning GB NL FR ES DE EL DA 2 13 24 35 46 58 70 Table of contents 1. 2. 3. 5. 6. 7. 8. 9. Safety............................................................................ 3 1.1 1.2 1.3 Intended use.....................................................................3 Labels in this manual........................................................3 General safety instructions...............................................3 2.1 2.2 Unpacking.........................................................................4 Package contents.............................................................4 3.1 3.2 3.3 4.1 4.2 4.3 Battery backup..................................................................5 Connecting to the mains...................................................6 Adjusting the viewing angle..............................................6 Top panel..........................................................................7 Front panel........................................................................7 Side panel.........................................................................7 5.1 5.2 5.3 5.4 Clock functions.................................................................8 Radio functions.................................................................9 Using the SLEEP function...............................................10 Alarm function.................................................................10 Preparations for use.................................................... 4 Installation.................................................................... 4 Operation...................................................................... 8 Cleaning and maintenance....................................... 11 Troubleshooting......................................................... 11 Technical data............................................................ 11 Disposal of used electrical and electronic equipment......................................... 12 Copyright notice Design and specifications are subject to change without notice. 2 AR270P 1. Safety 1.1 Intended use The Clock radio plays music from radio. The clock function includes an alarm and sleep program. The time can also be projected onto the wall or the ceiling. Read the manual carefully before first use. 1.2 WARNING A warning means that injury or death is possible if the instructions are not obeyed. CAUTION A caution means that damage to the equipment is possible. ! ! i 1.3 A note gives additional information, e.g. for a procedure. General safety instructions WARNING Do not put force on the appliance. The appliance can fall and can cause serious injury. CAUTION Do not spill any liquid on the appliance. WARNING Do not insert any objects in the ventilation holes. CAUTION Do not block the ventilation holes. This appliance is double insulated; therefore no earth wire is required. Always check that the mains voltage corresponds to the voltage on the rating plate. ! ! ! ! i Labels in this manual 3 2. Preparations for use 2.1 Unpacking ● Unpack the appliance carefully. ● Check the package contents as described below. If any item is missing, please contact your reseller. ● Remove the labels from the front panel carefully if present. i 2.2 We recommend that you retain the original carton and packing materials in case it ever becomes necessary to return your product for service. This is the only way to safely protect the product against damage in transit. If you do dispose of the carton and the packing materials, please remember to recycle with due care to the environment. Package contents The following items are included in the received package: 1 Clock radio 1 AC/DC adapter + cable 1 Operator manual i 3. If any item is missing, please contact your reseller. Installation ● Put the appliance on a horizontal flat surface. ● Install the batteries in the appliance. Read the paragraph "Installing the batteries". ● Connect the appliance to the mains. Read the paragraph "Connecting to the mains". ● Adjust the viewing angle. Read the paragraph "Adjusting the viewing angle". 4 AR270P ! CAUTION ● Do not put the appliance near a heat source. ● Do not expose the appliance to direct sunlight. i 3.1 This appliance is equipped with rubber feet to prevent it from moving. The feet are made from non-migrating material specially formulated to avoid leaving any marks or stains on furniture. However, certain types of furniture polishes, wood preservatives or cleaning sprays cause the rubber to soften and leave marks or a residue on the furniture, and potentially risk the surface to become damaged. To prevent damage to wooden surfaces, we recommend that you apply self-adhesive pads to the bottom of the rubber feet before installation. Battery backup In case of a power failure, the appliance relies on battery backup. For this purpose, the appliance uses three batteries (AAA). The appliance remembers the time, but does not display it. i ● Batteries are not included with this appliance. ● Batteries are not necessary for normal operation. Installing the batteries ● Remove the battery cover. ● Insert the batteries matching the (+) and (-) polarity markings. ● Re-install the battery cover. 5 ! 3.2 CAUTION Incorrect installation can cause battery leakage and corrosion which will damage the appliance. Corrosion, oxidation, battery leakage and any other gradually acidic defect of this nature will invalidate the guarantee. Connecting to the mains ● Connect the adapter plug on the adapter cable to the DC 9V connection. ● Connect the mains plug to a wall socket. 3.3 Adjusting the viewing angle 1 ● Turn the FOCUS knob (1) to adjust the viewing angle. 6 AR270P 4. Functions 2 3 10 20 4.1 4 5 11 19 10 11 12 13 14 15 18 17 8 9 13 16 21 15 14 Top panel 6 7 8 9 SNOOZE/DIMMER button ALM 1 button ALM 2 button PROJECTION button 16 17 18 19 20 ALM 2 indicator Radio band indicator Preset station indicator SLEEP indicator ALM 1 indicator Front panel PM indicator Display Snooze indicator RADIO/SLEEP button Arrow buttons MEMORY button 4.3 7 12 2 RESET button 3 SET button 4 - button 5 + button 4.2 6 Side panel 21 VOLUME dial 7 5. Operation ● To adjust the volume level, turn the VOLUME dial (21) to the required position. ● To set the display brightness, press the SNOOZE/DIMMER button (6). ● To project the time onto the wall or the ceiling, press the PROJECTION button (9). 5.1 Clock functions Setting the current time ● Press the SET button (3) once. The display (11) shows the time and flashes. ● Press the + button (5) or the - button (4) to set the current time. Press and hold the corresponding button to accelerate the process. Setting the time format ● Press the SET button (3) twice. The display (11) shows 24Hr and flashes. ● Press the + button (5) or the - button (4) to switch between 12Hr and 24Hr. If 12Hr is selected, the PM indicator (10) will come on. Setting the snooze duration ● Press the SET button (3) thrice. The snooze indicator (12) comes on. The display (11) shows 05 and flashes. ● Press the + button (5) or the - button (4) to set the snooze duration (5 to 60 minutes). i During a power failure, or when unplugging the appliance, the time settings are lost, unless backup batteries are installed. Setting the alarm time The alarm time can be set in radio and tone mode. Two time slots are available (ALM 1 and ALM 2). ● Press the alarm button (7/8). The display (11) shows 6:00 and flashes. ● Press the + button (5) or the - button (4) to set the alarm time. Press and hold the corresponding button to accelerate the process. 8 AR270P ● Press the alarm button (7/8) again to confirm. The corresponding alarm indicator (20/16) comes on. i 5.2 During a power failure, or when unplugging the appliance, the time settings are lost, unless backup batteries are installed. Radio functions ● To switch on the radio, press the RADIO/SLEEP button (13) once. The display (11) shows ON and flashes. ● Press the arrow buttons (up and down) (14) to select a frequency or radio station. Press and hold the corresponding button to accelerate the process. ● To adjust the volume level, turn the VOLUME dial (21) to the required position. ● To switch off the radio, press the RADIO/SLEEP button (13) again. i The MEMORY function can be used to select a preset radio station. Read the paragraph "Using the MEMORY function". i To improve the reception of the FM frequency, extend the aerial antenna. Using the MEMORY function The MEMORY function can be used to preset a maximum of 5 radio stations. ● To switch on the radio, press the RADIO/SLEEP button (13) once. ● Press the arrow buttons (up and down) (14) to select a radio station. ● Press and hold the MEMORY button (15) until the display (11) shows MEM and 01 flashes. ● Press the MEMORY button (15) again to save the radio station. ● Repeat the last 3 steps to preset another radio station. ● To edit a preset radio station, press the arrow buttons (up and down) (14) to select a preset radio station. Repeat the previous steps to save the radio station. ● To listen to a preset radio station, press the MEMORY button (15) to select a preset radio station while the radio is switched on. 9 5.3 Using the SLEEP function ● To activate the SLEEP function, press the RADIO/SLEEP button (13) twice. The SLEEP indicator (20) comes on. The display (11) shows 5 and flashes. ● To set the sleep timer (10/15/30/45/60/75/90), press and hold the RADIO/SLEEP button (13). The appliance stops playing after the chosen time has elapsed. ● To check the remaining time, press the RADIO/SLEEP button (13). ● To cancel the SLEEP function, press the SNOOZE/DIMMER button (6). 5.4 Alarm function This function is available in radio and tone mode. Two time slots are available (ALM 1 and ALM 2). ● Choose the alarm mode (radio or tone). ● To set the alarm: -Press the alarm button (7/8) once to view the time. -Press the alarm button (7/8) twice to wake up by radio. The corresponding icon appears in the display (11). -Press the alarm button (7/8) thrice to wake up by tone. The corresponding icon appears in the display (11). ● For radio alarm: -Switch on the radio. -Select the desired radio station. -Adjust the volume. Snooze alarm The default snooze time is: 9 minutes. ● To snooze the alarm, press the SNOOZE/DIMMER button (6) while the alarm sounds. The alarm sounds again after the snooze time has elapsed. ● To stop the alarm, press the alarm button (7/8) while the alarm sounds. The alarm is automatically set for the next day. 10 AR270P 6. ! Cleaning and maintenance WARNING Before performing any cleaning or maintenance, switch off and unplug the appliance. ● Clean the outside of the appliance with a soft cloth. When the appliance is very dirty, dampen the cloth slightly with water and a neutral solution. 7. Troubleshooting Trouble No display No sound 8. Action Connect the appliance properly. Press the RESET button using a thin object and set the time again. Connect the appliance properly. Adjust the volume. Adjust the tuning control. Technical data Parameter Voltage Backup voltage Power consumption Standby power consumption Max. power output Radio bands Dimensions (W x H x D) Weight Frequency range Parameter FM radio Value 230 VAC ~ 50 Hz 9V < 1.5 W 0.6 +/-0.2 W 1.1 +/-0.2 W FM 190 x 80 x 65 mm 290 g Value 87.5 - 108 MHz 11 9. Disposal of used electrical and electronic equipment Z The meaning of the symbol on the material, its accessory or packaging indicates that this product shall not be treated as household waste. Please, dispose of this equipment at your applicable collection point for the recycling of electrical and electronic equipments waste. In the European Union and Other European countries which there are separate collection systems for used electrical and electronic product. By ensuring the correct disposal of this product, you will help prevent potentially hazardous to the environment and to human health, which could otherwise be caused by unsuitable waste handling of this product. The recycling of materials will help conserve natural resources. Please do not therefore dispose of your old electrical and electronic equipment with your household waste. For more detailed information about recycling of this product, please contact your local city office, your household waste disposal service or the shop where you purchased the product. For more information and warranty conditions, please visit: www.akai.eu 12