1
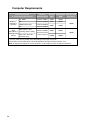
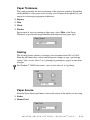
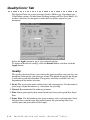
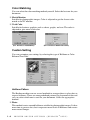
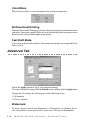
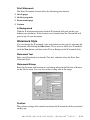
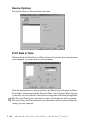
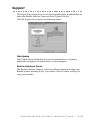
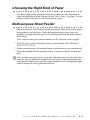
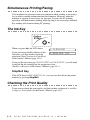
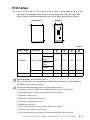
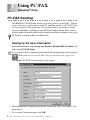
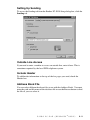
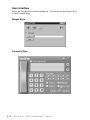
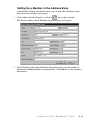
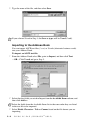
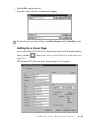
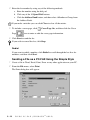
Printer & PC-FAX Manual
FAX-1800C
®
Table of Contents
1
Printer Driver Settings (Windows® Only) .................................... 1-1
Using the Brother FAX-1800C Printer Driver ........................... 1-1
Paper Tab.................................................................................... 1-1
Paper Size ............................................................................ 1-2
Orientation........................................................................... 1-2
Copy/Page Order ................................................................. 1-2
Copies ............................................................................. 1-2
Collate ............................................................................. 1-2
Reverse Order ................................................................. 1-2
Paper Thickness................................................................... 1-3
Scaling ................................................................................. 1-3
Paper Source........................................................................ 1-3
Quality/Color Tab ...................................................................... 1-4
Quality ................................................................................. 1-4
Media................................................................................... 1-5
Document ............................................................................ 1-5
Color Matching.................................................................... 1-6
Custom Setting .................................................................... 1-6
Halftone Pattern .............................................................. 1-6
Color Enhance................................................................. 1-7
Color/Mono ......................................................................... 1-8
Bi-Directional Printing ........................................................ 1-8
Fast Draft Mode................................................................... 1-8
Advanced Tab ............................................................................ 1-8
Watermark ........................................................................... 1-8
Print Watermark.............................................................. 1-9
In Background................................................................. 1-9
Watermark Style.................................................................. 1-9
Watermark Text .............................................................. 1-9
Watermark Bitmap.......................................................... 1-9
Position ........................................................................... 1-9
Device Options .................................................................. 1-10
Print Date & Time ............................................................. 1-10
Support ..................................................................................... 1-11
Web Update .................................................................. 1-11
Brother Solutions Center............................................... 1-11
i
2
3
ii
Using the Brother Machine as a Printer ....................................... 2-1
Features ...................................................................................... 2-1
Printer Driver.............................................................................. 2-1
Choosing the Right Kind of Paper ............................................. 2-2
Multi-purpose Sheet Feeder ....................................................... 2-2
Simultaneous Printing/Faxing .................................................... 2-3
The Ink Key................................................................................ 2-3
Stop/Exit Key ...................................................................... 2-3
Checking the Print Quality ......................................................... 2-3
Print Area ................................................................................... 2-4
Using PC-FAX (Windows® Only).................................................. 3-1
PC-FAX Sending........................................................................ 3-1
Setting Up the User Information ......................................... 3-1
Setting Up Sending.............................................................. 3-2
Outside Line Access ............................................................ 3-2
Include Header..................................................................... 3-2
Address Book File ............................................................... 3-2
User Interface ...................................................................... 3-3
Simple Style .................................................................... 3-3
Facsimile Style................................................................ 3-3
Setting Up Speed Dial ................................................................ 3-4
The Address Book ............................................................... 3-5
Setting Up a Member in the Address Book......................... 3-6
Setting Up a Group for Broadcasting .................................. 3-7
Editing Member Information............................................... 3-7
Deleting a Member or Group .............................................. 3-8
Exporting the Address Book ............................................... 3-8
Importing to the Address Book ........................................... 3-9
Setting Up a Cover Page.................................................... 3-10
To .................................................................................. 3-11
From .............................................................................. 3-11
Comment....................................................................... 3-11
Select Cover Page Form................................................ 3-11
Import BMP File ........................................................... 3-11
Count Cover Page ......................................................... 3-11
Sending a File as a PC-FAX Using the Facsimile Style ... 3-12
Redial ............................................................................ 3-13
Sending a File as a PC-FAX Using the Simple Style........ 3-13
4
Using the Brother Machine with a New Power Macintosh®
G3, G4 or iMac™/iBook™ ............................................................. 4-1
Set Up Your USB-Equipped Apple® Macintosh®
G3, G4 or iMac™ or iBook™ with
Mac OS 8.5/8.5.1/8.6/9.0/9.0.4/9.1/9.2.1................................ 4-1
Using Brother Printer Driver with Your Apple® Macintosh®.... 4-1
Sending a Fax from Your Macintosh® Application ................... 4-3
Setting Up Your Address Book........................................... 4-5
Adding a New Member................................................... 4-5
Adding a New Group ...................................................... 4-6
iii
Computer Requirements
Minimum System Requirements
Computer Platform
& Operating System Version
Windows®
Operating
Systems
Processor
Minimum Recommended Available Hard
Minimum Speed
RAM
RAM
Disk Space*
98, 98SE
Pentium 75MHz
24MB
32MB
Me
Pentium 150MHz
32MB
64MB
2000 Professional
Pentium 133MHz
XP
Pentium 233MHz
64MB
128MB
32MB
64MB
Mac OS 8.5 – 9.2.1
(Printing and PC-FAX)
Apple
iMacTM/iBookTM/
G3/G4 Operating Mac OS X 10.0, 10.1
Systems
(Printing Only)
All base models
meet minimun
requirements
30MB
30MB
128MB
160MB
* You may need more hard disk space depending on what you want to do.
Printer Driver and PC-FAX Driver can be downloaded from http://solutions. brother. com
Note: All registered trademarks referenced herein are the property of their respective companies.
iv
1
Printer Driver Settings
1
(Windows® Only)
Using the Brother FAX-1800C Printer Driver
A Printer Driver is software that translates data from the format used by a
computer into the format required by a particular printer, using a printer
command language or page description language.
Note
The screens shown in this section are from Windows® 98. The screens on your
PC may vary depending on your Windows Operating System.
For more information, please see the on-line Help in the printer driver.
Paper Tab
The paper tab screen allows you to set up the Paper Size, Paper Source, Paper
Thickness, Orientation, Scaling, and Copy/Page Order.
To access the Brother printer driver, select Print from the File menu. In the Print
dialog box, select Brother FAX1800C from the Name drop down list. Click the
Properties button. The Brother FAX1800C on BRUSB: Properties dialog box will
appear:
3
1
2
Select the Apply button to apply your selected settings.
To return to the default settings, click the Default button, and then click the
Apply button.
1 Select the Paper Size and Orientation.
2 Select number of Copies and Page Order.
3 Select Paper Thickness, Scaling and Paper Source.
PRINTER DRIVER SETTINGS (WINDOWS
®
ONLY)
1-1
Paper Size
You can choose from a large selection of standard paper sizes or you can even
create custom sizes ranging form 3.5" × 5" to 8.5" × 14". To select the paper size
you want to use, click the icon.
Orientation
Orientation selects the layout of your document on the printed page (Portrait or
Landscape).
Copy/Page Order
Copies
Select the number of copies that will be printed.
Collate
With the collate check box selected, one complete copy of your document will
be printed and then repeated for the number of copies you selected. If the collate
check box is not selected, then each page will be printed for all the copies
selected before the next page in the document is printed.
Reverse Order
Reverse Order prints the pages of your document in the opposite order.
1-2
PRINTER DRIVER SETTINGS (WINDOWS
®
ONLY)
Paper Thickness
This setting provides the best positioning of the paper for printing. Depending
on the thickness of the paper you are using, you can improve the quality of your
output by selecting the appropriate thickness:
■ Regular
■ Thin
■ Thick
■ Thicker
For example if you are printing on thin paper, select Thin as the Paper
Thickness to get the best paper handling and output for that paper type.
Scaling
The Scaling feature reduces or enlarges your document from 50% to 200%.
From the pull-down box, select from the preset settings or type a percentage
setting. You can also select 2 in 1 printing for printing two pages on one sheet
of paper.
For Windows® 2000 Professional, you can also select 4 in 1 printing.
Paper Source
From the Paper Source pull-down, choose the source of the media you are using.
■ Feeder
■ Manual Feed
PRINTER DRIVER SETTINGS (WINDOWS
®
ONLY)
1-3
Quality/Color Tab
The Quality/Color tab screen provides Quality, Media type, Document type,
Color/Mono settings, Bi-directional Printing settings and Fast Draft Mode. All
of these selections are designed to offer the best quality output for your
document.
Select the Apply button to apply your selected settings.
To return to the default settings, click the Default button, and then click the
Apply button.
Quality
The quality selection allows you to choose the print resolution you want for your
document. Print quality and speed are related. The higher the quality the longer
it will take to print the document. The quality selections available will vary
depending on the media selection.
■ Draft: The fastest print mode and the lowest ink consumption. Use this mode to
print large volume documents or a document for proofing.
■ Normal: Recommended for ordinary printouts.
■ Fine: Better print quality than normal mode and faster print speed than Super
Fine.
■ Super Fine: Use this mode to print precise images such as photographs. Since
the print data is much larger than normal mode, the processing time, data
transfer time and print time will be longer.
1-4
PRINTER DRIVER SETTINGS (WINDOWS
®
ONLY)
Media
To achieve the best print results, select the media being printed on should be
selected in the driver. The Brother machine changes the way it places dots,
depending on the selected media type.
Paper Type
Note
Recommended Print Quality
Plain Paper
Normal
Inkjet Paper
Fine
Glossy Paper (4 color)
Super Fine
Glossy Paper (3 color)
Super Fine
Transparencies
Fine
Transparencies (mirror)
Fine
The print quality of black ink varies depending on the kind of glossy paper you
are using. Black ink is used when you select Glossy Paper (4 color). If the
glossy paper you are using repels the black ink, select Glossy Paper (3 color),
which simulates black ink by combining the other three ink colors.
Document
The printer driver will select the most suitable color matching method,
depending on your document type. Generally, text and business graphics are
printed vividly and photographic images are printed softly.
■ Auto: The printer driver automatically selects the document type.
■ Photo: Use this mode for photographic images.
■ Graphics: This mode is for documents that contain text or business graphics
(charts or clip art).
■ Custom: Select this mode if you want to manually select the color matching
method and halftone method.
PRINTER DRIVER SETTINGS (WINDOWS
®
ONLY)
1-5
Color Matching
You can select the color matching method yourself. Select the best one for your
document.
■ Match Monitor
Suitable for photographic images. Color is adjusted to get the closest color
match to the PC monitor.
■ Vivid Color
Suitable for business graphics such as charts, graphs, and text. The color is
adjusted to give more vivid color.
(For Windows® 98/98SE/Me)
(For Windows® 2000 Professional)
Custom Setting
You can customize your settings by selecting the type of Halftone or Color
Enhance/True2Life.
Halftone Pattern
The Brother machine can use several methods to arrange where to place dots to
express halftones. There are some predefined patterns for placement of dots and
you can select which one is used for your document. Select the appropriate
method.
■ Photo
This method creates smooth halftones suitable for photographic images. It takes
more time to process data, but it expresses more levels of halftones and creates
more natural images.
1-6
PRINTER DRIVER SETTINGS (WINDOWS
®
ONLY)
■ Cluster
This is suitable for business graphics such as charts, graphs and drawings, since
this creates sharper printouts. Moreover, the processing time is shorter.
Color Enhance
Selecting Color Enhance/True2Life ON enables the True2Life feature. This
feature analyzes your image to improve quality sharpness, white balance and
color density. This process may take several minutes depending on the size of
the image and the speed and RAM memory of your computer.
■ Color Enhance/True2Life ON
Adjusts the color in the image for better print quality. Print time will be longer
with True2Life set to ON.
■ Sharpness
This setting enhances the detail of an image. This is similar to adjusting the fine
focus of a camera. If the focus is off a little you will not be able to clearly see
the fine details of an image.
■ Color Density
This adjusts the total amount of color in the image. You can increase or decrease
the amount of color in an image to improve a picture that may appear washed
out or weak.
■ White Balance
This adjusts the hue of the white sections of an image. Lighting, camera settings
and other influences will effect the appearance of white. The white parts of a
picture may appear to be slightly pink, yellow or some other color. By using
this adjustment you can correct this effect and bring the white sections back to
pure white.
■ Brightness
Change the brightness of the whole image. Moving the scroll bar to the left
makes your image darker and moving the scroll bar to the right makes your
image lighter.
■ Contrast
Change the contrast of an image. Darker sections will be darker and lighter
sections will be lighter as you increase the contrast. Increase the contrast when
you want an image to be clearer. Decrease the contrast when you want an image
to be more subdued.
■ Red
Increase the intensity of the Red color by adding red to the whole image.
■ Green
Increase the intensity of the Green color by adding green to the whole image.
■ Blue
Increase the intensity of the Blue color by adding blue to the whole image.
PRINTER DRIVER SETTINGS (WINDOWS
®
ONLY)
1-7
Color/Mono
This selection allows a color document to be printed in mono only.
Bi-Directional Printing
When Bi-Directional Printing is selected, the print head prints in both directions
and offers faster print speeds. When it is not selected the print head prints in one
direction only and provides higher print quality.
Fast Draft Mode
You can print much more quickly, than mono draft mode, by using both black
and cyan ink.
Advanced Tab
Select the Apply button to apply your selected settings.
To return to the default settings, click the Default button, and then click the Apply button.
Change the tab settings by selecting one of the following icons:
■ Watermark
■ Device Options
Watermark
To place a logo or text in your document as a Watermark, use a bitmap file or
text you created as your source file or select one of the preset Watermarks.
1-8
PRINTER DRIVER SETTINGS (WINDOWS
®
ONLY)
Print Watermark
The Print Watermark feature offers the following print choices:
■ On all pages
■ On first page only
■ From second page
■ Custom
In Background
With the In background feature checked Watermark will print on the page
behind your document. If this feature is not checked then the Watermark will
print on top of your document.
Watermark Style
You can change the Watermark’s size and position on the page by selecting the
Watermark and clicking the Edit button. If you want to add a new Watermark
click the New button, and then select Text or Bitmap in the Watermark Style.
Watermark Text
Enter your Watermark text into the Text box, and then select the Font, Size,
Color and Style.
Watermark Bitmap
Enter the file name and location of your bitmap image in the File box or Browse
for the file location. You can also set the scaling size of the image.
Position
The position settings offer controls for where the Watermark will be positioned
on the page.
PRINTER DRIVER SETTINGS (WINDOWS
®
ONLY)
1-9
Device Options
Set the Print Date & Time in Printer Function:
Print Date & Time
When enabled, the Print Date and Time feature will print the date and time from
your computer’s system clock on your document.
Click the Setting button to change the Date and Time Format, Position and Font.
To include a background with the Date and Time, select Opaque. When Opaque
is selected, you can click the Color button to change the color of the background.
Note
1 - 10
The Date and Time in the selection box shows the format that will be printed.
The actual Date and Time printed on your document will be retrieved from the
settings of your computer.
PRINTER DRIVER SETTINGS (WINDOWS
®
ONLY)
Support
The Support Tab provides driver version and setup information. In addition there are
links to the Brother Solutions Center and Driver Update Web sites.
Click the Support tab to display the following screen:
Web Update
Web Update checks the Brother web site for updated drivers, and then it
downloads and updates the printer driver on your computer.
Brother Solutions Center
The Brother Solutions Center is a Web site offering information about your
Brother product including FAQs, User Guides, Driver Updates and Tips for
using your machine.
PRINTER DRIVER SETTINGS (WINDOWS
®
ONLY)
1 - 11
2
Using the Brother Machine
as a Printer
2
Features
The FAX-1800C offers many features you’ll find in a high quality ink jet
printer.
Fast Printing Speed—Using Draft mode, you can print up to 8 pages per
minute in full color, and up to 10 pages per minute in black.
Brilliant High Quality Output—Printing at 2400 × 1200 dpi resolution on
glossy paper gives you highest resolution output.
Beautiful Elaborate Output—You can utilize 2 in 1, watermark printing,
True2Life technology, and other features for making beautiful outputs.
Low Running Cost—Whenever you run out of a color ink, you’ll replace only
the cartridge that is empty.
USB (Universal Serial Bus)—Interface allows for fast comunication with your
computer.
Straight Paper Path—The machine can use various types of paper: plain
paper, Ink Jet Paper, glossy paper, transparencies, and envelopes. Using the
appropriate paper reduces the occurrence of paper jams. For complete
information about the kinds of paper to use with the machine, please read
Chapter 3 in the Owner’s Manual.
Printer Driver
You can change the following printer settings when you print from your
computer:
■ Quality (Speed) /Media
■ Color Matching
■ Halftone
■ Color Enhance/True2Life
■ Fast Draft Mode
■ Watermark
■ Print Date & Time
2-1
USING THE BROTHER MACHINE AS A PRINTER
Choosing the Right Kind of Paper
To achieve high quality printing using your machine, it’s very important to
select the right kind of paper. Be sure to read “About Paper” on page 3-1 of the
Owner’s Manual before you select and purchase paper.
Multi-purpose Sheet Feeder
The multi-purpose sheet feeder can feed plain paper, inkjet paper, glossy paper,
transparencies and envelopes. When the machine receives data from your
computer, it begins the print process by feeding paper from the multi-purpose
sheet feeder.
After you select the print command from your PC, the print process begins:
1 Your PC sends a print command and data to the machine, the LCD shows
RECEIVING DATA.
2 If there are more pages, the machine begins to print the next page automatically.
3 When the machine finishes printing all data, it returns to display the date and
time.
Note
You can select the paper source, paper size, and orientation in your application
software. If your application software does not support your custom paper size,
select the next larger paper size. Then adjust the print area by changing the right
and left margins in your application software.
USING THE BROTHER MACHINE AS A PRINTER
2-2
Simultaneous Printing/Faxing
Your machine can print data from your computer while sending or receiving a
fax, or while scanning information into the computer. However, when the
machine is copying or receiving a fax on paper, it pauses the PC printing
operation, and then resumes printing when copying or fax receiving is finished.
Fax sending will continue during PC printing.
The Ink Key
When you press Ink, the LCD shows:
If you are having trouble with one of the
ink colors, you may need to clean the
print head. (See Cleaning the Print Head
in the Owner’s Manual, page 15-9.)
1.CLEANING
2.REPLACE INK
If you got the error message NEAR EMPTY or INK EMPTY, you will need
to replace the ink cartridge for the appropriate color.
(See Error Messages in the Owner’s Manual, page 15-1.)
Stop/Exit Key
If the LCD shows REMAINED DATA, you can clear data left in the printer
memory by pressing Stop/Exit.
Checking the Print Quality
If you want to check the print quality and find out how to improve it, see How
to Improve Print Quality in the Owner’s Manual, page 15-9.
2-3
USING THE BROTHER MACHINE AS A PRINTER
Print Area
The print area depends on the settings in the application you are using. The
figures below show the unprintable areas on cut sheet paper and envelopes.
Cut Sheet Paper
3
Envelopes
3
4
4
1
1
2
2
unprintable area
(inches)
Paper Type
1
2
3
4
0.12
0.43
0.25
0.25
Printer
0.12
0.43
0.13
0.13
Printer
0.39
0.79
0.13
0.13
Paper Size
Fax
Cut Sheet
Letter, Legal
Mono
Copy
Color
Copy
Printer
Executive
Envelopes
Note
Printer depends on the Printer Driver.
The above figures are approximate and the print area may vary depending on
the kind of paper you are using.
Do not use the following types of paper and envelopes:
■ Damaged, curled, wrinkled, or irregularly shaped paper and envelopes
■ Extremely shiny or highly textured paper and envelopes
■ Envelopes with clasps
■ Envelopes of baggy construction
■ Envelopes not sharply creased
■ Embossed envelopes
■ Paper and envelopes already printed with a laser printer
■ Envelopes preprinted on the inside
■ Paper and envelopes that cannot be arranged uniformly when stacked
USING THE BROTHER MACHINE AS A PRINTER
2-4
3
Using PC-FAX
3
(Windows® Only)
PC-FAX Sending
The Brother PC-FAX feature allows you to use your PC to send a file. You can
create a file in any application on your PC, and then send it as a PC-FAX. You
can even attach a cover page note. All you have to do is set up the receiving
parties as Members or Groups in your PC-FAX Address Book. Then you can
use the Address Book Search feature to quickly find them to address your faxes.
PC-FAX is available in Black & White only.
Setting Up the User Information
1 From the Start menu, select Programs, Brother, Brother MFL Pro Suite, and
then select PC-FAX Setup.
Note
You can access the User Information from the FAX Sending dialog box by clicking
. (See Sending a File as a PC-FAX Using the Facsimile Style, page 3-12.)
The Brother PC-FAX Setup dialog box will appear:
2 This information is required to create the Fax Header and Cover Page so you
must enter it.
3 To save the User Information, click OK.
3-1
USING PC-FAX (WINDOWS
®
ONLY)
Setting Up Sending
To access the Sending tab from the Brother PC-FAX Setup dialog box, click the
Sending tab.
Outside Line Access
If you need to enter a number to access an outside line, enter it here. This is
sometimes required by the local PBX telephone system.
Include Header
To add header information to the top of the fax pages you send, check the
Header box.
Address Book File
You can select different database files to use with the Address Book. You must
enter the path and file name of the database file or use the Browse button to find
the file so you can select it.
USING PC-FAX (WINDOWS
®
ONLY)
3-2
User Interface
Select the User Interface in the Sending tab. You can choose the Simple Style
or the Facsimile Style.
Simple Style
Facsimile Style
3-3
USING PC-FAX (WINDOWS
®
ONLY)
Setting Up Speed Dial
Access the Speed Dial tab from the Brother PC-FAX Setup dialog box by
clicking the Speed Dial tab. (To use this feature you must select the Facsimile
Style user interface.)
You can register any address or group on one of the ten Speed Dial buttons.
To register an address in a Speed Dial location:
1 Click the Speed Dial location you want to program.
2 Click the person or group you wish to assign to the Speed Dial location.
3 Click Add >> to program the Speed Dial location.
To clear a Speed Dial location:
1 Click the Speed Dial location you want to clear.
2 Click Clear.
USING PC-FAX (WINDOWS
®
ONLY)
3-4
The Address Book
From the Start menu, select Programs, Brother, Brother MFL Pro Suite, and
then click Address Book.
The Brother Address Book dialog box will appear:
3-5
USING PC-FAX (WINDOWS
®
ONLY)
Setting Up a Member in the Address Book
In the Brother Address Book dialog box you can add, edit and delete stored
information for members and groups.
1 In the Address Book dialog box, click the
icon to add a member.
The Brother Address Book Member Setup dialog box will appear:
2 In the Brother Address Book Member Setup dialog box, type the member’s
information. Name and Fax are required fields. Click OK to save the member’s
information.
USING PC-FAX (WINDOWS
®
ONLY)
3-6
Setting Up a Group for Broadcasting
If you repeatedly send the same PC-FAX to multiple recipients, you can
combine members into a Group.
1 In the Brother Address Book dialog box, click the
icon to create a group.
The Brother Address Book Group Setup dialog box appears:
2 Type the name of the new group in the Group Name field.
3 In the Available Names box, select each member to be included in the Group,
and then click Add >>.
Members you add to the group will be listed in the Group Members box.
4 After all the members have been added, click OK.
Editing Member Information
1 Select the Member or Group you want to edit.
2 Click the edit
icon.
3 Edit the Member or Group information.
4 Click OK to save your changes.
3-7
USING PC-FAX (WINDOWS
®
ONLY)
Deleting a Member or Group
1 Select the Member or Group you want to delete.
2 Click the delete
icon.
3 Click OK when the Delete OK? dialog box appears.
Exporting the Address Book
You can export the Address Book to an ASCII text file (*.csv). If you wish, you
can create a Vcard for selected members that will be attached to all the sender’s
outgoing e-mail; a Vcard is an electronic business card that contains the sender’s
contact information.
To export the current telephone book:
Note
If you are creating a Vcard, you must first select the member.
1 From the Address Book select File, point to Export, and then click Text
—OR—Click Vcard and go to Step 5.
2 Select the data fields you wish to Export from the Available Items column, and
then click Add >>.
Note
Select items in the order you want them listed.
3 If you are exporting to an ASCII file, select Divide Character - Tab or
Comma. This selection inserts a tab or comma between each data field when it
is Exported.
4 Select OK to save the data.
USING PC-FAX (WINDOWS
®
ONLY)
3-8
5 Type the name of the file, and then select Save.
Note
If you selected Vcard in Step 1, the Save as type: will be Vcard (*.vcf).
Importing to the Address Book
You can import ASCII text files (*.csv) or Vcards (electronic business cards)
into your Address Book.
To import an ASCII text file:
1 From the Address Book select File, point to Import, and then click Text
—OR—Click Vcard and go to Step 5.
2 Select the data fields you wish to Import from the Available Items column, and
then click Add >>.
Note
Select the fields from the Available Items list in the same order they are listed
in the text file to be imported.
3 Select Divide Character - Tab or Comma based on the file format you are
importing.
3-9
USING PC-FAX (WINDOWS
®
ONLY)
4 Select OK to import the data.
5 Type the name of the file, and then select Open.
Note
If you selected a text file in Step 1, the Files of type: will be Text file (*.csv).
Setting Up a Cover Page
Access the Brother PC-FAX Cover Page Setup from the FAX Sending dialog
box by clicking
. (See Sending a File as a PC-FAX Using the Facsimile Style,
page 3-12.)
The Brother PC-FAX Cover Page Setup dialog box will appear:
USING PC-FAX (WINDOWS
®
ONLY)
3 - 10
To
You can enter information in each field.
Note
If you are sending a fax to multiple recipients, the recipient information will not
be printed on the Cover Page.
From
You can enter information in each field.
Comment
Type the comment you want to add to the cover page.
Select Cover Page Form
Select the cover page form you want.
Import BMP File
You can insert a bitmap file, such as your company logo, in the cover page.
Select the BMP file by using the browse button, and then select the alignment
style.
Count Cover Page
When the Count Cover Page box is checked, the Cover Page will be included in
the page numbering. When this box is not checked, the Cover Page will not be
included.
3 - 11
USING PC-FAX (WINDOWS
®
ONLY)
Sending a File as a PC-FAX Using the Facsimile Style
1 Create a file in Word, Excel, Paint, Draw or any other application on your PC.
2 From the File menu, select Print.
The Print dialog box will appear:
3 Select Brother PC-FAX as your printer, and then click OK.
The FAX Sending dialog box will appear:
USING PC-FAX (WINDOWS
®
ONLY)
3 - 12
4 Enter the fax number by using any of the following methods:
a. Enter the number using the dial pad.
b. Click any of the 10 Speed Dial buttons.
c. Click the Address Book button, and then select a Member or Group from
the Address Book.
Note
If you make a mistake you can click Clear to clear all the entries.
5 To include a cover page, click
Page
Cover Page On, and then click the Cover
icon to enter or edit the cover page information.
6 Click Start to send the fax.
If you wish to cancel the fax, click Stop.
Redial
If you want to redial a number, click Redial to scroll through the last five fax
numbers, and then click Start.
Sending a File as a PC-FAX Using the Simple Style
1 Create a file in Word, Excel, Paint, Draw or any other application on your PC.
2 From the File menu, select Print.
The Print dialog box will appear:
3 - 13
USING PC-FAX (WINDOWS
®
ONLY)
3 Select Brother PC-FAX as your printer, and then click OK.
The FAX Sending dialog box will appear:
4 In the To: field, type the fax number of the receiving party. You can also use
the Address Book to select destination fax numbers. If you made a mistake
entering a number, click the Clear button to clear all entries.
5 To send a Cover Page and note, check the Cover Page On check box.
Note
You can also click the
icon to create or edit a cover page.
6 When you are ready to send your fax, click the Send
7 If you wish to cancel the fax, click the
icon.
icon.
USING PC-FAX (WINDOWS
®
ONLY)
3 - 14
4
Using the Brother Machine
with a New Power Macintosh®
G3, G4 or iMac™/iBook™
4
Set Up Your USB-Equipped Apple®
Macintosh® G3, G4 or iMac™ or iBook™ with
Mac OS 8.5/8.5.1/8.6/9.0/9.0.4/9.1/9.2.1
Note
Before you can connect the machine to your Machintosh®, you must purchase
a USB cable that is no longer than 6 feet (1.8 meters).
To work with your machine, your USB-Equipped Apple® Macintosh® must be
set up with Mac OS 8.5/8.5.1/8.6/9.0/9.0.4/9.1/9.2.1.
Using Brother Printer Driver with Your Apple®
Macintosh®
To select the Printer:
1 From the Apple menu, open the Chooser.
2 Click the MFL Pro Color icon. On the right side of the Chooser, click the
printer you want to print to. Close the Chooser.
4-1
USING THE BROTHER MACHINE WITH A NEW POWER MACINTOSH® G3, G4 OR IMAC™/IBOOK™
To print the document:
3 From application software such as PaperPort®, click File menu and select Page
Setup. Change the settings for Paper Size, Paper Thickness, Paper Source,
Orientation, and Scaling, and then click OK.
4 From application software such as PaperPort, click File menu and select Print.
Click Print to start printing.
Note
If you want to change Copies, Pages, Quality, Media Type and Color/Mono,
select your settings before clicking Print.
Option Setup allows you to change Document and Printing Options.
USING THE BROTHER MACHINE WITH A NEW POWER MACINTOSH® G3, G4 OR IMAC™/IBOOK™
4-2
Sending a Fax from Your Macintosh®
Application
You can send a fax directly from your Macintosh® application using the
following steps:
1 Create a document in a Macintosh application.
2 To begin the fax transmission, select Print from the File menu.
The Printer dialog box appears:
When Printer is selected, the top button shows Print and the Address button is
grayed.
3 From the Output pull-down menu, select Facsimile.
When Facsimile is selected, the top button shows Send Fax and the Address
button is available.
4-3
USING THE BROTHER MACHINE WITH A NEW POWER MACINTOSH® G3, G4 OR IMAC™/IBOOK™
4 Click Send Fax.
The Send Fax dialog box appears:
The Send Fax dialog box has two list boxes. The left box shows all the
previously Stored Fax Numbers; the right box will show the Destination Fax
Numbers as you select them.
5 To address the fax, type a fax number in the Input Fax Number box.
—OR—
Select a name/number from the Stored Fax Numbers box, and then click
. Your recipient will appear in the Destination Fax Numbers box.
Note
You can select several stored numbers at once by using the Shift and Ctrl keys.
6 If you want to, you can add your new recipients to the Stored Fax Numbers at
this time by clicking New. (See Adding a New Member, page 4-5.)
—OR—
You can add a new group by clicking Group.
(See Adding a New Group, page 4-6.)
7 If you are finished addressing your fax, click Send Fax.
Note
Note
To select and send only certain pages of the document, click OK to return to
the Print dialog box.
If you click Send Fax without addressing your fax, the following error message
appears:
Click OK to return to the Send Fax dialog box.
USING THE BROTHER MACHINE WITH A NEW POWER MACINTOSH® G3, G4 OR IMAC™/IBOOK™
4-4
Setting Up Your Address Book
You can add new members and groups to your Address Book, even while you
are addressing a fax.
Adding a New Member
1 To add a new member to the Address Book, in the Facsimile dialog box click
Address.
The Address Book dialog box appears:
2 Click New. The following dialog box appears:
3 Type the name and fax number.
4 If you want to, you can store a comment in the Memo field (up to 15 characters).
5 Click OK to return to the Address Book dialog box.
4-5
USING THE BROTHER MACHINE WITH A NEW POWER MACINTOSH® G3, G4 OR IMAC™/IBOOK™
Adding a New Group
You can set up a group of multiple recipients.
1 Click Group.
The Group Setting dialog box appears.
2 In the Group Name field, type a name for your Group.
3 From the Stored Fax Numbers box select the recipients for your Group, and
then click
.
Your selection will appear in the box under the Group Name field.
4 Click OK.
The Address Book dialog box reappears:
5 Click OK.
The Print/Facsimile dialog box reappears:
6 If you are ready to send your fax, click Send Fax.
(Follow the steps on page 4-3 for sending a fax.)
USING THE BROTHER MACHINE WITH A NEW POWER MACINTOSH® G3, G4 OR IMAC™/IBOOK™
4-6