1
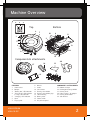
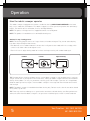
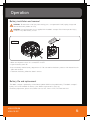
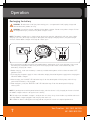
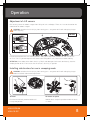
User Guide
Vax Careline: AU: 1300 361 505
NZ: 0800 800 900
Hard floor robotic sweeper
Get Cleaning...
What’s your Vax’s model number?
V
X
1
What’s your serial number? (Located on the base of the robotic cleaner)
Note these down in case you need them in future. Please keep instructions for further use.
vax.com.au
vax.co.nz
VX1
Vax Careline: AU: 1300 361 505
NZ: 0800 800 900
vax
vax
505
900
Machine Overview
5
4
3
Top
Bottom
6
7
10
1
8
11
9
12
5
13
4
3
2
Components & attachments
18
17
21
FEATURES
1. Side brushes
2. Bumper
3. “Battery low” LED indicator
4. “Dirt cup full” LED indicator
& “Clog” LED indicator
5. “Charging” LED indicator
6. Cover
7. Finger guide
vax.com.au
vax.co.nz
14
8
1
8.
9.
10.
11.
12.
13.
14.
15.
16.
Wheels
Intake
Cliff sensors
Dusting sheet holder
Dusting sheet holder grips
Lower housing
Battery cover
Power switch
DC jack receptical
15
16
20
19
22
COMPONENTS & ATTACHMENTS
17. Robotic sweeper
18. Rechargable battery (NiMH)
19. Dusting sheet
20. Power supply / AC adapter
21. Dusting sheet holder
22. Side brushes
2
General Safety Information
FOR HOUSEHOLD USE ONLY.
When using the robotic sweeper, basic safety precautions should always be observed, including the following:
Concerning groups of persons
1.
This appliance is not intended for use by persons (including children) with reduced physical, sensory
or mental capabilities, or lack of experience and knowledge, unless they have been given supervision
or instruction concerning use of the appliance by a person responsible for their safety.
2. This appliance is not to be used as a toy; pay close attention when used by or near children.
3.
Children should be supervised to ensure that they don’t play with the appliance.
Concerning the power supply
The appliance is charged with electrical power. There is always danger of electrical shock. Therefore pay particular
attention to the following:
4. Never touch AC adapter or docking station with wet hands.
5.
Never immerse appliance, docking station or AC adapter in water or other fluids. Keep these components away
from rain and moisture.
6.
If you want to unplug the AC adapter from the socket, always pull directly on the plug. Never pull or carry
the AC adapter via its power cord, use cord as a handle, close a door on cord or pull cord around sharp edges
or corners as this can damage the cord and can increase the risk of fire or electric shock. Do not abuse the
power cord.
7.
Ensure that the AC adapter’s power cord is not bent, pinched, rolled over and that it does not come into contact
with heat sources.
8.
Only charge the appliance if the voltage indicated on the AC adapter matches the voltage of your socket.
9.
Only use the AC adapter and docking station supplied with the appliance to charge the robotic cleaner.
10. Always check the AC adapter’s power cord for possible damage before using it. To avoid damage do not wrap
the cord around the charger for storage. Do not use an AC adapter with a damaged cord or plug. A damaged
or entangled charger cord can increase the risk of fire and electric shock.
11. Before cleaning or performing maintenance on the appliance, ensure that the AC adapter has been unplugged
from the socket.
Concerning the batteries provided
Danger of injury and explosion due to improper handling of the batteries provided.
12. Do not replace the battery pack with other batteries or rechargeable batteries.
13. Only use the original battery pack contained in the robotic sweeper and only replace with a genuine Vax battery
pack suitable for this model only.
3
Vax Careline: AU: 1300 361 505
NZ: 0800 800 900
vax
vax
505
900
General Safety Information
14. Before removing the battery pack, ensure that the AC adapter has been unplugged from the socket and the
appliance is switched “off” (0).
15. Never short-circuit batteries, i.e. never touch both poles simultaneously, especially with metal objects.
16. Never take batteries apart, never deform them and never expose them to high temperatures. Improper handling
can lead to liquid leaking from batteries. Avoid any contact with such liquid.
17. If any liquid gets on the skin wash immediately with soap and water. If the liquid gets into the eyes, flush them
immediately with clean water for a minimum of 10 minutes and seek medical attention. Liquid ejected from the
battery may cause irritation or burns. In an emergency situation contact professional help immediately!
18. Only use the AC adapter supplied with the appliance to charge the robotic sweeper.
Concerning appropriate storage, handling and use
19. Use only as described in this User Guide.
20. Do not store, use or charge the robotic sweeper outdoors, on wet surfaces or on raised surfaces such
as tables and furniture or next to heat sources.
21. Do not use with any opening blocked; keep openings free of dust, lint, hair and anything that may interfere with
the brushes.
22. Do not put objects on top of the appliance.
23. Do not modify or repair the appliance yourself. Please contact Vax for details of an authorised repair agent.
24. Do not use robotic sweeper to pick up:
a. Water and any other liquid
b. Toner (from laser printers)
c. Anything that is flammable, burning or smoking such as cigarettes, matches or hot ashes
d. Harmful or toxic materials such as chlorine, bleach, ammonia, drain cleaner etc.
e. Hard or sharp objects such as glass, nails, screws, coins etc.
f. Plaster dust, concrete dust or any other building or vitreous materials
g. Flour, baking soda or any other powder-based carpet deodoriser
25. If appliance is not working as it should, has been dropped, damaged, left outdoors or dropped in water
call Vax Careline for assistance. AU 1300 361 505 / NZ 0800 800 900
DAMAGE TO THE ROBOTIC SWEEPER AND PARTS CAUSED AS A DIRECT RESULT OF NOT ADHERING
TO THE GENERAL SAFETY INFORMATION AND THE INSTRUCTIONS IN THIS USER GUIDE INVALIDATES
THE WARRANTY.
This machine is intended for household use only, and NOT for commercial or industrial use.
PLEASE KEEP THESE INSTRUCTIONS FOR FURTHER USE.
vax.com.au
vax.co.nz
4
Operation
How the robotic sweeper operates
This robotic sweeper is equipped with functions suitable for cleaning HARD FLOOR SURFACES in the home
only, such as wood, tiles, and linoleum. This robotic sweeper has a three part cleaning routine that continuously
repeats. The routine consists of Random, Circular, and Edge Following.
NOTE: This process will repeat until it is stopped or batteries run out of power.
NOTE: This product is intended for use in confined/enclosed spaces.
Continual 3 step cleaning process
NOTE: The cleaning program consists of 3 steps that occur in order and repeat. They are not selectable, they
have been chosen for optimal effectiveness.
• The robot will start in random mode for 3 minutes then it will go to circular mode until it hits an edge, which
can be a wall, side of a dresser or edge of a stair.
• Then it will start its edge cleaning mode for 3 minutes and repeat starting with random mode again.
Random
Circular
Edge Following
TIP: For more efficient cleaning and better results, use the robotic sweeper in small enclosed areas. If you have
a larger area to clean try to segment it into smaller areas, moving the robotic sweeper from one area to another.
Closing all entry doors is an easy way to confine a cleaning space. For example: if you have an L-shaped room,
divide the room up into 2 rectangles. Start the robotic sweeper in 1 rectangle and when finished move it to the
2nd rectangle.
NOTE: The robotic sweeper is intended for bare floor cleaning only. For best results clear the area to be cleaned
of any cords, rugs or mats.
TIP: Throw rugs and mats rolled up act as great barriers to enclose a desired cleaning area. Best performance
and results come when the robotic sweeper is set up to clean in confined spaces where it cannot wander off.
5
Vax Careline: AU: 1300 361 505
NZ: 0800 800 900
vax
vax
505
900
Operation
Battery installation and removal
WARNING: To reduce the risk of injury from moving parts – turn power off (0=off), unplug charger and
then remove battery before servicing.
WARNING: Use only the battery that is supplied with the robotic sweeper. Risk of fire or personal injury
can occur if any other battery is used.
C
BOTTOM
B
A
1. Make sure the power switch (A) is turned OFF (0=OFF).
2. Open the battery cover (B).
3 Insert the battery into the battery compartment (C). Be sure to orient the battery contacts with those of the unit.
Slide cover to close.
4. To remove the battery, follow the above in reverse.
Battery life and replacement
The robotic sweeper is powered by a Nickel Metal Hydride (NiMH) rechargeable battery. The robotic sweeper’s
battery can last for hundreds of cleaning cycles before a replacement is necessary.
For battery replacement, please call Customer Service: AUS: 1300 361 505 / NZ: 0800 800 900
vax.com.au
vax.co.nz
6
Operation
Recharging the battery
WARNING: To reduce the risk of injury from moving parts – turn power off (0=off), unplug charger and
then remove battery before servicing.
WARNING: Use only the charger supplied with the robotic sweeper. Do not use any other chargers. Risk of
fire and personal injury can occur if any other charger is used.
NOTE: The robotic sweeper uses a charging timer so everytime you plug, and unplug it will start a new 4 hour
charging cycle. So if you charge it the light is solid green, then unplug it and plug it back in, the green led light
will flash and the robotic sweeper will charge for 4 hours again.
C
D
A
B
1. To ensure the best performance of the rechargeable battery and lengthen its life span, the battery is best used
after being fully charged for 4 hours every time. The charging function will be cut off automatically after
continuously charging for 4 hours.
2. Before charging , make sure the battery is correctly installed and the power switch has been turned to “OFF”
position (0=OFF).
3. To charge, plug the power supply (A) into a wall outlet and plug the end of the power supply to the charging port
(B) on the robotic sweeper.
4. When charging, the “CHARGE” LED indication lamp (C) on the control panel will flash green, and it will stay
green when the battery is fully charged.
5. When the battery is low, the “BATTERY LOW” LED indication lamp (D) on the control panel will light up
and stay RED.
NOTE: If you forget to turn off the power before charging, after the cleaner is fully charged, you have to switch off
the robotic sweeper and turn it on again to start cleaning.
TIP: To help ensure the robotic sweeper is ready to clean at its best, always clean the dirt cup and filter after each
use. Keep robotic sweeper plugged in and charging when not in use.
TIP: If robot has been in storage please charge prior to using to have it clean at its optimal performance.
7
Vax Careline: AU: 1300 361 505
NZ: 0800 800 900
vax
vax
505
900
Operation
Adjustment of cliff sensors
Cliff sensors prevent the robotic sweeper from falling off stairs and ledges. There are 3 sensors located on the
underside of the robotic sweeper.
WARNING: to reduce the risk of injury from moving parts – turn power off (0=off) and unplug charger
before adjusting.
01 2 3
BOTTOM
A
A
B
01 2 3
01 2 3
C
01 2 3
A
If the distance between the stair and the ground is short, please adjust both windows of “cliff” sensors (A)
to “2” or “1” or “0” position to prevent the cleaner from falling down stairs. Please test it before working.
ATTENTION: If the colour of the floor is dark (e.g. Black), and robot goes backwards continuously, close the
window position to the “1” to increase the cliff sensor’s sensitivity (C) position.
Installing side brushes for use in sweeping mode
WARNING: to reduce the risk of injury from moving parts – turn power off (0=off) and unplug charger
before installation and removal/replacement.
To install
To remove or replace
Push the brush directly onto the holder until
it snaps into position.
Hold the brush and pull upward to remove the brush
as shown.
vax.com.au
vax.co.nz
8
Operation
Installing the dusting sheet for use in dusting mode
WARNING: to reduce the risk of injury from moving parts – turn power off (0=off) and unplug charger
before installation and removal/replacement.
Stoppers
Fold back
4
Recess for
the stopper
Dusting sheet
Place the dusting sheet on a flat
surface then centre the dusting
sheet holder on the sheet (side with
4 stoppers facing upwards). Remove
the 4 stoppers from their recesses.
Press 6
3
Press
5 Press
2 Press
1
Fold back
Fold back the hem of the dusting
sheet on the two longest sides to the
dusting holder. Place the 4 stoppers
on top of the dusting sheet, then
press them firmly into the recesses
- fixing the dusting sheet to the
dusting sheet holder.
Place this underside of the dusting
sheet holder with dusting sheet on
the robotic sweeper.
2 Lift up
1
Push to
the left
Press the 2 bolts of the dusting
paper holder into the 2 holes on the
underside of the robotic sweeper.
Ensure the dusting sheet is facing
upwards (when the robotic sweeper
is in the upside down position).
9
To remove and replace the
dusting sheet, lift up dusting sheet
holder from the underside of the
robotic sweeper.
Vax Careline: AU: 1300 361 505
NZ: 0800 800 900
vax
vax
505
900
Operation
Start operation
The Robotic Sweeper has 2 modes of operation: sweeping mode and dusting mode.
NOTE: Do not use the robotic sweeper in sweeping mode and dusting mode at the same time.
If used in sweeping mode, remove the dusting sheet holder from the underside of the robotic sweeper.
If used in dusting mode, remove the side brushes from the unit.
1. Be sure the dirt cup filter is installed properly.
2. Place the robotic sweeper in an open area in the room, and turn the Power ON (I=ON).
3. When the robotic sweeper runs out of power, the “BATTERY LOW” LED lamp on the unit will turn RED
and the robotic sweeper will automatically stop.
4. When the robotic sweeper is not in use or prior to recharging, make sure the power switch is in the “OFF”
position (0=OFF).
NOTE: If you want the robotic sweeper to stay within a particular room be sure to close the door otherwise the
robot may roam from room to room.
NOTE: The robotic sweeper will stop where it is at when the battery runs out of power.
NOTE: For locating purposes, the robotic sweeper will beep twice every 60 seconds until the unit is turned off
and is plugged in to charge or until battery is completely depleted.
NOTE: Lights will flash green/red for a 8 seconds prior till the robot starts cleaning. Lights will continuously flash
green/red when the robotic sweeper is in use. When the batteries are low the red LED will illuminate.
vax.com.au
vax.co.nz
10
Maintenance (Keep your Vax as good as new)
Cleaning and the dirt cup and filter
WARNING: To reduce the risk of injury from moving parts – turn power off (0=off) and unplug charger
before cleaning.
Removing dirt cup
Lift the cover using the finger guide, unsnap the upper
housing cover.
Remove the dirt cup assembly from the robotic sweeper.
Removing dirt cup
A
Open the upper cover of the dirt cup.
Lift off the dirt cup cover (A).
Lift up and remove the filter by
gripping the two tabs.
Empty the dirt cup into the
rubbish bin.
FOR BEST PERFORMANCE: Each time the dirt cup is emptied, the filter should be cleaned as regular
maintenance. Tap the filter firmly against the inside of a rubbish bin until the dirt stops falling from the
filter. (Filter will be discoloured after use, this will not affect the filter’s performance.) Do not brush the
filter. The cleaning instructions may vary depending on the dirt conditions. In some cases, more or less
cleaning of the filter may be required.
For filter replacement, please call Customer Services on: AUS 1300 361 505 or NZ 0800 800 900.
11
Vax Careline: AU: 1300 361 505
NZ: 0800 800 900
vax
vax
505
900
Maintenance (Keep your Vax as good as new)
Rinse dirt cup
Reinstalling dirt cup
Hold dirt cup and filter under running water to rinse. DO Once dry, reinstall the filter and the dirt cup lid to the dirt
NOT use soap/detergent. Tap excess water
cup. Then reinstall the dirt cup assembly into the unit.
out of dirt cup and filter. Allow dirt cup and filter to
Return upper housing cover to robotic sweeper.
COMPLETELY DRY for at least 24 hours before
ATTENTION: Before starting the robotic sweeper,
replacing it back to the robotic sweeper.
please ensure the dirt cup has been correctly installed.
Cleaning nozzle
Cleaning side brushes
After repeated use, dirt and dust may accumulate
around the nozzle and it may reduce the working
efficiency. To ensure the best performance, the nozzle
should be cleaned periodically.
1. Turn power OFF (O=OFF), turn the robotic sweeper
up side down on a flat surface. Hold the brush and pull
upward to remove the brush.
2. Reinstall the brushes after cleaning.
3. The side brushes can be rinsed, and if they become
mis-shaped, you can soak them in hot water to make
them return to original shape. ALLOW TO COMPLETELY
DRY FOR 24 HOURS.
NOTE: After being used for a period of time, the brushes
need to be replaced for best performance.
vax.com.au
vax.co.nz
12
FAQ’s
WARNING: To reduce the risk of personal injury, unplug the robotic hard floor sweeper before
performing maintenance/troubleshooting checks.
Problem
Possible reason
Solution
Red LED stays after power on
Battery low power.
Recharge battery.
Lifted from floor.
Place back on floor.
On/off switch is in “OFF” (O=OFF) position.
Switch to “ON” (I=ON) position.
Dirt cup filter is installed incorrectly.
Install dirt cup filter correctly.
Floor is dark in colour.
Adjust cliff sensors sensitivity to a lower
sensitivity setting. See “Adjustment of
Cliff Sensors”
Side brush is bent, does not
sweep well
Excessive use.
Replace brush. Call Customer Service:
AUS: 1300 361 505 / NZ: 0800 800 900
Does not start
Battery is not installed correctly.
Install battery correctly. See “Battery Installation”
Battery low power.
Recharge battery (Turn cleaner “OFF” first)
Battery life has ended due to normal wear
and tear
Replace battery. Call Customer Service:
AUS: 1300 361 505 / NZ: 0800 800 900
Clog in nozzle.
Clean dirt cup and nozzle.
Does not sweep when it is turned on
Moves backwards after
being started
Clog indicator light on
we’re here to help
For troubleshooting please
call or visit our website:
AU: 1300 361 505
vax.com.au
NZ: 0800 800 900
vax.co.nz
13
Vax Careline: AU: 1300 361 505
NZ: 0800 800 900
vax
vax
505
900
Other Information
Vax Service & Help
Vax Careline:
Australia
New Zealand
1300 361 505
0800 800 900
Monday-Friday
8.30am to 5.00pm
If you have queries or concerns about using your Vax, call the Vax Careline. Calls are charged at the standard
local rate. Please make a note of the serial number and model number of the vacuum cleaner before calling.
For the nearest Service Agent, please call the Vax Customer Careline or visit vax.com.au/vax.co.nz
Technical Specification
Model No.:
VX1
Battery Voltage:
14.4 V DC
Charger Input Wattage: 100-240V a.c 50/60Hz 0.5A
Capacity:
280ml
Weight:
1.5kg
Filter:
Replaceable cloth
Charge Time:
4 hours
Run Time:
50 minutes
Battery Type:
NiMH (Nickel Metal Hydride)
Subject to technical change without notice.
Double
Insulated
Indoor
Use
Read
Instructions
Waste electrical products should not be disposed of with household waste. Please recycle where facilities exist.
Check with your Local Authority or retailer for recycling advice.
vax.com.au
vax.co.nz
14
Distributed by Techtronic Industries Australia Pty. Ltd.
31 Gilby Road, Mt Waverley, VIC 3149, Australia.
www.vax.com.au Careline: AU: 1300 361 505
www.vax.co.nz Careline: NZ: 0800 800 900