1
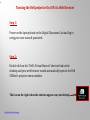
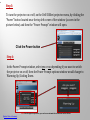
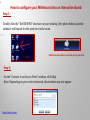
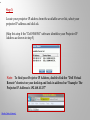
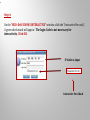
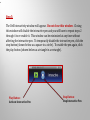
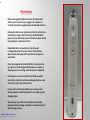
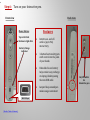
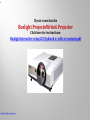
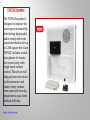
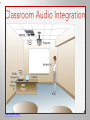
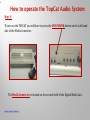
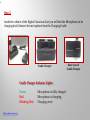
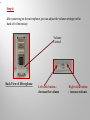
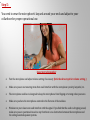
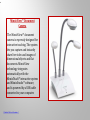
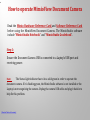
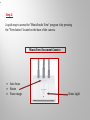
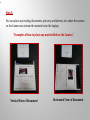
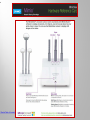
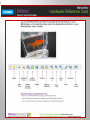
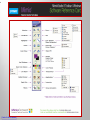
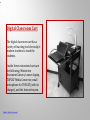
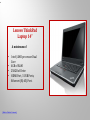
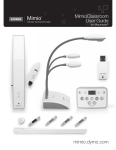
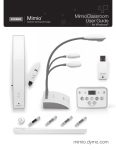
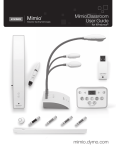
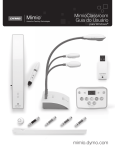
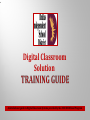
Digital Classroom
Solution
A detailed user guide to Digital Classroom Systems provided by the 2008 DISD Bond Program
Table of Contents
Page
Digital Classroom Components
3
Dell S500WI Projector
4
Turning the Dell projector On/Off via Web Browser
Steps 1 – 4
5
How to configure your Whiteboard into an Interactive Board
Steps 1-6
7
Locate your projector IP address
Step 3
8
Turn on your Interactive pen
Step 6
13
Boxlight ProjectoWrite6
14
Top Cat Speaker
15
Classroom Audio Integration
18
How to operate the TopCat Audio System
Steps 1-5
19
Media Connector
20
Microphone
21
MimioView™ Document Camera
30
How to operate MimioView Document Camera
Steps 1 – 3
26
Mimio Hardware Reference Card
29
Software Reference Card
30
Digital Classroom Cart
32
Lenovo ThinkPad Laptop 14”
34
Dell S500WI Interactive UltraShort Throw Projector
LightSpeed TOPCAT
Wireless Audio System
[ Back to Table of Contents ]
Boxlight ProjectoWrite6
Projector
Lenovo Thinkpad
Edge 14 Notebook PC
DYMO MimioView
Document Camera
Bretford
AV Notebook & Projection Cart
If your room has the Dell S500WI Projector follow the
instructions on pages 4 through 13.
[ Back to Table of Contents ]
Dell S500WI
The Dell S500WI projector
was designed to improve the
learning environment by
projecting a sharp, crisp,
clear picture of 720p HD
resolution onto any surface;
this presents an exceptional
view to the targeting
audience. This device
includes an interactive pen
which works like a
combination of a mouse and
stylus.
[ Back to Table of Contents ]
Turning the Dell projector On/Off via Web Browser
Step 1:
Power on the laptop found on the Digital Classroom Cart and log in
using your user name & password.
Step 2:
Double click on the “Dell’s Virtual Remote” shortcut link on the
desktop and your web browser would automatically open to the Dell
S500wi’s projector menu window.
The icon on the right is how the shortcut appears on your desktop.
[ Back to Table of Contents ]
Step 3:
To turn the projector on or off, on the Dell S500wi projector menu, by clicking the
“Power” button located near the top left corner of the window (as seen in the
picture below) and then the “Power Prompt” window will open.
Click the Power button
Step 4:
In the Power Prompt window, select yes or no depending if you want to switch
the projector on or off, then the Power Prompt options window would change to
Warming Up/Cooling Down.
[Back to Table of Contents]
Note: Once the projector powers on, you can close or minimize the web browser for Dell S500wi.
How to configure your Whiteboard into an Interactive Board
Step 1 :
Double click the “Dell S500WI” shortcut on your desktop. (See photo below) and the
software will search for the projector in the room
Step 2:
Desktop
Dell interactive software searching for the projector.
On the “Connect to an Access Point” window, click Skip.
Note: Depending on your school network, this window may not appear
[ Back to Table of Contents ]
Step 3:
Locate your projector IP address from the available server list, select your
projector IP address and click ok.
(Skip this step if the “Dell S500WI” software identifies your Projector IP
Address as shown in step 5)
Note: To find your Projector IP Address, double-click the “Dell Virtual
Remote” shortcut on your desktop and look in address bar “Example: The
Projector IP Address is 192.168.10.137”
[ Back to Table of Contents ]
Step 4:
On the “SSID: Dell S500WI INTERACTIVE” window, click the “Interactive Pen only”.
A green check mark will appear. The login Code is not necessary for
interactivity. Click OK.
IP Address Input
Interactive Pen Check
Step 5:
The Dell Interactivity window will appear. Do not close this window. Closing
this window will disable the interactive pen and you will have to repeat steps 2
through 4 to re-enable it. This window can be minimized at any time without
affecting the interactive pen. To temporarily disable the interactive pen, click the
stop button (shown below as a square in a circle). To enable the pen again, click
the play button (shown below as a triangle in a rectangle).
Play Button:
Activate Interactive Pen
Stop Button:
Stop Interactive Pen
Overview:
™
• Slim, rechargeable S500wi Projector Pen from Dell
allows you to write, draw, or apply it as a mouse on
virtually all software applications and smooth surfaces.
• Designed to deliver not just interactivity but off-surface
interactivity of up to 9m (29.5 feet), the Dell S500wi
projector pen will allow you the freedom to move off the
board and yet remain interactive.
• Embedded with a Li-ion battery, this slim and
rechargeable interactive pen comes with 3-button
functionality that puts swift control into the palm of
your hand.
• Cleverly designed for the Dell S500wi, this interactive
pen sports a sleek design and functions as a mouse, a
drawing tool, or a writing assistant at your command.
• Use this pen in concert with the Dell S500wi and its
interactive projection software and enjoy both on- and
off-surface (up to 9m) interactivity.
• Comes with a wrist strap which you can loop to the
bottom-end slot of the handy device to avoid drop and
damage of pen.
• You can now inject fun into mundane lessons, help
promote active learning, and spark renewed interest in
the learning journey.
[ Back to Table of Contents ]
Step 6: Turn on your Interactive pen.
Back view
Front view
Features
Mouse Buttons
Top is left click
Bottom is right click
Battery Charge
indicator
•
•
•
•
MINI USB port
[ Back to Table of Contents ]
Intuitive on- and offsurface (up to 9m)
interactivity
3-button functionality puts
swift control into the palm
of your hands
Embedded Li-ion battery
helps render easy recharge
via laptop/desktop using
the mini USB cable
Lanyard loop around pen
makes usage convenient
On/Off switch
for
Interactive pen
If your room has the
Boxlight ProjectoWrite6 Projector
Click here for instructions:
Boxlight Interactive setup123 Updated w-table of contents.pdf
[ Back to Table of Contents ]
TOPCAT Speaker
The TOPCAT speaker is
designed to improve the
learning environment by
distributing high quality
audio evenly with wide
sound distribution for up
to 1200 square feet. Each
TOPCAT includes a small
microphone for handsfree voice clarity with
single touch volume
control. This device will
help put less voice strain
on the instructor and
ensure every student,
even some with hearing
impairments, may listen
without difficulty.
[ Back to Table of Contents ]
One of three systems found in your classroom
Ceiling Mount
Wall Mount
Mobile Model
Increasing audibility in the classroom is a no brainer. Four traditional cone speakers
strategically placed will easily fill the room with sound. Use two cone speakers and turn up
the volume a little more and audibility will be satisfactory. This is a fine solution if all you
care about is making sure media related audio is being heard.
But what about speech intelligibility cues from teachers and peers?
A teacher’s voice can generally be heard just fine at almost any point in the
classroom through a traditional cone speaker system.
The problem lies in providing adequate intelligibility.
Audibility is essentially static, meaning that once you set the volume it won’t vary
significantly as you move about the room. It is measurable and predictable.
Intelligibility is dynamic.
Teachers move around the room, and may turn to face the interactive whiteboard, for
example (reducing visual cues as well).
Student generated noise levels change dramatically in an active classroom.
Other factors impacting speech intelligibility include projector noise, HVAC noise,
and traffic noise and are pervasive in modern classrooms.
You will find that this system eliminates all of the above!
[ Back to Table of Contents ]
How to operate the TopCat Audio System
Step 1:
To turn on the TOPCAT you will have to press the USB POWER button on the Left hand
side of the Media Connector.
The Media Connector is located on the second shelf of the Digital Media Cart.
[ Back to Table of Contents ]
[ Back to Table of Contents ]
Step 2:
Inside the cabinet of the Digital Classroom Cart you will find the Microphone on its
charging dock. Remove the microphone from the Charging Cradle.
Cradle Charger
Cradle Charger Indicator Lights:
Green
Red
Blinking Red
[ Back to Table of Contents ]
Microphone is fully charged.
Microphone is charging.
Charging error.
Back view of
Cradle Charger
Step 3:
After taking the microphone from the Charging Cradle, locate the power button
on the left side of the microphone with the light indicator facing you.
Front view of Microphone
Light Indicator
Power Button
Step 4:
After powering on the microphone, you can adjust the volume settings on the
back of it if necessary.
Volume
Control
Back View of Microphone
Left click button decrease the volume
Right click button
- increase volume
Step 5:
You need to wear the microphone’s lanyard around your neck and adjust to your
collarbone for proper operational use.
Important to Remember
•
•
•
•
•
Test the microphone and adjust volume setting if necessary (Refer back to step 4 for volume setting.)
Make sure you are not wearing items that could interfere with the microphone: jewelry, lanyards’, etc.
The microphone necklace is designed to keep the microphone from flipping or turning when you move.
Make sure you have the microphone centered in the flat area of the necklace.
Windows in your classroom could interfere with the signal. If you find that the audio is dropping sound,
make sure you are positioned in such a way that there is no obstruction between the microphone and
the ceiling mounted speaker systems.
MimioView™ Document
Camera
The MimioView™ document
camera is expressly designed for
interactive teaching. The system
lets you capture and instantly
share live video and images of
dimensional objects and flat
documents. MimioView
technology integrates
automatically with the
MimioTeach™ interactive system
and MimioStudio™ software,
and is powered by a USB cable
connected to your computer.
[ Back to Table of Contents ]
How to operate MimioView Document Camera
Read the Mimio Hardware Reference Card and Software Reference Card
before using the MimioView Document Camera. The MimioStudio software
include “MimioStudio Notebook” and “MimioStudio Gradebook”.
Step 1:
Ensure the Document Camera USB is connected to a Laptop’s USB port and
receiving power.
The Status Light indicator has to be a solid green in order to operate the
document camera. If it is flashing green, the MimioStudio software is not installed or the
Laptop is not recognizing the camera. Unplug the camera USB cable and plug it back in to
help fix this problem.
Note:
[ Back to Table of Contents ]
Step 2:
A quick way to access the “MimioStudio View” program is by pressing
the “View button” located on the base of the camera.
MimioView Document Camera
•
•
•
Auto focus
Rotate
Pause image
Status Light
Step 3:
You can place any reading documents, pictures, worksheets, etc. under the camera
so the Camera can stream the material onto the Laptop.
“Examples of how to place any material below the Camera”
Vertical View of Document
Horizontal View of Document
[ Back to Table of Contents ]
[ Back to Table of Contents ]
Digital Classroom Cart
The digital classroom cart has a
variety of learning tools for today’s
modern teachers to teach the
students.
Inside these customized carts are
the following; Mimioview
Document Camera, Lenovo laptop,
TOPCAT Media Connector, small
microphone for TOPCAT (with its
charger), and the Interactive pen.
[ Back to Table of Contents ]
FEATURES
• Affordable multimedia presentation cart incorporates your laptop, data projector, document
camera, DVD player, scanner and more all on one compact platform.
• Features a 3-height capability, from 34"-42"h in 4" increments and is easily adjusted by resetting four
leg screws.
• Two large 14”d shelves pull out from opposite sides on smooth rolling glides and allows you to easily
integrate your notebook computer with projectors and other equipment.
• Pull out shelf supports are arc welded to the leg supports for a strong and secure platform to support
equipment.
• Durable all-steel construction with black powder paint finish feature legs welded to the shelves so
minimal assembly time is required.
• Includes a roomy lockable storage cabinet with two keys and a rear grommet hole for cord
management.
• Rolls smoothly on 4" “Quiet Glide” casters, 2 locking.
• Die-pressed shelves have a 1/4" lip to prevent equipment from accidentally sliding off while in
transport.
• Top shelf includes a ribbed rubber mat.
• Recommended for use with a projector, document camera and notebook computer.
• 6-outlet electrical unit available with built-in cord winder and 20' extension cord lets you set up
anywhere in the room and still reach an electrical outlet.
Lenovo ThinkPad
Laptop 14”
A minimum of
Intel/AMD processor Dual
Core
• 4GB of RAM
• 250GB of Drive
• HDMI Port, 3 USB Ports,
Ethernet (RJ-45) Port.
•
[ Back to Table of Contents ]