1
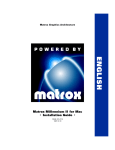
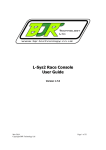
PLATINUM✴ QUALITY RANGE
REMOTE
CONTROL
6-in-1
URC6D
UNIVERSAL
■ For total control of up
to 6 pieces of remote
IR controlled devices
■ Ideal replacement for
lost or broken remote
controls
■ Compatible with most
brands (see reverse)
■ Features learning
technology
■ 1 years warranty
■ Complete with set up
instructions
Compatible equipment
QU
AL
IT
Y
M✴
TV
DVD
VCR
CABLE
AUDIO/HI-FI
SATELLITE
LASER DISC
& OTHERS
PL
AT
IN
U
■
■
■
■
■
■
■
■
This remote may provide functions that are not available on your
equipment. Some functions of your particular equipment (e.g. menu
functions) may not be controlled by this remote. In such cases, use the
original remote control for your equipment. Please use this manual to
become familiar with your Universal Remote. After you are familiar with
your remote the first thing you need to do is to install batteries and
set up your remote for your particular product and brand.
Button Functions
RED INDICATOR - Lights when any button is pressed.
TV, VCR, etc - Selects product to be operated.
SET UP - Used for setting up the remote.
OK - Selects menu items for the device you are controlling.
MENU - brings up the Menu screen - use with the
UP, DOWN, LEFT & RIGHT - navigation buttons.
6. TEXT HOLD - To stop at the current Teletext picture.
7. TEXT ON - Turns Teletext feature on.
8. LEARN - Used to set up learning functions.
9. VOLUME UP/DOWN - Changes the volume level of the product,
normally the TV.
10. NUMBERS - Enter numbers for direct channel selection.
11. AV - Press repeatedly to select from available viewing sources.
12. TELETEXT - feature colour buttons or VCR/DVD control buttons.
13. ENTER - Used for direct channel number entry.
14. MUTE - Turns off the TV sound while the picture remains.
15. PROGRAM UP/DOWN - Changes the channels.
16. TEXT MIX - Shows both Teletext and TV picture.
17. TEXT OFF - Turns Teletext feature off.
18. EXIT - Used to exit menu functions.
19. UP, DOWN, LEFT & RIGHT - navigation buttons.
20. INFO - Displays/selects on-screen channel information, etc.
21. POWER - Turns product On or Off. Button Functions, cont...
1.
2.
3.
4.
5.
Code Set Up
The SET UP button is used to set up the remote. You can either set up the
remote using the code for your brand of product, from the code tables
(on separate sheet), or you can search through the library of codes until
you find a code that works for your product.
Please refer to “Programming with Code Search” on page 3 for more
information on using the code search feature to learn how to search
through the library of codes for your products. NOTE: You can store
any kind of code under any mode (except TV). i.e. you can store a VCR
code under the SAT button, or a DVD code under the VCR button, etc.
However, you can only store TV codes under the TV button.
Direct Code Entry
1. Press and hold the SET UP button until the red indicator stays on,
then release the SET UP button.
2. Press and release the desired mode button (TV, VCR, etc.).
The red indicator blinks, then stays lit.
3. Enter the 3 digit code from the code tables (on separate sheet).
Note: After a valid code entry, the red indicator turns off.
For an invalid code, the red indicator flashes.
4. With your device on, press PROGRAM UP. If the device responds,
no further programming is required. Note: If some buttons do not
operate your equipment, try one of the other codes for your brand.
Write your codes down here for easy reference later.
2
1.
21
2
3
20
4
19
5
18
6
7
8
9
17
16
15
14
10
11
Note: The REC button must be
pressed TWICE to record from
your VCR. For some brands of
VCRs, you might need to press
the REC button once, then press
it again for three seconds.
Set Up Battery Installation
On the back of the remote, push
down on the tab and lift the cover
off. Match the batteries to the
+ and - marks inside the battery
case, then insert 2 AAA Alkaline
batteries. Press the battery cover
back into place.
Battery Saver
Your remote automatically turns
itself off if the buttons are depressed
for more than 30 seconds. This will
save your batteries should your
remote get stuck in a place where
the buttons remain depressed
(e.g: between the sofa cushions).
13
Code Saver
12
Codes are stored in permanent
memory while you are changing
batteries so you will not lose any
codes stored in the remote while
you are changing batteries.
Power-On Default
The remote powers on in TV mode.
Code Search
If your product does not respond after you have tried all the codes for
your brand, or if your brand is not listed, try searching for your code
by following these steps.
1. Manually turn on the device (TV, VCR, etc.) to be controlled.
2. Press and hold the SET UP button until the red indicator stays
on, then release the SET UP button.
3. Press and quickly release the desired mode button (TV, VCR, etc.).
The red indicator blinks off once.
4. Press the PROGRAM UP button repeatedly (up to 300 times) until the
device to be controlled changes channel. The red indicator blinks off
with each button press. If you accidentally overshoot the code required,
press the PROGRAM DOWN button to backtrack through the library
until the device changes channel. Pressing PROGRAM UP changes
direction to forward again.
5. Press and release MUTE to install the code.
Most users will store VCR codes under the VCR button, Cable codes under
SAT/CABLE, etc. If, for example you want to store a VCR code under
SAT/CABLE, first follow the procedure for Direct Code Entry
and press SAT/CABLE in step 2 of Direct Code Entry, then enter any
VCR code in step 3 of Direct Code Entry. Then follow the steps above
for Code Search. Note: If the device does not have a PROGRAM UP button,
use PLAY (VCR only) or POWER instead. Code Search starts from the
currently stored four digit number under that mode.
3
SET UP - Code Identification Feature
The Code Identification Feature allows you to identify the three digit library
code stored under your device key. For example, if you want to find out
what four digit code is stored under your TV device key, follow the
six steps below:
1. Press and hold the SET UP button until the red indicator stays on.
Release the SET UP button.
2. Press and release the desired mode button (TV, VCR, etc.).
The red indicator blinks, then stays lit.
3. Press and release the SET UP button. The red indicator blinks off.
4. To find the first digit for the code stored under the mode key pressed
in step 2, press each numeric key from 0-9 in turn. When the red indicator
blinks off, the number you pressed is the first digit for the code you are
searching for.
5. To find the second digit, repeat step 4, this time when the red
indicator blinks off this is the second digit.
6. Repeat step 4 again to find the third digit.
Programming Combo Device Codes
Some Combo devices (e.g TV/VCR, TV/DVD, DVD/ VCR, etc.) will require you
to set up two different Mode buttons to control both parts of the Combo
device. For example, if you have a TV/DVD Combo, you might need to set up
one code under the TV button to control the TV part AND a separate code
(under any other Mode button) to control the DVD part.
Controlling Combo Devices
Some Combo devices (e.g TV/VCR, TV/DVD, DVD/ VCR, etc.) have separate
buttons on the original remote to select the part of the combo device to be
controlled. For example, if your combo device is a DVD/VCR then its original
remote might have separate DVD and VCR buttons for selection of the
Combo part you would control. The equivalent button functions can be found
on your Universal Remote by using the device Mode and SET UP buttons.
Referring to “Programming with Code Search” on page 3, set up a device
Mode (e.g DVD) with the correct code for your Combo device. Assuming the
DVD/VCR Combo device is the example and its code is programmed under
DVD Mode, press and hold the DVD Mode button for more than one second
to send the DVD button command. To send the VCR button command, quickly
press and release the SET UP button followed by pressing and releasing the
DVD Mode button. This method can be applied similarly to all Combo devices
(e.g TV/VCR, TV/DVD, DVD/VCR etc.) and is available for all Modes.
Note this feature is not supported by all codes.
Controlling Devices Requiring
Separate Power On and Off Buttons
Some devices require separate Power On and Power Off buttons to turn
the device on and off. The equivalent button functions can be found on
your Universal Remote by using the device Mode and POWER buttons.
Referring to “Programming with Code Search”on page 3, set up a device
Mode (e.g TV) with the correct code for your device.
Assuming a TV device is the example and its code is programmed under TV
Mode, turn your TV on, press and hold the TV Mode button for more than
one second to transmit the Power On button command.
To turn the TV off, press and release the POWER button to transmit the
Power Off button command. This method can be applied similarly to any
device and is available for all modes. Note this feature is not supported by
all codes.
4
Volume/Mute Control and Punch-Through Feature
This remote lets you select which device Mode controls your Volume/Mute
buttons. The remote is initially set (factory default) for all device Modes
programmed with “Visual” codes (e.g TV, VCR, DVD, DVR, SAT, & CABLE)
and “Audio” codes (e.g CD & AUDIO) to use their own Volume/Mute control
if present. If the programmed “Visual” code has no Volume/Mute operation
of its own then those buttons will punch through control to the TV Mode
device without needing to change to TV Mode.
Any Mode chosen for Volume/Mute control MUST have its own
Volume/Mute function or the Volume/ Mute buttons will do nothing.
Setting ALL Volume/Mute Control to any one Mode
This routine can set all Modes to “punch-through” to any one chosen Mode
for Volume/Mute button control without the need to change to that Mode.
1. Press and hold the SET UP button until the red indicator turns on,
then release the button.
2. Press and hold the MUTE button until the red indicator blinks off,
then release the button.
3. Press and release the desired Mode button (TV, VCR, etc.) for
Volume/Mute control, the red indicator blinks then stays on.
4. Press and release the MUTE button and the red indicator turn off.
The red indicator will blink rapidly for three seconds if the Mode you
have selected has no Volume/Mute control.
5. All other Modes will now punch-through to your chosen Mode for
Volume/Mute control.
6. All “Visual” and “Audio” programmed Modes will now punch through
to the respective Modes you have chosen for Volume/Mute control.
Setting any Mode to use its own
Volume/Mute Control
This routine can set any Mode to use only its own Volume/Mute control.
Note - If your chosen Mode has no Volume/Mute functions of its own then
the Volume/ Mute buttons will do nothing.
1. Press and hold the SET UP button until the red indicator turns on,
then release the button.
2. Press and hold the MUTE button until the red indicator
blinks off, then release the button.
3. Press and release the desired Mode button (TV, VCR, etc.),
the red indicator blinks then stays on.
4. Press and release the VOLUME (Down) button, the red
indicator blinks then stays on.
5. Press and release the MUTE button and the red indicator turns off.
6. All “Visual” and “Audio” programmed Modes will now punch through
to the respective Modes you have chosen for Volume/Mute control.
5
Code Learning
The learning feature lets you “learn” functions from your original remote
control. For example - you may want to use your remote to operate the
RANDOM PLAY feature from your original CD remote control. This remote
is equipped with an “easy learning” feature that lets you “learn” features
(such as RANDOM PLAY from your original CD remote).
Tips on Learning
You can only learn one device type under any one Mode button (e.g only
learn TV codes under the TV Mode, VCR codes under the VCR Mode, etc.)
If you are trying to learn from a “Universal” remote, it might have more
than one code, type stored under a Mode. Try learning from another remote
to see if theres a problem with the type or brand of remote you are trying
to learn from.
a.
b.
c.
d.
e.
Some functions on some types of remotes might not be able to be learned.
No functions may be stored under LEARN, or SET UP buttons.
Only one original device type can be learned per individual Mode.
Use fresh batteries for both the Learning Remote and the Original Remote.
Keep at least 1 metre away from incandescent or low-energy lights
when learning.
f Perform a Master Clear (see page 7) before learning and try
learning 2 or 3 commands initially. Then carry out a Master Clear
before completely learning your original remote’s commands.
g. Place the original remote end-to-end with the Learning Remote sothe
(IR) transmitters on both remotes are directly in line with each other.
You may need to adjust the height of either remote to achieve this.
h. Keep the distance between the two remotes to approximately 3 cm and
do not move or change the distance between the two remotes until you
have learned all the required buttons for that Mode.
i. When Learning, do not release the button being learned until the
red indicator has blinked off for half a second.
j. Avoid learning your original remote Volume/Mute buttons unlessyou are
sure these operate the same device (e.g. some original DVD remotes
include TV Volume/Mute button control and can be two different types
of code).
k. Avoid learning your original remote VCR transport buttons unless you
are sure these operate the same device e.g. some TV remotes include VCR).
l. If learning the fi rst or second buttons for a Mode results in
continuous errors then try the following:
i. End the Learn session by pressing the SET UP key.
ii. Clear out the learned commands for that Mode.
iii. Check the IR transmitters are correctly aligned between
the two remotes.
iv. Adjust the distance between the two remotes to be closer
(e.g. 2 cm) or a further away (e.g. 5 cm) from each other.
v. Try learning the original remote for that Mode again.
If problems reoccur with the same button check the original remote button
being learned – Does it transmit? Does it operate the target device?
Try learning that button under a different clear Mode. If it learns okay
then it is likely to be a different code type from the others and cannot be
learned under the same Mode.
Learning Commands
The learning feature allows you to “learn” functions from your original
remote control. For example – you may want to use your remote to
operate the RANDOM PLAY feature from your original CD remote
control. This remote is equipped with an “easy learning” feature that
allows you to “learn” features (such as RANDOM PLAY) from your
original CD remote by following the steps on the next page.
6
1. Press and hold the SET UP button until the red indicator turns on,
then release the button.
2. Press and release the desired mode button (TV, VCR, etc.),
the red indicator blinks then stays on.
3. Press and release the LEARN button, the red indicator blinks
then stays on.
4. Press and release the Learning Remote button that you want to
teach (e.g. POWER).
5. Point both remotes facing each other by approximately 3 cm apart
6. Press and hold the Original Remote button (e.g. Power) until the
red indicator blinks once and stays on. If there is a learning
problem, the indicator blinks for three seconds and stays on.
If this happens, repeat Steps 4 to 6.
7. Repeat Steps 4-6 for other buttons you want to learn.
8. Press and release the SET UP button when all desired remote
commands are learned. Code Learning is now complete.
Clearing Commands
To Clear all Learned Commands under a Mode
Clearing learned commands is helpful if, for example, you replace your CD
player with another brand or model. If you had learned a feature from
your old CD player’s original remote on to this remote (such as RANDOM
PLAY), that feature would no longer work for your new CD player.
Should you wish to remove or clear one or more “learned” commands,
follow the steps below:
1. Press and hold the SET UP button until the red indicator turns on.
Release the SET UP button.
2. Press and release the button for the mode you want to clear (TV,
VCR, etc.). The red indicator blinks off.
3. Press and release the LEARN button TWICE. The red indicator
blinks off.
4. Press and release the SET UP button. The red indicator turns off.
All learned Commands under that mode are now cleared.
Master Clear To Clear all Learned Commands under all Modes
1. Press and hold the SET UP button until the red indicator turns on.
Release the SET UP button.
2. Press and release the LEARN button TWICE. The red indicator
blinks off.
3. Press and release the SET UP button. The red indicator turns off.
All Learned commands in the remote are now cleared.
Troubleshooting
Remote does not operate your product.
• Press the mode button of the product you want to control.
• Program the remote with a new code.
• Install new batteries. (You might have to re-program your remote
after installing new batteries.)
• Remote may not be compatible with your product.
Remote does not operate some features of your product.
• Program remote with a new code.
• Remote may not be able to operate all features of your
product or button names might be different than your product.
Red Indicator blinks after you program a product code.
• Remote did not accept the code.
• Try to program the code again or try a different code.
7
LIST OF SOME OF THE MOST POPULAR COMPATIBLE BRANDS
Complete list of all compatible brands and equipment is included inside
TV
VCR
DVD
SATELLITE
AUDIO
OTHERS
Apex
Audiovox
Benq
Citizen
Daewoo*
Emerson
GE
Hitachi*
JVC*
LG (Goldstar)*
LXI
Magnavox
Mitsubishi*
NEC*
Panasonic
Philco
Philips*
Pioneer*
Quasar
Radio Shack
RCA*
Samsung
Sanyo*
Sony*
Toshiba*
Zenith
Akai
Audiovox
Broksonic
Citizen
Daewoo
Emerson
GE
Hitachi
JVC
LG (Goldstar)
Magnavox
Mitsubishi
NEC
Panasonic
Philco
Philips
Pioneer
Quasar
Radio Shack
RCA
Realistic
Samsung
Sanyo
Sharp
Sony
Toshiba
Yamaha
Zenith
Apex
Bronsonic
Daewoo
Emerson
GE
Hitachi
JVC
LG (Goldstar)
Magnavox
Nexxtech
Panasonic
Philips
Pioneer
Radio Shack
RCA
Samsung
Sharp
Sony
Toshiba
Yamaha
ABC
Archer
Bell Expressvu
Direct TV
GE
General
Instrument (GI)
Motorola
Philips
Pioneer
Radio Shack
RCA
Samsung
Shaw
Sony
Star Choice
Toshiba
Uniden
Universal
Viewstar
Zenith
AIWA
AKAI
Denon
Fosher
Harman
Kardon
Kenwood
Magnavox
Mitsubishi
Panasonic
Philips
Pioneer
Radio Shack
RCA
Sanyo
Sharp
Sony
Teac
Technics
Yamaha
Zenith
DVR
Panasonic
Philips
RCA
Sony
Toshiba
DVD
RECORDERS
APEX
Hitachi
LG
Magnavox
Panasonic
Philips
Pioneer
Sony
Yamaha
LASER DISC
Denon
Pioneer
Sanyo
Sony
* Plasma, LCD & HDTV models
■ This remote is also equipped with a command learning feature, which lets the
remote learn commands from your original equipment remote control.
■ This remote control operates the common features of most, but not
all models and brands of Infrared Controlled Video Equipment (IR).
■ Requires two AAA batteries not included.
LIMITED 1 YEAR WARRANTY
The distributor warrants it’s products to be free
from defective materials and workmanship for
a period of 1 year from the original date of
purchase. If the product proves to be defective,
please return to the place of purchase within the
warranty period for a replacement (proof of purchase
will be required). This warranty does not extend to
any other product which have been subject to misuse,
neglect, accident, incorrect wiring or to use in violation
of operating instructions furnished herein, nor extend
to any units altered or repaired. This warranty does
not cover any incidental or consequential damages
and is in lieu of all other warranties expressed or
implied and no person is authorised to assume any
other liability in connection with the sale of this product.
ENVIRONMENTAL INFORMATION
Products marked with the crossed out
wheely bin must not be disposed of with
normal household waste but made available
for seperate household collection.
Seperate collection of used products and
their packaging allows materials to be
recycled and used again. Re use of recycled
materials helps prevent environmental
pollution and reduces the demand for raw
materials.
RoHs compliant
RoHS Compliant
■ Helpline: +44 (0) 1553 811000
■ Email: cust_serv@maxview.co.uk
■ Visit: www.maxview.co.uk
Iss 1