1
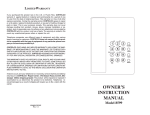
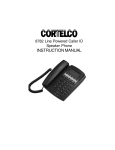
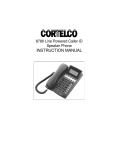
OWNER’S
INSTRUCTION MANUAL
CALLER ID TYPE II
LINE POWERED TELEPHONE
2211
TELEPHONE PART IDENTIFICATION
2
1
23
24
25
26 27 28
29
30
22
3
21
31
20
19
4
18
5
17
6
16
15
14 13 12 11 10 9
7
8
LCD Display
1
Line Jack
15
Hold LED
29
2
Data Jack
16
Handset Cord Jack
30
VM Button
3
Ringer Switch
17
Mem Dial Button
31
Flash Button
4
Speaker Volume
18
Mute Button w/ LED
5
2.5mm Headset Jack
19
Volume Button
6
Headset Off/On Switch
20
Delete Button
7
RJ45 Headset Jack
21
Handset Hook
8
One-Touch Memory
22
Hook Switch
9
Pause Button
23
Store Button
10
Redial Button
24
Review Down Button
11 Speakerphone LED
25
Customized Logo
12
Speakerphone Button
26
Release Button
13
Hold Button
27
Review Up Button
14
Memory Index
28
Message LED
6
TELEPHONE FEATURES
TONE DIALING
This unit is capable of only DTMF dialing. This phone is not compatible with pulse dialing.
RECEIVING A PHONE CALL
1. Be sure the RINGER switch is set to the HI or LOW position.
2.
When the phone rings and the caller’s information shows on the display window
(refer to Using the Caller ID Function), lift the handset or press the SPEAKERPHONE button and begin your conversation.
3.
Set the Ringer switch to the OFF position when you do not want to be interrupted
by the phone ringing. Remember to set the ringer switch back to Hi or Low when
you want to receive calls again.
PLACING A PHONE CALL
1. Lift the handset or press the SPEAKERPHONE button and wait for a dial tone.
2.
Dial the telephone number you wish to call. The number will appear on the display
window.
SPEAKERPHONE BUTTON
1. Receiving Incoming Calls
a. When the phone rings and the caller’s information shows on the display
window (refer to Using the Caller ID Function), press and release the
Speakerphone button and talk normally into the built-in microphone from a
distance of 5-6 inches.
b. You can adjust the volume of the caller’s voice by sliding the VOLUME
CONTROL on the right side of the phone.
c. After the conversation has finished, press the SPEAKERPHONE button to
hang up.
2.
To Make A Call
a. Press and release the SPEAKERPHONE button.
b. When you hear a dial tone, dial the number or press the auto memory
button just as you would on any other push-button telephone. The number
will appear on the display window.
7
c.
d.
When your party answers, adjust the sound level of his or her voice by sliding
the VOLUME CONTROL located on the right side of the phone.
After the conversation has finished, press SPEAKERPHONE to hang up.
Note:
1. If you wish to switch from speakerphone to handset, simply lift the handset.
2. If you wish to switch from handset to speakerphone, press and release
Speakerphone and then hang up the handset.
MEMORY
To Store A Number In Memory:
Note: Must be off-hook to store a number in memory
1. Press the STORE button, [SAVE TO?] appears on the display
window.
2.
Press the desired memory location.
•
To store in an auto memory button (located on right-hand side of base) - Press
1, 2, 3, or 11).
•
To store in a keypad memory location - Press one of the keypad buttons (l,
2, 3, or 0).
3.
[ENTER NUM >] appears in the display. Dial the telephone number (24 digits
maximum) to store in memory.
Note: The memory locations can be chained together to store numbers of
longer length.
4.
Press STORE again.
5.
Use pull out memory index to write in name and the memory button where it is
stored.
To Dial A Phone Number In Memory
1. Lift the handset and wait for a dial tone.
2.
3.
Press any memory location.
•
To dial an auto memory button (located on right-band side of base) - Press
the desired auto memory button (1, 2, 3.... or 11).
•
To dial a keypad memory location - press the MEM DIAL button first, and then
the desired keypad button (1, 2, 3.... or 0).
The number will be displayed and dialed automatically.
8
VOLUME BUTTON
A built-in amplifier feature allows you to increase the listening volume in the receiver of
the handset when speaking with your party. When needed, press the VOLUME button
to achieve four different levels. The volume remains the same between calls. It does
not return to a nominal level.
REDIAL BUTTON
1. If the number you dialed is busy, or you want to call the last number dialed again,
lift the handset, or press and release the hookswitch for a new dial tone.
2.
Press REDIAL. The number will appear on the display window.
3.
The last number called (32 digits maximum) will automatically be redialed.
PAUSE BUTTON
The PAUSE button allows you to insert a 3.6-second pause in the dialing sequence. This
is particularly useful if you are connected to a PABX system where you must dial an
access code (usually the number 9) to obtain an outside line.
1. Press the PAUSE button once and release at any point in the dialing sequence
where a pause is desired.
2. The PAUSE button can be pressed more than once to create a longer pause.
HOLD BUTTON
1. To place a call on hold, press the HOLD button and hang up the handset. The HOLD
Indicator will light up and remain lighted until you resume your conversation.
2.
To resume your conversation, lift the handset or that of any extension phone on the
same line or press and release SPEAKERPHONE. The HOLD indicator will go out
and your call can continue.
FLASH BUTTON
This telephone provides a line break signal for accessing PABX service or for convenient use of Call Waiting from your local telephone company. If you have Call Waiting
service, you can alternate the Call Waiting function per the following instructions.
1.
While having a conversation, another party calls and you hear a tone.
2.
Press the FLASH button once and release. The first conversation is placed on hold
and the second call can be answered.
3.
To return to the original conversation, press the FLASH button again and
release.The first caller can be spoken to again and the second call is placed on
hold.
9
DATA PORT
This is a connection which is in parallel with the telephone line. It allows the connection
of a device such as a modem, caller ID, or an answering machine.
MUTE BUTTON
Press MUTE to speak without the person on the phone hearing your conversation. The
MUTE Indicator will light up and remain lighted until you resume your conversation. To
resume your conversation, press MUTE. The MUTE indicator will go out and your call
can continue.
RELEASE BUTTON
To end a conversation, press the RELEASE button once.
VOICEMAIL BUTTON
Press the VOICE MAIL button to dial the voicemail access number.
Note: To store the Voice Mail Number, press STORE. Then press the VOICE MAIL button.
Enter the desired Voice Mail Number (max of 24 digits). Press store again to save the
number into memory.
HEADSET COMPATIBLE
The slide switch must be located in the proper position for this feature to work. The
headset can be turned on and off by using the handsfree button. Compatible with 2.5mm
and RJ45 headsets.
Note: Use the Slide Switch located on the right side of the phone base to set On or Off.
10
CALLER ID FEATURES
CALL WAITING DISPLAY
In the past, if you had call-waiting service, a tone alerted you there was a new call
coming while you were on an existing call.
Now our Call Waiting Caller ID not only tells you there is another call waiting, but lets you
know who the caller is before you answer it. The call waiting information will be shown
on the unit’s display.
Press the FLASH button to put the existing call on hold and answer the new call. No
matter whether you answer the call or not, the Call Waiting Caller ID will store the call
information for future reference.
4/15 01:45
Å
123-456-7891
PM
CALL #
01
JOHN SMITH
Note: Make sure you have subscribed to both Call Waiting Caller ID and Caller ID
service from your local telephone company. If you only have Caller ID service, the unit
works for Caller ID only.
MESSAGE WAITING
This unit’s MESSAGE WAITING DETECTION is for FSK, 24 and 90 Volt.
IF YOUR SERVICE IS FSK:
1. If you have a voice mailbox service from the phone company, the MESSAGE
light indicator will flash (green) and the message envelope icon will blink in the
display when a message waiting signal (on) from the Central Office is received.
2.
The MESSAGE light indicator will go off and the message envelope icon will
disappear if the message waiting off signal is sent from the Central office.
IF YOUR SERVICE IS 24V OR 90V:
Note: The Message Waiting switch must be in the proper position under the plastic
memory insert on the right side of the base.
1.
If you receive a voice mail, the red MESSAGE LED will flash (red).
2.
After the message is retrieved, the MESSAGE LED will go off.
11
This unit may not be activated or deactivated under certain conditions. For example,
when you retrieve your message from an outside phone (not your own telephone
number), the MESSAGE indicator may not be canceled when you return home. If you
experience this situation, pick up the receiver and hang up. The MESSAGE indicator will
cancel.
RECEIVING CALLS
1. When the telephone is not in use and a new call is received, the display will show
the phone number, the caller’s name, and time and date of the call.
4/15 01:45
123-456-7891
PM
CALL #
01
JOHN SMITH
2.
After 16 seconds with no activity, the display will default to the Stand-By screen
and remain on until another call is received or a button is pressed. This will show
you the total number of calls stored and the number of new calls that have not been
reviewed.
4/15 01:45
60
60
NEW TOTAL
PM
REVIEWING CALLS
1.
Press the REVIEW UP (
the incoming stored calls.
) or REVIEW DOWN (
) button to review
2.
When you have reached the end of the call records, the display will start at the
beginning of the call list again.
NOTE: A MAXIMUM OF 60 CALLER ID RECORDS CAN BE STORED.
12
DELETING CALLS
1. To delete an individual call: When reviewing calls, you can delete an individual
call by pressing the DELETE button once. The display will show DELETE?.
Press Delete again to confirm the deletion. The display will be erased and the
rest of the records will be renumbered.
4/15 01:45
123-456-7891
PM
CALL #
01
DELETE?
2.
To delete all calls: When reviewing calls, you can delete all calls by pressing and
holding DELETE for more than 3 seconds. Then [DELETE ALL]’ will appear. Press
DELETE to confirm you really want to erase all records. [-EMPTY LIST-] appears
on the display to show there are no calls stored in memory.
4/15 01:45
123-456-7891
PM
CALL #
01
DELETE ALL?
- EMPTY LIST -
MESSAGE ERROR
•
The display indicates [-ERROR-]” if your unit receives a call that has an
error in the transmission or reception.
- DATA ERROR -
13
PRIVATE CALLS
•
If the caller has exercised the option to block his number from being sent,
only his name will display on the screen when this information is received.
4/15 01:45
PM
CALL #
01
JOHN SMITH
•
If the caller has exercised the option to block his name from being sent, [PRIVATE
CALLER] and his telephone number will be displayed on the screen.
4/15 01:45
123-456-7891
PM
CALL #
01
- PRIVATE CALLER -
•
If the caller has exercised the option to block his name and number from being sent,
then [PRIVATE CALLER] will be displayed on the screen.
4/15 01:45
PM
CALL #
01
- PRIVATE CALLER UNKNOWN CALLS
•
When the telephone company is unable to provide information of the caller’s
telephone number, only his name will display on the screen when this informa
tion is received.
4/15 01:45
PM
CALL #
01
JOHN SMITH
•
When the telephone company is unable to provide information of the caller s name,
[UNAVAILABLE] and his telephone number will be displayed on the screen.
4/15 01:45
123-456-7891
PM
CALL #
01
- UNAVAILABLE -
•
When the telephone company is unable to provide information of the caller s name
and number, [UNAVAILABLE] will be displayed on the screen.
4/15 01:45
PM
CALL #
01
- UNAVAILABLE -
14
TELEPHONE SERVICE PROBLEMS
If you have any problems with your telephone equipment service, determine
if the problem is with your unit or the telephone company lines. BEFORE CALLING THE
TELEPHONE COMPANY, be aware that they may charge you for a service call if the
problem is caused by your telephone equipment.
TROUBLESHOOTING
PHONE DOES NOT RING
1. HI/LOW/OFF ringer switch is set to OFF position
2. Line cord is disconnected at telephone outlet or at telephone end.
3. Phone is OFF HOOK. Make certain the hookswitch is depressed when the handset
is in the cradle.
4. SPEAKERPHONE indicator is on. Turn off speakerphone.
NO DIAL TONE
Wire is disconnected at telephone jack or at wall jack. Test the telephone in a different
wall jack. If it works, the first jack may be defective.
HAVE DIAL TONE BUT CANNOT DIAL OUT
Check if the PULSE/TONE switch is at the correct position.
REDIAL BUTTON DOES NOT FUNCTION
The telephone may have been momentarily disconnected from the telephone jack.
CALLERS ARE NOT DISPLAYED ON THE SCREEN
1. Verify that you have subscribed to the appropriate service (Caller ID and Call
Waiting Caller ID) from your telephone company. If you only subscribed to the Caller
ID service this unit will not display the call waiting caller ID information.
2.
Check if your answering machine is set to answer the call before 2 rings.
NO CALLER INFORMATION IS DISPLAYED WHEN HEARING THE CALL WAITING
AUDIO SOUND
1. Verify that you have subscribed to the Call Waiting Caller ID service from your
telephone company.
15
MESSAGE ERROR HAPPENS FREQUENTLY
1. Caller information was not transmitted properly. Check with your telephone
company to see if there is a problem with your phone line.
Since our special design will always retain your stored call records, we
encourage you to disconnect all the telephone cords and adapter; and then
reinstall the unit step by step per this instruction manual before you ask for service.
MAINTENANCE INFORMATION
Treat your telephone equipment with care for trouble-free performance. Avoid
dropping the handset. Carefully place the handset on-hook after use.
Avoid putting near heating appliances and devices that generate electrical noise (for
example, motors and florescent lamps).
Clean your telephone equipment with a damp cloth. Stains may be removed with
a mild soap. Do not use liquid or aerosol detergents or cleaning agents.
Do not expose to direct sunlight or moisture
Retain the original package in case you need to ship it at a later date.
16