1
Complete 7-Piece 600-Watt Home
Theater Audio System
Please read before using this equipment.
Owner’s Manual
with 3-DVD Changer
ˆ Read this First
This audio system is made and tested to meet exacting safety standards. It meets both UL and FCC requirements.
• Connect the equipment into an outlet on a circuit different from
that to which the receiver is connected.
WARNING: To reduce the risk of fire or shock hazard, do
• Consult your local RadioShack store or an experienced radio/TV
technician for help.
not expose this product to rain or moisture.
• If you cannot eliminate the interference, the FCC requires that
you stop using your system.
CAUTION
RISK OF ELECTRIC SHOCK. DO NOT
OPEN.
!
Changes or modifications not expressly approved by RadioShack
may cause interference and void the user’s authority to operate the
equipment.
CAUTION: TO REDUCE THE RISK OF ELECTRIC
SHOCK, DO NOT REMOVE COVER OR BACK. NO
USER-SERVICEABLE PARTS INSIDE. REFER SERVICING TO QUALIFIED PERSONNEL.
REGION MANAGEMENT INFORMATION
Region Management Information: This DVD Player is designed and
manufactured to respond to the Region Management Information that
is recorded on a DVD disc. If the Region number described on the
DVD disc does not correspond to the Region number of this DVD
player, this DVD player cannot play that disc.
This symbol is intended to alert you to the
presence of uninsulated dangerous voltage
within the product’s enclosure that might be
of sufficient magnitude to constitute a risk of
electric shock. Do not open the product’s
case.
!
The Region number of this DVD player is 1 (USA/CANADA).
This symbol is intended to inform you that
important operating and maintenance
instructions are included in the literature
accompanying this product.
Notes on Unauthorized Discs
You may not be able to play back some DVD video discs on this player if they were purchased from outside your geographic area or made
for business purposes. When you try to play back an unauthorized
disc, “Check Regional Code” appears on the TV screen.
Warnings:
• This system employs a laser light beam. Only a qualified service
person should remove the cover or attempt to service this
device, due to possible eye injury.
• The use of controls, adjustments, or procedures other than those
specified herein might result in hazardous radiation exposure.
THE FCC WANTS YOU TO KNOW
This equipment has been tested and found to comply with the limits
for a Class B digital device, pursuant to Part 15 of the FCC Rules.
These limits are designed to provide reasonable protection against
harmful interference in a residential installation. This equipment generates, uses and can radiate radio frequency energy and, if not installed and used in accordance with the instructions, may cause
harmful interference to radio communications.
However, there is no guarantee that interference will not occur in a
particular installation. If this equipment does cause harmful interference to radio or television reception, which can be determined by
turning the equipment off and on, the user is encouraged to try to correct the interference by one or more of the following measures:
• Reorient or relocate the receiving antenna.
NOTES ON COPYRIGHT
It is forbidden by law to copy, broadcast, show, broadcast on cable,
play in public, and rent copyrighted material without permission.
DVD video discs are copy protected, and any recordings made from
these discs will be distorted.
This product incorporates copyright protection technology that is protected by method claims of certain U.S. patents and other intellectual
property rights owned by Macrovision Corporation and other rights
owners. Use of this copyright protection technology must be authorized by Macrovision Corporation, and is intended for home and other
limited viewing uses only, unless otherwise authorized by Macrovision Corporation. Reverse engineering or disassembly is prohibited.
PLACING THE RECEIVER
Do not place objects directly on top of the receiver as it could prevent
proper heat dispersal.
When installing in a rack or shelf, be sure to leave more than 8 inches
of space above and behind the receiver.
• Increase the separation between the equipment and receiver.
© 2001 RadioShack Corporation.
All Rights Reserved.
RadioShack is a trademark used by RadioShack Corporation.
© 1996 Digital Theater System, Inc.
DTS and DTS Digital Surround are trademarks of Digital Theater System, Inc.
All Rights Reserved.
© 1992-1997 Dolby Laboratories, Inc.
Dolby, ProLogic, and the double-D symbol are trademarks of Dolby Laboratories, Inc.
All Rights Reserved.
Spatializer(R) 3-D Stereo, Spatializer N-2-2 (TM) and the circle-in-square device are trademarks owned by Desper Products, Inc,.
All Rights Reserved.
2
Read this First
MAKING CABLE CONNECTIONS
Be careful not to bend cables over the top of the receiver.
mended by the manufacturer or sold with the product. Follow the
manufacturer's instructions for mounting, and use a recommended mounting accessory.
If cables are placed on top of the receiver, the magnetic field prodcued by the receiver’s transformers can cause the speakers to produce a humming noise.
• Carts — Move the product on a cart carefully. Quick stops,
excessive force, and uneven surfaces may cause the product/
cart to overturn.
6. Disc Tray — Keep your fingers well clear of the disc tray as it is
closing. It may cause serious personal injury.
USING DISCS
When using discs, you must always take the following precautions:
• Do not touch the playback side of the disc.
• Do not attach paper or tape to discs.
• Do not store discs in a place subject to direct sunlight or near
heat sources.
• Do not store discs in places subject to moisture and dust such as
a bathroom or near a humidifier.
• Store discs vertically in a case. Stacking or placing objects on
discs outside of their case may cause warping.
Cleaning Discs
Fingerprints and dust on the disc cause picture and sound deterioration. Wipe the disc from the center outward with a soft cloth. Always
keep the disc clean.
If you cannot wipe off the dust with a soft cloth, wipe the disc lightly
with a slightly moistened soft cloth and finish with a dry cloth.
Do not use any type of solvents such as thinner, benzene, commercially available cleaners or anti-static spray for vinyl LPs. They might
damage the disc.
IMPORTANT SAFETY INSTRUCTIONS
Careful attention is devoted to quality standards in the manufacture of
your system, and safety is a major factor in its design. However, safety is also your responsibility.
This section lists important information that will help you properly use
and enjoy your system. Read all the included safety and operating instructions before using your system. Follow them closely, and retain
them for future reference.
1. Heed Warnings — Follow all warnings on the product and in the
operating instructions.
2. Cleaning — Unplug this product from the wall outlet before
cleaning. Use only a damp cloth for cleaning. Do not use liquid or
aerosol cleaners.
3. Attachments — Do not use attachments/accessories not recommended by the product manufacturer, as they might create a
hazard.
4. Water and Moisture — Do not use this product near water (for
example, near a bathtub, washbowl, kitchen sink, or laundry tub;
in a wet basement; or near a swimming pool).
5. Accessories — Do not place this product on an unstable cart,
stand, tripod, bracket, or table. The product may fall, causing
serious injury to a child or adult, and serious damage to the product. Use only with a cart, stand, tripod, bracket, or table recom-
7. Burden — Do not place a heavy object on or step on the product.
The object may fall, causing serious personal injury and serious
damage to the product.
8. Connecting — When you connect the product to other equipment, turn off the power and unplug all the equipment from the
wall outlet. Failure to do so may cause an electric shock and
serious personal injury. Read the owner’s manual of the other
equipment carefully and follow the instructions when making any
connections.
9. Sound Volume — Reduce the volume to the minimum level
before you turn on the product. Otherwise, sudden high volume
sound may cause hearing or speaker damage.
10. Sound Distortion — Do not allow the product to output distorted
sound for a longtime. It may cause speaker overheating and fire.
11. Headphones — When you use the headphones, keep the
volume at a moderate level. If you use the headphones continuously with high volume sound, it may cause hearing damage.
12. Laser Beam — Do not look into the opening of the disc tray or
ventilation opening of the product to see the source of the laser
beam. It may cause sight damage.
13. Disc — Do not use a cracked, deformed, or repaired disc. These
discs are easily broken and may cause serious personal injury
and product malfunction.
14. Ventilation — Slots and openings in the cabinet provide ventilation, ensure reliable operation, and protect from overheating. Do
not block or cover these openings, and do not place the product
on a bed, sofa, rug, or other similar surface. Do not place the
product in a built-in installation such as a bookcase or rack
unless it provides proper ventilation as specified by the manufacturer.
15. Power Sources — Operate this product using only the power
source indicated on its marking label. If you are not sure of your
home's power type, consult your product dealer or local power
company.
16. Polarization — This product is equipped with a polarized AC line
plug (a plug having one blade wider than the other). This plug will
fit in the power outlet only one way. This is a safety feature. If
you cannot insert the plug fully into the outlet, try reversing the
plug. If the plug still doesn't fit, contact your electrician to replace
your obsolete outlet. Do not defeat the safety purpose of the
polarized plug. If you need an extension, use a polarized cord.
17. Power-Cord Protection — Route power-supply cords so they are
not likely to be walked on or pinched by items placed on or
against them, paying particular attention to cords at plugs, convenience receptacles, and the point where they exit from the
product.
Read this First
3
18. Lightning — For added protection for this product during a lightning storm, or when it is left unattended and unused for long periods of time, unplug it from the wall outlet and disconnect the
antenna or cable system. This will prevent damage to the product due to lightning and power-line surges.
19. Overloading — Do not overload wall outlets, extension cords, or
integral convenience receptacles, as this can result in a risk of
fire or electric shock.
20. Objects and Liquids — Never push objects of any kind into this
product through openings, as they may touch dangerous voltage
points or short out parts that could result in a fire or electric
shock. Never spill liquid of any kind on the product.
21. Servicing — Do not attempt to service this product yourself, as
opening or removing covers may expose you to dangerous voltage or other hazards. Refer all servicing to qualified service personnel.
unit, size of grounding conductors, location of antenna-discharge
unit, connection to grounding electrodes, and requirements for
the grounding electrode.
Note to CATV System Installer
This reminder is provided to call the CATV system installer’s attention
to Section 820-40 of the NEC which provides guidelines for proper
grounding and, in particular, specifies that the cable ground shall be
connected to the grounding system of the building, as close to the
point of cable entry as practical.
Power Lines — An outside antenna system should not be located in
the vicinity of overhead power lines or other electric light or power circuits, or where it can fall into such power lines or circuits. When installing an outside antenna system, extreme care should be taken to
keep from touching such power lines or circuits as contact with them
might be fatal.
22. Damage Requiring Service — Unplug this product from the wall
outlet and refer servicing to qualified service personnel under the
following conditions:
• When the power-supply cord or plug is damaged.
• If liquid has been spilled or objects have fallen into the product.
• If the product has been exposed to rain or water.
• If the product does not operate normally by following the operating instructions. Adjust only those controls that are covered
by the operating instructions, as an improper adjustment of
other controls may result in damage and will often require
extensive work by a qualified technician to restore the product
to normal operation.
• If the product has been dropped or damaged in any way.
• When the product exhibits a distinct change in performance.
23. Replacement Parts — When replacement parts are required, be
sure the service technician uses replacement parts specified by
the manufacturer or having the same characteristics as the original part. Unauthorized substitutions may result in fire, electric
shock, or other hazards.
24. Safety Check — Upon completion of service or repairs to this
product, ask the service technician to perform safety checks to
determine that the product is in proper operating condition.
25. Wall or Ceiling Mount — The product should be mounted to a
wall or ceiling only as recommended by the manufacturer.
26. Heat — The product should be situated away from heat sources
such as radiators, heat registers, stoves, or other products
(including amplifiers) that produce heat.
27. Non-use Periods — Unplug the system’s power cord when you
will not use it for extended periods.
28. Outdoor Antenna Grounding — If an outside antenna or cable
system is connected to the product, be sure the antenna or cable
system is grounded so as to provide some protection against
voltage surges and built-up static charges. Article 810 of the
National Electrical Code, ANSI/NFPA 70, provides information
with regard to proper grounding of the mast and supporting
structure, grounding of the lead-in wire to an antenna discharge
4
Read this First
ˆ Contents
Features .......................................................................................... 6
Preparation .....................................................................................
Connecting Components .............................................................
Connecting a TV .....................................................................
Connecting a Cassette Deck ..................................................
Connecting a VCR ..................................................................
Connecting a Satellite Receiver or Cable Box ........................
Connecting a Digital Optical Audio Devices ............................
Connecting an Auxiliary Audio Device ....................................
Connecting a Second Sub Woofer ..........................................
Connecting Antennas ..................................................................
FM Indoor Antenna .................................................................
FM Outdoor Antenna ..............................................................
AM Indoor Loop Antenna ........................................................
AM Outdoor Antenna ..............................................................
Connecting the Speakers ............................................................
Placing the Speakers ..................................................................
Installing Batteries in the Remote Control ...................................
7
7
7
7
7
7
7
7
7
7
7
7
7
8
8
8
8
Receiver Operation ........................................................................ 9
A Quick Look at the Receiver’s Controls ..................................... 9
Using the Tuner ......................................................................... 10
Listening To FM Stereo Broadcasts ...................................... 10
Presetting Radio Stations ..................................................... 10
Manual Preset ....................................................................... 10
Auto Preset ........................................................................... 10
Listening to Preset Stations .................................................. 10
Switching Between Preset Stations and Manual Tuning ....... 10
Using the CD Player .................................................................. 10
Continuous Play .................................................................... 11
Changing the Sound Mode ................................................... 11
Using Night Mode ...................................................................... 11
Using the Sleep TImer ............................................................... 11
Using the Dimmer ...................................................................... 11
Remote Control Operation ..........................................................
A Quick Look at the Remote Control .........................................
Operating Range of the Remote Control ...................................
Setting up the Surround Sound System ....................................
Changing the Speaker Size ..................................................
Changing the Channel Level .................................................
Changing the Speaker Distance ...........................................
Surround Effects ...................................................................
Changing System Settings - Special Circumstances ............
Using the Remote Control Unit to Control Additional
Components ..............................................................................
Controlling the Tuner .................................................................
Listening To FM Stereo Broadcasts ......................................
Presetting Radio Stations .....................................................
Manual Preset .......................................................................
Auto Preset ...........................................................................
Listening to Preset Stations ..................................................
Switching Between Preset Stations and Manual Tuning .......
Controlling the CD Player ..........................................................
Changing the Sound Mode ...................................................
Using GUI Menu Icons ..........................................................
Repeat Play ..........................................................................
Programming Tracks .............................................................
Modifying the Program and Adding a Track ..........................
Random Play ........................................................................
Controlling the Sleep TImer .......................................................
Stopping Play ........................................................................
Pausing Play .........................................................................
Advancing by Frames ...........................................................
Playing in Slow-Motion ..........................................................
Skipping Chapters .................................................................
Scanning ...............................................................................
Advanced Features ...................................................................
Using GUI Menu Icons ..........................................................
Using a Title Menu ................................................................
Using a DVD Menu ...............................................................
Changing Subtitle Language .................................................
Changing Soundtrack Language ..........................................
Viewing from Another Angle .................................................
Using Repeat Play ................................................................
Zooming In ............................................................................
Setting rating level and password .............................................
Selecting a Rating Level .......................................................
Setting a Password ...............................................................
Clearing Your Password ........................................................
Selecting TV Aspect ..................................................................
Selecting Digital Audio Out ........................................................
12
12
12
13
13
13
13
14
14
17
17
17
17
18
18
18
18
18
18
19
19
19
19
19
19
19
20
20
20
20
Troubleshooting .......................................................................... 21
Care ........................................................................................... 22
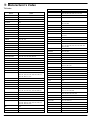
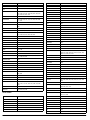
Manuracturer’s Codes .................................................................
TV Codes ..............................................................................
VCR Codes ...........................................................................
Cable Codes .........................................................................
SAT Codes ............................................................................
23
23
24
25
26
Specifications ..............................................................................
Amplifier Section ...................................................................
Tuner Section ........................................................................
Video Section ........................................................................
Speaker Section ....................................................................
Miscellaneous .......................................................................
27
27
27
27
28
28
14
14
14
14
14
15
15
15
15
15
15
15
16
16
16
16
DVD Player Operation ................................................................. 17
Basic Playback .......................................................................... 17
Contents
5
ˆ Features
Your Complete 7-Piece 600-Watt Home Theater Audio System is a
great system that incorporates some of the best features in home theater technology. The Home Theater Audio System comes complete
with a shielded center-channel speaker, a band pass-type subwoofer,
two shielded front-channel speakers, two rear surround speakers, a
remote control, and a receiver equipped with a tuner and a 3-disc
DVD player.
Its other features include:
Dolby Digital, Dolby ProLogic, and DTS Sound Settings — let you
use the Home Theater Audio System for a movie-theater surround
sound experience
Adjustable Speaker Size, Channel Level, and Distance — lets you
customize your setup for a true surround sound experience
Additional Component Connections — let you connect other audio
and audio/visual components to the receiver so that you can use the
system’s surround sound speakers
Night Mode — lets you compress the dynamic range, reducing the
difference in loudness between different sounds
Parental Lock (Rating Level) — lets you set a ratings level so that
your children cannot watch a DVD that has a rating higher than you
set
Sleep Timer — lets you program the receiver to turn off after a set
time period
6
Features
ˆ Preparation
CONNECTING COMPONENTS
You must connect a TV to the receiver in order to use the receiver’s
DVD player. You can connect other audio and audio/visual components to the receiver in order to use the Home Theater Audio System’s surround sound capabilities.
Connecting a TV
Use audio/video cords (not supplied) to connect a TV to the receiver.
Connect red plugs to the red AUDIO jacks and white plugs to the
white AUDIO jacks.
If your TV has an S-Video jack, use an S-Video cable to connect your
TV to the receiver’s S-VIDEO OUT. If your TV does not have an S-Video jack, use audio/video cord to connect your TV to the receiver’s
MONITOR OUT.
Connecting a Cassette Deck
Use audio/video cords (not supplied) to connect a cassette deck to
the receiver. Connect red plugs to the red AUDIO jacks and white
plugs to the white AUDIO jacks. Make sure you connect the VCR to
both the TAPE IN and TAPE OUT sets of jacks.
Note: If the cassette deck is placed too close to the receiver, noise
might occur during cassette playback. If this happens, move the cassette deck farther away from the receiver.
Connecting a VCR
Use audio/video cords (not supplied) to connect a VCR to the receiver. Connect red plugs to the red AUDIO jacks and white plugs to the
white AUDIO jacks.
Connect yellow plugs to the yellow VIDEO jacks.
Note: Make sure you connect the VCR to both the IN and OUT sets of
jacks.
You can also connect a satellite receiver, MD or DAT recorder, CD
player, or anything else with digital output to the receiver’s SAT IN optical jack. Use Toslink optical cable to connect the desired device to
the receiver.
Connecting an Auxiliary Audio Device
You can also connect an audio device that does not require Toslink
(such as an MP3 player, playback cassette deck, or portable CD
player) to the Home Theater Audio System. Use audio cords to connect the desired device to the receiver’s AUX jacks. Connect red
plugs to the red AUDIO jacks and white plugs to the white AUDIO
jacks.
Connecting a Second Sub Woofer
You can connect a second or larger powered subwoofer to the system. Connect the sub woofer to the receiver’s SUB WOOFER PRE-OUT
jack using shielded audio cable (not supplied).
CONNECTING ANTENNAS
When connecting equipment, always make sure the power is
switched off and the power cord is disconnected from the wall outlet.
FM Indoor Antenna
In an area with strong FM signals, the T-type FM antenna (supplied)
is sufficient.
1. Use a flat or Phillips screwdriver to loosen the screws on the
supplied transformer.
2. Place the metal connectors on the end of theT-type antenna’s
base on the transformer’s metal contacts (underneath the screw
heads) then tighten the screws.
3. Plug the transformer into ANTENNA FM 75 Ω.
4. Extend the T-antenna’s other two wires and attach them to a wall
or window frame for the best possible reception.
Connecting a Satellite Receiver or Cable Box
Use audio/video cords (not supplied) to connect a satellite receiver or
cable box to the receiver. Connect red plugs to the red AUDIO jacks
and white plugs to the white AUDIO jacks.
Note: Your cable box or satellite receiver must use audio/video cords
or Toslink optical cable to connect to the receiver. If your equipment
only uses coaxial cable, you cannot connect it to the receiver.
If your satellite receiver or cable box has digital output, use an optical
cable to connect the satellite receiver to the home theater receiver’s
SAT IN optical jack. If your satellite receiver or cable box does not
have digital output, use analog cable to connect it to the home theater
receiver’s SAT IN video jack.
If you have a cable FM antenna, use a coaxial cable to connect it to
ANTENNA FM 75 Ω.
FM Outdoor Antenna
In an area where FM signals are weak, you must use a 75-ohm unbalanced-type outdoor FM antenna (not supplied). Generally, a 3-element antenna will be sufficient. If you live in an area where the FM
signals are particularly weak, it may be necessary to use one with 5
or more elements.
Connect the antenna’s coaxial cable to the supplied transformer.
Plug the transformer into ANTENNA FM 75 Ω.
Connecting a Digital Optical Audio Devices
AM Indoor Loop Antenna
You can connect a digital audio device such as an DAT (Digital AudioTape) or MD (Mini Disc) recorder to the receiver’s DIGITAL OUT to
record audio from the receiver. Use Toslink optical cable to connect
the DAT or MD recorder to the receiver’s DIGITAL OUT optical jack.
The supplied high-performance AM loop antenna is sufficient for
good reception in most areas.
Preparation
7
Connect the loop antenna’s wires to AM and GND. Place the antenna
in a location (for example, on a shelf or window frame) that gives the
best reception.
resulting from the speaker falling from the TV in the event of
external shocks (for example, earthquakes).
3. If possible, install the surround speakers slightly above ear level.
Keep the antenna as far away as possible from the entire system,
speaker cords and the power cord to prevent unwanted noise.
Note: Try not to install the surround speakers farther away from
the listening position than the front and center speakers. Doing
so can weaken the surround effect.
AM Outdoor Antenna
If the supplied AM loop antenna does not deliver sufficient reception,
use an outdoor AM antenna (not supplied).
To achieve the best possible surround sound, install your speakers
as shown below. Be sure all speakers are installed securely to prevent accidents and improve sound quality.
Note: Even when using an outdoor AM antenna, do not disconnect
the AM indoor loop antenna.
Overhead view of speaker set up
Use an insulated wire more than 15 ft (5 m) long. Strip one end, and
connect that end to AM.
The antenna wire should be strung outdoors or indoors near a window. For better reception, connect the GND terminal to a reliable
ground.
CONNECTING THE SPEAKERS
When connecting equipment, always make sure the power is
switched off and the power cord is disconnected from the wall outlet.
(Illus of speaker set up, please use the illus of 31-5011 if necessary)
INSTALLING BATTERIES IN THE REMOTE
CONTROL
Your remote control requires two AAA batteries (not supplied) for
power. For the best performance and longest life, we recommend
RadioShack alkaline batteries.
Cautions:
Note: Use speakers with a normal impedance of 6 Ohms.
• Use only fresh batteries of the required size and recommended
type.
Follow these steps to connect the speakers.
• Do not mix old and new batteries or different types of batteries.
Follow these steps to install batteries.
1. Remove the plastic end pieces from the wires.
2. Twist the exposed ends of the bare wire strands.
1. Slide the battery compartment cover in the direction of the arrow
to remove it.
3. Press up (or down) the speaker’s terminal and insert the appropriate wire ends. The color of the speaker wire’s plastic coating is
the same as the color of the matching terminal.
2. Place the batteries in the compartment as indicated by the polarity symbols (+ and –) marked inside.
Note: Be sure to connect each speaker to the appropriate
speaker terminal, connecting positive to positive (+ to +) and
negative to negative (– to –).
4. Connect the front speaker’s wire to the receiver’s SPEAKERS
FRONT L and R terminals (Red/Black).
Connect the rear speaker’s wire to the receiver’s SPEAKERS
REAR L and R terminals (Gray/Black).
Connect the center speaker’s wire to the receiver’s SPEAKERS
CENTER terminal (Blue/Black).
3. Replace the cover.
When the remote control stops operating properly, replace the batteries.
Warning: Dispose of old batteries promptly and properly. Do not burn
or bury them.
Caution: If you do not plan to use the remote control for a month or
longer, remove the batteries. Batteries can leak chemicals that can
destroy electronic parts.
Connect the subwoofer’s wire to the receiver’s SPEAKERS
WOOFER terminal (Brown/Black).
5. Release the speaker terminal.
6. Plug the AC power cord into an AC wall socket.
PLACING THE SPEAKERS
1. Place the front left and right speakers at equal distances from
the TV.
2. Install the center speaker above or below the TV so that the
sound of the center channel is localized at the TV screen.
Caution: If you choose to install the center speaker on top of the
TV, be sure to secure it, to reduce the risk of damage or injury
8
Preparation
ˆ Receiver Operation
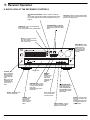
A QUICK LOOK AT THE RECEIVER’S CONTROLS
DISC SKIP/TUNING MODE – Press to skip discs in DVD/CD
mode.
In tuner mode, press to switch between presets and manual tuning
(see “Switching Between Preset Stations and Manual Tuning” on
Page 10).
BAND/PLAY – Press to select AM or FM
band in tuner mode.
Press to plays back the disc in DVD/CD mode.
FUNCTION – Rotate to select the desired audio
or audio/video source. The selected source name
appears on the display panel.
TUNING/PRESET – Repeatedly
press to tune to AM or FM stations
and select preset stations in tuner
mode.
DISC 1, 2, 3 – Press to open or
close the disc trays.
Note: You cannot use these buttons in tuner mode.
NIGHT MODE – When
the sound source is Dolby Digital or stereo
mode, press to compress large dynamic
range (see XXXX on
page XX)..
Display Panel
PHONES – This
jack is compatible
with wide range of
conventional dynamic headphone
types.
When you connect
headphones, the
unit automatically
selects stereo
mode.
MEMORY/
PAUSE –
stores a station
in memory in
tuner mode;
pauses the disc
in DVD/CD
mode.
FM MODE/STOP – In tuner
SURROUND MODE –
Press to switch surround
modes between PRO
LOGIC, THEATER, HALL,
and STADIUM for analog
equipment (not for SATOPT function).
mode, press to select stereo
or monaural mode for FM in
tuner mode.
In DVD/CD mode, press to
stop the disc.
SLEEP – Repeatedly press
DTS – Press to switch
to set the sleep timer.
to 5.1 Channel DTS
from stereo mode.
STEREO – Press to switch
DIMMER – Press
once to dim the
display panel.
Press one more to
return to normal
status.
DOLBY DIGITAL – Press to
switch to 5.1 Channel Dolby
Digital from stereo mode.
Receiver Operation
from surround mode to stereo mode.
In Dolby Digital mode, press
to change the mode to stereo. IJ appears.
9
USING THE TUNER
Auto Preset
1. Press POWER. The receiver defaults to the last selected function.
1. Press BAND to select the desired band.
2. Rotate FUNCTION to the tuner function.
2. Hold down MEMORY for about 3 seconds.
3. Press BAND to select the desired band.
3. The tuner automatically begins scanning, and stores the first 30
strong signals it receives.
4. Repeatedly press TUNING/PRESET )ý# or ,ý- to tune in the
desired station. When you reach a station, Jkd[Z appears above
the station number.
To change the frequency by one step, press TUNING/PRESET )
# or ,- quickly (less than half a second).
To tune to the next clear frequency, hold down TUNING/PRESET
)ý# or ,-, then release the button. The system automatically tunes to the next strong station.
Listening To FM Stereo Broadcasts
In FM mode, press FM MODE to select stereo or mono. When you select the stereo mode, IJ appears to the right of Jkd[Z. It goes off
when you select mono.
4. Scanning stops automatically after radio stations have been
stored in the auto preset memory.
Note: Press MEMO again to stop auto scanning earlier.
To store stations on the other band, repeat Steps 1–4, substituting
the other band in Step 1.
Listening to Preset Stations
To listen to a radio station stored in the station memory, press TUNING MODE then TUNING/PRESET )ý# or ,-.
Switching Between Preset Stations and Manual
Tuning
When you listen to very weak FM stereo stations, you might hear
higher-than-normal background hiss. Switch to mono to eliminate the
hiss.
If you store preset stations, pressing TUNING/PRESET )ý# or ,scrolls through the preset stations, rather than changing the frequency station by station.
Presetting Radio Stations
To switch to scrolling by individual stations, press TUNING MODE,
then repeatedly press TUNING/PRESET )ý # or ,- quickly to
change the frequency by one step. Or hold down TUNING/PRESET )
# or ,- to tune to the next clear station.
You can preset 30 AM and 30 FM stations regardless of the reception. Tune in the desired stations using auto or manual tuning.
To switch back to scrolling through the preset stations, press TUNING
)ý# or ,- until
you reach the desired station.
Manual Preset
MODE, then repeatedly press TUNING/PRESET
1. Press BAND to select the desired band.
2. Repeatedly press TUNING/PRESET
desired station.
)ý# or ,- to tune in the
To change the frequency by one step, press TUNING/PRESET )
# or ,- quickly (less than half a second).
To tune to the next clear frequency, hold down TUNING/PRE-
)ý# or ,-, then release the button. The system automatically tunes to the next strong station.
SET
3. Press MEMORY. C;CE flashes for 5 seconds. When C;CE goes
off, press the button again (C;CE flashes again).
4. Select the preset number with TUNING/PRESET )ý# or ,-.
5. Press MEMORY again.
USING THE CD PLAYER
You can use the receiver’s 3-DVD changer to listen to audio CDs.
Important: You can only use audio CDs and some CD-Rs with the
reciever. CD-ROM, CD-G, photo CD, and CD-i discs can not be
played on this player.
1. Press POWER.
2. Rotate FUNCTION until :L:%9: appears.
3. Press DISC 1, DISC 2, or DISC 3 to open the desired drawer.
4. Place the desired CDs in the tray, then press the appropriate
DISC button again to close the drawer.
6. Repeat Steps 1–5 to memorize other stations (up to 30 stations
for each band). If you store a new station on a memory number
in which a station is stored, the old station is cleared.
Note: If you want to load more than one CD, you can press
another DISC button. The receiver closes the open drawer and
opens the drawer of the DISC button you pressed.
To store stations on the other band, repeat Steps 1–6, substituting
the other band in Step 1.
5. To select a CD, repeatedly press DISC SKIP until the desired
CD’s number blinks.
Note: If you want to store more stations later, you might find that
pressing TUNING/PRESET )ý# or ,- only moves the tuner to the
next preset station (instead of moving the frequency one step). If this
happens, press TUNING MODE to return to manual tuning (see
“Switching Between Preset Stations and Manual Tuning”).
6. Press PLAY. The disc icon (at the far left) begins to rotate.
10
To pause playback, press PAUSE. The disc icon flashes rapidly.
To resume playback, press PAUSE again or press PLAY.
Receiver Operation
To move forward through a track, hold down TUNING/PRESET
,- for about 2 seconds. Repeat up to two times to increase
the fast-forward speed. To resume playback, press PLAY.
Note: At the beginning or end of a track on an audio CD, the
scan speed returns to normal.
To move backward through a track, hold down TUNING/PRESET
)ý# for about 2 seconds. Repeat up to two times to increase
the rewind speed. To resume playback, press PLAY.
To skip to the next track on the CD, press TUNING/PRESET ,once.
To return to the beginning of the current track, press TUNING/
)ý#.
PRESET
To return to the previous track, press TUNING/PRESET
twice.
)ý #
To stop playback, press STOP. The disc icon stops rotating, and
H;IKC; appears. To resume playback, press PLAY. To stop playback completely, press STOP again.
Continuous Play
When the receiver finishes playing an audio CD, it automatically
plays the disc on the next tray.
Changing the Sound Mode
You can listen to your CDs using Stereo or Surround modes.
For stereo only, press STEREO once.
For a surround mode, repeatedly press SURROUND MODE until the
desired mode (J>;7J;H, >7BB, IJ7:?KC, or FHEýBE=?9) appears.
Note: Dolby Digital and DTS modes do not work with CDs.
USING NIGHT MODE
You can use Night Mode to compress large dynamic ranges, resulting in “quieter” explosions and other loud sounds in movies. The
Night Mode feature adjusts the dynamic range so that there is less
disparity in the noise level of all sounds in a movie (explosions, music, dialogue, and so on).
While in Dolby Digital or Stereo mode, press NIGHT MODE to turn
Night Mode on. Press NIGHT MODE again to turn it off.
Note: Night Mode is not available for movies using DTS mode.
USING THE SLEEP TIMER
You can set the sleep timer to turn off the receiver after a set period
of time.
Repeatedly press SLEEP to set the sleep timer to the desired time ('&,
(&, )&, *&, +&, ,&, -&, .&, or /& minutes). The receiver turns off when
the selected time has expired.
USING THE DIMMER
Press DIMMER to make the display dimmer. Press again to return the
display to its original brightness.
Receiver Operation
11
ˆ Remote Control Operation
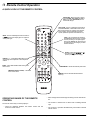
A QUICK LOOK AT THE REMOTE CONTROL
SURROUND – When you select an analog
source (TUNER, AUX, TAPE, TV, VCR, or
SAT), as you press SURROUND, the surround mode changes.
TEST TONE – Turns on or off the test tone function in
DTS, DOLBY DIGITAL, or PRO LOGIC mode. The test
tone is output from Front L speaker, Center speaker,
Front R speaker, Surround R speaker, Surround L
speaker, (Subwoofer speaker: when Subwoofer on).
MUTE – Press to immediately decrease the sound lev-
el. CKJ; appears on the display panel. To restore the
sound, press again.
TONE – Lets you adjust the low frequency
level (BASS) with (left arrow icon) or (right arrow icon) and also you can adjust high frequency level (TREBLE) with (left arrow icon)
or (right arrow icon) according to your taste
and room acoustics.
SLEEP – Press to set the sleep time. The
sleep time changes to '&, (&, )&, ... /&
(minutes), and E<< (former display).
PRESET – / + –- During AM or FM reception, you can
scan through other frequencies or select the preset
numbers.
BAND – selects AM or FM band while listening to the
tuner function.
TUNING MODE – selects and deselects preset mode.
FM MODE (FM MONO/STEREO) – selects FM
mono or stereo mode.
MEMORY – Press to memorize the desired station
frequency.
OPERATING RANGE OF THE REMOTE
CONTROL
• Direct sunlight or fluorescent light is shining onto the remote sensor.
The remote control may not work properly if:
• The receiver is located near a device that is emitting infrared
rays.
• There are obstacles between the remote control and the
receiver’s remote sensor.
12
• The receiver is operated simultaneously with another infrared
remote control.
Remote Control Operation
5. Press 7. 9ý&Z8ý appears. To change the center speaker’s level,
repeatedly press 8 or 9 until you reach the desired level (¶'&
to !'&ýZ8).
SETTING UP THE SURROUND SOUND
SYSTEM
You can use your Home Theater Audio System as soon as you take it
out of the packaging. If you wish to fine-tune the system (for example,
substitute different speakers or alter the sound distribution), follow the
directions below.
Changing the Speaker Size
Note: If you are using the speakers provided in your Home Theater
Audio System, the speaker size defaults are correct. If you are using
other speakers, follow these steps.
1. Press POWER.
6. Press ENTER. <HýB;L;B appears.
7. Press 7. <Hý &Z8ý appears. To change the front right speaker’s
level, repeatedly press 8 or 9 until you reach the desired level
(¶'& to !'&ýZ8).
8. Press ENTER. IHýB;L;B appears.
9. Press 7. IHý &Z8ý appears. To change the rear right speaker’s
level, repeatedly press 8 or 9 until you reach the desired level
(¶'& to !'&ýZ8).
10. Press ENTER. IBýB;L;B appears.
2. Press SETUP. IFýI?P; appears.
3. Press 7. <HEDJ appears.
4. Press 7 again. <#IC7BB appears. To change to <#B7H=;, press
8 or 9.
Note: If the cone size (diameter) of the speaker is larger than 5
inches, change to <#B7H=;.
5. Press ENTER. 9;DJ;H appears.
6. Press 7. 9#IC7BB appears. To change to 9#B7H=;, press
9. To change to 9#DED;, press 8 or 9again.
8 or
12. Press ENTER. IMýB;L;B appears.
13. Press 7. IMý &Z8ý appears. To change the sub woofer’s level,
repeatedly press 8 or 9 until you reach the desired level (¶'&
to !'&ýZ8).
14. Press ENTER. <BýB;L;B appears.
15. Press SETUP to exit.
Note: If the cone size (diameter) of the speaker is larger than 5
inches, set the item to 9#B7H=;.
7. Press ENTER. IKHH appears.
8. Press 7. I#IC7BB appears. To change to I#ýB7H=;, press
9. To change to I#DED;, press 8 or 9again.
11. Press 7. IBý &Z8ý appears. To change the rear left speaker’s
level, repeatedly press 8 or 9 until you reach the desired level
(¶'& to !'&ýZ8).
8 or
Note: If the cone size (diameter) of the speaker is larger than 5
inches, set the item to I#B7H=;.
9. Press ENTER. IK8#M< appears.
10. Press 7. IM#O;I appears. If you aren’t using a subwoofer,
change to IM#DE by pressing 8 or 9.
Changing the Speaker Distance
When you have your home theater arrangement the way you want it
(speakers, receiver, and any components), you can change the
speaker distance entered in the receiver’s memory. The default settings are 10 ft.
1. Imagine there is a straight line running from the front left speaker
to the front right speaker.
2. Measure the distance in a perpendicular line from your listening
position (for example, your couch) to the imaginary line.
Note: Do not meaure the distance to the speakers, just the line.
11. Press ENTER. <HEDJ appears. Press SETUP again to exit.
3. Repeat Steps 1–2 for the rear (surround) speakers.
Changing the Channel Level
4. Measure the distance in a perpendicular line from your listening
position (for example, your couch) to the center speaker.
The default channel level settings are 0 dB for each speaker. You can
change the speakers’ sound distribution to suit your surround sound
needs. For example, if you are closer to the left front speaker than the
right front speaker, the left front speaker might seem “louder” than the
right one. To adjust it, you must change the channel level for one or
both speakers until the sound evens out.
Follow these steps to change the channel level.
5. Press SETUP, then press 8 twice. IFý:?IJ appears.
6. Press 7. <HEDJ appears.
7. Press 7again. <ý'&<J appears. To change the distance between
the listening position and the front speakers, repeatedly press
8 or 9 until you reach the desired level (&ýto )&ý<J).
8. Press ENTER. 9;DJ;H appears.
1. Press SETUP, then 8. 9>ýB;L;B appears.
2. Press 7. <BýB;L;Býappears.
3. Press 7 again. <ý &Z8 appears. To change the front left
speaker’s level, repeatedly press 8 or 9 until you reach the
desired level (¶'& to !'&ýZ8).
9. Press 7. 9ý'&<J appears. To change the distance between the
listening position and the center speaker, repeatedly press 8 or
9 until you reach the desired level (&ýto )&ý<J).
10. Press ENTER. IKHH$ appears.
4. Press ENTER. 9ýB;L;B appears.
Remote Control Operation
13
11. Press 7. Iý'&<J appears. To change the distance between the
listening position and the rear (surround) speakers, repeatedly
press 8 or 9 until you reach the desired level (&ýto )&ý<J).
CONTROLLING THE TUNER
1. Press POWER. The last selected function appears.
12. Press ENTER. <HEDJ appears.
2. Press TUNER.
13. Press SETUP to exit.
3. Press BAND to select the desired band.
Surround Effects
4. Repeatedly press TUNING/PRESET
desired station.
Important: The center and rear speakers only operate when the unit
is set to a surround sound mode and the source material being
played is recorded or broadcast in Dolby Digital, DTS or Dolby Pro
Logic surround sound.
Stereo broadcasts or recordings will produce some rear channel effects when played in a surround mode. However, mono sources will
not produce any sound from the rear speakers.
Changing System Settings - Special Circumstances
When you make a copy of DVD/CD via TAPE output, set the front
speaker size to <#B7H=;. Set the surround mode to IJ;H;E.
USING THE REMOTE CONTROL UNIT TO
CONTROL ADDITIONAL COMPONENTS
You can set your remote control to control other components such as
a VCR, TV, satellite receiver or cable box.
)
or
-
to tune in the
To change the frequency by one step, press TUNING/PRESET )
or - quickly (less than half a second).
To tune to the next clear frequency, hold down TUNING/PRESET ) or -, then release the button. The system automatically
tunes to the next strong station.
Listening To FM Stereo Broadcasts
In FM mode, press FM MODE to select stereo or mono. When you select the stereo mode, IJ appears to the right of Jkd[Z. It goes off
when you select mono.
When you listen to very weak FM stereo stations, you might hear
higher-than-normal background hiss. Switch to mono to eliminate the
hiss.
Presetting Radio Stations
1. Turn on the component to be programmed.
You can preset 30 AM and 30 FM stations regardless of the reception. Tune in the desired stations using auto or manual tuning.
2. Look up the brand and corresponding code(s) in the code list
(see “Manuracturer’s Codes” on Page 23).
Manual Preset
3. While holding down the appropriate source button (VCR, TV, or
SAT) on the remote control, use the number keys enter the first
code from the code list.
4. Release the component button, then press POWER.
If you have entered the correct code, the component turns off.
If the component does not turn off, repeat Steps 3 and 4 and
subustitute use the next code (if available) listed for the brand of
your component until the component responds to the remote
command.
Note: To turn on or off the receiver when you select the VCR, SAT, or
TV function, press POWER twice.
Cautions:
2. Repeatedly press TUNING/PRESET
desired station.
)
or
-
to tune in the
To change the frequency by one step, press TUNING/PRESET )
or - quickly (less than half a second).
To tune to the next clear frequency, hold down TUNING/PRESET
then release the button. The system automatically
tunes to the next strong station.
) or -,
3. Press MEMORY. C;CE flashes for 5 seconds. When C;CE goes
off, press the button again (C;CE flashes again).
4. Select the preset number with TUNING/PRESET ) or -.
5. Press MEMORY again.
• This remote control unit may not operate on all models of the
brands shown.
• If batteries are removed from the battery compartment of the
remote unit, replace the batteries within 30 minutes or the codes
are lost. You must then re-enter all previously programmed
codes.
• The buttons on the remote control unit may not work correspondingly with those on the components brands.
• Experiment with the remote control and your components to see
which buttons work. If only a few functions operate, repeat Step
4 to see if another code operates more buttons.
14
1. Press BAND to select the desired band.
6. Repeat Steps 1–5 to memorize other stations (up to 30 stations
for each band). If you store a new station on a memory number
in which a station is stored, the old station is cleared.
To store stations on the other band, repeat Steps 1–6, substituting
the other band in Step 1.
Note: If you want to store more stations later, you might find that
pressing TUNING/PRESET ) or - only moves the tuner to the next
preset station (instead of moving the frequency one step). If this happens, press TUNING MODE to return to manual tuning (see “Switching
Between Preset Stations and Manual Tuning”).
Remote Control Operation
To move forward through a track, hold down TUNING/PRESET for about 2 seconds. Repeat up to two times to increase the fastforward speed. To resume playback, press BAND/7.
Auto Preset
1. Press BAND to select the desired band.
2. Hold down MEMORY for about 3 seconds.
To move backward through a track, hold down TUNING/PRESET
3. The tuner automatically begins scanning, and stores the first 30
strong signals it receives.
4. Scanning stops automatically after radio stations have been
stored in the auto preset memory.
) for about 2 seconds. Repeat up to two times to increase the
rewind speed. To resume playback, press BAND/7.
Note: At the beginning or end of a track on an audio CD, the
scan speed returns to normal.
To skip to the next track on the CD, press TUNING/PRESET
once.
Note: Press MEMO again to stop auto scanning earlier.
-
To store stations on the other band, repeat Steps 1–4, substituting
the other band in Step 1.
PRESET
Listening to Preset Stations
To return to the previous track, press TUNING/PRESET ) twice.
To listen to a radio station stored in the station memory, press TUNING MODE then TUNING/PRESET ) or -.
To stop playback, press FM MODE/ '. The disc icon stops rotating, and H;IKC; appears. To resume playback, press BAND/7.
To stop playback completely, press FM MODE/ ' again.
Switching Between Preset Stations and Manual
Tuning
If you store preset stations, pressing TUNING/PRESET ) or scrolls through the preset stations, rather than changing the frequency station by station.
To switch to scrolling by individual stations, press TUNING MODE,
then repeatedly press TUNING/PRESET ) or - quickly to change
the frequency by one step. Or hold down TUNING/PRESET : or ;
to tune to the next clear station.
To switch back to scrolling through the preset stations, press TUNING
) or - until you
reach the desired station.
MODE, then repeatedly press TUNING/PRESET
CONTROLLING THE CD PLAYER
To return to the beginning of the current track, press TUNING/
).
Changing the Sound Mode
For a surround mode, repeatedly press SURROUND until the desired
mode (J>;7J;H, >7BB, IJ7:?KC, IJ;H;E, or FHEýBE=?9) appears.
Note: Dolby Digital and DTS modes do not work with CDs.
Using GUI Menu Icons
GUI menu icons show the current track number and elapsed time of a
CD. Some icons only show the indicated information. Other icons allow the settings to be changed.
Important: You must turn on your television to view the GUI menu
icons.
Follow these steps to view or change GUI information.
You can use the receiver’s 3-DVD changer to listen to audio CDs.
Important: You can only use audio CDs and some CD-Rs with the
reciever. CD-ROM, CD-G, photo CD, and CD-i discs can not be
played on this player.
1. Press POWER.
1. Press GUI during playback. Icons of the current track number
and the elapsed time appear.
2. Press the remote’s 6 or 7 to select the desired item. The currently selected item is highlighted.
The first icon is the track icon. If you select it, you can jump to the
desired track number by pressing the number keys and ENTER,
or by pressing ) or -.
2. Press DVD.
3. On the receiver, press DISC 1, DISC 2, or DISC 3 to open the
desired drawer.
4. Place the desired CDs in the tray, then press the appropriate
DISC button again to close the drawer.
The second icon is the time icon. It shows the elapsed time. You
cannot change it. It is only for viewing.
Repeat Play
Note: If you want to load more than one CD, you can press
another DISC button. The receiver closes the open drawer and
opens the drawer of the DISC button you pressed.
Press REPEAT during playback. Each time you press this button, the
TV screen displays the repeat mode setting and the disc will repeat a
track.
5. To select a CD, repeatedly press DISC SKIP until the desired
CD’s number blinks.
The repeat mode changes between H;F;7JýED;, H;F;7Jý7BB, H;F;7J
7BBý:?I9I, and H;F;7JýE<< as you press the button.
6. To play, press BAND/7.
To return to normal play, press REPEAT several times until H;F;7JýE<<
appears.
To pause playback, press (pause icon). To resume playback,
press (pause icon) again or press BAND/7.
Note: Repeat play works only with discs for which the elapsed playing time appears in the display window during playback.
Remote Control Operation
15
Programming Tracks
CONTROLLING THE SLEEP TIMER
This function allows you to program up to 32 tracks for playback in
any desired order. This function only operates with audio CDs (not
DVDs).
You can set the sleep timer to turn off the receiver after a set period
of time.
Note: The disc must be recognized by the receiver, so play the disc
for a little while after loading, then program it.
Repeatedly press SLEEP to set the sleep timer to the desired time ('&,
(&, )&, *&, +&, ,&, -&, .&, or /& minutes). The receiver turns off when
the selected time has expired.
1. Press FM MODE/ ' to stop the CD.
2. Press PROGRAM. &'ý¶ý¶ appears.
3. Repeatedly press DISC SKIP to select the desired CD (if necessary). The CD number appears to the far right of the display.
4. Press the appropriate numeric buttons, then press ENTER to program the first desired track.
5. Repeat Steps 2–4 to program more tracks.
To check the programmed order, press STOP twice. Repeatedly
press 8 or 9 to view the programmed order.
To clear the programming, press STOP twice, then press CLEAR.
Notes:
• If you try to select more than 32 tracks, FULL appears and you
cannot program any more tracks.
• If you press PROGRAM twice successively while programming,
the programming stops and F#E<< appears.
• Press BAND/7 to start program playback.
Modifying the Program and Adding a Track
1. Press STOP twice. You cannot modify the programming in
Resume Mode.
2. Repeatedly press
track.
8 or 9 to
select the desired programmed
To clear the track, press CLEAR.
To change the track to another track, press the numeric buttons,
then ENTER.
To change the track to a track on another disc, press DISC SKIP,
the numeric buttons, then ENTER.
To add a track, repeatedly press 8 or 9 until you reach the
last programmed track. Press 8 or 9 again. Enter the appropriate numeric buttons, then press ENTER to program the desired
track.
3. To start program playback again, press PROGRAM, then BAND/
7.
Note: The programmed contents are lost if you turn off the unit or
change the function.
Random Play
Press RANDOM. The unit randomly selects trucks.
Note: Pressing RANDOM also clears any programming.
16
Remote Control Operation
ˆ DVD Player Operation
BASIC PLAYBACK
• When the inhibit icon appears on the TV screen while a button is
pressed, it means that the function is not available on the disc
you are playing.
1. Press POWER. The last selected function appears.
2. If necessary, press the remote’s DVD or rotate the receiver’s
FUNCTION until DVD appears.
3. Press DISC 1, DISC 2, or DISC 3 to open the desired disc tray.
EF;D appears and the corresponding disc indicator (1, 2, or 3)
flashes.
Note: The disc indicator 1, 2, or 3 lights even the disc is not in
the tray until the unit check the tray after the receiver’s PLAY or
the remote’s BAND/7 is pressed.
4. Place a disc on the disc tray with the playback side down. Place
the disc in the correct guide on the disc tray. If the disc is out of
the guide, it may damage the disc and cause the DVD player to
malfunction.
• .Depending on the DVD disc, some operations may be different
or restricted. Refer to the jacket or case of the disc you are playing.
Stopping Play
Press the receiver’s STOP or the remote’s FM MODE/'. When play is
stopped, the receiver remains at the point where the receiver’s STOP
or the remote’s FM MODE/' was pressed, and H;IKC; appears.
Press the receiver’s STOP or the remote’s FM MODE/' again to stop.
The resume option is cleared when the receiver’s STOP or the remote’s FM MODE/' is pressed the second time. Note: The resume option is also cleared when the power is turned off and then on.
Notes:
Press the receiver’s PLAY or the remote’s BAND/7 to resume the
playback from this point.
• If you leave the disc tray open for more than 8 minutes, the
disc tray automatically closes.
Notes:
• If you leave the disc tray open, the disc tray automatically
closes when the function mode is changed.
5. Press the receiver’s PLAY or the remote’s BAND/7. FB7O
appears. The disc tray automatically closes and the receiver
loads the disc. After loading the disc, the receiver enters menu
mode.
Note: If you close the tray by pressing DISC 1, DISC 2, or DISC 3,
the receiver does not load the disc. Press PLAY to load the disc.
6. To select another disc, repeatedly press DISC SKIP on the remote
or the receiver until the desired disc loads.
Note: After playing back all of the chapters in the title, the DVD
player automatically stops and returns to the menu screen.
7. When the menu screen appears on your television screen, press
the remote’s 6, 7, 8, or 9 to select the Play Movie option,
then press the remote’s BAND/7 or the receiver’s PLAY. The
receiver begins playback.
Cautions:
• Do not move the DVD player during playback. Doing so may
damage the disc and the unit.
• Use DISC 1, DISC 2, or DISC 3 on the main unit to open or close
the disc trays. Do not push the disc tray while it is moving. Doing
so may cause the DVD player to malfunction.
• Do not push on the disc tray or put any objects other than discs
on the disc tray. Doing so may cause the DVD player to malfunction.
• Keep your fingers well clear of the disc tray as it is closing. Keep
children’s fingers away from the closing disc tray as there is a
risk of personal injury.
• The resume option works only with discs for which the elapsed
playing time appears on the window display during playback.
• Opening the disc tray cancels the resume option.
• The resume option may not be available on some DVD discs.
Pausing Play
Press the receiver’s f or the remote’s MEMORY/ f.
To resume normal playback, press the receiver’s PLAY or the remote’s BAND/7.
Advancing by Frames
Press the receiver’s f or the remote’s MEMORY/ f while the DVD is
paused. Each time you press the receiver’s f or the remote’s MEMORY/ f, the picture advances one frame.
To resume normal playback, press the receiver’s PLAY or the remote’s BAND/7.
Playing in Slow-Motion
Press the remote’s SLOW – /+ during playback. During slow playback,
the playback speed and direction can be selected with SLOW – /+.
To decrease the playback speed, repeatedly press SLOW – .
To reverse the playback direction, press SLOW + to the playback direction. As you press the button the playback speed changes 1/2, 1/
4, 1/8.
To return to normal playback, press the receiver’s PLAY or the remote’s BAND/7.
DVD Player Operation
17
Skipping Chapters
To skip forward, press TUNING/PRESET -. The receiver skips forward one chapter each time the button is pressed.
To skip backward, press TUNING/PRESET ). If you press TUNING/
PRESET ) once midway through a chapter, the receiver returns to
the beginning of that chapter. The receiver then skips backward one
chapter each subsequent time you press TUNING/PRESET ).
Scanning
To scan forward through a DVD, hold down the remote’s TUNING/
-ý or the receiver’s TUNING/PRESET ,-ý for more than 1
second. Repeat up to three times to increase the fast-forward speed
(2X, 4X, 16X, or 100X). To resume playback, press the receiver’s
PLAY or the remote’s BAND/7.
PRESET
To scan backward through a DVD, hold down the remote’s TUNING/
PRESET ) or the receiver’s TUNING/PRESET )ý# for more than 1
second. Repeat up to three times to increase the fast-reverse speed
(2X, 4X, 16X, or 100X). To resume playback, press the receiver’s
PLAY or the remote’s BAND/7.
Notes:
• The DVD player does not play back sound during slow-motion,
high-speed-reverse, or high-speed-forward playback of DVDs.
• Subtitles do not appear on the screen during slow motion or scan
playback.
• The DVD player provides four scan speeds in each direction for
DVD movie play.
• The DVD player does not play back in slow-motion in case of
audio CD.
• In some equipment connected to digital output for DTS sound, a
noise can be heard during fast-forward or fast-reverse playback
of DTS DVDs.
Below each icon is the current information for that menu (for
example, ( appears under the chapter icon when you are watching the movie’s second chapter).
Note: Some DVDs might not provide all of the above GUI menu
icons.
2. Press the remote’s 6 or 7 to select the desired item. The currently selected item is highlighted.
The first icon is the title icon. When you select it , you can jump
to the desired title number by pressing the remote’s number
keys, then ENTER.
The second icon is the chapter icon. When you select it, you can
jump to the desired chapter number by pressing the remote’s
number keys, then ENTER, or by pressing 6 or 7.
The third icon is the time icon. When you select it, you can move
to a desired time in the movie by pressing the number keys, then
ENTER.
The fourth icon is the audio icon. When you select it, you can
change the soundtrack language by repeatedly pressing AUDIO
until the desired language appears. To select the current setting,
press ENTER.
The fifth icon is the subtitle icon. When you select it, you can
change the subtitle language by repeatedly pressing SUB TITLE
until the desired language appears. To select the current setting,
press ENTER.
The last icon is the angle icon. When you select it, you can
change the angle by repeatedly pressing ANGLE until the desired
number appears. To select the current setting, press ENTER.
Using a Title Menu
Some DVDs may contain two or more titles. If the disc has a title
menu recorded on it, you can use TITLE to select the movie title.
Notes:
ADVANCED FEATURES
• The details of operation differ depending on the DVD.
Note: For the advanced features, the receiver’s display screen does
not change. The displays appear on your television screen.
• Selecting a title may not be possible on certain DVD discs.
Follow these steps to select a movie title.
Using GUI Menu Icons
1. Press TITLE. A list of the DVD’s titles appears.
GUI menu icons show disc information (for example, title or chapter
number, elapsed playing time, audio/subtitle language, angle) and
player information (for example, repeat play, play mode).
2. Press BAND/7 or ENTER to resume play from the scene when
TITLE was first pressed.
Some icons only show the indicated information. Other icons allow
the settings to be changed.
3. Press the remote’s 8, 9, 6, or 7, then ENTER or BAND/7.
Or press the numeric button(s), to select the desired title. The
selected title now starts playing.
Follow these steps to view or change GUI information.
Using a DVD Menu
1. Press GUI during playback.
Note: Title function can also be accessed from the stop mode.
Icons of the current title number, current chapter number,
elapsed time, the current audio soundtrack language, current
subtitle language, and current angle number appear.
18
Some DVDs have unique menus called DVD menus. For example,
DVDs programmed with complex contents provide guide menus, and
those recorded with various languages provide menus for audio and
subtitle language.
The DVD menu’s contents and operation differ from disc to disc. The
following procedure explains the basic operation when this feature is
used.
DVD Player Operation
Press MENU during play. The DVD menu available on the disc now
appears. Pressing RETURN resumes play from the scene when MENU
was first pressed.
Note: The resume play option might not be possible on certain discs.
Press the remote’s 8, 9, 6, or 7, then ENTER. Or press the numeric button(s) to select the desired item. The selected item is now
executed.
Changing Subtitle Language
The repeat mode changes between 9>7FJ;Hý H;F;7J, J?JB;ý H;F;7J,
and H;F;7JýE<< as you press the button.
To return to normal play, press REPEAT several times until OFF appears.
Notes:
• .Repeat Play works only with discs for which the elapsed playing
time appears in the DVD display window during playback.
• Repeat Play may not work correctly with some DVDs.
Note: This operation works only with DVDs on which multiple subtitle
languages are recorded.
Zooming In
Press SUB TITLE during playback. When no subtitles are recorded,
The Zoom feature allows you to zoom in and enlarge the picture on
the screen to either 4 times (X4) or 16 times (X16) its normal size.
E<< appears instead of the language number. Repeatedly press SUB
TITLE until the desired language is selected.
Press ZOOM during normal playback or still playback.
To eliminate subtitles, repeatedly press SUB TITLE and select E<<.
Notes:
• When the desired language is not selected even after pressing
the button several times, it means that the language is not available on the disc.
• When the power is turned off or the DVD player is stopped, the
subtitle language selected at the initial settings appears.
To resume normal size, press ZOOM to cancel the zoom feature and
resume normal playback or still playback.
Notes:
• Some DVDs may not respond to the zoom feature.
• The zoom feature does not work on subtitles or menus included
on DVD video discs.
Changing Soundtrack Language
SETTING RATING LEVEL AND PASSWORD
Note: This operation works only with DVDs on which multiple
soundtrack languages are recorded.
This is to prohibit the playing of specified DVDs which are unsuitable
for children. Some DVD discs contain a restriction level which enables parents to remove scenes or prevent playback of discs by children. The DVD player is equipped with a password device designed
to prevent children from changing the level.
Press AUDIO during play. The currently selected soundtrack language appears. Repeatedly press AUDIO until the desired language
is selected.
Selecting a Rating Level
Notes:
• When the desired language is not selected even after pressing
the button several times, it means that the language is not available on the disc.
• When the power is turned off or the DVD player is stopped, the
language heard is the one selected at the initial settings.
1. Press DVD SET UP.
2. At the setup screen, press
ENTER.
8 or 9 to select H7J?D=, then press
Note: The password is set to 1,2,3,4 as a default. The rating is
set to unlock as a default.
Viewing from Another Angle
3. Enter a password and press ENTER.
Some DVDs may contain scenes which have been shot simultaneously from a number of different angles. For these discs, the same
scene can be viewed from each of these different angles using ANGLE. The recorded angles differ depending on the disc.
4. Repeatedly press ENTER to select the desired level.
Press ANGLE during playback. The currently selected angle appears.
Repeatedly press ANGLE until the desired angle is selected.
Note: This function only works for discs having scenes recorded at
different angles.
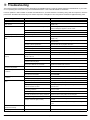
You cannot play DVD video discs rated higher than the level you
selected unless you cancel the parental lock function. For example, when you select level 7, discs rated higher than level 7 are
blocked and cannot be played.
The parent lock level is equivalent to the following USA movie
ratings.
Level
Using Repeat Play
Press REPEAT during playback. Each time you press this button, the
TV screen displays the repeat mode setting and the disc will repeat a
chapter or title.
DVD Player Operation
Movie Rating
7
NC-17
6
R
4
PG-13
3
PG
1
G
19
',0/ýM?:; (Widescreen) — If you have a wide-screen TV set, use
5. Press DVD SET UP to exit.
this setting. The DVD plays in full size. (You must also set your
widescreen TV to “full size”).
Notes:
• Some titles do not match with the rating level described as
above.
• If you change the level and enter a password, playback of all
DVDs with ratings higher than your selection will be blocked,
unless you enter the correct password again. For example: if you
change the level to 5, the DVD player will not play discs with ratings of 6, 7, or 8 unless the correct password is entered from the
remote control.
SELECTING DIGITAL AUDIO OUT
Each DVD has a variety of audio output options. If you connected a
device to the receiver’s digital optical jacks (see “Connecting a Digital
Optical Audio Devices” on Page 7), you might have to change the
digital audio output setting. Set the player’s Digital Audio Output according to the type of audio system you use.
1. Press DVD SET UP.
Setting a Password
2. At the setup screen, press 8 or 9 to select :?=?J7BýEKJ.
If you change the rating level to 7 or lower, you must enter a 4-digit
password to access playback of discs with higher ratings.
3. Repeatedly press ENTER to select the desired output (F9C or
8?JIJH;7C) , then press ENTER.
8?JIJH;7C — Select 8?JIJH;7C if you have an amplifier or other
To set this password, follow these steps.
equipment with DTS decoder or Dolby Digital decoder connected
to the receiver.
1. Press DVD SET UP.
2. At the setup screen, press
ENTER.
9 to
select F7IIMEH:, then press
3. Type a 4-digit password into EB:. (For example, 1234).
Important: Do not forget your password.
4. Type same the 4-digit password into D;M, then press ENTER.
Clearing Your Password
If you forget your password, you can clear the current password.
At the SETUP screen, press
F9C — Select F9C if you have an amplifier or other equipment
with linear PCM only (or a MD recorder or a DAT deck) connected to the receiver.
Caution: If an active digital audio output signal is supplied to an receiver or other equipment without a corresponding digital decoding
capability, a very loud noise may be produced which could permanently damage the speakers.
Note: When you make a digital recording from CD to your house audio CD recorder entire CD tracks are recorded as 1 track. This is because there is no track information.
9 to select F7IIMEH:, then press EN-
TER.
Enter 4-digit number (for example, 2850), then press ENTER. The 4digit password is cleared.
SELECTING TV ASPECT
Select the appropriate screen type according to your TV set. Conventional size screens use a 4:3 aspect ratio, and wide-screens use a
16:9 ratio.
1. Press DVD SET UP.
2. At the setup screen, press
press ENTER.
8 or 9 to select JLý:?IFB7O, then
3. Repeatedly press ENTER to select the desired aspect, then press
DVD SET UP. You must select the type of TV picture (aspect ratio)
that corresponds to the type of TV you are connecting to the
DVD unit.
*0)ýFI (Pan & Scan) — If you have a conventional TV set and
your DVD is not formatted for widescreen viewing, use this setting.
*0)ýB8 (Letterbox) — If you have a conventional TV set and your
DVD is formatted for widescreen viewing, use this setting. All
video material not formatted in the Pan & Scan style is played
back in the letterbox style. Black bands appear at top and bottom
of screen.
20
DVD Player Operation
ˆ Troubleshooting
This receiver has been manufactured to the specifications of RadioShack and is covered by a limited warranty from RadioShack. If your receiver is not operating as it should, take it to your local RadioShack store or call 1-800-THE-SHACK for assistance.
Incorrect operation is often mistaken for trouble and malfunctions. If you think that there is something wrong with this component, check the
points below. Sometimes the trouble may lie in another component. Investigate the other components and electrical appliances being used.
Symptom
Cause
Remedy
No power.
The power cord is disconnected.
Plug the power cord into the wall outlet securely.
The power is on, but the DVD player
does not work.
No disc is inserted.
Insert a disc. (Check that the DVD or audio CD indicator in the DVD
display is lit.)
No picture.
The TV is not set to receive DVD signal output.
Select the appropriate video input mode on the TV so the picture
from the DVD player appears on the TV screen.
The video cable is not connected securely.
Connect the video cable into the jacks securely.
The connected TV power is turned off.
Turn on the TV.
The playback picture is poor.
The disc is dirty.
Clean the disc.
The DVD player does not start playback.
No disc is inserted.
Insert a disc. (Check that the DVD or audio CD indicator in the DVD
display is lit.)
An unplayable disc is inserted.
Insert a playable disc. (Check the disc type, color system and
regional code.)
The remote control does not work
properly.
The disc is placed upside down.
Place the disc with the playback side down.
The disc is not placed within the guide.
Place the disc on the disc tray correctly inside the guide.
The disc is dirty.
Clean the disc.
A menu is on the TV screen.
Press SETUP to turn off the menu screen.
The rating level is set.
Cancel the rating function or change the rating level.
The remote control is not pointed at the remote
sensor of the unit.
Point the remote control at the remote sensor of the unit.
The remote control is too far from the unit.
Operate the remote control within about 23 ft (7 m).
There is an obstacle in the path of the remote
control and the DVD player.
Remove the obstacle.
The remote’s batteries are exhausted.
Replace the batteries with new ones.
The receiver does not respond when
the buttons are pressed.
Static electricity caused by dry air.
Disconnect the power plug from the outlet, and insert again.
No sound is output when a function
is selected.
Improper connections
Make sure the component is connected correctly.
Sound is muted.
Press the remote’s MUTE.
The volume is turned down.
Adjust VOLUME.
No image is output when a function
is selected.
Improper connections.
Make sure the component is connected correctly.
The input source is not properly selected.
Press the correct function button.
Considerable noise in radio broadcasts.
Incorrect frequency.
Tune in the correct frequency.
The antenna is not connected.
Connect the antenna.
ΠRF (AC-3) and/ or digital cables are near the
antenna terminals and wires.
Route ΠRF (AC-3) and digital cables away from the antenna terminals and wires.
(For FM) The FM antennais not fully extended
or is poorly positioned.
Fully extend the FM wire antenna, position for best reception, and
secure to a wall.
(For FM) The signal is weak.
Connect an outdoor FM antenna.
(For AM) The AM antenna is poorly positioned.
Adjust the direction and position for best reception.
(For AM) The signal is weak.
Connect an additional internal or external AM antenna.
Interference caused by other equipment (for
example, flourescent lights, motors).
Turn off the equipment causing the noise or move it away from the
receiver.
Place the antenna farther away from the equipment causing the
noise.
Broadcast stations cannot be
selected automatically.
The signals are weak.
Connect an outdoor antenna.
The display is dark or off.
The dimmer is on.
Press DIMMER repeatedly to return to the default setting.
Troubleshooting
21
Symptom
Cause
Remedy
When listening to the music in stereo, left/right speakers sounds are
reversed.
Speakers are connected wrong.
After checking, if needed, reconnect.
Low hum or buzz sound.
Power line of a fluorescent light is installed near
this product.
Place this product as far away as possible from electric devices with
interference.
Sound is only heard from one channel.
One of the input cords is disconnected.
Connect the input cords securely.
The speaker level is set to one side.
Adjust the speaker level.
Sound cuts off or there is no sound
even though power is on.
Speaker impedance is less than prescribed for
this unit.
After turning off the power and then turning it on again, reduce the
volume or change to the correct 6-ohm speakers.
Low bass response.
Speaker polarity(+/–) is reversed.
Check all speakers for correct polarity.
No sound from the rear speakers.
Surround Mode is set to STEREO.
Set the mode to the desired surround mode position.
Source being played is not recorded or broadcast in surround sound or stereo.
Use surround or stereo source.
One or more rear speaker wires is not making
good contact,
Check all rear speaker wires for good connection.
Surround Mode is not set to DTS, DOLBY DIGITAL, DOLBY PRO LOGIC or STEREO.
Set Surround Mode to DTS, DOLBY DIGITAL, DOLBY PRO LOGIC
or STEREO.
No sound from the center speaker.
If the receiver does not operate normally due to external effects such as static electricity, disconnect the power plug from the outlet and insert
again to return to normal operating conditions.
CARE
Keep the receiver dry; if it gets wet, wipe it dry immediately. Use and store the receiver only in normal temperature environments. Handle the receiver carefully; do not drop it. Keep the receiver away from dust and dirt, and wipe it with a damp cloth occasionally to keep it looking new.
Modifying or tampering with the receiver’s internal components can cause a malfunction and might invalidate its warranty and void your FCC
authorization to operate it. If your receiver is not performing as it should, take it to your local RadioShack store for assistance.
Caution: You might permanently damage your speakers by cleaning them with a vacuum cleaner. Use a feather duster or a soft loose cloth instead.
22
Troubleshooting
ˆ Manuracturer’s Codes
TV Codes
Brand
Codes
JC PENNY
104, 105, 106, 108, 122, 152, 154, 158, 163,
172, 185, 187, 205, 228, 271, 272, 281
272
JCB
102
ADMIRAL
101
JENSEN
104, 106
AKAI
102
ALLERON
146
JVC
AMTRON
138
112, 113, 154, 156, 160, 165, 166, 167, 189,
257, 258, 259
AOC
104,105,106,107
AUDIOVOX
138
BELCOR
104
BELL & HOWELL
101, 262
BRADFORD
138
BROKWOOD
104
LOEWE
162
CANDLE
104, 106, 108
LUXMAN
104, 106
CELEBRITY
102
LXI
106, 149, 162, 172, 185, 262, 281
CITIZEN
104, 106, 108, 138, 205, 271
MAGNAVOX
COLORTYME
104, 106
CONCERTO
104, 106
104, 106, 108, 119, 162, 169, 174, 175, 176,
177, 188, 189, 226, 230, 231, 232, 233, 234,
254, 283, 284
CONTEC/CONY
112, 113, 138
Brand
ABEX
Codes
CRAIG
138
CROWN
138, 271
CURTIS MATHES
104, 106, 115, 185, 205, 262, 271
CXC
138
DAEWOO
104, 105, 106, 117, 118, 271
DAYTRON
104, 106, 271
DIMENSIA
185
DUMONT
104
ELECTROBAND
102
ELECTROHOME
103, 104, 106, 119, 122
EMERSON
104, 106, 112, 124, 125, 126, 127, 128, 129,
130, 131, 132, 134, 135, 136, 138, 139, 141,
142, 146, 262, 271, 279
KAWASHO
102, 104, 106
KENWOOD
104, 106, 119
KLOSS NOVABEAM
169, 283
KTV
138, 271
LG (GOLDSTAR)
104, 105, 106, 112, 119, 156, 158, 255, 256,
271, 272
MARANTS
162
MARANTZ
104, 106, 162
MEGATRON
106, 159
MEMOREX
101, 106, 182, 262
MGA
104, 105, 106, 119, 122, 151, 179, 180, 182
MIDLAND
154, 271, 272, 281
MINUTZ
152
MITSUBISHI
104, 105, 106, 119, 122, 151, 179, 180, 181,
182, 210, 221, 225
MOTOROLA
103
MTC
104, 105, 106, 205
MULTITECH
138
MULTIVISION
184
NAD
106, 172
104, 106
NEC
103, 104, 105, 106, 189
FISHER
148, 149, 151, 262, 280
NIKKO
106
FUJITSO
146
ONWA
138
FUNAI
138, 146
ORION
135
FUTURETEC
138
PANASONIC
103, 154, 162, 230, 270
GE
103, 104, 106, 110, 119, 121, 122, 152, 154,
155, 185, 187, 200, 221, 230, 264, 265, 281
PHILCO
103, 104, 105, 106, 108, 112, 119, 162, 169,
174, 175, 177, 283, 284
GIBRALTER
104
PHILIPS
GRUNDY
138, 146, 271
103, 104, 108, 112, 119, 162, 169, 174, 175,
176, 186, 187, 188, 189, 230
HALLMARK
104, 106
PILOT
104, 271
HARVARD
138
PIONEER
104, 106, 190, 191, 192, 279
PORTLAND
104, 105, 106, 271
ENVISION
HITACHI
104, 106, 110, 112, 113, 119, 140, 159, 160,
214, 235, 236, 237, 238, 239, 240, 242, 243,
244, 245, 246, 248, 279
PRICE CLUB
205
PRISM
154
IMA
138
PROSCAN
185, 281
INFINITY
162
PROTON
104, 106, 112
JBL
162
PULSER
104
Manuracturer’s Codes
23
Brand
Codes
Brand
Codes
QUASAR
103, 154
AUDIO DYNAMICS
RADIOSHACK/REALISTIC
104, 106, 112, 138, 149, 185, 262, 271, 272
AUDIOVOX
414
BEAUMARK
413
RCA
103, 104, 105, 106, 107, 110, 119, 120, 121,
135, 156, 185, 198, 199, 200, 201, 202, 210,
221, 279, 281, 287, 290
BELL&HOWELL
411
CALIX
414
104, 106, 271, 272
CANDLE
413, 414, 423, 461
SAMSUNG
104, 105, 106, 112, 115, 119, 204, 205, 206,
271, 272
CANON
421
CARVER
462
SAMSUX
271
CCE
461
SANYO
104, 109, 148, 149, 180, 207, 208, 210, 262,
280
CITIZEN
413, 414, 415, 416, 417, 418
COLORTYME
409
COLT
461
CRAIG
413, 414, 423, 461
SAMPO
409, 410
SCOTCH
106
SCOTT
104, 106, 112, 124, 135, 138, 146
SEARS
104, 106, 113, 119, 146, 148, 149, 151, 166,
172, 185, 209, 210, 262, 280, 281
CURTIS-MATHES
409, 412, 413, 416, 418, 421, 515
SHARP
104, 106, 112, 129, 211, 212, 213, 221, 222, 271
CYBERNEX
413
SHOGUN
104
DAEWOO
415, 417, 426, 428
DBX
409, 410
SIGNATURE
101
SIMPSON
108
SONY
102
SOUNDESIGN
104, 106, 108, 138, 146
SSS
104, 138
STARLITE
138
SUPREME
102
SYLVANIA
104, 106, 108, 119, 162, 169, 174, 175, 176,
177, 188, 283, 284
SYMPHONIC
138
TATUNG
103
TECHNICS
154
TECHWOOD
104, 106, 154
TEKNIKA
104, 105, 106, 108, 112, 113, 138, 146, 176, 182
TELECAPTION
205, 270, 271
TOSHIBA
149, 172, 189, 205, 209, 210, 217, 218, 221,
260, 262
UNIVERSAL
152, 187
DIMENSIA
412
DYNATECH
426
ELECTROHOME
414, 429
ELECTROPHONIC
414
EMERSON
414, 415, 421, 426, 429, 430, 432, 433, 435,
436, 437, 438, 439, 440, 441, 442, 444, 445,
465, 513, 516, 517, 530
FISHER
405, 411, 419, 423, 448, 449, 450, 451, 518
FUJI
421, 519
FUNAI
426
GARRARD
426
GE
401, 412, 413, 421, 453, 515, 520
GRADIENTE
426
HARLEY DAVIDSON
426
HARMAN KARDON
409
HARWOOD
461
HEADQUARTER
411
HI-Q
423
421, 455, 456, 457, 489, 497, 507, 511, 520,
522
VICTOR
166
VIDTECH
104, 105, 106
HITACHI
WARDS
101, 104, 105, 106, 107, 124, 146, 152, 162,
169, 174, 175, 176, 185, 187, 188, 219, 220,
284
INSTANT REPLAY
421
JC PENNEY
409, 410, 411, 413, 414, 421, 455, 456, 458,
459, 460, 507, 518
JCI
421
JENSEN
455, 456, 511
JVC
409, 410, 411, 418, 420, 421, 458, 462, 468,
477, 511, 523
KENWOOD
409, 410, 411, 416, 418, 456, 511, 523
YANAHA
104, 105, 106, 119
ZENITH
104, 247, 253, 254
VCR Codes
Brand
ADMIRAL
Codes
531
ADVENTURA
426
AIWA
426
AKAI
403, 404, 512, 513
AMERICAN HIGH
421
ASHA
24
413
KLH
461
KODAK
414, 421
LG (GOLDSTAR)
409, 414, 418, 454, 506
LLOYD
426
LOGIK
461
LXI
414
MAGNAVOX
421, 462, 463, 504, 508, 524
Manuracturer’s Codes
Brand
Codes
Brand
Codes
MAGNIN
413
SANYO
MARANTZ
409, 410, 411, 416, 418, 421, 458, 462
SCOTT
415, 432, 435, 438, 465, 493, 516
MARTA
414
SEARS
MASUSHITA
421
401, 414, 421, 423, 448, 449, 450, 451, 455,
456, 507, 518
MEI
421
SHARP
417, 429, 431, 494, 495, 496, 531
MEMOREX
411, 413, 414, 421, 423, 426, 504, 531
MGA
429, 465, 513
MGGNAVOX
421, 449, 462, 504
MGN TECHOLOGY
413
MIDLAND
453
MINOLTA
455, 456, 507
MITSUBISHI
406, 407, 419, 421, 424, 429, 455, 456, 465,
466, 467, 469, 470, 471, 472, 473, 474, 506,
513, 523
MONTGOMERY WARD
531
MOTOROLA
421, 531
MTC
413, 426
MULTITECH
413, 416, 426, 453, 461
NEC
409, 410, 411, 416, 418, 458, 511, 523
NIKKO
414
NOBLEX
413
OLYMPUS
421
OPTIMUS
414, 421, 431, 446, 494, 509, 531
OPTONICA
496
ORION
435
PANASONIC
421, 446, 509, 525, 526, 531
PENTAX
416, 455, 456, 507, 520
405, 411, 413, 423
SHINTOM
404, 456, 46, 498
SHOGUN
413
SIGNATURE
531
SINGER
421, 461, 528
SONY
404, 421, 425, 427, 434, 498, 499, 519, 528
STS
421, 507
SYLVANIA
421, 426, 462, 463, 465, 524
SYMPHONIC
426
TANDY
411, 106
TASHIKO
414, 113, 138
TATUNG
458, 511
TEAC
426, 458, 511
TECHINICS
421, 409
TEKNIKA
414, 421, 426
TMK
413
TOSHIBA
415, 449, 451, 455, 465, 493, 506, 516
TOTEVSION
413, 414
UNITECH
413
VECTOR RESEARCH
409, 410, 415, 416, 513
VIDEOSONIC
413
WARDS
413, 414, 415, 421, 423, 426, 429, 455, 456,
461, 496, 501, 502, 503, 507, 516, 531
PENTEX RESEARCH
418
XR-1000
421, 426, 461
PHILCO
421, 462, 463
YAMAHA
409, 410, 411, 418, 458, 511
PHILIPS
421, 462, 496, 524
ZENITH
404, 498, 504, 519, 528
PILOT
414
PIONEER
410, 443, 455, 480, 481, 523
PORTLAND
416, 417
PROSCAN
401, 412
PROTEC
461
ABC
702, 703, 704, 705, 706, 709, 753
PULSAR
504
ANTRONIX
708, 709
QUARTER
411
ARCHER
708, 709, 710, 711
QUARTZ
411
CABLETENNA
708
QUASAR
421, 525
CABLEVIEW
708
RADIOSHACK/REALISTIC
411, 413, 414, 421, 423, 426, 429, 449, 450,
496, 531
CENTURY
711
CITIZEN
711
RADIX
414
COLOUR VOICE
712, 713
RANDEX
414
COMTRONICS
714, 715
RCA
401, 403, 412, 413, 415, 421, 431, 446, 448,
453, 454, 455, 456, 462, 482, 483, 484, 486,
487, 488, 489, 490, 491, 494, 507, 509, 515,
520, 525, 531
CONTEC
716
RICHO
528
GC ELECTRONICS
709
RUNCO
504
GEMINI
718, 719, 749
SAMSUNG
413, 415, 433, 453
GENERAL INSTRUMENTS
703
SANKY
504, 531
GRADIENT
781
SANSUI
410, 511, 523
HAMLIN
720, 721, 722, 735, 745
Cable Codes
Brand
Codes
EASTERN
717
GARRARD
711
Manuracturer’s Codes
25
Brand
Brand
Codes
Codes
HITACHI
703
DRAKE
HYTEX
702
ECHOSTAR
743
JASCO
711
GE
778
JERROLD
703, 705, 707, 714, 718, 723, 724, 746, 753,
782, 783, 784, 785, 788, 789, 790, 791, 792
GENERAL INSTRUMENTS
760, 761, 762
PANASONIC
757
PIONEER
739
PRIMESTAR DBS
776
PROSCAN
778
RCA
754, 755, 778
LG (GOLDSTAR)
770, 771, 779, 780
MAGNAVOX
725
MEMOREX
726
MOVIE TIME
702, 727, 728
NSC
702, 727, 728
OAK
702, 727, 728
PANASONIC
748, 752
PARAGON
726
PHILIPS
711, 712, 713, 714, 725, 730, 731, 732
PIONEER
701, 733, 734, 742
PULSAR
726
RADIOSHACK
770, 771, 779, 780
RCA
747, 749, 752
REALISTIC
709, 749
REGAL
722, 735
REGENCY
717
REMBRANDT
703
RUNCO
726
S.A
737, 738, 786, 787
SAMSUNG
714, 734
SCIENTIFIC ATALANTA
706, 736, 737, 738
SIGNAL
714, 718
SIGNATURE
703
SL MARX
714, 525
SPRUCER
752
STARCOM
707, 718, 753
STARGATE
714, 718
STARQUEST
718
TANDY
740
TELEVIEW
714
TOCOM
704, 723, 741
TOSHIBA
726
TSUA
718
TV86
727
UNIKA
708, 709, 711
UNITED ARTISTS
702
UNITED CABLE
753, 713
UNIVERSAL
708, 709, 710, 711
VIDEOWAY
744
VIEWSTAR
715, 725, 727, 740
ZENITH
726, 750, 751, 774, 777
REALISTIC
763
SONY
772, 725, 727, 740
STS1
764
STS2
765
STS3
766
STS4
767
TODHIBA
768
UNIDEN
769
SAT Codes
Brand
CHAPPARAL
26
758, 759
Codes
756, 757
Manuracturer’s Codes
ˆ Specifications
Amplifier Section
Output Power (6 ohms, 40 Hz ~ 20 kHz, 0.9% T.H.D) : Stereo .......................................................................................... Front L/R (2 Channel Driven)100W x 2ch
Output Power (6 ohms, 1 kHz, 0.9% T.H.D)
Front L/R (2 Channel Driven) ...................................................................................................................................................................................
Center (1 Channel Driven) .......................................................................................................................................................................................
Rear L/R (2 Channel Driven)....................................................................................................................................................................................
Subwoofer (1 Channel Driven) .................................................................................................................................................................................
100 W x 2ch
100 W x 1ch
100 W x 2ch
100 W x 1ch
Distortion at 1 kHz, 100 W
Front L/R .......................................................................................................................................................................................................................... < 0.9%
Center/Subwoofer ............................................................................................................................................................................................................ < 0.9%
Rear L/R........................................................................................................................................................................................................................... < 0.9%
S/N Ratio (IHF-A Weighted)
STEREO-TV (Line) ......................................................................................................................................................................................................... > 80 dB
S/N Ratio (IHF-A Weighted, -20dB FS)
SURROUND Front .......................................................................................................................................................................................................... > 65 dB
SURROUND Center........................................................................................................................................................................................................ > 65 dB
SURROUND Rear........................................................................................................................................................................................................... > 65 dB
Frequency Response
Front L/R .............................................................................................................................................................................................. 10 - 20 kHz, -3 dB/+1 dB
Center (Large) ...................................................................................................................................................................................... 10 - 20 kHz, -3 dB/+1 dB
Rear L/R............................................................................................................................................................................................... 10 - 20 kHz, -3 dB/+1 dB
Subwoofer ....................................................................................................................................................................................................... 10 - 120 Hz, -3 dB
Tone Control
Bass (100 Hz) ................................................................................................................................................................................................................. +/-10 dB
Treble (10 kHz)................................................................................................................................................................................................................ +/-10 dB
Input Sensitivity
STEREO-TV (Line) ......................................................................................................................................................................................................... 320 mV
Video (Monitor Output) ......................................................................................................................................................................................... 1 Vpp/75 ohm
Output Level
Audio (Tape REC OUT)....................................................................................................................................................................................... 280 mV/1 kohm
Video (Monitor Out) .............................................................................................................................................................................................. 1 Vpp/75 ohm
Cross-Talk (Separation)
STEREO-TV (Line) ......................................................................................................................................................................................................... > 55 dB
Dolby Digital .................................................................................................................................................................................................................... > 45 dB
Delay Time
Dolby Pro Logic ............................................................................................................................................................................................ Rear: 15 - 30 msec.
Dolby Digital ................................................................................................................................................................................................... Rear: 0 - 15 msec.
Center : 0 - 5 msec.
Tuner Section
(FM) Frequency Range ............................................................................................................................................................................................... 87.5 - 108 MHz
(FM) Sensitivity
Mono (THD 3%) .................................................................................................................................................................................................... 15 uV/m, EMF
(FM) Distortion (15 kHz LPF on)
Mono ................................................................................................................................................................................................................................ < 0.4%
Stereo............................................................................................................................................................................................................................... < 0.5%
(FM) S/N Ratio
Mono ............................................................................................................................................................................................................................... > 68 dB
Stereo.............................................................................................................................................................................................................................. > 63 dB
(FM) Frequency Response...................................................................................................................................................................................... 20 - 15 kHz, -3 dB
(AM) Frequency Range ............................................................................................................................................................................................... 520 - 1710 kHz
(AM) Sensitivity ( Loop Antenna).......................................................................................................................................................................................... 600 uV/m
(AM) Selectivity, +/- 10K .......................................................................................................................................................................................................... > 25 dB
(AM) S/N Ratio ........................................................................................................................................................................................................................ > 40 dB
Video Section
Output Level .......................................................................................................................................................................................................... 1.0 V (p-p), 75 ohm
Specifications
27
S-Video Y-Output Level.......................................................................................................................................................................................... 1.0 V(p-p), 75 ohm
S-Video C-Output Level ..................................................................................................................................................................................... 286 mV(p-p), 75 ohm
S/N Ratio ................................................................................................................................................................................................................................. > 45 dB
Speaker Section
Type
2 Way 2 Speakers Vented Enclosure ........................................................................................................................................................ x 1 (Front, Surround)
2 Way 3 Speakers Vented Enclosure ....................................................................................................................................................................... x 1 (Center)
1 Way 2 Speakers Bandpass Enclosure ........................................................................................................................................................... x 1 (Subwoofer)
Impedance.................................................................................................................................................................................................................................. 6 ohm
Power Handling Capacity .............................................................................................................................................................................................. 60 Watts RMS
Miscellaneous
Power Requirement................................................................................................................................................................................................... AC 120 V, 60 Hz
Power Consumption ............................................................................................................................................................................................................... ???????
Weight .................................................................................................................................................................................................................................. 37 lb 1 oz
(16.7 kg)
Dimension (W x H x D)............................................................................................................................................................... 16-15/16 × 5-8/16 × 15-12/16 inches
(430 × 140 × 400 mm)
Accessories ............................................................................................................................................................................................ Indoor FM Antenna (T Type)
Adapter for FM Antenna
AM Loop Antenna
Owner's Manual
Universal Remote Unit
Audio/Video Wire
Specifications are typical; individual units might vary. Specifications are subject to change and improvement without notice.
28
Specifications