1
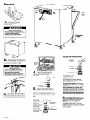
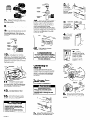
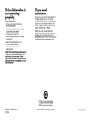
:
‘...
j.;..: ii,
,. .,
,.
,.:,.
:...
..,. : ,, .. . ..
,.
”
”
..
,:. :...:.,.,: .,,,:,. .:.:.... .
... . . .. .. . .. ... . . ... ?’
.:. .. .. .’
..,..
.
.
.
.
‘.
.
.
.
.
.
.
.:j.:
.
.
‘.
“‘:
... .. .. . :.
:
‘: .... ..... :...::.>.: .. . . :: .:.. ....
,.
.. .. .,.. .,. .,..:.,::, ,:,
.. ., : : : .. .. ~ >:. .... : ..:;: :.,:.,.,:, ::,,,:, ,, ,,,,, :,.:, i -. : : : :‘::.::i:‘i::.:i ji:;:.::.;::. ,,,.., :.. .. .. ... ..
,.
. . ....... ..:....
‘.
.. ..,....:>, ,.
.. .: .: ,.,: ,:,..,........
:.,., ... ... .: :.
..
:,. .,.., :.,
‘.‘.
. .. ..‘..:.::j:
,,, ,, .,..,. . . ......:,
:,: -.‘. ‘,:‘.,,‘,‘..:‘:...”
...., :.... ..::,... ‘.‘........;
.;.
.’
‘I:
:.
...k. ,..
.,:.:..:
.- 1.: ‘,
: : ..:.
... . ............ ....... .:,.,.: .,
: .: . . ...... .,...,.,,,’ ,,
‘... :’
..:
.: .: .,::..,.,,:::,.,:,.,,. ;.:.j::.:.j:j::.:..:.::.... ...
,‘.‘.”
,.
,, ..,:
,:.:..: :: j ‘.:‘:.::.:j,:.j .:j::. ,...: ::::.:,
.. .., .::::.
. ..
,:. ‘.:‘.
. . ...I:
: .. ., .,
‘.
:
:
: : ,,:,,,
.,. ,. ..
.,
:. ‘.’
:
.,I ,‘,... .‘. ., .: ,i:. .. . . .
.. .
:. ”
. ... . :-.,‘. :. ..,
:.
;.:::.:,;:
.‘.,“’
“:“‘y,
,:,,,
,.:
..::.::
;,;,:
‘.
.jj..
.. . .
: :..:.. ......::..
‘I. ,.:...j : .I. : ..::;.:.
...... ....... ::.‘I:...:.:.yj::..... :: ,:,,,,::.,:.j
., ..
:
:.,
‘.,,l.,\ 1; .;: :: i:, ‘.:I :,.j:‘ y.:.::i ,..
.,:. :.,: ,,.....
‘.
:’ ,, .. . .: . . . .. .
‘.
:
5’.
,., ,, . . .
‘:
..,:..
.
.
.
.
.
.
.
.
.
.
.
.
.
.
.
.
.
.
.
.
:.:‘.:‘:.:,.
.:..:.:..:
::.
.
.
.
.
.:
:
:.... :-j..::, :. . ...:.:..,...,. ,.~ :yy;;
..::.
,, ,,,.) ,., .,.
.:‘,>:‘.‘,j:., .. .
;...
,,
,.,. ,.,. i. :‘,.j’,i:,“”
::..,: .j
.,.
.::
;.
.‘,
:
,.,. . . . .
I.‘.
.::..:., .. ...
.::
..::.: :..y.
.,..,.
,. ,. : : :
: .... . ..:.... ... .:. ..
.j ....
,.,‘..:‘...‘...j .....’
.. ..
‘.:j...j.,
..:. ,,
.,
:..;,
.‘,3 . .. . .,.. ..A.:,
:, :.,
..:. . .......:::.::: ......:... ,.
” ‘. ‘..
:....., : ,: ,,:,..
,’
.... .. .,;,,,, ,.:::,..
.., :..:. .i. ‘,:
.:... ... ..
.. .. .j : :: ,. : ‘. .....
:
:.,
.:. : ..
:’
.‘-‘.‘,‘.‘, ..
.’ .,:,
:
. .. ..
;:.. ..
.. ., .. .,. .,
:
..... .. .. .. .,... .. ... .. ..
,. .. .:
. ..
,..
.:...:.:.:.:...,:
.,.:
:,:;.j.:...:.:.:.:.:.
,,,.,.,.,
.,.
”:
.:
:., j? ,:,,:... :.;.:.:.::~.... j.. .c.::: :
..,.,...’
. .. .
.j’
,:..
,, .,
.’
,.,
I,..
.,...:
..:.
.
.
.
.
.
.
.
.
.
.
.
.
,,,...
:...:.:
‘.
.:“=
.. :.:..:.j:: :. .:..: :
., ..
,.,,, ,. ,, ,,.:: .‘..,‘:::,.
,:
. . . . . . . . . . . .. . . ‘:c
.. .~.
... ,: ., :. ... ..
...
..: ,.,.; ;:,:,;; ,,,,
,,
:
.. ,,,,,
.. ,:.,,,, : : .:......
.,
.. . .
,.;
.. ..i i i
:
:
:. .,.i.. .y;p.
.;. :
:,
.::,.....::; .-, : :.:..:..
.
.
.
.,.
:., .:
”,, ,,
Y..:::,
:.:::::.j:.
,.:::...:,::. .y:
.,::. .>
...
... ..
‘- ,,
: --.-: j ...
,,,,,,,,,:,,,,,,,, : :,:,:::.:..:
:
.:. ,..,: :
... ...... “,:.
,’
-..‘I..:.:,.:.,
.’
:.,... y:....:
......:.:..:I
..
‘,
.,, :;: ‘,;;“:.‘.,‘.
j
,,,,,., ,.: .:::.j:.”
,’
,.,:,.:. :..:: .,.. ..:.:.,. ... .‘. .+j
:.:..
: :‘,.,. .’ :.
.,
.. ..
.’
.;:.
.: ,:.:..::: ::‘.:” .,:. .,...,.,.,.:.,.,.,.,.
: ”
.... ... .....:. :-.
,.: ..:.
..”
.A.:‘:,.,.
..:.:.,.,...,:.,
‘:.::‘,‘,:.:
..,:::.,?,:...“:
:-.
:: ,..
:.., .,.:::,
:.. .::.:.:.:.:.:,
.+.
:
,.,..,. .,.,. ... ... :...:.:.
” ,’
i ., ,, .,,
., ,...,..., .,.:.,.,.,.,.........,..........
:...: .,.....,,.
-.
:.
,,.,
:
.
.
,..
.’
“:...:‘:.‘;:.::::::.
,.,.,.,.,.,.,
.,
.:
.,..
:;
..
,’ :
.‘.,’ ....I
“:““‘.“.‘:,::::j
....... ..:.:.... . ... ... . . . ...’
,,.
.,
.
.
.
.
.
:....,
,: c .:... .. .:
: . ..“““’
..
:,
,,,,:,..::.,.:: .,.,.
::
,, ,;
..:,,.:.
..’
...
... ., ~,
:
‘. .:.,.,....:; ,:.:,.:..:.: ,:.:: .:. .: ,.::..: ,jjzy:
.. : .: ,.,., .. .:.,: ...
... :,:::,:::,y,[, ,: :
.. .... .... .:. .....::..:<...
..
..
......
... .. .j .,
.C’.’
,,
: ;y’ .‘.‘.
:..; .:
“.. ‘.“’
“’
:.
‘.
..,,..
:
: :..; ,.,. :
:.
..
.:....
,.
.,
..
,,.
‘.
IMPORTANT:
Read
and save
-these instructions.
IMPORTANT:
Installer: Leave Installation Instructions
with the homeowner.
Homeowner: Keep Installation
Instructions for future reference.
Save Installation Instructions for local
electrical inspector’s use.
.:,::,.,., .,
.,.,: :,:..,+., :‘,.:’
..:: ..:.... ::: ... . .
.. .. . ... . ... ..... ... . .. ‘. .:
.-..
.,., . . . . ... . .. . . .::
. .... ..... . .. . . ..... . ... . . ..: ..
. . ...:,
‘: ,.,. . . .... .:,,. :.,., ,.:: ..,.:.
..
: .,’
_:.. :-:
: ‘.
,,.:
.:.
:,
.:.,. ..:.::.~.~.~
.“.X, ,...::
.. .: ‘:“: ::
.’ ::
‘.“.’
,. .,. ,.
.,
,,.’
. . . . ‘..
,.. 1:
.. .;. : :... ........
:.., ;
: ‘: .,....,, .:. ... ........ ‘I..
.. .
...
.,
..:::. .,
... ..
. ..... . ... . .
:
., ,. 1: ,..
.,... .:
.’
. .. ..
,,
..:‘.:j: .j:,:
::
:
::
:.
.1
....>:
.: > ,.
‘:
,:..,. .:
:;.
...
‘.
.: : j
..
..:..,
‘...
:.
,.
:
‘.’
,,
. .. .
.. .. .....
‘..
:..
..
: .. ... ..:..jy.: ::
..:.,... .:> .. . .‘,. ‘.
.,.
:. :.. : ..
::: .:::: .. ::::.>. .. .. : : :
:‘:.,:,::
.. :..: : :: ::;.,
:.
.:::,.. : .:.:...:.: :.:.. : ..
,: .:. .. .......
;:
,,, .:...
.:.
:.
.,. .:.
... ..‘...’
:.:
‘,. ,.:
..
.. .. .: ... .. ..
.,...... ..‘.
:.. :c::.
.:
.,:..;...
:
,.,.:
,:;. ,::
... .. .....:....,.,
....,... ... .:.:..:
.:.. :
,. ,. .:...
,:
” ,,”
. . . . .j:..:::.:
..:..:... ‘.I .’
,. .> .I::.?:
..
:.
.:.
‘.
.‘.
\
Portable
Dishwasher
...
Before you start...
Check the area where you will be using
the portable dishwasher. Proper
installation for operation is your
responsibility. Make sure you have
everything necessary to insure correct
operation.
Grounded electrical outlet
is required. See “Electrical
Water heater: Should be set to deliver
12O’F water to dishwasher for best
results.
Hot water faucet or hot and cold singlespout water faucet: Should be
accessible within 30 inches of the back
of the dishwasher and should provide
15-120 PSIwater pressure.
Important: Observe all governing
codes and ordinances.
Electrical Shock Hazard
It is the customer’s responsibility:
l To contact
a qualified electrical
installer.
l To assure that the electrical
installation is adequate and in
conformance with National
Electrical Code ANSI/NFPA 70 latest edition,* and all local codes
and ordinances.
Failure to do so could result in fire,
electrical shock or other personal
injury.
Copies of the standards listed may be
obtained from:
*National Fire Protection Association
Batterymarch Park
Quincy, Massachusetts 02269
Tools needed for
installation:
Parts supplied for
installatgon:
faucet
adapter kit
Part No.
3374592
1 literature
Panel A
package
4 casters
Drain: To drain your
dishwasher, you
need a sink or a
laundry tub having
a minimum carrvaway capacity of 7
gallons per minute.
The top of the sink or
laundry tub cannot
be lower than 27
inches or higher
than 48 inches from
Remove parts and
from the
and latch dishwasher door.
Lust
support’the
pounds.
Electrical
requirements
Electrical Shock Hazard
l Electrical
ground is required on this
appliance.
l Do Not ground
to gas pipe.
l Do Not modify
the power supply
cord. If the plug does not fit the
outlet, have a proper outlet
installed by a qualified electrician.
l Do Not have a fuse in the neutral
or grounding circuit. A fuse in the
neutral or grounding circuit could
result in electrical shock.
l Do Not use an extension
cord with
this appliance.
l Check
with a qualified electrician
as to whether the appliance is
properly grounded.
Failure to follow these instructions
could result in a serious injury or
death.
If codes permit and a separate
grounding wire is used, it is
recommended that a qualified
electrician determine that the
grounding path is adequate.
A 120-volt, 60-Hz, AC-only, 15 or 20ampere, fused, electrical supply is
required. Time-delay fuse or circuit
breaker is recommended. it is
recommended that a separate circuit
serving only this appliance be
provided.
appliance
be:?
Of the
weight of 180
Recommended
grounding method
For your personal safety, this appliance
must be grounded. This appliance is
equipped with a power supply cord
having a 3-prong, grounding plug. To
minimize the risk of electrical shock, it
must be plugged into a mating 3-prong,
grounding-type wall receptacle,
grounded in accordance with the
National Electrical Code ANSVNFPA 70
- latest edition*, and all local codes
and ordinances. If a mating wall
receptacle is not available, it is the
personal responsibility and obligation of
the customer to have a properly
grounded, 3-prong wall receptacle
installed by a qualified electrician.
(See Figure 1.)
3-prong. groundingtype wall receptacle
Figure 1
Now start...
1
Take two of the foam corners from
the carton and place
them on the floor behind
the dishwasher.
n
Personal Injury Hazard
Because of the weight and size of
this dishwasher, two people may be
required to lift dishwasher.
Failure to do so could result in
personal injury.
Numbers
correspond
to steps.
Faucets with internal threads
2
Stand on the right or left side of
W the dishwasher. Firmly grasp the
body of the dishwasher and gently lay it
on its back on the foam corners,
Product Damage
Check that casters are locked in
place. If casters are not locked,
they may fall out when the
dishwasher is moved or cause the
dishwasher to vibrate during use.
faucet adapter
kit, Part No.
3374592
4
Stand dishwasher back up.
Open door and remove
beaded foam shipping pieces
from racks,
4
e
screen
screen holder
or aerator-
Remove the screen holder or
. aerator, and washer, from the
end of the faucet.
5
Use the faucet adapter kit that came
with your portable dishwasher to modify
the faucet where the dishwasher will be
used.
Faucets with external threads
Use faucet
adapter kit,
Part No. 3374592.
Insert the 2
screens and then
the thin washer
into faucet
adapter. Attach
adapter onto
end of faucet.
The thick washer
is not used.
Panel B
thin washer
-a
faucet
n
a
3
-m
screens
washer
Firmly push casters into holes at
w the corners of the dishwasher.
Check that casters are locked in place.
You may need to lightly tap casters with
a small hammer until they lock in place.
thick washer
faucet
aS
adapter
thin washer
\
-
screens
faucet
adapter
adapter
+
Use adapter kit, Part
No. 3374592. Insert the
2 screens, the thin
washer and then the
thick washer into faucet adapter.
Attach adapter onto end of faucet.
Both washers are used.
For other faucet types: See your local
dealer or parts distributor for a special
adapter kit.
Note: If the dishwasher will be used at a
faucet equipped with a spray hose
attachment, constant water pressure
may affect the spray hose. To prevent
potential problems, the spray hose
should be permanently disconnected
or replaced with a high-pressure hose.
6
CHECK THEELECTRICAL
H REQUIREMENTSTO BESUREYOU
HAVE THECORRECT ELECTRICALSUPPLY
AND RECOMMENDED GROUNDING
METHOD. Check the Installation
Instructions to see that you have
completed each step. If you have
skipped a step, go back and complete
that step before you continue with the
following steps.
2
n
Lift
door
panel(s
outer edges.
Use one hand
to bow bottom
of panel(s).
Remove
panel(s). Do Not
remove spacer.
7
Check that all ports were
installed. If there is an extra port,
go bock through the steps to see which
step was skipped.
8
9
n
Check that you hove all your tools.
n
Take a few minutes to read the
Use and Core Guide so you con
get the best use from your new
portable dishwasher. Then move the
dishwasher to the location where it will
be used.
n
14
When the cycle is complete,
unplug power supply cord and
push cord into storage compartment.
Turn the water faucet off. Press the
bleeder button on the connector to
release the water pressure. With one
hand, move the locking collar
downward while using the other hand
to pull down on the connector. Turn the
connector upside down and empty any
water remaining inside the connector.
Check for complete drain (no water
should be visible).
10
3
Insert one
side of
door panel(s),
with desired color
facing out, into
one side of door
frame.
n
4
Bow door
H panel(s)
and insert other
side of door
panel(s) into
door frame.
15
Turn on the hot water faucet
n until water is hot. Turn the
faucet off, Pull the inlet/drain hose from
the storage compartment. Attach the
hose connector to the faucet by pulling
down on the locking collar while
pushing the connector over the faucet
adapter. It will snap into place. Release
the locking collar.
n
Push hoses into storage
H compartment.
control
5
console
Push in
on door
panel(s) near the top
and slide panel(s) and
spacer up inside
bottom of control
console, allowing
panel(s) to rest on
channel at bottom
of door.
Congratulations!
You have just finished installing
your new dishwasher. Keep
Installation Instructions available
for easy reference.
n
Converting to
built-h
Your portable dishwasher con be
converted to a built-in (undercounter)
model by using conversion kit, Part No.
43 17856. The kit is available from your
dealer or authorized parts distributor.
Installation Instructions ore included
with the kit.
Untape the power supply
cord and plug it into the
grounded outlet. Open the dishwasher
door and spin the spray arm to check
for movement. Close the door.
ii
n
12
Turn hot water faucet to
H fully open position. Start
dishwasher.
13
To than e door
panel co1or
Personal Injury Hazard
Wear gloves and handle panels
carefully.
Cut metal edges may cause
personal injury or damage to other
materials.
Check for leaks around the
door and mounting gasket,
and at the hose connections.
n
Product/Property Damage
Turn water faucet off and press
bleeder button to release water
pressure before removing the drain
hose from faucet.
Failure to do so before removing
drain hose may result in product or
property damage.
Panel C
Snap into
channel.
(For models so equipped.)
Insert finger under one end of
retainer and pull towards you in
a peeling action. Set retainer aside.
6
Push in
along
Snap one end of retainer into
channel as shown. Push inward
while sliding thumb along full length of
retainer.
n
If the dishwasher is
not operating
properly...
Check these points:
Is the door closed tightly and
latched securely?
Has the cycle been set correctly
to start the dishwasher?
Is the water turned on?
Has the power supply cord been
plugged in?
Has a house fuse blown or a
circuit breaker tripped?
Has electrical power been
interrupted?
Note: If the motor stopped because of
overload, it will automatically reset
itself within a few minutes. If after
checking these points the dishwasher
still does not run or complete a cycle,
call for service.
l
l
l
l
If vou need
as&stance...
Check your Use and Core Guide for a
toll-free number to call, or call the
dealer from whom you purchased this
appliance. The dealer is listed in the
Yellow Pages of your phone directory
under “Appliances - Major”.
When you call, you will need the
dishwasher model number and serial
number. Both numbers ore on the
serial/rating plate, which con be found
on the front frame behind the door.
l
l
Printed on recycled paper.
10% post consumer waste/
50% recovered materials.
Port NO. 3369678 Rev. A
0 1994
Benton Harbor, Michigan
49022
Printed in U.S.A.