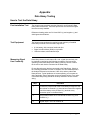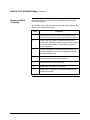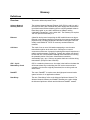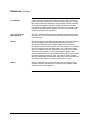
1
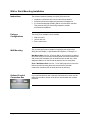
User’s Manual Edition 1/2007
ADVANCE NETWORK GATEWAY
with ETHERNET (ANG_EN)
pro
ces
s
p
GAS CHROMATOGRAPHY
Advance Network
Gateway with Ethernet (ANG_EN)
Revised Printing – January 2007
User’s Manual
2000590-001
Copyright Notice
© 2002-2007 by Siemens
All rights reserved.
This publication is for information only. The contents are subject to changes without notice and should not
be construed as a commitment, representation, warranty, or guarantee of any method, product, or device
by Siemens.
Reproduction or translation of any part of this publication beyond that permitted by Sections 107 and 109
of the United States Copyright Act without the written consent of the copyright owner is unlawful.
Inquiries regarding this manual should be addressed to:
Siemens Energy & Automation, Inc.
7101 Hollister Road
Houston, TX 77040
U.S.A.
Table of Contents
Chapter 1:
Chapter 2:
Chapter 3:
Chapter 4:
2000590-001
Preface
Technical Support
Safety Practices and Precautions
iii
v
vii
Advance Network Gateway
1
Introduction
Specifications
1
3
Installation
9
Introduction
Unpacking & Inspection
Pre Installation Planning
Wall or Rack Mounting Installation
CE Installations
Wiring Connections
AC Power (Mains) Connections
Data Hiway Connections
Ethernet Connections
9
10
11
14
15
17
18
20
23
Data Communications Setup
25
Introduction
Configuring Your PC
Establishing a Connection
Setting Network Address & Loop and Unit Numbers
Assigning an IP Address
Editing the Address Translation Table
Firm Updates
Command Summary
25
26
30
33
37
38
43
45
Troubleshooting
47
ANCB Description
ANCB LEDs Description & Operation
Ethernet Troubleshooting Guide
Guide to Network Health
Obtaining Diagnostic Information
48
50
53
55
56
Table of Contents • i
Table of Contents, Continued
Chapter 5:
Parts Catalog
59
Introduction
Available Parts
Power Supply Assembly Removal
59
60
61
Appendix
Data Hiway Testing
63
Glossary
Definitions of Important Terms
65
ChromLan/ELAN Technical Information
ii • Table of Contents
2000590-001
Preface
Audience & Purpose
This manual is intended to introduce users to the Advance Network
Gateway Ethernet (ANG_EN) unit that uses the ANCB Communications
Board P/N 2020951-001. The manual includes complete instructions for
proper and safe installation of the ANG_EN by installation personnel.
Chapter Contents
The manual provides the following information:
Topic
2000590-001
Page
Chapter 1. Advance Network Gateway
1
Chapter 2. Installation
9
Chapter 3. Data Communications Setup
25
Chapter 4. Troubleshooting
47
Chapter 5. Parts Catalog
59
Appendix. Data Hiway Testing
63
Glossary
65
Preface • iii/iv
Technical Support
Getting Help
At Siemens Energy & Automation, Inc. we take pride in the on going
support we provide our customers. This user’s manual should answer
most of your technical questions; however, our technical support service
provides a special “hot” line as an added source of information.
If you require assistance call:
In the United States: (800) 448-8224
Internationally: 001-918-662-7030
Before You Call
Before you call one of our technical support lines, please have the
following information available to help our representative answer your
questions:
1. Unit Serial Number and Date of Installation
2. Description of problem
3. LEDs status on Communication Board
2000590-001
Technical Support • v/vi
Safety Practices and Precautions
Safety First
This product has been designed and tested in accordance with IEC
Publication 1010-1, Safety Requirements for Electronic Measuring
Apparatus, and has been supplied in a safe condition. This manual
contains information and warnings, which have to be followed by the
user to ensure safe operation and to retain the product in a safe
condition.
Terms in This Manual
WARNING statements identify conditions or practices that could result in
personal injury or loss of life.
CAUTION statements identify conditions or practices that could result in
damage to the equipment or other property.
Terms as Marked on
Equipment
DANGER indicates a personal injury hazard immediately accessible as
one reads the markings.
CAUTION indicates a personal injury hazard not immediately accessible
as one reads the markings, or a hazard to property, including the
equipment itself.
Symbols in This
Manual
This symbol indicates where applicable cautionary or other
information is to be found.
Symbols Marked on
Equipment
DANGER - High voltage
Protective ground (earth) terminal
ATTENTION - Refer to Manual
Grounding the
Product
2000590-001
A grounding conductor should be connected to the grounding terminal
before any other connections are made.
Safety Practices and Precautions • vii
Safety Practices and Precautions, Continued
Correct Operating
Voltage
Before switching on the power, check that the operating voltage listed on
the equipment agrees with the available line voltage.
Danger Arising from
Loss of Ground
Any interruption of the grounding conductor inside or outside the
equipment or loose connection of the grounding conductor can result in a
dangerous unit. Intentional interruption of the grounding conductor is not
permitted.
Safe Equipment
If it is determined that the equipment cannot be operated safely, it should
be taken out of operation and secured against unintentional usage.
Use the Proper Fuse
To avoid fire hazard, use only a fuse of the correct type, voltage rating
and current rating as specified in the parts list for your product. Use of
repaired fuses or short-circuiting of the fuse switch is not permitted.
Safety Guidelines
DO NOT open the equipment to perform any adjustments,
measurements, maintenance, parts replacement or repairs until all power
supplies have been disconnected.
Only a properly trained technician should work on any equipment with
power still applied.
When opening covers or removing parts, exercise extreme care since
"live parts or connections can be exposed".
Capacitors in the equipment can retain their charge even after the unit
has been disconnected from all power supplies.
viii • Safety Practices and Precautions
2000590-001
Chapter 1
Advance Network Gateway
Introduction
Overview
The Advance Network Gateway with the Ethernet (ANG_EN) option connects
equipment residing on an Advance Data Hiway to a high speed Ethernet
communication system. The ANG_EN is a self-contained unit with its own
power supply and electronics. It is available for 19-inch rack or wall
mounting.
Read This
This manual provides installation instructions for the Advance Network
Gateway Ethernet (ANG_EN) unit that uses the ANCB Communications
Board P/N 2020951-001. For installation instructions for the Advance
Network Gateway (ANG_EN) that uses the Com 1 board refer to user
manual part number 20000579-001.
Figure 1-1: Typical
ANG_EN Network
ANG Network
Channel
Features
•
High speed implementation of
Advance Data Hiway using
Ethernet
•
Permits joining of multiple
segments of standard Data
Hiway
•
Significantly increases
communication data capacity
•
Allows use of fiber optics and
other Ethernet transmission
media
2000590-001
10BaseT
Data
Data
Wall Mounted
ANG
Advance GC
Ethernet
TCVR
(Fiber Optics
or Coax)
Wall Mounted
ANG
APC
Network
Advance GC
Advance Network Gateway • 1
Introduction, Continued
Available
Configurations
The Advance Network Ethernet Gateway is available in the following
configurations:
Description
2 • Advance Network Gateway
SEA Part Number
CSA/NRTL, Div 2, ADH to Ethernet, Wall Mount, CE
(Copper)
2015840-001
CSA/NRTL, Div 2, ADH to Ethernet, Rack Mount, CE
(Copper)
2015838-001
CENELEC, ZONE 1, ADH to Ethernet, Wall Mount, CE
(Copper)
2015850-001
2000590-001
Specifications
Media Interface
Advance Network Communication Board (ANCB): 10BASE-T RJ-45 STP
connector
Ethernet Specifications
Data rate:
10Mbits/sec.
Maximum Cable Length
Per Ethernet Specifications
Maximum length to adapter
concentrator/hub:
100m (328 ft)
Cable Type (minimum req.):
AT&T D-inside wire (DIW &
PDS, IBM Type 3, Category 3 or
5 data grade cabling)
Cable Characteristics:
100 Ohms nominal impedance
Data Hiway Specifications
248 Advance Units Maximum / 31 Units per Loop
8 Loops Maximum
Power (Mains) Requirement
Input Voltage
85-264 VAC, 47-63 Hz
Single Phase, Grounded Neutral
1 Ampere Maximum (<100 Watts)
Electrical Connections
Input Power
Terminal Strip for braided or solid 12 AWG (2.5mm2) maximum wire size
Data Hiway
Terminal Strip for dual or single pair Data Hiway cable
Interfaces
Laptop PC RS 232: 9-pin Sub D plug
Ethernet 10BASE-T: standard RJ-45 connector
Dimensions
Rack Mounted Package Configuration
See Figure 1-2 for Outline Drawing and Dimensions
Wall-Mounted Package Configuration
See Figure 1-3 for Outline Drawing and Dimensions
Zone 1 - Wall-Mounted Package Configuration
See Figure 1-4 for Outline Drawing and Dimension
2000590-001
Advance Network Gateway • 3
Specifications, Continued
Housing, Explosion Protection,
Ratings and Certifications
Wall Mounted Configuration
NEMA 3 (IP-54)
CSA Certified for Class I, Division 2, Group A,B,C,D
CENELEC non-Ex
(Air purge is not required for fire protection as indicated; however, the
unit may be air purged, if desired, for additional protection from
environmental elements.)
Rack Mounted Configuration
NEMA 2 (IP-20)
CSA Certified for Class I, Division 2, Group A,B,C,D
CENELEC non-Ex
Zone 1 Configurations
CENELEC approved EEx d IIC T6 Cortem CCA-04 enclosure
Electromagnetic and Radio Frequency Compatibility and Electrical
Safety
CE Compliance; certified to 89/336/ECC (EMC directive)
CE Compliance; certified to 73/23/EEC (Low Voltage directive)
Tested per EN 61010-1 / IEC 1010-1
Housing Materials and Colors
Stainless steel (1.4016); Front and top are commercial gray B
(RAL 7043), housing is light gray (RAL 7035)
Weight
Rack/Wall:
Zone 1:
Ambient Installation
Conditions
15 kg (35 pounds) approximately
33 kg (73 pounds)
Operation: -18° to +50°C (0° to 122°F)
0-99% relative humidity (non-condensing) maximum
0-75% relative humidity year-round average
(Purge with dry air or nitrogen if required in tropical conditions.)
Must not be exposed to direct sunlight.
Must be protected from rain.
Storage and Transport: -25° to +65°C
4 • Advance Network Gateway
2000590-001
Specifications, Continued
Figure 1-2: Rack Mount
Dimensions
Dimension Table
2000590-001
Figure 1-2
Description
U.S.
Inches
Metric
mm
A
Rack Height
6.97
177
B
Rack Total Width
19
483
C
Rack Mounting Holes Spacing
18.43
468
D
Rack Depth Case Only
16.26
413
E
Rack Handle
6.83
174
F
Rack Depth with Handles
17.63
448
G
Case Width
17.32
440
Advance Network Gateway • 5
Specifications, Continued
Figure 1-3: Wall Mount
Dimensions
Dimension Table
6 • Advance Network Gateway
Figure 1-4
Description
U.S.
Inches
Metric
mm
A
Wall Width
17.48
444
B
Wall Mount Holes Horizontal Spacing
15.59
396
C
Wall Mount Holes Vertical Spacing
17.72
450
D
Wall Height Including Cable Housing
24.04
611
E
Wall Height w/o Cable Housing
16.32
415
F
Wall Mount Total Depth
7.81
199
G
Wall Mount Depth Case Only
6.91
176
2000590-001
Specifications, Continued
Figure 1-4: Zone 1 – Wall
Mount
R
c/l
K
0
P
BOTTOM
B
C
E
Q
D
c/l
A
J
I
H
F
Q
FRONT
G
RIGHT
O
N
LEFT
P
M
c/l
K
L
S
T
TOP
Dimension Table
Figure 1-4
A
B
C
D
E
F
G
H
I
J
K
L
M
N
O
P
Q
R
S
T
2000590-001
Description
Overall enclosure height
Overall enclosure width
Overall enclosure depth from wall mounting
Vertical distance between wall mounting holes
Horizontal distance between wall mounting holes
Clearance of wall mounting holes
Distance from wall to front cable entry hole (left and right)
Distance from wall to back cable entry hole (left and right)
Spacing between holes on sides (left and right)
Spacing from center line to outer hole on side (left and right)
Spacing from wall to back cable entry hole (top and bottom)
Spacing from wall to front cable entry hole (top and bottom)
Spacing between front cable entry holes (top)
Spacing between center line and outer cable entry hole (top)
Spacing between center line and outer cable entry hole (top
and bottom)
Spacing between rear cable entry holes (top and bottom)
9 threaded cable entry holes each on left and right sides
2 threaded cable entry holes on bottom
2 threaded cable entry holes on top
2 threaded cable entry holes on top
Metric
(mm)
523
431
271
481
390
20
120
76
76
153
76
127
102
102
51
102
M25 x 1.5
M25 x 1.5
U.S. (inches)
20 9/16
16 15/16
10 11/16
19
15 3/8
13/16
4 3/4
3
3
6
3
5
4
4
2
4
1-1/4 x 11 NPT
3/4 x 14 NPT
Advance Network Gateway • 7
Chapter 2
Installation
Introduction
Overview
This chapter is intended for installation personnel. After completing the
procedures, within this Chapter, the Advance Network Gateway will be ready
for operation.
WARNING
Ensure that all AC Power (Mains) Specification requirements and advisories
are met. Failure to do so, and operating the equipment in a manner not
specified, may impair the safety protection provided by the equipment.
Installation Overview
Before beginning the installation process read through this Chapter to
familiarize yourself with the installation requirements.
The following table provides a recommended sequence of events you should
follow to ensure a safe and trouble free installation.
Topic
2000590-001
See Page
Unpacking and Inspection
10
Pre Installation Planning
11
Wall or Rack Mounting
14
CE Installations
15
Wiring Connections
17
AC Power (Mains) Connections
18
Data Hiway Connections
20
Ethernet Connections
23
Installation • 9
Unpacking & Inspection
Instructions
After opening the carton containing the unit, remove the unit from the carton
and inspect it for damage that may have occurred during transportation.
Points of inspection are:
Reporting Damage
•
Inspect exterior of unit for dents, chipped paint, scratches, etc.
•
Open unit and visually inspect interior mounted assemblies,
connectors and printed circuit boards for damage.
If there is any damage, notify your local Siemens Energy & Automation, Inc.
representative. Keep all shipping materials as evidence of damage, for
carrier’s inspection. Siemens will arrange for immediate repair or
replacement.
Telephone:
In the United States: (800) 448-8224
Internationally: 001-918-662-7030
10 • Installation
2000590-001
Pre Installation Planning
Description
This section provides information that can help you in preplanning your
installation. Subsequent information includes examples of how an Advance
Network Gateway (ANG_EN) can be used to physically extend a single loop
of the Advance Data Hiway (ADH) and a Fiber optic installation.
CAUTION
Before installing the Advance Network Gateway (ANG_EN) within an existing
LAN consult with the LAN administrator. You should also adhere to all the
ANG_EN Specification requirements; see Chapter 1, Specifications, page 3.
Figure 2-1: ANG_EN in
Analyzer House
The ANG_EN is designed for wall or 19-inch rack mounting. Figure 2-1
shows the ANG_EN wall mounted in an analyzer house. Note that the AC
Power (Mains) breaker is located in close proximity of the ANG_EN. Also
note the I/O connections to the ANG_EN.
AC BREAKER
PROTECTION
POWER & CABLE
CONNECTIONS
2000590-001
Installation • 11
Pre Installation Planning, Continued
Figure 2-2 illustrates how an ANG_EN can be used to physically extend a
single loop of the Advance Data Hiway (ADH) by providing a conversion from
the ADH media to Ethernet, and back to the ADH media.
Figure 2-2: ANG_EN
Installation
All segments of the system labeled “Advance Data Hiway” are according to
standard installation practices (9182 Belden cable or equivalent); see
Chapter 1, Specifications, page 3.
I/O Unit
Analyzer House
Advance
Data Hiway
ANG
APC
Distant Analyzer House
Advance
Network
Hub
Advance Data Hiway
GC
12 • Installation
SAA
Control
GC
GC
ANG
SAA
Fiber optics/
or STP
Analyzer House
ANG
Advance Data Hiway
GC
GC
2000590-001
Pre Installation Planning, Continued
Figure 2-3 shows an ANG_EN in a 10BASE-T to fiber optic installation. Fiber
optic equipment including converters, hubs and interconnecting cable are not
provided by Siemens.
Figure 2-3: ANG_EN Fiber
Optics Installation
As shown in Figure 2-3, multiple ANG_EN units may be interconnected into a
single large system by using appropriate Ethernet hubs.
The APC (Advance Personal Computer) must be connected to a standard
segment of Advance Data Hiway via the Advance Personal Computer
Interface (PCI).
Analyzer House
FIBER OPTICS
CONVERTER
Advance Hiway Data ANG
GC
FIBER
OPTICS HUB
GC
Control Room
ANG
I/O Unit
Distant
Analyzer House
FIBER
OPTICS
CONVERTER
Advance Data Hiway
GC
2000590-001
GC
ANG
Advance Data Hiway
STP (10BaseT)
from each
Gateway to
fiber optic hubs
or converters
PC-1
APC
Installation • 13
Wall or Rack Mounting Installation
Instructions
The Advance Network Gateway Unit (ANG_EN) should be:
•
•
•
Installed in a location that is free from shock and vibration.
Protected from direct sunlight and extremes of temperature.
It is recommended that the ANG_EN be mounted within a shelter.
This prevents ANG_EN from being exposed to outside
environmental conditions.
Package
Configurations
The ANG_EN is available in three models;
Wall Mounting
The mounting wall must be capable of supporting the weight of the
ANG_EN; see Chapter 1, Specifications and Figures 1-2 through 1-4.
•
•
•
Wall mount unit
19-inch rack unit
Zone 1 wall mount.
Wall Mount Unit: Use four, 5/16-inch (M8) or 3/8-inch (M10) lag bolts to
mount the ANG_EN to the wall. Mounting bolts must be secured to solid
wall construction members such as studs and into the wall only. Allow
adequate clearance on the left side to allow the door to swing open.
Zone 1 Wall Mount Unit: Use four, ¾ inch (M20) lag bolts to mount the
NAU to the wall. Mounting bolts must be secured to solid wall
construction members such as studs and into the wall only.
Optional Conduit
Connection Box
14 • Installation
If your wall mounted unit has a Conduit Connection box, holes must be
drilled into the side or bottom of the box to accommodate the moisture
protected.
2000590-001
CE Installations
Description
This section should be used for installation sites that must conform to CE
(Conformite Europeene) Certification. Typically, this does not apply to
installations outside the EC unless the equipment was purchased with
the explicit requirements and expectations that it shall conform to EC
Electromagnetic and Radio Frequency Interference (EMI/RFI) rejection
specifications.
CE Installation Kit
Available from Siemens is a CE Installation Kit P/N 2020264-001. This kit
has all the parts for the installations referenced in this section.
Instructions
The following information pertains to CE Installation of General Purpose,
Zone 1 and Division 2 Equipment. For Zone 1 Installations all cabling is
terminated in the ANG_EN Zone 1 Enclosure.
Installation with Steel
Conduit
The preferred method is to route the field wiring in steel conduit. If steel
conduit is used, unshielded power and signal wires can be used. The
power and signal wires (Ethernet and Data Hiway) must be routed in
separate conduit.
Using flexible conduit and/or armored cable is equivalent to using “steel
conduit”. Flexible conduit or armored cable must have its flexible conduit
and/or armoring conductivity 360-degree terminated at its entry to the
ANG_EN enclosure (or bulkhead).
Installation without Steel
Conduit
If conduit is not used, the following installation practices must be used to
ensure that the CE certification remains valid:
1. A shielded power cord or cable must be used for the input power
wiring. The shield must be terminated at the ANG_EN in a 360degree termination at the enclosure (bulkhead); use P/N 2015729001 contained in the CE Installation Kit or an equivalent part. For
Zone 1 Installation use P/N 1311001-014 Installation Kit.
2. The Data Hiway cables shields must be terminated in a 360-degree
termination at the enclosure or bulkhead; use P/N 2015729-001
contained CE Installation Kit or an equivalent part. For Zone 1
Installation use P/N 13111001-014 Installation Kit.
2000590-001
Installation • 15
CE Installations, Continued
3. A split ferrite must be clamped to Data Hiway cables and fixed
immediately to the outside of the ANG_EN; use part number
1173000-013 ferrite contained in CE Installation Kit. This is required
to meet the Conducted Immunity requirement for CE/EMC Heavy
Industrial. All other CE/EMC Heavy Industrial requirements are met
without the use of a ferrite clamp.
4. Shielded Ethernet cable must be used for all Ethernet connections,
in and outside the GC, and coupled through the enclosure using a
shielded RJ-45 coupler; use part number 1183200-003 contained in
CE Installation Kit. A mounting plate (part number 2020261-001) is
also available to accomplish this. If needed for Zone 1 installation
part numbers 2017984-001 and 2017985-001 is available to maintain
purge. If a PG gland is used to make the 360-degree termination of
the Ethernet shield at the enclosure, the Installation Kit and other
parts are not required.
16 • Installation
2000590-001
Wiring Connections
Description
All input ac power and communications connections are made to
connectors located on the chassis power supply assembly. To gain
access to the assembly, open the front panel of the ANG_EN. For Zone
1 units refer to the Figure 1-4, Zone 1 Outline Drawing.
Figure 2-4: Power
Supply/ANCB Assembly
Advance Data
Hiway Port 1& 2
Ethernet
Port
AC Power
ANCB (Advance
Network
Communications
Board)
Power
ON/OFF
Switch
I/O Wiring
Two removable wiring access plates permit all the wiring to be made
through the bottom section (wall units) or rear section (rack units) of the
ANG_EN. The plates can be punched to accommodate conduit or cable
gland connectors; see Figure 2-5. For Zone 1 units refer to the Figure
1-4, Zone 1 Outline Drawing.
Optional Conduit
Connection Box
If your wall mounted unit has a Conduit Connection box, holes must be
drilled into the side or bottom of the box to accommodate the moisture
protected cable glands or conduit fittings.
Figure 2-5: I/O Wiring
ACCESS PLATES
Conduit Connection Box
Instructions
2000590-001
AC Power (Mains) Connections
Data Hiway Connections
Ethernet Connections
Page 18
Page 20
Page 23
Installation • 17
AC Power (Mains) Connections
ANG_EN Power
Supply
The ANG_EN Power Supply can accept 90-264 VAC, 47-63 Hz inputs
without the need for setting switches or jumpers.
WARNING
Installation personnel shall adhere to all AC Power (Mains) Specification
requirements; see Chapter 1. Specifications, page 3. Failure to do so,
and operating the equipment in a manner not specified, can impair the
safety protection provided by the equipment.
Instructions
Step
Action
1.
Shut off the primary AC Power Supply line to this location.
2.
Open the front panel of the ANG_EN by loosening the four
captive screws located on each corner; use 4mm Allen
wrench.
3.
Install a 15-Ampere circuit breaker, a disconnect switch or a
receptacle in the power supply line or a switched receptacle
near the ANG_EN unit to make sure the unit can be
completely separated from the power source. Label the
breaker or receptacle box to make sure that the circuit is
clearly identifiable.
4.
If unit is equipped with conduit connection box, go to step 5.
If not, perform this step and go to step 7.
Remove wiring access plates from the units. Punch holes
as required for either conduit or cable gland connectors.
Install connectors and replace the plates.
18 • Installation
5.
Wall Mounted Units With Conduit Connection Box.
Remove the Conduit Connection Box cover by loosening
the 2 fastening screws.
6.
Wall Mounted Units With Conduit Connection Box. Drill
holes as required for either conduit or cable gland
connectors. Install connectors and replace the plate.
2000590-001
AC Power (Mains) Connections, Continued
Instructions,
continued
Step
7.
Installation Note
Action
Route input power, in accordance with pertinent electrical
codes and regulations, to ANG_EN.
To make the connections easier we have provided J1 as a removable
connector. Simply grasp the top portion of the connector and pull it
straight out from the base connector.
8.
Locate the AC Power Input connector. To make the AC
connections easier the Power Input Connector comes
apart. Simply loosen the two recessed captive screws,
grasp the top portion of the connector and pull it straight
out from the base connector.
Loosen the top wire retaining screws from the removed
connector. Strip the insulation ¼ -inch back from each of
the input power leads. Insert each lead in
2000590-001
9.
Plug the connector back into its base and secure down with
the two recessed captive screws.
10.
and connect
Locate the ANG_EN chassis ground lug
wire from it to the building’s ground connection.
11.
Inspect all connections for shorts or loose connections.
12.
You are now ready to connect the Data Hiway cable;
continue with Data Hiway Connections, page 20.
Installation • 19
Data Hiway Connections
Description
This section provides instructions for connecting the ANG_EN to an
existing Data Hiway.
Figure 2-6: Data
Hiway Connector
Pin 1
Data Hiway Port 1 &
2 Connections
Pin 1-ADH-A+
Pin 2-ADH-APin 3- Ground
Pin 4-ADH-B+
Pin 5-ADH-BPin 6- Ground
Data Hiway Cable
20 • Installation
The Advance Data Hiway requires a low capacitance, twin axial, 150ohm cable. The cable can be purchased from Siemens. See the table
below for ordering the correct cable:
Dual Channel Installation
Standard Oval Cable
Siemens P/N 1681000-003
(Belden P/N SSD1743)
Dual Channel Installation
Used for larger radius bends
Siemens P/N 1686002-002
(Alpha P/N 516689)
Single Channel Installation
Siemens P/N 1686002-001
(Belden 9182, Alpha P/N 9283,
Manhattan P/N 39240)
2000590-001
Data Hiway Connections, Continued
More Information
Instructions
For technical information on the Data Hiway refer to Appendix A in the
Optichrom Advance Library Set, Volume 2, Board Installation and
Strapping Manual.
Step
Action
1.
Place the ANG_EN AC Power Supply (Mains) circuit
breaker to OFF. On the ANG_EN Power Supply Assembly
place toggle ON/OFF switch to OFF.
WARNING
Placing the Power Supply Assembly toggle ON/OFF switch
to OFF does not remove the main voltage to the J1
terminals. To remove all input power to the ANG_EN, the
AC Power (Mains) to the ANG_EN needs to be shut off.
2.
Route the Data Hiway cable to the ANG_EN in accordance
with national or local electrical codes and regulations; see
Figure 2-1.
Installation Note
To make the Data Hiway connections easier we have made it a
removable connector. Simply grasp the top portion of the connector and
pull it straight out from the base connector; see Figure 2-6.
CAUTION
Do not plug the Data Hiway connector in until you have set the loop and
unit number; see Chapter 3, Data Communications Setup.
2000590-001
Installation • 21
Data Hiway Connections, Continued
Instructions,
continued
Step
Action
3.
Connect the Channel A Data Hiway cable to port 1, ADH +
and - terminals. Repeat for port 2 for Channel B Data
Hiway Cable.
Pin 1
Data Hiway Port 1 &
2 Connections
Pin 1-ADH-A+
Pin 2-ADH-APin 3- Ground
Pin 4-ADH-B+
Pin 5-ADH-BPin 6- Ground
Advance Data Hiway cable shields should be grounded
only at one end. If ground is at ANG_EN end, use GND
terminal.
22 • Installation
4.
Perform Data Hiway Post Installation Test; refer to
Appendix A. How to Test the Data Hiway.
5.
Remove the ADH plug connector from board. Do not make
final connections until you have set the loop and unit
number; see Chapter 3. Data Communications Setup.
6.
You are now ready for the Ethernet connections; go to
Ethernet Connections, page 23.
2000590-001
Ethernet Connections
Description
The DataNET Gateway connects to the Ethernet local area network via
the RJ-45 STP connector located on the topside of the ANCB.
Figure 2-7: RJ-45 STP
Connector
Before You Begin
Read the following notes.
1. The 10BASE-T data cable requires a minimum of two twisted pair
(transmit pair and a receive pair). Wire used should conform to the
AT&T D-inside wire (DWI&PDS), or IBM Type 3 or better twisted-pair
cable specifications, or Category 3 or 5 data grade cabling or better.
2. The maximum length of a 10BASE-T data cable cannot exceed 328
feet (100 meters). Typically to increase the distance each ANG_EN
will connect to a hub or other type of repeater/medium converter.
3. The cable should be terminated at both ends with RJ-45 STP male
connectors. The table below shows the RJ-45 wiring connections for
the ANG_EN end of the cable.
Pin No.
1
2
3
4
5
6
7
8
2000590-001
MDI Function
TX+
TXRX+
NC
NC
RXNC
NC
Installation • 23
Ethernet Connections, Continued
Installation
Do not perform the following procedure until you have defined the IP and
Subnetmask addresses; see Chapter 3, Data Communications Setup.
Step
1.
Action
Connect the incoming Ethernet line from the Hub to the
RJ-45 STP connector on the ANCB board.
RJ45 STP
Connector
24 • Installation
2.
Place the ANG_EN AC Power Supply (Mains) circuit
breaker to ON. On the ANG_EN Power Supply Assembly
place toggle ON/OFF switch to ON (Figure 2-4).
3.
After the ANG_EN has been connected to a hub and both
the ANG_EN and hub have been powered on, verify the
connection by looking at the LEDs visible on the top card
edge of the ANCB; see page 50, ANCB LEDs Description
and Operation.
2000590-001
Chapter 3
Data Communications Setup
Introduction
Overview
This chapter provides maintenance personnel instructions for configuring
the Advance Network Gateway (ANG_EN). Once configured, the
ANG_EN will “tunnel” Advance Data Hiway (ADH) messages across
Ethernet to another ADH by way of an Maxum™ Analyzer or another
ANG_EN.
Getting Started
… read through this Chapter prior to performing any procedures.
Chapter Preview
This chapter provides the following information:
Topic
2000590-001
Page
Configuring Your PC
26
Establishing a Connection
30
Setting Network Address & Loop and Unit Numbers
33
Assigning an IP Address
37
Editing the Address Translation Table
38
Firmware Updates
43
Command Summary
45
Data Communications Setup • 25
Configuring Your PC
Description
The Advance Network Gateway (ANG_EN) has a built-in utility for
configuring the ANG_EN. The Windows® HyperTerminal program, which
resides on most PCs, can be used to access the utility. Other serial
communication packages that support the following settings can also be
used.
Baud rate:
Data bits:
Parity:
Stop bits:
Flow control:
Instructions
57.6k baud
8
none
1
none
The following procedure uses the Windows HyperTerminal program, to
connect to the ANG_EN.
1. Click the Start button, and then click on Programs.
2. Click the HyperTerminal icon to start the Program.
The Connection Description dialog box will open
3. In the Name field type in a Connection Name. Example: Advance
Network Gateway.
4. In the Icon field select an Icon to represent the name selected.
26 • Data Communications Setup
2000590-001
Configuring Your PC, Continued
5. Click OK.
The Connect to dialog box opens
6. From the Connect Using scroll list choose the COM port number
you will be using on the PC to connect to the ANG_EN configuration
port.
7. Click OK to save the selection.
The COM Properties box opens
2000590-001
Data Communications Setup • 27
Configuring Your PC, Continued
8. Scroll each field and select the following Port Settings:
Bits per second: 57600
Data Bits: 8
Parity: None
Stop bits: 1
Flow Control: None
9. Click OK.
The Main Menu will appear.
10. Click File and choose Properties from the drop-down menu.
The Advance Network Gateway Properties box will appear
11. Click Setting tab.
12. From the Emulation scroll list select VT100. Do not change the
default settings for the other parameters.
28 • Data Communications Setup
2000590-001
Configuring Your PC, Continued
13. Click Terminal Settings button.
The Terminal Settings dialog box will appear
14. Click OK to accept the default settings.
The Advance Network Gateway Properties box will appear
16. Click ASCII Setup button.
The ASCII Setup dialog box will appear
17. Click OK to accept the default settings and return to the Settings
tab.
18. Click OK to return to main menu.
19. From the Main menu select File/Save As.
The Save AS dialog box will appear
20. Enter the short cut name. Click Save to complete the setup.
Your PC is now setup to connect to the ANG_EN.
To create a shortcut to the new connection you just entered and place it
on your Desktop, select the file name entered in step 19 and click the
right mouse button. From the pop-up menu select Create Shortcut.
Once the shortcut is created it can be moved to the Desktop. Simply click
the shortcut icon and drag the icon while holding down the left mouse
button. Release the mouse button to place the icon.
2000590-001
Data Communications Setup • 29
Establishing a Connection
Description
Once your PC is set up, as described in Configuring Your PC, you are
ready to connect to an Advance Network Gateway (ANG_EN).
Getting Started
… read through this Chapter prior to performing any procedures.
Before You Begin
1. Ensure that the ANG_EN is not connected to the network by
removing the RJ-45 plug from connector (J6) located on the edge of
the Communications board; reference page 23.
2. Connect a standard 9-pin COM cable from the PC COM port you
designated when you configured your PC (see page 26; step 6.) to
the Configuration Port J2 located on the Communications Board
(Figure 2-7).
3. Turn on the AC power to the ANG_EN Power Supply board;
reference page 18.
Password Protection
All programs on the ANG_EN Communication board are password
protected. This insures the data integrity of all configuration data and
limits unwanted access of the User’s network. To access any of the
configuration or diagnostic information the user must log in using the
password.
A password name can consist of any combination of alphanumeric
characters. The alphanumeric name must have a minimum of five and a
maximum of twenty characters. The ANG_EN Communication board is
shipped from the factory with the word “password” entered as the
default password name.
How to Change
Password
The user can change the password name at any time. To do this login
using the current password then type: “password stand stand”. Where
the word stand is the new password entered twice to verify that it was
properly entered.
How to Log Out
You may log out or close the Configuration and Diagnostic program at
any time by typing logout. However, the Configuration and Diagnostic
program will automatically log you out after five minutes.
30 • Data Communications Setup
2000590-001
Establishing a Connection, Continued
How to Log On
The following procedure assumes that the Windows Hyper Terminal
program residing on your PC has been configured, the ANG_EN is
operational and the PC is connected to the ANG_EN.
1. Open Windows Hyper Terminal program on your PC or double click
the shortcut icon to start; See Configuring PC.
2. Press ↵ Enter twice.
The following dialog box appears
3. At the > prompt type: login password and press ↵ Enter.
The Connect Screen will appear with the log in information and the
local prompt. The local prompt indicates that you are communicating
with the ANG_EN connected directly to the PC.
2.0.1
You are now ready to configure the Advance Network Gateway
(ANG_EN) with its own Network Address and ADH Loop and Unit
Number; go to page 33.
2000590-001
Data Communications Setup • 31
Establishing a Connection, Continued
Remote Connection
Log On
If your PC is connected to the ANG_EN configuration port you can
connect to any other ANG_EN on the same network if you know the IP
address of the device.
1. Open Windows Hyper Terminal program on your PC or double click
the shortcut icon to start; See Configuring PC.
2. Press ↵ Enter twice, the Command Request dialog box will appear.
3. At the > prompt type: login password [IP Address].
Once the password is verified the system responds with the login
information and displays the remote prompt, which includes the IP
address of the connected ANG_EN.
32 • Data Communications Setup
2000590-001
Setting Network Address & Loop and Unit Numbers
Description
This section provides instructions to configure an Advance Network
Gateway (ANG_EN) with its own Network Address.
Before You Begin
1. Open Windows Hyper Terminal program on your PC; reference
Configuring Your PC, page 26.
2. Connect and Log on to ANG_EN; reference Establishing a
Connection, page 30.
Important Definitions
2000590-001
Familiarize yourself with the following definitions.
address ip:
This is the 12-digit address that defines each
ANG_EN’s network ID and host ID. The IP
address must be assigned before the ANG_EN is
placed on-line to the network. Typically the
customer’s network administrator assigns this
address. The address ip is entered in dotted
decimal notation. Ex: xxx.xxx.xxx.xxx
subnetmask:
Subnetting, dividing the host ID into a subnet and
host ID, helps hide the details of an internal
network organization to external routers. The
subnetmask is used to reduce the size of routing
tables and restrict broadcast messages to the
subnetwork. The subnetmask is a 32-bit value
containing one bit for the network and subnet ID
and zero bits for the host ID. Typically the same
subnet mask is used on all ANG_ENs on a given
network. Ex: 255.255.000.000.
address ethernet:
This is the 48-bit unique Ethernet address. This
address is assigned at manufacturing time and is
not user configurable.
loop:
Loop refers to the Advance Data Hiway (ADH)
Loop number. Each ANG must be assigned a
Loop number. All ADH units physically connected
to the same bus as the ANG must have the same
Loop number. Allowable Loop numbers range
from 1 - 8.
Data Communications Setup • 33
Setting Network Address & Loop and Unit Numbers, Continued
Instructions
unit:
Unit refers to a numeric number assigned to a
device on the Advance Data Hiway (ADH).
Typically an ANG device can have a unit number
from 0 to 31. However, If the ANG is connected to
an Advance Network Interface Unit (NIU), the
ANG unit number must not be set to 0.
iproute:
The iproute variable defines the network path to
the default router. This value may be set to zero if
not used.
1. Log on locally to the ANG_EN.
The Connect Screen will appear with the log in information and the
local prompt. The local prompt indicates that you are communicating
with the ANG_EN connected directly to the PC.
2.0.1
Learning Hint
Parameters entered below are not saved until the ANG_EN is reset!
Even though you are given the option to save after each entry you can
make all your entries and then reset to save your entries.
2. To configure the ANG_EN IP address, at the Local > prompt type:
config address ip xxx.xxx.xxx.xxx
Where xxx.xxx.xxx.xxx should be replaced with the 12 digit unique
network address. See Assigning an IP (Internet Protocol) Address
page 37.
34 • Data Communications Setup
2000590-001
Setting Network Address & Loop and Unit Numbers, Continued
3. Press ↵ Enter.
The following message appears Configuration Change verified.
Type: reset - to save configuration changes
4. To save your entry, at the Local > prompt type: reset
5. To configure the ANG_EN subnetmask, at the Local > prompt type:
config netmask xxx.xxx.xxx.xxx
Where xxx.xxx.xxx.xxx is the subnet mask for your network.
Typically, this would be 255.255.0.0 or 255.255.255.0.
6. Press ↵ Enter, and save your entry by typing at the Local > prompt:
reset.
7. To configure the ANG_EN Loop number, at the Local > prompt type:
config loop x
Where x is a number in the range from 1 - 8 depending on the ADH
Loop number of the Units to be connected directly to the ANG_EN
ADH bus.
8. Press ↵ Enter, and save your entry by typing at the Local > prompt:
reset
9. To configure the ANG_EN Unit number at the Local > prompt type:
config unit x
Where x is a number in the range of 0 - 31. Typically this number is
set to zero to give the ANG_EN the top priority on its local ADH bus.
If the ANG_EN is connected to an NIU the unit number must be in
the range of 1 - 31. Note parameters are not saved until the
ANG_EN is reset.
2000590-001
Data Communications Setup • 35
Setting Network Address & Loop and Unit Numbers, Continued
10. Save all changes. At the Local > prompt Type: reset
This forces the ANG_EN to save the Configuration Information and
reboot using the new values.
The ANG_EN has now been configured. To display the current
settings, type at Local > prompt: config display
11. Connect the ANG_EN to the Advance Data Hiway; reference page
20.
12. Connect the ANG_EN to the network; see page 23.
36 • Data Communications Setup
2000590-001
Assigning an IP Address
Overview
Each Advance Network Gateway (ANG_EN) unit on a network must be
assigned an IP address. This 32-bit number defines each ANG_EN’s
network ID and host ID. The IP address is assigned by the user before
the Gateway is physically connected to a network.
See Setting Network Address & Loop and Unit Numbers, for instructions
on how to enter the IP address.
IP Address
The IP Address consists of a 32-bit number divided into four 8-bit fields.
Each field is expressed as a decimal number from 1 to 255 with each
field separated by periods. This is referred to as “dotted decimal”
notation. For example, 192.16.9.52 is an IP address.
How to Assign an IP
Address
Ask your network administrator to assign you an IP Address, or if the
ANG_EN will be in a closed plant area and not connected to the Internet
(World Wide Web) you can select an address from Table 3-1.
See Setting Network Address & Loop and Unit Numbers, for instructions
on how to enter the IP address.
Table 3-1: Available IP
Addresses
2000590-001
192.165.0.1
192.165.0.2
192.165.0.3
192.165.0.4
192.165.0.5
192.165.0.6
192.165.0.7
192.165.0.8
192.165.0.9
192.165.0.10
192.165.0.11
192.165.0.12
192.165.0.13
192.165.0.14
192.165.0.15
192.165.0.16
192.165.0.17
192.165.0.18
192.165.0.19
- 192.165.0.254
- 192.165.1.254
- 192.165.2.254
192.165.3.1 - 192.165.3.254
Data Communications Setup • 37
Editing the Address Translation Table
Overview
The Advance Network Gateway (ANG_EN) monitors the “local” ADH bus
for messages with a “remote” destination address. The ANG_EN
determines if the message destination is “remote” by searching it’s
Address Translation Table (ATT). If the destination address is located
remotely, the ANG_EN encapsulates the ADH message within the data
portion of an IP packet and sends the message out the Ethernet port.
Table Description
The Address Translation Table (ATT) records all known units that reside
on the Advance Data Hiway (ADH). Each record within the ATT contains
an ADH Loop / Unit number and the IP address of the ANG_EN the unit
is directly connected to. The ATT records are automatically added or
updated each time an ADH broadcast is received. Each ANG_EN
broadcasts it’s ATT every 10 minutes. This insures the data intgerity of
all ATT tables. An uninitalized ATT is automatically updated after 10
minutes by receiving ADH broadcasts and ANG_EN ATT broadcasts.
Important
Only Advance analyzer units broadcast on a periodic basis so it may be
necessary to add other type units when a new ANG_EN is added. An
alternate method of updating the ATT is to force all ADH units to send a
power-up broadcast by pressing the reset button or cycling the power.
Before You Begin
The following procedure assumes that the Windows Hyper Terminal
program residing on your PC has been configured, the ANG_EN is
operational and the PC is connected to the ANG_EN.
38 • Data Communications Setup
2000590-001
Editing the Address Translation Table, Continued
Displaying the ATT
The Address Translation Table (ATT) can be displayed using the
Configuration Management routines.
1. Log on locally to the ANG_EN.
2. To display the entire ATT type at the Local > prompt: display all
3. To display a single Loop only type: display adh x
Where x is the ADH Loop number. Allowable values are 1 - 8. If you
leave off the x value then the Loop number will default to the Loop
number of the local ANG_EN.
2000590-001
Data Communications Setup • 39
Editing the Address Translation Table, Continued
4. To display the ATT by IP number type: display ip xxx.xxx.xxx.xxx
Where xxx.xxx.xxx.xxx is the IP address. If you leave off the IP
address, the IP portion will default to the value of the local ANG_EN.
Note: 255.255.255.255 and 0.0.0.0 are not allowed.
Editing the ATT
1. To delete a single entry from the ATT type: del adh loop unit
Where loop is the ADH loop number (1 - 8) and unit is the ADH unit
number (1-31).
All parameters must be specified.
40 • Data Communications Setup
2000590-001
Editing the Address Translation Table, Continued
2. To delete all ATT entries associated with a single IP address type:
del ip xxx.xxx.xxx.xxx
Where xxx.xxx.xxx.xxx is the IP address in dotted decimal notation.
Note: 255.255.255.255 and 0.0.0.0 are not allowed.
3. To delete all entries in the ATT type: delete all
2000590-001
Data Communications Setup • 41
Editing the Address Translation Table, Continued
4. To add entries to the ATT type: add adh loop unit
Where loop is the ADH loop number (1 - 8) and unit is the ADH unit
number (1-31).
All parameters must be specified.
You can only add entries that are local to the ANG_EN. If it is not
directly connected to the ADH terminals you cannot edit it.
42 • Data Communications Setup
2000590-001
Firmware Updates
Description
Periodically we will provide our ANG_EN users with firmware upgrades.
Perform the following instructions to download a new ANG_EN firmware
upgrade to the Communications board. A firmware upgrade will take
approximately 5 minutes.
Instructions
The following procedure assumes that the Windows Hyper Terminal
program residing on your PC has been configured, the ANG_EN is
operational and the PC is connected to the ANG_EN.
1. Log on to the ANG_EN.
2. At the > prompt type: download
You should see the following response on the screen. At this point
the ANG_EN Communications board is ready to receive the new
firmware version.
3. From the Main Menu bar click on Transfer.
2000590-001
Data Communications Setup • 43
Firmware Updates, Continued
4. Click on Send Text File.
The Send Text File dialog box will appear.
5. Under Files of type select All files (*.*).
6. Under File name type in the upgrade version file name (for this
example Gateway.hex).
This will start the down loading of the files. Once the download has
begun the block numbers will be displayed as they are transmitted.
The upload will take approximately 5 minutes to complete.
44 • Data Communications Setup
2000590-001
Command Summary
Description
This section summarizes the command syntax for the Advance Network
Gateway (ANG_EN) software.
add
Adds an ADH Unit to the Address Translation Table
format: add adh loop unit
Where loop is a number in the range 1- 8.
Where unit is a number in the range 1-31.
config
This command permits configuration of the ANG_EN
format: config display
format: config time server ip xxx.xxx.xxx.xxx
Where xxx.xxx.xxx.xxx is the IP address of the time server
format: config address ip xxx.xxx.xxx.xxx
Where xxx.xxx.xxx.xxx is the IP address.
format: config address ethernet xx.xx.xx.xx.xx.xx
Where xx.xx.xx.xx.xx.xx is the Ethernet address.
format: config loop x
Where x is a number in the range 1-8.
format: config unit x
Where x is a number in the range 1-31.
format: config iproute xxx.xxx.xxx.xxx
Where xxx.xxx.xxx.xxx is the IP address.
format: config netmask xxx.xxx.xxx.xxx
Where xxx.xxx.xxx.xxx is the IP address.
del
Deletes the specified ADH Unit from the Address Translation Table
format: del all
format: del adh loop unit
Where loop is a number in the range 1- 8.
Where unit is a number in the range 1-31.
format: del ip xxx.xxx.xxx.xxx
Where xxx.xxx.xxx.xxx is the IP address.
display
Generates display of the specified ADH Unit(s) from the ATT
format: display all
format: display adh loop unit
Where loop is a number in the range 1-8.
Where unit is a number in the range 1-31.
loop & unit are optional parameters
no options defaults to this ANG_EN loop
loop only displays all Units in specified loop
loop unit displays specified ADH unit
format: display ip xxx.xxx.xxx.xxx
Where xxx.xxx.xxx.xxx is the optional IP address.
no option defaults to this ANG_EN IP
2000590-001
Data Communications Setup • 45
Command Summary, Continued
download
This command starts download of ANG_EN firmware (used for
upgrades)
format: download
errorlog
Generates and displays error log
format: errorlog
Help
Displays Command Summary List
login
Permits User access to display and configuration commands
format: login password
logout
Permits a User to end a User session
format: logout
Note: The user is automatically logged out after 5 minutes
netstat net
Displays network statistics for Ethernet port.
Netstat adh (a or b)
Displays the Advance Data Hiway A or B channel status
format: netstat adh a or netstat adh b
password
Permits a User to alter the User password
The password is case-sensitive and can be up to 20 alphanumeric
characters long.
No pass
format: password stand stand
Where stand is the new User supplied password.
reset
Reboots the ANG_EN and saves all configuration parameters
format: reset
46 • Data Communications Setup
2000590-001
Chapter 4
Troubleshooting
Introduction
Overview
This chapter provides installation personnel with troubleshooting
information to solve problems associated in the setup of the Advance
Network Gateway.
Chapter Highlights
Before beginning the installation process read through this Chapter to
familiarize yourself with the information provided.
Topic
2000590-001
See Page
ANCB Description
48
ANCB’s LEDs Description & Operation
50
Ethernet Troubleshooting Guide
53
Guide to Network Health
55
Obtaining Diagnostic Information
56
Troubleshooting • 47
ANCB Description
Description
Figure 4-1: ANCB Board
The ANCB (Advance Network Communication Board) is the
communications electronics for the unit. The ANCB plugs into the PCI
slot located on the power supply assembly. A bracket fastens it to the
chassis. See Figure 2-4 Power Supply/ANCB Assembly.
J 10 Port 1
For ADH: Jumpers on
Top 3 Positions
J11 Port 2
For DataNET:Jumpers on
Bottom 3 positions
Operation LEDS
Config Port
RS232
57.6 KB
Board
RESET
J12
J4
10Base2
10BaseT
J5
J10 & J11
Connections
J2 not used for ANG-EN
Jumpers J10 & J11 select the ANG_EN network interface provided to
connector J4.
J10 connects Port1 on J4 to either the Advance Data Hiway (ADH) or
Advance DataNET Channel A interface.
J11 connects Port2 on J4 to either the Advance Data Hiway (ADH) or
Advance DataNET Channel B interface. J10 & J11 are configured for
Advance Data Hiway (ADH) on the ANG_EN board.
J5 Connector
Connector J5 is the impedance matching jumper for the 10Base2 (BNC)
connector labeled P1 on the ANCB board. The connector is a 2-position
(4-pin) connector. The pins are numbered 1 to 4 in the clockwise
direction. Pin 1 is denoted by a dog-ear that is silk-screened in a
rectangle near J5.
For the Ethernet application P1 is not normally used and the ANCB, J5
connector, Pins 3&4 are shorted with the 2-position switch is in 25-ohm
position.
48 • Troubleshooting
2000590-001
More Information
2000590-001
See ANCB LEDs Description and Operation, page 50.
Troubleshooting • 49
ANCB LEDs Description & Operation
Description
This section provides maintenance personnel with information on how to
use the ANCB LEDs for troubleshooting the Advance Network Gateway
(ANG_EN).
Communications
Board LEDs
50 • Troubleshooting
2000590-001
ANCB LEDs Description and Operation, Continued
ADHA and ADHB -
During normal operation the Green LED for ADHA or ADHB will blink to
indicate either receive or transmit activity on the ANG_EN channel. If a
message retry is sent the Yellow LED will blink.
The ADHA and ADHB LEDs are status indicators. During reset all of the
LED’s will blink for ½ second while the board goes through self-test. If an
error is detected during the self-test period the Red FAULT LED will
remain on and the Yellow WARN LED will blink the detected error code.
Only the Channel A ADHA LED’s will display FAULT codes. Use the
following table to determine the error condition.
NUMBER
of Blinks
Type of Error
Corrective Action
1
RAM FAILURE
Replace Board
2
FLASH FAILURE
Reload Firmware or Replace
Board
3
ETHERNET FAILURE
Replace Board
4
DataNET FAILURE
Replace Board
5
OTHER HARDWARE FAILURE
Replace Board
6
DUPLICATE IP
Change Board IP address
7
CROSS LINK FAILURE
Check Cross Link Cable
8
WRONG LOOP
Change Loop Number
9
INVALID JUMPER
CONFIGURATION
Check J10 and J11
Connections
DUPLICATE UNIT NUMBER
Change Unit Number
10
IMPORTANT
FAULT errors can only be cleared with a board reset.
LOCKA and LOCKB -
If either of the LOCKA or LOCKB LED’s is on, the board must be reset.
This is indication that the board left the 455Khz Line Contention signal on
for more than +/- 2.3 seconds.
E1A / E1B OK ER -
These LEDs are used to indicate ANG_EN status and activity. The
Green LED will blink whenever a message is received or transmitted on
the respective channel. The Red LED will blink if an error has occurred
on the channel.
2000590-001
Troubleshooting • 51
ANCB LEDs Description and Operation, Continued
Ethernet Controller -
The Green TX LED blinks whenever a message is transmitted on the
Ethernet channel. The Green RX LED blinks whenever a message is
received on the Ethernet channel. The Red CL LED indicates there was
a collision on the Ethernet. Note: collisions are a normal occurrence on
an Ethernet network. The Red JB LED indicates that the Ethernet
controller has determined that the transmitter has remained on for longer
than allowed and indicates a possible hardware problem.
10BaseT / 10Base2
Ethernet HUB -
The bi-colored LED’s marked CL, BNC, and TP are used as indicators
for the Ethernet HUB. The HUB provides the 10BaseT and 10Base2
ports. The LED’s indicate the following information.
52 • Troubleshooting
CL
Steady Green indicates a FIFO error
Steady Red indicates a Collision on the HUB ports
(Receiving on one port while transmitting another)
BNC
10Base
T Port
Blinking Red indicates a packet is being transmitted.
Blinking Green indicates a packet is being received.
Alternating Red/Green indicates the 10Base2 port is
Partitioned Out (Disabled).
TP
10Base
T Port
Steady Green indicates the 10BaseT port is receiving the Link
Integrity Pulse (Keep Alive signal)
Blinking Red indicates a packet is being transmitted.
Blinking Green indicates a packet is being received.
Steady Red indicates the Polarity is reversed on the 10BaseT
port.
Alternating Red/Green indicates the 10BaseT port is
Partitioned Out (Disabled).
2000590-001
Ethernet Troubleshooting Guide
Description
The most common problems associated with the Ethernet and how to
correct them are given in the table below.
Fault
2000590-001
Probable Cause
Collisions
Excessive collisions are most often caused by a
physical media problem such as:
1. missing or incorrect terminators (10Base2)
2. impedance discontinuities (such as
defective connectors, cable stubs, crushed
cables, incorrect cable types)
3. defective network interface cards (NIC)
4. too many network devices on a single
collision domain
Late Collisions
Causes of Late Collisions are faulty NIC card or
a network that is physically too long. A network
is physically too long, if the end-to-end signal
propagation time is greater than the minimum
legal sized frame (about 57.6 microseconds or
~58 bit times)
1. cable lengths in excess of the maximum
permitted for the cable type
2. faulty connectors or improper cabling
3. excessive numbers of repeaters between
network devices
4. defective Ethernet transceivers or defective
network interface cards (NIC)
FCS Error
A FCS error can be caused by a faulty NIC or
driver, cabling, hub or induced noise. A Late
Collision can result in a FCS error. Possible
causes (listed by highest probability):
1. Late Collision
2. Faulty Cable/Connectors
3. Induced noise
4. Faulty NIC or HUB
Troubleshooting • 53
Ethernet Troubleshooting Guide, Continued
Fault
54 • Troubleshooting
Probable Cause
Jabber Error
Jabbering can be caused by faulty NIC or
driver, cabling, or grounding problems Possible
causes (listed by highest probability):
1. Faulty Cable/Connectors
2. Ground problem - Induced noise
3. Faulty NIC or HUB
Ghosts Error
Possible causes (listed by highest probability):
1. Poor grounding
2. Improper cable routing
2000590-001
Guide to Network Health
Recommendations
for Network Health
There are no magic numbers for good, or bad, network parameters (such
as: utilization and collisions). The parameters that are acceptable for a
healthy network are determined by many variables.
1. Utilization should average less than 40%. If you have extended
peaks of greater than 70% you may want to investigate the
causes and consider configuration changes to lower the average
utilization. Generally, the greater the number of stations the
lower the acceptable utilization threshold.
2. The collision rate should be less than 5%. Be wary of large
bursts of collisions (greater than 20%); this can be an indicator of
severe cabling or component problem.
3. Bad FCS errors, late collisions, jabbers, and ghosts should be
rare occurrences and should be investigated when they become
repetitive. These error conditions are typically a result of some
kind of problem with the cabling and/or network configuration.
4. Excessive broadcast traffic adversely affects all stations on the
network. Investigate nodes that are transmitting many
broadcasts for possible reconfiguration. The average broadcast
frame rate should be less than 5%.
2000590-001
Troubleshooting • 55
Obtaining Diagnostics Information
Description
You can access the following Diagnostic information from an Advance
Network Gateway (ANG_EN).
•
•
•
Ethernet Network Status
ADH Channels Status
Error Log
Before You Begin
The following procedures assumes that the Windows Hyper Terminal
program residing on your PC has been configured, the ANG_EN is
operational, the PC is connected to the ANG_EN and you have logged
on.
Ethernet Network
Information
To display current Ethernet network diagnostic information:
1. Log on to the ANG_EN.
2. At the > prompt type: netstat net
The UDP and Interface Statistics screen will appear. The display
shows the number of packets received and transmitted and the
number of errors detected.
56 • Troubleshooting
2000590-001
Obtaining Diagnostic Information, Continued
ADH Channel
Information
To display the current diagnostic information for the ADH channels:
1. Log on to the ANG_EN.
2. At the > prompt type: netstat adh (a or b).
The display shows the number of packets received, transmitted and
the number of errors detected for each of the 31 units on the
assigned loop.
Error Log
To display an error log specific to each ANG_EN:
1. Log on to the ANG_EN
2. At the > prompt type: errorlog
The Most Recent Error log screen appears.
2000590-001
Troubleshooting • 57
Chapter 5
Parts Catalog
Introduction
Overview
This chapter provides maintenance personnel with a list of replaceable
parts and assemblies for the Advance Network Gateway (ANG_EN).
Subsequent information includes how to remove and replace the
replacement part or assemblies.
How to Place an
Order
Parts can be ordered from:
Siemens Energy & Automation, Inc.
408 US Highway 60
Bartlesville, Oklahoma 74003
Tel: (800) 448-8224 (USA)
Tel: 001 918-662-7030 (International)
Fax: (918) 662-7482 (USA)
Fax: 001 918-662-7482
To ensure an immediate response to your request, you should provide
the following:
2000590-001
•
Purchase order number. If ordering by phone, a confirming P.O.
should be sent.
•
Address where the parts are to be shipped.
•
Address where the invoice is to be sent.
•
Part numbers as listed.
•
Quantity needed of each part.
•
Equipment Serial number or project number of the system
(especially for warranty related orders).
•
Preferred method of shipment.
Parts Catalog • 59
Available Parts
Description
60 • Parts Catalog
The available ANG_EN assemblies and parts and applicable part
numbers are shown below.
Part Description
Ordering Number
Power Supply, Base Assembly
2015849-802
ANCB Communication Board; Ethernet to Data
Hiway Gateway
2020951-801
Debug Port Extension Cable
2020914-001
Power Supply to Circuit Board Cable
2020276-001
Advance Data Hiway Connector
1221007-014
AC Power Connector
1222010-017
2000590-001
Power Supply Assembly Removal
Instructions
The following procedure removes the power supply assembly from the
ANG_EN enclosure.
Step
Action
1.
Open the front panel of the ANG_EN by loosening the four
captive screws located on each corner; use 4mm Allen
wrench.
2.
Shut off the primary AC Power Supply line to this location.
Place Power Supply toggle switch to OFF.
WARNING
Placing the Power Supply Assembly toggle On/Off switch to
OFF does not remove the main voltage to the J1 terminals.
To remove all input power to the ANG_EN, the AC Power
(Mains) to the ANG_EN needs to be shut off.
2000590-001
3.
Remove Power Input Connector and Port 1&2 Connector
from board mounted connectors.
4.
Remove Ethernet connection from the RJ-45 STP connector
(J2) on the Gateway Communication Board.
5.
Remove the ANCB retaining bracket fastened to the
chassis.
6.
Remove the 4 retaining nuts securing the Power Supply
Assembly to the ANG_EN.
7.
Lift the Power Supply Assembly up and out of the ANG_EN.
Parts Catalog • 61
Appendix
Data Hiway Testing
How to Test the Data Hiway
Post Installation Test
The following test procedure tests the Channel A and Channel B Data
Hiway cable connections. These test procedures insures that the signal
lines are correctly installed.
Referenced testing points are CH A and CH B (+) and negative (-) and
shield ground terminations.
Test Equipment
The following test equipment is required to test continuity of installed
Data Hiway Channel A and Channel B signal lines:
•
•
•
Measuring Signal
Line Continuity
9 Vdc battery, with connector leads and clips
Digital Volt Ohm Meter (DVM) or equivalent
10K ohm resistor, with leads and clips
Data Hiway channel A and channel B + and - signal line continuity can
be checked by performing the following procedures. Devices can be
operating on the Data Hiway when making continuity checks. Perform
the check for each device connected to the Data Hiway.
Do not skip testing any devices connected to the Data Hiway. Check at
the incoming termination's on the I/O chassis, the Termination Boards in
the Analyzer Electronics enclosures, LINC units, and any other Data
Hiway devices. Typical problems are reverse polarity; poor contacts on
wiring terminals, opens, and shorts and cross channel wiring. Every point
in the Data Hiway wiring should be carefully checked to ensure correct
wiring.
Step
2000590-001
Procedure
1.
Connect the positive lead of the 9-volt battery through the 10K
ohm resistor to Channel A (+) terminal and connect the negative
lead of the battery to the Channel A (-) terminal at any
connection point on the Data Hiway.
2.
Using DVM measure for 9.0 Vdc across Channel A (+) and
Channel A (-).
3.
Repeat steps 1 and 2 for Channel B.
Data Hiway Testing • 63
How to Test the Data Hiway, Continued
Measuring Shield
Continuity
Data Hiway shield lead continuity can be checked by performing the
following procedures:
Ground Data Hiway cable shields at only one end of each segment. This
practice reduces ground loop noise.
Step
64 • Data Hiway Testing
Procedure
1.
With Data Hiway communicating with connected Nodes,
temporarily disconnect Channel A shield lead from ground.
2.
Connect 10K ohm resistor to disconnected shield and
connect battery positive (+) lead to resistor. Resistor should
be in series with the battery. Connect battery negative (-)
lead to unit ground.
3.
Connect DVM positive (+) lead to channel A and connect
shield and negative (-) to unit ground. Measured voltage
potential should be 9 Vdc.
4.
If 9 Vdc is not measured, the channel A shield line is
grounded at another point; correct problem.
5.
Reconnect channel A and shield lead.
6.
Repeat steps 1 through 5 for Channel B.
7.
Repeat steps 1 through 6 for each shield ground point on
the Data Hiway cable.
2000590-001
Glossary
Definitions
Overview
This section defines important Terms.
Advance Network
Gateway Ethernet
The Advance Network Gateway Ethernet (ANG_EN) is a wall- (or rack-)
mounted unit that is self-contained with power supply and all electronics.
It provides internal field termination points to connect standard Advance
Data Hiway cable “on one side” and Ethernet 10BaseT cabling
(Unshielded Twisted Pair) “on the other side”. The Gateway unit requires
120 VAC power wired directly to it.
Ethernet
A data link level protocol comprising the OSI model’s bottom two layers.
Ethernet is a broadcast networking technology that uses several different
physical media, including twisted-pair cable and coaxial cable. Ethernet
usually used CSMA/CD. TCP/IP is commonly used with Ethernet
networks.
Collisions
The result of two or more LAN stations attempting to use the same
transmission medium at the same time. Collisions are a normal
occurrence on Ethernet. A properly functioning Ethernet will experience a
relative small percentage of collisions. Typically the collision rate should
be less than 5% of the available bandwidth. Most collisions occur during
the preamble portion of the frame. Most Ethernet controllers
automatically retry, up to 15 times, any packet that has a collision during
transmission. (Except for Late Collisions)
CRC - Cyclic
Redundancy Check
CRC is a method to detect errors. A number is derived from the data that
will be transmitted. By recalculating the CRC at the remote end and
comparing it to the value originally transmitted, the receiving node can
detect errors.
DataNET
The name “DataNET” is used to mean the high-speed communication
system inclusive of our application software.
Data Hiway
The term “Data Hiway” refers to the Advance Optichrom Network. The
Advance Network Gateway and DataNET Gateway are used to bridge
the Advance Optichrom network and the Advance DataNET network.
2000590-001
Glossary • 65
Definitions, Continued
Late Collision
A Late Collision is one that occurs after the first 64 bytes in a frame or
packet. Since the smallest Ethernet frame (packet) is 64 bytes in length,
late collisions will not be detected on small packets. Ethernet controllers
do not retransmit packets with late collisions resulting in lost packets.
Late Collisions usually appear as a bad FCS frame. The only time a late
collision can be detected on a 10BaseT network is when the detecting
device is transmitting at the same time.
FCS - Frame Check
Sequence Error
The CRC (Cycle Redundancy Check) remainder transmitted at the end
of a frame. A FCS error is a legal sized Ethernet frame with a bad frame
check sequence.
Ghosts
Ghosts are energy on the cable that appears to be a frame, but does not
have a valid beginning of frame pattern (start delimiter 10101011).
Ground loops and other wiring problems cause some repeaters to
believe that a frame is being received. Since the repeater is only reacting
to an AC voltage riding on the cable, there is not a valid frame to pass
along. The repeater, however, transmits this energy along the network.
This may be a jam pattern or a very long preamble. Ghosts events
consume bandwidth and can slow down a network. Ghosts are the result
of network elements reacting to noise. The effect of noise on network
wiring is indeterminate. Some network devices will react while others will
not. Ghosts cause random events and can be hard to correct.
Jabber
The term Jabber refers to an Ethernet frame that is greater than the
maximum legal size (Greater than 1518 bytes). Many 10BaseT HUBS
will partition a port that is jabbering.
66 • Glossary
2000590-001
ChromLan/ELAN - Gateway Ethernet - RS485/RS232
A&D PI 25 Chromatographie
Technical Information
ChromLan/ELAN - Gateway Ethernet - RS485/RS232 • 1
3 ChromLAN Gateway CGW – Elan Gateway EGW
With the Gateways CGW and EGW, Siemens PGC302, RGC202 and PGC102 Gas-Chromatographs as
well as the series 6 Continuous Gas Analyzers can be linked to an Ethernet network.
The Gateway has 2 Serial Ports:
There is a port for the Ethernet and a serial port for RS485 or RS232.
•
•
The Ethernet port consists of a 10BaseT interface for a twisted cable pair that typically ends in a
network hub.
The serial port can be configured as a RS485 or RS232-serial interface. This serial port functions
as a ChromLAN or ELAN master for a single specific analyzer or all analyzers connected in a
loop.
Design:
The gateway is integrated in an aluminum housing. The housing has also DIN-Rail mounting capabilities
and has therefore versatile mounting capabilities. It only requires 24 V DC power.
3 Network with ChromLAN Gateway CGW
•
•
The Gateway CGW can be installed inside the chromatograph. Using a cable, the CGW is
connected with one of the serial ports on the PCPU-2 on one side and with the external Ethernet
on the other side. This solution ensures the highest availability because in case of failure only that
specific analyzer will be off-line and not an entire network loop.
The Gateway CGW can also be used externally by connecting several (up to 15) chromatographs
to the RS-485 serial port. With that configuration a network loop can be build. Keep in mind, that
in case of a CGW failure, all chromatographs in that network loop will be off-line.
Comment: The Ethernet Gateway does not change the functionality or capabilities of the ChromLan
network. Because ChromLan is a Master/Slave network, the transmission capacity depends directly on
the scanning rate, which is the speed with which the individual participants are queried. The second
deciding factor is the transmission speed to the actual analyzer. Because the GC’s are communicating to
the CGW using RS232/RS485, the maximum speed is limited to 38400 Bit/sec.
Because the Ethernet concept does not limit the number of Workstations anymore, possible capacity
limitations with large networks can be circumvented by applying several Workstations and dedicate each
workstation to only certain specific participants in the network. This is especially advisable when querying
reports and chromatograms. All data are administered by a common database.
2 • ChromLan/ELAN - Gateway Ethernet - RS485/RS232
3 Gateway Operation Requirements
Siemens Chromatographs
•
•
Siemens Chromatographs communicating through the Ethernet Gateway must be equipped with
a PCPU-2 (Part # C79458-L2232-A3).
PCPU – Control Software must be Version 9.0 or higher.
Workstation / PC
•
•
•
Workstation-PC - with Ethernet port 10Mbit/s, minimum Pentium III / 400Mhz / 64MByte RAM
Operating System: Windows NT 4.0/ SP6 / Windows 2000 / Windows 98
Operating Software: GC TOOLS - Windows-based Workstation software
Network
•
•
Ethernet-Hub to connect to other network nods or to other media such as Fiber-Optic or CoaxCable.
Preferably the network should support DHCP (Dynamic Host Configuration). However, this is not
absolutely necessary.
3 Gateway Configuration
Generation of Ethernet Addresses
Normally a so-called DHCP server assigns the IP-Addresses to a specific Ethernet-network participant. In
case such a server is not available, the IP-Addresses have to be assigned manually which can be done
with the provided software tools RemoteIpConfig. RemoteIpConfig uses Win98/WinNT or Win2000.
Configuration of Communication Driver Clax2
The ChromLAN – Communication Driver Clax2 is responsible for the link between your Workstation and
the connected gateways or chromatographs.
CLAX2 serves the common serial ports of your PC (COM1 to COMn) as well as the PC installed Ethernet
port.
The configuration of Clax2 uses an Applet of the Windows-System Controller ChromLAN Konfiguration.
With that Applet, the connected ChromLan gateways can be selected. Using the Ethernet network, the
necessary adjustments of the individual gateways can be done.
ChromLan/ELAN - Gateway Ethernet - RS485/RS232 • 3
3 Technical Gateway Data
Housing
Size with Housing
132x120x42 [mm] / 51/5 x 43/4 x 11/8 (inch)
Housing with Din-Rail mounting)
Size without Housing
125x115x20 [mm] / 5 x 4 1/2 x 3/4 (inch)
Storage Temperature
-40 .. + 70°C / -40 ... 160°
Power Supply
Power
24V DC +/-20 % / 200mA
Cable Connection
Receptacle (Phoenix)
Network
Ethernet
10BaseT
automatic Recognition
TCP/IP
Automatic IP-Address assignment using DHCP
possible
Galvanic Separation
min. 500 V
Network Connection
RJ45
Serial Interface
Serial Port
RS232/IRS485 manual or via Ethernet selectable
(presently available as RS485 only)
Baud Rate
max. 38400 Baud
Galvanic Separation
min. 500 V
Terminating Resistance RS 485
Selectable manual or via Ethernet (presently not
supported)
Screw down terminal
4 • ChromLan/ELAN - Gateway Ethernet - RS485/RS232
Siemens Energy & Automation, Inc.
7101 Hollister Road, Houston, TX 77040
Phone 713-939-7400, Fax 713-939-9050
1/2007 Edition 2000590-001
Siemens Energy & Automation, Inc.
7101 Hollister Road, Houston, TX 77040
United States
Phone +1 (713) 939-7400
Fax +1 (713) 939-9050
www.usa.siemens.com/ia