1
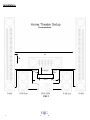
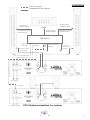
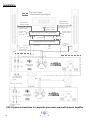
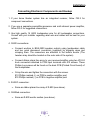
The Power of Clarity
Owner’s Manual and Setup Procedures
Radia Series.....................R-800 / R-400C / R-88Sub / BGA-2500
Introduction
Congratulations and thank you for selecting state of the art Radia Series InWall loudspeakers from BG Corp. We have assembled your loudspeakers
with the greatest care and using the finest materials available. This
craftsmanship, combined with our patented planar ribbon technology,
delivers sound unmatched by any conventional loudspeaker.
The Radia Series, BG’s finest In-Wall loudspeakers, are ideal for either
critical music listening or high performance home theater applications. The
line is comprised of models R-800, R-400C, R-88Sub. The BGA-2500
amplifier is used to drive the R-88Sub and active woofer section of R-800.
NOTE: This installation manual is primarily written for the professional
custom installer who will have the necessary experience for a perfect
installation and be familiar with local electrical and construction codes.
CONTENTS:
Page
Introduction and Table of Contents......................... 2
Important Owner Information................................... 3
General Information ................................................ 4
Installation ..........................................................…..6
Construction Principles and Preparation
Connecting to Electronic Components
Installation
Processor and Amplifier Settings
Warranty Information ….......................................... 15
2
BG Corp 2005
Important Owner Information
Read and Follow Instructions – Please read this entire manual before unpacking
and installing the Radia Series In-Wall loudspeakers. For optimum performance and
years of trouble-free enjoyment, all operating and care instructions should be followed.
Retain – DO NOT discard any factory packing material. The packing and shipping
materials may be required in the unlikely event your loudspeakers need to be moved or
shipped to our service center at BG.
Cleaning – Use a wax-free cleaning substance only (i.e. Pledge™) with a soft, dry
polishing cloth not a paper-based chamois. DO NOT spray any cleaning solutions
directly on the grill as it can clog its perforations.
Liquid – DO NOT place BG loudspeakers near an open source of liquid that may spill
on the loudspeaker surfaces.
Heat – DO NOT place BG loudspeakers near a direct heat source.
BG Corp 2005
3
General Information
Unpacking Your BG Loudspeakers and Amplifier
1. Due to its size and weight, the R-800 is shipped in a wooden crate. Other models
are shipped in cardboard boxes. Place the shipping box down on the floor, ensuring
that you have adequate space to set the loudspeaker down after removing it from
the box. Caution: If your floor is not carpeted, lay a blanket or other suitable soft
fabric on the floor to prevent possible damage to the loudspeakers.
2. Rotate the box if required, so that the white product label affixed at the factory is on
top and facing up.
3. Pull the top flaps (cardboard box) or the top cover (wooden crate) of the shipping
box up, taking care not to cut yourself on the staples used to close the box. Open
the other cardboard end flaps to expose the loudspeaker still cradled in its
protective foam and inside a protective plastic bag. Remove the foam pieces over
the top of the loudspeaker.
4. The R-800 has two plywood panels attached with screws on the sides that secure
the loudspeakers into the box. Use a screwdriver to remove those panels before
taking the speakers out.
5. Remove the loudspeaker by lifting it straight up and out of the box. Due to their
weight, we recommend that two people work together to remove the R-800 from the
crate.
6. Cut the taped seams of the amplifier box with a utility knife. Open the box flaps and
carefully remove amplifier from the box.
4
BG Corp 2005
General Information
General considerations
The R-800, R-400C and R-88Sub are high output, full range systems that are designed
to be installed in the wall. If there is a room adjacent to the wall where the system is
installed, low frequency bass sound will be heard there due to natural sound
transmission. The Installer should take the utmost care with the wall preparation to
reduce natural vibrations. See details in the Installation section.
Proper Hookup: All Radia in-wall speakers have binding post connections clearly
marked “+” and “ –“.
Connect Red speaker terminal post to positive (+) amplifier post.
Connect Black speaker terminal post to negative (-) amplifier post.
The R-800 must be bi-amplified by running separate dedicated loudspeaker wires from
BGA-2500 amplifier to its woofer section and from your power amplifier to ribbon line
array section of this speaker system.
Break-In Times: Typically a BG loudspeaker requires not less than 48 hours of
operation at moderate sound level before reaching its optimum sound quality. This
improvement may be subtle yet noticeable for a trained listener. Note: Do not play your
loudspeakers excessively loud to try to accelerate this process.
Amplifier: BG loudspeakers are extremely accurate and deliver a high degree of
detail and resolution at low distortion. Use an SPL meter to verify playback levels. A
good 100-250 watt per channel amplifier or receiver is needed to deliver adequate
power for a typical room size. Your authorized BG Dealer can recommend an amplifier
and other components and accessories best suited to your needs.
BG Corp 2005
5
Installation
Construction Principles and Preparation for Installation of
Radia Series Loudspeakers
1. General recommended layout of the front speakers is shown on
Fig.1. R-800 installation height should be chosen so that the height of the R800 center point H is equal or several inches higher than the ear level at
listening position. In most cases this would be about 40” (1m). Distance
between left and right speakers D should be equal or close to the distance
from listening position to center channel speaker/screen.
2. In most cases, the center channel speaker R-400C should be installed right
under the screen. Make sure that the top tweeter is oriented directly above or
below the screen (see indicator at the back of the speaker).
3. Allow for a minimum of 2.5 cubic feet for the rear cavity behind the
loudspeakers for optimum performance. A good rule of thumb is to use an
enclosure/stud cavity no smaller than a standard 2 x 4 stud-bay with 16” oncenters and 8 feet tall. If you plan installing speakers in dedicated cabinets,
prepare it with at least this enclosure size in mind. Enclosures of greater
depth, such as based on 2” x 6” studs, can also be used as long as it is filled
with fiberglass.
4. Sealing holes and joints whenever possible will also enhance low frequency
performance.
5. Utilizing an open-cell 1-mm thick compressible gasket strip (included) under
the lip of the mounting flange is necessary to avoid air leaks and resulting
noise.
6. Always fill the entire enclosure with slightly compressed fibrous material as
would be found normally in a loudspeaker enclosure (Fiberglass insulation,
Dacron, Miraflex, etc.).
7. In order to reduce wall vibration for the installation, a shear surface is
recommended beneath the drywall. R-Series loudspeakers are relatively
heavy and are capable of producing high sound pressure levels. A 1/4” or 3/8”
plywood, MDF (or particleboard) sub surface would act as that shear-wall with
a loudspeaker cutout will also enhance the system’s performance. Use flexible
adhesive between two panels to provide an additional layer dampening for the
wall.
6
BG Corp 2005
Installation
8. Use construction adhesive and tightly spaced screws to secure panels with
loudspeaker cutouts to studs.
9. We recommend using our optional new construction metal brackets,
especially when loudspeakers are installed in regular drywall panels without
additional panel reinforcement, as stated in paragraph 7. Properly bonded with
construction adhesive to the wall, the brackets not only provide a better seal,
but also reinforce the whole assembly and thereby reduce vibration.
10. For new construction, we highly recommend bracing adjacent stud cavities to
the left and to the right of the loudspeaker with additional diagonally positioned
studs. Use construction adhesive and screws to couple studs to the wall. Stuff
adjacent cavities heavily with dense green fiberglass. It has higher
transmission loss characteristics than pink fiberglass.
11. If maximum sound isolation is required, we recommend building dedicated
back boxes and suspending them inside the stud cavity or installing
loudspeakers in 5” deep on-wall cabinets. Refer to specification sheets for
cutout sizes and installed depth for cabinet layout. We recommend minimum
enclosure volume as indicated above.
BG Corp 2005
7
Installation
Front speakers
D
H
To line array
input
To line array
input
Multi-channel amp/Receiver
To woofer
section
To surround sound
speakers
To woofer section
FIG.1
8
BG Corp 2005
Installation
line level signal
loudspeaker level signal
Right channel
speaker output
Left channel
speaker output
Center channel
speaker output
To ribbon line array
input terminals
To ribbon line array
input terminals
Receiver
Right channel
Left channel
Line out
Line out
Sub/
LFE
Out
Surround speaker
outputs
To woofer section
input terminals
To woofer
section input
terminals
Line output
Y-connector
To additional subs
FIG.2 System connections to a receiver
BG Corp 2005
9
Installation
line level signal
loudspeaker level signal
Right channel
speaker output
Left channel
speaker output
To ribbon line array
input terminals
Left surround
speaker
output SL
Center channel
speaker output
Multi-channel power amplifier
SL
SR
Line in C
Line in L
To ribbon line array
input terminals
Right surround
speaker output
SR
Line in R
Preamplifier-processor
Line out R
To woofer section
input terminals
Line out L
Sub/
LFE
Out
To woofer
section input
terminals
To multi-channel
amp L and R line
inputs
Y-connector
To additional subs
(optional)
FIG.3 System connections to a separate processor and multi-channel amplifier
10
BG Corp 2005
Installation
Connecting Electronic Components and Hookup
1. If your home theater system has an integrated receiver, follow FIG.2 for
component connections.
2. If you use a separate preamplifier-processor and multi-channel power amplifier,
follow FIG.3 for suggested connections.
3. Use high quality 14 AWG loudspeaker wire for all loudspeaker connections.
Consult with your installer regarding what wire and cables will be best for your
system.
4. R-800 connections:
•
Connect woofers to BGA-2500 speaker outputs using loudspeaker cable
and two quick disconnect connectors (supplied) by stripping wires and
crimping them. The connectors are attached to the bottom woofer (The
tweeter array should be located on the outer side of the system).
•
Connect ribbon planar line array to your receiver/amplifier using two #10-24
hook connectors attached to PCB input terminals with #10 screws. These
Phillips Lug screws will be found on the back PCB (Printed Circuit board) of
the loudspeaker.
•
Crimp the wire and tighten the connectors with the screws.
#10 Phillips marked (+) on PCB to positive amplifier post
#10 Phillips marked (-) on PCB to negative amplifier post
5. R-400C connection:
•
Same as ribbon planar line array of R-800 (see above).
6. R-88Sub connection:
•
Same as R-800 woofer section (see above).
BG Corp 2005
11
Installation
Loudspeaker Installation
1. Cut a hole of the proper size for the loudspeaker using the supplied template.
2. Fill the loudspeaker cavity loosely with standard pink fiberglass.
3. Remove the loudspeaker from the plastic packaging.
4. Remove the black outer rubber covers on the sides of the front panel to reveal
the 1/8” Allen-Key screws to the dog-toggles.
5. Connect the loudspeaker cable and connectors to the loudspeaker. If new
construction brackets were installed during the construction phase of the project
pull the cable out and connect the crimp on connectors. If not, run the proper
cable and then connect the loudspeaker wires via the crimp-on connectors.
6. Insert the loudspeaker in the cavity.
7. Using the supplied 1/8” Allen-Key bit in a medium clutched screw gun, engage
the dog-toggles and tighten.
8. Insert the bottom and top edges of the grille into the end caps - the grille will
buckle in the middle. Gradually insert the side edges of the grille into the grille
slots located on the side edges of the speaker. Insert the grille simultaneously
from the top and bottom to the middle of the grille and speaker.
9. Test the loudspeaker.
Installation notes: R-88 in-wall subwoofers should be installed in stud cavities
adjacent to the R-800, preferably symmetrical to the listening position. The preferable
position is closer to the corners of the room on the outer sides of the R800s. Placing
the R-88Subs closer to the corners will result in fuller bass. FIG.2 and FIG.3 shows
R-88 Subs inside of R-800s for space saving and better scaling. However if the
room’s size does not permit the R-88Sub to be placed in the corner while keeping the
R-800’s spacing at minimum of 8 feet (see FIG.1 distance D), we recommend
positioning the subwoofers as shown on FIG.2 and FIG.3. Proper distance between
the R-800s should be the priority. The R-400C center channel speaker has a
preferred top side: refer to the rear panel.
12
BG Corp 2005
Installation
Processor and Amplifier Settings
Today’s electronic processors and AV receivers have built-in crossover points for small
and large loudspeaker settings. We recommend using the large setting with the R-800
left and right loudspeakers as this loudspeaker is a full range design. At this setting the
R-800 along with two R-88Subs is capable of delivering very high output in practically
any residential room. When using more than two subwoofers and when maximum
possible SPL is required or when the room is very large, you can set R800s as small.
This will relieve the R-800’s woofers and allow higher undistorted output providing
there is sufficient subwoofer support in the system. We recommend setting the small
setting for R-400C center channel loudspeaker for optimum performance.
Before using your processor’s auto-level set up routine (level calibration) and
automatic room EQ (where this option is available) we recommend performing a levelbalancing procedure for the R-800 and R-88Sub controls. Setting the BGA-2500 Level
knob at the 1 o’clock setting will provide balanced frequency response for the R-800
loudspeaker at 10-ft. (3 meters). In most cases your setting should not vary too much
from this recommended level. However, different receivers and amplifiers that will
power the R-800 ribbon planar array usually have different amplification factor or gain
and room acoustic parameters will affect the sound as well. Therefore it is important to
set BGA-2500 controls properly to make sure that the R-800’s woofers deliver the
same output as the planar ribbon array at the listening position and overall sound is
spectrally balanced. Connect all speakers and electronics in the system as indicated
on either of the above diagrams. Set BGA-2500 controls as recommended below.
R-800:
1. Set BGA-2500 Phase control knob at 0° (Note: When used together with the R-800,
the phase knob on the BGA-2500 amplifier should always be set at 0°).
2. Set Crossover switch at 250Hz.
3. Set Level potentiometer knob at about the 1 o’clock position.
4. Sit in the primary listening location, preferably at equal distance between two
loudspeakers and not closer than 10 feet (3 m) to the screen. Turn on your test or
favorite stereo recording (preferably with vocal content) and listen to it through one
speaker (left or right). Keep adjusting Level knob to the point when the sound is
optimally balanced. To confirm the results, listen to several different recordings and
through both loudspeakers in stereo.
BG Corp 2005
13
Installation
Processor and Amplifier Settings cont.
5. You may use a pink noise test signal and RTA analyzer for this procedure
(one channel), but ultimately your listening preferences should be of higher priority.
R-88Sub:
1. If your R-88Sub is located less than 5 feet (1.5 m) from the closest R-800, set its
BGA-2500’s Phase control knob at 0°. If this distance is further than 5 feet (1.5 m),
set the Phase control knob at 90°.
2. Set Crossover switch to Variable and set Crossover Frequency control knob at 80
Hz.
3. Set Level potentiometer at about 75% of max level or around the 2 o’clock position.
4. Sit in the primary listening location as described above for R-800.
Now you are ready to run level calibration sequence that should be provided by your
processor or receiver’s internal generator. Refer to your system’s electronics manual
for this. Run the level setting sequence. Your R-800 left and right levels should be at 0
dB. Normally your R-400C center channel level setting should be at 0 dB or slightly
higher. The subwoofer level setting would depend on the number of subs that you use,
their location, room parameters and your location in the room. The levels for surround
channels would depend on speakers that you use, and their distance to the listening
position. After the level setting is completed we recommend listening to your test/demo
surround sound material to verify these settings. You may want to fine tune the levels
based on your actual listening experience. You may also use a microphone and RTA
analyzer for this procedure to accurately verify levels.
If your subwoofers are further than 5 feet (1.5m) apart from the main R-800 speakers,
we recommend using a signal with sustained bass levels or 50-80Hz sine signal and
adjust the Phase Control knob on R-88Sub’s amplifier so that the bass level is
maximum at the listening position. Then run level calibration procedure again, since
you may want to reduce subwoofer’s level after phase setting has been optimized.
14
BG Corp 2005
WARRANTY: All BG loudspeaker systems are warranted to the original purchaser for five years against defects in
materials and manufacture when used in properly designed systems. Warranty is two years for the Z-Sub and Radia 210i
subwoofer.
Please record your loudspeaker’s information below for future reference.
MODEL: ___________________________________________
SERIAL NUMBER: ___________________________________
PURCHASE DATE: __________________________________
AUTHORIZED DEALER: ______________________________
As part of our policy of continual product improvement, BG reserves the right to change or discontinue any specifications
or parts associated with any of its products without advanced notice.
Thank you again for choosing BG loudspeakers!
BG Corp
3535B Arrowhead Drive
Carson City, NV 89706
775-884-1900 ph
775-884-1276 fax
www.bgcorp.com
sales@bgcorp.com
BG Corp 2005
15
The Power of Clarity
www.bgcorp.com
16
BG Corp 2005