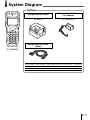
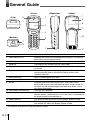
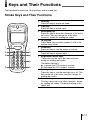
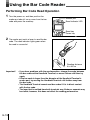
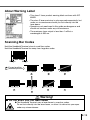
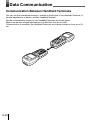
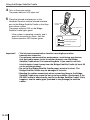
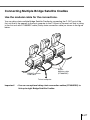
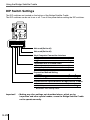
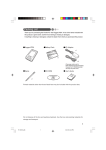
1
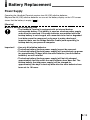
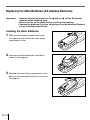
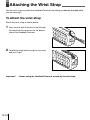
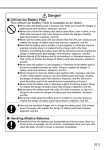
Danger!
■ Handling Alkaline Batteries
● Should fluid from the battery accidentally get into your eyes, there is a threat
of loss of eyesight, do not rub them. Immediately rinse your eyes with clean
tap water and then consult a physician immediately.
Warning!
■ Handling Alkaline Batteries
● Do not put the battery in a fire, expose it to heat, dismantle or modify it. If the
insulation or safety valve is damaged, the battery may leak fluid, overheat or
explode.
● Do not insert the battery with the poles reversed. Doing so may cause some
abnormality or a short and the battery may leak fluid, overheat or explode.
● Keep the battery out of the reach of children. If the battery is swallowed,
contact a physician immediately.
● If the alkali fluid gets in your mouth, rinse your mouth with water and contact
a physician immediately.
● If the alkali fluid gets on your skin or clothes, it may burn your skin,
thoroughly rinse the affected area with tap water.
● Do not store batteries with metal objects such as necklaces or hairpins,
doing so may cause the positive and negative poles to be shorted.
● Do not mix new and old batteries or other makes of batteries. The different
attributes may cause the battery to leak fluid, overheat or explode.
● This battery was not made to be recharged. Recharging this battery may
damage the insulation or internal structure and may cause the battery to leak
fluid, overheat or explode.
● Do not damage or remove the label on the exterior of the battery. Doing so
may cause the battery to short, leak fluid, overheat or explode.
● Do not drop, throw or expose the battery to extreme impact. Doing so may
cause the battery to leak fluid, overheat or explode.
● Do not alter the shape of the battery. If the insulation or safety valve is
damaged, the battery may leak fluid, overheat or explode.
E-3
Warning!
■ Disassembly and Modification
● Never try to disassemble or modify the unit in any way. High voltage inside
creates the danger of electrical shock.
■ Interior Parts and Components
● Never touch interior high-voltage parts or components. Doing so creates the
danger of electrical shock.
■ Abnormal Conditions
● Should the unit become hot or start to emit smoke or a strange odor,
immediately turn off the power and contact your original dealer or an
authorized CASIO service provider. Continued use creates the danger of fire
and electrical shock.
■ Foreign Objects
● Should any foreign matter ever get into the unit, immediately turn off the
power and contact your original dealer or an authorized CASIO service
provider. Continued use creates the danger of fire and electrical shock.
■ Dropping and Damage
● Should you drop the unit and damage it, immediately turn off the power and
contact your original dealer or an authorized CASIO service provider.
Continued use creates the danger of fire and electrical shock.
■ Moisture
● Keep the unit away from vases, planters, cups, glasses and other containers
of liquid. Also keep it away from metal. Water and metal getting into the unit
creates the danger of fire and electrical shock.
■ Laser Beam
● Never look directly into the laser beam. Doing so can cause serious eye
damage.
E-4
Warning!
■ Optional Bridge Satellite Cradle
● Power the Bridge Satellite Cradle only with a power outlet whose voltage
matches that marked on the Bridge Satellite Cradle. Do not plug the Bridge
Satellite Cradle into an extension shared by other appliances. Doing so
creates the danger of fire and electrical shock.
● Avoid conditions that can cause damage or breaks in the power cord. Do not
place heavy objects on the power cord. Keep it away from sources of heat.
Any of these conditions can damage the power cord, creating the danger of
fire and electrical shock.
● Never modify, sharply bend, twist, or pull on the power cord. Doing so
creates the danger of fire and electrical shock.
● Use only the AC adaptor specified in this manual. Use of other AC adaptor
models creates the danger of fire and electrical shock.
● Should the power cord ever become severely damaged (to the point that
wires are exposed or broken), contact your original dealer or CASIO service
provider for repair or replacement. Use of a damaged electrical cord creates
the danger of fire and electrical shock.
Caution!
■ Handling Alkaline Batteries
●Immediately remove batteries when they have lost all power. Leaving the
batteries in the unit for a long time may cause the batteries to leak fluid,
overheat or explode due to gas that is generated by the batteries.
● Remove the batteries from the unit when not using the unit for an extended
period of time. The batteries may leak fluid, overheat or explode due to gas
that is generated by the batteries.
● Do not apply solder directly to the batteries. The heat may cause the
batteries to leak fluid, overheat or explode.
● Do not store the batteries in the direct sunlight or in a car on a sunny day
when it is very hot. The batteries may leak fluid, overheat or explode.
● When storing or disposing of the batteries, cover the terminals with tape to
insulate them. Mixing them with other batteries or metal objects may cause
the batteries to leak fluid, overheat or explode.
● Do not get the batteries wet. Doing so may cause the batteries to overheat.
E-5
Caution!
■ Handling Alkaline Batteries
● Store batteries someplace out of direct sunlight where the temperature and
humidity are not high. Not doing so may cause the batteries to leak fluid, overheat
or explode. Also, it may cause the life and performance of the batteries to decline.
● Follow the regulations of the local government when disposing of these batteries.
■ Make back-up copies of all important data
● Note that CASIO Computer Co., Ltd. shall not be liable to you or any third party for
any damages or loss caused by deletion or corruption of data due to use of this,
malfunction or repair of this unit or its peripherals, or due to batteries going dead.
● This unit employs electronic memory to store data, which means that memory
contents can be corrupted or deleted if the power is interrupted due to batteries
going dead or incorrect battery replacement procedures. Data cannot be recovered
once it is lost or corrupted. Be sure to make back-up copies of all important data.
One way to do this is to use the optional Bridge Satellite Cradle to transfer data to
a computer.
■ Foreign Objects
● Take care to ensure that metal or combustible objects are not inserted into
the openings of the unit. Such objects create the danger of fire and electrical
shock.
■ Location
● Do not locate the unit on a surface that is unstable or uneven. Doing so
creates the danger of the unit falling, which can cause personal injury.
● Do not locate the unit in an area subjected to large amounts of humidity or
dust. Doing so creates the danger of fire and electrical shock.
● Do not leave the unit for long periods in a car parked in direct sunlight.
■ Heavy Objects
● Never place heavy objects on top of the unit. Doing so creates the risk of a
loss of balance and the object falling, which can cause personal injury.
■ LCD Screen
● Never apply strong pressure to the screen or subject it to strong impact. Doing
so can crack the LCD panel glass and create the danger of personal injury.
● Should the LCD panel glass ever break, never touch the liquid inside. Doing
so can cause skin irritation and inflammation.
• Should liquid from the LCD panel accidentally get into your mouth,
immediately wash your mouth with water and then consult a physician.
• Should liquid from the LCD panel accidentally get into your eyes or onto
your skin, immediately rinse for at least 15 minutes with clean tap water
and then consult a physician.
E-6
Caution!
■ Optional Bridge Satellite Cradle
● Keep the power cord away from stoves and other sources of extreme heat.
Heat can melt the insulation of the power cord and create the danger of fire
and electrical shock.
● Never pull on the power cord when unplugging it. Doing so can damage the
cord and create the danger of personal injury, fire and electrical shock.
Always hold onto the plug when unplugging it from the wall outlet.
● Never touch the plug while your hands are wet. Doing so can create the
danger of electrical shock.
● Be sure to unplug the power cord from the wall outlet before moving the
Bridge Satellite Cradle. Failure to do so can result in damage to the power
cord caused by pulling it, which creates the danger of fire and electrical
shock.
● Be sure to unplug the power cord from the wall outlet before cleaning the
Bridge Satellite Cradle.
● Be sure to turn the power OFF and unplug the power cord after use.
● Unplug the power cord from the wall outlet and clean the area around the
plugs at least once a year. If dust collects on the AC adaptor, humidity or
moisture may cause a fault in the insulation, which may result in a fire.
• The contents of this document may be updated, due to improvements, without prior notice.
• CASIO COMPUTER CO., LTD. assumes no responsibility for any loss or claims by third
parties which may arise from the use of this guide.
• This guide does not cover programming and the downloading of data. For more
information, refer to the material on programming and downloading that is provided
separately.
E-7
Contents
Safety Precautions ............................................... E-2
Unpacking ............................................................. E-9
Important ............................................................. E-10
Handling Precautions ........................................................... E-10
Service ................................................................................. E-10
System Diagram .................................................. E-11
General Guide ..................................................... E-12
Battery Replacement .......................................... E-13
Power Supply ....................................................................... E-13
Replacing the Main Batteries (AA Alkaline Batteries) .......... E-14
About the LCD Screen ............................................ 15
Attaching the Wrist Strap ................................... E-16
To attach the Wrist Strap ..................................................... E-16
Keys and Their Functions .................................. E-17
Stroke Keys and Their Functions ......................................... E-17
Using the Bar Code Reader ............................... E-18
Performing Bar Code Read Operation ................................. E-18
About Warning Label ........................................................... E-19
Scanning Bar Codes ............................................................ E-19
Data Communication .......................................... E-20
Communication Between Handheld Terminals .................... E-20
Specifications ..................................................... E-21
Using the Bridge Satellite Cradle ...................... E-23
General Guide ..................................................................... E-23
Power Hook Up and Connections ........................................ E-25
Connecting Multiple Bridge Satellite Cradles ....................... E-27
DIP Switch Settings ............................................................. E-28
Bridge Satellite Cradle Specifications .................................. E-29
E-8
Unpacking
The following items are included in the package with the product. If for some reason
anything is damaged or missing, please contact the store where you purchased the product.
• Handheld Terminal
DT-300M60E
Main Batteries
(Two AA Alkaline Batteries)
• User’s Guide (This book)
• Wrist Strap
E-9
Important
Carefully read the following points to get the best performance and long life from your
Handheld Terminal.
Handling Precautions
• Use only your finger or a blunt object to operate the stroke keys. Use of a sharp pointed
object can damage stroke keys and cause shorting of internal circuitry.
• Use a soft dry cloth when cleaning the Handheld Terminal. Do not wipe it with a wet cloth.
Do not use benzine, thinner, or other volatile chemicals, which can result in deformation of
the materials used in the keys and case.
• Do not lay the Handheld Terminal down with its key panel facing down. Doing so runs the
risk of accidental key operation, which may cause malfunction.
• Sudden temperature changes can cause condensation to form on the Handheld Terminal’s
case. Operating the Handheld Terminal while condensation is present can interfere with
proper operation. Take care to avoid conditions that cause the formation of condensation.
If condensation does form, wait until the Handheld Terminal dries completely before using
it.
Service
• If the Handheld Terminal has been damaged in any way, contact the store where you
purchased the Handheld Terminal and report the model, date of purchase, and a
description of the problem.
E-10
System Diagram
Options
Bridge Satellite Cradle
Bridge Satellite Cradle
AC Adaptor
DT-364IO
DT-9020ADP
Bridge Satellite Cradle
Cables
DT-300M60E
RS-232C Cable
DT-887AX/AXA
Bridge Satellite Cradle PC Connection Cable
RS-422 Cable
DT-888RSC
Bridge Satellite Cradle Chain Connection
USB Cable
DT-380USB
Bridge Satellite Cradle PC Connection Cablel
9 pin Socket
E-11
General Guide
<Front>
<Right side>
<Back>
1
<Top>
9
2
8
1
3
6
11
4
<Bottom>
5
10
7
13
7
12
1
Reader port
Emits a laser that reads bar codes
2
Read indicator LED
Indicates the status of the read operation: green for a successful
read, red for an unsuccessful read. *
3
LCD screen
Displays information about the programs being run.
4
Read key
Pressing this key activates the bar code reader.
5
Stroke key
A total of 18 keys are provided for operations and to turn the power
on and off.
6
Reset button (inside hole)
Use a paper clip or other thin object to press the Reset button
located inside the hole to initialize the internal status of the
Handheld Terminal.
7
Wrist strap hook
Hook for attaching the wrist strap.
8
Laser warning label
Class 2 laser warning label
9
Buzzer
Produces operation confirmation tones. Take care to avoid
blocking the buzzer holes and reducing output sound volume. Do
not insert any thin pointed objects into the buzzer holes, as this
may cause malfunction.
10 Main battery compartment
Holds the main batteries.
11 Main battery compartment lock
Locks the main battery compartment cover in place. Handheld
Terminal power is automatically cut off if the cover is removed and
the power cannot be turned back on.
12 Power terminal
This terminal receives power from the Bridge Satellite Cradle.
13 Infrared interface port
This interface port is for contact-less infrared data communication
with another DT-300 or the Bridge Satellite Cradle.
* The indicator must be set for the red indicator to light.
E-12
Battery Replacement
Power Supply
Operating the Handheld Terminal requires two AA (LR6) alkaline batteries.
Replace the AA (LR6) alkaline batteries as soon as the battery display on the LCD screen
).
shows that the battery is empty (
[Warning]
■ Make a Backup of Important Data
• The Handheld Terminal is equipped with an internal backup
rechargeable battery. This battery is used as a backup power supply
and cannot be removed. If the main batteries are removed while the
backup battery is not charged, will cause data to be lost or degraded.
Lost data cannot be recovered, so be sure to make a backup of
important data, use the Bridge Satellite Cradle (sold separately) to
backup data to your personal computer.
Important!
• Use only AA alkaline batteries.
• The backup battery (backup power supply) cannot be removed.
• The backup battery (backup power supply) will provide back up power
for approximately 10 days while the main batteries ( two AA alkaline
batteries) are not installed.
• The backup battery (backup power supply) will be fully charged
approximately four days after the main batteries have been set. The
backup battery (backup power supply) will be charged for
approximately two days to back up data after the main batteries have
been set for 16 hours.
E-13
Replacing the Main Batteries (AA Alkaline Batteries)
Important!
• Note the polarity (orientation of the
and the
) of the AA alkaline
batteries when installing them.
• Be sure to turn off the power before removing the batteries.
• Remove the batteries if you are not going to use the Handheld Terminal
for an extended period of time.
Loading the Main Batteries
1
2
3
E-14
Slide the main battery compartment cover
lock upwards and remove the main battery
compartment cover.
Load the AA alkaline batteries oriented as
shown in the diagram.
Replace the main battery compartment cover
back onto the Handheld Terminal as shown in
the diagram.
About the LCD Screen
The LCD screen of the Handheld Terminal shows program settings, operational procedures,
and calculation results and other information.
• Display Area
64 dots (V) x 112 dots (H)
• Display Characters
12-dot, 16-dot, and 20-dot font modes
Each font mode allows mixing of the following three fonts:
12-dot font Mode
16-dot font Mode
20-dot font Mode
Compressed ANK
18 columns by 10 lines 14 columns by 8 lines
11 columns by 6 lines
Single byte
18 columns by 5 lines
14 columns by 4 lines
11 columns by 3 lines
2-byte fonts
9 columns by 5 lines
7 columns by 4 lines
5 columns by 3 lines
• Text Fonts
Alphanumerics, kana, symbols,
JIS No. 1 and No. 2 equivalent 2-byte fonts
• Display Effects
You can display 2-byte fonts, alphanumerics, kana, and symbols in bold, or inverted or in a
combination of these.
Time-Date Function
The DT-300 has a clock function that can be used with programs.
E-15
Attaching the Wrist Strap
Use the wrist strap to protect the Handheld Terminal from being accidentally dropped while
you are carrying it.
To Attach the wrist strap
Attach the wrist strap as shown below.
1
2
Pass the thin end of the wrist strap through
the metal hand strap mount on the bottom
side of the Handheld Terminal.
Double the strap back through its own loop,
and pull it tight.
Important!
E-16
• Never swing the Handheld Terminal around by its wrist strap.
Keys and Their Functions
The Handheld Terminal has 18 stroke keys and one read key.
Stroke Keys and Their Functions.
1
2
3
4
5
1
5
3
7
8
6
6
7
4
2
9
8
9
Read key
Press this key to read a bar code.
Clear key
Press this key to cancel input.
Backspace key
Press this key to erase the character to the left of
the cursor. This key can be set to do other
functions, except for reading bar codes.
10-key pad
Press these keys to enter numbers 0 to 9 in the
number input mode.
Power key
Press this key to turn the power on and off.
Enter key
Press this key to register input.
Brightness control keys
These keys can be set to do other functions,
except for reading bar codes.
The default setting is:
▲ : Increase the LCD screen’s contrast
▼: Decrease the LCD screen’s contrast
Backlight key
Press this key to turn the backlight on or off. This
key can be set to do other functions, except for
reading bar codes.
Function key
This key can be set to do other functions, except
for reading bar codes. The default setting is the
space key.
E-17
Using the Bar Code Reader
Performing Bar Code Read Operation
1
Turn the power on, and then position the
reader port about 4 cm or more from the bar
code and press the read key.
Reader port
Read indicator LED
Read key
Power key
2
The reader port emits a laser to read the bar
code. The read indicator lights green when
the read is successful.
Reading distance
4 to 30 cm
Important!
E-18
• If you have problems with the read operation, change the angle between
the bar code and the Handheld Terminal, or move it closer and then try
again.
• If the bar code is larger than the diameter of the Handheld Terminal’s
reader port, try moving the Handheld Terminal a bit farther away from
the bar code.
• The Handheld Terminal cannot read bar codes if it is in direct contact
with the bar code.
• The laser that is emitted from both terminals may flicker or separate may
be visible, however, this does not affect the reading performance.
About Warning Label
• This class 2 laser product warning label conforms with IEC
60825.
• The class 2 laser emission is only exposed momentarily, but
under no circumstances should you look directly into the
laser beam.
• Operations not mentioned in this guide are dangerous and
should not be done under any circumstances.
• The maximum laser output is less than 1 mW at a
wavelength of 650 nm.
LASER RADIATION
DO NOT STARE INTO
BEAM
Class 2 Laser Product
_: 650 nm
P: 1 mW
Scanning Bar Codes
Hold the Handheld Terminal close to small bar codes.
Hold the Handheld Terminal far away from large bar codes.
Margin
Margin
Correct position
Incorrect position
Warning!
■ Do not stare into the laser beam
● The Handheld Terminal uses a laser beam to scan bar codes.
Do not look directly into the laser beam, or allow it to shine into your eyes
under any circumstances.
E-19
Data Communication
Communication Between Handheld Terminals
You can use the infrared interface port, located on the bottom of the Handheld Terminal, to
transfer applications or data to another Handheld Terminal.
Set the communication format for two Handheld Terminals as shown below.
Make sure that the infrared interface ports on both the units do not shift.
Communication is possible if the Handheld Terminals are in direct contact or from up to 20
cm.
E-20
Specifications
1. General
CPU:
Memory:
32-bit RISC Type
RAM : 2 MB (User area 1.3 MB)
FROM: 8 MB (User area 5.9 MB)
2. Display
Type:
Resolution:
Display contrast:
Backlight:
STN LCD with phase correction film
112 x 64 dots
Adjustable through key operation
LED backlight
3. Laser Scanner
Readable Codes:
Reading Distance:
JAN, EAN, UPC, NW-7, CODE39, ITF, CODE93, CODE128
(EAN128), MSI, Industrial 2 of 5, IATA
Approximately 4 to 30 cm
4. Input
Stroke Keys:
Read Key:
18
1
5. Infrared Communications
Interface:
Standard:
Control Protocol:
Synchronization:
Speed:
Infrared (contact-less)
Conforms to IrDA Ver. 1.1
Half-duplex
Asynchronous
9,600 bps, 19,200 bps, 38,400 bps, 57,600 bps,
115,200 bps, 4M bps
Communication Distance:
Between 0 (contact) and 20 cm.
6. Power Supply
Main:
Main Battery Life:
Two AA alkaline batteries
Approximately 190 hours (When using AA alkaline batteries, under
normal temperatures with the backlight OFF and reading bar code
twice every 10 seconds)
Backup:
One lithium secondary battery (internal)
Backup Battery Life Approximately 10 days (when it has been fully
charged by the main batteries over a four day period)
Automatic Power Off From 0 to 59 minutes, settable in one-minute increments
7. Dimensions and Weight
Dimensions:
Weight:
Approximately 40 <54.4> (W) x 139.4 (D) x 24.4 <34.4> (H) mm
Figures in the angle brackets do not include the display or
protrusions.
Approximately 170 g (including batteries)
E-21
Specifications
8. Operating Environment
Temperature:
-5 to 50C°
Humidity:
30% to 80% RH
Dust and Water splash proof:
IP54
Drop durability:
150 cm
9. Miscellaneous
Clock Function:
E-22
Fully automated calendar, with year, month, day, hour, minute and
leap year
Using the Bridge Satellite Cradle
You can transfer data (upload and download) between the Handheld Terminal and a
personal computer by connecting the Bridge Satellite Cradle (DT-364IO). Use an RS-232C
cable (DT-887AX/AXA) or a USB cable (DT-380USB) to connect the Bridge Satellite Cradle
to the personal computer.
General Guide
<Top>
6
5
4
<Front>
<Right side>
9
10
7
8
11
3
2
1
<Bottom>
12
Accessory
Cord Clip
E-23
Using the Bridge Satellite Cradle
1
USB interface
2
RS-232C interface
3
4
5
Used to connect the Handheld Terminal to a personal computer
and transfer data (upload and download) to or from the Handheld
Terminal. You need to install a dedicated driver on the personal
computer before connecting it to the PC.
Used to connect the Handheld Terminal to a personal computer
and transfer data (upload and download) to or from the Handheld
Terminal. You need to install a dedicated driver on the personal
computer before connecting it to the PC.
RS-422 interface
Used to connect Bridge Satellite Cradles.
Handheld Terminal detection switch
This switch detects if the Handheld Terminal is correctly mounted.
Infrared interface port
This interface is used for connect-less infrared data transfer. It is
used to communicate between Handheld Terminals.
6
7
8
Power supply terminal
Power switch
AC adaptor jack
9
System operation LED
Used to supply power to the Handheld Terminal.
This switch is used to turn the power on or off.
Used to hook up the AC adaptor (sold separately) for power
supply.
Indicates that the system is operating correctly. Indicates the
system operation status and if communication with the system is
possible; whether or not the Handheld Terminal is attached.
Off:
The system is not operating.
Lit Green:The system is operating.
10 Communicating LED
Indicates that the Handheld Terminal is transmitting.
Off: Not transmitting
Lit Green:Transmitting
Lit Red: Connection with the Bridge Satellite Cradle is abnormal
11 Power LED
Indicates whether the power is on or off, and the connection status
of the Handheld Terminal.
Off: Power is off.
Lit Red: Power is on, and the Handheld Terminal is not mounted.
Lit Green:Power is on, and the Handheld Terminal is correctly
mounted.
12 DIP switch
Use these switches to set various settings.
E-24
Power Hook Up and Connections
Use the AC adaptor (DT-9020ADP) for the Bridge Satellite Cradle sold separately for the
Bridge Satellite Cradle power supply. Be sure to hook up the AC adaptor and the Bridge
Satellite Cradle before transmitting data to or from the Handheld Terminal. The Handheld
Terminal draws its power directly from the Bridge Satellite Cradle.
1
2
3
Be sure the Bridge Satellite Cradle power is
turned off before plugging the AC adaptor into
the AC adaptor jack on the side of the Bridge
Satellite Cradle.
Plug the AC adaptor into an electrical outlet.
After making sure that the power to the Bridge
Satellite Cradle and the personal computer is
off before using either the RS-232C cable
(DT-887AX/AXA) or the USB cable (DT380USB) to connect the RS-232C interface or
the USB interface (after removing the cap) on
the Bridge Satellite Cradle and the personal
computer.
Power switch
is off
<For RS-232C interface>
Keep the cap on the RS-232C interface (DT887AX/AXA) and the USB interface (DT380USB) when they are not being used.
E-25
Using the Bridge Satellite Cradle
4
5
Turn on the power switch.
The power indicator LED lights red.
Place the infrared interface port on the
Handheld Terminal and the infrared interface
port on the Bridge Satellite Cradle so that they
are in direct contact.
The power indicator LED on the Bridge
Satellite Cradle lights green.
· If the system is operating correctly, and it
goes into transmission status, then the
system operation LED flashes green.
Power supply
terminal
Power switch is on
System operation LED
Communicating LED
Power LED
Important!
E-26
• The infrared communication function uses highly sensitive
transmission elements.
For optimum communication performance, avoid using any devices
that emit radio waves (such as cellular phones) near the Bridge
Satellite Cradle when it is transmitting data. If you need to use this
kind of device, keep it away from the Bridge Satellite Cradle (at least 30
cm for cellular phones).
• Do not let the Bridge Satellite Cradle power terminal to short. The
Bridge Satellite Cradle may be damaged if it shorts.
• Bending the cables excessively when connecting them to the Bridge
Satellite Cradle may cause the set up to be unstable. (Particularly if the
RS-232C cable is bent directly next to the Bridge Satellite Cradle. If this
happens, use the cable grips (included in the package) to hold the
cables.
Connecting Multiple Bridge Satellite Cradles
Use the modular cable for the connections.
You can daisy chain multiple Bridge Satellite Cradles by connecting the C-OUT port of the
first unit that is the nearest to the host computer to the C-IN port of the next unit that is sitting
to the first unit with DT-888RSC cable (Daisy chain connection cable) as shown in the figure
below.
RS232C cable or
USB cable
6-6 pin
Modular cable
(DT-888RSC)
To host computer
Important!
• You can use optional daisy chain connection cables (DT-888RSC) to
link up to eight Bridge Satellite Cradles.
E-27
Using the Bridge Satellite Cradle
DIP Switch Settings
The DIP switches are located on the bottom of the Bridge Satellite Cradle.
The DIP switches can be set to on or off. Turn off the power before setting the DIP switches.
1 2 3 4 5 6 7 8
Not used (Set to off)
Not used (Set to off)
Host Computer Connection Interface
Content
RS-232C
USB
6
Off
On
Terminator Unit in Linked Chain
Content
Bridge Satellite Cradle interconnection
Not linked/terminator
5
Off
On
Connection Method Setting
Content
Host computer connection
Linked connection
3
Off
On
4
Off
Off
Communication Speed Between Bridge Satellite Cradles
Content
115, 200 bps
1
On
2
Off
Indicates initial setting status.
Important!
E-28
• Making any other settings not described above, which are for
inspection and other special modes, cause the Bridge Satellite Cradle
not to operate correctly.
DT-364IO Bridge Satellite Cradle Specifications
1. Infrared Transmission
Interface:
Standard:
Synchronization:
Speed:
Infrared interface
Conforms to IrDA Ver 1.1
Asynchronous
9,600/115,200 bps/4M bps (Only when the host computer is
connected via USB.)
2. RS-232
Control Protocol:
Synchronization:
Speed
Half-duplex
Asynchronous
115,200 bps
3. RS-422
Control Protocol:
Synchronization:
Speed
Half-duplex
Asynchronous
115,200 bps
4. USB
Standard
Speed;
USB Ver. 1.1
12 Mbps (Max.)
5. Power Supply
Method:
AC adaptor (DT-9020ADP)
Power Requirements: DC 9 V approximately 400 mA
Out put to Handheld Terminal:
DC 5 V 300 mA (Max.)
6. AC Adaptor
Model:
Input:
Output:
7. Functions
DT-9020ADP
AC 230V (DT-9020ADP-G)
AC 120V (DT-9020ADP-U)
DC 9.5V approx. 1000 mA
Infrared interface
RS-232C interface
RS-422 interface
USB interface
8. Dimensions and Weight
Dimensions:
Weight:
Approximately 90 (W) x 80 (D) x 81 (H) mm
Approximately 300 g
9. Operating Environment
Temperature:
Humidity:
0 to 40C°
30% to 80% RH (no condensation)
E-29