1
BA Cover SL75 WLAN.qxd
22.03.2006
16:32 Uhr
Seite 1
Issued by
Siemens Home and Office Communication Devices GmbH & Co. KG
Schlavenhorst 66
D-46395 Bocholt
© Siemens Home and Office Communication Devices GmbH & Co. KG 2006
All rights reserved. Subject to availability.
Rights of modification reserved.
www.siemens.com/gigaset
Gigaset
SL75 WLAN
cyan magenta yellow black
Liebreich Medienproduktion
Gigaset SL75 WLAN / en / A31008-M700-B112-1-7619 / overview.fm / 24.4.06
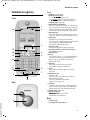
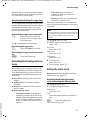
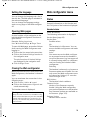
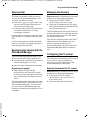
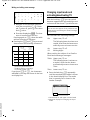
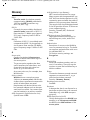
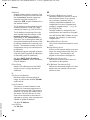
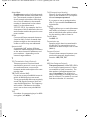
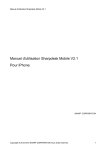
Handset at a glance
Handset at a glance
Front
Front
1
16
Ð
V
2
Gigaset SL75WLAN
20.06.06
§§§§§§INT§§§§§§
09:45
¨
3
15
14
4
13
5
12
11
10
6
7
9
8
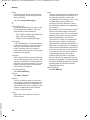
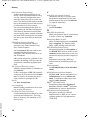
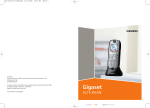
Back
1
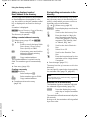
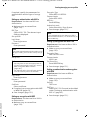
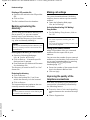
1 Display in idle status
2 Battery charge level
= e V U (flat to full)
= flashes: battery nearly flat/charging
e V U flashes: battery charging
3 Display keys (page 29)
4 End call key, On/Off key
Switch on the handset, end call, cancel function, go back one menu level (press briefly),
back to idle status (press and hold), deactivate handset (press and hold in idle status)
5 Message key
Access to calls, Email and messenger/message lists. Flashes: new message or new call
6 Hash key
Keypad lock on/off (press and hold)
For text input: toggle between upper/lower
case and digits, activate/deactivate
T9 predictive text (page 122)
7 Function keys
Start the assigned function (page 66)
8 Charging socket, connection socket for
headset/PC interface
9 Microphone
10 0 key
For number input: "+" is replaced automatically when dialling by the international
access code, e.g. 00 for calls abroad
(press and hold)
11 Star key
Ringtones on/off (press and hold),
open table of special characters
12 Key 1
Call network mailbox (press and hold,
page 31)
13 Handsfree key
Answer a call
During a call: switch between earpiece
and handsfree mode
Lights up: handsfree activated
Flashes: incoming call
14 Talk key
Answer a call, open last number redial list
(press briefly), start dialling for URI and IP
(press and hold), dial displayed number
15 Control key (page 29)
16 Signal strength
Ð i Ñ Ò (high to low)
| flashes: no reception
Back
Version05.08.2005
2
1 Camera lens
2 Loudspeaker with mirror
1
Gigaset SL75 WLAN / en / A31008-M700-B112-1-7619 / SL75_wlan_IVZ.fm / 24.4.06
Contents
Contents
Handset at a glance . . . . . . . . . . . 1
Safety precautions . . . . . . . . . . . . 5
Wireless use of
Gigaset SL75 WLAN – VoIP . . . . . . 6
Introduction: making calls
with VoIP . . . . . . . . . . . . . . . 7
WLAN access . . . . . . . . . . . . . . . . . 8
Access data . . . . . . . . . . . . . . . . . . . . . . 9
Security settings . . . . . . . . . . . . . . . . . . 9
IP addresses . . . . . . . . . . . . . . . . . . . . 10
SIP account . . . . . . . . . . . . . . . . . . 11
First Steps . . . . . . . . . . . . . 13
General . . . . . . . . . . . . . . . . . . . . . 13
Contents . . . . . . . . . . . . . . . . . . . . . . .
Range . . . . . . . . . . . . . . . . . . . . . . . . .
Handset with Web configurator . . . . .
"PhoneBook Manager" PC software . .
Documentation . . . . . . . . . . . . . . . . .
Trademarks . . . . . . . . . . . . . . . . . . . . .
13
13
13
14
14
14
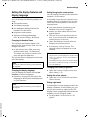
Setting up the handset
for use . . . . . . . . . . . . . . . . . . . . . 14
Inserting the battery . . . . . . . . . . . . . 14
Placing the handset in the charging
cradle and charging the battery . . . . . 15
Connecting the handset
with the network . . . . . . . . . . . . . 16
Checking the access point
requirements . . . . . . . . . . . . . . . . . . . 16
Compiling the necessary access
data . . . . . . . . . . . . . . . . . . . . . . . . . . . 17
Creating an access profile . . . . . . . . . 17
26
26
26
27
27
27
27
28
Operating the handset . . . . . . . 28
Switching the handset on/off . . . . . . .
Activating/deactivating the
keypad lock . . . . . . . . . . . . . . . . . . . . .
Control key on the handset . . . . . . . . .
Display keys . . . . . . . . . . . . . . . . . . . . .
Returning to idle status . . . . . . . . . . . .
28
28
29
29
29
Menu guidance . . . . . . . . . . . . . 30
Main menu (first menu level) . . . . . . . 30
Submenus . . . . . . . . . . . . . . . . . . . . . . 30
Correcting incorrect entries . . . . . . . . 30
Network services . . . . . . . . . . . . 31
Network mailbox . . . . . . . . . . . . . . . . .
Call forwarding . . . . . . . . . . . . . . . . . .
Activating/deactivating call waiting . .
Activating/deactivating explicit
call transfer (ECT) . . . . . . . . . . . . . . . .
Enquiry call, toggling, conference . . .
Accepting/rejecting call waiting . . . . .
Transferring a call (ECT) . . . . . . . . . . .
31
31
32
32
32
33
33
Using the directory and lists . . 34
Directory . . . . . . . . . . . . . . . . . . . . . . .
Voice dialling . . . . . . . . . . . . . . . . . . . .
Last number redial list . . . . . . . . . . . .
Opening lists with the message key . .
34
37
39
39
File manager . . . . . . . . . . . . . . . 42
Menu trees . . . . . . . . . . . . 21
Editing entries . . . . . . . . . . . . . . . . . . .
My pictures, pictures, animations . . . .
Sounds . . . . . . . . . . . . . . . . . . . . . . . .
Memory . . . . . . . . . . . . . . . . . . . . . . . .
Handset menu . . . . . . . . . . . . . . . 21
Using the integrated camera . . 44
Web configurator menu . . . . . . . 24
Taking a photo . . . . . . . . . . . . . . . . . . 44
Changing the camera setup . . . . . . . . 44
Handset . . . . . . . . . . . . . . . 26
Version05.08.2005
Ending a call . . . . . . . . . . . . . . . . . . . .
Answering a call . . . . . . . . . . . . . . . . .
Calling internal subscribers . . . . . . . . .
Call duration display . . . . . . . . . . . . . .
Rejecting a call . . . . . . . . . . . . . . . . . .
Calling line identification . . . . . . . . . .
Handsfree mode . . . . . . . . . . . . . . . . .
Muting . . . . . . . . . . . . . . . . . . . . . . . . .
Making calls . . . . . . . . . . . . . . . . . 26
Making an external call . . . . . . . . . . . 26
2
42
42
43
43
Email messages . . . . . . . . . . . . . 45
Settings . . . . . . . . . . . . . . . . . . . . . . . . 45
Writing Email messages . . . . . . . . . . . 46
Gigaset SL75 WLAN / en / A31008-M700-B112-1-7619 / SL75_wlan_IVZ.fm / 24.4.06
Contents
Sending Email messages . . . . . . . . . .
Receiving Email messages . . . . . . . . .
Email lists . . . . . . . . . . . . . . . . . . . . . .
Deleting all Email lists . . . . . . . . . . . .
Self-help with errors . . . . . . . . . . . . . .
48
48
49
51
52
Messenger . . . . . . . . . . . . . . . . . . 53
Establishing a connection,
going online . . . . . . . . . . . . . . . . . . . .
Changing/checking your
personal status, going offline . . . . . .
Opening the buddy list . . . . . . . . . . . .
Receiving messages . . . . . . . . . . . . . .
Writing and sending messages . . . . .
Self-help with errors . . . . . . . . . . . . . .
54
54
55
56
57
58
Creating/managing access
profiles . . . . . . . . . . . . . . . . . . . . . 59
Editing access profiles . . . . . . . . . . . .
Using the connection wizard . . . . . . .
Creating/editing an access
profile without the
connection wizard . . . . . . . . . . . . . . .
Overwriting an access profile . . . . . . .
Making/editing WLAN/provider
settings . . . . . . . . . . . . . . . . . . . . . . . .
Managing access profiles . . . . . . . . . .
59
59
Version05.08.2005
Configuring the handset
via your PC . . . . . . . . . . . . . . . . . 74
Starting the Web configurator . . . . . . 75
Structure of the Web pages . . . . . . . . 76
Using the Web configurator . . . 78
Web configurator login . . . . . . . . . . . .
Setting the language . . . . . . . . . . . . .
Opening Web pages . . . . . . . . . . . . . .
Closing the Web configurator . . . . . . .
78
79
79
79
Web configurator menu . . . . . . 79
Status . . . . . . . . . . . . . . . . . . . . . . . . .
Profile Wizard . . . . . . . . . . . . . . . . . . .
Users . . . . . . . . . . . . . . . . . . . . . . . . . .
Admin . . . . . . . . . . . . . . . . . . . . . . . . .
79
80
80
80
Securing the handset
with PINs . . . . . . . . . . . . . . . . . . . 80
Handset settings . . . . . . . . . . . . 81
60
61
61
64
Handset settings . . . . . . . . . . . . . 66
Shortcuts for functions and
numbers . . . . . . . . . . . . . . . . . . . . . . .
Setting the date and time . . . . . . . . .
Changing the display language . . . . .
Changing the name of the handset . .
Setting the display . . . . . . . . . . . . . . .
Displaying a screen picture . . . . . . . .
Setting night mode . . . . . . . . . . . . . .
Setting the timer for the display/
key backlight. . . . . . . . . . . . . . . . . . . .
Activating/deactivating "easy answer"
Adjusting the loudspeaker volume . .
Changing ringer tones . . . . . . . . . . . .
Activating/deactivating advisory
tones . . . . . . . . . . . . . . . . . . . . . . . . . .
Setting the alarm clock . . . . . . . . . . . .
Protecting against unauthorised
access . . . . . . . . . . . . . . . . . . . . . . . . .
Checking the status . . . . . . . . . . . . . .
Web configurator . . . . . . 74
66
67
67
68
68
68
69
69
69
69
70
71
71
72
73
Setting the audio parameters . . . . . . .
Setting the ringer tone volume
and melody . . . . . . . . . . . . . . . . . . . . .
Setting the display features and
display language . . . . . . . . . . . . . . . . .
Setting the camera . . . . . . . . . . . . . . .
Setting the date and time . . . . . . . . . .
Selecting the regulatory domain . . . .
Making Email settings . . . . . . . . . . . . .
Saving messenger access data . . . . . .
Importing/exporting
ringtones/pictures . . . . . . . . . . . . . . . .
Importing/exporting SIP provider files
Backing up/restoring the directory . . .
Making call settings . . . . . . . . . . . . . .
Improving the quality of the
telephone connections . . . . . . . . . . . .
81
82
83
84
84
85
85
86
86
87
88
88
88
Creating/managing access
profiles . . . . . . . . . . . . . . . . . . . . 90
Creating an access profile with
the profile wizard . . . . . . . . . . . . . . . . 90
Creating/editing the access
profile via the Admin menu . . . . . . . . 96
Activating/deleting access profiles . . 100
Using UPnP . . . . . . . . . . . . . . . . 101
3
Gigaset SL75 WLAN / en / A31008-M700-B112-1-7619 / SL75_wlan_IVZ.fm / 24.4.06
Contents
Importing/deleting
authentication certificates . . . 101
Specifications . . . . . . . . . . . . . . 119
Resetting handset settings . . 102
Notes on menu input . . . . . . . 119
Factory settings . . . . . . . . . . . . . . . . 102
Deleting user data . . . . . . . . . . . . . . 102
Deleting user settings . . . . . . . . . . . . 102
Symbols . . . . . . . . . . . . . . . . . . . . . . . 119
Example of menu input . . . . . . . . . . 119
Example of multiple line input . . . . . 120
Backing up the handset
configuration in a PC file . . . . 103
Writing and editing a
text message . . . . . . . . . . . . . . 121
Loading a new firmware
version . . . . . . . . . . . . . . . . . . . 103
Rebooting the handset . . . . . . 104
Diagnostics –
Checking connections . . . . . . 104
PhoneBook Manager
(PC software) . . . . . . . . . 105
Installing the PhoneBook
Manager on your PC . . . . . . . . 106
System requirements . . . . . . . . . . . . 106
Installing the software . . . . . . . . . . . 106
Uninstalling the software . . . . . . . . . 108
Using the PhoneBook
Manager . . . . . . . . . . . . . . . . . . 108
Starting PhoneBook Manager . . . . .
Interface elements . . . . . . . . . . . . . .
Opening Help . . . . . . . . . . . . . . . . . .
Registering the handset with the
PhoneBook Manager . . . . . . . . . . . .
Managing the directory . . . . . . . . . .
Configuring the PC control . . . . . . . .
Closing the PhoneBook Manager . . .
108
108
109
109
109
109
110
Appendix . . . . . . . . . . . . 111
Care . . . . . . . . . . . . . . . . . . . . . . 111
Contact with liquid . . . . . . . . . . . . . 111
Troubleshooting - FAQs . . . . . 111
Performance optimisation . . . 114
Service (Customer Care) . . . . . 116
Version05.08.2005
General specifications . . . . . . . . . . . . 119
Gigaset SL75 WLAN –
Free software . . . . . . . . . . . . . . 117
4
Changing input mode and
activating/deactivating T9 . . . . . . . .
Editing text (without T9) . . . . . . . . .
Editing text (with T9) . . . . . . . . . . . .
Order of directory entries . . . . . . . . .
122
123
123
125
Accessories . . . . . . . . . . . . . . . . 126
Glossary . . . . . . . . . . . . . . . . . . 127
Index . . . . . . . . . . . . . . . . 140
Gigaset SL75 WLAN / en / A31008-M700-B112-1-7619 / starting.fm / 24.4.06
Safety precautions
Safety precautions
Caution:
Read the safety precautions and the user guide before use.
Explain their contents to your children, and the potential hazards associated with using the handset.
$
Use only with the supplied charging cradle and mains adapter.
Only use the recommended, rechargeable battery of the same type! I.e. do not use any
other battery type or non-rechargeable batteries as this could result in significant health
risks and personal injury.
‹
Œ
Insert rechargeable batteries ensuring the correct polarity and use the battery in accordance with this user guide.
The operation of medical appliances may be affected. Be aware of the technical conditions
in your particular environment, e.g. doctor's surgery.
Do not hold the rear of the handset to your ear when it is ringing or when the handsfree
function is activated. Otherwise you risk serious and permanent damage to your hearing.
The handset may cause an unpleasant humming noise in hearing aids.
Do not use the handset in baths or shower rooms. The handset is not splash proof
(page 111).
Switch off the handset when onboard an aircraft. Ensure that it cannot be switched on
again accidentally.
Do not use the handset in environments exposed to explosion hazards, e.g. auto paint
shops.
ƒ
If you give your Gigaset to someone else, make sure you also give them the user guide.
Version05.08.2005
All electrical and electronic products should be disposed of separately from the municipal
waste stream via designated collection facilities appointed by the government or the local
authorities.
This crossed-out wheeled bin symbol on the product means the product is covered by the
European Directive 2002/96/EC.
The correct disposal and separate collection of your old appliance will help prevent potential negative consequences for the environment and human health. It is a precondition for
reuse and recycling of used electrical and electronic equipment.
For more detailed information about disposal of your old appliance, please contact your
city office, waste disposal service or the shop where you purchased the product.
Note:
Not all functions described in this user guide are available in all countries or with all providers.
5
Gigaset SL75 WLAN / en / A31008-M700-B112-1-7619 / starting.fm / 24.4.06
Wireless use of Gigaset SL75 WLAN – VoIP
Wireless use of
Gigaset SL75 WLAN – VoIP
Version05.08.2005
With the Gigaset SL75 WLAN VoIP handset, you are mobile. You can be reached
anywhere under your personal number –
at home, in the office or on the move –
without having to switch on your PC (for
requirements, see page 7).
To enable you to make calls easily and
send and receive Emails via the Internet
with a wireless connection (page 45),
your handset offers you even more:
u You can save and manage the data for
Internet access at different locations in
16 access profiles. In this way, your
handset makes it easier for you to
change location frequently (page 59).
u You can use the connection wizard to
log your handset into an access point
quickly and easily. The wizard is started
at the press of a button (page 66).
u You can use your handset's Web configurator to make all settings easily via
your PC's Web browser (page 74).
u Assign important numbers or functions
to the handset's number and function
keys. The number is then dialled or the
function started by pressing a key
(page 66).
6
u You can save up to 200 directory
u
u
u
u
u
entries, each with several entries, e.g.
surname, first name, address, Email
address and up to 3 numbers
(page 34). You can create and manage
the directory with Outlook/Outlook
Express and transfer it to the handset
(page 105).
You can save voice patterns for important numbers in the directory – and
your handset dials when you speak the
appropriate command.
You can designate important people as
VIPs so you can tell they are calling
from the ringer tone (page 34,
page 70).
You can save anniversaries on your
handset, which will remind you of
them in advance (page 36).
Use you handset's digital camera to
take photos and Email them.
Go "online" and chat on the Internet
(page 53).
Have fun using your new VoIP handset!
Gigaset SL75 WLAN / en / A31008-M700-B112-1-7619 / starting.fm / 24.4.06
Wireless use of Gigaset SL75 WLAN – VoIP
Introduction: making calls with VoIP
Version05.08.2005
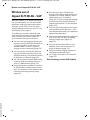
With VoIP (Voice over Internet Protocol),
your calls are no longer made via a fixed
connection as in the telephone network,
but rather they are transmitted via the
Internet in the form of data packets.
In order to establish connections to other
subscribers, the handset uses the SIP
standard (Session Initiation Protocol). SIP
controls call setup and disconnection. The
actual voice data is transmitted with RTP
(Realtime Transport Protocol).
To be able to use VoIP, you need the following:
u Access to a local, wireless network
(WLAN = Wireless Local Area Network)
with a central structure (infrastructure
WLAN), which supports WLAN standard IEEE 802.11g or IEEE 802.11b and
has a connection to the Internet.
Access to the WLAN is enabled by
access points (e.g. WLAN routers or
public hotspots).
Requirements:
– The access point does not require a
Web browser on the handset for
login.
– The access point is in "keep alive"
status and is thus permanently
online.
– You should have agreed a flat rate or
a volume-based tariff with your
Internet service provider.
u Access to the services of a SIP or gateway provider. Open an account with a
VoIP provider who supports the SIP
standard (SIP provider).
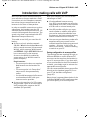
With your handset, you can use all the
advantages of VoIP:
u Via a broadband Internet access
(e.g. DSL), you can make cost-effective,
high-quality voice calls via the Internet
at a flat rate or volume-based price.
u Your SIP provider will give you a personal number or address with which
you can be reached worldwide from
the Internet, the fixed network and any
mobile communications network.
u You can use your handset to make calls
anywhere and you yourself can be
reached anywhere under your personal
number – at home, in the office, or
when on the move – without needing
to switch on your PC.
Saving configuration in access profiles
The settings that are required for login to
different WLANs or under different SIP
accounts can be saved on the handset in
up to 16 access profiles. If you then wish
to use your handset in the office instead of
at home, you simply need to activate the
appropriate access profile.
You can create and edit the access profiles
directly on the handset (page 59) or on
your PC via the Web configurator
(page 90).
Below, there is a general description of the
individual WLAN and SIP components that
you must specify in an access profile.
7
Gigaset SL75 WLAN / en / A31008-M700-B112-1-7619 / starting.fm / 24.4.06
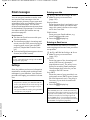
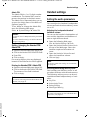
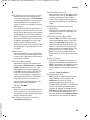
WLAN access
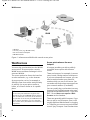
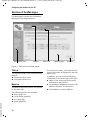
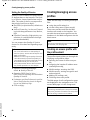
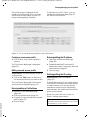
1
Internet
2
3
WLAN
4
4
3
1
2
3
4
Modem
Access point (e.g. WLAN router)
PC with network adapter
WLAN handset
Figure 1 Infrastructure WLAN with central access point
WLAN access
Access points when on the move:
hotspots
You must log your handset into the WLAN
access point. An access point controls
WLAN access and data exchange in infrastructure WLANs.
The access point also forms the interface
to other networks, e.g. to the Internet.
An access point can be, for example, a
(WLAN) router that can be used privately
or publicly. An access point can be at
home, at a friend's house or in a public
place.
A hotspot provides you with a publicly
accessible access point with Internet
access.
There are hotspots, for example, in restaurants, hotels, railway stations and airports.
If you are connected to a hotspot, you can
also be reached under your personal
number while you are on the move. You
can make calls and retrieve messages from
your network mailbox (if available).
You can usually log your handset into any
hotspot if the hotspot's access point supports WLAN standard IEEE 802.11g or IEEE
802.11b and does not require a Web
browser on the handset.
These are generally public hotspots. If you
have to pay to use a hotspot, then it will
usually require a Web browser for logging
in. Therefore you cannot use your handset
at such "pay" hotspots. Your handset does
Version05.08.2005
Note:
You can use your handset to register with
external access points/WLAN routers and use
them to make calls. Costs will be incurred by
the operator of the access point/WLAN router,
which may be charged to you, the handset
user. In such cases, the owner of the handset is
responsible.
8
Gigaset SL75 WLAN / en / A31008-M700-B112-1-7619 / starting.fm / 24.4.06
WLAN access
not have a Web browser (not to be confused with the handset's Web-based configuration option via the integrated Web
pages).
u security protocol 802.1x for authenti-
Access data
Authentication with 802.1x
To connect your handset to the WLAN, you
will need the following:
u The network name (SSID). This must be
the same for all subscribers in the
WLAN.
u An IP address for your handset so that it
can be addressed in the WLAN.
u The security settings required for
access to the WLAN and for data
exchange (authentication and encryption).
u If access to the access point is restricted
by entered MAC addresses, see
page 16.
The WLAN settings of the handset must
match the settings of the access point.
Security settings
Caution:
Version05.08.2005
You should protect your WLAN against unauthorised access!
To do this, set up authentication and/or
encryption in the access point.
Often, access to the WLAN, and the data
traffic within the WLAN are protected
against unauthorised access.
The security settings for authentication
and data encryption are specified centrally in the access point and apply for all
WLAN subscribers.
All WLAN subscribers must therefore use
the same protocols, passwords or keys for
authentication and encryption (or none at
all).
Before your handset can log into a WLAN,
you must save the protocol used and the
password or key in your access profile.
Your handset supports:
cation
u encryption systems WEP, WPA PSK and
WPA.
The 802.1x standard uses the EAP security
protocol (Extensible Authentication Protocol).
Your handset supports EAP with the two
security distributions LEAP and TLS.
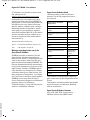
You must specify the following parameters for LEAP or TLS:
EAP Type
Parameter
LEAP
Login Name
Password
TLS
Login Name
Password
Certificate
u Login: user name in the WLAN
u Password: your ID in the WLAN
With TLS, a certificate is required for login
to the WLAN. The content and scope of
the certificate are specified in the access
point. A certificate is a file that contains all
required information to identify the user.
Certificates must be managed centrally in
the WLAN. You must save the certificate
for your handset in the handset. To do
this, use the Web configurator Web interface (page 101).
Encryption with WEP
WEP (Wired-Equivalent Privacy) is the
standard encryption for WLAN networks.
The WEP key can be 64 or 128 bits long:
u WEP 64: key with 5 ASCII characters or
10 hexadecimal characters
u WEP128: key with 13 ASCII characters or
26 hexadecimal characters
If data encryption with WEP 64 / WEP128 is
used in the WLAN, you must save the following parameters in the access profile:
9
Gigaset SL75 WLAN / en / A31008-M700-B112-1-7619 / starting.fm / 24.4.06
WLAN access
Parameter
Password mode
Selection / input
HEX
ASCII
WEP Key
Key, see below
Authenticat. mode
Shared Key
Open System
u Password mode: key coding
– Hexadecimal: 0–9 and A–F
– ASCII: 0–9, a–z and A–Z (case-sensitive)
Depending on the access point, the key
may also contain special characters.
u WEP Key (key): character string with
which the data is encrypted. The key
must be known to the access point.
u Authentication mode
– Shared Key: to login, the handset
must show the WEP key. In this
mode, WEP is also used for authentication.
– Open System: all WEP clients are
enabled. There is no authentication.
Note:
If the standard 802.1x with EAP type LEAP is
used for authentication, it is not necessary to
enter a Web key.
Encryption with WPA PSK
Requirement: All network subscribers
support the WPA standard.
WPA PSK is a version of WPA. New keys are
created in regular intervals using a key
word (Pre-Shared Key).
If data encryption with WPA PSK TKIP is
used in the WLAN, you must save the following parameters in the access profile:
Parameter
Selection / input
Password mode
HEX
ASCII
Version05.08.2005
Pre-Shared Key
Key, see below
u Pre-Shared Key: Character string of 8 to
63 ASCII characters (case-sensitive).
10
Data is encrypted using the Pre-Shared
Key. The Pre-Shared Key is the same for
all subscribers in a WLAN.
Authentication and encryption with WPA
Requirement: All network subscribers
support the WPA standard.
WPA (Wi-Fi Protected Access) uses more
complex procedures for key generation
than WEP and is therefore more secure.
The key the handset must produce during
registration is only used for establishing
the connection. Each user has their own
key.
WPA requires authentication with security
standard 802.1x (page 9).
WPA uses the following parameters:
WPA
Parameter
Security
TKIP
EAP Type
LEAP
TLS
u Security: procedure for key generation
u EAP Type: security distribution (page 9)
IP addresses
The subscribers to a network are identified
by their IP address.
The IP address consists of 4 parts (decimal
numbers between 0 and 255). The individual parts are separated from each other
by dots (e. g. 192.68.233.2).
You can have the assignment of IP
addresses managed automatically by
DHCP (recommended) or can specify the
IP address of the handset manually.
The DHCP (Dynamic Host Configuration
Protocol) Internet protocol ensures automatic assignment of IP addresses. For
management via DHCP, you require a
DHCP server in the WLAN, e.g. in the
WLAN router. Most WLAN routers support
this setting.
Gigaset SL75 WLAN / en / A31008-M700-B112-1-7619 / starting.fm / 24.4.06
SIP account
Enabling the handset's DHCP client:
dynamic IP address
SIP account
The handset is assigned a free IP address
each time it accesses the WLAN. The IP
address is not statically connected to the
handset. The IP address can change with
each access and during a connection. The
same IP address can be assigned to different WLAN subscribers in succession.
The DHCP client is enabled by default.
To be able to use VoIP on the basis of SIP,
you need a SIP provider. A SIP or gateway
provider is a provider in the Internet, who
establishes the connection to the person
you are calling. As the handset works with
the SIP standard, your provider must support the SIP standard.
VoIP connections to the telephone network are realized by a gateway.
The SIP provider provides you with a gateway for Internet telephony: the SIP provider forwards calls from VoIP to the telephone network (analogue, ISDN and
mobile) and vice versa. Via a SIP or gateway provider in the Internet, you can
reach subscribers in the telephone network and can be reached from the telephone network.
To be able to use your SIP provider's services, you must register with the provider.
To do this, you must open a so-called
account. The SIP provider can address you
via the account.
Note:
You can check the current IP address of the
handset (page 73).
Disabling the handset's DHCP client:
defining the IP address manually
Version05.08.2005
You can disable DHCP and define the
handset's IP address manually.
You must make the following settings in
the access point and handset if you disable
the DHCP client.
u IP address: when you specify the
IP address of the handset, you should
use an address from the address block
that is reserved for private use. This is
generally the range 192.168.0.0 –
192.168.255.254.
If you use the default subnet mask (see
below) the first three parts of the static
IP address must be the same for all subscribers in your WLAN.
u Subnet mask: To find out which values
you can use, see the user guide for the
access point (default: 255.255.255.0).
u Gateway: IP address of the gateway via
which the WLAN is connected with the
Internet (e.g. your router). Specify the
local IP address within the WLAN.
Note:
All information required for the SIP settings
can be obtained from your SIP provider.
Standard SIP settings
For access to the SIP service, the settings
of different SIP providers may be preset in
your handset. They contain your SIP provider's general access data, e.g. the SIP
proxy server address.
The SIP proxy server is the central
exchange for VoIP. The SIP proxy server
performs similar tasks to a standard PABX.
Its address comprises the following:
u IP address of the SIP proxy server. Alternatively, you can also specify the
domain name of the server.
u Communication port of the SIP proxy
server (Standard: 5060)
11
Gigaset SL75 WLAN / en / A31008-M700-B112-1-7619 / starting.fm / 24.4.06
SIP account
Note:
You can set up additional SIP providers via the
Web configurator (page 95).
You must enter your personal SIP access
data (e.g. your SIP account) and save it on
the handset.
This information is already set by default
for the saved providers.
Your access data for the SIP account is:
u Your user name for the SIP provider.
The name is usually the same as your
telephone number.
u Your password for the SIP provider
In addition, you can specify a name which
is to be displayed to the other party
instead of the telephone number.
Further information is not usually necessary for basic operation of the handset.
Additional SIP settings
You can make additional SIP settings via
the Web configurator.
Only make these additional SIP settings if
you have the relevant information from
your SIP provider.
Note:
Version05.08.2005
Your handset is not adapted to all existing SIP
providers or SIP servers. It is therefore possible
that the handset cannot access the SIP services
of certain SIP providers. In this case, please
select a different SIP provider. Please also refer
to our website at
www.siemens.com/gigasetcustomercare
to see if your provider is indeed supported and
you have simply made an input error.
12
Gigaset SL75 WLAN / en / A31008-M700-B112-1-7619 / starting.fm / 24.4.06
General
First Steps
General
Contents
The pack contains:
u one Gigaset SL75 WLAN handset,
u one charging cradle with mains
adapter,
u one battery,
u one battery compartment cover,
u one CD-ROM with the detailed user
guide (in PDF format), PC software,
Adobe® Reader®, current firmware if
applicable,
u one quick guide.
Please note:
u Never expose the handset to the fol-
lowing influences: heat sources, direct
sunlight, other electrical appliances.
u Protect your Gigaset from moisture,
dust, corrosive liquids and vapours.
u The charging cradle is designed to be
operated in enclosed, dry areas at temperatures ranging from +5 °C to +40 °C.
What you need in addition to your
handset to use VoIP
Range
u Up to 100 m in the open
u Up to 30 m indoors
Please note:
u Especially indoors, the range greatly
depends on the environment (e.g.
wooden house or reinforced concrete
house).
u The range depends on the properties of
the access point.
Note:
You can set an advisory tone to advise you
when the network signal is very weak
(page 71).
Handset with Web configurator
You can make all the necessary settings
directly on the handset (page 59) or also
on your PC via the Web configurator
(page 74).
With the Web configurator, your handset
provides you with an interface across
which you can make all settings from your
PC. Requirements are a Web browser on
the PC and an existing wireless connection
between the PC and handset.
u A WLAN router with a connection to the
Internet
u An Internet access (broadband with a
Version05.08.2005
bandwidth of at least 128 kBit/s downstream and upstream, e.g. DSL)
So that you can always be reached at
home and in the office, your Internet
connection should be uninterrupted.
For cost reasons, a flat rate or volumebased tariff is recommended.
13
Gigaset SL75 WLAN / en / A31008-M700-B112-1-7619 / starting.fm / 24.4.06
Setting up the handset for use
"PhoneBook Manager"
PC software
The PhoneBook Manager for your PC is
contained on the CD provided.
The PhoneBook Manager offers the following options:
u You can transfer contacts from the
directory on your PC to the handset.
You can save yourself from repeated
typing if you manage a central address
book, e.g. in Microsoft OutlookTM from
Microsoft Outlook 2002 or Outlook
Express (Windows Address Book) from
Internet Explorer Version 6.01.
u You can operate PC applications (e.g.
Windows Media Player) remotely using
your handset.
Microsoft, Windows 2000, Windows XP,
Internet Explorer, Outlook and Outlook
Express are registered trademarks of
Microsoft Corporation.
Firefox is a registered trademark of Mozilla
Organisation.
Adobe® Reader® is a registered trademark
of Adobe Systems Incorporated.
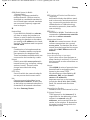
Setting up the handset
for use
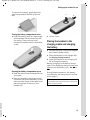
The display is protected by a
plastic film. Please remove
the protective film.
Documentation
Inserting the battery
Handset
Caution:
u Quick guide (printed)
u Detailed guide (in PDF format on the
enclosed product CD)
You will need Adobe® Reader® to view
these documents. You can find Adobe®
Reader® on the CD or on the Internet
under www.adobe.com.
Web configurator
u Online Help for the Web configurator
u For detailed instructions on how to use
the Web configurator, see the detailed
user guide.
PhoneBook Manager
u Installation instructions (page 105)
u Online Help for the PhoneBook
Manager
u Description of the PhoneBook Manager
in PDF format on the CD provided
Version05.08.2005
Trademarks
14
Only use the rechargeable batteries recommended by Siemens! This means that you
should under no circumstances use any other
battery type as this could result in significant
health risks and personal injury. For example,
the outer casing of the battery could be
destroyed or the battery could explode.
The phone could also malfunction or be
damaged as a result of using batteries that
are not of the recommended type.
Note:
Before inserting the battery, make a note of
your handset's MAC address. This is located in
the battery compartment and is concealed
after the battery is inserted.
If your WLAN is protected by a MAC access list,
you need the MAC address to log the handset
into the access point.
¤ Insert the battery so that the contacts
¤
touch those in the battery compartment.
Press gently on the battery until it clicks
into place.
Gigaset SL75 WLAN / en / A31008-M700-B112-1-7619 / starting.fm / 24.4.06
Setting up the handset for use
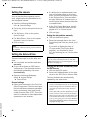
To remove the battery, gently press the
snap fitting inwards and lift up the battery.
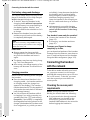
Closing the battery compartment cover
¤ Hold the battery cover at a slight angle
and introduce the two lower lugs into
the casing. Then push the cover
towards the camera until it closes with
a click.
a
b
¤ Lift the cover.
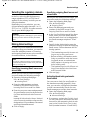
Placing the handset in the
charging cradle and charging
the battery
¤ Plug the charging cradle mains adapter
into a mains power socket.
¤ Place the handset in the charger with
Opening the battery compartment cover
¤ Hold the device with the keypad facing
your palm.
¤ Place the thumb of the other hand on
Version05.08.2005
the mirror near the loudspeaker (a) and
with the index finger of the same hand
press the groove at the top of the
handset (b).
the display facing forward.
¤ Leave the handset in the charging cradle to charge the battery.
Battery charging is indicated in the top
right of the display by changes in the level
indicator on the battery icon e, V or
U.
During handset operation, the battery
icon indicates the charge level of the batteries (page 1).
Note:
The handset may only be placed in the designated charging cradle.
15
Gigaset SL75 WLAN / en / A31008-M700-B112-1-7619 / starting.fm / 24.4.06
Connecting the handset with the network
First battery charge and discharge
The correct charge status can only be displayed if the battery is first fully charged
and discharged through use.
¤ To do this, leave the handset in the
charging cradle without interruption
until the battery icon stops flashing in
the display (approx. 6hours). Your
handset need not be switched on for it
to charge.
¤ Remove the handset from the cradle
and do not put it back until the battery
is completely discharged.
Note:
After the first battery charge and discharge,
you may replace your handset in the charging
cradle after every call.
Please note:
u Always repeat the charge and dis-
charge process if you remove the battery from the handset and insert it
again.
u The battery may heat up during charging. This is not dangerous.
u After a time, the charge capacity of the
battery will decrease for technical reasons.
Version05.08.2005
Charging procedure
Please note the following when charging
the handset:
u Place the deactivated handset in the
charging cradle – the handset switches
to charging mode (the charge icon
appears in the display). The handset
remains deactivated. This also applies if
the handset has switched off automatically (empty battery).
u You can activate the handset while it
is charging if you wish to remain contactable (press the a end call key).
Exception: if the battery is completely
discharged before being placed in the
charger (the handset has not been used
for a long period, e.g. while you were
16
on holiday), it may be some time before
the handset can be activated while
being charged (it needs to build up a
minimum charging capacity first).
Leave the handset in the charging cradle for a while and then try to activate
it again.
u Uninterrupted, successful charging
can only be guaranteed if you do not
switch off the handset in the charging cradle.
Your handset is now ready for operation!
¤ Connect the handset to the network
(page 16).
¤ If necessary, set the date and time
(page 67).
To ensure your Gigaset is always
completely up to date,
you can download updates of the handset
firmware from the Internet, save them on
your PC and load them onto the handset
using the Web configurator (page 103).
Connecting the handset
with the network
To be able to make calls with your handset, you must connect it to the access
point/WLAN router and set up an SIP service (or SIP server). To do this, you must
save the necessary access data in an
access profile.
Checking the access point
requirements
Before you log the handset into the
WLAN, you should check the following:
u If access restriction through entered
MAC addresses is activated for the
access point, you must record the
handset's MAC address in the access list
before logging the handset in.
Gigaset SL75 WLAN / en / A31008-M700-B112-1-7619 / starting.fm / 24.4.06
Connecting the handset with the network
u If a "hidden" SSID is configured for the
access point, deactivate this setting to
simplify handset login.
u If the access point uses authentication
by certificate for WLAN access
(page 9), you must deactivate authentication at the access point. Only once
the handset is logged in can you load
the certificate onto the handset and
reactivate authentication.
Note:
You can find your handset's MAC address in the
battery compartment under the battery, or it
can be called up via v
Ð
Status.
¢
¢
Compiling the necessary access
data
To access the WLAN:
u Network name (SSID),
u Data for authentication and the
encryption procedure used for a
"secure" WLAN (page 62),
u A free IP address from the WLAN's
address block, if the handset is to be
assigned a fixed IP address (i.e. DHCP is
not used page 10).
To access the SIP service:
u Your SIP account, i.e. your user name
and password.
For some SIP providers you must also
specify an authentication name on registration.
You can obtain this access data from your
SIP provider.
Note:
Version05.08.2005
Your SIP provider may use different terminology. Please refer to the Siemens website
www.siemens.com/gigasetcustomercare for a
list of alternative terms used.
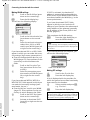
Creating an access profile
The procedure below requires that the
handset is not yet registered in a WLAN
and that no access profile has been saved.
¤ Press the end call key a to activate
the handset.
¤ Press the left-hand display key §Scan§.
The handset searches for accessible access
points.
A list is displayed with the SSIDs of the
access points found (provided the access
point has switched the SSID to visible).
You can scroll through the list with the
control key (press down or up).
¤ Select the SSID for your access point
and press §OK§.
Note:
If the SSID for your access point is "hidden",
select <Manual Config.> and enter the SSID.
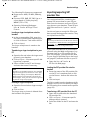
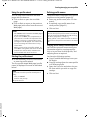
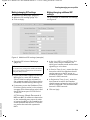
You will see the following display:
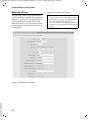
Profile 1
Profile name:
Profile 1 ¼
WLAN:
MyWLAN
Wx
1
§Save
1 Default name of the profile
Entering a profile name (optional)
Note:
Select a descriptive profile name from which
you can recognise the WLAN and SIP settings
for which the profile is valid, e.g.
"Anna_Office". This will make it easier to select
a profile later.
~
Enter any profile name (max.
32 characters, umlauts must
not be used).
17
Gigaset SL75 WLAN / en / A31008-M700-B112-1-7619 / starting.fm / 24.4.06
Connecting the handset with the network
Making WLAN settings
q
Scroll to the WLAN line (press
down on the control key).
§Edit§
Press the left display key.
You will see the following display:
WLAN
SSID:
MyWLAN¼
Authentication:
None
abc
§Edit§ V ¨
q
Version05.08.2005
r
Scroll to the Authentication line
(press down on the control
key).
Select the authentication procedure None, 802.1x or WPA
used in your WLAN (press left
or right on the control key).
If you have selected 802.1x or WPA, fields
appear in which you can make the necessary settings (login name, password etc.).
¤ Enter the authentication data for your
WLAN (page 62). Press up/down on the
control key to switch between the
fields.
q
Scroll to the Encryption Type
line (press down on the control key).
r
Select the encryption procedure used in your WLAN (press
left or right on the control
key).
If you have selected WEP 64, WEP128 or
WPA PSK TKIP, fields appear in which you
can make the necessary settings (password mode, key etc.).
¤ Enter the key etc. used in your WLAN
(page 62). Press up/down on the control key to switch between the fields.
q
Scroll to the DHCP line (press
down on the control key).
r
Activate or deactivate DHCP
(press left or right on the control key).
18
If DHCP is activated, the handset's IP
address is automatically assigned by the
DHCP server of your WLAN. A DHCP server
must be activated in the WLAN (e.g. in the
access point/router).
If you have deactivated DHCP, fields
appear in which you can insert the IP
address of your handset, the subnet mask
and IP address of the gateway (generally
the IP address of the access point in the
WLAN) (page 62).
This completes the WLAN settings.
§Save§
Press the right display key to
save the WLAN settings.
Note:
If your settings are incomplete, Invalid entry! is
displayed. The incomplete field is displayed on
the screen.
If your WLAN settings are complete, you
will see the following display:
Profile 1
WLAN:
MyWLAN
Provider:
No provider
1
§Edit§ U ¨
1 SSID of the WLAN router
Making SIP settings
q
Scroll to the Provider line.
Press the left display key.
A list is displayed with the providers for
which the general access data has already
been saved on the handset.
q
Select provider and press §OK§,
e.g. Provider 1.
§Edit§
Press the left display key.
§Edit§
If your provider is not in the list, briefly press
the end call key a. You must then make the
SIP settings via the Web configurator. To find
out how to do this, please read page 20.
Gigaset SL75 WLAN / en / A31008-M700-B112-1-7619 / starting.fm / 24.4.06
Connecting the handset with the network
You will see the following display:
Provider 1
Displayed Name:
Anna¼
Authent. Name:
W V
§Save§
Enter your personal SIP access data.
s
Scroll to the Displayed Name
line.
~
Enter any name (max. 32 characters) to be displayed to the
other party.
s
Scroll to the Authent. Name line.
~
If necessary, enter the user
password that has also been
agreed with the SIP provider.
s
Scroll to the Authent. Password
line.
~
Enter password.
s
Scroll to the User Name line.
~
Enter user ID.
§Save§
Press the display key to save
the SIP access data. The provider list is shown on the display.
a
Briefly press the end call key.
Saving settings in the access profile
v
Open menu.
Save Settings
Select and press §OK§.
The access profile is saved.
To activate the settings, the handset must
be rebooted. reboot now? is displayed on
the screen.
¤ Press §Yes§ (left display key).
After being rebooted, the handset first
establishes a connection to the WLAN. As
soon as it is connected to the WLAN, you
will hear a confirmation tone.
The handset then tries to connect to the
SIP server and register itself. This may take
some time.
If the handset was able to register successfully, you will see the following display:
Ð
V
Gigaset SL75WLAN
§§§§§§INT§§§§§§
¨
You can now make calls with your handset
(page 26).
If the handset was not able to register due to
incomplete/incorrect entries, you will see the
following message:
– No Access Point: It was not possible to establish a connection to the WLAN. Check your
WLAN settings (page 59). To find out how
to do this, please also read page 111.
– No Server: The handset was not able to register with the SIP server. Either the general
access data is missing (page 20) or you
have entered invalid personal access data
(page 59).
If the profile that you want to save is incomplete (e.g. because you could not enter any SIP
access data):
Press display key §Yes§ to save an incomplete
access profile (e.g. only the WLAN settings).
Or:
Press display key §No§ to complete the settings.
Complete the settings.
¥
Version05.08.2005
¥
¥
19
Gigaset SL75 WLAN / en / A31008-M700-B112-1-7619 / starting.fm / 24.4.06
Connecting the handset with the network
Recording general SIP access data
If your SIP provider is not included in the
provider list (page 18), you have the following options:
u Download a configuration file with the
general SIP access data onto your PC
from the Internet.
You can find additional SIP provider
files on the Siemens website at
www.siemens.com/gigasetcustomercare. Please only use files from this
website. They have been tested, i.e. the
access data is complete and correct for
the respective SIP provider.
You can import this file onto your handset using the Web configurator
(page 87). The provider is copied into
the list of providers.
You can then complete the SIP settings
either on your handset (page 59) or on
your PC using the Web configurator
(page 94).
u If there is no configuration file for your
SIP provider, you must enter all the SIP
access data manually via the Web configurator - your personal data and the
general data (page 95). For more information on how to do this, please also
refer to the Web configurator Help.
Notes:
– You can edit/change the WLAN/SIP settings
saved in the access profile at any time. You
can make these changes directly on the
handset (page 61) or on your PC (page 90).
– To register with different access points and/
or with other SIP accounts, you can create
up to 16 different access profiles, save
them on the handset and activate them as
required (page 64, page 90).
– To find out how to register with the Web
configurator, see page 75.
– You can find out the IP address of the handset via v
Ð
Status.
Version05.08.2005
¢
20
¢
Gigaset SL75 WLAN / en / A31008-M700-B112-1-7619 / menuetree.fm / 24.4.06
Handset menu
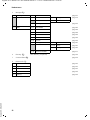
Menu trees
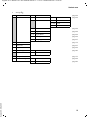
Handset menu
Instead of scrolling to locate a menu function, you can select a menu function
faster by opening the menu and keying in the digit combination ("Shortcut").
Example: v I 2 5 for "Set ringtone for the alarm clock".
Version05.08.2005
¤ With the telephone in idle status, press v (open menu):
1
Select Services æ
1-1
Call Forwarding
1-2
Call Waiting
page 32
1-4
Network Mailbox
page 31
1-6
Transfer (ECT)
page 33
2
Camera ë
3
Audio ï
3-1
Handset Volume
3-2
Ringer Settings
page 31
(Search mode is activated)
page 44
3-2-1
For Ext. Calls
page 70
3-2-2
VIP Calls
3-2-3
Anniversary
3-2-4
For Alarm Clock
page 69
3-3
Advisory Tones
page 71
3-4
Vibration Alert
page 70
4
Add. Features í
4-1
Alarm Clock
page 71
21
Gigaset SL75 WLAN / en / A31008-M700-B112-1-7619 / menuetree.fm / 24.4.06
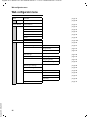
Handset menu
5
Messages î
5-1
Messenger
5-1-1
Buddies
5-1-2
User Account
page 55
5-1-2-1 Change Status
page 54
5-1-2-2 User Info
5-2
E-Mail
5-1-3
Messages
page 56
5-2-1
New E-Mail
page 46
5-2-2
Receive E-Mail
page 48
5-2-3
Inbox
page 48
5-2-4
Draft
page 49
5-2-5
Sent
page 49
5-2-6
Unsent
page 49
5-2-7
Settings
Version05.08.2005
5-2-8
5-2-7-1 User
page 45
5-2-7-2 Server
page 45
5-2-7-3 Security
page 46
Delete all E-Mails
page 51
(The directory is opened)
page 34
6
Directory Ì
7
Connect. Wizard å
8
Resource Dir. Ï
8-1
MyPictures
page 42
8-2
Images
page 42
8-3
Animations
page 42
8-4
Sounds
page 43
8-5
Capacity
page 43
22
page 59
Gigaset SL75 WLAN / en / A31008-M700-B112-1-7619 / menuetree.fm / 24.4.06
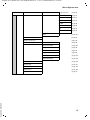
Handset menu
9
Settings Ð
9-1
Display
9-1-1
Screen Picture
9-1-2
Colour Scheme
page 68
9-1-2-1 Black-White
page 68
9-1-2-2 Blue
9-1-2-3 Brown
Version05.08.2005
9-1-2-4 Ochre
9-1-3
Contrast
page 68
9-1-4
Brightness
page 68
9-1-5
Night Mode
page 69
9-1-6
Backlight Switch
page 69
9-1-7
Language
page 67
9-2
Status
page 73
9-3
Date/Time
page 67
9-4
Easy Answer
9-5
Calls List Type
9-6
Change HS PIN
9-7
Network Config.
page 69
9-5-1
Missed Calls
9-5-2
All Calls
page 40
page 72
9-7-1
Handset Name
page 68
9-7-2
Access Profiles
page 60
23
Gigaset SL75 WLAN / en / A31008-M700-B112-1-7619 / menuetree.fm / 24.4.06
Web configurator menu
Web configurator menu
Status
Profile Wizard
User
Handset
page 79
File System
page 80
Profile Name
page 91
IP Addresses
page 92
WLAN
page 92
WLAN Security
page 93
SIP
page 94
Finish
page 96
Profile Selection
page 100
Handset PIN
page 80
Handset Settings
Audio
page 81
Ringer Tones
page 82
Display
page 83
Call Settings
Email Settings
page 88
Incoming Email
page 85
Outgoing Email
page 85
Advanced Settings
page 85
Messenger settings
page 86
Camera Settings
Transfer
Version05.08.2005
Logout
24
page 84
Ringer Tones
page 86
Pictures
page 86
SIP-Provider
page 87
Directory
page 88
page 79
Gigaset SL75 WLAN / en / A31008-M700-B112-1-7619 / menuetree.fm / 24.4.06
Web configurator menu
Admin
Network
Profile Selection
UPnP
page 96
Profile Name
page 97
IP Addresses
page 97
IP Routing
page 97
WLAN
page 98
WLAN Security
page 98
SIP
page 99
SIP advanced
page 99
page 101
Audio Settings
page 89
Quality of Service
page 90
System Settings
Version05.08.2005
for New or Edit:
Handset PIN
page 80
Reset User Data
page 102
Admin PIN
page 80
Time and Date
page 84
Regulatory Domain
page 85
Backup and Restore
page 103
Handset Restart
page 104
Factory Reset
page 102
Certificates
page 101
Firmware Update
page 103
Diagnostics
page 104
Logout
page 79
25
Gigaset SL75 WLAN / en / A31008-M700-B112-1-7619 / telephony.fm / 24.4.06
Making calls
Handset
Making calls
Answering a call
Making an external call
The handset indicates an incoming call in
three ways: by ringing, by a display on the
screen, and by the flashing handsfree
key d.
External calls are calls via the Internet to
other VoIP subscribers and to the fixed
network and mobile phone network.
Dialling a telephone number
~c
Enter number (maximum
32 characters) and press the
talk key.
Dialling a URI (SIP address) or IP address
c
Press and hold the talk key.
<URI> / <IP Address>
Select and press §OK§.
~
Enter URI or IP address
(page 123).
c
Press talk key.
– You can cancel the dialling operation with
the end call key a.
– You can copy the entered number / URI /
IP address to the directory using the display
key Ó. For more information see
page 36.
– Dialling with the directory (page 35), internal list (page 26) or last number redial list
(page 39) saves repeated input of numbers.
– For quick dial, you can assign a number
from the directory to a number key
(page 66).
Ending a call
Version05.08.2005
26
– Setting the ringer tone melody see
page 70, page 82.
– If the ringer tone is intrusive, press the display key §Silence§. You can take the call as
long as it is displayed on the screen.
You can answer the call by:
¤ Pressing the talk key c.
¤ Pressing the handsfree key d.
If the handset is in the charging cradle and
the Easy Answer function is activated
(page 69), the handset will take a call
automatically when you lift it out of the
cradle.
Calling internal subscribers
Notes:
a
Notes:
Press the end call key.
You can call other VoIP-enabled handsets
in the same WLAN directly (without SIP
server or Internet).
u
Press the control key.
The handset searches your WLAN for
handsets and displays these in a list after a
short time. The handset names are displayed in the order in which they were
found during the network search.
If no handset is found in the WLAN, your
handset returns to idle status.
Notes:
– You can view this list if your handset is in
idle status, pre-dialling, or if a call is in
progress.
– Internal calls are signalled with the ringer
tone for external calls (page 70).
Gigaset SL75 WLAN / en / A31008-M700-B112-1-7619 / telephony.fm / 24.4.06
Making calls
Call handset
sc
Select handset from the list
and press the talk key.
Ending a call
a
Press the end call key.
Call duration display
During calls, the call duration (hours, minutes, seconds) is displayed automatically.
Note:
For toggling (page 33) and for a conference
(page 33), the duration of the total call is displayed.
Call display
The caller's number (e.g. IP address, URI) is
displayed.
If the caller has arranged for their SIP provider to transmit their name (page 64),
this name is displayed instead of the
number.
If the caller's number is saved in your
directory or in the internal list, the name
of the directory entry/from the internal list
is displayed.
Å
Anna@provider.com
1
2
Rejecting a call
§Reject§
Requirement: An incoming call is being
signalled.
a
Press the end call key.
The caller will hear the busy tone.
1 Ringtone icon
2 Number (e.g. IP address, URI)/received
name of the caller/name of the caller from
your directory or the internal list
Calling line identification
When a call is received, the number (e.g.
IP address, URI) of the caller is shown in
the display.
For calls from the fixed network, the caller
can withhold calling line identification or
not request it. In this case the number is
not displayed.
§Silence
Handsfree mode
In handsfree mode, instead of holding the
handset to your ear you can put it down,
e.g. on the table in front of you to allow
others to participate in the call.
Activating/deactivating handsfree
operation
¤ You should inform your caller before
you use the handsfree function so that
they know someone else is listening.
Activating while dialling
¤ After entering the number, press the
Version05.08.2005
handsfree key d.
27
Gigaset SL75 WLAN / en / A31008-M700-B112-1-7619 / telephony.fm / 24.4.06
Operating the handset
Switching between earpiece and
handsfree mode
d
Press the handsfree key.
Switch handsfree on and off during a call.
If you wish to place the handset in the
charger during a call:
¤ Press and hold the handsfree key d
while placing the handset in the base
station. If the d key does not light
up, press the key again briefly.
For how to adjust the loudspeaker volume, see page 69 and page 81.
Adjusting the volume while in
handsfree mode
Requirement: Handsfree talking is activated.
t
Press the control key.
r
Set the volume.
Muting
You can deactivate your handset's microphone during a call. The other party hears
a wait melody.
§Ext.Call§
Press the display key to mute
the handset.
”
Press the display key to reactivate the microphone.
Operating the handset
Switching the handset on/off
Activating the handset
¤ Press the end call key a.
Note:
After activating the handset, it takes 30 to 60
seconds until the handset is ready for use
(booted up). The time required depends,
amongst other things, on the time taken to log
into in the WLAN network and to register on
the SIP server.
Deactivating the handset
¤ Press and hold the end call key a in
idle status.
You will hear the confirmation tone.
Note:
If you place the deactivated handset in the
charging cradle it does not automatically
switch on.
Activating/deactivating the
keypad lock
#
Press and hold the hash key.
You will hear the confirmation tone.
The Ø icon appears in the display when
the keypad lock is activated.
Caution!
With the keypad lock activated, you may not
be able to dial any emergency numbers,
including those provided by your SIP provider.
The keypad lock deactivates automatically
when you receive a call and activates
again after the call.
Version05.08.2005
Note:
The handset displays an advisory message if
you press a key by accident while the keypad
lock is on. To deactivate the keypad lock, press
and hold the hash key #.
28
Gigaset SL75 WLAN / en / A31008-M700-B112-1-7619 / telephony.fm / 24.4.06
Operating the handset
Control key on the handset
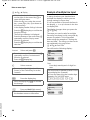
Display keys
The function of the display keys changes
depending on the particular operating situation. Example:
§§§§§§INT§§§§§
In this user guide the side of the control
key (top, bottom, right, left) you have to
press in each operating situation is shown
in black (e.g. v for "press the right of the
control key").
The control key has a number of different
functions:
When the handset is in idle status
s
v
u
t
Press briefly:
open directory.
Press and hold:
start voice dialling (page 38).
Open menu.
For internal calls: search
WLAN for other handsets
(page 26).
Set the ringer tones on the
handset (page 70).
In lists and menus
t/s
v
u
Scroll up/down.
Confirm the selected entry
(same as §OK§).
Go back one menu level, or
cancel.
In an input field
You can use the control key to move the
cursor up t, down s, right v or left
u.
¨
1
2
1 Current display key functions are shown in
the bottom display line.
2 Display keys
The most important display symbols are:
¨
Open the main menu or a
context dependent menu.
W
Î
Ó
Delete key: deletes one character at a time from right to
left.
Go back one menu level or
cancel procedure.
Copy number into directory.
Returning to idle status
You can revert to idle status from anywhere in the menu as follows:
¤ Press and hold the end call key a.
Or:
¤ Do not press any key: after some time
(depending on the starting status) the
display will automatically switch to
idle status.
Changes that you have not confirmed or
saved by pressing §OK§, §Save§, §Send§ or
Save Entry §OK§ will be lost.
The display in idle status is shown on
page 1.
Version05.08.2005
Note:
For notes on the menu system and on the
icons used in the user guide, as well as for
examples of menu inputs and multi-level
inputs, please see the appendix, from
page 119.
29
Gigaset SL75 WLAN / en / A31008-M700-B112-1-7619 / telephony.fm / 24.4.06
Menu guidance
Menu guidance
Your handset's functions are accessed
using a menu that has a number of levels.
Main menu (first menu level)
¤ To open the main menu, with the handset in idle status, press on the right of
the control key v.
Accessing a function
¤ Scroll to the function with the control
key q and press §OK§.
Or:
¤ Enter the number that is in front of the
function in the menu tree (page 21).
The corresponding submenu (the next
menu level) is opened.
Submenus
Version05.08.2005
The functions in the submenus are displayed as lists.
To access a function:
¤ Scroll to the function with the control
key q and press §OK§.
Or:
¤ Enter the number combination that is
in front of the function in the menu
tree (page 21).
Pressing briefly on the end call key a
returns you to the previous menu level /
cancels the operation.
30
Correcting incorrect entries
u Navigate to the incorrect entry with the
control key q or r.
u Press W to delete the character to
the left of the cursor.
u Insert characters to the left of the cursor.
u When entering the time and date etc.,
edit the (flashing) character.
Gigaset SL75 WLAN / en / A31008-M700-B112-1-7619 / Netzdienste_SAG.fm / 24.4.06
Network services
Network services
Network services are special services
offered by your SIP provider. You might
have to request network services from
your SIP provider.
¤ If you have any queries or require
assistance, please contact your SIP
provider.
You will generally find a description of the
network services on your SIP provider's
Internet site.
Network mailbox
The network mailbox is the answering
machine provided by your SIP provider.
Activating the network mailbox and
assigning the number to key 1
To activate the network mailbox you need
to enter the quick dial number using key
1.
v ¢ æ ¢ Network Mailbox
¤ Make an entry on several lines
(page 120).
Status:
Select On / Off.
Number
Enter the number of the network mailbox (max. 32 characters).
¤ Save changes (page 121).
Note:
Version05.08.2005
If the status is set to On, but no numbers have
yet been saved for quick dial, you can also
press and hold the number key 1 to open
the input field.
Network mailbox messages
Requirement: You have set up and activated the network mailbox.
A new message in your network mailbox is
signalled on the handset idle display by
the × icon. The message key flashes
(page 39).
Playing back the network mailbox
Requirement: You have set up and activated the network mailbox.
1
Press and hold. You are connected straight to the network
mailbox.
d
If necessary, press the handsfree key to hear the announcement aloud.
Notes:
– Your handset supports inband DTMF signalling for controlling the network mailbox.
Some SIP providers require the use of the
G.711 or G.722 codec for remote control of
the network mailbox. Therefore set the
handset's preferred codec if you experience
control difficulties (page 89).
– You can also play back the network mailbox
via the message key (page 41).
Call forwarding
You can forward all incoming calls to
another connection on the Internet or in
the telephone network.
You can select one of the following conditions:
u Immediate: No more calls are signalled.
u Busy: Call is forwarded (no call waiting
tone).
u No Reply: Call is forwarded if you do not
reply within several rings.
u Never: Call forwarding is deactivated.
You can store a phone number. If call forwarding is active, calls are forwarded to
the stored number.
31
Gigaset SL75 WLAN / en / A31008-M700-B112-1-7619 / Netzdienste_SAG.fm / 24.4.06
Network services
Setting up and activating call forwarding
v ¢ æ ¢ Call Forwarding
¤ Make an entry on several lines
(page 120):
Activation
Select Immediate / Busy / No Reply. If you
select Never, call forwarding is deactivated. The number is still stored.
Number Type
Select number type Phone Number / URI /
IP Address.
To
Enter number/URI/IP address.
¤ Save changes (page 121).
Call forwarding is activated. If you have
activated the condition Immediate, Call Forwarding activated is displayed in idle status.
Notes:
– You can also copy the number/URI/IP
address from the directory. The directory
opens if you press Ò. Ò is only
offered if the To field is blank.
– If call forwarding has already been set up,
the number has already been entered.
Depending on your provider, you will
receive confirmation (message or tone)
after activating/deactivating call forwarding.
¤ If required, press the end call key a.
Activating/deactivating call
waiting
Version05.08.2005
v¢æ
Call Waiting Select and press §OK§.
r
Select On / Off.
§Save§
Press the display key.
a
Press and hold (idle status).
Activating/deactivating explicit
call transfer (ECT)
If you have activated ECT (Explicit Call
Transfer) you can connect two callers with
one another (page 33).
v¢æ
Transfer (ECT)
Select and press §OK§.
r
Select On / Off.
§Save§
Press the display key.
a
Press and hold (idle status).
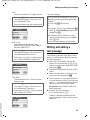
Enquiry call, toggling,
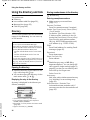
conference
Initiating an enquiry call:
You are making a call and wish to call
another party.
§Ext.Call§
Press the display key.
The party on hold hears the wait melody.
~
Enter number.
c
Press talk key.
You can also press © Dial
Number and §OK§.
The number is dialled.
Note:
You can also copy the number from the directory (page 35) or from the last number redial
list: © Redial List.
Enquiry call to a party in the same WLAN
u
Open the internal list.
The party on hold hears the wait melody.
¤ Call the internal party (page 26).
Returning to the party on hold
The enquiry party does not reply or the
line is busy.
§End§
Press the display key.
You return to the party on hold.
32
Gigaset SL75 WLAN / en / A31008-M700-B112-1-7619 / Netzdienste_SAG.fm / 24.4.06
Network services
Toggling
Accepting a waiting call
Requirement: You have established an
enquiry call or accepted a waiting call.
u Use q to toggle between the participants. The party on hold hears the wait
melody.
u End the call with the active party: press
the end call key a briefly or press
© End Active Call and §OK§.
If the active party terminates the connection you will hear the busy tone.
¤ Return to the party on hold (page 32).
§Accept§
Press the display key.
Or:
c
Press the talk key.
You have the option of toggling or initiating a conference call.
Or:
a
End call and accept the waiting call.
Conference
Requirement: Your SIP provider supports
two parallel connections.
You have established an enquiry call or
accepted a waiting call.
Initiating a conference call
§Conf.§
Press the display key.
Ending a conference call
a
Press the end call key. Both
calls are ended.
Rejecting call waiting
§Reject§
Press the display key.
The waiting caller will hear the busy tone.
Transferring a call (ECT)
Requirement: ECT is activated (page 32).
¤ You toggle between two external parties (page 33).
a
Press the end call key.
The parties are connected with each other.
The handset returns to idle status.
If the transfer is successful, Call transferred
is displayed. If the SIP server rejects the
transfer, all calls are ended.
Accepting/rejecting call waiting
Version05.08.2005
Requirement: Call waiting is activated
(page 32).
If you get another call while conducting a
call, you will hear the call waiting tone
(short tone).
If phone number identification is enabled,
the number (e.g. IP address, URI) or the
caller's name is shown in the display
(page 27).
33
Gigaset SL75 WLAN / en / A31008-M700-B112-1-7619 / directories.fm / 24.4.06
Using the directory and lists
Using the directory and lists
The options are:
u Directory,
u Last number redial list (page 39),
u Message lists (page 39),
u Calls list (page 40).
Directory
You can store numbers and the associated
names in the directory. You can store up
to 200 entries.
Notes:
You can use the PhoneBook Manager
(page 105) to manage a central directory on
your PC with Microsoft OutlookTM or Outlook
Express (Windows Address Book) and:
– transfer all/individual entries to the handset;
– transfer all/individual entries from the
handset to the PC.
You can save a backup copy of the directory on
your PC via the Web configurator and, if necessary, (e.g. after accidental deletion) transfer it
back into the handset.
Opening the directory
¤ Open the directory in idle status or during a call using the s key.
¤ You can also open the directory via the
main menu with v ¢ Ì.
Displaying the entry in the directory
An entry is displayed in the directory as
follows (example):
1
2
Directory
Festival, Helga
Sand, Anna
1234567
Welsch, Tim
Version05.08.2005
§View§
‚
¯
¾
M
3
4
U¨
1 Surname, First Name (if available)
2 First number entered in the sequence:
HOME, OFFICE, MOBILE
3 Displayed if a voice pattern has been saved
(page 38)
4 Type of number (e.g. HOME)
34
Storing numbers/name in the directory
s ¢ New Entry
Entering name/phone numbers
¤ Make an entry on several lines
(page 121).
Surname, First Name
Enter first name/surname if required.
Number Type, Phone (home) / Phone (office) /
Phone (mobile)
For Number Type Phone Number / URI /
IP Address select, and then in the following line Phone (home) / Phone (office) /
Phone (mobile) enter phone number,
URI (e.g. 8923756@myprovider.com)
or IP address (e.g. 123.45.67.89).
E-Mail
Enter Email address for sending Email
messages (page 45).
Department
Enter department.
Street, Post code, City
Enter address.
VIP
Mark directory entry as VIP (Very
Important Person). You can assign VIP
calls a specific ringer melody (page 70,
page 82) so that you can identify calls
from VIPs by the ringer tone.
Select Yes or No.
Anniversary:
Add, view, edit or delete an anniversary
(e.g. birthday) for an existing entry
(page 36).
Anniv./Reminder: / Reminder Time:
Activate/deactivate reminder call; if
necessary set time for the reminder call
(page 36).
Gigaset SL75 WLAN / en / A31008-M700-B112-1-7619 / directories.fm / 24.4.06
Using the directory and lists
Buddyname
Displays a buddylink assigned to the
entry plus the buddy's status
(page 56). You cannot edit the entry;
you can just delete it with the Delete
Buddylink function (page 35). You can
set a buddylink via the messenger on
your handset (page 56).
¤ Save entry (page 121).
Notes:
– In a SIP address, enter "@" with the *
key and "." (full stop) with the Q key
(page 122).
– You can assign a number from the directory
to a number key for quick dialling
(page 66).
– Please note that it is possible to store several entries in the directory with the same
name or the same number.
Selecting a directory entry
s
Open the directory.
You have the following options:
u Use q to scroll to the entry until the
required name is selected.
u Enter the first character of the name
and, if necessary, scroll to the entry
using q.
Dialling with the directory
Version05.08.2005
Requirement: The handset is in idle status and you are in the act of entering a
number or making a call.
s ¢ q (Select entry, page 35)
Just one number is stored in the entry:
c
Press the talk key. The number
is dialled.
Several numbers are stored in the entry:
c
Press the talk key.
s
Select number.
c
Press the talk key again. The
number is dialled.
Managing directory entries
You have selected an entry (page 35).
Editing entries
v
Press the control key.
Edit Entry Select and press §OK§.
¤ Then proceed as described under "Storing numbers/name in the directory" on
page 34.
To delete a number, press and hold X.
Using other functions
v
Press the control key.
You can select the following functions
with q:
Use Number
The numbers saved in the entry are displayed. You can use q to select a
number for pre-dialling.
Edit Entry
Edit selected entry.
Delete Entry
Delete selected entry.
Record Pattern
Record a voice pattern for this entry
(page 38).
If you have already recorded a voice
pattern there are more functions available to you:
Play Pattern
Play voice pattern.
Delete Pattern
Delete the voice pattern.
Global Patterns
Record, listen to and delete a global
pattern for voice dialling (page 37).
Delete Buddylink
Delete a buddylink assigned to the
entry (page 35, page 56).
Delete List
Delete all directory entries.
Available Memory
Display the number of entries that are
still available in the directory.
35
Gigaset SL75 WLAN / en / A31008-M700-B112-1-7619 / directories.fm / 24.4.06
Using the directory and lists
Adding a displayed number /
Email address to the directory
Storing/editing anniversaries in the
directory
You can copy to the directory any numbers
or Email addresses that appear in a list,
e.g. the calls list or the last number redial
list, or displayed in an Email or during a
call.
A number is displayed:
¨ Copy to Directory / Copy to Directory
Select and press §OK§.
The directory is opened.
You can store an anniversary (e.g. birthday) for every entry in the directory and
specify a time when you are to receive a
reminder call on the birthday.
s ¢ q (Select entry; page 35)
§View§ §Edit§ Press display keys one after the
other.
s
Scroll to the Anniversary: line.
~
Enter the date in 6-digit format. Depending on the Date
Format set (page 67), use the
sequence "Day, Month, Year"
or "Month, Day, Year".
s
Scroll to the Anniv./Reminder:
line.
r
Select On or Off.
s
Scroll to the Reminder Time:
line.
~
Enter the hour/minute for the
reminder call in 4-digit format
if required.
¤ Save changes (page 121).
The entry has the ‚ icon next to it in the
directory.
You can specify a particular ringer melody
for reminder calls (page 70, page 82).
Adding a number/address to an entry
s (Select entry; page 35) ¢ ¨
¢ Edit Entry
q
Scroll to one of the input fields
Phone (home) / Phone (office) /
Phone (mobile) or E-Mail.
X
If necessary, press and hold to
delete the already existing
number/address.
§Insert§
Copy number/address.
The number/address is copied into the
field. The number type is automatically
set.
¤ Save entry (page 34).
Creating a new entry
¨ New Entry
Select and press §OK§.
q
Select number type or E-Mail.
Copy number/address.
Complete and save the entry
(page 34).
§Insert§
Version05.08.2005
¤
36
Note:
The reminder call is made annually, regardless
of the specified year.
Reminder call on an anniversary
The handset signals a reminder call with
the selected ringer melody (page 70).
§Silence§
Press the display key or any
other key to stop the reminder
call.
The reminder call ends automatically after
60 seconds.
During a call, the reminder call is signalled
by a short tone.
Gigaset SL75 WLAN / en / A31008-M700-B112-1-7619 / directories.fm / 24.4.06
Using the directory and lists
Missed reminder calls
Recording a global pattern
Missed anniversaries are displayed in the
Anniversary: list if:
u You do not accept the reminder call.
u The anniversary is signalled during a
phone call.
u The handset is deactivated at the time
of the anniversary
The last 10 missed anniversaries are
stored in the list. The most recent entry is
at the start of the list.
If there is a new entry in the list, the message key f flashes, and the < icon is
shown in the idle display. Press the message key to open the list (page 39).
Global patterns are sued to dial the numbers, Phone (home), Phone (office) or Phone
(mobile), for a specific directory entry.
s ¢ s (Select entry)
v
Open menu.
Global Patterns ¢ Record Pattern
Select and press §OK§ to start
the recording.
You are prompted in the display to starting
the recording for "HOME". Press §OK§ to
start the recording. You will hear a short
beep. The display will prompt you accordingly. Say "HOME". Repeat "HOME" after
being prompted to do so by the display
and by a further beep.
Repeat this procedure for "OFFICE" and
"MOBILE".
Voice dialling
You can dial numbers from the directory
by speaking the name. In order for your
telephone to be able to "recognise" you,
you must record a voice pattern for each
name, i.e. say the name clearly into the
handset and store it.
You can also set your phone so that it
announces the name of a caller for an
external call instead of ringing (page 70).
You can store 3 global patterns and 27
voice patterns for voice dialling. Entries
with a voice pattern are marked with ¯.
Notes:
Version05.08.2005
– You should record the global patterns first
so that you can combine the voice patterns
with the global patterns.
– When recording the voice pattern, always
wait for the acknowledge tones on the
handset (short beep).
Playing back the global pattern
s ¢ s (Select entry)
v
Open menu.
Global Patterns ¢ Play Pattern
Select and press §OK§. The voice
pattern will be played in
handsfree mode.
a
Press and hold (idle status).
Deleting a global pattern
s ¢ s (Select entry)
v
Open menu.
Global Patterns ¢ Delete Pattern
Select and press §OK§.
a
Press and hold (idle status).
37
Gigaset SL75 WLAN / en / A31008-M700-B112-1-7619 / directories.fm / 24.4.06
Using the directory and lists
Recording voice patterns
Using voice dialling
Record your voice pattern in quiet surroundings. Your mouth should be about
25 cm away from the handset. The voice
pattern may last up to 1.5 seconds.
s
Press and hold.
Speak the name after the beep. If the
name matches the recorded voice pattern,
it is repeated. The number is dialled.
If more than one number is stored under
the directory entry concerned, you are
prompted to select the type of number
(HOME, OFFICE or MOBILE). Say: "HOME",
"OFFICE" or "MOBILE".
You can also say the name and the type of
number one after the other (e.g. "Anna
HOME").
Note:
If you use voice dialling predominantly with a
handsfree set, then it is beneficial to record the
voice pattern via the handsfree set.
s ¢ s (Select entry; page 35)
v
Open menu.
Record Pattern
Select.
§OK§
Press the display key to start
the recording.
You will hear a short beep. The display will
prompt you accordingly. Speak the name.
Repeat the name after being prompted to
do so by the display and by a further beep.
Notes:
– If the memory cannot accommodate a new
voice pattern, a message will appear on the
display. The phone automatically returns to
the directory. Delete a voice pattern and
select Record Pattern again.
– If several numbers are saved in one entry,
you must also record the standard patterns
for HOME, OFFICE and MOBILE (page 37), in
order to be able to use voice dialling.
Version05.08.2005
To change a voice pattern, you must
delete it (page 38) and re-record it.
38
Note:
You can also assign voice dialling to one of the
function keys i / j (page 66).
Playing voice patterns
s ¢ s (Select entry with ¯)
v
Open menu.
Play Pattern Select and press §OK§. The voice
pattern will be played in
handsfree mode.
a
Press and hold (idle status).
Deleting voice patterns
s ¢ s (Select entry with ¯)
v
Open menu.
Delete Pattern
Select and press §OK§.
a
Press and hold (idle status).
The directory entry is retained.
Gigaset SL75 WLAN / en / A31008-M700-B112-1-7619 / directories.fm / 24.4.06
Using the directory and lists
Last number redial list
The last number redial list contains the ten
numbers last dialled with the handset. If
one of the numbers is in the directory,
then the corresponding name (surname,
first name) will be displayed.
Last number redial
c
q
c
Press the key briefly.
Select an entry.
Press the talk key again. The
number is dialled.
If the number is shown in the list in an
abbreviated form (indicated by "..." at the
start of the number), you can display the
whole number with §View§ and then dial
with §OK§.
When displaying a name, you can have the
respective phone number displayed by
using the display key §View§.
Managing entries in the last number
redial list
Version05.08.2005
c
Press the key briefly.
q
Select an entry.
¨
Press the control key.
The following functions can be selected
with q:
Use Number
Edit or add to the number if required.
Then dial or call up further functions by
pressing ¨.
Copy to Directory
Copy an entry to the directory
(page 36).
Delete Entry
Delete selected entry.
Delete List
If you answer the security prompt with
§Yes, all the entries in the list are
deleted.
Opening lists with the
message key
You can use the message key f to open
the following lists:
u E-Mail:
Incoming Emails list (page 49)
u Messenger:
Messenger message list (page 53)
The list is only displayed if you are
online.
u Mailbox:
Play back the network mailbox
(page 41).
If your SIP provider supports this function and the network mailbox is activated (page 31).
u Calls List
Calls list (page 40).
u Anniversary:
List of missed anniversaries (page 37)
u TnC Event
If necessary, other lists, e.g. a list with
messages from the PhoneBook Manager's Message Box (page 110).
An advisory tone sounds as soon as a new
entry appears on a list. The f key
flashes. In idle status, the displays shows
an icon for the new message.
Icon
New message...
=
... on the network mailbox
<
... in the calls list or list of missed
anniversaries
;
... in the incoming Emails list or
messenger message list
>
... from OPCAP devices or the Message Box (PhoneBook Manager)
The number of new entries is shown
beneath the corresponding icon.
When you press the flashing key f, you
will see all the lists that contain new messages.
39
Gigaset SL75 WLAN / en / A31008-M700-B112-1-7619 / directories.fm / 24.4.06
Using the directory and lists
If only one list contains new messages,
this will be opened automatically.
The f key disappears on opening a list
and exiting the menu.
Calls list
The numbers of the last 30 incoming calls
are stored. Depending on the Calls List
Type either All Calls or only Missed Calls are
stored (page 40).
Multiple calls from the same number are
stored as follows:
u All Calls stored several times.
u Missed Calls stored once (last call).
The list is stored in the ascending order of
the time at which the calls arrive. New,
unread missed calls entries are red.
Already read entries and entries for received calls are black.
The calls list is displayed as follows:
1
Missed Calls
Helga Festival
25.09.05
Tim Welsch
root@linux.com
Î
02/05
19:00
2
3
4
U §Delete§
1 Type of list (All Calls / Missed Calls)
2 Entry number, e.g. 02/05 means: second of
a total of five entries
3 Number or name of caller.
You can add the number of the caller to the
directory (page 36)
4 Date and time of call (if set, page 67)
Setting list type for calls list
Version05.08.2005
v ¢ Ð ¢ Calls List Type
Missed Calls / All Calls
Select and §OK§ press (‰ = on).
a
Press and hold (idle status).
If you change the list type, entries for
missed calls stay in the calls list.
40
Opening the calls list
f ¢ Calls List 01+02
The last incoming call is displayed in the
calls list.
q
Select entry.
You have the following options:
§Delete§
The current entry is deleted.
v ¢ Copy to Directory
Copy an entry to the directory
(page 36).
Deleting the calls list
Caution! All old and new entries will be
deleted.
f ¢ Calls List ¢ v ¢ Delete List
§Yes§
Press the display key to confirm the prompt.
a
Press and hold (idle status).
Calling back a caller
Requirement: The caller's number has
been identified.
¤ Select list entry.
c
Press talk key.
Deleting missed anniversaries
f ¢ Anniversary:
¤ Select list entry.
§Delete§
Press the display key. The current entry is deleted.
Or:
v ¢ Delete List
All old and new entries will be
deleted.
Gigaset SL75 WLAN / en / A31008-M700-B112-1-7619 / directories.fm / 24.4.06
Using the directory and lists
Playing back the network mailbox
Requirement: You have entered the
number of the network mailbox
(page 31).
f ¢ Mailbox:
The number of the network mailbox is
dialled. If required, press the handsfree
key d to hear messages aloud.
Please refer to information from your SIP
provider for notes on how to operate the
network mailbox.
Note:
Version05.08.2005
If the number of the network mailbox has been
entered (page 31), you will also be connected
with the network mailbox if you press and hold
the 1 key while the handset is in idle status.
41
Gigaset SL75 WLAN / en / A31008-M700-B112-1-7619 / resource_directory.fm / 24.4.06
File manager
File manager
Additional options
The file manager manages the following
types of data in different lists:
List in menu Data type
Formats
MyPictures
Own photos
JPEG
Images
Graphics from
any source
JPEG, BMP,
GIF, PNG,
WBMP
Animations
Graphic
Animated GIF
sequences from
Emails
Sounds
Ringer tones,
melodies
MIDI, iMelody,
WAV, SP-MIDI
For exchanging data with a PC see
page 86.
Note:
Pictures in PNG format are supported up to a
colour depth of 24 bits per pixel.
Editing entries
v ¢ Ï ¢ MyPictures / Images /
Animations / Sounds
q
Select an entry and press §OK§.
Renaming entries
Version05.08.2005
You have selected an entry.
v
Open menu.
Rename
Select and press §OK§.
~ §OK§
Change name (up to 16 characters) and press §OK§. The
name may contains the special
characters + – = ! . „ ; _ ~, but
no spaces or umlauts.
The entry is stored with the
new name. A sound marked
with è cannot be renamed.
a
Press and hold (idle status).
42
If you have selected an entry and press the
display key © you have the following
options:
Delete Entry
The selected entry is deleted.
Any ringer melody that is deleted is
automatically replaced with the first
sound that cannot be deleted. A
deleted logo is not replaced.
If the entry cannot be deleted (è) you
will see an error message.
Delete List
All deletable entries in the displayed list
will be deleted.
Properties
The name, format and size of the entry
are displayed.
My pictures, pictures,
animations
Photos you have taken yourself with
the integrated camera are managed in
MyPictures, other pictures in Images.
You have the same options with both
types of image. Animated graphics are
administered in Animations and cannot be
used as a logo.
Viewing
v ¢ Ï ¢ MyPictures / Animations /
Images ¢ q (select entry)
§View§
Press the display key. The photograph / picture / animation is
displayed. Press the q key to
switch between entries in the
list.
”
Press the display key. The
MyPictures / Animations / Images
list is displayed again.
a
Press and hold (idle status).
Gigaset SL75 WLAN / en / A31008-M700-B112-1-7619 / resource_directory.fm / 24.4.06
File manager
Using a picture as a logo
Selecting as ringer melody
You can use MyPictures and Images as a
logo.
v ¢ Ï ¢ MyPictures / Images
¢ q (select entry)
v
Open menu.
as Screen Picture
Select and press §OK§.
If the selected picture is already used as a
logo (marked with ‰), the assignment is
cancelled. There is no logo shown in the
display.
If the picture is not being used as a logo:
§Yes§
Press the display key to replace
the current logo.
a
Press and hold (idle status).
You can specify different sounds or the
same sound for all signalling of calls,
wake-up calls and anniversaries.
v ¢ Ï ¢ Sounds ¢ q (select entry)
v
Open menu.
Install
Select and press §OK§.
q
Select what the selected entry
is to be used for and press §OK§.
The entry is assigned to the
selected category (‰ = on).
a
Press and hold (idle status).
Notes:
– The maximum portrayable picture size is
128 x 128 pixels. Smaller pictures are centred in the display. Larger pictures are
reduced as appropriate (exception: pictures
in bmp format).
– Animated Gif files cannot be used as logos.
Sounds
Playback
Version05.08.2005
v ¢ Ï ¢ Sounds ¢ q (select entry)
§Play§
Press the display key. Sound is
played back. Press the q key
to switch between entries.
§End§
Press the display key. Playback
is ended. The Sounds list is displayed again.
a
Press and hold (idle status).
While you are playing sounds, you can
adjust the volume using the §Volume§ display
key.
Note:
The selected sound is played while you are
selecting the type of signal.
Memory
The contents of the file manager, Email
lists and certificates are stored in a common memory area.
A total of approx 1 MB of memory is available.
You can view what percentage of the
memory is still available and what percentage is taken by individual areas.
v ¢ Ï ¢ Capacity
Use q to scroll through the list.
a
Press and hold (idle status).
43
Gigaset SL75 WLAN / en / A31008-M700-B112-1-7619 / camera.fm / 24.4.06
Using the integrated camera
Using the integrated camera
You can take photos and send these by
Email (page 47), download them to your
PC (page 86) or use them as a screen picture (page 68).
Taking a photo
¢ë
Use the display to search.
§Take§ / p Press the display key or control
key p to take a new photo.
The photo is shown in the display.
§Save§ / §New§ Press the display key to store
the photograph or to take a
new photograph.
a
Press and hold (idle status).
If there is insufficient memory to save the
photo, you will receive a message to this
effect.
¤ If necessary, delete data you no longer
require in the file manager or in the
Email lists.
§Camera§ or v
Notes:
Version05.08.2005
– If a call comes for you before you save the
photo, it is deleted.
– Photos are automatically saved with
names. You can rename the photo after it
has been saved.
44
Menu options
Search mode gives you the following
options using the display key ©:
Info
Display used and free memory
(page 43).
Camera setup
(page 44)
MyPictures
Open the MyPictures list in the file manager. You can rename and delete photos (page 42).
Changing the camera setup
You can set the picture quality, its brightness and the white balance.
v ¢ ë ¢ © ¢ Camera setup
¤ Change the following settings if
required (page 120):
u Quality: Select Normal (128 x 105 pixels)
or High (352 x 288 pixels).
u Brightness: Depending on brightness,
select Normal or High.
u White Bal.: Depending on environment,
select Auto, Indoor or Outdoor.
¤ Press the display key §Save§ to save the
changes.
Note:
For how to make the setting using the Web
configurator, see page 84.
Gigaset SL75 WLAN / en / A31008-M700-B112-1-7619 / email.fm / 24.4.06
Email messages
Email messages
You can use your handset to write, send
and receive Email messages. You can
attach photos, pictures, ringer tones and
animations from your handset's file manager to Email messages. You can also
receive Email attachments and store them
in the handset's file manager. For information about which file formats are supported see page 42.
Requirement:
u You have an Email account with your
Internet provider.
u The Internet provider's incoming mail
server uses the POP3 protocol and the
outgoing mail server uses the SMTP
protocol (Simple Mail Transfer Protocol).
u The received Email messages are in text
format (not HTML format).
Note:
You can make additional settings via the Web
configurator (page 85).
Settings
Store the address and access information
required for sending and receiving Email
messages in your handset. Your Internet
provider will supply you with this information.
Notes:
Version05.08.2005
– Anyone who knows your Handset PIN can
access your Email box on the incoming mail
server and send Email messages via your
Email account.
– For how to make the setting using the Web
configurator, see page 85.
Entering user data
v ¢ î ¢ E-Mail ¢ Settings ¢ User
¤ Make an entry on several lines
(page 120).
Displayed Name
Enter the name that is assigned to your
Email address. When you send a message, this name is shown to the recipient in the From field.
E-Mail Address
Enter your own Email address, e.g.
Anne.Sand@provider.com.
¤ Press the §Save§ display key.
Entering an Email server
You can obtain the names of incoming
and outgoing mail servers from your Internet provider.
v ¢ î ¢ E-Mail ¢ Settings ¢ Server
¤ Make an entry on several lines
(page 120).
Inc. POP3
Enter the name of the incoming mail
server (POP3 server) (example:
pop.theserver.com). The entry is necessary for receiving Email messages.
The messages that arrive for you are
stored on the POP3 server.
Outg. SMTP
Enter the name of your provider's outgoing mail server (SMTP server) (example: mail.theserver.com). The entry is
necessary if you wish to send Email
messages.
¤ Press the §Save§ display key.
Note:
The standard port 110 is used automatically
for the port (subscriber number) on the incoming Email server (POP3 port); standard port 25
is used for the port for the outgoing Email
server (SMTP port). If your Internet provider
uses different ports, you can adjust the setting
via the Web configurator (page 85).
45
Gigaset SL75 WLAN / en / A31008-M700-B112-1-7619 / email.fm / 24.4.06
Email messages
Version05.08.2005
Entering access data
Enter the data required for authentication.
The data is stored on the handset and
automatically passed on when a connection is established to the incoming or outgoing mail server.
v ¢ î ¢ E-Mail ¢ Settings
¢ Security
¤ Make an entry on several lines
(page 120).
POP3 User Name
Enter the authentication name
(account name) that your Internet provider has assigned you for accessing
your mailbox on the incoming mail
server.
POP3 Password
Enter the password you have agreed
with your provider for accessing the
incoming mail server (case-sensitive).
SMTP Registration
Specify the type of authentication with
the outgoing mail server. The options
are:
As POP3
The details in POP3 User Name and POP3
Password are used for authentication
with the outgoing mail server.
Yes
Logging on with the outgoing mail
server requires a user name and password that are different from the access
data for the incoming mail server. Enter
your user name and password in
SMTP User Name / SMTP Password. Your
provider will supply you with this data.
No
No authentication with the outgoing
mail server is required for sending
Emails.
The handset must log in with the
incoming mail server before sending a
message.
¤ Press the §Save§ display key.
46
For entries in POP3 Password / SMTP Password the characters are initially displayed
as entered. As soon as you exit the input
field (press up or down on the control key
q), the password is replaced with asterisks. To change a password, you must first
delete the old password (press once briefly
on W) and then enter the new password.
Writing Email messages
v ¢ î ¢ E-Mail ¢ New E-Mail
Requirement: There is still sufficient
memory available.
The Email editor is opened.
E-Mail
abc
To:
¼
Subject:
ÒV¨
¤ Make an entry on several lines
(page 120).
To
Enter the recipient's Email address by
hand or copy it from the directory
(page 47).
You can enter one or more recipients
(page 47).
Subject (max. 64 characters) or
Text (max. 1000 characters)
Press the display key §Edit§. The text editor is opened.
Enter Subject or Text of the Email message and select © ¢ Save. You will
return to the Email editor. The first
characters of the entered text are displayed in the Subject / Text field.
T9 predictive text is available
(page 123).
Gigaset SL75 WLAN / en / A31008-M700-B112-1-7619 / email.fm / 24.4.06
Email messages
Attachments
Add/delete attachments.
Press the display key §Edit§. Attachments
that are already attached to the Email
message are displayed.
Select New Entry and press §OK§. This
opens the file manager (page 42).
Select file and press §Insert§. Repeat process for further attachments if required.
With §Play§ / §View§ you can play back a
selected melody or view a picture. With
§Delete§ you can delete a file from the list.
Two attachments with the same file
name are not allowed.
Press the display key Î to return
to the Email editor. The number of
selected files is displayed in the
Attachments field.
Entering several recipients
You can link several Email addresses in the
To field (page 46) as follows:
¤ Write the Email addresses one after
another in the field, separated by a
semicolon ";" and/or by a line feed "Â".
";": press * key, select ";" with r /
q and press §OK§.
"Â": press 1 twice.
Or:
¤ After entering the first address, select
© ¢ Add Recipient. A semicolon is
inserted at the end of the To field. You
can enter the following address by
hand or copy it from the directory
(page 47).
Copying a recipient from the directory
Version05.08.2005
Requirement: You are writing an Email
message. The To field is empty or you have
selected Add Recipient from the context
menu.
Ò
Press the display key. The
names of all directory entries
containing an Email address
are displayed.
s
Select entry. The name and
Email address of the entry are
displayed. Press the display
key §OK§. The Email address is
copied to the To field.
Email/text editor menu options
Within the Email or text editor © offers
the following options:
Save (in all fields)
Store Email message in the Draft
(page 49) list. You can send it at a later
time.
Save (in text editor)
Close text editor and transfer text to
the Email editor.
The Email message is not stored in
the Draft list!
Send (in all fields, text editor)
See "Sending Email messages",
page 48.
Spell (text editor)
With T9 predictive text activated:
copy a new word into the T9 dictionary
(page 124).
Select Language (text editor)
For T9 predictive text: select the language in which you wish to write the
text and press §OK§. T9 uses the dictionary for the selected language.
T9 Info (text editor)
Display Help for T9.
Add Recipient (To field)
See "Entering several recipients",
page 47.
Delete Text (in text editor)
Delete the whole text.
47
Gigaset SL75 WLAN / en / A31008-M700-B112-1-7619 / email.fm / 24.4.06
Email messages
Sending Email messages
Requirement:
u You are writing or editing an Email
message. The Email editor is open
(page 46) or
u You have opened an Email to read it in
the Draft / Unsent lists.
© ¢ Send
Select and press §OK§.
If the connection can be established to the
outgoing mail server and the message can
be sent, the Email message is stored in the
Sent list.
If you receive a call while you are sending
Email messages, sending continues in the
background.
Please note the following:
u If there is no recipient address in To
v ¢ î ¢ E-Mail ¢ Receive E-Mail
The handset establishes a connection to
the incoming mail server and fetches new
Email messages.
A maximum of 99 Email messages are
fetched for each check. A maximum of 99
Kbytes are stored per Email message.
Notes:
– You can use the Web configurator to set an
automatic check for new Email messages
from the incoming mail server to take place
at specific time intervals (page 85).
– You can set the number of Email messages
and the maximum size via the Web configurator (page 86).
– All messages stay stored in the incoming
mail server's mailbox. You can read longer
messages later on your PC.
(page 46), the message is opened in
the Email editor. The cursor is in the
To field.
¤ Enter the address a re-send the
Email message.
u If an error occurs while the connection
to the outgoing mail server is being
established, you will receive an appropriate message (page 52). The Email
message is stored in the Unsent list.
¤ Send the Email message from the
Unsent list at a later time.
If errors occur when the connection is
being established to the incoming Email
server or when the Email messages are
being transmitted, the message key f
flashes. If you press the message key, a
corresponding message is displayed
(page 52).
Aborting transmission
If you receive a call while you are checking
new Email messages, the request continues in the background.
An hour glass is shown in the display while
the handset is sending an Email message.
¤ Press the display key ” to abort the
transmission.
Version05.08.2005
Receiving Email messages
48
Note:
If an error occurs during the periodic check for
new messages, the message key f flashes.
A message on the type of error is displayed if
you press the message key.
Aborting Email reception
An hour glass is shown in the display while
the handset is receiving Email messages.
¤ Press the display key ” to abort Email
reception.
Gigaset SL75 WLAN / en / A31008-M700-B112-1-7619 / email.fm / 24.4.06
Email messages
Incoming message list
Email messages are stored in your handset's incoming message list.
As soon as a new Email message enters
the list you will hear an advisory tone. The
f key flashes. In idle status the ; icon
appears in the display. The number of new
Email and messenger messages is shown
beneath it.
The new, unread entries are positioned in
front of the old, read entries in the incoming message list. New entries are red. The
most recent entry is at the top of the list
and the oldest read entry at the bottom.
Opening the incoming message list
v ¢ î ¢ E-Mail ¢ Inbox 01+05
or
f
Press the message key.
E-Mail: 01+05
Select and press §OK§.
For the incoming message list menu, see
"Email lists", page 49.
Email lists
Version05.08.2005
Email messages are stored in the following
lists:
u Inbox (incoming message list)
Contains all received Email messages
(page 49).
u Draft (draft message list)
Contains the draft versions of your
Email messages arranged in order of
date.
u Sent (outgoing message list)
Contains sent Email messages
arranged in order of date.
u Unsent ("unsent" list)
Contains Email messages for which an
error has occurred during transmission.
Example of display:
E-Mail
Inbox
Draft
Sent
Unsent
1
02+04
02
05
01
2
Î U §§§§§§§§§OK§§§§§§§§§
1 Number of new, unread messages + number
of old, read messages
2 Number of messages in the list
Note:
For information about the size of the available
memory, see page 43.
Opening an Email list
v ¢ î ¢ E-Mail
Inbox / Draft / Sent / Unsent
Select and press §OK§.
The names and Email addresses of stored
messages appear in the lists on a single
line. Any entry selected with q is
extended to include the date and time.
Example of a list display:
1
Inbox
Tim Welsch
Helga Festival
25.06.06 19:00
root@linux.com
§Delete§
02/05
2
3
4
U §View§
1 Name of list
2 Entry number,
e.g. 02/05 means: second entry of a total of
five entries
3 Sender's Email address or the name transmitted by the sender
4 Date and time of the Email message
You can open Emails to read them using
the display key §View§ (page 50).
49
Gigaset SL75 WLAN / en / A31008-M700-B112-1-7619 / email.fm / 24.4.06
Email messages
Depending on the lists, the following display keys are also available:
u Inbox / Sent
Delete displayed Email message
with §Delete§.
u Draft
Send Email message with §Send§. It is
also stored in the Sent or Unsent list.
u Unsent
Send Email message with §Send§. The
Email message is automatically moved
to the Sent outgoing message list.
Within the lists v offers the following
options:
Delete Entry (Unsent, Draft lists)
Delete the selected Email message.
Reply (Inbox list)
Reply to an Email message (page 51).
Forward (Inbox, Sent lists)
Forward an Email message (page 51).
Edit (all lists)
The Email message is opened for editing. For how to edit an Email message,
see "Writing Email messages" page 46.
Copy to Directory (Inbox list)
Add the sender's Email address to the
directory (page 36).
Delete all (all lists)
If you answer the security prompt
with §Yes, all the entries in the list are
deleted.
Caution! All the old and new (unread)
Email messages are deleted.
Version05.08.2005
Reading an Email message
Requirement: You have opened an Email
list and selected an entry with q.
§View§
Press the display key.
An overview of the Email message is
opened for you to read.
The following is displayed:
From / To
Sender's Email address/name or recipient's Email address.
50
Subject
Subject of the message.
If the subject is longer than one line the
field is expanded accordingly as soon
as you select it.
Text
First line of the contents of the
message.
Press the display key §View§. The whole
text is shown in the display.
Press the display key ” to return to
the overview.
Attachments
Number of attachments.
© offers the following options:
Delete Entry (all lists)
Delete the Email address.
Reply (Inbox list)
Reply to an Email message (page 51).
Forward (Inbox, Sent lists)
Forward an Email message (page 51).
Send (Draft, Unsent lists)
Send an Email message (page 48).
Edit (all lists)
The Email message is opened for editing. For how to edit an Email message,
see "Writing Email messages" page 46.
Copy to Directory (Inbox list)
Add the sender's Email address to the
directory (page 36).
View Attachment (all lists)
View attachments (page 50).
Viewing attachments
Requirement: You have opened an Email
message to read (page 50).
© ¢ View Attachment
Select and press §OK§.
A list of the attachments is displayed.
s
Select attachment.
§View§ / §Play§ Press the display key to view a
picture or listen to a melody.
Gigaset SL75 WLAN / en / A31008-M700-B112-1-7619 / email.fm / 24.4.06
Email messages
” / §End§
§Save§
§Save§
a
Press the display key to return
to the list of attachments.
Save the picture/melody:
If necessary change the name
of the picture or melody.
The picture/melody is saved in
the file manager (page 42).
Press and hold (idle status).
Note:
An attachment of an unknown file type is only
shown in the list. It cannot be opened. Press
§OK§ to return to the Email overview.
Forwarding an Email message
Requirement: You have selected an Email
message in the incoming or outgoing
message list or opened one to read
(page 50).
© / v ¢ Forward
Select and press §OK§.
The Email editor is opened with the Email
message for you to write an Email message (page 46).
To
The field is empty. Enter the recipient's
Email address.
Subject
Contains the subject of the original
message with the prefix Fw:.
Text
Contains ---Orig. Text--- and the text of
the original message. The cursor is in
front of ---Orig. Text--- . You can edit the
text.
Attachments
The attachments of the original message are copied. You can delete the
attachments.
¤ Edit the Email message as described on
page 46.
¤ Send the Email message as described
Version05.08.2005
on page 48.
Note:
Three full stops at the end of the message indicate that it cannot be displayed in full because
it is too long for the text editor. However, the
message is sent in full.
Replying to an Email message
Requirement: You have selected an Email
message in the incoming message list or
opened one to read (page 50).
© / v ¢ Reply
Select and press §OK§.
The Email editor is opened for you to write
an Email message (page 46).
The following are copied automatically:
To
The sender's Email address.
Subject
Contains the subject of the original
message with the prefix Re:.
Text
Contains ---Orig. Text--- and the text of
the original message. The cursor is in
front of ---Orig. Text--- . You can edit the
text.
The attachments of the original message
are not copied.
¤ Enter reply as described on page 46.
¤ If required, add your own attachments
as described on page 47.
¤ Send reply as described on page 48.
Deleting all Email lists
v ¢ î ¢ E-Mail
Delete all E-Mails
Select and press §OK§.
§Yes§
Respond to security prompt.
The entries in all Email lists are deleted.
Caution! All the old and new (unread)
Email messages are deleted.
51
Gigaset SL75 WLAN / en / A31008-M700-B112-1-7619 / email.fm / 24.4.06
Email messages
Self-help with errors
Version05.08.2005
The following errors can occur when sending and receiving Email messages:
Check E-Mail Settings
u Settings necessary for establishing a
connection to the incoming or outgoing mail server have not been made.
¤ Check settings and, if necessary,
enter the missing value and save it
(page 45).
Login failed!
u Error when logging in to the incoming
or outgoing mail server. This can have
the following causes:
– User name and/or password entered
wrongly in the handset.
¤ Check settings (page 45).
– Temporary problems with the
server.
¤ Repeat the check for new messages
or Email message transmission at a
later time.
E-mail: No server
u The address of the incoming mail
server stored in the handset (name/IP
address, port) is wrong.
¤ Check settings (page 45).
u The incoming mail server is not running or is not connected to the Internet.
¤ Repeat check at a later time.
E-Mail: memory full !
u It was not possible to receive all the
new Email messages. Your handset's
memory is full.
¤ Delete old Email messages from the
Email lists or objects from the file
manager (page 50) and start the
check again.
52
E-Mail: receive error
u It was not possible to fetch all the new
Email message from the incoming mail
server.
¤ Repeat check at a later time.
E-Mail: could not send
u It was not possible to send an Email
message. It is stored in the Unsent list.
¤ Send the Email message from the
Unsent list at a later time.
Gigaset SL75 WLAN / en / A31008-M700-B112-1-7619 / messenger.fm / 24.4.06
Messenger
Messenger
Version05.08.2005
The messenger in your handset makes
instant messaging possible (immediate
message transfer). The handset supports
the Jabber messenger.
Instant messaging refers to communication between "friends" on the Internet.
Subscribers exchange short messages
which are forwarded immediately. This
gives rise to a flowing "conversation" similar to chatting.
The precondition for this form of communication is that both subscribers have a
connection to the messenger server of
the same instant messaging provider.
Both subscribers must therefore be
"online". The messenger server forwards
the messages to the recipient.
The subscribers to instant messaging are
called buddies.
For most messenger servers it is possible
to create what are known as buddy lists.
You can store the buddies you wish to chat
to in the buddy list.
The messenger server informs you as soon
as one of your buddies comes online or
goes offline. Offline means that the
buddy has terminated the connection.
In addition to this, each buddy can determine their own (communication) status
(state of presence), from which buddies
can tell whether they are in the mood to
chat or wish to remain undisturbed.
A distinction is made in instant messaging
between the following types of message:
u Buddy messages are the "instant messages" you receive from other buddies.
You can "chat" with the buddies, i.e.
respond to the messages.
u Info messages are special information
from the provider. They are forwarded
to you, but you cannot reply to them.
Example: With some messaging providers you receive an info message
when another subscriber tries to add
you to their buddy list. You are
prompted to check the messages on
the messenger client on your PC.
Via the messenger client on your PC
you can agree to the action or refuse
permission. Without your agreement,
the other subscriber cannot add you to
their buddy list.
Requirements for instant messaging:
u You have registered with an instant
messaging provider via the Web
browser in your PC and (optional)
agreed a Web name.
u You have created a buddy list via the
messenger client on the PC.
u You have saved the messenger server
address and your access data for the
messenger server (user ID and password) in the handset using the Web
configurator (page 86). The handset
needs the data to establish a connection with the messenger server.
Notes:
– If your instant messaging provider does not
support the handset's messenger client and
the associated protocol, you have the following options:
Open an account with an open Jabber
server and enter this address in your handset (page 86). Many of these Jabber servers
offer gateways to other messenger servers
(e.g. Yahoo!, MSN etc.).
You can find a list of Jabber servers and an
overview of the gateways to other messenger servers on the Internet at
http://www.jabber.org.
– Anyone who knows your Handset PIN can
chat on the Internet using the handset and
your user ID.
53
Gigaset SL75 WLAN / en / A31008-M700-B112-1-7619 / messenger.fm / 24.4.06
Messenger
Establishing a connection,
going online
Changing/checking your
personal status, going offline
Your handset is set to attempt to establish
a connection with the messenger server
automatically after it has been switched
on or after a reboot (page 104).
If this connection is terminated or you
have logged off from the messenger
server (page 54), you can re-establish the
connection manually:
v ¢ î ¢ Messenger
Buddies / User Account / Messages
Select submenu and press §OK§.
The handset attempts to establish a connection. You are informed about the status of the connection by appropriate messages in the display.
If it is possible to establish a connection,
you are Online and can send and receive
messages.
You stay online until you set your status to
Offline (page 54) or the connection to the
messenger server is terminated (page 58).
You also stay online if you press the end
call key a.
If it is not possible to establish a connection within about 5 seconds, you will
receive an appropriate message. Try again
later (page 58).
You wish to log off (go offline) or let the
other buddies know whether you wish to
chat right now or would prefer not to be
disturbed.
You have the following selection options:
Offline
You log off from the messenger server.
The messenger server informs the
other buddies that you are no longer
available.
The handset changes to idle status. You
can neither send nor receive messages.
Online
(Setting after logging on)
You are logged on to the messenger
server and can send and receive messages.
Away / Extended Away / Do Not Disturb
You are Online and can send and receive
messages. You inform the other buddies that you cannot/do not wish to
"chat" at the moment, i.e. will not reply
to their messages straight away.
Free for Chat
You are Online and can send and receive
messages.
You invite the other buddies to "chat"
with you.
Invisible
You are Online and can send and receive
messages.
The messenger server, however, indicates to the other buddies that you are
Offline.
Notes:
– You can also assign the messenger to one
of the function keys i / j
(page 66). The connection is established
when you press the function key.
– You can also start the messenger via the
message list (page 57).
Note:
Version05.08.2005
All status settings apart from Offline and Invisible only inform other buddies about your communication status. Whether this information is
passed on to the other buddies depends on the
provider.
54
Gigaset SL75 WLAN / en / A31008-M700-B112-1-7619 / messenger.fm / 24.4.06
Messenger
Changing your status
v ¢ î ¢ Messenger ¢ User Account
¢ Change Status
s
Select status and press §OK§
(‰ = on).
If you have selected Offline you are logged
off from the messenger server. The handset returns to idle status. New messenger
messages are no longer sent to you. The
messenger message list is deleted.
Note:
It depends on the provider whether messages
directed to you are deleted or stored in the
messenger server. Stored messages are sent to
you when you go online again.
Checking your status and your user ID
v ¢ î ¢ Messenger ¢ User Account
¢ User Info
The following information can be displayed (display depends on the provider):
u Your current status
u Your user ID (format: userid@providerdomain).
Displaying your status in the idle display
If you are online and the handset is in idle
status, your status is displayed by the M
icon under the handset name (e.g.):
Ð
V
Gigaset SL75WLAN
20.06.06
§§§§INT§§§§
M
09:45
¨
u If the M icon is green, you are Online and
Free for Chat.
u If the M icon is orange, your status is
Version05.08.2005
Invisible, Away, Extended Away or Do Not
Disturb.
u No icon is displayed if you are in Offline
status (page 54).
Opening the buddy list
Requirement: You have stored a buddy
list in your provider's messenger server.
v ¢ î ¢ Messenger ¢ Buddies
If you are Offline, the handset first establishes a connection with the messenger
server. This may take a few seconds. You
are informed by means of an appropriate
message in the display (page 54).
Once the connection exists the messenger
server reads up to the first 99 buddies in
the buddy list and they are displayed in the
list on the handset.
Example:
Buddies
Jeanette
Lisa
John
Anna
M
M
N
L
§§§§§§§Chat§§§§§§§ U ¨
The buddies' Web names (nicknames) are
displayed in the list. If they do not have a
Web name the user ID is displayed.
If a buddy's name is longer than one line it
is abbreviated. You can navigate in the list
using the control key q.
The buddies are in the following order in
the list. You can interpret their status by
means of the colour of the M icon after the
buddies (page 54):
1. Buddies with Online status or Free for
Chat in alphabetical order. The M icon is
green.
2. Buddies with Away, Extended Away or
Do Not Disturb status in alphabetical
order. The M icon is orange.
3. Buddies with Offline or Invisible status in
alphabetical order. The M icon is red.
55
Gigaset SL75 WLAN / en / A31008-M700-B112-1-7619 / messenger.fm / 24.4.06
Messenger
Changes in the status of buddies
You have opened the buddy list and one of
the buddies changes their status. A distinction is made as follows:
u A buddy changes to the status Online /
Free for Chat:
You are informed by means of an
appropriate message in the display.
The buddy list will now be updated.
u In the event of another status change
the buddy list is updated. No message
is displayed.
Note:
If the buddy changes to Offline status, your
messages are no longer sent to them. Whether
the messenger server stores the messages
until the buddy is Online again or deletes them
depends on the provider.
Menu options for the buddy list
Within the buddy list v offers the following options:
Version05.08.2005
Info
Check information about the selected
buddy.
The following information can be displayed (display depends on the provider):
– Web name (nickname)
– Status
– User ID (format: userid@providerdomain). Resource names are not
displayed.
– Phone number (if known)
You can scroll through the information
with the control key q.
If the buddy changes their status the
entry is updated.
56
Copy buddy to dir.
Create a buddylink in the directory.
The handset directory is opened. Select
the entry to which the buddylink is to
be assigned and press §OK§.
The M icon is displayed after the entry i
the directory. You can identify the
buddy's status by the colour of the icon
(page 55). Address information is not
copied to the directory.
Chatting to buddies
You want to "chat" to a buddy, i.e. send a
message.
Requirement: You have opened the
buddy list (page 55) and selected a buddy
with q.
¤ Press the display key §Chat§. The text editor is opened.
¤ Write and send your message
(page 57).
The buddy list is shown again.
Receiving messages
Requirement: You are online.
Newly arriving buddy or info messages
(page 53) are shown by a flashing message key f, a signal tone and the ;
icon in the idle display.
The messages are stored in the Messenger:
message list.
About 25 to 99 messages may be stored in
the list, depending on their size. If the
memory is full and a new message arrives,
the oldest message is overwritten.
New (unread) messages are placed in
front of old ones (read) in the list. The oldest new message is at the beginning of the
list, and the newest old message is at the
end.
Gigaset SL75 WLAN / en / A31008-M700-B112-1-7619 / messenger.fm / 24.4.06
Messenger
Opening the message list using
the f key
Deleting a message
The handset is in idle status.
¤ Press the message key f.
All lists containing new messages are displayed.
¤ Select Messenger: list and press §OK§.
The list is opened.
The numbers after Messenger: mean:
number of new + number of read messages.
To open the list from the menu:
v ¢ î ¢ Messenger ¢ Messages
Select and press §OK§.
Message list
The names of the buddies who have sent
the message are displayed in the list. For
info messages Info is displayed.
The currently selected entry is extended to
include the date and time.
Example of a list display:
1
New Messages
Jeanette
26.06.06 12:45
Info
John
§§Delete§§
4 / 13
2
3
4
5
U §§§§§Read§§§§§
1 Status of message New (unread) / Old (read)
2 Name of list
3 Entry number,
e.g. 02/05 means: second entry of a total of
five entries
4 Sender's Web name/user ID
5 Date and time of message
Version05.08.2005
The counter in the header is updated as
soon as a new message arrives, even if the
list is open.
Requirement: You have opened the message list and selected a message with s.
¤ Press the display key §Delete§.
The message is deleted and the counter in
the header adjusted.
Reading messages
Requirement: You have opened the message list and selected a message with s.
¤ Press the display key §Read§.
The message is opened for you to read.
You have the following options:
§Delete§
Press the display key to delete
the message from the list. You
will return to the message list.
Or:
§Call§
Or:
a
(For buddy messages only)
Reply to message. The text
editor is opened. You can write
a reply (see "Writing and sending messages" on page 57).
Back to the message list.
Writing and sending messages
Requirement:
u You are reading a buddy's message and
press the display key §Call§ or
u You have pressed the display key §Chat§
in the buddy list.
A text editor is opened.
¤ Enter message using the handset keys
(T9 predictive text is
available, page 123).
¤ © ¢ Select Send.
The message is sent to the buddy.
57
Gigaset SL75 WLAN / en / A31008-M700-B112-1-7619 / messenger.fm / 24.4.06
Messenger
Interruption while writing
If you receive a call while you are writing a
message or the connection to the messenger server is interrupted, the text editor is
terminated. Your message is stored temporarily until ...
u ... you start up a chat with the same
buddy (page 56). The text editor is
opened with the stored text.
u ... you wish to write a message to
another buddy. The stored text is
deleted. The text editor is empty.
u ... you go offline. The text is deleted.
Text editor menu options
Within the text editor © offers the following options:
Send
Send message to buddy.
Delete Text
Delete the whole text.
Select Language
For T9 predictive text: select the language in which you wish to write the
text and press §OK§. T9 uses the dictionary for the selected language.
Checking T9 status
Version05.08.2005
If you wish to check T9 status while in text
editor:
§T9 Info§
Press the display key.
The T9 Help is displayed.
58
Self-help with errors
While establishing, and during, a connection to the messenger server and when
sending messages the following errors
can occur.
Behaviour when the connection is lost
If the connection to the messenger server
is interrupted, an appropriate message is
shown in the display. You are Offline.
If you are in a submenu of the messenger,
the handset switches to the messenger
menu.
¤ Try to re-establish the connection
(page 54).
Errors when sending
If it is not possible to send a message, a
distinction is made between the following
situations:
u The connection to the messenger
server is interrupted:
A message is shown in the display to
indicate that the connection to the
messenger server has been interrupted.
The message is stored temporarily
(page 58).
¤ Try to re-establish the connection
(page 54) and send the message
again.
u The server is unable to send the message:
A message is shown in the display to
indicate that the message could not be
sent. If, for example, the buddy is not
available, the message you have sent
will also be displayed.
The message is stored temporarily
(page 58).
¤ If necessary, check the buddy's user
ID and send the message again later.
Gigaset SL75 WLAN / en / A31008-M700-B112-1-7619 / settings_net.fm / 24.4.06
Creating/managing access profiles
Creating/managing access
profiles
§Edit§
Before you can make a call, you must log
the handset into a WLAN and establish a
connection to the SIP server.
The handset's WLAN settings depend on
the access point at which you wish to log
in. At different locations, you must log
into different WLAN environments.
The SIP settings depend on your SIP provider.
You can save and manage WLAN and SIP
settings in the access profiles.
Returning to the profile editor
Editing access profiles
Access profiles contain all relevant access
data for WLAN and SIP. You can save 16
different access profiles.
Profile editor
Access profiles are split into the following
areas:
u Profile name: Name of the access profile
which is displayed in the profile overview (optional). If you do not enter a
name, a default name is used (Profile 1
to Profile 16).
u WLAN: Settings for access to the WLAN.
u Provider: Access data for the account
with your SIP provider.
With the control key q you can scroll
through the profile editor (press down or
up).
Version05.08.2005
Opening the profile area
In the WLAN settings and provider profile
areas you can determine the necessary
parameters using multiple line entries. For
more information on the individual
parameters, see page 8.
¤ Use q to scroll through the profile editor.
¤
Press the display key to open a
profile area.
Make changes as described below.
You have made all the necessary settings
in the profile area:
§Save§
Press the display key.
You return to the profile editor.
¤ If necessary, edit the next profile area.
Using the connection wizard
The connection wizard helps you to log
the handset into a WLAN and with a SIP
provider. You can
u call up an existing access profile and
establish a connection to the WLAN
and SIP provider, or
u create a new access profile via an available access point.
Starting the connection wizard
Switch on the handset:
a
Press the end call key to activate the handset.
§Scan§
Press the display key.
If the handset is already switched on:
j
Press the function key.
If you have assigned the function key with
a different function (page 66):
v¢å
The connection wizard starts.
Note:
If the handset does not currently have a connection to the WLAN or to the SIP provider:
§Scan§ Press the display key to start the connection wizard.
Please note:
u If no access points are available, the
connection wizard opens a blank
access profile.
59
Gigaset SL75 WLAN / en / A31008-M700-B112-1-7619 / settings_net.fm / 24.4.06
Creating/managing access profiles
u If you have not yet saved any access
Creating a new profile
Creating a new access profile or using
a known access profile
The list of available access points (SSIDs) is
displayed.
q
Select an access point and
press §OK§.
Proceed as follows if the required access
point (SSID) is not displayed:
<Manual Config.>
Select and press §OK§.
The connection wizard creates a new
access profile and opens the profile editor
(page 59).
The connection wizard may copy the
WLAN and provider settings of a saved
access profile.
¤ Make or adapt WLAN/provider settings
(page 61).
profiles, the list of available access
points is displayed. Proceed as
described above under "Creating a new
profile" on page 60.
u If you have already saved an access profile, you can either select an existing
profile or create a new profile.
Requirement: You have started the connection wizard and have already saved at
least one profile.
Use exist. Profile/ Create new Profile
Select and press §OK§.
Using a known profile and establishing a
connection to the WLAN and SIP provider
Version05.08.2005
The list of all saved access profiles (profile
overview) is displayed. The current signal
strength is displayed for each access
profile (0 = no signal, 4 = very good signal).
Sequence of access profiles:
u The active access profile if applicable
u All saved access profiles according to
the current signal strength (good to no
signal)
q
Select an access profile and
press §OK§.
The connection to the WLAN and SIP provider is established.
If the handset cannot establish a connection to the WLAN with this access profile
(no/poor signal):
¤ Change location if possible.
§Re-Scan§
Press the display key to repeat
the search.
The profile overview is displayed.
60
Creating/editing an access
profile without the
connection wizard
Note:
If you wish to create the new access profile
based on an existing profile: create a new profile and copy sections (e.g. WLAN settings) of a
saved access profile (page 61).
v ¢ Ð ¢ Network Config.
¢ Access Profiles
If no access profile is available yet, a new
access profile is created automatically.
If access profiles have already been saved,
a list is displayed.
If necessary, create a new access profile:
v
Open menu.
New Entry Select and press §OK§. A new,
blank access profile is created.
In both cases, the profile editor is displayed (page 59).
¤ Make WLAN/provider settings
(page 61).
Gigaset SL75 WLAN / en / A31008-M700-B112-1-7619 / settings_net.fm / 24.4.06
Creating/managing access profiles
Note:
For how to select/edit saved access profiles,
see page 64.
Overwriting an access profile
You have opened the profile editor
(page 59) and selected one of the profile
areas WLAN / Provider.
Saving an access profile
If you wish to create a new access profile
but have already saved 16 access profiles,
you may have to overwrite an existing
access profile. A corresponding message is
displayed.
§Yes§
Press the display key to confirm the prompt.
The profile overview is displayed.
q
Select access profile to be
overwritten and press §OK§.
¤ Create new access profile.
Or:
§No§
Press the display key to cancel
the process.
v
Open menu.
Save Settings
Select and press §OK§.
The settings are checked. If the settings
are not complete, a corresponding note is
shown on the display.
If you want to save an incomplete profile,
e.g. to make additional settings on the PC
via the Web configurator:
§Yes§
Press the display key to confirm the prompt.
Or:
§No§
Press the display key to complete the settings.
Making/editing WLAN/provider
settings
Copying a profile area
Requirement: You are creating or editing
an access profile.
If you create a new profile or open a saved
profile, the profile editor is displayed first
(page 59).
Notes:
– Changes are not saved if you are interrupted by a call when entering an access
profile.
– If you have copied profile areas or are editing an existing access profile, the default
settings are already entered.
Version05.08.2005
Using profile editor functions
If you copy profile areas, you can save
yourself from repeated typing. If, for
example, the WLAN settings fully or partially match the settings of a previously
saved access profile, you can copy this
area into the new access profile.
q
Select profile area to be copied
(e.g. WLAN).
v
Open menu.
Save Settings
Select and press §OK§.
Copy from Profile
Select and press §OK§.
The profile overview is displayed.
q
Select the access profile from
which the area is to be copied,
and press §OK§.
¤ If required, edit the settings of the copied profile area (page 62, page 64).
61
Gigaset SL75 WLAN / en / A31008-M700-B112-1-7619 / settings_net.fm / 24.4.06
Creating/managing access profiles
Entering profile names
Requirement: You are editing an access
profile.
The profile name is displayed in the profile
overview. By default, the profiles are numbered (profile 1 to 16). You can change
the profile names.
Note:
Choose descriptive profile names from which
you can recognise the WLAN and SIP settings
for which the profile is valid, e.g.
"Anna_Office". This will make it easier to select
a profile from the profile overview.
Profile name
Enter any name (max. 32 characters).
¤ If required, edit the WLAN/provider settings and save the changes.
Editing the "WLAN settings"
profile area
Requirement: You are editing the WLAN
profile area (page 59).
¤ Make an entry on several lines
(page 120):
The number of input fields varies according to the current selection.
SSID
Enter the SSID
Authentication
Select None / 802.1x / WPA and if
required, set authentication and
encryption (page 62).
Specifying the IP address manually
Requirement: DHCP is disabled. Additional input fields are displayed.
¤ Make an entry on several lines
(page 120):
Gateway
Enter the gateway's IP address. This is
generally the local IP address of your
WLAN router (IP address within the
WLAN).
Subnet Mask
Enter the subnet mask.
IP Address
Enter the handset's IP address.
¤ Save changes (page 121).
Setting authentication and encryption
Requirement: You are editing the WLAN
profile area (page 59).
Notes:
– The security settings for the handset must
agree with the settings at the access point.
– For more information on the individual
parameters, see page 17.
Input structure on the handset
Note:
The number of input fields varies according to the current setting for Authentication:
Encryption Type
(You have set None / 802.1x as Authentication.)
Select None / WEP 64 / WEP128 /
WPA PSK TKIP and, if required,
set up encryption (page 63).
Authentication
You only have to make security settings if you
wish to obtain access to a secure WLAN.
Version05.08.2005
DHCP
Select On / Off. If you disable DHCP, you
must specify the handset's IP address
manually (see "Specifying the IP
address manually", page 62). It is recommended that you enable DHCP.
¤ Save changes (page 121).
None
WEP (page 63)
WPA PSK (page 63)
802.1x
WEP (page 63)
WPA PSK (page 63)
WPA
62
Possible encryption
WPA (page 63)
Gigaset SL75 WLAN / en / A31008-M700-B112-1-7619 / settings_net.fm / 24.4.06
Creating/managing access profiles
If required, specify the parameters for
authentication and the type of encryption.
Setting up authentication with 802.1x
Requirement: You have set 802.1x as
Authentication.
¤ Make an entry on several lines
(page 120):
EAP Type
Select LEAP / TLS. The relevant input
fields are displayed.
Set up LEAP:
Login Name
Enter login name.
Password
Enter password.
Note:
If you have selected authentication 802.1x with
EAP Type = LEAP, you must also set up encryption.
Set up TLS:
Notes:
– You may have to save the appropriate certificate in the handset. To do this, use the
Web configurator Web interface
(page 101).
– For authentication via certificates, the date
must be correctly set on the handset.
Login Name
Enter login name.
Password
Enter password.
Certificate
Select certificate.
¤ If required, set up encryption with WEP
or WPA PSK (page 63).
¤ Save changes (page 121).
Version05.08.2005
Setting up encryption with WEP
Encryption Type
Select WEP 64 / WEP128.
Password mode
Select HEX / ASCII.
WEP Key
Enter WEP key.
Authenticat. mode
Select Shared Key / Open System.
¤ Save changes (page 121).
Note:
If the standard 802.1x with EAP type LEAP is
used for authentication, it is not necessary to
enter a Web key.
Setting up encryption with WPA PSK
Requirement: You have set None / 802.1x
as Authentication.
¤ Make an entry on several lines
(page 120):
Encryption Type
WPA PSK TKIP is set.
Password mode
ASCII is set.
Pre-Shared Key
Enter WPA PSK key.
¤ Save changes (page 121).
Setting up authentication and encryption
with WPA
Requirement: You have set WPA as
Authentication.
¤ Make an entry on several lines
(page 120):
Security
TKIP is set.
EAP Type
Select LEAP / TLS. Proceed as described
under "Setting up authentication with
802.1x" (page 63).
¤ Save changes (page 121).
Requirement: You have set None / 802.1x
as Authentication.
¤ Make an entry on several lines
(page 120):
63
Gigaset SL75 WLAN / en / A31008-M700-B112-1-7619 / settings_net.fm / 24.4.06
Creating/managing access profiles
Editing the "provider" profile area
Managing access profiles
Requirement: You are editing the Provider
profile area (page 59).
The list of available providers is displayed.
Note:
Specifying the provider
q
Select a provider and
press §OK§.
Note:
If your provider is not included in the list, select
Other Provider. You must then make the SIP settings via the Web configurator (page 95).
Editing the provider
q
Select a provider and
press §Edit§.
¤ Make an entry on several lines
(page 120):
Displayed Name
Enter any name that is to be displayed
to the other party.
Authent. Name
If you have agreed an additional user
password with the SIP provider for
authentication, enter it here. Authent.
Name is usually the same as the user
name.
Authent. Password
Enter password.
User Name
Enter user ID.
¤ Save changes (page 121).
Notes:
Version05.08.2005
– You can only set up additional providers via
the Web configurator on your PC (page 95).
If you select Other Provider, a corresponding
message is displayed.
– Other SIP settings are not necessary for
basic operation. You can edit all SIP settings
on your PC via the Web configurator.
64
For how to call up an access profile with the
connection wizard, see page 60.
v ¢ Ð ¢ Network Config.
¢ Access Profiles
The profile overview is displayed. If no
access profile has been set up yet, a blank
profile is opened.
Selecting an access profile
q
Select access profile.
§OK§
Press the display key to activate the access profile.
You are prompted to answer whether you
wish to log in with the new access profile
immediately:
§Yes§
Press the display key to end
the current connection.
The handset establishes a connection to
the WLAN and SIP provider with the
selected access profile. The process can
take some time.
Or:
§No§
Press the display key to retain
the current connection.
Viewing an access profile
¤ Select access profile.
Press the display key.
The current settings are displayed. The
name of the access profile is displayed in
the header.
§Edit§
If necessary, press the control
key to edit the access profile
(page 65).
§View§
Gigaset SL75 WLAN / en / A31008-M700-B112-1-7619 / settings_net.fm / 24.4.06
Creating/managing access profiles
Using other functions
v
Open menu.
The following functions can be selected
with q:
New Entry
Create a new access profile (page 60).
Edit Entry
Edit access profile (page 65).
Delete Entry (not for active profile)
Delete selected access profile
(page 65).
Delete List
Delete all access profiles (page 65).
Editing an access profile
¤ Select access profile.
v
Open menu.
Edit Entry Select and press §OK§.
The current settings are displayed.
¤ If required, change the WLAN/SIP settings of the access profile.
Deleting an individual access profile
Requirement: The access profile is not
active.
¤ Select access profile.
v
Open menu.
Delete Entry Select and press §OK§.
§Yes§
Press the display key to confirm the prompt.
That particular access profile is deleted.
Deleting all access profiles
Version05.08.2005
¤ Select access profile.
v
Open menu.
Delete List Select and press §OK§.
§Yes§
Press the display key to confirm the prompt.
All access profiles are deleted. The handset reboots. After it has rebooted, you
must log in again with your handset PIN.
65
Gigaset SL75 WLAN / en / A31008-M700-B112-1-7619 / settings_hs.fm / 24.4.06
Handset settings
Handset settings
Your handset is preconfigured, but you
can change these settings to suit your
individual requirements.
Briefly press the number key.
§Edit§
Press the display key.
Proceed as is described when first assigning the key (seeabove).
Notes:
Deleting number key assignments
– You can also use a PC to make the settings
on your handset. To do this, use the Web
configurator (page 74). Even more settings
are possible on the PC.
– You can restore the handset's default settings via the Web configurator (page 102).
Briefly press the digit key.
§Clear§
Press the display key.
§Yes§
Confirm prompt. Quick dial is
deleted.
The directory entry is retained.
Shortcuts for functions and
numbers
You can assign a number for quick dialling
to each of the number keys 2 to O.
You can assign each of the function keys
i and j with a function.
The number is then dialled or the function
started by simply pressing a key.
Assigning quick dial to a number key
Requirement: You have not yet assigned
a number or function to the number key.
¤ Press one of the number keys 2 to
O.
§Set§
Press the display key. The
directory is opened.
q
Select an entry and press §OK§.
If there is just one number stored in the
directory entry, this is stored on the speed
dial key.
If several numbers are stored:
s
Select a number and press §OK§.
If you delete or edit the entry in the directory, this will not affect the assignment to
the number key or display key.
Version05.08.2005
Changing number key assignments
66
Dialling a number
¤ With the handset in idle status, press
and hold the number key.
The number is dialled.
Assigning a function key
As supplied, the function keys have
already been assigned functions. You can
change the assignment.
¤ Press and hold the function key i/
j.
The list of possible key assignments is
opened. The current assignment is indicated by ‰. The following can be selected:
u Voice Dialing
u E-Mail
u Connect. Wizard
u Messenger
u Connect to PC (page 110)
q
Select a function and
press §OK§.
Gigaset SL75 WLAN / en / A31008-M700-B112-1-7619 / settings_hs.fm / 24.4.06
Handset settings
Starting a function
¤ With the handset in idle status, press
the function key briefly.
The function menu is opened.
In order to use the Connect to PC function,
the handset must be set in the PhoneBook
Manger for PC control (page 109). The PC
must be registered on the same WLAN as
the handset.
The menu for the Connect to PC function
displays the PC applications you have configured for remote control using the
PhoneBook Manager (page 110).
Changing key assignments
Function key
¤ Press and hold the function key.
The list of possible key assignments is
opened. The current assignment is indicated by ‰.
Proceed as is described when first assigning the key with a shortcut (page 66).
Setting the date and time
Version05.08.2005
You can set the date and time on the
handset manually.
v ¢ Ð ¢ Date/Time
¤ Change multiple line input:
Date:
Enter the date in 6-digit format.
Depending on the set Date Format use
the sequence "Day, Month, Year" or
"Month, Day, Year".
Time:
Enter hours and minutes with 4 digits,
(e.g. Q M 1 5 for
07.15 a.m.).
If the twelve-hour mode is set
(see Time Mode:) use r to select
am (morning) or pm (afternoon).
Date Format
Choose between the "Day/Month/Year
(DD.MM.YY)" display and "Month/Day/
Year (MM/DD/YY)".
Time Mode:
Choose between the 12 and 24 hour
display mode.
§Save§
Press the display key.
The changes are saved.
The date and time are shown in the handset's idle display.
Note:
You can use the Web configurator to specify a
time server (page 84). If the handset can
establish a connection to the time server, the
time server handles the date and time. The
manual setting for the date/time is overwritten.
Changing the display language
You can view the display texts in different
languages.
v ¢ Ð ¢ Display ¢ Language
The current language is indicated by ‰.
s
Select a language and
press §OK§.
a
Press and hold (idle status).
If you accidentally choose a language you
do not understand:
v O 1L
Press keys one after the other.
s
Select the correct language
and press §OK§.
When you change the display language
the character set can change.
67
Gigaset SL75 WLAN / en / A31008-M700-B112-1-7619 / settings_hs.fm / 24.4.06
Handset settings
Changing the name of the
handset
You can select four colour schemes and
several contrast and brightness levels.
v ¢ Ð ¢ Display
You can display a screen picture in the
display when the handset is in idle status.
The screen picture is shown in the background. The standard idle display (date,
time and handset name) is retained.
The picture is not displayed in certain situations, e.g. during a call or when the
handset has been de-registered.
v ¢ Ð ¢ Display ¢ Screen Picture
¤ Make an entry on several lines
(page 120):
Activation
Select On (screen picture is displayed)
or Off (no screen picture).
Picture
If required, change the screen picture
(page 69).
¤ Save changes (page 121).
Selecting a colour scheme
Viewing/changing the screen picture
You can change the name of the handset.
The name is displayed in the idle display.
v ¢ Ð ¢ Network Config.
¢ Handset Name
~
Enter name (max. 16 characters).
§Save§
Press the display key.
Note:
For how to make the setting using the Web
configurator, see page 83.
Setting the display
Colour Scheme
Select and press §OK§.
s
Select colour scheme and
press §OK§ (‰ = current colour
scheme).
a
Press briefly.
Setting contrast
Contrast
r
§Save§
a
Select and press §OK§.
Select contrast.
Press the display key.
Press briefly.
Setting brightness
Brightness Select and press §OK§.
r
Select brightness.
§Save§
Press the display key.
a
Press and hold (idle status).
Version05.08.2005
Displaying a screen picture
68
In the default settings several screen pictures are saved on your handset. You can
use one of these screen pictures or a
camera picture or a picture loaded onto
the handset via the Web configurator
(page 86).
v ¢ Ð ¢ Display ¢ Screen Picture
s
Scroll to the Picture line.
Viewing a screen picture
Press the display key. The current picture is displayed.
Press any key to return to the multiple
line entry.
§View§
¤
Gigaset SL75 WLAN / en / A31008-M700-B112-1-7619 / settings_hs.fm / 24.4.06
Handset settings
Changing the screen picture
Press the display key. This
opens the file manager.
Images
Select and press §OK§.
q
Select picture. Press §View§ to
display the picture. Use q
to switch between pictures.
Press §OK§ to accept the picture.
¤ Save changes (page 121).
§Edit§
Notes:
– Animated Gif files cannot be used as logos.
– For how to make the setting using the Web
configurator, see page 83.
Setting night mode
If the handset is in the charging cradle, the
display is dimmed. If this bothers you, you
can set the handset to night mode. The
display is then completely dark when the
handset is in the charging cradle.
v ¢ Ð ¢ Display
Night Mode Select and press §OK§ (‰ = on).
a
Press and hold (idle status).
Version05.08.2005
Setting the timer for the display/
key backlight.
Specify how long the display and keys
should remain illuminated after the handset switches to idle status.
v ¢ Ð ¢ Display
Backlight Switch
Select and press §OK§.
r
Select a time between 5 and
60 seconds for the timer.
§Save§
Press the display key.
a
Press and hold (idle status).
After switching to idle status, once the
timer expires the display is first dimmed
and the key backlight is switched off. After
the set time passes for a second time, the
display becomes completely dark.
During a call, the display is dimmed after
the set time passes.
The display lights up again as soon as you
press a key on the handset.
Note:
Do not make the timer time too long as this
will reduce the standby time of your handset.
Activating/deactivating
"easy answer"
When this function is activated, simply
remove the handset from the charging
cradle to take a call. The call is accepted
automatically; you do not need to press
the c talk key.
v¢Ð
Easy Answer
Select and press §OK§ (‰ = on).
Note:
For how to make the setting using the Web
configurator, see page 88.
Adjusting the loudspeaker
volume
You can set the loudspeaker volume for
handsfree talking and the earpiece volume to eight different levels.
v ¢ ï ¢ Handset Volume
¤ Make an entry on several lines
(page 120):
Handset
Set earpiece volume (1–8).
Handsfree Set the volume for handsfree
talking (1–8).
¤ Save changes (page 121).
Note:
For how to make the setting using the Web
configurator, see page 81.
69
Gigaset SL75 WLAN / en / A31008-M700-B112-1-7619 / settings_hs.fm / 24.4.06
Handset settings
Adjusting the volume during a call
You can adjust the volume of the active
function during a call.
t
Press the display key.
r
Set volume.
§Save§
Press the display key.
If t is assigned a different function, e.g.
when toggling (page 33):
v
Open menu.
Volume
Select and press §OK§.
¤ Continue as described above.
Changing ringer tones
u Volume:
You can choose between five volumes
(1–5; e.g. volume 2 = ˆ) and
the "crescendo" ring (6; volume
increases with each ring =
‰).
u Ringer tones:
You can select any sound from the file
manager.
Note:
Version05.08.2005
Your handset features integrated software that
allows you to play back various melodies in
.WAV, .MIDI format etc. Optimum playback
cannot be guaranteed for all melodies that
you transfer to the handset. It may not be possible to play back melodies at all.
You should therefore check your own melodies
to make sure that they play back OK before setting them as ringtones.
The best playback results are achieved with
melodies that have been scanned at max.
8 kHz.
Please check one of the websites detailed
below regularly for software updates:
www.siemens.com/gigasetcustomercare
You may find a software update on one of
these websites that will allow your handset
to provide optimum playback for melodies
scanned at a higher frequency too.
70
You can configure the following functions
with different ringer tones:
u For Ext. Calls: For all calls except VIP.
u VIP Calls: For VIP calls (page 34).
u Anniversary: For stored anniversaries
(page 34).
u For Alarm Clock: For a pre-set wake-up
call (page 71).
In idle status, you can also open the Ringer
Settings menu by pressing t briefly.
Settings for external calls, VIP,
anniversaries and wake-up call
Set the volume and melody depending on
the type of signalling required.
v ¢ ï ¢ Ringer Settings
For Ext. Calls / VIP Calls / Anniversary /
For Alarm Clock
Select and press §OK§.
¤ Make an entry on several lines
(page 120):
Volume
Set the volume (1-6). The current melody is played at the set volume.
Melody
Select melody. The selected melody is
played.
The following settings apply only to
incoming calls (For Ext. Calls / VIP Calls):
Announce
Select On or Off.
¤ Save changes (page 121).
Vibration alert
Regardless of the settings for the individual functions. you can activate or deactivate vibration alert for all functions. The
vibration alert is also triggered if all ringer
tones are deactivated.
v¢ï
Vibration Alert
Select and press §OK§ (‰ = on).
a
Press and hold (idle status).
Gigaset SL75 WLAN / en / A31008-M700-B112-1-7619 / settings_hs.fm / 24.4.06
Handset settings
Vibration alert is temporarily deactivated
when the handset is in the charging cradle
or connected to a data cable.
Activating/deactivating the ringer tone
You can deactivate the ringer tone on your
handset before you answer a call or when
the handset is in idle status; the ringer
tone can be deactivated permanently or
just for the current call.
Deactivating the ringer tone permanently
*
Press the star key and hold
until you can no longer hear
the ringer tone.
The Ú icon appears in the display.
Re-activating the ringer tone
*
Press and hold the star key.
Deactivating the ringer tone for the current
call
§Silence§
Press the display key.
Version05.08.2005
Activating/deactivating advisory
tones
Your handset uses ‘advisory tones’ to tell
you about different activities and statuses.
The following advisory tones can be activated and deactivated independently of
each other:
u Key click: Each key press is acknowledged.
u Battery tone: The battery requires
charging.
u Range: the connection to the access
point is weak.
u Acknowledge tones:
– Confirmation tone (a rising tone
sequence): at the end of the entry/
setting, when the handset is placed
in the charging cradle and when an
Email or a new entry arrives in the
calls list.
– Error tone (descending tone
sequence): when you make an
incorrect entry
– End tone: when you scroll beyond
the end of a menu or list
You cannot deactivate the confirmation
tone for placing the handset in the charging cradle.
Note:
You can change the volume of advisory tones
via the Web configurator. For how to make the
setting using the Web configurator, see
page 81.
v ¢ ï ¢ Advisory Tones
¤ Make an entry on several lines
(page 120):
Key Tones
Select On or Off.
Battery low
Select On or Off.
Out of range
Select On or Off.
u Confirmation
Select On or Off.
¤ Save changes (page 121).
Setting the alarm clock
Requirement: The date and time have
already been set (page 67).
Activating/deactivating the alarm
clock and setting the wake-up time
v ¢ í ¢ Alarm Clock
¤ Change multiple line input:
Alarm Clock:
Select On or Off.
Time:
Enter the wake-up time in 4-digit format.
§Save§
Press the display key.
You will see the ¼ icon.
71
Gigaset SL75 WLAN / en / A31008-M700-B112-1-7619 / settings_hs.fm / 24.4.06
Handset settings
Depending on the mode of setting for the
date and time, you must enter the wakeup time in 12 or 24 hour mode (see Time:,
page 67).
A wake-up call is signalled on the handset
by the selected ringer tone (page 70). The
wake-up call sounds for about 60 seconds.
The display shows Alarm Clock plus the
date and time.
During a call, the wake-up call is signalled
by a short tone.
The wake-up time is saved.
Deactivating the wake-up call
Requirement: A wake-up call is sounding.
§Silence§
Press the display key or any
key.
The alarm clock is still switched on.
Protecting against unauthorised
access
Protect the handset with a PIN known only
to yourself. If a PIN is entered it is
requested when the handset is switched
on. When the phone is supplied no PIN has
been entered.
Caution:
If you do not assign a PIN, every subscriber to
the WLAN has free access to your handset settings.
a
Enter new Handset PIN (four
digits 0–9) and press §OK§.
Press and hold (idle status).
Notes:
– To delete the Handset PIN: leave the input
field for the new PIN empty and press §OK§.
– You cannot correct wrong entries when you
are entering the PIN. If necessary, cancel
the input (a or ”) and start the process again.
Clearing handset blocking
If you enter a wrong PIN three times in a
row, the handset will be blocked. In the
display, a corresponding notification and
the handset's IP address are shown.
You can only clear the blocking via the
Web configurator.
¤ Start the Web configurator with the IP
address displayed (page 75).
¤ Change the Handset PIN via the Admin
menu (page 80).
¤ Close the Web configurator (page 79).
The handset blocking is cleared.
§OK§
Press the display key to confirm the information on the
handset display. The handset
switches off.
a
Press the End call key to switch
the handset on again and register with the new Handset
PIN.
Changing the Handset PIN
Notes:
You can save a 4-digit Handset PIN.
– If you wish to clear the handset blocking at
a later time, press the §OK§ display key. The
handset switches off. The message with
the handset's current IP address will be displayed again the next time you switch on.
– If you wish to launch the Web configurator
in a different WLAN: press the §Scan§ display
key. This launches the connection wizard
(page 59).
Caution:
– Memorise the new Handset PIN well! If you
forget it, you can change it using the
Admin PIN via the Web configurator.
– For how to set/change or delete PINs using
the Web configurator, see page 80.
v ¢ Ð ¢ Change HS PIN
Version05.08.2005
~
~
72
Enter current Handset PIN if
necessary und press §OK§.
Gigaset SL75 WLAN / en / A31008-M700-B112-1-7619 / settings_hs.fm / 24.4.06
Handset settings
Checking the status
Version05.08.2005
v ¢ Ð ¢ Status
The following information is displayed:
u handset name,
u the handset's MAC address,
u the handset's current IP address,
u proxy name,
u hardware version,
u software version.
73
Gigaset SL75 WLAN / en / A31008-M700-B112-1-7619 / web_server.fm / 24.4.06
Configuring the handset via your PC
Web configurator
The Web configurator is the Web interface
for your handset.
Configuring the handset
via your PC
u Create and administer WLAN/SIP access
u
u
Using the Web configurator on your handset, you can also make all settings on your
handset via a PC.
u
Requirements:
u
u The handset is in idle status.
u A Web browser is installed in the PC,
e.g. Internet Explorer version 6.0 or
higher, or Firefox version 1.0.4 or
higher.
u The handset is connected to the PC.
The following is possible:
– a radio connection, i.e. PC and handset are in the same WLAN subnet
and logged in with the same SSID
(page 8).
Or:
– a USB connection, i.e. handset and
PC are connected by a data cable.
Note:
You may have to download a more recent version of the Web browser.
Version05.08.2005
With the Web configurator on your
handset, you have the following options:
74
u
u
u
u
profiles
Load files with SIP access data from the
Siemens website onto your handset
Check and change the handset's audio,
display and call settings
Find out information about the handset
and its file system (firmware version,
MAC address, etc.) (page 79)
Update the firmware on the handset
(page 103)
Back up the handset configuration or
the directory on your PC and load it
onto the handset again as required
Restore the handset's default settings
(page 102)
Transfer your own pictures, melodies,
and certificates from your PC to the
handset for access to a secure WLAN
Load pictures, photos and melodies
from the handset into the PC (page 86)
Note:
While you are making settings with the Web
configurator, the handset is locked: incoming
calls are ignored and the keypad lock is activated.
If you wish to make a call, save the changes
you have made and close the Web configurator.
Gigaset SL75 WLAN / en / A31008-M700-B112-1-7619 / web_server.fm / 24.4.06
Configuring the handset via your PC
Starting the Web configurator
¤ Launch the Web browser on your PC.
¤ Enter the handset's IP address in the
address field of the Web browser, e.g.
http://192.168.2.2.
If you wish to set up an encrypted connection, enter https://... in the address
field of the Web browser.
¤ Press the return key.
A Web page opens with general information about the handset (see Handset status, page 79).
Notes:
– If the popup blocker is activated on the Web
browser, you must allow popups for this
Web page so that the Web configurator
pages can be displayed.
– The handset's IP address may change if you
have enabled the DHCP client during login
to the access point/WLAN router.
The handset's current IP address is displayed on the handset during the status
check (page 73).
Remedy:
¤ Establish a connection between the
handset and the WLAN router/access
point, for example by making a phone
call.
¤ Within one minute of ending the phone
call, try to access the handset using the
PC (via the Web browser or using
"Ping").
If access is possible, the handset is
working properly.
This means that the malfunction was
caused by the WLAN router/access point
(possible cause: "unclean" implementation of the Traffic Indication Bit feature).
If this is the case, please contact the
WLAN router/access point manufacturer.
The connection to the handset is established as soon as you click on one of the
menus in the menu bar (page 76).
What to do if there is no connection to the
handset
Version05.08.2005
It may be the case that you are unable to
establish a WLAN connection to your
handset using the PC even though the
handset is in idle status, i.e.:
u You can no longer access the handset
via your PC's Web browser (page 75).
u You do not receive any response to a
"Ping" on the handset (ping <handset
ip address>).
75
Gigaset SL75 WLAN / en / A31008-M700-B112-1-7619 / web_server.fm / 24.4.06
Configuring the handset via your PC
Structure of the Web pages
The Web pages contain the UI elements
displayed in the diagram below.
Navigation area
Title bar
Menu bar
Working area
Buttons
Figure 1 Structure of the Web pages
Title bar
The title bar contains the following information:
u Handset product name
u Language selection list
Menu bar
The Web configurator menus are offered
in the menu bar.
Version05.08.2005
The following menus are available:
u Status (page 79)
u Profile Wizard (page 80)
u User (page 80)
u Admin (page 80)
76
If you click on a menu, a list with the functions of this menu is displayed in the navigation area.
In addition, you can find the following
information in the menu bar on the right:
u name of the access profile currently
activated on the handset
u the handset's telephone number or SIP
address URI (max. 20 characters)
u the handset's current IP address
Gigaset SL75 WLAN / en / A31008-M700-B112-1-7619 / web_server.fm / 24.4.06
Configuring the handset via your PC
Navigation area
Working area
In the navigation area, the functions of the
menu selected in the menu bar (page 76)
are listed.
Making changes
In the Status, User, Admin menus
If you click on a function, the associated
page opens in the working area with information and fields for your inputs.
If a function is assigned subfunctions,
these are displayed with the function
as soon as you click on the function.
The relevant page for the first subfunction
is displayed in the working area.
In the Profile Wizard menu
You are guided through the menu. The
individual steps are also listed in the navigation area. The step you are currently
executing is highlighted. This is displayed
in black font.
The Home entry
The navigation area always contains the
entry Home .
If you click on Home, the current editing in
the working area is terminated and you
are switched back to the homepage (general handset information). The connection
to the Web configurator is terminated
Data that was not yet transferred to the
handset is lost.
The working area is where you make your
settings.
For configurable parameters, a field, a list
or one/several options are displayed.
u There may be restrictions regarding the
possible values for a field, e.g. entering
special characters or certain value
ranges.
If you want to import or export data,
you can enter the file name, including
the associated path, in this field. Alternatively, you can click on Browse.... The
Select file window opens. Select the
desired file and click on Open. The file
name, with the complete path, is copied into the field.
u To open a list, click on
. You can
choose between default values.
u To activate options, click on
or
.
Active options are marked with
or
.
Applying changes
As soon as you have made your change on
a page, activate the new setting on the
handset by clicking on Apply.
If your input in a field does not comply
with the rules for this field, an appropriate
error message will be displayed. You can
then repeat the input.
Caution:
Version05.08.2005
Changes that you have not saved on the handset are lost when you change to a different
Web page.
77
Gigaset SL75 WLAN / en / A31008-M700-B112-1-7619 / web_server.fm / 24.4.06
Using the Web configurator
Buffer
Navigating in Help:
In the Profile Wizard menu, changes are
buffered in the Web configurator. You can
switch between the Web pages of the
menu using the buttons (page 78) and
change settings, if required. When you finish the profile, the settings are saved in
the handset.
u Use the scroll bar at the side of the
Buttons
Buttons are displayed in the bottom row of
the working area. The function of the buttons changes according to the operating
situation.
The most important buttons are:
Button
Meaning
Help
Open (context-based) Help
Apply
Save inputs on the handset
Undo
Reset the changes made in
the Web page fields
For multi-level inputs
(Menu: Profile Wizard):
Next
Open next Web page
Back
Open previous Web page
Cancel
Exit Web page (Profile Wizard) without saving
For displaying lists
(e.g. list of access profiles)
Searching in Help
Click inside the Help window and press the
Ctrl and F keys. A search dialogue box is
opened. Enter the term you are looking for
and click on OK.
Using the Web configurator
Web configurator login
You can protect the handset and the Web
configurator against unauthorised access
by assigning a Handset PIN and/or an
Admin PIN (page 80).
If you have assigned PINs, you can only
access the functions of the menu concerned after entering the correct PIN.
New
Create new list element
Handset PIN request
Edit
Change list element
Clear
Delete list element
If a Handset PIN has been set, you will be
prompted to enter the Handset PIN after
you start the Web configurator and click
for the first time on one of the User or
Profile Wizard menus. Instead of the Handset PIN, you can also enter the Admin PIN.
Help
The Help button is available on every
Web page of the Web configurator.
¤ In the working area, click on Help.
Help is opened in a separate window.
Help information on the current Web
page is displayed.
Version05.08.2005
Help window to navigate in Help.
icon is displayed at the end of
each Help topic. Click on this icon to
change to the contents page at the
start of Help.
u If you click on an entry in the contents
page, the associated Help topic is displayed in the window.
u The
78
Admin PIN request
The first time you click on the Admin
menu, you must enter the Admin PIN if
one is set.
Gigaset SL75 WLAN / en / A31008-M700-B112-1-7619 / web_server.fm / 24.4.06
Web configurator menu
Setting the language
You can change the language via a list in
the title bar. The Web page is reloaded in
the selected language.
You can change the language setting
again on any page of the Web configurator.
Opening Web pages
An brief outline of the navigation to the
individual Web configurator functions is
given below.
Example: Setting ringer tones
User ¢ Handset Settings ¢ Ringer Tones
To open this Web page, proceed as follows
after starting the Web configurator and
logging in:
¤ Click on the User menu in the menu bar.
¤ Click on the Handset Settings function in
the navigation area.
The sub-functions of Handset Settings
are displayed in the navigation tree.
¤ Click on Ringer Tones.
Closing the Web configurator
When you terminate the connection to the
Web configurator, the handset is released
again.
You can terminate the connection in the
following ways:
u Click on User / Admin ¢ Logout.
u Click on the Status menu. Logout is executed automatically.
The handset status is displayed.
Warning:
Version05.08.2005
Always end the connection to the Web configurator as described above. If you close the Web
browser without ending the connection, for
example, the handset may become locked for
a few minutes.
Web configurator menu
Status
General information on the Handset and
the File System of the handset is displayed.
Handset status
Status ¢ Handset
The following information is displayed:
Handset Name (page 68)
Handset State
Possible values:
Idle
The handset is in idle status. You can
access the Web configurator and make
settings.
Active
You cannot access the Web configurator at present because the handset is
not yet in idle status (e.g. because a call
is currently being made) or a different
user is accessing the handset's Web
configurator.
Rebooting
The handset is rebooted, e.g. because a
firmware update was initiated. You can
only access the Web configurator once
the reboot has finished, i.e. once the
status changes to Idle.
MAC Address
The handset's device address.
Firmware Version
Version of the firmware currently
loaded. Using the Web configurator,
you can load updates onto the handset.
Any firmware updates are available on
the Internet. (page 103).
Hardware Version
Handset device version.
79
Gigaset SL75 WLAN / en / A31008-M700-B112-1-7619 / web_server.fm / 24.4.06
Securing the handset with PINs
File system status
Status ¢ File System
Pictures (screen pictures, photos, animations), ringer tones, certificates and the
Email lists are stored in your handset's file
system.
The amount of memory remaining in the
file system and the space taken up by pictures, ringer tones, certificates and Email
messages respectively, is displayed in
kByte.
Profile Wizard
The profile wizard "guides" you through
the process for creating new access profiles for the network access (page 90).
The navigation area contains the individual steps that must be executed to create
the profiles.
The basic settings for the WLAN and SIP
service access are checked.
If other information is required for the network access, you can add to the access
profile via the Admin menu (page 96).
Users
You can make user settings for the handsets via the User menu: PIN, audio and
display settings, ringtones and Email
settings. You can also import and export
ringtones and pictures.
The functions offered in the navigation
area are located in the menu overview on
page 24.
Admin
Via the Admin menu, you can:
Create and edit profiles for the network
access. In doing so, you can make additional SIP settings and call settings.
The functions offered in the navigation
area are located in the menu overview on
page 25.
Securing the handset
with PINs
You can protect your handset by means of
the Handset PIN and the Admin PIN.
Handset PIN
The Handset PIN is a 4-digit number combination. You can use the Handset PIN to
protect your handset against unauthorised access. The PIN is requested when
you switch the handset on. Only persons
who know your PIN can make calls with
the handset, change the handset settings
or access the directory via the PhoneBook
Manager.
On the Web interface, you are prompted
to enter the Handset PIN as soon as you
click on User or Profile Wizard in the menu
bar (page 78). No Handset PIN is set in the
default settings.
To set, delete or change the Handset PIN,
open one of the following Web pages:
u User ¢ Handset PIN
u Admin ¢ System Settings ¢ Handset PIN
Caution:
Version05.08.2005
The Admin PIN does not protect the handset
against unauthorised access.
You must therefore assign a Handset PIN and
change it regularly!
80
Gigaset SL75 WLAN / en / A31008-M700-B112-1-7619 / web_server.fm / 24.4.06
Handset settings
Admin PIN
The Admin PIN is a 1 to 10-digit number
combination. The Admin PIN is used to
protect the settings in the Admin menu.
The Admin Pin is requested when you try
to open the Admin menu of the Web configurator (page 78).
To set, delete or change the Admin PIN,
open the following Web page:
Admin ¢ System Settings ¢ Admin PIN.
Caution:
The Admin menu is not protected by the Handset PIN.
You must therefore assign an Admin PIN and
change it regularly!
Setting / changing the Handset PIN /
Admin PIN
¤ Open the relevant Web page (page 80).
¤ Click in the Handset PIN / Admin PIN field.
¤ Enter PIN.
¤ Click on Apply.
For security reasons, dots are displayed
instead of the PIN after the PIN is applied.
Deleting the Handset PIN / Admin PIN
¤ Open the relevant Web page (page 80).
¤ Click in the Handset PIN / Admin PIN field.
¤
The content of the field is deleted.
Click on Apply.
Note:
For how to set/change the Handset PIN on the
handset, see page 72.
Handset settings
Setting the audio parameters
You can adjust the handset's loudspeaker
volume and switch various advisory tones
on or off.
Adjusting the loudspeaker/headset/
handsfree volume
You can set the handset's loudspeaker volume and the handsfree and headset volume to eight different levels.
¤ Open the following Web page:
User ¢ Handset Settings ¢ Audio.
¤ Open the Handset/Headset Volume list in
the top of the Web page. Select the
handset earpiece and headset volumes.
¤ Open the Handsfree Volume list and
select the handsfree volume.
¤ Click on Apply.
Note:
For how to make the setting on the handset,
see page 69.
Activating/deactivating advisory tones
Your handset uses ‘advisory tones’ to tell
you about different activities and statuses.
The following advisory tones can be activated/deactivated independently of each
other.
u Key Click
u Acknowledge Tones
u Battery Warning
u Weak Signal Warning
Note:
Version05.08.2005
For more information on the individual advisory tones, see page 71.
81
Gigaset SL75 WLAN / en / A31008-M700-B112-1-7619 / web_server.fm / 24.4.06
Handset settings
¤ Open the following Web page:
User ¢ Handset Settings ¢ Audio.
u Click on the On / Off option for Key Click /
¤
¤
Acknowledge Tones / Battery Warning /
Weak Signal Warning.
Open the Volume list and select the volume for the activated advisory tones.
The volume of the key click cannot be
adjusted.
Click on Apply.
Note:
You can also activate/deactivate the advisory
tones on the handset (page 71).
Setting the ringer tone volume
and melody
You can configure the ringer tone volume
and the melody individually.
Different ringer tones can be set for the
following functions:
u External Calls: For all calls
u VIP Calls: For VIP calls (page 34)
u Anniversary: For anniversary reminder
calls (page 36)
u Alarm
You can choose between five different volumes and the "crescendo" setting.
Version05.08.2005
When the handset is supplied, standard
ringer tones are stored on the handset. In
addition, you can load your own melodies
onto the handset from your PC (page 87)
and use them as your ringer tone.
82
Note:
Your handset features integrated software that
allows you to play back various melodies in
.WAV, .MIDI format etc. Optimum playback
cannot be guaranteed for all melodies that you
transfer to the handset. It may not be possible
to play back melodies at all.
You should therefore check your own melodies
to make sure that they play back OK before setting them as ringtones.
The best playback results are achieved with
melodies that have been scanned at max.
8 kHz.
Please check one of the websites detailed
below regularly for software updates:
www.siemens.com/gigasetcustomercare
You may find a software update on one of
these websites that will allow your handset
to provide optimum playback for melodies
scanned at a higher frequency too.
¤ Open the following Web page:
User ¢ Handset Settings
¢ Ringer Tones.
¤ For External Calls / VIP Calls /
¤
¤
Anniversary / Alarm, open the Tone list
and select a ringer tone.
Open the Volume list in each case and
select the volume.
Click on Apply.
Note:
For how to make the setting on the handset,
see page 70.
Gigaset SL75 WLAN / en / A31008-M700-B112-1-7619 / web_server.fm / 24.4.06
Handset settings
Setting the display features and
display language
You can change the following display settings:
u the handset name
u the display language
u the wallpaper displayed when the
handset is in idle status
u brightness and contrast
¤ Open the following Web page:
User ¢ Handset Settings ¢ Display.
Changing the Handset Name
The currently set handset name is displayed in the Handset Name field. You can
change the name.
¤ In the Handset Name field, enter any
desired name (max. 16 characters).
The name can consist of letters, numbers and special characters.
The Handset Name is displayed in the handset's idle display.
Note:
For how to make the setting on the handset,
see page 68.
Changing the display language
You can display the display text on the
handset in various languages.
¤ Open the Language list and select the
language to be used for the display text
on your handset.
Note:
Version05.08.2005
For how to make the setting on the handset,
see page 67.
Setting/changing the screen picture
You can display a screen picture when the
handset is in idle status.
A standard screen picture is stored in the
handset when it is supplied. You can also
select the following items for use as the
screen picture:
u your own pictures, loaded onto the
handset from your PC (page 87)
u photos you have taken with the integrated camera
¤ Click on Yes to activate the screen picture. If you do not wish to display any
screen picture, click on No.
¤ Open the Wallpaper list and select an
image as the screen picture.
¤ If necessary, click on Preview. The
selected image is displayed in a new
window.
Notes:
– The picture is not displayed in certain situations, e.g. during a call or if the handset is
not logged in.
– Animated Gif files cannot be used as logos.
– For how to make the setting on the handset, see page 68.
Changing the contrast, brightness
¤ Open the Contrast / Brightness list and
select value (1–9).
Setting the colour scheme
¤ Open the Colour Scheme list and select
colour scheme.
Setting night mode
If the handset is in the charging cradle, the
display is dimmed. If this bothers you, you
can set the handset to night mode. The
display is then (completely) dark when the
handset is in the charging cradle.
¤ For Night Mode, click on the On / Off
option.
83
Gigaset SL75 WLAN / en / A31008-M700-B112-1-7619 / web_server.fm / 24.4.06
Handset settings
Setting the camera
¤ If a distinction is made between sum-
You can set the picture quality (resolution), brightness and white balance for
the integrated camera.
¤ Open the following Web page:
User ¢ Camera Settings.
¤ For Quality, click on the option Normal or
¤
High.
¤ For Brightness, click on the option
¤
Normal or High.
¤ For White Balance, click on the option
Setting the date and time manually
¤ Click on the Manual option.
¤ Enter the time and date in the Local
¤
Automatic, Indoor or Outdoor.
Click on Apply.
Note:
For how to make the setting on the handset,
see page 44.
Setting the date and time
There are two ways to set the date and
time:
u You can either set the date and time
manually.
u Or you can activate an SNTP server
(time server). The date and time are
periodically updated by the server
automatically.
¤ Open the following Web page:
Admin ¢ System Settings
¢ Time and Date.
General settings
¤ Select your time zone in the Time Zone
Offset (hh:mm) area. The time zone specifies the difference between standard
time (not summer time) and Coordinated Universal Time (UTC). This information is relevant for time-dependent
operations in the Internet.
Version05.08.2005
mer and standard time in your time
zone, you must activate the On option
in the Daylight Saving Time area when
the time switches to summer time, or
the Off option when the time switches
to standard time.
In the Time Display Mode area, specify
whether you wish the time to be displayed in 12 or 24-hour mode.
Click on Apply.
84
Time (hh:mm) and "Date (day, month, year)"
fields.
If you wish to display the time in
12-hour mode (Time Display Mode,
page 84), you should also select
a.m. (for morning) or p.m. (for the afternoon).
Note:
You can set the display format for the date
("day/month/year" or "month/day/year") on the
handset, see page 67.
Copying the date/time automatically from
the SNTP server
¤ Click on the SNTP option.
¤ Enter the IP address/name of the time
server in the SNTP Server Address field.
The time and date are automatically
updated by the time server.
Notes:
– If you set the date and time on the handset,
these settings will be overwritten during
the next synchronisation with the time
server.
– If the date and time are updated by a time
server, find out if the time server already
takes into account the time deviation from
Coordinated Universal Time and summer
time. In this case, you must enter 00:00 in
Time Zone Offset (hh:mm) and deactivate
Daylight Saving Time.
Gigaset SL75 WLAN / en / A31008-M700-B112-1-7619 / web_server.fm / 24.4.06
Handset settings
Selecting the regulatory domain
In the list, select the WLAN frequency
usage regulation (FCC or ETSI) that is
applied in the country in which you are
using the handset.
Depending on your selection, you can
choose between radio channels 1 to 11
(FCC) or 1 to 13 (ETSI) for radio transmission in your WLAN (page 98).
Warning:
Note the regulations that apply in your country
and only use the radio channels permitted
there.
Making Email settings
In order for you to send and receive Email
messages using your handset, you need to
store the addresses/names of incoming
and outgoing Email servers, plus user data
for authentication, in the handset.
Note:
For how to make the setting on the handset
and what requirements there are of your Email
service, see page 45.
Version05.08.2005
Specifying incoming Email server and
access data
Before you can receive Email messages,
you must make the following settings.
¤ Open the following Web page:
User ¢ Email Settings
¢ Incoming Email.
¤ Enter the address/name and port
number of the POP3 server in the
Incoming Email Server and Port fields.
¤ Enter the account name and password
for your Email account in the Authentication Name and Authentication Password
fields.
Instead of Authentication Name / Authentication Password, providers often use the
designations Account Name / Password
and Login Name/Password.
¤ Click on Apply.
Specifying outgoing Email server and
access data
Before you can send Email messages, you
must also make the following settings.
¤ Open the following Web page:
User ¢ Email Settings
¢ Outgoing Email.
¤ Enter the address/name and port
number of the SMTP server in the
Outgoing Email Server and Port fields.
¤ In the Your Email Address and Your Name
fields, enter your own Email address
and the name that is to be displayed in
the Email message recipient's "From"
field.
¤ Specify in the Authentication area the
manner of the log on with the outgoing
Email server. Choose between the following options:
– The handset logs on with the same settings as my incoming mail server.
– Before sending, the handset establishes a connection with the incoming Email server to authenticate
itself (option to incoming mail server
before sending mail).
– The handset logs on with different settings. Enter these in the User Name
and Password fields.
¤ Click on Apply.
Activating/deactivating automatic
Email check
You can start a check for new Emails on
the handset manually (page 48). However, you can also configure the handset
so that it automatically checks for new
Email messages at certain time intervals.
¤ Open the following Web page:
User ¢ Email Settings
¢ Advanced Settings.
¤ If necessary, activate the Periodic check
for new Email option and enter the time
interval for the automatic check in minutes in the Periodic Check Time (in min.)
field (number between 10 and 1440).
85
Gigaset SL75 WLAN / en / A31008-M700-B112-1-7619 / web_server.fm / 24.4.06
Handset settings
¤ Click on Apply.
Note:
If errors occur during the connection setup to
the incoming Email server or when transferring the Email messages, a corresponding
error message will be displayed. It is displayed
if you click on the f message key. Confirm
the message by clicking on §OK§.
Controlling the scope of the receipt of
Emails
In order to avoid memory bottlenecks,
your handset is configured so that a maximum of 99 messages can be received per
Email check. The handset stores up to 99
Kbytes of each Email message received.
You can change the maximum number
and size.
¤ Open the following Web page:
User ¢ Email Settings
¢ Advanced Settings.
¤ In the field Maximum size to be received
¤
¤
(kBytes), state the maximum size in
kByte of each received Email that is to
be stored in the handset. Specify a
value between 1 and 99.
Enter the maximum number of messages that the handset should receive
per Email check in the Number of most
recent messages to be fetched field. You
can enter a value between 1 and 99.
Click on Apply.
Saving messenger access data
Version05.08.2005
In order for you to use your handset's messenger to go online and chat on the Internet (page 53), you must save the address
of the messenger server and your access
data on the handset via the Web configurator. The handset uses this data to establish a connection.
86
You can determine a Ressource name and
a Priority for your handset. Both are
required if you are logged in (online) with
the messenger server with several devices
(WLAN handset, desktop PC and notebook) at the same time using the same
User ID.
The name is used to distinguish between
the devices. The handset cannot log in
with the messenger server if it does not
have a resource name.
You should assign a Priority, because each
message is only sent to one device per
user ID. The Priority decides which device
receives the message.
¤ Open the following Web page:
User ¢ Messenger settings.
¤ Specify the IP address or DNS name of
¤
¤
¤
the messenger server you are registered with for instant messaging in the
Messenger Server field.
Enter the user ID and password with
which you are registered with the messenger server in the User ID and
Password fields.
Specify a name and the priority for your
WLAN handset in the Ressource and
Priority fields. Select a number between
1 (highest priority) and 9999 (lowest
priority) for the priority.
Click on Apply.
Importing/exporting
ringtones/pictures
You can transfer your own ringer tones,
pictures (screen pictures) which you have,
for example, downloaded from the Internet, from your PC to the handset and use
them there.
Likewise, you can save ringer tones and
pictures (screen pictures, photos etc.)
from your handset to your PC.
Gigaset SL75 WLAN / en / A31008-M700-B112-1-7619 / web_server.fm / 24.4.06
Handset settings
The following file formats are supported:
u Ringer tones: MIDI, SP-MIDI, iMelody,
WAV
u Pictures: JPEG, BMP, GIF, PNG (up to a
colour depth of 24 bit per pixel),
WBMP (128 × 128)
¤ Open the following Web page:
User ¢ Transfer ¢ Ringer Tones /
Pictures.
Loading a ringer tone/picture onto the
handset
¤ In the corresponding field, enter the
file name, including the complete path,
or click on Browse... and select the file.
¤ Click on Import.
The ringer tone/picture is saved on the
handset.
Transferring a ringer tone/picture to your
PC
¤ Open the list and select the ringer tone/
picture in your handset.
¤ Click on Export.... A browser-specific dialogue box is opened.
¤ Select a folder in the PC and change
and save the name if necessary.
Note:
Depending on the Web browser, the standard
program configured on the PC for music playback/picture display (for example, Windows
Media Player) will be opened instead of the
save dialogue. Then you can save the ringtone
on your PC using this program.
Deleting a ringer tone/picture
¤ Open the list and select ringer tone/picture.
¤ Click on Clear.
The ringer tone or picture is deleted from
the handset's file system.
Importing/exporting SIP
provider files
You can download files containing the
general SIP access data for your SIP provider from the Internet onto your PC and
copy them to your handset. These SIP provider files must be in *.pvd or *.tar format.
You do not have to record this SIP access
data yourself during profile creation. They
are copied from the file.
Note:
Siemens provides files with SIP access data on
the website at: www.siemens.com/gigasetcustomercare. It is recommended that you only
use these tested SIP configuration files.
If you have recorded the SIP access data
yourself using the Web configurator (e.g.
because there is no SIP provider file for
your SIP provider), you can save the data
in your own SIP provider file on the handset (page 87) and save this file on your PC.
¤ Open the User ¢ Transfer ¢
SIP-Provider Web page.
Loading the SIP provider file onto the
handset
¤ Enter the name of the SIP provider file
on the PC incl. complete path or click
on the Browse... button and select the
file.
¤ Click on Import.
The file is copied onto the handset and displayed in the Provider list when you make
the SIP setting for a network access profile
(page 94)
Transferring a SIP provider file to the PC
¤ Open the list and select the handset's
Version05.08.2005
¤
¤
SIP provider file.
Click on Export.... A browser-specific
dialogue box is opened.
Select the folder on the PC and save the
file.
87
Gigaset SL75 WLAN / en / A31008-M700-B112-1-7619 / web_server.fm / 24.4.06
Handset settings
Deleting a SIP provider file
¤ Open the list and select the SIP provider
file.
¤ Click on Clear.
The file is deleted from the handset.
Backing up/restoring the
directory
You can save your handset's directory in a
file on your PC, i.e. you can create a
backup copy of your directory. You can
then restore the directory to your handset
e.g. after accidentally deleting it.
Caution:
If you import the backup file for a directory, the
directory currently stored in the handset will
be overwritten.
Backing up the directory in a file on the PC
¤ Open the following Web page:
User ¢ Transfer ¢ Directory.
¤ Click on Backup.... A browser-specific
dialogue box is opened.
¤ Enter and save the folder and file name
for the backup file.
The directory is stored in the PC in a "tar"
format file.
Restoring the directory
¤ Click on Browse....
¤ Select the backup file (*.tar) from
which the directory is to be restored.
¤ Click on Restore.
The imported directory replaces the one
currently stored in the handset.
Note:
Version05.08.2005
The voice patterns saved for voice dialling are
also saved in the backup file.
88
Making call settings
You can activate/deactivate Call Waiting
and Easy Answer and set up the network
mailbox.
¤ Open the following Web page:
User ¢ Call Settings.
Activating/deactivating Call Waiting/
Easy Answer
¤ For Call Waiting / Easy Answer, click on
On / Off.
Notes:
– For how to process a waiting call, see
page 33.
– For more information on Easy Answer, see
Easy Answer page 69.
Setting up the network mailbox
Many SIP providers offer you a network
mailbox which accepts calls in your
absence.
You can save the number for your network
mailbox on your handset. You can then listen to your network mailbox by pressing
and holding the 1 key on the
handset(page 31).
¤ Enter the number of the network mailbox in the Network Mailbox field.
¤ Click on Apply.
Improving the quality of the
telephone connections
With VoIP, the quality of your telephone
connections is essentially influenced by
the following factors:
u Execution time of voice and signalling
packets between the sender and recipient
u Silence Suppression
Gigaset SL75 WLAN / en / A31008-M700-B112-1-7619 / web_server.fm / 24.4.06
Handset settings
Notes:
– Increasing the voice quality is usually also
associated with an increase in the bandwidth required.
– The values for the voice quality are set at
the factory to ensure the voice quality is
generally acceptable. You should therefore
only change the preset values if the voice
quality seems to you to be too poor or if you
wish to reduce the bandwidth required at
the expense of the voice quality (e.g. for
parallel connections to the Internet).
With Silence Suppression activated, hardly
any data packets are transmitted from the
sender during pauses in the conversation.
At the recipient's end, "synthetic" noise is
created instead during pauses, which is
intended to replace the background
noises.
Silence Suppression saves transmission
capacity, but can reduce the voice quality.
Execution time of voice packets
Setting the voice quality
The execution time determines the delay
between the sender speaking and the
recipient hearing what has been said. A
long delay is experienced as disruptive
when making calls. The execution time
consists of the following:
u the time required to digitalise the
voice, to packetise it into data packets
and to convert the voice packets into
voice. You can influence the time
required through the choice of Codec
(coder-decoder) used.
Both parties involved in the telephone
connection (caller/sender and recipient) must use the same Codec. The
Codec is negotiated between the
sender and the recipient when establishing a connection.
u The time the voice packets spend in the
Internet, essentially consisting of the
time the voice packets wait in the SIP
routers when there is heavy traffic. To
improve the waiting time, you can
request preferred handling of the data
packets in the Internet – a Quality of
Service – and reduce the size of the
voice packets (RTP Packet Size). Large
packets generally mean a longer execution time.
Version05.08.2005
Silence Suppression
¤ Open the following Web page:
Admin ¢ Audio Settings.
¤ Open the Codec list and select Codec.
¤
¤
¤
G.711 (default setting), G.723,
G.729A/B and G.722 are available for
selection. For information on the
Codecs, see the Online Help for the
Web configurator.
Open the RTP Packet Size list and select
the packet size.
If relevant, click on Silence Suppression
to activate the function.
Click on Apply.
Note:
If you select a Codec as "preferred" and the
receiving device does not support this Codec,
then a different Codec (lower quality) is negotiated. The connection is established.
If you select a Codec as "only" and the receiving device does not support this Codec, the
connection is not established. An appropriate
message will be displayed on the handset.
89
Gigaset SL75 WLAN / en / A31008-M700-B112-1-7619 / web_server.fm / 24.4.06
Creating/managing access profiles
Setting the Quality of Service
Quality of Service means the prioritisation
of data packets on the Internet. The Quality of Service classes listed below are possible. The order of the list corresponds to
the priority level (low to high):
u Best Effort (no prioritisation; default setting)
u Assured Forwarding 1 to Assured Forwarding 4 with drop preference Low, Medium,
High
u Expedited Forwarding (high priority; reservation of a minimum data throughput rate/bandwidth)
You can request the Quality of Service
classes for voice data and signalling separately.
Notes:
– For more information on the Quality of
Service classes, see the Online Help for the
Web configurator.
– Whether or not a higher Quality of Service
class will actually improve the quality of
your telephone connection depends on the
IP network behind your access point.
– Your VoIP provider will be able to answer
any further questions on this subject.
¤ Open the following Web page:
Admin ¢ Quality of Service.
¤ Open the DSCP Class for Voice /
¤
¤
DSCP Class for Signalling lists and select
Quality of Service.
If relevant, set Drop Preference Levels for
Voice / Drop Preference Levels for Signalling to Low, Medium, High.
Click on Apply.
Creating/managing access
profiles
There are two ways of creating access profiles:
u using the profile wizard, or
u via the Admin menu (Expert mode)
The access profiles saved via the Web
interface are saved on the handset. You
can edit the saved access profiles on the
handset or in the Web configurator via the
Admin menu.
Note:
For how to create/administer access profiles on
the handset, see see page 59.
Creating an access profile with
the profile wizard
The profile wizard guides you through the
following configuration steps:
u Defining the name of the access profile,
u Assigning the handset IP address automatically/manually,
u WLAN settings: entering the SSID,
u WLAN security: setting encryption and
authentication,
u Making SIP settings, and
u Finishing the access profile.
The Web pages for all configuration steps
are displayed in the navigation area. The
current Web page is in the foreground.
Note:
Version05.08.2005
The settings are buffered in the profile wizard.
Only once you have finished the access profile
are the settings saved on the handset.
90
Gigaset SL75 WLAN / en / A31008-M700-B112-1-7619 / web_server.fm / 24.4.06
Creating/managing access profiles
Using the profile wizard
Defining profile names
You can only switch between the Web
pages with the buttons:
¤ Click on Next to open the next Web
page.
¤ Click on Back to return to the previous
Web page (with effect from the second
Web page).
The profile name is displayed in the profile
overview on the handset (page 60).
¤ Enter any profile name (max. 32 characters).
¤ If required, copy profile areas from
other profiles (page 91).
¤ Click on Next.
Notes:
Note:
– You cannot switch between the Web pages
via the navigation area.
– If you click on Next, the completeness of
your entries is checked. If important information is missing, a corresponding error
message will be displayed. You should confirm the message and enter the missing
information.
– While you are using the profile wizard, all
other Web configurator functions are deactivated. You cannot switch between the
profile wizard and other functions.
Starting the profile wizard
¤ In the menu bar, click on Profile Wizard
to start the profile wizard.
The first profile wizard Web page (profile
name) is displayed. Proceed as described
below.
Note:
If you wish to end the profile wizard prematurely:
Click on Cancel.
Confirm the prompt.
All inputs are lost.
Version05.08.2005
¥
¥
Choose descriptive profile names from which
you can recognise the WLAN and SIP settings
for which the profile is valid, e.g.
"Anna_Office". This makes it easier to select a
profile from the profile overview on the handset.
Copying profile areas from saved profiles
You can save yourself from entering the
information again by copying settings
fully or in part from a saved profile, and
adapting them as required.
You have the following options:
u Copy IP and WLAN settings from a profile and/or
u Copy SIP settings from the same profile
or a different profile
¤ Open the Profile list and select the profile from which you wish to copy the
settings.
¤ Click on Next.
91
Gigaset SL75 WLAN / en / A31008-M700-B112-1-7619 / web_server.fm / 24.4.06
Creating/managing access profiles
Assigning IP address with/without
DHCP
If DHCP is enabled, the handset's IP
address is automatically assigned. If DHCP
is disabled, you must define the handset's
IP address manually. For more information
on assigning the IP address, see page 10.
Assigning an IP address automatically
with DHCP
¤ For DHCP Client, click on the Enable
option (DHCP is enabled by default).
¤ Click on Next.
For further information, see below:
"WLAN settings: entering the network
name" on page 92.
Defining the IP address manually –
Disabling DHCP
¤ For DHCP Client, click on the Disable
option.
Additional fields are displayed.
¤ Enter the respective IP addresses in the
Handset IP Address, Subnet Mask and
Default Gateway fields.
¤ Enter the IP addresses of the preferred
DNS server in the Primary DNS IP Address
and Secondary DNS IP Address fields, if
relevant. If you leave the fields blank,
the SIP provider uses its default DNS
server.
DNS (Domain Name System) enables the
assignment of IP addresses to domain
names. Thus, a domain can have several IP
addresses. A more reliable SIP connection
can then be established.
If you wish to guarantee which DNS servers are used, you can define the IP address
of the primary/secondary DNS server. The
definition of preferred DNS servers enables quicker troubleshooting when establishing calls.
Note:
If you define a primary/secondary DNS server,
you should select Transport Protocol TCP or
TLS for the SIP settings(page 96).
¤ Enter the domain name in the
Domain Name field.
¤ Click on Next.
Note:
You can obtain this information from your SIP
provider.
WLAN settings: entering the network
name
You can search for available SSIDs and
select an available network or enter the
SSID manually.
Note:
The network name must be the same for all
WLAN subscribers (page 9).
Copying available SSIDs
¤ Click on Scan.
¤ Select an SSID from the SSID Scan list.
The SSID is copied into the Network
Name (SSID) field.
Entering SSIDs manually
¤ Enter the name in the Network Name
(SSID) field.
Version05.08.2005
¤ Click on Next.
92
Gigaset SL75 WLAN / en / A31008-M700-B112-1-7619 / web_server.fm / 24.4.06
Creating/managing access profiles
WLAN security: configuring
encryption and authentication in
the WLAN
Open System option if no authentication
is to take place. Click on Shared Key if
the WEP key is to be used for authentication.
If required, set up authentication with
802.1x (page 93) or click on Next.
Encryption and authentication can be
defined for the WLAN in the access point,
(page 9).
¤
Note:
Setting up encryption with WPA
Encryption and authentication for the handset
must agree with the settings for the access
point.
Setting up an access profile without
encryption and authentication
¤ Check if the value None is selected in
the Encryption and Authentication lists
(default setting).
¤ Click on Next.
For further information, see below:
"Making SIP settings" on page 94.
Setting up encryption with WPA-PSK
¤ Open the Encryption list and select
WPA-PSK.
¤ Enter the WLAN key in the
Pre-Shared Key field.
For WPA-PSK encryption, you cannot set
up authentication with 802.1x. In the
Authentication list, therefore, None is
selected automatically.
¤ Click on Next.
Setting up encryption with WEP
¤ Open the Encryption list and select WEP.
Additional fields are displayed.
¤ For WEP Mode, click on the option 128
¤
Version05.08.2005
¤ For Authentication Mode, click on the
or 64 Bit to define the key length
(page 9).
In the WEP Key field, enter the WEP key
in ASCII or hexadecimal format. The
Web configurator recognises the format automatically.
If standard 802.1x with EAP type LEAP is
used for authentication, it is not necessary to enter a WEP key.
Notes:
– You can only use WPA in the WLAN if all
subscribers support WPA.
– WPA requires authentication with 802.1x.
¤ Open the Encryption list and select WPA.
¤ Set up authentication with 802.1x
(page 93).
Setting up authentication with 802.1x
¤ Open the Authentication list and select
802.1x.
Setting up authentication with LEAP/TLS
¤ For EAP Type, click on the LEAP / TLS
option. Additional fields are displayed.
¤ Enter the login and password for WLAN
access in the Login Name / Password
fields.
For authentication with TLS you also
require a certificate:
¤ Open the Certificate list and select the
certificate.
¤ If necessary, click on Validate Server
Certificate. With this option activated,
the handset checks the validity of the
server certificate received from the
access point.
Notes:
– To find out how to administer certificates in
the Web configurator, see Admin
Certificates (page 101).
– For authentication via certificates, the date
must be correctly set on the handset.
£
¤ Click on Next.
93
Gigaset SL75 WLAN / en / A31008-M700-B112-1-7619 / web_server.fm / 24.4.06
Creating/managing access profiles
Making SIP settings
Typical SIP settings see Figure 2.
You can save a file on your handset with
your SIP provider's general SIP access data
(page 87). This file is then offered to you
in a list. When you use the SIP provider
data from the file, you only have to enter
your personal access data for the SIP service (page 95).
Notes:
Version05.08.2005
Figure 2 SIP settings (example)
94
– You can obtain all the information required
for the SIP settings from your SIP provider.
For more information, see page 11.
– Files with SIP provider data may already be
available on your handset in the default settings.
Gigaset SL75 WLAN / en / A31008-M700-B112-1-7619 / web_server.fm / 24.4.06
Creating/managing access profiles
Selecting saved SIP providers
¤ Open the Provider list and select a pro¤
vider. The general SIP access data is
automatically applied.
Enter personal SIP access data (see
below).
Entering personal SIP access data
You must enter the following access data:
u Username: User ID
u Authentication Name: ID for authentication by the SIP provider, if relevant
u Authentication Password: Password for
authentication by the SIP provider
¤ If necessary, enter a name in the
Display Name field that is to be displayed
to the other party when you make a call
(page 27).
Note:
If you do not enter a name, your number will
be displayed.
¤ Click on Next.
Manually configuring the SIP provider
¤ If the Provider list is displayed, open the
list and select Manual.
¤ If necessary, enter the name of your SIP
¤
¤
Version05.08.2005
¤
provider in My Provider Name. The general SIP access data that you enter
below is then saved in a SIP provider file
on your handset. You can use this to
create further access profiles or to save
the file on the PC (page 87).
If the handset is connected to the Internet via a PABX, specify the type of PABX
in Server type.
For SIP Proxy, enter the IP address
(Enter IP-Address option activated) or
the computer name (Enter Name option
activated) and the Port.
Enter personal SIP access data
(page 95).
If you receive additional information from
your SIP provider, you can set up additional servers and carry out further SIP
settings:
u Set up separate registrar
u Set up a separate outbound proxy
u Activate required authentication
u Enter realm
u Select transport protocol
Setting up separate registrar
The registrar (registration server) assigns
the SIP-URI or IP address under which you
are currently registered to your personal
number. For many SIP providers, the SIP
server is also the registrar.
¤ If your provider uses a separate registrar, click on Yes in the Separate Registrar
Server area.
¤ Enter the IP address (Enter IP-Address
option active) or computer name (Enter
Name option active) and the Port.
Setting up a separate outbound proxy
An outbound proxy is required if the
access point's NAT conceals the handset's
IP address behind the public IP address of
the access point/router. The handset then
directs the connection request to the outbound proxy of your SIP provider, who
supplies your handset's data packages
with the public address.
¤ For Outbound Proxy, click on Yes.
¤ For Separate Outbound Proxy Server, click
on Yes if the outbound proxy is not the
same as the SIP proxy.
¤ Enter the IP address (Enter IP-Address
option activated) or the computer
name (Enter Name option activated) and
the Port.
95
Gigaset SL75 WLAN / en / A31008-M700-B112-1-7619 / web_server.fm / 24.4.06
Creating/managing access profiles
Making additional SIP settings
¤ For Authentication Required, click on Yes /
¤
¤
No if the Authentication Name has to be
entered for authentication with the SIP
provider.
Enter the name of your provider's security domain (SIP realm) in the Realm
field. This is often the same as the
name of the SIP proxy server.
Open the Transport Protocol list and
select the UDP, TCP or TLS protocol.
Which protocol you can use depends
on your SIP provider.
– The UDP transmission protocol is
slower during troubleshooting.
UDP shouldn't be used if you have
manually assigned the handset's
IP address and have defined a
Primary DNS IP Address / Secondary
DNS IP Address (page 92).
– Transmission protocols TCP and TLS
offer quicker and more reliable
transmission.
Saving the access profile and exiting
the profile wizard
¤ If relevant, click on Activate this profile if
¤
the handset is to use the newly created
access profile immediately.
Click on Finish. The access profile is
saved on the handset.
The profile wizard is concluded. To create
another access profile, start the profile
wizard again (page 91).
If you have clicked on Activate this profile,
the handset establishes a connection to
the WLAN/SIP provider of the new profile.
The connection to the Web configurator is
terminated.
Version05.08.2005
Caution:
If the network name (SSID) set for the new
access profile is different from the SSID on your
PC, the connection between the PC and handset can only be restored if you set the same
SSID on the PC.
96
Creating/editing the access
profile via the Admin menu
You can create and edit access profiles in
the Admin menu. Here, you can make settings that are not possible in the profile
wizard. These additional settings are not
necessary for basic operation.
Caution:
Only change the additional settings if you
have received corresponding information from
your SIP provider or if login to the WLAN
requires special settings.
¤ Open the following Web page:
Admin ¢ Network ¢ Profile Selection.
If you have already saved access profiles, a
list with the most important settings is displayed (s. Figure 3).
Using functions in the Admin menu
Several functions are available to you in
the navigation area for creating or editing
an access profile.
Calling up a function/opening Web page
There are two ways in which you can
switch between the Web pages of an
access profile:
u Via the Apply button. The changes are
saved in the handset. The Web pages
are opened one after the other.
u Via the navigation area:
Admin ¢ Network ¢ Profile Selection
¢ (Create new access profile / Edit
access profile from list) ¢ Profile
Name / IP Addresses / IP Routing / WLAN /
WLAN Security / SIP / SIP advanced
Caution:
Save your changes before you leave a Web
page. If you switch to a different Web page via
the navigation area, unsaved changes will be
lost.
Gigaset SL75 WLAN / en / A31008-M700-B112-1-7619 / web_server.fm / 24.4.06
Creating/managing access profiles
The profile name is displayed in the
header of the Web page. You can easily
check which access profile you are currently creating/editing. Example:
IP Addresses for profile "Office": you are
editing the IP addresses Web page for
the Office access profile.
Figure 3 List of saved access profiles in the Admin menu
Creating a new access profile
Entering/editing the IP address
created.
The Profile Name Web page is displayed
(page 97).
¤ Enable/disable DHCP and enter IP
¤ Click on New. A new access profile is
Editing a saved access profile
Requirement: You have already saved an
access profile.
¤ Click on the Edit button in the line of
the access profile that you wish to edit.
The Profile Name Web page of the saved
access profile is displayed (page 97).
Entering/editing a Profile Name
¤ Open the Profile Name Web page
(page 96).
¤ Enter the profile name (page 91).
¤ If required, copy settings from another
Version05.08.2005
profile (page 91).
¤ Click on Apply.
¤ Open the IP Addresses Web page
(page 96).
¤
address manually, if necessary. Proceed
as described on page 92.
Click on Apply.
Defining/editing the IP routing
Requirement: DHCP is disabled
(page 92).
If the WLAN network is in a subnet that is
connected to the Internet via other WLAN
or LAN networks, you can specify two
alternative routes here for transferring
data between the handset and the access
point to the Internet.
Route 2 is used if an error occurs on
Route 1 during data transfer.
Note:
By default, the handset transmits to the standard gateway (e.g. your router).
97
Gigaset SL75 WLAN / en / A31008-M700-B112-1-7619 / web_server.fm / 24.4.06
Creating/managing access profiles
¤ Open the IP Routing Web page
¤
¤
(page 96).
If relevant, enter IP addresses in the
Route 1, Mask 1, Gateway 1, Route 2,
Mask 2 and Gateway 2 fields.
Click on Apply.
Making/editing WLAN settings
¤ Open the WLAN Web page (page 96).
¤ Search for available SSIDs and select
¤ In the Fragmentation Threshold field,
¤
¤
available SSID (page 92) or enter name
in the Network Name (SSID) field.
You can also make the following WLAN
settings.
Notes:
– Only change the default settings if you
know that this is necessary.
– For more information on the following
parameters, see the Online Help for the
Web configurator.
¤ Open the Channel list and select chan-
nel. Which channels are offered
depends on the configured regulatory
domain (page 85).
Note:
The handset must use the same channel as the
access point, as otherwise it cannot establish
radio contact.
¤ Open the Output Power (in %) list and
select the transmission power.
¤ Open the Transfer Mode list and select
Version05.08.2005
¤
98
Mixed Mode or only 802.11b. If IEEE
802.11g is set as a fixed value at the
access point or WLAN router for the
transfer mode, you must set Mixed Mode
here.
Open the Transmission Rate list and
select Auto or a fixed value. The transmission rate is measured in data units
per unit of time (Mbit/s). The Transmission Rate depends on the selected
Transfer Mode. The possible transmission rates for the set Transfer Mode are
shown in the list.
¤
¤
specify the size at which voice packets
are to be fragmented.
In the RTS/CTS Threshold field, specify
the minimum packet size (in bytes), for
which an RTS (Request To Send) should
be sent.
If, to improve the signal strength, your
WLAN includes several access points
with the same SSID, specify the minimum value for the access point signal
strength in the Roaming Threshold field.
If the value is undershot, the handset
searches for an access point with a better connection quality and establishes a
connection to this access point.
For Preamble Type, click on the Long /
Short option. Note that the IEEE 802.11
standards demand preamble type Long.
Click on Apply.
Setting up encryption and
authentication in the WLAN
¤ Open the WLAN Security Web page
(page 96).
Setting up an access profile without
encryption and authentication
¤ Check that None is selected in both lists
(default setting).
¤ Click on Apply.
Setting up encryption with WEP, WPA or
WPA PSK
¤ Set up encryption (page 93).
¤ If relevant, set up authentication with
¤
802.1x (page 93).
Click on Apply.
Gigaset SL75 WLAN / en / A31008-M700-B112-1-7619 / web_server.fm / 24.4.06
Creating/managing access profiles
Making/changing SIP settings
¤ Open the SIP Web page (page 96).
¤ Make the SIP settings (page 94).
¤ Click on Apply.
Figure 4 Additional SIP settings (example)
¤ Open the SIP advanced Web page
(page 96).
Note:
You should only change the additional SIP settings if you have the appropriate information
from your SIP provider.
Making/changing additional SIP
settings
For an example of additional SIP settings,
see Figure 4.
¤ In the Local SIP Port and RTP Base Port
¤
¤ If your SIP provider supports a Message
Version05.08.2005
¤
Waiting Server, enter the IP address
(Enter IP-Address option activated) or
the computer name (Enter Name option
activated) and the Message Waiting Port.
If necessary, enter the IP address (Enter
IP-Address option active) or the computer name (Enter Name option active) and
the STUN server port in STUN-Server /
STUN-Port.
A STUN server (Simple Transversal of
UDP over NAT) is used as an alternative
to the outbound proxy server in order
to bypass the NAT or the firewall at the
access point/WLAN routers. STUN servers cannot be used with symmetric
NATs.
¤
¤
fields, enter the port numbers via
which your handset sends and receives
signalling or voice data.
In Session Timer (in sec.), enter the time
interval at which the handset should
send a request to the SIP server to
establish a session. The recommended
interval is 3600 seconds.
In Registration Timer (in sec.), enter the
time interval at which the handset
should repeat registration with the SIP
server or registrar. The recommended
interval is 3600 seconds.
Click on Apply.
99
Gigaset SL75 WLAN / en / A31008-M700-B112-1-7619 / web_server.fm / 24.4.06
Creating/managing access profiles
Activating/deleting access
profiles
If several access profiles are saved on your
handset, you can activate a different
access profile via the Web configurator.
You can delete access profiles that are not
active.
Open the Web page via the User menu:
User ¢ Profile Selection
Open the Web page via the Admin menu:
Admin ¢ Network ¢ Profile Selection
The list of saved access profiles is displayed with the most important settings
(s. Figure 5 in the User menu or see Figure
3 in the Admin menu).
Note:
You can only edit saved access profiles via the
Admin menu (page 96).
In the User menu, you can only activate or
delete access profiles.
Figure 5 List of saved access profiles in the User menu
Activating an access profile
Deleting an access profile
Requirement: You have already saved an
access profile.
¤ Click on Active in the line of the access
profile that is to be activated.
The handset establishes a connection to
the WLAN/SIP provider of the selected
access profile. The connection to the Web
configurator is terminated.
Requirement: The access profile is not
active.
¤ Click on the Delete button in the line of
the access profile that you wish to
delete.
That particular access profile is deleted.
Caution:
Version05.08.2005
If the network name (SSID) set for the new
access profile is different from the SSID on your
PC, the connection between the PC and handset can only be restored if you set the same
SSID on the PC.
100
Note:
To delete the last/only (and thus also active)
profile, delete the list of access profiles on the
handset (page 65) or log into the Web configurator as the administrator and reset the
default settings on the handset (page 102).
Please note that when resetting the default
settings, all handset and network settings, all
user data (directory, list of internal subscribers
etc.) and the handset PIN and Admin PIN are
deleted.
Gigaset SL75 WLAN / en / A31008-M700-B112-1-7619 / web_server.fm / 24.4.06
Using UPnP
Using UPnP
UPnP (Universal Plug and Play) allows
other UPnP-enabled WLAN subscribers
access to the handset configuration data
and allows the handset to use the services
of other WLAN subscribers.
Note:
If you wish to use UPnP, DHCP must be enabled, i.e. you must not assign a fixed IP address
to the handset (page 92).
¤ Open the following Web page:
Admin ¢ Network ¢ UPnP.
¤ Activate UPnP Device, so that other
¤
WLAN subscribers can access the handset's configuration data. UPnP Device
must be activated if, for example, you
wish to access the directory with the
PhoneBook Manager.
Click on Apply.
Caution:
If UPnP Device is activated, other WLAN subscribers can access the handset. You must
therefore assign a Handset PIN and Admin PIN
before you activate this function. If you do not
wish to use the function, deactivate it.
Version05.08.2005
Importing/deleting
authentication certificates
Certificates are files that contain all relevant subscriber information for authentication in the WLAN. You need certificates
if authentication with TLS is set up in the
WLAN (page 93).
The certificates required for authentication in the WLAN are created by a certification server. Access authorisation for the
WLAN is monitored by an authentication
server.
You may need to save the following certificates relating to access to the WLAN on
the handset:
u WLAN client certificate
The (WLAN) client certificate identifies
the handset. The handset must transfer
the certificate on registration. Using
the client certificate, the authentication server checks the access authorisation for the WLAN.
u WLAN root certificate
u If the handset has registered using the
correct client certificate, the authentication server sends its server certificate
to the handset. The handset can
(optional) use the certificate to check
whether it has logged on to the correct
authentication server (in the correct
WLAN). The handset needs the WLAN
root certificate to do this. If the check
needs to be carried out (see Validate
Server Certificate, page 93), you will also
need to transfer the WLAN root certificate to the handset.
Please note: It is only possible to check
the server certificate if the WLAN root
certificate is available in cer format.
You must save the certificates on the PC
before import.
Importing a new certificate and updating
certificates
¤ Open the following Web page:
Admin ¢ Certificates ¢ WLAN Client /
WLAN Root.
¤ In the Retrieve a certificate field, enter
the file name, including the complete
path, or click on Browse... and select the
file (page 77).
¤ Click on Update.
The new certificate is stored on the handset.
Deleting a certificate
¤ Open the following Web page:
Admin ¢ Certificates ¢ WLAN Client /
WLAN Root.
¤ Open the Select a certificate list of saved
certificates and select a certificate.
¤ Click on Delete.
101
Gigaset SL75 WLAN / en / A31008-M700-B112-1-7619 / web_server.fm / 24.4.06
Resetting handset settings
The selected certificate is deleted.
Resetting handset settings
You can reset the handset in the following
ways:
u Reset handset to Factory Reset
u Clear all user data
u Reset User Settings
Note:
You should backup your handset configuration
in a PC file before resetting the handset
(page 103).
Factory settings
All handset and network settings (profiles), all user data (e.g. directory) and the
Handset PIN and Admin PIN are deleted.
After resetting, the handset is no longer
registered in any WLAN. The connection to
the handset's Web configurator is terminated and cannot be re-established.
¤ Open the following Web page:
Admin ¢ Factory Reset.
¤ Click on Reset.
The handset reboots automatically.
Deleting user data
Version05.08.2005
The following user data is deleted:
u Directory
u Calls list
u Last number redial list
u Email lists
u Imported data (ringer tones, screen
pictures)
102
All handset and network settings are
retained.
¤ Open the following Web page:
Admin ¢ System Settings
¢ Reset User Data.
¤ In the Clear all user data area, click on
Clear.
The handset reboots automatically. The
connection to the handset is terminated.
Deleting user settings
The following settings are deleted:
u Handset name
u Audio settings
u Display language, screen picture,
brightness, contrast, colour scheme,
night mode
u Call settings (network mailbox, call
waiting, easy answer)
u Input language for the T9 predictive
text function
u List type for calls list
u Setting for the preferred Codec
u Settings for date and time
u Alarm clock settings
u Assignment of function keys
All network settings and user data are
retained (page 102).
¤ Open the following Web page:
Admin ¢ System Settings
¢ Reset User Data.
¤ In the User Settings area, click on Clear.
The handset reboots automatically. The
connection to the handset is terminated.
Gigaset SL75 WLAN / en / A31008-M700-B112-1-7619 / web_server.fm / 24.4.06
Backing up the handset configuration in a PC file
Backing up the handset
configuration in a PC file
The handset's current configuration is overwritten.
If you have finished configuring your
handset and your handset is working in
the desired manner, you should back up
the configuration in a file on your PC.
You can then reload the configuration
onto your handset if, for example, an error
occurs, or if you wish to configure a different Gigaset SL75 WLAN handset in same
way you can load your backup configuration onto this handset. All handset settings are saved.
Loading a new firmware
version
Backing up configuration
You can find new firmware versions under:
www.siemens.com/gigasetcustomercare
¤ Open the following Web page:
Admin ¢ System Settings
¢ Backup and Restore.
¤ In the Backup area, click on Backup....
A browser-specific dialogue box opens
in which you can enter the name and
file directory of the backup file.
The current configuration is saved.
Caution:
During a data backup, the Handset PIN and
Admin PIN are also saved. During restoration
(loading the backup onto the handset) these
saved PINs become active again.
Loading the backup configuration onto the
handset
Version05.08.2005
Caution:
Requirement: You have saved a backup
file on the PC (see "Backing up configuration", page 103).
¤ Open the following Web page:
Admin ¢ System Settings
¢ Backup and Restore.
¤ In the Restore field, enter the file name,
including the complete path or click on
Browse... and select the file(page 77).
¤ Click on Restore.
The saved configuration is saved on the
handset. The handset reboots automatically. The connection to the handset is
terminated.
You can download new firmware versions
(updates) for your handset from the Internet. Updates are provided if there are new
or improved functions that you can use on
your handset.
Note:
¤ Download the current firmware version
from the Internet and save it on your
PC.
You can load the new firmware version
onto the handset.
Caution:
You should back up the configuration of your
handset in a PC file, before you load new
firmware onto the handset.
¤ Open the following Web page:
Admin ¢ Firmware Update.
¤ In the Firmware Download field, enter the
file name, including the complete path,
or click on Browse... and select the file
(page 77).
¤ Click on Update.
The firmware is loaded. The firmware is
automatically checked for validity after it
is successfully loaded onto the handset.
If the new firmware is valid, the old
version is overwritten. Updating can take
several minutes.
The handset reboots automatically. Your
connection to the handset is terminated.
103
Gigaset SL75 WLAN / en / A31008-M700-B112-1-7619 / web_server.fm / 24.4.06
Rebooting the handset
Rebooting the handset
If you cannot make changes, or if the
handset does not respond, you can reboot
it from the PC.
Caution:
Unsaved changes are lost.
¤ Open the following Web page:
Admin ¢ System Settings
¢ Handset Restart.
¤ Click on Restart.
The handset is rebooted. The connection
to the Web configurator is terminated
Diagnostics –
Checking connections
Version05.08.2005
Use ping tests to check the connection to
servers on the Internet and in the WLAN.
If, forexample, problems occur when
making calls, checking the network mailbox or when updating the time/date, you
can check if there is currently a connection
between the handset and the corresponding server on the Internet or in the WLAN.
¤ Open the following Web page:
Admin ¢ Diagnostics.
¤ Select the server from the Ping Test to
list. All servers currently saved on the
handset are shown in the list.
¤ Click on Ping to call up the server.
If the server cannot be reached, check the
address. If you have entered the DNS
name of the server, check if the DNS
server can be reached.
104
Other ping tests
¤ In the Other Ping Test area, enter the
¤
IP address (Enter IP-Address option activated) or the computer name (Enter
Name option activated).
Click on Ping to call up the server.
Gigaset SL75 WLAN / en / A31008-M700-B112-1-7619 / PC_software.fm / 24.4.06
PhoneBook Manager
(PC software)
The PhoneBook Manager software for
your PC can be found on the product CD.
The PhoneBook Manager offers the following options:
u Harmonise your handset's directory
with your PC address book.
u Control PC applications using the keys
on your handset.
u Have messages and notifications that
come to your PC transferred to the
handset.
Version05.08.2005
Harmonising the directory with the
PC address book
Using the Directories (page 109) function,
you can harmonise your handset's directory with the address book on your PC,
i.e. entries from the handset's directory
can be transferred to the address book on
your PC and contacts from the PC address
book can be transferred to the handset.
The simple transfer of individual address
book or directory entries gives you the following possibilities:
u You can create and manage a central
directory/address book on your PC
using Microsoft OutlookTM or Outlook
Express (Windows Address Book).
You can simply use drag & drop to
transfer entries in the central address
book to the handset.
u If you make changes in the handset's
directory, the changed/new entries are
highlighted on the PC interface. This
means that you can see at a glance
which entries you need to copy into the
central PC address book (using drag &
drop) in order to update the address
book.
u You can create distribution lists on the
PC with the contacts that you use on
the handset. In this way, you can
update your directory on the handset
"at the click of a button".
The PhoneBook Manager supports the
following address books:
u Microsoft OutlookTM as of Microsoft
Outlook 2002
u Outlook Express (Windows Address
Book) as of Internet Explorer Version
6,01
Remote control of PC applications
Using the Remote control function in the
PhoneBook Manager, you can remotely
control PC applications using the handset
keys.
For example, you can use your handset to
control the Windows Media Player application, to play back music (CD/DVD) or start/
stop internal radio, to adjust the volume
and to skip forwards or back etc.
You can use the PhoneBook Manager to
configure remote control on an individual
basis. You determine which PC functions
to control using the handset and which
handset keys to use for the appropriate
commands.
Remote control settings can be exported
to file and then imported into the PhoneBook Manager of a different PC (e.g. a laptop ). This allows you to control the application from the second PC in the usual
way without having to repeat all the
entries.
Note:
Using the handset, you can remotely control
all PC programs that can be operated using
keyboard shortcuts.
105
Gigaset SL75 WLAN / en / A31008-M700-B112-1-7619 / PC_software.fm / 24.4.06
Installing the PhoneBook Manager on your PC
Forwarding PC messages to the handset
The Message box (page 110) function in
the PhoneBook Manager forwards messages from your PC to your handset.
For example, you can have the error
messages relating to a lengthy procedure
started on the PC or notifications of Emails
received on the PC sent to your handset.
You can specify what type of message the
PhoneBook Manager should forward to
the handset (e.g. system messages, Email
notifications, all messages ) and in what
scope (message header, entire content,
maximum content length).
Note:
You may be able to download new software
versions with additional/enhanced functionality from the Internet. You can find further
information about this on the websites
detailed below:
www.siemens.com/gigasetcustomercare.
Installing the PhoneBook
Manager on your PC
System requirements
At least the following requirements for
installation must be fulfilled on your
PC before you can use the PhoneBook
Manager.
Hardware
u IBM AT-compatible Pentium III with 500
Version05.08.2005
u
u
u
u
MHz
128 MB RAM working memory
20 MB free disk space on the hard drive
CD or DVD drive
Screen resolution at least 800 x 600
pixels
106
Software
Operating system
Windows 2000 (Service Pack 4) or
Windows XP (Service Pack 2).
User rights
For the Windows 2000 and Windows XP
operating systems, you must be logged in
as a user with administrative rights before
carrying out installation. If necessary, contact your administrator.
Please note:
u If Gigaset M34 software is installed on
your PC, you must uninstall this first
(page 108).
u If the PhoneBook Manager or a predecessor product is already installed, this
software will be overwritten by the
new installation. To avoid errors, you
may wish to remove this before installing the new software (page 108).
u If a more recent version of the PhoneBook Manager is already installed on
your PC, you must uninstall this first
(page 108), otherwise the initial installation will be cancelled.
Installing the software
¤ Before installing the software, close all
programs which are currently open on
your PC.
You should also close programs whose
activity is only indicated by an icon in
the information area of the toolbar
(next to the clock) (e.g. antivirus software).
Gigaset SL75 WLAN / en / A31008-M700-B112-1-7619 / PC_software.fm / 24.4.06
Installing the PhoneBook Manager on your PC
Starting the installation wizard
¤ Insert the installation CD provided. The
¤
¤
setup wizard starts automatically.
The language selection window opens.
Select the language, if necessary.
Click on OK.
Note:
If the setup wizard does not start automatically:
Open the file explorer for your operating
system.
Select the CD drive.
Double-click on start_setup.exe.
¥
¥
¥
The Windows installation wizard, which
guides you through the installation, starts
up.
¤
you wish the software to be installed.
– Click on Continue to confirm the
default installation folder.
Or:
– Click on Change, to select the installation folder yourself. Use OK to confirm your selection.
Click on Continue.
Note:
Once you have started the installation, you can
no longer change the installation settings.
Click on Back to check the settings.
¤ Click on Install. The software is installed
on your PC.
Completing the installation
Selecting the installation settings
¤ If relevant, deselect the documents you
The installation takes place in several
steps in which you select the desired functions. After each step confirm your settings with Continue to continue with the
installation procedure. Use Back to return
to your previous selection.
¤ Click on Finish to complete the installa-
Note:
¥
¥
To cancel the installation, click on Cancel.
Click Yes to confirm the prompt.
All previous installation settings and, if relevant, all previously installed software components are deleted or removed.
¤ Click on Continue to start the installa-
tion.
The window for selecting the installation folder (target folder) may open.
This window is skipped if the PhoneBook Manager is already installed on
your PC for another Gigaset unit. The
software is then automatically installed
in the same installation folder.
Version05.08.2005
¤ If necessary, select the folder in which
do not wish to view immediately.
tion.
The following documents are offered:
u Readme files
After the installation has finished, the
current additional information on the
software is displayed.
u GPL/LGPL licences
After the installation has finished, the
GNU General Public License (GPL) and
GNU Lesser General Public License
(LGPL) are displayed (page 117).
u Operating instructions
After installation has finished, the CD
folder in which the operating instructions are saved is shown. You can open
the operating instructions in your own
language.
107
Gigaset SL75 WLAN / en / A31008-M700-B112-1-7619 / PC_software.fm / 24.4.06
Using the PhoneBook Manager
Reboot the PC
You will be prompted to restart your system.
¤ Click on Yes to reboot the PC.
After the PC has been rebooted, you can
use the PhoneBook Manager.
Possible problems during installation
In rare cases, the installation wizard may
cancel the installation. In this case, read
the ReadMe files on the CD. Reboot your
PC and try the installation again.
Note:
If the installation fails again, please contact
the Siemens hotline (page 116).
Uninstalling the software
Version05.08.2005
In the Windows toolbar, select:
Start ¢ Settings ¢ Control Panel
¢ Software
¤ Select software.
¤ Click Remove to uninstall the software.
¤ Click Yes to confirm the prompt.
The software is uninstalled.
You will be prompted to restart your system.
¤ Click on Yes to reboot the PC.
108
Using the PhoneBook
Manager
For more information on how to use the
PhoneBook Manager, see the Help files
and the operating instructions on the
product CD.
Starting PhoneBook Manager
In the Windows toolbar, select:
Start ¢ Programs ¢ Siemens PC-SW
¢ PhoneBook Manager
Interface elements
When first started, the PhoneBook Manager is opened with the default view.
This view is split into the following areas:
u The menu bar and toolbar contain not
only the Help, but also all commands
that are available for the respective
components.
u The menu tree (left-hand window)
shows all components of the PhoneBook Managers that have been
installed. This is where you select the
component you wish to use.
u In the working area (right-hand window), the configuration dialogue box
for the selected components is displayed. This is where you configure the
components and enter your data.
Gigaset SL75 WLAN / en / A31008-M700-B112-1-7619 / PC_software.fm / 24.4.06
Using the PhoneBook Manager
Opening Help
Managing the directory
The Help is available to help you set up
and use the PhoneBook Managers. You
can open the Help as follows:
¤ Click on the icon or press the F1 key.
You will receive Help information on
the current operating step.
¤ In the menu bar, click on Help and select
a software component. The Help
homepage is opened.
Use the table of contents on the left of the
Help window to navigate within the Help
files.
Use the arrows above or below the Help
texts (on the right of the Help window) to
scroll through the Help files.
Requirement: the handset must be registered with the Phonebook Manager.
¤ Select Gigaset S35/SL75 WLAN
¢ Directories in the menu tree.
¤ Select the PC address book (left hand
side) and the handset (right hand side)
from the working area.
The PC address book entries are shown on
the left hand side of the working area and
the handset directory entries are shown
on the right hand side.
You can now transfer entries from the PC
address book to the handset and vice
versa or create a distribution list.
Further information can be found in the
PhoneBook Manager Help documentation.
Registering the handset with the
PhoneBook Manager
You must select the handset for PC control
if you wish to use your handset to
remotely control PC applications and
receive Message Box messages.
Registering the handset
Selecting the handset for PC control
¤ Select Gigaset S35/SL75 WLAN
¢ Registration ¢ Register/De-register
in the menu tree and register the handset as described in the Help documentation.
The data required for registering the handset is saved on the PC, even after you close
the PhoneBook Manager. The next time
you start the PhoneBook Manager, the
handset is automatically registered, if it is
accessible.
Version05.08.2005
Configuring the PC control
The following requirements apply if you
wish to access the handset from the PC:
u You must have activated the handset as
a UPnP device(page 101) and
u you must have registered the handset
Requirement: the handset must be registered with the Phonebook Manager.
¤ Select Gigaset S35/SL75 WLAN
¢ Registration ¢ Use PC Services
in the menu tree.
¤ Select the handset from the list.
109
Gigaset SL75 WLAN / en / A31008-M700-B112-1-7619 / PC_software.fm / 24.4.06
Using the PhoneBook Manager
Configuring remote control
Configuring the Message Box
You can remotely control all PC applications that can be operated using keyboard
shortcuts.
¤ Select Gigaset S35/SL75 WLAN
¢ PC control ¢ Remote control in the
menu tree.
¤ Enter the PC applications for remote
control in the list.
¤ Click on the ? button next to the PC
application.
¤ Assign the keyboard commands for the
PC application to the handset keys.
Further information can be found in the
PhoneBook Manager Help documentation.
Specify which messages should be forwarded to the handset.
¤ Select Gigaset S35/SL75 WLAN
¢ PC control ¢ Message box in the
menu tree.
¤ Select the type of message.
¤ Select the scope of each message on
the handset (e.g. message header,
entire message or a certain length).
Further information can be found in the
PhoneBook Manager Help documentation.
Handset settings
You must assign the Connect to PC function
to one of the i/j function keys if
you wish to use the handset for remote
control purposes or for playback or recording (page 66).
Controlling the PC application using the
handset
Requirement: the PC and the handset are
registered in the same WLAN. The handset
has been selected for PC control
(page 109).
¤ Press the function key that has been
assigned the Connect to PC function.
The handset establishes a connection to
the PC. The PC applications that you have
configured for remote control are shown
in the handset display.
¤ Select the PC application and press §OK§.
The PC application is started. You can control this application using the handset
keypad.
Note:
Version05.08.2005
Note that your handset will be blocked to calls
for the duration of the connection.
110
Receiving messages on the handset
Requirement: the PC and the handset are
registered in the same WLAN. The handset
has been selected for PC control
(page 109).
The messages from the PC are saved in the
TnC Event list.
The f message key flashes if a new
message is received. The > icon and the
number of new messages appear in the
display.
¤ Press the f message key or select
the TnC Event list and press §OK§.
Closing the PhoneBook
Manager
¤ Select File ¢ Exit in the menu tree.
The PhoneBook Manager closes. All
entries are saved. Nothing needs to be
saved manually.
Gigaset SL75 WLAN / en / A31008-M700-B112-1-7619 / appendix.fm / 24.4.06
Care
Appendix
¤ Establish a connection to the handset's
Care
¤ Wipe the handset with a damp cloth
(do not use solvent) or an antistatic
cloth.
Never use a dry cloth. This can cause
static.
Contact with liquid
!
If the handset has come into contact with
liquid:
1. Switch the handset off and remove
the battery immediately.
2. Allow the liquid to drain from the handset.
3. Pat all parts dry, then place the handset
with the battery compartment open
and the keypad facing down in a dry,
warm place for at least 72 hours (not
in a microwave, oven etc.).
4. Do not switch on the handset again
until it is completely dry.
When it has fully dried out, you will
normally be able to use it again.
Troubleshooting - FAQs
You can find more tips and answers as well as
the current firmware for your handset on the
Siemens pages on the Internet:
www.siemens.com/gigasetcustomercare
Version05.08.2005
Handset no longer reacts or does not react
correctly
This may be caused by the changes made
to the handset settings.
The handset Web configurator contains
functions with which you can reset the
settings.
Web configurator using the PC
(page 75).
¤ Reset the user settings (page 102).
¤ If the handset still does not react, reset
the default settings on the handset
(page 102).
If the Web configurator is no longer accessible:
¤ Remove and refit the handset's battery.
The SSID of your access point is not
displayed
When searching for access points in the
handset's receiving range (§Scan§), the SSID
of your access point is not displayed.
Broadcasting of the SSID may be blocked
at the access point (it is "hidden").
¤ Change the setting at the access point
temporarily.
Or
¤ Enter the SSID manually (<Manual Config.> option during profile creation)
It is not possible to register in the WLAN
The access point is accessible (is displayed
during scanning) and you have created
and activated a profile for the access
point. Nevertheless, the handset displays
No Access Point.
Possible reasons:
u The access point is using access restriction through entered MAC addresses in
which your handset is not entered.
u The access point requires authentication with a certificate (802.1x with EAP
type TLS). The necessary certificates
are not saved on the handset.
u You may have entered the WLAN security settings incorrectly.
111
Gigaset SL75 WLAN / en / A31008-M700-B112-1-7619 / appendix.fm / 24.4.06
Troubleshooting - FAQs
Proceed as follows:
¤ Temporarily deactivate the security
settings of the access point/WLAN
router (no encryption, visible SSID, no
access list, DHCP server active).
¤ Press display key §Scan§ on the handset.
¤ Select Create new Profile and press §OK§.
¤ Select the SSID and press §OK§.
¤ Press display key §Save§ to save the new
profile.
¤ Briefly press the end call key a.
¤ Select Use exist. Profile and press §OK§.
¤ Select the new profile and press §OK§.
¤ Confirm the reboot now? display with
§Yes§ (press left display key).
If the handset is able to connect to the
access point after rebooting, you can
establish a connection to the handset's
Web configurator using your PC
(page 75).
¤ If necessary, load the certificates
required for WLAN access onto the
handset (page 101). Please note that
the root certificate must be in cer format.
¤ Create a profile with the WLAN/SIP settings (incl. WLAN encryption) on the
PC.
¤ Activate the profile (page 100).
¤ If necessary, enter the handset's MAC
address in the access table at the access
point.
¤ Reactivate the security settings at
the access point!
You can find the handset's MAC address
e.g. in the following menu: v ¢ Ð
¢ Status.
You are no longer able to connect to the
Web configurator
Version05.08.2005
If DHCP is active, the handset's IP address
may have changed. You can find the current IP address in the following menu: v
¢ Ð ¢ Status
112
The PhoneBook Manager on the PC
cannot access the handset directory
UPnP may be deactivated on the handset.
¤ Connect to the handset's Web configurator (page 75).
¤ Activate DHCP if necessary (precondition for UPnP).
¤ Activate UPnP.
Your PC is not able to connect to the
handset
You cannot establish a WLAN connection
to your handset from your PC even though
the handset is in idle status, i.e.:
u You can no longer access the handset
via your PC's Web browser.
u You cannot access the handset directory with the PhoneBook Manager.
u You do not receive any response to a
"Ping" on the handset (ping <handset
ip address>).
Remedy:
¤ Establish a connection between the
handset and the WLAN router/access
point, e.g. by making a phone call.
¤ Within one minute of ending the phone
call, try to access the handset using the
PC (via the Web browser, PhoneBook
Manager or "Ping").
If access is now possible, the handset is
working properly.
This means that the malfunction was
caused by the WLAN router/access point
(possible cause: "unclean" implementation of the Traffic Indication Bit feature).
If this is the case, please contact the WLAN
router/access point manufacturer.
Gigaset SL75 WLAN / en / A31008-M700-B112-1-7619 / appendix.fm / 24.4.06
Troubleshooting - FAQs
The handset is locked
External configuration is displayed on the
screen even though no connection has
been established to the Web configurator
or PhoneBook Manager.
Possible cause:
You previously ended the connection to
the Web configurator by simply closing
the Web browser. The handset may
remain locked for a few minutes.
¤ Always end a connection to the Web
configurator with Logout or by switching to the Status menu.
Your handset supports inband DTMF signalling for controlling the network mailbox. Some SIP providers require the use of
the G.711 or G.722 codec for remote control of the network mailbox. Therefore set
the handset's preferred codec if you experience control difficulties (page 89).
If you can still not control the mailbox,
your SIP provider may not support inband
signalling.
Possible causes:
u The ringtone on the handset is deactivated (Ú icon in the display, page 71).
u You have set your own melody, downloaded from your PC, which is not
played back correctly.
Your handset's firmware allows you to play
back melodies in .WAV, .MIDI etc. formats.
However, optimum playback is not guaranteed for all melodies that you load onto
the handset. It may not be possible to play
back melodies at all.
The best playback results are achieved
with melodies that have been scanned at
max. 8 kHz.
¤ Select a different ringtone.
¤ Test playback with your one of your
own melodies.
You may be able to find a firmware update
on the Internet that will allow your handset to provide optimum playback for melodies scanned at a higher frequency.
You are not able to "chat" using the
handset
The screen picture is not displayed or is
not shown correctly
You cannot control your network mailbox
Your instant messaging provider may not
support the handset's messenger client
and the associated protocol.
In this case, open an account with an open
Jabber server and enter this address in
your handset (page 86). Many of these
Jabber servers offer gateways to other
messenger servers (e.g. Yahoo!, MSN
etc.).
You can find a list of Jabber servers and an
overview of the gateways to other messenger servers on the Internet at http://
www.jabber.org.
Version05.08.2005
The handset does not ring or playback of
the ringtone melody is poor
The following restrictions apply for pictures that you have downloaded onto the
handset:
u The size of pictures in .bmp format is
not automatically reduced to the display size. You must reduce them on the
PC before loading them (max.
128 x 128 pixels).
u Pictures in .PNG format are supported
up to a colour depth of 24 bit per pixel.
u Animated graphics and individual
frames of animated graphics cannot be
used as screen pictures.
113
Gigaset SL75 WLAN / en / A31008-M700-B112-1-7619 / appendix.fm / 24.4.06
Performance optimisation
Despite entering a STUN server, voice
connections are one-sided or there are
problems with registration or you are not
accessible.
¤ Enable the SIP and RTP ports on your
router (e.g. with port forwarding).
If this does not help, the above-mentioned
case might involve an infrastructure with a
symmetric NAT. STUN servers, however,
can only be used with asymmetric NATs
and not blocking firewalls.
¤ Use an outbound proxy instead of the
STUN server.
Please ask your provider if they use such
an outbound proxy server.
Performance optimisation
The performance of your WLAN handset is
also dependent on the properties of the
infrastructure as a whole.
The following may impact performance:
u Wireless ADSL router
u DSLAM
u DSL transmission path
u Connection paths over the Internet
Performance includes, amongst other
things, voice quality, power consumption
and range.
Voice quality
Version05.08.2005
In VoIP networks, voice quality is affected
by " Quality of Service" (QoS, page 90) etc.
If the entire infrastructure demonstrates
QoS, voice quality is better (fewer delays,
less echoing, less crackling etc.).
If, for example, the wireless access point/
router does not demonstrate QoS, voice
quality is poorer as a result. QoS includes,
for example, TOS (Type of Service),
802.11e etc. Please see the specialist
documentation for further information.
114
Power consumption
Long standby and talk times can be
achieved if, for example, the WLAN router/
access point already boasts the WMMTM
(Wi-Fi Multimedia) feature and you are
able to change the DTIM value on the
router/access point (value 5 is recommended, for example). WMM primarily
influences the talk time, changeable DTIM
values mainly affect the standby time.
If an access point does not support WMM
and changeable DTIM values, the standby
and talk times can be more than halved. In
addition, the handset can become warm
around the display. We therefore recommend an access point that supports the
features mentioned above.
Please refer to the device manufacturer's
user guide or Web pages and/or find out
about software updates for the access
points.
Other factors that can affect standby and
talk times include:
u The field strength where the handset is
located
The further away the handset is from
the WLAN router/access point, the
shorter the standby and talk times.
The handset discharges particularly
quickly if it is outside the range of the
WLAN router/access point for a lengthy
period of time, i.e. it has practically
ceased to be "registered" on the WLAN
router/access point.
u Display illumination (page 69)
The more frequently the display is
activated, e.g. when making directory
entries, and the longer the periods of
activation, the shorter the standby
time.
u Vibrating alarm (page 70)
The standby and talk times are reduced
if the vibrating alarm is activated.
Gigaset SL75 WLAN / en / A31008-M700-B112-1-7619 / appendix.fm / 24.4.06
Performance optimisation
u Volume setting (page 69)
The higher the phone/handsfree/ringtone volume, the shorter the standby
and talk times.
u Codec/RTP packet length (page 89)
The shorter the packet length, the
shorter the standby and talk times.
The handset requires more power for
a Codec G.711 with 10 ms RTP packet
length than for a G.711 with 20 ms
packet length.
Other influencing factors include the temperature and environmental conditions.
Version05.08.2005
Range
The range of your WLAN handset is highly
dependent on the environment in which
you use it.
Factors that can significantly reduce the
range include reinforced concrete constructions, underfloor heating, plants,
other electrical devices as interference
(e.g. old microwaves).
The range for a WLAN handset is less than
that with a WLAN card for a PC. WLAN
cards are generally only used for data
operation. With data operation, packet
losses are permissible under certain conditions. In voice operation, however, there
are higher requirements. The WLAN network or coverage at home must be correspondingly better. For voice, the "field
strength" at the location of the WLAN
handset must be 15 - 20 dBm better than
for data operation (guide value). For reasonable voice operation, the field strength
(connection quality) at the WLAN handset
should therefore be at least -70 dBm. The
current connection quality is displayed in
the Web configurator's profile overview
(e.g. User ¢ Profile Selection).
In general you can increase the range of
your WLAN handset by using repeaters.
However, there may be performance
losses (e.g. crackling, cut-outs etc. during
roaming). Not all repeaters allow for clean
voice operation.
You may have to install a second access
point with the same SSID and the same
radio channel to increase the range. Your
WLAN handset can switch between the
access points without breaking the connection (roaming).
Comments
u The DTIM value determines when and
how often devices in a WLAN network
can be activated – in order to increase
the standby time of mobile devices.
The DTIM value is always a multiple of
the (TIM) beacon interval and should
be set to 5 for a beacon interval of
100 ms.
The standby and talk times are reduced
significantly if old WLAN routers/access
points that do not yet have this feature
are being used. It may be a good idea
to ask your manufacturer about a
firmware update (or visit the manufacturer's website).
u The standby time refers to the time during which the handset is completely
idle (no phone calls, no user action
such as creating directory entries etc.).
The talk time refers to the length of
time for which you can talk on the
phone. Both of these times depend on
the charge status of the battery, on the
influencing factors detailed above and,
last but not least, on the phone's history. Example: the talk time is significantly reduced if the telephone has
already been in standby mode for some
time but has not been in the charging
cradle.
115
Gigaset SL75 WLAN / en / A31008-M700-B112-1-7619 / appendix.fm / 24.4.06
Service (Customer Care)
Service (Customer Care)
You can get assistance easily when you have technical questions or questions about how
to use your device by using our online support service on the Internet at:
www.siemens.com/gigasetcustomercare
This site can be accessed at any time wherever you are. It will give you 24/7 support for all
our products. It also provides interactive troubleshooting, a list of FAQs and answers plus
user guides for you to download. You will also find frequently asked questions and answers
in the Questions and Answers section of this user guide in the appendix (page 111).
If the device needs to be repaired, please contact one of our Customer Care Centers:
Version05.08.2005
Abu Dhabi. . . . . . . . . . . . . . . 0 26 42 38 00
Argentina . . . . . . . . . . . . 0 80 08 88 98 78
Australia . . . . . . . . . . . . . . . 13 00 66 53 66
Austria . . . . . . . . . . . . . . . . 05 17 07 50 04
Bahrain . . . . . . . . . . . . . . . . . . . . . 40 42 34
Bangladesh . . . . . . . . . . . . . . 0 17 52 74 47
Belgium . . . . . . . . . . . . . . . . 0 78 15 22 21
Bosnia Herzegovina . . . . . . . 0 33 27 66 49
Brazil . . . . . . . . . . . . . . . . 0 80 07 07 12 48
Brunei . . . . . . . . . . . . . . . . . . . 02 43 08 01
Bulgaria. . . . . . . . . . . . . . . . . . 02 73 94 88
Cambodia . . . . . . . . . . . . . . . . 12 80 05 00
Canada . . . . . . . . . . . . . . . . 70 13 55 39 84
China . . . . . . . . . . . . .0 21 40 06 70 60 07
Croatia . . . . . . . . . . . . . . . . . 0 16 10 53 81
Czech Republic . . . . . . . . . . . 2 33 03 27 27
Denmark . . . . . . . . . . . . . . . . . 35 25 86 00
Dubai . . . . . . . . . . . . . . . . . . 0 43 96 64 33
Egypt. . . . . . . . . . . . . . . . . . . 0 23 33 41 11
Estonia . . . . . . . . . . . . . . . . . . . 6 30 47 97
Finland . . . . . . . . . . . . . . . . 09 23 11 34 25
France. . . . . . . . . . . . . . . . . 01 56 38 42 00
Germany . . . . . . . . . . . . . . .01805 333 222
Greece . . . . . . . . . . . . . . 0 80 11 11 11 16
Hong Kong . . . . . . . . . . . . . . . 28 61 11 18
Hungary . . . . . . . . . . . . . . . 06 14 71 24 44
Iceland . . . . . . . . . . . . . . . . . . . 5 20 30 00
India . . . . . . . . . . . 22 24 98 70 00 - 70 40
Ireland . . . . . . . . . . . . . . . . 18 50 77 72 77
Italy. . . . . . . . . . . . . . . . . . . 02 24 36 44 00
Jordan . . . . . . . . . . . . . . . . . . 0 64 39 86 42
Kenya . . . . . . . . . . . . . . . . . . . . 2 72 37 17
Kuwait . . . . . . . . . . . . . . . . . . . 2 45 41 78
Latvia . . . . . . . . . . . . . . . . . . . . 7 50 11 18
Lebanon . . . . . . . . . . . . . . . . . 01 44 30 43
Libya . . . . . . . . . . . . . . . . . . 02 13 50 28 82
Lithuania. . . . . . . . . . . . . . . . 8 70 07 07 00
Luxembourg . . . . . . . . . . . . . . 43 84 33 99
Macedonia . . . . . . . . . . . . . . 0 23 13 14 84
Malaysia. . . . . . . . . . . . . . 6 03 77 12 43 04
Malta . . . . . . . . . . . . . 00 39 2 24 36 44 00
Mauritius . . . . . . . . . . . . . . . . . . 2 11 62 13
Mexico . . . . . . . . . . . . . .01 80 07 11 00 03
Morocco . . . . . . . . . . . . . . . . . 22 66 92 09
Netherlands . . . . . . . . . . . 0 90 03 33 31 02
New Zealand . . . . . . . . . . . 08 00 27 43 63
Norway . . . . . . . . . . . . . . . . . . 22 70 84 00
Oman. . . . . . . . . . . . . . . . . . . . . . 79 10 12
Pakistan . . . . . . . . . . . . . . . 02 15 66 22 00
Philippines . . . . . . . . . . . . . . 0 27 57 11 18
Poland . . . . . . . . . . . . . . . . 08 01 30 00 30
Portugal . . . . . . . . . . . . . . . . 8 08 20 15 21
Qatar . . . . . . . . . . . . . . . . . . . . 04 32 20 10
Romania . . . . . . . . . . . . . . 02 12 04 60 00
Russia. . . . . . . . . . . . . . . . .8 800 200 0212
Saudi Arabia . . . . . . . . . . . . 0 22 26 00 43
Serbia. . . . . . . . . . . . . . . . . 01 13 07 00 80
Singapore . . . . . . . . . . . . . . . . 62 27 11 18
Slovak Republic . . . . . . . . . 02 59 68 22 66
Slovenia . . . . . . . . . . . . . . . . . 01 47 46 336
South Africa. . . . . . . . . . . . 08 60 10 11 57
Spain . . . . . . . . . . . . . . . . . . 9 02 11 50 61
Sweden . . . . . . . . . . . . . . . . 0 87 50 99 11
Switzerland . . . . . . . . . . . . 08 48 21 20 00
Taiwan . . . . . . . . . . . . . . . . 02 23 96 10 06
Thailand. . . . . . . . . . . . . . . . 0 27 22 11 18
Tunisia . . . . . . . . . . . . . . . . . . . 71 86 19 02
Turkey . . . . . . . . . . . . . . . 0 21 64 59 98 59
Ukraine . . . . . . . . . . . . . . 8 80 05 01 00 00
United Arab Emirates . . . . . 0 43 66 03 86
United Kingdom . . . . . . . . 0845 367 0812
USA . . . . . . . . . . . . . . . . . . 70 13 55 39 84
Vietnam . . . . . . . . . . . . . . . 84 89 20 24 64
Please have your record of purchase ready when calling.
Replacement or repair services are not
not sold by authorised dealers.
offered in countries where our product is
116
Gigaset SL75 WLAN / en / A31008-M700-B112-1-7619 / appendix.fm / 24.4.06
Gigaset SL75 WLAN – Free software
Approval
This device is intended for use within the
European Union and Switzerland.
Country-specific requirements have been
taken into consideration. We, Siemens
Home and Office Communication Devices
GmbH & Co. KG, declare that this device
meets the essential requirements and
other relevant regulations laid down in
Directive 1999/5/EC.
A copy of the 1999/5/EC Declaration
of Conformity is available at this
Internet address:
http://www.siemens.com/gigasetdocs.
Gigaset SL75 WLAN –
Free software
The product contains, among other
things, embedded Open Source Software,
licensed under an Open Source Software
License and developed by third parties.
These embedded Open Source Software
files are protected by copyright. Your
rights to use the Open Source Software
beyond the mere execution of Siemens´
program, is governed by the relevant
Open Source Software license conditions.
Your compliance with those license conditions will entitle you to use the Open
Source Software as foreseen in the relevant license. In the event of conflicts
between Siemens license conditions and
the Open Source Software license conditions, the Open Source Software conditions shall prevail with respect to the Open
Source Software portions of the software.
A list of the Open Source Software programs contained in this product and the
Open Source Software licenses are available over the user documentation. Furthermore the license conditions can be found
at the following internet websites.
http://www.siemens.com/gigasetopensource/
(if software is not placed on above website, please look at
www.siemens.com/gigasetcustomercare)
If programs contained in this product are
licensed under GNU General Public
License (GPL), GNU Lesser General Public
License (LGPL) or Mozilla Public License
(MPL, you can download the source code
and the copyright notices of the relevant
software from the internet at:
Version05.08.2005
http://www.siemens.com/gigasetopensource/
117
Gigaset SL75 WLAN / en / A31008-M700-B112-1-7619 / appendix.fm / 24.4.06
Gigaset SL75 WLAN – Free software
(if software is not placed on above website, please look at
www.siemens.com/gigasetcustomercare)
Additionally you can request the corresponding source code from SIEMENS by
paying a fee 10 Euro for the physical act of
transferring the copy. Please send your
specific request, together with a receipt
indicating the date of purchase, within
three years of your purchase, together
with the ID number (MAC ID) of the device
and the software release number to be
found in the phone itself (under status
information) to:
Open Source Software Used
(following table is valid for different
phones, not all SW-components are in
your phone)
Open Source Software
Component
License
Linux Kernel
GPL
U-Boot – Universal Bootloader
GPL
Instant Messangîng Protocoll LGPL
(XMPP)
v2linux
LGPL
Mozilla LDAP
MPL
Kleinteileversand Com Bocholt
Busybox
GPL
Email: kleinteileversand@bch.siemens.de
Glibc
LGPL
Fax:
gcc(libgcc_s, libstdc++)
LGPL
Independent JPEG Group
Library
Independant
JPEG Group
license
Libuuis
BSD
Net SNMP agent
Net SNMP
license
Zlib
Zlib License
Expat XML Parser
Expat license
MSNTP
GPL
libEtPan – Mail stuff library
libEtPan license
libgmp
LGPL
+49 (0)2871 / 91 30 29
Warranty regarding further use of the
Open Source Software
SIEMENS provides no warranty for the
Open Source Software programs contained in this device, if such programs are
used in any manner other than the program execution intended by SIEMENS. The
licenses listed below define the warranty,
if any, from the authors or licensors of the
Open Source Software. SIEMENS specifically disclaims any warranties for defects
caused by altering any Open Source Software program or the product´s configuration. You have no warranty claims against
SIEMENS in the event that the Open
Source Software infringes the intellectual
property rights of a third party.
Technical support, if any, will only be provided for unmodified software.
The software of this product is based in
part on the work of the Independent JPEG
Group.
This product includes software developed
by the University of California, Berkeley
and its contributors.
Open Source Software Licenses
Version05.08.2005
GPL, LGPL, MPL, BSD, Expat license,
libEtPan license, Net SNMP license
118
Gigaset SL75 WLAN / en / A31008-M700-B112-1-7619 / appendix.fm / 24.4.06
Specifications
Specifications
Notes on menu input
General specifications
This section explains the meaning of certain symbols and typographical conventions that are used in this user guide.
WLAN standard 802.11g (backward compatible to 802.11b)
Symbols
VoIP standard
SIP (RFC 3261)
No. of channels 13 (Europe); 11 (USA);
Radio frequency 2.000 – 2.484 GHz
range
Bit rate (gross)
802.11 b:
1, 2, 5.5, 11 Mbit/s;
802.11 g:
6, 9, 12, 18, 24, 36, 48,
54 Mbit/s
Modulation
DQPSK, BQPSK, CCK, OFDM
(depending on the current
transmission rate)
Language code G711, G729, G723
(optional, depending on SW
version: G722)
Service quality TOS, DiffServ, 802.1Q,
802.11e (WME subset)
(Quality of
Service)
Security
WEP (64 and 128 bit), WPA,
802.1x, (optional 802.11i,
depending on SW version)
Protocols/Network features
UPnP, STUN, DHCP, RTP, DNS,
HTTP, TLS, SIP
Transmission
power
max. 100 mW beam power
(EIRP)
Range
up to 100 m outdoors,
up to 30 m indoors (depending on the conditions, significantly lower values are also
possible)
Power supply
230 V, ~ 50 Hz (mains adapter
SN6 31-A)
Delete Entry / Delete List
Select one of the two menu
functions specified (the forward slash / means "or").
~
Enter digits or letters.
§Save§
The display keys' current functions are shown reverse highlighted in the bottom display
line. Press the display key
below to launch the function.
q
Press the top or the bottom of
the control key: scroll up or
down.
r
Press the right or left of the
control key: e.g. select setting.
c / Q / * etc.
Press the illustrated key on the
handset.
Example of menu input
In the user guides, the steps you need to
perform are shown in abbreviated form.
This is illustrated below using the example
of "Setting the contrast for the display".
The things you have to do are explained in
the grey boxes.
Environmental +5 °C to + 45 °C,
conditions for 20 % to 75 % relative humidoperation
ity
Version05.08.2005
Handset dimen- 132 x 52 x 22 mm
sions
Antenna
Internal
119
Gigaset SL75 WLAN / en / A31008-M700-B112-1-7619 / appendix.fm / 24.4.06
Notes on menu input
v¢Ð
¢ Display
¤ With the handset in idle status, press
¤
¤
¤
¤
¤
on the right of the control key v to
open the main menu.
Select the Ð icon using the control
key – press right, left, up or down on
the control key.
In the display header Settings is shown.
Press the §OK§ display key to confirm the
function Settings.
The Settings submenu is displayed.
Press the bottom of the control key q
repeatedly until the Display menu
function is selected.
Press the §OK§ display key to confirm the
selection
Contrast
Select and press §OK§.
In many situations your handset has a
multiple line display in which you can
change settings or input data.
If it is not possible to show all the lines in
the display, V, W or U is shown in the lowest display line.
The display changes when you press the
s or t key.
The steps you need to take for multiple
line entry are shown in this user guide by
means of symbols. This is illustrated
below using the example of "Setting the
date and time". The things you have to do
are explained in the grey boxes.
v ¢ Ð ¢ Date/Time
You will see the following display:
¤ Press the bottom of the control key q
Date/Time
Date:
[¼1.06.06]
Time:
¤
ÎV
repeatedly until the Contrast menu
function is selected.
Press the §OK§ display key.
r
Select contrast.
¤ Press on the right (higher) or left
(lower) of the control key to set the
contrast.
§Save§
Press the display key.
¤ Press the display key §Save§ to activate
the change.
a
Press and hold (idle status).
¤ Press and hold the end call key until
the handset returns to idle status.
Version05.08.2005
Example of multiple line input
120
§Save§
Date:
Enter day/ month/year in 6-digit format.
The second line is marked to show it is the
active display line (framed).
¤ Enter the date using the number keys.
Example: For 24/12/05 enter:
2 4 1 2 Q 5.
Date/Time
Date:
[¼4.06.06]
Time:
ÎV
§Save§
Gigaset SL75 WLAN / en / A31008-M700-B112-1-7619 / appendix.fm / 24.4.06
Writing and editing a text message
Time:
Enter hours/minutes in 4-digit format.
¤ Press the s key.
¤
The display changes. The cursor is in
the line beneath Time:.
Enter the time using the number keys.
Date/Time
Time:
[¼00:00]
Date Format
ÎU
§Save§
Date Format
Select between the display "Day/
Month/Year (DD.MM.YY)" and "Month/
Day/Year (MM/DD/YY)".
¤ Press the s key.
¤
The display changes. The cursor is in
the line beneath Date Format.
Press right or left (r) on the control
key to select DD.MM.YY or MM/DD/YY.
Date/Time
Date Format
fDD.MM.YYg
Time Mode:
24 h
ÎU
§Save§
Time Mode:
Choose between the 12 and 24 hour
display mode.
¤ Press the s key.
¤
The display changes. The cursor is in
the line beneath Time Mode:.
Press right or left (r) on the control
key to select 24 h or 12 h.
Version05.08.2005
Date/Time
Time Mode:
f12 hg
ÎW
¤ Save changes.
You can save your changes in two ways
depending on the particular operating
situation.
¤ Press the §Save§ display key.
Or:
¤ Press the v key or the display key ©.
With q select Save Entry and press the
display key §OK§.
¤ No matter which method you use,
¤
always subsequently press and hold
the a key.
The handset changes to idle status.
Writing and editing a
text message
The following general rules apply when
writing a text message (directory entries,
Emails, messages):
u Move the cursor within the text by
means of the control key u v t s.
Open the editor menu by means of the
display key ©.
u Characters are added to the left of the
cursor.
u Delete the character to the left of the
cursor with the display key X.
u The first letter in a text input field and
in a new sentence (after a full stop and
space ".s") are automatically written as
capitals. Lower case letters follow.
Exceptions: input fields for URI and
Email addresses.
u Entering special characters:
¤ Press the star key *.
A table is opened containing all the
special characters. The cursor is on the
character *.
§Save§
121
Gigaset SL75 WLAN / en / A31008-M700-B112-1-7619 / appendix.fm / 24.4.06
Writing and editing a text message
s
_
!
?
@
,
’
"
¤
(
)
;
:
.
-
+
&
%
§*§
=
<
>
/
£
$
¥
]
§
Â
â
[
\
~
^
¿
¡
{
}
#
|
¤ Navigate to the required character
with the control key r, q. Example: To select @, press v four times
and t twice.
¤ Press the display key §Insert§. The character is inserted into the text.
Pressing again on * closes the table
without inserting a character.
u Pressing the 1 and Q keys several
times enters the following characters:
1
*)
Q
**)
***)
1x
Space
Space
.
2x
1
Â
,
1
?
3x
4x
!
5x
0
*) Directory and other lists
**) When writing a message
***) See also page 124
If you press 1 or Q, the characters
available for the key are shown in the lowest display line.
Changing input mode and
activating/deactivating T9
With the hash key # you can switch
between upper/lower case and digits and
activate and deactivate T9 predictive text.
Note:
You can use the support of T9 predictive text
when writing a messenger or Email message
(subject/text).
You can select the following settings:
Abc
Upper case, T9 off.
The following letter is written as a
capital. After that the letters automatically revert to lower case abc.
abc
Lower case, T9 off.
123
Writing digits.
When writing the subject of an Email or
Email and messenger messages:
T9Abc Upper case, T9 on.
The following letter is written as
a capital. After that the letters
automatically revert to lower case
T9abc.
T9abc
Lower case, T9 on.
¤ Press the hash key # repeatedly
until the required input mode is shown
in the lowest display line. The mode
that is currently set is shown in the
header. Example:
¼
T9Abc
E-Mail
T9Abc
1
2
Version05.08.2005
1 T9 switched on and upper case activated
2 Selection display for changing the input
mode
122
Gigaset SL75 WLAN / en / A31008-M700-B112-1-7619 / appendix.fm / 24.4.06
Writing and editing a text message
Note:
Editing text (with T9)
Editing text (without T9)
"Tegic T9" predictive text helps you to
write messenger or Email messages (subject/text).
T9 deduces the correct word from the individual key entries by making comparisons
with an extensive dictionary. You can
expand the dictionary.
If T9 is activated when you exit a text editor,
then T9 is also activated when you reopen the
editor.
You can enter several characters with one
key.
If you press a key, all the characters available for that key are shown in the lowest
display line. The current character is
reverse-highlighted.
The current character is displayed in the
input field.
Example: Entering the URI (SIP address) in
the directory
Directory
Number Type
URI
Phone (office)
anna@pro¼v
tuv8üúùû
abc
1
2
3
1 Input mode (here: lower case)
2 Text input field with URI
3 Selection line; reverse-highlighted: selected
character
Selecting a character
¤ Press key repeatedly until the required
Version05.08.2005
character is highlighted.
Or:
¤ Press key and hold. The handset automatically moves to the next character.
¤ Release the key to insert the highlighted character into the input field.
The cursor jumps to the next position.
Writing with T9
The display changes as you proceed. It is
best if you finish a word without looking at
the display.
Briefly press the keys beneath the letter
concerned once, e.g. for "Hotel":
#
Press briefly for T9Abc.
Then: 4 L N I 5 1.
A space 1 or v ends a word.
Do not use special characters or umlauts
such as Ä. Use the standard characters
instead, e.g. Ae. T9 will do the rest for you.
T9® Text Input is licensed under one or more of
the following:
U.S. Pat. Nos. 5,818,437, 5,953,541,
5,187,480, 5,945,928 and 6,011,554; Canadian Pat. No. 1,331,057; United Kingdom Pat.
No. 2238414B; Hong Kong Standard Pat. No.
HK0940329; Republic of Singapore Pat. No.
51383; Euro.Pat. No. 0 842 463 (96927260.8)
DE/DK, FI, FR, IT, NL, PT, ES, SE, GB; and additional patents are pending worldwide.
T9 word suggestions
If several options are found in the dictionary for a key sequence (a word), the most
probable is displayed first. If the word you
want has not been recognised, the next
suggestion from T9 may be correct.
Requirement: The cursor is located inside
a word. The word is §highlighted§.
?
Press the display key.
The displayed word is replaced with a different word. If this word is also incorrect,
press ? again. Repeat until the correct
word is displayed.
123
Gigaset SL75 WLAN / en / A31008-M700-B112-1-7619 / appendix.fm / 24.4.06
Writing and editing a text message
When the correct word is displayed:
1 /v Enter a space or press the right
of the control key. You can
start the next word.
If the dictionary does not contain an entry
or any subsequent entries, the word is
replaced with §–§–§–§.
If the required word is not in the dictionary:
u Add the word to the dictionary or
u deactivate T9 and write the word without T9 (page 123).
Adding a word to the dictionary
Requirement: The cursor is located within
§–§–§–§.
§Spell§
Press the display key.
~
Re-enter the word as
described under "Editing text
(without T9)" on page 123.
§OK§
Press the display key.
The word is inserted into the text and
saved in the T9 dictionary.
Note:
Digits and special characters cannot be
entered.
Correcting a word
r Move left or right, word by word, until
the required word is §highlighted§.
?
Scroll through the T9 word
suggestions again.
X
Deletes the character to the
left of the cursor and displays
a new possible word!
Additional information
u Within a "T9 word", individual letters
may not be edited without first removing the T9 status. In most cases it is better to rewrite the complete word.
u If you insert a full stop (press Q
once) there are the following distinctions:
– The word is concluded if it is followed by a space.
– Within a word, a full stop represents
an apostrophe or hyphen:
e.g. §provider.s§ = provider’s.
Writing emoticons
You can write an emoticon such as :-) for
happy or :-( for unhappy with T9 as follows:
Q
Press key briefly (with short
pauses) three times. :-) is
shown as a "T9 word" (highlighted).
?
Press the display key repeatedly until the required emoticon is displayed.
1 /v Enter a space or press the right
of the control key.
You can start the next word.
Notes:
– The first character shown in the available
characters display (bottom line of the display) changes each time the Q key is
pressed.
– Emoticons comprise a maximum of three
characters. Pressing Q for a fourth time
starts a new emoticon.
Version05.08.2005
Selecting the input language
Set the language in which you wish to
write the text.
T9 uses the dictionary for the selected language.
Requirement: You are writing the subject/
text of an Email or a messenger message.
©
Open menu.
124
Gigaset SL75 WLAN / en / A31008-M700-B112-1-7619 / appendix.fm / 24.4.06
Writing and editing a text message
Select Language
Select and press §OK§.
s
Select Automatic or a language
and press §OK§ (‰ = on).
If you select Automatic, the set display language is set as the input language. If no
dictionary exists for this language, T9 uses
English.
The set language is saved. Next time you
open a text editor in which T9 is available,
this language is set again.
Displaying Help for T9
Requirement: You are writing a messenger or Email message (subject/text) and T9
is activated.
v
Open menu.
T9 Info
Select and press §OK§. You can
navigate within the Help
with q.
§OK§
Press the display key to exit
Help and change to the editor.
Order of directory entries
Version05.08.2005
Directory entries are usually sorted in
alphabetical order of surname. Spaces and
digits take first priority. The sort order is as
follows:
1. Space
2. Digits (0–9)
3. Letters (alphabetic; lower case letters
before upper case letters)
4. Other characters
5. Directory entries without names
To get round the alphabetical order of the
entries, insert a space or a digit in front of
the name. These entries will then move to
the beginning of the directory. Names
which you have preceded with an asterisk
will move to the end of the directory.
125
Gigaset SL75 WLAN / en / A31008-M700-B112-1-7619 / accessories_SAG.fm / 24.4.06
Accessories
Accessories
Data Cable DCA-510
For connecting your phone to the serial RS232 interface of
your computer.
Mobile Handsfree Set
With the mobile handsfree set you can make a call while keeping your hands free.
In addition, conversations can be heard on the handset.
The following headsets can be used via a 36859-01 adapter cable:
Plantronics Encore H91 (H91N, H101, H101N)
Plantronics Supra H51 (H51N, H61, H61N)
Plantronics Encore Polaris P91 (P91N, P101, P101N) for USA
Version05.08.2005
All accessories and batteries are available from your mobile phone retailer.
The Online Shop also has the latest product information.
Only use original accessories. This will avoid possible health risks and damage,
and also ensure that all the relevant regulations are complied with.
126
Gigaset SL75 WLAN / en / A31008-M700-B112-1-7619 / glossary.fm / 24.4.06
Glossary
Glossary
802.11
Transfer mode for wireless network
communication (WLAN) published in
1997 by the IEEE (extensions e.g.
802.11b, 802.11g).
802.11b
Currently the most widely distributed
transfer mode (extension of 802.11).
Data transfer: 11 Mbit/s gross (approx.
50 % net), frequency band 2.400 to
2.485 GHz.
802.11g
Extension of 802.11. Less widely used
compared with 802.11b, but greatly on
the increase. Data transfer: 54 Mbit/s
gross. Frequency range: 2.400 to 2.485
GHz.
A
Version05.08.2005
Access point
Centre of a wireless infrastructure
WLAN. All WLAN subscribers log into
the access point.
The access point regulates the data
traffic between the subscribers, and
forms the interface with other networks (e.g. to the Internet).
An access point can, for example, be a
WLAN router.
Ad-hoc network
WLAN without a central structure
(without an access point). WLAN subscribers form a spontaneous network in
which all subscribers are equal.
Requirement: all devices have a wireless network adapter and can be operated in ad-hoc mode. You cannot operate the handset in an ad-hoc network.
ADSL (Asymmetric Digital Subscriber Line)
Special form of DSL.
ALG (Application Layer Gateway)
NAT control mechanism of a router.
Many routers with integrated NAT use
ALG. ALG lets the data packets in a SIP
connection pass and adds the public IP
address of the secure private network.
The router's ALG should be deactivated
if the SIP provider offers a STUN server
or an outbound proxy.
See also: Firewall, NAT, Outbound
Proxy, STUN.
ATM (Asynchronous Transfer Mode)
High-speed network technology for
transferring text, voice, audio and
video.
Authentication
Restriction of access to the WLAN by
use of a password to log in. The handset supports authentication with security standard 802.1x.
For further security settings, see
Encryption.
B
Block dialling
Enter the complete number, and correct it if necessary. Then pick up the
receiver or press the handsfree key to
dial the number.
Bridge
Connection between several network
segments at network level 2, e.g. a
wired and a wireless network.
See also: Gateway, Router).
Broadband Internet access
See DSL.
Broadcast
A data packet that is not directed to a
particular recipient but to all network
subscribers e.g. with UDP transport
protocol).
BSSID (Basic Service Set ID)
Clearly distinguishes one WLAN from
another. In an infrastructure WLAN
the BSSID is the MAC address of the
access point.
127
Gigaset SL75 WLAN / en / A31008-M700-B112-1-7619 / glossary.fm / 24.4.06
Glossary
Buddy
Subscriber with whom you exchange
brief messages on the Internet in real
time (chatting).
See also: Instant Messaging.
C
Version05.08.2005
Call forwarding CF
Automatic redirecting of a call to a different telephone number. There are
three kinds of call forwarding:
– CFU, Call Forwarding Unconditional
– CFB, Call Forwarding Busy
– CFNR, Call Forwarding No Reply
Call waiting
= CW (Call Waiting). Feature provided
by the SIP provider. An acoustic signal
during a call indicates that another
caller is waiting. You can accept or
reject the second call. You can activate/
deactivate the feature.
Certificate
File in which all the necessary information for identifying a user is stored. You
require a certificate for authentication
with the TLS security protocol. You can
import certificates into your handset
via the Web configurator.
CF (Call Forwarding)
See Call Forwarding
Channel
See Radio Channel.
Chatting
Form of communication on the Internet. During a chat, brief messages are
exchanged between the communicating parties in real time. Chatting in this
sense is understood to be a written
form of communication.
Client
Application that requests a service
from a server.
128
Codec
Codec is a procedure that digitises and
compresses analogue voice before it is
sent via the Internet and decodes –
i.e.translates into analogue voice – digital data when voice packets are
received. There are different codecs,
with differing degrees of compression,
for instance.
Both sides of a VoIP connection (caller/
sender side and recipient side) must
use the same codec. This is negotiated
between the sender and the recipient
when establishing a connection.
The choice of Codec is a compromise
between voice quality, transmission
speed and the necessary bandwidth. A
high level of compression, for example,
means that the bandwidth required for
each voice connection is low. However,
it also means that the time needed to
compress/decompress the data is
greater, which increases execution
time for data in the network and thus
impairs voice quality. The time required
increases the delay between the sender
speaking and the recipient hearing
what has been said.
CW (Call Waiting)
See Call Waiting
Gigaset SL75 WLAN / en / A31008-M700-B112-1-7619 / glossary.fm / 24.4.06
Glossary
D
Version05.08.2005
DHCP (Dynamic Host Configuration Protocol)
Internet protocol that regulates the
automatic assignment of IP addresses
to network subscribers. The protocol is
made available in the network by a
server. A router, for example, can be a
DHCP server.
The handset contains a DHCP client. A
router that contains a DHCP server can
assign the IP addresses for the handset
automatically from a defined address
block. This dynamic assignment means
that several subscribers can share one
IP address, although they use it alternately and not simultaneously.
With some routers you can specify that
the IP address for the handset is never
changed.
Displayed name
Feature provided by your SIP provider.
You can specify any name that is to be
shown to the other party call instead of
your phone number.
DNS (Domain Name System)
Hierarchical system that permits the
assignment of IP addresses to domain
names that are easier to note. This
assignment has to be managed by a
local DNS server in each (W)LAN. The
local DNS server determines the IP
address, if necessary by enquiring of
superordinate DNS servers and other
local DNS servers in the Internet.
You can specify the IP address of the
primary/secondary DNS server.
See also: DynDNS.
Domain Name
Name of one (or several) Web server(s)
on the Internet (e.g. Siemens-Home).
The domain name is assigned to the relevant IP address by DNS.
DSCP (Differentiated Service Code Point)
See Quality of Service.
DSL (Digital Subscriber Line)
Data transfer technology which allows
Internet access at e.g. 1.5 Mbps over
conventional phone lines. Requirements: DSL modem and the appropriate service offered by the Internet provider.
DSLAM (Digital Subscriber Line Access
Multiplexer)
The DSLAM is a switch cabinet in an
exchange at which all subscriber connectors converge.
DTIM (Delivery Traffic Indicator MAP)
Like the TIM, the DTIM is a list on the
access point/WLAN router. The DTIM
beacon is a broadcast signal that is
sent with a larger delay than the TIM
beacon. It is set on the access point/
WLAN router as a multiple of the TIM
beacon interval. As a rule, WLAN
devices are only activated with the
DTIM beacon to increase the execution
time.
Dynamic IP Address
A dynamic IP address is assigned to a
network component automatically via
DHCP. The dynamic IP address for a network component can change every
time it registers or in certain time intervals.
See also: Static IP address
DynDNS (Dynamic DNS)
DNS is used to assign domain names
and IP addresses. For dynamic IP
addresses this service is now
enhanced with what is known as
Dynamic DNS (DynDNS). It enables the
use of a network component with a
dynamic IP address as server on the
Internet. DynDNS ensures that a service can always be addressed on the
Internet under the same domain name
irrespective of the current IP address.
129
Gigaset SL75 WLAN / en / A31008-M700-B112-1-7619 / glossary.fm / 24.4.06
Glossary
E
ECT (Explicit Call Transfer)
Subscriber A calls Subscriber B. He puts
the connection on hold and calls Subscriber C. Rather than connect everyone in a three-party conference, A now
transfers Subscriber B to C and hangs
up.
Encryption
Encryption protects data against unauthorised access.
Encryption within a WLAN only protects data exchange within the WLAN,
not data exchange with Ethernet networks or with the Internet.
Your handset supports encryption with
WEP, WPA and WPA-PSK.
For further security settings, see
Authentication.
Enquiry Call
You are making a call. Using an enquiry
call, you interrupt the conversation
briefly to establish a connection to
another subscriber. If you terminate the
connection to this subscriber immediately, then this was an enquiry call. If
you switch to and fro between the first
and second subscriber, it is called toggling.
Ethernet Network
Wired LAN.
F
Version05.08.2005
Firewall
You can use a firewall to protect your
network against unauthorised external
access. This involves combining various
measures and technologies (hard and/
or software) to control the flow of data
between a private network you wish to
protect and an unprotected network
(e.g. the Internet).
See also: NAT.
130
Firmware
Device software in which basic information is stored for the functioning of
a device. A new version of the firmware
can be loaded into the device's memory
(firmware update) to correct errors or
update the device software.
Flat rate
System of billing for an Internet connection. The Internet provider charges
a set monthly fee. There are no additional costs for the duration of the connection or number of connections.
Fragmentation
Data packets that are too big are split
into smaller packets (fragments) before
they are transferred. They are put
together again when they reach the
recipient (defragmented). You can
specify a threshold for fragmentation
(fragmentation threshold). If data
packets are smaller than the threshold
value they may not be fragmented.
Full Duplex
Data transmission mode in which data
can be sent and received at the same
time.
G
Gateway
Connects two different networks with
one another, e.g. router as Internet
gateway.
For phone calls from VoIP to the telephone network the gateway has to be
connected to the IP network and the
telephone network (gateway/SIP provider). It forwards calls from VoIP to the
telephone network as required.
Gateway Provider
See SIP Provider.
Global IP Address
See Public IP address.
Gigaset SL75 WLAN / en / A31008-M700-B112-1-7619 / glossary.fm / 24.4.06
Glossary
GSM (Global System for Mobile
Communication)
Originally, European standard for
mobile networks. GSM can now be
described as a worldwide standard. In
the USA and Japan national standards
are now more frequently supported
than in the past.
H
Handset Mask
If your WLAN is divided into subnets,
you have to assign the handset to a
subnet. In order to define the subnet
and assign the handset to the subnet
you specify an IP address as the handset mask. The handset mask is a special
subnet mask.
Version05.08.2005
Headset
Combination of microphone and earpiece. A headset enables easy handsfree operation for telephone calls.
There are headsets available which are
connected to the handset by a cable.
Hotspot
Publicly accessible access point with
Internet access (e.g. at airports, railway
stations, hotels). There are often
charges associated with using
hotspots.
HTTP Proxy
Sever via which the network subscribers can process their Internet traffic.
Hub
Connects several subscribers in one
infrastructure network. All data sent
to the hub by one network subscriber is
forwarded to all network subscribers.
See also: Gateway, Router.
I
IEEE (Institute of Electrical and Electronics
Engineers)
International body that defines standards in electronics and electrotechnology, concerned in particular with the
standardisation of LAN technology,
transmission protocols, data transfer
rate and wiring.
IEEE 802.11
Standard for WLANs. Terminals may be
connected to infrastructure networks
and also to ad-hoc networks.
Infrastructure Network
WLAN with central structure: all subscribers communicate via a central
access point. The handset (like all terminals) must be logged into the access
point with a MAC address and/or IP
address.
Instant Messaging
(immediate exchange of messages)
Service that uses a client program to
allow chatting in real time, i.e. to send
brief messages to other subscribers on
the Internet.
Internet
Global WAN. A series of protocols have
been defined for exchanging data,
known by the name TCP/IP.
All subscribers are identifiable by IP
addresses. DNS assigns domain
names to IP addresses.
Important services on the Internet
include the World Wide Web (WWW),
Email, file transfer and discussion
forums.
Internet Service Provider
Enables access to the Internet for a fee.
IP (Internet Protocol)
TCP/IP protocol on the Internet. IP is
responsible for the addressing of subscribers in a network using IP
addresses, and routes data from the
sender to the recipient. IP determines
the paths (routing) along which the
data packets travel.
131
Gigaset SL75 WLAN / en / A31008-M700-B112-1-7619 / glossary.fm / 24.4.06
Glossary
IP Address
Unique address within a network. One
IP address is assigned to each interface.
On the Internet, domain names are
normally assigned instead of IP
addresses. DNS assigns IP addresses to
the domain names.
The IP address has four parts (decimal
numbers between 0 and 255) separated by full stops (e.g. 230.94.233.2).
The IP address is made up of the network number and the number of the
network subscriber (e.g. phone).
Depending on the subnet mask the
front one, two or three parts make up
the network number and the rest of the
IP address addresses the network component. The network number of all the
components in any one network must
be identical.
IP addresses can be assigned automatically with DHCP (dynamic IP addresses)
or manually (static IP addresses).
See also: DHCP, Static IP address,
Dynamic IP Address, Public IP address,
Local IP Address.
IP Pool Range
Range of IP addresses that the DHCP
server can use to assign dynamic IP
addresses.
L
Version05.08.2005
LAN (Local Area Network)
Network with a restricted physical
range. A LAN can be wireless (WLAN)
and/or wired.
Local IP Address
The local or private IP address is the
address for a network component in
the local network (LAN). The network
operator can assign any address he or
she wants. Devices that act as a link
from a local network to the Internet
(gateway or router), have a private and
a public or global IP address.
See also: IP Address.
Local SIP Port
See SIP Port.
132
M
MAC Address (Media Access Control)
Hardware address by means of which
each network device (e.g. network
card, switcher, handset) can be
uniquely identified worldwide. It is
composed of six parts (hexadecimal
numbers), separated by a "-" (e.g. 0090-65-44-00-3A).
The MAC address is assigned by the
manufacturer and cannot be changed.
You will find the MAC address for your
handset, for example, in the battery
compartment.
Mbps (Million Bits per Second)
Unit of the transmission speed in a network.
Message Waiting Server
Server on the Internet where your messages are stored temporarily until you
request them. The message is displayed in the relevant message list.
MRU (Maximum Receive Unit)
Defines the maximum user data volume within a data packet.
MTU (Maximum Transmission Unit)
Defines the maximum length of a data
packet that can carried over the network at a time.
Gigaset SL75 WLAN / en / A31008-M700-B112-1-7619 / glossary.fm / 24.4.06
Version05.08.2005
Glossary
N
O
NAT (Network Address Translation)
Method for converting (private) IP
addresses to one or more (public) IP
addresses. NAT enables the IP
addresses of subscribers (e.g. VoIP telephones) in a LAN to be concealed
behind a shared IP address for the
router on the Internet.
VoIP telephones behind a NAT router
cannot be reached by SIP servers (on
account of the private IP address). In
order to "get around" NAT it is possible
to use (alternatively) ALG in the router,
STUN in the VoIP telephone, or for the
SIP provider to use an outbound proxy.
If an outbound proxy is made available
you must allow for this in the SIP settings for your handset.
Network
Group of devices. Devices can be connected in either wired or wireless
mode.
Networks can also differ in range and
structure:
– Range: local networks (LAN) or
wide-area networks (WAN)
– Structure: infrastructure network
or ad-hoc network
Network Adapter
Forms the connection between a
device and a local network (hardware)
and has a unique MAC address. Your
handset has a wireless network
adapter.
Network Name
See SSID.
Network subscribers
Devices and computers that are connected to each other in a network, e.g.
servers, PCs and phones.
NTP Server (Network Time Protocol)
See SNTP Server (Simple Network
Time Protocol).
OPCAP Devices (Open Platform for Cordless
Applications)
OPCAP devices include, for example,
Gigaset M34 USB, gate intercoms,
alarm systems, fire and smoke alarms.
You can operate an OPCAP device using
the handset (remote control) via the
PhoneBook Manager (PC software).
Outbound Proxy
Alternative NAT control mechanism to
STUN and ALG.
Outbound proxies are used by the SIP
provider in Firewall/NAT environments
as an alternative to a SIP Proxy Server.
They control data traffic through the
firewall.
Outbound proxy and STUN servers
should not be used simultaneously.
See also STUN and NAT.
Output Power
Transmission power within the WLAN.
P
Password Mode
Determines the character set for the
password. The handset supports the
ASCII and hexadecimal character set.
– ASCII characters: 0–9 or A–Z
– Hexadecimal characters:
0–9 and A–F
The possible length of the password
also changes depending on which
character set is used.
PIN (Personal Identification Number)
Protects against unauthorised use.
When the PIN is activated a number
combination has to be entered in order
to access a protected area.
You can protect your handset with a
Handset PIN (4-digit number combination) and you can also assign an Admin
PIN (1 to 10-digit number combination)
in the Web configurator.
133
Gigaset SL75 WLAN / en / A31008-M700-B112-1-7619 / glossary.fm / 24.4.06
Glossary
Version05.08.2005
Ping Test
Diagnostic tool in data networks. The
handset sends a query to a server/host
to check its availability.
Port
Data is exchanged between two applications in a network across a port.
Port Forwarding
The Internet gateway (e.g. your router)
forwards data packets from the Internet that are directed to a certain port
to the port concerned. This allows servers in the LAN to offer services on the
Internet without you needing a public
IP address.
Port Number
Indicates a specific application of a network subscriber. Depending on the setting in the LAN, the port number is permanently assigned or else it is newly
assigned with each access.
The combination of IP address/port
number identifies the recipient or
sender of a data packet within a network.
PPPoATM (Point-to-Point Protocol over ATM)
Protocol for connecting network subscribers within an ATM network to the
Internet via a modem.
PPPoE (Point-to-Point Protocol over Ethernet)
Protocol for connecting network subscribers within an Ethernet network to
the Internet via a modem.
Pre-dialling
See Block dialling.
Preamble
Preamble type (short/long)
Private IP Address
See Local IP Address.
Protocol
Describes the agreements for communicating within a network. It contains
rules for opening, administering and
closing a connection, about data formats, time frames and possible error
handling.
134
Proxy/Proxy Server
Computer program that controls the
exchange of data between client and
server in computer networks. If the
handset sends a query to the SIP server,
the proxy acts as a server towards the
handset and as a handset (client)
towards the server. A proxy is
addressed via the IP address/domain
name and port.
Public IP address
The public IP address is the address for
a network component on the Internet.
It is assigned by the Internet Service
Provider. Devices that act as a link from
a local network to the Internet (gateway, router) have a public and a local IP
address.
See also IP Address.
Q
Quality of Service
Describes the Quality of Service in communication networks. Differentiations
are made between various Quality of
Service classes.
QoS influences the flow of data packets
on the Internet e.g. by prioritising data
packets, bandwidth reservation and
packet optimisation.
In VoIP networks, QoS influences the
voice quality. If the whole infrastructure (router, network server etc.) has
QoS, the voice quality is better, i.e.
fewer delays, less echoing, less crackling.
Gigaset SL75 WLAN / en / A31008-M700-B112-1-7619 / glossary.fm / 24.4.06
Glossary
R
Radio Channel
Channel by means of which WLAN subscribers and the access point of a
WLAN communicate. The radio channel must be the same within a WLAN.
You can change the radio channel for a
handset (1–14) in the WLAN settings in
the Web configurator.
RAM (Random Access Memory)
Memory in which you have reading and
storage rights. Such items as melodies
and screen pictures are stored in the
RAM after being loaded into the handset via the Web configurator.
Version05.08.2005
Registrar
The registrar manages the network
subscriber's current IP addresses.
When you log in with your SIP provider,
your current IP address is stored on the
registrar. This means you can also be
reached when on the move.
Remote Management
A LAN can be administered from a
computer that is not within the LAN.
Repeater
Increases the range of an access point
and therefore of a WLAN. The device
receives the radio signal from the
access point and broadcasts it further.
Roaming
Increases the range of a WLAN by
means of several access points connected by an Ethernet network. Connected access points have the same
SSID and the same radio channel. The
handset can switch between the access
points without breaking the connection.
ROM (Read Only Memory)
A type of memory that can only be
read, as opposed to RAM which can be
both read and written.
Router
Routes data packets within a network
and between different networks via the
quickest route. Can connect Ethernet
networks and WLAN. Can be the gateway to the Internet.
Routing
Routing is the transmission of data
packets to another subscriber in your
network. On its way to the recipient,
the data packet is sent from one router
to the next until it reaches its destination.
If data packets were not forwarded in
this way, a network like the Internet
would not be possible. Routing connects the individual network to this global system.
A router is a part of this system; it transmits data packets both within a network and from one network to the
next. Transmission of data from one
network to another is performed on the
basis of a common protocol.
RTP port
(Local) port by means of which voice
data packets are sent and received for
VoIP.
If you have received the RTP port from
your SIP provider, enter the number in
the additional SIP settings.
RTS/CTS-Threshold (request to send signal/
clear to send signal)
Signals used to control transmission in
the WLAN. If you specify an RTS/CTS
threshold value, send requests are not
answered until the threshold is reached
(threshold 1 = every send request is
answered). In heavily frequented
WLANs this can lead to network congestion.
135
Gigaset SL75 WLAN / en / A31008-M700-B112-1-7619 / glossary.fm / 24.4.06
Glossary
S
Server
Makes a service available to other network subscribers (clients). The term
can indicate a computer/PC or an application. A server is addressed via the IP
address/domain name and port.
Version05.08.2005
Silence Suppression
Voice quality parameter. If you suppress silence, no bandwidth is occupied
during breaks in the conversation.
SIP (Session Initiation Protocol)
Signalling protocol independent of
voice communication. Used for establishing and ending a call. It is also possible to define parameters for voice
transmission.
SIP Address
See URI.
SIP Port (Local SIP Port)
(Local) port via which SIP data is
exchanged.
SIP Provider
An SIP or gateway provider is an Internet service provider that provides a
gateway for Internet telephony. As the
handset works with the SIP standard,
your provider must support the SIP
standard.
The provider routes calls from VoIP to
the telephone network (analogue,
ISDN and mobile radio) and vice versa.
SIP Proxy Server
IP address of your SIP provider's gateway server. You can also configure an
Outbound Proxy.
SMTP (Simple Mail Transfer Protocol)
Governs the exchange of electronic
mail. Your Internet provider gives you
access to an SMTP server.
SNTP Server (Simple Network Time Protocol)
Server on which the SNTP protocol
runs. The protocol synchronises network subscribers' clocks.
136
SSID (Service Set Identifier)
Network name. Identifies the subscribers to a wireless network (WLAN). The
SSID can be freely selected, but it must
be the same for all the subscribers in a
WLAN.
Static IP address
A static IP address is assigned to a network component manually during network configuration. Unlike a dynamic
IP address, a static IP address never
changes.
See also IP Address.
Streaming
Streaming refers to the real time transfer of multimedia data via a network
connection. The data is not stored in
the device used to play it but is downloaded at the time of playing. This
allows real time transfer, for example
for the receipt of Internet radio.
Streaming requires a continuous data
flow; the server on which the files are
located must continuously send the
data to the client.
STUN (Simple Transversal of UDP over NAT)
NAT control mechanism.
STUN is a data protocol for VoIP telephones. STUN replaces the private IP
address in the data packets of the VoIP
telephone with the public address of
the secure private network. To control
data transfer, a STUN server is also
required on the Internet. STUN cannot
be implemented by symmetric NATs.
See also: ALG, Firewall, NAT, Outbound
Proxy.
Subnet
Segment of a network.
Gigaset SL75 WLAN / en / A31008-M700-B112-1-7619 / glossary.fm / 24.4.06
Glossary
Subnet Mask
IP addresses consist of a fixed network
number and a variable subscriber number. The network number is identical
for all network subscribers. Which portion of the IP address is the network
number is determined in the subnet
mask. For the subnet mask
255.255.255.0, for example, the first
three parts of the IP address are the network number and the last part the computer number.
Switch
Connects different network elements
(see also Hub). Switch forwards data
packets straight to the network subscriber to which they are addressed.
Symmetric NAT
A symmetric NAT assigns different
external IP addresses and port numbers
to the same internal IP addresses and
port numbers – depending on the
external target address.
T
Version05.08.2005
TCP (Transmission Control Protocol)
Transport protocol. Session-based
transmission protocol: it sets up, monitors and terminates a connection
between sender and recipient for transporting data.
TIM (Traffic Indicator MAP)
List at the access point/WLAN router in
which all WLAN devices are saved.
The access point/WLAN router regularly
sends TIM signals (beacons) that activate the WLAN devices. The frequency
with which a TIM beacon should be
sent is set at the access point/WLAN
router.
TKIP
Procedure for generating keys for WPA
encryption (see WPA).
TLS (Transport Layer Security)
Protocol for encrypting data transmissions on the Internet. TLS is a superordinated transport protocol.
If you want to set up authentication
with TLS you need a Certificate and
login details.
Toggling
Toggling allows you to switch between
two callers or between a conference
and an individual caller without allowing the waiting caller to listen in.
Transfer Mode
See 802.11.
Transmission rate
Speed at which data is transmitted in
the WLAN. The transmission rate is
measured in data units per unit of time
(Mbit/s).
Transport Protocol
Controls data transport between communication partners (applications).
See also: UDP, TCP, TLS.
U
UDP (User Datagram Protocol)
Transport protocol. Unlike TCP, UDP is
a non session-based protocol. It does
not establish a fixed connection. The
data packets (called datagrams) are
sent as broadcast. The recipient is
solely responsible for making sure the
data is received. The sender is not notified about whether it is received.
137
Gigaset SL75 WLAN / en / A31008-M700-B112-1-7619 / glossary.fm / 24.4.06
Glossary
Version05.08.2005
UPnP (Universal Plug and Play)
Enables spontaneous linking of networks: UPnP-compatible devices carry
out the network configuration automatically when they log in to the network. The devices make services available to the network and use the services
of other devices in the network.
You can activate/deactivate UPnP for
the handset via the Web configurator:
UPnP device (handset functions/data
can be read by other network subscribers) and UPnP control point (the handset can access other devices and their
data).
URI (Uniform Resource Identifier)
Character string used to identify
resources (e.g. http://siemens.com,
files, Email recipient).
On the Internet URIs are used for the
standardised identification of
resources. URIs are also referred to as
the SIP address.
URIs can be entered as a number in the
handset. By dialling a URI you can call
an Internet subscriber equipped with
VoIP.
URL (Universal Resource Locator)
Globally unique address of a domain on
the Internet.
A URL is a subtype of URI. URLs identify
a resource by its location) on the Internet. For historical reasons the term is
often used as a synonym for URI.
User ID
See User recognition.
User recognition
Name/number combination for access
e.g. to your SIP account.
UTC (Universal Time Conversion)
Coordinated global time. Basis for international time distribution. The local
time in Germany, for example, is UTC
plus an hour.
138
V
VoIP (Voice over Internet Protocol)
Telephone calls are no longer established and transmitted over the telephone network but over the Internet
(or other IP networks).
VoIP Provider
See SIP Provider.
W
WAN (Wide Area Network)
Wide-area network that is unrestricted
in terms of area (e.g. Internet).
Wait melody (Music on hold)
Music is played while you are consulting or toggling. The waiting caller
hears a wait melody while on hold.
WEP (Wired Equivalent Privacy)
Standard algorithm for encryption in
the WLAN. WEP controls access to the
network (when shared key is set) and
ensures the secrecy and the integrity of
data.
Parameters: key length, WEP key,
authentication (shared key/open system).
Wireless Network
See WLAN (Wireless Local Area Network).
WLAN (Wireless Local Area Network)
Wireless LAN. Can be operated as an
infrastructure or as an ad-hoc network. Transmission takes place via a
specific radio channel.
WMMTM (Wi-Fi Multimedia)
Procedure to determine Quality of
Service in WLANs. WMMTM allocates
bandwidths for various applications.
WPA (Wireless Protected Access)
Encryption system for a WLAN.
Improvement on WEP as it is a more
complex method of key generation
(TKIP, AES).
Gigaset SL75 WLAN / en / A31008-M700-B112-1-7619 / glossary.fm / 24.4.06
Glossary
Version05.08.2005
WPA-PSK (Wireless Protected Access with
Pre-Shared Key)
Requirement: All devices in the WLAN
support WPA-PSK.
Variant of WPA. New keys are generated at regular intervals (known as
rekey intervals) using a Pre-Shared Key.
Procedure for generating keys: TKIP,
AES.
139
Gigaset SL75 WLAN / en / A31008-M700-B112-1-7619 / SL75_wlan_SIX.fm / 24.4.06
Index
Numerics
802.11 . . . . . . . . . . . . . . . . . . . . . . 127
802.11b . . . . . . . . . . . . . . . . . . . . . 127
802.11g . . . . . . . . . . . . . . . . . . . . . 127
Version05.08.2005
A
Access data
Email server . . . . . . . . . . . . . . . . . . 45
SIP provider . . . . . . . . . . . . . . . . . . 17
WLAN . . . . . . . . . . . . . . . . . . . . . . 17
Access point . . . . . . . . . . . . . . . . . . 127
Access point, see WLAN
Access profile
deleting . . . . . . . . . . . . . . . . . 65, 100
editing . . . . . . . . . . . . . . . . 59, 65, 97
list . . . . . . . . . . . . . . . . . . . . . . . . . 96
managing. . . . . . . . . . . . . . . . . . . . 64
overwriting . . . . . . . . . . . . . . . . . . 61
profile editor . . . . . . . . . . . . . . 59, 61
profile name . . . . . . . . . . . . . . . 17, 91
profile wizard (Web configurator) . . 80
using . . . . . . . . . . . . . . . . . . . . . . . 60
using known . . . . . . . . . . . . . . . . . 60
Access protection . . . . . . . . . . . . . 72, 80
Account name (Email) . . . . . . . . . . . . 45
Acknowledge tones . . . . . . . . . . . 71, 81
Activating
advisory tones . . . . . . . . . . . . . 71, 81
call transfer . . . . . . . . . . . . . . . . . . 32
call waiting . . . . . . . . . . . . . . . . 32, 88
easy answer . . . . . . . . . . . . . . . . . . 69
handset . . . . . . . . . . . . . . . . . . . . . 28
handsfree talking . . . . . . . . . . . . . . 27
keypad lock . . . . . . . . . . . . . . . . . . 28
Activating/deactivating UPnP . . . . . . 101
Ad-hoc network . . . . . . . . . . . . . . . . 127
Adjusting
loudspeaker volume . . . . . . . . . . . . 69
Admin, see Expert mode
ADSL . . . . . . . . . . . . . . . . . . . . . . . . 127
Advisory tones . . . . . . . . . . . . . . . 71, 81
Alarm clock
assigning ringer melody . . . . . . . . . 43
setting . . . . . . . . . . . . . . . . . . . . . . 71
ALG . . . . . . . . . . . . . . . . . . . . . . . . . 127
Anniversary
assigning ringer melody . . . . . . . . . 43
140
deleting from calls list . . . . . . . . . . 40
saving . . . . . . . . . . . . . . . . . . . 34, 36
Application Layer Gateway
(ALG) . . . . . . . . . . . . . . . . . . . . 127
Assigning a key . . . . . . . . . . . . . . . . . 66
Assigning a number key . . . . . . . . . . 66
Asymmetric Digital Subscriber Line . 127
Asynchronous Transfer Mode
(ATM). . . . . . . . . . . . . . . . . . . . 127
ATM . . . . . . . . . . . . . . . . . . . . . . . . 127
Attachment
adding to Email . . . . . . . . . . . . . . . 47
viewing . . . . . . . . . . . . . . . . . . . . . 50
Authentication . . . . . . . . . . . . . . . . 127
802.1x . . . . . . . . . . . . . . . . 9, 63, 93
certificates . . . . . . . . . . . . . . . . . 101
introduction . . . . . . . . . . . . . . . . . . 9
WPA . . . . . . . . . . . . . . . . . . . . 10, 63
AWS (call diversion). . . . . . . . . . . . . . 31
AWS (CF) . . . . . . . . . . . . . . . . . . . . 128
B
Basic Service Set ID . . . . . . . . . . . . . 127
Battery
charging . . . . . . . . . . . . . . . . . . . . 15
display . . . . . . . . . . . . . . . . . . . . . 15
fitting . . . . . . . . . . . . . . . . . . . . . . 14
icon . . . . . . . . . . . . . . . . . . . . . . . 15
Battery tone . . . . . . . . . . . . . . . . . . . 71
Battery warning tone . . . . . . . . . . . . 81
Birthday, see Anniversary
Block dialling . . . . . . . . . . . . . . . . . 127
Boot time . . . . . . . . . . . . . . . . . . . . . 28
Bridge . . . . . . . . . . . . . . . . . . . . . . 127
Brightness
display . . . . . . . . . . . . . . . . . . . . . 68
photos . . . . . . . . . . . . . . . . . . . . . 44
Broadband Internet access . . . . . . . . 127
Broadcast . . . . . . . . . . . . . . . . . . . . 127
BSSID . . . . . . . . . . . . . . . . . . . . . . . 127
Buddy . . . . . . . . . . . . . . . . . 35, 53, 128
status changes. . . . . . . . . . . . . . . . 56
Buddy list . . . . . . . . . . . . . . . . . . . . . 53
menu options . . . . . . . . . . . . . . . . 56
opening . . . . . . . . . . . . . . . . . . . . 55
Buddy messages . . . . . . . . . . . . . . . . 53
Buttons (Web configurator) . . . . . . . . 78
Gigaset SL75 WLAN / en / A31008-M700-B112-1-7619 / SL75_wlan_SIX.fm / 24.4.06
Version05.08.2005
C
Call
activating/deactivating
transfer . . . . . . . . . . . . . . . . . . 32
answering . . . . . . . . . . . . . . . . . . . 26
disconnecting (toggling) . . . . . . . . . 33
ending . . . . . . . . . . . . . . . . . . . . . . 26
rejecting . . . . . . . . . . . . . . . . . . . . . 27
settings . . . . . . . . . . . . . . . . . . . . . 88
transferring . . . . . . . . . . . . . . . . . . 33
Call back caller . . . . . . . . . . . . . . . . . . 40
Call display . . . . . . . . . . . . . . . . . . . . 27
Call diversion . . . . . . . . . . . . . . . . . . . 31
Call duration display . . . . . . . . . . . . . . 27
Call forwarding . . . . . . . . . . . . . . . . 128
Call waiting . . . . . . . . . . . . . . . . . . . 128
accepting/rejecting . . . . . . . . . . . . . 33
activating/deactivating . . . . . . . 32, 88
Callback from calls list . . . . . . . . . . . . 40
Calling internal subscribers . . . . . . . . . 26
Calling Line Identification. . . . . . . . . . 27
Calls . . . . . . . . . . . . . . . . . . . . . . . . . 26
Calls list . . . . . . . . . . . . . . . . . . . . . . . 40
deleting . . . . . . . . . . . . . . . . . . . . . 40
opening . . . . . . . . . . . . . . . . . . . . . 40
setting list type . . . . . . . . . . . . . . . . 40
Camera . . . . . . . . . . . . . . . . . . . . . . . 44
changing settings . . . . . . . . . . . . . . 44
lens . . . . . . . . . . . . . . . . . . . . . . . . . 1
memory . . . . . . . . . . . . . . . . . . . . . 44
setting . . . . . . . . . . . . . . . . . . . . . . 84
taking a photo . . . . . . . . . . . . . . . . 44
Cancelling (operation) . . . . . . . . . . . . 29
Care of the telephone . . . . . . . . . . . 111
Certificate . . . . . . . . . . . . . . . . . . . . 128
CF . . . . . . . . . . . . . . . . . . . . . . . . . . 128
CF (AWS) . . . . . . . . . . . . . . . . . . . . . 128
Changing
audio parameters . . . . . . . . . . . . . . 81
display language . . . . . . . . . . . . 67, 83
earpiece volume . . . . . . . . . . . . . . . 81
handset PIN . . . . . . . . . . . . . . . . . . 80
Quality of Service . . . . . . . . . . . . . . 90
ringer tones . . . . . . . . . . . . 29, 70, 82
transmitted name . . . . . . . . . . . . . . 95
voice quality . . . . . . . . . . . . . . . . . . 89
volume for handsfree . . . . . . . . . . . 28
Channel. . . . . . . . . . . . . . . . . . . . . . 128
Charge status display . . . . . . . . . . . 1, 15
Chatting . . . . . . . . . . . . . . . . . . 53, 128
with buddies . . . . . . . . . . . . . . . . . 56
Checking
hardware version . . . . . . . . . . . . . . 73
IP address . . . . . . . . . . . . . . . . . . . 73
MAC address . . . . . . . . . . . . . . . . . 73
proxy name . . . . . . . . . . . . . . . . . . 73
software version . . . . . . . . . . . . . . 73
Clear to send signal . . . . . . . . . . . . . 135
Clearing handset blocking . . . . . . . . . 72
Client . . . . . . . . . . . . . . . . . . . . . . . 128
Closing
Web configurator . . . . . . . . . . . . . . 79
Codec . . . . . . . . . . . . . . . . . . . . . . . 128
Conference
ending . . . . . . . . . . . . . . . . . . . . . 33
initiating . . . . . . . . . . . . . . . . . . . . 33
Confirmation tone. . . . . . . . . . . . . . . 71
Connecting with PC . . . . . . . . . . . . . 110
Connection socket for
headset . . . . . . . . . . . . . . . . . . . . . . 1
PC interface . . . . . . . . . . . . . . . . . . . 1
Connection wizard
choosing access profile . . . . . . . . . 60
creating access profile . . . . 17, 18, 60
Contrast (display) . . . . . . . . . . . . . . . 68
Control key . . . . . . . . . . . . . . . . . . 1, 29
Copying a profile area . . . . . . . . . . . . 61
Correcting incorrect input . . . . . . . . . 30
Creating access profile
on handset . . . . . . . . . . . . . . . . . . 60
on handset, connection wizard . . . . 17
Web configurator . . . . . . . . . . . . . . 90
Web configurator, admin . . . . . . . . 97
Web configurator/profile wizard . . . 90
CTS-Threshold . . . . . . . . . . . . . . . . . 135
Customer Care . . . . . . . . . . . . . . . . 116
CW . . . . . . . . . . . . . . . . . . . . . . . . . 128
D
Data packets, fragmentation . . . . . . 130
Data transfer. . . . . . . . . . . . . . . . . . . 86
Deactivating
advisory tones . . . . . . . . . . . . . . . . 81
call transfer . . . . . . . . . . . . . . . . . . 32
call waiting . . . . . . . . . . . . . . . 32, 88
handset . . . . . . . . . . . . . . . . . . . . . 28
handsfree talking . . . . . . . . . . . . . . 27
keypad lock . . . . . . . . . . . . . . . . . . 28
Deactivating the wake-up call . . . . . . 72
141
Version05.08.2005
Gigaset SL75 WLAN / en / A31008-M700-B112-1-7619 / SL75_wlan_SIX.fm / 24.4.06
Default settings of the handset . . . . . 102
Delete key . . . . . . . . . . . . . . . . . . . . . 29
Deleting
anniversary from calls list . . . . . . . . 40
calls list . . . . . . . . . . . . . . . . . . . . . 40
characters . . . . . . . . . . . . . . . . . . . 30
global pattern . . . . . . . . . . . . . . . . . 37
voice pattern . . . . . . . . . . . . . . . . . 38
Delivery Traffic Indicator MAP . . . . . . 129
DHCP . . . . . . . . . . . . . . . . . . . . . . . . 129
Dialling
URI/IP address . . . . . . . . . . . . . . . . . 26
voice dialling . . . . . . . . . . . . . . . . . 38
with directory . . . . . . . . . . . . . . . . . 35
Dialling URI address . . . . . . . . . . . . . . 26
Dialling with quick dial . . . . . . . . . . . . 66
Differentiated Service Code Point . . . 129
Digital Subscriber Line . . . . . . . . . . . 129
Digital Subscriber Line Access
Multiplexer . . . . . . . . . . . . . . . . 129
Directory . . . . . . . . . . . . . . . . . . . . . . 34
copying number to directory . . . . . . 36
displaying entry . . . . . . . . . . . . . . . 34
managing entries . . . . . . . . . . . . . . 35
managing using PhoneBook
Manager . . . . . . . . . . . . . . . . 109
opening . . . . . . . . . . . . . . . . . . 29, 34
order of entries . . . . . . . . . . . . . . . 125
restoring . . . . . . . . . . . . . . . . . . . . 88
saving . . . . . . . . . . . . . . . . . . . . . . 88
saving anniversary . . . . . . . . . . 34, 36
saving entry . . . . . . . . . . . . . . . . . . 34
selecting entry . . . . . . . . . . . . . . . . 35
Display
12/24 hour format . . . . . . . . . 67, 121
brightness . . . . . . . . . . . . . . . . . . . 68
buddylink . . . . . . . . . . . . . . . . . . . . 35
call duration . . . . . . . . . . . . . . . . . . 27
changing display language . . . . . . . 67
changing language . . . . . . . . . . . . . 83
contrast . . . . . . . . . . . . . . . . . . . . . 68
display keys . . . . . . . . . . . . . . . . . . 29
entry in directory . . . . . . . . . . . . . . 34
in idle status . . . . . . . . . . . . . . . . 1, 29
memory . . . . . . . . . . . . . . . . . . . . . 35
name . . . . . . . . . . . . . . . . . . . . 27, 95
network mailbox message . . . . . . . . 31
night mode . . . . . . . . . . . . . . . . . . 69
number . . . . . . . . . . . . . . . . . . . . . 27
142
screen picture . . . . . . . . . . . . . . . . 68
setting . . . . . . . . . . . . . . . . . . 68, 83
wrong language . . . . . . . . . . . . . . 67
Display backlight
setting timer . . . . . . . . . . . . . . . . . 69
Display keys . . . . . . . . . . . . . . . . . . . . 1
Displayed name . . . . . . . . . . . . . . . 129
Displayed name (Email) . . . . . . . . . . . 45
Displaying a buddylink . . . . . . . . . . . 35
Disposal
electrical and electronic devices . . . . 5
DNS . . . . . . . . . . . . . . . . . . . . . . . . 129
Domain name . . . . . . . . . . . . . . . . . 129
Domain Name System . . . . . . . . . . . 129
Draft message list (Email) . . . . . . . . . 49
DSCP . . . . . . . . . . . . . . . . . . . . . . . 129
DSL . . . . . . . . . . . . . . . . . . . . . . . . 129
DSLAM . . . . . . . . . . . . . . . . . . . . . . 129
DTIM . . . . . . . . . . . . . . . . . . . . . . . 129
Dynamic DNS . . . . . . . . . . . . . . . . . 129
Dynamic Host Configuration
Protocol . . . . . . . . . . . . . . . . . . 129
Dynamic IP address . . . . . . . . . . . . . 129
DynDNS . . . . . . . . . . . . . . . . . . . . . 129
E
Earpiece mode . . . . . . . . . . . . . . . . . 28
Earpiece volume . . . . . . . . . . . . . 69, 81
Easy answer . . . . . . . . . . . . . 26, 69, 88
ECT, see Call transfer
Email . . . . . . . . . . . . . . . . . . . . . . . . 45
adding attachment . . . . . . . . . . . . 47
deleting all lists . . . . . . . . . . . . . . . 51
displayed name . . . . . . . . . . . . . . . 45
draft message list . . . . . . . . . . . . . 49
enter server . . . . . . . . . . . . . . . . . . 85
entering access data . . . . . . . . . . . 45
entering server . . . . . . . . . . . . . . . 45
entering user data . . . . . . . . . . . . . 45
error handling . . . . . . . . . . . . . 52, 58
incoming message list . . . . . . . . . . 49
outgoing message list . . . . . . . . . . 49
receiving . . . . . . . . . . . . . . . . . . . . 48
replying . . . . . . . . . . . . . . . . . . . . . 51
sending . . . . . . . . . . . . . . . . . . . . . 48
settings . . . . . . . . . . . . . . . . . . 45, 85
subject . . . . . . . . . . . . . . . . . . . . . 46
viewing attachments . . . . . . . . . . . 50
writing . . . . . . . . . . . . . . . . . . . . . 46
Email address, entering own . . . . . . . 45
Gigaset SL75 WLAN / en / A31008-M700-B112-1-7619 / SL75_wlan_SIX.fm / 24.4.06
Email lists . . . . . . . . . . . . . . . . . . . . . 49
opening . . . . . . . . . . . . . . . . . . . . . 49
Email message
deleting all lists. . . . . . . . . . . . . . . . 51
forwarding . . . . . . . . . . . . . . . . 50, 51
replying . . . . . . . . . . . . . . . . . . 50, 51
Encryption . . . . . . . . . . . . . . . . . . . . 130
introduction . . . . . . . . . . . . . . . . . . . 9
WEP . . . . . . . . . . . . . . . . . . . 9, 63, 93
WPA . . . . . . . . . . . . . . . . . . . . . 10, 63
WPA PSK . . . . . . . . . . . . . . . 10, 63, 93
End call key . . . . . . . . . . . . . . . . . . 1, 26
End tone . . . . . . . . . . . . . . . . . . . . . . 71
Ending
call . . . . . . . . . . . . . . . . . . . . . . . . . 26
Enquiry call . . . . . . . . . . . . . . . . . . . 130
initiating . . . . . . . . . . . . . . . . . . . . 32
internal . . . . . . . . . . . . . . . . . . . . . 32
Enter incoming Email server . . . . . . . . 85
Enter POP3 server . . . . . . . . . . . . . . . 85
Entering incoming Email server . . . . . 45
Entering outgoing Email server . . . . . . 45
Entering POP3 server . . . . . . . . . . . . . 45
Entering SMTP server . . . . . . . . . . . . . 45
Entry
selecting (menu) . . . . . . . . . . . . . . 29
selecting from directory . . . . . . . . . 35
Error handling (Email) . . . . . . . . . 52, 58
Error tone . . . . . . . . . . . . . . . . . . . . . 71
Establishing a connection to the
messenger server . . . . . . . . . . . . 54
Ethernet network . . . . . . . . . . . . . . . 130
Example
menu input . . . . . . . . . . . . . . . . . 119
multiple line entry . . . . . . . . . . . . 120
Expert mode (Web configurator). . . . . 80
Explicit Call Transfer . . . . . . . . . . . . . 130
Exporting . . . . . . . . . . . . . . . . . . . . . 86
Version05.08.2005
F
FAQs . . . . . . . . . . . . . . . . . . . . . . . . 111
File manager . . . . . . . . . . . . . . . . . . . 42
animated graphics . . . . . . . . . . . . . 42
animations . . . . . . . . . . . . . . . . . . . 42
any graphics . . . . . . . . . . . . . . . . . . 42
audio data . . . . . . . . . . . . . . . . . . . 43
editing entry . . . . . . . . . . . . . . . . . 42
file formats . . . . . . . . . . . . . . . . . . . 42
graphics . . . . . . . . . . . . . . . . . . . . . 42
melodies . . . . . . . . . . . . . . . . . . . . 42
memory . . . . . . . . . . . . . . . . . . . . 43
my pictures . . . . . . . . . . . . . . . . . . 42
own photos . . . . . . . . . . . . . . . . . . 42
pictures . . . . . . . . . . . . . . . . . . . . . 42
ringer tones . . . . . . . . . . . . . . . . . . 42
sounds . . . . . . . . . . . . . . . . . . . . . 43
Firewall . . . . . . . . . . . . . . . . . . . . . 130
Firmware . . . . . . . . . . . . . . . . . . . . 130
loading new version . . . . . . . . . . . 103
update . . . . . . . . . . . . . . . . . . . . 103
Flat rate . . . . . . . . . . . . . . . . . . . . . 130
Forwarding an Email message . . . . . . 50
Fragmentation of data packets. . . . . 130
Free software, licences . . . . . . . . . . 117
Full duplex . . . . . . . . . . . . . . . . . . . 130
Function key . . . . . . . . . . . . . . . . . . . . 1
assigning . . . . . . . . . . . . . . . . . . . . 66
G
Gateway . . . . . . . . . . . . . . . . . . . . . 130
Gateway provider . . . . . . . . . 7, 11, 130
Global IP address . . . . . . . . . . . . . . . 130
Global pattern
deleting. . . . . . . . . . . . . . . . . . . . . 37
playing . . . . . . . . . . . . . . . . . . . . . 37
recording . . . . . . . . . . . . . . . . . . . 37
Global System for
Mobile Communication. . . . . . . 131
GNU General Public License . . . . . . . 117
GNU Lesser General Public License . . 117
Going online (messenger) . . . . . . . . . 54
GPL . . . . . . . . . . . . . . . . . . . . . . . . 117
GSM . . . . . . . . . . . . . . . . . . . . . . . . 131
H
Handset
activating/deactivating . . . . . . . . . . 28
advisory tones . . . . . . . . . . . . . 71, 81
backing up configuration on PC . . 103
changing name . . . . . . . . . . . . . . . 68
changing PIN . . . . . . . . . . . . . . . . . 72
checking status . . . . . . . . . . . . . . . 73
clearing blocking . . . . . . . . . . . . . . 72
configuring (individual) . . . . . . . . . 81
configuring via PC . . . . . . . . . . . . . 74
connecting with WLAN/SIP . . . . 16, 60
contact with liquid . . . . . . . . . . . . 111
display language . . . . . . . . . . . 67, 83
idle status . . . . . . . . . . . . . . . . . . . 29
list . . . . . . . . . . . . . . . . . . . . . . . . 29
143
Gigaset SL75 WLAN / en / A31008-M700-B112-1-7619 / SL75_wlan_SIX.fm / 24.4.06
loudspeaker volume . . . . . . . . . . . . 69
muting . . . . . . . . . . . . . . . . . . . . . . 28
night mode . . . . . . . . . . . . . . . . . . 69
operating . . . . . . . . . . . . . . . . . . . . 28
protecting . . . . . . . . . . . . . . . . . . . 80
rebooting . . . . . . . . . . . . . . . . . . . 104
registering (PhoneBook
Manager) . . . . . . . . . . . . . . . . 109
resetting to default settings. . . . . . 102
screen picture . . . . . . . . . . . . . . 68, 83
settings (individual) . . . . . . . . . . . . 66
Handset mask . . . . . . . . . . . . . . . . . 131
Handsfree
changing volume . . . . . . . . . . . . . . 28
key . . . . . . . . . . . . . . . . . . . . . . . . . . 1
Handsfree talking. . . . . . . . . . . . . . . . 27
activating . . . . . . . . . . . . . . . . . . . . 27
deactivating . . . . . . . . . . . . . . . . . . 27
volume. . . . . . . . . . . . . . . . . . . . . . 81
Hash key . . . . . . . . . . . . . . . . . . . . 1, 28
Headset . . . . . . . . . . . . . . . . . . . . . . 131
Hearing aids . . . . . . . . . . . . . . . . . . . . 5
Hotspot . . . . . . . . . . . . . . . . . . . . 8, 131
HTTP proxy . . . . . . . . . . . . . . . . . . . 131
Hub . . . . . . . . . . . . . . . . . . . . . . . . . 131
Version05.08.2005
I
Idle status
display . . . . . . . . . . . . . . . . . . . . . . 29
returning to . . . . . . . . . . . . . . . . . . 29
IEEE. . . . . . . . . . . . . . . . . . . . . . . . . 131
IEEE 802.11 . . . . . . . . . . . . . . . . . . . 131
IEEE 802.11b . . . . . . . . . . . . . . . . . . . . 7
IEEE 802.11g . . . . . . . . . . . . . . . . . . . . 7
Importing . . . . . . . . . . . . . . . . . . . . . 86
Incoming message list (Email) . . . . . . 49
Incorrect input (correction). . . . . . . . . 30
Info messages . . . . . . . . . . . . . . . . . . 53
Infrastructure Network . . . . . . . . . . . 131
Instant messaging . . . . . . . . . . . 53, 131
requirements . . . . . . . . . . . . . . . . . 53
Institute of Electrical and
Electronics Engineers . . . . . . . . . 131
Integrated camera . . . . . . . . . . . . . . . 44
Internet . . . . . . . . . . . . . . . . . . . . . . 131
Internet access
broadband . . . . . . . . . . . . . . . . . . 127
Internet Protocol . . . . . . . . . . . . . . . 131
Internet service provider. . . . . . . . . . 131
144
Introduction
security in the WLAN . . . . . . . . . . . . 9
SIP access . . . . . . . . . . . . . . . . . . . 11
VoIP . . . . . . . . . . . . . . . . . . . . . . . . 7
WLAN access . . . . . . . . . . . . . . . . . . 8
IP . . . . . . . . . . . . . . . . . . . . . . . . . . 131
IP address . . . . . . . . . . . . . . . . . . . . 132
checking . . . . . . . . . . . . . . . . . . . . 73
defining . . . . . . . . . . . 10, 62, 92, 97
dialling . . . . . . . . . . . . . . . . . . . . . 26
dynamic . . . . . . . . . . . . . . . . . . . 129
global . . . . . . . . . . . . . . . . . . . . . 130
local . . . . . . . . . . . . . . . . . . . . . . 132
private . . . . . . . . . . . . . . . . . . . . 134
public . . . . . . . . . . . . . . . . . . . . . 134
static . . . . . . . . . . . . . . . . . . . . . . 136
with/without DHCP . . . . . . . . . . . . 10
IP pool range . . . . . . . . . . . . . . . . . 132
K
Key 1 (fast access) . . . . . . . . . . . . . . . . 1
Key backlight
setting timer . . . . . . . . . . . . . . . . . 69
Key click . . . . . . . . . . . . . . . . . . . . . . 81
Keypad lock . . . . . . . . . . . . . . . . . . . 28
Keys
cancel key . . . . . . . . . . . . . . . . . . . 29
control key . . . . . . . . . . . . . . . . 1, 29
delete key . . . . . . . . . . . . . . . . . . . 29
display keys . . . . . . . . . . . . . . . . 1, 29
end call key . . . . . . . . . . . . . . . . 1, 26
fast access . . . . . . . . . . . . . . . . . . . . 1
function keys . . . . . . . . . . . . . . . . . . 1
handsfree key . . . . . . . . . . . . . . . . . 1
hash key . . . . . . . . . . . . . . . . . . 1, 28
key 0 . . . . . . . . . . . . . . . . . . . . . . . . 1
key 1 . . . . . . . . . . . . . . . . . . . . . . . 31
keypad lock . . . . . . . . . . . . . . . . . . 28
menu key . . . . . . . . . . . . . . . . . . . 29
message key . . . . . . . . . . . . . . . 1, 39
On/Off key . . . . . . . . . . . . . . . . . . . . 1
quick dial . . . . . . . . . . . . . . . . . . . . 66
star key . . . . . . . . . . . . . . . . . . . 1, 71
talk key . . . . . . . . . . . . . . . . . . . 1, 26
L
LAN . . . . . . . . . . . . . . . . . . . . . . . . 132
Language
display . . . . . . . . . . . . . . . . . . . . . 67
Web configurator . . . . . . . . . . . . . . 79
Gigaset SL75 WLAN / en / A31008-M700-B112-1-7619 / SL75_wlan_SIX.fm / 24.4.06
Last number redial . . . . . . . . . . . . . . . 39
LGPL . . . . . . . . . . . . . . . . . . . . . . . . 117
Licences, free software. . . . . . . . . . . 117
Liquid . . . . . . . . . . . . . . . . . . . . . . . 111
List
"unsent" list (Email) . . . . . . . . . . . . 49
access profiles . . . . . . . . . . . . . . . . 60
calls list . . . . . . . . . . . . . . . . . . . . . 40
Email messages . . . . . . . . . . . . . . . 49
handsets . . . . . . . . . . . . . . . . . . . . 29
internal subscribers. . . . . . . . . . . . . 26
last number redial list . . . . . . . . . . . 39
OPCAP device . . . . . . . . . . . . . . . . 110
List type (calls list) . . . . . . . . . . . . . . . 40
Local Area Network . . . . . . . . . . . . . 132
Local IP address . . . . . . . . . . . . . . . . 132
Local SIP port . . . . . . . . . . . . . . . . . . 136
Lock (keypad) . . . . . . . . . . . . . . . . . . 28
Lost connection . . . . . . . . . . . . . . . . . 58
Loudspeaker volume . . . . . . . . . . . . . 69
Loudspeaker with mirror . . . . . . . . . . . 1
Version05.08.2005
M
MAC address . . . . . . . . . . . . . . . . . . 132
checking . . . . . . . . . . . . . . . . . . . . 73
Main menu . . . . . . . . . . . . . . . . . . . . 30
Mains adapter . . . . . . . . . . . . . . . . . . . 5
Making calls. . . . . . . . . . . . . . . . . . . . 26
answering a call . . . . . . . . . . . . . . . 26
ending call . . . . . . . . . . . . . . . . . . . 26
Maximum Receive Unit. . . . . . . . . . . 132
Maximum Transmission Unit. . . . . . . 132
Mbps . . . . . . . . . . . . . . . . . . . . . . . . 132
Media Access Control . . . . . . . . . . . . 132
Medical appliances . . . . . . . . . . . . . . . . 5
Melody, ringer tone . . . . . . . . . . . . . . 70
Memory
camera . . . . . . . . . . . . . . . . . . . . . . 44
directory, speed dial list. . . . . . . . . . 35
Email directory . . . . . . . . . . . . . . . . 35
file manager . . . . . . . . . . . . . . . . . . 43
Menu
back one menu level . . . . . . . . . . . . 29
entry . . . . . . . . . . . . . . . . . . . . . . . 29
key . . . . . . . . . . . . . . . . . . . . . . . . . 29
menu guidance . . . . . . . . . . . . . . . 30
menu input . . . . . . . . . . . . . . . . . 119
opening . . . . . . . . . . . . . . . . . . . . . 29
overview . . . . . . . . . . . . . . . . . . . . 21
overview (Web configurator) . . . 24, 79
Menu bar (Web configurator) . . . . . . 76
Message
deleting. . . . . . . . . . . . . . . . . . . . . 57
reading . . . . . . . . . . . . . . . . . . . . . 57
receiving . . . . . . . . . . . . . . . . . . . . 56
sending . . . . . . . . . . . . . . . . . . . . . 57
viewing the network
mailbox message. . . . . . . . . . . 31
writing . . . . . . . . . . . . . . . . . . . . . 57
Message Box
(PhoneBook Manager) . . . . . . . 106
configuring . . . . . . . . . . . . . . . . . 110
Message key . . . . . . . . . . . . . . . . . 1, 39
Message list . . . . . . . . . . . . . . . . . . . 57
Message waiting server . . . . . . . . . . 132
Messenger . . . . . . . . . . . . . . . . . . . . 53
settings . . . . . . . . . . . . . . . . . . . . . 86
Messenger server . . . . . . . . . . . . . . . 53
establishing a connection . . . . . . . . 54
Microphone . . . . . . . . . . . . . . . . . . . . 1
Million bits per second . . . . . . . . . . 132
MRU . . . . . . . . . . . . . . . . . . . . . . . . 132
MTU . . . . . . . . . . . . . . . . . . . . . . . . 132
Multiple line entry. . . . . . . . . . . . . . 120
Music on hold . . . . . . . . . . . . . . . . . 138
Muting handset . . . . . . . . . . . . . . . . 28
My pictures . . . . . . . . . . . . . . . . . . . . 42
N
Name
announcing . . . . . . . . . . . . . . . . . . 70
displayed (SIP) . . . . . . . . . . . . . . . 129
displaying . . . . . . . . . . . . . . . . 27, 95
NAT . . . . . . . . . . . . . . . . . . . . . . . . 133
symmetric . . . . . . . . . . . . . . . . . . 137
Navigation area (Web configurator) . . 77
Network . . . . . . . . . . . . . . . . . . . . . 133
connecting . . . . . . . . . . . . . . . 16, 60
Ethernet . . . . . . . . . . . . . . . . . . . 130
Network adapter . . . . . . . . . . . . . . . 133
Network Address Translation . . . . . . 133
Network mailbox. . . . . . . . . . 31, 41, 88
Network name . . . . . . . . . . . . . . . . 133
entering . . . . . . . . . . . . . . 62, 92, 98
Network services. . . . . . . . . . . . . . . . 31
Network Time Protocol . . . . . . . . . . 133
Night mode . . . . . . . . . . . . . . . . . . . 69
NTP server . . . . . . . . . . . . . . . . . . . 133
Number
copying to directory . . . . . . . . . . . . 36
145
Gigaset SL75 WLAN / en / A31008-M700-B112-1-7619 / SL75_wlan_SIX.fm / 24.4.06
displaying caller's . . . . . . . . . . . . . . 27
saving in directory . . . . . . . . . . . . . 34
O
Offline. . . . . . . . . . . . . . . . . . . . . 53, 54
On/Off key . . . . . . . . . . . . . . . . . . . . . . 1
Online . . . . . . . . . . . . . . . . . . . . . . . . 53
Online Help
PhoneBook Manager . . . . . . . . . . . 109
Web configurator . . . . . . . . . . . . . . 78
OPCAP device
list . . . . . . . . . . . . . . . . . . . . . . . . 110
OPCAP Devices. . . . . . . . . . . . . . . . . 133
Open Platform for
Cordless Applications . . . . . . . . . 133
Opening
calls list . . . . . . . . . . . . . . . . . . . . . 40
directory . . . . . . . . . . . . . . . . . 29, 34
Email lists . . . . . . . . . . . . . . . . . . . . 49
menu . . . . . . . . . . . . . . . . . . . . . . . 29
Order of entries in directory . . . . . . . 125
Outbound proxy. . . . . . . . . . . . . . . . 133
setting up . . . . . . . . . . . . . . . . . . . . 95
Outgoing message list (Email) . . . . . . 49
Output power . . . . . . . . . . . . . . . . . 133
Version05.08.2005
P
Pack contents . . . . . . . . . . . . . . . . . . 13
Password (Email server) . . . . . . . . . . . 45
Password mode . . . . . . . . . . . . . . . . 133
PC control
selecting handset . . . . . . . . . . . . . 109
PC control (PhoneBook Manager)
configuring . . . . . . . . . . . . . . . . . 109
PC messages
reading on the handset . . . . . . . . . 110
sending to handset . . . . . . . . 106, 110
PC software
starting Online Help . . . . . . . . . . . 109
system requirements . . . . . . . . . . 106
uninstalling . . . . . . . . . . . . . . . . . 108
Performance improvement . . . . . . . . 114
Performance optimisation . . . . . . . . 114
PhoneBook Manager . . . . . . . . . 14, 105
closing . . . . . . . . . . . . . . . . . . . . . 110
installing . . . . . . . . . . . . . . . . . . . 106
managing the directory . . . . . . . . . 109
Message Box . . . . . . . . . . . . . . . . 110
operating . . . . . . . . . . . . . . . . . . . 108
PC control . . . . . . . . . . . . . . . . . . 109
146
registering handset . . . . . . . . . . . 109
remote control . . . . . . . . . . . . . . . 110
starting . . . . . . . . . . . . . . . . . . . . 108
starting Online Help . . . . . . . . . . . 109
system requirements . . . . . . . . . . 106
uninstalling . . . . . . . . . . . . . . . . . 108
Photos, see My pictures and Picture
Picture . . . . . . . . . . . . . . . . . . . . . . . 42
deleting. . . . . . . . . . . . . . . . . . . . . 87
exporting . . . . . . . . . . . . . . . . . . . 87
importing . . . . . . . . . . . . . . . . . . . 87
picture quality (photos) . . . . . . . . . 44
PIN (Personal Identification Number) 133
Admin PIN . . . . . . . . . . . . . . . . . . . 81
changing . . . . . . . . . . . . . . . . . . . . 72
handset PIN . . . . . . . . . . . . . . . . . . 80
Ping test . . . . . . . . . . . . . . . . . . . . . 134
Playing
global pattern . . . . . . . . . . . . . . . . 37
voice pattern . . . . . . . . . . . . . . . . . 38
Point-to-Point Protocol
over ATM . . . . . . . . . . . . . . . . . . . 134
over Ethernet. . . . . . . . . . . . . . . . 134
Port . . . . . . . . . . . . . . . . . . . . . . . . 134
Port forwarding. . . . . . . . . . . . . . . . 134
Port number . . . . . . . . . . . . . . . . . . 134
PPPoATM . . . . . . . . . . . . . . . . . . . . 134
PPPoE . . . . . . . . . . . . . . . . . . . . . . . 134
Preamble . . . . . . . . . . . . . . . . . . . . 134
Pre-dialling . . . . . . . . . . . . . . . . . . . 134
Private IP address . . . . . . . . . . . . . . 134
Profile wizard (Web configurator). . . . 80
Profile, see Access profile
Protecting phone from access . . . . . . 72
Protocol . . . . . . . . . . . . . . . . . . . . . 134
Proxy . . . . . . . . . . . . . . . . . . . . . . . 134
Proxy server . . . . . . . . . . . . . . . . . . 134
Public IP address . . . . . . . . . . . . . . . 134
Q
Quality (photos) . . . . . . . . . . . . . . . . 44
Quality of Service . . . . . . . . . . . . . . 134
Quick dial
assigning keys . . . . . . . . . . . . . . . . 66
network mailbox . . . . . . . . . . . . . . 31
R
Radio channel . . . . . . . . . . . . . . . . . 135
RAM . . . . . . . . . . . . . . . . . . . . . . . . 135
Random Access Memory . . . . . . . . . 135
Gigaset SL75 WLAN / en / A31008-M700-B112-1-7619 / SL75_wlan_SIX.fm / 24.4.06
Range . . . . . . . . . . . . . . . . . . . . . . . . 13
improving. . . . . . . . . . . . . . . . . . . 115
Range warning tone . . . . . . . . . . . 71, 81
Read Only Memory . . . . . . . . . . . . . 135
Realtime Transport Protocol, see RTP
Recording
global pattern . . . . . . . . . . . . . . . . . 37
voice pattern . . . . . . . . . . . . . . . . . 38
Registrar . . . . . . . . . . . . . . . . . . . . . 135
Reminder call . . . . . . . . . . . . . . . . . . . 36
Remote control of
PC application . . . . . . . . . . 105, 110
Remote management . . . . . . . . . . . . 135
Repeater . . . . . . . . . . . . . . . . . . . . . 135
Replying to an Email message . . . . . . . 50
Request to send signal . . . . . . . . . . . 135
Resolution (photos) . . . . . . . . . . . . . . 44
Ringer
activating/deactivating . . . . . . . . . . 71
Ringer melody
assigning from file manager . . . . . . 43
Ringer tone
changing . . . . . . . . . . . . . . 29, 70, 82
deleting . . . . . . . . . . . . . . . . . . . . . 87
exporting . . . . . . . . . . . . . . . . . . . . 87
importing . . . . . . . . . . . . . . . . . . . . 87
setting melody . . . . . . . . . . . . . 70, 82
setting volume . . . . . . . . . . . . . 70, 82
Roaming . . . . . . . . . . . . . . . . . . . . . 135
ROM . . . . . . . . . . . . . . . . . . . . . . . . 135
Router . . . . . . . . . . . . . . . . . . . . . . . 135
Routing . . . . . . . . . . . . . . . . . . . . . . 135
RTP . . . . . . . . . . . . . . . . . . . . . . . . . . . 7
RTP port . . . . . . . . . . . . . . . . . . . . . 135
RTS/CTS-Threshold . . . . . . . . . . . . . . 135
Version05.08.2005
S
Safety precautions . . . . . . . . . . . . . . . . 5
Screen picture . . . . . . . . . . . . . . . . . . 68
exporting . . . . . . . . . . . . . . . . . . . . 87
importing . . . . . . . . . . . . . . . . . . . . 87
setting . . . . . . . . . . . . . . . . . . . . . . 83
Searching in directory . . . . . . . . . . . . 35
Selecting access profile . . . . . . . . . . 100
Sending (Email) . . . . . . . . . . . . . . . . . 48
Server . . . . . . . . . . . . . . . . . . . . . . . 136
Service Set Identifier . . . . . . . . . . . . 136
Session Initiation Protocol, see SIP
Setting
alarm clock . . . . . . . . . . . . . . . . . . . 71
announcing name . . . . . . . . . . . . . 70
camera . . . . . . . . . . . . . . . . . . . . . 44
display language . . . . . . . . . . . . . . 67
earpiece volume . . . . . . . . . . . . . . 69
handset (individual) . . . . . . . . . . . . 66
loudspeaker volume . . . . . . . . . . . . 69
melody . . . . . . . . . . . . . . . . . . . . . 70
ringer melody . . . . . . . . . . . . . . . . 70
ringer tone volume . . . . . . . . . . . . 70
volume . . . . . . . . . . . . . . . . . . . . . 70
Setting audio parameters . . . . . . . . . 81
Setting date . . . . . . . . . . . . . . . . 67, 84
Setting Quality of Service . . . . . . . . . 90
Setting time . . . . . . . . . . . . . . . . 67, 84
Setting up registrar . . . . . . . . . . . . . . 95
Setting voice quality . . . . . . . . . . . . . 89
Shortcut . . . . . . . . . . . . . . . . . . . . . . 21
Signal strength . . . . . . . . . . . . . . . . . . 1
warning tone . . . . . . . . . . . . . . . . . 71
Signal tone, see Advisory tones
Silence Suppression . . . . . . . . . . . . 136
Simple Mail Transfer Protocol . . . . . . 136
Simple Network Time Protocol . . . . . 136
Simple Transversal of UDP over NAT . 136
SIP . . . . . . . . . . . . . . . . . . . . . . . . . 136
SIP access data
loading onto handset . . . . . . . . . . . 87
saving on PC . . . . . . . . . . . . . . . . . 87
SIP address . . . . . . . . . . . . . . . . . . . 136
SIP port . . . . . . . . . . . . . . . . . . . . . 136
SIP provider . . . . . . . . . . . . . 7, 11, 136
configuring . . . . . . . . . . . . . . . . . . 95
SIP provider file
copying to PC . . . . . . . . . . . . . . . . 87
deleting. . . . . . . . . . . . . . . . . . . . . 88
loading onto handset . . . . . . . . . . . 87
SIP proxy server . . . . . . . . . . . . . . . 136
SIP settings
access data . . . . . . . . . . . . . . . . . . 17
account . . . . . . . . . . . . . . . . . . . . . 11
introduction . . . . . . . . . . . . . . . . . 11
making . . . . . . . . . . . . . . . 18, 64, 94
making additional settings . . . . 96, 99
SIP standard . . . . . . . . . . . . . . . . . . . . 7
SMTP . . . . . . . . . . . . . . . . . . . . . . . 136
SNTP server . . . . . . . . . . . . . . . . . . 136
Sounds
file manager . . . . . . . . . . . . . . . . . 43
ringer tone . . . . . . . . . . . . . . . 29, 70
Specifications . . . . . . . . . . . . . . . . . 119
147
Gigaset SL75 WLAN / en / A31008-M700-B112-1-7619 / SL75_wlan_SIX.fm / 24.4.06
SSID . . . . . . . . . . . . . . . . . . . . . . . . 136
Star key . . . . . . . . . . . . . . . . . . . . . 1, 71
Starting the connection wizard . . . . . . 59
Starting the installation wizard . . . . . 107
Static IP address . . . . . . . . . . . . . . . . 136
Status
buddy . . . . . . . . . . . . . . . . . . . . . . 53
handset . . . . . . . . . . . . . . . . . . 73, 79
Web configurator . . . . . . . . . . . . . . 79
Streaming . . . . . . . . . . . . . . . . . . . . 136
Structure of IP address . . . . . . . . . . . 132
STUN . . . . . . . . . . . . . . . . . . . . . . . . 136
Subject (Email) . . . . . . . . . . . . . . . . . 46
Sub-menus . . . . . . . . . . . . . . . . . . . . 30
Subnet . . . . . . . . . . . . . . . . . . . . . . 136
Subnet mask . . . . . . . . . . . . . . . . . . 137
Switch . . . . . . . . . . . . . . . . . . . . . . . 137
Symmetric NAT . . . . . . . . . . . . . . . . 137
System requirements . . . . . . . . . . . . 106
T
T9 . . . . . . . . . . . . . . . . . . . . . . . . . . 123
T9 predictive text . . . . . . . . . . . . . . . 123
Talk key . . . . . . . . . . . . . . . . . . . . . . . . 1
TCP . . . . . . . . . . . . . . . . . . . . . . . . . 137
TIM . . . . . . . . . . . . . . . . . . . . . . . . . 137
Timer
display/key backlight . . . . . . . . . . . . 69
Title bar (Web configurator) . . . . . . . . 76
TKIP. . . . . . . . . . . . . . . . . . . . . . . . . 137
TLS . . . . . . . . . . . . . . . . . . . . . . . . . 137
Toggling . . . . . . . . . . . . . . . . . . 33, 137
Traffic Indicator MAP . . . . . . . . . . . . 137
Transfer mode . . . . . . . . . . . . . . . . . 137
Transmission Control Protocol . . . . . . 137
Transmission rate . . . . . . . . . . . . . . . 137
Transport Layer Security . . . . . . . . . . 137
Transport protocol.. . . . . . . . . . . . . . 137
Troubleshooting . . . . . . . . . . . . . . . . 111
Version05.08.2005
U
UDP . . . . . . . . . . . . . . . . . . . . . . . . . 137
Uniform Resource Identifier . . . . . . . 138
Universal Plug and Play. . . . . . . . . . . 138
Universal Resource Locator . . . . . . . . 138
Universal Time Conversion . . . . . . . . 138
Update, firmware . . . . . . . . . . . . . . . 103
UPnP . . . . . . . . . . . . . . . . . . . . . . . . 138
URI . . . . . . . . . . . . . . . . . . . . . . . . . 138
URL . . . . . . . . . . . . . . . . . . . . . . . . . 138
148
User data (Email) . . . . . . . . . . . . . . . 45
User Datagram Protocol . . . . . . . . . . 137
User ID . . . . . . . . . . . . . . . . . . . . . . 138
User identification. . . . . . . . . . . . . . 138
User name (Email server) . . . . . . . . . 45
UTC . . . . . . . . . . . . . . . . . . . . . . . . 138
V
Version (hardware, software) . . . . . . 73
Vibration alert. . . . . . . . . . . . . . . . . . 70
VIP . . . . . . . . . . . . . . . . . . . . . . . 34, 70
Voice dialling . . . . . . . . . . . . . . . 37, 38
Voice over Internet Protocol . . . . . . . 138
Voice pattern
deleting. . . . . . . . . . . . . . . . . . . . . 38
playing . . . . . . . . . . . . . . . . . . . . . 38
recording . . . . . . . . . . . . . . . . . . . 38
Voice quality . . . . . . . . . . . . . . . . . . 114
VoIP . . . . . . . . . . . . . . . . . . . . . . . . 138
introduction . . . . . . . . . . . . . . . . . . 7
requirement . . . . . . . . . . . . . . . . . . 7
VoIP Provider . . . . . . . . . . . . . . . . . 138
Volume
earpiece . . . . . . . . . . . . . . . . . . . . 69
handset loudspeaker . . . . . . . . . . . 69
handsfree . . . . . . . . . . . . . . . . . . . 28
loudspeaker . . . . . . . . . . . . . . . . . . 69
ringer tone . . . . . . . . . . . . . . . 29, 70
setting . . . . . . . . . . . . . . . . . . . . . 70
W
Wait melody . . . . . . . . . . . . . . . 28, 138
WAN . . . . . . . . . . . . . . . . . . . . . . . . 138
Warning tone, see Advisory tones
Web configurator
closing . . . . . . . . . . . . . . . . . . . . . 79
diagnostics . . . . . . . . . . . . . . . . . 104
expert mode . . . . . . . . . . . . . . . . . 80
login . . . . . . . . . . . . . . . . . . . . . . . 78
menu . . . . . . . . . . . . . . . . . . . 24, 79
operating . . . . . . . . . . . . . . . . . . . 78
profile wizard . . . . . . . . . . . . . . . . 80
setting language . . . . . . . . . . . . . . 79
starting . . . . . . . . . . . . . . . . . . . . . 75
starting Help . . . . . . . . . . . . . . . . . 78
status . . . . . . . . . . . . . . . . . . . . . . 79
user mode . . . . . . . . . . . . . . . . . . . 80
Web interface, see Web configurator
Web page structure . . . . . . . . . . . . . . 76
WEP . . . . . . . . . . . . . . . . . . . . . . . . 138
Gigaset SL75 WLAN / en / A31008-M700-B112-1-7619 / SL75_wlan_SIX.fm / 24.4.06
Version05.08.2005
White balance (photos) . . . . . . . . . . . 44
Wide Area Network . . . . . . . . . . . . . 138
Wi-Fi Multimedia . . . . . . . . . . . . . . . 138
Wired Equivalent Privacy . . . . . . . . . 138
Wireless LAN, see WLAN
Wireless Local Area Network, see WLAN
Wireless network . . . . . . . . . . . . . . . 138
Wireless Protected Access . . . . . . . . . 138
with Pre-Shared Key . . . . . . . . . . . 139
WLAN . . . . . . . . . . . . . . . . . . . . . 7, 138
access data . . . . . . . . . . . . . . . . . 9, 17
access point requirements . . . . . . . . 16
access via hotspot . . . . . . . . . . . . . . . 8
introduction . . . . . . . . . . . . . . . . . . . 8
making settings . . . . . . . . . 18, 62, 98
setting authentication . . . . . . . . 62, 98
setting encryption . . . . . . . . . . 62, 98
WMM . . . . . . . . . . . . . . . . . . . . . . . 138
Working area (Web configurator) . . . . 77
WPA . . . . . . . . . . . . . . . . . . . . . . . . 138
Writing (Email). . . . . . . . . . . . . . . . . . 46
Writing, editing text . . . . . . . . . . . . . 121
149