1
Symbol LS7808 Horizontal Slot Scanner
Quick Reference Guide
2
Symbol LS7808 Horizontal Slot Scanner
© 2007 MOTOROLA, INC. All rights reserved.
Motorola reserves the right to make changes to any product to improve reliability,
function, or design.
Motorola does not assume any product liability arising out of, or in connection
with, the application or use of any product, circuit, or application described herein.
No license is granted, either expressly or by implication, estoppel, or otherwise
under any patent right or patent, covering or relating to any combination, system,
apparatus, machine, material, method, or process in which Motorola products
might be used. An implied license exists only for equipment, circuits, and
subsystems contained in Motorola products.
MOTOROLA, the Stylized M Logo and Symbol and the Symbol logo are
registered trademarks of Motorola, Inc. Other product names mentioned in this
manual may be trademarks or registered trademarks of their respective
companies and are hereby acknowledged.
Motorola, Inc.
One Motorola Plaza
Holtsville, N.Y. 11742-1300
http://www.symbol.com
Warranty
For the complete Motorola hardware product warranty statement, go to:
http://www.symbol.com/warranty.
Patents
This product is covered by one or more patents. For patent information go to:
http://www.symbol.com/patents.
Quick Reference Guide
3
Introduction
This guide is designed to assist during routine LS7808 operation. Detailed
information about unpacking, installation, performance specifications,
programming and troubleshooting can be found in the LS7808 Product
Reference Guide (p/n 72E-73952-XX).
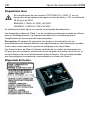
Product Description
The Symbol LS7808 horizontal slot scanner is a high performance,
omni-directional scanner that supports high throughput applications at the point of
sale (POS). The scanner reads all retail symbologies and has multi-interface
capability to interface to all popular POS devices. The scanner is designed for
horizontal in-counter mounting and allows slide-through scanning of items
enhancing productivity and throughput. The scanner has an integrated Electronic
Article Surveillance (EAS) antenna for use with Checkpoint® EAS systems.
The LS7808-SR20007TCR features standard tin oxide glass, and the
LS7808-SR2X009SCR features scratch proof sapphire glass.
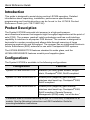
Configurations
The Symbol LS7808 is available in the following configurations.
Configuration
Symbol LS7808-SR20007TCR
Features
Standard (tin oxide) glass window; twilight
black; Checkpoint® EAS; RoHS compliant.
Symbol LS7808-SR20009SCR
Scratch proof (sapphire) glass window;
stainless steel bezel top; Checkpoint® EAS;
RoHS compliant.
Symbol LS7808-SR22009SCR
Scratch proof (sapphire) glass window;
stainless steel bezel top; Checkpoint® EAS;
RoHS compliant; Remote Scanner
Management (RSM) ready “out of the box.”
A stainless steel in-counter mounting kit (p/n 12-17206-02R) is required for all
models. See the Mounting Instructions and EAS Installation Guide for
mounting/installation instructions.
4
Symbol LS7808 Horizontal Slot Scanner
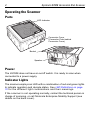
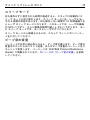
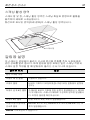
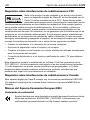
Operating the Scanner
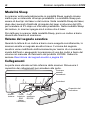
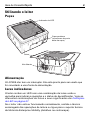
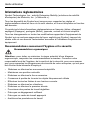
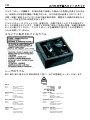
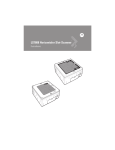
Parts
LED Indicator
Connector Cover
(Connector Ports behind
Connector Cover)
Bucket
Speaker
Power
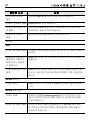
The LS7808 does not have an on/off switch. It is ready to scan when
connected to a power supply.
Indicator Lights
The scanner employs an LED with a combination of red and green lights
to indicate operation and decode status. See LED Definitions on page
10 for the different light combinations and their meanings.
If the scanner is not operating normally, contact the technical person in
charge of scanning, or call Motorola Enterprise Mobility Support (see
details on the back cover).
Quick Reference Guide
5
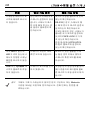
Sleep Mode
The scanner automatically enters Sleep mode when it has been inactive
for a specified length of time. The scanner has two levels of sleep: laser
and motor. In laser sleep mode, after ten seconds of inactivity the laser
pulses at a 50% rate, and then drops to 3% after a specified time. In
motor sleep mode, the scanner is programmed to turn off the motor and
the laser.
To wake the scanner from sleep mode, present a bar code at the scanner
window.
Beeper Volume
The scanner emits a short beep when it successfully reads a bar code.
The volume of the beep is changed electronically by a command sent by
the host, or by scanning one of the beeper volume bar codes in the
LS7808 Product Reference Guide. See Beeper Definitions on page 8.
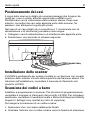
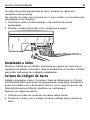
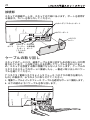
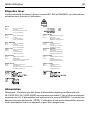
Connections
The scanner’s ports are at the lower edge of the scanner. Remove the
connection cover to access the ports.
Secondary
Scanner
Port
Host Port
EAS
Power
Port
EAS
Interlock
Port
(Behind
Label)
RS-232
Auxiliary
Port
Connector
Cover
6
Symbol LS7808 Horizontal Slot Scanner
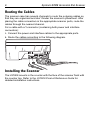
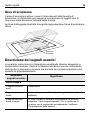
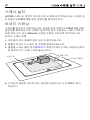
Routing the Cables
The scanner case has several channels to route the outgoing cables so
that they are organized and don’t hinder the scanner’s placement. After
placing the cable connectors in the appropriate scanner ports, route the
cables through the nearest channel.
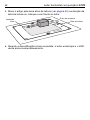
For a cable with a Y-connector (containing both power and interface
connectors):
1.
Connect the power and interface cables to the appropriate ports.
2.
Route the cables according to the following diagram.
Installing the Scanner
The LS7808 mounts in the counter with the face of the scanner flush with
the counter top. Refer to the LS7808 Product Reference Guide for
detailed installation instructions.
Quick Reference Guide
7
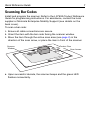
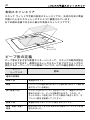
Scanning Bar Codes
Install and program the scanner. Refer to the LS7808 Product Reference
Guide for programming instructions. For assistance, contact the local
supplier or Motorola Enterprise Mobility Support (see details on the
back cover).
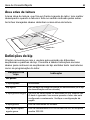
To scan a bar code:
1.
Ensure all cable connections are secure.
2.
Orient the item with the bar code facing the scanner window.
3.
Move the item through the active scan area (see page 8) in the
direction of the scan arrow, or place the item in front of the scanner.
Scanner
Window
4.
Product Flow
Scan Arrows
Upon successful decode, the scanner beeps and the green LED
flashes momentarily.
8
Symbol LS7808 Horizontal Slot Scanner
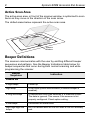
Active Scan Area
The active scan area, in front of the scanner window, is optimized to scan
items as they move in the direction of the scan arrow.
The dotted areas below represent the active scan area.
Scanner
Window
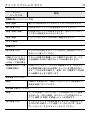
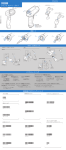
Beeper Definitions
The scanner communicates with the user by emitting different beeper
sequences and patterns. See the Beeper Indications table below for
beeper sequences that occur during both normal scanning and while
programming the scanner.
Beeper
Sequence
Indication
Standard Use
3 high beeps
Power up.
High beep
A bar code symbol was decoded (if decode beeper is
enabled).
4 long low beeps
A transmission error was detected in a scanned symbol.
The data is ignored. This occurs if the scanner is not
properly configured. Check option setting.
5 low beeps
Conversion or format error.
High-high-high-low
beeps
RS-232 receive error on RS-232 host or RS-232 auxiliary
port.
Quick Reference Guide
Beeper
Sequence
9
Indication
Code 39 Buffering
High-low beep
New Code 39 data was entered into the buffer.
3 long high beeps
Code 39 buffer is full.
Low-high-low beeps
The Code 39 buffer was erased or there was an attempt to
clear or transmit an empty buffer.
Low-high beeps
A successful transmission of buffered data.
Host Specific
USB only
4 short high beeps
Scanner has not completed initialization. Wait several
seconds and scan again.
Scanner gives a
power-up beep after
scanning a USB
Device Type.
Communication with the bus must be established before
the scanner can operate at the highest power level.
This power-up beep
occurs more than
once.
The USB bus may put the scanner in a state where power
to the scanner is cycled on and off more than once. This is
normal and usually happens when the PC cold boots.
RS-232 Host only
High beep
A <BEL> character is received and Beep on <BEL> is
enabled.
RS-232 Auxiliary Port only
High beep
A complete block of data was received and sent to the
host, either due to a carriage return or because the
two-second serial response timeout has elapsed.
4 long low beeps
A data overrun condition has occurred. Abstain from
scanning data from other ports when large amounts of
data are sent to the RS-232 Auxiliary port.
10
Symbol LS7808 Horizontal Slot Scanner
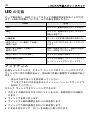
LED Definitions
In addition to beeper sequences, the scanner communicates with the
user via an LED display. The Standard LED Definitions table defines LED
indications that display during scanning.
LED
Indication
Off
No power is applied to the scanner.
Green
The scanner is on and ready to scan.
Momentary flash
A bar code was successfully decoded.
Slow continuous red flashing, green on
The scanner is in programming mode.
Fast continuous red flashing, green on
There is an internal problem; the laser
is shut off for regulatory reasons.
Green on (and laser blinking)
Scanner is in low power blink mode.
Red and green on
Scanner is in low power (sleep) mode
and laser shutdown mode.
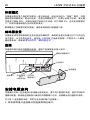
Maintenance
Cleaning the exit window is the only maintenance required. A dirty or
scratched window may affect scanning activity.
-
Remove any dirt particles with a damp cloth.
-
Wipe the window with a tissue moistened with ammonia or water.
To clean the exit window:
Insert a coin into the large screw heads on the front of the scanner
and turn counter-clockwise.
1.
2.
Lift off the window.
3.
Wipe clean the underside of the upper window.
4.
Wipe clean the top surface of the lower window.
5.
Re-install the top cover by tightening the two large screws.
To change the exit window:
1.
Remove the window as described above.
2.
Replace with a new window.
3.
Reinstall the top cover by tightening the two large screws.
Quick Reference Guide
11
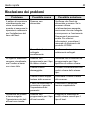
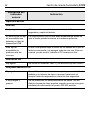
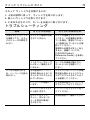
Troubleshooting
Problem
The omni-line scan
pattern does not
display when you
follow the directions for
installing the host
cable.
Scan line(s) display,
but bar code cannot be
read.
Bar code is decoded,
but not transmitted to
the host.
Possible Causes
Possible Solutions
No power to the
scanner.
Ensure the host has power,
and is on. If the scanner uses
a separate power supply,
ensure it’s connected to a
working AC outlet.
Power-up sequence is
incorrect. Refer to the LS7808
Product Reference Guide for
more information.
Interface cable is not
properly connected.
Check for loose cable
connections.
Scanner is not
programmed to read
the bar code type.
Ensure scanner is
programmed to read the bar
code type you are scanning.
Bar code is damaged.
Try scanning other bar codes
of the same bar code type.
Bar code is too far from
scanner.
Move the bar code closer to
the scanner.
The host has disabled
scanning or overridden
parameter settings.
See the technical person in
charge of scanning.
Scanner is not
programmed for the
correct host type.
Scan the appropriate host
type bar code.
12
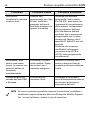
Symbol LS7808 Horizontal Slot Scanner
Problem
Possible Causes
Possible Solutions
Scanned data is
incorrectly displayed
on the host.
Scanner is not
programmed to work
with the host. Check
scanner host type
parameters or editing
options.
Ensure proper host is
selected.
For RS-232, ensure the
scanner’s communication
parameters match the host’s
settings.
For keyboard wedge, ensure
scanner is programmed with
the correct country code and
that the CAPS LOCK key is
off.
Ensure editing options (e.g.,
UPCE-to-UPCA Conversion)
are properly programmed.
Although the green
and red LEDs are on,
the scanner does not
produce the
omni-directional scan
pattern.
The scanner has gone
into the low power
“Motor Sleep” mode.
Move a bar coded item over
the active scan area to
awaken the unit.
USB or Synapse host
not functioning
properly.
Scanner does not
recognize host.
Remove and reinsert external
power supply to force cable to
autodetect correct host.
NOTE If the symbol still does not scan, contact distributor or call Motorola
Enterprise Mobility Support. See the back cover for contact
information.
13
Guide utilisateur
Introduction
Ce guide est conçu pour faciliter l'utilisation quotidienne du LS7808. De
plus amples informations sur le déballage, l'installation, les
performances, la programmation et le dépannage sont disponibles
dans le Guide de référence produit du LS7808 (p/n 72E-73952-XX).
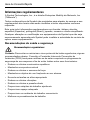
Description du produit
Le scanner slot horizontal Symbol LS7808 est un lecteur
omnidirectionnel hautes performances conçu pour les applications de
lecture intensive dans les points de vente. Doté d'une capacité
multi-interface, il est compatible avec tous les appareils les plus courants
utilisés dans les points de vente et prend en charge toutes les
symbologies de la vente au détail. Destiné à un montage horizontal sur
comptoir, le scanner permet une lecture rapide et améliore la
productivité. Il est doté d'une antenne EAS (surveillance électronique
des articles) intégrée pour une utilisation avec les systèmes Checkpoint®
EAS.
Le modèle LS7808-SR20007TCR dispose d'un écran en verre d'oxyde
d'étain et le modèle LS7808-SR2X009SCR d'un écran en verre en
saphir résistant aux rayures.
Configurations
Le scanner Symbol LS7808 est disponible dans les configurations suivantes.
Configuration
Fonctionnalités
Symbol LS7808-SR20007TCR
Écran en verre standard (oxyde d'étain) ; noir
crépuscule ; système de surveillance
Checkpoint® EAS ; conformité RoHS.
Symbol LS7808-SR20009SCR
Écran en verre (saphir) résistant aux rayures ;
façade en acier inoxydable ; système de
surveillance Checkpoint® EAS ; conformité RoHS.
Symbol LS7808-SR22009SCR
Écran en verre (saphir) résistant aux rayures ;
façade en acier inoxydable ; système de
surveillance Checkpoint® EAS ;
conformité RoHS ; compatibilité avec le système
de gestion des scanners à distance (RSM).
Tous les modèles requièrent un support de fixation en acier inoxydable sur
comptoir (p/n 12-17206-02R). Pour l'installation et le montage de l'appareil,
reportez-vous aux instructions de montage et au guide d'installation EAS.
14
Scanner Slot horizontal LS7808
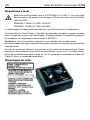
Fonctionnement du scanner
Composants
Voyant lumineux
Couvercle du connecteur
(Ports du connecteur
derrière couvercle du
connecteur)
Boîtier
Haut-parleur
Alimentation
Le LS7808 ne dispose pas d'un bouton marche/arrêt. Il suffit de le
connecter à une source d'alimentation pour le rendre opérationnel.
Voyants lumineux
Des voyants lumineux de couleur rouge et vert informent l'utilisateur de
l'état du fonctionnement et de la lecture. Consultez la rubrique
Définition des voyants lumineux à la page 20 pour les différentes
combinaisons visuelles et leur signification.
Si le scanner ne fonctionne pas correctement, contactez le technicien
chargé de la lecture ou appelez l'assistance Motorola Enterprise
Mobility au numéro de téléphone qui se trouve au dos.
15
Guide utilisateur
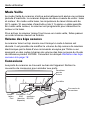
Mode Veille
Le mode Veille du scanner s'active automatiquement après une certaine
période d'inactivité. Le scanner dispose de deux niveaux de veille : laser
et moteur. En mode veille laser, les impulsions du laser diminuent de
50 % après 10 secondes d'inactivité et de 3 % après un délai spécifié.
En mode veille moteur, le scanner est programmé pour désactiver le
moteur et le laser.
Pour activer le scanner lorsqu'il se trouve en mode veille, faites passer
un code à barres devant sa fenêtre.
Volume des bips sonores
Le scanner émet un bip sonore court lorsqu'un code à barres est
décodé. Il est possible de modifier le volume du bip sonore de manière
électronique par le biais d'une commande envoyée par l'hôte ou en
scannant un des codes à barres de volume des bips sonores du Guide
de référence produit LS7808. Consultez la rubrique Définition des bips
sonores à la page 18.
Connexions
Les ports du scanner se trouvent au bas de l'appareil. Retirez le
couvercle de connexion pour accéder aux ports.
Deuxième
port de
lecture
Port hôte
EAS
Alimen
tation
Port
Port antivol Port
EAS
auxiliaire
(derrière RS-232
étiquette)
Couvercle du
connecteur
16
Scanner Slot horizontal LS7808
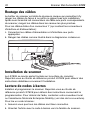
Routage des câbles
Le boîtier du scanner est doté de plusieurs canaux qui permettent d'y
ranger les câbles de façon à ce qu'ils ne gênent pas son installation.
Après avoir branché les connecteurs de câble aux ports correspondants
du scanner, rangez les câbles dans les canaux les plus proches.
Pour les câbles dotés d'un connecteur Y (qui contient les connecteurs
d'interface et d'alimentation) :
1. Connectez les câbles d'alimentation et d'interface aux ports
appropriés.
2. Rangez les câbles comme illustré dans le diagramme ci-dessous.
Installation du scanner
Le LS7808 se monte partie frontale sur la surface du comptoir.
Reportez-vous au Guide de référence produit LS7808 pour obtenir des
instructions détaillées concernant l'installation.
Lecture de codes à barres
Installez et programmez le scanner. Reportez-vous au Guide de
référence produit LS7808 pour obtenir des instructions concernant la
programmation. Pour obtenir de l'aide, contactez votre revendeur local
ou l'assistance Motorola Enterprise Mobility (voir dos de la couverture).
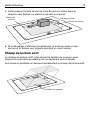
Pour lire un code à barres :
1.
Assurez-vous que tous les câbles sont bien connectés.
2.
Orientez l'article avec le code à barres vers la fenêtre du scanner.
17
Guide utilisateur
3.
Faites passer l'article devant la zone de lecture active dans la
direction des flèches ou placez-le devant le scanner.
Fenêtre du
scanner
4.
Flux des produits
Flèche de lecture
Si le décodage s'effectue correctement, le scanner émet un bip
sonore et le témoin vert clignote pendant un court instant.
Champ de lecture actif
Le champ de lecture actif, situé devant la fenêtre du scanner, peut
scanner les éléments pendant qu'ils se déplacent vers la flèche.
Les zones en pointillés en dessous représentent le champ de lecture actif.
Fenêtre du scanner
18
Scanner Slot horizontal LS7808
Définition des bips sonores
Le scanner communique avec l'utilisateur par le biais de séquences
sonores. Reportez-vous au tableau des indications des bips sonores
ci-dessous pour consulter la liste des bips sonores utilisés durant la
lecture et la programmation du lecteur.
Séquence
sonore
Signification
Utilisation standard
3 bips sonores de
forte intensité
Mise en marche.
Bip sonore de forte
intensité
Code à barres décodé (si le bip sonore de décodage est
activé).
4 bips sonores longs
de faible intensité
Une erreur de transmission a été détectée sur un symbole
lu. Les données sont ignorées. Ce problème survient
lorsque le scanner n'est pas configuré correctement.
Vérifiez le réglage des options.
5 bips sonores de
faible intensité
Erreur de format ou de conversion.
Bips sonores
élevé-élevé-élevé-fai
ble
Le port RS-232 a reçu une erreur sur le port hôte RS-232
ou le port auxiliaire RS-232.
Mise en mémoire tampon du Code 39
Bip sonore
élevé/faible
Les nouvelles données du Code 39 ont été saisies dans la
mémoire tampon.
3 bips sonores longs
de haute intensité
La mémoire tampon du Code 39 est saturée.
Bips sonores
faible/élevé/faible
La mémoire tampon du Code 39 a été effacée ou une
suppression ou transmission de mémoire tampon a été
tentée.
Bips sonores
faible/élevé
Transmission réussie des données en mémoire tampon.
19
Guide utilisateur
Séquence
sonore
Signification
Spécifique à l'hôte
USB uniquement
4 courts bips sonores
forts
Le scanner n'a pas terminé l'initialisation. Attendez
quelques secondes puis recommencez.
Le scanner émet un
bip de mise en
marche après avoir
lu un périphérique de
type USB.
La communication avec le bus doit être établie avant que
le scanner ne puisse fonctionner au maximum de sa
puissance.
Ce bip de mise en
marche se produit à
plusieurs reprises.
Il se peut que le bus USB force le scanner à s'activer ou se
désactiver à plusieurs reprises. Cette situation est normale
et se produit généralement lorsque le PC est redémarré à
froid.
Hôte RS-232 uniquement
Bip sonore de forte
intensité
Un caractère de type <BEL> est reçu et les bips sonores
sont activés pour <BEL>.
Port auxiliaire RS-232 uniquement
Bip sonore de forte
intensité
Un bloc complet de données a été reçu et envoyé à l'hôte,
en raison d'un retour chariot ou parce que le délai du
temps de réponse série de deux secondes a expiré.
4 bips sonores longs
de faible intensité
Dépassement de la quantité de données. Ne décodez plus
de données à partir d'autres ports lorsque des données
volumineuses sont envoyées au port auxiliaire RS-232.
20
Scanner Slot horizontal LS7808
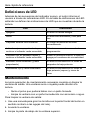
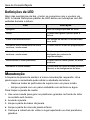
Définition des voyants lumineux
Outre les séquences sonores, le scanner communique avec l'utilisateur
via l'affichage de voyants lumineux. Le tableau des voyants lumineux
standard énumère l'ensemble des voyants qui s'affichent durant la
lecture.
Voyant lumineux
Signification
Éteint
Le scanner n'est pas alimenté.
Vert
Le lecteur est activé et « prêt à la
lecture ».
Clignote momentanément
Un code à barres a été décodé.
Le voyant rouge clignote lentement en
continu, vert allumé
Le scanner est en mode de
programmation.
Le voyant rouge clignote rapidement en
continu, vert allumé
Problème interne ; le laser est éteint
pour des raisons réglementaires.
Vert allumé (et le laser clignote)
Le mode de clignotement du scanner
est en veille.
Voyants vert et rouge allumés
Le scanner est en mode veille du
moteur et en mode d'extinction du
laser.
Guide utilisateur
21
Maintenance
Le nettoyage de la fenêtre de lecture est le seul entretien requis. Une
fenêtre sale ou rayée peut affecter la lecture.
-
Enlevez la poussière à l'aide d'un chiffon humide.
-
Essuyez la fenêtre à l'aide d'un chiffon humecté d'ammoniaque ou
d'eau.
Pour nettoyer la fenêtre de lecture :
1.
Insérez une pièce dans les têtes de vis situées à l'avant du scanner et
tournez dans le sens inverse des aiguilles d'une montre.
2.
Retirez la fenêtre en la soulevant.
3.
Nettoyez le dessous de la fenêtre supérieure.
4.
Nettoyez la surface supérieure de la fenêtre inférieure.
5.
Réinstallez le couvercle supérieur en serrant les deux grosses vis.
Pour changer la fenêtre de lecture :
1.
Retirez la fenêtre comme indiqué ci-dessus.
2.
Remplacez-la par une nouvelle fenêtre.
3.
Réinstallez le couvercle supérieur en serrant les deux grosses vis.
22
Scanner Slot horizontal LS7808
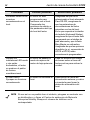
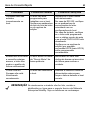
Dépannage
Problème
La trame de lecture
omniligne ne s'affiche
pas lorsque vous
suivez les instructions
d'installation du câble
hôte.
Les lignes de lecture
s'affichent, mais le
code à barres ne peut
pas être décodé.
Le code à barres a été
décodé, mais n'a pas
été transmis à l'hôte.
Causes possibles
Solutions possibles
Le scanner n'est pas
alimenté.
Assurez-vous que l'hôte est
alimenté et qu'il est activé. Si
le scanner utilise une source
d'alimentation séparée, veillez
à ce qu'il soit connecté à une
prise de courant.
La séquence de mise en
marche est incorrecte.
Reportez-vous au Guide de
référence produit LS7808
pour de plus amples
informations.
Le câble d'interface
n'est pas branché
correctement.
Vérifiez que le câble est bien
connecté.
Le scanner n'est pas
programmé pour
décoder ce type de
code à barres.
Veillez à ce que le scanner
soit programmé pour lire le
code à barre que vous
décodez.
Le code à barres est
endommagé.
Essayez de lire d'autres
codes à barres du même type.
Le code à barres est
trop éloigné du
scanner.
Rapprochez-le du scanner.
L'hôte a désactivé la
lecture ou a annulé vos
paramètres.
Contactez le technicien
chargé du décodage.
Le scanner n'est pas
programmé pour le type
d'hôte approprié.
Scannez le code à barres de
type hôte approprié.
23
Guide utilisateur
Problème
Causes possibles
Solutions possibles
Affichage inexact des
données scannées sur
l'hôte.
Le scanner n'est pas
programmé pour
fonctionner avec cet
hôte. Vérifiez les
paramètres de type
hôte du scanner ou
modifiez les options.
Assurez-vous que l'hôte
approprié est sélectionné.
Pour le port RS-232, veillez à
ce que les paramètres de
communication du scanner
correspondent aux
paramètres de l'hôte.
Pour l'émulation clavier,
veillez à ce que le scanner
soit programmé avec le code
pays approprié et que la
touche de VERROUILLAGE
DES MAJUSCULES ne soit
pas sélectionnée.
Assurez-vous que les options
de modification (par ex.,
conversion UPCE/UPCA) sont
correctement programmées.
Bien que les voyants
vert et rouge soient
tous deux allumés, le
scanner ne produit pas
de trame de lecture
omnidirectionnelle.
Le lecteur est passé en
mode « veille du
moteur ».
Placez un élément à codes
barres dans le champ de
lecture actif pour activer
l'unité.
L'hôte USB ou
Synapse ne fonctionne
pas correctement.
Le scanner ne
reconnaît pas l'hôte.
Débranchez et reconnectez à
l'alimentation externe de
façon à forcer le câble à
détecter automatiquement
l'hôte approprié.
REMARQUE Si le symbole ne peut toujours pas être lu, contactez votre
distributeur ou appelez l’assistance Motorola Enterprise
Mobility. Les numéros de téléphone de l'assistance se trouvent
au dos.
Scanner compatto orizzontale LS7808
24
Introduzione
Questo manuale è stato realizzato per facilitare il normale utilizzo dello
scanner LS7708. Le informazioni dettagliate su disimballaggio,
installazione, specifiche prestazionali, programmazione e risoluzione
dei problemi sono riportate nel manuale di riferimento del prodotto
LS7808 (codice 72E-73952-XX).
Descrizione del prodotto
Lo scanner compatto orizzontale Symbol LS7808 è un dispositivo
omnidirezionale ad alte prestazioni che supporta applicazioni ad alta
produttività nel punto vendita (POS). Lo scanner legge tutti i simboli di
retail e include interfacce multiple che ne consentono l'utilizzo con i più
diffusi dispositivi POS. Lo scanner è progettato per essere montato in
orizzontale sul bancone; consente di eseguire la scansione degli elementi
semplicemente facendoli scorrere attraverso l'apposito slot al fine di
ottimizzare la produttività. Lo scanner integra un'antenna EAS (Electronic
Article Surveillance) compatibile con i sistemi Checkpoint® EAS.
Lo scanner LS7808-SR20007TCR include vetro in ossido di stagno
standard, mentre il modello LS7808-SR2X009SCR integra vetro in
zaffiro antigraffio.
Configurazioni
Lo scanner Symbol LS7808 è disponibile nelle seguenti configurazioni.
Configurazione
Caratteristiche
Symbol LS7808-SR20007TCR
Finestra in vetro standard (ossido di stagno);
nero crepuscolo; Checkpoint® EAS; conformità
RoHS.
Symbol LS7808-SR20009SCR
Finestra in vetro antigraffio (zaffiro); anello di
fissaggio in acciaio inossidabile; Checkpoint®
EAS; conformità RoHS.
Symbol LS7808-SR22009SCR
Finestra in vetro antigraffio (zaffiro); anello di
fissaggio in acciaio inossidabile; Checkpoint®
EAS; conformità RoHS; gestione in remoto
dello scanner (RSM) "utilizzo immediato".
Un kit di montaggio su bancone in acciaio inossidabile (n/p 12-17206-02R) è
richiesto per tutti i modelli. Per informazioni dettagliate su installazione/montaggio,
consultare le Istruzioni per il montaggio e la Guida di installazione EAS.
Guida rapida
25
Funzionamento dello scanner
Componenti
LED
Coperchio del connettore
(le porte del connettore sono
ubicate dietro il coperchio del
connettore)
Piano di appoggio
Altoparlante
Alimentazione
L'LS7808 non dispone di un interruttore di accensione/spegnimento.
È pronto a eseguire le scansioni non appena viene collegato
all'alimentazione.
Spie di segnalazione
Questo scanner è dotato di un LED, le cui combinazioni di diodi rossi
e verdi indicano lo stato di funzionamento e decodifica. Vedere
Descrizione degli stati del LED a pagina 31 per il significato delle
diverse combinazioni di spie.
Se lo scanner non funziona correttamente, contattare il tecnico
responsabile oppure chiamare Motorola Enterprise Mobility Support
(i dettagli sono riportati sul retro di copertina).
Scanner compatto orizzontale LS7808
26
Modalità Sleep
Lo scanner entra automaticamente in modalità Sleep quando rimane
inattivo per un intervallo di tempo prestabilito. La modalità Sleep può
essere di due tipi: del laser e del motore. Nella modalità Sleep del laser,
dopo dieci secondi d'inattività gli impulsi del laser si riducono del 50%,
per scendere al 3% dopo un intervallo prestabilito. Nella modalità Sleep
del motore, lo scanner spegne sia il motore che il laser.
Per riattivare lo scanner dalla modalità Sleep, porre un codice a barre
davanti alla finestra di scansione.
Volume del segnale acustico
Quando la lettura di un codice a barre viene eseguita correttamente, lo
scanner emette un segnale acustico breve. Il volume del segnale
acustico viene modificato elettronicamente per mezzo di un comando
inviato dall'host o eseguendo la scansione di uno dei codici a barre del
volume nel manuale di riferimento del prodotto LS7808. Vedere la
sezione Descrizione dei segnali acustici a pagina 29.
Collegamenti
Le porte sono ubicate sul lato inferiore dello scanner. Rimuovere il
coperchio dei collegamenti per accedere alle porte.
Porta per
scanner
secondario
Porta host
EAS
Alimentazione
Porta
Porta
Interlock ausiliaria
EAS
RS-232
(dietro
l'etichetta)
Coperchio del
connettore
Guida rapida
27
Posizionamento dei cavi
Il corpo dello scanner è dotato di numerosi passaggi che fungono da
guida per i cavi in uscita, affinché questi siano ordinati e non
interferiscano con la collocazione dello scanner stesso. Dopo aver
inserito i connettori dei cavi nelle apposite porte dello scanner, far
passare i cavi attraverso la guida più vicina.
Nel caso di un cavo dotato di un connettore a Y (contenente cavi di
alimentazione e di interfaccia) procedere come segue:
1. Collegare i cavi di alimentazione e di interfaccia alle apposite porte.
2. Posizionare i cavi secondo lo schema seguente.
Installazione dello scanner
L'LS7808 è predisposto per essere montato su un bancone con la parte
anteriore dello scanner a livello della superficie del bancone stesso. Per
istruzioni sull'installazione, consultare il manuale di riferimento del
prodotto LS7808.
Scansione dei codici a barre
Installare e programmare lo scanner. Per istruzioni di programmazione,
consultare il manuale di riferimento del prodotto LS7808. Per richiedere
assistenza, contattare il rivenditore locale o Motorola Enterprise Mobility
Support (i dettagli sono riportati sul retro di copertina).
Per eseguire la scansione di un codice e barre:
1.
Assicurarsi che i cavi siano saldamente fissati.
2.
Orientare l'articolo con il codice a barre verso la finestra di scansione.
Scanner compatto orizzontale LS7808
28
3.
Muovere l'articolo attraverso l'area di scansione (vedere pagina 29)
nella direzione della freccia di scansione oppure posizionarlo davanti
allo scanner.
Finestra di
scansione
4.
Flusso prodotti
Freccia di
scansione
Quando la decodifica viene eseguita correttamente, lo scanner emette
un segnale acustico e il LED verde lampeggia brevemente.
Guida rapida
29
Area di scansione
L'area di scansione attiva, ovvero l'area davanti alla finestra di
scansione, è ottimizzata per eseguire la scansione di oggetti che si
muovono nella direzione indicata dalla freccia.
Le linee tratteggiate illustrate di seguito rappresentano l'area di scansione
attiva.
Scanner
Finestra
Descrizione dei segnali acustici
Lo scanner comunica con l'operatore emettendo diverse sequenze e
combinazioni sonore. Vedere la tabella Indicazioni sonore sottostante,
che riporta le sequenze emesse sia durante la normale scansione che
durante la programmazione.
Sequenza
segnali acustici
Significato
Utilizzo standard
3 segnali acustici
acuti
Accensione.
Segnale acustico
acuto
Codice a barre decodificato (se il segnale di decodifica è
abilitato).
4 segnali acustici
bassi e lunghi
È stato rilevato un errore di trasmissione nel simbolo
acquisito. I dati vengono ignorati. Ciò si verifica se lo
scanner non è configurato correttamente. Verificare
l'impostazione delle opzioni.
Scanner compatto orizzontale LS7808
30
Sequenza
segnali acustici
Significato
5 segnali acustici
bassi
Errore di conversione o formato.
Tre segnali acustici
acuti e uno basso
Errore di ricezione RS-232 sulla porta host RS-232 o sulla
porta RS-232 ausiliaria.
Memorizzazione codice 39
Segnale acustico
acuto/basso
Nuovo codice 39 memorizzato.
3 segnali acustici
lunghi e acuti
Buffer codice 39 pieno.
Un segnale acustico
basso, uno acuto e
uno basso
Buffer codice 39 cancellato o tentativo di cancellare/
trasmettere un buffer vuoto.
Un segnale acustico
basso e uno acuto
Trasmissione riuscita dei dati nel buffer.
Host
Solo USB
4 segnali acustici
acuti e brevi
Inizializzazione non completata. Attendere alcuni secondi
e ripetere la scansione.
Segnale acustico di
accensione dopo la
scansione con un
dispositivo di tipo
USB.
Affinché lo scanner possa funzionare alla massima
potenza, stabilire la comunicazione con il bus.
Questo segnale
acustico di accensione
viene generato più di
una volta.
Il bus USB potrebbe attivare e disattivare l'alimentazione
allo scanner più di una volta. Questa condizione è normale
e si verifica solitamente quando si avvia il PC.
Solo host RS-232
Segnale acustico
acuto
Ricezione di un carattere <BEL> con segnale acustico
<BEL> attivato.
Guida rapida
31
Sequenza
segnali acustici
Significato
Solo porta ausiliaria RS-232
Segnale acustico
acuto
È stato ricevuto e trasmesso all'host un blocco completo di
dati, sia a causa di un "A capo" che per timeout
dell'intervallo di due secondi previsto per la risposta della
comunicazione seriale.
4 segnali acustici
bassi e lunghi
Si è verificata una condizione di sovraccarico di dati.
Evitare di eseguire la scansione tramite altre porte quando
la porta ausiliaria RS-232 sta ricevendo grandi quantità di
dati.
Descrizione degli stati del LED
Oltre alle sequenze di segnali acustici, lo scanner comunica con
l'operatore tramite un LED. La tabella Descrizione degli stati standard del
LED riporta i significati degli stessi durante la scansione.
LED
Significato
Spento
Scanner non alimentato.
Verde
Lo scanner è acceso e pronto all'uso.
Breve lampeggio
La decodifica del codice a barre è
riuscita.
Lento e continuo lampeggio del rosso,
verde acceso
Lo scanner è in modalità di
programmazione.
Rapido e continuo lampeggio del rosso,
verde acceso
Problema interno. Il laser viene spento
per ragioni di sicurezza.
Verde acceso (lampeggiamento
a intervalli del laser)
Lo scanner è in modalità di
lampeggiamento a basso consumo.
Rosso e verde accesi
Lo scanner è nella modalità di
motore a basso consumo (Sleep)
e di spegnimento del laser.
Scanner compatto orizzontale LS7808
32
Manutenzione
L'unico intervento di manutenzione necessario è la pulizia della finestra
di scansione. In caso di finestra sporca o graffiata, lo scanner potrebbe
non funzionare correttamente.
-
Pulire la finestra con un panno umido.
-
Passare sulla finestra un panno inumidito con ammoniaca o acqua.
Per pulire la finestra di scansione:
1.
Inserire una moneta nella testa delle viti grandi sulla parte anteriore
dello scanner e ruotarla in senso antiorario.
2.
Sollevare la finestra.
3.
Pulire con un panno la parte interna della finestra superiore.
4.
Pulire con un panno la superficie superiore della finestra inferiore.
5.
Reinstallare il coperchio superiore stringendo le due grosse viti.
Per sostituire la finestra di scansione:
1.
Rimuovere la finestra in base alla procedura sopra descritta.
2.
Sostituirla con una nuova finestra.
3.
Reinstallare il coperchio superiore stringendo le due grosse viti.
Guida rapida
33
Risoluzione dei problemi
Problema
Il pattern di scansione
omnidirezionale non
viene visualizzato
quando si eseguono le
operazioni necessarie
per l'installazione del
cavo dell'host.
Le righe di scansione
vengono visualizzate,
ma il codice a barre
non viene letto.
Decodifica del codice
a barre eseguita.
Trasmissione dei dati
all'host non riuscita.
Possibile causa
Possibile soluzione
Scanner non
alimentato.
Verificare che l'host sia
alimentato e acceso. Se lo
scanner utilizza
un'alimentazione separata,
assicurarsi che sia collegato
a una presa c.a. funzionante.
Sequenza di accensione
errata. Per ulteriori
informazioni, consultare il
manuale di riferimento del
prodotto LS7808.
Cavo d'interfaccia non
collegato
correttamente.
Verificare che i cavi siano
saldamente collegati.
Scanner non
programmato per il tipo
di codice a barre.
Verificare che lo scanner sia
programmato per il tipo
specifico di codice a barre.
Codice a barre
danneggiato.
Provare a scannerizzare altri
codici a barre dello stesso
tipo.
Codice a barre troppo
lontano dallo scanner.
Avvicinare il codice a barre
allo scanner.
L'host ha disabilitato la
scansione o ignorato
l'impostazione dei
parametri.
Consultare il personale
tecnico responsabile.
Scanner non
programmato per il tipo
di host corretto.
Eseguire la scansione di
codici a barre corretti per il
tipo di host.
Scanner compatto orizzontale LS7808
34
Problema
Possibile causa
Possibile soluzione
Dati raccolti
visualizzati in maniera
errata su host.
Scanner non
programmato per il tipo
di host. Verificare i
parametri del tipo di
host dello scanner o le
opzioni di modifica.
Verificare che sia stato
selezionato l'host corretto.
Per RS-232, assicurarsi che
i parametri di comunicazione
dello scanner corrispondano
alle impostazioni dell'host.
Per l'emulazione tastiera,
verificare che lo scanner sia
programmato con il codice
corretto del Paese e che il
tasto BLOC MAIUSC non sia
premuto.
Verificare che le opzioni
modificabili (ad esempio
conversione da UPCE a
UPCA) siano programmate
correttamente.
Nonostante i diodi
verdi e rossi siano
accesi, lo scanner non
genera il pattern di
scansione
omnidirezionale.
Lo scanner è entrato
nella modalità "Sleep
del motore" per il
risparmio energetico.
Muovere un articolo con il
codice a barre sull'area di
scansione attiva per riattivare
l'unità.
Funzionamento non
corretto dell'host USB
o Synapse.
Lo scanner non
riconosce l'host.
Scollegare e ricollegare il
cavo di alimentazione esterna
per forzare la rilevazione
automatica dell'host.
NOTA Se non è comunque possibile eseguire la scansione, contattare il
distributore oppure chiamare Motorola Enterprise Mobility Support.
Per i numeri telefonici, vedere il retro di copertina.
Guida rapida
35
LS7808 Horizontaler Slot-Scanner
36
Einführung
Dieses Handbuch soll Ihnen Hilfe beim täglichen Betrieb Ihres LS7808
bieten. Ausführlichere Informationen zu Geräteentnahme, Installation,
Leistung, technischen Daten und zur Problembehebung finden Sie im
LS7808 Produktleitfaden (Teilenr. 72E-73952-XX).
Produktbeschreibung
Der Symbol LS7808 ist ein leistungsstarker, omnidirektionaler
horizontaler Slot-Scanner für Scan-Anwendungen mit hohen
Durchsatzraten in allen Verkaufsumgebungen. Dieser Scanner liest alle im
Einzelhandel verwendeten Codes. Darüber hinaus bietet er eine hohe
Schnittstellenflexibilität für die Unterstützung aller gängigen POS-Geräte.
Der Scanner wurde für die horizontale Montage im Kassentisch entwickelt
und ermöglicht das Scannen, während die Ware über den Tisch gezogen
wird. Hierdurch können Produktivität und Durchsatz optimiert werden. Der
Scanner verfügt über eine integrierte Artikelüberwachung (EAS) sowie
über eine Antenne für die Verwendung mit Checkpoint® EAS-Systemen.
Der LS7808-SR20007TCR weist ein Standard-Zinnoxid-Glas, der
LS7808-SR2X009SCR ein kratzbeständiges Saphirglas auf.
Konfigurationen
Der Symbol LS7808 ist in folgenden Konfigurationen erhältlich.
Konfiguration
Funktionen
Symbol LS7808-SR20007TCR
Standard-Zinnoxid-Glasfenster; Grauschwarz;
Checkpoint® EAS; Entspricht RoHS.
Symbol LS7808-SR20009SCR
Kratzbeständiges Saphirglasfenster;
Edelstahlrahmen; Checkpoint® EAS; Entspricht
RoHS.
Symbol LS7808-SR22009SCR
Kratzbeständiges Saphirglasfenster;
Edelstahlrahmen; Checkpoint® EAS; Entspricht
RoHS; RSM-kompatibel (Remote Scanner
Management).
Ein Edelstahl-Montagekit für die Montage im Kassentisch (Teilenr. 12-17206-02R)
ist für alle Modelle erforderlich. Weitere Informationen zur Montage und Installation
finden Sie in den Anweisungen zur Montage und im Installationshandbuch zu EAS.
Kurzreferenz
37
Bedienung des Scanners
Bauteile
LED-Anzeige
Abdeckung der
Anschlüsse
(Anschlüsse hinter
der Abdeckung)
Behälter
Lautsprecher
Stromversorgung
Der LS7808 besitzt keinen Betriebsschalter. Er ist betriebsbereit, sobald
er an das Stromnetz angeschlossen wird.
Anzeigen
Der Scanner verfügt über eine LED mit roter und grüner Leuchtanzeige,
die den Betriebs- und Decodierungsstatus angibt. Die verschiedenen
Leuchtkombinationen und ihre Bedeutungen finden Sie unter
Bedeutung der LED-Anzeigen auf Seite 43.
Wenn der Scanner nicht normal funktioniert, wenden Sie sich an den
Dienst habenden Scanner-Techniker, oder wenden Sie sich unter der
rückseitig angegebenen Telefonnummer an den Motorola Enterprise
Mobility-Kundendienst.
LS7808 Horizontaler Slot-Scanner
38
Ruhemodus
Wenn der Scanner eine bestimmte Zeit lang nicht verwendet wurde,
schaltet er in den Ruhemodus. Der Scanner verfügt über zwei Ruhestufen, Laser- und Motormodus. Im Laser-Ruhemodus schaltet der
Scanner nach 10 Sekunden Inaktivität auf eine Abtastrate von 50 % und
nach einem bestimmten Intervall auf 3 %. Im Motor-Ruhemodus schaltet
der Scanner den Motor und den Laser ab.
Halten Sie einen Barcode vor das Scanfenster, um den Scanner aus
dem Ruhemodus zu aktivieren.
Lautstärke der Pieptöne
Der Scanner gibt einen kurzen Piepton aus, wenn er einen Barcode
erfolgreich entschlüsselt hat. Die Lautstärke des Pieptons kann
elektronisch verändert werden, indem der Host einen entsprechenden
Befehl sendet oder einer der Lautstärke-Barcodes im LS7808
Produktleitfaden eingescannt wird. Nähere Hinweise finden Sie unter
Bedeutung der Pieptöne auf Seite 41.
Anschlüsse
Die Anschlüsse und Schnittstellen des Scanners befinden sich an der
Geräteunterseite. Entfernen Sie die Abdeckung der Anschlüsse, damit
Sie auf die Schnittstellen zugreifen können.
Zweitscanneranschluss
Host-Schnittstelle
EAS
Stromvers
orgung
Anschluss
EAS-Schnit
tstelle
(hinter dem
Etikett)
RS-232Schnittstelle
anschluss
Abdeckung der
Anschlüsse
Kurzreferenz
39
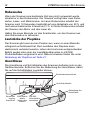
Verkabelung
Der Scanner verfügt über verschiedene Kanäle zur Verkabelung, so
dass die Kabel die Montage des Scanners nicht beeinträchtigen. Stecken
Sie die Kabelverbindungen in die vorgesehenen Scanneranschlüsse und
leiten Sie sie durch den nächstgelegenen Kanal.
Für Kabel mit einem Y-Anschluss (Strom- und Schnittstellenkabel):
1. Schließen Sie Strom- und Schnittstellenkabel an die entsprechenden
Anschlüsse an.
2. Führen Sie die Kabel gemäß dem nachfolgenden Diagramm.
Installation des Scanners
Der LS7808 wird im Kassentisch montiert, wobei die Vorderseite des
Scanners bündig mit der Oberfläche des Kassentischs abschließt.
Nähere Informationen hierzu finden Sie im LS7808 Produktleitfaden.
Scannen von Barcodes
Installieren und programmieren Sie den Scanner. Nähere Informationen
hierzu finden Sie im LS7808 Produktleitfaden. Unterstützung erhalten
Sie bei Bedarf von Ihrem Händler vor Ort oder vom Motorola Enterprise
Mobility-Kundendienst (Telefonnummer auf der Rückseite).
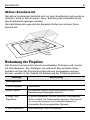
So scannen Sie einen Barcode:
1.
Überprüfen Sie, ob alle Kabelverbindungen fest angeschlossen sind.
2.
Halten Sie den Gegenstand mit dem Barcode in Richtung Scanfenster.
LS7808 Horizontaler Slot-Scanner
40
3.
Ziehen Sie den Gegenstand in Richtung des Scanpfeils durch den
aktiven Scanbereich (siehe Seite 41), oder setzen Sie ihn vor dem
Scanner ab.
Scanfenster
4.
Warenfluss
Scanpfeil
Nach erfolgreicher Decodierung gibt der Scanner einen Piepton aus
und die grüne LED leuchtet kurz auf.
Kurzreferenz
41
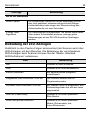
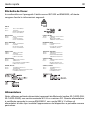
Aktiver Scanbereich
Der aktive Scanbereich befindet sich vor dem Scanfenster und wurde so
optimiert, dass er Artikel scannt, die in Richtung des Scanpfeils durch
den Scanbereich gezogen werden.
Die nachfolgenden gepunkteten Bereiche stellen den aktiven Scanbereich dar.
Scanfenster
Bedeutung der Pieptöne
Der Scanner kommuniziert durch verschiedene Tonfolgen und -muster
mit dem Bediener. Die Tonfolgen, die während des normalen Scanbetriebs und bei der Scannerprogrammierung ausgegeben werden
können, werden in der Tabelle zur Bedeutung der Pieptöne erläutert.
Tonfolge
Bedeutung
Normalgebrauch
3 hohe Pieptöne
Einschalten
Hoher Piepton
Ein Barcode-Symbol wurde entschlüsselt (wenn
Decodierungs-Signalgeber aktiviert).
4 lange, leise
Signaltöne
In einem gescannten Symbol wurde ein Übertragungsfehler ermittelt. Die Daten werden ignoriert. Dies kommt
vor, wenn der Scanner nicht richtig konfiguriert ist.
Überprüfen Sie die eingestellten Optionen.
5 leise Signaltöne
Konvertierungs- oder Formatfehler
LS7808 Horizontaler Slot-Scanner
42
Tonfolge
Pieptöne:
hoch/hoch/hoch/tief
Bedeutung
RS-232 Empfangsfehler am RS-232-Host oder der
RS-232-Schnittstelle.
Code 39 Puffer
Piepton: hoch/tief
Neue Code 39 Daten wurden in den Puffer geschrieben.
3 lange, hohe
Pieptöne
Code 39 Puffer ist voll.
Pieptöne:
tief/hoch/tief
Der Code 39 Puffer wurde gelöscht, oder es wurde
versucht, einen leeren Puffer zu löschen oder zu
übertragen.
Pieptöne: tief/hoch
Gepufferte Daten wurden erfolgreich übertragen.
Host-spezifisch
Nur USB
4 kurze, laute
Pieptöne
Scanner hat Initialisierung nicht abgeschlossen.
Versuchen Sie es nach einigen Sekunden erneut.
Scanner gibt nach
dem Scannen eines
USB-Gerätetyps eine
Einschalt-Tonfolge
aus.
Die Kommunikation mit dem Bus muss hergestellt werden,
bevor der Scanner auf der höchsten Leistungsstufe
arbeiten kann.
Die
Einschalt-Tonfolge
wird mehrmals
ausgegeben.
Der USB-Bus kann den Scanner in einen Status
versetzen, in dem der Scanner mehrmals ein- und
ausgeschaltet wird. Das ist normal und kommt oft vor,
wenn der PC einen Kaltstart durchführt.
Nur RS-232 Host
Hoher Piepton
Ein <BEL>-Zeichen wurde empfangen, und die
Signal-Einschaltfunktion <BEL> ist aktiviert.
Kurzreferenz
43
Tonfolge
Bedeutung
Nur RS-232-Schnittstelle
Hoher Piepton
Ein vollständiger Datenblock wurde empfangen und an
den Host gesendet, entweder aufgrund eines Wagenrücklaufzeichens oder wegen der Überschreitung des
Antwortzeitlimits von zwei Sekunden.
4 lange, leise
Signaltöne
Ein Datenüberlauf ist aufgetreten. Sie sollten keine Daten
über andere Schnittstellen einlesen, solange große
Datenmengen an den RS-232-Anschluss übertragen
werden.
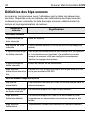
Bedeutung der LED-Anzeigen
Zusätzlich zu den Piepton-Folgen kommuniziert der Scanner auch über
LED-Anzeigen mit dem Benutzer. Die Bedeutung der verschiedenen
LED-Anzeigen beim Scannen können Sie der Tabelle „StandardLED-Definitionen“ entnehmen.
LED
Bedeutung
Aus
Scanner ist nicht im Betrieb.
Grün
Scanner ist an und betriebsbereit.
Kurzes Aufblinken
Ein Barcode wurde erfolgreich
entschlüsselt.
Langsames rotes Aufblinken, Grün ein
Der Scanner befindet sich im
Programmiermodus.
Schnelles rotes Aufblinken, Grün ein
Ein interner Fehler ist aufgetreten; aus
Sicherheitsgründen hat sich der Laser
abgeschaltet.
Grün ein (Laser blinkt)
Scanner ist im Strom sparenden
Blink-Modus.
Rotes und grünes Dauerlicht
Scanner ist im Strom sparenden
Modus (Ruhemodus) und
Laser-Ruhemodus.
LS7808 Horizontaler Slot-Scanner
44
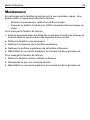
Wartung
Die einzige erforderliche Wartungsmaßnahme besteht im Reinigen des
Scanfensters. Ein verschmutztes oder verkratztes Fenster kann sich
negativ auf das Scannen auswirken.
-
Entfernen Sie Schmutz- oder Staubpartikel mit einem feuchten
Tuch.
-
Wischen Sie das Fenster mit einem angefeuchteten Tuch (Wasser
oder Salmiaklösung) ab.
So reinigen Sie das Scanfenster:
1.
Lösen Sie die großen Schraubenköpfe an der Vorderseite des
Scanners mithilfe einer Münze (gegen den Uhrzeigersinn drehen).
2.
Heben Sie das Fenster an.
3.
Wischen Sie die Unterseite des oberen Fensters aus.
4.
Wischen Sie die Oberseite des unteren Fensters aus.
5.
Bringen Sie die obere Abdeckung wieder an, indem Sie die beiden
großen Schrauben anziehen.
So tauschen Sie das Scanfenster aus:
1.
Entfernen Sie das Fenster wie oben beschrieben.
2.
Setzen Sie ein neues Fenster ein.
3.
Bringen Sie die obere Abdeckung wieder an, indem Sie die beiden
großen Schrauben anziehen.
Kurzreferenz
45
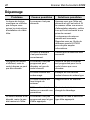
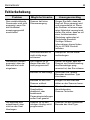
Fehlerbehebung
Problem
Das omnidirektionale
Scanmuster wird nicht
angezeigt, wenn Sie
das Hostkabel
anweisungsgemäß
anschließen.
Abtastzeilen werden
angezeigt, aber der
Barcode wird nicht
eingelesen.
Der Barcode wird
entschlüsselt, aber
nicht an den Host
übertragen.
Mögliche Ursache
Lösungsvorschlag
Scanner hat keine
Stromversorgung.
Sorgen Sie dafür, dass der
Host mit Strom versorgt wird
und eingeschaltet ist. Wenn
der Scanner mit einem separaten Netzkabel versorgt wird,
stellen Sie sicher, dass es mit
einer funktionierenden
Steckdose verbunden ist.
Fehlerhafte EinschaltTonfolge. Nähere
Informationen hierzu finden
Sie im LS7808 Produktleitfaden.
Schnittstellenkabel ist
nicht richtig angeschlossen.
Überprüfen Sie die Kabelverbindungen.
Der Scanner ist für
diesen Barcode-Typ
nicht programmiert.
Stellen Sie sicher, dass der
Scanner zur Entschlüsselung
des Barcodetyps programmiert ist, den Sie einlesen.
Barcode ist beschädigt.
Versuchen Sie, andere
Barcodes desselben Typs
einzulesen.
Barcode zu weit vom
Scanner entfernt.
Bringen Sie den Barcode
näher an den Scanner heran.
Der Host hat die
Scanfunktion
deaktiviert oder
bestehende
Parametereinstellungen
außer Kraft gesetzt.
Wenden Sie sich an den
diensthabenden
Scanner-Techniker.
Scanner ist für den
richtigen Hosttyp nicht
programmiert.
Scannen Sie den passenden
Barcode des Host-Typs.
LS7808 Horizontaler Slot-Scanner
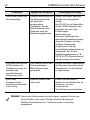
46
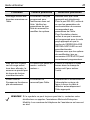
Problem
Mögliche Ursache
Lösungsvorschlag
Scan-Daten falsch auf
Host angezeigt.
Scanner wurde nicht für
die Zusammenarbeit
mit dem Host
programmiert.
Überprüfen Sie die
Host-Parameter des
Scanners oder die
Bearbeitungsoptionen.
Stellen Sie sicher, dass der
richtige Host ausgewählt
wurde.
Bei RS-232 ist zu überprüfen,
ob die COM-Parameter des
Scanners mit den HostEinstellungen
übereinstimmen.
Bei einer Tastaturweiche
muss darauf geachtet werden,
dass der Scanner mit dem
richtigen Ländercode
programmiert und die
Feststelltaste abgeschaltet ist.
Überprüfen Sie, ob die
Bearbeitungsoptionen (z. B.
UPCE-/UPCA-Konvertierung)
richtig konfiguriert wurden.
Die grüne und die rote
LED leuchten auf.
Trotzdem erzeugt der
Scanner das
omnidirektionale
Scanmuster nicht.
Der Scanner hat in den
Strom sparenden
Motor-Ruhemodus
geschaltet.
Ziehen Sie einen Gegenstand
mit Barcode über den aktiven
Scanbereich, um die Einheit
zu reaktivieren.
USB- oder
Synapsen-Hostanschluss funktioniert
nicht richtig.
Scanner erkennt den
Host nicht.
Lösen Sie das externe
Netzteil und schließen Sie es
wieder an, um eine
automatische
Host-Erkennung auszulösen.
HINWEIS Wenn das Gerät weiterhin nicht scannt, wenden Sie sich an
Ihren Händler oder rufen Sie den Motorola Enterprise
Mobility-Kundendienst an. Telefonnummern rückseitig
angegeben.
Kurzreferenz
47
Lector de ranura horizontal LS7808
48
Introducción
Esta guía está diseñada como asistente para las operaciones habituales
con el dispositivo LS7808. En la Guía de referencia de producto LS7808
(ref. 72E-73952-XX) puede obtener información detallada acerca de las
operaciones de desembalaje e instalación, así como de la programación o
de las especificaciones de rendimiento y la solución de problemas.
Descripción del producto
El lector de presentación Symbol LS7808 es un lector láser omnidireccional de
alto rendimiento compatible con aplicaciones de gran productividad en los puntos
de venta. El lector permite la lectura de todos los símbolos minoristas y admite
varias interfaces, por lo que puede utilizarse con los dispositivos de punto de
venta más habituales. El lector está diseñado para su montaje en mostrador y
permite la lectura mediante el deslizamiento de los elementos, lo que permite
una mejora de la productividad y el rendimiento. El lector incluye una antena de
protección electrónica de artículos para utilizarla con los sistemas de protección
electrónica de artículos Checkpoint®.
El modelo LS7808-SR20007TCR incluye una ventana de cristal estándar
con óxido de estaño y el modelo LS7808-SR2X009SCR incluye una ventana
de cristal de zafiro resistente a arañazos.
Configuraciones
El modelo Symbol LS7808 está disponible con las siguientes configuraciones.
Configuración
Características
LS7808-SR20007TCR de Symbol
Ventana de cristal estándar (óxido de estaño);
negro claro; sistema de protección electrónica de
artículos (EAS) y Checkpoint®; conforme a RoHS.
LS7808-SR20009SCR de Symbol
Ventana de cristal resistente a arañazos (zafiro);
cubierta superior de acero inoxidable; sistema de
protección electrónica de artículos (EAS) y
Checkpoint®; conforme a RoHS.
LS7808-SR22009SCR de Symbol
Ventana de cristal resistente a arañazos (zafiro);
cubierta superior de acero inoxidable; sistema de
protección electrónica de artículos (EAS) y
Checkpoint®; conforme a RoHS; preparado para la
gestión de lectura remota (RSM) desde el primer
momento.
Se necesita un kit para montaje en mostrador de acero inoxidable (ref. 12-17206-02R)
para todos los modelos. Consulte las Instrucciones de Montaje (Mounting Instructions)
y la Guía de instalación del sistema de protección electrónica de artículos (EAS
Installation Guide) para obtener las instrucciones de montaje y/o instalación.
Guía rápida de referencia
49
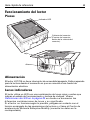
Funcionamiento del lector
Piezas
Indicador LED
Cubierta del conector
(Puertos del conector
detrás de la cubierta del
conector)
cajón
Altavoz
Alimentación
El lector LS7708 no tiene interruptor de encendido/apagado. Está preparado
para la lectura desde el momento en que se conecta a una fuente de
alimentación eléctrica.
Luces indicadoras
El lector utiliza un LED con una combinación de luces rojas y verdes que
indican el estado de funcionamiento y lectura de códigos. Véase
Definiciones de LED en la página 55 en donde se enumeran las
diferentes combinaciones de luces y su significado.
Si el lector no funciona según lo previsto, póngase en contacto con el
técnico encargado de las operaciones de lectura o o llame al Centro de
asistencia de Motorola Enterprise Mobility (consulte los datos en la
contraportada).
Lector de ranura horizontal LS7808
50
Modo de reposo
El lector pasa automáticamente al modo de reposo cuando permanece
inactivo durante un período especificado. El lector tiene dos niveles de
reposo: láser y motor. En el modo de reposo de láser, los impulsos del
láser se reducen a un 50% al cabo de diez segundos de inactividad, y al
3% después de un tiempo especificado. En el modo de reposo del
motor, el lector está programado para que se apaguen el motor y el
láser.
Para activar el lector si está en modo de reposo, presente un código de
barras ante la ventana de lectura.
Volumen del indicador sonoro
El lector emite un bip breve cuando lee correctamente un código de
barras. El volumen del indicador sonoro se modifica electrónicamente
con un comando enviado por el host o leyendo uno de los códigos de
barras de volumen del mismo que figuran en la Guía de referencia de
producto LS7808. Consulte Definiciones del indicador sonoro en la
página 53.
Conexiones
Los puertos se encuentran en la parte inferior del lector. Retire la
cubierta del conector para acceder a los puertos.
Puerto de lectura secundario
Puerto de host
EAS
Puerto de
Puerto
Puerto
interblode
auxiliar
alimen- queo de EAS RS-232
tación (detrás de la
etiqueta)
Cubierta del
conector
Guía rápida de referencia
51
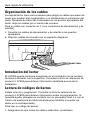
Organización de los cables
La caja del lector tiene varios canales para dirigir los cables que salen de
modo que queden bien organizados y no obstaculicen la colocación del
lector. Después de hacer las conexiones en los puertos apropiados del
lector, dirija los cables por el canal más cercano.
Para un cable con conexión en Y (con conectores de alimentación y de
interfaz):
1. Conecte los cables de alimentación y de interfaz a los puertos
apropiados.
2. Dirija los cables de acuerdo con el siguiente diagrama.
Instalación del lector
El LS7808 puede montarse empotrado en el mostrador con la ventana
de lectura alineada con la superficie. Consulte la Guía de referencia de
producto LS7808 para obtener información detallada acerca de la
instalación.
Lectura de códigos de barras
Instale el lector y prográmelo. Consulte la Guía de referencia de
producto LS7808 para obtener información sobre la programación. Si
necesita ayuda, póngase en contacto con su proveedor local o o con el
Centro de asistencia de Motorola Enterprise Mobility (consulte los
datos en la contraportada).
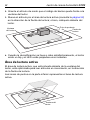
Para leer un código de barras:
1.
Asegúrese de que todos los cables están bien conectados.
Lector de ranura horizontal LS7808
52
2.
Oriente el artículo de modo que el código de barras quede frente a la
ventana del lector.
3.
Mueva el artículo por el área de lectura activa (consulte la página 52)
en la dirección de la flecha de lectura; o bien, colóquelo delante del
lector.
Flujo de producto
Flecha de
lectura
Ventana
del lector
4.
Cuando la decodificación se lleva a cabo satisfactoriamente, el lector
emite un bip y el LED verde parpadea unos instantes.
Área de lectura activa
El área de lectura activa, que está situada delante de la ventana del
lector, está optimizada para leer artículos en movimiento, en la dirección
de la flecha de lectura.
Las zonas de puntos en la parte inferior representan el área de lectura
activa.
Ventana del
lector
Guía rápida de referencia
53
Definiciones del indicador sonoro
El lector se comunica con el usuario a través de la emisión de distintas
secuencias y pautas del indicador sonoro. Consulte en la tabla de
indicadores sonoros las secuencias acústicas que se ejecutan durante la
lectura normal y durante la programación del lector.
Secuencia del
indicador
sonoro
Indicación
Uso estándar
3 bips agudos
Encendido.
Bip agudo
Se ha decodificado un símbolo de código de barras (si el
indicador sonoro de decodificación está activado).
4 bips largos y
graves
Se ha detectado un error en la transmisión de un símbolo
leído. Se omiten los datos. Esto ocurre si el lector no está
configurado correctamente. Compruebe la configuración
de las opciones.
5 bips graves
Error de conversión o de formato.
Bips agudo/agudo/
agudo/grave
Error de recepción de RS-232 en host RS-232 o puerto
auxiliar RS-232.
Almacenamiento en búfer de código 39
Bips agudo/grave
Se han introducido nuevos datos de código 39 en el búfer.
3 bips agudos largos
El búfer del código 39 está lleno.
Bips grave/agudo/
grave
Se ha borrado el búfer del código 39 o se ha intentado
borrar o transmitir un búfer vacío.
Bips grave/agudo
Transmisión correcta de datos de búfer.
Lector de ranura horizontal LS7808
54
Secuencia del
indicador
sonoro
Indicación
Específicas del host
Sólo USB
4 bips agudos breves El lector no ha completado la inicialización. Espere unos
segundos y repita la lectura.
El lector emite un bip
de encendido tras
detectar un tipo de
dispositivo USB.
La comunicación con el bus debe establecerse antes de
que el lector pueda funcionar a la máxima potencia.
Este bip de
encendido se
produce más de
una vez.
El bus USB puede dejar el lector en un estado en el que el
lector se encienda y se apague más de una vez. Esto es
normal y suele ocurrir cuando el PC arranca en frío.
Sólo host RS-232
Bip agudo
Se recibe un carácter <BEL> y se activa el bip con <BEL>.
Sólo puerto auxiliar RS-232
Bip agudo
Se recibió un bloque de datos completo y se envió al host,
debido a un retorno de carro o porque transcurrió el
tiempo límite de respuesta en serie de dos segundos.
4 bips largos y
graves
Se ha producido un desbordamiento de datos. No lea
datos a través de otros puertos cuando se envíe una gran
cantidad de información al puerto RS-232 auxiliar.
Guía rápida de referencia
55
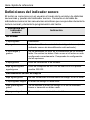
Definiciones de LED
Además de las secuencias del indicador sonoro, el lector informa al
usuario a través de indicadores LED. En la tabla de definiciones de LED
estándar se definen las indicaciones de LED que se muestran durante la
lectura.
LED
Indicación
Apagado
El lector no recibe energía.
Verde
El lector está encendido y listo para
leer.
Parpadeo durante unos instantes
El código de barras se ha leído
correctamente.
Indicador rojo en parpadeo lento y
continuo e indicador verde encendido
El lector se encuentra en modo de
programación.
Indicador rojo en parpadeo rápido y
continuo e indicador verde encendido
Existe un problema interno; el láser se
apaga por cuestiones de normatividad.
Indicador verde encendido (y láser
parpadeante)
El lector se encuentra en el modo de
parpadeo de baja potencia.
Indicadores rojo y verde encendidos
El lector se encuentra en el modo de
baja potencia (reposo) y cierre de
láser.
Mantenimiento
La única operación de mantenimiento necesaria consiste en limpiar la
ventana de salida. Una ventana sucia o rayada puede afectar a la
lectura.
-
Quite el polvo que pudiera haber con un paño húmedo.
-
Limpie la ventana con un paño humedecido con amoníaco o agua.
Para limpiar la ventana de salida:
1.
Use una moneda para girar los tornillos en la parte frontal del lector en
sentido contrario a las agujas del reloj.
2.
Levante la ventana.
3.
Limpie la parte de abajo de la ventana superior.
Lector de ranura horizontal LS7808
56
4.
Limpie la superficie de la ventana inferior.
5.
Vuelva a colocar la cubierta y apriete los dos tornillos.
Para cambiar la ventana de salida:
1.
Quite la ventana como se indica más arriba.
2.
Reemplácela con una nueva ventana.
3.
Vuelva a colocar la cubierta y apriete los dos tornillos.
Solución de problemas
Problema
El patrón de lectura
omnidireccional no se
visualiza cuando se
siguen las indicaciones
para la instalación del
cable del host.
Causas posibles
Soluciones posibles
El lector no recibe
alimentación.
Asegúrese de que el host está
conectado al suministro
eléctrico y está encendido. Si
el lector utiliza una fuente de
alimentación independiente,
asegúrese de que está
conectada a una toma de
corriente alterna que
funcione.
La secuencia de encendido es
incorrecta. Consulte la Guía
de referencia de producto
LS7808 para obtener más
información.
El cable de interfaz no
está bien conectado.
Compruebe que los cables
están bien conectados.
Guía rápida de referencia
Problema
Se muestran las líneas
de lectura pero no se
puede leer el código
de barras.
El código de barras se
decodifica sin
problemas pero la
información no se
transmite al host.
Causas posibles
57
Soluciones posibles
El lector no está
programado para leer
este tipo de código de
barras.
Asegúrese de que el lector
está programado para leer el
tipo de código de barras que
desea detectar.
El código de barras
está dañado.
Intente leer otros códigos de
barras del mismo tipo.
El código de barras se
encuentra demasiado
lejos del lector.
Acerque el código de barras
al lector.
El host ha desactivado
la lectura o anulado la
configuración de
parámetros.
Consulte al técnico
responsable de sistemas de
lectura.
El lector no está
programado para el tipo
de host adecuado.
Lea el código de barras del
tipo de host adecuado.
Lector de ranura horizontal LS7808
58
Problema
Causas posibles
Soluciones posibles
Los datos leídos no se
muestran
correctamente en el
host.
El lector no está
programado para
funcionar con el host.
Compruebe las
opciones de edición o
los parámetros del tipo
de host del lector.
Asegúrese de que se ha
seleccionado el host adecuado.
Para RS-232, asegúrese de
que los parámetros de
comunicaciones del lector
coinciden con los del host.
En lo que respecta a la interfaz
de teclado (Keyboard Wedge),
asegúrese de que el lector está
programado con el código de
país adecuado y que la tecla
Bloq Mayús no está activa.
Asegúrese de que las opciones
de edición (p. ej., conversión de
UPCE a UPCA) están
correctamente programadas.
Aunque los
indicadores LED verde
y rojo están
encendidos, el lector
no produce el patrón
de lectura
omnidireccional.
El lector ha pasado al
modo de reposo del
motor de baja potencia.
Pase un artículo con código
de barras sobre el área de
lectura activa para activar la
unidad.
El host USB o
Synapse no funciona
correctamente.
El lector no reconoce el
host.
Desconecte la fuente de
alimentación externa y vuelva
a insertarla para forzar la
detección automática del
host.
NOTA Si aun así no es posible leer el símbolo, póngase en contacto con
su distribuidor o o llame al Centro de asistencia de Motorola
Enterprise Mobility. Busque el número de teléfono en la
contraportada.
Guía rápida de referencia
59
Leitor horizontal com posição LS7808
60
Introdução
Este guia foi elaborado para ajudar na operação de rotina do LS7808.
Informações detalhadas sobre as especificações de desempenho,
desembalagem, instalação e programação, além de soluções de
problemas, podem ser encontradas no Guia de Referência do
Produto LS7808 (p/n 72E-73952-XX).
Descrição do produto
O Symbol LS7808 é um leitor horizontal com encaixe omnidirecional e
de alto desempenho para aplicações com altas taxas de transferência
nos pontos de venda. O Symbol LS7808 lê todas as simbologias do
varejo e seu recurso de interface múltipla permite que funcione com
todos os dispositivos de pontos de vendas conhecidos. O leitor foi
projetado para montagem horizontal em balcão e permite leitura por
deslizamento de itens, com maior taxa de transferência e produtividade.
Com uma antena para vigilância eletrônica de mercadorias (EAS), o
leitor pode ser usado com sistemas de EAS Checkpoint®.
O modelo LS7808-SR20007TCR vem com vidro padrão revestido com
óxido de estanho, enquanto o LS7808-SR2X009SCR vem com vidro
safira resistente a arranhões.
Configurações
O Symbol LS7808 está disponível nas configurações descritas abaixo.
Configuração
Funções
Symbol LS7808-SR20007TCR
Janela de vidro padrão (revestido com óxido de
estanho); preto fosco; EAS Checkpoint®; em
conformidade com a RoHS.
Symbol LS7808-SR20009SCR
Janela de vidro (safira) resistente a arranhões;
superfície e moldura de aço inoxidável; EAS
Checkpoint®; em conformidade com a RoHS.
Symbol LS7808-SR22009SCR
Janela de vidro (safira) à prova de arranhões;
superfície e moldura de aço inoxidável; EAS
Checkpoint®; em conformidade com a RoHS;
compatível com gerenciamento remoto do
leitor, pronto para uso imediato.
Todos os modelos requerem um kit de montagem para balcão em aço inoxidável
(peça nº 12-17206-02R). Consulte o Guia de Instalação do EAS e as instruções de
montagem para obter informações de montagem e instalação.
Guia de Consulta Rápida
61
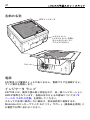
Utilizando o leitor
Peças
Indicador de LED
Capa protetora
(conectores de porta
atrás da capa)
Caixa
Alto-falante
Alimentação
O LS7808 não tem um interruptor. Ele esta pronto para ser usado que
for conectado a uma fonte de alimentação.
Luzes indicadoras
O leitor contém um LED com uma combinação de luzes verde e
vermelha para indicar a operação e o status de decodificação. Veja as
diferentes combinações de luzes e seus significados em Definições
de LED na página 67.
Se o leitor não estiver funcionando normalmente, contate o técnico
encarregado das operações de leitura ou ligue para o suporte técnico
da Motorola Enterprise Mobility (detalhes na contracapa).
Leitor horizontal com posição LS7808
62
Modo de dormir
O leitor entra automaticamente no modo de dormir após ficar inativo por
um período especificado. O leitor tem dois níveis de dormir: laser e
motor. No modo de dormir laser, após 10 segundos de inatividade o
laser pulsa a uma taxa de 50%, caindo depois para 3% após um tempo
especificado. No modo de dormir motor, o leitor é programado para
desligar o motor e o laser.
Para ativar o leitor quando em modo de dormir, posicione um código de
barras na sua janela.
Volume do bip
O leitor emite um bip curto quando lê com êxito um código de barras. O
volume do bip é alterado eletronicamente por um comando enviado pelo
host ou pela leitura de um dos códigos de barras de volume do bip no
Guia de Referência do Produto LS7808. Consulte Definições do bip na
página 65.
Conexões
As portas do leitor ficam na sua parte inferior. Retire a capa protetora
para ter acesso às portas.
Porta secundária
Porta do host
EAS
Porta
de
alimentação
Capa
protetora
Porta de
Porta
travaauxiliar
mento EAS RS-232
(atrás da
etiqueta)
Orientando os cabos
A caixa do leitor tem diversas canaletas para os cabos de saída a fim de
não atrapalhar o posicionamento do leitor. Após colocar os conectores
Guia de Consulta Rápida
63
de cabo nas portas apropriadas do leitor, encaixe os cabos nas
canaletas mais próximas.
No caso de um cabo com conector em Y (que contém os conectores de
alimentação e de interface):
1. Conecte os cabos de alimentação e de interface às portas
apropriadas.
2. Oriente os cabos de acordo com o diagrama a seguir.
Instalando o leitor
Monte o LS7808 em um balcão, mantendo seu painel em nível com a
superfície do balcão. Consulte o Guia de Referência do Produto LS7808
para obter instruções de instalação detalhadas.
Leitura de códigos de barra
Instale e programe o leitor. Consulte o Guia de Referência do Produto
LS7808 para obter instruções de programação. Para obter assistência,
entre em contato com o fornecedor local ou com o suporte técnico da
Motorola Enterprise Mobility (detalhes na contracapa).
Para ler um código de barras:
1.
Verifique se todas as conexões de cabos estão firmes.
2.
Posicione o artigo com o código de barras voltado para a janela do
leitor.
Leitor horizontal com posição LS7808
64
3.
Mova o artigo pela área ativa de leitura (ver página 65) na direção da
seta de leitura ou coloque-o em frente ao leitor.
Janela do
leitor
4.
Fluxo de produtos
Seta de leitura
Quando a decodificação é bem-sucedida, o leitor emite bips e o LED
verde pisca momentaneamente.
Guia de Consulta Rápida
65
Área ativa de leitura
A área ativa de leitura, que fica em frente à janela do leitor, tem melhor
desempenho quando a leitura é feita no sentido indicado pelas setas.
As linhas tracejadas abaixo delimitam a área ativa de leitura.
Janela do
leitor
Definições do bip
O leitor comunica-se com o usuário pela emissão de diferentes
seqüências e padrões de bip. Consulte a tabela Indicações sonoras
abaixo para conhecer as seqüências de bip emitidas tanto nas leituras
como na programação do leitor.
Seqüência de
bips
Indicação
Uso padrão
3 bips agudos
Inicializado.
Bip agudo
Um símbolo de código de barras foi decodificado (se o bip
de decodificação estiver ativado).
4 bips graves longos
Um erro de transmissão foi detectado em um símbolo lido.
O dado é ignorado. Isso ocorre quando o leitor não está
configurado corretamente. Verifique a configuração da
opção.
5 bips graves
Erro de conversão ou formato.
Bips agudo-agudoagudo-grave
Erro de recebimento RS-232 no host RS-232 ou na porta
auxiliar RS-232.
Leitor horizontal com posição LS7808
66
Seqüência de
bips
Indicação
Buffer do Código 39
Bips agudo-grave
Novos dados do Código 39 foram inseridos no buffer.
3 bips agudos longos O buffer do Código 39 está cheio.
Bips
grave-agudo-grave
O buffer do Código 39 foi apagado ou houve uma tentativa
de limpar ou transmitir um buffer vazio.
Bips grave/agudo
Êxito na transmissão de dados em buffer.
Específico do host
Apenas USB
4 bips agudos curtos
O leitor não completou a inicialização. Aguarde alguns
segundos e faça a leitura novamente.
O leitor emite um bip
de inicialização após
a leitura do tipo de
dispositivo USB.
A comunicação com o barramento deve ser estabelecida
para o leitor operar no nível mais alto de potência.
Esse bip de
inicialização ocorre
mais de uma vez.
O barramento USB pode colocar o leitor em uma condição
em que a alimentação do leitor é ativada e desativada
mais de uma vez. Isso é normal e acontece comumente
quando o PC é inicializado a frio.
Host RS-232 somente
Bip agudo
Um caractere <BEL> é recebido e Beep on <BEL> é
ativado.
Porta auxiliar RS-232 somente
Bip agudo
Um bloco completo de dados foi recebido e enviado ao
host, devido a um retorno de carro ou porque o tempo
limite de resposta serial de dois segundos expirou.
4 bips graves longos
Ocorreu uma condição de saturação de dados.
Abstenha-se de ler dados de outras portas quando
grandes volumes de dados forem enviados para a porta
auxiliar RS-232.
Guia de Consulta Rápida
67
Definições de LED
Além das seqüências de bip, o leitor se comunica com o usuário via
LED. A tabela Definições padrão de LED define as indicações de LED
exibidas durante a leitura.
LED
Indicação
Apagado
Não há energia aplicada ao leitor.
Verde
O leitor está ligado e pronto para a
leitura.
Pisca momentaneamente
Um código de barras foi decodificado
com êxito.
Vermelho pisca lentamente de forma
contínua, verde aceso
O leitor está no modo de programação.
Vermelho pisca rapidamente de forma
contínua, verde aceso
Existe um problema interno; o laser foi
desligado por motivos de
regulamentação.
Verde aceso (e laser piscando)
O leitor está no modo piscar, de baixa
potência.
Vermelho e verde acesos
O leitor está no modo de baixa potência
(dormir) e de desligamento do laser.
Manutenção
A limpeza da janela de saída é a única manutenção requerida. Uma
janela suja ou arranhada pode afetar a atividade de leitura.
-
Remova todas as partículas de sujeira com um pano úmido.
-
Limpe a janela com um pano embebido em amônia ou água.
Para limpar a janela de saída:
1.
Use uma moeda para girar os parafusos grandes na frente do leitor
no sentido anti-horário.
2.
Levante a janela.
3.
Limpe a parte de baixo da janela.
4.
Limpe a parte de cima da janela inferior.
5.
Coloque a cobertura de volta no lugar apertando os dois parafusos
grandes.
Leitor horizontal com posição LS7808
68
Para mudar a janela de saída:
1.
Retire a janela como descrito acima.
2.
Coloque uma nova janela no lugar.
3.
Instale a cobertura novamente apertando os dois parafusos grandes.
Solução de problemas
Problema
O padrão de leitura
omni-line não é exibido
quando você segue as
instruções para a
instalação do cabo do
host.
As linhas de leitura são
exibidas, mas o código
de barras não é lido.
O código de barras foi
decodificado, mas não
transmitido para o host.
Possíveis causas
Possíveis soluções
Leitor sem alimentação. Verifique se o host está
alimentado e ligado. Se o
leitor usa uma fonte de
alimentação separada,
verifique se está conectada a
uma tomada CA em
funcionamento.
A seqüência da inicialização
está incorreta. Consulte o
Guia de Referência do
Produto LS7808 para obter
mais informações.
O cabo de interface não
está conectado
corretamente.
Verifique se há conexões de
cabo frouxas.
O leitor não está
programado para ler
este tipo de código de
barras.
Verifique se o leitor está
programado para ler o tipo de
código de barras que você
está lendo.
O código de barras está
danificado.
Tente ler outros códigos de
barra do mesmo tipo.
O código de barras está
longe demais para ser
lido.
Aproxime o código de barras
do leitor.
O host desativou a
leitura ou anulou as
configurações de
parâmetro.
Contate o pessoal técnico
encarregado da leitura.
O leitor não está
programado para o tipo
de host correto.
Faça a leitura do código de
barras apropriado ao tipo de
host.
Guia de Consulta Rápida
Problema
69
Possíveis causas
Possíveis soluções
Os dados lidos são
exibidos
incorretamente no
host.
O leitor não está
programado para
trabalhar com o host.
Verifique os parâmetros
do tipo de host do leitor
ou as opções de
edição.
Verifique se o host correto
está selecionado.
No caso de RS-232, verifique
se os parâmetros de
comunicação do leitor
coincidem com as
configurações do host.
No caso de teclado, verifique
se o leitor está programado
com o código correto de país
e se a tecla CAPS LOCK está
desativada.
Verifique se as opções de
edição (por exemplo,
conversão UPCE-para-UPCA)
estão programadas
corretamente.
Embora os LEDs verde
e vermelho estejam
acesos, o leitor não
produz o padrão de
leitura onidirecional.
O leitor entrou no modo
de “Dormir Motor” de
baixa potência.
Movimente um item com
código de barras na área ativa
de leitura para reativar a
unidade.
O host USB ou
Synapse não está
funcionando
corretamente.
O leitor não reconhece
o host.
Remova e reinsira a fonte de
alimentação externa para
forçar o cabo a detectar o host
correto.
OBSERVAÇÃO Se ainda assim o símbolo não for lido, contate o
distribuidor ou ligue para o suporte técnico da Motorola
Enterprise Mobility. Veja os telefones na contracapa.
70
Leitor horizontal com posição LS7808
クイック リファレンス ガイド
71
はじめに
このガイドでは、LS7808 の操作方法を説明します。開梱、設置、性
能仕様、プログラミング、トラブルシューティングに関する詳細は、
『LS7808 Product Reference Guide』(p/n 72E-73952-XX) を参照し
てください。
製品について
Symbol LS7808 水平型スロット スキャナは、POS での高スループット
アプリケーションに対応する高性能なオムニスキャナです。あらゆる小
売コードの読み込みを行うことができ、また、標準的に使用されている
すべての POS 機器に対応する複数のインタフェースを備えています。
カウンター内に水平に設置できるように設計されているため、品物を滑
らせるだけでスキャンすることができ、生産性とスループットの向上に
貢献します。このスキャナは EAS (Electriconic Article Surveillance:
電波式電子商品監視 ) アンテナを内蔵しており、Checkpoint® EAS シ
ステムと接続できます。
LS7808-SR20007TCR は酸化スズを使用した標準ガラス、
LS7808-SR2X009SCR は傷のつきにくいサファイアガラスを装備し
ています。
モデル
Symbol LS7808 には次のようなモデルが設定されています。
モデル
特徴
Symbol LS7808-SR20007TCR
標準 ( 酸化スズ ) ガラス ウィンドウ、トワイ
ライトブラック、Checkpoint® EAS、RoHS
準拠。
Symbol LS7808-SR20009SCR
傷のつきにくい ( サファイア ) ガラス ウィンド
ウ、ステンレス鋼ベゼル トップ、
Checkpoint® EAS、RoHS 準拠。
Symbol LS7808-SR22009SCR
傷のつきにくい ( サファイア ) ガラス ウィンド
ウ、ステンレス鋼ベゼル トップ、
Checkpoint® EAS、RoHS 準拠、工場出荷状
態でリモート スキャナ管理 (RSM) 使用可能。
すべてのモデルでステンレス鋼製のカウンター マウント キット ( 部品番号
12-17206-02R) が必要です。取り付けに関しては、『Mounting Instructions and
EAS Installation Guide ( 取り付け手順および EAS インストール ガイド )』を
参照してください。
72
各部の名称
LED インジケータ
コネクタ カバー
( コネクタ カバーを開け
るとコネクタ ポートに
アクセスできます )
バケット
スピーカ
電源
LS7808 には電源スイッチがありません。電源プラグを接続すると、
すぐに動作を開始します。
インジケータ ランプ
LS7708 には、動作や読み取り状態を示す、赤/緑コンビネーション
LED が採用されています。各組み合わせとその意味については 78
ページの「LED の定義」を参照してください。
スキャナが正常に動作しない場合は、担当技術者に相談するか、
Motorola のエンタープライズ モビリティ サポート ( 裏表紙を参照 ) に
お電話でお問い合わせください。
クイック リファレンス ガイド
73
スリープ モード
何も操作せずに指定された時間が経過すると、スキャナは自動的にス
リープ モードに切り替わります。スリープ モードには、レーザとモー
タの 2 段階の状態があります。何も操作しない時間が 10 秒間連続する
とレーザ スリープ モードになります。このモードでは、レーザの振幅
が 50% に下がり、さらに無操作時間が続くと 3% に下がります。モー
タ スリープ モードでは、モータとレーザがオフになります。
スリープ モードから復帰させるには、スキャナ ウィンドウにバーコー
ドをかざしてください。
ビープ音の音量
バーコードが正常に読み取られると、ビープ音が鳴ります。ビープ音の
音量はホストからのコマンド送信、またはビープ音量のバーコードをス
キャンして変更します。バーコードは『LS7808 Product Reference
Guide』に掲載されています。76 ページの「ビープ音の定義」を参照
してください。
74
接続部
スキャナの接続ポートは、スキャナの下部にあります。ポートを使用す
る場合は、カバーを取り外してください。
セカンダリ スキャナ ポート
ホスト ポート
EAS
電源
ポート
コネクタ
カバー
EAS イン RS-232
ターロッ 外部接続
ク ポート ポート
( ラベルの
裏側 )
ケーブルの取り回し
スキャナのケースには、通信ケーブルを取り回すための取り出し口が用
意されています。この取り出し口を利用してケーブルをきれいにまと
め、スキャナを設置する際に邪魔にならないようにします。ケーブルの
コネクタをスキャナのポートに接続したら、一番近い取り出し口にケー
ブルを通してください。
Y コネクタ ( 電源コネクタとインタフェース コネクタの両方を備えた
もの ) の場合は、以下のように取り付けてください。
1. 電源ケーブルとインタフェース ケーブルを適切なポートに接続します。
2. 以下の図のようにケーブルを取り回します。
クイック リファレンス ガイド
75
スキャナの設置
LS7808 は、スキャン部 ( 発光部分 ) が上になるように、カウンターの
上などに設置します。設置の詳細については、
『LS7808 Product
Reference Guide』を参照してください。
バーコードのスキャン
スキャナを設置してプログラムします プログラム方法については、
『LS7808 Product Reference Guide』を参照してください。不明な点
がある場合は、最寄の販売店または Motorola のエンタープライズ モ
ビリティ サポート ( 裏表紙を参照 ) にお問い合わせください。
以下の手順で、バーコードをスキャンします。
1.
すべてのケーブルがしっかり接続されていることを確認します。
2.
商品を持ち、バーコードをスキャナのウィンドウに向けます。
3.
下図のように、商品を有効スキャンエリア内 (76 ページを参照 ) で矢
印の方向に動かします。
スキャナ
ウィンドウ
4.
商品を動かす方向
スキャン方向
を示す矢印
バーコードが正常に読み取られるとビープ音が鳴り、LED が緑色に
一瞬点滅します。
76
有効スキャンエリア
スキャナ ウィンドウ手前の有効スキャンエリアは、矢印の方向に商品
が動いたときにスキャンしやすいように調整されています。
以下の図の点線で示された部分が有効スキャンエリアです。
スキャナ
ウィンドウ
ビープ音の定義
ビープ音のさまざまな音程やパターンによって、スキャナの動作状態を
知ることができます。通常のスキャンやスキャナのプログラミング中に
発生するビープシーケンスの意味については、以下の表を参照ください。
ビープ
シーケンス
意味
通常の使用時
高音 3 回
電源投入中です。
高音
バーコードが読み取られました ( 読み取りのビープ音が有
効になっている場合 )。
長い低音 4 回
スキャンされたバーコード記号について、転送エラーが
検出されました。データは無視されます。これは、ス
キャナが正しく設定されていない場合に発生します。オ
プション設定を確認してください。
低音 5 回
変換またはフォーマットに関するエラーです。
高音 - 高音 - 高音 低音
RS-232 ホストまたは RS-232 外部ポートでエラーが受
信されました。
クイック リファレンス ガイド
ビープ
シーケンス
77
意味
CODE 39 バッファリング時
高音 - 低音
新しい CODE 39 データがバッファに入力されました。
長い高音 3 回
CODE 39 バッファに空き容量がなくなりました。
低音 - 高音 - 低音
CODE 39 バッファが消去されたか、空のバッファがク
リアまたは転送されようとしました。
低音 - 高音
バッファされたデータが正常に転送されました。
ホスト固有
USB のみ
短い高音 4 回
スキャナの初期化が完了していません。数秒待ってから
スキャンし直してください。
USB デバイス タイ
プの設定後に電源投
入のビープ音が鳴る
スキャナが最大の電源レベルで動作するためには、バス
との通信がその前に確立されている必要があります。
電源投入のビープ音
が複数回鳴る
USB バスによって、スキャナの電源オン / オフのサイク
ルが複数回繰り返される状態になっている可能性があり
ます。これは正常な動作で、通常、PC を電源オフの状態
から起動するときに発生します。
RS-232 ホストのみ
高音
<BEL> が受信され、<BEL> に対してビープ音を鳴らす
設定が有効になっています。
RS-232 外部ポートのみ
高音
データが完全にブロックされ、この状態がホストに送信
されました。CR の受信、またはシリアル応答のタイム
アウト時間 (2 秒間 ) が経過したことが原因です。
長い低音 4 回
データ オーバーラン状態が発生しました。大量のデータ
を RS-232 外部ポートに送信しているときには、他の
ポートからデータをスキャンしないでください。
78
LED の定義
ビープ音の他に、LED によってスキャナの動作状況を知ることができ
ます。LED の定義については、以下の表を参照ください。
LED
意味
消灯
スキャナに電源が供給されていません。
緑色
スキャナに電源が投入され、スキャン
可能な状態です。
一瞬点滅
バーコードが正常に読み取られました。
赤色にゆっくりと連続して点滅し、
緑色に点灯
スキャナがプログラム モードになって
います。
赤色に速く連続して点滅し、
緑色に点灯
内部に問題があります。規制上の理由
でレーザはオフになります。
緑色に点灯 ( レーザは点滅 )
スキャナが低電力点滅モードです。
赤色と緑色が点灯
スキャナが低電力 ( スリープ ) モード /
レーザ シャットダウン モードです。
メンテナンス
必要なメンテナンスは、スキャナ ウィンドウのクリーニングだけです。
ウィンドウに汚れや傷があると、読み取り性能に影響がでる場合があり
ます。
-
湿らせた布でほこりを拭き取ってください。
-
アンモニアまたは水を含ませたティッシュ ペーパーでウィンドウ
を拭いてください。
スキャナ ウィンドウをクリーニングするには :
1.
スキャナ上部の大きなネジ穴にコインを入れ、反時計回りに回転さ
せます。
2.
ウィンドウを取り外します。
3.
ウィンドウ上部の裏面をきれいに拭き取ります。
4.
ウィンドウ下部の表面をきれいに拭き取ります。
5.
2 本の大きなネジで、カバーを元通りに取り付けます。
クイック リファレンス ガイド
79
スキャナ ウィンドウを交換するには :
1.
上記の説明に従って、ウィンドウを取り外します。
2.
新しいウィンドウを取り付けます。
3.
2 本の大きなネジで、カバーを元通りに取り付けます。
トラブルシューティング
現象
考えられる原因
考えられる解決方法
手順どおりにケーブル
を接続しても、スキャ
ナからレーザが照射さ
れない。
スキャナに電源が供給
されていません。
ホストの電源をチェックして
ください。外部電源を使用し
ている場合、電源がコンセン
トに接続されていることを確
認してください。
電源投入の順序が正しくあり
ません。詳細については、
『LS7808 Product
Reference Guide』を参照し
てください。
レーザは照射される
が、バーコードを読み
取れない。
インタフェースケーブ
ルが正しく接続されて
いません。
ケーブルの接続が緩んでい
ないかどうかを確認してく
ださい。
その種類のバーコード
を読み取れるようにス
キャナがプログラムさ
れていません。
スキャンするバーコードの種
類を読み取れるようにスキャ
ナがプログラムされているこ
とを確認してください。
バーコードが損傷して
います。
同じ種類の他のバーコードを
スキャンしてみてください。
バーコードがスキャナ
から遠すぎます。
バーコードをスキャナに近づ
けてください。
ホストによってス
キャン、またはパラ
メータ設定が無効に
されました。
担当技術者にご連絡ください。
80
現象
考えられる原因
考えられる解決方法
バーコードは読み取ら
れるが、ホストに転送
されない。
スキャナが正しいホス
ト タイプに対応するよ
うにプログラムされて
いません。
適切なホストタイプを設定し
てください。
スキャンされたデータ
がホストで正しく表示
されない。
スキャナがホストと連
携するようにプログラ
ムされていません。ス
キャナのホスト タイプ
のパラメータまたは編
集オプションを確認し
てください。
正しいホストが選択されてい
ることを確認してください。
RS-232 の場合は、スキャナ
の通信パラメータがホストの
設定と同じであることを確認
してください。
キーボード ウェッジの場合
は、スキャナが正しい国コー
ドでプログラムされており、
CAPS LOCK キーがオフに
なっていることを確認してく
ださい。
編集オプション (UPCE から
UPCA への変換など ) が正し
くプログラムされていること
を確認してください。
バーコードが貼付された商
LED が緑 / 赤色に点灯 スキャナが低電力の
品を有効スキャンエリア内
するが、スキャナから 「モータ スリープ」
レーザが照射されない。 モードになっています。 で動かして、スキャナをス
リープ モードから復帰させ
てください。
USB またはシナプス
ホストが正しく機能し
ない。
注
スキャナがホストを認
識していません。
外部電源アダプタを取り外し
てから取り付け直し、ケーブ
ルによって正しいホストが自
動的に認識されるようにして
ください。
それでもバーコードがスキャンされない場合は、販売店または最寄
の Motorola のエンタープライズ モビリティ サポートにお電話で
お問い合わせください。Motorola サポート センターの連絡先電話
番号については、このマニュアルの裏表紙を参照してください。
クイック リファレンス ガイド
81
LS7808 平台式 Slot 扫描器
82
简介
本指南的目的是帮助您完成 LS7808 的常规操作。有关拆除包装、安装、性能规
格、编程以及故障排除的详细信息,请参阅《LS7808 产品参考指南》(p/n
72E-73952-XX)。
产品说明
Symbol LS7808 平台式插槽扫描器是一款性能出众的全向扫描器,可支持销售点
(POS) 的高吞吐量扫描应用。它可以读取所有零售码制,具备多接口功能以连接
所有流行的 POS 设备。此款扫描器设计为平展式柜内安装模式,可对物品进行滑
过式扫描以提高工作效率和吞吐量。扫描器配有一个集成的 商品电子防盗系统
(EAS) 天线,可与 Checkpoint® EAS 系统一起使用。
LS7808-SR20007TCR 采用标准二氧化锡镀膜玻璃,而 LS7808-SR2X009SCR 采
用防刮擦的蓝宝石水晶玻璃。
配置
Symbol LS7808 提供以下配置。
配置
特点
Symbol LS7808-SR20007TCR
标准(二氧化锡镀膜)玻璃窗;微光黑;
Checkpoint® EAS;RoHS 兼容。
Symbol LS7808-SR20009SCR
防刮擦(蓝宝石)玻璃窗;不锈钢面板上盖;
Checkpoint® EAS;RoHS 兼容。
Symbol LS7808-SR22009SCR
防刮擦(蓝宝石)玻璃窗;不锈钢面板上盖;
Checkpoint® EAS;RoHS 兼容;远程扫描器管
理 (RSM) 即拆即用。
所有型号都必须使用不锈钢柜内安装套件 (p/n 12-17206-02R)。有关安装指示,请
参见《Mounting Instructions and EAS Installation Guide》。
快速参考指南
83
操作扫描器
部件
LED 指示器
连接器盖
(连接器端口在
连接器盖后面)
面槽
扬声器
电源
LS7808 没有开/关开关。只要连上电源,就随时可以扫描。
指示灯
这款扫描器采用红绿双色灯光组合的 LED 指示器来指示操作和解码状态。有关不
同灯光组合及其含义的信息,请参阅第 88页的“LED 指示器定义”。
如果扫描器操作不正常,请与负责扫描的技术人员联系,或致电 Motorola
Enterprise Mobility 支持(参见背面板上的详细信息)。
LS7808 平台式 Slot 扫描器
84
休眠模式
扫描器如果在某个指定时间期内一直没有活动,就会自动进入“休眠”模式。扫描
器有两种休眠级别:激光和电机。在激光休眠模式下,如果十秒钟不活动,激光脉
冲速率下降到 50%,如果在指定时间后仍不活动,则下降到 3%。在电机休眠模式
下,则将扫描器编程为关闭电机和激光。
要唤醒处于休眠模式的扫描器,请将条码放到扫描器窗口前。
蜂鸣器音量
扫描器在成功读取条码时会发出短促的蜂鸣声。蜂鸣的音量可以通过以下方式进行
电子更改:从主机发出命令,或扫描《LS7808 产品参考指南》中的其中一个蜂鸣
器音量条码。请参阅第 86页的“蜂鸣器定义”。
连接
扫描器的端口都在扫描器的底部。请取下连接器盖以接入端口。
辅助扫描器端口
主机端口
EAS
电源端口
连接器盖
EAS 互锁 RS-232
端口
辅助端口
(标签后面)
安排电缆走向
扫描器外壳有一些沟道用以安排输出电缆走向,便于用户整理好电缆,使其不妨碍扫
描器的放置。将电缆连接器接入相应的扫描器端口之后,沿着最近的沟道布好电缆。
对于带 Y 连接器的电缆(同时包含电源和接口连接器):
1.
将电源和接口连接器分别连接到相应端口。
快速参考指南
2.
85
依照下表布好电缆。
安装扫描器
将 LS7808 安装在柜台中,扫描面朝向柜台顶部。有关详细的安装指示,请参阅
《LS7808 产品参考指南》。
扫描条码
安装扫描器并为其编程。有关编程说明,请参阅《LS7808 产品参考指南》。要获
得帮助,请与当地的供应商或“Motorola Enterprise Mobility 支持”联系(参见背
面板上的详细信息)。
要扫描条码:
1.
确保已固定好所有电缆连接。
2.
调整物品方向,使条码朝向扫描器窗口。
3.
按扫描箭头方向将物品移过有效扫描区域(参见第 86 页),或将物品
放到扫描器前方。
扫描器窗口
产品流程图
扫描箭头
LS7808 平台式 Slot 扫描器
86
4.
成功解码时,扫描器会发出蜂鸣声,绿色 LED 短暂闪烁。
有效扫描区域
有效扫描区域在扫描器窗口前方,这是在沿着扫描箭头方向移动物品时的最佳扫描
位置。
下面的虚线区表示有效扫描区域。
扫描器窗口
蜂鸣器定义
扫描器通过发出不同的蜂鸣器顺序和模式,与用户进行通讯。有关在正常扫描期间
以及为扫描器编程时发出的蜂鸣器顺序,请参阅下面的“蜂鸣器指示”表。
蜂鸣器顺序
指示
标准使用
3 声高高的蜂鸣声
开机。
高蜂鸣声
条码符号已解码(如果启用了解码蜂鸣器)。
4 声长而低的蜂鸣声
在扫描的符号中检测到传输错误。数据被忽略。如果未正
确配置扫描器,就会发生此情况。请检查选项设置。
5 声低低的蜂鸣声
转换或格式错误。
高 - 高 - 高 - 低蜂鸣声
RS-232 在 RS-232 主机端口或 RS-232 辅助端口上收到
错误。
快速参考指南
87
蜂鸣器顺序
指示
Code 39 缓冲
高-低蜂鸣声
已将新的 Code 39 数据输入缓冲区。
3 声长而高的蜂鸣声
Code 39 缓冲区已满。
低-高-低蜂鸣声
Code 39 缓冲区已经被擦除,或者尝试清除或传送空缓
冲区。
低-高蜂鸣声
成功传输缓冲的数据。
特定于主机
仅限 USB
4 声短而高的蜂鸣声
扫描器尚未完成初始化。请等待几秒钟,然后再扫描。
在扫描“USB 设备类
型”之后,扫描器会
发出开机蜂鸣声
必须先建立与总线的通讯,扫描器才能以最高的功率电平
操作。
多次发出开机蜂鸣声
USB 总线可能使扫描器处于多次循环通电断电的状态。
这种情况通常在 PC 冷启动时出现。
仅限 RS-232 主机端口
高蜂鸣声
收到一个 <BEL> 字符,并且启用了“在 <BEL> 时蜂鸣”。
仅限 RS-232 辅助端口
高蜂鸣声
收到一个完整的数据块并将其发送到主机,然而遇到一个
回车,或者已过了 2 秒的串口响应超时时间,则会发出此
蜂鸣声。
4 声长而低的蜂鸣声
出现数据溢出情况。在向 RS-232 辅助端口发送大量数据
时,应避免从其它端口扫描数据。
LS7808 平台式 Slot 扫描器
88
LED 指示器定义
除蜂鸣器顺序之外,扫描器还通过 LEG 显示与用户通讯。“标准 LED 指示器定
义”表定义了在扫描期间显示的 LED 指示。
指示
LED 指示器
关闭
扫描器断电。
绿色
扫描器通电并且为“ready to scan”。
短暂闪烁
条码成功解码。
红灯慢速连续闪烁,绿灯亮起
扫描器处于编程模式。
红灯快速连续闪烁,绿灯亮起
内部出错,为遵守规章,激光关闭。
绿灯亮起(并且激光闪烁)
扫描器处于低功率闪烁模式。
红灯和绿灯亮起
扫描器处于低功率(休眠)模式和激光
关闭模式。
维护
唯一需要维护的就是清洁出射窗。窗口不干净或有刮痕都会影响扫描活动。
-
用湿布擦去尘粒。
-
用沾有氨水或水的纸巾擦拭窗口。
快速参考指南
89
要清洁出射窗:
1.
将一枚硬币插入扫描器正面的大螺丝头中,然后逆时针旋转。
2.
提起视窗。
3.
擦干净上视窗的内面。
4.
擦干净下视窗的顶面。
5.
旋紧这两个大螺丝,重新装好顶盖。
要更换出射窗:
1.
按以上所述取下视窗。
2.
更换新视窗。
3.
旋紧这两个大螺丝,重新装好顶盖。
故障排除
问题
在遵循指示安装主机电
缆时,未显示全线扫描
模式。
扫描线显示,但无法读
取条码。
条码已解码,但无法将
其传送给主机。
可能的原因
可能的解决方案
扫描器未通电。
确保主机通电并开启。如果扫
描器使用单独的电源,请确保
扫描器连接到正在工作的交流
电源插座上。
开机顺序不正确。有关更多信
息,请参阅 《LS7808 产品参
考指南》。
接口电缆连接不正确。
检查电缆连接是否松动。
未对扫描器编程,无法
读取条码类型。
确保已对扫描器编程,使其可
读取要扫描的条码类型。
条码损坏。
请尝试扫描具有相同条码类型
的其它条码。
条码离扫描器太远。
将条码移近扫描器。
主机已禁用扫描或改写
参数设置。
请咨询负责扫描的技术人员。
未按正确的主机类型对
扫描器编程。
扫描适当主机类型的条码。
LS7808 平台式 Slot 扫描器
90
问题
可能的原因
可能的解决方案
扫描的数据在主机上显
示不正确。
未对扫描器编程,无法
与主机配合使用。请检
查扫描器主机类型参数
或编辑选项。
确保选择了正确主机。
对于 RS-232,请确保扫描器
的通讯参数与主机设置相匹配。
对于键盘仿真,请确保使用正
确的国家 (地区)代码对扫描
器编程,并且关闭了 CAPS
LOCK (大写锁定)键。
请确保对编辑选项 (例如,
UPCE 至 UPCA 转换)正确
编程。
虽然绿色和红色 LED 指 扫描器已进入低功率
示器亮起,但是扫描器 “电机休眠”模式。
未生成全向扫描模式。
将带条码的物品移过有效扫描
区域以唤醒扫描器。
USB 或 Synapse 主机
工作不正常。
取出并重新插入外部电源,
强制电缆重新自动检测正确
的主机。
注释
扫描器未识别主机。
如果仍然未扫描符号,请与经销商联系或致电 “Motorola
Enterprise Mobility 支持”。有关电话号码,请参见背面板。
快速参考指南
91
92
개요
이 설명서에서는 LS7808의 일반 작동 관련 내용을 다룹니다. 포장 풀기와
설치, 성능 사양, 환경 설정, 문제 해결 등에 대한 자세한 내용은 LS7808
제품 참조 설명서(부품 번호: 72E-73952-XX)를 참조하십시오.
제품 설명
Symbol LS7808 수평형 슬롯 스캐너는 고성능의 전방향 스캐너로 POS
시스템에서 고속 처리 애플리케이션을 지원합니다. 스캐너는 모든 소매
바코드를 인식하며 일반적인 모든 POS 장치에 접속 연결할 수 있는 다중
인터페이스 기능을 갖추고 있습니다. 스캐너는 계산대 내에 가로 형태로
장착할 수 있도록 설계되어 있으며 물품을 슬라이드 통과 방식으로 스캐
닝할 수 있어 생산성과 처리량을 향상시킬 수 있습니다. 또한, 이 스캐너
에는 EAS(Electronic Article Surveillance) 안테나가 달려 있어
Checkpoint ® EAS 시스템에 연결하여 사용할 수 있습니다.
LS7808-SR20007TCR은 표준 산화주석 유리로 되어 있고,
LS7808-SR2X009SCR은 긁힘에 강한 사파이어 유리로 되어 있습니다.
구성
Symbol LS7808은 다음과 같은 구성으로 되어 있습니다.
구성
특징
Symbol LS7808-SR20007TCR
표준(산화주석) 유리창; 연한 검정, Checkpoint®
EAS, RoHS 준수.
Symbol LS7808-SR20009SCR
긁힘 방지(사파이어) 유리창; 스테인리스강 홈
상단, Checkpoint ® EAS, RoHS 준수.
Symbol LS7808-SR22009SCR
긁힘 방지(사파이어) 유리창; 스테인리스강 홈
상단, Checkpoint ® EAS; RoHS 준수, 준비 작
업 없이도 바로 사용할 수 있는 스캐너 원격 관
리(RSM)
모든 모델에 스테인리스강 계산대 내 장착 키트(p/n 12-17206-02R)가 필요합니다.
장착/설치 지침은 장착 지침 및 EAS 설치 설명서를 참조하십시오.
빠른 참조 안내서
93
스캐너 사용
각 부 명칭
LED 표시등
커넥터 덮개
(커넥터 덮개 뒤에 달린
커넥터 포트임)
버킷
스피커
94
전원
LS7708에는 전원 스위치가 없습니다. 전원에 연결하면 바로 스캐닝할 수
있습니다.
표시등
이 스캐너에는 빨간색 표시등과 녹색 표시등이 켜지는 LED가 달려 있어
스캐너 작동 상태와 디코딩 상태를 파악할 수 있습니다. 표시등에 대한 자
세한 내용은 99페이지의 LED 설명을 참조하십시오.
스캐너가 올바르게 작동하지 않는 경우, 스캐닝 담당 기술자에게 문의하
거나 스캐너 뒤쪽 표지에 적혀 있는 또는 Motorola 기업용 모바일 지원부
로 문의하십시오.
휴면 모드
스캐너를 지정한 시간 동안 작동하지 않으면 자동으로 휴면 모드로 들어
갑니다. 스캐너의 휴면 모드에는 레이저, 모터 등, 두 가지가 있습니다. 레
이저 휴면 모드에서는 10초 동안 작동하지 않으면 레이저 펄스가 50%로
감소하고 지정한 시간이 지나면 3%로 떨어집니다. 모터 휴면 모드에서는
모터와 레이저가 자동으로 꺼집니다.
스캐너의 휴면 모드를 해제하려면 스캐너 창에 바코드를 대십시오.
알림음 음량
바코드가 제대로 판독되면 알림음이 짧게 울립니다. 알림음 음량을 조절
하려면 호스트로 전자 명령을 보내거나 알림음 음량 바코드(LS7808 제품
참조 설명서 참조) 중에서 하나를 스캐닝하십시오. 97페이지의 알림음 설
명을 참조하십시오.
빠른 참조 안내서
95
연결부
스캐너의 포트는 스캐너 하부에 있습니다. 연결 단자 덮개를 떼어내면 포
트가 보입니다.
스캐너 보조 포트
호스트 포트
EAS
전원
포트에
연결
커넥터 덮개
EAS 인터 RS-232
록 포트 보조 포트
(표지 뒤에
있음)
케이블 배치
스캐너 케이스에는 인출 케이블 노선이 몇 개 있기 때문에 스캐너 설치에
장애가 되지 않게 정리할 수 있습니다. 케이블 커넥터를 스캐너의 관련 포
트에 꽂고 가장 가까이에 있는 노선을 따라 케이블을 배치하십시오.
전원 커넥터와 인터페이스 커넥터가 모두 달려 있는 Y형 커넥터 케이블인
경우
1.
전원 케이블과 인터페이스 케이블을 관련 포트에 꽂으십시오.
2.
아래 그림과 같이 케이블을 배치하십시오.
96
스캐너 설치
LS7808 스캐너는 정면이 계산대 상단과 접하게 부착하십시오. 자세한 설
치 방법은 LS7808 제품 참조 설명서를 참조하십시오.
바코드 스캐닝
스캐너를 설치하고 설정하십시오. 자세한 설정 방법은 LS7808 제품 참조
설명서를 참조하십시오. 도움이 필요하면 현지 구입처나 스캐너 뒤쪽 표
지에 적혀 있는 또는 Motorola 기업용 모바일 지원부로 문의하십시오.
바코드 스캐닝 방법
1.
케이블이 모두 제대로 꽂혀 있는지 확인하십시오.
2.
물품의 바코드가 스캐너 창 정면을 향하게 대십시오.
3.
물품을 스캐닝 활성 영역(97페이지 참조) 안에서 스캐닝 화살표 방향으
로 움직이거나 스캐너 앞에 놓으십시오.
스캐너 창
제품 그림
스캐닝 화살표
4.
디코딩이 제대로 이루어지면, 알림음이 울리면서 녹색 LED가 잠시
켜집니다.
빠른 참조 안내서
97
스캐닝 활성 영역
스캐너 창 앞 등, 스캐닝 활성 영역은 스캐닝 화살표 방향으로 물품을
움직여야 제대로 스캐닝됩니다.
점선으로 표시된 영역(아래 참조)이 스캐닝 활성 영역입니다.
스캐너 창
알림음 설명
이 스캐너는 알림음이 울리는 순서와 방식에 변화를 주어 사용자에게
관련 상태를 알려 줍니다. 아래 알림음 설명 표에는 일반 스캐닝 작업과
스캐너 설정 작업을 할 때 알림음이 울리는 순서가 나와 있습니다.
알림음 순서
설명
일반 스캐닝 작업
고음이 세 번 울림
시동되고 있습니다.
고음이 울림
바코드 기호가 디코딩되었습니다(디코딩 알림음이 설정된
경우).
저음이 길게 4번 울림
스캐닝된 바코드 기호에 전송 오류가 발생했습니다. 데이터
가 무시됩니다. 스캐너가 제대로 구성되지 않으면 발생합니
다. 지정한 옵션을 확인하십시오.
저음이 5번 울림
변환 오류나 포맷 오류가 발생했습니다.
고음-고음-고음-저음
순서로 울림
RS-232 호스트 또는 RS-232 보조 포트에 RS-232 수신 오
류가 발생했습니다.
Code 39 가 버퍼링되고 있습니다 .
98
알림음 순서
설명
고음-저음 순서로
울림
버퍼에 Code 39 데이터가 새로 입력되었습니다.
고음이 길게 3번 울림
Code 39 버퍼가 꽉 찼습니다.
저음-고음-저음 순서
로 울림
버퍼에서 Code 39 데이터가 삭제되었거나 삭제하거나
전송하려는 버퍼가 비어 있습니다.
저음-고음 순서로
울림
버퍼링된 데이터를 제대로 전송되었습니다.
호스트
USB
고음이 짧게 4번 울림
스캐너가 초기화되지 않았습니다. 몇 초 기다렸다 스캐닝하
십시오.
USB 장비 유형을 스
캐닝하면 스캐너 시
동을 알리는 알림음
이 울립니다.
USB 버스와 통신이 이루어져야 스캐너가 최고 전력에서 작
동됩니다.
시동 알림음 2번 이상
울림
USB 버스로 인해 스캐너가 두 번 이상 켜졌다 꺼질 수 있
습니다. 정상적인 현상이며 주로 PC 콜드 부팅 시에 발생
합니다.
RS-232 호스트
고음이 울림
<BEL> 문자가 수신되었고 <BEL> 알림음이 활성 상태입
니다.
RS-232 보조 포트
고음이 울림
캐리지 리턴(CR: carriage return)이나 연속 응답 시간인
2초가 경과되어 데이터 블록 전체가 수신되어 호스트에
전송되었습니다.
저음이 길게 4번 울림
데이터 오버런 상태가 발생했습니다. RS-232 보조 포트
로 전송되는 데이터가 크면 다른 포트에서 데이터를 스
캐닝하지 마십시오.
빠른 참조 안내서
99
LED 설명
이 스캐너는 알림음이 울리는 순서 뿐 아니라 LED 표시등에 변화를 주어
사용자에게 관련 상태를 알려 줍니다. 표준 LED 설명 표에는 스캐닝 작업
중에 표시되는 LED 표시등에 대해 설명되어 있습니다.
LED
설명
꺼짐
스캐너에 전력이 공급되지 않습니다.
녹색
스캐너가 켜져 있고 '스캐닝 대기 중'에
있습니다.
짧게 켜짐
바코드가 제대로 디코딩되었습니다.
빨간색으로 느리게 깜박이다 녹색으로
켜짐
스캐너가 설정 모드에 있습니다.
빨간색으로 빠르게 깜박이다 녹색으로
켜짐
내부 문제가 발생했습니다. 규격에 적합
하지 않아 레이저가 차단되었습니다.
녹색으로 켜짐(레이저도 깜박임)
스캐너가 저전력 깜박임 모드에 있습
니다.
빨간색과 녹색으로 켜짐
스캐너가 저전력 모터 및 레이저 차단
모드에 있습니다.
100
유지관리
출구 창만 청소하면 됩니다. 창이 지저분하거나 긁혀 있으면 스캐닝이
제대로 작동하지 않을 수 있습니다.
-
천을 물에 적셔 먼지를 닦아내십시오.
-
휴지를 암모니아나 물에 적셔 창을 닦으십시오.
출구 창 청소 방법
1.
스캐너 앞에 있는 큰 나사 머리에 동전을 끼워 넣고 시계 반대 방향으로
돌리십시오.
2.
창을 올려 분리하십시오.
3.
상부 창의 바닥을 닦으십시오.
4.
하부 창의 상단을 닦으십시오.
5.
큰 나사 두 개를 조여 상단 덮개를 다시 부착하십시오.
출구 창 교체 방법
1.
아래 설명된 대로 창을 떼어 내십시오.
2.
새 창을 끼우십시오.
3.
큰 나사 두 개를 조여 상단 덮개를 다시 부착하십시오.
빠른 참조 안내서
101
문제 해결
문제
발생 가능 원인
해결 가능 방법
호스트 케이블 설치 방
법을 따르면 스캐닝 줄
패턴이 사방으로 표시
되지 않습니다.
스캐너에 전력이 공급되
지 않습니다.
호스트에 전력이 공급되고 호
스트가 켜져 있는지 확인하십
시오. 스캐너에서 사용하는 전
력 공급 장치가 따로 있으면,
작동되는 AC 콘센트에 꽂혀 있
는지 확인하십시오.
시동 순서가 잘못되었습니다.
자세한 내용은 LS7808 제품
참조 설명서를 참조하십시오.
스캐닝 줄이 표시되는
데 바코드 판독이 불가
능합니다.
바코드가 디코딩되었
는데 호스트에 전송되
지 않습니다.
인터페이스 케이블이 잘
못 연결되었습니다.
케이블이 느슨하게 연결되었
는지 확인하십시오.
바코드 유형을 판독하게
스캐너가 설정되지 않았
습니다.
스캐닝하려는 바코드 유형을
판독하도록 설정되어 있는지
확인하십시오.
바코드가 손상되었습
니다.
유형이 같은 다른 바코드를
스캐닝해 보십시오.
바코드가 스캐너와 너무
멀리 떨어져 있습니다.
바코드를 스캐너에 가까이 대
십시오.
호스트에서 스캐닝을 비
활성화했거나 매개 변수
설정을 무시했습니다.
스캐닝 담당 기술자에게 문의
하십시오.
관련 호스트 유형에 적
합하게 스캐너가 설정되
지 않았습니다.
적합한 호스트 유형 바코드를
스캐닝하십시오.
102
문제
스캐닝된 데이터가 호
스트에 제대로 표시되
지 않습니다.
발생 가능 원인
해결 가능 방법
관련 호스트와 호환되게
스캐너가 설정되지 않았
습니다. 스캐너의 호스
트 유형 매개 변수나 편
집 옵션이 올바른지 확
인하십시오.
호스트 유형을 올바르게 선택
했는지 확인하십시오.
RS-232인 경우, 스캐너의 통
신 매개 변수가 호스트 설정과
일치하는지 확인하십시오.
키보드 웨지인 경우, 스캐너가
올바른 국가 코드로 설정되어
있으며 CAPS LOCK 키가 꺼
져 있는지 확인하십시오.
편집 옵션(예: UPCE-UPCA
변환)이 올바르게 설정되어
있는지 확인하십시오.
녹색 LED와 빨간색
LED가 켜져 있는데 스
캐너가 전방향 스캐닝
패턴을 표시하지 않습
니다.
스캐너가 저전력 '모터
휴면' 모드에 있습니다.
바코드가 있는 물품을 스캐
닝 활성 영역 위에서 움직여
스캐너의 휴면 모드를 해제
하십시오.
USB 또는 Synapse 호
스트가 올바르게 작동
하지 않습니다.
스캐너가 호스트를 인식
하지 못합니다.
외장형 전력 공급 장치를 분리
했다 연결하여 케이블에 올바
른 호스트가 자동 감지되게 하
십시오.
참고
그래도 기호가 스캐닝되지 않으면 현지 구입처나 또는 Motorola
기업용 모바일 지원부에 문의하십시오. 전화 번호는 뒷면을 참
조하십시오.
빠른 참조 안내서
103
104
LS7808 Horizontal Slot Scanner
Programming
Generally, the technical person in charge of scanning customizes the
scanner for the particular application using programming bar codes
found in the LS7808 Product Reference Guide, p/n 72E-73952-XX. If
the user is programming the scanner, consult the LS7808 Product
Reference Guide for more information.
Following are some frequently used programming bar codes.
NOTE For additional host types, refer to the LS7808 Product Reference
Guide available at http://www.symbol.com/manuals.
When scanning the desired bar code, cover the other bar code on
the page.
Test
To confirm that your scanner is working properly, scan the UPC-A bar
code below.
Verify the Scanner Is Working
Quick Reference Guide
105
Set Defaults
NOTE When scanning the desired bar code, cover other bar code on
page.
Scanning this bar code sets all parameters to their factory default values.
Set Defaults
Host Type Selection
If a Synapse cable (i.e., part number STIxx-xxxx) is used, the scanner
autocoders the type of host, so there is no need to scan host type
selection bar codes.
If a USB interface is used, the scanner autocoders the USB and defaults
to the HID keyboard interface. See page 118 to select the IBM
Hand-Held host type. Refer to the LS7808 Product Reference Guide, p/n
72-69531-XX, for additional USB host types.
If a Keyboard Wedge, RS-232, Wand Emulation or IBM 46XX host is
used, select that host type from the programming bar codes that follow. If
Keyboard Wedge is selected, also select a country keyboard type from
the following pages.
Keyboard Wedge Host Type
IBM PC/AT & IBM PC Compatibles
106
LS7808 Horizontal Slot Scanner
Keyboard Wedge Host Type (continued)
NOTE When scanning the desired bar code, cover other bar code on
page.
IBM PS/2 (Model 30)
IBM AT NOTEBOOK
Quick Reference Guide
107
Keyboard Wedge Host Type (continued)
NOTE When scanning the desired bar code, cover other bar code on
page.
NCR7 7052
Country Keyboard Types (Country Codes)
Country keyboard options apply to the Keyboard Wedge interface only.
North American
108
LS7808 Horizontal Slot Scanner
Country Keyboard Types (continued)
NOTE When scanning the desired bar code, cover other bar code on
page.
French
French Canadian Win95/98
Quick Reference Guide
109
Country Keyboard Types (continued)
NOTE When scanning the desired bar code, cover other bar code on
page.
French Canadian XP/2000
German
110
LS7808 Horizontal Slot Scanner
Country Keyboard Types (continued)
NOTE When scanning the desired bar code, cover other bar code on
page.
Spanish
Italian
Quick Reference Guide
111
Country Keyboard Types (continued)
NOTE When scanning the desired bar code, cover other bar code on
page.
Swedish
UK English
112
LS7808 Horizontal Slot Scanner
Country Keyboard Types (continued)
NOTE When scanning the desired bar code, cover other bar code on
page.
Japanese
Brazil Portuguese Windows
Quick Reference Guide
113
RS-232 Host Types
Standard RS-232
ICL RS-232
114
LS7808 Horizontal Slot Scanner
RS-232 Host Types (continued)
NOTE When scanning the desired bar code, cover other bar code on
page.
Wincor-Nixdorf RS-232 Mode A
Wincor-Nixdorf RS-232 Mode B
Quick Reference Guide
115
RS-232 Host Types (continued)
NOTE When scanning the desired bar code, cover other bar code on
page.
Fujitsu RS-232
OPOS
116
LS7808 Horizontal Slot Scanner
RS-232 Host Types (continued)
NOTE When scanning the desired bar code, cover other bar code on
page.
JPOS
USB Host Types
NOTE When scanning the desired bar code, cover other bar code on
page.
HID Keyboard Emulation
(Common Keyboard Wedge Interfacing)
Quick Reference Guide
117
USB Host Types (continued)
NOTE When scanning the desired bar code, cover other bar code on
page.
IBM Table Top USB
IBM Hand-Held USB
(For IBM SurePOS 700 Series)
118
LS7808 Horizontal Slot Scanner
USB Host Types (continued)
NOTE When scanning the desired bar code, cover other bar code on
page.
OPOS
IBM 46XX Host Types
* None Selected
Quick Reference Guide
119
IBM 46XX Host Types (continued)
NOTE When scanning the desired bar code, cover other bar code on
page.
Port 5B
Port 9B
120
LS7808 Horizontal Slot Scanner
IBM 46XX Host Types (continued)
NOTE When scanning the desired bar code, cover other bar code on
page.
Port 17
Quick Reference Guide
121
Regulatory Information
Symbol Technologies, Inc., the Enterprise Mobility business of Motorola, Inc.
(“Motorola”).
All Symbol devices are designed to be compliant with rules and regulations in
locations they are sold and will be labeled as required.
This guide includes regulatory information in French, Italian, German, Spanish
(Spain), Brazilian Portuguese, Japanese, Korean, and simplified Chinese.
Any changes or modifications to Symbol equipment, not expressly approved by
Symbol, could void the user's authority to operate the equipment.
Health & Safety Recommendations
Ergonomic Recommendations
Caution: In order to avoid or minimize the potential risk of ergonomic injury follow
the recommendations below. Consult with your local Health & Safety Manager to
ensure that you are adhering to your company’s safety programs to prevent
employee injury.
•
Reduce or eliminate repetitive motion
•
Maintain a natural position
•
Reduce or eliminate excessive force
•
Keep objects that are used frequently within easy reach
•
Perform tasks at correct heights
•
Reduce or eliminate vibration
•
Reduce or eliminate direct pressure
•
Provide adjustable workstations
•
Provide adequate clearance
•
Provide a suitable working environment
•
Improve work procedures.
122
LS7808 Horizontal Slot Scanner
Laser Devices
Complies with 21CFR1040.10 and 1040.11 except for deviations
pursuant to Laser Notice No. 50, dated July 26, 2001.
EN60825-1:1994+ A1:2002 +A2:2001
IEC60825-1:1993+A1:1997+A2:2001
The laser classification is marked on one of the labels on the device.
Class 1 Laser devices are not considered to be hazardous when used for their
intended purpose. The following statement is required to comply with US and
international regulations:
Caution: Use of controls, adjustments or performance of procedures other than
those specified herein may result in hazardous laser light exposure.
Class 2 laser scanners use a low power, visible light diode. As with any very bright
light source, such as the sun, the user should avoid staring directly into the light
beam. Momentary exposure to a Class 2 laser is not known to be harmful.
Scanner Labeling
Quick Reference Guide
123
Laser Labels
In accordance with Clause 5, IEC 825 and EN60825, the following information is
provided to the user:
ENGLISH
CLASS 1
CLASS 2
HEBREW
CLASS 1 LASER PRODUCT
LASER LIGHT
DO NOT STARE INTO BEAM
CLASS 2 LASER PRODUCT
DANISH / DANSK
KLASSE 1
KLASSE 1 LASERPRODUKT
KLASSE 2
LASERLYF
SE IKKE IND I STRÅLEN
KLASSE 2 LASERPRODUKT
ITALIAN / ITALIANO
CLASSE 1
PRODOTTO AL LASER DI CLASSE 1
CLASSE 2
LUCE LASER
NON FISSARE IL RAGGIO
PRODOTTO AL LASER DI CLASSE 2
DUTCH / NEDERLANDS
KLASSE 1
KLASSE-1 LASERPRODUKT
KLASSE 2
LASERLICHT
NIET IN STRAAL STAREN
KLASSE-2 LASERPRODUKT
NORWEGIAN / NORSK
KLASSE 1
LASERPRODUKT, KLASSE 1
KLASSE 2
LASERLYS
IKKE STIRR INN I LYSSTRÅLEN
LASERPRODUKT, KLASSE 2
FINNISH / SUOMI
LUOKKA 1
LUOKKA 1 LASERTUOTE
LUOKKA 2
LASERVALO
ÄLÄ TUIJOTA SÄDETTÄ
LUOKKA 2 LASERTUOTE
FRENCH / FRANÇAIS
CLASSE 1
PRODUIT LASER DE CLASSE 1
CLASSE 2
LUMIERE LASER
NE PAS REGARDER LE RAYON FIXEMENT
PRODUIT LASER DE CLASSE 2
PORTUGUESE / PORTUGUÊS
CLASSE 1
PRODUTO LASER DA CLASSE 1
CLASSE 2
LUZ DE LASER
NÃO FIXAR O RAIO LUMINOSO
PRODUTO LASER DA CLASSE 2
SPANISH / ESPAÑOL
CLASE 1
PRODUCTO LÁSER DE LA CLASE 1
CLASE 2
LUZ LÁSER
NO MIRE FIJAMENTE EL HAZ
PRODUCTO LÁSER DE LA CLASE 2
GERMAN / DEUTSCH
KLASSE 1
LASERPRODUKT DER KLASSE 1
KLASSE 2
LASERSTRAHLEN
NICHT DIREKT IN DEN LASERSTRAHL SCHAUEN
LASERPRODUKT DER KLASSE 2
SWEDISH / SVENSKA
KLASS 1
LASERPRODUKT KLASS 1
KLASS 2
LASERLJUS
STIRRA INTE MOT STRÅLEN
LASERPRODUKT KLASS 2
Power Supply
Note: Use only a Motorola approved power supply (p/n 50-14000-058,
50-14000-058R) output rated 5Vdc and minimum 2A. The power supply is
certified to EN60950-1 with SELV outputs. Use of alternative power supply will
invalidate any approval given to this device and may be dangerous.
124
LS7808 Horizontal Slot Scanner
Radio Frequency Interference Requirements-FCC
Note: This equipment has been tested and found to comply
with the limits for a Class B digital device, pursuant to Part 15
of the FCC rules. These limits are designed to provide
reasonable protection against harmful interference in a
residential installation. This equipment generates, uses and can radiate radio
frequency energy and, if not installed and used in accordance with the
instructions, may cause harmful interference to radio communications. However
there is no guarantee that interference will not occur in a particular installation. If
this equipment does cause harmful interference to radio or television reception,
which can be determined by turning the equipment off and on, the user is
encouraged to try to correct the interference by one or more of the following
measures:
•
Reorient or relocate the receiving antenna
•
Increase the separation between the equipment and receiver
•
Connect the equipment into an outlet on a circuit different from that to which
the receiver is connected
•
Consult the dealer or an experienced radio/TV technician for help.
This device complies with Part 15 of the FCC Rules. Operation is subject to the
following two conditions: (1) this device may not cause harmful interference, and
(2) this device must accept any interference received, including interference that
may cause undesired operation.
Radio Frequency Interference Requirements - Canada
This Class B digital apparatus complies with Canadian ICES-003.
Cet appareil numérique de la classe B est conforme à la norme NMB-003 du
Canada.
Marking and European Economic Area (EEA)
Statement of Compliance
Symbol hereby declares that this device is in compliance with all the
applicable Directives, 89/336/EEC, 73/23/EEC. A Declaration of
Conformity may be obtained from http://www2.symbol.com/doc/.
Guide utilisateur
125
Informations réglementaires
Symbol Technologies, Inc., activité Enterprise Mobility (solutions de mobilité
d'entreprise) de Motorola, Inc. (« Motorola »).
Tous les dispositifs de Symbol sont conçus pour respecter les règles et
réglementations dans les lieux où ils sont vendus, et ils sont étiquetés en fonction
des besoins.
Ce guide inclut des informations réglementaires en français, italien, allemand,
espagnol (Espagne), portugais (Brésil), japonais, coréen et chinois simplifié.
Tous les changements ou toutes les modifications apportés à l'équipement de
Symbol qui ne sont pas approuvés de façon explicite par Symbol, risquent de
rendre nulle et non avenue l'autorisation accordée à l'utilisateur d'exploiter cet
équipement.
Recommandations concernant l'hygiène et la sécurité
Recommandations ergonomiques
Attention : pour éviter ou minimiser le risque potentiel d'une blessure
ergonomique, respectez les recommandations suivantes. Consultez votre
responsable local de l'hygiène, de la santé et de la sécurité, pour vous assurer
que vous respectez les programmes de sécurité de votre entreprise, qui ont pour
but d'éviter toute blessure d'employé.
•
Réduisez ou éliminez les mouvements répétitifs
•
Maintenez une position naturelle
•
Réduisez ou éliminez la force excessive
•
Conservez à portée de la main les objets fréquemment utilisés
•
Effectuez toutes les tâches à une hauteur correcte
•
Réduisez ou éliminez les vibrations
•
Réduisez ou éliminez la pression directe
•
Fournissez des postes de travail réglables
•
Prévoyez un dégagement suffisant
•
Prévoyez un cadre de travail approprié
•
Améliorez les procédures de travail.
126
Scanner Slot horizontal LS7808
Appareils lasers
Conformes aux normes américaines 21CFR1040.10 et 1040.11, à
l'exception des déviations conformément à l'avertissement laser No. 50,
du 26 juillet 2001.
EN60825-1:1994+ A1:2002 +A2:2001
IEC60825-1:1993+A1:1997+A2:2001
La classification des rayons laser figure sur l'une des étiquettes de l'appareil.
Les appareils à rayons laser de classe 1 ne sont pas considérés comme
dangereux, à condition de les utiliser pour les activités prévues. La déclaration
suivante est nécessaire pour respecter les réglementations américaines et
internationales :
Attention : L'utilisation de commandes, réglages ou procédures autres que ceux
qui sont spécifiés dans ce document risque d'entraîner une exposition
dangereuse à des rayons laser.
Les scanners à rayons laser de classe 2 utilisent une diode lumineuse de faible
puissance. Comme c'est le cas avec n'importe quelle source lumineuse très
brillante, tel le soleil, l'utilisateur doit éviter de regarder directement le faisceau
lumineux. Une exposition momentanée à un rayon laser de classe 2 ne présente
pas de danger connu.
Etiquettage laser
Guide utilisateur
127
Etiquettes laser
Conformément à la clause 5 et aux normes IEC 825 et EN60825, les informations
suivantes sont fournies à l'utilisateur :
ENGLISH
CLASS 1
CLASS 2
HEBREW
CLASS 1 LASER PRODUCT
LASER LIGHT
NE PAS FIXER LE FAISCEAU LASER
CLASS 2 LASER PRODUCT
DANISH / DANSK
KLASSE 1
KLASSE 1 LASERPRODUKT
KLASSE 2
LASERLYF
SE IKKE IND I STRÅLEN
KLASSE 2 LASERPRODUKT
ITALIAN / ITALIANO
CLASSE 1
PRODOTTO AL LASER DI CLASSE 1
CLASSE 2
LUCE LASER
NON FISSARE IL RAGGIO
PRODOTTO AL LASER DI CLASSE 2
DUTCH / NEDERLANDS
KLASSE 1
KLASSE-1 LASERPRODUKT
KLASSE 2
LASERLICHT
NIET IN STRAAL STAREN
KLASSE-2 LASERPRODUKT
FINNISH / SUOMI
LUOKKA 1
LUOKKA 1 LASERTUOTE
LUOKKA 2
LASERVALO
ÄLÄ TUIJOTA SÄDETTÄ
LUOKKA 2 LASERTUOTE
NORWEGIAN / NORSK
KLASSE 1
LASERPRODUKT, KLASSE 1
KLASSE 2
LASERLYS
IKKE STIRR INN I LYSSTRÅLEN
LASERPRODUKT, KLASSE 2
PORTUGUESE / PORTUGUÊS
CLASSE 1
PRODUTO LASER DA CLASSE 1
CLASSE 2
LUZ DE LASER
NÃO FIXAR O RAIO LUMINOSO
PRODUTO LASER DA CLASSE 2
FRENCH / FRANÇAIS
CLASSE 1
PRODUIT LASER DE CLASSE 1
CLASSE 2
LUMIERE LASER
NE PAS REGARDER LE RAYON FIXEMENT
PRODUIT LASER DE CLASSE 2
SPANISH / ESPAÑOL
CLASE 1
PRODUCTO LÁSER DE LA CLASE 1
CLASE 2
LUZ LÁSER
NO MIRE FIJAMENTE EL HAZ
PRODUCTO LÁSER DE LA CLASE 2
GERMAN / DEUTSCH
KLASSE 1
LASERPRODUKT DER KLASSE 1
KLASSE 2
LASERSTRAHLEN
NICHT DIREKT IN DEN LASERSTRAHL SCHAUEN
LASERPRODUKT DER KLASSE 2
SWEDISH / SVENSKA
KLASS 1
LASERPRODUKT KLASS 1
KLASS 2
LASERLJUS
STIRRA INTE MOT STRÅLEN
LASERPRODUKT KLASS 2
Alimentation
Remarque : N'utilisez que des blocs d'alimentation agréés par Motorola (p/n
50-14000-058, 50-14000-058R) de puissance nominale 5 Vdc et d'une surtension
minimum de 2 A. L'alimentation est conforme à la norme EN60950-1 avec de très
basses tensions de sécurité (TBTS). L'utilisation d'une autre alimentation annule
toute autorisation liée à cet appareil et peut être dangereuse.
128
Scanner Slot horizontal LS7808
Obligations en ce qui concerne les parasites en radiofréquence - FCC
Remarque : cet appareil a été testé et les résultats de ces
tests ont révélé qu'il respecte les limites d'un appareil
numérique de classe B, en conformité avec les règles de la
Partie 15 de la FCC. Ces limites sont conçues pour offrir une
protection raisonnable contre les parasites dangereux dans une installation
résidentielle. Cet appareil produit, utilise et peut rayonner une énergie sous la
forme de radiofréquences et, s'il n'est pas installé et employé en conformité avec
ces consignes, peut provoquer des parasites dangereux au niveau des
communications radio. Cependant, il n'y a aucune garantie que des parasites ne
vont pas se produire dans une installation particulière. Si cet appareil provoque
des parasites dangereux qui affectent la réception d'un poste de radio ou de
télévision, ce que vous pouvez déterminer en allumant puis en éteignant
l'appareil, nous encourageons l'utilisateur à essayer de corriger ces parasites en
employant au moins l'une des méthodes suivantes :
•
Réorientez ou déplacez l'antenne de réception
•
Éloignez l'appareil du récepteur
•
Branchez cet équipement sur la sortie d'un circuit différent de celui sur lequel
le récepteur est branché
•
Consultez le concessionnaire ou un technicien en radio et télévision
expérimenté pour obtenir une assistance.
Ce périphérique respecte les règles de la Partie 15 de la FCC. Son
fonctionnement est assujetti au respect des deux conditions suivantes : 1) cet
appareil ne doit pas provoquer de parasites dangereux et 2) cet appareil doit
accepter tous les parasites éventuellement reçus, y compris ceux qui risquent de
provoquer un fonctionnement intempestif.
Obligations en matière d'interférence en radiofréquence - Canada
Cet appareil numérique de la classe B est conforme à la norme canadienne
ICES-003.
Cet appareil numérique de la classe B est conforme à la norme NMB-003 du
Canada.
Marquage et zone économique européenne (ZEE)
Déclaration de conformité
Symbol déclare par la présente que cet appareil est conforme à toutes
les Directives 89/336/CEE et 73/23/CEE. Vous pouvez obtenir une
déclaration de conformité en vous adressant à
http://www2.symbol.com/doc/.
Guida rapida
129
Informazioni normative
Symbol Technologies, Inc., il reparto Enterprise Mobility di Motorola, Inc.
("Motorola").
Tutti i dispositivi di Symbol sono progettati in modo da garantire la conformità con
le disposizioni e le normative dei Paesi in cui vengono venduti e sono etichettati
come previsto dalla legge.
Il presente manuale contiene informazioni normative in francese, italiano,
tedesco, spagnolo (Spagna), portoghese (Brasile), giapponese, coreano e cinese
semplificato.
Eventuali modifiche apportate ad apparecchiature di Symbol non espressamente
approvate da Symbol stessa possono invalidare il diritto dell'utente ad utilizzarle.
Raccomandazioni in materia di salute e sicurezza
Raccomandazioni in materia di ergonomia
Avvertenza: al fine di evitare o minimizzare il rischio di lesioni ergonomiche,
attenersi alle raccomandazioni fornite di seguito. Consultare il responsabile
dell'implementazione delle misure di salute e sicurezza e verificare di operare nel
rispetto dei programmi di sicurezza per la prevenzione degli infortuni sul lavoro.
•
Ridurre o eliminare i movimenti ripetitivi
•
Assumere una postura naturale
•
Ridurre o eliminare gli sforzi eccessivi
•
Tenere gli oggetti di uso frequente a portata di mano
•
Eseguire le operazioni all'altezza corretta
•
Ridurre o eliminare le vibrazioni
•
Ridurre o eliminare la pressione diretta
•
Utilizzare stazioni di lavoro regolabili
•
Predisporre uno spazio adeguato
•
Creare un ambiente di lavoro consono
•
Migliorare le procedure di lavoro.
130
Scanner compatto orizzontale LS7808
Dispositivi laser
Conforme alle norme 21CFR1040.10 e 1040.11, fatta eccezione per le
deviazioni ai sensi del Laser Notice No. 50 del 26 luglio 2001.
EN60825-1:1994+A1:2002+A2:2001
IEC60825-1:1993+A1:1997+A2:2001
La classificazione del laser è riportata sulle etichette del dispositivo.
I dispositivi con laser di classe 1 non sono considerati pericolosi se utilizzati per gli
scopi previsti. La dichiarazione seguente è obbligatoria ai sensi delle normative
USA e internazionali.
Avvertenza: l'utilizzo di comandi, regolazioni o procedure diversi da quelli
specificati nel presente documento può essere causa di esposizione a luce laser
pericolosa.
Gli scanner con laser di classe 2 utilizzano un diodo a luce visibile di bassa
potenza. Come nel caso di tutte le fonti particolarmente luminose, quali il sole,
l'utente deve evitare di fissare direttamente il fascio luminoso. L'esposizione
temporanea a laser di classe 2 non viene considerata dannosa.
Etichette dello scanner
Guida rapida
131
Etichette del laser
In conformità con il paragrafo 5 delle norme IEC 825 ed EN60825, all'utente
vengono fornite le informazioni seguenti:
ENGLISH
CLASS 1
CLASS 2
HEBREW
CLASS 1 LASER PRODUCT
LASER LIGHT
DO NOT STARE INTO BEAM
CLASS 2 LASER PRODUCT
DANISH / DANSK
KLASSE 1
KLASSE 1 LASERPRODUKT
KLASSE 2
LASERLYF
SE IKKE IND I STRÅLEN
KLASSE 2 LASERPRODUKT
ITALIAN / ITALIANO
CLASSE 1
PRODOTTO AL LASER DI CLASSE 1
CLASSE 2
LUCE LASER
NON FISSARE IL RAGGIO
PRODOTTO AL LASER DI CLASSE 2
DUTCH / NEDERLANDS
KLASSE 1
KLASSE-1 LASERPRODUKT
KLASSE 2
LASERLICHT
NIET IN STRAAL STAREN
KLASSE-2 LASERPRODUKT
NORWEGIAN / NORSK
KLASSE 1
LASERPRODUKT, KLASSE 1
KLASSE 2
LASERLYS
IKKE STIRR INN I LYSSTRÅLEN
LASERPRODUKT, KLASSE 2
FINNISH / SUOMI
LUOKKA 1
LUOKKA 1 LASERTUOTE
LUOKKA 2
LASERVALO
ÄLÄ TUIJOTA SÄDETTÄ
LUOKKA 2 LASERTUOTE
PORTUGUESE / PORTUGUÊS
CLASSE 1
PRODUTO LASER DA CLASSE 1
CLASSE 2
LUZ DE LASER
NÃO FIXAR O RAIO LUMINOSO
PRODUTO LASER DA CLASSE 2
FRENCH / FRANÇAIS
CLASSE 1
PRODUIT LASER DE CLASSE 1
CLASSE 2
LUMIERE LASER
NE PAS REGARDER LE RAYON FIXEMENT
PRODUIT LASER DE CLASSE 2
SPANISH / ESPAÑOL
CLASE 1
PRODUCTO LÁSER DE LA CLASE 1
CLASE 2
LUZ LÁSER
NO MIRE FIJAMENTE EL HAZ
PRODUCTO LÁSER DE LA CLASE 2
GERMAN / DEUTSCH
KLASSE 1
LASERPRODUKT DER KLASSE 1
KLASSE 2
LASERSTRAHLEN
NICHT DIREKT IN DEN LASERSTRAHL SCHAUEN
LASERPRODUKT DER KLASSE 2
SWEDISH / SVENSKA
KLASS 1
LASERPRODUKT KLASS 1
KLASS 2
LASERLJUS
STIRRA INTE MOT STRÅLEN
LASERPRODUKT KLASS 2
Alimentatore
Nota: utilizzare soltanto alimentatori approvati da Motorola (codice 50-14000-058,
50-14000-058R) con uscita nominale di 5 Vcc e minimo 2A. Questo alimentatore
è certificato secondo la norma EN60950-1 con uscite SELV. L'utilizzo di
alimentatori di altro tipo invalida l'approvazione del dispositivo e potrebbe essere
pericoloso.
132
Scanner compatto orizzontale LS7808
Requisiti in materia di interferenze in radiofrequenza-FCC
Nota: la presente apparecchiatura è stata testata e giudicata
conforme ai limiti previsti per i dispositivi digitali di Classe B, ai
sensi della Parte 15 delle normative FCC. Questi limiti sono
stati elaborati per garantire una ragionevole protezione contro
le interferenze dannose nelle installazioni domestiche. La presente apparecchiatura
genera, utilizza e può irradiare radiofrequenze e, se non viene installata e utilizzata
conformemente alle istruzioni, può causare interferenze dannose nelle
comunicazioni via radio. Non è tuttavia possibile garantire che dette interferenze
non si verifichino in installazioni specifiche. Nel caso in cui questa apparecchiatura
causi interferenze dannose per la ricezione radio o televisiva, rilevabili accendendo
e spegnendo l'apparecchiatura stessa, si consiglia di eliminare queste interferenze
adottando una o più delle misure seguenti:
•
Riorientare o riposizionare l'antenna di ricezione
•
Aumentare la distanza fra apparecchiatura e ricevitore
•
Collegare l'apparecchiatura a una presa di un circuito diverso da quello a cui è
collegato il ricevitore
•
Rivolgersi al rivenditore o a un tecnico radiotelevisivo esperto per una
consulenza.
Il presente dispositivo è conforme alla Parte 15 delle normative FCC. Il
funzionamento è soggetto alle due condizioni seguenti: (1) il dispositivo non può
causare interferenze dannose e (2) deve ricevere qualsiasi interferenza,
comprese quelle che possono causare un funzionamento indesiderato.
Requisiti in materia di interferenze in radiofrequenza - Canada
Questo apparecchio digitale di Classe B è conforme alla norma canadese
ICES-003.
Cet appareil numérique de la classe B est conforme à la norme NMB-003 du
Canada.
Marcatura e Spazio Economico Europeo (SEE)
Dichiarazione di conformità
Symbol dichiara che il presente dispositivo è conforme a tutte le
direttive applicabili (89/336/CEE e 73/23/CEE). La dichiarazione di
conformità è disponibile sul sito http://www2.symbol.com/doc/.
Kurzreferenz
133
Rechtliche Informationen
Symbol Technologies, Inc., die Enterprise Mobility-Sparte von Motorola, Inc.
(„Motorola“).
Alle Symbol-Geräte sind so konstruiert, dass sie die Normen und Richtlinien der
Länder erfüllen, in denen sie verkauft werden. Außerdem werden alle MotorolaGeräte je nach Land mit den erforderlichen Prüfzeichen versehen und
entsprechend den Bestimmungen des Landes beschriftet.
Dieses Handbuch enthält Informationen zu den Zulassungsbestimmungen auf
Deutsch, Französisch, Italienisch, Spanisch, Portugiesisch (Brasilien), Japanisch,
Koreanisch und Chinesisch (vereinfacht).
Jegliche Änderungen an Geräten von Symbol, die nicht ausdrück-lich von Symbol
genehmigt wurden, könnten dazu führen, dass der Benutzer die Befugnis für den
Gebrauch des Geräts verwirkt.
Arbeitsschutzempfehlungen
Ergonomische Empfehlungen
Vorsicht: Die folgenden Empfehlungen sollten beachtet werden, um potenzielle
Gesundheitsbeschwerden am Arbeitsplatz zu vermeiden oder zu minimieren.
Wenden Sie sich an Ihren Gesundheits- und Sicherheitsbeauftragten vor Ort, um
sicherzustellen, dass Sie mit den Sicherheitsvorschriften Ihres Unternehmens
vertraut sind, die dem Schutz von Mitarbeitern am Arbeitsplatz dienen.
•
Vermeiden Sie einseitige, sich ständig wiederholende Bewegungen
•
Achten Sie auf eine geeignete Körperhaltung
•
Vermeiden Sie die Ausübung großer Kräfte
•
Halten Sie Gegenstände, die häufig verwendet werden, im funktionellen
Greifraum
•
Passen Sie die Arbeitshöhe der Körpergröße und der Art der Arbeit an
•
Stellen Sie Gegenstände schwingungsfrei auf
•
Vermeiden Sie die Ausübung von direktem Druck
•
Achten Sie auf verstellbare Tische und Sitze
•
Für Körperbewegungen muss ausreichend Raum vorgesehen sein
•
Achten Sie auf ein geeignetes Arbeitsumfeld
•
Optimieren Sie Ihre Arbeitsabläufe
134
LS7808 Horizontaler Slot-Scanner
Lasergeräte
Erfüllt die Richtlinien 21CFR1040.10 und 1040.11 mit Ausnahme der in
Laser Notice Nr. 50 vom 26. Juli 2001 aufgeführten Abweichungen.
EN60825-1:1994+ A1:2002 +A2:2001
IEC60825-1:1993+A1:1997+A2:2001
Die Laserklassifizierung ist auf einem der Aufkleber auf dem Gerät angegeben.
Lasergeräte der Klasse 1 werden als ungefährlich eingestuft, sofern sie für ihren
vorgesehenen Zweck eingesetzt werden. Die folgende Warnung muss laut USund internationalen Bestimmungen aufgeführt werden:
Vorsicht: Die Verwendung von Bedienelementen, die Veränderung von Einstellungen oder die Durchführung von Verfahren, die hier nicht erwähnt sind,
können dazu führen, dass Personen gefährlichem Laserlicht ausgesetzt werden.
Laserscanner der Klasse 2 arbeiten mit einer sichtbaren Niedervolt-Lichtdiode.
Wie bei jeder hellen Lichtquelle, wie z. B. auch der Sonne, sollte vermieden
werden, direkt in den Lichtstrahl zu blicken. Über Gefahren bei einer kurzzeitigen
Aussetzung des Laserlichts eines Laserscanners der Klasse 2 ist nichts bekannt.
Warnhinweise auf Scannern
Kurzreferenz
135
Laser-Etiketten
Die folgenden Informationen werden nach Maßgabe von Abschnitt 5 IEC 825 und
EN60825 bereitgestellt:
ENGLISCH
CLASS 1
CLASS 2
HEBREW
CLASS 1 LASER PRODUCT
LASER LIGHT
DO NOT STARE INTO BEAM
CLASS 2 LASER PRODUCT
DANISH / DANSK
KLASSE 1
KLASSE 1 LASERPRODUKT
KLASSE 2
LASERLYF
SE IKKE IND I STRÅLEN
KLASSE 2 LASERPRODUKT
ITALIAN / ITALIANO
CLASSE 1
PRODOTTO AL LASER DI CLASSE 1
CLASSE 2
LUCE LASER
NON FISSARE IL RAGGIO
PRODOTTO AL LASER DI CLASSE 2
DUTCH / NEDERLANDS
KLASSE 1
KLASSE-1 LASERPRODUKT
KLASSE 2
LASERLICHT
NIET IN STRAAL STAREN
KLASSE-2 LASERPRODUKT
NORWEGIAN / NORSK
KLASSE 1
LASERPRODUKT, KLASSE 1
KLASSE 2
LASERLYS
IKKE STIRR INN I LYSSTRÅLEN
LASERPRODUKT, KLASSE 2
FINNISH / SUOMI
LUOKKA 1
LUOKKA 1 LASERTUOTE
LUOKKA 2
LASERVALO
ÄLÄ TUIJOTA SÄDETTÄ
LUOKKA 2 LASERTUOTE
PORTUGUESE / PORTUGUÊS
CLASSE 1
PRODUTO LASER DA CLASSE 1
CLASSE 2
LUZ DE LASER
NÃO FIXAR O RAIO LUMINOSO
PRODUTO LASER DA CLASSE 2
FINNISH / SUOMI
LUOKKA 1
LUOKKA 1 LASERTUOTE
LUOKKA 2
LASERVALO
ÄLÄ TUIJOTA SÄDETTÄ
LUOKKA 2 LASERTUOTE
PORTUGUESE / PORTUGUÊS
CLASSE 1
PRODUTO LASER DA CLASSE 1
CLASSE 2
LUZ DE LASER
NÃO FIXAR O RAIO LUMINOSO
PRODUTO LASER DA CLASSE 2
GERMAN / DEUTSCH
KLASSE 1
LASERPRODUKT DER KLASSE 1
KLASSE 2
LASERSTRAHLEN
NICHT DIREKT IN DEN LASERSTRAHL SCHAUEN
LASERPRODUKT DER KLASSE 2
SWEDISH / SVENSKA
KLASS 1
LASERPRODUKT KLASS 1
KLASS 2
LASERLJUS
STIRRA INTE MOT STRÅLEN
LASERPRODUKT KLASS 2
Netzteil
Hinweis: Benutzen Sie nur eine von Motorola genehmigte Stromversorgung (Teilenr. 50-14000-058, 50-14000-058R) mit einer Ausgangsleistung
von 5 V (Gleichstrom) und mindestens 2 A. Die Stromversorgung ist nach
EN60950-1 für die Verwendung in SELV-Stromkreisen zertifiziert. Bei
Verwendung eines anderen Netzteils werden alle für das Gerät gewährten
Genehmigungen außer Kraft gesetzt, und der Betrieb kann gefährlich sein.
136
LS7808 Horizontaler Slot-Scanner
FCC-Anforderungen zum Schutz vor Hochfrequenzstörungen
Hinweis: Dieses Gerät wurde geprüft und erfüllt die
Grenzwerte für ein digitales Gerät der Klasse B laut Teil 15
der FCC-Richtlinien. Diese Grenzwerte wurden festgelegt,
um einen angemessenen Schutz vor Störungen zu
gewährleisten, wenn das Gerät in einer Wohngegend eingesetzt wird. Dieses
Gerät erzeugt, verwendet und kann unter Umständen Funkfrequenzen
aussenden und kann sich, sofern es nicht gemäß der Bedienungsanleitung
angeschlossen und eingesetzt wird, störend auf andere Funkfrequenzen
auswirken. Eine Garantie, dass bei einer bestimmten Installation keine Störungen
auftreten, kann nicht gegeben werden. Sollte das Gerät Störungen beim Radiooder TV-Empfang verursachen, die durch Aus- und Einschalten des Geräts
erkannt werden können, sollten die Störungen durch eine oder mehrere der
folgenden Maßnahmen behoben werden:
•
Neuausrichtung oder Umstellung der Empfangsantenne
•
Vergrößerung des Abstands zwischen Gerät und Empfänger
•
Anschluss des Geräts an eine andere Steckdose als die, an der der Empfänger
angeschlossen ist
•
Beratung durch den Händler oder einen Radio-/Fernsehtechniker
Dieses Gerät erfüllt die Anforderungen von Teil 15 der FCC-Richtlinien. Der
Betrieb des Geräts unterliegt den beiden folgenden Bedingungen: (1) das Gerät
darf keine schädlichen Interferenzen verursachen und (2) das Gerät muss alle
empfangenen Interferenzen annehmen, einschließlich Interferenzen, die zu
einem unerwünschten Betrieb führen können.
Anforderungen zum Schutz vor Hochfrequenzstörungen – Kanada
Dieses digitale Gerät der Klasse B erfüllt die Richtlinien der kanadischen Norm
ICES-003.
Cet appareil numérique de la classe B est conforme à la norme NMB-003 du
Canada.
Zeichen, Europäischer Wirtschaftsraum (EWR)
Konformitätserklärung
Symbol erklärt hiermit, dass dieses Gerät allen anwendbaren
Richtlinien, 89/336/EEC, 73/23/EEC, entspricht.
Eine Konformitätserklärung kann unter http://www2.symbol.com/doc/
heruntergeladen werden.
Guía rápida de referencia
137
Información normativa
Symbol Technologies, Inc., la división Enterprise Mobility Business de Motorola,
Inc. (“Motorola”).
Todos los dispositivos de Symbol están diseñados para cumplir con las reglas y
normativas de los lugares donde se venden, y estarán etiquetados de forma
adecuada.
Esta guía incluye información sobre normativas en francés, italiano, alemán,
español europeo, portugués brasileño, japonés, coreano y chino simplificado.
Aquellos cambios o modificaciones de los equipos de Symbol que no hayan sido
expresamente autorizados por Symbol podrán anular el permiso del usuario para
utilizarlos.
Recomendaciones sobre salud y seguridad
Recomendaciones ergonómicas
Precaución: para evitar o reducir al mínimo el posible riesgo de lesiones
ergonómicas siga estas recomendaciones. Consulte con el responsable local de
salud y seguridad para asegurarse de que cumple los programas de seguridad de
la empresa encaminados a prevenir lesiones del personal.
•
Reduzca o elimine los movimientos repetitivos.
•
Mantenga una posición natural.
•
Reduzca o elimine los esfuerzos excesivos.
•
Tenga a mano los objetos que utilice con mayor frecuencia.
•
Realice las tareas a una altura adecuada.
•
Reduzca o elimine la vibración.
•
Reduzca o elimine la presión directa.
•
Suministre estaciones de trabajo ajustables.
•
Facilite un espacio libre adecuado.
•
Proporcione un entorno de trabajo adecuado.
•
Mejore los procedimientos de trabajo.
138
Lector de ranura horizontal LS7808
Dispositivos láser
En cumplimiento de las normas 21CFR1040.10 y 1040.11, con la
excepción de las variaciones según el aviso de láser n° 50, con fecha de
26 de julio de 2001.
EN60825-1:1994+ A1:2002 +A2:2001
IEC60825-1:1993+A1:1997+A2:2001
La clasificación láser figura en una de las etiquetas del dispositivo.
Los dispositivos láser de Clase 1 no se consideran peligrosos cuando se utilizan
para su finalidad prevista. La siguiente declaración es necesaria para el
cumplimiento de las normativas internacionales:
Precaución: El empleo de controles, los ajustes o la realización de los
procedimientos de manera distinta a la especificada en este documento pueden
tener como consecuencia la exposición peligrosa a los rayos láser.
Los lectores láser de Clase 2 utilizan un diodo de luz visible de baja potencia.
Al igual que con cualquier otra fuente de luz de gran intensidad, como el sol, el
usuario debe evitar mirar directamente al haz luminoso. No se ha demostrado
que sea peligrosa la exposición momentánea a un láser de Clase 2.
Etiquetado del lector
Guía rápida de referencia
139
Etiquetas sobre láser
De acuerdo con la Cláusula 5, IEC 825 y EN60825, se proporciona la siguiente
información al usuario:
ENGLISH
CLASS 1
CLASS 2
HEBREW
CLASS 1 LASER PRODUCT
LASER LIGHT
DO NOT STARE INTO BEAM
CLASS 2 LASER PRODUCT
DANISH / DANSK
KLASSE 1
KLASSE 1 LASERPRODUKT
KLASSE 2
LASERLYF
SE IKKE IND I STRÅLEN
KLASSE 2 LASERPRODUKT
ITALIAN / ITALIANO
CLASSE 1
PRODOTTO AL LASER DI CLASSE 1
CLASSE 2
LUCE LASER
NON FISSARE IL RAGGIO
PRODOTTO AL LASER DI CLASSE 2
DUTCH / NEDERLANDS
KLASSE 1
KLASSE-1 LASERPRODUKT
KLASSE 2
LASERLICHT
NIET IN STRAAL STAREN
KLASSE-2 LASERPRODUKT
NORWEGIAN / NORSK
KLASSE 1
LASERPRODUKT, KLASSE 1
KLASSE 2
LASERLYS
IKKE STIRR INN I LYSSTRÅLEN
LASERPRODUKT, KLASSE 2
FINNISH / SUOMI
LUOKKA 1
LUOKKA 1 LASERTUOTE
LUOKKA 2
LASERVALO
ÄLÄ TUIJOTA SÄDETTÄ
LUOKKA 2 LASERTUOTE
PORTUGUESE / PORTUGUÊS
CLASSE 1
PRODUTO LASER DA CLASSE 1
CLASSE 2
LUZ DE LASER
NÃO FIXAR O RAIO LUMINOSO
PRODUTO LASER DA CLASSE 2
FRENCH / FRANÇAIS
CLASSE 1
PRODUIT LASER DE CLASSE 1
CLASSE 2
LUMIERE LASER
NE PAS REGARDER LE RAYON FIXEMENT
PRODUIT LASER DE CLASSE 2
SPANISH / ESPAÑOL
CLASE 1
PRODUCTO LÁSER DE LA CLASE 1
CLASE 2
LUZ LÁSER
NO MIRE FIJAMENTE AL HAZ
PRODUCTO LÁSER DE LA CLASE 2
GERMAN / DEUTSCH
KLASSE 1
LASERPRODUKT DER KLASSE 1
KLASSE 2
LASERSTRAHLEN
NICHT DIREKT IN DEN LASERSTRAHL SCHAUEN
LASERPRODUKT DER KLASSE 2
SWEDISH / SVENSKA
KLASS 1
LASERPRODUKT KLASS 1
KLASS 2
LASERLJUS
STIRRA INTE MOT STRÅLEN
LASERPRODUKT KLASS 2
Fuente de alimentación
Nota: use únicamente una fuente de alimentación aprobada por Motorola (ref.
50-14000-058, 50-14000-058R) con una potencia de salida de 5V CC y un
mínimo de 2 A. La fuente de alimentación cuenta con la certificación EN60950-1
con salidas SELV. El uso de una fuente de alimentación alternativa puede resultar
peligroso y anulará cualquier homologación de este dispositivo.
140
Lector de ranura horizontal LS7808
Requisitos sobre interferencias de radiofrecuencia: FCC
Nota: este equipo ha sido probado y se ajusta a los límites
para un dispositivo digital de Clase B, de conformidad con la
Parte 15 de las normativas de la FCC. Estos límites están
diseñados para proporcionar una protección razonable contra
interferencias perjudiciales en una instalación residencial. Este equipo genera,
usa y puede irradiar energía de radiofrecuencia. Si no se instala y utiliza con
arreglo a las instrucciones, puede producir interferencias perjudiciales en las
comunicaciones de radio. No obstante, no se garantiza que la interferencia no se
produzca en una instalación determinada. Si este equipo genera interferencias
perjudiciales en la recepción de señales de radio o televisión (lo que se puede
averiguar encendiendo y apagando el equipo), se aconseja al usuario que intente
corregir la interferencia tomando una o varias de las siguientes medidas:
•
Cambie la orientación o la ubicación de la antena receptora.
•
Aumente la separación entre el equipo y el receptor.
•
Conecte el equipo a una toma de un circuito distinto del utilizado actualmente
para la conexión del receptor.
•
Consulte al distribuidor o a un técnico cualificado de radio / TV para obtener
ayuda.
Este dispositivo cumple lo establecido en la Parte 15 de las normativas de la
FCC (EE.UU.). Su funcionamiento está sujeto a las dos condiciones siguientes:
(1) este dispositivo no puede causar interferencias perjudiciales, y (2) este
dispositivo debe aceptar cualquier interferencia recibida, incluidas las que
pudieran dar lugar a un funcionamiento no deseado.
Requisitos sobre interferencias de radiofrecuencia: Canadá
Este aparato digital de Clase B cumple con la normativa canadiense ICES-003.
Cet appareil numérique de la classe B est conforme à la norme NMB-003 du
Canada.
Marcas del Espacio Económico Europeo (EEE)
Declaración de conformidad
Symbol declara que este dispositivo cumple las especificaciones de las
directivas pertinentes, 89/336/CEE, 73/23/CEE. La declaración de
conformidad se puede obtener en http://www2.symbol.com/doc/.
Guia de Consulta Rápida
141
Informações regulamentares
A Symbol Technologies, Inc., é a divisão Enterprise Mobility da Motorola, Inc
("Motorola").
Todos os dispositivos da Symbol são projetados para atender às normas e aos
regulamentos dos locais onde serão vendidos e serão etiquetados conforme
requerido.
Este guia inclui informações regulamentares em francês, italiano, alemão,
espanhol (Espanha), português (Brasil), japonês, coreano e chinês simplificado.
Qualquer alteração ou modificação em equipamentos da Symbol que não seja
expressamente aprovada pela Symbol pode invalidar a autoridade do usuário de
operar esses equipamentos.
Recomendações de saúde e segurança
Recomendações ergonômicas
Cuidado: Para evitar ou minimizar o risco potencial de lesão ergonômica, siga as
recomendações abaixo. Consulte a Comissão Interna de Prevenção de
Acidentes (CIPA) local para certificar-se de estar cumprindo os programas de
segurança de sua empresa a fim de evitar lesões entre seus funcionários.
•
Reduza ou elimine movimentos repetitivos
•
Mantenha uma postura natural
•
Reduza ou elimine o excesso de força
•
Mantenha os objetos de uso freqüente ao seu alcance
•
Execute as tarefas na altura apropriada
•
Reduza ou elimine vibrações
•
Reduza ou elimine a pressão direta
•
Proporcione estações de trabalho ajustáveis
•
Proporcione espaço adequado
•
Proporcione um ambiente de trabalho conveniente
•
Melhore os procedimentos de trabalho
142
Leitor horizontal com posição LS7808
Dispositivos a laser
Estão em conformidade com a 21CFR1040.10 e 1040.11, com exceção
das variações, de acordo com a regra nº 50 do Aviso de Laser, de 26 de
julho de 2001.
EN60825-1:1994+ A1:2002 +A2:2001
IEC60825-1:1993+A1:1997+A2:2001
A classificação do laser está marcada em uma das etiquetas do dispositivo.
Os dispositivos a laser Classe 1 não são considerados perigosos quando usados
para o propósito a que foram destinados. O aviso a seguir é necessário para que
se cumpram as exigências internacionais e dos EUA:
Cuidado: o uso de controles e ajustes ou a execução de procedimentos
diferentes daqueles aqui especificados podem resultar em exposição prejudicial à
radiação laser.
Os leitores a laser de Classe 2 usam diodo de luz visível de baixa potência. Como
acontece com qualquer fonte de luz muito brilhante, como o sol, o usuário deve
evitar olhar diretamente para o feixe de luz. A exposição momentânea a laser de
Classe 2 não é considerada prejudicial.
Etiquetagem do leitor
Guia de Consulta Rápida
143
Etiquetas de laser
As seguintes informações são fornecidas ao usuário em conformidade com a
Cláusula 5, IEC 825 e EN60825:
ENGLISH
CLASS 1
CLASS 2
HEBREW
CLASS 1 LASER PRODUCT
LASER LIGHT
DO NOT STARE INTO BEAM
CLASS 2 LASER PRODUCT
DANISH / DANSK
KLASSE 1
KLASSE 1 LASERPRODUKT
KLASSE 2
LASERLYF
SE IKKE IND I STRÅLEN
KLASSE 2 LASERPRODUKT
ITALIAN / ITALIANO
CLASSE 1
PRODOTTO AL LASER DI CLASSE 1
CLASSE 2
LUCE LASER
NON FISSARE IL RAGGIO
PRODOTTO AL LASER DI CLASSE 2
DUTCH / NEDERLANDS
KLASSE 1
KLASSE-1 LASERPRODUKT
KLASSE 2
LASERLICHT
NIET IN STRAAL STAREN
KLASSE-2 LASERPRODUKT
NORWEGIAN / NORSK
KLASSE 1
LASERPRODUKT, KLASSE 1
KLASSE 2
LASERLYS
IKKE STIRR INN I LYSSTRÅLEN
LASERPRODUKT, KLASSE 2
FINNISH / SUOMI
LUOKKA 1
LUOKKA 1 LASERTUOTE
LUOKKA 2
LASERVALO
ÄLÄ TUIJOTA SÄDETTÄ
LUOKKA 2 LASERTUOTE
PORTUGUESE / PORTUGUÊS
CLASSE 1
PRODUTO COM LASER DA CLASSE 1
CLASSE 2
LUZ DE LASER
NÃO FIXAR O RAIO LUMINOSO
PRODUTO LASER DA CLASSE 2
FRENCH / FRANÇAIS
CLASSE 1
PRODUIT LASER DE CLASSE 1
CLASSE 2
LUMIERE LASER
NE PAS REGARDER LE RAYON FIXEMENT
PRODUIT LASER DE CLASSE 2
SPANISH / ESPAÑOL
CLASE 1
PRODUCTO LÁSER DE LA CLASE 1
CLASE 2
LUZ LÁSER
NO MIRE FIJAMENTE EL HAZ
PRODUCTO LÁSER DE LA CLASE 2
GERMAN / DEUTSCH
KLASSE 1
LASERPRODUKT DER KLASSE 1
KLASSE 2
LASERSTRAHLEN
NICHT DIREKT IN DEN LASERSTRAHL SCHAUEN
LASERPRODUKT DER KLASSE 2
SWEDISH / SVENSKA
KLASS 1
LASERPRODUKT KLASS 1
KLASS 2
LASERLJUS
STIRRA INTE MOT STRÅLEN
LASERPRODUKT KLASS 2
Fonte de alimentação
Nota: use somente saídas de alimentação aprovadas pela Motorola (p/n
50-14000-058R), classificadas como 5V CC e mínimo de 2A. A alimentação é
certificada para a EN60950-1 com saídas SELV. O uso de outra fonte de
alimentação invalidará qualquer aprovação dada a este dispositivo e poderá
torná-lo perigoso.
144
Leitor horizontal com posição LS7808
Requisitos de interferência de RF - FCC
Nota: este equipamento foi testado e concluiu-se que está em
conformidade com os limites para dispositivo digital da
Classe B, de acordo com a Parte 15 das Regras da FCC.
Esses limites foram estabelecidos para fornecer proteção
razoável contra a interferência prejudicial em instalações residenciais. Este
equipamento gera, usa e pode irradiar energia de radiofreqüência e, se não for
instalado e usado de acordo com as instruções, poderá causar interferência
prejudicial às radiocomunicações. Todavia, não existe garantia de que não ocorra
interferência em uma instalação particular. Se este equipamento causar
interferência prejudicial à recepção de rádio ou televisão, o que pode ser
determinado desligando-se e ligando-se o equipamento, o usuário deverá tentar
corrigir a interferência usando uma ou mais das seguintes medidas:
•
Reorientar ou reposicionar a antena receptora
•
Aumentar a distância entre o equipamento e o receptor
•
Conectar o equipamento à tomada de um circuito diferente daquele ao qual o
receptor está conectado
•
Consultar o revendedor ou um técnico experiente em rádio/TV para obter
ajuda
Este dispositivo está em conformidade com a Parte 15 das Regras da FCC.
A operação está sujeita às duas seguintes condições: (1) este dispositivo não
pode causar interferência prejudicial; e (2) este dispositivo deve aceitar qualquer
interferência recebida, inclusive interferência que possa causar operação
indesejada.
Requisitos de interferência de radiofreqüência - Canadá
Este aparelho digital de Classe B está em conformidade com a norma ICES-003
do Canadá.
Cet appareil numérique de la classe B est conforme à la norme NMB-003 du
Canada.
Marca CE e Área Econômica Européia (EEA)
Declaração de conformidade
A Symbol declara neste documento que este dispositivo está em
conformidade com todas as Diretivas aplicáveis, 89/336/EEC,
73/23/EEC. Uma Declaração de Conformidade pode ser obtida em
http://www2.symbol.com/doc/.
クイック リファレンス ガイド
145
規制に関する情報
Symbol Technologies, Inc. は、Motorola, Inc (「Motorola」) のエンタープラ
イズ モビリティ ビジネス部門です。
Symbol のデバイスはすべて、販売地域の法令および規制に準拠するように設計
されており、必要に応じてその旨を記載したラベルが貼付されています。
本書では、規制に関する情報をフランス語、イタリア語、ドイツ語、ヨーロッパ
スペイン語、ポルトガル語、日本語、韓国語、簡体中国語で提供いたします。
Symbol の機器に変更または改変を加えた場合、Symbol による明示的な承認が
ある場合を除き、その機器を操作するお客様の権限が無効になる場合があります。
衛生および安全に関する推奨事項
人間工学に基づく推奨事項
注意 : 人間工学上の被害を受けるリスクを回避または最小限に抑えるため、以下
の推奨事項に従ってください。安全に関する社内規定に従って本製品を使用して
いることを衛生 / 安全管理担当者に確認し、従業員の負傷を防いでください。
•
•
•
•
•
•
•
•
•
•
•
同じ動作の繰り返しは、極力減らすかなくすようにしてください。
自然な姿勢を保ってください。
過度に力が必要な動作は、極力減らすかなくすようにしてください。
頻繁に使用するものは手の届く範囲内に配置してください。
作業は、適切な高さで行ってください。
振動が発生する作業は、極力減らすかなくすようにしてください。
直接圧力を受ける作業は、極力減らすかなくすようにしてください。
調整可能なワークステーションを用意してください。
適切な距離を保ってください。
適切な作業環境を用意してください。
作業手順を改善してください。
レーザ機器
本製品は、21CFR1040.10 および 1040.11 (2001 年 7 月 26 日付け
のレーザ通告 50 項の規定を除く ) に準拠しています。
EN60825-1:1994+ A1:2002 +A2:2001
IEC60825-1:1993+A1:1997+A2:2001
レーザの分類は、機器に貼付されているラベルに記載されています。
146
クラス 1 のレーザ機器は、本来の用途で使用した場合には危険とは見なされませ
ん。米国および各国の規制に準拠するため、以下の記述が必要とされています。
注意 : 本書に明記されていない方法で操作部の使用、調整または操作手順を行う
と、レーザ光を浴びる可能性があります。
クラス 2 のレーザ スキャナには、低電力の、肉眼で見ることができる発光ダイ
オードが使用されています。太陽などの非常に明るい光源と同様、光線を直接見
ることは避けてください。クラス 2 のレーザを瞬間的に浴びることが危険かど
うかは判明していません。
スキャナに貼付されているラベル
レーザのラベル
IEC 825 第 5 条および EN60825 に従い、以下の情報をユーザーに示します。
ENGLISH
CLASS 1
CLASS 2
HEBREW
CLASS 1 LASER PRODUCT
LASER LIGHT
DO NOT STARE INTO BEAM
CLASS 2 LASER PRODUCT
DANISH / DANSK
KLASSE 1
KLASSE 1 LASERPRODUKT
KLASSE 2
LASERLYF
SE IKKE IND I STRÅLEN
KLASSE 2 LASERPRODUKT
ITALIAN / ITALIANO
CLASSE 1
PRODOTTO AL LASER DI CLASSE 1
CLASSE 2
LUCE LASER
NON FISSARE IL RAGGIO
PRODOTTO AL LASER DI CLASSE 2
DUTCH / NEDERLANDS
KLASSE 1
KLASSE-1 LASERPRODUKT
KLASSE 2
LASERLICHT
NIET IN STRAAL STAREN
KLASSE-2 LASERPRODUKT
NORWEGIAN / NORSK
KLASSE 1
LASERPRODUKT, KLASSE 1
KLASSE 2
LASERLYS
IKKE STIRR INN I LYSSTRÅLEN
LASERPRODUKT, KLASSE 2
FINNISH / SUOMI
LUOKKA 1
LUOKKA 1 LASERTUOTE
LUOKKA 2
LASERVALO
ÄLÄ TUIJOTA SÄDETTÄ
LUOKKA 2 LASERTUOTE
PORTUGUESE / PORTUGUÊS
CLASSE 1
PRODUTO LASER DA CLASSE 1
CLASSE 2
LUZ DE LASER
NÃO FIXAR O RAIO LUMINOSO
PRODUTO LASER DA CLASSE 2
クイック リファレンス ガイド
FRENCH / FRANÇAIS
CLASSE 1
PRODUIT LASER DE CLASSE 1
CLASSE 2
LUMIERE LASER
NE PAS REGARDER LE RAYON FIXEMENT
PRODUIT LASER DE CLASSE 2
GERMAN / DEUTSCH
KLASSE 1
LASERPRODUKT DER KLASSE 1
KLASSE 2
LASERSTRAHLEN
NICHT DIREKT IN DEN LASERSTRAHL SCHAUEN
LASERPRODUKT DER KLASSE 2
147
SPANISH / ESPAÑOL
CLASE 1
PRODUCTO LÁSER DE LA CLASE 1
CLASE 2
LUZ LÁSER
NO MIRE FIJAMENTE EL HAZ
PRODUCTO LÁSER DE LA CLASE 2
SWEDISH / SVENSKA
KLASS 1
LASERPRODUKT KLASS 1
KLASS 2
LASERLJUS
STIRRA INTE MOT STRÅLEN
LASERPRODUKT KLASS 2
電源アダプタ
注 : Motorola によって使用が認められている電源アダプタ (p/n
50-14000-058、50-14000-058R、出力 DC5V、最小 2A) のみを使用してくだ
さい。この電源アダプタは、SELV 出力について EN60950-1 への準拠が認定
されています。その他の電源を使用した場合、この機器に対する承認事項はすべ
て無効になります。また、安全に使用できません。
無線電波障害に関する要件 - FCC
注 : この機器は、FCC 規制第 15 部に定められたクラス B
デジタル機器に関する制限に従ってテストされ、これに準拠
するものと認定されています。この制限は、この機器を住居
内で使用する際に有害な電波障害を起こさないために規定さ
れたものです。この機器は、無線周波数エネルギーを発生、使用、および放射す
る可能性があります。また、指示に従わずに設置、および使用した場合、無線通
信に有害な電波障害を引き起こす可能性があります。ただし、これは特定の設置
状況で電波障害が発生しないことを保証するものではありません。この機器がラ
ジオやテレビの受信に有害な電波障害を引き起こし、機器の電源のオン / オフ操
作によってそのことが確認できる場合、以下の方法を用いて、お客様ご自身で電
波障害の解決を試みることをお勧めします。
• 受信アンテナの方向または場所を変えてください。
• 本機器と受信機の距離を離してください。
• 受信機が接続されているものとは別の回路のコンセントに本機器を接続して
ください。
• 販売店またはテレビ / ラジオの専門技術者に相談してください。
この機器は、FCC 規制第 15 部に準拠しています。この機器の動作は次の 2 つ
の条件を前提としています : (1) この機器は有害な干渉を発生させません。(2) こ
の機器は、不適切な動作の原因となり得る干渉も含め、受信したあらゆる干渉の
影響を受けます。
148
無線電波障害に関する要件 - カナダ
このクラス B デジタル機器は、カナダの ICES-003 に準拠しています。
Cet appareil numérique de la classe B est conforme à la norme NMB-003 du
Canada.
マークと欧州経済地域 (EEA)
準拠の宣言
Symbol は、このデバイスが、該当するすべての指示項目
(89/336/EEC、73/23/EEC) に準拠していることを、本文書により宣
言します。
「適合宣言」文書は、http://www2.symbol.com/doc/ から
入手できます。
快速参考指南
149
规章信息
Symbol Technologies, Inc. 是 Motorola, Inc. (“Motorola”) 的企业移动业务。
所有 Symbol 设备的设计均严格遵守各个销售地点所制定的法律和规章,并已将此
条明文列出。
本指南包括已译成法文、意大利文、德文、西班牙文(西班牙)、巴西/葡萄牙文、
日文、韩文和简体中文的规章信息。
未经 Symbol 明确批准而擅自对 Symbol 的设备作出更改或修改,将有可能令用户
操作设备的授权作废。
健康与安全建议
人体工程建议
警告:为了避免或将人体工程方面的潜在伤害风险减至最低,我们建议您注意以下
事项。请咨询当地的健康与安全经理,确保您已参加公司为预防员工意外伤害而设
立的安全计划。
• 减少或避免重复的动作
• 保持一种自然的姿势
• 减少或避免用力过度
• 将经常使用的物品放在随手可及之处
• 以合适的高度从事工作
• 减少或避免振动
• 减少或避免直接受压
• 提供可调节的工作台
• 提供足够宽敞的空间
• 提供适宜的工作环境
• 改进工作步骤
激光设备
除容差遵照 2001 年 7 月 26 日颁布的 Laser Notice No.50 的规定外,
激光设备必须遵照 21CFR1040.10 和 1040.11 的规定。
EN60825-1:1994+ A1:2002 +A2:2001
IEC60825-1:1993+A1:1997+A2:2001
此设备上的其中一个标签中标注有激光分类信息。
LS7808 平台式 Slot 扫描器
150
对于 1 级激光设备,如果按其设计用途使用,则不被视为危险产品。遵照美国和
国际规章的要求,必须提供以下声明:
警告:控制、调整或执行未在此处指定的其它过程均可能导致暴露于激光光束的危
险发生。
2 级激光扫描器使用低能量的可见光二极管。与任何强光光源(例如太阳)一样,
用户应当避免直视激光束。短时间暴露于 2 级激光是否有害尚不得而知。
扫描器标签
激光专用标签
依照 Clause 5、IEC 825 和 EN60825 规章,向用户提供以下信息:
ENGLISH
CLASS 1
CLASS 2
HEBREW
CLASS 1 LASER PRODUCT
LASER LIGHT
DO NOT STARE INTO BEAM
CLASS 2 LASER PRODUCT
DANISH / DANSK
KLASSE 1
KLASSE 1 LASERPRODUKT
KLASSE 2
LASERLYF
SE IKKE IND I STRÅLEN
KLASSE 2 LASERPRODUKT
ITALIAN / ITALIANO
CLASSE 1
PRODOTTO AL LASER DI CLASSE 1
CLASSE 2
LUCE LASER
NON FISSARE IL RAGGIO
PRODOTTO AL LASER DI CLASSE 2
DUTCH / NEDERLANDS
KLASSE 1
KLASSE-1 LASERPRODUKT
KLASSE 2
LASERLICHT
NIET IN STRAAL STAREN
KLASSE-2 LASERPRODUKT
NORWEGIAN / NORSK
KLASSE 1
LASERPRODUKT, KLASSE 1
KLASSE 2
LASERLYS
IKKE STIRR INN I LYSSTRÅLEN
LASERPRODUKT, KLASSE 2
FINNISH / SUOMI
LUOKKA 1
LUOKKA 1 LASERTUOTE
LUOKKA 2
LASERVALO
ÄLÄ TUIJOTA SÄDETTÄ
LUOKKA 2 LASERTUOTE
PORTUGUESE / PORTUGUÊS
CLASSE 1
PRODUTO LASER DA CLASSE 1
CLASSE 2
LUZ DE LASER
NÃO FIXAR O RAIO LUMINOSO
PRODUTO LASER DA CLASSE 2
FRENCH / FRANÇAIS
CLASSE 1
PRODUIT LASER DE CLASSE 1
CLASSE 2
LUMIERE LASER
NE PAS REGARDER LE RAYON FIXEMENT
PRODUIT LASER DE CLASSE 2
SPANISH / ESPAÑOL
CLASE 1
PRODUCTO LÁSER DE LA CLASE 1
CLASE 2
LUZ LÁSER
NO MIRE FIJAMENTE EL HAZ
PRODUCTO LÁSER DE LA CLASE 2
快速参考指南
GERMAN / DEUTSCH
KLASSE 1
LASERPRODUKT DER KLASSE 1
KLASSE 2
LASERSTRAHLEN
NICHT DIREKT IN DEN LASERSTRAHL SCHAUEN
LASERPRODUKT DER KLASSE 2
151
SWEDISH / SVENSKA
KLASS 1
LASERPRODUKT KLASS 1
KLASS 2
LASERLJUS
STIRRA INTE MOT STRÅLEN
LASERPRODUKT KLASS 2
电源
注释:只能使用经 Motorola 授权的电源 (p/n 50-14000-058, 50-14000-058R),其
输出电压为 5Vdc,最小电流 2A。此电源已通过符合 SELV 输出的 EN60950-1 认
证。使用其它电源将使对此设备的所有授权作废,并且可能带来危害。
无线电频率干扰要求 - FCC
注释:此设备已通过测试,符合 FCC 规则第 15 部分关于 B
级数字设备的限制。这些限制的制定是为了提供合理保护,防
止此设备在居住区安装时产生有害干扰。此设备可产生、使用
并会发射无线射频能量,而且,如果未按说明进行安装和使
用,可能会对无线电通信造成有害干扰。当然,也不能担保在特定安装中不会产生
干扰问题。如果使用此设备确实对无线电或电视机的接收造成干扰(可以通过关闭
设备然后再打开来确定),建议用户采取以下一种或多种措施排除干扰:
• 重新调整接收天线的方向或位置
• 增加此设备与接收器的间隔距离
• 将此设备和接收器分别连接到不共用同一电路的电源插座上
• 咨询经销商或经验丰富的无线电/TV 技术人员,以获得帮助
此设备符合 FCC 规则第 15 部分的规定。设备操作必须遵循以下两个条件:(1) 此
设备不会产生有害干扰,并且 (2) 此设备必须抗任何外部干扰,包括可能导致意外
操作的干扰。
无线电频率干扰要求 - 加拿大
此 B 级数字仪器符合加拿大 ICES-003 的规定。
Cet appareil numérique de la classe B est conforme à la norme NMB-003 du
Canada.
标示和欧洲经济区 (EEA)
符合声明
Symbol, Inc. 在此处郑重声明此设备符合所有适用规定、89/336/EEC、
73/23/EEC 的要求。要获得符合声明,请访问
http://www2.symbol.com/doc/
152
규격 정보
Symbol Technologies, Inc. Motorola, Inc("Motorola")의 기업용 모바일 솔루션 사업
부문의 중추적인 역할을 수행하고 있습니다. 모든 Symbol 장치는 판매 지역의 규
칙과 규격에 적합하게 제작되었으며 필요한 인증 마크가 부착되어 있습니다.
이 설명서에는 한국어, 프랑스어, 이탈리아어, 독일어, 스페인어, 포르투갈어, 일본
어, 중국어 간체 등, 여러 국가의 언어로 규격 내용이 나와 있습니다.
Symbol 가 명백히 승인하지 않는 Symbol 장비에 대해 어떠한 변경이나 수정을 가
하는 경우 사용자의 장비 작동 권한이 무효화될 수 있습니다.
건강과 안전을 위한 권장 사항
안전을 위한 권장 사항
주의: 아래 권장 사항에 따르면 인체 부상 위험을 예방하거나 최대한 줄일 수 있습
니다. 현지 건강 및 안전 관리자와 상담을 통해, 회사 안전 방침을 제대로 지켜지고
있는지 확인하여 작업자 부상을 예방하십시오.
•
반복되는 동작은 피하거나 줄이십시오.
•
편안한 자세를 유지하십시오.
•
과도한 힘은 피하거나 줄이십시오.
•
자주 사용하는 물건은 주변에 두십시오.
•
올바른 높이에서 작업을 수행하십시오.
•
진동은 피하거나 줄이십시오.
•
직접적인 압력은 피하거나 줄이십시오.
•
조절식 작업대를 준비해두십시오.
•
여유 공간을 충분히 확보하십시오.
•
적합한 작업 환경을 조성하십시오.
•
작업 절차를 개선하십시오.
레이저 장비
21CFR1040.10 및 1040.11(2001년 7월 26일자 Laser Notice No. 50에 따
른 편차 제외)에 적합.
EN60825-1:1994+ A1:2002 +A2:2001
IEC60825-1:1993+A1:1997+A2:2001
레이저 장치 등급은 장비에 부착된 마크에 표시되어 있습니다.
1급 레이저 장비는 본래 용도로만 사용되면 위험하지 않습니다. 다음 문구가 있으
면 미국 및 국제 규격에 적합한 것입니다.
빠른 참조 안내서
153
주의: 본 문서에 언급되지 않은 조작 작업 및 개조 작업, 절차 수행 등을 하면 위험
한 레이저 광선이 발생할 수 있습니다.
2급 레이저 스캐너에는 저전력 가시 광선 다이오드가 사용됩니다. 태양처럼, 빛 강
도가 아주 높은 광원에서 나오는 광선은 육안으로 쳐다보지 마십시오. 2급 레이저
광선에 잠시 노출되는 것은 위험하지 않습니다.
스캐너 안전 표지
레이저 안전 표지
IEC 825 및 EN60825 5항에 따라 다음과 같은 정보가 사용자에게 제공됩니다.
ENGLISH
CLASS 1
CLASS 2
HEBREW
CLASS 1 LASER PRODUCT
LASER LIGHT
DO NOT STARE INTO BEAM
CLASS 2 LASER PRODUCT
DANISH / DANSK
KLASSE 1
KLASSE 1 LASERPRODUKT
KLASSE 2
LASERLYF
SE IKKE IND I STRÅLEN
KLASSE 2 LASERPRODUKT
ITALIAN / ITALIANO
CLASSE 1
PRODOTTO AL LASER DI CLASSE 1
CLASSE 2
LUCE LASER
NON FISSARE IL RAGGIO
PRODOTTO AL LASER DI CLASSE 2
DUTCH / NEDERLANDS
KLASSE 1
KLASSE-1 LASERPRODUKT
KLASSE 2
LASERLICHT
NIET IN STRAAL STAREN
KLASSE-2 LASERPRODUKT
NORWEGIAN / NORSK
KLASSE 1
LASERPRODUKT, KLASSE 1
KLASSE 2
LASERLYS
IKKE STIRR INN I LYSSTRÅLEN
LASERPRODUKT, KLASSE 2
FINNISH / SUOMI
LUOKKA 1
LUOKKA 1 LASERTUOTE
LUOKKA 2
LASERVALO
ÄLÄ TUIJOTA SÄDETTÄ
LUOKKA 2 LASERTUOTE
PORTUGUESE / PORTUGUÊS
CLASSE 1
PRODUTO LASER DA CLASSE 1
CLASSE 2
LUZ DE LASER
NÃO FIXAR O RAIO LUMINOSO
PRODUTO LASER DA CLASSE 2
RENCH / FRANÇAIS
CLASSE 1
PRODUIT LASER DE CLASSE 1
CLASSE 2
LUMIERE LASER
NE PAS REGARDER LE RAYON FIXEMENT
PRODUIT LASER DE CLASSE 2
SPANISH / ESPAÑOL
CLASE 1
PRODUCTO LÁSER DE LA CLASE 1
CLASE 2
LUZ LÁSER
NO MIRE FIJAMENTE EL HAZ
PRODUCTO LÁSER DE LA CLASE 2
154
GERMAN / DEUTSCH
KLASSE 1
LASERPRODUKT DER KLASSE 1
KLASSE 2
LASERSTRAHLEN
NICHT DIREKT IN DEN LASERSTRAHL SCHAUEN
LASERPRODUKT DER KLASSE 2
SWEDISH / SVENSKA
KLASS 1
LASERPRODUKT KLASS 1
KLASS 2
LASERLJUS
STIRRA INTE MOT STRÅLEN
LASERPRODUKT KLASS 2
전원 공급 장치
참고: Motorola에서 인가한 전원 공급 장치(부품 번호: 50-14000-058,
50-14000-058R)(정격 출력 5V DC, 최소 2A)만 사용하십시오. 이 전원 공급 장치는
SELV 출력에서 EN60950 인증 마크를 획득하였습니다 대체 전원 공급 장치를 사
용하면 본 장비에 대한 승인이 무효화되고 위험할 수 있습니다.
전자파 간섭 규제 - FCC
참고: 본 장비는 FCC 규격 제15조의 B등급 디지털 장비 관련
규제에 따라 테스트되었으며 이에 적합한 것으로 판정되었습
니다. 이러한 규제는 주거 환경에서 사용할 때 발생하는 유해
한 전자파 간섭으로부터 보호하기 위해 마련되었습니다. 라디
오와 TV 수신을 방해하는 유해한 간섭이 유발되는 경우, 장비 전원을 껐다 켜고, 다
음 방법에 따라 간섭을 해결하십시오. 그러나, 특정 환경에서 사용한다고 해서 전
자파 간섭이 발생하지 않는 것은 아닙니다. 라디오와 TV 수신을 방해하는 유해한
간섭이 유발되는 경우, 장비 전원을 껐다 켜고, 다음 방법에 따라 간섭을 해결하십
시오.
•
수신 안테나의 방향이나 위치를 바꾸십시오.
•
수신기와 장비 사이 거리를 넓히십시오.
•
수신기와 장비를 서로 다른 콘센트에 꽂으십시오.
•
판매점이나 라디오/TV 전문 기술자의 도움을 받으십시오.
본 장비는 FCC 규격 제15조에 적합하며, 다음 두 작동 조건을 충족합니다. (1) 유해
한 전자파 간섭을 일으키지 않습니다. (2) 오작동을 유발하는 전자파 간섭을 비롯한
수신된 간섭을 모두 수용해야 합니다.
전자파 간섭 규제 - 캐나다
본 B급 디지털 장치는 Canadian ICES-003에 적합합니다.
Cet appareil numérique de la classe B est conforme à la norme NMB-003 du
Canada.
빠른 참조 안내서
155
표시 및 EEA(유럽 경제 지역)
자기 인증 선언
Symbol, Inc.는 본 문서를 통해 이 장비가 적용되는 모든 Directives인
89/336/EEC, 73/23/EEC를 준수함을 선언합니다. 자기 인증 선언 내용
은 http://www2.symbol.com/doc/에서 자세히 확인할 수 있습니다.
156
LS7808 Horizontal Slot Scanner
Waste Electrical and Electronic Equipment (WEEE)
English: For EU Customers: All products at the end of their life must be returned
to Motorola for recycling. For information on how to return product, please go to:
http://www.symbol.com/environmental_compliance.
Bulgarish: За клиенти от ЕС: След края на полезния им живот всички
продукти трябва да се връщат на Motorola за рециклиране. За информация
относно връщането на продукти, моля отидете на адрес:
http://www.symbol.com/weeelink.
Dansk: Til kunder i EU: Alle produkter skal returneres til Motorola til recirkulering,
når de er udtjent. Læs oplysningerne om returnering af produkter på:
http://www.symbol.com/environmental_compliance.
Deutsch: Für Kunden innerhalb der EU: Alle Produkte müssen am Ende ihrer
Lebensdauer zum Recycling an Motorola zurückgesandt werden. Informationen
zur Rücksendung von Produkten finden Sie unter
http://www.symbol.com/environmental_compliance.
Eesti: EL klientidele: kõik tooted tuleb nende eluea lõppedes tagastada
taaskasutamise eesmärgil Motorola'ile. Lisainformatsiooni saamiseks toote
tagastamise kohta külastage palun aadressi:
http://www.symbol.com/environmental_compliance.
Español: Para clientes en la Unión Europea: todos los productos deberán
entregarse a Motorola al final de su ciclo de vida para que sean reciclados. Si
desea más información sobre cómo devolver un producto, visite:
http://www.symbol.com/environmental_compliance.
Français : Clients de l'Union Européenne : Tous les produits en fin de cycle de vie
doivent être retournés à Motorola pour recyclage. Pour de plus amples
informations sur le retour de produits, consultez :
http://www.symbol.com/environmental_compliance.
Italiano: per i clienti dell'UE: tutti i prodotti che sono giunti al termine del rispettivo
ciclo di vita devono essere restituiti a Motorola al fine di consentirne il riciclaggio.
Per informazioni sulle modalità di restituzione, visitare il seguente sito Web:
http://www.symbol.com/environmental_compliance.
Quick Reference Guide
157
Magyar: Az EU-ban vásárlóknak: Minden tönkrement terméket a Motorola
vállalathoz kell eljuttatni újrahasznosítás céljából. A termék visszajuttatásának
módjával kapcsolatos tudnivalókért látogasson el a
http://www.symbol.com/environmental_compliance weboldalra.
Nederlands: Voor klanten in de EU: alle producten dienen aan het einde van hun
levensduur naar Motorola te worden teruggezonden voor recycling. Raadpleeg
http://www.symbol.com/environmental_compliance voor meer informatie over het
terugzenden van producten.
Português: Para clientes da UE: todos os produtos no fim de vida devem ser
devolvidos à Motorola para reciclagem. Para obter informações sobre como
devolver o produto, visite: http://www.symbol.com/environmental_compliance.
Românesc: Pentru clienţii din UE: Toate produsele, la sfârşitul duratei lor de
funcţionare, trebuie returnate la Motorola pentru reciclare. Pentru informaţii
despre returnarea produsului, accesaţi: http://www.symbol.com/weeelink.
Slovenski: Za kupce v EU: vsi izdelki se morajo po poteku življenjske dobe vrniti
podjetju Motorola za reciklažo. Za informacije o vraèilu izdelka obišèite:
http://www.symbol.com/environmental_compliance.
Suomi: Asiakkaat Euroopan unionin alueella: Kaikki tuotteet on palautettava
kierrätettäväksi Motorola-yhtiöön, kun tuotetta ei enää käytetä. Lisätietoja tuotteen
palauttamisesta on osoitteessa
http://www.symbol.com/environmental_compliance.
Svenska: För kunder inom EU: Alla produkter som uppnått sin livslängd måste
returneras till Motorola för återvinning. Information om hur du returnerar produkten
finns på http://www.symbol.com/environmental_compliance.
Service Information
If you have a problem using the equipment, contact your facility’s Technical or
Systems Support. If there is a problem with the equipment, they will contact the
Motorola Enterprise Mobility Support at: http:www.symbol.com/contactsupport.
For the latest version of this guide go to: http://www.symbol.com/support.
Motorola, Inc.
One Motorola Plaza
Holtsville, New York 11742, USA
1-800-927-9626
http://www.symbol.com
MOTOROLA and the Stylized M Logo and Symbol and the Symbol logo are registered in the U.S.
Patent and Trademark Office. All other product or service names are the property of their
respective owners. © Motorola, Inc. 2007
72E-73950-02 Revision A - September 2007