1
www.novell.com/documentation
Installation Guide
Identity Manager 4.0.1
August 2012
Legal Notices
Novell, Inc. makes no representations or warranties with respect to the contents or use of this documentation, and specifically
disclaims any express or implied warranties of merchantability or fitness for any particular purpose. Further, Novell, Inc.
reserves the right to revise this publication and to make changes to its content, at any time, without obligation to notify any
person or entity of such revisions or changes.
Further, Novell, Inc. makes no representations or warranties with respect to any software, and specifically disclaims any
express or implied warranties of merchantability or fitness for any particular purpose. Further, Novell, Inc. reserves the right
to make changes to any and all parts of Novell software, at any time, without any obligation to notify any person or entity of
such changes.
Any products or technical information provided under this Agreement may be subject to U.S. export controls and the trade
laws of other countries. You agree to comply with all export control regulations and to obtain any required licenses or
classification to export, re-export or import deliverables. You agree not to export or re-export to entities on the current U.S.
export exclusion lists or to any embargoed or terrorist countries as specified in the U.S. export laws. You agree to not use
deliverables for prohibited nuclear, missile, or chemical biological weaponry end uses. See the Novell International Trade
Services Web page (http://www.novell.com/info/exports/) for more information on exporting Novell software. Novell assumes
no responsibility for your failure to obtain any necessary export approvals.
Copyright © 2007-2012 Novell, Inc. All rights reserved. No part of this publication may be reproduced, photocopied, stored on
a retrieval system, or transmitted without the express written consent of the publisher.
Novell, Inc.
1800 South Novell Place
Provo, UT 84606
U.S.A.
www.novell.com
Online Documentation: To access the latest online documentation for this and other Novell products, see the Novell
Documentation Web page (http://www.novell.com/documentation).
Novell Trademarks
For Novell trademarks, see the Novell Trademark and Service Mark list (http://www.novell.com/company/legal/trademarks/
tmlist.html).
Third-Party Materials
All third-party trademarks are the property of their respective owners.
Contents
About This Guide
7
Part I Planning
9
1 Setting Up a Development Environment
11
2 Creating a Project Plan
13
2.1
2.2
2.3
2.4
2.5
2.6
2.7
Discovery Phase . . . . . . . . . . . . . . . . . . . . . . . . . . . . . . . . . . . . . . . . . . . . . . . . . . . . . . . . . . . . . . . . 13
2.1.1
Defining Current Business Processes . . . . . . . . . . . . . . . . . . . . . . . . . . . . . . . . . . . . . . . . . 14
2.1.2
Defining How the Identity Manager Solution Affects the Current Business Processes . . . . 15
2.1.3
Identifying the Key Business and Technical Stakeholders . . . . . . . . . . . . . . . . . . . . . . . . . 16
2.1.4
Interviewing All Stakeholders. . . . . . . . . . . . . . . . . . . . . . . . . . . . . . . . . . . . . . . . . . . . . . . . 16
2.1.5
Creating a High-level Strategy and an Agreed Execution Path . . . . . . . . . . . . . . . . . . . . . . 16
Requirements and Design Analysis Phase . . . . . . . . . . . . . . . . . . . . . . . . . . . . . . . . . . . . . . . . . . . . 17
2.2.1
Defining the Business Requirements. . . . . . . . . . . . . . . . . . . . . . . . . . . . . . . . . . . . . . . . . . 18
2.2.2
Analyzing Your Business Processes . . . . . . . . . . . . . . . . . . . . . . . . . . . . . . . . . . . . . . . . . . 19
2.2.3
Designing an Enterprise Data Model . . . . . . . . . . . . . . . . . . . . . . . . . . . . . . . . . . . . . . . . . . 20
Proof of Concept . . . . . . . . . . . . . . . . . . . . . . . . . . . . . . . . . . . . . . . . . . . . . . . . . . . . . . . . . . . . . . . . 21
Data Validation and Preparation . . . . . . . . . . . . . . . . . . . . . . . . . . . . . . . . . . . . . . . . . . . . . . . . . . . . 21
Production Pilot . . . . . . . . . . . . . . . . . . . . . . . . . . . . . . . . . . . . . . . . . . . . . . . . . . . . . . . . . . . . . . . . . 22
Production Rollout Planning . . . . . . . . . . . . . . . . . . . . . . . . . . . . . . . . . . . . . . . . . . . . . . . . . . . . . . . . 22
Production Deployment . . . . . . . . . . . . . . . . . . . . . . . . . . . . . . . . . . . . . . . . . . . . . . . . . . . . . . . . . . . 22
3 Technical Guidelines
3.1
3.2
3.3
3.4
3.5
23
Management Tools Guidelines . . . . . . . . . . . . . . . . . . . . . . . . . . . . . . . . . . . . . . . . . . . . . . . . . . . . . 24
3.1.1
Analyzer Guidelines . . . . . . . . . . . . . . . . . . . . . . . . . . . . . . . . . . . . . . . . . . . . . . . . . . . . . . . 24
3.1.2
Designer Guidelines . . . . . . . . . . . . . . . . . . . . . . . . . . . . . . . . . . . . . . . . . . . . . . . . . . . . . . 25
3.1.3
iManager Guidelines . . . . . . . . . . . . . . . . . . . . . . . . . . . . . . . . . . . . . . . . . . . . . . . . . . . . . . 25
3.1.4
Role Mapping Administrator Guidelines . . . . . . . . . . . . . . . . . . . . . . . . . . . . . . . . . . . . . . . 25
Metadirectory Server Guidelines . . . . . . . . . . . . . . . . . . . . . . . . . . . . . . . . . . . . . . . . . . . . . . . . . . . . 25
eDirectory Guidelines . . . . . . . . . . . . . . . . . . . . . . . . . . . . . . . . . . . . . . . . . . . . . . . . . . . . . . . . . . . . . 26
3.3.1
Identity Manager Objects in eDirectory . . . . . . . . . . . . . . . . . . . . . . . . . . . . . . . . . . . . . . . . 27
3.3.2
Replicating the Objects that Identity Manager Needs on the Server . . . . . . . . . . . . . . . . . . 27
3.3.3
Using Scope Filtering to Manage Users on Different Servers . . . . . . . . . . . . . . . . . . . . . . 28
User Application . . . . . . . . . . . . . . . . . . . . . . . . . . . . . . . . . . . . . . . . . . . . . . . . . . . . . . . . . . . . . . . . . 31
Auditing and Reporting Guidelines. . . . . . . . . . . . . . . . . . . . . . . . . . . . . . . . . . . . . . . . . . . . . . . . . . . 31
Part II Installation
33
4 Basic Identity Manager System Checklist
35
4.1
4.2
4.3
4.4
4.5
Prerequisites . . . . . . . . . . . . . . . . . . . . . . . . . . . . . . . . . . . . . . . . . . . . . . . . . . . . . . . . . . . . . . . . . . . 36
Planning . . . . . . . . . . . . . . . . . . . . . . . . . . . . . . . . . . . . . . . . . . . . . . . . . . . . . . . . . . . . . . . . . . . . . . . 36
Installation . . . . . . . . . . . . . . . . . . . . . . . . . . . . . . . . . . . . . . . . . . . . . . . . . . . . . . . . . . . . . . . . . . . . . 36
Driver Configuration with the Remote Loader . . . . . . . . . . . . . . . . . . . . . . . . . . . . . . . . . . . . . . . . . . 37
Driver Configuration without the Remote Loader . . . . . . . . . . . . . . . . . . . . . . . . . . . . . . . . . . . . . . . . 37
Contents
3
4.6
Additional Configuration . . . . . . . . . . . . . . . . . . . . . . . . . . . . . . . . . . . . . . . . . . . . . . . . . . . . . . . . . . . 37
5 Where to Get Identity Manager
39
6 System Requirements
43
6.1
6.2
6.3
6.4
6.5
6.6
6.7
eDirectory and iManager . . . . . . . . . . . . . . . . . . . . . . . . . . . . . . . . . . . . . . . . . . . . . . . . . . . . . . . . . . 46
Metadirectory Server . . . . . . . . . . . . . . . . . . . . . . . . . . . . . . . . . . . . . . . . . . . . . . . . . . . . . . . . . . . . . 46
6.2.1
Supported Processors . . . . . . . . . . . . . . . . . . . . . . . . . . . . . . . . . . . . . . . . . . . . . . . . . . . . . 47
6.2.2
Server Operating Systems. . . . . . . . . . . . . . . . . . . . . . . . . . . . . . . . . . . . . . . . . . . . . . . . . . 48
Remote Loader . . . . . . . . . . . . . . . . . . . . . . . . . . . . . . . . . . . . . . . . . . . . . . . . . . . . . . . . . . . . . . . . . 49
User Application . . . . . . . . . . . . . . . . . . . . . . . . . . . . . . . . . . . . . . . . . . . . . . . . . . . . . . . . . . . . . . . . . 51
Auditing and Reporting. . . . . . . . . . . . . . . . . . . . . . . . . . . . . . . . . . . . . . . . . . . . . . . . . . . . . . . . . . . . 51
Workstations . . . . . . . . . . . . . . . . . . . . . . . . . . . . . . . . . . . . . . . . . . . . . . . . . . . . . . . . . . . . . . . . . . . 52
6.6.1
Workstation Platforms . . . . . . . . . . . . . . . . . . . . . . . . . . . . . . . . . . . . . . . . . . . . . . . . . . . . . 53
6.6.2
Web Browsers . . . . . . . . . . . . . . . . . . . . . . . . . . . . . . . . . . . . . . . . . . . . . . . . . . . . . . . . . . . 53
Resource Requirements . . . . . . . . . . . . . . . . . . . . . . . . . . . . . . . . . . . . . . . . . . . . . . . . . . . . . . . . . . 54
7 Installing Identity Manager
7.1
7.2
7.3
7.4
7.5
7.6
7.7
7.8
7.9
7.10
7.11
7.12
7.13
Installing Analyzer . . . . . . . . . . . . . . . . . . . . . . . . . . . . . . . . . . . . . . . . . . . . . . . . . . . . . . . . . . . . . . . 55
Installing Designer . . . . . . . . . . . . . . . . . . . . . . . . . . . . . . . . . . . . . . . . . . . . . . . . . . . . . . . . . . . . . . . 56
Installing eDirectory . . . . . . . . . . . . . . . . . . . . . . . . . . . . . . . . . . . . . . . . . . . . . . . . . . . . . . . . . . . . . . 57
Installing iManager . . . . . . . . . . . . . . . . . . . . . . . . . . . . . . . . . . . . . . . . . . . . . . . . . . . . . . . . . . . . . . . 57
Installing the Metadirectory Server. . . . . . . . . . . . . . . . . . . . . . . . . . . . . . . . . . . . . . . . . . . . . . . . . . . 58
7.5.1
Non-root Installation of the Metadirectory Server . . . . . . . . . . . . . . . . . . . . . . . . . . . . . . . . 59
7.5.2
Silent Installation of the Metadirectory Server . . . . . . . . . . . . . . . . . . . . . . . . . . . . . . . . . . . 60
Installing the Remote Loader . . . . . . . . . . . . . . . . . . . . . . . . . . . . . . . . . . . . . . . . . . . . . . . . . . . . . . . 61
7.6.1
Requirements . . . . . . . . . . . . . . . . . . . . . . . . . . . . . . . . . . . . . . . . . . . . . . . . . . . . . . . . . . . 61
7.6.2
Supported Drivers . . . . . . . . . . . . . . . . . . . . . . . . . . . . . . . . . . . . . . . . . . . . . . . . . . . . . . . . 62
7.6.3
Installation Procedure . . . . . . . . . . . . . . . . . . . . . . . . . . . . . . . . . . . . . . . . . . . . . . . . . . . . . 63
7.6.4
Silent Installation of the Remote Loader . . . . . . . . . . . . . . . . . . . . . . . . . . . . . . . . . . . . . . . 64
7.6.5
Installing the Java Remote Loader on UNIX or Linux . . . . . . . . . . . . . . . . . . . . . . . . . . . . . 65
7.6.6
Coexistence of 32-Bit and 64-Bit Remote Loader . . . . . . . . . . . . . . . . . . . . . . . . . . . . . . . . 66
Installing the Driver Files . . . . . . . . . . . . . . . . . . . . . . . . . . . . . . . . . . . . . . . . . . . . . . . . . . . . . . . . . . 66
Installing the Roles Based Provisioning Module . . . . . . . . . . . . . . . . . . . . . . . . . . . . . . . . . . . . . . . . 67
Installing a Custom Driver . . . . . . . . . . . . . . . . . . . . . . . . . . . . . . . . . . . . . . . . . . . . . . . . . . . . . . . . . 67
Installing the Role Mapping Administrator . . . . . . . . . . . . . . . . . . . . . . . . . . . . . . . . . . . . . . . . . . . . . 67
Installing the Identity Reporting Module or Sentinel . . . . . . . . . . . . . . . . . . . . . . . . . . . . . . . . . . . . . . 68
Installing the Identity Manager 4.0.1 Patch . . . . . . . . . . . . . . . . . . . . . . . . . . . . . . . . . . . . . . . . . . . . 68
7.12.1 Prerequisites . . . . . . . . . . . . . . . . . . . . . . . . . . . . . . . . . . . . . . . . . . . . . . . . . . . . . . . . . . . . 69
7.12.2 GUI Installation . . . . . . . . . . . . . . . . . . . . . . . . . . . . . . . . . . . . . . . . . . . . . . . . . . . . . . . . . . 69
7.12.3 Silent Installation . . . . . . . . . . . . . . . . . . . . . . . . . . . . . . . . . . . . . . . . . . . . . . . . . . . . . . . . . 70
Language Support for the Identity Manager Installers . . . . . . . . . . . . . . . . . . . . . . . . . . . . . . . . . . . . 71
7.13.1 Non-Installer Language Considerations . . . . . . . . . . . . . . . . . . . . . . . . . . . . . . . . . . . . . . . 72
8 Activating Novell Identity Manager Products
8.1
8.2
8.3
8.4
8.5
8.6
4
55
73
Purchasing an Identity Manager Product License . . . . . . . . . . . . . . . . . . . . . . . . . . . . . . . . . . . . . . . 73
Installing a Product Activation Credential . . . . . . . . . . . . . . . . . . . . . . . . . . . . . . . . . . . . . . . . . . . . . 73
Viewing Product Activations for Identity Manager and for Drivers . . . . . . . . . . . . . . . . . . . . . . . . . . . 74
Activating Identity Manager Drivers . . . . . . . . . . . . . . . . . . . . . . . . . . . . . . . . . . . . . . . . . . . . . . . . . . 75
Activating Analyzer. . . . . . . . . . . . . . . . . . . . . . . . . . . . . . . . . . . . . . . . . . . . . . . . . . . . . . . . . . . . . . . 75
Activating Designer and the Role Mapping Administrator . . . . . . . . . . . . . . . . . . . . . . . . . . . . . . . . . 75
Identity Manager 4.0.1 Framework Installation Guide
9 Troubleshooting Identity Manager
77
10 What’s New
83
10.1
10.2
What’s New in Identity Manager 4.0.1 . . . . . . . . . . . . . . . . . . . . . . . . . . . . . . . . . . . . . . . . . . . . . . . . 83
10.1.1 Identity Manager Advanced Edition Versus Standard Edition . . . . . . . . . . . . . . . . . . . . . . . 83
10.1.2 Telemetry . . . . . . . . . . . . . . . . . . . . . . . . . . . . . . . . . . . . . . . . . . . . . . . . . . . . . . . . . . . . . . . 83
10.1.3 Resource Request Activity. . . . . . . . . . . . . . . . . . . . . . . . . . . . . . . . . . . . . . . . . . . . . . . . . . 83
10.1.4 New Reports Added to the Identity Reporting Module. . . . . . . . . . . . . . . . . . . . . . . . . . . . . 84
10.1.5 Applications Added to the Designer Palette . . . . . . . . . . . . . . . . . . . . . . . . . . . . . . . . . . . . 84
What’s New in Identity Manager 4.0 . . . . . . . . . . . . . . . . . . . . . . . . . . . . . . . . . . . . . . . . . . . . . . . . . 84
10.2.1 Identity Reporting Module . . . . . . . . . . . . . . . . . . . . . . . . . . . . . . . . . . . . . . . . . . . . . . . . . . 84
10.2.2 New Drivers . . . . . . . . . . . . . . . . . . . . . . . . . . . . . . . . . . . . . . . . . . . . . . . . . . . . . . . . . . . . . 85
10.2.3 Support for XDAS Auditing Included . . . . . . . . . . . . . . . . . . . . . . . . . . . . . . . . . . . . . . . . . . 85
10.2.4 Packages Replace Driver Configuration Files . . . . . . . . . . . . . . . . . . . . . . . . . . . . . . . . . . . 85
10.2.5 Role Mapping Administrator . . . . . . . . . . . . . . . . . . . . . . . . . . . . . . . . . . . . . . . . . . . . . . . . 85
10.2.6 Analyzer . . . . . . . . . . . . . . . . . . . . . . . . . . . . . . . . . . . . . . . . . . . . . . . . . . . . . . . . . . . . . . . . 86
10.2.7 Integrated Installer . . . . . . . . . . . . . . . . . . . . . . . . . . . . . . . . . . . . . . . . . . . . . . . . . . . . . . . . 86
Part III Upgrading Identity Manager
87
11 Upgrade Versus Migration
89
Part IV Uninstalling Identity Manager
91
12 Uninstalling the Identity Manager Components
93
12.1
12.2
Removing Objects from eDirectory . . . . . . . . . . . . . . . . . . . . . . . . . . . . . . . . . . . . . . . . . . . . . . . . . . 93
Uninstalling the Metadirectory Server . . . . . . . . . . . . . . . . . . . . . . . . . . . . . . . . . . . . . . . . . . . . . . . . 94
12.2.1 Uninstalling on Linux/UNIX . . . . . . . . . . . . . . . . . . . . . . . . . . . . . . . . . . . . . . . . . . . . . . . . . 94
12.2.2 Uninstalling a Non-root Installation . . . . . . . . . . . . . . . . . . . . . . . . . . . . . . . . . . . . . . . . . . . 94
12.2.3 Uninstalling on Windows . . . . . . . . . . . . . . . . . . . . . . . . . . . . . . . . . . . . . . . . . . . . . . . . . . . 94
12.3 Uninstalling the Remote Loader . . . . . . . . . . . . . . . . . . . . . . . . . . . . . . . . . . . . . . . . . . . . . . . . . . . . . 94
12.3.1 Uninstalling on Linux/UNIX . . . . . . . . . . . . . . . . . . . . . . . . . . . . . . . . . . . . . . . . . . . . . . . . . 95
12.3.2 Uninstalling on Windows . . . . . . . . . . . . . . . . . . . . . . . . . . . . . . . . . . . . . . . . . . . . . . . . . . . 95
12.4 Uninstalling the Roles Based Provisioning Module . . . . . . . . . . . . . . . . . . . . . . . . . . . . . . . . . . . . . . 95
12.4.1 Deleting the Drivers . . . . . . . . . . . . . . . . . . . . . . . . . . . . . . . . . . . . . . . . . . . . . . . . . . . . . . . 95
12.4.2 Uninstalling the User Application . . . . . . . . . . . . . . . . . . . . . . . . . . . . . . . . . . . . . . . . . . . . . 95
12.4.3 Uninstalling the Application Server and the Database. . . . . . . . . . . . . . . . . . . . . . . . . . . . . 96
12.5 Uninstalling the Identity Reporting Module Components . . . . . . . . . . . . . . . . . . . . . . . . . . . . . . . . . . 97
12.5.1 Deleting the Reporting Drivers. . . . . . . . . . . . . . . . . . . . . . . . . . . . . . . . . . . . . . . . . . . . . . . 97
12.5.2 Uninstalling the Identity Reporting Module . . . . . . . . . . . . . . . . . . . . . . . . . . . . . . . . . . . . . 97
12.5.3 Uninstalling the Event Auditing Service . . . . . . . . . . . . . . . . . . . . . . . . . . . . . . . . . . . . . . . . 97
12.6 Uninstalling iManager. . . . . . . . . . . . . . . . . . . . . . . . . . . . . . . . . . . . . . . . . . . . . . . . . . . . . . . . . . . . . 98
12.7 Uninstalling eDirectory . . . . . . . . . . . . . . . . . . . . . . . . . . . . . . . . . . . . . . . . . . . . . . . . . . . . . . . . . . . . 98
12.8 Uninstalling Analyzer . . . . . . . . . . . . . . . . . . . . . . . . . . . . . . . . . . . . . . . . . . . . . . . . . . . . . . . . . . . . . 99
12.9 Uninstalling Designer . . . . . . . . . . . . . . . . . . . . . . . . . . . . . . . . . . . . . . . . . . . . . . . . . . . . . . . . . . . . . 99
12.10 Uninstalling the Role Mapping Administrator . . . . . . . . . . . . . . . . . . . . . . . . . . . . . . . . . . . . . . . . . . 100
Contents
5
6
Identity Manager 4.0.1 Framework Installation Guide
About This Guide
Novell Identity Manager is a data sharing and synchronization service that enables applications,
directories, and databases to share information. It links scattered information and enables you to
establish policies that govern automatic updates to designated systems when identity changes occur.
Identity Manager provides the foundation for account provisioning, security, single sign-on, user
self-service, authentication, authorization, automated workflow, and Web services. It allows you to
integrate, manage, and control your distributed identity information so you can securely deliver the
right resources to the right people.
This guide contains information about how to plan, install, or upgrade an Identity Manager system
that is useful for your environment.
Part I, “Planning,” on page 9
Chapter 1, “Setting Up a Development Environment,” on page 11
Chapter 2, “Creating a Project Plan,” on page 13
Chapter 3, “Technical Guidelines,” on page 23
Part II, “Installation,” on page 33
Chapter 4, “Basic Identity Manager System Checklist,” on page 35
Chapter 5, “Where to Get Identity Manager,” on page 39
Chapter 6, “System Requirements,” on page 43
Chapter 7, “Installing Identity Manager,” on page 55
Chapter 8, “Activating Novell Identity Manager Products,” on page 73
Chapter 9, “Troubleshooting Identity Manager,” on page 77
Chapter 10, “What’s New,” on page 83
Part III, “Upgrading Identity Manager,” on page 87
Chapter 11, “Upgrade Versus Migration,” on page 89
Part IV, “Uninstalling Identity Manager,” on page 91
Audience
This guide is intended for administrators, consultants, and network engineers who plan and
implement Identity Manager in a network environment.
Documentation Updates
For the most recent version of this document, see the Identity Manager Documentation Web site
(http://www.novell.com/documentation/idm401/index.html).
Additional Documentation
For additional Identity Manager Drivers documentation, see the Identity Manager Drivers
Documentation Web site (http://www.novell.com/documentation/idm401drivers/index.html).
About This Guide
7
For User Application documentation, see the Identity Manager Roles Based Provisioning Module
Documentation Web site (http://www.novell.com/documentation/idmrbpm401/index.html).
8
Identity Manager 4.0.1 Framework Installation Guide
I
Planning
I
Identity Manager 4.0.1 helps you manage the identities and resources in your business. It also
automates many business processes for you that are currently manual tasks.
If you have any questions about the different components that make up an Identity Manager
solution, see the Identity Manager 4.0.1 Overview Guide for more information about each component.
To create an effective Identity Manager solution for your environment, you first must take time to
plan and design the solution. There are two major aspects to planning: setting up a test lab to become
familiar with the products and creating a project plan to implement an Identity Manager solution.
When you create a project plan, you define your business process and create an implementation plan.
Most companies have many different business processes that are managed by many different people.
A complete Identity Manager solution affects most of these processes. It is extremely important to
take the time to plan an Identity Manager solution, so that it can be effectively implemented in your
environment.
If you are creating a new Identity Manager solution where all of the components resides on the same
server, use the Identity Manager 4.0.1 Integrated Installation Guide to help you with the installation. This
is a simplified installer to help you get a system set up faster.
We strongly recommend that you engage an Identity Manager expert to assist in each phase of your
Identity Manager implementation. For more information about partnership options, see the Novell
Solution Partner Web site (http://www.novell.com/partners/). Novell Education also offers courses
that address Identity Manager implementation.
Chapter 1, “Setting Up a Development Environment,” on page 11
Chapter 2, “Creating a Project Plan,” on page 13
Chapter 3, “Technical Guidelines,” on page 23
Planning
9
10
Identity Manager 4.0.1 Framework Installation Guide
1
Setting Up a Development Environment
1
Before you begin the planning phase of the Identity Manager deployment, you must be familiar with
the Identity Manager products so you can create a useful plan. Setting up a development
environment where you can test, analyze, and develop your Identity Manager solution allows you to
learn about each component of Identity Manager and find unforeseen issues that can arise.
For example, when you synchronize information between different systems, the information is
presented differently for each system. Changing the data to see how it synchronizes between these
two systems allows you to see if this change affects other systems that use this same information.
Another major reason to set up a development environment is to make sure your solutions work
before you apply them to live data. Identity Manager manipulates and deletes data. Having the test
environment allows you to make changes without any loss to the data in your production
environment.
You should set up a development environment for each deployment of Identity Manager. Each
deployment is different. There are different systems, business policies, and procedures that need to
be included in the Identity Manager solution. The development environment allows you to create the
solution that is best for each situation.
The most important tool to use when you are developing your Identity Manager solution is Designer.
It allows you to capture all of the information about your environment and then use that information
to create an Identity Manager solution that fits your needs. You should use Designer during all
aspects of the planning to capture all of the information. Designer makes it much easier to create a
project plan that includes the business information as well as the technical information. For more
information about Designer, see Designer 4.0.1 for Identity Manager 4.0.1 Administration Guide.
To set up your development environment, use the information in Chapter 4, “Basic Identity Manager
System Checklist,” on page 35. It is an installation checklist of all of the Identity Manager
components. Use this list to make sure you have installed and configured all components for Identity
Manager that you can use to develop a project plan. Use the information in Chapter 3, “Technical
Guidelines,” on page 23 as you set up your development environment, so you can learn about
technical considerations as you install and configure each component of Identity Manager.
After your development environment is created, the next step is to create the project plan to
implement the Identity Manager solution. Use the information in Chapter 2, “Creating a Project
Plan,” on page 13 to create the project plan.
Setting Up a Development Environment
11
12
Identity Manager 4.0.1 Framework Installation Guide
2
Creating a Project Plan
2
This planning material provides an overview of the activities that are usually part of an Identity
Manager project, from its inception to its full production deployment. Implementing an identity
management strategy requires you to discover what all of your current business processes are, what
are the needs for these processes, who the stakeholders are in your environment, and then design a
solution, get buy-in from stakeholders, and test and roll out the solution. This section is intended to
provide you with sufficient understanding of the process so that you can maximize the benefit from
working with Identity Manager.
This section is not exhaustive; it is not intended to address all possible configurations, nor is it
intended to be rigid in its execution. Each environment is different and requires flexibility in the type
of activities to be used.
Section 2.1, “Discovery Phase,” on page 13
Section 2.2, “Requirements and Design Analysis Phase,” on page 17
Section 2.3, “Proof of Concept,” on page 21
Section 2.4, “Data Validation and Preparation,” on page 21
Section 2.5, “Production Pilot,” on page 22
Section 2.6, “Production Rollout Planning,” on page 22
Section 2.7, “Production Deployment,” on page 22
2.1
Discovery Phase
The Identity Manager solution affects many aspects of your business. In order to create an effective
solution, you must take time to define all of your current business processes, then identify how an
implementation of Identity Manager changes these processes, who these changes affect, and how the
changes are implemented.
The discovery phase provides a common understanding of the issues and solutions for all
stakeholders. It creates a plan or road map that contains the key business and systems information
that are affected by the Identity Manager solution. It also allows all stakeholders to participate in the
creation of the Identity Manager solution so they understand how it can affect their area of the
business.
The following list indicates the steps needed to have a successful discovery phase. There might be
additional items you find that you need to add to the list as you proceed through the discovery and
design phases.
Section 2.1.1, “Defining Current Business Processes,” on page 14
Section 2.1.2, “Defining How the Identity Manager Solution Affects the Current Business
Processes,” on page 15
Section 2.1.3, “Identifying the Key Business and Technical Stakeholders,” on page 16
Creating a Project Plan
13
Section 2.1.4, “Interviewing All Stakeholders,” on page 16
Section 2.1.5, “Creating a High-level Strategy and an Agreed Execution Path,” on page 16
2.1.1
Defining Current Business Processes
Identity Manager automates business processes to easily manage identities in your environment. If
you do not know what the current business processes are, you cannot design an Identity Manager
solution that automates those processes. You can use the Architecture mode of Designer to capture
your current business processes and display them graphically. For more information, see “Architect
Mode” in the Designer 4.0.1 for Identity Manager 4.0.1 Administration Guide.
For example, you company might identify the following business processes:
When an employee is terminated, the user account in the e-mail system is deleted, but the user’s
account in all other systems is disabled, not deleted.
The format for a user’s e-mail address.
The systems or resources that sales employees can access.
The systems or resources that managers can access.
What systems generate new accounts? Is it the human resource system or is it through a
workflow request?
A password policy for the company that defines how often a password changes, how complex
the password is, and which systems are synchronizing the password.
As you define your business processes, use the following list of items to help you understand all of
the processes:
Define or clarify the current business issues.
Determine what initiatives are required to address these issues.
Determine which services and systems are affected by these initiatives.
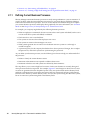
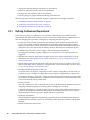
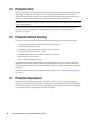
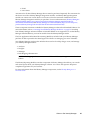
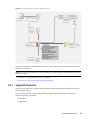
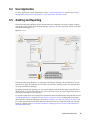
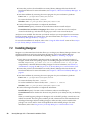
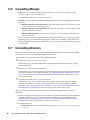
This step allows you to create a high-level overview of what your business is currently doing and
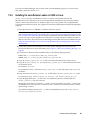
what processes need to be improved. For example, Figure 2-1 uses Designer to show how new user
accounts are generated from the PeopleSoft system. They are synchronized into the Identity Vault
and then synchronized into Lotus Notes and Active Directory. Passwords are being synchronized
between Active Directory and the Identity Vault. Accounts are synchronizing into the Notes system,
but no accounts are synchronizing back to the Identity Vault.
14
Identity Manager 4.0.1 Framework Installation Guide
Figure 2-1 Example of Business Processes
After you determine processes, you start to identify how Identity Manager can be involved. Continue
with Section 2.1.2, “Defining How the Identity Manager Solution Affects the Current Business
Processes,” on page 15.
2.1.2
Defining How the Identity Manager Solution Affects the Current
Business Processes
After you have defined your current business processes, you need to decide which processes you
want to incorporate into an Identity Manager solution.
It is best to look at the entire solution and then prioritize which processes should be implemented.
Identity Manager encompasses so many aspects of your business, it is easier to plan the entire
solution rather than approach each business process as its own solution.
Create a list of which business processes are a priority to automate, then identify which systems these
changes will affect. Then continue with Section 2.1.3, “Identifying the Key Business and Technical
Stakeholders,” on page 16.
Creating a Project Plan
15
2.1.3
Identifying the Key Business and Technical Stakeholders
Identifying all stakeholders involved in the Identity Manager solution is important for the success of
the solution. In most companies, there is not just one person you can contact who understands all
business and technical aspects of the business processes. You must identify which services and
systems are going to be affected by the Identity Manager solution, and you must also identify the
person who is responsible for that service or system.
For example, if you are integrating an e-mail system into your solution, you would need to list what
the e-mail system is, who the e-mail system administrator is, and what the contact information is.
You can add all of this information into the Designer project. Each application icon has a place where
you can store information about the system and the system administrator. For more information, see
“Configuring Application Properties” in the Designer 4.0.1 for Identity Manager 4.0.1 Administration
Guide.
After you have identified all of the people involved in each business process, the next step is in
Section 2.1.4, “Interviewing All Stakeholders,” on page 16.
2.1.4
Interviewing All Stakeholders
Interviews with key business and technical stakeholders allow you to gather information needed for
a complete design of the Identity Manager solution. The interviews also allow you to educate each
stakeholder about the Identity Manager solution and how the solution affects them. Here is a list of
items to cover when you do the interviews:
Define or clarify the business processes being addressed by the Identity Manager solution. The
person you are interviewing might have information that can change the current plan.
Determine how the solution will impact the stakeholders and address any concerns they have.
Also ask the stakeholders how much time their part of the solution might take. They might or
might not have an estimate, but gathering this information helps to determine the scope of the
solution.
Capture key business and systems information from the stakeholders. Sometimes a proposed
plan might adversely affect a business process or a system. By capturing this information, you
can make educated decisions about the Identity Manager solution.
After you have interviewed the key stakeholders, the next step is in Section 2.1.5, “Creating a Highlevel Strategy and an Agreed Execution Path,” on page 16.
2.1.5
Creating a High-level Strategy and an Agreed Execution Path
After all of the information is gathered, you need to create a high-level strategy or road map for the
Identity Manager solution. Add all of the features you want to be included in the Identity Manager
solution. For example, new user accounts are generated from a request through a workflow, but the
type of user depends upon the resources the user is given access to.
Present this high-level strategy to all of the stakeholders in the same meeting, if possible. This allows
you to accomplish several things:
Verify that the included initiatives are the most correct and identify which ones have the highest
priority.
Identify planning activities in preparation for a requirements and design phase
Determine what it would take to carry out one or more of these initiatives.
16
Identity Manager 4.0.1 Framework Installation Guide
Create an agreed execution path for the Identity Manager solution.
Define additional education for stakeholders.
Discovery provides a common understanding of the issues and solutions for all stakeholders. It
provides an excellent primer for the analysis phase, which is a phase that requires stakeholders to
have a basic knowledge of directories, Novell eDirectory, Novell Identity Manager, and XML
integration in general.
After you have completed the discovery phase, proceed to Section 2.2, “Requirements and Design
Analysis Phase,” on page 17.
2.2
Requirements and Design Analysis Phase
Take the high-level road map that was created in the discovery phase as a starting point for this
analysis phase. The document and the Designer project both need technical and business details
added. This produces the data model and high-level Identity Manager architecture design used to
implement the Identity Manager solution.
The focus of the design should be specifically on identity management; however, many of the
elements traditionally associated with a resource management directory, such as file and print, can
also be addressed. Identity Manager synchronizes user accounts to directories that do not have direct
access to the operating system’s file system. For example, you can have a user account in Active
Directory, but that does not grant you access to the file system on the Active Directory server.
Using the information gathered in the discovery phase, answer the following sample questions to see
what other information needs to be gathered. This might require additional interviews with
stakeholders.
What versions of system software are being used?
Is the eDirectory design appropriate? For example, does the Identity Manager server contain a
Master or Read/Write replica of the user objects that are synchronizing? If it does not, the
eDirectory design is not appropriate.
Is the quality of the data in all systems appropriate? (If the data is not of usable quality, the
business policy might not be implemented as desired.) For example, there might be duplicate
accounts for the users in the systems that are synchronizing, or the format of the data might not
be consistent throughout each system. Each system’s data must be evaluated before information
is synchronized.
Is data manipulation required for your environment? For example, a user’s hire date format in
the human resource system can only be 2008/02/23 and the hire date in the Identity Vault is 0223-2008. This requires that the date be manipulated for synchronization to occur.
Identity Manager contains a tool to help you simplify the process of analyzing and cleaning your
data. For more information, see Analyzer 4.0.1 for Identity Manager Administration Guide.
Review the information in Chapter 3, “Technical Guidelines,” on page 23 to help make the correct
decisions for your environment.
After the requirements analysis, you can establish the scope and project plan for the implementation,
and determine if any prerequisite activities need to occur. To avoid costly mistakes, be as complete as
possible in gathering information and documenting requirements. Here is a list of possible
requirements:
Data model showing all systems, authoritative data sources, events, information flow, data
format standards, and mapping relationships between connected systems and attributes within
Identity Manager.
Creating a Project Plan
17
Appropriate Identity Manager architecture for the solution.
Details for additional system connection requirements.
Strategies for data validation and record matching.
Directory design to support the Identity Manager infrastructure.
The following tasks should be completed during the requirements and design assessment:
“Defining the Business Requirements” on page 18
“Analyzing Your Business Processes” on page 19
“Designing an Enterprise Data Model” on page 20
2.2.1
Defining the Business Requirements
In the discovery phase, you gathered your organization’s business processes and the business
requirements that define these business processes. Create a list of these business requirements and
then start mapping these processes in Designer by completing the following tasks:
Create a list of the business requirements and determine which systems are affected by this
process. For example, a business requirement for terminating an employee might be that the
employee’s network and e-mail account access must be removed the same day the employee is
terminated. The e-mail system and the Identity Vault are affected by this termination process.
Establish the process flows, process triggers, and data mapping relationships.
For example, if something is going to happen in a certain process, what other processes are
triggered?
Map data flows between applications. Designer allows you to see this information. For more
information, see “Managing the Flow of Data” in the Designer 4.0.1 for Identity Manager 4.0.1
Administration Guide.
Identify data transformations that need to take place from one format to another, such as 2/25/
2007 to 25 Feb 2007, and use Analyzer to change the data. For more information, see the Analyzer
4.0.1 for Identity Manager Administration Guide.
Document the data dependencies that exist.
If a certain value is changed, it is important to know if there is a dependency on that value. If a
particular process is changed, it is important to know if there is a dependency on that process.
For example, selecting a “temporary” employee status value in a human resources system might
mean that the IT department needs to create a user object in eDirectory with restricted rights and
access to the network during certain hours.
List the priorities.
Not every requirement, wish, or desire of every party can be immediately fulfilled. Priorities for
designing and deploying the provisioning system will help plan a road map.
It might be advantageous to divide the deployment into phases that enable implementation of a
portion of the deployment earlier and other portions of the deployment later, or use a phased
deployment that is based on groups of people within the organization.
Define the prerequisites.
The prerequisites required for implementing a particular phase of the deployment should be
documented. This includes access to the connected systems that need to interface with Identity
Manager.
Identify authoritative data sources.
18
Identity Manager 4.0.1 Framework Installation Guide
Learning early on which items of information that system administrators and managers feel
belong to them can help in obtaining and keeping buy-in from all parties.
For example, the account administrator might want ownership over granting rights to specific
files and directories for an employee. This can be accommodated by implementing local trustee
assignments in the account system.
After you have defined your business requirements, proceed to Section 2.2.2, “Analyzing Your
Business Processes,” on page 19.
2.2.2
Analyzing Your Business Processes
After you complete the analysis of your business requirements, there is more information you need
to gather to help focus the Identity Manager solution. You need to interview essential individuals
such as managers, administrators, and employees who actually use the application or system. Issues
to be addressed include:
Where does the data originate?
Where does the data go?
Who is responsible for the data?
Who has ownership for the business function to which the data belongs?
Who needs to be contacted to change the data?
What are all the implications of the data being changed?
What work practices exist for data handling (gathering and/or editing)?
What types of operations take place?
What methods are used to ensure data quality and integrity?
Where do the systems reside (on what servers, in which departments)?
What processes are not suitable for automated handling?
For example, you could use the following questions for an administrator for a PeopleSoft system in
Human Resources:
What data are stored in the PeopleSoft database?
What appears in the various panels for an employee account?
What actions must be reflected across the provisioning system (such as add, modify, or delete)?
Which of these are required? Which are optional?
What actions need to be triggered based on actions taken in PeopleSoft?
What operations/events/actions are to be ignored?
How is the data to be transformed and mapped to Identity Manager?
Interviewing key people can lead to other areas of the organization that can provide a more clear
picture of the entire process.
After you have gathered all of this information, you can design a correct enterprise data model for
your environment. Proceed to Section 2.2.3, “Designing an Enterprise Data Model,” on page 20 to
start the design.
Creating a Project Plan
19
2.2.3
Designing an Enterprise Data Model
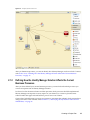
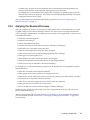
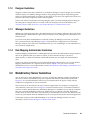
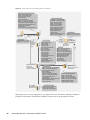
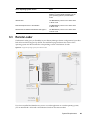
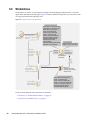
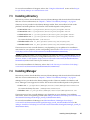
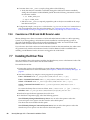
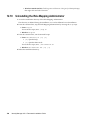
After your business processes have been defined, you can use Designer to begin to design a data
model that reflects your current business processes.
The model in Designer illustrates where data originates, where it moves to, and where it can’t move.
It can also account for how critical events affect the data flow. For example, Figure 2-2 shows data
flow between Identity Vault and different connected systems.
Figure 2-2 Data Flow through Designer
You might also want to develop a diagram that illustrates the proposed business process and the
advantages of implementing automated provisioning in that process.
The development of this model begins by answering questions such as the following:
What types of objects (users, groups, etc.) are being moved?
Which events are of interest?
Which attributes need to be synchronized?
What data is stored throughout your business for the various types of objects being managed?
20
Identity Manager 4.0.1 Framework Installation Guide
Is the synchronization one-way or two-way?
Which system is the authoritative source for which attributes?
It is also important to consider the interrelationships of different values between systems.
For example, an employee status field in PeopleSoft might have three set values: employee,
contractor, and intern. However, the Active Directory system might have only two values: permanent
and temporary. In this situation, the relationship between the “contractor” status in PeopleSoft and
the “permanent” and “temporary” values in Active Directory needs to be determined.
The focus of this work should be to understand each directory system, how they relate to each other,
and what objects and attributes need to be synchronized across the systems. After the design is
complete, the next step is to create a proof of concept. Proceed to Section 2.3, “Proof of Concept,” on
page 21.
2.3
Proof of Concept
You create an test your proof of concept by using a sample implementation in a lab environment in
order to reflect your company’s business policy and data flow. The implementation is based on the
design of the data model developed during the requirement analysis and design and is a final step
before the production pilot. You perform the tests in the lab you created in Chapter 1, “Setting Up a
Development Environment,” on page 11.
NOTE: This step is often beneficial in gaining management support and funding for a final
implementation effort.
Chapter 3, “Technical Guidelines,” on page 23 contains information that can help you validate your
proof of concept. It contains technical guidelines to help make your Identity Manager deployment
successful.
As you create the proof of concept, you need to also create a plan to validate the data that you have in
your systems. This step helps you make sure that conflicts don’t occur between systems. Proceed to
Section 2.4, “Data Validation and Preparation,” on page 21 to make sure these conflicts do not occur.
2.4
Data Validation and Preparation
The data in production systems can be of varying quality and consistency and therefore might
introduce inconsistencies when synchronizing systems. This phase presents an obvious point of
separation between the resources implementation team and the business units or groups who “own”
or manage the data in the systems to be integrated. At times, the associated risk and cost factors
might not belong in a provisioning project.
You need to use the data model that you completed in the analysis and design phases. You should
also have a possible record matching and data format strategy in order to prepare the data correctly.
With the data model and format strategy defined, you can complete two important steps:
Create production data sets appropriate for loading into the Identity Vault (as identified in the
analysis and design activities). This includes the probable method of loading (either bulk load or
via connectors). The requirement for data that is validated or otherwise formatted is also
identified.
Identify performance factors and validate these factors against equipment being used and the
overall distributed architecture of the deployment of Identity Manager.
After the data is prepared, proceed to Section 2.5, “Production Pilot,” on page 22.
Creating a Project Plan
21
2.5
Production Pilot
The production pilot is the first step in migrating into a production environment. During this phase,
there might be additional customization that occurs. In this limited introduction, the desired
outcomes of the preceding activities can be confirmed and agreement obtained for the production
rollout. The pilot validates the plan that has been created to this point in the process.
NOTE: This phase can provide the acceptance criteria for the solution and the necessary milestone en
route to full production.
The pilot solution provides live proof of concept and validation for the data model and desired
process outcomes. After the pilot is completed, proceed to Section 2.6, “Production Rollout
Planning,” on page 22.
2.6
Production Rollout Planning
This phase is where the production deployment is planned. The plan should do several things:
Confirm server platforms, software revisions, and service packs
Confirm the general environment
Confirm the design of the Identity Vault in a mixed coexistence
Confirm that the business logic is correct
Confirm that the data synchronization is occurring as planned
Plan the legacy process cutover
Plan a rollback contingency strategy
The plan needs to contain implementation and completion dates for each step in the rollout. Each
stakeholder provides input for these dates and agrees that these dates work for them. This allows
each person involved in the rollout to know when the changes are coming and when they should be
completed.
With the production rollout plan completed, proceed to the Section 2.7, “Production Deployment,”
on page 22.
2.7
Production Deployment
The production deployment phase puts all of the plans into action so that the Identity Manager
solution is created in the live environment. Use the production rollout plan to put the different pieces
of the Identity Manager solution into place. Depending on the complexity of the plan, this might be
accomplished quickly or it might take some time to complete.
22
Identity Manager 4.0.1 Framework Installation Guide
3
Technical Guidelines
3
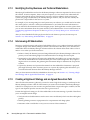
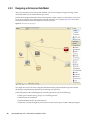
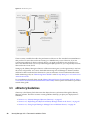
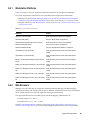
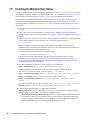
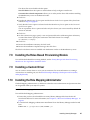
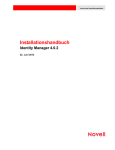
The information that you gather in Designer allows you to make the technical decisions such as
installation location and configuration options about each component of Identity Manager. For an
introduction to each component, see the Identity Manager 4.0.1 Overview Guide guide. Figure 3-1 is one
possible configuration of an Identity Manager solution.
Figure 3-1 Identity Manager Components
User Application
Server/Reporting
Server
Designer
Analyzer
iManager
Role Mapping
Administrator
Administration
Workstation
Metadirectory
Server with
eDirectory
iManager and Role
Mapping Administrator
Web Services
Event Auditing
Service/Novell
Sentinel Server
Identity Manager is very customizable. The following sections contain technical best practices
guidelines to help set up and configure the Identity Manager solution that works best for your
environment. Variables that affect how these guidelines apply to your environment include the type
of hardware you have for your servers, how your WAN is configured, and how many objects are
being synchronized.
Section 3.1, “Management Tools Guidelines,” on page 24
Section 3.2, “Metadirectory Server Guidelines,” on page 25
Section 3.3, “eDirectory Guidelines,” on page 26
Section 3.4, “User Application,” on page 31
Section 3.5, “Auditing and Reporting Guidelines,” on page 31
Technical Guidelines
23
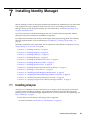
3.1
Management Tools Guidelines
The two main management tools for the Identity Manager solution are Designer and iManager, as
illustrated in Figure 3-2. Designer is used during the planning and creation of the Identity Manager
solution, and iManager is used for daily management tasks of the Identity Manager solution.
Figure 3-2 Identity Manager Management Tools
User Application
Server/Reporting
Server
Designer
iManager
Analyzer
Role Mapping
Administrator
Administration
Workstation
Metadirectory
Server with
eDirectory
iManager and Role
Mapping Administrator
Web Services
Event Auditing
Service/Novell
Sentinel Server
The User Application uses a Web-based administration page. For more information about the User
Application, see “Administering the User Application” in the User Application: Administration Guide.
Section 3.1.1, “Analyzer Guidelines,” on page 24
Section 3.1.2, “Designer Guidelines,” on page 25
Section 3.1.3, “iManager Guidelines,” on page 25
Section 3.1.4, “Role Mapping Administrator Guidelines,” on page 25
3.1.1
Analyzer Guidelines
Analyzer is a thick client that is installed on a workstation. Analyzer is used to examine and clean the
data in the systems that you want to add to your Identity Manager solution. Using Analyzer during
the planning phase helps you see what changes need to be made and how best to make those
changes.
There are no major considerations for using Analyzer. For more information, see the Analyzer 4.0.1 for
Identity Manager Administration Guide.
24
Identity Manager 4.0.1 Framework Installation Guide
3.1.2
Designer Guidelines
Designer is a thick client that is installed on a workstation. Designer is used to design, test, document,
and then deploy your Identity Manager solution. Using Designer throughout the planning phase
helps you capture information in one place. It also helps you see issues you might not be aware of as
you look at all of the components of the solution together.
There are no major considerations for using Designer, unless you have multiple people working on
the same project. Designer allows for version control of the project. For more information, see
“Version Control” in the Designer 4.0.1 for Identity Manager 4.0.1 Administration Guide.
3.1.3
iManager Guidelines
iManager is a Web application that is the administration tool for Identity Manager. When you install
Identity Manager, the installation expects that you already have an iManager server installed in your
eDirectory tree.
If you have more than 10 administrators constantly working in iManager at one time, you should
have a server that hosts only iManager. Figure 3-2 represents this configuration of your Identity
Manager solution. If you have only one administrator, you can run iManager on your Metadirectory
server without complications.
3.1.4
Role Mapping Administrator Guidelines
The Role Mapping Administrator is a Web application that discovers authorizations and permissions
that can be granted within your major IT systems. It allows business analysts, not just IT
administrators, to define and maintain which authorizations are associated with which business
roles.
There are no major considerations for using the Role Mapping Administrator. You can run the Role
Mapping Administrator on a separate server as show in Figure 3-2 or you can run it on the
Metadirectory server. For more information, see the Identity Manager Role Mapping Administrator 4.0.1
Installation and Configuration Guide.
3.2
Metadirectory Server Guidelines
You can have one or more Metadirectory servers in your Identity Manager solution, depending on
the server workload. The Metadirectory server requires that eDirectory be installed as shown in
Figure 3-3. You can add a Remote Loader server, not represented in the figure, to help with the
workload or configuration of your environment.
Drivers must run on the same server as the connected application. For example, to configure the
Active Directory driver, the server in Figure 3-3 must be a member server or a domain controller. If
you do not want to install eDirectory and Identity Manager on a member server or domain controller,
then you can install the Remote Loader on a member server or a domain controller. The Remote
Loader sends all of the events from Active Directory to the Metadirectory server. The Remote Loader
receives any information from the Metadirectory server and passes that to the connected application.
The Remote Loader provides added flexibility for your Identity Manager solution. For more
information, see the Identity Manager 4.0.1 Remote Loader Guide.
Technical Guidelines
25
Figure 3-3 Metadirectory Sever
User Application
Server/Reporting
Server
Designer
iManager
Analyzer
Role Mapping
Administrator
Administration
Workstation
Metadirectory
Server with
eDirectory
iManager and Role
Mapping Administrator
Web Services
Event Auditing
Service/Novell
Sentinel Server
There are many variables that affect the performance of the server. The standard recommendation is
that you have no more than ten drivers running on a Metadirectory server. However, if you are
synchronizing millions of objects with each driver, you might not be able to run ten drivers on a
server. On the other hand, if you are synchronizing 100 objects per driver, you can probably run more
than ten drivers on one server.
Setting up the Identity Manager solution in a lab environment gives you the opportunity to test how
the servers will perform. You can use the health monitoring tools in iManager to obtain a baseline
and then be able to make the best decisions for your environment. For more information about the
health monitoring tools, see “Monitoring Driver Health” in the Identity Manager 4.0.1 Common Driver
Administration Guide.
For considerations for each driver, see the Identity Manager Drivers documentation Web site (http://
www.novell.com/documentation/idm36drivers/index.html). Driver-specific information is provided
in each driver guide.
3.3
eDirectory Guidelines
eDirectory is the Identity Vault that stores the objects that are synchronized through the Identity
Manager solution. The follow sections contain guidelines that help you plan your deployment of
eDirectory.
Section 3.3.1, “Identity Manager Objects in eDirectory,” on page 27
Section 3.3.2, “Replicating the Objects that Identity Manager Needs on the Server,” on page 27
Section 3.3.3, “Using Scope Filtering to Manage Users on Different Servers,” on page 28
26
Identity Manager 4.0.1 Framework Installation Guide
3.3.1
Identity Manager Objects in eDirectory
The following list indicates the major Identity Manager objects that are stored in eDirectory and how
they relate to each other. No objects are created during the installation of Identity Manager. The
Identity Manager objects are created during the configuration of the Identity Manager solution.
Driver Set: A driver set is a container that holds Identity Manager drivers and library objects.
Only one driver set can be active on a server at a time. However, more than one server might be
associated to one driver set. Also, a driver can be associated with more than one server at a time.
However, the driver should only be running on one server at a time. The driver should be in a
disabled state on the other servers. Any server that is associated with a driver set must have the
Metadirectory server installed on it.
Library: The Library object is a repository of commonly used policies that can be referenced
from multiple locations. The library is stored in the driver set. You can place a policy in the
library so that every driver in the driver set can reference it.
Driver: A driver provides the connection between an application and the Identity Vault. It also
enables data synchronization and sharing between systems. The driver is stored in the driver set.
Job: A job is automates a recurring task. For example, a job can configure a system to disable an
account on a specific day, or initiate a workflow to request an extension of a person’s access to a
corporate resource. The job is stored in the driver set.
3.3.2
Replicating the Objects that Identity Manager Needs on the Server
If your Identity Manager environment calls for multiple servers in order to run multiple Identity
Manager drivers, your plan should make sure that certain eDirectory objects are replicated on servers
where you want to run these Identity Manager drivers.
You can use filtered replicas, as long as all of the objects and attributes that the driver needs to read or
synchronize are included in the filtered replica.
Keep in mind that you must give the Identity Manager Driver object sufficient eDirectory rights to
any objects it is to synchronize, either by explicitly granting it rights or by making the Driver object
security equivalent to an object that has the desired rights.
An eDirectory server that is running an Identity Manager driver (or that the driver refers to, if you
are using the Remote Loader) must hold a master or read/write replica of the following:
The Driver Set object for that server.
You should have one Driver Set object for each server that is running Identity Manager. Unless
you have specific needs, don’t associate more than one server with the same Driver Set object.
NOTE: When you create a Driver Set object, the default setting is to create a separate partition.
Novell recommends creating a separate partition on the Driver Set object. For Identity Manager
to function, the server is required to hold a full replica of the Driver Set object. If the server has a
full replica of the location where the Driver Set object is installed, the partition is not required.
The Server object for that server.
The Server object is necessary because it allows the driver to generate key pairs for objects. It is
also important for Remote Loader authentication.
The objects that you want this instance of the driver to synchronize.
The driver can’t synchronize objects unless a replica of those objects is on the same server as the
driver. In fact, an Identity Manager driver synchronizes the objects in all the containers that are
replicated on the server unless you create rules for scope filtering to specify otherwise.
Technical Guidelines
27
For example, if you want a driver to synchronize all user objects, the simplest way is to use one
instance of the driver on a server that holds a master or read/write replica of all your users.
However, many environments don’t have a single server that contains a replica of all the users.
Instead, the complete set of users is spread across multiple servers. In this case, you have three
choices:
Aggregate users onto a single server. You can create a single server that holds all users by
adding replicas to an existing server. Filtered replicas can be used to reduce the size of the
eDirectory database if desired, as long as the necessary user objects and attributes are part
of the filtered replica.
Use multiple instances of the driver on multiple servers, with scope filtering. If you
don’t want to aggregate users onto a single server, you need to determine which set of
servers holds all the users, and set up one instance of the Identity Manager driver on each of
those servers.
To prevent separate instances of a driver from trying to synchronize the same users, you
need to use scope filtering to define which users each instance of the driver should
synchronize. Scope filtering means that you add rules to each driver to limit the scope of the
driver’s management to specific containers. See “Using Scope Filtering to Manage Users on
Different Servers” on page 28.
Use multiple instances of the driver on multiple servers, without scope filtering. If you
want to have multiple instances of a driver running on different servers without using
filtered replicas, you need to define policies on the different driver instances that enable the
driver to process different sets of objects within the same Identity Vault.
The Template objects you want the driver to use when creating users, if you choose to use
templates.
Identity Manager drivers do not require you to specify eDirectory Template objects for creating
users. However, if you specify that a driver should use a template when creating users in
eDirectory, the Template object must be replicated on the server where the driver is running.
Any containers you want the Identity Manager driver to use for managing users.
For example, if you have created a container named Inactive Users to hold user accounts that
have been disabled, you must have a master or read/write replica (preferably a master replica) of
that container on the server where the driver is running.
Any other objects that the driver needs to refer to (for example, work order objects for the Avaya
PBX driver).
If the other objects are only to be read by the driver, not changed, the replica for those objects on
the server can be a read-only replica.
3.3.3
Using Scope Filtering to Manage Users on Different Servers
Scope filtering means adding rules to each driver to limit the scope of the driver’s actions to specific
containers. The following are two situations in which you would need to use scope filtering:
You want the driver to synchronize only users that are in a particular container.
By default, an Identity Manager driver synchronizes objects in all the containers that are
replicated on the server where it is running. To narrow that scope, you must create scope
filtering rules.
You want an Identity Manager driver to synchronize all users, but you don’t want all users to be
replicated on the same server.
28
Identity Manager 4.0.1 Framework Installation Guide
To synchronize all users without having them replicated on one single server, you need to
determine which set of servers holds all the users, and then create an instance of the Identity
Manager driver on each of those servers. To prevent two instances of the driver from trying to
synchronize the same users, you need to use scope filtering to define which users each instance
of the driver should synchronize.
NOTE: You should use scope filtering even if your server’s replicas don’t currently overlap. In
the future, replicas could be added to your servers and an overlap could be created
unintentionally. If you have scope filtering in place, your Identity Manager drivers do not try to
synchronize the same users, even if replicas are added to your servers in the future.
Here’s an example of how scope filtering is used:
The following illustration shows an Identity Vault with three containers that hold users: Marketing,
Finance, and Development. It also shows an Identity Management container that holds the driver
sets. Each of these containers is a separate partition.
Figure 3-4 Example Tree for Scope Filtering
ACME Identity Vault
ACME
Marketing
Finance
JBassad
Development
Identity Management
Driver Set
Server A
Server B
GroupWise
Driver A
GroupWise
Driver B
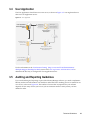
In this example, the Identity Manager administrator has two Identity Vault servers, Server A and
Server B, shown in Figure 3-5 on page 30. Neither server contains a copy of all the users. Each server
contains two of the three partitions, so the scope of what the servers hold is overlapping.
The administrator wants all the users in the tree to be synchronized by the GroupWise driver, but
does not want to aggregate replicas of the users onto a single server. He chooses instead to use two
instances of the GroupWise driver, one on each server. He installs Identity Manager and sets up the
GroupWise driver on each Identity Manager server.
Server A holds replicas of the Marketing and Finance containers. Also on the server is a replica of the
Identity Management container, which holds the driver set for Server A and the GroupWise Driver
object for Server A.
Technical Guidelines
29
Server B holds replicas of the Development and Finance containers, and the Identity Management
container holding the driver set for Server B and the GroupWise Driver object for Server B.
Because Server A and Server B both hold a replica of the Finance container, both servers hold the user
JBassad, who is in the Finance container. Without scope filtering, both GroupWise Driver A and
GroupWise Driver B would synchronize JBassad.
Figure 3-5 Two Servers with Overlapping Replicas, without Scope Filtering
Marketing
Development
Finance
Finance
JBassad
Identity
Manager
Server A
JBassad
Identity Management
Identity Management
Driver Set Server A
GroupWise Server A
Driver Set Server B
Identity
Manager
Server B
GroupWise Server B
Without scope filtering,
both GroupWise drivers try
to manage user JBassad
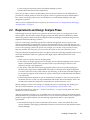
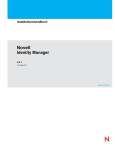
The next illustration shows that scope filtering prevents both instances of the driver from managing
the same user, because it defines which drivers synchronize each container.
Figure 3-6 Scope Filtering Defines Which Drivers Synchronize Each Container
Marketing
Development
Finance
Finance
JBassad
JBassad
Identity
Manager
Server A
Identity Management
Driver Set
Identity Management
Driver Set
GroupWise Driver A
Identity
Manager
Server B
GroupWise Driver B
With scope filtering,
only the GroupWise driver on
Server A manages user JBassad
Identity Manager comes with predefined rules. There are two rules that help with scope filtering.
“Event Transformation - Scope Filtering - Include Subtrees” and “Event Transformation - Scope
Filtering - Exclude Subtrees” are documented in Understanding Policies for Identity Manager 4.0.1.
For this example, you would use the Include Subtrees predefined rule for Server A and Server B. You
would define the scope for each driver differently so that they would only synchronize the users in
the specified containers. Server A would synchronize Marketing and Finance. Server B would
synchronize Development.
30
Identity Manager 4.0.1 Framework Installation Guide
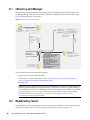
3.4
User Application
The User Application should run on its own server, as shown in Figure 3-7. You might need more
than one User Application server.
Figure 3-7 User Application
User Application
Server/Reporting
Server
Designer
Analyzer
iManager
Role Mapping
Administrator
Administration
Workstation
Metadirectory
Server with
eDirectory
iManager and Role
Mapping Administrator
Web Services
Event Auditing
Service/Novell
Sentinel Server
Use the information in the “Performance Tuning” (http://www.novell.com/documentation/
idmrbpm40/agpro/data/b2gx735.html) section of the User Application: Administration Guide to
determine the best way to configure the User Application server.
3.5
Auditing and Reporting Guidelines
If you need auditing and reporting as part of the Identity Manager solution, you need to implement
Identity Audit or Novell Sentinel. You should run either the Event Auditing Service or Sentinel on its
own server, as shown in Figure 3-8. The number of servers that are required for your solution
depends on how many drivers you have in your environment and how many events you have
defined to audit.
Technical Guidelines
31
Figure 3-8 Sentinel
User Application
Server/Reporting
Server
Designer
iManager
Analyzer
Role Mapping
Administrator
Administration
Workstation
Metadirectory
Server with
eDirectory
iManager and Role
Mapping Administrator
Web Services
Event Auditing
Service/Novell
Sentinel Server
32
Identity Manager 4.0.1 Framework Installation Guide
II
Installation
I
The following sections contain the information required to install an Identity Manager system
without using the integrated installer. For simple installation and configuration you should use the
new integrated installer instead of installing the components separately. For more information about
the integrated installer, see the Identity Manager 4.0.1 Integrated Installation Guide.
However, if you need to install one or more of the Identity Manager components separately, use the
information in these sections to complete those installations.
Chapter 4, “Basic Identity Manager System Checklist,” on page 35
Chapter 5, “Where to Get Identity Manager,” on page 39
Chapter 6, “System Requirements,” on page 43
Chapter 7, “Installing Identity Manager,” on page 55
Chapter 8, “Activating Novell Identity Manager Products,” on page 73
Chapter 9, “Troubleshooting Identity Manager,” on page 77
Chapter 10, “What’s New,” on page 83
Installation
33
34
Identity Manager 4.0.1 Framework Installation Guide
4
Basic Identity Manager System Checklist
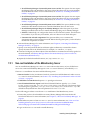
4
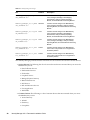
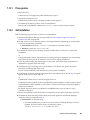
The are many different ways to configure Identity Manager to take advantage of all of its features.
Figure 4-1 represents a basic configuration of Identity Manager. This configuration provisions users
by synchronizing data. No matter how Identity Manager is configured, you always start with a basic
system.
As you configure your Identity Manager system, use this checklist to make sure all steps are
completed.
Figure 4-1 Basic Identity Manager System
Metadirectory
Server
Domain Controller
or Member Server
Identity
Vault
Driver
Active Directory
Server
Active
Directory
Remote
Loader
Metadirectory
Engine
Entitlements
LDAP
Driver
iPlanet Server
Section 4.1, “Prerequisites,” on page 36
Section 4.2, “Planning,” on page 36
Section 4.3, “Installation,” on page 36
Section 4.4, “Driver Configuration with the Remote Loader,” on page 37
Section 4.5, “Driver Configuration without the Remote Loader,” on page 37
Section 4.6, “Additional Configuration,” on page 37
Basic Identity Manager System Checklist
35
4.1
Prerequisites
Verify that your system meets the system requirements listed in Chapter 6, “System
Requirements,” on page 43.
4.2
Planning
Planning is the key to having a successful implementation and deployment of Identity Manager.
Create a development environment. It is important to have access to an Identity Manager system
to validate your Identity Manager solution. You want to do all testing and development in the
development environment before changing to the production environment. For more
information, see Chapter 1, “Setting Up a Development Environment,” on page 11.
Create a project plan for deploying Identity Manager. The project plan includes defining your
key business processes, creating an Identity Manager solution that automates those processes,
and creating a technical implementation plan. To have a successful deployment of Identity
Manager, you must have a project plan. For more information, see Chapter 2, “Creating a Project
Plan,” on page 13.
After you have created a project plan, use Analyzer to clean and prepare your data for
synchronization. For more information, see the Analyzer 4.0.1 for Identity Manager Administration
Guide.
4.3
Installation
Install Analyzer. For more information, see Section 7.1, “Installing Analyzer,” on page 55.
Install Designer. For more information, see Section 7.2, “Installing Designer,” on page 56.
Install eDirectory. For more information, see Section 7.3, “Installing eDirectory,” on page 57.
Install iManager. For more information, see Section 7.4, “Installing iManager,” on page 57.
Install the Metadirectory server and drivers. For more information, see Chapter 7, “Installing
Identity Manager,” on page 55.
Activate Identity Manager. For more information, see Chapter 8, “Activating Novell Identity
Manager Products,” on page 73.
(Optional) Design and create entitlements for your Identity Manager system.
Entitlements are a set of defined criteria for a person or group that can be applied to multiple
drivers. After the criteria are met, the entitlements initiate an event to grant or revoke access to
business resources. Entitlements add an additional level of control and automation for granting
and revoking resources.
The key benefit of entitlements is to create and define business logic, and then apply that logic to
multiple drivers. If you need to make a change, you change it in the entitlement instead of in
each driver.
Entitlements are implemented through three agents:
Role-Based Entitlements using the Entitlements service driver
Workflow
Roles Based Provisioning Module
For more information about entitlements, see the Identity Manager 4.0.1 Entitlements Guide.
36
Identity Manager 4.0.1 Framework Installation Guide
4.4
Driver Configuration with the Remote Loader
The Remote Loader allows you to synchronize information to a connected system without having
eDirectory installed on the connected system. The Remote Loader synchronizes the information to
the Metadirectory server, which stores the data in the Identity Vault. Identity Manager uses
eDirectory as the Identity Vault.
Install the Remote Loader on a machine that communicates with the connected system. The
Remote Loader communicates between the connected system and the Metadirectory server, and
makes it possible for Identity Manager to communicate with a machine that does not have
eDirectory installed. For more information, see “Installing the Remote Loader” in the Identity
Manager 4.0.1 Remote Loader Guide.
Configure the Remote Loader for a driver. You define a specific instance of the Remote Loader to
communicate with a specific driver. For more information, see “Configuring the Remote
Loader” in the Identity Manager 4.0.1 Remote Loader Guide.
Configure the driver to communicate with the Remote Loader. There is a driver guide for each
driver. For specific information about your driver, see the Identity Manager 4.0.1 Drivers
Documentation Web site (http://www.novell.com/documentation/idm401drivers/).
(Optional) Enable entitlements on the driver. Verify that you have the correct policies in place to
execute the entitlement. For more information, see the Identity Manager 4.0.1 Entitlements Guide.
Repeat these steps for each driver you have in your environment.
4.5
Driver Configuration without the Remote Loader
Create and configure your driver. There is a driver guide for each driver. For specific
information about your driver, see the Identity Manager 4.0.1 Drivers Documentation Web site
(http://www.novell.com/documentation/idm401drivers/).
(Optional) Enable entitlements on the driver. Verify that you have the correct policies in place to
execute the entitlement. For more information, see the Identity Manager 4.0.1 Entitlements Guide.
Repeat these steps for each driver you have in your environment.
4.6
Additional Configuration
With the basic Identity Manager system installed and configured, you can add the following features:
Password Management: If you want to manage passwords with Identity Manager, you need to
do some additional configuration. Use the “Password Management Checklist” in the Identity
Manager 4.0.1 Password Management Guide to verify that all configuration steps are completed.
Roles Management: If you want to manage roles across different systems from one location,
Identity Manager contains a tool called the Roles Mapping Administrator. It allows you to map
business roles from one system to another without understanding the IT infrastructure. For
more information, see the Identity Manager Role Mapping Administrator 4.0.1 Installation and
Configuration Guide.
Roles Based Provisioning: If you want to add Roles Based Provisioning to your Identity
Manager solution, use the “Installation Checklist” in the Identity Manager Roles Based Provisioning
Module 4.0.1 User Application: Installation Guide to verify that all configuration steps are
completed.
Basic Identity Manager System Checklist
37
Auditing and Reporting: Adding auditing and reporting to your Identity Manager solution
provides a means to show that your business policies comply with the company’s policies. You
can add the Identity Reporting Module or Novell Sentinel to your Identity Manager solution for
auditing and reporting. For more information about the Identity Reporting Module, see the
Identity Reporting Module Guide. For more information about Novell Sentinel, see the Identity
Manager 4.0.1 Reporting Guide for Novell Sentinel.
38
Identity Manager 4.0.1 Framework Installation Guide
5
Where to Get Identity Manager
5
Identity Manager 4.0.1 is available in Advanced and Standard Editions. There are separate ISOs for
each of them. Identity Manager 4.0.1 Advanced Edition includes a complete set of features for
enterprise class user provisioning. To meet the varying customer requirements, Identity Manager
Standard Edition includes a subset of features available in the Identity Manager Advanced Edition.
The Standard Edition continues to provide all the features that were present in the previous versions
of Identity Manager. For more information on the offerings of Identity Manager 4.0.1 Advanced and
Standard Editions, see “Identity Manager 4.0.1 Features ” in the Identity Manager 4.0.1 Overview
Guide.
You can download an evaluation copy of Identity Manager and use it for 90 days free of charge.
However, the Identity Manager components must be activated within 90 days of installation, or they
will shut down. At any time during the 90 days, or afterward, you can choose to purchase a product
license and activate Identity Manager. For more information, see Chapter 8, “Activating Novell
Identity Manager Products,” on page 73.
To download Identity Manager and its services:
1 Go to the Novell Downloads Web site (http://download.novell.com).
2 In the Product or Technology menu, select Novell Identity Manager, then click Search.
3 On the Novell Identity Manager Downloads page, click the Download button next to a file you
want. Table 12-1 contains a description of each file.
Based on your requirements, you can select an appropriate ISO. Each ISO contains the 32-bit and
64-bit versions of the product.
IMPORTANT: To switch from Identity Manager Advanced Edition to Standard Edition,
uninstall the Advanced Edition and then install the Standard Edition ISO from the Identity
Manager media. To upgrade from Standard Edition to Advanced Edition, use the Identity
Manager Advanced Edition ISO. You need to apply the correct activation to be able to upgrade
to Advanced Edition. For more information on upgrading from Standard Edition to Advanced
Edition, see Identity Manager 4.0.1 Upgrade and Migration Guide.
4 Follow the on-screen prompts to download the file to a directory on your computer.
5 Repeat Step 3 until you have downloaded all of the files you need.
6 Either mount the downloaded .iso file as a volume, or use the .iso file to create a DVD of the
software. If you haven’t already verified that the media you burned is valid, you can check it by
using the Media Check option.
NOTE: The Linux ISO files should be copied onto a double layer DVD due to the large size of
the files.
Where to Get Identity Manager
39
Table 5-1 Identity Manager ISO Images
ISO
Platform
Description
Identity_Manager_4.0.1_Wind
ows_Advanced.iso
Windows
Contains the DVD image for the Metadirectory
server, Designer, iManager, Role Mapping
Administrator, Analyzer, Identity Reporting
Module, and Roles Based Provisioning Module.
Identity_Manager_4.0.1_Wind
ows_Standard.iso
Windows
Contains the DVD image for the Metadirectory
server, Designer, iManager, Analyzer, Identity
Reporting Module, and Roles Based Provisioning
Module.
Identity_Manager_4.0.1a_Lin
ux_Advanced.iso
Linux
Contains the DVD image for the Metadirectory
server, Designer, iManager, Role Mapping
Administrator, Analyzer, Identity Reporting
Module, and Roles Based Provisioning Module.
Identity_Manager_4.0.1a_Lin
ux_Standard.iso
Linux
Contains the DVD image for the Metadirectory
server, Designer, iManager, Analyzer, Identity
Reporting Module, and Roles Based Provisioning
Module.
Identity_Manager_4.0.1_Sola
ris_Advanced.iso
Solaris
Contains the DVD image for the Metadirectory
server. Other components are not supported on
the Solaris platform.
Identity_Manager_4.0.1_Sola
ris_Standard.iso
Solaris
Contains the DVD image for the Metadirectory
server. Other components are not supported on
the Solaris platform.
Your Identity Manager purchase includes activations for service drivers and several common drivers.
Service Drivers: The following the a list of service drivers that are activated when you active the
Metadirectory server:
Data Collection Service
Entitlements Services
ID Provider
Loopback Service
Managed System Gateway
Manual Task Service
Null Service
Role and Resource Service
User Application
WorkOrder
Common Drivers: The following is a list of common drivers that are activated when you active
the Metadirectory server:
Active Directory
ADAM
eDirectory
GroupWise
40
Identity Manager 4.0.1 Framework Installation Guide
LDAP
Lotus Notes
Activations for all other Identity Manager drivers must be purchased separately. The activations for
the drivers are sold as Identity Manager Integration modules. An Identity Manager Integration
module can contain one or more drivers. You receive a Product Activation Credential for each
Identity Manager Integration module you purchase. For more information see, Identity Manager 4
Standard Edition (https://www.netiq.com/products/identity-manager/standard/technicalinformation/modules.html) and Identity Manager 4 Advanced Edition (https://www.netiq.com/
products/identity-manager/advanced/technical-information/modules.html).
There are separate activations available for Identity Manager Advanced and Standard Editions. For
more information, refer to “Activating Novell Identity Manager Products” on page 73. Switching
from Identity Manager Advanced Edition to Standard Edition is not supported. To use the Identity
Manager Standard Edition, you need to install it from the Identity Manager media.
The User Application Roles Based Provisioning Module is included with your Identity Manager
purchase. It adds a powerful roles based approval workflow to managing your users’ identities.
Your Identity Manager purchase also includes the several tools to help design, create, and manage
your Identity Manager solution:
Analyzer
Designer
iManager
Role Mapping Administrator
NOTE: Role Mapping Administrator is not available with Identity Manager 4.0.1 Standard
Edition.
The Identity Reporting Module is another component of Identity Manager that allows you to audit
and create reports about your Identity Manager solution. You can use the reports to help meet
compliance regulations for your business.
For more information about the Identity Manager components, see the Identity Manager 4.0.1
Overview Guide.
Where to Get Identity Manager
41
42
Identity Manager 4.0.1 Framework Installation Guide
6
System Requirements
6
The components of Novell Identity Manager can be installed on multiple systems and platforms.
Figure 6-1 shows which platforms and systems are supported.
System Requirements
43
Figure 6-1 System Requirements for the Identity Manager Components
User Application / Reporting Server
SLES 10 SP3 (32 and 64-bit)
SLES 11 SP1 (32 and 64-bit)
OES 2 SP3 (32 and 64-bit)
OES 11 (64-bit)
OES 11 SP1 (64-bit)
RHEL 5.4 or later (32 and 64-bit)
RHEL 6.0 or later (32 and 64-bit)
Windows Server 2003 SP2 (32-bit only)
Windows Server 2008 R2 (64-bit only)
Windows Server 2008 SP1
(32 and 64-bit)
Solaris 10 (64-bit) (User Application only)
Administration
Workstation
Designer and Analyzer
openSUSE 10.3 (32 and 64-bit)
openSUSE 11.2 (32 and 64-bit)
SLED 10.3 (32 and 64-bit)
SLED 11 (32 and 64-bit)
SLES 10.3 (32 and 64-bit)
SLES 11 (32 and 64-bit)
SLES 11 SP1 (32 and 64-bit)
Windows 2003 SP2 (32-bit)
Windows 2008 R2 (64-bit)
Windows XP Prof SP3
(32 and 64-bit)
Windows Vista Business (32-bit)
Windows 7 (32 and 64-bit)
User Application
Server 4.0.1/Reporting
Server
Web Browsers
Internet Explorer 7, 8, and 9
Firefox 3, 3.5.x, 3.6.x, and 4
Remote Loader
Remote
Loader 4.0.1
32-bit and
/or 64-bit
Server
Metadirectory 4.0.1
Server with
eDirectory 8.8.6
or later, 32 and 64-bit
SLES 10 SP3 or later
(32 and 64-bit)
SLES 11 or later
(32 and 64-bit)
OES 2 SP3 (32 and 64-bit)
OES 11 (64-bit)
OES 11 SP1 (64-bit)
RHEL 5.4 or later
(32 and 64-bit)
RHEL 6.0 or later
(32 and 64-bit)
Windows 2003 SP2 or later
(32 and 64-bit)
Windows 2008 or later
(32 and 64-bit)
Windows 2008 R2 (64-bit)
Solaris 10 (64-bit)
Web Browsers
Internet Explorer 7, 8, and 9
Firefox 3, 3.5.x, 3.6.x, and 4
Designer
iManager
Analyzer
Role Mapping
Administrator
Administration
Workstation
iManager
SLES 10 SP3 (32 and 64-bit)
SLES 11 (32 and 64-bit)
SLES 11 SP1 (32 and 64-bit)
RHEL 5.4 or later (32 and 64-bit)
RHEL 6.0 or later (32 and 64-bit)
Windows 2003 SP2 (32-bit)
Windows 2008 R2 (64-bit)
OES 2 SP1, SP2, SP3
(32 and 64-bit)
OES 11 (64-bit)
OES 11 SP1 (64-bit)
Metadirectory
SLES 10 SP3 or later (32 and 64-bit)
SLES 11 or later (32 and 64-bit)
OES 2 SP3 (32 and 64-bit)
OES 11 (64-bit)
OES 11 SP1 (64-bit)
RHEL 5.4 or later (32 and 64-bit)
RHEL 6.0 or later (32 and 64-bit)
Windows 2003 SP2 or later
(32 and 64-bit)
Windows 2008 or later (32 and 64-bit)
Windows 2008 R2 (64-bit)
Solaris 10 (64-bit)
iManager and Role
Mapping Administrator
Web Services
Role Mapping Administrator
SLES 10 SP3 (32 and 64-bit)
SLES 11 (32 and 64-bit)
SLES 11 SP1 (32 and 64-bit)
RHEL 5.4 or later (32 and 64-bit)
RHEL 6.0 or later (32 and 64-bit)
Windows 2003 SP2 (32-bit)
Windows 2008 R2 (64-bit)
Event Auditing Service
Event Auditing
Service/Novell
Sentinel Server
SLES 10 SP3 (32 and 64-bit)
SLES 11 (32 and 64-bit)
SLES 11 SP1 (32 and 64-bit)
Depending on your system configuration, you might need to run the Identity Manager installation
program several times to install Identity Manager components on the appropriate systems.
44
Identity Manager 4.0.1 Framework Installation Guide
Dependent Libraries for Identity Manager Installation on RHEL 6.x
Ensure that you install the following libraries before installing Identity Manager on RHEL 6.x:
For GUI Install: Before invoking the Identity Manager installer, manually install the dependant
libraries.
For a 64-bit RHEL: Install the following libraries in the same order:
1. libXau-1.0.5-1.el6.i686.rpm
2. libxcb-1.5-1.el6.i686.rpm
3. libX11-1.3-2.el6.i686.rpm
4. libXext-1.1-3.el6.i686.rpm
5. libXi-1.3-3.el6.i686.rpm
6. libXtst-1.0.99.2-3.el6.i686.rpm
7. glibc-2.12-1.7.el6.i686.rpm
8. libstdc++-4.4.4-13.el6.i686.rpm
9. libgcc-4.4.4-13.el6.i686.rpm
10. compat-libstdc++-33-3.2.3-69.el6.x86_64.rpm
11. compat-libstdc++-33-3.2.3-69.el6.i686.rpm
For a 32-bit RHEL: Install the following library:
compat-libstdc++-33-3.2.3-69.el6.i686.rpm
For Non-GUI Install: Before invoking the Identity Manager installer, manually install the
dependant libraries.
For a 64-bit RHEL: Install the following libraries in the same order:
1. glibc-2.12-1.7.el6.i686.rpm
2. libstdc++-4.4.4-13.el6.i686.rpm
3. libgcc-4.4.4-13.el6.i686.rpm
4. compat-libstdc++-33-3.2.3-69.el6.x86_64.rpm
5. compat-libstdc++-33-3.2.3-69.el6.i686.rpm
For a 32-bit RHEL: Install the following library:
compat-libstdc++-33-3.2.3-69.el6.i686.rpm
NOTE: Ensure that the unzip rpm is installed before installing Identity Manager. This is applicable
for all Linux platforms.
Proceed to the following sections for system requirements for Identity Manager components:
Section 6.1, “eDirectory and iManager,” on page 46
Section 6.2, “Metadirectory Server,” on page 46
Section 6.3, “Remote Loader,” on page 49
Section 6.4, “User Application,” on page 51
Section 6.5, “Auditing and Reporting,” on page 51
Section 6.6, “Workstations,” on page 52
Section 6.7, “Resource Requirements,” on page 54
System Requirements
45
6.1
eDirectory and iManager
Identity Manager requires eDirectory and iManager to be installed. These products provide a base
for Identity Manager, and they are included in the Identity Manager Advanced Edition ISO image.
Figure 6-2 illustrates these components.
Figure 6-2 Base Products for Identity Manager
Administration
Workstation
User Application
Server 4.0.1/Reporting
Server
Designer
Analyzer
Administration
Workstation
Remote
Loader 4.0.1
32-bit and
/or 64-bit
Server
Metadirectory 4.0.1
Server with
eDirectory 8.8.6
or later, 32 and 64-bit
Event Auditing
Service/Novell
Sentinel Server
iManager
Role Mapping
Administrator
Metadirectory
SLES 10 SP3 or later (32 and 64-bit)
SLES 11 or later (32 and 64-bit)
OES 2 SP3 (32 and 64-bit)
OES 11 (64-bit)
OES 11 SP1 (64-bit)
RHEL 5.4 or later (32 and 64-bit)
RHEL 6.0 or later (32 and 64-bit)
Windows 2003 SP2 or later
(32 and 64-bit)
Windows 2008 or later (32 and 64-bit)
Windows 2008 R2 (64-bit)
Solaris 10 (64-bit)
iManager and Role
Mapping Administrator
Web Services
You need the following versions of these products:
eDirectory 8.8.6 or later (32-bit or 64-bit)
For eDirectory system requirements, see the Novell eDirectory 8.8 Installation Guide (http://
www.novell.com/documentation/edir88/index.html).
iManager 2.7.4
NOTE: The Identity Manager 4.0.1a does not install iManager 2.7.4 FTF3. To extend support for
Microsoft Internet Explorer 9 and Mozilla Firefox 4.0.1 browsers, manually upgrade iManager
2.7.4 to iManager 2.7.4 FTF3. For iManager installation and upgrade requirements, see Installing
iManager (http://www.novell.com/documentation/imanager27/imanager_install_274/data/
alw39eb.html) section in the iManager 2.7 Installation Guide (http://www.novell.com/
documentation/imanager27/index.html).
6.2
Metadirectory Server
The Metadirectory server processes the events from the drivers, whether they are configured using
the Remote Loader or not. For a list of the supported operating systems, see Figure 6-3.
46
Identity Manager 4.0.1 Framework Installation Guide
Figure 6-3 Supported Operating Systems for the Metadirectory Server
Designer
Administration
Workstation
User Application
Server 4.0.1/Reporting
Server
Analyzer
iManager
Role Mapping
Administrator
Administration
Workstation
Remote
Loader 4.0.1
32-bit and
/or 64-bit
Server
Metadirectory 4.0.1
Server with
eDirectory 8.8.6
or later, 32 and 64-bit
Event Auditing
Service/Novell
Sentinel Server
Metadirectory
SLES 10 SP3 or later (32 and 64-bit)
SLES 11 or later (32 and 64-bit)
OES 2 SP3 (32 and 64-bit)
OES 11 (64-bit)
OES 11 SP1 (64-bit)
RHEL 5.4 or later (32 and 64-bit)
RHEL 6.0 or later (32 and 64-bit)
Windows 2003 SP2 or later
(32 and 64-bit)
Windows 2008 or later (32 and 64-bit)
Windows 2008 R2 (64-bit)
Solaris 10 (64-bit)
iManager and Role
Mapping Administrator
Web Services
During the installation of the Metadirectory server, the installation program detects what version of
eDirectory is installed.
NOTE: You must have eDirectory 8.8.6 or later (32-bit or 64-bit) installed, or the installation program
does not continue.
Section 6.2.1, “Supported Processors,” on page 47
Section 6.2.2, “Server Operating Systems,” on page 48
6.2.1
Supported Processors
The processors listed here are used during the testing of Identity Manager. The SPARC processor is
used for Solaris testing.
The supported 32-bit processors for Linux (Red Hat and SUSE Linux Enterprise Server) and
Windows operating systems are:
Intel x86-32
AMD x86-32
System Requirements
47
The supported 64-bit processors for Linux (Red Hat and SUSE Linux Enterprise Server) and
Windows operating systems are:
Intel EM64T
AMD Athlon64
AMD Opteron
All operating systems should have the latest support packs.
6.2.2
Server Operating Systems
You can install the Metadirectory server as a 32-bit application on a 64-bit operating system. Table 6-1
contains a list of the supported server operating systems that the Metadirectory server can run on.
Table 6-1 Supported Server Operating Systems
48
Server Operating System Version
Notes
Windows Server 2003 SP2 or later support packs (32bit)
The Metadirectory server runs only in 32-bit
mode.
Windows 2008 or later support packs (32-bit and 64-bit)
The Metadirectory server runs in either 32-bit
or 64-bit mode.
Windows Server 2008 R2 (64-bit)
The Metadirectory server runs only in 64-bit
mode.
Red Hat 5.4 or later support packs (32-bit and 64-bit)
The Metadirectory server runs in either 32-bit
or 64-bit mode. Novell recommends that you
apply the latest OS patches via the
manufacturer’s automated update facility
before you install Identity Manager.
Red Hat 6.0 or later support packs (32-bit and 64-bit)
The Metadirectory server runs in either 32-bit
or 64-bit mode. Novell recommends that you
apply the latest OS patches via the
manufacturer’s automated update facility
before you install Identity Manager.
SUSE Linux Enterprise Server 10 SP3 or later support
packs (32-bit and 64-bit)
The Metadirectory server runs in either 32-bit
or 64-bit mode. Novell recommends that you
apply the latest OS patches via the
manufacturer's automated update facility
before you install Identity Manager.
SUSE Linux Enterprise Server 11 or support packs(32bit and 64-bit)
The Metadirectory server runs in either 32-bit
or 64-bit mode. Novell recommends that you
apply the latest OS patches via the
manufacturer's automated update facility
before you install Identity Manager.
OES 2 SP3 (32-bit and 64-bit)
The Metadirectory server runs in 32-bit and
64-bit mode.
OES 11 (64-bit)
The Metadirectory server runs only in 64-bit
mode.
Solaris 10 (64-bit)
The Metadirectory server runs only in 64-bit
mode.
Identity Manager 4.0.1 Framework Installation Guide
6.3
Server Operating System Version
Notes
Xen
Xen is supported when the Xen Virtual
Machine is running SLES 10/SLES 11 as the
guest operating system in paravirtualized
mode.
VMware ESX
The Metadirectory server runs in either 32-bit
or 64-bit mode.
Red Hat Enterprise Linux 5 Virtualization
The Metadirectory server runs in either 32-bit
or 64-bit mode.
Windows Server 2008 R2 Virtualization with Hyper-V
The Metadirectory server runs in either 32-bit
or 64-bit mode.
Remote Loader
The Remote Loader gives you flexibility in your Identity Manager solution configuration. It provides
both 32-bit and 64-bit support. By default, the installation program detects the version of the
operating system and then installs the corresponding version of the Remote Loader.
Figure 6-4 Supported Operating Systems for the Remote Loader
Designer
Administration
Workstation
Analyzer
User Application
Server 4.0.1/Reporting
Server
iManager
Role Mapping
Administrator
Administration
Workstation
Remote Loader
Remote
Loader 4.0.1
32-bit and
/or 64-bit
Server
Metadirectory 4.0.1
Server with
eDirectory 8.8.6
or later, 32 and 64-bit
SLES 10 SP3 or later
(32 and 64-bit)
SLES 11 or later
(32 and 64-bit)
OES 2 SP3 (32 and 64-bit)
OES 11 (64-bit)
OES 11 SP1 (64-bit)
RHEL 5.4 or later
(32 and 64-bit)
RHEL 6.0 or later
(32 and 64-bit)
Windows 2003 SP2 or later
(32 and 64-bit)
Windows 2008 or later
(32 and 64-bit)
Windows 2008 R2 (64-bit)
Solaris 10 (64-bit)
iManager and Role
Mapping Administrator
Web Services
Event Auditing
Service/Novell
Sentinel Server
If you have installed the Metadirectory server as a 32-bit application on a 64-bit operating system,
you can install both a 32-bit and a 64-bit Remote Loader on the same machine.
System Requirements
49
Table 6-2 lists the supported operating systems for the Remote Loader.
Table 6-2 Supported Operating Systems for the Remote Loader
Server Operating System Version
Notes
Windows Server 2003 SP2 (32-bit and 64-bit)
The Remote Loader runs in 32-bit and 64-bit
mode.
Windows Server 2008 or later support packs (32-bit and The Remote Loader runs in 32-bit and 64-bit
64-bit)
mode.
Windows Server 2008 Server R2 (64-bit)
The Remote Loader runs only in 64-bit mode.
Red Hat 5.4 or later support packs (32-bit and 64-bit)
The Remote Loader runs in 32-bit and 64-bit
mode. Novell recommends that you apply the
latest OS patches via the manufacturer’s
automated update facility before you install
Identity Manager.
Red Hat 6.0 or later support packs (32-bit and 64-bit)
The Remote Loader runs in 32-bit and 64-bit
mode. Novell recommends that you apply the
latest OS patches via the manufacturer’s
automated update facility before you install
Identity Manager.
SUSE Linux Enterprise Server 10 SP3 or later support
packs (32-bit and 64-bit)
The Remote Loader runs in 32-bit and 64-bit
mode. Novell recommends that you apply the
latest OS patches via the manufacturer's
automated update facility before you install
Identity Manager.
SUSE Linux Enterprise Server 11 or later support packs The Remote Loader runs in 32-bit and 64-bit
(32-bit and 64-bit)
mode. Novell recommends that you apply the
latest OS patches via the manufacturer's
automated update facility before you install
Identity Manager.
OES 2 SP3 (32-bit and 64-bit)
The Remote Loader runs in 32-bit and 64-bit
mode.
OES 11 (64-bit)
The Remote Loader runs only in 64-bit mode.
Solaris 10 (64-bit)
The Remote Loader runs only in 64-bit mode.
Xen
Xen is supported when the Xen Virtual
Machine is running SLES 10/SLES 11 as the
guest operating system in paravirtualized
mode.
VMware ESX (64-bit)
The Remote Loader runs in 32-bit and 64-bit
mode.
Red Hat Enterprise Linux 5 Virtualization (64-bit)
The Remote Loader runs in 32-bit and 64-bit
mode.
Windows Server 2008 R2 Virtualization with Hyper-V
(64-bit)
The Remote Loader runs in 32-bit and 64-bit
mode.
Java Remote Loader is supported on platforms where native Remote Loader is not available. .NET
Remote Loader is supported on .NET platform version 2.
50
Identity Manager 4.0.1 Framework Installation Guide
6.4
User Application
For User Application system requirements, see the “System Requirements” section in the Identity
Manager Roles Based Provisioning Module 4.0.1 User Application: Installation Guide.
6.5
Auditing and Reporting
The Identity Reporting Module and Novell Sentinel are two different tools used to gather auditing
and reporting information about Identity Manager. Figure 6-5 lists the supported version of Sentinel
with Identity Manager 4.0.1.
Figure 6-5 Sentinel
Administration
Workstation
User Application
Server 4.0.1/Reporting
Server
Designer
iManager
Analyzer
Role Mapping
Administrator
Administration
Workstation
Remote
Loader 4.0.1
32-bit and
/or 64-bit
Server
Metadirectory 4.0.1
Server with
eDirectory 8.8.6
or later, 32 and 64-bit
iManager and Role
Mapping Administrator
Web Services
Event Auditing Service
Event Auditing
Service/Novell
Sentinel Server
SLES 10 SP3 (32 and 64-bit)
SLES 11 (32 and 64-bit)
SLES 11 SP1 (32 and 64-bit)
The Identity Reporting Module is a component of the Identity Manager Advanced Edition. Novell
Sentinel is an optional component you can add to your Identity Manager system, but Sentinel does
not come with Identity Manager.
By adding auditing and reporting, you can meet compliance standards that many companies must
abide by. You can create audit trails for any events you need to track, and you can generate reports to
meet audit standards for your company.
For system requirements and configuration information about the Identity Reporting Module, see the
“System Requirements” section the Identity Reporting Module Guide. For configuration information
about Sentinel with Identity Manager, see the Identity Manager 4.0.1 Reporting Guide for Novell Sentinel.
For system requirement information about Novell Sentinel, see the “Supported Platforms and Best
Practices” chapter in the Novell Sentinel Installation Guide (http://www.novell.com/documentation/
sentinel61/index.html).
System Requirements
51
6.6
Workstations
Workstations are used to access Designer, iManager, the Role Mapping Administrator, or the User
Application administration Web page. Figure 6-6 lists the different components for workstations that
are supported with Identity Manager 4.0.1.
Figure 6-6 Supported Components for Workstations
Designer and Analyzer
Administration
Workstation
User Application
Server 4.0.1/Reporting
Server
openSUSE 10.3 (32 and 64-bit)
openSUSE 11.2 (32 and 64-bit)
SLED 10.3 (32 and 64-bit)
SLED 11 (32 and 64-bit)
SLES 10.3 (32 and 64-bit)
SLES 11 (32 and 64-bit)
SLES 11 SP1 (32 and 64-bit)
Windows 2003 SP2 (32-bit)
Windows 2008 R2 (64-bit)
Windows XP Prof SP3
(32 and 64-bit)
Windows Vista Business (32-bit)
Windows 7 (32 and 64-bit)
Remote
Loader 4.0.1
32-bit and
/or 64-bit
Server
Metadirectory 4.0.1
Server with
eDirectory 8.8.6
or later, 32 and 64-bit
Web Browsers
Internet Explorer 7, 8, and 9
Firefox 3, 3.5.x, 3.6.x, and 4
Designer
iManager
Analyzer
Role Mapping
Administrator
Administration
Workstation
iManager and Role
Mapping Administrator
Web Services
Role Mapping Administrator
Event Auditing
Service/Novell
Sentinel Server
There are three different items that affect workstations:
Section 6.6.1, “Workstation Platforms,” on page 53
Section 6.6.2, “Web Browsers,” on page 53
52
Identity Manager 4.0.1 Framework Installation Guide
SLES 10 SP3 (32 and 64-bit)
SLES 11 (32 and 64-bit)
SLES 11 SP1 (32 and 64-bit)
RHEL 5.4 or later (32 and 64-bit)
RHEL 6.0 or later (32 and 64-bit)
Windows 2003 SP2 (32-bit)
Windows 2008 R2 (64-bit)
6.6.1
Workstation Platforms
Table 6-3 contains a list of the supported workstation platforms for Designer and iManager.
For system requirements information, refer to the individual component documentation.
iManager: See the Installing iManager (http://www.novell.com/documentation/imanager27/
imanager_install_274/data/alw39eb.html) section in the Novell iManager 2.7 Installation Guide.
Designer: See the “System Requirements” section in the Designer 4.0.1 for Identity Manager 4.0.1
Administration Guide.
Table 6-3 Supported Workstation Platforms
Platforms
Details
Windows 7 (32 and 64-bit)
Both 32 and 64-bit versions are supported.
Windows Vista (32-bit)
Only the 32-bit version is supported.
Windows XP Professional SP3 (32 and 64-bit)
Both 32 and 64-bit versions are supported.
Windows 2003 SP2 (32-bit)
Only the 32-bit version is supported.
Windows 2008 R2 (64-bit)
Only the 64-bit Business Edition is supported.
openSUSE 10.3 (32 and 64-bit)
Apply the latest patches via the automated update
facility.
openSUSE 11.2 (32 and 64-bit)
Apply the latest patches via the automated update
facility.
SUSE Linux Enterprise Desktop 10 SP3 (32 and
64-bit)
Apply the latest patches via the automated update
facility.
SUSE Linux Enterprise Desktop 11 (32 and 64-bit)
Apply the latest patches via the automated update
facility.
SUSE Linux Enterprise Server 10 SP3 (32 and 64- Apply the latest patches via the automated update
bit)
facility.
6.6.2
SUSE Linux Enterprise Server 11 (32 and 64-bit)
Apply the latest patches via the automated update
facility.
SUSE Linux Enterprise Server 11 SP1 (32 and 64bit)
Apply the latest patches via the automated update
facility.
Web Browsers
iManager runs all of the plug-ins required to administer Identity Manager. The Role Mapping
Administrator allows you to map business roles in different systems without having to understand
the IT infrastructure. You access both application through a Web browser.
The supported Web browsers for iManager and the Role Mapping Administrator are:
Internet Explorer 7, 8, and 9
Mozilla Firefox 3, 3.5.x, 3.6.x, , 4 and 5
See the “System Requirements” section in the Identity Manager Role Mapping Administrator 4.0.1
Installation and Configuration Guide for a list of Role Mapping Administrator system requirements.
System Requirements
53
6.7
Resource Requirements
Table 6-4 Identity Manager Resource Requirements
54
Identity Manager Component
Minimum Requirement
Metadirectory Server
2048 MB
Remote Loader
256 MB
Drivers
200 MB
iManager Plug-ins
80 MB
Identity Manager 4.0.1 Framework Installation Guide
7
Installing Identity Manager
7
Identity Manager contains an integrated installer that simplifies the installation process and installs
and configures all of the components at the same time. If you are installing your first Identity
Manager system, use the integrated installer. For more information, see the Identity Manager 4.0.1
Integrated Installation Guide.
If you have experience with Identity Manager and want to install each item separately, Identity
Manager has separate installers for the different components.
It is important to install and use Analyzer and Designer during the planning phase of the Identity
Manager implementation. For more information, see Chapter 2, “Creating a Project Plan,” on
page 13.
Install the components in the order listed. For an explanation of the different components, see the
Identity Manager 4.0.1 Overview Guide guide.
Section 7.1, “Installing Analyzer,” on page 55
Section 7.2, “Installing Designer,” on page 56
Section 7.3, “Installing eDirectory,” on page 57
Section 7.4, “Installing iManager,” on page 57
Section 7.5, “Installing the Metadirectory Server,” on page 58
Section 7.6, “Installing the Remote Loader,” on page 61
Section 7.7, “Installing the Driver Files,” on page 66
Section 7.8, “Installing the Roles Based Provisioning Module,” on page 67
Section 7.9, “Installing a Custom Driver,” on page 67
Section 7.10, “Installing the Role Mapping Administrator,” on page 67
Section 7.11, “Installing the Identity Reporting Module or Sentinel,” on page 68
Section 7.12, “Installing the Identity Manager 4.0.1 Patch,” on page 68
Section 7.13, “Language Support for the Identity Manager Installers,” on page 71
7.1
Installing Analyzer
Analyzer is a workstation-based tool that allows you to analyze, clean, and prepare your data for
synchronization with Identity Manager. You should install Analyzer and use it throughout the
planning part of your Identity Manager implementation. For more information about planning, see
Part I, “Planning,” on page 9.
1 Verify that your workstation’s operating system is supported.
For more information, see Section 6.6, “Workstations,” on page 52.
Installing Identity Manager
55
2 Ensure that you have downloaded the necessary Identity Manager files from the Novell
Downloads Web site. For more information, see Chapter 5, “Where to Get Identity Manager,” on
page 39.
3 Start the installation by executing the correct program for your workstation’s platform.
Linux: IDM4.0.1_Lin/products/Analyzer/install
To execute the binary file, enter ./install.
Windows: IDM4.0.1_Win:/products/Analyzer/install.exe
4 Use the following information to complete the installation:
Install Location: Specify a location on the workstation where to install Analyzer.
Create Short Cuts and Select a Language: Select where you want short cuts for Analyzer
created on the desk top, and select the language you want to use to install Analyzer.
Analyzer is now installed. The first time you launch Analyzer you are prompted for an activation.
Until you activate Analyzer, you cannot use it. For more information, see Chapter 8, “Activating
Novell Identity Manager Products,” on page 73.
To run a silent installation of Analyzer, refer to the “Using the Silent Install” section of the Analyzer
4.0.1 for Identity Manager Administration Guide.
7.2
Installing Designer
Designer is a workstation-based tool that allows you to design your Identity Manager solution. You
should install Designer and use it throughout the planning part of your Identity Manager
implementation. For more information about planning, see Part I, “Planning,” on page 9.
1 Verify that your workstation’s operating system is supported. For a proper functioning of
Designer, install 32-bit NICI package. If you are installing Designer on a 64-bit system, make
sure that libgthread-2_0-0-32bit-2.17.2+2.17.3+20080708+r7171-3.1.x86_64.rpm
compat library is installed before installing Designer. For more information, see Section 6.6,
“Workstations,” on page 52 and Designer 4.0.1 for Identity Manager 4.0.1 Administration Guide.
2 Ensure that you have downloaded the necessary Identity Manager files from the Novell
Downloads Web site. For more information, see Chapter 5, “Where to Get Identity Manager,” on
page 39.
3 Start the installation by executing the correct program for your workstation’s platform.
Linux: IDM4.0.1_Lin/products/Designer/install
To execute the binary file, enter ./install.
To run the installation in the text mode, enter ./install -i console.
Windows: IDM4.0.1_Win:\products\Designer\install.exe
4 Use the following information to complete the installation:
Install Folder: Specify a location on the workstation where to install Designer.
Create Shortcuts: Select whether the shortcuts are placed on your desktop and in your Desktop
Menu.
When you install support packages for Designer, such as the NICI package, certain Linux core
utilities are needed. The GNU gettext utilities provide a framework for internationalized and
multilingual messages. Before installing Designer, make sure that you have installed this
package. You can use YaST to check for dependencies and installed packages. For more
information, refer to the Designer 4.0.1 for Identity Manager 4.0.1 Administration Guide.
56
Identity Manager 4.0.1 Framework Installation Guide
To run a silent installation of Designer, refer to the “Using the Silent Install” section of the Designer
4.0.1 for Identity Manager 4.0.1 Administration Guide.
7.3
Installing eDirectory
Ensure that you have downloaded the necessary Identity Manager files from the Novell Downloads
Web site. For more information, see Chapter 5, “Where to Get Identity Manager,” on page 39.
eDirectory 8.8.6 is provided on the Identity Manager media. There are installers for both 32-bit
platforms and 64-bit platforms. The location of the installer depends on the platform:
Linux 32-bit: IDM4.0.1_Lin/products/eDirectory/x86/setup/nds-install
Linux 64-bit: IDM4.0.1_Lin/products/eDirectory/x64/setup/nds-install
Solaris 32-bit: IDM4.0.1_Solaris/products/eDirectory/x86/setup/nds-install
Solaris 64-bit: IDM4.0.1_Solaris/products/eDirectory/x64/setup/nds-install
To execute the binary file, enter ./nds-install.
Windows 32-bit: IDM4.0.1_Win:\products\eDirectory\x86\nt\Setup.exe
Windows 64-bit: IDM4.0.1_Win:\products\eDirectory\x64\windows\Setup.exe
The instructions on how to install eDirectory vary depending on your platform. For installation
instructions for your platform, see the corresponding section in the Novell eDirectory 8.8 Installation
Guide (http://www.novell.com/documentation/edir88/edirin88/data/a2iii88.html).
NOTE: For Linux and Solaris, you must configure your eDirectory after it is installed before you can
install the Metadirectory server. For configuration instructions, see “Configuring Novell eDirectory
on Linux, Solaris, or AIX Systems” (http://www.novell.com/documentation/edir88/edirin88/data/
bnn8z89.html) in the Novell eDirectory 8.8 Installation Guide.
To run a silent installation of eDirectory, refer to the Novell eDirectory 8.8 Installation Guide (http://
www.novell.com/documentation/edir88/edirin88/data/a2iii88.html).
7.4
Installing iManager
Ensure that you have downloaded the necessary Identity Manager files from the Novell Downloads
Web site. For more information, see Chapter 5, “Where to Get Identity Manager,” on page 39.
iManager 2.7.4 is provided on the Identity Manager media. There are installers for Windows and
Linux. iManager is not supported on Solaris. The location of the installer depends on the platform:
Linux: IDM4.0.1_Lin/products/iManager/installs/linux/iManagerInstallLinux.bin
To execute the binary file, enter ./iManagerInstallLinux.bin.
Windows: IDM4.0.1_Win:\products\iManager\installs\win\iManagerInstall.exe
The instructions on how to install iManager vary depending on your platform. For installation
instructions, see the corresponding section in the iManager Installation Guide (http://www.novell.com/
documentation/imanager27/imanager_install_27/data/hk42s9ot.html).
To run a silent installation of iManager, see Silent Installation of iManager Server (http://
www.novell.com/documentation/imanager27/imanager_install_274/data/bwbhk3v.html) in the
iManager Installation Guide (http://www.novell.com/documentation/imanager27/imanager_install_27/
data/hk42s9ot.html).
Installing Identity Manager
57
7.5
Installing the Metadirectory Server
For Linux\UNIX platforms you can install the Metadirectory server as root or a non-root user. The
installation procedure is different if you are using the non-root installation. See Section 7.5.1, “Nonroot Installation of the Metadirectory Server,” on page 59 for the installation instructions.
This procedure covers the GUI installation of the Metadirectory server, Web components, and
utilities for the different platforms that Identity Manager supports. If you want to do a silent
installation of these components, see Section 7.5.2, “Silent Installation of the Metadirectory Server,”
on page 60.
1 Verify that you have met the system requirement list in Chapter 6, “System Requirements,” on
page 43.
2 Ensure that you have downloaded the necessary Identity Manager files from the Novell
Downloads Web site. For more information, see Chapter 5, “Where to Get Identity Manager,” on
page 39.
3 (Linux\UNIX only) To verify that the environment variables for eDirectory are exported before
starting the installation on Linux/UNIX, go to a command prompt and enter:
set | grep PATH
The environment variables set the path for the eDirectory installation. The eDirectory
installation path is listed if the environment variables are set. If the environment variables are
not set, the installation of Identity Manager fails.
To set the environment variables for your current shell:
. /opt/novell/eDirectory/bin/ndspath
You must have the space between the . and the / for the command to work. For more
information, see “Using the nds-install Utility to Install eDirectory Components” (http://
www.novell.com/documentation/edir88/edirin88/index.html?page=/documentation/edir88/
edirin88/data/a79kg0w.html#ai39feq).
4 Start the installation, by using the correct program for your platform.
Linux - GUI Install: IDM4.0.1_Lin/products/IDM/install.bin
On UNIX platforms, the installer is invoked in the GUI mode by default. To invoke
idm_linux.bin in the GUI mode, you must specify [-i gui] option.
Linux - Command Line Install: IDM4.0.1.1_Lin/products/IDM/install.bin -i console
Solaris - GUI Install: IDM4.0.1_Solaris/products/IDM/install.bin
Solaris - Command Line Install: IDM4.0.1_Solaris/products/IDM/install.bin -i
console
To execute the binary files on Linux or Solaris, enter ./install.bin [-i {gui | console}].
Windows: IDM4.0.1_Win:\products\IDM\windows\setup\idm_install.exe
5 Use the following information to complete the installation:
Select Components: Select the Metadirectory server. You can also select Connected Systems,
iManager plug-ins, and utilities from the same installation page.
Novell Identity Manager Metadirectory Server: This option requires the Identity Vault to
be installed on this server and installs a 32-bit or a 64-bit Identity Manager based on the
version of already installed eDirectory. It extends the schema for Identity Manager and
installs the Metadirectory server and the Identity Manager drivers.
58
Identity Manager 4.0.1 Framework Installation Guide
Novell Identity Manager Connected System Server (32-bit): This option does not require
the Identity Vault to be installed on this server. Select this option only if you are installing
the 32-bit Remote Loader. For more information, see Section 7.6, “Installing the Remote
Loader,” on page 61.
Novell Identity Manager Connected System Server (64-bit): This option does not require
the Identity Vault to be installed on this server. Select this option only if you are installing
the 64-bit Remote Loader. For more information, see Section 7.6, “Installing the Remote
Loader,” on page 61.
Novell Identity Manager Connected System Server (.NET): This option (Windows only)
installs the .NET Remote Loader service and the SharePoint driver on this server.
Novell Identity Manager Plug-ins for Identity Manager: Select this option if you have
iManager installed on this server. It installs the iManager plug-ins for Identity Manager.
Utilities: Utilities help you configure the drivers for the connected systems. Not all drivers
have utilities. If you are sure you need this, select it. It does not use much disk space.
Customize the selected components: This option enables you to customize the
components that you have selected to install. Before selecting this option, you should select
the relevant components to install.
6 Activate Identity Manager. For more information, see Chapter 8, “Activating Novell Identity
Manager Products,” on page 73.
7 Specify a user and password that has sufficient rights in eDirectory to extend the schema.
Specify the username in the LDAP format. For example, cn=idmadmin,o=company.
8 Create and configure your driver objects. This information is contained in each driver guide. For
more information, see Identity Manager Drivers documentation (http://www.novell.com/
documentation/idm401drivers/).
9 (Optional) For default installed locations, see /tmp/idmInstall.log.
7.5.1
Non-root Installation of the Metadirectory Server
You can install Identity Manager as a non-root user to enhance the security of your UNIX/Linux
server. You cannot install Identity Manager as a non-root user if eDirectory is installed by root.
The non-root installation does not install the following items:
Remote Loader: Use the Java Remote Loader if you need to install the Remote Loader as a nonroot user. For more information, see Section 7.6.5, “Installing the Java Remote Loader on UNIX
or Linux,” on page 65.
UNIX/Linux Account Driver: Requires root privileges to function.
Novell Sentinel Platform Agent: Install Novell Sentinel Platform Agent by root. Create
Dirxml.properties in the /etc/opt/novell/sentinelpa/conf directory. The location where
the event log file is generated (/var/opt/novell/sentinelpa/data/AuditEvents.log is the
default location) should have the write permission for a non-root user.
Use the following procedure to run the non-root installation of the Metadirectory server:
1 Ensure that you have downloaded the necessary Identity Manager files from the Novell
Downloads Web site. For more information, see Chapter 5, “Where to Get Identity Manager,” on
page 39.
2 Install eDirectory 8.8.6 or later as a non-root user. For more information, see “Non-root User
Installing eDirectory 8.8.6” (http://www.novell.com/documentation/edir88/edirin88/
index.html?page=/documentation/edir88/edirin88/data/a79kg0w.html#bs6a3gs).
3 Log in as the non-root user used to install eDirectory.
Installing Identity Manager
59
You should install Identity Manager as the same user you used to install the non-root version of
eDirectory. The user who installs Identity Manager must have write access to the directories and
files of the non-root eDirectory installation.
4 Execute the installation program for your platform.
Linux: IDM4.0.1_Lin/products/IDM/linux/setup/idm-nonroot-install
Solaris: IDM4.0.1_Solaris/products/IDM/solaris/setup/idm-nonroot-install
5 Use the following information to complete the installation:
Base Directory for the non-root eDirectory Installation: Specify the directory where the nonroot eDirectory installation is. For example, /home/user/install/eDirectory.
Extend eDirectory Schema: If this is the first Identity Manager server installed into this instance
of eDirectory, enter Y to extend the schema. If the schema is not extended, Identity Manager
cannot function.
You are prompted to extend the schema for each instance of eDirectory owned by the non-root
user that is hosted by the non-root eDirectory installation.
If you do select to extend the schema, specify the full distinguished name (DN) of the eDirectory
user who has rights to extend the schema. The user must have the Supervisor right to the entire
tree to extend the schema. For more information about extending the schema as a non-root user,
see the schema.log file that is placed in the data directory for each instance of eDirectory.
Run the /opt/novell/eDirectory/bin/idm-install-schema program to extend the schema
on additional eDirectory instances after the installation is complete.
Utilities: (Optional) If you need an Identity Manager driver utility, you must copy the utilities
from the Identity Manager installation media to the Identity Manager server. All utilities are
found in the IDM4.0.1_platform/product/IDM/platform/setup/utilities directory.
6 Activate Identity Manager. For more information, see Chapter 8, “Activating Novell Identity
Manager Products,” on page 73.
7 Create and configure the driver objects. This information is contained in each driver guide. For
more information, see the Identity Manager Drivers documentation (http://www.novell.com/
documentation/idm401drivers/).
7.5.2
Silent Installation of the Metadirectory Server
In order to run a silent installation of Identity Manager you must create a properties files with the
parameters required to complete the installation. There is a sample file included on the Identity
Manager media:
Linux: IDM4.0.1_Lin/products/IDM/linux/setup/silent.properties
Solaris: IDM4.0.1_Solaris/products/IDM/solaris/setup/silent.properties
Windows: IDM4.0.1_Win:\products\IDM\windows\setup\silent.properties
Start the silent installation by using the correct program for your platform:
Linux: IDM4.0.1_Lin/products/IDM/install.bin -i silent -f <filename>.properties
Solaris: IDM4.0.1_Solaris/products/IDM/install.bin -i silent -f
<filename>.properties
Windows: IDM4.0.1_Win:\products\IDM\windows\setup\idm_install.exe -i silent -f
<filename>.properties
Create a property file <filename>.properties with the following attributes, in the location from
where you run the Identity Manger installer:
60
Identity Manager 4.0.1 Framework Installation Guide
EDIR_USER_NAME=cn=admin,o=test
EDIR_USER_PASSWORD=test
METADIRECTORY_SERVER_SELECTED=true
CONNECTED_SYSTEM_SELECTED=false
X64_CONNECTED_SYSTEM_SELECTED=false
WEB_ADMIN_SELECTED=false
UTILITIES_SELECTED=false
For default installed locations, see /tmp/idmInstall.log.
If you have installed iManager, and you later want to install iManager plug-ins, you must set the
WEB_ADMIN_SELECTED value to true.
If you want to do a silent installation of Identity Manager on multiple instances, you must make sure
that the <filename>.properties file has the following lines:
EDIR_NCP_PORT=524
EDIR_NDS_CONF=/etc/opt/novell/eDirectory/conf
EDIR_IP_ADDRESS=<xxx.xx.xx.xx>
The password is stored in a file for the silent installation of Metadirectory. You can also use the
EDIR_USER_PASSWORD environment variable to supply the password instead of writing it in a file.
If the EDIR_USER_PASSWORD variable is not set in the properties file, the installer reads the value
from the EDIR_USER_PASSWORD environment variable.
7.6
Installing the Remote Loader
The Remote Loader extends the functionality of Identity Manager by allowing the driver to access the
connected system without having the Identity Vault and Metadirectory server installed on the same
server as the connected system. As part of the planning process, you need to decide if you are going
to use the Remote Loader or not. For more information about the planning process, see Chapter 3,
“Technical Guidelines,” on page 23.
Section 7.6.1, “Requirements,” on page 61
Section 7.6.2, “Supported Drivers,” on page 62
Section 7.6.3, “Installation Procedure,” on page 63
Section 7.6.4, “Silent Installation of the Remote Loader,” on page 64
Section 7.6.5, “Installing the Java Remote Loader on UNIX or Linux,” on page 65
Section 7.6.6, “Coexistence of 32-Bit and 64-Bit Remote Loader,” on page 66
If you want to install the Remote Loader through a non-root user, use the Java Remote Loader. The
Java Remote Loader can also be used when you customize your environment and install the Java
Remote Loader on a unsupported platform such as HP-UX. For more information, see Section 7.6.5,
“Installing the Java Remote Loader on UNIX or Linux,” on page 65.
7.6.1
Requirements
The Remote Loader requires that each driver’s connected system is available and the relevant APIs
are provided. Refer to the Identity Manager Driver documentation (http://www.novell.com/
documentation/idm401drivers/) for operating system and connected system requirements that are
specific to each driver.
Installing Identity Manager
61
7.6.2
Supported Drivers
Not all Identity Manager drivers are supported by the Remote Loader. The following is a list the
drivers that have Remote Loader capability.
Active Directory
Avaya PBX
Data Collection Services
Delimited Text
GroupWise (Available only for 32-bit Remote Loader)
JDBC
JMS
LDAP
Linux/UNIX Settings
Lotus Notes
Managed System Gateway
Manual Task Services
PeopleSoft 5.2
Remedy ARS
RACF
SalesForce.com
SAP Business Logic
SAP GRC (CMP only)
SAP HR
SAP Portal
SAP User Management
Sentinel
Scripting
SharePoint
SOAP
Top Secret
WorkOrder
The drivers listed below are not capable of using the Remote Loader.
eDirectory
Entitlements Services
Role Service
User Application
62
Identity Manager 4.0.1 Framework Installation Guide
7.6.3
Installation Procedure
The Remote Loader has different programs for the different platforms, so it can communicate with
the Metadirectory server.
Linux/UNIX: rdxml is an executable that enables the Metadirectory server to communicate with
the Identity Manager drivers running in Solaris or Linux environments.
Windows: The Remote Loader Console uses rlconsole.exe to interface with
dirxml_remote.exe, which is an executable that enables the Metadirectory server to
communicate with the Identity Manager drivers running on Windows.
To install the Remote Loader:
1 Verify you have met the system requirements listed in Chapter 6, “System Requirements,” on
page 43.
2 Ensure that you have downloaded the necessary Identity Manager files from the Novell
Downloads Web site. For more information, see Chapter 5, “Where to Get Identity Manager,” on
page 39.
3 Start the installation, using the correct program for your platform.
Linux - GUI Install: IDM4.0.1_Lin/products/IDM/install.bin
Linux - Command Line Install: IDM4.0.1_Lin/products/IDM/install.bin -i console
Solaris - GUI Install: IDM4.0.1_Solaris/products/IDM/install.bin
Solaris - Command Line Install: IDM4.0.1_Solaris/products/IDM/install.bin -i
console
Windows: IDM4.0.1_Win:\products\IDM\windows\setup\idm_install.exe
To execute the binary files on Linux or Solaris, enter ./install.bin [-i {gui | console}].
4 Use the following information provided to complete the installation:
Select Components: Select the connected system server and utilities to install the Remote
Loader.
Novell Identity Manager Metadirectory Server: Select this option only if you are installing
the Metadirectory server. This option requires the Identity Vault to be installed on this
server. For more information, see Section 7.5, “Installing the Metadirectory Server,” on
page 58.
Novell Identity Manager Connected System Server 32-bit: This option does not require
the Identity Vault to be installed on this server. It installs the 32-bit version of the Remote
Loader Service on your application server.
Novell Identity Manager Connected System Server 64-bit: This option does not require
the Identity Vault to be installed on this server. It installs the 64-bit version of the Remote
Loader Service on your application server.
Novell Identity Manager Connected System Server (.NET): This option (Windows only)
installs the .NET Remote Loader service and the SharePoint driver on this server.
Novell Identity Manager Plug-ins for Identity Manager: Select this option if you have
iManager installed on this server. It installs the iManager plug-ins for Identity Manager.
Custom: Select this option if you want to customize the features that are installed. It allows
you to select the options listed below. Before you select this option, you should select the
components to install:
Remote Loader Service 32-bit: The service that communicates with the Metadirectory
server.
Installing Identity Manager
63
Remote Loader Service 64-bit: The service that communicates with the Metadirectory
server.
Drivers: Select which driver files to install. You should install all of the driver files. If
you need to add another Remote Loader instance, you do not need to run the
installation again.
Novell Identity Manager Connected System Server (.NET): (Windows Only) Installs
the .NET Remote Loader service and the SharePoint driver.
Other options must be selected when you select the customize for the installation to
proceed.
(Windows Only) Install Location for Connected System Server: Specify the directory where
the Connected System Server is installed.
(Windows Only) Install Location for .NET Remote Loader: Specify the directory where the
.NET Remote Loader is installed.
(Windows Only) Install Location for Utilities: Specify the directory where the utilities are
installed.
5 Create and configure your driver objects to use the Remote Loader. This information is
contained in each driver guide. For more information, see the Identity Manager Drivers
documentation (http://www.novell.com/documentation/idm401drivers/).
6 Create a Remote Loader configuration file to work with your connected system. For more
information, see “Configuring the Remote Loader for Linux/UNIX by Creating a Configuration
File” in the Identity Manager 4.0.1 Remote Loader Guide.
7.6.4
Silent Installation of the Remote Loader
In order to run a silent installation of the Remote Loader you must create a properties file with the
parameters required to complete the installation. There is a sample file included on the Identity
Manager media:
Linux: IDM4.0.1_Lin/products/IDM/linux/setup/silent.properties
Solaris: IDM4.0.1_Solaris/products/IDM/solaris/setup/silent.properties
Windows: IDM4.0.1_Win:\products\IDM\windows\setup\silent.properties
Start the silent installation by using the correct program for your platform:
Linux: IDM4.0.1_Lin/products/IDM/install.bin -i silent -f <filename>.properties
Solaris: IDM4.0.1_Solaris/products/IDM/install.bin -i silent -f
<filename>.properties
Windows: IDM4.0.1_Win:\products\IDM\windows\setup\idm_install.exe -i silent -f
<filename>.properties
Create a property file <filename>.properties with the following attributes, in the location from
where you run the Identity Manger installer:
METADIRECTORY_SERVER_SELECTED=false
CONNECTED_SYSTEM_SELECTED=true
X64_CONNECTED_SYSTEM_SELECTED=true
WEB_ADMIN_SELECTED=false
UTILITIES_SELECTED=false
For default installed locations, see /tmp/idmInstall.log.
64
Identity Manager 4.0.1 Framework Installation Guide
If you have installed iManager, and you later want to install iManager plug-ins, you must set the
WEB_ADMIN_SELECTED value to true.
7.6.5
Installing the Java Remote Loader on UNIX or Linux
dirxml_jremote is a pure Java Remote Loader. It is used to exchange data between the
Metadirectory server running on one server and the Identity Manager drivers running in another
location, where rdxml doesn’t run. It should be able to run on any system with a compatible JRE
(1.5.0 minimum) and Java Sockets. It is supported on the Linux/UNIX platforms the Identity Manager
supports.
1 Verify that the Java 1.5.x JDK/JRE is available on the host system.
IMPORTANT: For updating your JRE, you must note that JRE 1.6 versions upto update 23 ship
with CVE-2010-4476 security vulnerability (http://www.oracle.com/technetwork/topics/security/
alert-cve-2010-4476-305811.html). This security vulnerability has been addressed in JRE 1.6.0-24
version. You must use the FPUpdater tool that Sun has recently released to update your JRE to
JRE 1.6.0-24 version. The instructions for installing the latest JRE versions are available at the JRE
Patch Download Site (http://www.oracle.com/technetwork/java/javase/fpupdater-tool-readme305936.html).
2 Ensure that you have downloaded the necessary Identity Manager files from the Novell
Downloads Web site. For more information, see Chapter 5, “Where to Get Identity Manager,” on
page 39.
3 Locate the Java Remote Loader installation files on the Identity Manager media:
Linux: IDM4.0.1_Lin/products/IDM/java_remoteloader
Solaris: IDM4.0.1_Solaris/products/IDM/java_remoteloader
4 Copy the dirxml_jremote_dev.tar.gz file to the desired location on the remote server.
5 Copy the dirxml_jremote.tar.gz or the dirxml_jremote_mvs.tar file to the desired location
on the remote server.
For example: /usr/idm
For information on mvs, untar the dirxml_jremote_mvs.tar file, then refer to the usage.html
document.
6 Unzip and extract the dirxml_jremote.tar.gz file and the dirxml_jremote_dev.tar.gz file.
For example: gunzip dirxml_jremote.tar.gz or tar -xvf dirxml_jremote_dev.tar
7 Copy the application shim .jar files to the lib subdirectory that was created when the
dirxml_jremote.tar file was extracted.
Because the tar file doesn’t contain the .jar files, you must manually copy these .jar files from
the Metadirectory server into the lib directory. The lib directory is under the directory where
the untarring occurred.
The default installation directory for .jar files on the Metadirectory server is /opt/novell/
eDirectory/lib/dirxml/classes.
Installing Identity Manager
65
8 Customize the dirxml_jremote script by doing either of the following:
Verify that the Java executable is reachable through the PATH environment variable by
setting the environment variable RDXML_PATH. Enter the following commands to set the
environment variable:
1. set RDXML_PATH=path
2. export RDXML_PATH
Edit the dirxml_jremote script and prepend the path to the Java executable on the script
line that executes Java.
9 Configure the sample config8000.txt file from the /opt/novell/dirxml/doc location for use
with your application shim. For more information, see “Configuring the Remote Loader for
Linux/UNIX by Creating a Configuration File” in the Identity Manager 4.0.1 Remote Loader Guide.
7.6.6
Coexistence of 32-Bit and 64-Bit Remote Loader
Identity Manager 4.0.1 allows coexistence of 32-bit and 64-bit Remote Loader on a 64-bit operating
system. If you are upgrading a 32-bit Remote Loader installed on a 64-bit operating system, it
upgrades 32-bit Remote Loader and also installs 64-bit Remote Loader. You can have both 32-bit
Remote Loader and 64-bit Remote Loader on the same machine.
If you choose to have both a 32-bit and a 64-bit Remote Loader on the same machine, the audit events
are generated only with the 64-bit Remote Loader. If a 64-bit Remote Loader is installed before
installing a 32-bit Remote Loader, the events are logged to the 32-bit lcache.
7.7
Installing the Driver Files
You can install the driver files without installing the Metadirectory server or the Remote Loader. The
driver files consists of driver shims and the driver utilities.
To install the driver files:
1 Ensure that you have downloaded the necessary Identity Manager files from the Novell
Downloads Web site. For more information, see Chapter 5, “Where to Get Identity Manager,” on
page 39.
2 Start the installation, by using the correct program for your platform.
Linux - GUI Install: IDM4.0.1_Lin/products/IDM/install.bin [-i gui]
Linux - Command Line Install: IDM4.0.1_Lin/products/IDM/install.bin -i console
Solaris - GUI Install: IDM4.0.1_Solaris/products/IDM/install.bin [-i gui]
Solaris - Command Line Install: IDM4.0.1_Solaris/products/IDM/install.bin -i
console
To execute the binary files on Linux or Solaris, enter ./install.bin [-i {gui | console}].
Windows: IDM4.0.1_Win:\products\IDM\windows\setup\idm_install.exe
3 Read and accept the license agreement, then click Next.
4 On the Select Components page, select the following options:
Novell Identity Manager Metadirectory Server: You can select this option or select the
Connected System Server option. You don’t need to select both options.
The driver files are included with this option.
Novell Identity Manager Connected System Server: You can select this option or select the
Metadirectory Server option. You don’t need to select both options.
66
Identity Manager 4.0.1 Framework Installation Guide
The driver files are included with this option.
Novell Utilities Select this option to install utilities to help configure some drivers.
Customize the selected components: Allows you to select just the driver files without installing
the Metadirectory server or the Remote Loader.
5 Click Next.
6 Unselect the Metadirectory Engine option and the Remote Loader Service option if they have been
selected in Step 4 on page 66.
7 Verify that the Drivers option is selected under the Metadirectory Server option or the Connected
System Server option.
You can expand the Drivers option and select only the drivers you want to install. By default all
drivers are selected.
8 Click Next.
9 On the Authentication page, specify a user and password that has sufficient rights in eDirectory
to extend the schema. Specify the username in the LDAP format. For example,
cn=idmadmin,o=company.
10 Click Next.
11 Review the installation summary, the click Install.
12 Review the installation complete message, then click Done.
The files for the drivers are now installed with the Remote Loader or the Metadirectory server.
7.8
Installing the Roles Based Provisioning Module
To install the Roles Based Provisioning Module, see the Identity Manager Roles Based Provisioning
Module 4.0.1 User Application: Installation Guide.
7.9
Installing a Custom Driver
You can create a custom driver to use in your environment. For more information on creating a
custom driver or installing one, see the Novell Developer Kit (http://developer.novell.com/wiki/
index.php/Dirxml).
7.10
Installing the Role Mapping Administrator
The Role Mapping Administrator is a Web service that discovers authorizations and permissions that
can be granted within your major IT systems.
NOTE: The Role Mapping Administrator is not available with Standard Edition.
To install the Role Mapping Administrator:
1 Ensure that you have downloaded the necessary Identity Manager files from the Novell
Downloads Web site. For more information, see Chapter 5, “Where to Get Identity Manager,” on
page 39.
2 Locate the Role Mapping Administrator installation file on the Identity Manager media located
here:
Linux: IDM4.0.1_Lin/products/RMA/IDMRMAP.jar
Installing Identity Manager
67
Windows: IDM4.0.1_Win:\products\RMA\IDMRMAP.jar
3 From a command line, access the Role Mapping Administrator installation directory, then enter
java -jar IDMRMAP.jar.
NOTE: For security reasons, you should install the Role Mapping Administrator as a non-root
user on Linux platforms.
4 Enter Yes to accept the license agreement.
5 Specify the installation directory for the Role Mapping Administrator. The default path is your
current location.
6 Specify the portion of the URL representing the Role Impinging Administrator name. The
default value is IDMRMAP.
7 Specify the HTTP port. The default value is 8081.
8 Specify a password for the configuration administrator.
The Role Mapping Administrator is now installed. The application is not automatically started after
the installation finishes. Use the following scripts from the installation directory to stop and start the
application.
Linux: The start script is start.sh and the stop script is stop.sh.
Windows: The start script is start.bat and the stop script is stop.bat.
After the Role Mapping Administrator is installed and started, you must configure it. See
“Configuring the Application” in the Identity Manager Role Mapping Administrator 4.0.1 Installation and
Configuration Guide for configuration information.
7.11
Installing the Identity Reporting Module or Sentinel
The Identity Reporting Module and Sentinel are optional addition to the Identity Manager solution.
By adding auditing and reporting, you can meet compliance standards that many companies must
abide by. You can create audit trails for any events you need to track, then generate reports to ensure
that you meet any audit standards for your company.
For installation and configuration information of the Identity Reporting Module, see the Identity
Reporting Module Guide. For configuration information of Sentinel with Identity Manager, see the
Identity Manager 4.0.1 Reporting Guide for Novell Sentinel. For system requirement information for
Sentinel, see the Novell Sentinel Installation Guide (http://www.novell.com/documentation/sentinel6/
index.html).
7.12
Installing the Identity Manager 4.0.1 Patch
The Identity Manager 4.0.1 patch file contains updates for the Metadirectory server and the Remote
Loader.
The Identity Manager 4.0.1 patch can be installed in GUI and silent modes only. Console mode is not
supported.
Section 7.12.1, “Prerequisites,” on page 69
Section 7.12.2, “GUI Installation,” on page 69
Section 7.12.3, “Silent Installation,” on page 70
68
Identity Manager 4.0.1 Framework Installation Guide
7.12.1
Prerequisites
Stop eDirectory.
If eDirectory is not stopped, the patch installer tries to stop it.
Stop Remote Loader services.
If the Remote Loader is in use, the patch installer cannot replace it.
(Conditional) Set the Java path for a non-root installation.
Edit the JAVA_NONROOT variable in the install.sh file or export the Java 1.6 path.
7.12.2
GUI Installation
Run the following steps for both root and non-root installation.
1 Download the Identity Manager 4.0.1 patch file from Novell (http://support.novell.com/
patches.html) and unzip the file.
2 Change to the cd-image directory where you unzipped the files. Depending on your platform,
run one of the following commands:
Linux/Solaris: Execute the ./install.sh command in a terminal window.
Windows: Launch the install.bat file.
3 (Conditional) If eDirectory is running, the patch installer stops it. Click OK to continue the
installation.
or
If the patch installer fails to stop eDirectory, a warning message is displayed. You can manually
stop eDirectory and click OK to continue or click Cancel to stop the installation.
4 From the patch installer page that displays on the screen, select the desired components for
installation or upgrade, then click Install.
5 (Conditional) If you are doing a non-root installation, click Browse and specify the path of
eDirectory installation, then click Install.
For a non-root installation, only Metadirectory server patch is available.
6 (Conditional) A warning message is displayed if you selected Remote Loader in Step 4. Stop the
Remote Loader service, then click OK.
or
If the Remote Loader service is already stopped, click OK.
For Remote Loader, the Browse button is enabled if the patch installer is not able to detect a 32-bit
or 64-bit Remote Loader installed on your system. Use the Browse button to specify the path of
eDirectory installation.
By default, the Browse button is available for the Metadirectory server on Linux. It is not
available on Windows.
7 Review the installation status of the selected components in an output screen, then click Done.
8 (Conditional) Verify that the patch has been successfully applied for the Identity Manager
components that you selected in Step 4.
Linux/Solaris: Do the following:
Check the Metadirectory server trace to verify that your Identity Manager version is
updated. The trace window shows the following output:
<product version="4.0.1.x">DirXML</product>
Installing Identity Manager
69
where x is the version of the Identity Manager patch.
On Linux, run the rpm -qa | grep nov | grep 4.0.1 command to verify Identity
Manager RPMs installed on your system. On Solaris, running this command shows
Identity Manager packages installed on your system.
NOTE: In a non-root patch installation/upgrade, the RPM versions are not upgraded.
Windows: Do the following:
Check the modification date for the files updated by the patch installer.
Verify that the patch has been successfully applied for the Remote Loader:
1. Launch the Remote Loader.
2. Go to Properties, right-click rlconsole.exe, then select Properties.
3. Click the Details tab and verify that the value in the file version is 4.0.1.x.
where x is the version of the Identity Manager patch.
7.12.3
Silent Installation
In order to run a silent installation of the Identity Manager 4.0.1 patch, you must modify the
patchUpgradeSilent.Properties sample file from the cd-image directory. Start the silent
installation by using the correct command for your platform:
Linux/Solaris: ./install.sh -i silent -f patchUpgradeSilent.Properties
Windows: install.bat -i silent -f patchUpgradeSilent.Properties
The sample patchUpgradeSilent.Properties property file has the following attributes:
#Silent Properties File IDMPatchInstaller
#eDirectory and RemoteLoader services should be stopped before installation
#Set this property to true/false for Engine Upgrade for root and non root install
install_Engine=true
#Set this property to true/false for Remote Loader32 Upgrade
install_RL32=true
#Set this property to true/false for Remote Loader64 Upgrade
install_RL64=true
#Set this property for Engine Upgrade for NON ROOT user
#eg: If the engine location is /home/eDirectoryNonRoot/eDirectory/opt/novell/
eDirectory select till eDirectory(parent directory of /opt)
engine_Location=/home/eDirectoryNonRoot/eDirectory/
#Set this property for Remote Loader 32-Bit Install location
#Only for Windows
RL32_Location=C:\\Novell\\IdentityManager\\RemoteLoader\\32bit
#Set this property for Remote Loader 64-Bit Install location
#Only for Windows
RL64_Location=C:\\Novell\\IdentityManager\\RemoteLoader\\64bit
On Windows, there is no option to specify the Metadirectory server installation path in the silent
property file. The patch installer uses the same installation path that has been specified when Identity
Manager 4.0.1 was installed.
The log files are available at the following locations:
Linux: /tmp/logs/idmPatchInstall.log
Solaris: /var/tmp/logs/idmPatchInstall.log
Windows: \%Temp%\logs
The patch installer backup folder is created in the \%USERPROFILE%\PatchInstallBackup
location. The backup folder is created only for Windows.
70
Identity Manager 4.0.1 Framework Installation Guide
7.13
Language Support for the Identity Manager Installers
Each of the Identity Manager installers support different languages.
Metadirectory Server: French, German, Japanese, Simplified Chinese, and Traditional Chinese.
Integrated Installer: French, German, Japanese, Simplified Chinese, and Traditional Chinese.
Roles Based Provisioning Module: Brazilian Portuguese, Danish, Dutch, French, German,
Italian, German, Japanese, Russian, Simplified Chinese, Spanish, Swedish, and Traditional
Chinese.
Identity Reporting Module: Brazilian Portuguese, Danish, Dutch, French, German, Italian,
German, Japanese, Russian, Simplified Chinese, Spanish, Swedish, and Traditional Chinese.
Designer: Brazilian Portuguese, Dutch, French, German, Italian, Japanese, Simplified Chinese,
Spanish, and Traditional Chinese.
NOTE: On Linux, install the gettext utilities. The GNU gettext utilities provide a framework for
internationalized and multilingual messages.
Analyzer: English.
Role Mapping Administrator: English.
The following conditions apply when an Identity Manager installer is launched:
If the operating system is in a language supported by the Identity Manager installer, the
language picker for the Identity Manager installer defaults to that language.
If the operating system is in a language not supported by the Identity Manager installer, the
language picker for the Identity Manager installer defaults to English.
If the operating system is a Latin type language, all of the other Latin type languages will be
available from the language picker.
If the operating system is Asian or Russian, only the language of the operating system and
English will be available in the language picker.
The Identity Manager installers detect the locale of a system and decide which language to support.
To install a new language on your system, change the locale on Windows through the Regional
Settings option. On Linux/Solaris, set the LANG variable in the profile or through the command line.
Identity Manager supports the following Latin type languages:
Danish
Dutch
English
French
German
Italian
Portuguese (Brazilian)
Spanish
Swedish
Other languages supported by Identity Manager are:
Asian languages: Japanese, Simplified Chinese, and Traditional Chinese.
Cyrillic languages: Russian.
Installing Identity Manager
71
7.13.1
Non-Installer Language Considerations
Although Designer is localised in nine languages, the Identity Manager drivers are localized only in
five languages. If the driver language is not supported, the driver configuration defaults to English.
All of the Identity Manager iManager plug-ins are translated into five languages. Four iManager
plug-ins are translated into Spanish, Russian, Italian, and Portuguese. On localized systems, the
localized plug-ins are translated, and all other plug-ins are in English. On Danish, Dutch, and
Swedish systems, all plug-ins are in English.
72
Identity Manager 4.0.1 Framework Installation Guide
8
Activating Novell Identity Manager
Products
8
The following information explains how activation works for products based on Novell Identity
Manager. Identity Manager, Integration Modules, and the Provisioning Module must be activated
within 90 days of installation, or they will shut down. At any time during the 90 days, or afterward,
you can choose to activate Identity Manager products.
You can activate Identity Manager and the drivers by completing the following tasks:
Section 8.1, “Purchasing an Identity Manager Product License,” on page 73
Section 8.2, “Installing a Product Activation Credential,” on page 73
Section 8.3, “Viewing Product Activations for Identity Manager and for Drivers,” on page 74
Section 8.4, “Activating Identity Manager Drivers,” on page 75
Section 8.5, “Activating Analyzer,” on page 75
Section 8.6, “Activating Designer and the Role Mapping Administrator,” on page 75
8.1
Purchasing an Identity Manager Product License
To purchase an Identity Manager product license, so that you can activate the product, see the Novell
Identity Manager How to Buy Web page (http://www.novell.com/products/identitymanager/
howtobuy.html)
After you purchase a product license, Novell sends you a Customer ID via e-mail. The e-mail also
contains a URL to the Novell site where you can obtain a Product Activation credential. If you do not
remember or do not receive your Customer ID, call the Novell Activation Center at 1-800-418-8373 in
the U.S. In all other locations, call 1-801-861-8373 (You will be charged for calls made using the 801
area code.). You can also chat with us online (http://support.novell.com/chat/activation).
8.2
Installing a Product Activation Credential
You should install the Product Activation Credential via iManager.
1 After you purchase a license, Novell sends you an e-mail with your Customer ID. The e-mail
also contains a link under the Order Detail section to the site where you can obtain your
credential. Click the link to go to the site.
2 Click the license download link and do one of the following:
Save the Product Activation Credential file.
or
Open the Product Activation Credential file, then copy the contents of the Product
Activation Credential to your clipboard.
Activating Novell Identity Manager Products
73
Carefully copy the contents, and make sure that no extra lines or spaces are included. You
should begin copying from the first dash (-) of the credential (----BEGIN PRODUCT
ACTIVATION CREDENTIAL) through the last dash (-) of the credential (END PRODUCT
ACTIVATION CREDENTIAL-----).
WARNING: If Standard Edition activation is applied to an existing non-activated
Advanced Edition system, it stops the Identity Manager Metadirectory server and drivers.
3 Open iManager.
4 Select Identity Manager > Identity Manager Overview.
5 Click
to browse for and select a driver set in the tree structure.
6 On the Identity Manager Overview page, click the driver set that contains the driver to activate.
7 On the Driver Set Overview page, click Activation > Installation.
8 Select the driver set where you want to activate an Identity Manager component, then click Next.
9 Do one of the following:
Specify where you saved the Identity Manager Activation Credential, then click Next.
or
Paste the contents of the Identity Manager Activation Credential into the text area, then
click Next.
10 Click Finish.
NOTE: You need to activate each driver set that has a driver you want to use. You can activate any
tree with the credential.
8.3
Viewing Product Activations for Identity Manager and for
Drivers
For each of your driver sets, you can view the Product Activation Credentials you have installed for
the Metadirectory server and Identity Manager drivers:
1 Open iManager.
2 Click Identity Manager > Identity Manager Overview.
3 Click
to browse for and select a driver set in the tree structure, then click
to perform the
search.
4 On the Identity Manager Overview page, click the driver set you want to view the activation
information for.
5 On the Driver Set Overview page, click Activation > Information.
You can view the text of the activation credential or, if an error is reported, you can remove an
activation credential.
NOTE: After installing a valid Product Activation Credential for a driver set, you might still see
“Activation Required” next to the driver name. If this is the case, restart the driver and the message
should then disappear.
74
Identity Manager 4.0.1 Framework Installation Guide
8.4
Activating Identity Manager Drivers
Your Identity Manager purchase includes activations for service drivers and several common drivers.
Service Drivers: The following service drivers are activated when you activate the
Metadirectory server:
Data Collection Service
Entitlements Services
ID Provider
Loopback Service
Managed System Gateway
Manual Task Service
Null Service
Roles Service
User Application
WorkOrder
Common Drivers: The following common drivers are activated when you activate the
Metadirectory server:
Active Directory
ADAM
eDirectory
GroupWise
LDAP
Lotus Notes
Activations for all other Identity Manager drivers must be purchased separately. The activations for
the drivers are sold as Identity Manager Integration modules. An Identity Manager Integration
module can contain one or more drivers. You receive a Product Activation Credential for each
Identity Manager Integration module that you purchase.
You must perform the steps in Section 8.2, “Installing a Product Activation Credential,” on page 73
for each Identity Manager Integration module to activate the drivers.
8.5
Activating Analyzer
The first time you launch Analyzer, you are prompted for an activation. If you do not enter the
activation, you cannot use Analyzer. For more information, see “Activating Analyzer” in the Analyzer
4.0.1 for Identity Manager Administration Guide.
8.6
Activating Designer and the Role Mapping Administrator
Designer and the Role Mapping Administrator don’t require additional activations beyond activating
the Metadirectory server or drivers.
Activating Novell Identity Manager Products
75
76
Identity Manager 4.0.1 Framework Installation Guide
9
Troubleshooting Identity Manager
9
Keep in mind the following information when you install Identity Manager:
“Lotus Notes driver issue while installing Identity Manager” on page 77
“The Identity Manager installation might sporadically fail on Windows 2008 SP2 32-bit
platform” on page 77
“Issues with invoking installer in the GUI mode” on page 80
“When two events occur on the syntax stream attribute, the first attribute change is lost” on
page 80
“lcache issue during Identity Manager upgrade” on page 81
“Upgrading Identity Manager requires the correct Administrator account to avoid losing
Challenge Response answers” on page 81
Lotus Notes driver issue while installing Identity Manager
Source: On Solaris 10, while installing Identity Manager 4.0.1 as non-root, you might
encounter the following error message for Lotus Notes driver:
ln: cannot create /usr/lib/locale/ja/wnn//ndsrep: File exists
ln: cannot create
cp: cannot create /usr/lib/locale/ja/wnn//libnotesdrvjni.so.1.0.0:
Permission
denied
ln: cannot create /usr/lib/locale/ja/wnn//libnotesdrvjni.so.1:
File exists
ln: cannot create /usr/lib/locale/ja/wnn//libnotesdrvjni.so: File
exists
Action: Manually create the symbolic links. For information on checking and re-creating
symbolic links, see “Troubleshooting Installation Problems” in the Identity
Manager 4.0.1 Driver for Lotus Notes Implementation Guide.
The Identity Manager installation might sporadically fail on Windows 2008 SP2
32-bit platform
Source: The framework installer displays the following error:
Java Platform SE binary has stopped working.
Action: To work around this issue:
1 Run the Identity Manager installer with the -DCLUSTER_INSTALL="true"
option. This installs only the Identity Manager files and not the eDirectory
schema and other files.
<install_drive>:\windows\setup\idm_install.exe DCLUSTER_INSTALL="true"
Troubleshooting Identity Manager
77
2 Extend Identity Manager schema through iManager by using the Import
Convert Export Wizard under eDirectory Maintenance.
3 Create the default objects by using the LDIF file.
Default password policy LDIF file
dn: cn=Password Policies,cn=Security
objectClass: nspmPasswordPolicyContainer
objectClass: Top
cn: Password Policies
ACL: 1#subtree#[Public]#[Entry Rights]
ACL: 3#subtree#[Public]#[All Attributes Rights]
dn: cn=Sample Challenge Set,cn=Password
Policies,cn=Security
objectClass: nsimChallengeSet
objectClass: Top
cn: Sample Challenge Set
dn: cn=Sample Password Policy,cn=Password
Policies,cn=Security
objectClass: nspmPasswordPolicy
objectClass: Top
cn: Sample Password Policy
Default notification collection policy LDIF file
dn: cn=Default Notification Collection,cn=Security
objectClass: notfTemplateCollection
objectClass: Top
cn: Default Notification Collection
ACL: 1#subtree#[Public]#[Entry Rights]
ACL: 3#subtree#[Public]#[All Attributes Rights]
dn: cn=Password Expiration Notification,cn=Default
Notification Collection,cn=Security
notfMergeTemplateSubject: Password Expiration Notification
notfMergeTemplateData::
PGh0bWwgeG1sbnM6Zm9ybT0iaHR0cDovL3d3dy5ub3ZlbGwuY29tL2Rpc
nhtbC93b3JrZmxvdy9mb3JtIj4gDQo8Zm9ybTp0b2tlbi1kZXNjcmlwdG
lvbnM+IA0KPGZvcm06dG9rZW4tZGVzY3JpcHRpb24gZGVzY3JpcHRpb24
9IkZ1bGwgbmFtZSBieSB3aGljaCB0byBhZGRyZXNzIHVzZXIiIGl0ZW0t
bmFtZT0iVXNlckZ1bGxOYW1lIi8+IA0KPGZvcm06dG9rZW4tZGVzY3Jpc
HRpb24gZGVzY3JpcHRpb249Ik51bWJlciBvZiBkYXlzIHVudGlsIHBhc3
N3b3JkIGV4cGlyZXMiIGl0ZW0tbmFtZT0iRXhwRGF5cyIvPiANCjwvZm9
ybTp0b2tlbi1kZXNjcmlwdGlvbnM+IA0KPGhlYWQ+IA0KPHRpdGxlPlBh
c3N3b3JkIEV4cGlyYXRpb24gTm90aWZpY2F0aW9uPC90aXRsZT4gDQo8c
3R5bGU+IA0KPCEtLSBib2R5IHsgZm9udC1mYW1pbHk6IFRyZWJ1Y2hldC
BNUyB9IC0tPiANCjwvc3R5bGU+IA0KPC9oZWFkPiANCjxib2R5IEJHQ09
MT1I9IiNGRkZGRkYiPiANCjxwPkRlYXIgJFVzZXJGdWxsTmFtZSQsPC9w
PiANCjxwPlRoaXMgbWVzc2FnZSBpcyB0byBpbmZvcm0geW91IHRoYXQge
W91ciBwYXNzd29yZCB3aWxsIGV4cGlyZSBpbjwvcD4gDQo8YnIvPiANCi
AgJEV4cERheXMkIGRheXM8YnIvPiANCjxici8+IA0KPHA+UGxlYXNlIHB
sYW4gdG8gY2hhbmdlIHlvdXIgcGFzc3dvcmQgYmVmb3JlIGl0IGV4cGly
ZXMuPC9wPiANCjxwPiAtIEF1dG9tYXRlZCBTZWN1cml0eSAtIDwvcD4gD
Qo8cD4gDQo8aW1nIEFMVD0iUG93ZXJlZCBieSBOb3ZlbGwiIFNSQz0iY2
lkOnBvd2VyZWRfYnlfbm92ZWxsLmdpZiIgaGVpZ2h0PSIyOSIgd2lkdGg
9IjgwIi8+IA0KPC9wPiANCjwvYm9keT4gDQo8L2h0bWw+IA0K
objectClass: notfMergeTemplate
objectClass: Top
cn: Password Expiration Notification
dn: cn=Password Reset Fail,cn=Default Notification
Collection,cn=Security
notfMergeTemplateSubject: Notice of Password Reset Failure
notfMergeTemplateData::
PGh0bWwgeG1sbnM6Zm9ybT0iaHR0cDovL3d3dy5ub3ZlbGwuY29tL2Rpc
nhtbC93b3JrZmxvdy9mb3JtIj4NCiAgPGZvcm06dG9rZW4tZGVzY3JpcH
Rpb25zPg0KICAgIDxmb3JtOnRva2VuLWRlc2NyaXB0aW9uIGl0ZW0tbmF
78
Identity Manager 4.0.1 Framework Installation Guide
tZT0iVXNlckZ1bGxOYW1lIiBkZXNjcmlwdGlvbj0iVGhlIHVzZXIncyBm
dWxsIG5hbWUiLz4NCiAgICA8Zm9ybTp0b2tlbi1kZXNjcmlwdGlvbiBpd
GVtLW5hbWU9IlVzZXJHaXZlbk5hbWUiIGRlc2NyaXB0aW9uPSJUaGUgdX
NlcidzIGdpdmVuIG5hbWdDT0xPUj0iI0ZGRkZGRiI+DQogIDxwPkRlYXI
gJFVzZXJGdWxsTmFtZSQsPC9wPg0KICA8cD5UaGlzIGlzIGEgbm90aWNl
IHRoYXQgeW91ciBwYXNzd29yZCBjb3VsZCBub3QgYmUgcmVzZXQgaW4gd
GhlICRDb25uZWN0ZWRTeXN0ZW1OYW1lJCBzeXN0ZW0uLiAgVGhlIHJlYX
NvbiBmb3IgZmFpbHVyZSBpcyBpbmRpY2F0ZWQgYmVsb3c6PC9wPg0KICA
8cD5SZWFzb246ICRGYWlsdXJlUmVhc29uJDwvcD4NCiAgPHA+SWYgeW91
IGhhdmUgYW55IGZ1cnRoZXIgcXVlc3Rpb25zLA0KICAgICBwbGVhc2UgY
29udGFjdCB0aGUgaGVscCBkZXNrIGF0ICgwMTIpIDM0NS02Nzg5IG9yIG
VtYWlsDQogICAgIGF0IDxhIGhyZWY9Im1haWx0bzpoZWxwLmRlc2tAbXl
jb21wYW55LmNvbSI+DQogICAgIGhlbHAuZGVza0BteWNvbXBhbnkuY29t
IDwvYT48L3A+DQogIDxwPiAtIEF1dG9tYXRlZCBTZWN1cml0eTwvcD4NC
iAgPHA+PGltZyBTUkM9ImNpZDpwb3dlcmVkX2J5X25vdmVsbC5naWYiIE
FMVD0iUG93ZXJlZCBieSBOb3ZlbGwiIHdpZHRoPSI4MCIgaGVpZ2h0PSI
yOSIvPjwvcD4NCjwvYm9keT4NCjwvaHRtbD4NCg==
objectClass: notfMergeTemplate
objectClass: Top
cn: Password Reset Fail
dn: cn=Password Set Fail,cn=Default Notification
Collection,cn=Security
notfMergeTemplateSubject: Notice of Password Set Failure
notfMergeTemplateData::
PGh0bWwgeG1sbnM6Zm9ybT0iaHR0cDovL3d3dy5ub3ZlbGwuY29tL2Rpc
nhtbC93b3JrZmxvdy9mb3JtIj4NCiAgPGZvcm06dG9rZW4tZGVzY3JpcH
Rpb25zPg0KICAgIDxmb3JtOnRva2VuLWRlc2NyaXB0aW9uIGl0ZW0tbmF
tZT0iVXNlckZ1bGxOYW1lIiBkZXNjcmlwdGlvbj0iVGhlIHVzZXIncyBm
dWxsIG5hbWUiLz4NCiAgICA8Zm9ybTp0b2tlbi1kZXNjcmlwdGlvbiBpd
GVtLW5hbWU9IlVzZXJHaXZlbk5hbWUiIGRlc2NyaXB0aW9uPSJUaGUgdX
NlcidzIGdpdmVuIG5hbWUiLz4NCiAgICA8Zm9ybTp0b2tlbi1kZXNjcml
wdGlvbiBpdGVtLW5hbWU9IlVzZXJMYXN0TmFtZSIgZGVzY3JpcHRpb249
IlRoZSB1c2VyJ3MgbGFzdCBuYW1lIi8+DQogICAgPGZvcm06dG9rZW4tZ
GVzY3JpcHRpb24gaXRlbS1uYW1lPSJDb25uZWN0ZWRTeXN0ZW1OYW1lIi
BkZXNjcmlwdGlvbj0iVGhlIGV4dGVybmFsIGFwcGxpY2F0b24gbmFtZSI
vPg0KICAgIDxmb3JtOnRva2VuLWRlc2NyaXB0aW9uIGl0ZW0tbmFtZT0i
RmFpbHVyZVJlYXNvbiIgZGVzY3JpcHRpb249IlRoZSBmYWlsdXJlIHJlY
XNvbiIvPg0KICA8L2Zvcm06dG9rZW4tZGVzY3JpcHRpb25zPg0KPGhlYW
Q+DQogIDx0aXRsZT5Ob3RpY2Ugb2YgUGFzc3dvcmQgU2V0IEZhaWx1cmU
8L3RpdGxlPg0KICA8c3R5bGU+IDwhLS0gYm9keSB7IGZvbnQtZmFtaWx5
OiBUcmVidWNoZXQgTVMgfSAtLT4gPC9zdHlsZT4NCjwvaGVhZD4NCjxib
2R5IEJHQ09MT1I9IiNGRkZGRkYiPg0KPHA+RGVhciAkVXNlckZ1bGxOYW
1lJCw8L3A+DQogIDxwPlRoaXMgaXMgYSBub3RpY2UgdGhhdCB5b3VyIHB
hc3N3b3JkIGNvdWxkIG5vdCBiZSBzZXQgaW4gdGhlICRDb25uZWN0ZWRT
eXN0ZW1OYW1lJCBzeXN0ZW0uLiAgVGhlIHJlYXNvbiBmb3IgZmFpbHVyZ
SBpcyBpbmRpY2F0ZWQgYmVsb3c6PC9wPg0KICA8cD5SZWFzb246ICRGYW
lsdXJlUmVhc29uJDwvcD4NCiAgPHA+SWYgeW91IGhhdmUgYW55IGZ1cnR
oZXIgcXVlc3Rpb25zLA0KICAgICBwbGVhc2UgY29udGFjdCB0aGUgaGVs
cCBkZXNrIGF0ICgwMTIpIDM0NS02Nzg5IG9yIGVtYWlsDQogICAgIGF0I
DxhIGhyZWY9Im1haWx0bzpoZWxwLmRlc2tAbXljb21wYW55LmNvbSI+DQ
ogICAgIGhlbHAuZGVza0BteWNvbXBhbnkuY29tIDwvYT48L3A+DQogIDx
wPiAtIEF1dG9tYXRlZCBTZWN1cml0eTwvcD4NCiAgPHA+PGltZyBTUkM9
ImNpZDpwb3dlcmVkX2J5X25vdmVsbC5naWYiIEFMVD0iUG93ZXJlZCBie
SBOb3ZlbGwiIHdpZHRoPSI4MCIgaGVpZ2h0PSIyOSIvPjwvcD4NCjwvYm
9keT4NCjwvaHRtbD4NCg==
objectClass: notfMergeTemplate
objectClass: Top
cn: Password Set Fail
dn: cn=Password Sync Fail,cn=Default Notification
Collection,cn=Security
notfMergeTemplateSubject: Notice of Password
Synchronization Failure
notfMergeTemplateData::
PGh0bWwgeG1sbnM6Zm9ybT0iaHR0cDovL3d3dy5ub3ZlbGwuY29tL2Rpc
nhtbC93b3JrZmxvdy9mb3JtIj4NCiAgPGZvcm06dG9rZW4tZGVzY3JpcH
Rpb25zPg0KICAgIDxmb3JtOnRva2VuLWRlc2NyaXB0aW9uIGl0ZW0tbmF
tZT0iVXNlckZ1bGxOYW1lIiBkZXNjcmlwdGlvbj0iVGhlIHVzZXIncyBm
dWxsIG5hbWUiLz4NCiAgICA8Zm9ybTp0b2tlbi1kZXNjcmlwdGlvbiBpd
Troubleshooting Identity Manager
79
GVtLW5hbWU9IlVzZXJHaXZlbk5hbWUiIGRlc2NyaXB0aW9uPSJUaGUgdX
NlcidzIGdpdmVuIG5hbWUiLz4NCiAgICA8Zm9ybTp0b2tlbi1kZXNjcml
wdGlvbiBpdGVtLW5hbWU9IlVzZXJMYXN0TmFtZSIgZGVzY3JpcHRpb249
IlRoZSB1c2VyJ3MgbGFzdCBuYW1lIi8+DQogICAgPGZvcm06dG9rZW4tZ
GVzY3JpcHRpb24gaXRlbS1uYW1lPSJDb25uZWN0ZWRTeXN0ZW1OYW1lIi
BkZXNjcmlwdGlvbj0iVGhlIGV4dGVybmFsIGFwcGxpY2F0b24gbmFtZSI
vPg0KICAgIDxmb3JtOnRva2VuLWRlc2NyaXB0aW9uIGl0ZW0tbmFtZT0i
RmFpbHVyZVJlYXNvbiIgZGVzY3JpcHRpb249IlRoZSBmYWlsdXJlIHJlY
XNvbiIvPg0KICA8L2Zvcm06dG9rZW4tZGVzY3JpcHRpb25zPg0KPGhlYW
Q+DQogIDx0aXRsZT5Ob3RpY2Ugb2YgUGFzc3dvcmQgU3luY2hyb25pemF
0aW9uIEZhaWx1cmU8L3RpdGxlPg0KICA8c3R5bGU+IDwhLS0gYm9keSB7
IGZvbnQtZmFtaWx5OiBUcmVidWNoZXQgTVMgfSAtLT4gPC9zdHlsZT4NC
jwvaGVhZD4NCjxib2R5IEJHQ09MT1I9IiNGRkZGRkYiPg0KICA8cD5EZW
FyICRVc2VyRnVsbE5hbWUkLDwvcD4NCiAgPHA+VGhpcyBpcyBhIG5vdGl
jZSB0aGF0IHlvdXIgcGFzc3dvcmQgZnJvbSB0aGUgJENvbm5lY3RlZFN5
c3RlbU5hbWUkIHdhcyB1bmFibGUgdG8gc3luY2hyb25pemUgdG8gb3RoZ
XIgY29ubmVjdGVkIHN5c3RlbXMuICBUaGUgcmVhc29uIGZvciBmYWlsdX
JlIGlzIGluZGljYXRlZCBiZWxvdzo8L3A+DQogIDxwPlJlYXNvbjogJEZ
haWx1cmVSZWFzb24kPC9wPg0KICA8cD5JZiB5b3UgaGF2ZSBhbnkgZnVy
dGhlciBxdWVzdGlvbnMsIHBsZWFzZSBjb250YWN0IHRoZSBoZWxwIGRlc
2sgYXQgKDAxMikNCiAgICAgMzQ1LTY3ODkgb3IgZW1haWwgYXQgPGEgaH
JlZj0ibWFpbHRvOmhlbHAuZGVza0BteWNvbXBhbnkuY29tIj4NCiAgICA
gaGVscC5kZXNrQG15Y29tcGFueS5jb20gPC9hPjwvcD4NCiAgPHA+IC0g
QXV0b21hdGVkIFNlY3VyaXR5PC9wPg0KICA8cD48aW1nIFNSQz0iY2lkO
nBvd2VyZWRfYnlfbm92ZWxsLmdpZiIgQUxUPSJQb3dlcmVkIGJ5IE5vdm
VsbCIgd2lkdGg9IjgwIiBoZWlnaHQ9IjI5Ii8+PC9wPg0KPC9ib2R5Pg0
KPC9odG1sPg0K
objectClass: notfMergeTemplate
objectClass: Top
cn: Password Sync Fail
4 Install the NMAS methods.
5 After installing the NMAS plug-ins on iManager, goto NMAS > NMAS
Login> Methods > New. Browse to and install the configuration files from the
desired NMAS methods.
NOTE: Ensure that you refer the log file before applying the workaround. For
example, the Role Based Provisioning Module schema is already extended, you
don't need to extend it while installing the Role Based Provisioning Module
driver.
Issues with invoking installer in the GUI mode
Possible Cause: An error message displays when integrated installer is invoked in the GUI mode
if the required RPMs are not present in the system. The integrated installer
automatically switches to the console mode, which is not supported.
Action: Install the required RPMs before invoking the Identity Manager installer.
See Identity Manager 4.0.1 Readme (http://www.novell.com/documentation/
idm401/readme/data/idm401_readme.html#bwnkb9a) for a list of RPMs
required for a successful installation and configuration of Identity Manager.
When two events occur on the syntax stream attribute, the first attribute change
is lost
Source: The Identity Manager 4.0.1 engine does not store the STREAM and
OCTET_STRING attributes in the cache. When an event is synchronized to the
connected system, the engine reads these attributes from the Identity Vault and
80
Identity Manager 4.0.1 Framework Installation Guide
updates the connected system. If these attributes are modified before the engine
reads them from the Identity Vault, the modified value is updated in the
connected system and the intermediate change might be lost.
Action: If the attribute is changed frequently, use an appropriate syntax other than
SYN_STREAM.
For example, if an XML object is stored in the STREAM attribute, use XMLData
syntax instead of SYN_STREAM.
lcache issue during Identity Manager upgrade
Source: After upgrading Identity Manager, the Platform Agent might not log events as
desired. This problem occurs because Platform Agent is not upgraded during
the Identity Manager upgrade on Linux. On Solaris, the Platform Agent is
upgraded to the latest version but the new Platform Agent has different default
ports, which requires restarting lcache.
Action: You must manually stop lcache before starting the upgrade.
Upgrading Identity Manager requires the correct Administrator account to avoid
losing Challenge Response answers
Source: When you upgrade from an earlier version of Identity Manager on the Windows
platform, you should use the same Administrator account that was used to
install eDirectory.
Explanation: For example, if a domain Administrator account was used to install eDirectory,
use the domain Administrator account again when installing Identity Manager.
Do not use a local Administrator account.
Action: If you do not use the same Administrator account, users’ answers for their
Challenge Response questions are no longer accessible. This occurs because the
tree key is re-created during the installation (because of the different
Administrator accounts) and the new tree key does not provide the correct
access to the stored answers. Users are prompted for new Challenge Response
answers when they log in.
Troubleshooting Identity Manager
81
82
Identity Manager 4.0.1 Framework Installation Guide
10
What’s New
10
Identity Manager 4.0.1 includes several new features and enhancements:
Section 10.1, “What’s New in Identity Manager 4.0.1,” on page 83
Section 10.2, “What’s New in Identity Manager 4.0,” on page 84
10.1
What’s New in Identity Manager 4.0.1
Section 10.1.1, “Identity Manager Advanced Edition Versus Standard Edition,” on page 83
Section 10.1.2, “Telemetry,” on page 83
Section 10.1.3, “Resource Request Activity,” on page 83
Section 10.1.4, “New Reports Added to the Identity Reporting Module,” on page 84
Section 10.1.5, “Applications Added to the Designer Palette,” on page 84
10.1.1
Identity Manager Advanced Edition Versus Standard Edition
To meet varying customer requirements, Identity Manager 4.0.1 is shipped in two editions, Advanced
Edition and Standard Edition. The Advanced Edition includes a complete set of features for
enterprise-class user provisioning. The Standard Edition includes a subset of the features available in
the Identity Manager Advanced Edition and continues to provide all the features that were present in
the previous versions of Identity Manager. For a comparison of the Identity Manager features
available in the Advanced and Standard Editions, see the Identity Manager Version Comparison
(https://www.netiq.com/products/identity-manager/advanced/features/version-comparison/).
10.1.2
Telemetry
Identity Manager Telemetry is a new job introduced with Identity Manager 4.0.1. The job functions as
a usage counting tool or a license monitoring tool that provides value to the Identity Manager
customers, because they can add more licenses or retire unused licenses. The customers can also
leverage benefits such as inactive user pricing.
10.1.3
Resource Request Activity
The Resource Request activity allows you to automate the granting or revoking of resources to users.
For example, you might write a provisioning request definition that provisions all of the resources a
new employee needs on his or her first day. Using the resource request activity, you can automate the
approval of that employee for specified resources. For more details on resource request activity, see
”Resource Request Activity” in the User Application: Design Guide.
What’s New
83
10.1.4
New Reports Added to the Identity Reporting Module
The following reports have been added:
User Status Change within the Identity Vault: Displays significant events for the Identity Vault
users.
User Password change within the Identity Vault: Displays all user password changes within
the Identity Vault.
Access Requests by Recipient: Displays resource assignment workflow processes grouped by
recipients.
Access Requests by Requester: Displays resource assignment workflow processes grouped by
requesters.
Access Requests by Resource: Displays resource assignment workflow processes grouped by
resources.
For more information on new reports, see Identity Reporting Module Guide.
10.1.5
Applications Added to the Designer Palette
The following applications have been added to the Designer palette:
Blackboard
Google Apps
RSA
10.2
What’s New in Identity Manager 4.0
Section 10.2.1, “Identity Reporting Module,” on page 84
Section 10.2.2, “New Drivers,” on page 85
Section 10.2.3, “Support for XDAS Auditing Included,” on page 85
Section 10.2.4, “Packages Replace Driver Configuration Files,” on page 85
Section 10.2.5, “Role Mapping Administrator,” on page 85
Section 10.2.6, “Analyzer,” on page 86
Section 10.2.7, “Integrated Installer,” on page 86
10.2.1
Identity Reporting Module
The Identity Reporting Module gives you the ability to generate reports that show information about
various aspects of your Identity Manager configuration, including information collected from one or
more Identity Vaults or managed systems. The reporting module provides a set of predefined report
definitions you can use to generate reports. In addition, it gives you the option to import custom
reports defined in a third-party tool.
The Identity Reporting Module requires two new service drivers:
Data Collection Service Driver
Managed System Gateway Driver
84
Identity Manager 4.0.1 Framework Installation Guide
For details on the reporting module and on the two reporting drivers, see the Identity Reporting
Module Guide. For details on the predefined reports, see Using Identity Manager 4.0.1 Reports.
10.2.2
New Drivers
The following new drivers are included with Identity Manager 4.0.1:
“SharePoint Driver (.NET Remote Loader)” on page 85
“Salesforce.com Driver” on page 85
SharePoint Driver (.NET Remote Loader)
The SharePoint driver for Novell Identity Manager enables user and group membership events to be
synchronized between the Identity Vault and a SharePoint 2007 or SharePoint 2010 site collection. A
single driver can process these events for a single site collection, which maintains user and group
membership information for one or more SharePoint sites. For more information, see the Identity
Manager 4.0.1 Driver for SharePoint Implementation Guide.
Salesforce.com Driver
Identity Manager 4.0.1 offers automatic provisioning and synchronization of users to cloud
applications. The new Salesforce.com driver for Novell Identity Manager can seamlessly provision
and deprovision users to a Salesforce.com cloud application, which ensures that user identity
information is consistent between the Identity Vault and the cloud application. The Salesforce.com
driver also supports secure password synchronization between Identity Vault and Salesforce.com
cloud and supports an authenticated proxy server and configurable user profile for automatic user
provisioning. For more information, see the Identity Manager 4.0.1 Driver for Salesforce.com
Implementation Guide.
10.2.3
Support for XDAS Auditing Included
Identity Manager 4.0.1 supports XDAS-based auditing that augments the auditing capabilities of the
Novell Audit Platform Agent. It is uses common XDAS schema for Identity Manager, NMAS,
eDirectory and the Role Mapping Administrator. The new auditing service also supports the syslog
and file appenders. For more information, see the Identity Reporting Module Guide and the Identity
Manager 4.0.1 Reporting Guide for Novell Sentinel.
10.2.4
Packages Replace Driver Configuration Files
Identity Manager 4.0.1 introduces packages, which contain high-quality building blocks of Identity
Manager policy content. Packages are now used to create drivers instead of using driver
configuration files. For more information, see “Managing Packages” in the Designer 4.0.1 for Identity
Manager 4.0.1 Administration Guide.
10.2.5
Role Mapping Administrator
The Role Mapping Administrator is a new tool that analyzes the authorizations or permissions that
can be grated in your IT systems, and allows you to grant those authorizations or permissions. The
authorizations and permissions can be grated by a business analyst, not just IT staff or consultants.
For more information, see the Novell Identity Manager Role Mapping Administrator 4.0.1 User Guide.
What’s New
85
10.2.6
Analyzer
Analyzer allows you to diagnose, clean, and prepare identity data for management with Identity
Manager. For more information, see the Analyzer 4.0.1 for Identity Manager Administration Guide.
10.2.7
Integrated Installer
Identity Manager 4.0.1 comes with an integrated installer that installs and configures all of the
Identity Manager components through one installer. The installer is used for new installations in
small to medium environments. For more information, see the Identity Manager 4.0.1 Integrated
Installation Guide.
86
Identity Manager 4.0.1 Framework Installation Guide
III
Upgrading Identity Manager
I
For upgrading Identity Manager components, use the individual product installers for upgrading to
Identity Manager 4.0.1. Upgrading from Identity Manager 4.0.1 Standard Edition to Advanced
Edition has a different upgrade procedure, which involves only configuration changes. You do not
need to run the Identity Manager installer for this upgrade. For more information on Identity
Manager upgrade, see the Identity Manager 401 Upgrade and Migration Guide.
Upgrading Identity Manager
87
88
Identity Manager 4.0.1 Framework Installation Guide
11
Upgrade Versus Migration
1
Before beginning, make sure you have reviewed the differences between an upgrade and a
migration. See the Identity Manager 4.0.1 Upgrade and Migration Guide.
Upgrade Versus Migration
89
90
Identity Manager 4.0.1 Framework Installation Guide
IV
Uninstalling Identity Manager
IV
If you need to uninstall any of the Identity Manager, you must uninstall each component.
Chapter 12, “Uninstalling the Identity Manager Components,” on page 93
Uninstalling Identity Manager
91
92
Identity Manager 4.0.1 Framework Installation Guide
12
Uninstalling the Identity Manager
Components
12
Unistall the Identity Manager components in the order listed.
Section 12.1, “Removing Objects from eDirectory,” on page 93
Section 12.2, “Uninstalling the Metadirectory Server,” on page 94
Section 12.3, “Uninstalling the Remote Loader,” on page 94
Section 12.4, “Uninstalling the Roles Based Provisioning Module,” on page 95
Section 12.5, “Uninstalling the Identity Reporting Module Components,” on page 97
Section 12.6, “Uninstalling iManager,” on page 98
Section 12.7, “Uninstalling eDirectory,” on page 98
Section 12.8, “Uninstalling Analyzer,” on page 99
Section 12.9, “Uninstalling Designer,” on page 99
Section 12.10, “Uninstalling the Role Mapping Administrator,” on page 100
12.1
Removing Objects from eDirectory
The first step in uninstalling Identity Manager is to delete all Identity Manager objects from the
Identity Vault. If any driver set objects are partition root objects in eDirectory, the partition must be
merged into the parent partition before the driver set object can be deleted. When the driver set is
created, the wizard prompts you to make the driver set a partition.
1 Perform a health check on the eDirectory database. If any errors occur, fix the errors before
proceeding.
For more information, see Keeping eDirectory Healthy (http://www.novell.com/documentation/
edir88/edir88/data/a5ziqam.html) in the Novell eDirectory 8.8 Administration Guide.
2 Log in to iManager as an administrator user with full rights to the eDirectory tree.
3 Select Partitions and Replica > Merge Partition.
4 Browse to and select the driver set object that is the partition root object, then click OK.
5 Wait for the merge process to complete, then click OK.
6 Delete the driver set object.
When you delete the driver set object, it deletes all of the driver objects associated with that
driver set.
7 Repeat Step 3 through Step 6 for each driver set object that is in the eDirectory database, until
they are all deleted.
8 Repeat Step 1 to make sure all merges completed and all of the objects have been deleted.
Uninstalling the Identity Manager Components
93
12.2
Uninstalling the Metadirectory Server
When Identity Manager is installed, there is an uninstall script that is placed on the Identity Manager
server. It allows you to remove all services, packages, and directories that were created when Identity
Manager was installed.
Section 12.2.1, “Uninstalling on Linux/UNIX,” on page 94
Section 12.2.2, “Uninstalling a Non-root Installation,” on page 94
Section 12.2.3, “Uninstalling on Windows,” on page 94
12.2.1
Uninstalling on Linux/UNIX
To uninstall Identity Manager on Linux/UNIX, run the uninstall script located at /root/idm/
Uninstall_Identity_Manager/Uninstall_Identity_Manager. To execute the script, enter ./
Uninstall_Identity_Manager.
12.2.2
Uninstalling a Non-root Installation
If you installed Identity Manager as a non-root user, the idm directory is placed in the directory of
the user that installed Identity Manager.
To uninstall a non-root installation of Identity Manager, you need to run the uninstall script as the
user that installed Identity Manager. It is located in the /eDirectory_Base_Directory/opt/
novell/eDirectory/bin/idm-uninstall file.
The script cleans up the user RPM database created during the installation of Identity Manager.
12.2.3
Uninstalling on Windows
The procedure to uninstall the Metadirectory server is different for each of the supported Windows
platforms.
Windows 2003 SP2 (32-bit and 64-bit): In the Control Panel select Add or Remove Programs >
Identity Manager, then click Change/Remove.
Windows 2008 SP1 (32-bit and 64-bit): Click Programs and Features > Identity Manager, then
right-click and select Uninstall.
Windows 2008 R2 (64-bit): Click Programs and Features > Identity Manager, then right-click and
select Uninstall.
12.3
Uninstalling the Remote Loader
When the Remote Loader is installed, an uninstall script is placed on the Remote Loader server. It
allows you to remove all services, packages, and directories that are created when the Remote Loader
is installed.
Section 12.3.1, “Uninstalling on Linux/UNIX,” on page 95
Section 12.3.2, “Uninstalling on Windows,” on page 95
94
Identity Manager 4.0.1 Framework Installation Guide
12.3.1
Uninstalling on Linux/UNIX
To uninstall the Remote Loader on Linux/UNIX, run the uninstall script located at /root/idm/
Uninstall_Identity_Manager/Uninstall_Identity_Manager. To execute the script, enter ./
Uninstall_Identity_Manager.
If you installed the Remote Loader as a non-root user, the idm directory is placed in the directory of
the user that installed the Remote Loader.
12.3.2
Uninstalling on Windows
The procedure to uninstall the Remote Loader is different for each of the supported Windows
platforms.
Windows 2003 SP2 (32-bit and 64-bit): In the Control Panel, select Add or Remove Programs >
Identity Manager, then click Change/Remove.
Windows 2008 SP1 (32-bit and 64-bit): Click Programs and Features > Identity Manager, then
right-click and select Uninstall.
Windows 2008 R2 (64-bit): Click Programs and Features > Identity Manager, then right-click and
select Uninstall.
12.4
Uninstalling the Roles Based Provisioning Module
There are multiple components for the Roles Based Provisioning Module and each component must
be uninstalled.
Section 12.4.1, “Deleting the Drivers,” on page 95
Section 12.4.2, “Uninstalling the User Application,” on page 95
Section 12.4.3, “Uninstalling the Application Server and the Database,” on page 96
12.4.1
Deleting the Drivers
You must delete the User Application driver and the Role and Resource Service driver.
1 Stop the User Application driver and the Role and Resource Service driver.
Designer: Right-click the driver line, then click Live > Stop Driver.
iManager: On the Driver Set Overview page, click the upper right corner of the driver, then
click Stop Driver.
2 Delete the User Application driver and the Role and Resource Service driver.
Designer: Right-click the driver line, then click Delete.
iManager: On the Driver Set Overview page, click Drivers > Delete drivers, then click the
driver you want to delete.
12.4.2
Uninstalling the User Application
Linux/UNIX: Execute the uninstall script located at /root/
Roles_Based_Provisioning_Module_for_Novell_Identity_Manager/Uninstall Roles
Based Provisioning Module for Novell Identity Manager.
Uninstalling the Identity Manager Components
95
To execute the script, enter ./Uninstall\ Roles\ Based\ Provisioning\ Module\ for\
Novell\ Identity\ Manager.
Windows: The procedure to uninstall the User Application is different for each of the supported
Windows platforms.
Windows 2003 SP2 (32-bit and 64-bit): In the Control Panel, select Add or Remove Programs
> Roles Based Provisioning Module, then click Change/Remove.
Windows 2008 SP1 (32-bit and 64-bit): Click Programs and Features > Roles Based
Provisioning Module, then right-click and select Uninstall.
Windows 2008 R2 (64-bit): Click Programs and Features > Roles Based Provisioning Module,
then right-click and select Uninstall.
IMPORTANT: Be cautious when you remove the User Application because the uninstaller removes
all the folders and files from the folder where the User Application scripts and supporting files were
installed. For example, the installation folder on Linux is typically /opt/novell/idm/rbpm. It also
contains the folders for JBoss and PostgreSQL.
12.4.3
Uninstalling the Application Server and the Database
The User Application runs on the following application servers and database.
Table 12-1 Supported Applications Servers and Databases
Application Server
JBoss 5.1.0
Database
MS SQL 2008
MySQL Version 5.1
Oracle 11g
PostgreSQL 8.4.3 and 9
WebSphere 7.0
DB2 9.5b
MS SQL 2008
Oracle 11g
PostgreSQL 8.4.3 and 9
WebLogic 10.3
MS SQL 2008
Oracle 11g
PostgreSQL 8.4.3 and 9
The following procedure explains how to uninstall JBoss and PostgreSQL. If you are using another
application server and database, refer that product’s documentation for instructions.
Linux/UNIX: Execute the uninstall script located at /opt/novell/idm/Postgres/
JBossPostgreSQL_Uninstaller/Uninstall_JBossPostgreSQL.
To execute the script, enter ./Uninstall_JBossPostgreSQL.
Windows: The procedure to uninstall JBoss and PostgreSQL is different for each of the
supported Windows platforms.
Windows 2003 SP2 (32-bit and 64-bit): In the Control Panel, select Add or Remove Programs
> JBossPostgreSQL, then click Change/Remove.
96
Identity Manager 4.0.1 Framework Installation Guide
Windows 2008 SP1 (32-bit and 64-bit): Click Programs and Features > JBossPostgreSQL, then
right-click and select Uninstall.
Windows 2008 R2 (64-bit): Click Programs and Features > JBossPostgreSQL, then right-click
and select Uninstall.
12.5
Uninstalling the Identity Reporting Module Components
The Identity Reporting Module consists of multiple components. Each component must be
uninstalled in order to uninstall the Identity Reporting Module.
Section 12.5.1, “Deleting the Reporting Drivers,” on page 97
Section 12.5.2, “Uninstalling the Identity Reporting Module,” on page 97
Section 12.5.3, “Uninstalling the Event Auditing Service,” on page 97
12.5.1
Deleting the Reporting Drivers
You must delete the Data Collection driver and the Managed System Gateway driver.
1 Stop the Data Collection driver and the Managed System Gateway driver.
Designer: Right-click the driver line, then click Live > Stop Driver.
iManager: On the Driver Set Overview page, click the upper right corner of the driver, then
click Stop Driver.
2 Delete the Data Collection driver and the Managed System Gateway driver.
Designer: Right-click the driver line, then click Delete.
iManager: On the Driver Set Overview page, click Drivers > Delete drivers, then click the
driver you want to delete.
12.5.2
Uninstalling the Identity Reporting Module
Linux: Execute the uninstall script located at /opt/novell/IdentityReporting/
Uninstall_Identity Reporting.
To execute the script, enter ./Uninstall\ Identity\ Reporting.
Windows: The procedure to uninstall the Identity Reporting Module is different for each of the
supported Windows platforms.
Windows 2003 SP2 (32-bit and 64-bit): In the Control Panel, select Add or Remove Programs
> Identity Reporting, then click Change/Remove.
Windows 2008 SP1 (32-bit and 64-bit): Click Programs and Features > Identity Reporting, then
right-click and select Uninstall.
Windows 2008 R2 (64-bit): Click Programs and Features > Identity Reporting, then right-click
and select Uninstall.
12.5.3
Uninstalling the Event Auditing Service
The Event Auditing Service (EAS) is supported only on SLES platforms. Execute the uninstall script
located at /opt/novell/sentinel_eas/Uninstall_Event Auditing Service/Uninstall Event
Auditing Service. To execute the script, enter ./Uninstall\ Event\ Auditing\ Service.
Uninstalling the Identity Manager Components
97
12.6
Uninstalling iManager
Linux: As root, execute the uninstall script located at /var/opt/novell/iManager/nps/
UninstallerData/UninstalliManager.
To execute the script, enter ./UninstalliManager.
Windows: The procedure to uninstall iManager is different for each of the supported Windows
platforms.
Windows 2003 SP2 (32-bit and 64-bit): In the Control Panel, select Add or Remove Programs
> Novell iManager, then click Change/Remove.
Windows 2008 SP1 (32-bit and 64-bit): Click Programs and Features > Novell iManager, then
right-click and select Uninstall.
Windows 2008 R2 (64-bit): Click Programs and Features > Novell iManager, then right-click
and select Uninstall.
Tomcat and NICI are listed as separate entries in the Control Panel. If you are no longer using
these programs, you can uninstall each program. If eDirectory is installed on this same server,
NICI is required for eDirectory to continue to run. If you are not uninstalling eDirectory, do not
uninstall NICI.
12.7
Uninstalling eDirectory
Before you uninstall eDirectory, you need to understand your eDirectory tree structure and replica
placements, so you don’t cause problems in the eDirectory tree.
Answer the following questions before uninstalling eDirectory:
Is there more than one server in your tree?
If the answer is yes, proceed with the other questions in this list. If the answer is no, you can
remove eDirectory.
Does this server hold any master replicas?
If the answer is yes, you need to promote another server in the replica ring to be a master before
you remove eDirectory. For more information, see “Managing Partitions and Replicas” (http://
www.novell.com/documentation/edir88/edir88/data/a2iiiik.html) in the Novell eDirectory 8.8
Administration Guide..
Does this server hold the only copy of a partition?
If the answer is yes, you must either merge this partition into the parent partition or add a
replica of this partition to another server and make it the master replica holder. For more
information, see “Managing Partitions and Replicas” (http://www.novell.com/documentation/
edir88/edir88/data/a2iiiik.html) in the Novell eDirectory 8.8 Administration Guide.
After you make sure your eDirectory tree is ready, use the following procedure to uninstall
eDirectory:
1 If this is a single-server tree, skip to Step 2. Otherwise, perform a health check on the eDirectory
database. If any errors occur, fix the errors before proceeding. For more information, see
“Keeping eDirectory Healthy” (http://www.novell.com/documentation/edir88/edir88/data/
a5ziqam.html) in the Novell eDirectory 8.8 Administration Guide.
2 Uninstall eDirectory.
Linux/UNIX: Execute the uninstall script located at /opt/novell/eDirectory/sbin/ndsuninstall.
98
Identity Manager 4.0.1 Framework Installation Guide
To execute the script, enter ./nds-uninstall.
Windows: The procedure to uninstall eDirectory is different for each of the supported
Windows platforms.
Windows 2003 SP2 (32-bit and 64-bit): In the Control Panel, select Add or Remove
Programs > Novell eDirectory, then click Change/Remove.
Windows 2008 SP1 (32-bit and 64-bit): Click Programs and Features > Novell eDirectory,
then right-click and select Uninstall.
Windows 2008 R2 (64-bit): Click Programs and Features > Novell eDirectory, then rightclick and select Uninstall.
3 (Conditional) If this is a multiple-server tree, delete any server-specific objects left in the tree,
then perform another health check. This verifies that the server was properly removed from the
tree.
For more information, see “Keeping eDirectory Healthy” (http://www.novell.com/
documentation/edir88/edir88/data/a5ziqam.html) in the Novell eDirectory 8.8 Administration
Guide.
12.8
Uninstalling Analyzer
1 Make sure Analyzer is closed.
2 Uninstall Analyzer:
Linux: Execute the uninstall script located at <installation_directory>/analyzer/
UninstallAnalyzer/Uninstall Analyzer for Identity Manager.
To execute the script, enter ./Uninstall\ Analyzer\ for\ Identity\ Manager.
Windows: The procedure to uninstall Analyzer is different for each of the supported
Windows platforms.
Windows 2003 SP2 (32-bit and 64-bit): In the Control Panel, select Add or Remove
Programs > Analyzer for Identity Manager, then click Change/Remove.
Windows 2008 SP1 (32-bit and 64-bit): Click Programs and Features > Analyzer for
Identity Manager, then right-click and select Uninstall.
Windows 2008 R2 (64-bit): Click Programs and Features > Analyzer for Identity Manager,
then right-click and select Uninstall.
12.9
Uninstalling Designer
1 Make sure that Designer is closed.
2 Uninstall Designer.:
Linux/UNIX: Execute the uninstall script located at <installation_directory>/
designer/UninstallDesigner/Uninstall Designer for Identity Manager.
To execute the script, enter ./Uninstall\ Designer\ for\ Identity\ Manager.
Windows: The procedure to uninstall Designer is different for each of the supported
Windows platforms.
Windows 2003 SP2 (32-bit and 64-bit): In the Control Panel, select Add or Remove
Programs > Designer for Identity Manager, then click Change/Remove.
Windows 2008 SP1 (32-bit and 64-bit): Click Programs and Features > Designer for
Identity Manager, then right-click and select Uninstall.
Uninstalling the Identity Manager Components
99
Windows 2008 R2 (64-bit): Click Programs and Features > Designer for Identity Manager,
then right-click and select Uninstall.
12.10
Uninstalling the Role Mapping Administrator
1 Access the installation directory of the Role Mapping Administrator.
This directory is defined during the installation, so it can be different for each installation.
2 From the command line, stop the Role Mapping Administrator by running the stop script.
Linux: stop.sh
To execute the script, enter ./stop.sh
Windows: stop.bat
3 From the command line, run the uninstall script.
Linux: rma-uninstall.sh [-h] [-s]
[-h]: Specifies help.
[-s]: Specifies silent mode.
To execute the script, enter ./rma-uninstall.sh.
Windows: rma-uninstall.bat [-h] [-s]
4 Delete the installation directory.
100
Identity Manager 4.0.1 Framework Installation Guide