1
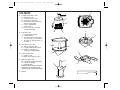
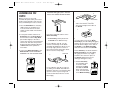
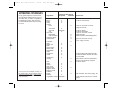
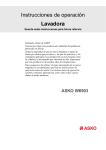
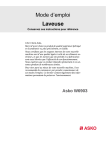
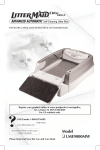
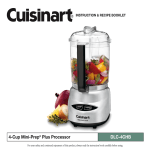
02CU13237 DLC-1 Series IB rev.
6/30/03
12:00 PM
Page 1
INSTRUCTION AND
RECIPE BOOKLET
Mini-Prep® Processor
DLC-1
For your safety and continued enjoyment of this product, always read the instruction book carefully before using.
02CU13237 DLC-1 Series IB rev.
6/30/03
12:00 PM
Page 2
02CU13237 DLC-1 Series IB rev.
6/30/03
12:00 PM
appliance malfunctions, or is dropped or
damaged in any manner. Return the
appliance to the nearest authorized
Cuisinart® Service Facility for
examination, repair, electrical or
mechanical adjustment.
TABLE OF CONTENTS:
IMPORTANT SAFEGUARDS......... PG 1
INTRODUCTION.......................... PG 1
THE PARTS ................................. PG 2
ASSEMBLING THE PARTS......... PG 3
TIPS FOR PROCESSING............ PG 4
PROCESSING FOOD.................. PG 5
OPERATING TECHNIQUES......... PG 6
TROUBLESHOOTING ................. PG 7
CLEANING AND STORAGE......... PG 7
RECIPE SUGGESTIONS ............ PG 7
WARRANTY..................................PG 11
IMPORTANT
SAFEGUARDS
When using an electrical appliance,
basic safety precautions should always
be followed including the following:
1.
READ ALL INSTRUCTIONS.
2.
To protect against risk of electric shock,
do not put motor base in water or other
liquid.
3.
4.
Close supervision is necessary
when any appliance is used by or near
children.
Unplug from outlet when not in use,
before putting on or taking off parts, and
before cleaning. To unplug, grasp plug
and pull from electrical outlet. Never pull
cord.
5.
Avoid contacting moving parts.
6.
Do not operate any appliance with a
damaged cord or plug, or after the
Page 3
7.
The use of attachments not
recommended or sold by Cuisinart
may cause fire, electric shock or injury.
8.
Do not let cord hang over edge of table
or counter, or touch hot surfaces.
9.
Do not use outdoors.
10. Keep hands and utensils away from
moving blade while processing food
to reduce the risk of severe injury to
persons, or damage to the food
processor. A scraper may be used,
but must be used only when the
food processor is not running.
11. Blade is sharp. Handle carefully when
removing, inserting or cleaning.
12. To reduce the risk of injury, never place
cutting blade on base without first
putting prep bowl properly in place.
13. Be certain cover is securely locked in
place before operating appliance. Do not
attempt to remove cover until blade has
stopped rotating.
14. Do not attempt to defeat the cover
interlock mechanism.
15. Check prep bowl for presence of foreign
objects before using.
SAVE THESE
INSTRUCTIONS
NOTICE
This appliance has a polarized plug
(one blade is wider than the other).
As a safety feature, this plug will fit in a
polarized outlet only one way. If the plug
does not fit fully in the outlet, reverse the
plug. If it still does not fit, contact a
qualified electrician. Do not attempt to
defeat this safety feature.
INTRODUCTION
The Cuisinart® Mini-Prep® Processor
handles a variety of food preparation
tasks including chopping, grinding,
puréeing, emulsifying and blending.
The patented two-position blade
provides a super-sharp edge for the
delicate chopping of herbs, and for
blending and puréeing other soft foods,
while the blunt edge offers a powerful
cutting surface to grind through coffee
beans, spices and other hard foods.
Two operating speeds with pulse
activation give maximum control for
precision processing.
A powerful high-speed motor works
hard and fast to accomplish any small
job with ease. Chop herbs, onions,
garlic; grind coffee beans, spices,
hard cheese; purée baby foods; blend
mayonnaise and flavored butters all
with the same compact appliance.
The Mini- Prep® takes up a minimum
of counter space and stores neatly on
the countertop or in a cabinet.
1
02CU13237 DLC-1 Series IB rev.
6/30/03
12:00 PM
Page 4
THE PARTS:
G
F
A. Compact Motor Base, with:
B. Shaft from motor
C. LO Speed-Control lever
D. HI Speed-Control lever
E. Round bowl-support platform
with two locking tabs
F. Column at back with
interlock slot
G. Power cord with concealed
storage underneath
B
E
A
MINI PREP PROCESSOR
LO
C
H. Prep Bowl, with:
I. Prep Bowl part number
J. Central Opening
K. Two openings for locking tabs
on lower surface of motor base
L. Two tabs on opposite sides of
top surface
M. Prep Bowl Cover, with:
N. Tabs on opposite sides
P. Long descending tab at back
Q. Handle on top with two
openings for adding liquids
R. Plastic Sheath, with:
T. Handle on top
U. Ridges along opposite sides
V. Blade Assembly, with:
W. Central hub holding ribs (grips)
X. Curved sharp edge
Y. Flat blunt edge
BLADE IS VERY SHARP. ALWAYS
HANDLE IT BY CENTRAL HUB.
NEVER TOUCH THE BLADE ITSELF.
HI
Q
D
M
L
H
J
N
P
V
I
K
T
Y
R
X
W
U
Z. Spatula
Z
2
02CU13237 DLC-1 Series IB rev.
6/30/03
12:00 PM
ASSEMBLING THE
PARTS
Page 5
HOLDING RIBS (grips) ONLY. DO NOT
TOUCH THE RAZOR-SHARP BLADES.
Before you process any food,
assemble the parts and try the HI and
LO processing speeds to get a feel for
how your Mini-Prep® Processor works.
BLUNT SIDE UP
• There are notches (C) on opposite
sides of the interior of the hub.
These fit over ridges on the sides of
the Sheath.
1. Place the Motor Base on a flat, dry,
stable surface. It should be close
to an electrical outlet of the same
voltage as that stated on the bottom
of the unit.
2. Locate part number on bottom of
Prep Bowl. Place the Prep Bowl on
the motor base with the Prep Bowl
part number slightly to the left of
center, then rotate it counterclockwise
until it locks and clicks into position.
Rotate Prep Bowl following direction
of Bowl Lock arrows printed on
motor base.
3. Connect the Blade Assembly to the
Blade Sheath. HOLD THE BLADE
ASSEMBLY BY THE CENTRAL HUB
C.
LO
HI
Notch
Note these important features of the
Blade Assembly.
• The Assembly can be placed over
the Sheath in two different ways.
If you hold it this way (A), you will
see the word "Sharp" on the blade.
Assemble the blade this side up to use
the sharp edge. (See the section on
processing food for information about
when to use the sharp edge.)
A.
MINI PREP PROCESSOR
B.
SHARP SIDE
If you hold it this way (B), you will see
no writing on the blade. Assemble the
blade this side up to use the blunt edge.
(See the section on processing food
for infor-mation about when to use the
blunt edge.)
Place the Sheath, handle side up,
on a flat surface. Pick up the Blade
Assembly by its hub holding ribs (grips)
and line up the notches in the interior of
the hub with the ridges on the sides of
the Sheath. Let the Blade Assembly
slide down to the bottom of the Sheath.
Lift the Sheath by its handle. Hold the
Blade Assembly by its hub holding
ribs (grips) and turn it very slightly
clockwise. This locks it in place on
the Sheath and prevents it from
sliding up during processing.
4. Hold the Sheath by
its top handle, place
it over the central
opening of the Bowl,
and slide the Sheath
down over the motor
shaft. The lower blade
on the Blade Assembly
MINI PREP PROCESSOR
LO
HI
3
02CU13237 DLC-1 Series IB rev.
6/30/03
should almost touch the bottom of the
Prep Bowl.
5. Hold the cover by its handle on the
top, with the descending tab in about
the 2 o'clock position (D).
While holding
the Motor Base,
press the cover
onto the Prep
Bowl. Use the
handle to turn it
counterclockwise
until the
descending tab
on the back locks into the slot on the
column of the Motor Base. IF THE TAB
DOES NOT FULLY OR COMPLETELY
ENGAGE IN THE SLOT, THE MOTOR
WILL NOT START.
D.
SOR
P PROCES
MINI PRE
HI
LO
6. Plug the cord into an electrical outlet.
7. Place one hand on the cover of the
unit, and press the LO Speed-Control
Lever with the thumb or forefinger of
your other hand. Remove your thumb
or finger from the control.
8. Now press and release the HI SpeedControl Lever.
9. WHEN THE
BLADE STOPS
MOVING, remove
the cover by
turning it
gently clockwise
and lifting it
straight up.
SOR
P PROCES
MINI PRE
HI
LO
4
12:00 PM
Page 6
10. Now you are ready to process food.
11. Disassembling the Blade
Assembly
Lift the Sheath. Holding the Blade
Assembly stationary, carefully turn
the Sheath Cylinder clockwise, then
guide the Blade Assembly up over
the Sheath.
TIPS FOR PROCESSING
FOOD
Preparing the Food
Size:
Always cut large pieces of food into
smaller pieces of even size – about 1/2
inch (12mm) to a side. If you don't start
with pieces that are small and uniform,
you will not get an even chop.
Quantity:
Do not overload the Prep Bowl.
Overloading causes inconsistent
results and it strains the motor. Use the
quantities given in the recipe section as
a guide. As a rule of thumb, remember
that after being processed, food should
not reach more than 2/3 of the way up
the Sheath of the Blade Assembly.
Selecting the Right Blade Edge
Use the sharp edge for chopping,
puréeing and mixing. It is the right
choice, for example, for chopping soft,
fragile food such as herbs, celery, onions,
garlic and most cheese. It is also
the right choice for puréeing cooked
vegetables, making mayonnaise and
mixing salad dressing.
Use the blunt edge for grinding coffee
beans and spices, and for chopping
hard food such as peppercorns, seeds,
chocolate and nuts.
Selecting the Right Operating Speed
Use low speed (LO Lever) for chopping,
puréeing, and mixing food with the
sharp edge of the blade.
Use high speed (HI Lever) for grinding
and for chopping hard food with the
blunt edge of the blade.
Note: Due to the powerful motor
provided with this unit, Cuisinart
recommends using one hand to support
the Mini-Prep® during operation. This is
especially true of the Hi speed.
Selecting the Right Lever Action
Pulse action is best when you are using
the sharp edge of the blade. Two or
three pulses are often enough. Be sure
to check the food frequently to prevent
overprocessing. If you overprocess, you
are likely to get a watery paste instead of
a fine chop.
Continuous-hold action is best when
you are using the blunt edge of the
blade. You may have to operate the
Mini-Prep® Processor for several
seconds to achieve the desired
results with some food - as long as
20 seconds for some seeds, or 40
seconds for coffee beans.
When you operate the unit for more than
10 seconds, use a pulse action every 10
seconds or so to allow food to drop to
the bottom of the Prep Bowl. This
provides more consistent results.
02CU13237 DLC-1 Series IB rev.
6/30/03
12:00 PM
Never operate the Mini-Prep®
continuously for longer than
1 minute at a time.
Note: The Prep Bowl and Cover may
become scratched when you use them
for grinding coffee, grain and spices.
This does not affect the performance
of the Mini-Prep® Processor. However,
you may want to reserve that bowl for
grinding, and purchase an additional
bowl and cover set for other uses.
These are available from the Cuisinart®
Customer Service Department, which
you can reach by dialing our toll-free
number: 800-726-0190. Ask for Model
DLC-195A when ordering.
Summary: Selecting Blade, Speed,
and Lever Action
Operation
Blade Edge
Chopping
Grinding
Sharp
Blunt
Speed
LO
HI
Lever
Action
Pulse
Continuous
Adding Liquid
You can add liquids such as water, oil or
flavoring while the machine is running.
You might want to add oil when making
mayonnaise or salad dressing, for
example. Or you could add vanilla or
alcohol when making frozen yogurt.
Pour the liquid through one of the two
openings in the cover. IMPORTANT:
Add liquid through only one opening at a
time. The other opening must be left free
for air to escape. If both openings are
blocked, liquid cannot flow smoothly
into the bowl.
Page 7
Removing Food from the Sides
of the Bowl
Occasionally food will stick to the sides
of the bowl as you process. Stop the
machine to clear it away. AFTER THE
BLADE HAS STOPPED MOVING, remove
the cover, and use the spatula to scrape
the food from the sides of the bowl back
into the center.
Reversing the Blade in the Middle of
a Processing Task
While preparing some recipes, you may
want to switch the blade from sharp to
blunt or vice versa.
1. Be sure neither of the Control Levers
is pressed down.
PROCESSING FOOD
1. Place the Prep Bowl firmly on the
motor base and insert the Blade
Assembly. Be sure the blade is
assembled to use the blade edge
that is appropriate for the food to
be processed.
2. Place food in the Prep Bowl. Be
sure the food is cut in small pieces,
and the bowl is not overloaded.
3. Lock the Cover into position.
Note: Due to the powerful motor
provided with this unit, Cuisinart
recommends using one hand
to support the Mini-Prep®
during operation.
2. Unplug the unit.
3. Remove the cover from the Prep Bowl.
4. Lift the Sheath by its top handle and
remove the Blade Assembly. NEVER
TOUCH THE BLADE ITSELF.
5. Remove the contents of the bowl to
another container.
6. Carefully remove the Blade Assembly,
holding it by its Hub Holding Ribs. Turn
blade upside-down and reinsert it on
the Sheath.
4. Press the appropriate SpeedControl Lever – LO or HI, depending
on the food you are processing.
5. When you have finished processing
the food, stop the machine by
releasing the Speed-Control Lever.
6. WHEN THE BLADE STOPS MOVING,
remove the Cover.
6a. Unplug the unit.
7. Insert the Sheath over the central
opening of the empty bowl.
7. Carefully remove the Blade
Assembly, holding it by the handle on
the top of the Sheath. NEVER TOUCH
THE BLADE ITSELF.
8. Insert the food to be processed.
8. Remove food with the spatula.
9. Replace the cover, locking it into place.
Note: Do not operate Mini-Prep®
without food contents in Prep Bowl.
10. Plug the unit into the electrical outlet
and continue processing.
5
02CU13237 DLC-1 Series IB rev.
6/30/03
12:00 PM
Page 8
OPERATING TECHNIQUES
Chop, grind and purée small amounts
of food with the Mini-Prep® Processor.
This table lists a number of ingredients
in alphabetical order, and shows the
recommended method of processing
for each.
Ingredient:
anchovies
bacon
butter
celery
cheese
hard*
semi-hard
semi-soft
soft
chocolate
bittersweet
milk chocolate
cinnamon sticks
coffee beans
fruit chips
garlic
ginger root
grain
green onions
herbs, fresh
horseradish
leeks
macaroons
meats
mushrooms
nutmeg
*If cheese is fresh and slightly crumbly, use
the SHARP edge. ( Use the BLUNT edge for
extremely hard, imported or older cheeses
only. Many cheeses available are actually
only semi-hard. )
6
nuts
olives
onions
peel, citrus
peppercorns
peppers, dried
peppers, fresh
scallions
seeds
shallots
vegetables, cooked
Blade Position/Speed
Sharp/LO
Blunt/HI
X
X
X
X
Comments
must be cooked crisp
X
X
Sharp/HI
X
X
X
X
X
chop no more than 2 ounces
(56g) at one time
must be chilled
must be well chilled
chop no more than 1ounce
(28g) at a time
better results if chilled/refrigerated
grind no more than 1/2 cup
(2 oz., 56g) at a time
X
X
X
X
X
X
X
X
X
X
must be brittle, like Italian amaretti
meats should be cold but not frozen
or precooked
X
X
X
pulse about 5 times to break apart,
then let run until finely chopped
must be chilled
X
X
X
X
X
X
X
X
X
Sharp/HI
like coriander, dill, cumin, poppy, etc.
cook until soft, process to a smooth
purée
02CU13237 DLC-1 Series IB rev.
6/30/03
TROUBLESHOOTING
Motor doesn't start or blade
doesn't rotate.
• Check that plug is securely inserted
into outlet.
• Check that Prep Bowl and cover are
securely locked into place.
• Be sure to press only one speedcontrol lever at a time.
Food is unevenly chopped.
• Either you are chopping too much
food at one time, or the pieces are
not small enough. Try cutting food
into smaller pieces of even size and
processing a smaller amount per batch.
Food is chopped too fine or is watery.
• The food is overprocessed. Use brief
pulses, or process for less time.
Food collects on Prep Bowl cover or
sides of Prep Bowl.
• You may be processing too much
food. Turn machine off. When blade
stops rotating, remove cover, and
clean bowl and lid with spatula.
Food hangs up on blade.
• You may be processing too much
food. Carefully remove blade. Remove
food from blade with spatula, and start
over again.
CLEANING AND STORAGE:
To simplify cleaning, rinse the Prep Bowl,
cover and blade immediately after use,
so that food won't dry onto them. Wash
Blade Assembly, Sheath, Prep Bowl,
cover and spatula in warm soapy water.
Rinse and dry. Wash the blade carefully.
12:00 PM
Page 9
Avoid leaving it in soapy water where it
may disappear from sight.
for each of the various cooking methods.
Model Recipe:
If you have a dishwasher, you can wash
the Prep Bowl, cover, Blade Assembly
and spatula on the upper shelf. Insert
the Prep Bowl upside-down and the
cover right-side up. Put the blade and
spatula in the cutlery basket. Unload
the dishwasher carefully to avoid
contact with the sharp blade. Wipe
the motor base clean with a damp
sponge or cloth. Dry it immediately.
Never submerge the motor base or
the plug in water or other liquid.
1/2 cup (5 ounces, 140g) frozen peas
3 tablespoons hot water (to purée)
The Mini-Prep® stores neatly on the
countertop in a minimum of space.
When it is not in use, be sure to leave
it unplugged. The hidden cord storage
underneath the motor base will help to
keep excess cord off the countertop.
Store the unit assembled to prevent loss
of parts. Store the blades as you would
sharp knives–-out of the reach of children.
Microwave Oven
Place frozen peas in microwave-safe
container, and cover with plastic wrap.
Cook at 100% power for 5 minutes,
stirring once. Let stand covered for
60 seconds.
Saucepan
Place peas and 1/4 cup water in
saucepan. Bring to full boil over medium
heat, separating with fork. Reduce heat;
cover and simmer until tender, about
3 minutes. Drain.
Steamer
Fill saucepan with 1 inch of water. Place
steamer basket in saucepan and add
peas. Bring to full boil. Separate peas
with fork. Let steam for 5 minutes.
The Mini-Prep® is intended for
HOUSE-HOLD USE ONLY. Any service
other than cleaning and normal user
maintenance, should be performed
by an authorized Cuisinart® Service
Representative.
Insert blade using SHARP edge. Add
peas with the 3 tablespoons hot water.
Run at HI speed to purée, about 60
seconds. Stop and scrape bowl. Run at
HI speed again until peas are completely
puréed, about 30 seconds.
RECIPES
Makes about 1/2 cup (5 oz., 140g)
puréed peas.
BABY FOOD*
Puréed Vegetables, Fruit, Meat or Poultry
may be prepared by using the following
model recipe for Tiny Tender Peas.
Note: For very stringy vegetables such
as asparagus, press cooked puréed
vegetables through a sieve before using.
Foods may be cooked in a microwave
oven, saucepan or steamed in a steamer
basket. Some additional water is added
*Always consult with your physician to
know which foods are best for your baby.
7
02CU13237 DLC-1 Series IB rev.
6/30/03
12:00 PM
Page 10
TUNA FISH SALAD
Make this popular tasty sandwich filler
with a few quick pulses!
cheese. Run at HI speed for
15 seconds. For a finer texture,
run machine 5 seconds longer.
1/2 ounce (15g) onion, peeled
1 small celery stalk, about
5 inches (13cm), cut into 1-inch
(2.5cm) pieces
1 3-ounce (85g) can tuna fish
Freshly ground black pepper
to taste
2 tablespoons (30ml) mayonnaise,
light or homemade
Makes 3/4 cup (2 ounces, 55g) grated
cheese.
Insert blade using BLUNT edge.
Add onion and celery to Prep Bowl
and pulse at HI speed until coarsely
chopped, about 5 pulses. Drain tuna
fish and add with pepper and
mayonnaise. Pulse twice at HI speed.
Serve immediately or refrigerate.
Makes about 3/4 cup (6 ounces, 170g).
CHOCOLATE FROSTING
1-1/2 cups (6 ounces, 170g)
confectioner’s sugar
1
ounce (28g) unsweetened
chocolate, in 1/2" pieces
2
tablespoons margarine
2
tablespoons milk*
1/2
teaspoon vanilla extract
1/8
teaspoon salt
Insert blade using BLUNT edge. Add
sugar and chocolate to Prep Bowl. Pulse
on Hi speed to coarsely chop chocolate,
about 8 pulses. Then process at HI speed
until chocolate is finely chopped, about
30 seconds.
CHOPPED MEAT/HAMBURGER
5
ounces (140g) boneless
round or sirloin, cut into
1/2-inch (1cm) cubes
Insert blade using SHARP edge. Add
beef and run at HI speed for 15 seconds.
Scrape down bowl. Run for 15 more
seconds for finer texture.
Makes 5 ounces (140g) of chopped
beef. Shape into hamburger or use in
your favorite recipe, as desired.
In a small saucepan over medium heat,
bring margarine and milk to a boil. Add to
Prep Bowl and process at HI speed until
creamy, about 15 seconds. Add vanilla and
salt; process at LO speed to incorporate,
about 5 seconds.
Makes 3/4 cup (180 ml) frosting,
enough to frost one 8-inch (20cm)
round layer cake.
*You may use whole, 2%, 1% or skim milk.
APPLESAUCE
GRATED PARMESAN CHEESE
2 ounces (55g) Parmesan cheese, cut
into 1/2-inch (1cm) pieces
Insert blade using SHARP edge. Add
8
2 small apples, 6 ounces (170g) each
1/4 cup (2 ounces, 60 ml) water
Peel and core apples. Cut into eighths.
In small saucepan, cook apples in water
over medium-low heat until apples are
soft, about 20-25 minutes. Add
additional water while cooking, if
necessary, to prevent scorching.
Insert blade using BLUNT edge. For a
smooth applesauce, process apples
at LO speed until smooth, about
25 sec-onds. For a chunkier
applesauce, pulse at LO speed until
desired consistency is reached.
GRAHAM CRACKER CRUST
8
2
5
whole graham crackers,
quartered (4 ounces, 113g)
tablespoons sugar
tablespoons (2-1/2 ounces, 70g)
unsalted butter or margarine,
melted
Preheat oven to 375oF (190o C).
Insert blade using SHARP edge. Add
half the crackers with all the sugar to the
Prep Bowl and pulse 3 times at HI speed
to break apart. Then let machine run at
HI speed until very finely chopped, about
15 seconds. Add remaining crackers
and pulse at HI speed 3 times to break
apart. Then let machine run at HI speed
until crackers are finely chopped, about
30 seconds.
Add melted butter and process at
HI speed until combined, about
10 seconds. Use spatula to scrape
Prep Bowl.
Press crumb mixture into bottom and
sides of 8-inch (20cm) pie pan. Bake
until set and edges begin to lightly
brown, about 8 to 10 minutes. Cool
before filling. Makes one 8-inch (20cm)
pie crust.
02CU13237 DLC-1 Series IB rev.
6/30/03
12:00 PM
Page 11
CLASSIC MAYONNAISE
at HI speed to blend, about 15 seconds.
2
1
1
large egg yolks
tablespoon red-wine vinegar
teaspoon mustard, preferably
Dijon-style
1/8 teaspoon freshly ground
white pepper
1/8 teaspoon salt
2/3 cup (6 ounces, 175 ml)
vegetable oil
With machine running at HI speed,
gradually add oil to one of the recessed
areas in the cover so that oil flows
through feed hole in a slow, steady
stream.* The mayonnaise will thicken
as the oil is added. This takes about
2 minutes. Run machine for about
1 minute, check consistency, and
then continue.
Insert blade using BLUNT edge. Add all
ingredients except oil to Prep Bowl. Mix
at HI speed to blend, about 15 seconds.
Makes 1 cup (8 ounces, 250 ml).
With machine running at HI speed,
gradually add oil to one of the recessed
areas in the cover so that oil flows
through the feed hole in a slow, steady
stream.* The mayonnaise will thicken
as the oil is added. This takes about
2 minutes. Run machine for about
1 minute, check consistency, and
then continue.
Makes 1 cup (8 oz., 250 ml).
*Oil should flow through only one feed
hole. If both are used, the flow will
be blocked.
NO-CHOLESTEROL MAYONNAISE
1/4 cup egg substitute
1 teaspoon mustard, preferably
Dijon-style
1/8 teaspoon freshly ground
white pepper
2/3 cup (6 ounces, 175 ml)
vegetable oil
Insert blade using BLUNT edge. Add all
ingredients except oil to Prep Bowl. Mix
*Oil should flow through only one feed
hole. If both are used, the flow will
be blocked.
VINAIGRETTE SALAD DRESSING
1 small garlic clove (1/4 ounce, 7g)
3/4 cup ( 6 ounces, 177 ml )
vegetable oil
1/4 cup (2 ounces, 55 ml)
red-wine vinegar
1 tablespoon mustard (Dijon-style)
1/8 teaspoon freshly ground
white pepper
1/8 teaspoon salt
Insert blade using SHARP edge. Add
garlic and process at HI speed to mince,
about 10 seconds. Add remaining
ingredients and process at HI speed
to mix well, about 5-10 seconds.
Makes about 1 cup (8 ounces, 250 ml).
NO-FAT HERB SALAD DRESSING
A delicious, fresh-tasting dressing with a
creamy consistency.
1
cup (1/2 ounce, 14g) tightly
packed parsley leaves
1-1/2 tablespoons fresh dill or 1/2
teaspoon dried dill
1
tablespoon fresh cilantro leaves
1
tablespoon fresh oregano or
1/8 teaspoon dried oregano
1
teaspoon fresh thyme or
1/8 teaspoon dried thyme
1/4 teaspoon salt
1
large shallot (3/4 ounce, 21g)
1/2 cup (4 ounces, 125 ml) non-fat
plain yogurt
1/3 cup (2-1/2 ounces, 75 ml)
skim milk
2
tablespoons lemon juice
1
tablespoon prepared mustard
(Dijon-style)
1
tablespoon balsamic or
red-wine vinegar
Insert blade using SHARP edge.
Add parsley, herbs and salt to Prep
Bowl. Process at HI speed until finely
chop-ped, about 45 seconds. Check
consistency and continue processing
if necessary.
Peel and quarter shallot. Add to Prep
Bowl and process at HI speed until
finely chopped, about 15 seconds. Add
remaining ingredients and process at HI
speed to blend well, about 30 seconds.
Makes 1 cup (8 ounces, 250 ml).
TONNATO SAUCE
This sauce is delicious spread on
poached fish, cold poultry or meat.
1
1
7
2
can tuna in water
(3-1/4 ounces, 92g)
2 ounce (56g) can anchovy filets
small cornichons (1 ounce, 30g)
tablespoons capers
9
02CU13237 DLC-1 Series IB rev.
1
1/8
1/2
6/30/03
12:00 PM
tablespoon prepared mustard
(Dijon-style)
teaspoon freshly ground
white pepper
cup (4 ounces, 125 ml) light
mayonnaise
Insert blade using SHARP edge. Add all
ingredients except mayonnaise to Prep
Bowl and process at HI speed to blend,
about 40 seconds. Scrape Prep Bowl,
add mayonnaise and blend well at HI
speed, about 40 seconds.
Makes 1 cup (8 ounces, 250 ml) or four
2-ounce (60 ml) servings.
WALNUT PESTO SAUCE
1
1/4
1
1/2
1
1/8
1/8
ounce (28g) Romano cheese
cup (1 ounce, 28g) walnuts
large garlic clove (3/4 ounce, 21g)
cup (4 ounces, 125 ml)
vegetable oil
cup (1/2 ounce, 14g) tightly
packed basil leaves
teaspoon salt
teaspoon freshly ground
white pepper
Insert blade using BLUNT edge.* Cut
cheese into 1/2-inch (1cm) pieces. Add
to Prep Bowl with walnuts. Chop coarsely
at HI speed about 10 seconds. Add
garlic, oil and basil leaves. Process at HI
speed to purée, about 45 seconds. Scrape
Prep Bowl. Add salt and pepper, and
process to blend at HI speed, 10 seconds.
Makes about 1 cup (8 ounces, 250 ml).
If cheese is not extremely hard, use the
sharp edge to process. Then reverse
blade to Blunt edge for remainder of
recipe.
10
Page 12
LEMON GARLIC BUTTER
1/4 cup (3.5g) tightly packed
parsley leaves
1/2 teaspoon fresh or dried
rosemary leaves
1 large garlic clove (3/4 ounce, 21g)
2 tablespoons lemon juice
1/2 teaspoon prepared mustard
(Dijon-style)
1/4 teaspoon salt
1/8 teaspoon freshly ground
white pepper
1/2 cup (4 ounces, 113g) unsalted
butter, cut into 8 pieces, at
room temperature.
Insert blade using SHARP edge.
Process parsley and rosemary at HI
speed until finely chopped, about 20
seconds. Add remaining ingredients,
except butter. Process at HI speed to
blend well, about 30 seconds. Scrape
Prep Bowl. Remove blade and reinsert
using BLUNT edge. Add butter and
process at LO speed to cream, about
30 seconds.
Makes about 1/2 cup (5 ounces, 140g).
CAJUN SPICE BLEND
The DLC-1 Mini-Prep® Processor grinds
spices to a homogeneous fine blend.
Comparable prepared spice mixtures
cost more and are not as fresh as those
you make yourself.
This blend of spices is an excellent
seasoning to rub on fish, poultry or pork.
It can also be added to bread crumbs for
use as a coating or stuffing. For a milder
spice blend, reduce the amount of white
peppercorns, cayenne pepper and chili
powder to taste.
1
1
1
1
1
2
1
1/2
1/2
1/2
1/2
1/4
tablespoon coriander seed
tablespoon dried, minced onion
teaspoon dried, minced garlic
teaspoon mustard seed
teaspoon whole white
pepper-corns
tablespoons paprika
tablespoon dried parsley flakes
tablespoon dried thyme
teaspoon celery salt
teaspoon chili powder
teaspoon ground sage
teaspoon cayenne pepper
Insert blade using BLUNT edge. Add
coriander, onion, garlic, mustard seed
and peppercorns. Process at HI speed
until seeds are finely ground, about 30
seconds. Add remaining ingredients and
process at HI speed to blend well, about
30 seconds.
Makes about 1-1/2 ounces (42g)
of Cajun Spice Blend. The Cajun
Spice Blend may be stored in a tighlly
sealed jar in a cool, dark place for
several months.
GROUND COFFEE BEANS
1/2 cup (2 ounces, 60g) coffee beans
Insert blade using BLUNT edge.
Add beans. Run at HI speed for
30 seconds. For a finer grind, process
30 seconds more.
Makes 1/2 cup (2 ounces, 60g)
ground coffee.
02CU13237 DLC-1 Series IB rev.
6/30/03
12:00 PM
GROUND WHOLE GRAIN BERRIES
Adding whole grain flour to all-purpose
flour enhances the flavor and nutrient
value of homemade baked goods. Whole
grain berries, also called groats, are
available in most health food stores in a
variety of grains such as wheat, rye,
barley, soy and triticale.
1/2 cup (approx. 1-1/2 ounces, 40g)
whole grain berries
Insert blade using BLUNT edge. Add
whole grain berries. Run at HI speed
for no more than 60 seconds. Check
consistency and continue processing
if necessary.
Makes about 3/4 cup (1-1/2 ounces,
40g) whole grain flour.
FRESHLY GROUND NUTMEG
1
whole nutmeg
Insert blade using BLUNT edge. Add
nutmeg. Pulse at HI speed to break
apart, about 5 pulses; then let the
machine run at HI speed for 30 seconds.
Stop to check texture. Continue
processing for 5-10 more seconds
for a finer texture.
Makes 1-1/2 tablespoons ground nutmeg.
BANANA STRAWBERRY SMOOTHIE
1
2
medium banana (6 ounces, 170g)
large strawberries, 1/2 ounce
(14g) each
1/2 cup (4 ounces, 120 ml) milk*
Page 13
1/2-inch (1cm) pieces.Insert blade using
BLUNT edge. Add fruit and milk to Prep
Bowl and run at HI speed until smooth,
about 30 seconds.
Makes about 1-1/3 cups (10 ounces,
300 ml).
*Whole, low-fat or skim milk.
BANANA FROZEN YOGURT
This recipe produces a rich tasting, soft,
frozen yogurt. If you prefer a more
scoopable texture, use only 1/4 cup
(2 ounces, 57g) yogurt.
1 large banana (8 oz., 225g)
1/2 cup (4 oz., 113g) non-fat
plain yogurt
2 tablespoons sugar
Cut banana into 1/2-inch pieces.
Arrange in a single layer on a tray, and
place in freezer until banana is frozen,
at least 2 hours.
Insert blade using BLUNT edge. Add
banana to Prep Bowl and pulse at HI
speed to chop, about 5 pulses. Add
yogurt and sugar, and run at HI speed
to blend, about 45 seconds.
Makes about 1 cup (8 oz., 250 ml).
CUISINART ® MINI-PREP ®
PROCESSOR
18-Month Limited Warranty
This warranty is available to consumers
only. You are a consumer if you are
the owner of a Cuisinart® Mini-Prep®
Processor that was purchased at retail
for personal, family or household use.
Except as otherwise required under
ap-plicable state law, this warranty is
not available to retailers or other
commercial purchasers or owners.
We warrant that your Cuisinart®
Mini-Prep® Processor will be free of
defects in material and workmanship
under normal home use for 18 months
from the original date of purchase.
We suggest that you complete and
return the enclosed warranty registration
card promptly to facilitate verification of
the date of original purchase. However,
return of the warranty registration card is
not a condition of this warranty.
If your Cuisinart® Mini-Prep® Processor
should prove to be defective within the
warranty period, we will repair it, (or, if
we think necessary, replace it) without
charge to you. To obtain warranty
service, please call our Cuisinart Service
Center toll-free at 1-800-726-0190 for
information and instructions, or write:
Cuisinart®
150 Milford Road
East Windsor, NJ 08520
Attn: Customer Service Center
Cut banana and strawberries into
11
02CU13237 DLC-1 Series IB rev.
6/30/03
12:00 PM
To facilitate the speed and accuracy of
your return, please enclose $7.00 for
shipping and handling of the product.
(California residents need only supply
a proof of purchase and should call
1-800-726-0190 for shipping instructions.)
Please be sure to include a return
address, description of the product’s
defect, product serial number and any
other information pertinent to the
product's return. Please pay by check
or money order.
Your Cuisinart® Mini-Prep® Processor
has been manufactured to the strictest
specifications and has been designed
for use only with authorized Cuisinart®
accessory and replacement parts. This
warranty expressly excludes any defects
or damages caused by accessories,
replacement parts or repair service other
than those that have been authorized by
Cuisinart.
This warranty does not cover any
damage caused by accident, misuse,
shipment or other than ordinary
household use.
This warranty excludes all incidental or
consequential damages. Some states
do not allow the exclusion or limitation
of these damages, so the foregoing
limitations or exclusions may not apply
to you.
12
Page 14
Index to Recipes
Baby Food
Vegetables, 7
Fruits, 7
Meat, 7
Poultry, 7
Beverages
Banana Strawberry Smoothie, 11
Cheese
Grated Parmesan Cheese, 8
Coffee and Grains
Ground Coffee Beans, 10
Ground Whole Grain Berries, 11
Desserts
Applesauce, 8
Banana Frozen Yogurt, 11
Chocolate Frosting, 8
Graham Cracker Crust, 8
Meat & Fish
Chopped Meat/Hamburger, 8
Tuna Fish Salad, 8
Sauces and Spreads
Classic Mayonnaise, 9
Lemon Garlic Butter, 10
No-Cholesterol Mayonnaise, 9
No-Fat Herb Salad Dressing, 9
Tonnato Sauce, 9
Vinaigrette Salad Dressing, 9
Walnut Pesto Sauce, 10
Spice Blends
Cajun Spice Blend, 10
Freshly Ground Nutmeg, 11
02CU13237 DLC-1 Series IB rev.
6/30/03
12:00 PM
Page 15
02CU13237 DLC-1 Series IB rev.
6/30/03
Food
Processors
12:00 PM
Blenders
Page 16
Toasters
Hand
Blenders
Ice Cream
Makers
Cuisinart offers an extensive assortment of top quality products to make life in the
kitchen easier than ever. Try some of our other countertop appliances and
cookware, and Savor the Good Life ®.
www.cuisinart.com
© 2002 Cuisinart
Cuisinart® is a registered trademark of
Cuisinart
150 Milford Road
East Windsor, NJ 08520
Printed in China
02CU13237
IB-4276