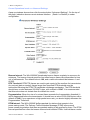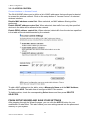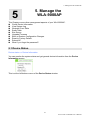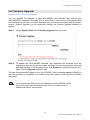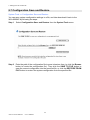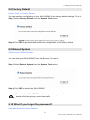
1
WLA-9000AP 108Mbps 802.11a/b/g Dual Radio Access Point User’s Manual Declaration of Conformity We, Manufacturer/Importer OvisLink Corp. 5F., NO.6, Lane 130, Min-Chuan Rd., Hsin-Tien City, Taipei County, Taiwan Declare that the product 802.11a/b/g Dual Radio Access Point AirLive WLA-9000AP is in conformity with In accordance with 89/336 EEC-EMC Directive and 1999/5 EC-R & TTE Directive Clause Description ■ EN Broadband Radio Access Network(BRAN); 5GHz high performance RLAN; Harmonized EN Covering essential requirements of Article 3.2 of the R&TTE Directive. ■ EN Electromagnetic compatibility and Radio spectrum Matters (ERM); Electromagnetic compatibility(EMC) standard for radio equipment and Services; Part 17:Specific conditions for wideband data and HIPERLAN equipment 301 893 v1.3.1 (2005-03) 301 489-1 v1.6.1 (2005-09) ■ EN 301 489-17 v1.2.1 (2002-08) ■ EN 50371:2002 Generic standard to demonstrate the compliance of low power Electronic and electrical apparatus with the basic restrictions related to human exposure to electromagnetic field (10MHz – 300GHz) -General public ■ EN 60950-1:2001/A11 Safety for information technology equipment including electrical :2004 business equipment ■ CE marking Manufacturer/Importer Signature: Name : Position/ Title : Albert Yeh Vice President Date: 2007/11/28 (Stamp) AirLive WLA-9000AP CE Declaration Statement Country cs Česky [Czech] Declaration OvisLink Corp. tímto prohlašuje, že tento AirLive WLA-9000AP je ve shodě se základními požadavky a dalšími příslušnými ustanoveními směrnice 1999/5/ES. da Undertegnede OvisLink Corp. erklærer herved, Dansk [Danish] at følgende udstyr AirLive WLA-9000AP overholder de væsentlige krav og øvrige relevante krav i direktiv 1999/5/EF. de Hiermit erklärt OvisLink Corp., dass sich das Deutsch Gerät AirLive WLA-9000AP in Übereinstimmung [German] mit den grundlegenden Anforderungen und den übrigen einschlägigen Bestimmungen der Richtlinie 1999/5/EG befindet. et Käesolevaga kinnitab OvisLink Corp. seadme Eesti [Estonian] AirLive WLA-9000AP vastavust direktiivi 1999/5/EÜ põhinõuetele ja nimetatud direktiivist tulenevatele teistele asjakohastele sätetele. en Hereby, OvisLink Corp., declares that this AirLive English WLA-9000AP is in compliance with the essential requirements and other relevant provisions of Directive 1999/5/EC. es Por medio de la presente OvisLink Corp. declara Español que el AirLive WLA-9000AP cumple con los [Spanish] requisitos esenciales y cualesquiera otras disposiciones aplicables o exigibles de la Directiva 1999/5/CE. el ΜΕ ΤΗΝ ΠΑΡΟΥΣΑ OvisLink Corp. ΔΗΛΩΝΕΙ Ελληνική [Greek] ΟΤΙ AirLive WLA-9000AP ΣΥΜΜΟΡΦΩΝΕΤΑΙ ΠΡΟΣ ΤΙΣ ΟΥΣΙΩΔΕΙΣ ΑΠΑΙΤΗΣΕΙΣ ΚΑΙ ΤΙΣ ΛΟΙΠΕΣ ΣΧΕΤΙΚΕΣ ΔΙΑΤΑΞΕΙΣ ΤΗΣ ΟΔΗΓΙΑΣ 1999/5/ΕΚ. fr Par la présente OvisLink Corp. déclare que Français [French] l'appareil AirLive WLA-9000AP est conforme aux exigences essentielles et aux autres dispositions pertinentes de la directive 1999/5/CE it Con la presente OvisLink Corp. dichiara che Italiano [Italian] questo AirLive WLA-9000AP è conforme ai requisiti essenziali ed alle altre disposizioni pertinenti stabilite dalla direttiva 1999/5/CE. lv Ar šo OvisLink Corp. deklarē, ka AirLive WLALatviski [Latvian] 9000AP atbilst Direktīvas 1999/5/EK būtiskajām prasībām un citiem ar to saistītajiem noteikumiem. sv Härmed intygar OvisLink Corp. att denna AirLive Svenska WLA-9000AP står I överensstämmelse med de [Swedish] väsentliga egenskapskrav och övriga relevanta bestämmelser som framgår av direktiv 1999/5/EG. Country lt Lietuvių [Lithuanian] Declaration Šiuo OvisLink Corp. deklaruoja, kad šis AirLive WLA9000AP atitinka esminius reikalavimus ir kitas 1999/5/EB Direktyvos nuostatas. nl Hierbij verklaart OvisLink Corp. dat het toestel AirLive Nederlands [Dutch WLA-9000AP in overeenstemming is met de essentiële eisen en de andere relevante bepalingen van richtlijn 1999/5/EG. mt Hawnhekk, OvisLink Corp, jiddikjara li dan AirLive Malti [Maltese] WLA-9000AP jikkonforma mal-ħtiġijiet essenzjali u ma provvedimenti oħrajn relevanti li hemm fidDirrettiva 1999/5/EC. hu Magyar [Hungarian] pt Português [Portuguese] Az OvisLink Corporation kijelenti, hogy az AirLive WLA-9000AP megfelel az 1999/05/CE irányelv alapvető követelményeinek és egyéb vonatkozó rendelkezéseinek. Niniejszym OvisLink Corp oświadcza, że AirLive WLA-9000AP jest zgodny z zasadniczymi wymogami oraz pozostałymi stosownymi postanowieniami Dyrektywy 1999/5/EC. OvisLink Corp declara que este AirLive WLA-9000AP está conforme com os requisitos essenciais e outras disposições da Directiva 1999/5/CE. sl Slovensko [Slovenian] OvisLink Corp izjavlja, da je ta AirLive WLA-9000AP v skladu z bistvenimi zahtevami in ostalimi relevantnimi določili direktive 1999/5/ES. pl Polski [Polish] sk OvisLink Corp týmto vyhlasuje, že AirLive WLASlovensky [Slovak] 9000AP spĺňa základné požiadavky a všetky príslušné ustanovenia Smernice 1999/5/ES. fi Suomi [Finnish] OvisLink Corp vakuuttaa täten että AirLive WLA9000AP tyyppinen laite on direktiivin 1999/5/EY oleellisten vaatimusten ja sitä koskevien direktiivin muiden ehtojen mukainen Hér með lýsir OvisLink Corp yfir því að AirLive WLAÍslenska [Icelandic] 9000AP er í samræmi við grunnkröfur og aðrar kröfur, sem gerðar eru í tilskipun 1999/5/EC. no OvisLink Corp erklærer herved at utstyret AirLive Norsk [Norwegian] WLA-9000AP er i samsvar med de grunnleggende krav og øvrige relevante krav i direktiv 1999/5/EF. A copy of the full CE report can be obtained from the following address: OvisLink Corp. 5F, No.6 Lane 130, Min-Chuan Rd, Hsin-Tien City, Taipei, Taiwan, R.O.C. This equipment may be used in AT, BE, CY, CZ, DK, EE, FI, FR, DE, GR, HU, IE, IT, LV, LT, LU, MT, NL, PL, PT, SK, SI, ES, SE, GB, IS, LI, NO, CH, BG, RO, TR Regulatory Information Federal Communication Commission Interference Statement This equipment has been tested and found to comply with the limits for a Class B digital device, pursuant to Part 15 of the FCC Rules. These limits are designed to provide reasonable protection against harmful interference in a residential installation. This equipment generates, uses and can radiate radio frequency energy and, if not installed and used in accordance with the instructions, may cause harmful interference to radio communications. However, there is no guarantee that interference will not occur in a particular installation. If this equipment does cause harmful interference to radio or television reception, which can be determined by turning the equipment off and on, the user is encouraged to try to correct the interference by one of the following measures: - Reorient or relocate the receiving antenna. - Increase the separation between the equipment and receiver. - Connect the equipment into an outlet on a circuit different from that to which the receiver is connected. - Consult the dealer or an experienced radio/TV technician for help. FCC Caution: To assure continued compliance, (example - use only shielded interface cables when connecting to computer or peripheral devices) any changes or modifications not expressly approved by the party responsible for compliance could void the user’s authority to operate this equipment. This device complies with Part 15 of the FCC Rules. Operation is subject to the following two conditions: (1) This device may not cause harmful interference, and (2) this device must accept any interference received, including interference that may cause undesired operation. IMPORTANT NOTE FCC Radiation Exposure Statement: This equipment complies with FCC radiation exposure limits set forth for an uncontrolled environment. This equipment should be installed and operated with minimum distance 20cm between the radiator & your body. This transmitter must not be co-located or operating in conjunction with any other antenna or transmitter. Copyright Statement No part of this publication may be reproduced, stored in a retrieval system, or transmitted in any form or by any means, whether electronic, mechanical, photocopying, recording or otherwise without the written consent of OvisLink Corp. Windows™ 95/98 and Windows™ 2000 are trademarks of Microsoft® Corp. Pentium is trademark of Intel. All copyright reserved. Table of Contents Table of Contents 1. Introduction ..............................................................................................1 1.1 Overview..............................................................................................1 1.2 Features...............................................................................................1 1.3 Operational Modes ..............................................................................2 1.3.1 Dual WDS bridge mode ...............................................................................2 1.3.2 Dual AP Mode..............................................................................................2 1.3.3 AP + Client Mode.........................................................................................3 1.3.4 AP + WDS bridge Mode...............................................................................3 2. Install the 802.11 A/G Access Point ..........................................................4 2.1 What’s in the box? ...............................................................................4 2.2 Hardware Presentation ........................................................................4 2.3 Configuration steps ..............................................................................5 2.3.1 Set up a wired connection with Ethernet cable ............................................6 2.3.2 Set up a wireless client as a fixed IP client ..................................................6 3. Basic Configuration ...................................................................................8 3.1 Log On .................................................................................................8 3.2 Setup wizard ........................................................................................9 3.2.1 TIME SETTINGS .........................................................................................9 3.2.2 DEVICE IP SETTINGS ..............................................................................10 3.2.3 OPERATION MODE SETTINGS ............................................................... 11 3.3 Wireless Interface Configuration........................................................13 3.3.1 AP Mode Settings ......................................................................................13 3.3.2 Client Mode Settings .................................................................................23 3.3.3 WDS Bridge Mode Settings .......................................................................28 3.4 ACK Timeout Setup ...........................................................................31 4. Advanced Setting.....................................................................................33 4.1 Password Settings .............................................................................33 4.2 System Management .........................................................................34 4.3 SNMP Settings...................................................................................35 4-4 Multi-SSID Settings............................................................................36 4.5 QoS Settings......................................................................................38 5. Manage the WLA-9000AP......................................................................39 5.1 Device Status .....................................................................................39 5.2 System Log........................................................................................40 5.3 Wireless Client Table .........................................................................40 5.4 Radio Table ........................................................................................41 5.5 Site Survey ........................................................................................41 5.5.1 Signal survey.........................................................................................41 5.6 Firmware Upgrade .............................................................................43 5.7 Configuration Save and Restore........................................................44 5.8 Factory Default ..................................................................................45 5.9 Reboot System ..................................................................................45 5.10 What if you forgot the password? ....................................................45 6. Specifications.........................................................................................47 AirLive WLA-9000AP User’s Manual 1. Introduction 1 1. Introduction 1.1 Overview The WLA-9000AP is a wireless access-point based on IEEE 802.11a/g 5-GHz and 2.4-GHz radio technologies. It contains an 802.11a/g wireless interface and one half/full-duplex 10/100 LAN interface. WLA-9000AP, with the new 2.0 firmware, features a total of 6 wireless modes: Access Point, Repeater, WDS Bridge, Client Infrastructure, Client Ad Hoc and WISP Router. Since the 802.11g shares the same 2.4GHz radio band with the 802.11b technology, it can interoperate with existing 802.11b (up to 11Mbps) devices. Therefore, you can reserve your existing investment in 802.11b client cards, and migrate to the high-speed 802.11g standard as your needs grow. To address growing security concerns in a wireless LAN environment, different levels of security can be enabled in WLA-9000AP: To disable SSID broadcast to restrict association to only those client stations that are already pre-configured with the correct SSID To enable WEP (Wireless Encryption Protocol) 64, 128, or 152-bit encryption to protect the privacy of your data. Support of Access List Control to allow you to grant/deny access to/from specified wireless stations Provisioning of centralized authentication through RADIUS Server. WPA-PSK (Wi-Fi Protected Access, Pre-Shared Key) for home users to provide authentication, data integrity, and data privacy. WPA (Wi-Fi Protected Access) works with a RADIUS server to provide stronger authentication as well as data integrity and privacy. 1.2 Features Compliant with 802.11a, 802.11b and 802.11g, Super A™ and Super G™ standards with roaming capability. Dual Wireless interfaces support multi-function modes: Dual Access Point, Dual WDS Bridge, AP + Client Infrastructure, AP + WDS mode. Static assignment or DHCP client to set the device IP address. Multiple security measures: SSID hiding, Access Control List, WEP based encryption (64, 128, 152 bits), enhanced Security with 802.1x using a primary and a backup RADIUS Server with/without dynamic WEP keys, WPA-PSK, WPA, and WPA2. Extensive monitoring capability such as event logging, traffic/error statistics monitoring. 1 AirLive WLA-9000AP User’s Manual 1. Introduction Easy configuration and monitoring through the use of a Web-browser based GUI with predefined operation mode. SNMP commands from a remote SNMP management station, and UPnP for users to automatically discover the device. Setup Wizard for easy configuration/installation. Configuration file download and restore. Firmware upgradeable for flexibility to add extra features. 1.3 Operational Modes There are currently 4 predefined operational modes. Extra operational mode will be added according to the evolution of firmware. They are: 1. Dual WDS bridge mode 2. Dual AP mode 3. AP + Client mode 4. AP + Bridge mode 1.3.1 Dual WDS bridge mode When configured to operate in the Wireless Distribution System (WDS) Mode, the WLA-9000AP provides bridging functions between LANs physically separated. When configured in the Dual WDS Bridge mode, a WLA-9000AP allows solving discontinuous link due to geographical obstacles, shown as below and extension of distance between two WDS bridge nodes separated by a building. WLA-9000AP acts in Dual WDS Mode application as repeater of backbone 1.3.2 Dual AP Mode In Dual AP mode, both wireless interface of WLA-9000AP are set as AP and provide hotspot service on each interface. 2 AirLive WLA-9000AP User’s Manual 1. Introduction WLA-9000AP acts in Dual AP Mode application to serve wider coverage This Application provides winder coverage that difficult to be reached with a unique omni antenna by using another adequate antenna such as sector antenna. It’s particularly suitable for WISP to provide stable and high performance link. 1.3.3 AP + Client Mode In AP + Client operational Mode, WLA-9000AP can be used as the repeater of backbone, it provide the possibility to “chain-up” continuously from one point to another despite of long distance crossing the wide geography. Multiple WLA-9000AP act in continuous AP-Client Mode application to chain backbone 1.3.4 AP + WDS bridge Mode Under this operational mode, WDS acts as bridge to pass through data from another remote node as point-to-point data transmission. The other side acts as AP and provides coverage as point-to-multi point service. One device satisfies multiple applications maintaining the performance. WLA-9000AP acts in AP+WDS Mode application as extension of backbone in long distance. 3 AirLive WLA-9000AP User’s Manual 2. Install the WLA-9000AP 2 2. Install the 802.11 A/G Access Point This section describes the installation procedure for the WLA-9000AP. It starts with a summary of the content of the package you have purchased, followed by steps of how to power up and connect the WLA-9000AP. Finally, this section explains how to configure a Windows PC to communicate with the WLA-9000AP. 2.1 What’s in the box? The WLA-9000AP package contains the following items: 1. One WLA-9000AP main unit 2. One 5.5V 2.5A DC power adapter 3. Indoor detachable Omni Antenna x 2 4. One CD of the WLA-9000AP Quick Start Guide 2.2 Hardware Presentation 2.2.1 Front side introduction 1 2 3 4 5 6 LED # Display Description 1 Power Solid Green LED while the device is powered on, either by power adaptor or PoE. 2 WLAN1 3 WLAN2 4 LAN 1 5 LAN 2 6 LAN 3 Solid Green LED while the device is powered on. Blinking while there is Data transmission, dark when this interface is turn off. LAN ports status LED, Solid Green LED shows when a port is actively connected, blinking while there is data transmission, turns into dark when this disconnected. 4 AirLive WLA-9000AP User’s Manual 2. Install the WLA-9000AP 2.2.2 Back side introduction 2 1 4 3 5 6 7 Port # Display Description 1 WLAN1 Detachable antenna with R-SMA connector. 2 indoor 2dBi antennas are delivered. 2 Power Adaptor 5.5V 2.5A power supply adaptor delivered with product. 3 RESET Reset button for rebooting and reset device as default facory value. 4 LAN 3/PoE 5 LAN 2 LAN port 2 6 LAN 1 LAN port 1 7 WLAN2 LAN port 3 and PoE port. It can be plug 802.3af compliant PoE as power and data supply. Detachable antenna with R-SMA connector. 2.3 Configuration steps This section describes configuration required for the WLA-9000AP before it can work properly in your network. Set up the device The WLA-9000AP can be managed remotely by a PC through either the wired or wireless network. To do this, the WLA-9000AP must first be assigned an IP address, which can be done using one of the following 2 methods. WLA-9000AP’s Factory default value IP The default IP address of the LAN interface of an WLA-9000AP is a private IP address of 192.168.1.1, and a network mask of 255.255.255.0. This means IP addresses of other devices on the LAN should be in the range of 192.168.1.2 to 192.168.1.254. This IP address can be modified to either a different address in this same subnet or to an address in a different subnet, depending on the existing network settings (if there is any) or user’s preferences. 5 AirLive WLA-9000AP User’s Manual 2. Install the WLA-9000AP First, you need to perform various configuration changes to the WLA-9000AP, including the SSID, Channel number, the WEP key, …, etc., it is necessary to associate a fixed IP address with the WLA-9000AP, which is why the WLA-9000AP will be shipped with a factory default private IP address of 192.168.1.1 (and a network mask of 255.255.255.0). Therefore, during the system installation time, you need to build an isolated environment with the WLA-9000AP and a PC, and then perform the following steps. 2.3.1 Set up a wired connection with Ethernet cable In the case of using a LAN attached PC, the PC must have an Ethernet interface installed properly, be connected to the WLA-9000AP either directly or through an external LAN switch, and have TCP/IP installed and configured as fixed IP and same subnet mask scope as the AP. Then perform the following steps for either of the cases above. To configure types of workstations other than Windows 95/98/NT/2000, please consult the manufacturer’s documentation. Step 1. From the Win95/98/2000 Start Button, select Settings, then Control Panel. The Win95/98/2000 Control Panel displays. Step 2. Double-click on the Network icon. Manually change the IP address of the PC to become 192.168.1.3. To do this , move your mouse and high light the node device (please go to your network device such as Ethernet card), right click on your mouse. Click Properties, and check the settings in each of the TCP/IP Properties window. Select fixed IP and assign the IP as 192.168.1.3 and subnet mask as 255.255.255.0. Step 3. Once you have modified the PC’s IP as same network scope as the default IP of WLA-9000AP, you can then open a browser and start to configure the AP by typing the default IP address into the URL line. Please note that after you change the IP address of the ACCESS POINT, the PC client may not be able to reach the ACCESS POINT. This is because they may no longer belong to the same IP network address space. 2.3.2 Set up a wireless client as a fixed IP client The following will give detailed steps of how to configure a PC or a wireless client to “obtain IP addresses automatically”. In the case of using a wireless client, the client must also have an 802.11a/b/g wireless interface installed properly, be physically within the radio range of the WLA-9000AP, and have TCP/IP installed and configured as fixed IP and same subnet mask scope as the AP. Then perform the following steps for either of the cases above. To configure types of workstations other than Windows 95/98/NT/2000, please consult the manufacturer’s documentation. Step 1. From the Win95/98/2000 Start Button, select Settings, then Control Panel. The Win95/98/2000 Control Panel displays. Step 2. Double-click on the Network icon. Step 3. Check your list of Network Components in the Network window Configuration tab. If TCP/IP has already been installed, go to Step 8. Otherwise, select Add to install it now. Step 4. In the new Network Component Type window, select Protocol. In the new Select 6 AirLive WLA-9000AP User’s Manual 2. Install the WLA-9000AP Network Protocol window, select Microsoft in the Manufacturers area. Step 5. In the Network Protocols area of the same window, select TCP/IP, then click OK. You may need your Win95/98 CD to complete the installation. After TCP/IP installation is complete, go back to the Network window described in Step 4. Step 6. Select TCP/IP in the list of Network Components. Step 7. Click Properties, and check the settings in each of the TCP/IP Properties window. Manually change the IP address of the PC to become 192.168.1.4 and Subnet mask as 255.255.255.0. Step 8. With the WLA-9000AP powered on, reboot the PC/wireless client. After the PC/wireless client is re-booted, you should be ready to configure the WLA-9000AP. See Chapter 3. The procedure required to set a static IP address is not too much different from the procedure required to set to “obtain IP addresses dynamically” - except that at the end of step 7, instead of selecting “obtain IP addresses dynamically, you should specify the IP address explicitly. 7 AirLive WLA-9000AP User’s Manual 3. Basic Configuration 3 3. Basic Configuration This section describes the basic configuration procedure for the WLA-9000AP. It describes how to set up the WLA-9000AP for wireless connections, and the configuration of the local LAN environment. All basic configurations may be effected through a standard Web browser such as Microsoft Internet Explorer. From a PC that has been configured as described in Chapter 2, enter the IP address of the WLA-9000AP as the URL in your browser, e.g. http://192.168.1.1. The IP address of your PC must be in the same IP subnet scope as the WLA-9000AP. The Home Page of the WLA-9000AP screen will appear. Its main menu displays on the right hand side of the window. The main menu includes the following choices: Setup Wizard, Device Status, Advanced Settings, System Tools, and Help. 3.1 Log On If you attempt to access a configuration item from the browser menu, an administrator logon screen, shown below, will appear. 8 AirLive WLA-9000AP User’s Manual 3. Basic Configuration If you are logging on for the first time, you should use the factory default setting “airlive”. The password is always displayed as a string of wildcards or dots. Click the LOG ON button to start the configuration session. 3.2 Setup wizard The Setup Wizard will guide you through a series of configuration screens to set up the basic functionality of the device. Every time you modify the settings, remember to click APPLY button to save the changes. 3.2.1 TIME SETTINGS Setup Wizard>>Time Settings After logging on, the Time Settings page appears. The device time is automatically set to the local time of the management PC at the first time a connection is made. To modify the device’s time, modify the appropriate fields, then click APPLY. 9 AirLive WLA-9000AP User’s Manual 3. Basic Configuration 3.2.2 DEVICE IP SETTINGS Setup Wizard>> Device IP Settings The Device IP Settings screen allows you to configure the IP address and subnet of the device. Although you can rely on a DHCP server to assign an IP address to the WLA-9000AP automatically, it is recommended that you configure a static IP address manually in most applications. If you choose to assign the IP address manually, enable the checkbox of “Assign static IP to this device” and then fill in the following fields IP Address and IP Subnet Mask: Default values are 192.168.1.1 and 255.255.255.0 respectively. It is important to note that there are similar addresses falling in the standard private IP address range and it is an essential security feature of the device. Because of this private IP address, the device can no longer be accessed (seen) from the Internet. Gateway IP Address: Enter the IP address of your default gateway. DNS Server: The Domain Name System (DNS) is a server on the Internet that translates logical names such as “www.yahoo.com” to IP addresses like 66.218.71.80. In order to do this, a query is made by the requesting device to a DNS server to provide the necessary information. If your system administrator requires you to manually enter the DNS Server addresses, you should enter them here. Click APPLY to go to the next screen. If you choose to use a DHCP Server to acquire an IP address for the WLA-9000AP automatically, enable the checkbox that says, “Use the DHCP client protocol to automatically get the IP address for this device”. Then click Next to go to the next screen. Again, as a reminder, it is recommended that your WLA-9000AP should be assigned a static IP address in order to make it easy for you to manage the device later on. 10 AirLive WLA-9000AP User’s Manual 3. Basic Configuration 3.2.3 OPERATION MODE SETTINGS Setup Wizard>>Operation Modes >> “Current Operation Mode” There are two levels of setting while set the device: the operational mode and the detail parameter of each wireless interface under current operation mode. To start, please select first the “Operational Mode” under Setup Wizard, to choose an operational mode, click on radio button and “APPLY”. Click here to modify operational mode Current operational mode Once you decide the operation mode, please press “APPLY” to validate your choice. The screen will show appear as below according to your choice: On this page, left lower side appears current operational mode. It’s easy to switch between operation mode selection and detail parameter setting page: click on “Operational Mode” to return to Operational mode selection list; if you want to return the detail parameter setting page without modifying current operational mode, click on current operation mode, current parameter detail page will appear again. 11 AirLive WLA-9000AP User’s Manual 3. Basic Configuration Current Operational Mode page 1 2 3 4 This is the page of each operational mode here-by. The graphic shows current operational mode inside of device, it helps you to understand and make the configuration with predefined operational mode. Regulatory Domain: Please make sure that your regulatory domain matches your region. The default value is “United Kingdom”. You an reconfigure with help of Telnet. For more detail, please check in the Quick Start Guide. There are two wireless interfaces parameter to be configured, interfaces are present as Radio1 and Radio 2, which are shown on the back of antenna R-SMA connector as WLAN1 and WLAN2. Each wireless interface can be setup separately, such as SSID, WDS MAC ID registry, Security, Advanced Setting and Access Control. Each wireless interface operation mode parameters are presented separately in following sections. 12 AirLive WLA-9000AP User’s Manual 3. Basic Configuration 3.3 Wireless Interface Configuration 3.3.1 AP Mode Settings Please find the AP mode parameter page below: Enable Radio: On WLA-9000AP, both wireless interfaces can work independently from the other wireless interface. It’s possible to enable/disable a wireless interface without impact on the other. Network ID (SSID): The SSID is the network name used to identify a wireless network. The SSID must be the same for all devices in the wireless network (i.e. in the same BSS). Several access points on a network can have the same SSID. The SSID length is up to 32 characters. The default SSID is “AirLive1” and “AirLive2”. In WDS bridge mode, the method allowing association is MAC ID registration. There will not SSID field available. Disable SSID Broadcasting: An access point periodically broadcasts its SSID along with other information, which allows client stations to learn its existence while searching for access points in a wireless network. Check Disable SSID Broadcasting if you do not want the device to broadcast the SSID. Mode: The option of two interfaces are different. Only “802.11a” and “SuperA” are available for the WLAN 1 Interface. “11g/b”, “11g only”, “11b”, “11a”, “Super G” or “Super A” are available on WLAN 2 interface. Select “11g/b”, “11g only”, “11b”, “11a”, “Super G” or “Super A”. The wireless module is IEEE 802.11g and 802.11b compliant, and choosing “11g/b” allows both 802.11b and 802.11g client stations to get associated. However, choosing “11g” allows only 802.11g client stations to get associated and get better overall performance. 802.11a is not compliant with either 802.11b or 802.11g; choosing “11a” only allows 802.11a client stations to get associated. Super A and Super G are proprietary transmission of Atheros Chip maker. Only equipments of same chip maker provide this feature. Channel: Select a channel from the drop down menu. All devices in a BSS must use the same channel. You can select Auto to let the system pick up the best channel for you. 13 AirLive WLA-9000AP User’s Manual 3. Basic Configuration The available channels are different from country to country and for different WLAN mode. Enable Radio eXtended Range: Select the check box to enable the Atheros’s eXtended Range(XR) technology to extend the wireless coverage range. Enable Client Isolation (Privacy Separator): Select the check box to prohibit data transmission between client stations. Enable 802.11d: Select the check box to enable 802.11d. 802.11d is a standard for use in countries where systems using other standards in the 802.11 family are not allowed to operate. 14 AirLive WLA-9000AP User’s Manual 3. Basic Configuration 3.3.1.1 Security Settings Security: Click on this button, a pop-up window appears. On the scroll menu, select different security policy to provide association authentication and/or data encryption as you need. WEP WEP allows you to use data encryption to secure your data from being eavesdropped by malicious people. It allows 3 types of key: 64 (WEP64), 128 (WEP128), and 152 (WEP152) bits. You can configure up to 4 keys using either ASCII or Hexadecimal format. Key Settings: The length of a WEP64 key must be equal to 5 bytes, a WEP128 key is 13 bytes, and a WEP152 key is 16 bytes. Key Index: You have to specify which of the four keys will be active. Once you enable the WEP function, please make sure that both the WLA-9000AP and the wireless client stations use the same key. Some wireless client cards only allow Hexadecimal digits for WEP keys. Please note that when configuring WEP keys, a WEP128 ASCII key looks like “This is a key”(13 characters), while a WEP128 Hex key looks like “546869732069732061206b6579”(26 HEX) (hexadecimal notation are 0-9 and A-F). 15 AirLive WLA-9000AP User’s Manual 3. Basic Configuration 802.1x 802.1x allows users to leverage a RADIUS server to do association authentications. You can also enable dynamic WEP key (128 bit) to have data encryption. Here you do not have to enter the WEP key manually because it will be generated automatically and dynamically. Rekey interval is time period that the system will change the key periodically. The shorter the interval is, the better the security is. Server IP and Shared Secret: If you have connect AP to a RADIUS server behind, key in the Server IP and share secret, it will redirect incoming connection request first to this RADIUS for Authentication. In general you don’t have to change Port Number, which is 1812 by default and used by most RADIUS server. After you have finished the configuration wizard, you have to configure the RADIUS Settings in Advanced Settings in order to make the 802.1x function work. Share secret is the key for AP to communicate with RADIUS server, check with your Authentication provider for more details. 16 AirLive WLA-9000AP User’s Manual 3. Basic Configuration WPA Wi-Fi Protected Access (WPA) requires a RADIUS server available in order to do authentication (same as 802.1x), thus there is no shared key required. Encryption Type: There are two encryption types TKIP and CCMP (AES). While CCMP provides better security than TKIP, some wireless client stations may not be equipped with the hardware to support it. You can select Both to allow TKIP clients and CCMP clients to connect to the Access Point at the same time. Group Rekey Interval: A group key is used for multicast/broadcast data, and the re-key interval is time period that the system will change the group key periodically. The shorter the interval is, the better the security is. The default is 300 sec. WPA-PSK Wi-Fi Protected Access (WPA) with Pre-Shared Key (PSK) provides better security than WEP keys. It does not require a RADIUS server in order to provide association authentication, but you do have to enter a shared key for the authentication purpose. The encryption key is generated automatically and dynamically. Pre-shared Key: This is an ASCII string with 8 to 63 characters. Please make sure that both the WLA-9000AP and the wireless client stations use the same key. 17 AirLive WLA-9000AP User’s Manual 3. Basic Configuration Encryption Type: There are two encryption types TKIP and CCMP (AES). While CCMP provides better security than TKIP, some wireless client stations may not be equipped with the hardware to support it. You can select Both to allow TKIP clients and CCMP clients to connect to the Access Point at the same time. Group Rekey Interval: A group key is used for multicast/broadcast data, and the re-key interval is time period that the system will change the group key periodically. The shorter the interval is, the better the security is. The default is 300 sec. WPA2 WPA2 stands for Wi-Fi Protected Access 2. It provides stronger data protection and network access control then WPA. Only authorized users can access the wireless networks. Encryption Type: There are two encryption types TKIP and CCMP (AES). While CCMP provides better security than TKIP, some wireless client stations may not be equipped with the hardware to support it. You can select Both to allow TKIP clients and CCMP clients to connect to the Access Point at the same time. Group Rekey Interval: A group key is used for multicast/broadcast data, and the re-key interval is time period that the system will change the group key periodically. The shorter the interval is, the better the security is. The default is 300 sec. WPA2-PSK Enter the Pre-shared Key to initiate WPA2 security. All devices try to access the network should have the matching encryption key. Pre-shared Key: This is an ASCII string with 8 to 63 characters. Please make sure that both the WLA-9000AP and the wireless client stations use the same key. Encryption Type: There are two encryption types TKIP and CCMP (AES). While CCMP provides better security than TKIP, some wireless client stations may not be equipped with the hardware to support it. You can select Both to allow TKIP clients and CCMP clients to connect to the Access Point at the same time. 18 AirLive WLA-9000AP User’s Manual 3. Basic Configuration Group Rekey Interval: A group key is used for multicast/broadcast data, and the re-key interval is time period that the system will change the group key periodically. The shorter the interval is, the better the security is. The default is 300 sec. WPA-AUTO Encryption Type: There are two encryption types TKIP and CCMP (AES). While CCMP provides better security than TKIP, some wireless client stations may not be equipped with the hardware to support it. You can select Both to allow TKIP clients and CCMP clients to connect to the Access Point at the same time. Group Rekey Interval: A group key is used for multicast/broadcast data, and the re-key interval is time period that the system will change the group key periodically. The shorter the interval is, the better the security is. The default is 300 sec. WPA-PSK-AUTO WPA-PSK-AUTO tries to authenticate wireless clients using WPA-PSK or WPA2-PSK. Pre-shared Key: This is an ASCII string with 8 to 63 characters. Please make sure that both the WLA-9000AP and the wireless client stations use the same key. Encryption Type: There are two encryption types TKIP and CCMP (AES). While CCMP provides better security than TKIP, some wireless client stations may not be equipped with the hardware to support it. You can select Both to allow TKIP clients and CCMP clients to connect to the Access Point at the same time. Group Rekey Interval: A group key is used for multicast/broadcast data, and the re-key interval is time period that the system will change the group key periodically. The shorter the interval is, the better the security is. The default is 300 sec. 3.3.1.2 Advanced Settings 19 AirLive WLA-9000AP User’s Manual 3. Basic Configuration Current Operational mode >> Advanced Settings A pop-up windows shows when click the setup button “Advanced Settings”. On the top of the page, indication shows current wireless interface (Radio1 or Radio2) is under configuration. Beacon Interval: The WLA-9000AP broadcasts beacon frames regularly to announce its existence. The beacon Interval specifies how often beacon frames are transmitted in time unit of milliseconds. The default value is 100, and a valid value should be between 1 and 65,535. RTS Threshold: RTS/CTS frames are used to gain control of the medium for transmission. Any unicast (data or control) frames larger than specified RTS threshold must be transmitted following the RTS/CTS handshake exchange mechanism. The RTS threshold should have a value between 256-2347 bytes, with a default of 2347. It is recommended that this value does not deviate from the default too much. Fragmentation: When the size of a unicast frame exceeds the fragmentation threshold, it will be fragmented before the transmission. It should have a value of 256-2346 bytes, with a default of 2346. If you experience a high packet error rate, you should slightly decrease the Fragmentation Threshold. DTIM Interval: The WLA-9000AP buffers packets for stations that operate in the power-saving mode. The Delivery Traffic Indication Message (DTIM) informs such power-conserving stations that there are packets waiting to be received by them. The DTIM interval specifies how often the beacon frame should contain DTIMs. It should have a value 20 AirLive WLA-9000AP User’s Manual 3. Basic Configuration between 1 to 255, with a default value of 3. User Limitation: The range of user limitation is from 1 to 100. Age Out Timer: Set the age out time. The default is 300 sec. Transmit Power: Transmit power output depends upon the size and RF characteristics because that will determine the number of APs, channels, and need for antennas. Enable STP: Spanning Tree Protocol prevents the condition known as a bridge loop. Ack TimeOut (11a)/ (11g): The "ACK time-out" determines how long the program waits after receiving a packet from a file stream to determine that stream to be a complete file. For details, please go to Section 3.4. 21 AirLive WLA-9000AP User’s Manual 3. Basic Configuration 3.3.1.3 ACCESS CONTROL Current interface >> Access Control The WLA-9000AP allows you to define a list of MAC addresses that are allowed or denied to access the wireless network. Click on the setup button of “Access Control” of selected wireless interface. Disable MAC address control list: When selected, no MAC address filtering will be performed. Enable GRANT address control list: When selected, data traffic from only the specified devices in the table will be allowed in the network. Enable DENY address control list: When selected, data traffic from the devices specified in the table will be denied/discarded by the network. To add a MAC address into the table, enter a Mnemonic Name and the MAC Address, and then click ADD. The table lists all configured MAC Filter entries. To delete entries, check the corresponding Select boxes and then press DELETE SELECTED. FINISH SETUP WIZARD AND SAVE YOUR SETTINGS After stepping through the Wizard’s pages, you can click the APPLY button for your modification to take effect. This also makes your new settings saved into the permanent memory on your system. 22 AirLive WLA-9000AP User’s Manual 3. Basic Configuration Congratulations! You are now ready to use the WLA-9000AP. If you change the device’s IP address, as soon as you click on FINISH you will no longer be able to communicate with your WLA-9000AP. You need to change your IP address and then re-boot your computer in order to resume the communication. 3.3.2 Client Mode Settings 3.3.2.1 Site Survey The client can search for the SSIDs of APs in the environment, in order to select the AP that he wants to make connection with. For details, please go to Section 5.5: Device Status>>Site Survey 3.3.2.2 Security WEP WEP allows you to use data encryption to secure your data from being eavesdropped by malicious people. It allows 3 types of key: 64 (WEP64), 128 (WEP128), and 152 (WEP152) bits. You can configure up to 4 keys using either ASCII or Hexadecimal format. 23 AirLive WLA-9000AP User’s Manual 3. Basic Configuration Key Settings: The length of a WEP64 key must be equal to 5 bytes, a WEP128 key is 13 bytes, and a WEP152 key is 16 bytes. Key Index: You have to specify which of the four keys will be active. Once you enable the WEP function, please make sure that both the WLA-9000AP and the wireless client stations use the same key. Some wireless client cards only allow Hexadecimal digits for WEP keys. Please note that when configuring WEP keys, a WEP128 ASCII key looks like “This is a key”(13 characters), while a WEP128 Hex key looks like “546869732069732061206b6579”(26 HEX) (hexadecimal notation are 0-9 and A-F). 802.1X as Client mode parameter While the node is under client mode as a registered authenticated node of a RADIUS server, the parameter to be set are the EAP type, User Name and Password. Please contact your networking provider or MIS for further information. WPA-PSK 24 AirLive WLA-9000AP User’s Manual 3. Basic Configuration As node of Client WPA-PSK, please check with your network administrator for the Pre-shared Key for more detail of your network. 3.3.2.3 Advances Wireless Settings Current Operational mode >> Advanced Settings When click on Advanced Setup button under client mode, a pop-up window appears and show parameter as follow: RTS Threshold: RTS/CTS frames are used to gain control of the medium for transmission. Any unicast (data or control) frames larger than specified RTS threshold must be transmitted following the RTS/CTS handshake exchange mechanism. The RTS threshold should have a value between 256-2347 bytes, with a default of 2347. It is recommended that this value does not deviate from the default too much. 25 AirLive WLA-9000AP User’s Manual 3. Basic Configuration Fragmentation: When the size of a unicast frame exceeds the fragmentation threshold, it will be fragmented before the transmission. It should have a value of 256-2346 bytes, with a default of 2346. If you experience a high packet error rate, you should slightly decrease the Fragmentation Threshold. Transmit Power: Transmit power output depends upon the size and RF characteristics because that will determine the number of APs, channels, and need for antennas. Ack TimeOut (for all modes): The "ACK time-out" determines how long the program waits after receiving a packet from a file stream to determine that stream to be a complete file. For details, please go to Section 3.4. 3.3.2.4 ACCESS CONTROL Current interface >> Access Control The WLA-9000AP allows you to define a list of MAC addresses that are allowed or denied to access the wireless network. Click on the setup button of “Access Control” of selected wireless interface. Disable MAC address control list: When selected, no MAC address filtering will be performed. Enable GRANT address control list: When selected, data traffic from only the specified devices in the table will be allowed in the network. Enable DENY address control list: When selected, data traffic from the devices specified in the table will be denied/discarded by the network. 26 AirLive WLA-9000AP User’s Manual 3. Basic Configuration To add a MAC address into the table, enter a Mnemonic Name and the MAC Address, and then click ADD. The table lists all configured MAC Filter entries. To delete entries, check the corresponding Select boxes and then press DELETE SELECTED. FINISH SETUP WIZARD AND SAVE YOUR SETTINGS After stepping through the Wizard’s pages, you can click the APPLY button for your modification to take effect. This also makes your new settings saved into the permanent memory on your system. Congratulations! You are now ready to use the WLA-9000AP. If you change the device’s IP address, as soon as you click on FINISH you will no longer be able to communicate with your WLA-9000AP. You need to change your IP address and then re-boot your computer in order to resume the communication. 27 AirLive WLA-9000AP User’s Manual 3. Basic Configuration 3.3.3 WDS Bridge Mode Settings Current Operation Mode>> WDS Bridge Under WDS mode, APs connects to each other with MAC ID address. It’s important to register the device MAC ID between each other. To do this, click first the “Setup” button of “WDS Settings” the register remote node’s MAC ID. WDS Settings pop-up screen shows, please input the details of MAC ID address and desired name for remote device. Once the registry finished, WLAN Current WDS node shows list of registered nodes. Finish the reciprocal registry of MAC ID on each device. Please note that only one set of WEP encryption is allowed set amount all nodes. 28 AirLive WLA-9000AP User’s Manual 3. Basic Configuration 3.3.3.1 Advances Wireless Settings Current Operational mode >> Advanced Settings When click on Advanced Setup button under client mode, a pop-up window appears and show parameter as follow: RTS Threshold: RTS/CTS frames are used to gain control of the medium for transmission. Any unicast (data or control) frames larger than specified RTS threshold must be transmitted following the RTS/CTS handshake exchange mechanism. The RTS threshold should have a value between 256-2347 bytes, with a default of 2347. It is recommended that this value does not deviate from the default too much. Fragmentation: When the size of a unicast frame exceeds the fragmentation threshold, it will be fragmented before the transmission. It should have a value of 256-2346 bytes, with a default of 2346. If you experience a high packet error rate, you should slightly decrease the Fragmentation Threshold. Transmit Power: Transmit power output depends upon the size and RF characteristics because that will determine the number of APs, channels, and need for antennas. Ack TimeOut (for all modes): The "ACK time-out" determines how long the program waits after receiving a packet from a file stream to determine that stream to be a complete file. For details, please go to Section 3.4. 29 AirLive WLA-9000AP User’s Manual 3. Basic Configuration 3.3.3.2 ACCESS CONTROL Current interface >> Access Control The WLA-9000AP allows you to define a list of MAC addresses that are allowed or denied to access the wireless network. Click on the setup button of “Access Control” of selected wireless interface. Disable MAC address control list: When selected, no MAC address filtering will be performed. Enable GRANT address control list: When selected, data traffic from only the specified devices in the table will be allowed in the network. Enable DENY address control list: When selected, data traffic from the devices specified in the table will be denied/discarded by the network. To add a MAC address into the table, enter a Mnemonic Name and the MAC Address, and then click ADD. The table lists all configured MAC Filter entries. To delete entries, check the corresponding Select boxes and then press DELETE SELECTED. FINISH SETUP WIZARD AND SAVE YOUR SETTINGS After stepping through the Wizard’s pages, you can click the APPLY button for your modification to take effect. This also makes your new settings saved into the permanent memory on your system. 30 AirLive WLA-9000AP User’s Manual 3. Basic Configuration Congratulations! You are now ready to use the WLA-9000AP. If you change the device’s IP address, as soon as you click on FINISH you will no longer be able to communicate with your WLA-9000AP. You need to change your IP address and then re-boot your computer in order to resume the communication. 3.4 ACK Timeout Setup Ack TimeOut (11a)/ (11g)/: The "ACK time-out" determines how long the program waits after receiving a packet from a file stream to determine that stream to be a complete file. WLA-9000AP provides a calculator on UI that helps you to obtain this value only by giving the distance. Input distance value in meters. The ACK Timeout value will be automatically calculated accordingly. This is the value to be entered into the “ACK Timeout (11a)” or “ACK Timeout (11g)” field according to the spectrum . 3.4.1 ACK Calculator Advanced setting >> wireless settings Click on the “ACK Calculator” at the right down side of this page. In the field of “Distance”, input the distance in “meters”. After input the distance value, move the cursor to any place on the pop-up window out of three fields. The calculated value will display. 31 AirLive WLA-9000AP User’s Manual 3. Basic Configuration Enter the calculated value of “AckTimeOut” into the appropriate “Ack TimeOut” field (11a or 11g) in the “Wireless Settings” window. 32 AirLive WLA-9000AP User’s Manual 4. Advanced Setting 4 4. Advanced Setting 4.1 Password Settings Advanced Settings>> Password Settings It’s recommended to set your own password instead of using default factory password. The default factory password is “airlive” all letters are in lower case. To change the password, press the Password Settings button to enter the Password Settings screen; then enter the Current Password followed by the New Password twice. The entered characters will appear as asterisks. 33 AirLive WLA-9000AP User’s Manual 4. Advanced Setting 4.2 System Management Advanced Settings>> System Management Clicking the System Management button to configure system related parameters to for the WLA-9000AP. System Administration HTTP Port No.: HTTP stands for Hyper Text Transfer Protocol. The default port for the HTTP Web server is 80. Time-out: This setting specifies the duration of idle time (inactivity) before a web browser or telnet management session times out. The default is 10 minutes. UPnP: The Universal Plug and Play (UPnP) feature allows a Windows XP/ME PC to discover this WLA-9000AP and automatically show an icon on the screen. Then a user can double-click the icon to access this device directly (without having to find out its IP address). Syslog: Syslog is an IETF (Internet Engineering Task Force - the Internet standards body)-conformant standard for logging system events (RFC-3164). When the WLA-9000AP encounters an error or warning condition (e.g., a log-in attempt with an invalid password), it will create a log in the system log table. To be able to remotely view such system log events, you need to check the Enable Syslog box and configure the IP address of a Syslog daemon. When doing so, the WLA-9000AP will send logged events over network to the daemon for future reviewing. Syslog server IP address: System event messages generated by the wireless access point will be sent to a Syslog daemon running on a server identified by this IP address. 34 AirLive WLA-9000AP User’s Manual 4. Advanced Setting 4.3 SNMP Settings Advanced Settings>>SNMP Settings This screen allows you to configure SNMP parameters including the system name, the location and contact information. System Name: A name that you assign to your WLA-9000AP. It is an alphanumeric string of up to 30 characters. System Location: Enter a system location. System Contact: Contact information for the system administrator responsible for managing your 802.11a+g Router. It is an alphanumeric string of up to 60 characters. Community String For Read: If you intend the router to be managed from a remote SNMP management station, you need to configure a read-only “community string” for read-only operation. The community string is an alphanumeric string of up to 15 characters. Community String For Write: For read-write operation, you need to configure a write “community string”. Assign a specific name and IP address for your SNMP trap manager: A trap manager is a remote SNMP management station where special SNMP trap messages are generated (by the router) and sent to in the network. 35 AirLive WLA-9000AP User’s Manual 4. Advanced Setting You can define trap managers in the system. You can add a trap manager by entering a name, an IP address, followed by pressing the ADD button. You can delete a trap manager by selecting the corresponding entry and press the DELETE SELECTED button. To enable a trap manager, check the Enable box in the corresponding entry; to disable it, un-check the Enable box. Some extra feature of WLA-9000AP does not show in the wizard because some higher knowledge of parameter of them are required. They are classified in the tab of “Advances Setting”, such as the Multi SSID for VLAN setting and 802.11e QoS configuration. 4.4 Multi-SSID Settings Advanced Settings >> SSID Settings SSID, a name for an access point (or a network), differentiates one WLAN from another. All devices in a same specific WLAN must use the same SSID. “Enable VLAN for all SSID” here allows to create multiple SSID on single wireless interface and apply the VLAN on single wireless. This feature is only available when an interface set as AP mode. Please do remember to click on “APPLY” button to validate this feature before adding any additional SSID with VLAN ID. Without validation, an SSID will not be available for add VLAN ID, in consequent, there is no VLAN deployment possible. It’s possible to modify VLAN detail with existing Multiple SSID. After validation of “Enable VLAN for all SSID”, select the radio button of SSID to be 36 AirLive WLA-9000AP User’s Manual 4. Advanced Setting modified, add extra VLAN information. In case there is more than one interface set as AP mode, select on the scroll menu of “Radio” to switch between Radio 1 and Radio 2 as WLAN 1 and WLAN 2 then continue to set additional SSID on selected interface. VLAN: VLAN stands for Virtual Local Area Network. It is a technique allows one or more physical LAN routers or APs to deliver packets as if they were a single physical router or AP. DiffServ Marking: Enable DiffServ Marking to have better traffic prioritization and bandwidth management. Disable SSID Broadcasting: Select this check box to hide the SSID. Security Policy: Each SSID can be assigned an encryption mode. Select security policy. “None”, “WEP”, “802.1x”, “WPA”, “WPA-PSK”, “WPA2”, “WPA2-PSK”, “WPA-AUTO” or “WPA-PSK-AUTO”. Only one WEP can be assigned among multiple SSIDs per wireless interface. We recommend to assign WPA-PSK or higher as encryption if necessary. 37 AirLive WLA-9000AP User’s Manual 4. Advanced Setting 4.5 QoS Settings Advanced Settings >> QoS Settings QoS stands for Quality of Service which attempts to provide different levels of quality to different types of network traffic. WMM stands for Wi-Fi Multimedia. WMM defines quality of service (QoS) in wireless networks. WMM improves audio, video and voice applications transmitted over wireless networks. WMM adds prioritized capabilities to wireless networks and optimizes the performance when multiple concurring applications. Check radio button of “Radio 1” and “Radio 2” to switch between WLAN 1 or WLAN 2. To Enable WMM, WMM Parameters of Access Point and Station are indicated. The following information is listed: AC TYPE (AC_BE; Best Effort) (AC_BK; Background)(AC_VI; Video)(AC_VO;Voice)/ ECWMIn/ ECWMax/ AIFS/ TxopLimit (11b)/ TxopLimit (11ag)ACM and Ack-policy. 38 AirLive WLA-9000AP User’s Manual 5. Manage the WLA-9000AP 5 5. Manage the WLA-9000AP This Chapter covers other management aspects of your WLA-9000AP: Check Device Information View System Log Wireless Client Table Radio Table Site Survey Upgrade Firmware Save or Restore Configuration Changes Reset to Factory Default Reboot AP What if you forgot the password? 5.1 Device Status Device status >> Device Information You can monitor the system status and get general device information from the Device Information screen: This is at the left-bottom corner of the Device Status window. 39 AirLive WLA-9000AP User’s Manual 5. Manage the WLA-9000AP 5.2 System Log Device Status >> System Log The WLA-9000AP maintains a system log that you can use to track events that have occurred in the system. Such event messages can sometimes be helpful in determining the cause of a problem that you may have encountered. You can select System Log on the left side of the Device Status window to view log events recorded in the system. The System Log entries are shown in the main screen along with the log level, the severity level of messages that are being displayed (lower is severer), and the uptime, which is the amount of time since the WLA-9000AP was boot-up. 5.3 Wireless Client Table Device Status >> Wireless Client Table The wireless client table lists the current wireless clients and its MAC address, state, traffic statistics and signal strength of connected client node. In consequent, it’s available when at least one wireless interface is set as AP mode. You can check this table by clicking Wireless Client Table at the left side of the Device Status window. 40 AirLive WLA-9000AP User’s Manual 5. Manage the WLA-9000AP 5.4 Radio Table Device Status >> Radio Table The Radio Table indicates wireless radio counters’ data under one of the six operational modes: Access Point; Repeater; WDS Bridge; Client Infrastructure, Client Adhoc and WISP Router. Radio Table will indicate the following information: Radio Name, Mode, Op Channel, Assoc. Tx Pkts, Rx Pkts and Error. 5.5 Site Survey Device Status >> Site Survey The Site Survey table shows the wireless Access Point and Ad Hoc stations in your environment detected by the 802.11 A/G Access Point. You can click the REFRESH button to get latest environment information. Site Survey list will indicate the following information: ESSID, MAC Address, Conn Mode, Channel, Turbo, Super, XR, WME, Signal strength (%), Security and Network While the device is under Client mode and being associated with an AP displayed on the list, the active connected AP will be highlighted with a light blue color. 5.5.1 Signal survey Device Status >> Site Survey >> Signal Survey This is a unique feature from AirLive. It provides real-time signal strength between two nodes. Better signal strength means better link quality, which aims to improve alignment results. To observe the signal survey result, select first an AP to be check. 41 AirLive WLA-9000AP User’s Manual 5. Manage the WLA-9000AP Click the “SIGNAL SURVEY” button. A pop-up window will continuously display signal strength of selected AP information in real time. The user can readjust the antenna position in order to achieve maximum signal strength. 42 AirLive WLA-9000AP User’s Manual 5. Manage the WLA-9000AP 5.6 Firmware Upgrade System tools >> Firmware Upgrade You can upgrade the firmware of your WLA-9000AP (the software that controls your WLA-9000AP’s operation). Normally, this is done when a new version of firmware offers new features that you want, or solves problems that you have encountered with the current version. System upgrade can be performed through the System Upgrade window as follows: Step 1 Select System Tools, then Firmware Upgrade from the menu. Step 2 To update the WLA-9000AP firmware, first download the firmware from the distributor’s web site to your local disk, and then from the above screen enter the path and filename of the firmware file (or click Browse to locate the firmware file). Next, Click the Upgrade button to start. The new firmware will be loaded to your WLA-9000AP. After a message appears telling you that the operation is completed, you need to reset the system to have the new firmware take effect. Do not power off the device while upgrading the firmware. It is recommended that you do not upgrade your WLA-9000AP unless the new firmware has new features you need or if it has a fix to a problem that you’ve encountered. 43 AirLive WLA-9000AP User’s Manual 5. Manage the WLA-9000AP 5.7 Configuration Save and Restore System Tools >> Configuration Save and Restore You can save system configuration settings to a file, and later download it back to the WLA-9000AP by following the steps. Step 1 Select Configuration Save and Restore from the System Tools menu. Step 2 Enter the path of the configuration file to save-to/restore-from (or click the Browse button to locate the configuration file). Then click the SAVE TO FILE button to save the current configuration into the specified file, or click the RESTORE FROM FILE button to restore the system configuration from the specified file. 44 AirLive WLA-9000AP User’s Manual 5. Manage the WLA-9000AP 5.8 Factory Default System Tools >> Factory Default You can reset the configuration of your WLA-9000AP to the factory default settings. To do it: Step 1 Select Factory Default from the System Tools menu. Step 2 Click YES to go ahead and restore the configuration to the factory default. 5.9 Reboot System System tools>>Reboot System You can reset your WLA-9000AP from the Browser. To reset it: Step 1 Select Reboot System from the System Tools menu. Step 2 Click YES to reboot the WLA-9000AP. Rebooting the WLA-9000AP would disconnect any active clients and therefore will disrupt any current data traffic. 5.10 What if you forgot the password? Hardware Reset To Factory Defaults 45 AirLive WLA-9000AP User’s Manual 5. Manage the WLA-9000AP If you forgot the password, the only way to recover is to clear the device configuration and return the unit to its original state as shipped from the factory. You can reset the Access Point’s Settings to factory defaults by pushing a paperclip in the RESET hole on the PCB panel. Push and hold for around 2 seconds until the lights at the front of the Access Point are off. Doing so will clear your current configuration. 46 AirLive WLA-9000AP User’s Manual 6. Specifications 6 6. Specifications AP Specifications Product Name OS Standard TX-Power (2.412~2.472GHz) TX-Power (5125-5825MHz) Receiver Sensitivity(2.412~2.472GHz) (Tolerance : max/min= +3/-1.5dB) Receiver Sensitivity(5125-5825MHz) (Tolerance : max/min= +3/-1.5dB) Wireless Transfer Data Rate for IEEE 802.11a Draft Standard Power Supply Hardware & Antenna Security IEEE WLA-9000AP Linux® 2.4.18 • IEEE 802.11a • IEEE 802.1d Spanning Tree • IEEE 802.1x • IEEE 802.3u Ethernet protocol 54 Mbps @ 19 dBm 48 Mbps @ 20 dBm 36 Mbps @ 21 dBm 6, 9, 12, 18, 24 Mbps @ 23 dBm 54 Mbps @ 17 dBm 48 Mbps @ 18 dBm 36 Mbps @ 19 dBm 6, 9, 12, 18, 24 Mbps @ 23 dBm 6Mbps @ -89 dBm 9Mbps @ -88 dBm 12Mbps @ -88 dBm 18Mbps @ -86 dBm 24Mbps @ -82 dBm 36Mbps @ -79 dBm 48Mbps @ -75dBm 54Mbps @ -73dBm 6Mbps @ -90 dBm 9Mbps @ -89 dBm 12Mbps @ -88 dBm 18Mbps @ -86 dBm 24Mbps @ -82 dBm 36Mbps @ -79 dBm 48Mbps @ -73dBm 54Mbps @ -71dBm IEEE 802.11a Standard: 54, 48, 36, 24, 18, 12, 9 & 6 Mbps with auto fallback • 5.5V/2.5A power adaptor • 802.3af Power over Ethernet with DC48V/0.4A (optional) • 3 x RJ45 • 1 x Reset Button • 2 x R-SMA connector detachable omni Antenna • WEP 64-bit, 128-bit, 152-bit Encryption • MAC Access Control for the wireless interface • EAP & 802.1x support • Support Primary & secondary RADIUS server • WPA and WPA-PSK 47 AirLive WLA-9000AP User’s Manual 6. Specifications Management IP Address Assignment • Web-Based Management Tool • UPnP • Upload & download test-based configuration file via HTTP browser • Firmware upgrade via HTTP browser • SysLog • DHCP Client • Static IP Address L x W x H : 225mm x 122mm x 225mm Weight :341 g Dimension Environmental Specification EMC Certification • Operation Temperature: 0oC ~ 40oC. • Storage Temperature: -20oC ~ 65oC • Operating Humidity: 10% ~ 90% (without Condensation) • CE 48 AirLive WLA-9000AP User’s Manual